windows processes and threads (and environment variables)
TRANSCRIPT
www.installsetupconfig.com
1
Windows Processes and Threads
(and Environment Variables)
What do we have in this session?
Brief Intro
Processes and Threads
Multitasking
Advantages of Multitasking
When to Use Multitasking
Multitasking Considerations
Scheduling
Scheduling Priorities
Priority Class
Priority Level
Base Priority
Context Switches
Priority Boosts
Priority Inversion
Multiple Processors
Thread Affinity
Thread Ideal Processor
NUMA Support
NUMA Support on Systems with More Than 64 Logical Processors
NUMA API
Thread Ordering Service
Multimedia Class Scheduler Service
Registry Settings
Thread Priorities
Processor Groups
Multiple Threads
Creating Threads (With Code Example)
Thread Stack Size
Thread Handles and Identifiers
Suspending Thread Execution
Synchronizing Execution of Multiple Threads
Multiple Threads and GDI Objects
www.installsetupconfig.com
2
Thread Local Storage
Creating Windows in Threads
Terminating a Thread
How Threads are Terminated
Thread Security and Access Rights
Protected Processes
Child Processes
Creating Processes (With Code Example)
Setting Window Properties Using STARTUPINFO
Process Handles and Identifiers
Process Enumeration
Obtaining Additional Process Information
Inheritance
Inheriting Handles
Inheriting Environment Variables
Inheriting the Current Directory
Environment Variables
Terminating a Process
How Processes are Terminated
Process Working Set
Process Security and Access Rights
Protected Processes
Thread Pools
Thread Pool Architecture
Best Practices
Job Objects
User-Mode Scheduling
UMS Scheduler
UMS Scheduler Thread
UMS Worker Threads, Thread Contexts, and Completion Lists
UMS Scheduler Entry Point Function
UMS Thread Execution
UMS Best Practices
Fibers
Fiber Local Storage
Creating Processes Program Example
Creating Threads Program Example
Creating a Child Process with Redirected Input and Output Program Example
The Child Process Program Example

www.installsetupconfig.com
3
Changing Environment Variables Program Examples
Environment Variables: Example 1
Environment Variables: Example 2
Environment Variables: Example 3
Using Thread Local Storage Program Example
Using Fibers Program Example
Using the Thread Pool Functions Program Example (Vista/Server 2008)
Brief Intro
An application consists of one or more processes. A process, in the simplest terms, is an
executing program. One or more threads run in the context of the process. A thread is the
basic unit to which the operating system allocates processor time. A thread can execute any part
of the process code, including parts currently being executed by another thread. A fiber is a unit
of execution that must be manually scheduled by the application. Fibers run in the context of the
threads that schedule them.
A job object allows groups of processes to be managed as a unit. Job objects are namable,
securable, sharable objects that control attributes of the processes associated with them.
Operations performed on the job object affect all processes associated with the job object.
Processes and Threads
Each process provides the resources needed to execute a program. A process has a virtual
address space, executable code, open handles to system objects, a security context, a unique
process identifier, environment variables, a priority class, minimum and maximum working set
sizes, and at least one thread of execution. Each process is started with a single thread, often
called the primary thread, but can create additional threads from any of its threads.
A thread is the entity within a process that can be scheduled for execution. All threads of a
process share its virtual address space and system resources. In addition, each thread maintains
exception handlers, a scheduling priority, thread local storage, a unique thread identifier, and a
set of structures the system will use to save the thread context until it is scheduled. The thread
context includes the thread's set of machine registers, the kernel stack, a thread environment
block, and a user stack in the address space of the thread's process. Threads can also have their
own security context, which can be used for impersonating clients.
Microsoft Windows supports preemptive multitasking, which creates the effect of simultaneous
execution of multiple threads from multiple processes. On a multiprocessor computer, the system
can simultaneously execute as many threads as there are processors on the computer.
www.installsetupconfig.com
4
A job object allows groups of processes to be managed as a unit. Job objects are namable,
securable, sharable objects that control attributes of the processes associated with them.
Operations performed on the job object affect all processes associated with the job object.
User-mode scheduling (UMS) is a light-weight mechanism that applications can use to schedule
their own threads. An application can switch between UMS threads in user mode without
involving the system scheduler and regain control of the processor if a UMS thread blocks in the
kernel. Each UMS thread has its own thread context instead of sharing the thread context of a
single thread. The ability to switch between threads in user mode makes UMS more efficient
than thread pools for short-duration work items that require few system calls.
A fiber is a unit of execution that must be manually scheduled by the application. Fibers run in
the context of the threads that schedule them. Each thread can schedule multiple fibers. In
general, fibers do not provide advantages over a well-designed multithreaded application.
However, using fibers can make it easier to port applications that were designed to schedule their
own threads.
Multitasking
A multitasking operating system divides the available processor time among the processes or
threads that need it. The system is designed for preemptive multitasking; it allocates a
processor time slice to each thread it executes (something like round-robin). The currently
executing thread is suspended when its time slice elapses, allowing another thread to run. When
the system switches from one thread to another, it saves the context of the preempted thread and
restores the saved context of the next thread in the queue (context switching).
The length of the time slice depends on the operating system and the processor. Because each
time slice is small (approximately 20 milliseconds), multiple threads appear to be executing at
the same time. This is actually the case on multiprocessor systems, where the executable threads
are distributed among the available processors. However, you must use caution when using
multiple threads in an application, because system performance can decrease if there are too
many threads.
Advantages of Multitasking
To the user, the advantage of multitasking is the ability to have several applications open and
working at the same time. For example, a user can edit a file with one application while another
application is recalculating a spreadsheet.
To the application developer, the advantage of multitasking is the ability to create applications
that use more than one process and to create processes that use more than one thread of
execution. For example, a process can have a user interface thread that manages interactions with
the user (keyboard and mouse input), and worker threads that perform other tasks while the

www.installsetupconfig.com
5
user interface thread waits for user input. If you give the user interface thread a higher priority,
the application will be more responsive to the user, while the worker threads use the processor
efficiently during the times when there is no user input.
When to Use Multitasking
There are two ways to implement multitasking:
1. As a single process with multiple threads or
2. As multiple processes, each with one or more threads
An application can put each thread that requires a private address space and private resources
into its own process, to protect it from the activities of other process threads.
A multithreaded process can manage mutually exclusive tasks with threads, such as providing a
user interface and performing background calculations. Creating a multithreaded process can
also be a convenient way to structure a program that performs several similar or identical tasks
concurrently. For example, a named pipe server can create a thread for each client process that
attaches to the pipe. This thread manages the communication between the server and the client.
Your process could use multiple threads to accomplish the following tasks:
1. Manage input for multiple windows.
2. Manage input from several communications devices.
3. Distinguish tasks of varying priority. For example, a high-priority thread manages time-
critical tasks, and a low-priority thread performs other tasks.
4. Allow the user interface to remain responsive, while allocating time to background tasks.
It is typically more efficient for an application to implement multitasking by creating a single,
multithreaded process, rather than creating multiple processes, for the following reasons:
1. The system can perform a context switch more quickly for threads than processes,
because a process has more overhead than a thread does (the process context is larger
than the thread context).
2. All threads of a process share the same address space and can access the process's global
variables, which can simplify communication between threads.
3. All threads of a process can share open handles to resources, such as files and pipes.
There are other techniques you can use in the place of multithreading. The most significant
of these are as follows:

www.installsetupconfig.com
6
1. Asynchronous input and output (I/O)
2. I/O completion ports
3. Asynchronous procedure calls (APC), and
4. The ability to wait for multiple events
A single thread can initiate multiple time-consuming I/O requests that can run concurrently
using asynchronous I/O. Asynchronous I/O can be performed on files, pipes, and serial
communication devices.
A single thread can block its own execution while waiting for any one or all of several events to
occur. This is more efficient than using multiple threads, each waiting for a single event, and
more efficient than using a single thread that consumes processor time by continually checking
for events to occur.
Multitasking Considerations
The recommended guideline is to use as few threads as possible, thereby minimizing the use of
system resources. This improves performance. Multitasking has resource requirements and
potential conflicts to be considered when designing your application. The resource requirements
are as follows:
1. The system consumes memory for the context information required by both processes
and threads. Therefore, the number of processes and threads that can be created is limited
by available memory.
2. Keeping track of a large number of threads consumes significant processor time. If there
are too many threads, most of them will not be able to make significant progress. If most
of the current threads are in one process, threads in other processes are scheduled less
frequently.
Providing shared access to resources can create conflicts. To avoid them, you must synchronize
access to shared resources. This is true for system resources (such as communications ports),
resources shared by multiple processes (such as file handles), or the resources of a single process
(such as global variables) accessed by multiple threads. Failure to synchronize access properly
(in the same or in different processes) can lead to problems such as deadlock and race
conditions. The synchronization objects and functions you can use to coordinate resource
sharing among multiple threads. Reducing the number of threads makes it easier and more
effective to synchronize resources.
A good design for a multithreaded application is the pipeline server. In this design, you create
one thread per processor and build queues of requests for which the application maintains the

www.installsetupconfig.com
7
context information. A thread would process all requests in a queue before processing requests in
the next queue.
Scheduling
The system scheduler controls multitasking by determining which of the competing threads
receives the next processor time slice. The scheduler determines which thread runs next using
scheduling priorities.
Scheduling Priorities
Threads are scheduled to run based on their scheduling priority. Each thread is assigned a
scheduling priority. The priority levels range from zero (lowest priority) to 31 (highest priority).
Only the zero-page thread can have a priority of zero. (The zero-page thread is a system thread
responsible for zeroing any free pages when there are no other threads that need to run.)
The system treats all threads with the same priority as equal. The system assigns time slices in a
round-robin fashion to all threads with the highest priority. If none of these threads are ready to
run, the system assigns time slices in a round-robin fashion to all threads with the next highest
priority. If a higher-priority thread becomes available to run, the system ceases to execute the
lower-priority thread (without allowing it to finish using its time slice), and assigns a full time
slice to the higher-priority thread. The priority of each thread is determined by the following
criteria:
1. The priority class of its process
2. The priority level of the thread within the priority class of its process
The priority class and priority level are combined to form the base priority of a thread.
Priority Class
Each process belongs to one of the following priority classes:
1. IDLE_PRIORITY_CLASS
2. BELOW_NORMAL_PRIORITY_CLASS
3. NORMAL_PRIORITY_CLASS
4. ABOVE_NORMAL_PRIORITY_CLASS
5. HIGH_PRIORITY_CLASS
6. REALTIME_PRIORITY_CLASS

www.installsetupconfig.com
8
By default, the priority class of a process is NORMAL_PRIORITY_CLASS. Use the
CreateProcess() function to specify the priority class of a child process when you create it. If the
calling process is IDLE_PRIORITY_CLASS or BELOW_NORMAL_PRIORITY_CLASS, the
new process will inherit this class. Use the GetPriorityClass() function to determine the current
priority class of a process and the SetPriorityClass() function to change the priority class of a
process.
Processes that monitor the system, such as screen savers or applications that periodically update
a display, should use IDLE_PRIORITY_CLASS. This prevents the threads of this process,
which do not have high priority, from interfering with higher priority threads.
Use HIGH_PRIORITY_CLASS with care. If a thread runs at the highest priority level for
extended periods, other threads in the system will not get processor time. If several threads are
set at high priority at the same time, the threads lose their effectiveness. The high-priority class
should be reserved for threads that must respond to time-critical events. If your application
performs one task that requires the high-priority class while the rest of its tasks are normal
priority, use SetPriorityClass() to raise the priority class of the application temporarily; then
reduce it after the time-critical task has been completed. Another strategy is to create a high-
priority process that has all of its threads blocked most of the time, awakening threads only when
critical tasks are needed. The important point is that a high-priority thread should execute for a
brief time, and only when it has time-critical work to perform.
You should almost never use REALTIME_PRIORITY_CLASS, because this interrupts system
threads that manage mouse input, keyboard input, and background disk flushing. This class can
be appropriate for applications that "talk" directly to hardware or those perform brief tasks that
should have limited interruptions.
Priority Level
The following are priority levels within each priority class:
1. THREAD_PRIORITY_IDLE
2. THREAD_PRIORITY_LOWEST
3. THREAD_PRIORITY_BELOW_NORMAL
4. THREAD_PRIORITY_NORMAL
5. THREAD_PRIORITY_ABOVE_NORMAL
6. THREAD_PRIORITY_HIGHEST
7. THREAD_PRIORITY_TIME_CRITICAL

www.installsetupconfig.com
9
All threads are created using THREAD_PRIORITY_NORMAL. This means that the thread
priority is the same as the process priority class. After you create a thread, use the
SetThreadPriority() function to adjust its priority relative to other threads in the process.
A typical strategy is to use THREAD_PRIORITY_ABOVE_NORMAL or
THREAD_PRIORITY_HIGHEST for the process's input thread, to ensure that the application is
responsive to the user. Background threads, particularly those that are processor intensive, can be
set to THREAD_PRIORITY_BELOW_NORMAL or THREAD_PRIORITY_LOWEST, to
ensure that they can be preempted when necessary. However, if you have a thread waiting for
another thread with a lower priority to complete some task, be sure to block the execution of the
waiting high-priority thread. To do this, use a wait function, critical section, or the Sleep()
function, SleepEx(), or SwitchToThread() function. This is preferable to having the thread
execute a loop. Otherwise, the process may become deadlocked, because the thread with lower
priority is never scheduled. To determine the current priority level of a thread, use the
GetThreadPriority() function.
Base Priority
www.installsetupconfig.com
10
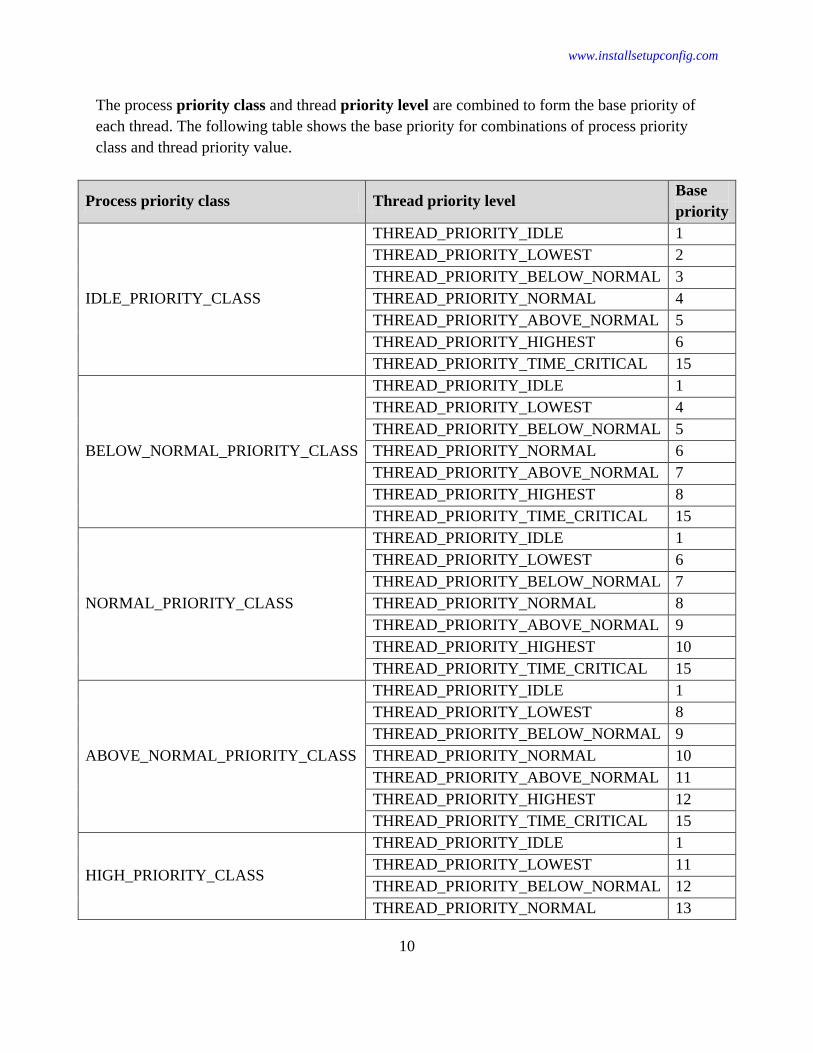
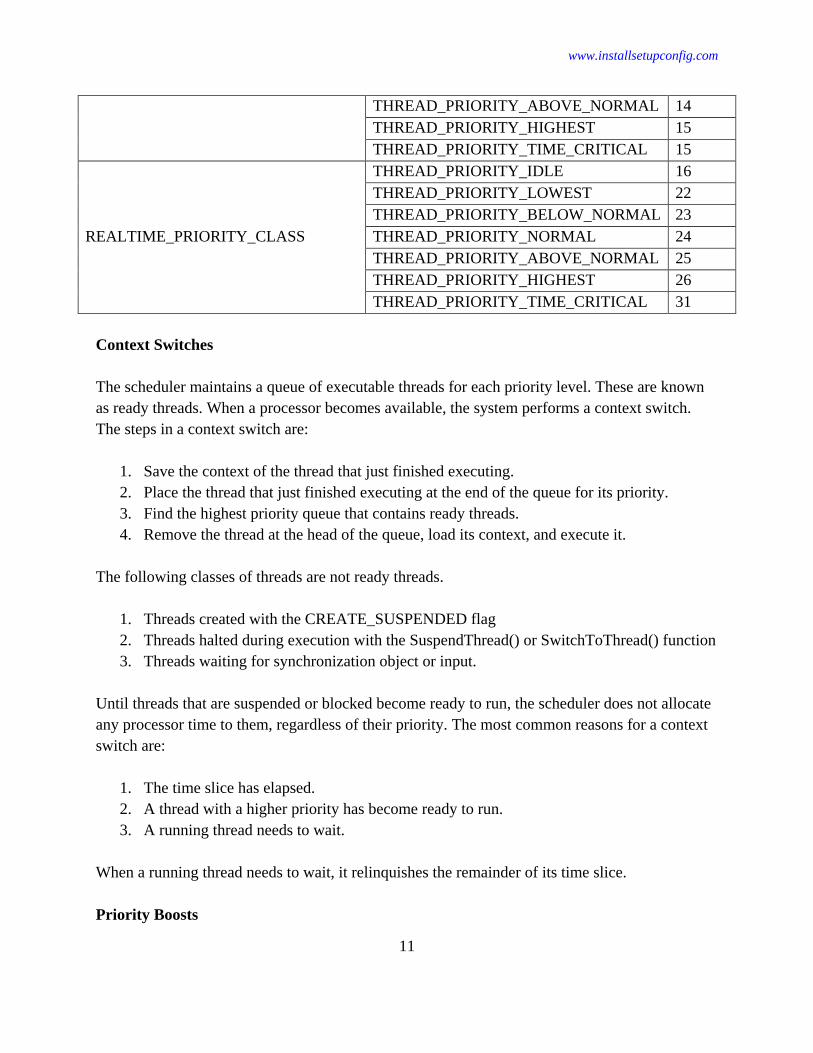
The process priority class and thread priority level are combined to form the base priority of
each thread. The following table shows the base priority for combinations of process priority
class and thread priority value.
Process priority class Thread priority level Base
priority
IDLE_PRIORITY_CLASS
THREAD_PRIORITY_IDLE 1
THREAD_PRIORITY_LOWEST 2
THREAD_PRIORITY_BELOW_NORMAL 3
THREAD_PRIORITY_NORMAL 4
THREAD_PRIORITY_ABOVE_NORMAL 5
THREAD_PRIORITY_HIGHEST 6
THREAD_PRIORITY_TIME_CRITICAL 15
BELOW_NORMAL_PRIORITY_CLASS
THREAD_PRIORITY_IDLE 1
THREAD_PRIORITY_LOWEST 4
THREAD_PRIORITY_BELOW_NORMAL 5
THREAD_PRIORITY_NORMAL 6
THREAD_PRIORITY_ABOVE_NORMAL 7
THREAD_PRIORITY_HIGHEST 8
THREAD_PRIORITY_TIME_CRITICAL 15
NORMAL_PRIORITY_CLASS
THREAD_PRIORITY_IDLE 1
THREAD_PRIORITY_LOWEST 6
THREAD_PRIORITY_BELOW_NORMAL 7
THREAD_PRIORITY_NORMAL 8
THREAD_PRIORITY_ABOVE_NORMAL 9
THREAD_PRIORITY_HIGHEST 10
THREAD_PRIORITY_TIME_CRITICAL 15
ABOVE_NORMAL_PRIORITY_CLASS
THREAD_PRIORITY_IDLE 1
THREAD_PRIORITY_LOWEST 8
THREAD_PRIORITY_BELOW_NORMAL 9
THREAD_PRIORITY_NORMAL 10
THREAD_PRIORITY_ABOVE_NORMAL 11
THREAD_PRIORITY_HIGHEST 12
THREAD_PRIORITY_TIME_CRITICAL 15
HIGH_PRIORITY_CLASS
THREAD_PRIORITY_IDLE 1
THREAD_PRIORITY_LOWEST 11
THREAD_PRIORITY_BELOW_NORMAL 12
THREAD_PRIORITY_NORMAL 13
www.installsetupconfig.com
11
THREAD_PRIORITY_ABOVE_NORMAL 14
THREAD_PRIORITY_HIGHEST 15
THREAD_PRIORITY_TIME_CRITICAL 15
REALTIME_PRIORITY_CLASS
THREAD_PRIORITY_IDLE 16
THREAD_PRIORITY_LOWEST 22
THREAD_PRIORITY_BELOW_NORMAL 23
THREAD_PRIORITY_NORMAL 24
THREAD_PRIORITY_ABOVE_NORMAL 25
THREAD_PRIORITY_HIGHEST 26
THREAD_PRIORITY_TIME_CRITICAL 31
Context Switches
The scheduler maintains a queue of executable threads for each priority level. These are known
as ready threads. When a processor becomes available, the system performs a context switch.
The steps in a context switch are:
1. Save the context of the thread that just finished executing.
2. Place the thread that just finished executing at the end of the queue for its priority.
3. Find the highest priority queue that contains ready threads.
4. Remove the thread at the head of the queue, load its context, and execute it.
The following classes of threads are not ready threads.
1. Threads created with the CREATE_SUSPENDED flag
2. Threads halted during execution with the SuspendThread() or SwitchToThread() function
3. Threads waiting for synchronization object or input.
Until threads that are suspended or blocked become ready to run, the scheduler does not allocate
any processor time to them, regardless of their priority. The most common reasons for a context
switch are:
1. The time slice has elapsed.
2. A thread with a higher priority has become ready to run.
3. A running thread needs to wait.
When a running thread needs to wait, it relinquishes the remainder of its time slice.
Priority Boosts

www.installsetupconfig.com
12
Each thread has a dynamic priority. This is the priority the scheduler uses to determine which
thread to execute. Initially, a thread's dynamic priority is the same as its base priority. The
system can boost and lower the dynamic priority, to ensure that it is responsive and that no
threads are starved for processor time. The system does not boost the priority of threads with
a base priority level between 16 and 31. Only threads with a base priority between 0 and 15
receive dynamic priority boosts. The system boosts the dynamic priority of a thread to enhance
its responsiveness as follows.
1. When a process that uses NORMAL_PRIORITY_CLASS is brought to the foreground,
the scheduler boosts the priority class of the process associated with the foreground
window, so that it is greater than or equal to the priority class of any background
processes. The priority class returns to its original setting when the process is no longer in
the foreground.
2. When a window receives input, such as timer messages, mouse messages, or keyboard
input, the scheduler boosts the priority of the thread that owns the window.
3. When the wait conditions for a blocked thread are satisfied, the scheduler boosts the
priority of the thread. For example, when a wait operation associated with disk or
keyboard I/O finishes, the thread receives a priority boost.
You can disable the priority-boosting feature by calling the SetProcessPriorityBoost() or
SetThreadPriorityBoost() function. To determine whether this feature has been disabled,
call the GetProcessPriorityBoost() or GetThreadPriorityBoost() function.
After raising a thread's dynamic priority, the scheduler reduces that priority by one level each
time the thread completes a time slice, until the thread drops back to its base priority. A thread's
dynamic priority is never less than its base priority.
Priority Inversion
Priority inversion occurs when two or more threads with different priorities are in
contention to be scheduled. Consider a simple case with three threads: thread 1, thread 2, and
thread 3. Thread 1 is high priority and becomes ready to be scheduled. Thread 2, a low-priority
thread, is executing code in a critical section. Thread 1, the high-priority thread, begins waiting
for a shared resource from thread 2. Thread 3 has medium priority. Thread 3 receives all the
processor time, because the high-priority thread (thread 1) is waiting for shared resources from
the low-priority thread (thread 2). Thread 2 will not leave the critical section, because it does not
have the highest priority and will not be scheduled.
The scheduler solves this problem by randomly boosting the priority of the ready threads (in this
case, the low priority lock-holders). The low priority threads run long enough to exit the critical

www.installsetupconfig.com
13
section, and the high-priority thread can enter the critical section. If the low-priority thread does
not get enough CPU time to exit the critical section the first time, it will get another chance
during the next round of scheduling.
Multiple Processors
Computers with multiple processors are typically designed for one of two architectures:
1. Non-uniform memory access (NUMA) or
2. Symmetric multiprocessing (SMP)
In a NUMA computer, each processor is closer to some parts of memory than others, making
memory access faster for some parts of memory than other parts. Under the NUMA model, the
system attempts to schedule threads on processors that are close to the memory being used.
In an SMP computer, two or more identical processors or cores connect to a single shared main
memory. Under the SMP model, any thread can be assigned to any processor. Therefore,
scheduling threads on an SMP computer is similar to scheduling threads on a computer with a
single processor. However, the scheduler has a pool of processors, so that it can schedule threads
to run concurrently. Scheduling is still determined by thread priority, but it can be influenced by
setting thread affinity and thread ideal processor, as discussed in the following section.
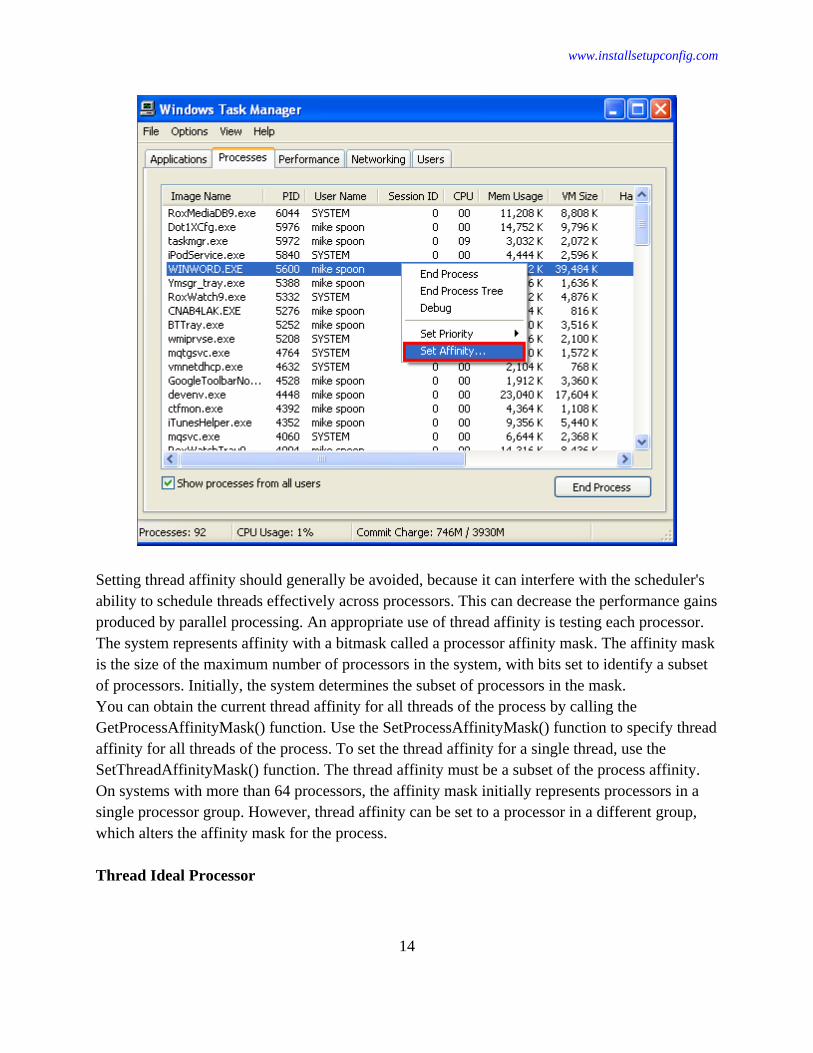
Thread Affinity
Thread affinity forces a thread to run on a specific subset of processors.
www.installsetupconfig.com
14
Setting thread affinity should generally be avoided, because it can interfere with the scheduler's
ability to schedule threads effectively across processors. This can decrease the performance gains
produced by parallel processing. An appropriate use of thread affinity is testing each processor.
The system represents affinity with a bitmask called a processor affinity mask. The affinity mask
is the size of the maximum number of processors in the system, with bits set to identify a subset
of processors. Initially, the system determines the subset of processors in the mask.
You can obtain the current thread affinity for all threads of the process by calling the
GetProcessAffinityMask() function. Use the SetProcessAffinityMask() function to specify thread
affinity for all threads of the process. To set the thread affinity for a single thread, use the
SetThreadAffinityMask() function. The thread affinity must be a subset of the process affinity.
On systems with more than 64 processors, the affinity mask initially represents processors in a
single processor group. However, thread affinity can be set to a processor in a different group,
which alters the affinity mask for the process.
Thread Ideal Processor

www.installsetupconfig.com
15
When you specify a thread ideal processor, the scheduler runs the thread on the specified
processor when possible. Use the SetThreadIdealProcessor() function to specify a preferred
processor for a thread. This does not guarantee that the ideal processor will be chosen but
provides a useful hint to the scheduler. On systems with more than 64 processors, you can use
the SetThreadIdealProcessorEx() function to specify a preferred processor in a specific processor
group.
NUMA Support
The traditional model for multiprocessor support is symmetric multiprocessor (SMP). In this
model, each processor has equal access to memory and I/O. As more processors are added, the
processor bus becomes a limitation for system performance.
System designers use non-uniform memory access (NUMA) to increase processor speed
without increasing the load on the processor bus. The architecture is non-uniform because
each processor is close to some parts of memory and farther from other parts of memory.
The processor quickly gains access to the memory it is close to, while it can take longer to
gain access to memory that is farther away.
In a NUMA system, CPUs are arranged in smaller systems called nodes. Each node has its
own processors and memory, and is connected to the larger system through a cache-coherent
interconnect bus.
The system attempts to improve performance by scheduling threads on processors that are in
the same node as the memory being used. It attempts to satisfy memory-allocation requests
from within the node, but will allocate memory from other nodes if necessary. It also
provides an API to make the topology of the system available to applications. You can improve
the performance of your applications by using the NUMA functions to optimize scheduling
and memory usage.
First of all, you will need to determine the layout of nodes in the system. To retrieve the highest
numbered node in the system, use the GetNumaHighestNodeNumber() function. Note that this
number is not guaranteed to equal the total number of nodes in the system. Also, nodes with
sequential numbers are not guaranteed to be close together. To retrieve the list of processors on
the system, use the GetProcessAffinityMask() function. You can determine the node for each
processor in the list by using the GetNumaProcessorNode() function. Alternatively, to retrieve a
list of all processors in a node, use the GetNumaNodeProcessorMask() function.
After you have determined which processors belong to which nodes, you can optimize your
application's performance. To ensure that all threads for your process run on the same node, use
the SetProcessAffinityMask() function with a process affinity mask that specifies processors in
the same node. This increases the efficiency of applications whose threads need to access the
same memory. Alternatively, to limit the number of threads on each node, use the
SetThreadAffinityMask() function.

www.installsetupconfig.com
16
Memory-intensive applications will need to optimize their memory usage. To retrieve the
amount of free memory available to a node, use the GetNumaAvailableMemoryNode() function.
The VirtualAllocExNuma() function enables the application to specify a preferred node for the
memory allocation. VirtualAllocExNuma() does not allocate any physical pages, so it will
succeed whether or not the pages are available on that node or elsewhere in the system. The
physical pages are allocated on demand. If the preferred node runs out of pages, the memory
manager will use pages from other nodes. If the memory is paged out, the same process is used
when it is brought back in.
NUMA Support on Systems with More Than 64 Logical Processors
On systems with more than 64 logical processors, nodes are assigned to processor groups
according to the capacity of the nodes. The capacity of a node is the number of processors
that are present when the system starts together with any additional logical processors that
can be added while the system is running.
Windows Server 2008, Windows Vista, Windows Server 2003, and
Windows XP/2000: Processor groups are not supported.
Each node must be fully contained within a group. If the capacities of the nodes are relatively
small, the system assigns more than one node to the same group, choosing nodes that are
physically close to one another for better performance. If a node's capacity exceeds the
maximum number of processors in a group, the system splits the node into multiple smaller
nodes, each small enough to fit in a group.
An ideal NUMA node for a new process can be requested using the
PROC_THREAD_ATTRIBUTE_PREFERRED_NODE extended attribute when the process is
created. Like a thread ideal processor, the ideal node is a hint to the scheduler, which assigns the
new process to the group that contains the requested node if possible.
The extended NUMA functions GetNumaAvailableMemoryNodeEx(),
GetNumaNodeProcessorMaskEx(), GetNumaProcessorNodeEx(), and
GetNumaProximityNodeEx() differ from their unextended counterparts in that the node number
is a USHORT value rather than a UCHAR, to accommodate the potentially greater number of
nodes on a system with more than 64 logical processors. Also, the processor specified with or
retrieved by the extended functions includes the processor group; the processor specified with or
retrieved by the unextended functions is group-relative. For details, see the individual function
reference topics.
A group-aware application can assign all of its threads to a particular node in a similar fashion to
that described earlier in this topic, using the corresponding extended NUMA functions. The
application uses GetLogicalProcessorInformationEx() to get the list of all processors on the
system. Note that the application cannot set the process affinity mask unless the process is

www.installsetupconfig.com
17
assigned to a single group and the intended node is located in that group. Usually the application
must call SetThreadGroupAffinity() to limit its threads to the intended node.
NUMA API
The following table describes the NUMA API.
Function Description
AllocateUserPhysicalPagesNuma()
Allocates physical memory pages to be mapped and
unmapped within any Address Windowing Extensions
(AWE) region of a specified process and specifies the
NUMA node for the physical memory.
CreateFileMappingNuma()
Creates or opens a named or unnamed file mapping
object for a specified file, and specifies the NUMA node
for the physical memory.
GetLogicalProcessorInformation() Retrieves information about logical processors and
related hardware.
GetLogicalProcessorInformationEx() Retrieves information about the relationships of logical
processors and related hardware.
GetNumaAvailableMemoryNode() Retrieves the amount of memory available in the
specified node.
GetNumaAvailableMemoryNodeEx() Retrieves the amount of memory available in a node
specified as a USHORT value.
GetNumaHighestNodeNumber() Retrieves the node that currently has the highest number.
GetNumaNodeProcessorMask() Retrieves the processor mask for the specified node.
GetNumaNodeProcessorMaskEx() Retrieves the processor mask for a node specified as a
USHORT value.
GetNumaProcessorNode() Retrieves the node number for the specified processor.
GetNumaProcessorNodeEx() Retrieves the node number as a USHORT value for the
specified processor.
GetNumaProximityNode() Retrieves the node number for the specified proximity
identifier.
GetNumaProximityNodeEx() Retrieves the node number as a USHORT value for the
specified proximity identifier.
MapViewOfFileExNuma()
Maps a view of a file mapping into the address space of
a calling process, and specifies the NUMA node for the
physical memory.
VirtualAllocExNuma() Reserves or commits a region of memory within the
virtual address space of the specified process, and

www.installsetupconfig.com
18
specifies the NUMA node for the physical memory.
Thread Ordering Service
The thread ordering service controls the execution of one or more client threads. It ensures
that each client thread runs once during the specified period and in relative order.
Windows Server 2003 and Windows XP/2000: The thread ordering service is not available.
Each client thread belongs to a thread ordering group. The parent thread creates one or more
thread ordering groups by calling the AvRtCreateThreadOrderingGroup() function. The parent
thread uses this function to specify the period for the thread ordering group and a time-out
interval.
Additional client threads call the AvRtJoinThreadOrderingGroup() function to join an existing
thread ordering group. These threads indicate whether they are to be a predecessor or successor
to the parent thread in the execution order. Each client thread is expected to complete a certain
amount of processing each period. All threads within the group should complete their execution
within the period plus the time-out interval.
The threads of a thread ordering group enclose their processing code within a loop that is
controlled by the AvRtWaitOnThreadOrderingGroup() function. First, the predecessor threads
are executed one at a time in the order that they joined the group, while the parent and successor
threads are blocked on their calls to AvRtWaitOnThreadOrderingGroup(). When each
predecessor thread is finished with its processing, control of execution returns to the top of its
processing loop and the thread calls AvRtWaitOnThreadOrderingGroup() again to block until its
next turn. After all predecessor threads have called this function, the thread ordering service can
schedule the parent thread. Finally, when the parent thread finishes its processing and calls
AvRtWaitOnThreadOrderingGroup() again, the thread ordering service can schedule the
successor threads one at a time in the order that they joined the group. If all threads complete
their execution before a period ends, all threads wait until the remainder of the period elapses
before any are executed again.
When the client need no longer run as part of the thread ordering group, it calls the
AvRtLeaveThreadOrderingGroup() function to remove itself from the group. Note that the
parent thread should not remove itself from a thread ordering group. If a thread does not
complete its execution before the period plus the time-out interval elapses, then it is deleted from
the group.
The parent thread calls the AvRtDeleteThreadOrderingGroup() function to delete the thread
ordering group. The thread ordering group is also destroyed if the parent thread does not
complete its execution before the period plus the time-out interval elapses. When the thread
ordering group is destroyed, any calls to AvRtWaitOnThreadOrderingGroup() from threads of
that group fail or time out.

www.installsetupconfig.com
19
Multimedia Class Scheduler Service
The Multimedia Class Scheduler service (MMCSS) enables multimedia applications to
ensure that their time-sensitive processing receives prioritized access to CPU resources.
This service enables multimedia applications to utilize as much of the CPU as possible
without denying CPU resources to lower-priority applications.
MMCSS uses information stored in the registry to identify supported tasks and determine the
relative priority of threads performing these tasks. Each thread that is performing work related to
a particular task calls the AvSetMmMaxThreadCharacteristics() or
AvSetMmThreadCharacteristics() function to inform MMCSS that it is working on that task.
MMCSS is not available in Windows Server 2003 and Windows XP/2000
Registry Settings
The MMCSS settings are stored in the following registry key:
HKEY_LOCAL_MACHINE\SOFTWARE\Microsoft\Windows
NT\CurrentVersion\Multimedia\SystemProfile
This key contains a REG_DWORD value named SystemResponsiveness that determines the
percentage of CPU resources that should be guaranteed to low-priority tasks. For example, if this
value is 20, then 20% of CPU resources are reserved for low-priority tasks. Note that values that
are not evenly divisible by 10 are rounded up to the nearest multiple of 10. A value of 0 is also
treated as 10. The key also contains a subkey named Tasks that contains the list of tasks. By
default, Windows supports the following tasks:
1. Audio
2. Capture
3. Distribution
4. Games
5. Playback
6. Pro Audio
7. Window Manager
OEMs can add additional tasks as required. Each task key contains the following set of values
that represent characteristics to be applied to threads that are associated with the task.
Value Format Possible values
Affinity REG_DWORD A bit mask that indicates the processor affinity. Both

www.installsetupconfig.com
20
0x00 and 0xFFFFFFFF indicate that processor affinity is
not used.
Background Only REG_SZ
Indicates whether this is a background task (no user
interface). The threads of a background task do not
change because of a change in window focus. This value
can be set to True or False.
BackgroundPriority REG_DWORD The background priority. The range of values is 1-8.
Clock Rate REG_DWORD The maximum guaranteed clock rate the system uses if a
thread joins this task, in 100-nanosecond intervals.
GPU Priority REG_DWORD The GPU priority. The range of values is 0-31. This
priority is not yet used.
Priority REG_DWORD
The task priority. The range of values is 1 (low) to 8
(high).
For tasks with a Scheduling Category of High, this value
is always treated as 2.
Scheduling
Category REG_SZ
The scheduling category. This value can be set to High,
Medium, or Low.
SFIO Priority REG_SZ
The scheduled I/O priority. This value is reflected by all
IRPs issued by threads joined to this task. This value can
be set to Idle, Low, Normal, or High.
Critical priority is reserved for the memory manager.
Thread Priorities
The MMCSS boosts the priority of threads that are working on high-priority multimedia tasks.
MMCSS determines the priority of a thread using the following factors:
1. The base priority of the task
2. The Priority parameter of the AvSetMmThreadPriority() function
3. Whether the application is in the foreground
4. How much CPU time is being consumed by the threads in each category
MMCSS sets the priority of client threads depending on their scheduling category.
Category Priority Description
High 23-26
These threads run at a thread priority that is only lower than certain
system-level tasks. This category is designed for pro audio and can
theoretically use as much of the CPU resource as required.
Medium 16-22 These threads are part of the application that is in the foreground.

www.installsetupconfig.com
21
Low 8-15 This category contains the remainder of the threads. They are guaranteed
a minimum percentage of the CPU resources if required.
1-7
These threads have used their quota of CPU resource. They can continue
to run if no low-priority threads are ready to run.
Processor Groups
The 64-bit versions of Windows 7 and Windows Server 2008 R2 support more than 64 logical
processors on a single computer. This functionality is not available on 32-bit versions of
Windows.
Systems with more than one processor or systems with processors that have multiple cores
provide the operating system with multiple logical processors. A logical processor is one
logical computing engine from the perspective of the operating system, application or
driver. A core is one processor unit, which can consist of one or more logical processors. A
physical processor can consist of one or more cores. A physical processor is the same as a
processor package, a socket, or a CPU.
Support for systems that have more than 64 logical processors is based on the concept of a
processor group, which is a static set of up to 64 logical processors that is treated as a single
scheduling entity. Processor groups are numbered starting with 0. Systems with fewer than 64
logical processors always have a single group, Group 0. Processor groups are not supported in
Windows Server 2008, Windows Vista, Windows Server 2003, and Windows XP/2000.
When the system starts, the operating system creates processor groups and assigns logical
processors to the groups. If the system is capable of hot-adding processors, the operating system
allows space in groups for processors that might arrive while the system is running. The
operating system minimizes the number of groups in a system. For example, a system with 128
logical processors would have two processor groups with 64 processors in each group, not four
groups with 32 logical processors in each group.
For better performance, the operating system takes physical locality into account when assigning
logical processors to groups. All of the logical processors in a core, and all of the cores in a
physical processor, are assigned to the same group, if possible. Physical processors that are
physically close to one another are assigned to the same group. A NUMA node is assigned to a
single group unless the capacity of the node exceeds the maximum group size.
On systems with 64 or fewer processors, existing applications will operate correctly without
modification. Applications that do not call any functions that use processor affinity masks or
processor numbers will operate correctly on all systems, regardless of the number of processors.
To operate correctly on systems with more than 64 logical processors, the following kinds of
applications might require modification:

www.installsetupconfig.com
22
1. Applications that manage, maintain, or display per-processor information for the entire
system must be modified to support more than 64 logical processors. An example of such
an application is Windows Task Manager, which displays the workload of each processor
in the system.
2. Applications for which performance is critical and that can scale efficiently beyond 64
logical processors must be modified to run on such systems. For example, database
applications might benefit from modifications.
3. If an application uses a DLL that has per-processor data structures, and the DLL has not
been modified to support more than 64 logical processors, all threads in the application
that call functions exported by the DLL must be assigned to the same group.
By default, an application is constrained to a single group, which should provide ample
processing capability for the typical application. The operating system initially assigns each
process to a single group in a round-robin manner across the groups in the system. A
process begins its execution assigned to one group. The first thread of a process initially runs in
the group to which the process is assigned. Each newly created thread is assigned to the same
group as the thread that created it.
An application that requires the use of multiple groups so that it can run on more than 64
processors must explicitly determine where to run its threads and is responsible for setting the
threads' processor affinities to the desired groups. The INHERIT_PARENT_AFFINITY flag can
be used to specify a parent process (which can be different than the current process) from which
to generate the affinity for a new process. If the process is running in a single group, it can read
and modify its affinity using GetProcessAffinityMask() and SetProcessAffinityMask() while
remaining in the same group; if the process affinity is modified, the new affinity is applied to its
threads.
A thread's affinity can be specified at creation using the
PROC_THREAD_ATTRIBUTE_GROUP_AFFINITY extended attribute with the
CreateRemoteThreadEx() function. After the thread is created, its affinity can be changed by
calling SetThreadAffinityMask() or SetThreadGroupAffinity(). If a thread is assigned to a
different group than the process, the process's affinity is updated to include the thread's affinity
and the process becomes a multi-group process. Further affinity changes must be made for
individual threads; a multi-group process's affinity cannot be modified using
SetProcessAffinityMask(). The GetProcessGroupAffinity() function retrieves the set of groups to
which a process and its threads are assigned.
A logical processor is identified by its group number and its group-relative processor number.
This is represented by a PROCESSOR_NUMBER structure. Numeric processor numbers used
by legacy functions are group-relative.
Multiple Threads

www.installsetupconfig.com
23
A thread is the entity within a process that can be scheduled for execution. All threads of a
process share its virtual address space and system resources. Each process is started with a single
thread, but can create additional threads from any of its threads.
Creating Threads (With Code Example)
The CreateThread() function creates a new thread for a process. The creating thread must specify
the starting address of the code that the new thread is to execute. Typically, the starting address
is the name of a function defined in the program code (see ThreadProc()). This function takes a
single parameter and returns a DWORD value. A process can have multiple threads
simultaneously executing the same function.
The following is a simple program example that demonstrates how to create a new thread that
executes the locally defined function, MyThreadFunction().
The calling thread uses the WaitForMultipleObjects() function to persist until all worker
threads have terminated. The calling thread blocks while it is waiting; to continue processing, a
calling thread would use WaitForSingleObject() and wait for each worker thread to signal its
wait object. Note that if you were to close the handle to a worker thread before it terminated, this
does not terminate the worker thread. However, the handle will be unavailable for use in
subsequent function calls.
Create a new empty Win32 console application project. Give a suitable project name and change
the project location if needed.
Then, add the source file and give it a suitable name.
Next, add the following source code.
#include <windows.h>
#include <strsafe.h>
#include <stdio.h>
#define MAX_THREADS 3
#define BUF_SIZE 255
// Prototypes
DWORD WINAPI MyThreadFunction( LPVOID lpParam );
void ErrorHandler(LPTSTR lpszFunction);
// Sample custom data structure for threads to use.
// This is passed by void pointer so it can be any data type
// that can be passed using a single void pointer (LPVOID).
typedef struct MyData {
int val1;
int val2;
} MYDATA, *PMYDATA;
// This should be the parent process

www.installsetupconfig.com
24
int wmain(int argc, WCHAR *argv[])
{
PMYDATA pDataArray[MAX_THREADS];
DWORD dwThreadIdArray[MAX_THREADS];
HANDLE hThreadArray[MAX_THREADS];
DWORD Ret = 0;
// Create MAX_THREADS worker threads, in this case = 3
for(int i=0; i<MAX_THREADS; i++)
{
// Allocate memory for thread data
pDataArray[i] = (PMYDATA) HeapAlloc(GetProcessHeap(),
HEAP_ZERO_MEMORY, sizeof(MYDATA));
if(pDataArray[i] == NULL)
{
// If the array allocation fails, the system is out of memory
// so there is no point in trying to print an error message.
// Just terminate execution.
wprintf(L"\nHeapAlloc() failed! Error %u\n",
GetLastError());
ExitProcess(2);
}
wprintf(L"\nHeapAlloc() for thread #%u should be fine!\n", i);
// Generate unique data for each thread to work with
pDataArray[i]->val1 = i;
pDataArray[i]->val2 = i+100;
// Create the thread to begin execution on its own
hThreadArray[i] = CreateThread(
NULL, // default security attributes
0, // use default stack size
MyThreadFunction, // thread function name - a pointer to
the application-defined
// function to be
executed by the thread
pDataArray[i], // argument to thread function
0, // use default creation flags
&dwThreadIdArray[i]); // returns the thread identifier
wprintf(L"Thread ID is %u\n", dwThreadIdArray[i]);
// Check the return value for success.
// If CreateThread() fails, terminate execution.
// This will automatically clean up threads and memory.
if (hThreadArray[i] == NULL)
{
ErrorHandler(L"CreateThread()");
ExitProcess(3);
}
wprintf(L"CreateThread() for thread #%u is fine!\n", i);
} // End of main thread creation loop.

www.installsetupconfig.com
25
// Wait until all threads have terminated
Ret = WaitForMultipleObjects(MAX_THREADS, hThreadArray, TRUE, INFINITE);
wprintf(L"\nWaitForMultipleObjects() return value is 0X%.8X\n", Ret);
// Close all thread handles and free memory allocations
wprintf(L"\n");
for(int i=0; i<MAX_THREADS; i++)
{
if(CloseHandle(hThreadArray[i]) != 0)
wprintf(L"Closing thread's handle #%u\n", i);
else
ErrorHandler(L"CloseHandle()");
if(pDataArray[i] != NULL)
{
if(HeapFree(GetProcessHeap(), 0, pDataArray[i]) != 0)
wprintf(L"HeapFree() #%u is doing his job!\n", i);
else
ErrorHandler(L"HeapFree()");
pDataArray[i] = NULL; // Ensure address is not reused.
}
}
return 0;
}
// Thread creation function
DWORD WINAPI MyThreadFunction(LPVOID lpParam)
{
HANDLE hStdout;
PMYDATA pDataArray;
WCHAR msgBuf[BUF_SIZE];
size_t cchStringSize;
DWORD dwChars;
// Make sure there is a console to receive output results
hStdout = GetStdHandle(STD_OUTPUT_HANDLE);
if(hStdout == INVALID_HANDLE_VALUE)
{
ErrorHandler(L"GetStdHandle()");
return 1;
}
else
wprintf(L"GetStdHandle() - Handle to the standard output is
OK!\n");
// Cast the parameter to the correct data type
// The pointer is known to be valid because
// it was checked for NULL before the thread was created
pDataArray = (PMYDATA)lpParam;
// Print the parameter values using thread-safe functions
StringCchPrintf(msgBuf, BUF_SIZE, L"Parameter values: val1 = %u, val2 =
%u\n", pDataArray->val1, pDataArray->val2);
www.installsetupconfig.com
26
StringCchLength(msgBuf, BUF_SIZE, &cchStringSize);
WriteConsole(hStdout, msgBuf, (DWORD)cchStringSize, &dwChars, NULL);
return 0;
}
// This just redundant, you can use the GetLastError() instead
void ErrorHandler(LPTSTR lpszFunction)
{
// Retrieve the system error message for the last-error code
LPVOID lpMsgBuf;
LPVOID lpDisplayBuf;
DWORD dw = GetLastError();
FormatMessage(
FORMAT_MESSAGE_ALLOCATE_BUFFER |
FORMAT_MESSAGE_FROM_SYSTEM |
FORMAT_MESSAGE_IGNORE_INSERTS,
NULL,
dw,
MAKELANGID(LANG_NEUTRAL, SUBLANG_DEFAULT),
(LPTSTR) &lpMsgBuf,
0, NULL );
// Display the error message
lpDisplayBuf = (LPVOID)LocalAlloc(LMEM_ZEROINIT,
(lstrlen((LPCTSTR) lpMsgBuf) + lstrlen((LPCTSTR) lpszFunction) +
40) * sizeof(WCHAR));
StringCchPrintf((LPTSTR)lpDisplayBuf,
LocalSize(lpDisplayBuf) / sizeof(WCHAR),
L"%s failed with error %u: %s",
lpszFunction, dw, lpMsgBuf);
MessageBox(NULL, (LPCTSTR) lpDisplayBuf, L"Error", MB_OK);
// Free error-handling buffer allocations
LocalFree(lpMsgBuf);
LocalFree(lpDisplayBuf);
}
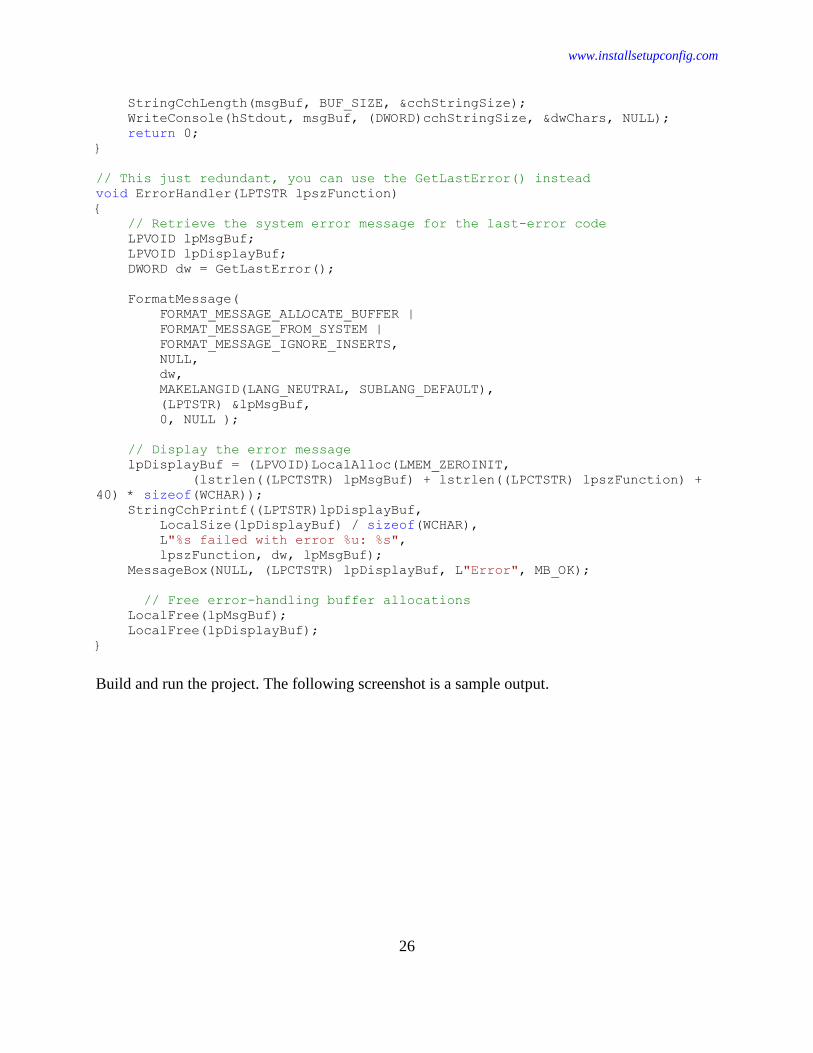
Build and run the project. The following screenshot is a sample output.

www.installsetupconfig.com
27
The MyThreadFunction() function avoids the use of the C run-time library (CRT), as many of its
functions are not thread-safe, particularly if you are not using the multithreaded CRT. If you
would like to use the CRT in a ThreadProc() function, use the _beginthreadex() function instead.
It is risky to pass the address of a local variable if the creating thread exits before the new thread,
because the pointer becomes invalid. Instead, either pass a pointer to dynamically allocated
memory or make the creating thread wait for the new thread to terminate. Data can also be
passed from the creating thread to the new thread using global variables. With global variables,
it is usually necessary to synchronize access by multiple threads. The creating thread can use the
arguments to CreateThread() to specify the following:
1. The security attributes for the handle to the new thread. These security attributes include
an inheritance flag that determines whether the handle can be inherited by child
processes. The security attributes also include a security descriptor, which the system
uses to perform access checks on all subsequent uses of the thread's handle before access
is granted.
2. The initial stack size of the new thread. The thread's stack is allocated automatically in
the memory space of the process; the system increases the stack as needed and frees it
when the thread terminates.

www.installsetupconfig.com
28
3. A creation flag that enables you to create the thread in a suspended state. When
suspended, the thread does not run until the ResumeThread() function is called.
You can also create a thread by calling the CreateRemoteThread() function. This function is used
by debugger processes to create a thread that runs in the address space of the process being
debugged.
Thread Stack Size
Each new thread or fiber receives its own stack space consisting of both reserved and initially
committed memory. The reserved memory size represents the total stack allocation in virtual
memory. As such, the reserved size is limited to the virtual address range. The initially
committed pages do not utilize physical memory until they are referenced; however, they do
remove pages from the system total commit limit, which is the size of the page file plus the size
of the physical memory. The system commits additional pages from the reserved stack memory
as they are needed, until either the stack reaches the reserved size minus one page (which is used
as a guard page to prevent stack overflow) or the system is so low on memory that the operation
fails.
It is best to choose as small a stack size as possible and commit the stack that is needed for the
thread or fiber to run reliably. Every page that is reserved for the stack cannot be used for any
other purpose.
A stack is freed when its thread exits. It is not freed if the thread is terminated by another thread.
The default size for the reserved and initially committed stack memory is specified in the
executable file header. Thread or fiber creation fails if there is not enough memory to reserve or
commit the number of bytes requested. The default stack reservation size used by the linker is 1
MB. To specify a different default stack reservation size for all threads and fibers, use the
STACKSIZE statement in the module definition (.def) file. The operating system rounds up the
specified size to the nearest multiple of the system's allocation granularity (typically 64 KB). To
retrieve the allocation granularity of the current system, use the GetSystemInfo() function.
To change the initially committed stack space, use the dwStackSize parameter of the
CreateThread(), CreateRemoteThread(), or CreateFiber() function. This value is rounded up to
the nearest page. Generally, the reserve size is the default reserve size specified in the executable
header. However, if the initially committed size specified by dwStackSize is larger than or equal
to the default reserve size, the reserve size is this new commit size rounded up to the nearest
multiple of 1 MB.
To change the reserved stack size, set the dwCreationFlags parameter of CreateThread() or
CreateRemoteThread() to STACK_SIZE_PARAM_IS_A_RESERVATION and use the
dwStackSize parameter. In this case, the initially committed size is the default size specified in
www.installsetupconfig.com
29
the executable header. For fibers, use the dwStackReserveSize parameter of CreateFiberEx().
The committed size is specified in the dwStackCommitSize parameter.
The SetThreadStackGuarantee() function sets the minimum size of the stack associated with the
calling thread or fiber that will be available during any stack overflow exceptions.
Thread Handles and Identifiers
When a new thread is created by the CreateThread() or CreateRemoteThread() function, a handle
to the thread is returned. By default, this handle has full access rights, and, subject to security
access checking, can be used in any of the functions that accept a thread handle. This handle can
be inherited by child processes, depending on the inheritance flag specified when it is created.
The handle can be duplicated by DuplicateHandle(), which enables you to create a thread handle
with a subset of the access rights. The handle is valid until closed, even after the thread it
represents has been terminated.
The CreateThread() and CreateRemoteThread() functions also return an identifier that uniquely
identifies the thread throughout the system. A thread can use the GetCurrentThreadId() function
to get its own thread identifier. The identifiers are valid from the time the thread is created until
the thread has been terminated. Note that no thread identifier will ever be 0.
If you have a thread identifier, you can get the thread handle by calling the OpenThread()
function. OpenThread() enables you to specify the handle's access rights and whether it can be
inherited.
A thread can use the GetCurrentThread() function to retrieve a pseudo handle to its own thread
object. This pseudo handle is valid only for the calling process; it cannot be inherited or
duplicated for use by other processes. To get the real handle to the thread, given a pseudo handle,
use the DuplicateHandle() function. To enumerate the threads of a process, use the
Thread32First() and Thread32Next() functions.
Suspending Thread Execution
A thread can suspend and resume the execution of another thread. While a thread is suspended, it
is not scheduled for time on the processor.
If a thread is created in a suspended state (with the CREATE_SUSPENDED flag), it does not
begin to execute until another thread calls the ResumeThread() function with a handle to the
suspended thread. This can be useful for initializing the thread's state before it begins to execute.
Suspending a thread at creation can be useful for one-time synchronization, because this ensures
that the suspended thread will execute the starting point of its code when you call
ResumeThread().

www.installsetupconfig.com
30
The SuspendThread() function is not intended to be used for thread synchronization because it
does not control the point in the code at which the thread's execution is suspended. This function
is primarily designed for use by debuggers.
A thread can temporarily yield its execution for a specified interval by calling the Sleep() or
SleepEx() functions This is useful particularly in cases where the thread responds to user
interaction, because it can delay execution long enough to allow users to observe the results of
their actions. During the sleep interval, the thread is not scheduled for time on the processor.
The SwitchToThread() function is similar to Sleep() and SleepEx(), except that you cannot
specify the interval. SwitchToThread allows the thread to give up its time slice.
Synchronizing Execution of Multiple Threads
To avoid race conditions and deadlocks, it is necessary to synchronize access by multiple
threads to shared resources. Synchronization is also necessary to ensure that interdependent code
is executed in the proper sequence. There are a number of objects whose handles can be used to
synchronize multiple threads. These objects include:
1. Console input buffers
2. Events
3. Mutexes
4. Processes
5. Semaphores
6. Threads
7. Timers
The state of each of these objects is either signaled or not signaled. When you specify a handle to
any of these objects in a call to one of the wait functions, the execution of the calling thread is
blocked until the state of the specified object becomes signaled.
Some of these objects are useful in blocking a thread until some event occurs. For example, a
console input buffer handle is signaled when there is unread input, such as a keystroke or mouse
button click. Process and thread handles are signaled when the process or thread terminates. This
allows a process, for example, to create a child process and then block its own execution until the
new process has terminated.
Other objects are useful in protecting shared resources from simultaneous access. For example,
multiple threads can each have a handle to a mutex object. Before accessing a shared resource,
the threads must call one of the wait functions to wait for the state of the mutex to be signaled.
When the mutex becomes signaled, only one waiting thread is released to access the resource.
The state of the mutex is immediately reset to not signaled so any other waiting threads remain

www.installsetupconfig.com
31
blocked. When the thread is finished with the resource, it must set the state of the mutex to
signaled to allow other threads to access the resource.
For the threads of a single process, critical-section objects provide a more efficient means of
synchronization than mutexes. A critical section is used like a mutex to enable one thread at a
time to use the protected resource. A thread can use the EnterCriticalSection() function to request
ownership of a critical section. If it is already owned by another thread, the requesting thread is
blocked. A thread can use the TryEnterCriticalSection() function to request ownership of a
critical section, without blocking upon failure to obtain the critical section. After it receives
ownership, the thread is free to use the protected resource. The execution of the other threads of
the process is not affected unless they attempt to enter the same critical section.
The WaitForInputIdle() function makes a thread wait until a specified process is initialized and
waiting for user input with no input pending. Calling WaitForInputIdle() can be useful for
synchronizing parent and child processes, because CreateProcess() returns without waiting for
the child process to complete its initialization.
Multiple Threads and GDI Objects
To enhance performance, access to graphics device interface (GDI) objects (such as palettes,
device contexts, regions, and the like) is not serialized. This creates a potential danger for
processes that have multiple threads sharing these objects. For example, if one thread deletes a
GDI object while another thread is using it, the results are unpredictable. This danger can be
avoided simply by not sharing GDI objects. If sharing is unavoidable (or desirable), the
application must provide its own mechanisms for synchronizing access.
Thread Local Storage
All threads of a process share its virtual address space. The local variables of a function are
unique to each thread that runs the function. However, the static and global variables are
shared by all threads in the process. With thread local storage (TLS), you can provide unique
data for each thread that the process can access using a global index. One thread allocates the
index, which can be used by the other threads to retrieve the unique data associated with the
index.
The constant TLS_MINIMUM_AVAILABLE defines the minimum number of TLS indexes
available in each process. This minimum is guaranteed to be at least 64 for all systems. The
maximum number of indexes per process is 1,088.
When the threads are created, the system allocates an array of LPVOID values for TLS, which
are initialized to NULL. Before an index can be used, it must be allocated by one of the threads.
Each thread stores its data for a TLS index in a TLS slot in the array. If the data associated with
an index will fit in an LPVOID value, you can store the data directly in the TLS slot. However, if
www.installsetupconfig.com
32
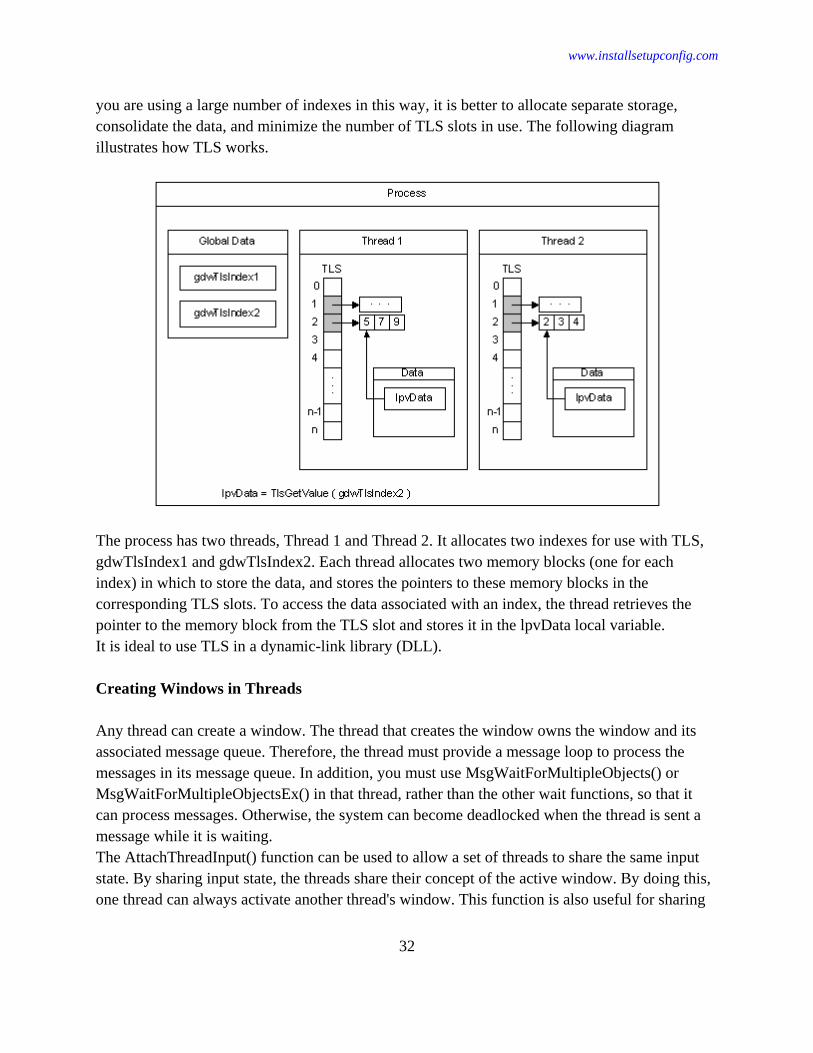
you are using a large number of indexes in this way, it is better to allocate separate storage,
consolidate the data, and minimize the number of TLS slots in use. The following diagram
illustrates how TLS works.
The process has two threads, Thread 1 and Thread 2. It allocates two indexes for use with TLS,
gdwTlsIndex1 and gdwTlsIndex2. Each thread allocates two memory blocks (one for each
index) in which to store the data, and stores the pointers to these memory blocks in the
corresponding TLS slots. To access the data associated with an index, the thread retrieves the
pointer to the memory block from the TLS slot and stores it in the lpvData local variable.
It is ideal to use TLS in a dynamic-link library (DLL).
Creating Windows in Threads
Any thread can create a window. The thread that creates the window owns the window and its
associated message queue. Therefore, the thread must provide a message loop to process the
messages in its message queue. In addition, you must use MsgWaitForMultipleObjects() or
MsgWaitForMultipleObjectsEx() in that thread, rather than the other wait functions, so that it
can process messages. Otherwise, the system can become deadlocked when the thread is sent a
message while it is waiting.
The AttachThreadInput() function can be used to allow a set of threads to share the same input
state. By sharing input state, the threads share their concept of the active window. By doing this,
one thread can always activate another thread's window. This function is also useful for sharing

www.installsetupconfig.com
33
focus state, mouse capture state, keyboard state, and window Z-order state among windows
created by different threads whose input state is shared.
Terminating a Thread
Terminating a thread has the following results:
1. Any resources owned by the thread, such as windows and hooks, are freed.
2. The thread exit code is set.
3. The thread object is signaled.
4. If the thread is the only active thread in the process, the process is terminated.
The GetExitCodeThread() function returns the termination status of a thread. While a thread is
executing, its termination status is STILL_ACTIVE. When a thread terminates, its termination
status changes from STILL_ACTIVE to the exit code of the thread.
When a thread terminates, the state of the thread object changes to signaled, releasing any other
threads that had been waiting for the thread to terminate. When a thread terminates, its thread
object is not freed until all open handles to the thread are closed.
How Threads are Terminated
A thread executes until one of the following events occurs:
1. The thread calls the ExitThread() function.
2. Any thread of the process calls the ExitProcess() function.
3. The thread function returns.
4. Any thread calls the TerminateThread() function with a handle to the thread.
5. Any thread calls the TerminateProcess() function with a handle to the process.
The exit code for a thread is either the value specified in the call to ExitThread(), ExitProcess(),
TerminateThread(), or TerminateProcess(), or the value returned by the thread function.
If a thread is terminated by ExitThread(), the system calls the entry-point function of each
attached DLL with a value indicating that the thread is detaching from the DLL (unless you call
the DisableThreadLibraryCalls() function). If a thread is terminated by ExitProcess(), the DLL
entry-point functions are invoked once, to indicate that the process is detaching. DLLs are not
notified when a thread is terminated by TerminateThread() or TerminateProcess().
The TerminateThread() and TerminateProcess() functions should be used only in extreme
circumstances, since they do not allow threads to clean up, do not notify attached DLLs, and do

www.installsetupconfig.com
34
not free the initial stack. In addition, handles to objects owned by the thread are not closed until
the process terminates. The following steps provide a better solution:
1. Create an event object using the CreateEvent() function.
2. Create the threads.
3. Each thread monitors the event state by calling the WaitForSingleObject() function. Use
a wait time-out interval of zero.
4. Each thread terminates its own execution when the event is set to the signaled state
(WaitForSingleObject() returns WAIT_OBJECT_0).
Thread Security and Access Rights
Microsoft Windows enables you to control access to thread objects. You can specify a security
descriptor for a thread when you call the CreateProcess(), CreateProcessAsUser(),
CreateProcessWithLogonW(), CreateThread(), or CreateRemoteThread() function. If you
specify NULL, the thread gets a default security descriptor. The ACLs in the default security
descriptor for a thread come from the primary or impersonation token of the creator.
To retrieve a thread's security descriptor, call the GetSecurityInfo() function. To change a
thread's security descriptor, call the SetSecurityInfo() function.
The handle returned by the CreateThread() function has THREAD_ALL_ACCESS access to the
thread object. When you call the GetCurrentThread() function, the system returns a
pseudohandle with the maximum access that the thread's security descriptor allows the caller.
The valid access rights for thread objects include the standard access rights and some thread-
specific access rights. The following table lists the standard access rights used by all objects.
Value Meaning
DELETE
(0x00010000L) Required to delete the object.
READ_CONTROL
(0x00020000L)
Required to read information in the security descriptor for the object,
not including the information in the SACL. To read or write the SACL,
you must request the ACCESS_SYSTEM_SECURITY access right.
SYNCHRONIZE
(0x00100000L)
The right to use the object for synchronization. This enables a thread to
wait until the object is in the signaled state.
WRITE_DAC
(0x00040000L) Required to modify the DACL in the security descriptor for the object.
WRITE_OWNER
(0x00080000L) Required to change the owner in the security descriptor for the object.
The following table lists the thread-specific access rights.

www.installsetupconfig.com
35
Value Meaning
SYNCHRONIZE (0x00100000L) Enables the use of the thread handle in any of
the wait functions.
THREAD_ALL_ACCESS
All possible access rights for a thread object.
Windows Server 2003 and
Windows XP/2000: The size of the
THREAD_ALL_ACCESS flag increased on
Windows Server 2008 and Windows Vista. If
an application compiled for Windows
Server 2008 and Windows Vista is run on
Windows Server 2003 or Windows XP/2000,
the THREAD_ALL_ACCESS flag is too large
and the function specifying this flag fails with
ERROR_ACCESS_DENIED. To avoid this
problem, specify the minimum set of access
rights required for the operation. If
THREAD_ALL_ACCESS must be used, set
_WIN32_WINNT to the minimum operating
system targeted by your application (for
example,
#define _WIN32_WINNT
_WIN32_WINNT_WINXP
).
THREAD_DIRECT_IMPERSONATION
(0x0200)
Required for a server thread that impersonates
a client.
THREAD_GET_CONTEXT (0x0008) Required to read the context of a thread using
GetThreadContext().
THREAD_IMPERSONATE (0x0100)
Required to use a thread's security information
directly without calling it by using a
communication mechanism that provides
impersonation services.
THREAD_QUERY_INFORMATION
(0x0040)
Required to read certain information from the
thread object, such as the exit code (see
GetExitCodeThread()).
THREAD_QUERY_LIMITED_INFORMATI
ON (0x0800)
Required to read certain information from the
thread objects (see GetProcessIdOfThread()). A
handle that has the
THREAD_QUERY_INFORMATION access
right is automatically granted

www.installsetupconfig.com
36
THREAD_QUERY_LIMITED_INFORMATI
ON.
Windows Server 2003 and
Windows XP/2000: This access right is not
supported.
THREAD_SET_CONTEXT (0x0010) Required to write the context of a thread using
SetThreadContext().
THREAD_SET_INFORMATION (0x0020) Required to set certain information in the
thread object.
THREAD_SET_LIMITED_INFORMATION
(0x0400)
Required to set certain information in the
thread object. A handle that has the
THREAD_SET_INFORMATION access right
is automatically granted
THREAD_SET_LIMITED_INFORMATION.
Windows Server 2003 and
Windows XP/2000: This access right is not
supported.
THREAD_SET_THREAD_TOKEN (0x0080) Required to set the impersonation token for a
thread using SetThreadToken().
THREAD_SUSPEND_RESUME (0x0002) Required to suspend or resume a thread (see
SuspendThread() and ResumeThread()).
THREAD_TERMINATE (0x0001) Required to terminate a thread using
TerminateThread().
You can request the ACCESS_SYSTEM_SECURITY access right to a thread object if you want
to read or write the object's SACL.
Protected Processes
Windows Vista introduces protected processes to enhance support for Digital Rights
Management. The system restricts access to protected processes and the threads of protected
processes. The following specific access rights are not allowed from a process to the threads of a
protected process:
1. THREAD_ALL_ACCESS
2. THREAD_DIRECT_IMPERSONATION
3. THREAD_GET_CONTEXT
4. THREAD_IMPERSONATE
5. THREAD_QUERY_INFORMATION

www.installsetupconfig.com
37
6. THREAD_SET_CONTEXT
7. THREAD_SET_INFORMATION
8. THREAD_SET_TOKEN
9. THREAD_TERMINATE
The THREAD_QUERY_LIMITED_INFORMATION right was introduced to provide access to
a subset of the information available through THREAD_QUERY_INFORMATION.
Child Processes
Each process provides the resources needed to execute a program. A child process is a process
that is created by another process, called the parent process.
Creating Processes (With Code Example)
The CreateProcess() function creates a new process, which runs independently of the creating
process. However, for simplicity, the relationship is referred to as a parent-child relationship.
The following code example demonstrates how to create a process.
Create a new empty Win32 console application project. Give a suitable project name and change
the project location if needed.
Then, add the source file and give it a suitable name.
Next, add the following source code.
#include <windows.h>
#include <stdio.h>
#include <strsafe.h>
#include <wchar.h>
// Prototype
void ErrorHandler(LPTSTR lpszFunction);
// This wmain() is the main or parent process
int wmain(int argc, WCHAR *argv[])
{
STARTUPINFO si;
PROCESS_INFORMATION pi;
DWORD Ret = 0, dwPID = 0, dwTID = 0, dwPver = 0;
ZeroMemory(&si, sizeof(si));
si.cb = sizeof(si);
ZeroMemory(&pi, sizeof(pi));
// Validate the argument
if(argc != 2)
{
wprintf(L"Usage: %s [cmdline]\n", argv[0]);

www.installsetupconfig.com
38
return 1;
}
// Get parent process and...
dwPID = GetCurrentProcessId();
wprintf(L"wmain() process ID is %u\n", dwPID);
// What about the current thread?
dwTID = GetCurrentThreadId();
wprintf(L"wmain() thread ID is %u\n", dwTID);
// More info...
wprintf(L"Command line: %s\n", GetCommandLine());
// Other info
dwPver = GetProcessVersion(dwPID);
// or dwPver = GetProcessVersion(0);
wprintf(L"Process version: %u\n", dwPver);
// Start the child process
wprintf(L"Starting another process i.e. child process...\n");
if(!CreateProcess(NULL, // No module name (so use command line -
[cmdline])
argv[1], // Command line
NULL, // Process handle not inheritable
NULL, // Thread handle not inheritable
FALSE, // Set handle inheritance to FALSE
0, // No creation flags
NULL, // Use parent's environment block
NULL, // Use parent's starting directory
&si, // Pointer to STARTUPINFO structure
&pi ) // Pointer to PROCESS_INFORMATION structure
)
{
ErrorHandler(L"CreateProcess()");
return 1;
}
else
{
wprintf(L"CreateProcess() - child process was created
successfully!\n");
wprintf(L"Process ID is %u or %u\n", pi.dwProcessId,
GetProcessId(pi.hProcess));
wprintf(L"Thread ID is %u\n", pi.dwThreadId);
// Minimum is Vista, Windows 2003 for the following code
// wprintf(L" Thread ID is %u\n", GetThreadId(pi.hThread));
}
// Wait until child process exits.
wprintf(L"Waiting the child process exits...\n");
// The time-out interval, in milliseconds. If a nonzero value is
specified,
// the function waits until the object is signaled or the interval
elapses.
// If dwMilliseconds is zero, the function does not enter a wait state
if
// the object is not signaled; it always returns immediately. If
dwMilliseconds is INFINITE,

www.installsetupconfig.com
39
// the function will return only when the object is signaled.
Ret = WaitForSingleObject( pi.hProcess, INFINITE );
// WAIT_ABANDONED - 0x00000080L, WAIT_OBJECT_0 - 0x00000000L,
// WAIT_TIMEOUT - 0x00000102L, WAIT_FAILED - (DWORD)0xFFFFFFFF
wprintf(L"The WaitForSingleObject() return value is 0X%.8X\n", Ret);
// Close process and thread handles
wprintf(L"Closing the process and thread handles...\n");
if(CloseHandle(pi.hProcess) != 0)
wprintf(L"pi.hProcess handle was closed successfully!\n");
else
ErrorHandler(L"CloseHandle(pi.hProcess)");
if(CloseHandle(pi.hThread) != 0)
wprintf(L"pi.hThread handle was closed successfully!\n");
else
ErrorHandler(L"CloseHandle(pi.hThread)");
return 0;
}
// This just redundant, you can use the GetLastError() instead
void ErrorHandler(LPTSTR lpszFunction)
{
// Retrieve the system error message for the last-error code
LPVOID lpMsgBuf;
LPVOID lpDisplayBuf;
DWORD dw = GetLastError();
FormatMessage(
FORMAT_MESSAGE_ALLOCATE_BUFFER |
FORMAT_MESSAGE_FROM_SYSTEM |
FORMAT_MESSAGE_IGNORE_INSERTS,
NULL,
dw,
MAKELANGID(LANG_NEUTRAL, SUBLANG_DEFAULT),
(LPTSTR) &lpMsgBuf,
0, NULL );
// Display the error message
lpDisplayBuf = (LPVOID)LocalAlloc(LMEM_ZEROINIT,
(lstrlen((LPCTSTR) lpMsgBuf) + lstrlen((LPCTSTR) lpszFunction) +
40) * sizeof(WCHAR));
StringCchPrintf((LPTSTR)lpDisplayBuf,
LocalSize(lpDisplayBuf) / sizeof(WCHAR),
L"%s failed with error %u: %s",
lpszFunction, dw, lpMsgBuf);
MessageBox(NULL, (LPCTSTR)lpDisplayBuf, L"Error", MB_OK);
// Free error-handling buffer allocations
if(LocalFree(lpMsgBuf) == NULL)
wprintf(L"lpMsgBuf buffer freed!\n");
else
wprintf(L"Failed to free lpMsgBuf buffer, error %u\n",
GetLastError());

www.installsetupconfig.com
40
if(LocalFree(lpDisplayBuf) == NULL)
wprintf(L"lpDisplayBuf buffer freed!\n");
else
wprintf(L"Failed to free lpDisplayBuf buffer, error %u\n",
GetLastError());
}
Build and run the project. The following screenshot is a sample output when we use the calc
(calculator) as the argument. The Windows calculator program should be launched.
The following is the Windows calculator.
When we see through Windows Task Manager, we can see both processes and their threads
respectively.

www.installsetupconfig.com
41
When we close the calc program, the following screenshot shows the complete output.
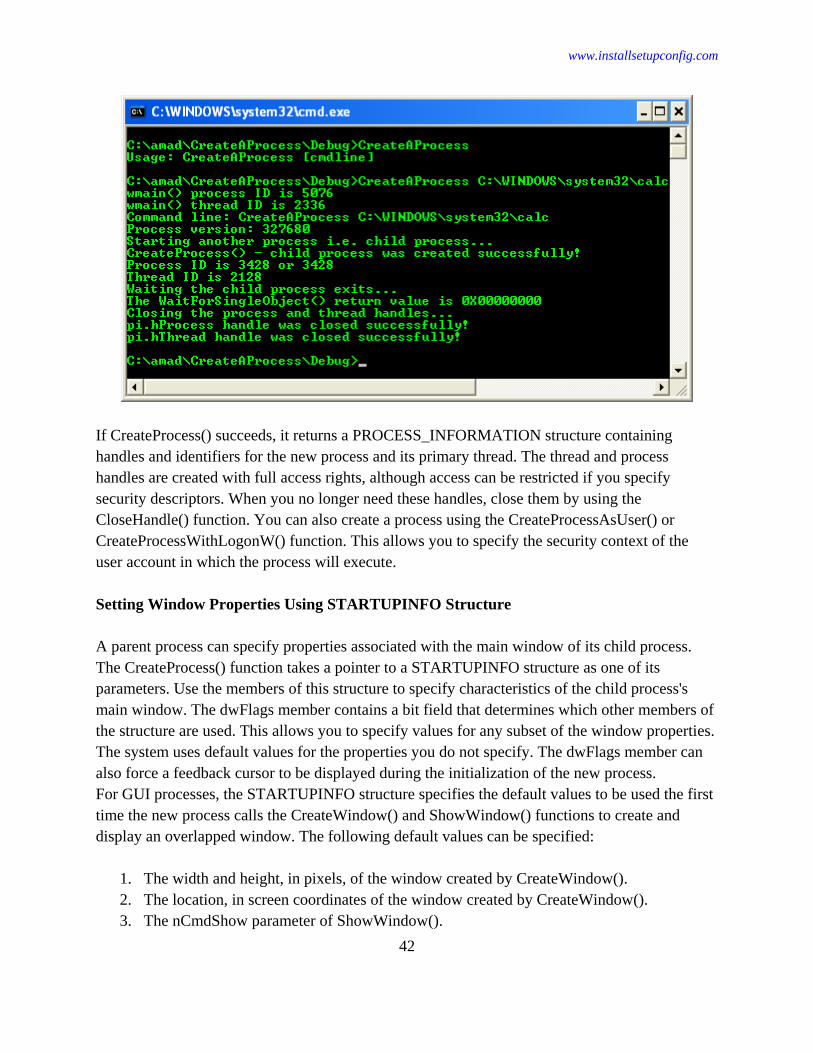
www.installsetupconfig.com
42
If CreateProcess() succeeds, it returns a PROCESS_INFORMATION structure containing
handles and identifiers for the new process and its primary thread. The thread and process
handles are created with full access rights, although access can be restricted if you specify
security descriptors. When you no longer need these handles, close them by using the
CloseHandle() function. You can also create a process using the CreateProcessAsUser() or
CreateProcessWithLogonW() function. This allows you to specify the security context of the
user account in which the process will execute.
Setting Window Properties Using STARTUPINFO Structure
A parent process can specify properties associated with the main window of its child process.
The CreateProcess() function takes a pointer to a STARTUPINFO structure as one of its
parameters. Use the members of this structure to specify characteristics of the child process's
main window. The dwFlags member contains a bit field that determines which other members of
the structure are used. This allows you to specify values for any subset of the window properties.
The system uses default values for the properties you do not specify. The dwFlags member can
also force a feedback cursor to be displayed during the initialization of the new process.
For GUI processes, the STARTUPINFO structure specifies the default values to be used the first
time the new process calls the CreateWindow() and ShowWindow() functions to create and
display an overlapped window. The following default values can be specified:
1. The width and height, in pixels, of the window created by CreateWindow().
2. The location, in screen coordinates of the window created by CreateWindow().
3. The nCmdShow parameter of ShowWindow().

www.installsetupconfig.com
43
For console processes, use the STARTUPINFO structure to specify window properties only
when creating a new console (either using CreateProcess() with CREATE_NEW_CONSOLE or
with the AllocConsole() function). The STARTUPINFO structure can be used to specify the
following console window properties:
1. The size of the new console window, in character cells.
2. The location of the new console window, in screen coordinates.
3. The size, in character cells, of the new console's screen buffer.
4. The text and background color attributes of the new console's screen buffer.
5. The title of the new console's window.
Process Handles and Identifiers
When a new process is created by the CreateProcess() function, handles of the new process and
its primary thread are returned. These handles are created with full access rights, and subject to
security access checking, can be used in any of the functions that accept thread or process
handles. These handles can be inherited by child processes, depending on the inheritance flag
specified when they are created. The handles are valid until closed, even after the process or
thread they represent has been terminated.
The CreateProcess() function also returns an identifier that uniquely identifies the process
throughout the system. A process can use the GetCurrentProcessId() function to get its own
process identifier (also known as the process ID or PID). The identifier is valid from the time the
process is created until the process has been terminated. A process can use the Process32First()
function to obtain the process identifier of its parent process.
If you have a process identifier, you can get the process handle by calling the OpenProcess()
function. OpenProcess() enables you to specify the handle's access rights and whether it can be
inherited.
A process can use the GetCurrentProcess() function to retrieve a pseudo handle to its own
process object. This pseudo handle is valid only for the calling process; it cannot be inherited or
duplicated for use by other processes. To get the real handle to the process, call the
DuplicateHandle() function.
Process Enumeration
All users have read access to the list of processes in the system and there are a number of
different functions that enumerate the active processes. The function you should use will depend
on factors such as desired platform support. The following functions are used to enumerate
processes.

www.installsetupconfig.com
44
Function Description
EnumProcesses() Retrieves the process identifier for each process object in the
system.
Process32First() Retrieves information about the first process encountered in a
system snapshot.
Process32Next() Retrieves information about the next process recorded in a system
snapshot.
WTSEnumerateProcesses() Retrieves information about the active processes on the specified
terminal server.
The toolhelp functions and EnumProcesses() enumerate all process. To list the processes that are
running in a specific user account, use WTSEnumerateProcesses() and filter on the user SID.
You can filter on the session ID to hide processes running in other terminal server sessions.
You can also filter processes by user account, regardless of the enumeration function, by calling
OpenProcess(), OpenProcessToken(), and GetTokenInformation() with TokenUser. However,
you cannot open a process that is protected by a security descriptor unless you have been granted
access.
Obtaining Additional Process Information
There are a variety of functions for obtaining information about processes. Some of these
functions can be used only for the calling process, because they do not take a process handle as a
parameter. You can use functions that take a process handle to obtain information about other
processes.
1. To obtain the command-line string for the current process, use the GetCommandLine()
function.
2. To retrieve the STARTUPINFO structure specified when the current process was created,
use the GetStartupInfo() function.
3. To obtain the version information from the executable header, use the
GetProcessVersion() function.
4. To obtain the full path and file name for the executable file containing the process code,
use the GetModuleFileName() function.
5. To obtain the count of handles to graphical user interface (GUI) objects in use, use the
GetGuiResources() function.
6. To determine whether a process is being debugged, use the IsDebuggerPresent() function.
7. To retrieve accounting information for all I/O operations performed by the process, use
the GetProcessIoCounters() function.

www.installsetupconfig.com
45
Inheritance
A child process can inherit several properties and resources from its parent process. You can also
prevent a child process from inheriting properties from its parent process. The following can be
inherited:
1. Open handles returned by the CreateFile() function. This includes handles to files,
console input buffers, console screen buffers, named pipes, serial communication
devices, and mailslots.
2. Open handles to process, thread, mutex, event, semaphore, named-pipe, anonymous-pipe,
and file-mapping objects. These are returned by the CreateProcess(), CreateThread(),
CreateMutex(), CreateEvent(), CreateSemaphore(), CreateNamedPipe(), CreatePipe(),
and CreateFileMapping() functions, respectively.
3. Environment variables.
4. The current directory.
5. The console, unless the process is detached or a new console is created. A child console
process can also inherits the parent's standard handles, as well as access to the input
buffer and the active screen buffer.
6. The error mode, as set by the SetErrorMode() function.
7. The process affinity mask.
8. The association with a job.
The child process does not inherit the following:
1. Priority class.
2. Handles returned by LocalAlloc(), GlobalAlloc(), HeapCreate(), and HeapAlloc().
3. Pseudo handles, as in the handles returned by the GetCurrentProcess() or
GetCurrentThread() function. These handles are valid only for the calling process.
4. DLL module handles returned by the LoadLibrary() function.
5. GDI or USER handles, such as HBITMAP or HMENU.
Inheriting Handles
A child process can inherit some of its parent's handles, but not inherit others. To cause a handle
to be inherited, you must do two things:
1. Specify that the handle is to be inherited when you create, open, or duplicate the handle.
Creation functions typically use the bInheritHandle member of a

www.installsetupconfig.com
46
SECURITY_ATTRIBUTES structure for this purpose. DuplicateHandle() uses the
bInheritHandles parameter.
2. Specify that inheritable handles are to be inherited by setting the bInheritHandles
parameter to TRUE when calling the CreateProcess() function. Additionally, to inherit
the standard input, standard output, and standard error handles, the dwFlags member of
the STARTUPINFO structure must include STARTF_USESTDHANDLES.
An inherited handle refers to the same object in the child process as it does in the parent process.
It also has the same value and access privileges. Therefore, when one process changes the state
of the object, the change affects both processes. To use a handle, the child process must retrieve
the handle value and "know" the object to which it refers. Usually, the parent process
communicates this information to the child process through its command line, environment
block, or some form of interprocess communication.
The DuplicateHandle() function is useful if a process has an inheritable open handle that you do
not want to be inherited by the child process. In this case, use DuplicateHandle() to open a
duplicate of the handle that cannot be inherited, then use the CloseHandle() function to close the
inheritable handle. You can also use the DuplicateHandle() function to open an inheritable
duplicate of a handle that cannot be inherited.
Inheriting Environment Variables
A child process inherits the environment variables of its parent process by default. However,
CreateProcess() enables the parent process to specify a different block of environment variables.
Inheriting the Current Directory
The GetCurrentDirectory() function retrieves the current directory of the calling process. A child
process inherits the current directory of its parent process by default. However, CreateProcess()
enables the parent process to specify a different current directory for the child process. To
change the current directory of the calling process, use the SetCurrentDirectory() function.
Environment Variables
Every process has an environment block that contains a set of environment variables and their
values. There are two types of environment variables: user environment variables (set for each
user) and system environment variables (set for everyone).
By default, a child process inherits the environment variables of its parent process. Programs
started by the command processor inherit the command processor's environment variables. To

www.installsetupconfig.com
47
specify a different environment for a child process, create a new environment block and pass a
pointer to it as a parameter to the CreateProcess() function.
The command processor provides the set command to display its environment block or to create
new environment variables. You can also view or modify the environment variables by selecting
System from the Control Panel, selecting Advanced system settings, and clicking
Environment Variables.

www.installsetupconfig.com
48
Each environment block contains the environment variables in the following format:
Var1=Value1\0
Var2=Value2\0
Var3=Value3\0
...
VarN=ValueN\0\0
The name of an environment variable cannot include an equal sign (=). The
GetEnvironmentStrings() function returns a pointer to the environment block of the calling
process. This should be treated as a read-only block; do not modify it directly. Instead, use the
SetEnvironmentVariable() function to change an environment variable. When you are finished
with the environment block obtained from GetEnvironmentStrings(), call the
FreeEnvironmentStrings() function to free the block.
Calling SetEnvironmentVariable() has no effect on the system environment variables. To
programmatically add or modify system environment variables, add them to the
HKEY_LOCAL_MACHINE\System\CurrentControlSet\Control\Session Manager\Environment
registry key, then broadcast a WM_SETTINGCHANGE message with lParam set to the string

www.installsetupconfig.com
49
"Environment". This allows applications, such as the shell, to pick up your updates. Note that the
values of the environment variables listed in this key are limited to 1024 characters.
The GetEnvironmentVariable() function determines whether a specified variable is defined in the
environment of the calling process, and, if so, what its value is.
To retrieve a copy of the environment block for a given user, use the CreateEnvironmentBlock()
function. To expand environment-variable strings, use the ExpandEnvironmentStrings()
function.
You can use the set command to manipulate the environment variables. The following
screenshots show some of the set command and options.

www.installsetupconfig.com
50
The following is the set command without any option(s).
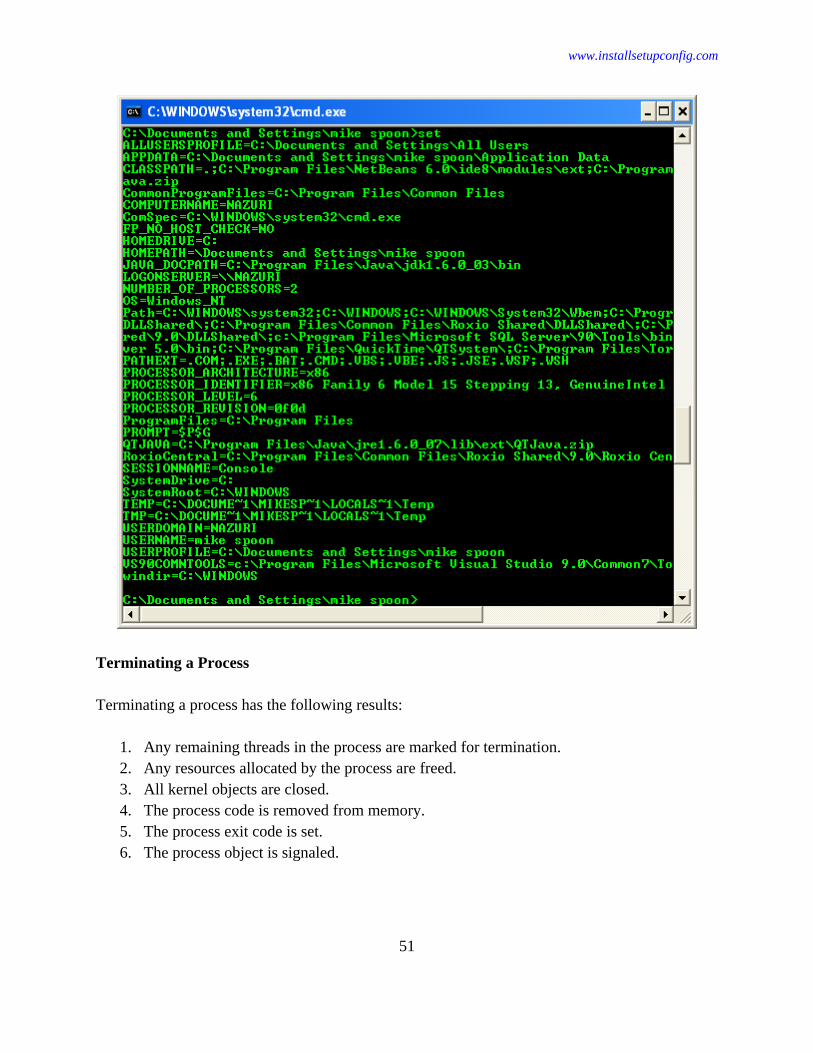
www.installsetupconfig.com
51
Terminating a Process
Terminating a process has the following results:
1. Any remaining threads in the process are marked for termination.
2. Any resources allocated by the process are freed.
3. All kernel objects are closed.
4. The process code is removed from memory.
5. The process exit code is set.
6. The process object is signaled.

www.installsetupconfig.com
52
While open handles to kernel objects are closed automatically when a process terminates, the
objects themselves exist until all open handles to them are closed. Therefore, an object will
remain valid after a process that is using it terminates if another process has an open handle to it.
The GetExitCodeProcess() function returns the termination status of a process. While a process
is executing, its termination status is STILL_ACTIVE. When a process terminates, its
termination status changes from STILL_ACTIVE to the exit code of the process.
When a process terminates, the state of the process object becomes signaled, releasing any
threads that had been waiting for the process to terminate.
When the system is terminating a process, it does not terminate any child processes that the
process has created. Terminating a process does not generate notifications for WH_CBT hook
procedures.
Use the SetProcessShutdownParameters() function to specify certain aspects of the process
termination at system shutdown, such as when a process should terminate relative to the other
processes in the system.
How Processes are Terminated
A process executes until one of the following events occurs:
1. Any thread of the process calls the ExitProcess() function. Note that some
implementation of the C run-time library (CRT) call ExitProcess if the primary thread of
the process returns.
2. The last thread of the process terminates.
3. Any thread calls the TerminateProcess() function with a handle to the process.
4. For console processes, the default console control handler calls ExitProcess() when the
console receives a CTRL+C or CTRL+BREAK signal.
5. The user shuts down the system or logs off.
Do not terminate a process unless its threads are in known states. If a thread is waiting on a
kernel object, it will not be terminated until the wait has completed. This can cause the
application to hang.
The primary thread can avoid terminating other threads by directing them to call ExitThread()
before causing the process to terminate. The primary thread can still call ExitProcess()
afterwards to ensure that all threads are terminated.
The exit code for a process is either the value specified in the call to ExitProcess() or
TerminateProcess(), or the value returned by the main or WinMain() function of the process. If a
process is terminated due to a fatal exception, the exit code is the value of the exception that
caused the termination. In addition, this value is used as the exit code for all the threads that were
executing when the exception occurred.

www.installsetupconfig.com
53
If a process is terminated by ExitProcess(), the system calls the entry-point function of each
attached DLL with a value indicating that the process is detaching from the DLL. DLLs are not
notified when a process is terminated by TerminateProcess().
If a process is terminated by TerminateProcess(), all threads of the process are terminated
immediately with no chance to run additional code. This means that the thread does not execute
code in termination handler blocks. In addition, no attached DLLs are notified that the process is
detaching. If you need to have one process terminate another process, the following steps provide
a better solution:
1. Have both processes call the RegisterWindowMessage() function to create a private
message.
2. One process can terminate the other process by broadcasting a private message using the
BroadcastSystemMessage() function as follows:
DWORD dwRecipients = BSM_APPLICATIONS;
UINT uMessage = PM_MYMSG;
WPARAM wParam = 0;
LPARAM lParam = 0;
BroadcastSystemMessage(
BSF_IGNORECURRENTTASK, // do not send message to this process
&dwRecipients, // broadcast only to applications
uMessage, // registered private message
wParam, // message-specific value
lParam ); // message-specific value
3. The process receiving the private message calls ExitProcess() to terminate its execution.
The execution of the ExitProcess(), ExitThread(), CreateThread(), CreateRemoteThread(), and
CreateProcess() functions is serialized within an address space. The following restrictions apply:
1. During process startup and DLL initialization routines, new threads can be created, but
they do not begin execution until DLL initialization is finished for the process.
2. Only one thread at a time can be in a DLL initialization or detach routine.
3. The ExitProcess() function does not return until there are no threads are in their DLL
initialization or detach routines.
Process Working Set
The working set of a program is a collection of those pages in its virtual address space that have
been recently referenced. It includes both shared and private data. The shared data includes pages
that contain all instructions your application executes, including those in your DLLs and the
system DLLs. As the working set size increases, memory demand increases.

www.installsetupconfig.com
54
A process has an associated minimum working set size and maximum working set size. Each
time you call CreateProcess(), it reserves the minimum working set size for the process. The
virtual memory manager attempts to keep enough memory for the minimum working set resident
when the process is active, but keeps no more than the maximum size.
To get the requested minimum and maximum sizes of the working set for your application, call
the GetProcessWorkingSetSize() function.
The system sets the default working set sizes. You can also modify the working set sizes using
the SetProcessWorkingSetSize() function. Setting these values is not a guarantee that the
memory will be reserved or resident. Be careful about requesting too large a minimum or
maximum working set size, because doing so can degrade system performance. To obtain the
current or peak size of the working set for your process, use the GetProcessMemoryInfo()
function.
Process Security and Access Rights
The Microsoft Windows security model enables you to control access to process objects. When a
user logs in, the system collects a set of data that uniquely identifies the user during the
authentication process, and stores it in an access token. This access token describes the security
context of all processes associated with the user. The security context of a process is the set of
credentials given to the process or the user account that created the process. You can use a token
to specify the current security context for a process using the CreateProcessWithTokenW()
function. You can specify a security descriptor for a process when you call the CreateProcess(),
CreateProcessAsUser(), or CreateProcessWithLogonW() function. If you specify NULL, the
process gets a default security descriptor. The ACLs in the default security descriptor for a
process come from the primary or impersonation token of the creator.
To retrieve a process's security descriptor, call the GetSecurityInfo() function. To change a
process's security descriptor, call the SetSecurityInfo() function.
The valid access rights for process objects include the standard access rights and some process-
specific access rights. The following table lists the standard access rights used by all objects.
Value Meaning
DELETE
(0x00010000L) Required to delete the object.
READ_CONTROL
(0x00020000L)
Required to read information in the security descriptor for the object,
not including the information in the SACL. To read or write the SACL,
you must request the ACCESS_SYSTEM_SECURITY access right.
SYNCHRONIZE
(0x00100000L)
The right to use the object for synchronization. This enables a thread to
wait until the object is in the signaled state.
WRITE_DAC Required to modify the DACL in the security descriptor for the object.

www.installsetupconfig.com
55
(0x00040000L)
WRITE_OWNER
(0x00080000L) Required to change the owner in the security descriptor for the object.
The following table lists the process-specific access rights.
Value Meaning
PROCESS_ALL_ACCESS
All possible access rights for a process object.
Windows Server 2003 and
Windows XP/2000: The size of the
PROCESS_ALL_ACCESS flag increased on
Windows Server 2008 and Windows Vista. If
an application compiled for Windows
Server 2008 and Windows Vista is run on
Windows Server 2003 or Windows XP/2000,
the PROCESS_ALL_ACCESS flag is too large
and the function specifying this flag fails with
ERROR_ACCESS_DENIED. To avoid this
problem, specify the minimum set of access
rights required for the operation. If
PROCESS_ALL_ACCESS must be used, set
_WIN32_WINNT to the minimum operating
system targeted by your application (for
example,
#define _WIN32_WINNT
_WIN32_WINNT_WINXP
).
PROCESS_CREATE_PROCESS (0x0080) Required to create a process.
PROCESS_CREATE_THREAD (0x0002) Required to create a thread.
PROCESS_DUP_HANDLE (0x0040) Required to duplicate a handle using
DuplicateHandle().
PROCESS_QUERY_INFORMATION
(0x0400)
Required to retrieve certain information about a
process, such as its token, exit code, and
priority class (see OpenProcessToken(),
GetExitCodeProcess(), GetPriorityClass(), and
IsProcessInJob()).
PROCESS_QUERY_LIMITED_INFORMAT
ION (0x1000)
Required to retrieve certain information about a
process (see QueryFullProcessImageName()).
A handle that has the

www.installsetupconfig.com
56
PROCESS_QUERY_INFORMATION access
right is automatically granted
PROCESS_QUERY_LIMITED_INFORMATI
ON.
Windows Server 2003 and
Windows XP/2000: This access right is not
supported.
PROCESS_SET_INFORMATION (0x0200)
Required to set certain information about a
process, such as its priority class (see
SetPriorityClass()).
PROCESS_SET_QUOTA (0x0100) Required to set memory limits using
SetProcessWorkingSetSize().
PROCESS_SUSPEND_RESUME (0x0800) Required to suspend or resume a process.
PROCESS_TERMINATE (0x0001) Required to terminate a process using
TerminateProcess().
PROCESS_VM_OPERATION (0x0008)
Required to perform an operation on the
address space of a process (see
VirtualProtectEx() and
WriteProcessMemory()).
PROCESS_VM_READ (0x0010) Required to read memory in a process using
ReadProcessMemory().
PROCESS_VM_WRITE (0x0020) Required to write to memory in a process using
WriteProcessMemory().
SYNCHRONIZE (0x00100000L) Required to wait for the process to terminate
using the wait functions.
To open a handle to another process and obtain full access rights, you must enable the
SeDebugPrivilege privilege.
The handle returned by the CreateProcess() function has PROCESS_ALL_ACCESS access to
the process object. When you call the OpenProcess() function, the system checks the requested
access rights against the DACL in the process's security descriptor. When you call the
GetCurrentProcess() function, the system returns a pseudohandle with the maximum access that
the DACL allows to the caller.
You can request the ACCESS_SYSTEM_SECURITY access right to a process object if you
want to read or write the object's SACL.
Warning: A process that has some of the access rights noted here can use them to gain other
access rights. For example, if process A has a handle to process B with
PROCESS_DUP_HANDLE access, it can duplicate the pseudo handle for process B. This
creates a handle that has maximum access to process B.

www.installsetupconfig.com
57
Protected Processes
Windows Vista introduces protected processes to enhance support for Digital Rights
Management. The system restricts access to protected processes and the threads of protected
processes. The following standard access rights are not allowed from a process to a protected
process:
1. DELETE
2. READ_CONTROL
3. WRITE_DAC
4. WRITE_OWNER
The following specific access rights are not allowed from a process to a protected process:
1. PROCESS_ALL_ACCESS
2. PROCESS_CREATE_PROCESS
3. PROCESS_CREATE_THREAD
4. PROCESS_DUP_HANDLE
5. PROCESS_QUERY_INFORMATION
6. PROCESS_SET_INFORMATION
7. PROCESS_SET_QUOTA
8. PROCESS_VM_OPERATION
9. PROCESS_VM_READ
10. PROCESS_VM_WRITE
The PROCESS_QUERY_LIMITED_INFORMATION right was introduced to provide access to
a subset of the information available through PROCESS_QUERY_INFORMATION.
Thread Pools
A thread pool is a collection of worker threads that efficiently execute asynchronous callbacks on
behalf of the application. The thread pool is primarily used to reduce the number of application
threads and provide management of the worker threads. Applications can queue work items,
associate work with waitable handles, automatically queue based on a timer, and bind with I/O.
Thread Pool Architecture
The following applications can benefit from using a thread pool:

www.installsetupconfig.com
58
1. An application that is highly parallel and can dispatch a large number of small work
items asynchronously (such as distributed index search or network I/O).
2. An application that creates and destroys a large number of threads that each run for a
short time. Using the thread pool can reduce the complexity of thread management and
the overhead involved in thread creation and destruction.
3. An application that processes independent work items in the background and in parallel
(such as loading multiple tabs).
4. An application that must perform an exclusive wait on kernel objects or block on
incoming events on an object. Using the thread pool can reduce the complexity of thread
management and increase performance by reducing the number of context switches.
5. An application that creates custom waiter threads to wait on events.
The original thread pool has been completely rearchitected in Windows Vista. The new thread
pool is improved because it provides a single worker thread type (supports both I/O and non-
I/O), does not use a timer thread, provides a single timer queue, and provides a dedicated
persistent thread. It also provides clean-up groups, higher performance, multiple pools per
process that are scheduled independently, and a new thread pool API. The thread pool
architecture consists of the following:
1. Worker threads that execute the callback functions
2. Waiter threads that wait on multiple wait handles
3. A work queue
4. A default thread pool for each process
5. A worker factory that manages the worker threads
Best Practices
The new thread pool API provides more flexibility and control than the original thread pool API.
However, there are a few subtle but important differences. In the original API, the wait reset was
automatic; in the new API, the wait must be explicitly reset each time. The original API handled
impersonation automatically, transferring the security context of the calling process to the thread.
With the new API, the application must explicitly set the security context.
The following are best practices when using a thread pool:
1. The threads of a process share the thread pool. A single worker thread can execute
multiple callback functions, one at a time. These worker threads are managed by the
thread pool. Therefore, do not terminate a thread from the thread pool by calling
TerminateThread() on the thread or by calling ExitThread() from a callback function.

www.installsetupconfig.com
59
2. An I/O request can run on any thread in the thread pool. Canceling I/O on a thread pool
thread requires synchronization because the cancel function might run on a different
thread than the one that is handling the I/O request, which can result in cancellation of an
unknown operation. To avoid this, always provide the OVERLAPPED structure with
which an I/O request was initiated when calling CancelIoEx() for asynchronous I/O, or
use your own synchronization to ensure that no other I/O can be started on the target
thread before calling either the CancelSynchronousIo() or CancelIoEx() function.
3. Clean up all resources created in the callback function before returning from the function.
These include TLS, security contexts, thread priority, and COM registration. Callback
functions must also restore the thread state before returning.
4. Keep wait handles and their associated objects alive until the thread pool has signaled
that it is finished with the handle.
5. Mark all threads that are waiting on lengthy operations (such as I/O flushes or resource
cleanup) so that the thread pool can allocate new threads instead of waiting for this one.
6. Before unloading a DLL that uses the thread pool, cancel all work items, I/O, wait
operations, and timers, and wait for executing callbacks to complete.
7. Avoid deadlocks by eliminating dependencies between work items and between
callbacks, by ensuring a callback is not waiting for itself to complete, and by preserving
the thread priority.
8. Do not queue too many items too quickly in a process with other components using the
default thread pool. There is one default thread pool per process, including Svchost.exe.
By default, each thread pool has a maximum of 500 worker threads. The thread pool
attempts to create more worker threads when the number of worker threads in the
ready/running state must be less than the number of processors.
9. Avoid the COM single-threaded apartment model, as it is incompatible with the thread
pool. STA creates thread state which can affect the next work item for the thread. STA is
generally long-lived and has thread affinity, which is the opposite of the thread pool.
10. Create a new thread pool to control thread priority and isolation, create custom
characteristics, and possibly improve responsiveness. However, additional thread pools
require more system resources (threads, kernel memory). Too many pools increases the
potential for CPU contention.
11. Use the thread pool debugger extension, !tp. This command has the following usage:
a. pool address flags
b. obj address flags
c. tqueue address flags
d. waiter address
e. worker address

www.installsetupconfig.com
60
For pool, waiter, and worker, if the address is zero, the command dumps all objects. For
waiter and worker, omitting the address dumps the current thread. The following flags are
defined: 0x1 (single-line output), 0x2 (dump members), and 0x4 (dump pool work
queue).
Job Objects
A job object allows groups of processes to be managed as a unit. Job objects are namable,
securable, sharable objects that control attributes of the processes associated with them.
Operations performed on the job object affect all processes associated with the job object.
To create a job object, use the CreateJobObject() function. When the job is created, there are no
associated processes. To associate a process with a job, use the AssignProcessToJobObject()
function. A process can be associated only with a single job. After you associate a process with a
job, the association cannot be broken. By default, processes created using CreateProcess() by a
process associated with a job are associated with the job; however, processes created using
Win32_Process.Create() are not associated with the job.
If a job has the extended limit JOB_OBJECT_LIMIT_BREAKAWAY_OK and a process
associated with the job was created with the CREATE_BREAKAWAY_FROM_JOB flag, its
child processes are not associated with the job. If the job has the extended limit
JOB_OBJECT_LIMIT_SILENT_BREAKAWAY_OK, no child processes are associated with
the job.
To determine if a process is running in a job, use the IsProcessInJob() function.
A job can enforce limits on each associated process, such as the working set size, process
priority, end-of-job time limit, and so on. To set limits for a job object, use the
SetInformationJobObject() function. If a process associated with a job attempts to increase its
working set size or process priority, the function calls are silently ignored.
The job object also records basic accounting information for all its associated processes,
including those that have terminated. To retrieve this accounting information, use the
QueryInformationJobObject() function. To terminate all processes currently associated with a
job object, use the TerminateJobObject() function.
To obtain a handle for an existing job object, use the OpenJobObject() function and specify the
name given to the object when it was created. Only named job objects can be opened.
To close a job object handle, use the CloseHandle() function. The job is destroyed when its last
handle has been closed and all associated processes have been terminated. However, if the job
has the JOB_OBJECT_LIMIT_KILL_ON_JOB_CLOSE flag specified, closing the last job
object handle terminates all associated processes and then destroys the job object itself.
If a tool is to manage a process tree that uses job objects, both the tool and the members of the
process tree must cooperate. Use one of the following options:

www.installsetupconfig.com
61
1. The tool could use the JOB_OBJECT_LIMIT_SILENT_BREAKAWAY_OK limit. If
the tool uses this limit, it cannot monitor an entire process tree. The tool can monitor only
the processes it adds to the job. If these processes create child processes, they are not
associated with the job. In this option, child processes can be associated with other job
objects.
2. The tool could use the JOB_OBJECT_LIMIT_BREAKAWAY_OK limit. If the tool uses
this limit, it can monitor the entire process tree, except for those processes that any
member of the tree explicitly breaks away from the tree. A member of the tree can create
a child process in a new job object by calling the CreateProcess() function with the
CREATE_BREAKAWAY_FROM_JOB flag, then calling the
AssignProcessToJobObject() function. Otherwise, the member must handle cases in
which AssignProcessToJobObject() fails. The CREATE_BREAKAWAY_FROM_JOB
flag has no effect if the tree is not being monitored by the tool. Therefore, this is the
preferred option, but it requires advance knowledge of the processes being monitored.
3. The tool could prevent breakaways of any kind by setting neither the
JOB_OBJECT_LIMIT_BREAKAWAY_OK nor the
JOB_OBJECT_LIMIT_SILENT_BREAKAWAY_OK limit. In this option, the tool can
monitor the entire process tree. However, if a child process attempts to associate itself or
another child process with a job by calling AssignProcessToJobObject(), the call will fail.
If the process was designed to be associated with a specific job, this failure may prevent
the process from working properly.
User-Mode Scheduling
User-mode scheduling (UMS) is a light-weight mechanism that applications can use to schedule
their own threads. An application can switch between UMS threads in user mode without
involving the system scheduler and regain control of the processor if a UMS thread blocks in the
kernel. UMS threads differ from fibers in that each UMS thread has its own thread context
instead of sharing the thread context of a single thread. The ability to switch between threads in
user mode makes UMS more efficient than thread pools for managing large numbers of short-
duration work items that require few system calls.
UMS is recommended for applications with high performance requirements that need to
efficiently run many threads concurrently on multiprocessor or multicore systems. To take
advantage of UMS, an application must implement a scheduler component that manages the
application's UMS threads and determines when they should run. Developers should consider
whether their application performance requirements justify the work involved in developing such
a component. Applications with moderate performance requirements might be better served by
allowing the system scheduler to schedule their threads.

www.installsetupconfig.com
62
UMS is available starting with 64-bit versions of Windows 7 and Windows Server 2008 R2. This
feature is not available on 32-bit versions of Windows.
UMS Scheduler
An application's UMS scheduler is responsible for creating, managing, and deleting UMS
threads and determining which UMS thread to run. An application's scheduler performs the
following tasks:
1. Creates one UMS scheduler thread for each processor on which the application will run
UMS worker threads.
2. Creates UMS worker threads to perform the work of the application.
3. Maintains its own ready-thread queue of worker threads that are ready to run, and selects
threads to run based on the application's scheduling policies.
4. Creates and monitors one or more completion lists where the system queues threads after
they finish processing in the kernel. These include newly created worker threads and
threads previously blocked on a system call that become unblocked.
5. Provides a scheduler entry point function to handles notifications from the system. The
system calls the entry point function when a scheduler thread is created, when a worker
thread blocks on a system call, or when a worker thread explicitly yields control.
6. Performs cleanup tasks for worker threads that have finished running.
7. Performs an orderly shutdown of the scheduler when requested by the application.
UMS Scheduler Thread
A UMS scheduler thread is an ordinary thread that has converted itself to UMS by calling the
EnterUmsSchedulingMode() function. The system scheduler determines when the UMS
scheduler thread runs based on its priority relative to other ready threads. The processor on
which the scheduler thread runs is influenced by the thread's affinity, same as for non-UMS
threads.
The caller of EnterUmsSchedulingMode() specifies a completion list and a UmsSchedulerProc()
entry point function to associate with the UMS scheduler thread. The system calls the specified
entry point function when it is finished converting the calling thread to UMS. The scheduler
entry point function is responsible for determining the appropriate next action for the specified
thread.
An application might create one UMS scheduler thread for each processor that will be used to
run UMS threads. The application might also set the affinity of each UMS scheduler thread for a
specific logical processor, which tends to exclude unrelated threads from running on that
processor, effectively reserving it for that scheduler thread. Be aware that setting thread affinity

www.installsetupconfig.com
63
in this way can affect overall system performance by starving other processes that may be
running on the system.
UMS Worker Threads, Thread Contexts, and Completion Lists
A UMS worker thread is created by calling CreateRemoteThreadEx() with the
PROC_THREAD_ATTRIBUTE_UMS_THREAD attribute and specifying a UMS thread
context and a completion list.
A UMS thread context represents the UMS thread state of a worker thread and is used to identify
the worker thread in UMS function calls. It is created by calling CreateUmsThreadContext().
A completion list is created by calling the CreateUmsCompletionList() function. A completion
list receives UMS worker threads that have completed execution in the kernel and are ready to
run in user mode. Only the system can queue worker threads to a completion list. New UMS
worker threads are automatically queued to the completion list specified when the threads were
created. Previously blocked worker threads are also queued to the completion list when they are
no longer blocked.
Each UMS scheduler thread is associated with a single completion list. However, the same
completion list can be associated with any number of UMS scheduler threads, and a scheduler
thread can retrieve UMS contexts from any completion list for which it has a pointer.
Each completion list has an associated event that is signaled by the system when it queues one or
more worker threads to an empty list. The GetUmsCompletionListEvent() function retrieves a
handle to the event for a specified completion list. An application can wait on more than one
completion list event along with other events that make sense for the application.
UMS Scheduler Entry Point Function
An application's scheduler entry point function is implemented as a UmsSchedulerProc()
function. The system calls the application's scheduler entry point function at the following times:
1. When a non-UMS thread is converted to a UMS scheduler thread by calling
EnterUmsSchedulingMode().
2. When a UMS worker thread calls UmsThreadYield().
3. When a UMS worker thread blocks on a system service such as a system call or a page
fault.
The Reason parameter of the UmsSchedulerProc() function specifies the reason that the entry
point function was called. If the entry point function was called because a new UMS scheduler
thread was created, the SchedulerParam parameter contains data specified by the caller of
EnterUmsSchedulingMode(). If the entry point function was called because a UMS worker
www.installsetupconfig.com
64
thread yielded, the SchedulerParam parameter contains data specified by the caller of
UmsThreadYield(). If the entry point function was called because a UMS worker thread blocked
in the kernel, the SchedulerParam parameter is NULL.
The scheduler entry point function is responsible for determining the appropriate next action for
the specified thread. For example, if a worker thread is blocked, the scheduler entry point
function might run the next available ready UMS worker thread.
When the scheduler entry point function is called, the application's scheduler should attempt to
retrieve all of the items in its associated completion list by calling the
DequeueUmsCompletionListItems() function. This function retrieves a list of UMS thread
contexts that have finished processing in the kernel and are ready to run in user mode. The
application's scheduler should not run UMS threads directly from this list because this can cause
unpredictable behavior in the application. Instead, the scheduler should retrieve all UMS thread
contexts by calling the GetNextUmsListItem() function once for each context, insert the UMS
thread contexts in the scheduler’s ready thread queue, and only then run UMS threads from the
ready thread queue. If the scheduler does not need to wait on multiple events, it should call
DequeueUmsCompletionListItems() with a non-zero timeout parameter so the function waits on
the completion list event before returning. If the scheduler does need to wait on multiple
completion list events, it should call DequeueUmsCompletionListItems() with a timeout
parameter of zero so the function returns immediately, even if the completion list is empty. In
this case, the scheduler can wait explicitly on completion list events, for example, by using
WaitForMultipleObjects().
UMS Thread Execution
A newly created UMS worker thread is queued to the specified completion list and does not
begin running until the application's UMS scheduler selects it to run. This differs from non-UMS
threads, which the system scheduler automatically schedules to run unless the caller explicitly
creates the thread suspended.
The scheduler runs a worker thread by calling ExecuteUmsThread() with the worker thread's
UMS context. A UMS worker thread runs until it yields by calling the UmsThreadYield()
function, blocks, or terminates.
UMS Best Practices
Applications that implement UMS should follow these best practices:
1. The underlying structures for UMS thread contexts are managed by the system and
should not be modified directly. Instead, use QueryUmsThreadInformation() and
SetUmsThreadInformation() to retrieve and set information about a UMS worker thread.

www.installsetupconfig.com
65
2. To help prevent deadlocks, the UMS scheduler thread should not share locks with UMS
worker threads. This includes both application-created locks and system locks that are
acquired indirectly by operations such as allocating from the heap or loading DLLs. For
example, suppose the scheduler runs a UMS worker thread that loads a DLL. The worker
thread acquires the loader lock and blocks. The system calls the scheduler entry point
function, which runs another worker thread that loads a DLL. This causes a deadlock,
because the loader lock is already held and cannot be released until the first thread
unblocks. To help avoid this problem, delegate work that might share locks with UMS
worker threads to a dedicated UMS worker thread or a non-UMS thread.
3. UMS is most efficient when most processing is done in user mode. Whenever possible,
avoid making system calls in UMS worker threads.
4. UMS worker threads should not assume the system scheduler is being used. This
assumption can have subtle effects; for example, if a thread in the unknown code sets a
thread priority or affinity, the UMS scheduler might still override it. Code that assumes
the system scheduler is being used may not behave as expected and may break when
called by a UMS thread.
5. The system may need to lock the thread context of a UMS worker thread. For example, a
kernel-mode asynchronous procedure call (APC) might change the context of the UMS
thread, so the thread context must be locked. If the scheduler tries to execute the UMS
thread context while it is locked, the call will fail. This behavior is by design, and the
scheduler should be designed to retry access to the UMS thread context.
Fibers
A fiber is a unit of execution that must be manually scheduled by the application. Fibers
run in the context of the threads that schedule them. Each thread can schedule multiple
fibers. In general, fibers do not provide advantages over a well-designed multithreaded
application. However, using fibers can make it easier to port applications that were designed to
schedule their own threads.
From a system standpoint, a fiber assumes the identity of the thread that runs it. For example, if a
fiber accesses thread local storage (TLS), it is accessing the thread local storage of the thread that
is running it. In addition, if a fiber calls the ExitThread() function, the thread that is running it
exits. However, a fiber does not have all the same state information associated with it as that
associated with a thread. The only state information maintained for a fiber is its stack, a subset of
its registers, and the fiber data provided during fiber creation. The saved registers are the set of
registers typically preserved across a function call.
Fibers are not preemptively scheduled. You schedule a fiber by switching to it from another
fiber. The system still schedules threads to run. When a thread running fibers is preempted, its
currently running fiber is preempted but remains selected. The selected fiber runs when its thread
runs.

www.installsetupconfig.com
66
Before scheduling the first fiber, call the ConvertThreadToFiber() function to create an area in
which to save fiber state information. The calling thread is now the currently executing fiber.
The stored state information for this fiber includes the fiber data passed as an argument to
ConvertThreadToFiber().
The CreateFiber() function is used to create a new fiber from an existing fiber; the call requires
the stack size, the starting address, and the fiber data. The starting address is typically a user-
supplied function, called the fiber function, that takes one parameter (the fiber data) and does not
return a value. If your fiber function returns, the thread running the fiber exits. To execute any
fiber created with CreateFiber(), call the SwitchToFiber() function. You can call
SwitchToFiber() with the address of a fiber created by a different thread. To do this, you must
have the address returned to the other thread when it called CreateFiber and you must use proper
synchronization.
A fiber can retrieve the fiber data by calling the GetFiberData() macro. A fiber can retrieve the
fiber address at any time by calling the GetCurrentFiber() macro.
Fiber Local Storage
A fiber can use fiber local storage (FLS) to create a unique copy of a variable for each fiber. If
no fiber switching occurs, FLS acts exactly the same as thread local storage. The FLS functions (
FlsAlloc(), FlsFree(), FlsGetValue(), and FlsSetValue()) manipulate the FLS associated with the
current thread. If the thread is executing a fiber and the fiber is switched, the FLS is also
switched.
To clean up the data associated with a fiber, call the DeleteFiber() function. This data includes
the stack, a subset of the registers, and the fiber data. If the currently running fiber calls
DeleteFiber(), its thread calls ExitThread() and terminates. However, if the selected fiber of a
thread is deleted by a fiber running in another thread, the thread with the deleted fiber is likely to
terminate abnormally because the fiber stack has been freed.
Creating Processes Program Example
The CreateProcess() function creates a new process, which runs independently of the creating
process. However, for simplicity, the relationship is referred to as a parent-child relationship.
The following code demonstrates how to create a process.
Create a new empty Win32 console application project. Give a suitable project name and change
the project location if needed.
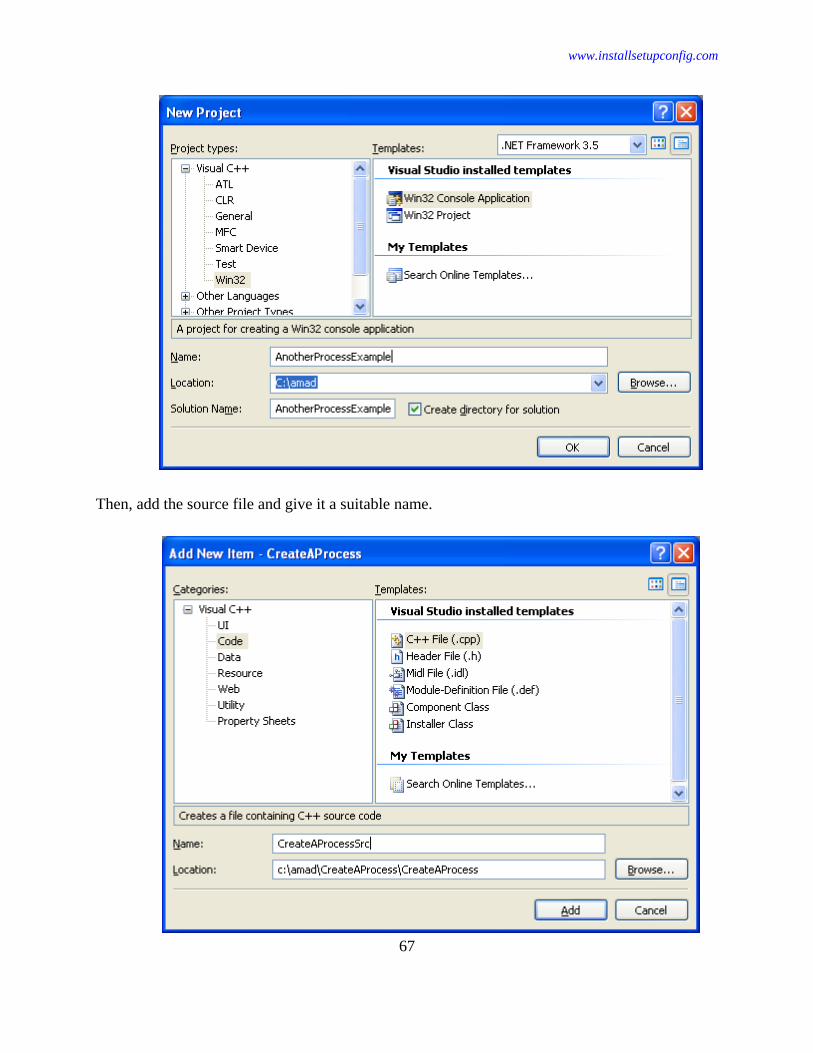
www.installsetupconfig.com
67
Then, add the source file and give it a suitable name.

www.installsetupconfig.com
68
Next, add the following source code.
#include <windows.h>
#include <stdio.h>
#include <strsafe.h>
// Prototype
void ErrorHandler(LPTSTR lpszFunction);
// This wmain() is the main or parent process
int wmain(int argc, WCHAR *argv[])
{
STARTUPINFO si;
PROCESS_INFORMATION pi;
DWORD Ret = 0;
// The parent process and thread IDs
wprintf(L"Parent process ID: %u\n", GetCurrentProcessId());
wprintf(L"Parent thread ID: %u\n", GetCurrentThreadId());
ZeroMemory(&si, sizeof(si));
si.cb = sizeof(si);
ZeroMemory(&pi, sizeof(pi));
if(argc != 2)
{
wprintf(L"Usage: %s [cmdline]\n", argv[0]);
wprintf(L"Example: %s \"C:\\WINDOWS\\system32\\ipconfig
/all\"\n", argv[0]);
return 1;
}
// Start the child process
wprintf(L"Starting child process...\n");
if( !CreateProcess( NULL, // No module name (so use command line)
argv[1], // Command line
NULL, // Process handle not inheritable
NULL, // Thread handle not inheritable
FALSE, // Set handle inheritance to FALSE
0, // No creation flags
NULL, // Use parent's environment block
NULL, // Use parent's starting directory
&si, // Pointer to STARTUPINFO structure
&pi ) // Pointer to PROCESS_INFORMATION structure
)
{
ErrorHandler(L"CreateProcess()");
return 1;
}
else
{
wprintf(L"CreateProcess() - child process was created
successfully!\n");

www.installsetupconfig.com
69
// The child process and thread IDs
wprintf(L"Child process ID: %u\n", pi.dwProcessId);
wprintf(L"Child thread ID: %u\n", pi.dwThreadId);
}
// Wait until child process exits.
wprintf(L"Waiting the child process exits...\n");
// The time-out interval, in milliseconds. If a nonzero value is
specified,
// the function waits until the object is signaled or the interval
elapses.
// If dwMilliseconds is zero, the function does not enter a wait state
if
// the object is not signaled; it always returns immediately. If
dwMilliseconds is INFINITE,
// the function will return only when the object is signaled.
Ret = WaitForSingleObject( pi.hProcess, INFINITE );
// WAIT_ABANDONED - 0x00000080L, WAIT_OBJECT_0 - 0x00000000L,
// WAIT_TIMEOUT - 0x00000102L, WAIT_FAILED - (DWORD)0xFFFFFFFF
wprintf(L"The WaitForSingleObject() return value is 0X%.8X\n", Ret);
// Close process and thread handles
wprintf(L"Closing the process and thread handles...\n");
if(CloseHandle(pi.hProcess) != 0)
wprintf(L"pi.hProcess handle was closed...\n");
else
ErrorHandler(L"CloseHandle(pi.hProcess)");
if(CloseHandle(pi.hThread) != 0)
wprintf(L"pi.hThread handle was closed...\n");
else
ErrorHandler(L"CloseHandle(pi.hProcess)");
}
void ErrorHandler(LPTSTR lpszFunction)
{
// Retrieve the system error message for the last-error code
LPVOID lpMsgBuf;
LPVOID lpDisplayBuf;
DWORD dw = GetLastError();
FormatMessage(
FORMAT_MESSAGE_ALLOCATE_BUFFER |
FORMAT_MESSAGE_FROM_SYSTEM |
FORMAT_MESSAGE_IGNORE_INSERTS,
NULL,
dw,
MAKELANGID(LANG_NEUTRAL, SUBLANG_DEFAULT),
(LPTSTR) &lpMsgBuf,
0, NULL );
// Display the error message
lpDisplayBuf = (LPVOID)LocalAlloc(LMEM_ZEROINIT,
(lstrlen((LPCTSTR) lpMsgBuf) + lstrlen((LPCTSTR) lpszFunction) +
40) * sizeof(WCHAR));
StringCchPrintf((LPTSTR)lpDisplayBuf,

www.installsetupconfig.com
70
LocalSize(lpDisplayBuf) / sizeof(WCHAR),
L"%s failed with error %d: %s",
lpszFunction, dw, lpMsgBuf);
MessageBox(NULL, (LPCTSTR) lpDisplayBuf, L"Error", MB_OK);
// Free error-handling buffer allocations
LocalFree(lpMsgBuf);
LocalFree(lpDisplayBuf);
}
Build and run the project. The following screenshot is a sample output without any argument.
Build and run the project. The following screenshot is a sample output with an argument that
invoking the ipconfig /all command.

www.installsetupconfig.com
71
The following is another portion of the output.

www.installsetupconfig.com
72
If CreateProcess() succeeds, it returns a PROCESS_INFORMATION structure containing
handles and identifiers for the new process and its primary thread. The thread and process
handles are created with full access rights, although access can be restricted if you specify
security descriptors. When you no longer need these handles, close them by using the
CloseHandle() function. You can also create a process using the CreateProcessAsUser() or
CreateProcessWithLogonW() function. This allows you to specify the security context of the
user account in which the process will execute.
Creating Threads Program Example
The CreateThread() function creates a new thread for a process. The creating thread must specify
the starting address of the code that the new thread is to execute. Typically, the starting address
is the name of a function defined in the program code. This function takes a single parameter and
returns a DWORD value. A process can have multiple threads simultaneously executing the
same function.
The following is a simple example that demonstrates how to create a new thread that executes
the locally defined function, MyThreadFunction().
The calling thread uses the WaitForMultipleObjects() function to persist until all worker threads
have terminated. The calling thread blocks while it is waiting; to continue processing, a calling
thread would use WaitForSingleObject() and wait for each worker thread to signal its wait
object. Note that if you were to close the handle to a worker thread before it terminated, this does
not terminate the worker thread. However, the handle will be unavailable for use in subsequent
function calls.
Create a new empty Win32 console application project. Give a suitable project name and change
the project location if needed.

www.installsetupconfig.com
73
Then, add the source file and give it a suitable name.
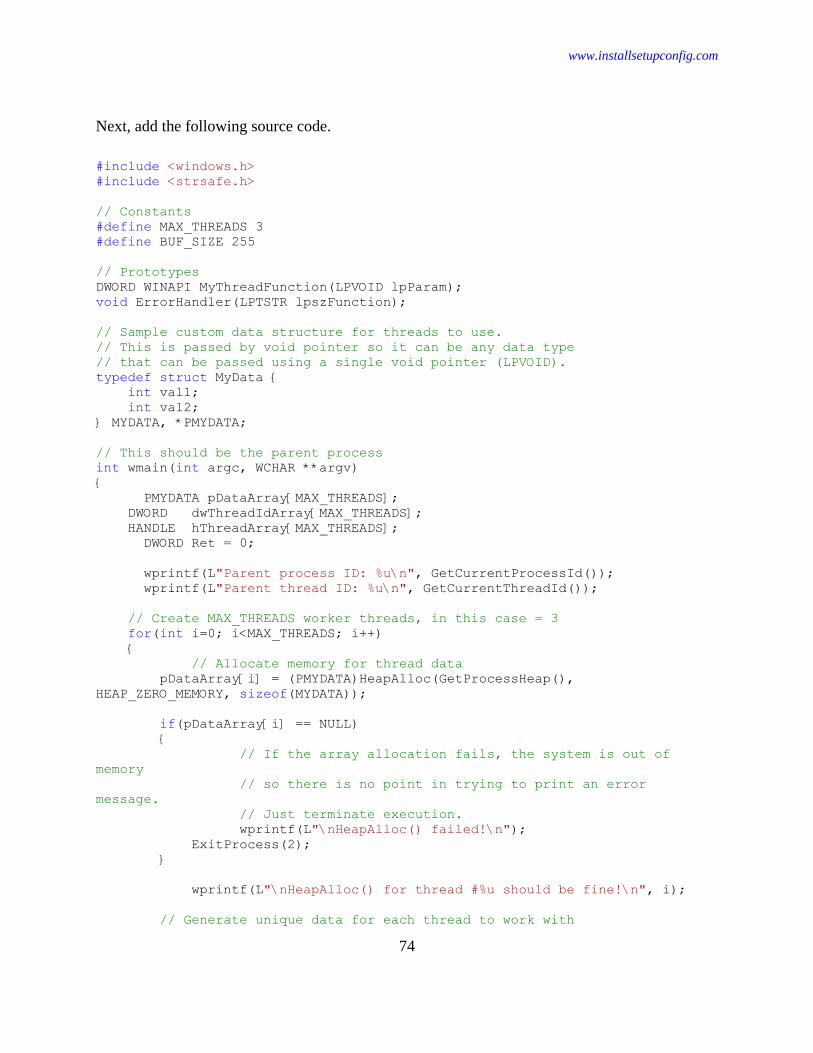
www.installsetupconfig.com
74
Next, add the following source code.
#include <windows.h>
#include <strsafe.h>
// Constants
#define MAX_THREADS 3
#define BUF_SIZE 255
// Prototypes
DWORD WINAPI MyThreadFunction(LPVOID lpParam);
void ErrorHandler(LPTSTR lpszFunction);
// Sample custom data structure for threads to use.
// This is passed by void pointer so it can be any data type
// that can be passed using a single void pointer (LPVOID).
typedef struct MyData {
int val1;
int val2;
} MYDATA, *PMYDATA;
// This should be the parent process
int wmain(int argc, WCHAR **argv)
{
PMYDATA pDataArray[MAX_THREADS];
DWORD dwThreadIdArray[MAX_THREADS];
HANDLE hThreadArray[MAX_THREADS];
DWORD Ret = 0;
wprintf(L"Parent process ID: %u\n", GetCurrentProcessId());
wprintf(L"Parent thread ID: %u\n", GetCurrentThreadId());
// Create MAX_THREADS worker threads, in this case = 3
for(int i=0; i<MAX_THREADS; i++)
{
// Allocate memory for thread data
pDataArray[i] = (PMYDATA)HeapAlloc(GetProcessHeap(),
HEAP_ZERO_MEMORY, sizeof(MYDATA));
if(pDataArray[i] == NULL)
{
// If the array allocation fails, the system is out of
memory
// so there is no point in trying to print an error
message.
// Just terminate execution.
wprintf(L"\nHeapAlloc() failed!\n");
ExitProcess(2);
}
wprintf(L"\nHeapAlloc() for thread #%u should be fine!\n", i);
// Generate unique data for each thread to work with

www.installsetupconfig.com
75
pDataArray[i]->val1 = i;
pDataArray[i]->val2 = i+100;
// Create the thread to begin execution on its own
hThreadArray[i] = CreateThread(
NULL, // default security attributes
0, // use default stack size
MyThreadFunction, // thread function name - a pointer to
the application-defined
// function to be
executed by the thread
pDataArray[i], // argument to thread function
0, // use default creation flags
&dwThreadIdArray[i]); // returns the thread identifier
// Check the return value for success.
// If CreateThread() fails, terminate execution.
// This will automatically clean up threads and memory.
if (hThreadArray[i] == NULL)
{
ErrorHandler(L"CreateThread()");
ExitProcess(3);
}
wprintf(L"CreateThread() for thread #%i is fine!\n", i);
wprintf(L"Current process ID: %u\n", GetCurrentProcessId());
wprintf(L"Current thread ID: %u\n", dwThreadIdArray[i]);
} // End of main thread creation loop.
// Wait until all threads have terminated
Ret = WaitForMultipleObjects(MAX_THREADS, hThreadArray, TRUE, INFINITE);
wprintf(L"WaitForMultipleObjects() return value is 0X%.8X\n", Ret);
// Close all thread handles and free memory allocations
wprintf(L"\n");
for(int i=0; i<MAX_THREADS; i++)
{
wprintf(L"Closing thread's handle #%i\n", i);
CloseHandle(hThreadArray[i]);
if(pDataArray[i] != NULL)
{
HeapFree(GetProcessHeap(), 0, pDataArray[i]);
pDataArray[i] = NULL; // Ensure address is not reused.
}
}
return 0;
}
// Thread creation function
DWORD WINAPI MyThreadFunction(LPVOID lpParam)
{
HANDLE hStdout;
PMYDATA pDataArray;
WCHAR msgBuf[BUF_SIZE];

www.installsetupconfig.com
76
size_t cchStringSize;
DWORD dwChars;
// Make sure there is a console to receive output results
hStdout = GetStdHandle(STD_OUTPUT_HANDLE);
if(hStdout == INVALID_HANDLE_VALUE)
return 1;
else
wprintf(L"Handle to the standard output is OK!\n");
// Cast the parameter to the correct data type
// The pointer is known to be valid because
// it was checked for NULL before the thread was created
pDataArray = (PMYDATA)lpParam;
// Print the parameter values using thread-safe functions
StringCchPrintf(msgBuf, BUF_SIZE, L"Parameters = %d, %d\n", pDataArray-
>val1, pDataArray->val2);
StringCchLength(msgBuf, BUF_SIZE, &cchStringSize);
WriteConsole(hStdout, msgBuf, (DWORD)cchStringSize, &dwChars, NULL);
return 0;
}
void ErrorHandler(LPTSTR lpszFunction)
{
// Retrieve the system error message for the last-error code
LPVOID lpMsgBuf;
LPVOID lpDisplayBuf;
DWORD dw = GetLastError();
FormatMessage(
FORMAT_MESSAGE_ALLOCATE_BUFFER |
FORMAT_MESSAGE_FROM_SYSTEM |
FORMAT_MESSAGE_IGNORE_INSERTS,
NULL,
dw,
MAKELANGID(LANG_NEUTRAL, SUBLANG_DEFAULT),
(LPTSTR) &lpMsgBuf,
0, NULL );
// Display the error message
lpDisplayBuf = (LPVOID)LocalAlloc(LMEM_ZEROINIT,
(lstrlen((LPCTSTR) lpMsgBuf) + lstrlen((LPCTSTR) lpszFunction) +
40) * sizeof(WCHAR));
StringCchPrintf((LPTSTR)lpDisplayBuf,
LocalSize(lpDisplayBuf) / sizeof(WCHAR),
L"%s failed with error %d: %s",
lpszFunction, dw, lpMsgBuf);
MessageBox(NULL, (LPCTSTR) lpDisplayBuf, L"Error", MB_OK);
// Free error-handling buffer allocations
LocalFree(lpMsgBuf);
LocalFree(lpDisplayBuf);
}

www.installsetupconfig.com
77
Build and run the project. The following screenshot is a sample output.
From the sample output, you should notice something that was expected. We have the same
process ID (3024) for all threads, which is the main or parent program (wmain()).We loop the
thread creation three times, however there are 4 threads. The extra thread is the wmain()'s thread.
The MyThreadFunction() function avoids the use of the C run-time library (CRT), as many of its
functions are not thread-safe, particularly if you are not using the multithreaded CRT. If you
would like to use the CRT in a ThreadProc() function, use the _beginthreadex() function instead.
It is risky to pass the address of a local variable if the creating thread exits before the new thread,
because the pointer becomes invalid. Instead, either pass a pointer to dynamically allocated
memory or make the creating thread wait for the new thread to terminate. Data can also be
passed from the creating thread to the new thread using global variables. With global variables, it
is usually necessary to synchronize access by multiple threads. The creating thread can use the
arguments to CreateThread() to specify the following:
1. The security attributes for the handle to the new thread. These security attributes include
an inheritance flag that determines whether the handle can be inherited by child
processes. The security attributes also include a security descriptor, which the system

www.installsetupconfig.com
78
uses to perform access checks on all subsequent uses of the thread's handle before access
is granted.
2. The initial stack size of the new thread. The thread's stack is allocated automatically in
the memory space of the process; the system increases the stack as needed and frees it
when the thread terminates.
3. A creation flag that enables you to create the thread in a suspended state. When
suspended, the thread does not run until the ResumeThread() function is called.
You can also create a thread by calling the CreateRemoteThread() function. This function is used
by debugger processes to create a thread that runs in the address space of the process being
debugged.
Creating a Child Process with Redirected Input and Output Program Example
The following example demonstrates how to create a child process using the CreateProcess()
function from a console process. It also demonstrates a technique for using anonymous pipes to
redirect the child process's standard input and output handles. Note that named pipes can also be
used to redirect process I/O.
The CreatePipe() function uses the SECURITY_ATTRIBUTES structure to create inheritable
handles to the read and write ends of two pipes. The read end of one pipe serves as standard
input for the child process, and the write end of the other pipe is the standard output for the child
process. These pipe handles are specified in the STARTUPINFO structure, which makes them
the standard handles inherited by the child process.
The parent process uses the opposite ends of these two pipes to write to the child process's input
and read from the child process's output. As specified in the STARTUPINFO structure, these
handles are also inheritable. However, these handles must not be inherited. Therefore, before
creating the child process, the parent process uses the SetHandleInformation() function to ensure
that the write handle for the child process's standard input and the read handle for the child
process's standard input cannot be inherited.
The following is the code for the parent process. It takes a single command-line argument: the
name of a text file.
Create a new empty Win32 console application project. Give a suitable project name and change
the project location if needed.
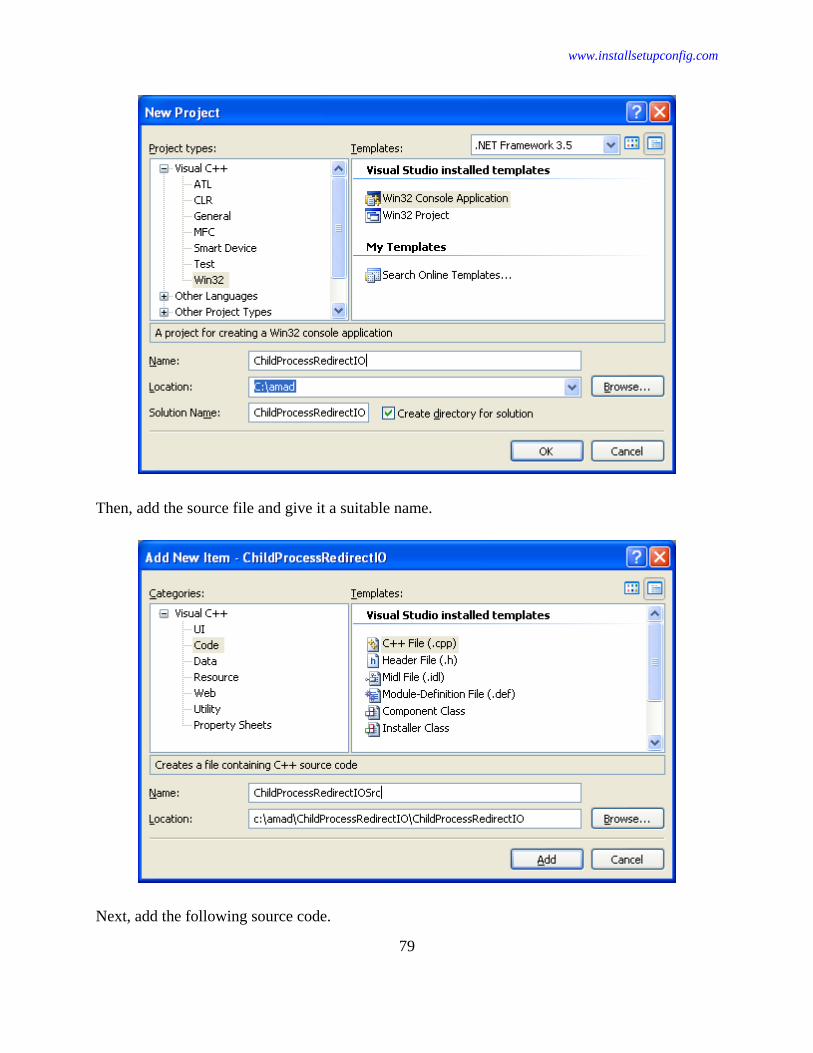
www.installsetupconfig.com
79
Then, add the source file and give it a suitable name.
Next, add the following source code.

www.installsetupconfig.com
80
#include <windows.h>
#include <stdio.h>
#include <strsafe.h>
// Constant
#define BUFSIZE 4096
// Global variables
HANDLE g_hChildStd_IN_Rd = NULL;
HANDLE g_hChildStd_IN_Wr = NULL;
HANDLE g_hChildStd_OUT_Rd = NULL;
HANDLE g_hChildStd_OUT_Wr = NULL;
HANDLE g_hInputFile = NULL;
// Prototypes, needed for C++
void CreateChildProcess(void);
void WriteToPipe(void);
void ReadFromPipe(void);
void ErrorExit(PTSTR);
// wmain() is a main process...
int wmain(int argc, WCHAR *argv[])
{
SECURITY_ATTRIBUTES saAttr;
wprintf(L"Start of parent execution.\n");
wprintf(L"Parent process ID %u\n", GetCurrentProcessId());
wprintf(L"Parent thread ID %u\n", GetCurrentThreadId());
// Set the bInheritHandle flag so pipe handles are inherited
saAttr.nLength = sizeof(SECURITY_ATTRIBUTES);
saAttr.bInheritHandle = TRUE;
saAttr.lpSecurityDescriptor = NULL;
// Create a pipe for the child process's STDOUT
if (!CreatePipe(&g_hChildStd_OUT_Rd, &g_hChildStd_OUT_Wr, &saAttr, 0))
ErrorExit(L"CreatePipe() - pipe for child process\'s STDOUT failed");
else
wprintf(L"CreatePipe() - pipe for child process\'s STDOUT pipe was
created!\n");
// Ensure the read handle to the pipe for STDOUT is not inherited
if (!SetHandleInformation(g_hChildStd_OUT_Rd, HANDLE_FLAG_INHERIT, 0))
ErrorExit(L"SetHandleInformation() - pipe STDOUT read handle failed for
inheritance");
else
wprintf(L"SetHandleInformation() - pipe STDOUT read handle is not
inherited!\n");
// Create a pipe for the child process's STDIN
if (! CreatePipe(&g_hChildStd_IN_Rd, &g_hChildStd_IN_Wr, &saAttr, 0))
ErrorExit(L"CreatePipe() - pipe for child\'s STDIN failed");
else
wprintf(L"CreatePipe() - pipe for child process\'s STDIN was
created!\n");

www.installsetupconfig.com
81
// Ensure the write handle to the pipe for STDIN is not inherited
if (!SetHandleInformation(g_hChildStd_IN_Wr, HANDLE_FLAG_INHERIT, 0))
ErrorExit(L"SetHandleInformation() - pipe STDIN write handle failed for
inheritance");
else
wprintf(L"Stdin SetHandleInformation() - pipe STDIN read handle is
not inherited!\n");
// Create the child process
wprintf(L"Verify: argv[1] = %s\n", argv[1]);
wprintf(L"Creating the child process...\n");
CreateChildProcess();
// Get a handle to an input file for the parent
// This example assumes a plain text file and uses string output to verify
data flow
if(argc == 1)
{
ErrorExit(L"Please specify an input file.\n");
wprintf(L"%s [sample_text_file.txt]\n", argv[0]);
}
g_hInputFile = CreateFile(
argv[1],
GENERIC_READ,
0,
NULL,
OPEN_EXISTING,
FILE_ATTRIBUTE_READONLY,
NULL);
if(g_hInputFile == INVALID_HANDLE_VALUE)
ErrorExit(L"CreateFile()");
else
wprintf(L"CreateFile() - %s was successfully opened!\n", argv[1]);
// Write to the pipe that is the standard input for a child process
// Data is written to the pipe's buffers, so it is not necessary to wait
// until the child process is running before writing data
WriteToPipe();
wprintf(L" Contents of %s written to child STDIN pipe.\n", argv[1]);
// Read from pipe that is the standard output for child process
wprintf(L" Contents of %s child process STDOUT:\n", argv[1]);
ReadFromPipe();
wprintf(L" End of parent execution.\n");
// The remaining open handles are cleaned up when this process terminates
// To avoid resource leaks in a larger application, close handles
explicitly
return 0;
}
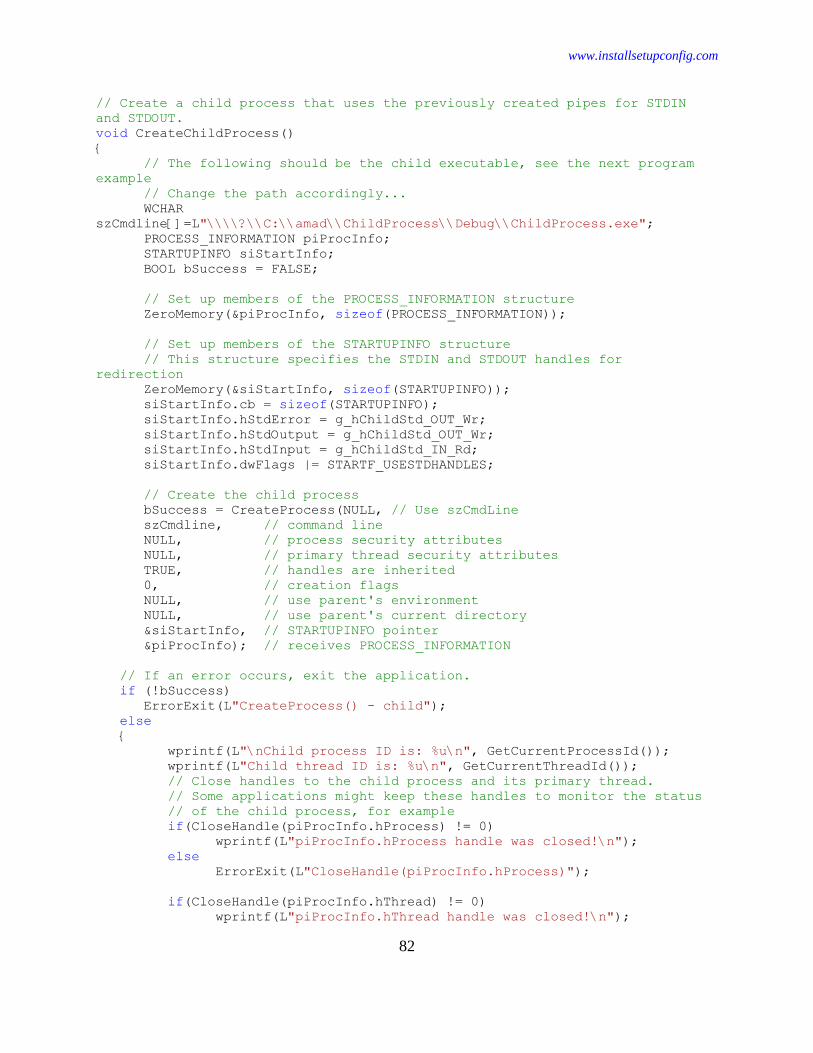
www.installsetupconfig.com
82
// Create a child process that uses the previously created pipes for STDIN
and STDOUT.
void CreateChildProcess()
{
// The following should be the child executable, see the next program
example
// Change the path accordingly...
WCHAR
szCmdline[]=L"\\\\?\\C:\\amad\\ChildProcess\\Debug\\ChildProcess.exe";
PROCESS_INFORMATION piProcInfo;
STARTUPINFO siStartInfo;
BOOL bSuccess = FALSE;
// Set up members of the PROCESS_INFORMATION structure
ZeroMemory(&piProcInfo, sizeof(PROCESS_INFORMATION));
// Set up members of the STARTUPINFO structure
// This structure specifies the STDIN and STDOUT handles for
redirection
ZeroMemory(&siStartInfo, sizeof(STARTUPINFO));
siStartInfo.cb = sizeof(STARTUPINFO);
siStartInfo.hStdError = g_hChildStd_OUT_Wr;
siStartInfo.hStdOutput = g_hChildStd_OUT_Wr;
siStartInfo.hStdInput = g_hChildStd_IN_Rd;
siStartInfo.dwFlags |= STARTF_USESTDHANDLES;
// Create the child process
bSuccess = CreateProcess(NULL, // Use szCmdLine
szCmdline, // command line
NULL, // process security attributes
NULL, // primary thread security attributes
TRUE, // handles are inherited
0, // creation flags
NULL, // use parent's environment
NULL, // use parent's current directory
&siStartInfo, // STARTUPINFO pointer
&piProcInfo); // receives PROCESS_INFORMATION
// If an error occurs, exit the application.
if (!bSuccess)
ErrorExit(L"CreateProcess() - child");
else
{
wprintf(L"\nChild process ID is: %u\n", GetCurrentProcessId());
wprintf(L"Child thread ID is: %u\n", GetCurrentThreadId());
// Close handles to the child process and its primary thread.
// Some applications might keep these handles to monitor the status
// of the child process, for example
if(CloseHandle(piProcInfo.hProcess) != 0)
wprintf(L"piProcInfo.hProcess handle was closed!\n");
else
ErrorExit(L"CloseHandle(piProcInfo.hProcess)");
if(CloseHandle(piProcInfo.hThread) != 0)
wprintf(L"piProcInfo.hThread handle was closed!\n");

www.installsetupconfig.com
83
else
ErrorExit(L"CloseHandle(piProcInfo.hThread)");
}
}
// Read from a file and write its contents to the pipe for the child's STDIN.
// Stop when there is no more data.
void WriteToPipe(void)
{
DWORD dwRead, dwWritten;
CHAR chBuf[BUFSIZE];
BOOL bSuccess = FALSE;
for(;;)
{
bSuccess = ReadFile(g_hInputFile, chBuf, BUFSIZE, &dwRead, NULL);
if (! bSuccess || dwRead == 0)
{
// Cannot use ErrorExit() lol
wprintf(L"\nReadFile() - Failed to read file! Error %u\n",
GetLastError());
break;
}
else
wprintf(L"\nReadFile() - Reading from a file...\n");
bSuccess = WriteFile(g_hChildStd_IN_Wr, chBuf, dwRead, &dwWritten,
NULL);
if (!bSuccess)
{
wprintf(L"\nWriteFile() - Failed to write to pipe for child\'s
STDIN! Error %u\n", GetLastError());
break;
}
else
wprintf(L"\nWriteFile() - writing to the pipe for the child\'s
STDIN...\n");
}
// Close the pipe handle so the child process stops reading
if (!CloseHandle(g_hChildStd_IN_Wr))
ErrorExit(L"CloseHandle()");
else
wprintf(L"Closing the pipe handle...\n");
}
// Read output from the child process's pipe for STDOUT
// and write to the parent process's pipe for STDOUT.
// Stop when there is no more data.
void ReadFromPipe(void)
{
DWORD dwRead, dwWritten;
WCHAR chBuf[BUFSIZE];
BOOL bSuccess = FALSE;
HANDLE hParentStdOut = GetStdHandle(STD_OUTPUT_HANDLE);

www.installsetupconfig.com
84
// Close the write end of the pipe before reading from the
// read end of the pipe, to control child process execution.
// The pipe is assumed to have enough buffer space to hold the
// data the child process has already written to it
if (!CloseHandle(g_hChildStd_OUT_Wr))
ErrorExit(L"CloseHandle() - ReadFromPipe()");
for(;;)
{
bSuccess = ReadFile(g_hChildStd_OUT_Rd, chBuf, BUFSIZE, &dwRead,
NULL);
if(!bSuccess || dwRead == 0)
{
wprintf(L"\nReadFile() from child's standard output failed!
Error %u\n", GetLastError());
break;
}
else
{
wprintf(L"\nReadFile() from child's standard output is
OK!\n");
}
bSuccess = WriteFile(hParentStdOut, chBuf, dwRead, &dwWritten,
NULL);
if(!bSuccess)
{
wprintf(L"\nWriteFile() to parent's standard output failed!
Error %u\n", GetLastError());
break;
}
else
{
wprintf(L"\nWriteFile() to parent's standard output is
OK!\n");
}
}
}
// Format a readable error message, display a message box,
// and exit from the application.
void ErrorExit(PTSTR lpszFunction)
{
LPVOID lpMsgBuf;
LPVOID lpDisplayBuf;
DWORD dw = GetLastError();
FormatMessage(
FORMAT_MESSAGE_ALLOCATE_BUFFER |
FORMAT_MESSAGE_FROM_SYSTEM |
FORMAT_MESSAGE_IGNORE_INSERTS,
NULL,
dw,
MAKELANGID(LANG_NEUTRAL, SUBLANG_DEFAULT),

www.installsetupconfig.com
85
(LPTSTR) &lpMsgBuf,
0, NULL );
lpDisplayBuf = (LPVOID)LocalAlloc(LMEM_ZEROINIT,
(lstrlen((LPCTSTR)lpMsgBuf)+lstrlen((LPCTSTR)lpszFunction)+40)*sizeof(WCHAR))
;
StringCchPrintf((LPTSTR)lpDisplayBuf,
LocalSize(lpDisplayBuf) / sizeof(WCHAR),
L"%s failed with error %d: %s",
lpszFunction, dw, lpMsgBuf);
MessageBox(NULL, (LPCTSTR)lpDisplayBuf, L"Error", MB_OK);
LocalFree(lpMsgBuf);
LocalFree(lpDisplayBuf);
ExitProcess(1);
}
Build the project. In order to see the output, create a text file with some texts under the project’s
Debug folder as an input file.
Run the project without any argument. Click the OK button for the Error message.

www.installsetupconfig.com
86
After dismissing the Error message, the following is the output.
The following is the sample output with a text file, test_file.txt (already created) as the argument.

www.installsetupconfig.com
87
The following sample output is possible because the child program already created (see next
program example).

www.installsetupconfig.com
88
The Child Process Program Example
The following is the code for the child process. It uses the inherited handles for STDIN and
STDOUT to access the pipe created by the parent. The parent process reads from its input file
and writes the information to a pipe. The child receives text through the pipe using STDIN and
writes to the pipe using STDOUT. The parent reads from the read end of the pipe and displays
the information to its STDOUT.
Create a new empty Win32 console application project. Give a suitable project name and change
the project location if needed.

www.installsetupconfig.com
89
Then, add the source file and give it a suitable name.
Next, add the following source code.
// This program not intended to be run independently
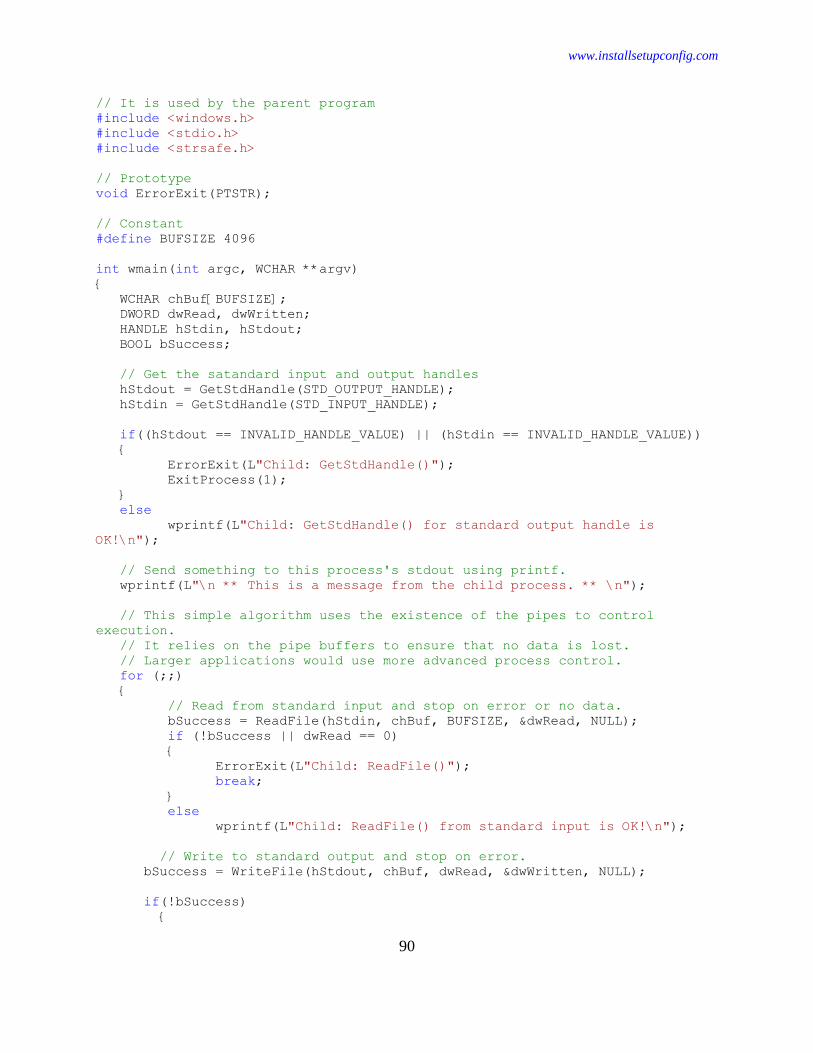
www.installsetupconfig.com
90
// It is used by the parent program
#include <windows.h>
#include <stdio.h>
#include <strsafe.h>
// Prototype
void ErrorExit(PTSTR);
// Constant
#define BUFSIZE 4096
int wmain(int argc, WCHAR **argv)
{
WCHAR chBuf[BUFSIZE];
DWORD dwRead, dwWritten;
HANDLE hStdin, hStdout;
BOOL bSuccess;
// Get the satandard input and output handles
hStdout = GetStdHandle(STD_OUTPUT_HANDLE);
hStdin = GetStdHandle(STD_INPUT_HANDLE);
if((hStdout == INVALID_HANDLE_VALUE) || (hStdin == INVALID_HANDLE_VALUE))
{
ErrorExit(L"Child: GetStdHandle()");
ExitProcess(1);
}
else
wprintf(L"Child: GetStdHandle() for standard output handle is
OK!\n");
// Send something to this process's stdout using printf.
wprintf(L"\n ** This is a message from the child process. ** \n");
// This simple algorithm uses the existence of the pipes to control
execution.
// It relies on the pipe buffers to ensure that no data is lost.
// Larger applications would use more advanced process control.
for (;;)
{
// Read from standard input and stop on error or no data.
bSuccess = ReadFile(hStdin, chBuf, BUFSIZE, &dwRead, NULL);
if (!bSuccess || dwRead == 0)
{
ErrorExit(L"Child: ReadFile()");
break;
}
else
wprintf(L"Child: ReadFile() from standard input is OK!\n");
// Write to standard output and stop on error.
bSuccess = WriteFile(hStdout, chBuf, dwRead, &dwWritten, NULL);
if(!bSuccess)
{

www.installsetupconfig.com
91
ErrorExit(L"Child: WriteFile()");
break;
}
else
wprintf(L"Child: WriteFile() to standard output is OK!\n");
}
return 0;
}
// Format a readable error message, display a message box,
// and exit from the application.
void ErrorExit(PTSTR lpszFunction)
{
LPVOID lpMsgBuf;
LPVOID lpDisplayBuf;
DWORD dw = GetLastError();
FormatMessage(
FORMAT_MESSAGE_ALLOCATE_BUFFER |
FORMAT_MESSAGE_FROM_SYSTEM |
FORMAT_MESSAGE_IGNORE_INSERTS,
NULL,
dw,
MAKELANGID(LANG_NEUTRAL, SUBLANG_DEFAULT),
(LPTSTR) &lpMsgBuf,
0, NULL );
lpDisplayBuf = (LPVOID)LocalAlloc(LMEM_ZEROINIT,
(lstrlen((LPCTSTR)lpMsgBuf)+lstrlen((LPCTSTR)lpszFunction)+40)*sizeof(WCHAR))
;
StringCchPrintf((LPTSTR)lpDisplayBuf,
LocalSize(lpDisplayBuf) / sizeof(WCHAR),
L"%s failed with error %d: %s",
lpszFunction, dw, lpMsgBuf);
MessageBox(NULL, (LPCTSTR)lpDisplayBuf, L"Error", MB_OK);
LocalFree(lpMsgBuf);
LocalFree(lpDisplayBuf);
ExitProcess(1);
}
Build the project. This program should be used for the previous example. However when you
type some text and press Enter key, the text will be echoed to the standard output. Press Ctrl+C
to quit.

www.installsetupconfig.com
92
Changing Environment Variables Program Examples
Each process has an environment block associated with it. The environment block consists of a
null-terminated block of null-terminated strings (meaning there are two null bytes at the end of
the block), where each string is in the form:
name=value
All strings in the environment block must be sorted alphabetically by name. The sort is case-
insensitive, Unicode order, without regard to locale. Because the equal sign is a separator, it must
not be used in the name of an environment variable.
Environment Variables: Example 1
By default, a child process inherits a copy of the environment block of the parent process. The
following example demonstrates how to create a new environment block to pass to a child
process using CreateProcess(). This example uses the code in example three as the child process,
EnvironVar3.exe. In this case you should try the third example first.
Create a new empty Win32 console application project. Give a suitable project name and change
the project location if needed.

www.installsetupconfig.com
93
Then, add the source file and give it a suitable name.

www.installsetupconfig.com
94
Next, add the following source code.
#include <windows.h>
#include <tchar.h>
#include <stdio.h>
#include <strsafe.h>
#define BUFSIZE 4096
int wmain(int argc, WCHAR **argv)
{
LPTSTR lpszCurrentVariable;
// Child process to be executed
WCHAR
szAppName[]=L"\\\\?\\C:\\amad\\EnvironVar3\\Debug\\EnvironVar3.exe";
// WCHAR szAppName[]=L"\\\\?\\C:\\WINDOWS\\system32\\sol.exe";
STARTUPINFO si = {0};
PROCESS_INFORMATION pi = {0};
BOOL fSuccess;
DWORD Ret = 100;
LPTSTR lpszVariable;
LPWCH lpvEnv;
// Get the current process and thread IDs
wprintf(L"Parent process ID (wmain()) is %u\n", GetCurrentProcessId());
wprintf(L"Parent thread ID (wmain()) is %u\n", GetCurrentThreadId());

www.installsetupconfig.com
95
// Get a pointer to the environment block
lpvEnv = GetEnvironmentStrings();
// If the returned pointer is NULL, exit
if (lpvEnv == NULL)
{
printf("GetEnvironmentStrings failed, error %d\n", GetLastError());
return 1;
}
else
wprintf(L"GetEnvironmentStrings() is OK!\n");
// Copy environment strings into an environment block
lpszCurrentVariable = lpvEnv;
// Frees a block of environment strings
if(FreeEnvironmentStrings(lpvEnv) != 0)
wprintf(L"\nFreeEnvironmentStrings() - a block of environment
strings was freed!\n");
else
wprintf(L"\nFreeEnvironmentStrings() failed, error %u\n",
GetLastError());
if (FAILED(StringCchCopy(lpszCurrentVariable, BUFSIZE,
L"MyNewEnvSetting=awek gedik")))
{
wprintf(L"StringCchCopy() - String copy failed\n");
return 1;
}
else
wprintf(L"StringCchCopy() - env var was copied
successfully!\n");
lpszCurrentVariable += lstrlen(lpszCurrentVariable) + 1;
if (FAILED(StringCchCopy(lpszCurrentVariable, BUFSIZE,
L"MyNewVersion=2.34")))
{
wprintf(L"StringCchCopy() - String copy failed\n");
return 1;
}
else
wprintf(L"StringCchCopy() - Another env var was copied
successfully!\n");
// Terminate the block with a NULL byte
// Variable strings are separated by NULL byte, and the block is
// terminated by a NULL byte
lpszCurrentVariable += lstrlen(lpszCurrentVariable) + 1;
*lpszCurrentVariable = (WCHAR)0;
// Create the child process, specifying a new environment block
SecureZeroMemory(&si, sizeof(STARTUPINFO));
si.cb = sizeof(STARTUPINFO);
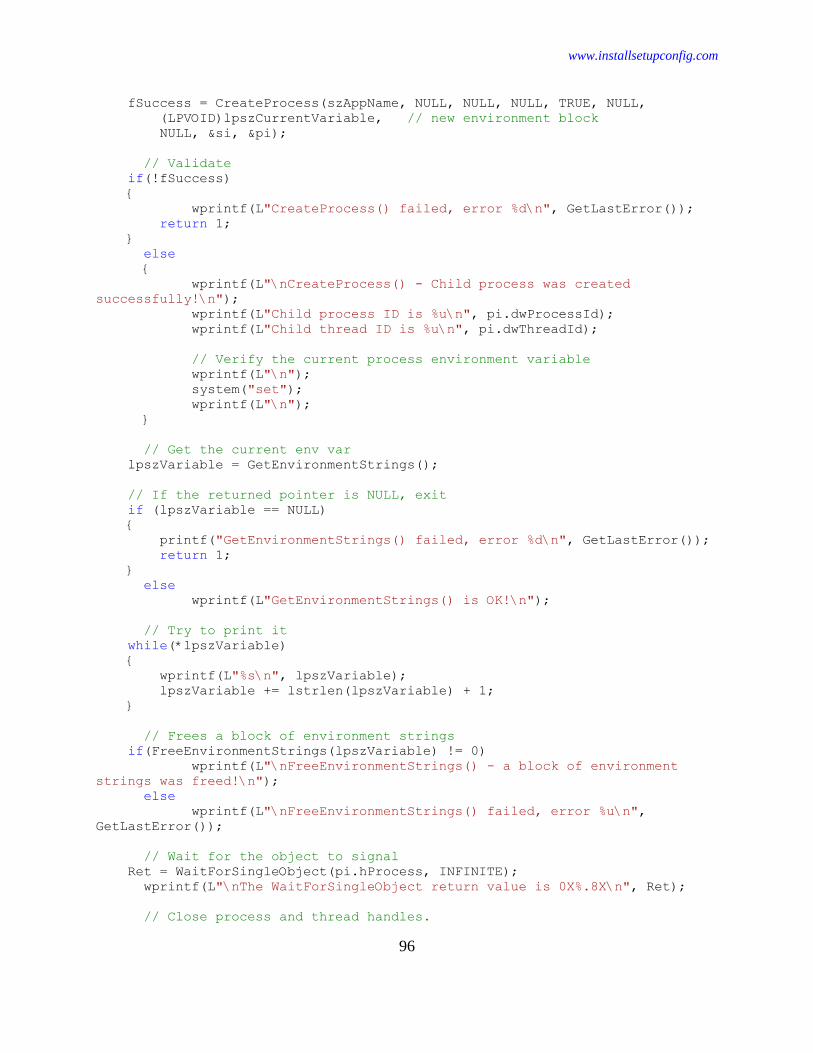
www.installsetupconfig.com
96
fSuccess = CreateProcess(szAppName, NULL, NULL, NULL, TRUE, NULL,
(LPVOID)lpszCurrentVariable, // new environment block
NULL, &si, &pi);
// Validate
if(!fSuccess)
{
wprintf(L"CreateProcess() failed, error %d\n", GetLastError());
return 1;
}
else
{
wprintf(L"\nCreateProcess() - Child process was created
successfully!\n");
wprintf(L"Child process ID is %u\n", pi.dwProcessId);
wprintf(L"Child thread ID is %u\n", pi.dwThreadId);
// Verify the current process environment variable
wprintf(L"\n");
system("set");
wprintf(L"\n");
}
// Get the current env var
lpszVariable = GetEnvironmentStrings();
// If the returned pointer is NULL, exit
if (lpszVariable == NULL)
{
printf("GetEnvironmentStrings() failed, error %d\n", GetLastError());
return 1;
}
else
wprintf(L"GetEnvironmentStrings() is OK!\n");
// Try to print it
while(*lpszVariable)
{
wprintf(L"%s\n", lpszVariable);
lpszVariable += lstrlen(lpszVariable) + 1;
}
// Frees a block of environment strings
if(FreeEnvironmentStrings(lpszVariable) != 0)
wprintf(L"\nFreeEnvironmentStrings() - a block of environment
strings was freed!\n");
else
wprintf(L"\nFreeEnvironmentStrings() failed, error %u\n",
GetLastError());
// Wait for the object to signal
Ret = WaitForSingleObject(pi.hProcess, INFINITE);
wprintf(L"\nThe WaitForSingleObject return value is 0X%.8X\n", Ret);
// Close process and thread handles.
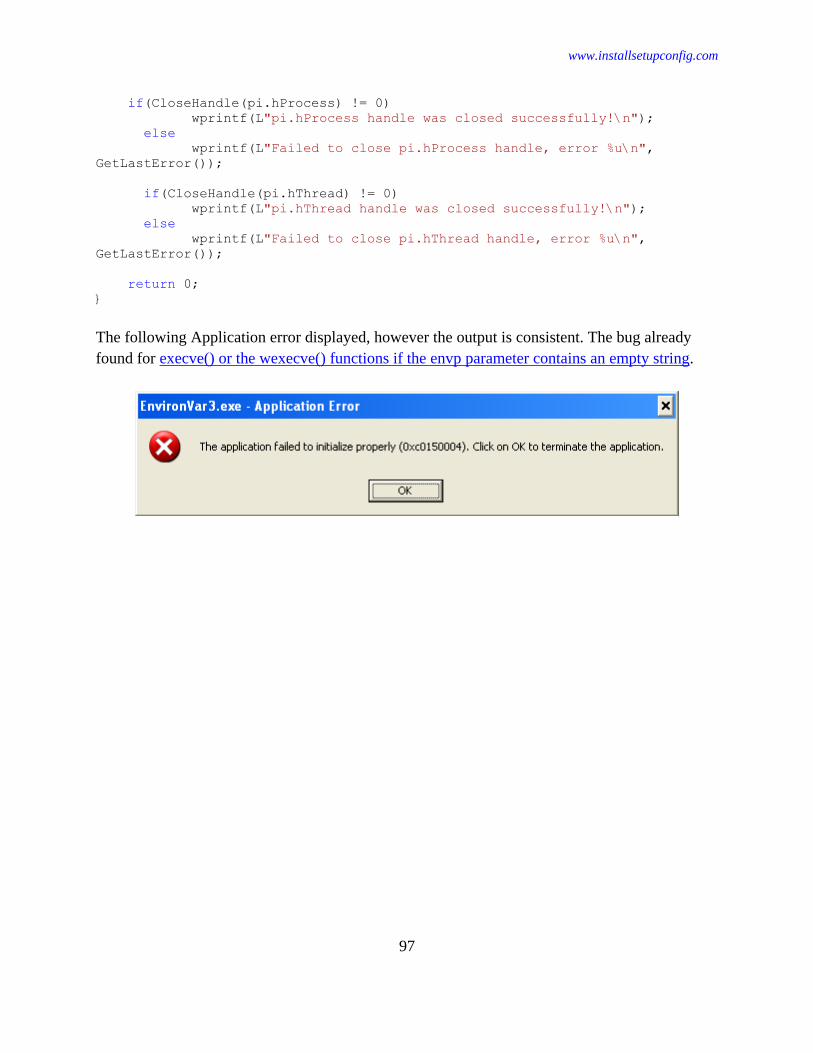
www.installsetupconfig.com
97
if(CloseHandle(pi.hProcess) != 0)
wprintf(L"pi.hProcess handle was closed successfully!\n");
else
wprintf(L"Failed to close pi.hProcess handle, error %u\n",
GetLastError());
if(CloseHandle(pi.hThread) != 0)
wprintf(L"pi.hThread handle was closed successfully!\n");
else
wprintf(L"Failed to close pi.hThread handle, error %u\n",
GetLastError());
return 0;
}
The following Application error displayed, however the output is consistent. The bug already
found for execve() or the wexecve() functions if the envp parameter contains an empty string.

www.installsetupconfig.com
98
Environment Variables: Example 2
Altering the environment variables of a child process during process creation is the only way one
process can directly change the environment variables of another process. A process can never
directly change the environment variables of another process that is not a child of that process.
If you want the child process to inherit most of the parent's environment with only a few
changes, retrieve the current values using GetEnvironmentVariable(), save these values, create
an updated block for the child process to inherit, create the child process, and then restore the
saved values using SetEnvironmentVariable(), as shown in the following example.
This example uses the code in example three as the child process, EnvironVar3.exe.
Create a new empty Win32 console application project. Give a suitable project name and change
the project location if needed.

www.installsetupconfig.com
99
Then, add the source file and give it a suitable name.

www.installsetupconfig.com
100
Next, add the following source code.
#include <windows.h>
#include <stdio.h>
#define BUFSIZE 4096
#define VARNAME L"MyVariable"
int wmain(int argc, WCHAR **argv)
{
DWORD dwRet, dwErr;
LPTSTR pszOldVal;
// The path of the child program
WCHAR szAppName[]=L"C:\\amad\\EnvironVar3\\Debug\\EnvironVar3.exe";
STARTUPINFO si;
PROCESS_INFORMATION pi;
BOOL fExist, fSuccess;
DWORD Ret;
// Retrieves the current value of the variable if it exists.
// Sets the variable to a new value, creates a child process,
// then uses SetEnvironmentVariable to restore the original
// value or delete it if it did not exist previously
pszOldVal = (LPTSTR)malloc(BUFSIZE*sizeof(WCHAR));
if(pszOldVal == NULL)
{

www.installsetupconfig.com
101
wprintf(L"Out of memory!\n");
return FALSE;
}
else
wprintf(L"malloc() should be fine!\n");
dwRet = GetEnvironmentVariable(VARNAME, pszOldVal, BUFSIZE);
if(dwRet == 0)
{
dwErr = GetLastError();
if(dwErr == ERROR_ENVVAR_NOT_FOUND)
{
wprintf(L"The given environment variable does not exist!\n");
fExist=FALSE;
}
}
else if(BUFSIZE < dwRet)
{
pszOldVal = (LPTSTR)realloc(pszOldVal, dwRet*sizeof(WCHAR));
if(pszOldVal == NULL)
{
wprintf(L"Out of memory!\n");
return FALSE;
}
dwRet = GetEnvironmentVariable(VARNAME, pszOldVal, dwRet);
if(!dwRet)
{
wprintf(L"GetEnvironmentVariable() failed! Error %d\n",
GetLastError());
return FALSE;
}
else
{
wprintf(L"GetEnvironmentVariable() - The environment
variable exists!\n");
fExist=TRUE;
}
}
else
{
wprintf(L"GetEnvironmentVariable() is OK!\n");
fExist = TRUE;
}
// Set a value for the child process to inherit
if (!SetEnvironmentVariable(VARNAME, L"Test"))
{
wprintf(L"SetEnvironmentVariable() failed! Error %d\n",
GetLastError());
return FALSE;
}
else

www.installsetupconfig.com
102
wprintf(L"SetEnvironmentVariable() is OK! Environment variable
was set\n");
// Create a child process
SecureZeroMemory(&si, sizeof(STARTUPINFO));
si.cb = sizeof(STARTUPINFO);
fSuccess = CreateProcess(szAppName, NULL, NULL, NULL, TRUE, 0,
NULL, // inherit parent's environment
NULL, &si, &pi);
if(!fSuccess)
{
wprintf(L"CreateProcess() failed! Error %d\n", GetLastError());
}
else
wprintf(L"CreateProcess() is OK!\n");
Ret = WaitForSingleObject(pi.hProcess, INFINITE);
wprintf(L"The WaitForSingleObject() return value is 0X%.8X\n", Ret);
// Restore the original environment variable
if(fExist)
{
if(!SetEnvironmentVariable(VARNAME, pszOldVal))
{
wprintf(L"SetEnvironmentVariable() failed! Error %d\n",
GetLastError());
return FALSE;
}
else
wprintf(L"SetEnvironmentVariable() - Restoring the old
environment variable!\n");
}
else
{
wprintf(L"SetEnvironmentVariable() - Removing the new environment
variable!\n");
SetEnvironmentVariable(VARNAME, NULL);
}
free(pszOldVal);
return fSuccess;
}
Build and run the project. The following screenshot are sample outputs.

www.installsetupconfig.com
103

www.installsetupconfig.com
104
The Windows’s set command can be used to manipulate the environment variables.
Environment Variables: Example 3
The following example retrieves the process's environment block using GetEnvironmentStrings()
and prints the contents to the console.
Create a new empty Win32 console application project. Give a suitable project name and change
the project location if needed.

www.installsetupconfig.com
105
Then, add the source file and give it a suitable name.

www.installsetupconfig.com
106
Next, add the following source code.
#include <windows.h>
#include <stdio.h>
int wmain(int argc, WCHAR **argv)
{
LPTSTR lpszVariable;
LPWCH lpvEnv;
// Get a pointer to the environment block
lpvEnv = GetEnvironmentStrings();
// If the returned pointer is NULL, exit
if (lpvEnv == NULL)
{
wprintf(L"GetEnvironmentStrings() failed! Error %d\n",
GetLastError());
return 0;
}
else
wprintf(L"GetEnvironmentStrings() is OK!\n\n");
// Variable strings are separated by NULL byte, and the block is
// terminated by a NULL byte
lpszVariable = (LPTSTR)lpvEnv;

www.installsetupconfig.com
107
while(*lpszVariable)
{
wprintf(L"%s\n", lpszVariable);
lpszVariable += lstrlen(lpszVariable) + 1;
}
// Frees a block of environment strings
if(FreeEnvironmentStrings(lpvEnv) != 0)
wprintf(L"FreeEnvironmentStrings() - a block of environment
strings was freed!\n");
else
wprintf(L"FreeEnvironmentStrings() failed, error %u\n",
GetLastError());
return 1;
}
Build and run the project. The following screenshot is a sample output.

www.installsetupconfig.com
108
Using Thread Local Storage Program Example
Thread local storage (TLS) enables multiple threads of the same process to use an index
allocated by the TlsAlloc() function to store and retrieve a value that is local to the thread. In this
example, an index is allocated when the process starts. When each thread starts, it allocates a
block of dynamic memory and stores a pointer to this memory in the TLS slot using the
TlsSetValue() function. The CommonFunc() function uses the TlsGetValue() function to access
the data associated with the index that is local to the calling thread. Before each thread
terminates, it releases its dynamic memory. Before the process terminates, it calls TlsFree() to
release the index.

www.installsetupconfig.com
109
Create a new empty Win32 console application project. Give a suitable project name and change
the project location if needed.
Then, add the source file and give it a suitable name.

www.installsetupconfig.com
110
Next, add the following source code.
#include <windows.h>
#include <stdio.h>
#define THREADCOUNT 5
// Global variable
DWORD dwTlsIndex;
// Prototype
void ErrorExit(LPWSTR);
void CommonFunc(void)
{
LPVOID lpvData;
// Retrieve a data pointer for the current thread's TLS
lpvData = TlsGetValue(dwTlsIndex);
if ((lpvData == 0) && (GetLastError() != ERROR_SUCCESS))
ErrorExit(L"TlsGetValue() error");
else
wprintf(L"TlsGetValue() is OK!\n");
// Use the data stored for the current thread
wprintf(L"common: Current thread Id is %d: Its data pointer, lpvData =
%lx\n", GetCurrentThreadId(), lpvData);
Sleep(5000);
}

www.installsetupconfig.com
111
DWORD WINAPI ThreadFunc(void)
{
LPVOID lpvData;
// Initialize the TLS index for this thread
// Allocates the specified number of bytes from the heap
lpvData = (LPVOID)LocalAlloc(LPTR, 256);
if(lpvData == NULL)
wprintf(L"LocalAlloc() failed, error %d\n", GetLastError());
else
wprintf(L"Heap memory has been successfully allocated!\n");
if (!TlsSetValue(dwTlsIndex, lpvData))
ErrorExit(L"TlsSetValue() error");
else
wprintf(L"TlsSetValue() is OK lol!\n");
wprintf(L"\nThread Id %d: lpvData = %lx\n", GetCurrentThreadId(),
lpvData);
CommonFunc();
// Release the dynamic memory before the thread returns
lpvData = TlsGetValue(dwTlsIndex);
if (lpvData != 0)
LocalFree((HLOCAL)lpvData);
else
wprintf(L"lpvData already freed!\n");
return 0;
}
int wmain(int argc, WCHAR **argv)
{
DWORD IDThread;
HANDLE hThread[THREADCOUNT];
int i;
DWORD Ret;
// Allocate a TLS index
if ((dwTlsIndex = TlsAlloc()) == TLS_OUT_OF_INDEXES)
ErrorExit(L"TlsAlloc() failed");
else
wprintf(L"TlsAlloc() is OK!\n");
// Create multiple threads
for (i = 0; i < THREADCOUNT; i++)
{
hThread[i] = CreateThread(NULL, // default security attributes
0, // use default stack size
(LPTHREAD_START_ROUTINE) ThreadFunc, // thread function
NULL, // no thread function argument

www.installsetupconfig.com
112
0, // use default creation flags
&IDThread); // returns thread identifier
// Check the return value for success.
if (hThread[i] == NULL)
ErrorExit(L"CreateThread() error\n");
else
wprintf(L"CreateThread() #%u is OK. Thread ID is %u\n", i,
IDThread);
}
for (i = 0; i < THREADCOUNT; i++)
{
Ret = WaitForSingleObject(hThread[i], INFINITE);
wprintf(L"The WaitForSingleObject() return value is 0X%.8x\n", Ret);
}
if(TlsFree(dwTlsIndex) != 0)
wprintf(L"The TLS index, dwTlsIndex was released!\n");
else
wprintf(L"Failed to released TLS index, dwTlsIndex, error %d\n",
GetLastError());
return 0;
}
void ErrorExit(LPWSTR lpszMessage)
{
fwprintf_s(stderr, L"%s\n", lpszMessage);
ExitProcess(0);
}
Build and run the project. The following screenshot is a sample output.
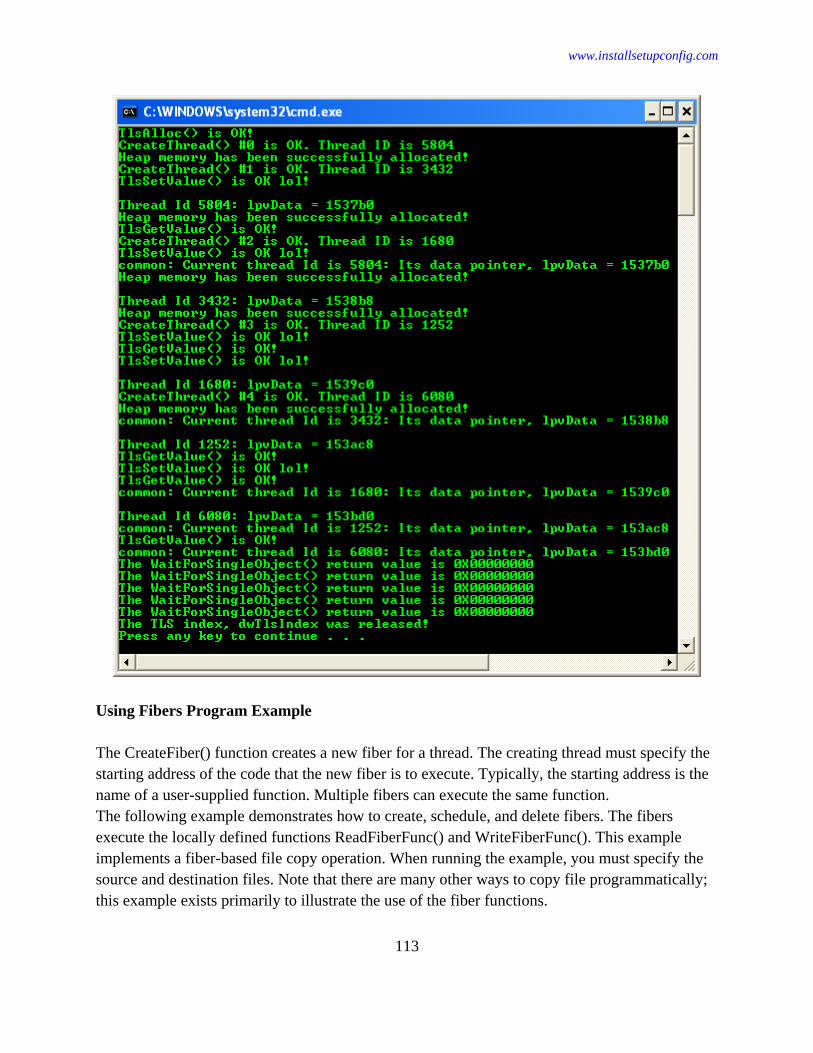
www.installsetupconfig.com
113
Using Fibers Program Example
The CreateFiber() function creates a new fiber for a thread. The creating thread must specify the
starting address of the code that the new fiber is to execute. Typically, the starting address is the
name of a user-supplied function. Multiple fibers can execute the same function.
The following example demonstrates how to create, schedule, and delete fibers. The fibers
execute the locally defined functions ReadFiberFunc() and WriteFiberFunc(). This example
implements a fiber-based file copy operation. When running the example, you must specify the
source and destination files. Note that there are many other ways to copy file programmatically;
this example exists primarily to illustrate the use of the fiber functions.

www.installsetupconfig.com
114
Create a new empty Win32 console application project. Give a suitable project name and change
the project location if needed.
Then, add the source file and give it a suitable name.

www.installsetupconfig.com
115
Next, add the following source code.
#include <windows.h>
#include <stdio.h>
void __stdcall ReadFiberFunc(LPVOID lpParameter);
void __stdcall WriteFiberFunc(LPVOID lpParameter);
void DisplayFiberInfo(void);
typedef struct
{
DWORD dwParameter; // DWORD parameter to fiber (unused)
DWORD dwFiberResultCode; // GetLastError() result code
HANDLE hFile; // handle to operate on
DWORD dwBytesProcessed; // number of bytes processed
} FIBERDATASTRUCT, *PFIBERDATASTRUCT, *LPFIBERDATASTRUCT;
#define RTN_OK 0
#define RTN_USAGE 1
#define RTN_ERROR 13
#define BUFFER_SIZE 32768 // read/write buffer size
#define FIBER_COUNT 3 // max fibers (including primary)
#define PRIMARY_FIBER 0 // array index to primary fiber
#define READ_FIBER 1 // array index to read fiber
#define WRITE_FIBER 2 // array index to write fiber
LPVOID g_lpFiber[FIBER_COUNT];

www.installsetupconfig.com
116
LPBYTE g_lpBuffer;
DWORD g_dwBytesRead;
int wmain(int argc, WCHAR *argv[])
{
LPFIBERDATASTRUCT fs;
// Validate arguments
if (argc != 3)
{
wprintf(L"Usage: %s <SourceFile> <DestinationFile>\n", argv[0]);
wprintf(L"Example: %s testsrcfile.txt testdstfile.txt\n",argv[0]);
// Returns 1
return RTN_USAGE;
}
// Allocate storage for the fiber data structures
fs = (LPFIBERDATASTRUCT)HeapAlloc(GetProcessHeap(), 0,
sizeof(FIBERDATASTRUCT) * FIBER_COUNT);
if (fs == NULL)
{
wprintf(L"HeapAlloc() error %d\n", GetLastError());
return RTN_ERROR;
}
else
wprintf(L"Heap was allocated for LPFIBERDATASTRUCT struct
successfully!\n");
// Allocate storage for the read/write buffer
g_lpBuffer = (LPBYTE)HeapAlloc(GetProcessHeap(), 0, BUFFER_SIZE);
if (g_lpBuffer == NULL)
{
wprintf(L"HeapAlloc() error %d\n", GetLastError());
return RTN_ERROR;
}
else
wprintf(L"Heap was allocated for buffer successfully!\n");
// Open the source file
fs[READ_FIBER].hFile = CreateFile(
argv[1],
GENERIC_READ,
FILE_SHARE_READ,
NULL,
OPEN_EXISTING,
FILE_FLAG_SEQUENTIAL_SCAN,
NULL
);
if (fs[READ_FIBER].hFile == INVALID_HANDLE_VALUE)
{
wprintf(L"CreateFile() error %d\n", GetLastError());
return RTN_ERROR;
}

www.installsetupconfig.com
117
else
wprintf(L"CreateFile() - file was opened for reading
successfully!\n");
// Open the destination file
fs[WRITE_FIBER].hFile = CreateFile(
argv[2],
GENERIC_WRITE,
0,
NULL,
CREATE_NEW,
FILE_FLAG_SEQUENTIAL_SCAN,
NULL
);
if (fs[WRITE_FIBER].hFile == INVALID_HANDLE_VALUE)
{
wprintf(L"CreateFile() error %d\n", GetLastError());
return RTN_ERROR;
}
else
wprintf(L"CreateFile() - file was created/opened for writing
successfully!\n");
// Convert thread to a fiber, to allow scheduling other fibers
g_lpFiber[PRIMARY_FIBER]=ConvertThreadToFiber(&fs[PRIMARY_FIBER]);
if (g_lpFiber[PRIMARY_FIBER] == NULL)
{
wprintf(L"ConvertThreadToFiber() error %d\n", GetLastError());
return RTN_ERROR;
}
else
wprintf(L"ConvertThreadToFiber() is pretty fine!\n");
// Initialize the primary fiber data structure. We don't use
// the primary fiber data structure for anything in this sample.
fs[PRIMARY_FIBER].dwParameter = 0;
fs[PRIMARY_FIBER].dwFiberResultCode = 0;
fs[PRIMARY_FIBER].hFile = INVALID_HANDLE_VALUE;
// Create the Read fiber
g_lpFiber[READ_FIBER]=CreateFiber(0,ReadFiberFunc,&fs[READ_FIBER]);
if (g_lpFiber[READ_FIBER] == NULL)
{
wprintf(L"CreateFiber() error %d\n", GetLastError());
return RTN_ERROR;
}
else
wprintf(L"CreateFiber() - read fiber was created successfully!\n");
fs[READ_FIBER].dwParameter = 0x12345678;
// Create the Write fiber

www.installsetupconfig.com
118
g_lpFiber[WRITE_FIBER]=CreateFiber(0,WriteFiberFunc,&fs[WRITE_FIBER]);
if (g_lpFiber[WRITE_FIBER] == NULL)
{
wprintf(L"CreateFiber() error %d\n", GetLastError());
return RTN_ERROR;
}
else
wprintf(L"CreateFiber() - write fiber was created successfully!\n");
fs[WRITE_FIBER].dwParameter = 0x54545454;
// Switch to the read fiber or schedules a fiber
// This function does not return a value.
SwitchToFiber(g_lpFiber[READ_FIBER]);
// We have been scheduled again. Display results from the
// read/write fibers
wprintf(L"ReadFiber: result code is %lu, %lu bytes processed\n",
fs[READ_FIBER].dwFiberResultCode, fs[READ_FIBER].dwBytesProcessed);
wprintf(L"WriteFiber: result code is %lu, %lu bytes processed\n",
fs[WRITE_FIBER].dwFiberResultCode, fs[WRITE_FIBER].dwBytesProcessed);
// Delete the fibers
// This function does not return a value.
DeleteFiber(g_lpFiber[READ_FIBER]);
DeleteFiber(g_lpFiber[WRITE_FIBER]);
// Close handles
if(CloseHandle(fs[READ_FIBER].hFile) != 0)
wprintf(L"fs[READ_FIBER].hFile handle was closed successfully!\n");
else
wprintf(L"Failed to close fs[READ_FIBER].hFile handle, error %d\n",
GetLastError());
if(CloseHandle(fs[WRITE_FIBER].hFile) != 0)
wprintf(L"fs[WRITE_FIBER].hFile handle was closed successfully!\n");
else
wprintf(L"Failed to close fs[WRITE_FIBER].hFile handle, error %d\n",
GetLastError());
// Free allocated memory
if(HeapFree(GetProcessHeap(), 0, g_lpBuffer) != 0)
wprintf(L"Heap for g_lpBuffer was freed!\n");
else
wprintf(L"Failed to free g_lpBuffer heap, error %d\n",
GetLastError());
if(HeapFree(GetProcessHeap(), 0, fs) != 0)
wprintf(L"Heap for fs was freed!\n");
else
wprintf(L"Failed to free fs heap, error %d\n", GetLastError());
return RTN_OK;

www.installsetupconfig.com
119
}
void __stdcall ReadFiberFunc(LPVOID lpParameter)
{
LPFIBERDATASTRUCT fds = (LPFIBERDATASTRUCT)lpParameter;
// If this fiber was passed NULL for fiber data, just return,
// causing the current thread to exit
if (fds == NULL)
{
wprintf(L"Passed NULL fiber data, exiting current thread.\n");
return;
}
// Display some information pertaining to the current fiber
DisplayFiberInfo();
fds->dwBytesProcessed = 0;
while (1)
{
// Read data from file specified in the READ_FIBER structure
if (!ReadFile(fds->hFile, g_lpBuffer, BUFFER_SIZE, &g_dwBytesRead,
NULL))
{
break;
}
// if we reached EOF, break
if (g_dwBytesRead == 0)
break;
// Update number of bytes processed in the fiber data structure
fds->dwBytesProcessed += g_dwBytesRead;
// Switch to the write fiber
// This function does not return a value.
wprintf(L"Switching to write fiber!\n");
SwitchToFiber(g_lpFiber[WRITE_FIBER]);
} // while
// Update the fiber result code
fds->dwFiberResultCode = GetLastError();
// Switch back to the primary fiber
wprintf(L"Switching to primary fiber!\n");
SwitchToFiber(g_lpFiber[PRIMARY_FIBER]);
}
void __stdcall WriteFiberFunc(LPVOID lpParameter)
{
LPFIBERDATASTRUCT fds = (LPFIBERDATASTRUCT)lpParameter;
DWORD dwBytesWritten;
// If this fiber was passed NULL for fiber data, just return,

www.installsetupconfig.com
120
// causing the current thread to exit
if (fds == NULL)
{
wprintf(L"Passed NULL fiber data; exiting current thread.\n");
return;
}
else
wprintf(L"Some fiber data was passed...\n");
// Display some information pertaining to the current fiber
DisplayFiberInfo();
// Assume all writes succeeded. If a write fails, the fiber
// result code will be updated to reflect the reason for failure
fds->dwBytesProcessed = 0;
fds->dwFiberResultCode = ERROR_SUCCESS;
while (1)
{
// Write data to the file specified in the WRITE_FIBER structure
if (!WriteFile(fds->hFile, g_lpBuffer, g_dwBytesRead,
&dwBytesWritten, NULL))
{
// If an error occurred writing, break
break;
}
// Update number of bytes processed in the fiber data structure
fds->dwBytesProcessed += dwBytesWritten;
// Switch back to the read fiber
wprintf(L"Switching to read fiber...\n");
SwitchToFiber(g_lpFiber[READ_FIBER]);
} // while
// If an error occurred, update the fiber result code...
fds->dwFiberResultCode = GetLastError();
// ...and switch to the primary fiber
wprintf(L"Switching to primary fiber...\n");
SwitchToFiber(g_lpFiber[PRIMARY_FIBER]);
}
void DisplayFiberInfo(void)
{
LPFIBERDATASTRUCT fds = (LPFIBERDATASTRUCT)GetFiberData();
LPVOID lpCurrentFiber = GetCurrentFiber();
// Determine which fiber is executing, based on the fiber address
if (lpCurrentFiber == g_lpFiber[READ_FIBER])
wprintf(L"Read fiber entered...");
else
{
if (lpCurrentFiber == g_lpFiber[WRITE_FIBER])
wprintf(L"Write fiber entered...");

www.installsetupconfig.com
121
else
{
if (lpCurrentFiber == g_lpFiber[PRIMARY_FIBER])
wprintf(L"Primary fiber entered...");
else
wprintf(L"Unknown fiber entered...");
}
}
// Display dwParameter from the current fiber data structure
wprintf(L"(dwParameter is 0x%lx)\n", fds->dwParameter);
}
Build the project.
Create a source file (in this case sourcefile.txt) under the project’s Debug folder and put some
texts.
Run the project.

www.installsetupconfig.com
122
Check the destination file under the project’s Debug folder.
This example makes use of a fiber data structure which is used to determine the behavior and
state of the fiber. One data structure exists for each fiber; the pointer to the data structure is
passed to the fiber at fiber creation time using the parameter of the FiberProc() function.

www.installsetupconfig.com
123
The calling thread calls the ConvertThreadToFiber() function, which enables fibers to be
scheduled by the caller. This also allows the fiber to be scheduled by another fiber. Next, the
thread creates two additional fibers, one that performs read operations against a specified file,
and another that performs the write operations against a specified file.
The primary fiber calls the SwitchToFiber() function to schedule the read fiber. After a
successful read, the read fiber schedules the write fiber. After a successful write in the write
fiber, the write fiber schedules the read fiber. When the read/write cycle has completed, the
primary fiber is scheduled, which results in the display of the read/write status. If an error occurs
during the read or write operations, the primary fiber is scheduled and example displays the
status of the operation. Prior to process termination, the process frees the fibers using the
DeleteFiber() function, closes the file handles, and frees the allocated memory.
Using the Thread Pool Functions Program Example (Vista/Server 2008)
The following working example creates a custom thread pool, creates a work item and a thread
pool timer, and associates them with a cleanup group. The pool consists of one persistent thread.
It demonstrates the use of the following thread pool functions:
1. CloseThreadpool()
2. CloseThreadpoolCleanupGroup()
3. CloseThreadpoolCleanupGroupMembers()
4. CloseThreadpoolWait()
5. CloseThreadpoolWork()
6. CreateThreadpool()
7. CreateThreadpoolCleanupGroup()
8. CreateThreadpoolTimer()
9. CreateThreadpoolWait()
10. CreateThreadpoolWork()
11. InitializeThreadpoolEnvironment()
12. SetThreadpoolCallbackCleanupGroup()
13. SetThreadpoolCallbackPool()
14. SetThreadpoolThreadMaximum()
15. SetThreadpoolThreadMinimum()
16. SetThreadpoolTimer()
17. SetThreadpoolWait()
18. SubmitThreadpoolWork()
19. WaitForThreadpoolWaitCallbacks()
For the above mentioned functions the following info should be applied.

www.installsetupconfig.com
124
Minimum supported client: Windows Vista
Minimum supported server: Windows Server 2008
Header: Winbase.h (include Windows.h)
Library: Kernel32.lib
DLL: Kernel32.dll
Create a new empty Win32 console application project. Give a suitable project name and change
the project location if needed.
Then, add the source file and give it a suitable name.

www.installsetupconfig.com
125
Next, add the following source code.
// This just a program skeleton
#include <windows.h>
#include <stdio.h>
// Thread pool wait callback function template
void CALLBACK MyWaitCallback(
PTP_CALLBACK_INSTANCE Instance,
PVOID Parameter,
PTP_WAIT Wait,
TP_WAIT_RESULT WaitResult
)
{
wprintf(L"MyWaitCallback() - Wait callback is over...\n");
// Do something when the wait is over
}
// Thread pool timer callback function template
void CALLBACK MyTimerCallback(
PTP_CALLBACK_INSTANCE Instance,
PVOID Parameter,
PTP_TIMER Timer
)
{
wprintf(L"MyTimerCallback() - Timer fireddddd.....\n");
// Do something when the timer fires
}

www.installsetupconfig.com
126
// This is the thread pool work callback function.
// The callback demonstrates correct behavior when changing the
// state of the thread inside the callback function.
//
// Any changes to the thread state must be restored to original
// before exiting the callback routine.
void CALLBACK MyWorkCallback(
PTP_CALLBACK_INSTANCE Instance,
PVOID Parameter,
PTP_WORK Work
)
{
BOOL bRet = FALSE;
DWORD dwPriorityOriginal = 0;
// Record the original thread priority
dwPriorityOriginal = GetThreadPriority(GetCurrentThread());
if (dwPriorityOriginal == THREAD_PRIORITY_ERROR_RETURN)
{
wprintf(L"GetThreadPriority() failed, error is %u\n",
GetLastError());
return;
}
// Increase the priority of the thread pool thread
bRet = SetThreadPriority(GetCurrentThread(),
THREAD_PRIORITY_ABOVE_NORMAL);
if (bRet == FALSE)
{
wprintf(L"SetThreadPriority() failed, error is %u\n",
GetLastError());
return;
}
// Perform tasks at increased priority
{
wprintf(L"Performing task at the higher level of priority...\n");
}
// Restore thread state by resetting the original priority
bRet = SetThreadPriority(GetCurrentThread(), dwPriorityOriginal);
// If restore fails, maybe retry or throw an exception. Otherwise,
// the thread will continue to execute other work items at increased
priority.
if (bRet == FALSE)
{
wprintf(L"Fatal Error! SetThreadPriority() failed, error is
%u\n", GetLastError());
return;
}
return;
}

www.installsetupconfig.com
127
void DemoCleanupPersistentWorkTimer()
{
BOOL bRet = FALSE;
PTP_WORK work = NULL;
PTP_TIMER timer = NULL;
PTP_POOL pool = NULL;
PTP_WORK_CALLBACK workcallback = MyWorkCallback;
PTP_TIMER_CALLBACK timercallback = MyTimerCallback;
TP_CALLBACK_ENVIRON CallBackEnviron;
PTP_CLEANUP_GROUP cleanupgroup = NULL;
FILETIME FileDueTime;
ULARGE_INTEGER ulDueTime;
UINT rollback = 0;
InitializeThreadpoolEnvironment(&CallBackEnviron);
// Create a custom, dedicated thread pool
pool = CreateThreadpool(NULL);
if (pool == NULL)
{
wprintf(L"CreateThreadpool() failed, error is %u\n", GetLastError());
goto main_cleanup;
}
// pool creation succeeded
rollback = 1;
// The thread pool is made persistent simply by setting
// both the minimum and maximum threads to 1.
SetThreadpoolThreadMaximum(pool, 1);
bRet = SetThreadpoolThreadMinimum(pool, 1);
if (bRet == FALSE)
{
wprintf(L"SetThreadpoolThreadMinimum() failed, error is %u\n",
GetLastError());
goto main_cleanup;
}
// Create a cleanup group for this thread pool
cleanupgroup = CreateThreadpoolCleanupGroup();
if (cleanupgroup == NULL)
{
wprintf(L"CreateThreadpoolCleanupGroup() failed, error is %u\n",
GetLastError());
goto main_cleanup;
}
// Cleanup group creation succeeded
rollback = 2;
// Associate the callback environment with our thread pool

www.installsetupconfig.com
128
SetThreadpoolCallbackPool(&CallBackEnviron, pool);
// Associate the cleanup group with our thread pool
SetThreadpoolCallbackCleanupGroup(&CallBackEnviron, cleanupgroup, NULL);
// Create work with the callback environment
work = CreateThreadpoolWork(workcallback, NULL, &CallBackEnviron);
if (work == NULL)
{
wprintf(L"CreateThreadpoolWork() failed, error is %u\n",
GetLastError());
goto main_cleanup;
}
// Creation of work succeeded
rollback = 3;
// Submit the work to the pool. Because this was a pre-allocated
// work item (using CreateThreadpoolWork), it is guaranteed to execute
SubmitThreadpoolWork(work);
// Create a timer with the same callback environment
timer = CreateThreadpoolTimer(timercallback, NULL, &CallBackEnviron);
if (timer == NULL)
{
wprintf(L"CreateThreadpoolTimer() failed, error is %u\n",
GetLastError());
goto main_cleanup;
}
// Timer creation succeeded
rollback = 4;
// Set the timer to fire in one second
ulDueTime.QuadPart = (LONGLONG) -(1 * 10 * 1000 * 1000);
FileDueTime.dwHighDateTime = ulDueTime.HighPart;
FileDueTime.dwLowDateTime = ulDueTime.LowPart;
SetThreadpoolTimer(timer, &FileDueTime, 0, 0);
// Delay for the timer to be fired
Sleep(1500);
// Wait for all callbacks to finish.
// CloseThreadpoolCleanupGroupMembers also calls the cleanup
// functions for all the individual objects in the specified
// cleanup group.
CloseThreadpoolCleanupGroupMembers(cleanupgroup, FALSE, NULL);
// Already cleaned up the work item with the
// CloseThreadpoolCleanupGroupMembers, so set rollback to 2.
rollback = 2;
goto main_cleanup;
main_cleanup:

www.installsetupconfig.com
129
// Clean up any individual pieces manually
// Notice the fall through structure of the switch.
// Clean up in reverse order.
switch (rollback)
{
case 4:
case 3:
// Clean up the cleanup group members
CloseThreadpoolCleanupGroupMembers(cleanupgroup, FALSE, NULL);
case 2:
// Clean up the cleanup group
CloseThreadpoolCleanupGroup(cleanupgroup);
case 1:
// Clean up the pool
CloseThreadpool(pool);
default:
break;
}
return;
}
void DemoNewRegisterWait()
{
PTP_WAIT Wait = NULL;
PTP_WAIT_CALLBACK waitcallback = MyWaitCallback;
HANDLE hEvent = NULL;
UINT i = 0;
UINT rollback = 0;
// Create an auto-reset event
hEvent = CreateEvent(NULL, FALSE, FALSE, NULL);
if (hEvent == NULL)
{
// Error Handling
wprintf(L"CreateEvent() failed, error is %u\n", GetLastError());
return;
}
// CreateEvent() succeeded
rollback = 1;
Wait = CreateThreadpoolWait(waitcallback, NULL, NULL);
if(Wait == NULL)
{
wprintf(L"CreateThreadpoolWait() failed, error is %u\n",
GetLastError());
goto new_wait_cleanup;
}
// CreateThreadpoolWait succeeded
rollback = 2;
// Need to re-register the event with the wait object
// each time before signaling the event to trigger the wait callback

www.installsetupconfig.com
130
for (i = 0; i < 5; i ++)
{
SetThreadpoolWait(Wait, hEvent, NULL);
SetEvent(hEvent);
// Delay for the waiter thread to act if necessary
Sleep(500);
// Block here until the callback function is done executing
WaitForThreadpoolWaitCallbacks(Wait, FALSE);
}
new_wait_cleanup:
switch (rollback)
{
case 2:
// Unregister the wait by setting the event to NULL
SetThreadpoolWait(Wait, NULL, NULL);
// Close wait
CloseThreadpoolWait(Wait);
case 1:
// Close event
CloseHandle(hEvent);
default:
break;
}
return;
}
int wmain(int argc, WCHAR **argv)
{
DemoNewRegisterWait();
DemoCleanupPersistentWorkTimer();
return 0;
}
Build and run the project. The following is the sample output when run on Windows XP Pro
SP2. We need Windows Vista/Windows Server 2008.

www.installsetupconfig.com
131
The following section is left for you to be explored: Process and Thread Reference