windows iot core application development: headed blinky · windows iot core application...
TRANSCRIPT

Windows IoT Core Application Development: Headed BlinkyCreated by Rick Lesniak
Last updated on 2016-11-02 05:29:27 PM UTC

2349
13151718
Guide Contents
Guide ContentsIntroductionAdd BlinkyHeaded project to SolutionGUI DesignerMain ProgramCodeRunning BlinkyHeadedFAQ
© Adafruit Industries https://learn.adafruit.com/windows-iot-application-development-headed-blinky
Page 2 of 18

IntroductionWe’ll go through a simple Headed application. As mentioned in the previous tutorial, a Headed application differs from a Headless application inthat it has a graphical user interface.
On a Pi, the user interface will appear on your HDMI monitor (currently, the Adafruit PiTFT is not supported by Windows 10 IoT Core).
IMPORTANT: Before going forward, make sure you have successfully completed the BlinkyHeadless app. This tutorial assumes you will bebuilding on that.Go back to Headless Application tutorialhttp://adafru.it/pcs
© Adafruit Industries https://learn.adafruit.com/windows-iot-application-development-headed-blinky
Page 3 of 18

Add BlinkyHeaded project to SolutionAs mentioned in the Blinky Headless tutorial, you can have multiple projects inside a single solution. We will be adding the BlinkyHeaded project tothe Blinky solution, alongside the BlinkyHeadless project.
To get started, follow thse steps:
In the Solution Explorer, right-click on Solution Blinky, and place the cursor over Add. This will bring up another popup menu. Select NewProject
The Add New Project window will open. On the left, navigate to Installed > Visual C# > Windows > Universal, and select Blank App(Universal Windows)Give the project a name (“BlinkyHeaded”).Leave the Location path alone. Visual Studio will automatically put the project inside the Blinky Solution folder.Click OK
A new dialog window will open, asking you to choose the target and minimum versions your BlinkyHeaded app will support. Choose the target and
© Adafruit Industries https://learn.adafruit.com/windows-iot-application-development-headed-blinky
Page 4 of 18

Minimum versions to match the version of Windows IoT Core you have running on your Raspberry Pi. If you’re not sure, check the main HDMIdisplay or Device Portal to see the installed version.
Click OK and the BlinkyHeaded project will appear in the Blinky Solution:
Even though we used a Windows IoT template for creating our solution, we still need to add the IoT framework to our BlinkyHeaded project, the
© Adafruit Industries https://learn.adafruit.com/windows-iot-application-development-headed-blinky
Page 5 of 18

same as we did in BlinkyHeadless. In the Solution Explorer, right click on the line that says References, and select Add Reference…
This will bring up the References Manager. In the References Manager Window, navigate to Universal Windows > Extensions. In the list, findWindows IoT Extensions for the UWP. There may be more than one item with this name. To the right of each item, you’ll see a version number.Select the items that match the Target and Minimum versions you entered earlier.
When you select an item, a checkbox will appear to the left of the item. Check the box for each item you select.
© Adafruit Industries https://learn.adafruit.com/windows-iot-application-development-headed-blinky
Page 6 of 18

Click OK to add the references to your project.
One more thing to do: We need to tell Visual Studio that we are now working on BlinkyHeaded. Right-click on BlinkyHeaded, and select Set asStartUp Project in the popup.
© Adafruit Industries https://learn.adafruit.com/windows-iot-application-development-headed-blinky
Page 7 of 18

© Adafruit Industries https://learn.adafruit.com/windows-iot-application-development-headed-blinky
Page 8 of 18

GUI DesignerWhen the BlinkyHeaded project is added to the solution, Visual Studio will automatically generate several files, and it will open one of these files:App.xaml.cs
This file sets up the application and we really don’t need to change anything in it. You can close the tab and open the MainPage.xaml file instead. InSolution Explorer, find MainPage.xaml and double-click on it. This brings up an editing window where you can graphically design your user interface.
The Raspberry Pi is a 10” IoT device, so select that from the box at the upper left of the graphics-editing window.
Now, locate the Ellipse control in the Toolbox, under All XAML Controls. Drag and drop an ellipse on to the edit window. Drag it around until it’scentered in the upper half of the panel:
We're going to 'blink' the ellipse on the display, along with blinking the real LED.
In the Properties panel, give the ellipse a name, LED. In the BlinkyHeader program, we’re planning to blink a real LED, and also blink this ellipse tomatch the real LED.
Now, drag a text block from the toolbox, and drop it underneath the ellipse. In Properties, give it a name, DelayText. In the Common box ofProperties, change the text to 500ms. In the Text box of Properties, change the font size to 24 px.
© Adafruit Industries https://learn.adafruit.com/windows-iot-application-development-headed-blinky
Page 9 of 18

Now, center the text block under the ellipse.
Add one more TextBlock underneath the DelayText block. Name it GpioStatus, and change the text to Waiting to initialize GPIO... Make the font size 24 px,and center the box:
© Adafruit Industries https://learn.adafruit.com/windows-iot-application-development-headed-blinky
Page 10 of 18

Finally, we’re going to group our ellipse and text blocks into a StackPanel. Select all three objects by dragging over them with the cursor. Right-click on the ellipse, and move the cursor to Group Into. From the popup, select StackPanel:
You'll have to play around with the GUI editor to get things right. Don't be afraid to explore the properties and experiment with items from thetoolbox (and don't be afraid to make mistakes!).
If you want to get back to the gui design used in this tutorial, simply delete thecode in the box underneath the GUI editing window and replace itwith the following
<Page x:Class="BlinkyHeaded.MainPage" xmlns="http://schemas.microsoft.com/winfx/2006/xaml/presentation" xmlns:x="http://schemas.microsoft.com/winfx/2006/xaml" xmlns:local="using:BlinkyHeaded" xmlns:d="http://schemas.microsoft.com/expression/blend/2008" xmlns:mc="http://schemas.openxmlformats.org/markup-compatibility/2006"
© Adafruit Industries https://learn.adafruit.com/windows-iot-application-development-headed-blinky
Page 11 of 18

mc:Ignorable="d">
<Grid Background="{ThemeResource ApplicationPageBackgroundThemeBrush}"> <StackPanel Margin="373,170,371,261" Orientation="Vertical"> <Ellipse x:Name="LED" Fill="LightGray" HorizontalAlignment="Center" Height="100" Margin="0,25,0,0" Stroke="White" VerticalAlignment="Top" Width="100"/> <TextBlock x:Name="DelayText" HorizontalAlignment="Center" Margin="0,50,0,0" Text="500 ms" VerticalAlignment="Top" FontSize="24" TextAlignment="Center" Width="100"/> <TextBlock x:Name="GpioStatus" HorizontalAlignment="Center" Text="Waiting to initialize GPIO..." VerticalAlignment="Center" TextAlignment="Center" FontSize="24" Height="34" Margin="0,50,0,0" Width="270"/>
</StackPanel>
</Grid></Page>
© Adafruit Industries https://learn.adafruit.com/windows-iot-application-development-headed-blinky
Page 12 of 18

Main ProgramFor the purposes of this tutorial, we're going to be using screen captures to illustrate the code in this section. Just follow along and try tounderstand each step. The full code is available in the next section.
To open the graphics editor, we double-clicked on MainPage.xaml in the Solution Explorer. If you single-click on it instead, MainPage.xaml.cs will beshown below. Double-click on MainPage.xaml.cs The file will open in a new edit window, and this will be our main program file:
Headed applications support threading, just like headless applications. But, there’s a detail to be aware of: user interface operations must alwaysoccur on the user-interface thread. The MainPage function is originally called on the UI thread, so we need to arrange things such that our UIupdates always happen on this same thread.
Although we don’t need to update the real LED on the UI thread, we do need to update the virtual LED on the screen from the main thread.
In BlinkyHeadless, we started a new thread for the timer. In BlinkyHeaded, we will use a DispatcherTimer instead. This timer is guaranteed to executeon the main UI thread. It is said to be “synchronous”. Meaning that our Timer-Tick routine will be called when the UI thread isn’t doing anything else.The BlinkyHeadless timer was “asynchronous”, that is, it could happen at any time, regardless of what the main thread is doing.
Let’s add the timer to the function MainPage:
Note the error line underneath Timer_Tick. That’s because we haven’t declared the Timer_Tick function yet. Let’s do that next.
Timer_Tick is going to look just about the same as Timer_Tick from BlinkyHeadless. But we’re going to add the code to “blink” the LED on screen. Wedo that by filling the ellipse with either red or gray color.
Our colors will be controlled by the Brush object. We’ll need a gray_brush object and a red_brush object. These will be declared as global objects, andwe’ll put them right after the DispatcherTimer global object:
Recall that we named the ellipse LED. Filling the ellipse object is straightforward; we just call the Fill method of the LED object. Here’s our Timer_Tick
function:
© Adafruit Industries https://learn.adafruit.com/windows-iot-application-development-headed-blinky
Page 13 of 18

Of course, we have some errors because we haven’t declared our Gpio objects yet. We’ll need a InitGPIO function, just like we had inBlinkyHeadless. We’ll also need the same set of Gpio variables we had in BlinkyHeadless:
We’ll just copy the InitGPIO function over from BlinkyHeadless, and add some messages to take advantage of the GpioStatus text block we includedin the UI:
We still have some syntax errors, but those will go away when include our using statement for Windows.Devices.Gpio
All that’s left to do is call InitGPIO from the MainPage function, start the timer, and the program is done:
© Adafruit Industries https://learn.adafruit.com/windows-iot-application-development-headed-blinky
Page 14 of 18

CodeHere's the final version of MainPage.xaml.cs There are other source code files in the BlinkyHeaded project, but they are automatically generated byVisual Studio, and we don't need to be concerned with them now.
using System; using System.Collections.Generic; using System.IO; using System.Linq; using System.Runtime.InteropServices.WindowsRuntime; using Windows.Devices.Gpio; using Windows.Foundation; using Windows.Foundation.Collections; using Windows.UI.Xaml; using Windows.UI.Xaml.Controls; using Windows.UI.Xaml.Controls.Primitives; using Windows.UI.Xaml.Data; using Windows.UI.Xaml.Input; using Windows.UI.Xaml.Media; using Windows.UI.Xaml.Navigation; // The Blank Page item template is documented at http://go.microsoft.com/fwlink/?LinkId=402352&clcid=0x409 namespace BlinkyHeaded { /// <summary> /// An empty page that can be used on its own or navigated to within a Frame. /// </summary> /// public sealed partial class MainPage : Page { private DispatcherTimer timer; private SolidColorBrush redBrush = newSolidColorBrush(Windows.UI.Colors.Red); private SolidColorBrush grayBrush = newSolidColorBrush(Windows.UI.Colors.LightGray); private const int LED_PIN = 5; private GpioPin pin; private GpioPinValue pinValue; public MainPage() { this.InitializeComponent(); timer = new DispatcherTimer(); timer.Interval = TimeSpan.FromMilliseconds(500); timer.Tick += Timer_Tick; InitGPIO(); if (pin != null) { timer.Start(); } } private void InitGPIO() { GpioController gpio = GpioController.GetDefault(); // Show an error if there is no GPIO controller if (gpio == null) { pin = null; GpioStatus.Text = "No GPIO controller on device."; return; } pin = gpio.OpenPin(LED_PIN); pinValue = GpioPinValue.High; pin.Write(pinValue); pin.SetDriveMode(GpioPinDriveMode.Output); GpioStatus.Text = "GPIO pin initialized."; } private void Timer_Tick(object sender, object e)
© Adafruit Industries https://learn.adafruit.com/windows-iot-application-development-headed-blinky
Page 15 of 18
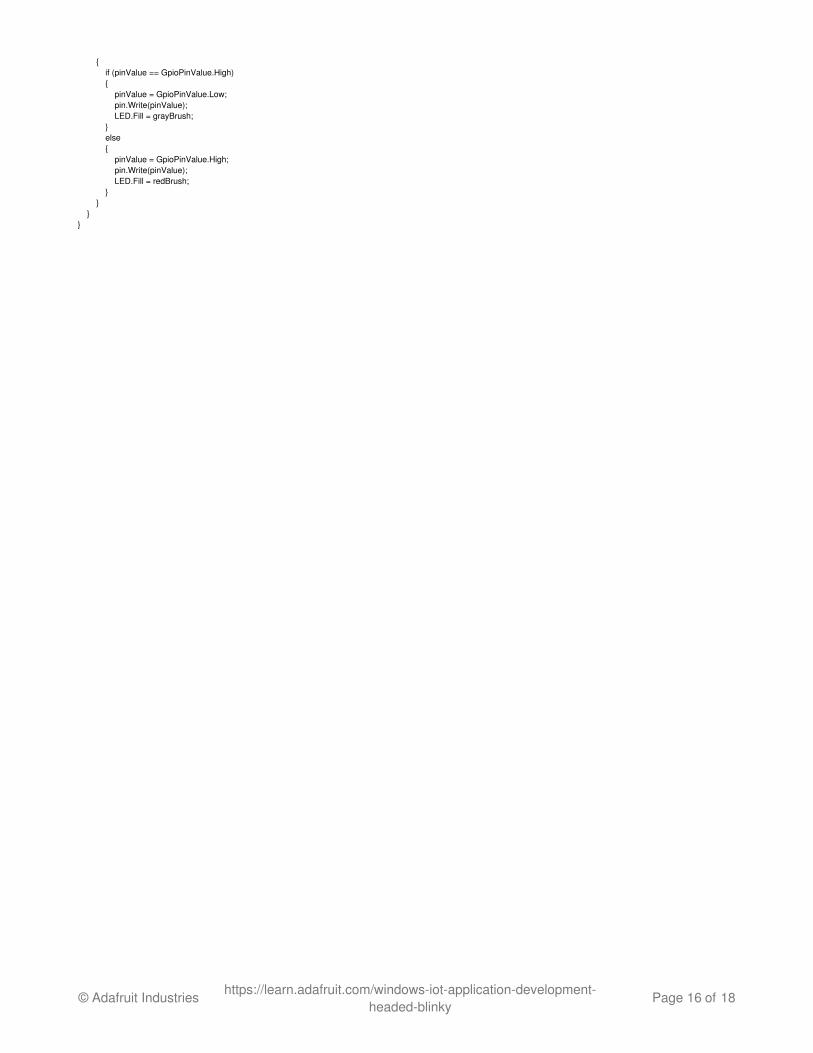
{ if (pinValue == GpioPinValue.High) { pinValue = GpioPinValue.Low; pin.Write(pinValue); LED.Fill = grayBrush; } else { pinValue = GpioPinValue.High; pin.Write(pinValue); LED.Fill = redBrush; } } } }
© Adafruit Industries https://learn.adafruit.com/windows-iot-application-development-headed-blinky
Page 16 of 18
Running BlinkyHeadedRunning the application from Visual Studio is the same as running BlinkyHeadless. Set the run button to Remote Machine, and click.
Be prepared to wait several minutes for BlinkyHeaded to start up the first time. Be patient!
Remember, you can set breakpoints and single-step in the debugger, just as we did in BlinkyHeadless.
Next: Set Your Application to Run at Startuphttp://adafru.it/psD
© Adafruit Industries https://learn.adafruit.com/windows-iot-application-development-headed-blinky
Page 17 of 18
FAQI get a deployment error from Visual Studio: DEP0001 : Unexpected Error: -2145615869
This error typically happens after you reboot your Pi. For whatever reason, Visual Studio is no longer able to communicate with it. The solution isto simply close and restart Visual Studio. Do this every time you reboot your Pi.
© Adafruit Industries Last Updated: 2016-11-02 05:29:26 PM UTC Page 18 of 18