windows azure® web sites - 第七城市pdf.th7.cn/down/files/1312/windows azure web sites.pdf ·...
TRANSCRIPT

WINDOWS AZURE® WEB SITES
INTRODUCTION . . . . . . . . . . . . . . . . . . . . . . . . . . . . . . . . . . . . . . . . . . . . . . . . . . . . . . . . . . x
CHAPTER 1 Introduction to Windows Azure and Fundamental Concepts . . . . . . 1
CHAPTER 2 Moving an Application to the Cloud . . . . . . . . . . . . . . . . . . . . . . . . . . 13
CHAPTER 3 Managing Deployments via Source Control. . . . . . . . . . . . . . . . . . . . 26
CHAPTER 4 Managing Windows Azure Web Sites from the Console . . . . . . . . . 39
CHAPTER 5 Working with Other Flavors of Windows Azure Web Sites . . . . . . . 52
CHAPTER 6 Using Peripheral Features with Windows Azure Web Sites . . . . . . . 61
CHAPTER 7 Scaling, Confi guring, and Monitoring Your Site . . . . . . . . . . . . . . . . . 70
CHAPTER 8 Deploying and Confi guring a Cloud Application . . . . . . . . . . . . . . . . 82
www.it-ebooks.info
ACQUISITIONS EDITORMary James
SENIOR PROJECT EDITORAmi Frank Sullivan
TECHNICAL EDITORSBruce Johnson
Cory Fowler
SENIOR PRODUCTION EDITORKathleen Wisor
COPY EDITORLuann Rou
EDITORIAL MANAGERMary Beth Wakefi eld
FREELANCER EDITORIAL MANAGERRosemarie Graham
ASSOCIATE DIRECTOR OF MARKETINGDavid Mayhew
MARKETING MANAGERAshley Zurcher
VICE PRESIDENT AND EXECUTIVE GROUP PUBLISHERRichard Swadley
VICE PRESIDENT AND EXECUTIVE PUBLISHERNeil Edde
ASSOCIATE PUBLISHERJim Minatel
PROOFREADERNancy Carrasco
COVER DESIGNERRyan Sneed
Windows Azure® Web SitesPublished by
John Wiley & Sons, Inc.
10475 Crosspoint Boulevard
Indianapolis, IN 46256
www.wiley.com
Copyright © 2013 by John Wiley & Sons, Inc., Indianapolis, Indiana
Published simultaneously in Canada
ISBN: 978-1-118-67864-0 (ebk)
ISBN: 978-1-118-74979-1 (ebk)
No part of this publication may be reproduced, stored in a retrieval system or transmi ed in any form or by any means, elec-
tronic, mechanical, photocopying, recording, scanning or otherwise, except as permi ed under Sections 107 or 108 of the 1976
United States Copyright Act, without either the prior wri en permission of the Publisher, or authorization through payment
of the appropriate per-copy fee to the Copyright Clearance Center, 222 Rosewood Drive, Danvers, MA 01923, (978) 750-8400,
fax (978) 646-8600. Requests to the Publisher for permission should be addressed to the Permissions Department, John Wiley &
Sons, Inc., 111 River Street, Hoboken, NJ 07030, (201) 748-6011, fax (201) 748-6008, or online at http://www.wiley.com/go/permissions.
Limit of Liability/Disclaimer of Warranty: e publisher and the author make no representations or warranties with
respect to the accuracy or completeness of the contents of this work and specifi cally disclaim all warranties, including without
limitation warranties of fi tness for a particular purpose. No warranty may be created or extended by sales or promotional mate-
rials. e advice and strategies contained herein may not be suitable for every situation. is work is sold with the understand-
ing that the publisher is not engaged in rendering legal, accounting, or other professional services. If professional assistance is
required, the services of a competent professional person should be sought. Neither the publisher nor the author shall be liable
for damages arising herefrom. e fact that an organization or Web site is referred to in this work as a citation and/or a poten-
tial source of further information does not mean that the author or the publisher endorses the information the organization or
Web site may provide or recommendations it may make. Further, readers should be aware that Internet Web sites listed in this
work may have changed or disappeared between when this work was wri en and when it is read.
For general information on our other products and services please contact our Customer Care Department within the United
States at (877) 762-2974, outside the United States at (317) 572-3993 or fax (317) 572-4002.
Trademarks: Wiley and the Wiley logo are trademarks or registered trademarks of John Wiley & Sons, Inc. and/or its a liates,
in the United States and other countries, and may not be used without wri en permission. Windows Azure is a registered trade-
mark of Microso Corporation. All other trademarks are the property of their respective owners. John Wiley & Sons, Inc. is not
associated with any product or vendor mentioned in this book.
www.it-ebooks.info
ABOUT THE AUTHOR
JAMES CHAMBERS is a presenter, long-time blogger, and geek who loves the cra and the tools that
he works with. He works on open source projects such as Twi er.Bootstrap.Mvc4 and AngelaSmith,
and contributes to the docs project for NuGet. He has worked at all three levels of Canadian
government, with social and military fi rms, in food service and insurance, in telecommunication,
and even the auto industry. He enjoys mentoring, learning from others and sharing his
development experiences at conferences, web camps, user group meetings, and brown bag lunches.
You can fi nd him online at http://jameschambers.com or on Twi er as @CanadianJames. He
lives in rural Manitoba — the epicenter of so ware development in Canada — where he and his
wife are raising three mancubs and surviving the ownership of a dog and a cat.
ABOUT THE TECHNICAL EDITOR
CORY FOWLER is a Windows Azure Technical Evangelist at Microso Corporation. He has been
working with Windows Azure since shortly a er the beginning of the public beta in 2008, gaining
him two consecutive MVP awards for his work in the Windows Azure community before joining
Microso . Cory has extensive experience in web development spanning from Startup to Enterprise
with various Server-side languages, including but not limited to ASP.NET, PHP, Perl/CGI. You can
read more about Windows Azure Web Sites on Cory’s blog http://blog.syntaxc4.net or follow
Cory on Twi er under the handle @SyntaxC4.
www.it-ebooks.info
ACKNOWLEDGMENTS
THANKS go to my incredible wife, Angie, who is supportive beyond reason, beautiful inside and
out, and the perfect mother to our three awesome, inspiring children, Beemer, Pants, and Molly.
anks to Cory and Bruce who helped make these pages come together, and Ami and Mary for
pu ing up with my “timely” delivery. ough the work on this book has been short, it has been
through a rough patch, so thanks to James 1:2-5 for helping me to keep focus. anks to my
good friends, Edwin and Fred, who are walking through troubling times and showing me what
true character is; and thank you to Kevin and Keith who have demonstrated wisdom, grace, and
compassion that I can only hope to emulate.
www.it-ebooks.info
CONTENTS
INTRODUCTION TO THE WINDOWS AZURE BOOK SERIES X
INTRODUCTION TO WINDOWS AZURE WEB SITES XII
CHAPTER 1: INTRODUCTION TO WINDOWS AZURE AND FUNDAMENTAL CONCEPTS 1
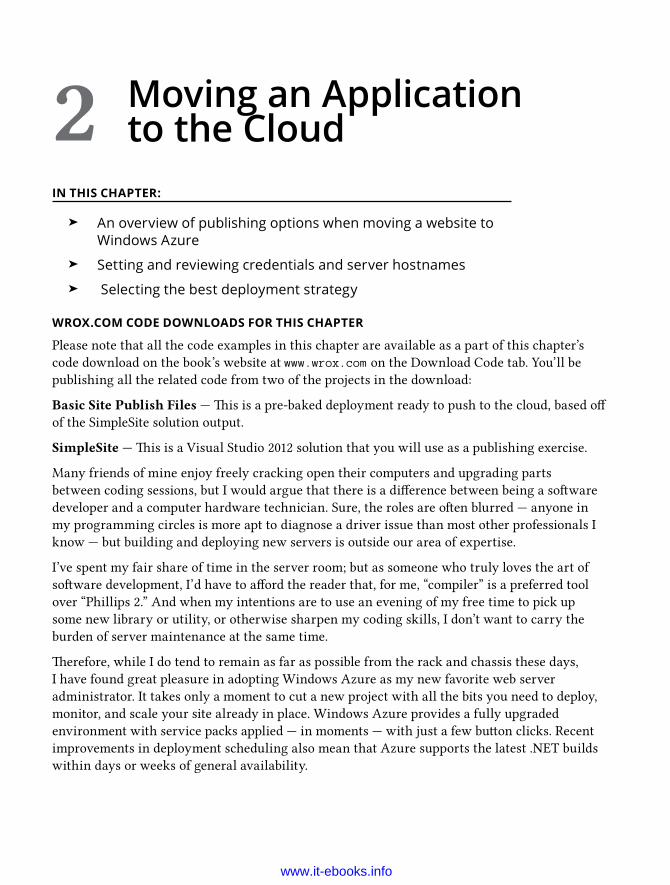
Understanding Windows Azure Web Sites 2Understanding the Windows Azure Portal 4Creating a Simple Site 5Managing Your Site from the Portal 7
Working with Notifi cations 8Modifying Application State 8Performing Other Application Operations 9Deleting a Site 10Setting Your Deployment Credentials 10
Summary 12
CHAPTER 2: MOVING AN APPLICATION TO THE CLOUD 13
Uploading Your Web Site via FTP 14Gathering the Basics 14Connecting to the Server 15Validating a Connection 16Publishing the “Real” Site 17
Publishing from WebMatrix 18Deploying Your Site for the First Time 18Publishing Changes to the Site 20
Publishing through Dropbox 21Associating Your Web Site with a Dropbox Folder 21Pushing Files to the Cloud through Dropbox 22
Going to the Cloud with Visual Studio 2012 23Downloading Your Publishing Profi le 23Registering the Publishing Profi le with Your Project 23
Selecting a Deployment Strategy 24 Summary 25
www.it-ebooks.info
vii
CONTENTS
CHAPTER 3: MANAGING DEPLOYMENTS VIA SOURCE CONTROL 26
Understanding Prerequisites 27Publishing from Source Control 28
Publishing from GitHub 28Publishing from CodePlex 30Publishing from Bitbucket 32Publishing from Team Foundation Service 33
Managing Previously Deployed Releases 36Summary 38
CHAPTER 4: MANAGING WINDOWS AZURE WEB SITES FROM THE CONSOLE 39
Preparing Your Environment 39Confi guring Your Account 40
Downloading Your Publishing Profi le 42Importing Settings 42Switching between Subscriptions 43
Managing Your Subscription and Web Sites 44Creating Sites 45Controlling Site State 46Removing Sites from Your Account 47Confi rming Your Account and Site Status 47
Confi guring Your Site 48Listing Application Confi guration Elements 48Adding, Updating, and Deleting Keys 49
Summary 51
CHAPTER 5: WORKING WITH OTHER FLAVORS OF WINDOWS AZURE WEB SITES 52
Exploring Apps in the Web Site Gallery 53Selecting a Template 53
Sample Implementation and Publishing Walk-Through — phpBB 54
Creating the Site 55Confi guring the Board 56Working Locally with Project Files 57Publishing the Customized Site 58Moving beyond the Basic Set Up 60
Summary 60
www.it-ebooks.info
viii
CONTENTS
CHAPTER 6: USING PERIPHERAL FEATURES WITH WINDOWS AZURE WEB SITES 61
Sharing Administrative Responsibilities 61Understanding the Scope of Trust in Co-Administration 63Avoiding Shared Administration 64
Managing Your Linked Resources 65Working with Windows Azure SQL Databases Remotely 67
Opening the Firewall 67Establishing Remote Connections 68
Summary 69
CHAPTER 7: SCALING, CONFIGURING, AND MONITORING YOUR SITE 70
Using the Power of the Cloud: Scale 71Understanding Levels of Scale 71Improving Capacity 72Scaling Linked Resources 73
Confi guring and Downloading Diagnostic Logs 74Viewing Trace Information from Visual Studio 2012 74Viewing the Logs from the PowerShell Console 75Downloading Logs via FTP 76
Setting Up and Using Custom Domains 76Working with Application Defaults 77
Working with Application Settings 78Setting Up Connection Strings 78
Setting Other Confi guration Elements 79Setting Framework Versions 79Adding Handler Mappings 80Setting the Default Document 81
Summary 81
CHAPTER 8: DEPLOYING AND CONFIGURING A CLOUD APPLICATION 82
Exploring the MovieFu Application 82Deploying and Running the Application Locally 83Examining Application Components 84Creating the Database with Entity Framework 85
Familiarizing Yourself with the Application 92
www.it-ebooks.info
ix
CONTENTS
Registering to Use the Site 92Creating Movies and People 92Adding Ratings 93
Deploying and Confi guring MovieFu 94Creating a Site and Database 94Publishing the Site 95Changing Application Settings 95Refi ning Your Skills 96
Summary 96
www.it-ebooks.info
INTRODUCTION TO THE WINDOWS AZURE BOOK SERIES
It has been fascinating watching the maturation of Windows Azure since its introduction in
2008. When it was announced, Azure was touted as being Microso ’s “new operating system.”
And at that level, it has not really lived up to its billing. However, if you consider Azure to be a
collection of platforms and tools that allow you to cloud-enable your corporation’s applications
and infrastructure, well, now you’re on the right track.
And, as it turns out, a collection of cooperating tools and services is the best way to think of
Azure. e di erent components that comprise Azure become building blocks that allow you
to construct an environment to suit your needs. Want to be able to host a simple website? Well,
then Azure Web Sites fi ts the bill. Want to move some of your infrastructure to the cloud while
leaving other systems on premise? Azure Virtual Networking gives you the capability to extend
your corporate domain to include machines hosted in Azure. Almost without exception, each
twist and turn in your infrastructure roadmap can take advantage of the building blocks that
make up Windows Azure.
A single book covering everything that encompasses Azure would be huge. And because of
the breadth of components in Azure, such a book is likely to contain information that you are
not necessarily interested in. For this reason, the Windows Azure series from Wrox takes the
same “building block” approach that Azure does. Each book in the series drills deeply into one
technology. If you want to learn everything you need to work with a particular technology,
then you could not do be er than to pick up the book for that topic. But you don’t have to
dig through 2,000 pages to fi nd the 120 pages that ma er to you. Each book stands on its own.
You can pick up the books for the topics you are care about and know that’s all that you will get.
And you can leave the other books until desire or circumstance makes them of interest to you.
So enjoy this book. It will give you the information you need to put Windows Azure to use for
you. But as you continue to look to other Azure components to add to your infrastructure, don’t
forget to check out the other books in the series to see what topics might be helpful. e books
in the series are:
➤ Windows Azure and ASP.NET MVC Migration by Benjamin Perkins, Senior Support
Escalation Engineer, Microso
➤ Windows Azure Mobile Services by Bruce Johnson, MVP, Partner, ObjectSharp Consulting
➤ Windows Azure Web Sites by James Chambers, Product & Community Development
Manager, LogiSense
www.it-ebooks.info
xi
INTRODUCTION TO THE WINDOWS AZURE BOOK SERIES
➤ Windows Azure Data Storage by Simon Hart, So ware Architect, Microso
➤ Windows Azure Hybrid Cloud by Danny Garber, Windows Azure Solution Architect,
Microso ; Jamal Malik, Business Solution Architect; and Adam Fazio, Solution
Architect, Microso
Each one of these books was wri en with the same thought in mind: to provide deep
knowledge of that one topic. As you go further into Azure, you can pick and choose what makes
sense for you from the other books that are available. Constructing your knowledge using these
books is like building blocks, which is just in the same manner that Azure was designed.
Bruce Johnson
Azure Series Book Editor
www.it-ebooks.info
xii
INTRODUCTION TO WINDOWS AZURE WEB SITES
I’ll make a quick observation on the past experiences of many web developers who tried to put
a website on “the cloud” — it really wasn’t very good. Most of us didn’t know where to start, and
even if you were very familiar with the steps, you needed a careful and calculated approach to
confi gure and move your site into the sky. Missteps cost hours and there was li le support or
collective knowledge to help resolve issues.
row all that away. If you have been burned in a similar scenario, you can forget about those
experiences; you are going to be pleasantly surprised with the o ering of Windows Azure
Web Sites. A point-and-click interface gives you the power to scale your site to support tens of
thousands of users, with publishing simplifi ed to the point of one-bu on deployment. You can
wire di erent confi gurations and transformations into your website and automate the process
of moving your application into staging and production environments with tools you likely
already know.
e keen reader may have already noticed the spelling of “Web Sites” versus “website.” While
“website” is the generally accepted spelling for the application that lives on the other end of a
URL, the product name is o cially “Windows Azure Web Sites.” roughout the book, “Web
Sites” or even WAWS refers to the product proper.
WHO THIS BOOK IS FOR e content of this book is well suited to developers using the .NET Framework to build web
applications, to folks who are building applications on PHP or Node.js, and to programmers and
managers who are interested in learning more about how to deploy and manage websites in the
cloud. is is not a book about learning to program or building a site, but about learning how to
get your site onto the Internet using the features of Windows Azure Web Sites.
Maybe you’re a .NET developer but you want to learn more about alternative development
platforms and where they fi t in Azure. Or, perhaps you’re from a di erent technology stack
and you want to equip yourself with information on Azure, and how you could use it in your
context. Chapters 5 and 7 will be most relevant to you, exploring a PHP site from an open-
source forum project and later using the Azure Management Portal to grow your site.
If you have general familiarity with Windows Azure and are already comfortable working in
the Azure Management Portal, you might be most interested in using the fi rst few chapters as
a reference when required and jumping straight to Chapter 4, which introduces management
of WAWS from the console. Chapters 7 and 8 discuss confi guring, monitoring, and scaling your
site, and walk you through a sample deployment.
www.it-ebooks.info
xiii
INTRODUCTION TO WINDOWS AZURE WEB SITES
WHAT THIS BOOK COVERS is book provides a walk-through of the Windows Azure Web Sites features that ma er to
developers and explains how they can be leveraged, as illustrated by an accompanying project.
Readers can expect to walk away with an understanding of the supported technologies, site
deployment and management tools, and how to monitor and scale their application. Covered in
the book and its accompanying materials are the following:
➤ Creation, deployment, and scaling of applications
➤ Supported project types and technologies
➤ Source control integration and release management
➤ A detailed walk-through of an application, including prepping it and moving it to the
cloud using techniques and features discussed throughout the book
HOW THIS BOOK IS STRUCTUREDIf you have built and deployed a website to any server, then you likely already know all the
basics needed to build and deploy a website to the cloud. Windows Azure Web Sites has its own
nuances and di erences from what some would consider traditional deployment. is book
is arranged in such a way that regardless of your background, if you are familiar with web
development you should gain a be er understanding of the process in the context of Windows
Azure Web Sites.
e culmination of what you learn in the early chapters arrives in Chapter 8, where you will
take a pre-built ASP.NET MVC application and prepare to move it to the cloud.
Chapter 1: Introduction to Windows Azure and Fundamental ConceptsWindows Azure Web Sites provide a very low-friction starting point for new and low-volume
websites, as well as a clean way to scale up your application as its popularity and resource
demands grow. You will work through several starting points to warm up and then take a
sample application — something comparable to a real-world application that would be deployed
to physical hardware — and see what it takes to bring it to the cloud and manage it while it’s
there.
Chapter 2: Moving an Application to the CloudWorking from a simple sample application you’ll be introduced to the bare essentials of moving
an IIS-based deployment to the cloud. ere are a number of tools that allow direct publishing,
enabling you to selectively move fi les or publish your entire site; these are the ones that are
most like the familiar “xcopy” deployment.
www.it-ebooks.info
xiv
INTRODUCTION TO WINDOWS AZURE WEB SITES
Chapter 3: Managing Deployments via Source Control e websites you’re building are likely much more than single, static pages. Many developers
work on teams with a central code repository, but even if they’re working alone most
developers have adopted source control as part of their toolkit. In this chapter you will become
familiar with source control deployments in the context of Windows Azure Web Sites and learn
how deployments can be created from various source control servers, largely automated and
initiated simply by checking your code in.
Chapter 4: Managing Windows Azure Web Sites from the Console
is chapter provides an overview of the command-line tools available for cross-platform
management of your Windows Azure account. While not limited to Web Sites, the console
enables you to perform most actions you can carry out in the portal from your local machine.
Understanding the pieces of WAWS that can be scripted is critical to automating your build
process and incorporating WAWS as part of a continuous deployment project.
Chapter 5: Working with Other Flavors of Windows Azure Web SitesNot all websites need to be built on ASP.NET, and not all sites have to be built from scratch.
Here you’ll be introduced to the alternative options for development languages and some
of the kick-start apps developers can use as a base for their site. Specifi cally, you’ll have the
opportunity to walk through creating, altering, and deploying a PHP site using tools native to
the Azure developer.
Chapter 6: Using Peripheral Features with Windows Azure Web SitesBuilding a website on Windows Azure Web Sites means that you can also easily leverage other
assets you’ve built on Azure. In this chapter you use the Management Portal to link those
resources to your website and learn how to share access to those resources with others.
Chapter 7: Scaling, Confi guring, and Monitoring Your SiteAs a site grows in popularity it o en requires additional resources to accommodate the growth,
and good business dictates that you maximize the resources you have to keep your expenses
in check. Developers also have to consider branding and how users access a site. is chapter
demonstrates how to use the Management Portal to monitor website growth, how to use custom
domains, and fi nally how to scale when the time is right.
www.it-ebooks.info
xv
INTRODUCTION TO WINDOWS AZURE WEB SITES
Chapter 8: Deploying and Confi guring a Cloud ApplicationTo close the book, you’ll explore a pre-built reference application, examining the key
components of the application and how these pieces interact. You’ll learn to work with
connection strings and application se ings and deploy an application using GitHub.
WHAT YOU NEED TO USE THIS BOOKAll the so ware used in this book to build, deploy, and maintain your website is either free or
free for trial use. Much of it can be downloaded from Microso ’s various web properties.
e easiest way to get the tooling for the .NET projects is to visit http://asp.net/mvc and use
the Web Platform Installer. You can also use the links in the Management Portal to get some of
the so ware running locally. You’ll want to install the following:
➤ Visual Studio 2012 — Web, Professional, or Ultimate trial versions are OK to work
with in this book. Be sure to get the latest updates to VS and NuGet (you’ll be prompted
when you run the IDE).
➤ Azure SDK 2.0 — is updates tooling in VS and enables the latest features to manage
your site remotely.
➤ WebMatrix 3 — Completely Azure-enabled and tied to your subscription, this is an
alternate development environment for those who don’t require the beefy install of
Visual Studio 2012.
You’ll also get a chance to try out some online services and see how they integrate or can
coexist with your development e orts. To do this, you should create an account with the
following properties if you don’t already have one:
➤ http://www.windowsazure.com
➤ http://www.github.com
➤ http://www.bitbucket.com
➤ http://www.dropbox.com
➤ http://tfs.visualstudio.com
➤ http://www.codeplex.com
CONVENTIONSTo help you get the most from the text and keep track of what’s happening, we’ve used a
number of conventions throughout the book.
www.it-ebooks.info
xvi
INTRODUCTION TO WINDOWS AZURE WEB SITES
NOTE Notes, warnings, tips, hints, tricks, and asides to the current discussion are o set
and placed in italics like this.
As for styles in the text:
➤ We highlight new terms and important words when we introduce them.
➤ We show keyboard strokes like this: Ctrl+A.
➤ We show fi lenames, URLs, and code within the text like so: persistence.properties.
We present code in one of two ways:
We use a monofont type with no highlighting for most code examples.
We use bold to highlight code of particular importance.
SOURCE CODEAs you work through the examples in this book, you may choose either to type in all the code
manually or to use the source code fi les that accompany the book. All the source code used
in this book is available for download at http://www.wrox.com. If there are any fi les to be
downloaded to work through a chapter, the fi lenames and/or project names will be noted in
a list at the beginning of the chapter. Once at the site, simply locate the book’s title (either by
using the Search box or by using one of the title lists) and click the Download Code link on the
book’s detail page to obtain all the source code for the book.
NOTE Because many books have similar titles, you may fi nd it easiest to search by ISBN;
this book’s ISBN is 978-1-118-67864-0 (ePDF) or 978-1-118-74979-1 (ePub).
Once you download the code, just decompress it with your favorite compression tool.
Alternately, you can go to the main Wrox code download page at www.wrox.com/dynamic/books/download.aspx to see the code available for this book and all other Wrox books.
ERRATAWe make every e ort to ensure that there are no errors in the text or in the code. However, no
one is perfect, and mistakes do occur. If you fi nd an error in one of our books, such as a spelling
mistake or a faulty piece of code, we would be very grateful for your feedback. By sending
in errata you may save another reader hours of frustration and at the same time you will be
helping us provide even higher quality information.
www.it-ebooks.info
xvii
INTRODUCTION TO WINDOWS AZURE WEB SITES
To fi nd the errata page for this book, go to http://www.wrox.com and locate the title using the
Search box or one of the title lists. en, on the book details page, click the Book Errata link.
On this page you can view all errata that has been submi ed for this book and posted by Wrox
editors. A complete book list, including links to each book’s errata, is also available at
www.wrox.com/misc-pages/booklist.shtml.
If you don’t spot “your” error on the Book Errata page, go to www.wrox.com/contact/techsupport.shtml and complete the form there to send us the error you have found. We’ll
check the information and, if appropriate, post a message to the book’s errata page and fi x the
problem in subsequent editions of the book.
P2P.WROX.COMFor author and peer discussion, join the P2P forums at p2p.wrox.com. e forums are a web-
based system for you to post messages relating to Wrox books and related technologies and
interact with other readers and technology users. e forums o er a subscription feature to
e-mail you topics of interest of your choosing when new posts are made to the forums. Wrox
authors, editors, other industry experts, and your fellow readers are present on these forums.
At http://p2p.wrox.com you will fi nd a number of di erent forums that will help you not only
as you read this book, but also as you develop your own applications. To join the forums, just
follow these steps:
1. Go to http://p2p.wrox.com and click the Register link.
2. Read the terms of use and click Agree.
3. Complete the required information to join as well as any optional information you wish
to provide and click Submit.
4. You will receive an e-mail with information describing how to verify your account and
complete the joining process.
NOTE You can read messages in the forums without joining P2P but in order to post your
own messages, you must join.
Once you join, you can post new messages and respond to messages other users post. You
can read messages at any time on the web. If you would like to have new messages from a
particular forum e-mailed to you, click the Subscribe to this Forum icon by the forum name in
the forum listing.
For more information about how to use the Wrox P2P, be sure to read the P2P FAQs for answers
to questions about how the forum so ware works as well as many common questions specifi c to
P2P and Wrox books. To read the FAQs, click the FAQ link on any P2P page.
www.it-ebooks.info
IN THIS CHAPTER:
➤ The role of Windows Azure Web Sites and how it may fi nd a place in your workfl ow
➤ An introduction to the Windows Azure Management Portal in the context of a website developer
➤ The basics of creating a simple site ➤ How application state management di ers from IIS ➤ Setting deployment credentials
References to “the cloud” seem to be everywhere. Targeted developer advertisements, corporate
messaging, and even consumer marketing have all been invaded by this new use of a common
word. You can’t drive by a bank of city billboards or walk down the corridor of an airport
terminal without seeing mention of cloud computing in some form. Heck, by the end of this
book, “cloud” won’t even sound like a real word anymore!
Indeed, at this point in the Internet’s history, it’s almost impossible to have any kind of Internet
presence without being “in” the cloud, even if you were unaware of it. e most popular
mail services have all been cloud-based for some time, as have music and movie services.
Nearly every smartphone vendor o ers some kind of cloud feature set that it tries to leverage
as a marketing point to distinguish itself from the competition. Even the latest versions of
document- and photo-editing so ware have built-in cloud features, or are themselves built on
top of the cloud fabric. It’s not surprising that the same can be said about our operating systems
as well.
By now you have likely wrestled through some of what it means to be “in” the cloud — perhaps
you’ve even tried to host an application or two on a cloud server. However, neither marketing
blurbs from vendors nor water cooler talk about the “cloud” among developers will answer all
your questions. is book will guide you, as a web developer, from the initial steps of creating
a website in the cloud to some of the more advanced operations you will need to manage a
successful application. However, before diving into what the cloud means to the solution you’re
creating, fi rst take a moment to understand what the cloud is not, then circle back to what the
Introduction to Windows Azure and Fundamental Concepts1
www.it-ebooks.info
CHAPTER 1 INTRODUCTION TO WINDOWS AZURE AND FUNDAMENTAL CONCEPTS
2
cloud is and how it can work for you. I’ll keep this short, and I’ll make no a empt to sugar coat
it. e cloud is not right for all scenarios. It isn’t an assurance that your app will scale without
issue, nor does it fi x any bugs. It should not be viewed as the go-to solution when, for myriad
other reasons, you’re having trouble keeping your app up to the expectations of your users. It
does not automatically make your app more performant, more popular, or more profi table.
“Great,” you’re thinking, “now what?”
Don’t worry. e cloud still o ers quite a few benefi ts to kick around, especially as they relate
to web developers. For example, one more thing the cloud doesn’t do is throw away everything
you’ve learned about development to date! Recent advancements in the developer experience
have made it much easier to get started. It’s relatively simple to hook into a variety of
continuous integration systems, and deployment is straightforward. You can tie into other cloud
features such as storage, content distribution networks, identity, and caching without having
to overhaul your app, and the fl exibility to scale is also possible. You don’t have to perform any
signifi cant amount of server admin to get a website turned on, and you can start applying your
skills as a .NET web developer by simply clicking File ➪ New Project.
To paint a picture: At this point you’re a web developer who has an idea about what the cloud is
and what it’s not. e following sections dive deeper to give a more expansive, detailed picture
of how Windows Azure Web Sites will fi t into your toolkit.
NOTE is fi rst chapter covers the Windows Azure Portal as it relates to managing
Windows Azure Web Sites. If you are already comfortable within the portal, you may
wish to move on to Chapter 2, which introduces the sample application that serves as the
focus of this book. If you would like a refresher on the portal, or you haven’t worked with a
recent version of it, this chapter is a good place to start.
UNDERSTANDING WINDOWS AZURE WEB SITES ere have been a lot of promises made about how cloud computing will change the so ware
developer’s life. To sort the cha out, it’s useful to step back and assess what you have grown
accustomed to as you build, deploy, and manage websites. In that vein, let’s remove cloud
and Azure from the conversation for a moment, and defi ne some of the main aspects of web
development to which you have likely become accustomed to throughout your career. As a
starting point, this discussion assumes that you have worked with “traditional” deployments to
a server that you or your company owns and manages.
What are the advantages of running your own server? First of all, you have the freedom to pick
whatever operating systems and languages you’ll use and how you’re going to implement them.
Second, you can manage fi les at a low level, working right against the fi le system. ird, you
have the capability to connect to databases from whichever vendor or open-source o ering
www.it-ebooks.info
Understanding Windows Azure Web Sites
3
you choose — and speaking of open source, it’s easy to kick-start a project using myriad templates,
including CMS, blogging, shopping cart, payment processors, or other project templates available
from the developer community. ese are all valuable assets in your developer arsenal and they
enable you to remain fl exible as you address your clients’ requirements.
However, I would be remiss to not identify the ramifi cations of running one’s own server, and
certainly we need to understand these implications as developers. First and foremost are the
costs. If you’re going to run your own server you must pay for the metal, the physical presence
(whether on- or o -premises), and the bandwidth. ere are also costs associated with power,
cooling and Internet connectivity. You might even be inclined to purchase a great server, to
allow for scaling.
But with good hardware alone are you really ready? Who’s going to maintain the security
patches? How will you handle load balancing? What if you want to incorporate a service bus
layer, or improve performance overseas if your website takes o in Asia or Europe? You also
have to consider redundancy, security, and caching; and even if you get all that right, when it’s
time to scale you will have to buy more hardware. I don’t argue that having your own server in
place isn’t without its freedom, but it doesn’t guarantee that you’ll be home free!
Your website isn’t going to write itself, so it would be great if the aforementioned list of
potential limitations were available without the consequent list of costs and responsibilities.
And this is exactly where Windows Azure Web Sites comes into play. It essentially removes the
operating system and physical hardware of a traditional server from the equation while adding
robustness and scalability. Well played, Windows Azure, well played.
ough you will have opportunity to scale later, the default confi guration of a Windows Azure
Web Site is the equivalent of a website you would create in IIS. ere is a chunk of fi le system
set aside for your app, and a portion of memory and processor utilization are sliced o for your
application. A host header and corresponding DNS entry are aligned with the site so that you
can start browsing right away. Your website is simply a set of fi les on a fi le system. Sounds
familiar, doesn’t it?
To the point of this topic, you need to know where the Web Sites product fi ts into the spectrum
of Windows Azure o erings. If you have previous experience with cloud computing, you
know there are many di erent approaches you can take; and with previous Windows Azure
experience, you may choose to spin up a compute instance and walk through some deployment
preparation and confi guration.
Another approach would be to set up a VM with IIS running on it — but that parallels running
on a server you own, and all the responsibilities noted earlier fall back on you!
Windows Azure Web Sites do indeed fall into the category of “compute,” but they are now
highlighted as a separate execution model. is model enables you to share IIS on a VM with
other websites, each in its own app domain, and eventually scale up to a dedicated virtual
machine or a bank of 10 virtual servers, each of which has 4 cores and 7GB of memory. You
defi nitely have options.
www.it-ebooks.info
CHAPTER 1 INTRODUCTION TO WINDOWS AZURE AND FUNDAMENTAL CONCEPTS
4
UNDERSTANDING THE WINDOWS AZURE PORTALYou’re already aware that Windows Azure provides much more than just a way to deploy and
manage websites, so it will come as no surprise to fi nd a lot more tooling on the Windows
Azure Portal than what you require to manage your application, but once you are comfortable
with the layout you’ll fi nd that most options you need are fairly close at hand.
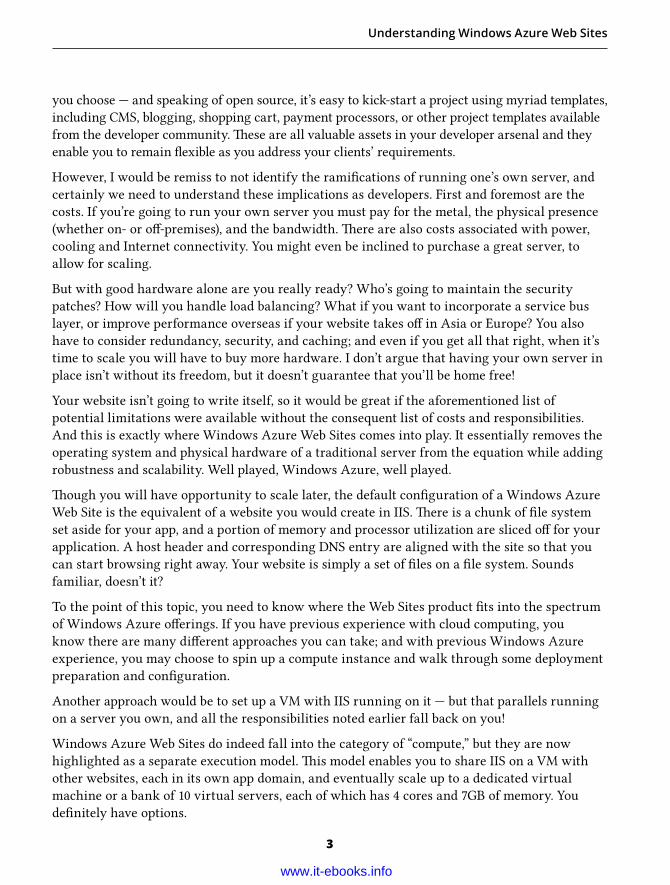
e main area of the window presents a list of all items on your account from all the feature
areas, as shown in Figure 1-1. A command bar is located along the bo om, which updates itself
to present options relevant to the area or item you’ve selected.
FIGURE 1-1
NOTE e Management Portal has seen some great improvements over the last year and
many changes have been ushered in. Your options in the portal may not exactly match
those illustrated in Figure 1-1. As new features are released, you may be required to opt in
to them through your account se ings before the related menu items are made available
in your portal.
Selecting a feature from the le navigation pane, such as Web Sites, presents the list of items
fi ltered to that feature, as shown in Figure 1-2, which helps you quickly fi nd whatever items you
may be looking for in a particular category. Note that the le navigation pane collapses into its
icon representation to give you more real estate in the window as you select a particular item.
www.it-ebooks.info
Creating a Simple Site
5
In addition to creating more real estate, selecting an item from the list by clicking on its name
will take you to the dashboard for managing that item. Alternatively, you can select a row by
clicking elsewhere on the row to highlight it, then use the context menu at the bo om of the
screen to perform some of the basic state management commands that you may be familiar
with from IIS. ese operations and other related commands are described in detail later in this
chapter, but fi rst you’ll need to create a site in order to display them in your portal.
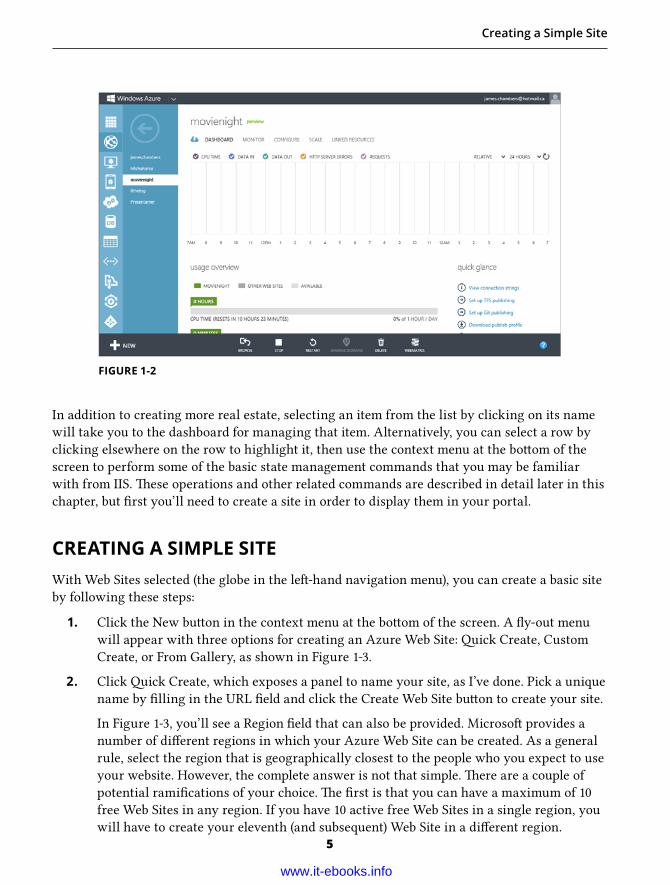
CREATING A SIMPLE SITEWith Web Sites selected (the globe in the le -hand navigation menu), you can create a basic site
by following these steps:
1. Click the New bu on in the context menu at the bo om of the screen. A fl y-out menu
will appear with three options for creating an Azure Web Site: ick Create, Custom
Create, or From Gallery, as shown in Figure 1-3.
2. Click ick Create, which exposes a panel to name your site, as I’ve done. Pick a unique
name by fi lling in the URL fi eld and click the Create Web Site bu on to create your site.
In Figure 1-3, you’ll see a Region fi eld that can also be provided. Microso provides a
number of di erent regions in which your Azure Web Site can be created. As a general
rule, select the region that is geographically closest to the people who you expect to use
your website. However, the complete answer is not that simple. ere are a couple of
potential ramifi cations of your choice. e fi rst is that you can have a maximum of 10
free Web Sites in any region. If you have 10 active free Web Sites in a single region, you
will have to create your eleventh (and subsequent) Web Site in a di erent region.
FIGURE 1-2
www.it-ebooks.info
CHAPTER 1 INTRODUCTION TO WINDOWS AZURE AND FUNDAMENTAL CONCEPTS
6
e second potential consideration relates to the scalability of a Web Site. As will
be covered in Chapter 7, “Scaling, Confi guring, and Monitoring Your Site,” there are
three levels of scalability supported by WAWS: Free, Shared, and Reserved. When you
upgrade a Web Site to Reserved, then all of the Web Sites in the same region are also
upgraded. As a result, when you determine the region in which your Web Site is being
created, keep in mind whether you expected it to always be “free” or to grow into
“reserved” at some point in the future.
You’ll need to wait a few moments while Windows Azure spins up your website. Each
new site creation process entails several stages, none of which require administrator
interaction — namely, creating, deploying, and running.
A er completion of the la er stage, you’ll see your website in the portal.
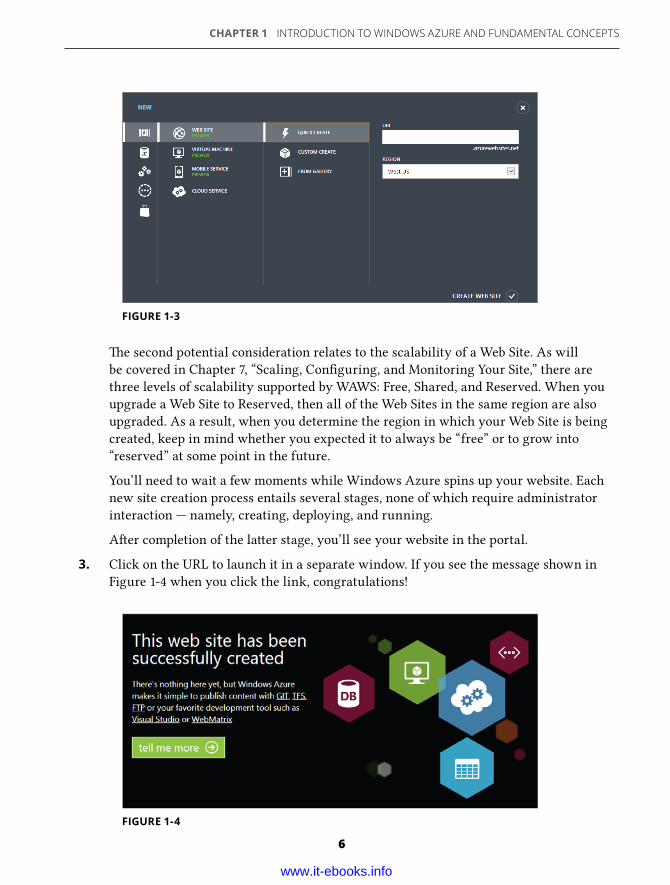
3. Click on the URL to launch it in a separate window. If you see the message shown in
Figure 1-4 when you click the link, congratulations!
FIGURE 1-3
FIGURE 1-4
www.it-ebooks.info
Managing Your Site from the Portal
7
is default site won’t win you any awards for web design and functionality, but it will serve
as a proxy while you learn the essentials of managing a site. In Chapter 8, “Deploying and
Confi guring a Cloud Application,” you’ll look at an Azure Web Site with a li le more oomph.
is fl edgling application will help you explore many of the real-world scenarios that most
developers encounter as they grow their site.
MANAGING YOUR SITE FROM THE PORTAL is section examines the management options in a li le more detail. To follow along, you’ll
need to navigate to the dashboard of your site by walking through the following steps:
1. Close any browser windows that were opened when you were exploring the site you
created in the previous section. Leave open the window containing the Windows Azure
Management Portal.
2. Click the globe icon or Web Sites item in the le navigation pane. is will take you to
the fi ltered list of websites that you have created.
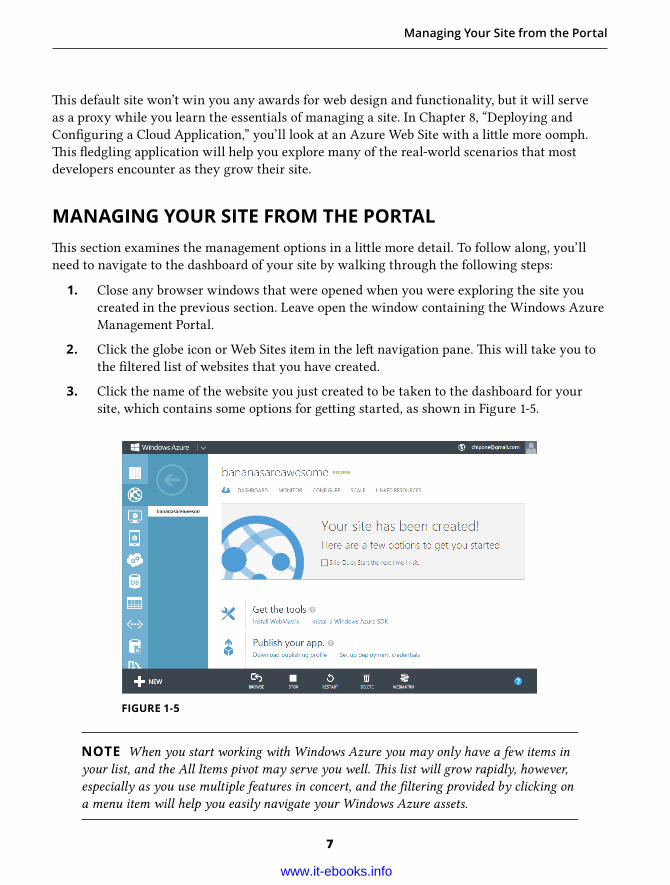
3. Click the name of the website you just created to be taken to the dashboard for your
site, which contains some options for ge ing started, as shown in Figure 1-5.
FIGURE 1-5
NOTE When you start working with Windows Azure you may only have a few items in
your list, and the All Items pivot may serve you well. is list will grow rapidly, however,
especially as you use multiple features in concert, and the fi ltering provided by clicking on
a menu item will help you easily navigate your Windows Azure assets.
www.it-ebooks.info
CHAPTER 1 INTRODUCTION TO WINDOWS AZURE AND FUNDAMENTAL CONCEPTS
8
As mentioned earlier, the menu will collapse, giving you a li le more working space in the
portal. You can also easily switch between any websites you have created on your account, as
the menu title area is converted to a list of the Web Sites that are part of your subscription.
Working with Notifi cationsAs you carry out operations on the site, the portal does a pre y good job of keeping you up
to date. Any list of the items in your account contains a status column for each row, which is
updated in real time.
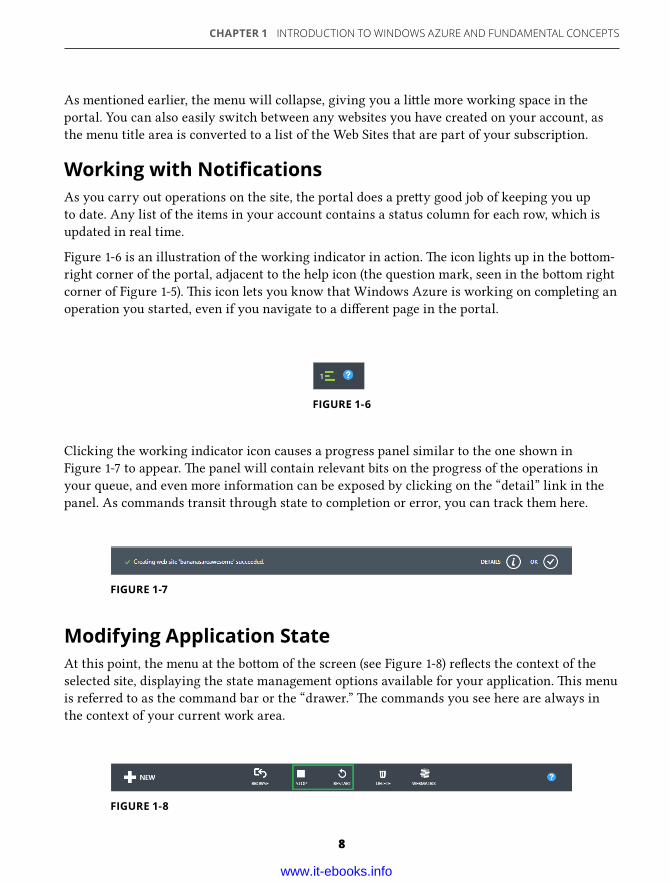
Figure 1-6 is an illustration of the working indicator in action. e icon lights up in the bo om-
right corner of the portal, adjacent to the help icon (the question mark, seen in the bo om right
corner of Figure 1-5). is icon lets you know that Windows Azure is working on completing an
operation you started, even if you navigate to a di erent page in the portal.
FIGURE 1-6
FIGURE 1-7
FIGURE 1-8
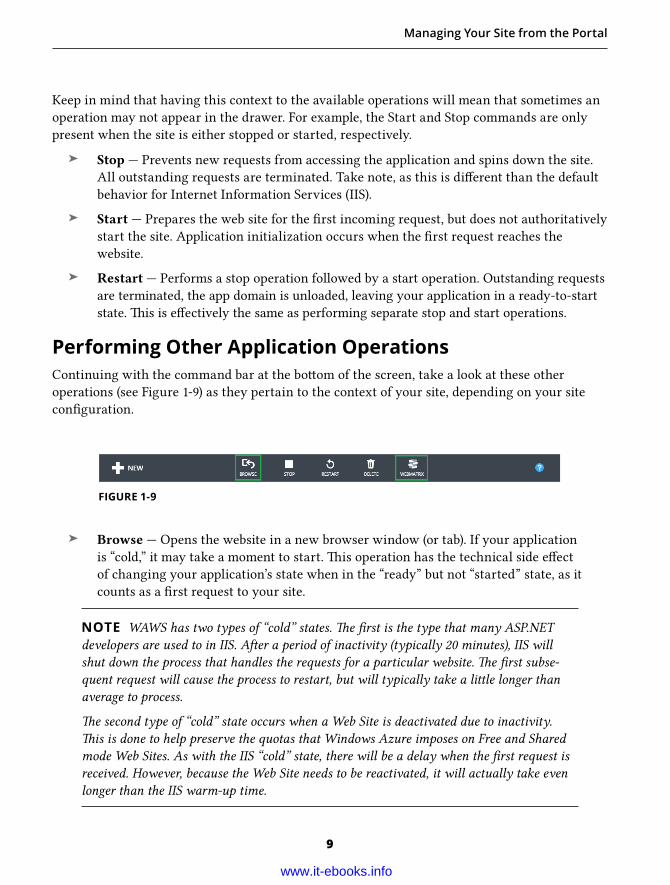
Clicking the working indicator icon causes a progress panel similar to the one shown in
Figure 1-7 to appear. e panel will contain relevant bits on the progress of the operations in
your queue, and even more information can be exposed by clicking on the “detail” link in the
panel. As commands transit through state to completion or error, you can track them here.
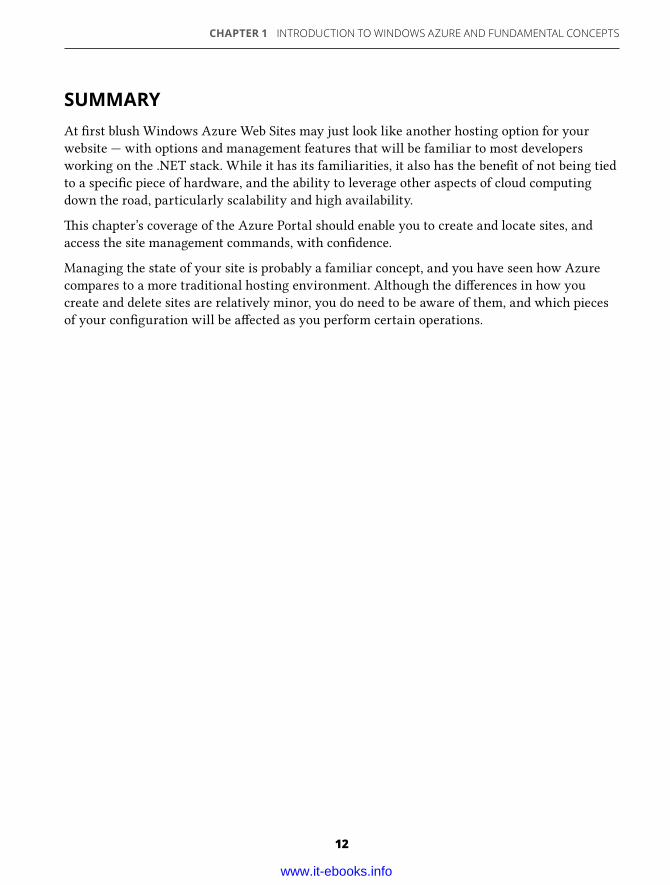
Modifying Application StateAt this point, the menu at the bo om of the screen (see Figure 1-8) refl ects the context of the
selected site, displaying the state management options available for your application. is menu
is referred to as the command bar or the “drawer.” e commands you see here are always in
the context of your current work area.
www.it-ebooks.info
Managing Your Site from the Portal
9
Keep in mind that having this context to the available operations will mean that sometimes an
operation may not appear in the drawer. For example, the Start and Stop commands are only
present when the site is either stopped or started, respectively.
➤ Stop — Prevents new requests from accessing the application and spins down the site.
All outstanding requests are terminated. Take note, as this is di erent than the default
behavior for Internet Information Services (IIS).
➤ Start — Prepares the web site for the fi rst incoming request, but does not authoritatively
start the site. Application initialization occurs when the fi rst request reaches the
website.
➤ Restart — Performs a stop operation followed by a start operation. Outstanding requests
are terminated, the app domain is unloaded, leaving your application in a ready-to-start
state. is is e ectively the same as performing separate stop and start operations.
Performing Other Application OperationsContinuing with the command bar at the bo om of the screen, take a look at these other
operations (see Figure 1-9) as they pertain to the context of your site, depending on your site
confi guration.
FIGURE 1-9
➤ Browse — Opens the website in a new browser window (or tab). If your application
is “cold,” it may take a moment to start. is operation has the technical side e ect
of changing your application’s state when in the “ready” but not “started” state, as it
counts as a fi rst request to your site.
NOTE WAWS has two types of “cold” states. e fi rst is the type that many ASP.NET
developers are used to in IIS. A er a period of inactivity (typically 20 minutes), IIS will
shut down the process that handles the requests for a particular website. e fi rst subse-
quent request will cause the process to restart, but will typically take a li le longer than
average to process.
e second type of “cold” state occurs when a Web Site is deactivated due to inactivity.
is is done to help preserve the quotas that Windows Azure imposes on Free and Shared
mode Web Sites. As with the IIS “cold” state, there will be a delay when the fi rst request is
received. However, because the Web Site needs to be reactivated, it will actually take even
longer than the IIS warm-up time.
www.it-ebooks.info

CHAPTER 1 INTRODUCTION TO WINDOWS AZURE AND FUNDAMENTAL CONCEPTS
10
➤ Manage Domains — Reveals a popup window that enables you to confi gure which
domains are associated with the current website. Note that you have to perform some
additional steps in order for this feature to be enabled, which are covered in Chapter
7, “Scaling, Confi guring, and Monitoring Your Site.” When your site is properly
confi gured, this command item will appear, as was shown in Figure 1-2.
➤ Web Matrix — Opens the Azure Web Site locally for editing in the WebMatrix
Integrated Development Environment (IDE). If you don’t have the IDE installed, it
will be bootstrapped as part of this operation. e website fi les are downloaded from
Windows Azure to your local fi le system and you can edit the site locally before
pushing any changes.
Deleting a SiteAs a careful reader who has been closely inspecting all the wonderful artwork in the book and
reading a entively, you likely noticed that I did not mention the Delete bu on in the previous
set of commands. at’s because there is a li le more going on with delete — it’s worth noting
separately, as this is one of the marked di erences from hosting a website on your own server.
Remember that your Azure Web Site is very much like what you would have on IIS; there’s
an entry on a virtual machine somewhere that serves requests to your clients, and a set of
fi les that are referenced as part of the confi guration. Unlike your traditional IIS deployment,
however, your web site has a number of other details a ached to it that are also deleted when
you delete the site. ese details extend beyond the standard confi guration of a website in
IIS and include the DNS entries, related host headers and logs, as well as post-deployment
confi guration that you may have set up, such as connection strings, application se ings, or the
scaling options of your site. Among the most important of these a ached details are the fi les
that make up your application and enable your site to tick. When you delete a site on Windows
Azure Web Sites, all your application fi les are gone for good.
WARNING is brings up a very important related point: Do not count on Windows
Azure Web Site (or any deployed website) as a form of source control! Although you could
handle this manually, keeping track of which version of your site exists where, imagine the
horror of losing hours of work or damaging a relationship with a customer because you
accidentally pulled or pushed the wrong version of your site when working with a publish-
ing tool! You’ll look at several alternatives for managing your fi les that outline some best
practices to help prevent this in Chapter 3, “Managing Deployments via Source Control.”
Setting Your Deployment CredentialsAlthough you have already logged into the portal and tied your Microso Account to your
Azure subscription, certain deployment procedures in this book require a di erent set of
www.it-ebooks.info

Managing Your Site from the Portal
11
credentials. is is because some protocols (such as FTP) and third-party providers (such as Git)
do not support Microso Accounts.
You can confi gure your subscription-wide username and password through the “Reset
deployment credentials” link from the dashboard of any Windows Azure Web Site. As shown in
Figure 1-10 the link appears under the quick glance section of the page.
FIGURE 1-10
FIGURE 1-11
Selecting this link allows you to originally set and subsequently reset your credentials as
required, as you can see in Figure 1-11.
www.it-ebooks.info
CHAPTER 1 INTRODUCTION TO WINDOWS AZURE AND FUNDAMENTAL CONCEPTS
12
SUMMARYAt fi rst blush Windows Azure Web Sites may just look like another hosting option for your
website — with options and management features that will be familiar to most developers
working on the .NET stack. While it has its familiarities, it also has the benefi t of not being tied
to a specifi c piece of hardware, and the ability to leverage other aspects of cloud computing
down the road, particularly scalability and high availability.
is chapter’s coverage of the Azure Portal should enable you to create and locate sites, and
access the site management commands, with confi dence.
Managing the state of your site is probably a familiar concept, and you have seen how Azure
compares to a more traditional hosting environment. Although the di erences in how you
create and delete sites are relatively minor, you do need to be aware of them, and which pieces
of your confi guration will be a ected as you perform certain operations.
www.it-ebooks.info
IN THIS CHAPTER:
➤ An overview of publishing options when moving a website to Windows Azure
➤ Setting and reviewing credentials and server hostnames ➤ Selecting the best deployment strategy
WROX .COM CODE DOWNLOADS FOR THIS CHAPTER
Please note that all the code examples in this chapter are available as a part of this chapter’s
code download on the book’s website at www.wrox.com on the Download Code tab. You’ll be
publishing all the related code from two of the projects in the download:
Basic Site Publish Files — is is a pre-baked deployment ready to push to the cloud, based o
of the SimpleSite solution output.
SimpleSite — is is a Visual Studio 2012 solution that you will use as a publishing exercise.
Many friends of mine enjoy freely cracking open their computers and upgrading parts
between coding sessions, but I would argue that there is a di erence between being a so ware
developer and a computer hardware technician. Sure, the roles are o en blurred — anyone in
my programming circles is more apt to diagnose a driver issue than most other professionals I
know — but building and deploying new servers is outside our area of expertise.
I’ve spent my fair share of time in the server room; but as someone who truly loves the art of
so ware development, I’d have to a ord the reader that, for me, “compiler” is a preferred tool
over “Phillips 2.” And when my intentions are to use an evening of my free time to pick up
some new library or utility, or otherwise sharpen my coding skills, I don’t want to carry the
burden of server maintenance at the same time.
erefore, while I do tend to remain as far as possible from the rack and chassis these days,
I have found great pleasure in adopting Windows Azure as my new favorite web server
administrator. It takes only a moment to cut a new project with all the bits you need to deploy,
monitor, and scale your site already in place. Windows Azure provides a fully upgraded
environment with service packs applied — in moments — with just a few bu on clicks. Recent
improvements in deployment scheduling also mean that Azure supports the latest .NET builds
within days or weeks of general availability.
Moving an Application to the Cloud2
www.it-ebooks.info
CHAPTER 2 MOVING AN APPLICATION TO THE CLOUD
14
All of this is to say that you get quite a few personal benefi ts when using Azure in your
deployment pipeline — not to mention potential corporate benefi ts — and you’re here now,
looking to push your app up to the sky, so let’s get started! e deployment examples in this
chapter make use of a trivial application that simply shows contact information for 25 random,
fi ctitious people. ese exercises don’t require any advanced confi guration or any database
connectivity.
In Chapter 8, “Deploying and Confi guring Cloud Application,” you’ll have a look at a more
complete example that allows you to explore the features covered in this and the other chapters.
UPLOADING YOUR WEB SITE VIA FTPLong before users were bestowed OS-integrated FTP support, web application developers
were making use of the command-line version of FTP to synchronize the server with our
latest output. In fact, FTP likely predates most of today’s web developers themselves! With
roots dating back over four decades, the protocol has been used in many di erent and varied
scenarios and still provides much usefulness in today’s modern networks.
Gathering the Basics ere are only three prerequisites for publishing via FTP: knowing the name of the FTP
deployment server to which you’re connecting, the subdomain name for the Web Site, and your
username and password.
Provided you’ve confi gured your publishing credentials, se ing up to leverage FTP is fairly
straightforward. For the purpose of this example, you’ll work from the pre-baked version of a
website that is ready to deploy, a er an initial push with a single “hello world” sample.
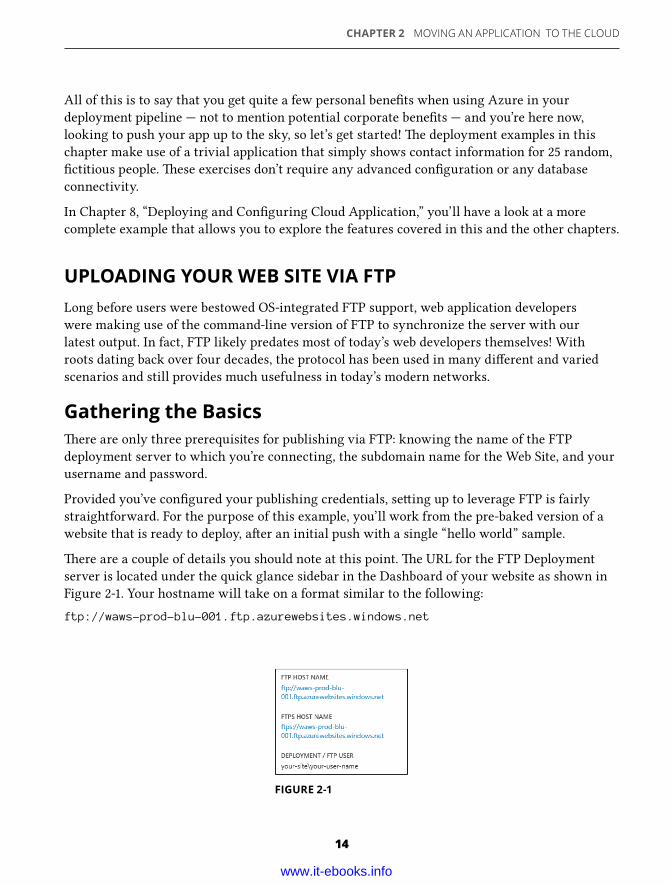
ere are a couple of details you should note at this point. e URL for the FTP Deployment
server is located under the quick glance sidebar in the Dashboard of your website as shown in
Figure 2-1. Your hostname will take on a format similar to the following:
ftp://waws-prod-blu-001.ftp.azurewebsites.windows.net
FIGURE 2-1
www.it-ebooks.info
Uploading Your Web Site via FTP
15
Also located in the quick glance side bar is the name of your deployment/FTP user. You may
fi nd that all server endpoints across your subscription are identical, but the user you log in
with sorts out the home directory for each particular FTP session. Your username is in the
format sitename\user, where user is the name you specifi ed when you created your publishing
credentials. If you don’t recall what they are, you can reset them by following the steps in the
section titled “Se ing Your Deployment Credentials” in Chapter 1.
Connecting to the Server ose of you who have previously worked with FTP may have a more elegant so ware package
than working from Windows Explorer to connect and manage your fi les. You can perform the
steps here in your preferred FTP client if you choose, or you can use the operating system’s
built-in support for FTP. e la er approach, which is generally the more cumbersome choice,
is what you’ll use for the purpose of this exercise, but feel free to follow along in whichever
so ware you ultimately decide to use.
To make it easy to get started, follow these steps:
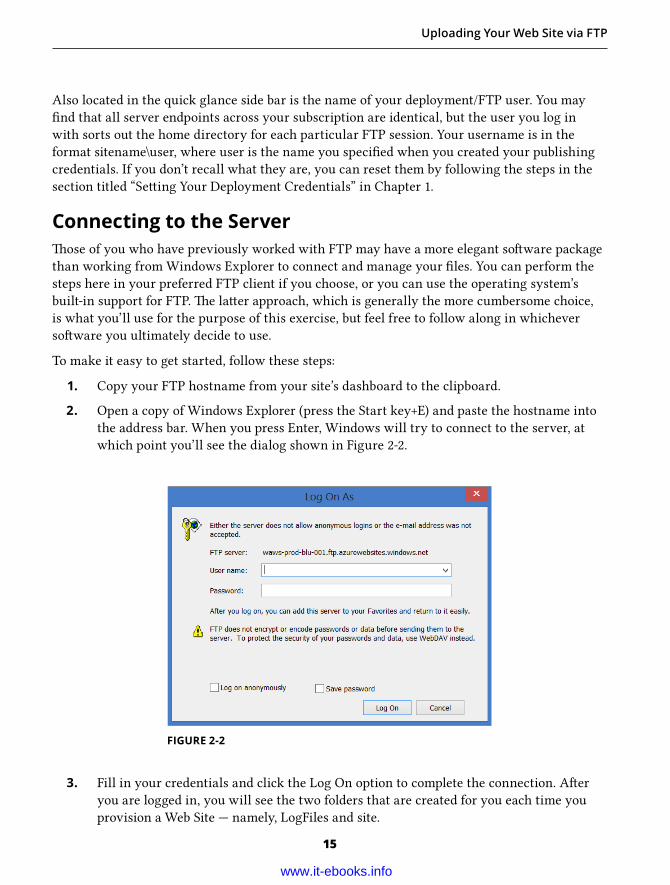
1. Copy your FTP hostname from your site’s dashboard to the clipboard.
2. Open a copy of Windows Explorer (press the Start key+E) and paste the hostname into
the address bar. When you press Enter, Windows will try to connect to the server, at
which point you’ll see the dialog shown in Figure 2-2.
FIGURE 2-2
3. Fill in your credentials and click the Log On option to complete the connection. A er
you are logged in, you will see the two folders that are created for you each time you
provision a Web Site — namely, LogFiles and site.
www.it-ebooks.info
CHAPTER 2 MOVING AN APPLICATION TO THE CLOUD
16
4. Navigate into the site folder, and fi nally into the wwwroot folder, where you’ll fi nd
a single fi le called hostingstart.html. is is the directory you’ll target when you
deploy the application.
NOTE A heads up on security: Although FTP is provided as a convenience, it may not
meet the security requirements of your organization. Remember that FTP sends your
credentials via clear text — that’s right, no encryption — so anyone who might be “listen-
ing” to the tra c on your connection could exploit your username and password. For this
reason, Azure provides a secure FTP (sFTP) endpoint for users who elect to use this as part
of their workfl ow.
Keep this FTP directory open because you’re going to come back to it in just a moment.
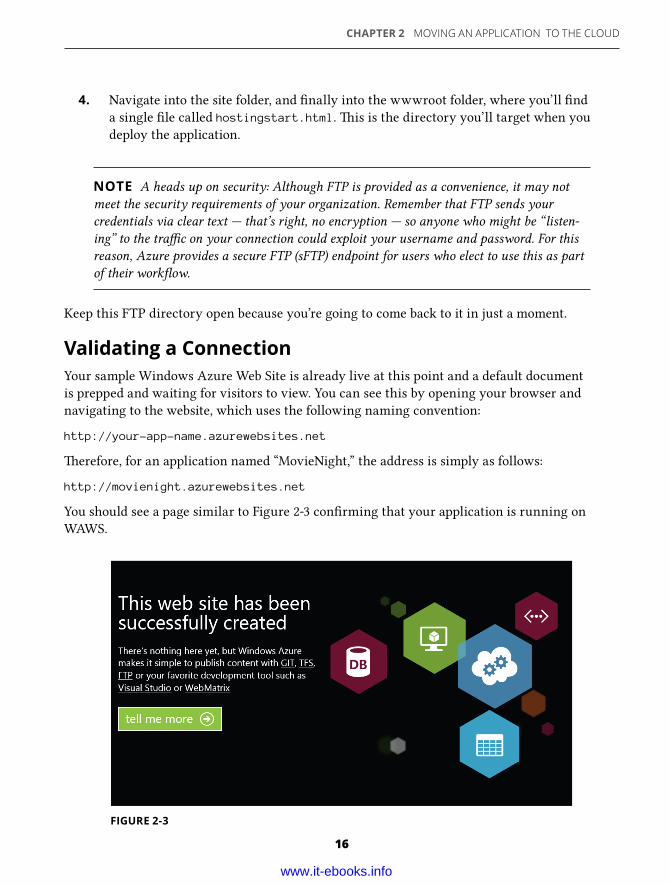
Validating a ConnectionYour sample Windows Azure Web Site is already live at this point and a default document
is prepped and waiting for visitors to view. You can see this by opening your browser and
navigating to the website, which uses the following naming convention:
http://your-app-name.azurewebsites.net
erefore, for an application named “MovieNight,” the address is simply as follows:
http://movienight.azurewebsites.net
You should see a page similar to Figure 2-3 confi rming that your application is running on
WAWS.
FIGURE 2-3
www.it-ebooks.info
Uploading Your Web Site via FTP
17
You can change what users see when they arrive at your site by adding a new page to this
directory. is section doesn’t get too fancy here — it just sticks with the bare bones to
demonstrate the process:
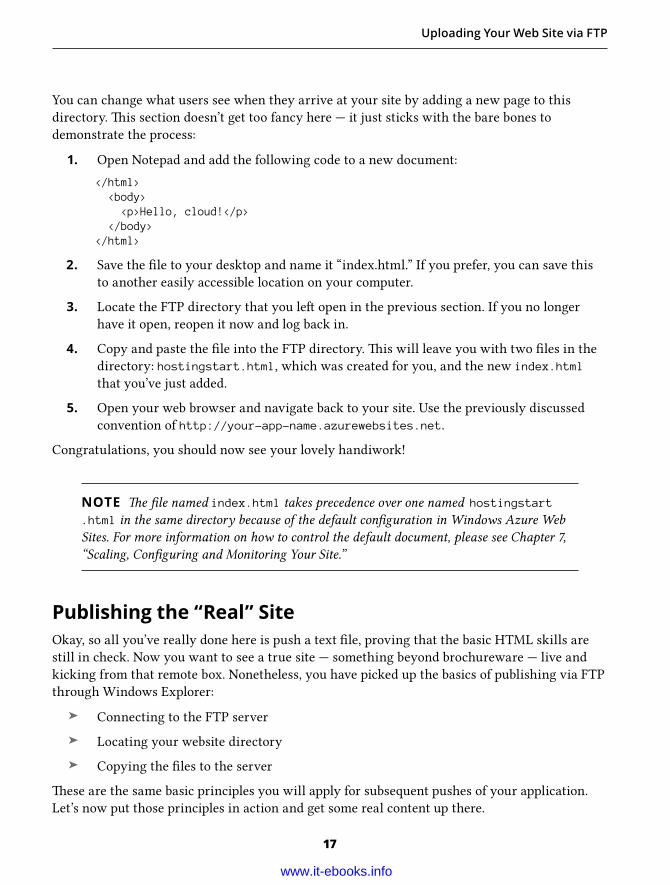
1. Open Notepad and add the following code to a new document:
</html> <body> <p>Hello, cloud!</p> </body> </html>
2. Save the fi le to your desktop and name it “index.html.” If you prefer, you can save this
to another easily accessible location on your computer.
3. Locate the FTP directory that you le open in the previous section. If you no longer
have it open, reopen it now and log back in.
4. Copy and paste the fi le into the FTP directory. is will leave you with two fi les in the
directory: hostingstart.html, which was created for you, and the new index.htmlthat you’ve just added.
5. Open your web browser and navigate back to your site. Use the previously discussed
convention of http://your-app-name.azurewebsites.net.
Congratulations, you should now see your lovely handiwork!
NOTE e fi le named index.html takes precedence over one named hostingstart.html in the same directory because of the default confi guration in Windows Azure Web
Sites. For more information on how to control the default document, please see Chapter 7,
“Scaling, Confi guring and Monitoring Your Site.”
Publishing the “Real” SiteOkay, so all you’ve really done here is push a text fi le, proving that the basic HTML skills are
still in check. Now you want to see a true site — something beyond brochureware — live and
kicking from that remote box. Nonetheless, you have picked up the basics of publishing via FTP
through Windows Explorer:
➤ Connecting to the FTP server
➤ Locating your website directory
➤ Copying the fi les to the server
ese are the same basic principles you will apply for subsequent pushes of your application.
Let’s now put those principles in action and get some real content up there.
www.it-ebooks.info
CHAPTER 2 MOVING AN APPLICATION TO THE CLOUD
18
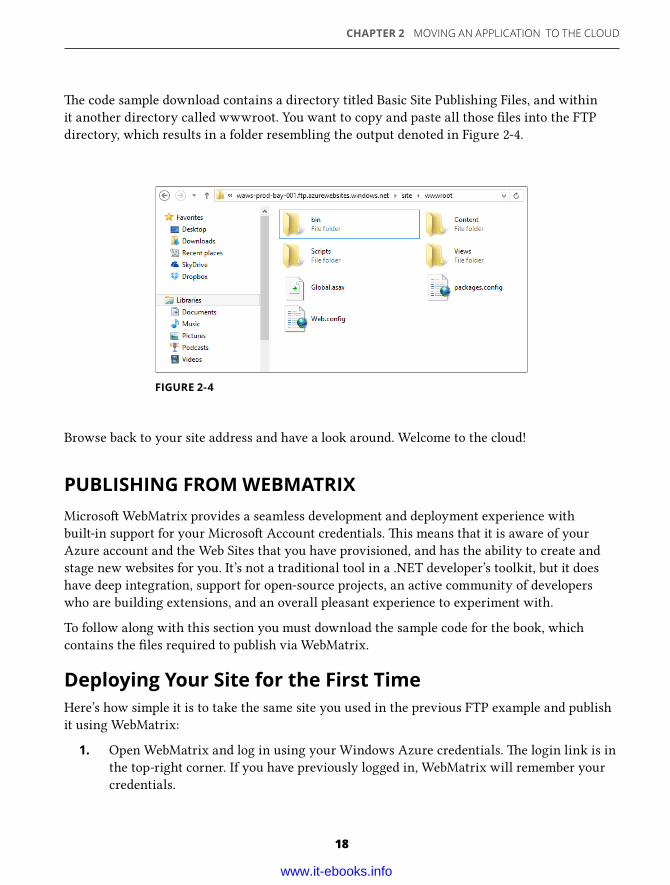
e code sample download contains a directory titled Basic Site Publishing Files, and within
it another directory called wwwroot. You want to copy and paste all those fi les into the FTP
directory, which results in a folder resembling the output denoted in Figure 2-4.
FIGURE 2-4
Browse back to your site address and have a look around. Welcome to the cloud!
PUBLISHING FROM WEBMATRIXMicroso WebMatrix provides a seamless development and deployment experience with
built-in support for your Microso Account credentials. is means that it is aware of your
Azure account and the Web Sites that you have provisioned, and has the ability to create and
stage new websites for you. It’s not a traditional tool in a .NET developer’s toolkit, but it does
have deep integration, support for open-source projects, an active community of developers
who are building extensions, and an overall pleasant experience to experiment with.
To follow along with this section you must download the sample code for the book, which
contains the fi les required to publish via WebMatrix.
Deploying Your Site for the First TimeHere’s how simple it is to take the same site you used in the previous FTP example and publish
it using WebMatrix:
1. Open WebMatrix and log in using your Windows Azure credentials. e login link is in
the top-right corner. If you have previously logged in, WebMatrix will remember your
credentials.
www.it-ebooks.info
Publishing from WebMatrix
19
2. Choose Open ➪ Folder from the welcome screen and select the folder containing the
basic site publishing fi les. is is the wwwroot folder located in Basic Site Publishing
Files, which is in your code download.
3. Click the Publish command in the Home ribbon. is will open the Publish Your Site
dialog.
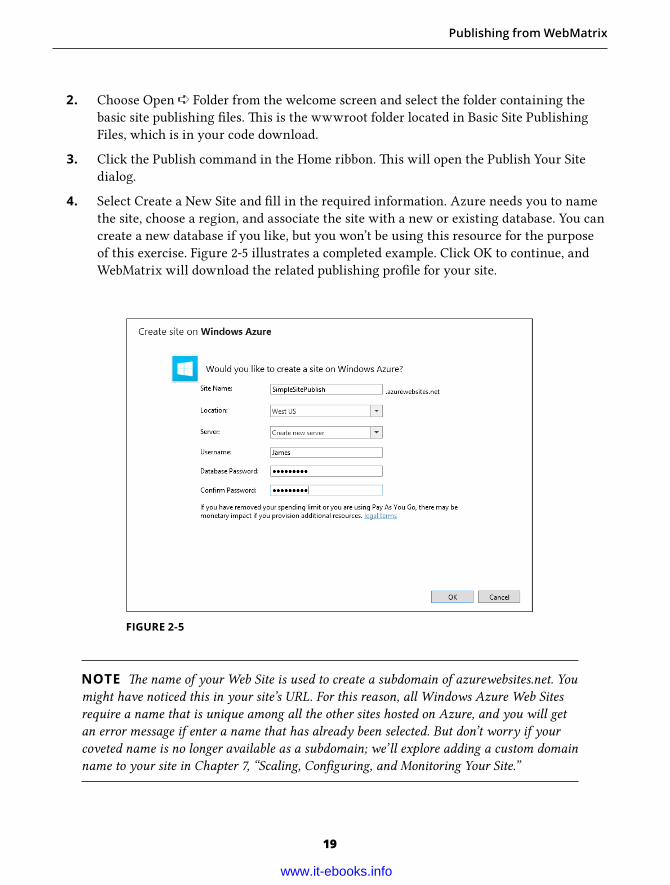
4. Select Create a New Site and fi ll in the required information. Azure needs you to name
the site, choose a region, and associate the site with a new or existing database. You can
create a new database if you like, but you won’t be using this resource for the purpose
of this exercise. Figure 2-5 illustrates a completed example. Click OK to continue, and
WebMatrix will download the related publishing profi le for your site.
FIGURE 2-5
NOTE e name of your Web Site is used to create a subdomain of azurewebsites.net. You
might have noticed this in your site’s URL. For this reason, all Windows Azure Web Sites
require a name that is unique among all the other sites hosted on Azure, and you will get
an error message if enter a name that has already been selected. But don’t worry if your
coveted name is no longer available as a subdomain; we’ll explore adding a custom domain
name to your site in Chapter 7, “Scaling, Confi guring, and Monitoring Your Site.”
www.it-ebooks.info
CHAPTER 2 MOVING AN APPLICATION TO THE CLOUD
20
5. Complete the test deployment by clicking Continue, and Continue again once the
tests are complete. WebMatrix will ensure that the basic components of the site are
compatible with the Azure Web Site and display the results. You are not required to
do this step and can skip it if you like, but I recommend trying it out at least once
to familiarize yourself with the process. is simple step can help catch deployment
problems before they occur!
6. Review the Publish Preview screen. is contains the type of information that
WebMatrix presents to you as you begin the publish process on each iteration. In future
sessions you will usually see far fewer fi les; the initial deployment has to upload all
the assets of the project, while subsequent deployments perform a di erential upload,
so only those fi les that have changed will be shown in the screen (and sent to the Web
Site).
7. Click Continue to complete your deployment. e dialog will close and you’ll see
a yellow alert panel at the bo om of the screen. is panel reports on progress as
WebMatrix processes changes on your site.
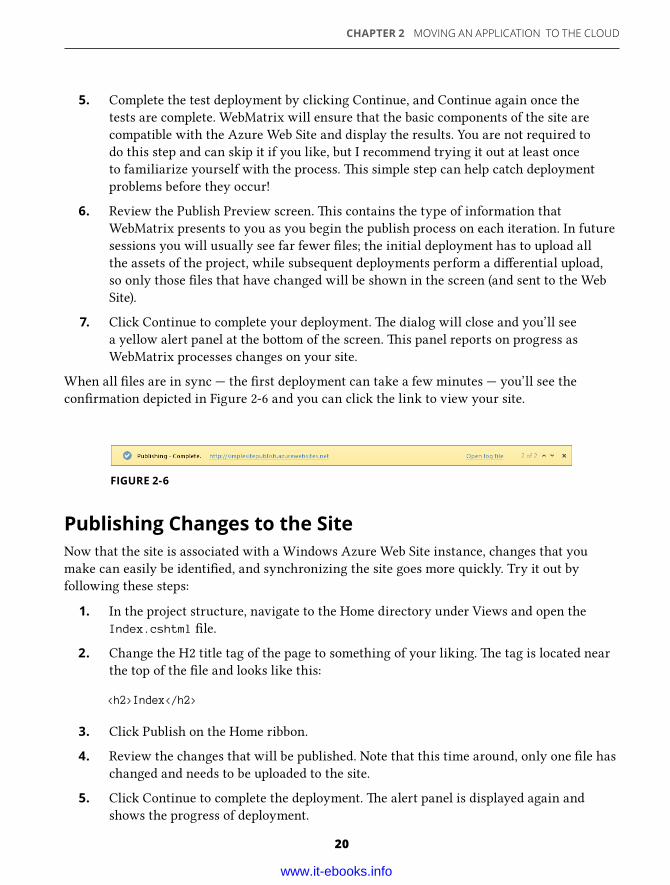
When all fi les are in sync — the fi rst deployment can take a few minutes — you’ll see the
confi rmation depicted in Figure 2-6 and you can click the link to view your site.
FIGURE 2-6
Publishing Changes to the SiteNow that the site is associated with a Windows Azure Web Site instance, changes that you
make can easily be identifi ed, and synchronizing the site goes more quickly. Try it out by
following these steps:
1. In the project structure, navigate to the Home directory under Views and open the
Index.cshtml fi le.
2. Change the H2 title tag of the page to something of your liking. e tag is located near
the top of the fi le and looks like this:
<h2>Index</h2>
3. Click Publish on the Home ribbon.
4. Review the changes that will be published. Note that this time around, only one fi le has
changed and needs to be uploaded to the site.
5. Click Continue to complete the deployment. e alert panel is displayed again and
shows the progress of deployment.
www.it-ebooks.info

Publishing through Dropbox
21
at’s the basics! You can now refresh your site and see any changes you’ve made.
PUBLISHING THROUGH DROPBOXDropbox is a cloud-based fi le storage system that makes it easy to move fi les around from
computers, tablets, phones, and through the web interface. It started with a private beta
and grew to millions of users, and its creators recently announced that Dropbox users were
uploading more than one billion fi les per day. So, yeah…they’re popular. Chances are good you
already have a Dropbox account; if not, it’s easy to set one up. is section describes an easy
way to move project fi les to a cloud application server.
Before you get started, please ensure that you have a Dropbox account set up and that you have
downloaded the appropriate so ware for your operating system. Dropbox users will already be
familiar with the client so ware that you use to keep your fi les in sync with your cloud storage
account.
To follow along with this section you must download the sample code for the book, which
contains the fi les required to publish via Dropbox.
Associating Your Web Site with a Dropbox FolderBecause Dropbox is not a Microso product and doesn’t exist as part of the Windows Azure
o ering, you fi rst need to set up a trust between the services. Start by creating a new site from
your Azure portal as you did in “Creating a Simple Site” in Chapter 1, and then follow these
steps:
1. Navigate to the dashboard of your site in the Azure portal. For the purposes of these
steps, let’s presume that the name of your site is “movienight.” Just remember that you
need to pick a unique name and use that throughout this exercise.
2. Under the ick Glance section of the dashboard, select “Set up deployment from
source control.” is reveals a prompt asking “Where is your source code?”
3. Select Dropbox from the list of source control providers and click the Next arrow.
4. Sign in (if required), review the prompt from Dropbox, and click Allow. Dropbox
provides an authentication and association window to confi rm that you indeed wish
to set up a link between Azure and your Dropbox account, to which you’ll need to be
signed in.
5. Choose a new folder in the “Set up publishing” dialog and name the new folder. By
default, Azure gives the folder the same name as your site name. In this example, that
means that the folder would be named “movienight.” is makes it easy to identify the
site to which you’re publishing.
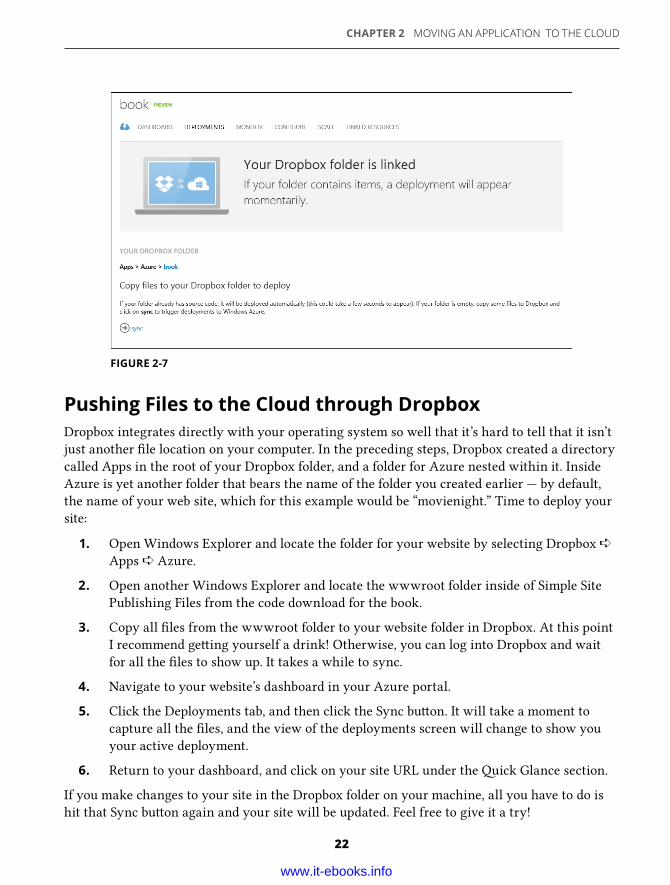
When you are done you’ll see a confi rmation similar to that in Figure 2-7, le ing you know that
everything completed successfully. You’re now published and online. Congrats!
www.it-ebooks.info
CHAPTER 2 MOVING AN APPLICATION TO THE CLOUD
22
Pushing Files to the Cloud through DropboxDropbox integrates directly with your operating system so well that it’s hard to tell that it isn’t
just another fi le location on your computer. In the preceding steps, Dropbox created a directory
called Apps in the root of your Dropbox folder, and a folder for Azure nested within it. Inside
Azure is yet another folder that bears the name of the folder you created earlier — by default,
the name of your web site, which for this example would be “movienight.” Time to deploy your
site:
1. Open Windows Explorer and locate the folder for your website by selecting Dropbox ➪
Apps ➪ Azure.
2. Open another Windows Explorer and locate the wwwroot folder inside of Simple Site
Publishing Files from the code download for the book.
3. Copy all fi les from the wwwroot folder to your website folder in Dropbox. At this point
I recommend ge ing yourself a drink! Otherwise, you can log into Dropbox and wait
for all the fi les to show up. It takes a while to sync.
4. Navigate to your website’s dashboard in your Azure portal.
5. Click the Deployments tab, and then click the Sync bu on. It will take a moment to
capture all the fi les, and the view of the deployments screen will change to show you
your active deployment.
6. Return to your dashboard, and click on your site URL under the ick Glance section.
If you make changes to your site in the Dropbox folder on your machine, all you have to do is
hit that Sync bu on again and your site will be updated. Feel free to give it a try!
FIGURE 2-7
www.it-ebooks.info
Going to the Cloud with Visual Studio 2012
23
As you can see, this model whereby Windows Azure “pulls” your site from another location
can be pre y powerful, and the sharp reader will be wondering about the list of deployments
that is amended with each sync operation you perform. Hang tight, you’ll be working with
deployments in depth in Chapter 3, “Managing Deployments via Source Control.”
GOING TO THE CLOUD WITH VISUAL STUDIO 2012 e last piece is one that I put in the game changer category. Publishing to Windows Azure
through Visual Studio 2012 has all but eliminated any barriers for any experienced developer
who wants to try running a website on the cloud. is could be the single most enticing feature
that will draw you in and make you want to experiment with Windows Azure Web Sites, if you
haven’t already done so.
Now that I’ve set the bar so unrealistically high that you are likely having a hard time believing
it, I’m going to walk you through the steps and hopefully gain some face in the process!
To follow along with this section you must download the sample code for the book, which
contains the fi les required to publish with Visual Studio 2012.
Downloading Your Publishing Profi le e key to this magic show is the publishing profi le that is exposed on the dashboard of any
Windows Azure Web Site. is is an XML fi le that gives Visual Studio the instructions it needs
to complete a deployment to Azure. You can create your own XML fi le and add it to your project
manually, but Windows Azure Web Sites and Visual Studio 2012 give you an easy alternative:
Download the pre-confi gured se ings and easily import them into your project.
Pop back into your portal and use ick Create to add another site to your account, and then
follow along with these steps:
1. Go to the dashboard for your site in the Azure portal.
2. Click the “Download publish profi le” link under the ick Glance section of the
dashboard. When the browser prompts you to save the fi le, select a location you’ll be
able to remember in the next step.
Registering the Publishing Profi le with Your ProjectYou don’t have to create the project from scratch, but you can if you like. For a head start, there
is a solution entitled “SimpleSite” in the code download for the book. is is the source code
for the fi les you’ve been deploying so far throughout this chapter. e following steps take you
through the publishing process for the SimpleSite solution, but it’s an easy transition to use
your own site in its place.
www.it-ebooks.info
CHAPTER 2 MOVING AN APPLICATION TO THE CLOUD
24
1. Locate and open the SimpleSite.sln solution fi le in Visual Studio 2012.
2. Select Build ➪ Publish from the menu. Visual Studio will launch the Publish Web dialog.
3. Switch to the Profi le tab if you’re not already there, and click the bu on labeled Import
next to the profi le selection dropdown.
4. Navigate to and select the publishing profi le you downloaded in the previous section.
You’ll see all the credentials and connection information you need automatically fi lled
in for you. You can click the Validate Connection bu on to assert that you have a valid
confi guration.
5. Click the Publish bu on. Visual Studio takes care of the heavy li ing for you.
From this point forward, all you have to do is click Build ➪ Publish to push updates to your
site. And the real value of using this deployment mechanism? You can add multiple publishing
profi les to your project and deploy on a whim to any of them.
e publishing profi le is the same format that is used by Web Deploy and it can be incorporated
into your physical servers as well, meaning you can deploy as easily to your test environment
as you can to a scalable, cloud-based production server running on Windows Azure. You can
even leverage these profi les as part of your continuous deployment process or otherwise in your
build scripts.
SELECTING A DEPLOYMENT STRATEGYIt’s fairly trivial to work with tools like FTP and DropBox to deploy your site, both of which
provide a method that is as straightforward as using the fi le system to copy fi les. WebMatrix
and the Visual Studio IDE give you a method of publishing from directly within the tools you’re
using to create your site. ere can be great benefi t from being able to directly push fi les to the
cloud, but how do you keep track of changes? What happens when you work with other team
members? Will you be expected to support multiple versions of your site?
ese techniques let you play with the metal, so to speak, and grind fi les out quickly and
e ectively with the caveat that you’re unable to really take your deployments to the next level.
It’s hard to work with other folks on your team without overwriting fi les and losing work, or
worse, even rendering your site inoperable. ere is no way to roll back to a previous version — or
even track previous versions — and all of a sudden you start to realize that “quick” and “e ective”
might not be what you’re looking for.
Truthfully, publishing as illustrated in this chapter is quickly outgrown by the serious hobbyist
and professionals alike. You’re going to need to take control of your source and start using
repositories. If you’re working with other team members, on open source projects or even alone,
using a source control repository really opens the door to some deployment methods that
pair up really nicely with Windows Azure Web Sites. If you’re looking to build a strategy for
www.it-ebooks.info
Summary
25
deployment it should not include copying and pasting fi les, nor should it include any process
which permanently overwrites previous work.
Unfortunately, all of the techniques demonstrated thus far allow you to fall into those traps.
Fortunately, you’re about to learn how to tie your code base hosted in any one of several source
control providers to the automated deployment facilities of Windows Azure. Chapter 3 will
cover this ground and give you some solid footing as you move past these basic concepts and
towards an environment that fi ts most development realities.
SUMMARY ere are almost as many ways to get your web application up on the cloud as there are ways
to say “hello,” and you’re only halfway through them! You should now feel pre y comfortable
using several di erent tools to deploy your site and keep it up to date.
Be it simple operations as basic as copying fi les for FTP or Dropbox, using more complete
tooling and authoring environments such as WebMatrix, or building a solution in a fully
featured IDE like Visual Studio, you’ve seen how the friction related to deployment has been
signifi cantly lessened. So it’s time to start experimenting!
Ultimately, chances are good that you’ll be working with more mature sites, sites built through
the e ort of a team, with a distributed group, or for clients that work o site; and for those types
of projects, you’ll likely need to leverage some kind of source control, the subject of the next
chapter.
www.it-ebooks.info
Managing Deployments via Source Control3
IN THIS CHAPTER:
➤ Associating a version control system with your Azure account ➤ Using source control repositories to publish Azure Web Sites ➤ Working with di erent versions of a previously deployed code
base
WROX.COM CODE DOWNLOADS FOR THIS CHAPTER
Please note that all the code examples in this chapter are available as a part of this chapter’s
code download on the book’s website at www.wrox.com on the Download Code tab. You’ll be
publishing all the related code from the following project in the download:
SimpleSite — is is a Visual Studio 2012 solution that you will use as a publishing exercise
throughout this chapter.
It is o en said that the only good code is shipped code. Until code is shipped, users gain no
benefi t from our e orts. And on too many occasions, the time between development and
deployment into production can be measured in weeks and months. So how great would it be to
have code shipped as soon as it’s checked in? is is an idea that has been gaining support for
quite a while. Support not just in terms of people approving of the idea, but also in the number
and quality of tools used to actually deliver on it. Developers can add Windows Azure Web
Sites to the list of tools that help achieve this laudable goal.
Developers don’t go out of their way to make their deployment process intentionally more
complex. ey don’t add extra tools to their toolkit for the heck of it. ey have no desire to
make it di cult for the team to work together. e process of developing code, integrating new
functions into the application, and performing tests is already challenging to do. ere is no
benefi t to making the points of interaction among the team members worse.
And yes, the build or deployment process is o en a point of tension on many teams. Perhaps
the build is fragile. One small piece out of place and tests start to fail. Or maybe the build is
inconsistent, showing failure one moment and success immediately a erwards. Any situation
like this is one that development teams want to avoid.
Typically, at the onset of a project, someone will lead the e ort to put the build together. ey
wire up the compilation of the separate projects and create scripts for the deployment and
testing steps. is can be intimidating. And to make it worse, the most typical pa ern has the
www.it-ebooks.info
Understanding Prerequisites
27
build changing on a regular basis over the development period as more and more functionality
is added.
Many good pa erns exist for creating a seamless build and deployment experience. If your
build and deployment systems are not causing pain in your daily work, there may be very li le
business value in changing it. is chapter should not be viewed as a demand to rewrite your
deployment process. If, however, the only continuity in your build process is “stress,” then it
might be time to consider an alternative approach.
As your development toolkit has grown and matured, so has the general landscape for the
build process. Continuous Integration servers are equipped with web-based front ends that are
capable of monitoring changes to source control, checking out code, executing build scripts,
performing automatic acceptance tests, staging deployments to multiple servers, as well as
myriad other tasks. ese systems will not be perfect for every team, every scenario, or perhaps
even for your project requirements, but they are good to be aware of so that when you are
ready, you’re equipped with the pieces you need to deliver a timely and comprehensive solution.
Now, the fact that Windows Azure can integrate easily and rather seamlessly into your
continuous deployment process won’t solve all your problems. But it does mean that Azure is a
solid choice for a deployment target. And as an added benefi t, confi guring Azure and your build
environment to accomplish this is not as intimidating as you might fi rst think. A er looking
at the basics of working with source control systems, this chapter discusses the components of
this process that make it easier to automate the juicy bits.
UNDERSTANDING PREREQUISITESFor most of the exercises that follow, you will be required to provide credentials in the
Windows Azure portal for external source control systems. Each of these systems requires a
varying degree of confi guration and may require tool installation or shell extensions in order
for you to work with them on your machine.
e focus of this chapter is to help you understand how source control tools (specifi cally the
deployment components of those tools) allow for integration with Windows Azure Web Sites.
at means that this chapter does not provide a comprehensive guide to installing, confi guring,
or managing your choice of source control. at is well beyond the scope of this chapter and
this book. e assumption is that you have already selected a source control tool; this chapter
covers four popular tool choices and how they work with WAWS.
You should have a good understanding of your tools of choice, the ability to check in code
changes, and familiarity with creating branches and merging code as required. Using a variety
of tools, I will demonstrate how diverse this process can be, but the examples will not serve as a
tutorial for managing your source tree.
www.it-ebooks.info
CHAPTER 3 MANAGING DEPLOYMENTS VIA SOURCE CONTROL
28
Finally, you should be comfortable with creating new Azure Web Sites and moving around
the Windows Azure portal — specifi cally, with using the command bar and navigating to the
dashboard of the website you’re working with.
PUBLISHING FROM SOURCE CONTROLIn Chapter 2 you had a quick look at publishing from Dropbox. It is straightforward enough,
and while it maintains history on fi les and integrates nicely into modern operating systems,
it is missing some critical aspects of source control when used on its own. Although it is
possible to create composite solutions — Git or Mercurial over Dropbox, for example — they
rarely satisfy more than single-user requirements, and even then ideally only for backup and
redundancy. erefore, as simple as it is to set up Dropbox with Windows Azure Web Sites,
it’s probably not a real-world solution for your team. e following sections describe how to
confi gure WAWS publishing from GitHub, CodePlex, Bitbucket, and Team Foundation Service.
Publishing from GitHubGitHub is one of the fastest-growing hosts of open-source so ware projects, enabling private
or public collaboration within organizations, between individuals and as a community. ough
there is a for-fee model, you can make as many public repositories as you like, fork code from
existing e orts, and contribute to projects created by others.
From Windows Azure Web Sites you are able to connect your site to any GitHub project
associated with your account. is includes any public or private repositories you’ve created,
as well as projects that you’ve forked from other sources. Be er still, you can select the branch
to be associated with your website, which allows for great fl exibility in running multiple
environments and deployment versions. Using a custom deployment engine, Windows Azure
Web Sites will download code a er a check-in, build your solution, and deploy your updated site
automatically.
To get started, you’ll need to set up a local repository and put some code in it. is section
provides instructions assuming you’ll be using GitHub for Windows as your client so ware.
GitHub for Windows is an excellent GitHub client with a very streamlined UI that should feel
right at home in your Windows environment. If you prefer to use another client, you should be
able to tailor the process accordingly:
1. From the home screen in GitHub for Windows, create a new repository using the add
bu on located at the top center of the screen. When you are done, open the repository
in GitHub for Windows.
2. From File Explorer, copy the fi les for the Simple Site into your repository’s local
directory. e site solution is located in the Basic Site Publishing Files folder of the code
download.
www.it-ebooks.info
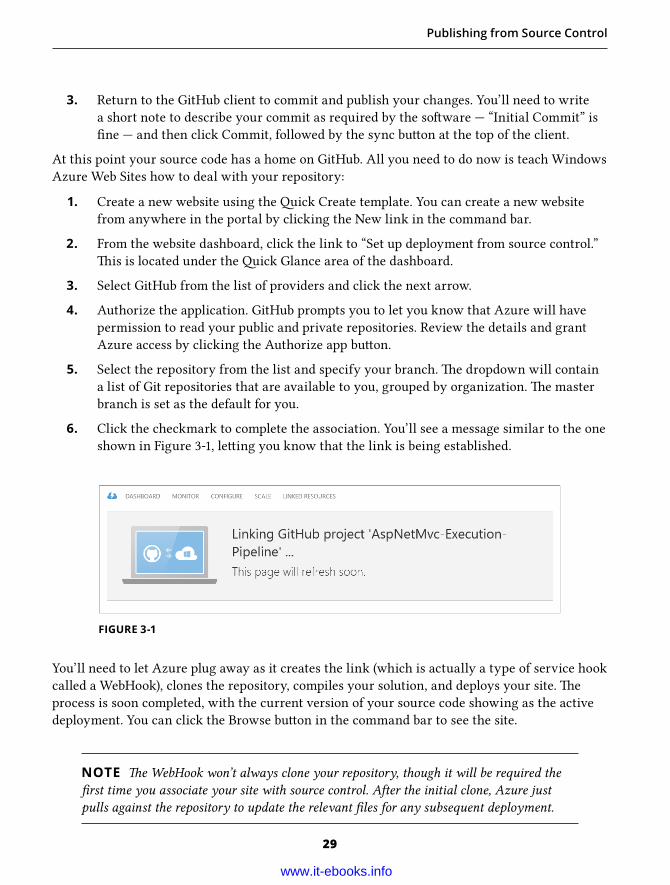
Publishing from Source Control
29
3. Return to the GitHub client to commit and publish your changes. You’ll need to write
a short note to describe your commit as required by the so ware — “Initial Commit” is
fi ne — and then click Commit, followed by the sync bu on at the top of the client.
At this point your source code has a home on GitHub. All you need to do now is teach Windows
Azure Web Sites how to deal with your repository:
1. Create a new website using the ick Create template. You can create a new website
from anywhere in the portal by clicking the New link in the command bar.
2. From the website dashboard, click the link to “Set up deployment from source control.”
is is located under the ick Glance area of the dashboard.
3. Select GitHub from the list of providers and click the next arrow.
4. Authorize the application. GitHub prompts you to let you know that Azure will have
permission to read your public and private repositories. Review the details and grant
Azure access by clicking the Authorize app bu on.
5. Select the repository from the list and specify your branch. e dropdown will contain
a list of Git repositories that are available to you, grouped by organization. e master
branch is set as the default for you.
6. Click the checkmark to complete the association. You’ll see a message similar to the one
shown in Figure 3-1, le ing you know that the link is being established.
FIGURE 3-1
You’ll need to let Azure plug away as it creates the link (which is actually a type of service hook
called a WebHook), clones the repository, compiles your solution, and deploys your site. e
process is soon completed, with the current version of your source code showing as the active
deployment. You can click the Browse bu on in the command bar to see the site.
NOTE e WebHook won’t always clone your repository, though it will be required the
fi rst time you associate your site with source control. A er the initial clone, Azure just
pulls against the repository to update the relevant fi les for any subsequent deployment.
www.it-ebooks.info
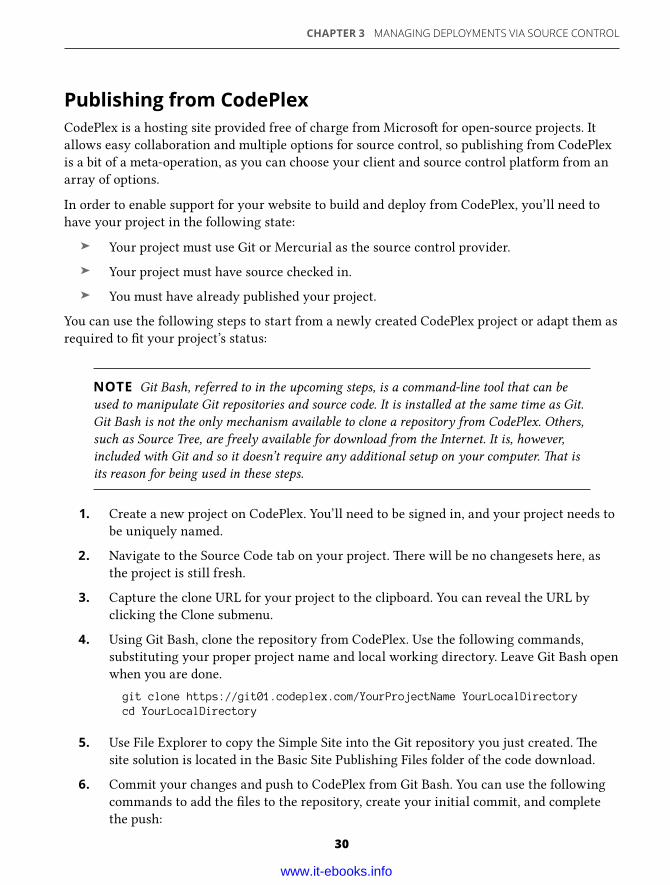
CHAPTER 3 MANAGING DEPLOYMENTS VIA SOURCE CONTROL
30
Publishing from CodePlexCodePlex is a hosting site provided free of charge from Microso for open-source projects. It
allows easy collaboration and multiple options for source control, so publishing from CodePlex
is a bit of a meta-operation, as you can choose your client and source control platform from an
array of options.
In order to enable support for your website to build and deploy from CodePlex, you’ll need to
have your project in the following state:
➤ Your project must use Git or Mercurial as the source control provider.
➤ Your project must have source checked in.
➤ You must have already published your project.
You can use the following steps to start from a newly created CodePlex project or adapt them as
required to fi t your project’s status:
NOTE Git Bash, referred to in the upcoming steps, is a command-line tool that can be
used to manipulate Git repositories and source code. It is installed at the same time as Git.
Git Bash is not the only mechanism available to clone a repository from CodePlex. Others,
such as Source Tree, are freely available for download from the Internet. It is, however,
included with Git and so it doesn’t require any additional setup on your computer. at is
its reason for being used in these steps.
1. Create a new project on CodePlex. You’ll need to be signed in, and your project needs to
be uniquely named.
2. Navigate to the Source Code tab on your project. ere will be no changesets here, as
the project is still fresh.
3. Capture the clone URL for your project to the clipboard. You can reveal the URL by
clicking the Clone submenu.
4. Using Git Bash, clone the repository from CodePlex. Use the following commands,
substituting your proper project name and local working directory. Leave Git Bash open
when you are done.
git clone https://git01.codeplex. com/YourProjectName YourLocalDirectory cd YourLocalDirectory
5. Use File Explorer to copy the Simple Site into the Git repository you just created. e
site solution is located in the Basic Site Publishing Files folder of the code download.
6. Commit your changes and push to CodePlex from Git Bash. You can use the following
commands to add the fi les to the repository, create your initial commit, and complete
the push:
www.it-ebooks.info
Publishing from Source Control
31
git add . git commit -m 'initial commit' git push -u origin master
NOTE If you have not previously saved your credentials for CodePlex, Git will prompt
you for your username and password for operations such as clone and push. You will need
to use the same username and password that you use to log into the CodePlex website.
You’ll see all the fi les scroll by as the operation completes, and you will be able to browse the
code in CodePlex immediately.
As shown in Figure 3-2, publishing your project also requires a number of other elements. In
addition to pushing your fi rst set of code, you’ll need to edit your home page, select one of the
open-source licensing models available on the site, and fi nalize your project summary.
FIGURE 3-2
Complete each of those requirements, then follow these steps in your Azure portal to connect to
CodePlex for automatic deployments:
1. Create a new website using the ick Create template. You can create a new website
from anywhere in the portal by clicking the New link in the command bar.
2. From the website dashboard, click the link to “Set up deployment from source control.”
is is located under the ick Glance area of the dashboard.
3. Select CodePlex from the list and click the next arrow.
4. Authorize the application. Review the details of the permissions you’re granting Azure
and click the Authorize bu on.
5. Select the repository from the list. e dropdown will contain all published sites that
are bound to Git or Mercurial source control.
6. Click the checkmark to complete the association.
www.it-ebooks.info
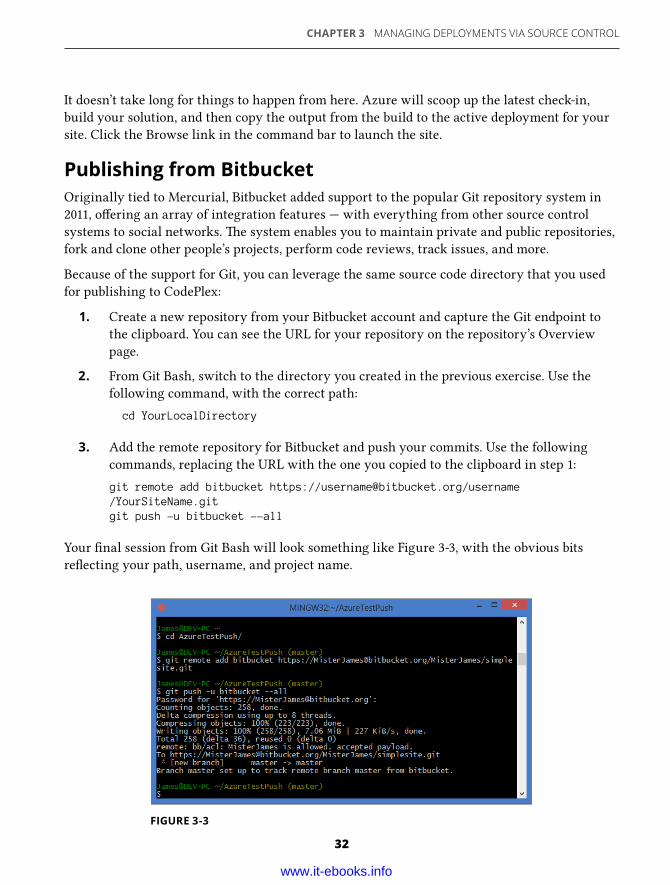
CHAPTER 3 MANAGING DEPLOYMENTS VIA SOURCE CONTROL
32
It doesn’t take long for things to happen from here. Azure will scoop up the latest check-in,
build your solution, and then copy the output from the build to the active deployment for your
site. Click the Browse link in the command bar to launch the site.
Publishing from BitbucketOriginally tied to Mercurial, Bitbucket added support to the popular Git repository system in
2011, o ering an array of integration features — with everything from other source control
systems to social networks. e system enables you to maintain private and public repositories,
fork and clone other people’s projects, perform code reviews, track issues, and more.
Because of the support for Git, you can leverage the same source code directory that you used
for publishing to CodePlex:
1. Create a new repository from your Bitbucket account and capture the Git endpoint to
the clipboard. You can see the URL for your repository on the repository’s Overview
page.
2. From Git Bash, switch to the directory you created in the previous exercise. Use the
following command, with the correct path:
cd YourLocalDirectory
3. Add the remote repository for Bitbucket and push your commits. Use the following
commands, replacing the URL with the one you copied to the clipboard in step 1:
git remote add bitbucket https://[email protected]/username /YourSiteName.git git push -u bitbucket --all
Your fi nal session from Git Bash will look something like Figure 3-3, with the obvious bits
refl ecting your path, username, and project name.
FIGURE 3-3
www.it-ebooks.info
Publishing from Source Control
33
Now that your code has a comfy new place to hang out on Bitbucket, the fi nal step is to get
Windows Azure Web Sites cha ing with the source repository. e steps are very similar to the
other Git-based control systems:
1. Log in to the Azure Portal and create a new website using the ick Create template.
You can create a new website from anywhere in the portal by clicking the New link in
the command bar.
2. From the website dashboard, click the link to “Set up deployment from source control.”
is is located under the ick Glance area of the dashboard.
3. Select Bitbucket from the list and click the next arrow. You will be prompted to enter
your credentials to log into your Bitbucket account.
4. Authorize the application. Review the details of the permissions you’re granting
Azure — read and write permissions on both private and public repositories — and click
the “Grant access” bu on.
5. Select the repository from the dropdown list and then select a branch. You can choose
any repository that your account has permission to view, and any branch in that
repository.
6. Click the checkmark to complete the association.
NOTE e Git-based repositories are confi gured with a POST URL when you create the
association with your Windows Azure Web Site. e Git control system you have linked
with will POST to that address when a new commit is made, thus enabling continuous
deployment. If you want to disable the continuous feed, you need to do this in the respec-
tive system. For example, in Bitbucket, you would go to the repository’s se ings, select
Services, and change or remove the POST URL present among your services integration
details.
Publishing from Team Foundation Service e fl agship of collaboration for teams that develop on the Microso stack, Team Foundation
Server has really broadened its horizons. Once a tool o en feared and misunderstood, TFS relied
heavily on a thorough understanding of the “Visual Studio way” and a persistent connection to
a central server. Today, Team Foundation Server has re-manifested itself in other incarnations
that support distributed source control, and it can be served up in web-sized doses that please
developers of all walks.
e incarnation you’ll be working from here is Team Foundation Service, accessible at
tfs.visualstudio.com, and it works a li le di erently than the other source control services
you have examined in this chapter. Rather than pull in source code and build the solution,
TFS publishes the build to the connected Windows Azure Web Site when a check-in builds
www.it-ebooks.info
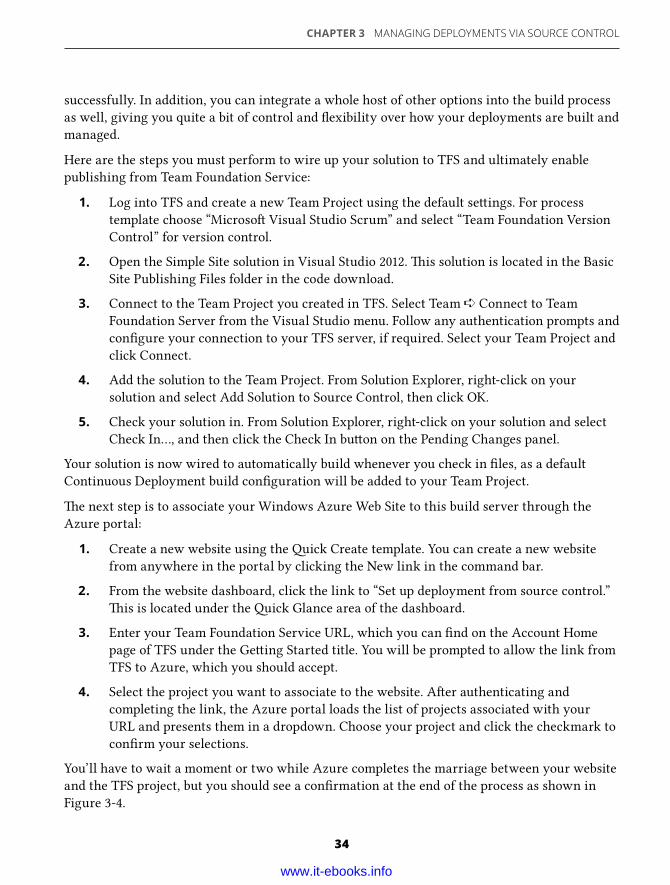
CHAPTER 3 MANAGING DEPLOYMENTS VIA SOURCE CONTROL
34
successfully. In addition, you can integrate a whole host of other options into the build process
as well, giving you quite a bit of control and fl exibility over how your deployments are built and
managed.
Here are the steps you must perform to wire up your solution to TFS and ultimately enable
publishing from Team Foundation Service:
1. Log into TFS and create a new Team Project using the default se ings. For process
template choose “Microso Visual Studio Scrum” and select “Team Foundation Version
Control” for version control.
2. Open the Simple Site solution in Visual Studio 2012. is solution is located in the Basic
Site Publishing Files folder in the code download.
3. Connect to the Team Project you created in TFS. Select Team ➪ Connect to Team
Foundation Server from the Visual Studio menu. Follow any authentication prompts and
confi gure your connection to your TFS server, if required. Select your Team Project and
click Connect.
4. Add the solution to the Team Project. From Solution Explorer, right-click on your
solution and select Add Solution to Source Control, then click OK.
5. Check your solution in. From Solution Explorer, right-click on your solution and select
Check In…, and then click the Check In bu on on the Pending Changes panel.
Your solution is now wired to automatically build whenever you check in fi les, as a default
Continuous Deployment build confi guration will be added to your Team Project.
e next step is to associate your Windows Azure Web Site to this build server through the
Azure portal:
1. Create a new website using the ick Create template. You can create a new website
from anywhere in the portal by clicking the New link in the command bar.
2. From the website dashboard, click the link to “Set up deployment from source control.”
is is located under the ick Glance area of the dashboard.
3. Enter your Team Foundation Service URL, which you can fi nd on the Account Home
page of TFS under the Ge ing Started title. You will be prompted to allow the link from
TFS to Azure, which you should accept.
4. Select the project you want to associate to the website. A er authenticating and
completing the link, the Azure portal loads the list of projects associated with your
URL and presents them in a dropdown. Choose your project and click the checkmark to
confi rm your selections.
You’ll have to wait a moment or two while Azure completes the marriage between your website
and the TFS project, but you should see a confi rmation at the end of the process as shown in
Figure 3-4.
www.it-ebooks.info
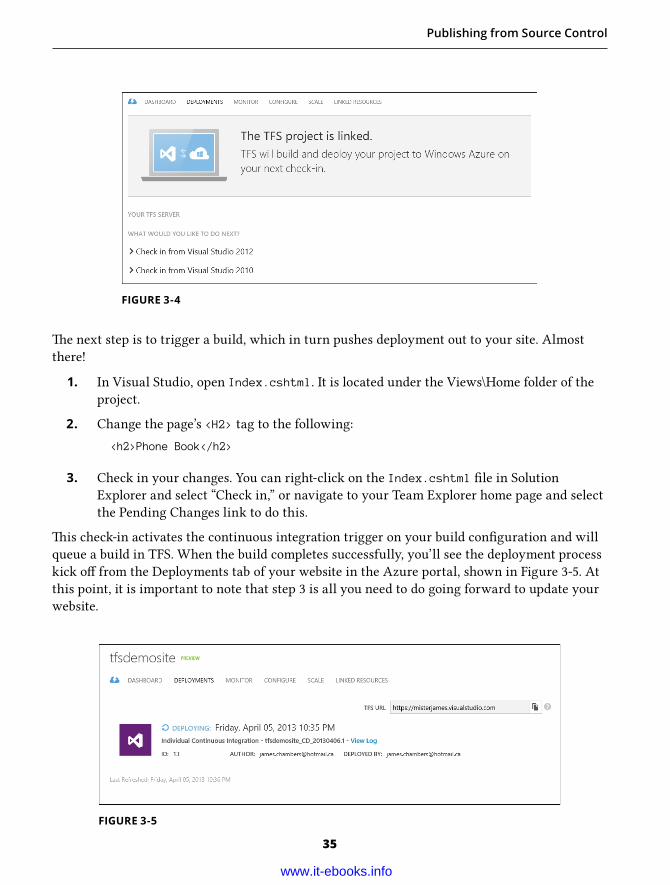
Publishing from Source Control
35
e next step is to trigger a build, which in turn pushes deployment out to your site. Almost
there!
1. In Visual Studio, open Index.cshtml. It is located under the Views\Home folder of the
project.
2. Change the page’s <H2> tag to the following:
<h2>Phone Book</h2>
3. Check in your changes. You can right-click on the Index.cshtml fi le in Solution
Explorer and select “Check in,” or navigate to your Team Explorer home page and select
the Pending Changes link to do this.
is check-in activates the continuous integration trigger on your build confi guration and will
queue a build in TFS. When the build completes successfully, you’ll see the deployment process
kick o from the Deployments tab of your website in the Azure portal, shown in Figure 3-5. At
this point, it is important to note that step 3 is all you need to do going forward to update your
website.
FIGURE 3-4
FIGURE 3-5
www.it-ebooks.info
CHAPTER 3 MANAGING DEPLOYMENTS VIA SOURCE CONTROL
36
When the deployment is completed, Azure switches over to the new code base and your site is
immediately live. You can view the results of your handiwork by clicking the Browse bu on in
the command bar.
MANAGING PREVIOUSLY DEPLOYED RELEASES ere’s nothing worse than pushing a chunk of code out that introduces new problems,
especially when you were trying to fi x something in the fi rst place! (Of course, this never
happens to you because you all write tests, right?) Over the years you’ve likely come up with
processes to make backups of your websites, or you check installers into your versioning
control system to ensure that you could easily roll back if a deployment goes sideways on you.
ese were previously legitimate processes, but in today’s world of continuous integration and
continuous deployment these manual methods of versioning tend to be di cult to use and
require constant e ort to maintain.
Or consider the situation in which you haven’t yet managed to work your project into SAAS
nirvana, and you are managing several sites for multiple clients that are potentially running on
di erent versions of your code base. You’re notifi ed of a problem and you need to write unit or
acceptance tests to identify which versions are a ected, but your test and staging environments
are matched to the latest version of the code base. How will you test each of the versions?
e concept of managed deployments makes this task trivial, as all previously deployed
versions of your site remain persistent in your site’s dashboard. Be er still, the deployments are
available through the command-line interface, so they’re also scriptable, perfect for our world
of continuous integration and deployment. You’ll get a chance to see this in action in Chapter 4,
“Managing Windows Azure Web Sites from the Console.”
NOTE Binding your website to a source control provider is not a permanent operation,
and you can disconnect from source control rather easily from the Windows Azure portal.
Keep in mind, however, that the list of previous deployments will be discarded when you
complete the disconnection. is is one of the caveats you’ll face if you choose to switch
your back-end link to source control.
e continuous deployment approach through source control systems is a fairly pleasant
experience in its own right. Each deployment created from your check-in is persisted in the
portal for each of your websites in Azure. You can access the complete list, a sample of which
is shown in Figure 3-6, by navigating to the Deployments tab on any site confi gured for source
control integration.
www.it-ebooks.info
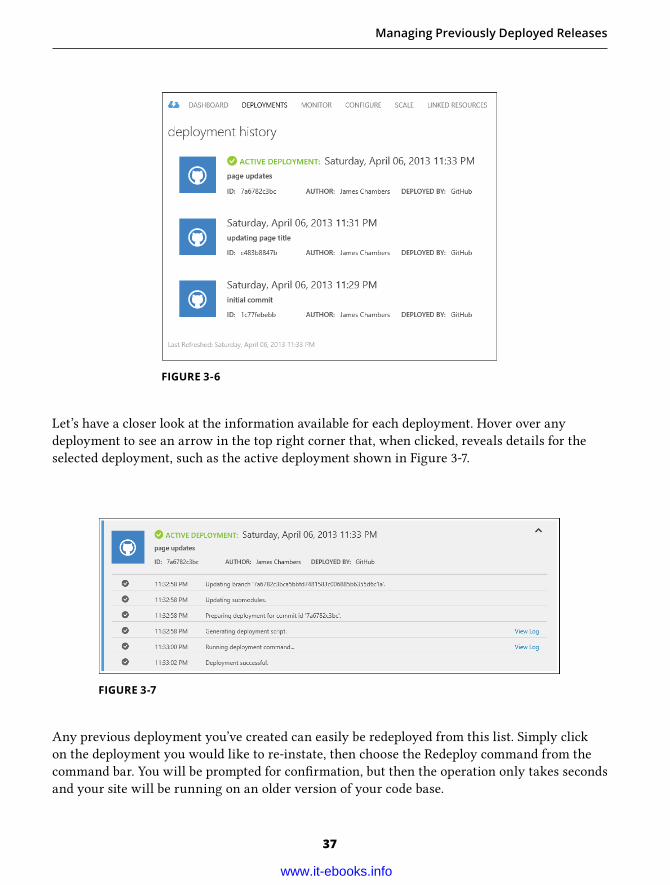
Managing Previously Deployed Releases
37
Let’s have a closer look at the information available for each deployment. Hover over any
deployment to see an arrow in the top right corner that, when clicked, reveals details for the
selected deployment, such as the active deployment shown in Figure 3-7.
FIGURE 3-6
FIGURE 3-7
Any previous deployment you’ve created can easily be redeployed from this list. Simply click
on the deployment you would like to re-instate, then choose the Redeploy command from the
command bar. You will be prompted for confi rmation, but then the operation only takes seconds
and your site will be running on an older version of your code base.
www.it-ebooks.info

CHAPTER 3 MANAGING DEPLOYMENTS VIA SOURCE CONTROL
38
SUMMARYYour familiarity with various source control systems puts you in an enviable position in the
marketplace, and the ability to apply your knowledge to the cloud is an additional benefi t.
Using your skills with di erent versioning platforms, you have seen how simple it can be to
tie a website hosted in Windows Azure back to a source control system. e process is further
enhanced through automated builds and deployments following a successful check in through
the supported providers.
Building on what you’ve learned about creating and managing sites in the previous chapters,
you can now review previous deployments of your project and move between versions through
the Windows Azure portal via your website’s dashboard. With a handle on these so skills,
you’ll next learn to manipulate Windows Azure Web Sites through the command-line interface
(CLI).
www.it-ebooks.info
Managing Windows Azure Web Sites from the Console4
IN THIS CHAPTER:
➤ Tuning up your system to execute the Azure cmdlets ➤ Managing site state and application settings ➤ Getting comfortable with building more complex scripts
She checks her watch; there are only minutes to spare. It’s dark, and it’s ge ing darker. e
guards are closing in, but their weapons are the least of her worries. e clock seems to run
faster and faster, and it won’t be long until the good guys, nay, the whole planet, will have all
but run out of time. e music crescendos as time appears certain to favor the antagonists, and
the only hope le for all of humanity is to connect to a distant satellite and override the nuclear
launch control codes. And what does our heroine do? Browse to a website? Open Visual Studio?
No! She opens a command-line shell!
ere is something uber-geeky and smart-looking about anyone who seems to have good con-
trol of their systems from a command line. If you’re a touch typist and know your command set
well, you can move very quickly inside of a shell and, be er yet, write scripts to help automate
anything that exposes a compatible interface.
Your typical day at the o ce may not be quite as compelling as the heroine above, but there
are many practical applications for having a handle on what you’re able to do and knowing the
fastest way to do it. With Azure, it may very well be from within PowerShell, and the Windows
Azure cmdlets (pronounced “command-lets”) are the way to get there.
In addition, if you don’t use PowerShell but instead prefer a di erent shell or operating system
altogether, all the features described in this chapter are available to you in the Azure Cross-
Platform CLI tools with minor syntax changes here and there. Use what you’re comfortable using!
PREPARING YOUR ENVIRONMENTIf you haven’t used any third-party external cmdlets on your system you need to fi rst grant the
proper permissions for scripts to execute in PowerShell. e default policy is the most secure,
allowing only individual commands to run, but no scripts and certainly no unsigned scripts or
confi guration fi les.
www.it-ebooks.info
CHAPTER 4 MANAGING WINDOWS AZURE WEB SITES FROM THE CONSOLE
40
e Windows Azure cmdlets are signed and thus require the execution policy called
RemoteSigned. is permission level allows you to write your own scripts and will only run
scripts and confi guration fi les downloaded from the Internet that are digitally signed. Here’s
how to do that:
1. Open PowerShell as an administrator by right-clicking on the PowerShell icon and
selecting Run as Administrator if you are running in least privilege mode. You won’t
always need to run as admin, but it is required for se ing the execution policy.
2. Set the execution policy to RemoteSigned. Type the following command:
Set-ExecutionPolicy RemoteSigned
You can close PowerShell at this point and your execution policy se ings will be saved for
future sessions, even when running as a standard user.
Next, it’s time to download the cmdlet installer and get them on your machine:
1. Navigate to http://go.microsoft.com/?linkid=9811175&clcid=0x409 in your web
browser.
2. Select the download for Windows Azure PowerShell.
3. When the download is complete, run the installer.
e installer is just a quick download of less than 100KB that launches the Web Platform
Installer with the Windows Azure PowerShell cmdlets selected for download. You will encounter
a licensing agreement that, while you’re free to consent or not as you wish, only a er acceptance
will the installation fi nish successfully. Congratulations! You’re now one step closer to saving the
world from thermonuclear warfare or, more likely, scripting some Windows Azure operations.
NOTE e Web Platform Installer (WebPI) should be your preferred method of down-
load and installation, if given the option when working with web development tools and
Windows Azure tools in particular. Most applications served through WebPI have the
capability to check for compatibility, install dependencies, and generally help you avoid
any headaches ge ing your tools to run. Once installed, related downloads, applications,
and tooling are o en recommended to complement your installation.
CONFIGURING YOUR ACCOUNTEven if you only work with one Windows Azure subscription throughout the course of your
daily responsibilities, the PowerShell scripts need to have correct information on hand in order
to manage your subscription and its assets. To provide this information you can download a
single fi le representing the authority to manipulate your websites and any other Windows
Azure pieces you’ve created, installing it once.
www.it-ebooks.info
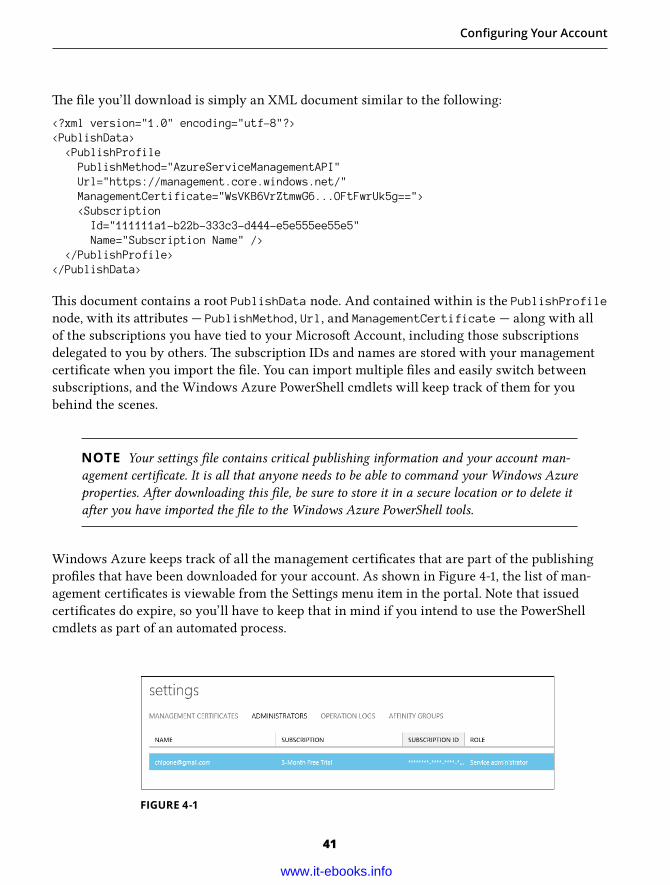
Confi guring Your Account
41
e fi le you’ll download is simply an XML document similar to the following:
<?xml version="1.0" encoding="utf-8"?><PublishData> <PublishProfile PublishMethod="AzureServiceManagementAPI" Url="https://management.core.windows.net/" ManagementCertificate="WsVKB6VrZtmwG6...OFtFwrUk5g=="> <Subscription Id="111111a1-b22b-333c3-d444-e5e555ee55e5" Name="Subscription Name" /> </PublishProfile></PublishData>
is document contains a root PublishData node. And contained within is the PublishProfilenode, with its a ributes — PublishMethod, Url, and ManagementCertificate — along with all
of the subscriptions you have tied to your Microso Account, including those subscriptions
delegated to you by others. e subscription IDs and names are stored with your management
certifi cate when you import the fi le. You can import multiple fi les and easily switch between
subscriptions, and the Windows Azure PowerShell cmdlets will keep track of them for you
behind the scenes.
NOTE Your se ings fi le contains critical publishing information and your account man-
agement certifi cate. It is all that anyone needs to be able to command your Windows Azure
properties. A er downloading this fi le, be sure to store it in a secure location or to delete it
a er you have imported the fi le to the Windows Azure PowerShell tools.
Windows Azure keeps track of all the management certifi cates that are part of the publishing
profi les that have been downloaded for your account. As shown in Figure 4-1, the list of man-
agement certifi cates is viewable from the Se ings menu item in the portal. Note that issued
certifi cates do expire, so you’ll have to keep that in mind if you intend to use the PowerShell
cmdlets as part of an automated process.
FIGURE 4-1
www.it-ebooks.info
CHAPTER 4 MANAGING WINDOWS AZURE WEB SITES FROM THE CONSOLE
42
Downloading Your Publishing Profi leWhile the mechanics of downloading your profi le is a straightforward operation, the process
is a li le more di cult if you have multiple subscriptions to work with. e basic fl ow is as
follows:
1. Open a PowerShell console.
2. Type the following command:
Get-AzurePublishSettingsFile
3. Sign into your Windows Azure account, if prompted, in the browser page that was
opened in your default browser.
4. Save the fi le to a known location.
Step number 3 that can become a li le convoluted, especially if you have saved your credentials
in your browser or you’re using an operating system (such as Windows 8) that has the ability
to pass on the credentials of the currently signed-in user account through Internet Explorer. To
get around this, you can take advantage of the fact that Windows will try to open the requested
link in an existing browser session, if available. To sign in using an account other than the
cached credentials, you can do the following:
1. Close any open instances of Internet Explorer. is ensures that the browser you’re
opening will be the one targeted when you try to download your se ings fi le.
2. Start InPrivate browsing in Internet Explorer by right-clicking on the Internet Explorer
icon and selecting the InPrivate option.
3. Follow the steps listed in the previous section as described. When you get to step 3, the
browser opened in InPrivate mode will not have any cached credentials, thus allowing
you to sign in with an alternate account.
NOTE It’s a good idea to save your se ings fi le to a directory that is easy to navigate to
from a command line, such as c:\azure. Later, when you go to import the se ings, you’ll
save some keystrokes moving around the fi le system!
If you want to work with multiple Microso Accounts from PowerShell, you can repeat the
preceding steps for each account; just remember to close all your open browser windows at the
start of each cycle.
Importing SettingsWith your se ings downloaded you can now import the profi le of each account.
www.it-ebooks.info
Confi guring Your Account
43
1. Open PowerShell.
2. Navigate to the directory where you saved your publishing profi les.
3. Execute the following command:
Import-AzurePublishSettingsFile .\your_file_name.publishsettings
Remember that you can use tab completion in PowerShell, so if you’re in the directory where
the fi le is created, you simply need to press Tab to complete the fi lename of your publish set-
tings fi le.
e utility will import the data for you and cache the information in the roaming
data folder of your account, located at C:\Users\%UserProfile%\AppData\Roaming\Windows Azure PowerShell, where a number of di erent fi les are created to store the information:
➤ Config.json — A JSON representation of your account information
➤ DefaultSubscriptionData.xml — Contains the complete list of imported account
profi les
➤ publishSettings.xml — e cache used to represent the account currently in context
for Windows Azure PowerShell cmdlets
If, for any reason, you want to clear the se ings for your Azure accounts in PowerShell, navigate
to the preceding directory and delete all the fi les. is doesn’t a ect your account, it just removes
all the certifi cates and subscription IDs that are required to publish to your Azure properties
from your local computer. You can download and import the se ings again at any time.
NOTE Deleting the fi les in your roaming folder for Windows Azure PowerShell will not
have an immediate e ect on any open PowerShell consoles. Some of the se ings informa-
tion is loaded when you start to use the Azure cmdlets, and this information is cached for
as long as you leave the console open. You need to restart PowerShell if you want to fully
clear the cache.
Switching between Subscriptions e fi rst publishing profi le that you import will be saved as the default on your machine, but
you can switch between di erent profi les if you know the name. If you have already imported
the se ings, you can also get the name of the subscription locally, either by examining the
import fi le or from the Windows Azure PowerShell tools themselves. To get the names from a
PowerShell console type the following command:
Get-AzureSubscription
www.it-ebooks.info
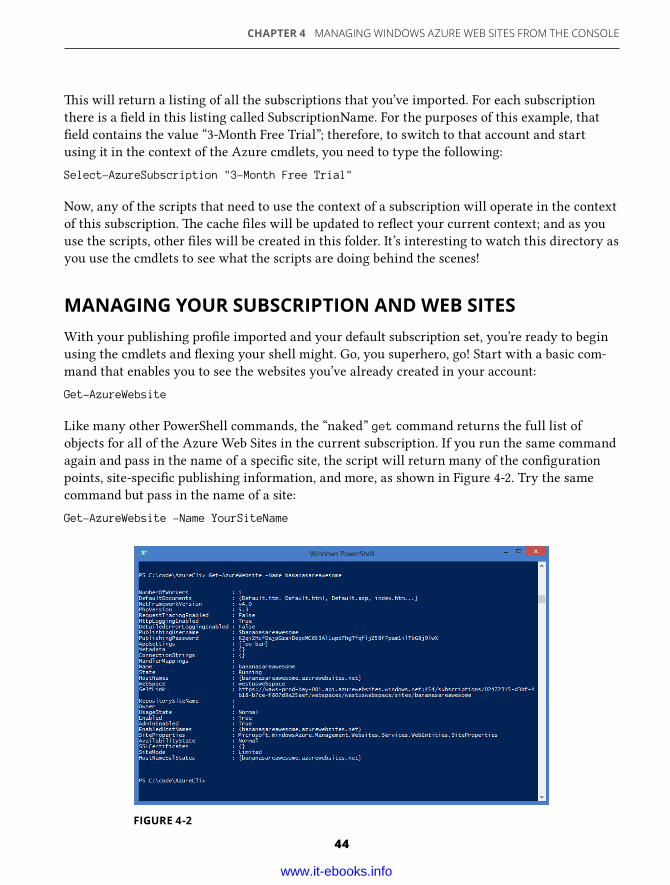
CHAPTER 4 MANAGING WINDOWS AZURE WEB SITES FROM THE CONSOLE
44
is will return a listing of all the subscriptions that you’ve imported. For each subscription
there is a fi eld in this listing called SubscriptionName. For the purposes of this example, that
fi eld contains the value “3-Month Free Trial”; therefore, to switch to that account and start
using it in the context of the Azure cmdlets, you need to type the following:
Select-AzureSubscription "3-Month Free Trial"
Now, any of the scripts that need to use the context of a subscription will operate in the context
of this subscription. e cache fi les will be updated to refl ect your current context; and as you
use the scripts, other fi les will be created in this folder. It’s interesting to watch this directory as
you use the cmdlets to see what the scripts are doing behind the scenes!
MANAGING YOUR SUBSCRIPTION AND WEB SITESWith your publishing profi le imported and your default subscription set, you’re ready to begin
using the cmdlets and fl exing your shell might. Go, you superhero, go! Start with a basic com-
mand that enables you to see the websites you’ve already created in your account:
Get-AzureWebsite
Like many other PowerShell commands, the “naked” get command returns the full list of
objects for all of the Azure Web Sites in the current subscription. If you run the same command
again and pass in the name of a specifi c site, the script will return many of the confi guration
points, site-specifi c publishing information, and more, as shown in Figure 4-2. Try the same
command but pass in the name of a site:
Get-AzureWebsite -Name YourSiteName
FIGURE 4-2
www.it-ebooks.info
Managing Your Subscription and Web Sites
45
is is a good script to keep in your back pocket, as it is easy to survey the state of your web-
sites or the properties of a specifi c site. When using the command as part of a more complex
script, you could do more interesting things by fi ltering and piping the results of the command
to other operations. For example, you could restart all your websites that have “acceptancetest”
in their name with the following script:
Get-AzureWebsite | Where-Object { $_.Name -like "*acceptancetest*" } | ForEach-Object { Restart-AzureWebsite $_.Name }
erefore, while you’re working through the following cmdlets, keep in mind that though their
premise is o en simple, you can actually work them into more interesting scripts to orchestrate
operations of much greater complexity.
NOTE When you are trying out commands in this section, be aware that Azure host-
names must be unique. If I have already created the site “MyNothingSite,” I will have
reserved the hostname “mynothingsite.azurewebsites.net” and you, understanding reader,
won’t be able to reuse it. If you get an error indicating that a site name has been snatched
up by a previous Windows Azure Web Site Customer, just pick a new one and keep rolling.
Creating SitesSome things are kept cleverly simple. Take, for instance, creating a new Web Site in your Azure
portal:
New-AzureWebsite MyNothingSite
Your site won’t do anything, but it will be created for you and le running with the standard
“ is web site has been successfully created” message on a default page, and you can manage it
from PowerShell (or the portal) as you would any other site.
Creating sites from the command line isn’t always going to be practical, but you may fi nd rea-
son for it throughout the course of your development adventures; for example, if you need to
replicate a Web Site across di erent regions to improve the overall performance for your users
or if you want to perform a Web Site deployment as part of a build process.
Consider the following script, which accepts the full path of a local directory in a GitHub repos-
itory. It spins up the website for you in your Azure account, creates a deployment based on your
last GitHub check-in, and displays the site in your browser:
param( [string] $SiteName=[guid]::NewGuid().ToString(), [parameter(Mandatory=$true)] [string] $FullPath)
www.it-ebooks.info
CHAPTER 4 MANAGING WINDOWS AZURE WEB SITES FROM THE CONSOLE
46
# save the current location and switch to the path providedPush-Locationcd $FullPath
# create the website and store the script result$createData = New-AzureWebsite $siteName -GitHub
# output the host name of the created website$createData.HostNames[0]
# switch back to the orginal directoryPop-LocationSet-Location
# pause for dramatic suspense (...and git deployment)Start-Sleep 30
# launch the site in a local browserShow-AzureWebsite $SiteName
Return
A word of caution when running the script: e directory indicated by the $FullPath parameter
must be a valid GitHub repository. If not, then the script receives an error suggesting that the
data at the root level is invalid.
is li le bit of code will start to give you an idea of some of the power you have with the
PowerShell cmdlets. e script enables you to create a site with a random GUID if you don’t
pass in the name of a site, so it also outputs the fi rst (and only) hostname of your newly created
site. If you want to give it a try, perform the following steps:
1. Open the PowerShell ISE.
2. Save the preceding script into a fi le called CreateSite.ps1.
3. Navigate to the directory in which the script is located.
4. From the PowerShell console, call the script and pass in the name of a folder with a
GitHub repository. You could, for example, use the simple site that you deployed in
Chapter 3. Had you saved that repository in a directory called “c:\azure\simplesite” you
could execute the script as follows:
.\CreateAndLaunchSite.ps1 -FullPath c:\azure\simplesite
Controlling Site State ese are the bread-and-bu er commands of any web developer. You’ve likely worked from the
command line before to restart IIS, or perhaps you’ve even used WMI in PowerShell to start,
stop, or recycle a website or app pool. To do the same to your Windows Azure Web Sites, you
www.it-ebooks.info
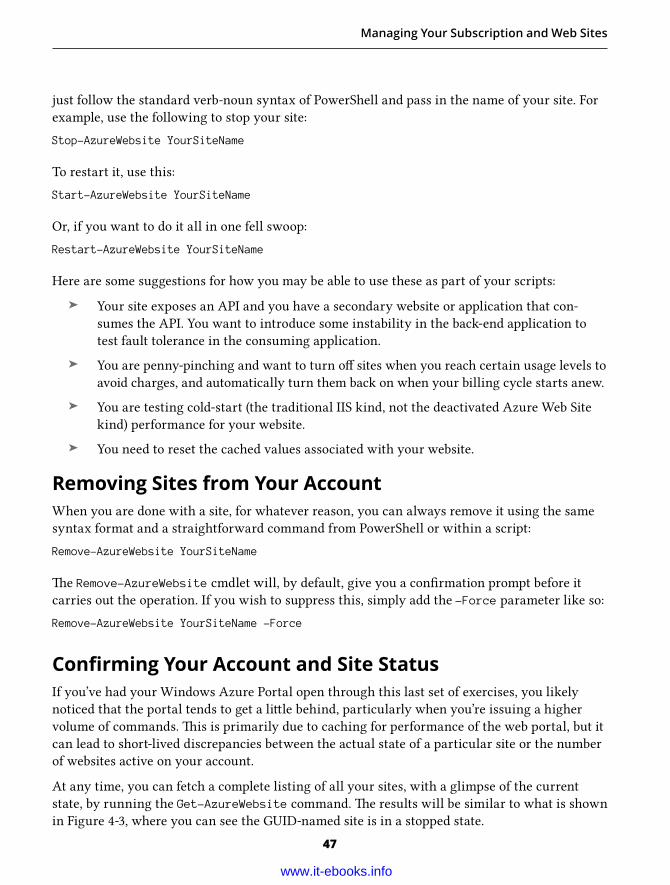
Managing Your Subscription and Web Sites
47
just follow the standard verb-noun syntax of PowerShell and pass in the name of your site. For
example, use the following to stop your site:
Stop-AzureWebsite YourSiteName
To restart it, use this:
Start-AzureWebsite YourSiteName
Or, if you want to do it all in one fell swoop:
Restart-AzureWebsite YourSiteName
Here are some suggestions for how you may be able to use these as part of your scripts:
➤ Your site exposes an API and you have a secondary website or application that con-
sumes the API. You want to introduce some instability in the back-end application to
test fault tolerance in the consuming application.
➤ You are penny-pinching and want to turn o sites when you reach certain usage levels to
avoid charges, and automatically turn them back on when your billing cycle starts anew.
➤ You are testing cold-start (the traditional IIS kind, not the deactivated Azure Web Site
kind) performance for your website.
➤ You need to reset the cached values associated with your website.
Removing Sites from Your AccountWhen you are done with a site, for whatever reason, you can always remove it using the same
syntax format and a straightforward command from PowerShell or within a script:
Remove-AzureWebsite YourSiteName
e Remove-AzureWebsite cmdlet will, by default, give you a confi rmation prompt before it
carries out the operation. If you wish to suppress this, simply add the -Force parameter like so:
Remove-AzureWebsite YourSiteName -Force
Confi rming Your Account and Site Status If you’ve had your Windows Azure Portal open through this last set of exercises, you likely
noticed that the portal tends to get a li le behind, particularly when you’re issuing a higher
volume of commands. is is primarily due to caching for performance of the web portal, but it
can lead to short-lived discrepancies between the actual state of a particular site or the number
of websites active on your account.
At any time, you can fetch a complete listing of all your sites, with a glimpse of the current
state, by running the Get-AzureWebsite command. e results will be similar to what is shown
in Figure 4-3, where you can see the GUID-named site is in a stopped state.
www.it-ebooks.info
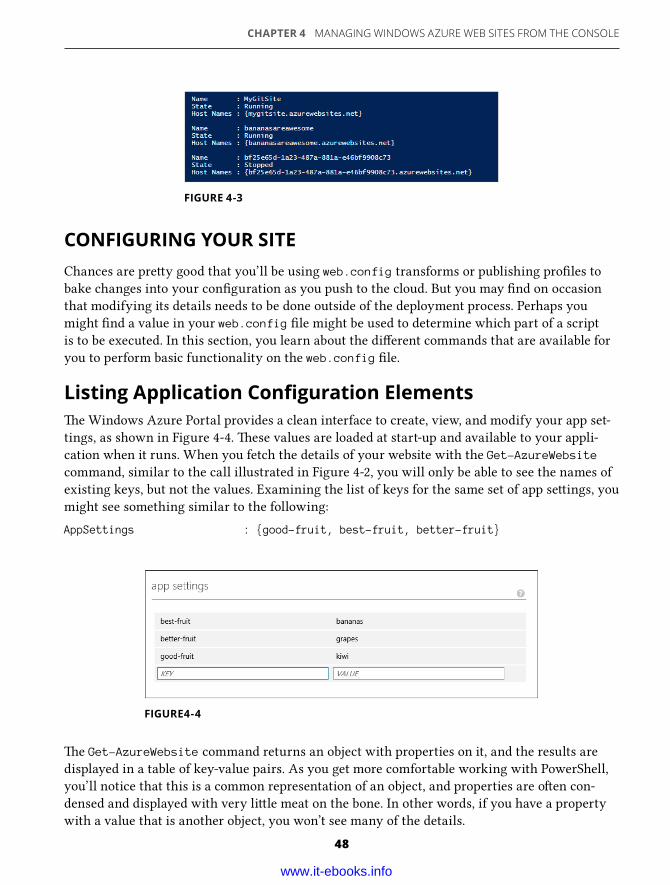
CHAPTER 4 MANAGING WINDOWS AZURE WEB SITES FROM THE CONSOLE
48
CONFIGURING YOUR SITE Chances are pre y good that you’ll be using web.config transforms or publishing profi les to
bake changes into your confi guration as you push to the cloud. But you may fi nd on occasion
that modifying its details needs to be done outside of the deployment process. Perhaps you
might fi nd a value in your web.config fi le might be used to determine which part of a script
is to be executed. In this section, you learn about the di erent commands that are available for
you to perform basic functionality on the web.config fi le.
Listing Application Confi guration Elements e Windows Azure Portal provides a clean interface to create, view, and modify your app set-
tings, as shown in Figure 4-4. ese values are loaded at start-up and available to your appli-
cation when it runs. When you fetch the details of your website with the Get-AzureWebsitecommand, similar to the call illustrated in Figure 4-2, you will only be able to see the names of
existing keys, but not the values. Examining the list of keys for the same set of app se ings, you
might see something similar to the following:
AppSettings : {good-fruit, best-fruit, better-fruit}
FIGURE 4-3
FIGURE4-4
e Get-AzureWebsite command returns an object with properties on it, and the results are
displayed in a table of key-value pairs. As you get more comfortable working with PowerShell,
you’ll notice that this is a common representation of an object, and properties are o en con-
densed and displayed with very li le meat on the bone. In other words, if you have a property
with a value that is another object, you won’t see many of the details.
www.it-ebooks.info
Confi guring Your Site
49
In the case of our app se ings, the property value is another set of key-value pairs. To coerce
the values of those keys out of the cmdlet, you need to instead return the property itself. e
shorthand version of this command is as follows:
(Get-AzureWebsite YourSiteName).AppSettings
When I issued this command against my fantastically fruity website, I got the following output:
Name Value ---- ----- good-fruit kiwi best-fruit bananas better-fruit grapes
Of course, you’re in PowerShell, so you’re required to do something more interesting, right? e
names and values you see here are actually part of a HashTable object, so you can manipulate
the collection by ge ing the enumerator and piping the results into additional commands. e
following command sorts the collection of app se ings by the value — largest value fi rst — and
outputs as part of a string:
(Get-AzureWebsite YourSiteName).AppSettings.GetEnumerator() | Sort-Object Value -Descending | ForEach-Object { Write-Host $_.Key ‘is set to’ $_.Value }
You can use this technique to extract the data you are looking for out of other properties on the
object returned from Get-AzureWebste, such as for installed SSL certifi cates or your site’s con-
nection strings.
Adding, Updating, and Deleting KeysIn the preceding section you were working with values that already existed, either from a previ-
ous shell session or perhaps as a result of what you confi gured in the Azure Portal. But what if you
wanted to create the app se ings from scratch? No problem, but you’re going to have to wire up the
hashtable by hand in PowerShell fi rst, then pass that object in to the Set-AzureWebsite cmdlet:
$settings = @{ "best-fruit" = "bananas"; "better-fruit" = "grapes"; "good-fruit" = "kiwi"}Set-AzureWebsite YourWebSite -AppSettings $settings
Now the base keys are there, but there is one additional step that still needs to be performed
(but was le out of your fi rst go-round); for this example, imagine you had meant to include
a property defi ning the worst fruit but forgot it. e AppSettings property on the
Get-AzureWebsite cmdlet result is a hashtable. To add your worst-fruit property, start by
ge ing a reference to the hashtable and then add your new property to the collection. Finally,
you would push the resulting set of data back to your site:
www.it-ebooks.info
CHAPTER 4 MANAGING WINDOWS AZURE WEB SITES FROM THE CONSOLE
50
$settings = (Get-AzureWebsite YourWebSite).AppSettings$settings.Add("worst-fruit", "tomatoes")Set-AzureWebsite YourWebSite -AppSettings $settings
But what i f, in your haste to get that key-value pair up in the cloud, you accidentally added
the wrong value (in other words, tomatoes really aren’t the worst fruit) and need to rectify the
value of your se ing. You don’t want to modify any of the previous values, so again you start by
grabbing your se ings from the portal, then adjust the value in the hashtable before shipping it
back up into the sky.
$settings = (Get-AzureWebsite YourWebSite).AppSettings$settings.Set_Item("worst-fruit", "dried prunes")Set-AzureWebsite YourWebSite -AppSettings $settings
While the property types vary on the di erent objects, this fetch-update-store pa ern is very
applicable to other se ings as well. If you wanted to update a specifi c connection string you
would do the following:
1. Fetch the list of connection strings on your site.
2. Update the connection string you need to modify in the collection.
3. Push the collection of connection strings back up to the site.
To translate that back into PowerShell, you might end up with something like this:
# fetch the current collection of strings$connectionStrings = (Get-AzureWebsite YourWebSite).ConnectionStrings# select the specific string you’re updating$connectionStrings | Where-Object { $_.Name -eq "DefaultConnection" } | ForEach-Object { $_.ConnectionString = "Details-Go-Here" }
# store the details back in the cloudSet-AzureWebsite YourWebSite -ConnectionStrings $connectionStrings
If you ever need to remove a se ing or connection string from the site, you would follow a simi-
lar set of steps, downloading the details, modifying the collection, and then pushing it back to
your account. For example, consider the following script, which would remove the connection
string named ExtraConnection from the confi g fi le.
$connectionStrings = (Get-AzureWebsite YourWebSite).ConnectionStrings$connectionStrings | Where-Object { $_.Name -eq "ExtraConnection" } | ForEach-Object { $_.Remove }
Set-AzureWebsite YourWebSite -ConnectionStrings $connectionStrings
www.it-ebooks.info
Summary
51
SUMMARYFor most purposes you’ll fi nd that working in the Windows Azure Management Portal is a
pleasant experience. You will be able to manage the bulk of your work without much grief, and
nearly all of the requisite functionality will only be a click away.
When it comes time to automate some of that functionality, you’re now be er equipped to
tackle the chore and create reusable scripts to help with initial creation and deployment, confi g-
uration, and state management. You’ve explored the basic commands and know how to control
various aspects of your site through the Windows Azure PowerShell cmdlets, updating existing
values or removing them from your website.
www.it-ebooks.info
IN THIS CHAPTER:
➤ Discovering the types of web apps you can install from the Gallery in Windows Azure Web Sites
➤ Installing and confi guring an open source bulletin board through the Azure portal
➤ Getting a copy of your website to maintain locally and redeploy to the cloud
e prestige is a pivotal point in a magic act when the magician takes an already impressive
trick to the next level and shows the audience something they’ve never seen. e folks working
on the Windows Azure team have had plenty of wins over the last year: a newly designed
interface that makes confi guration, deployment, and scaling more accessible; streamlined
publishing options; and improved CLI integration, to name only a few. As Microso continues
to improve upon its cloud e orts, Windows Azure is in many ways becoming the company’s
“prestige.”
If you’re from outside the .NET camp, you’ve likely been wondering how some of the things
in the peripheral view of the portal come into play in your development space; and if you’re a
.NET developer (and you have been paying a ention to the Windows Azure world), you might
have seen hints that Azure will contain functionality that is intended for people outside of the
Microso world.
And you’d be correct.
It turns out that, when it comes to Windows Azure, the “dot-ne ers” of the world aren’t the
only ones who get to have fun. Azure has embraced the open source community and made
many non-Microso technologies feel right at home when running on Windows Azure, even
from within alternative and competing development environments.
If you’re crossing over from another community, this is the chapter for you, replete with the
information you need to bring your site to the cloud. If you’re a regular Visual Studio user, this
chapter will give you a glimpse of how things roll for your development brothers and sisters
with a di erent gait to their walk.
Working with Other Flavors of Windows Azure Web Sites5
www.it-ebooks.info
Selecting a Template
53
EXPLORING APPS IN THE WEB SITE GALLERYYou’ll fi nd a growing number of templates in the Gallery for Windows Azure Web Sites,
handily categorized. e list of projects you can use to kick-start your own is diverse and o ers
everything from bare-bones starter sites to rich applications with dynamic content.
Here is a sampling of the current categories at the time of writing that you’ll fi nd as you create
an app-based site in the portal:
➤ App Frameworks — Foundations for application development backed by active
communities and great documentation
➤ Blogs — e fundamentals you need to create and host a blog site on Windows Azure
➤ CMS — Going beyond a straight blog, complete management systems to compose sites
with multiple authors and varying levels of extensibility
➤ E-Commerce — O ers a quick way to implement shopping cart functionality and
content pages with an eye to payment gateways and social-enabled commerce
➤ Forums — Simple starting points to enable users to interact with each other on your
website
➤ Galleries — O ers comprehensive CMS capabilities as well as transcoding and
thumbnailing services to share media and its metadata on the web
➤ Templates — From boilerplate, no-frills documents to turnkey multi-page sites that
include membership in a variety of languages
➤ Wiki — Enables you to easily add crowd-sourced documentation in the style of several
well-known sites
Pick your language, pick your open-source project, or pick your empty document in a language
of your choice and get going. e Azure portal provides a wizard-style interface to select a
template; and if there are additional steps to perform, such as associating a database, it will
help you through those steps as well.
SELECTING A TEMPLATE e list of web apps available continues to grow, and the projects in the list are updated on
a regular basis. When you add a new web app from the Gallery, the portal displays a great
template browser, illustrated in Figure 5-1, that enables you to read an overview of any
of the templates.
www.it-ebooks.info
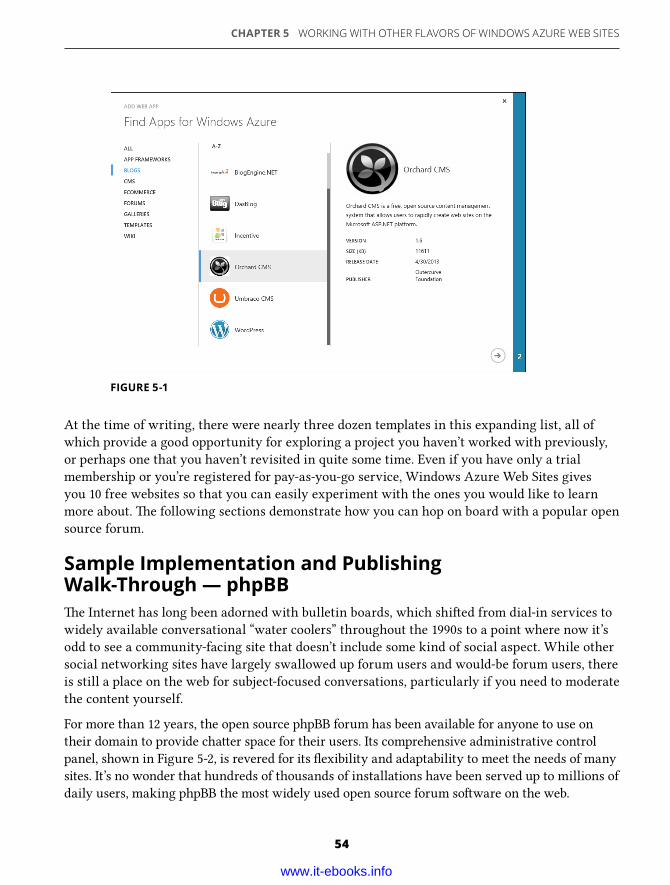
CHAPTER 5 WORKING WITH OTHER FLAVORS OF WINDOWS AZURE WEB SITES
54
At the time of writing, there were nearly three dozen templates in this expanding list, all of
which provide a good opportunity for exploring a project you haven’t worked with previously,
or perhaps one that you haven’t revisited in quite some time. Even if you have only a trial
membership or you’re registered for pay-as-you-go service, Windows Azure Web Sites gives
you 10 free websites so that you can easily experiment with the ones you would like to learn
more about. e following sections demonstrate how you can hop on board with a popular open
source forum.
Sample Implementation and Publishing Walk-Through — phpBB
e Internet has long been adorned with bulletin boards, which shi ed from dial-in services to
widely available conversational “water coolers” throughout the 1990s to a point where now it’s
odd to see a community-facing site that doesn’t include some kind of social aspect. While other
social networking sites have largely swallowed up forum users and would-be forum users, there
is still a place on the web for subject-focused conversations, particularly if you need to moderate
the content yourself.
For more than 12 years, the open source phpBB forum has been available for anyone to use on
their domain to provide cha er space for their users. Its comprehensive administrative control
panel, shown in Figure 5-2, is revered for its fl exibility and adaptability to meet the needs of many
sites. It’s no wonder that hundreds of thousands of installations have been served up to millions of
daily users, making phpBB the most widely used open source forum so ware on the web.
FIGURE 5-1
www.it-ebooks.info
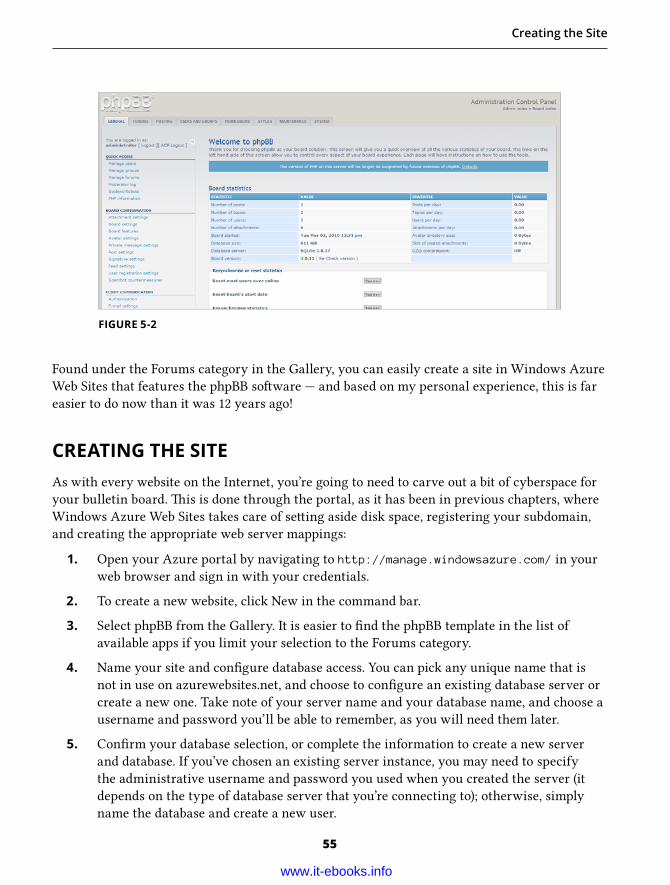
Creating the Site
55
Found under the Forums category in the Gallery, you can easily create a site in Windows Azure
Web Sites that features the phpBB so ware — and based on my personal experience, this is far
easier to do now than it was 12 years ago!
CREATING THE SITEAs with every website on the Internet, you’re going to need to carve out a bit of cyberspace for
your bulletin board. is is done through the portal, as it has been in previous chapters, where
Windows Azure Web Sites takes care of se ing aside disk space, registering your subdomain,
and creating the appropriate web server mappings:
1. Open your Azure portal by navigating to http://manage.windowsazure.com/ in your
web browser and sign in with your credentials.
2. To create a new website, click New in the command bar.
3. Select phpBB from the Gallery. It is easier to fi nd the phpBB template in the list of
available apps if you limit your selection to the Forums category.
4. Name your site and confi gure database access. You can pick any unique name that is
not in use on azurewebsites.net, and choose to confi gure an existing database server or
create a new one. Take note of your server name and your database name, and choose a
username and password you’ll be able to remember, as you will need them later.
5. Confi rm your database selection, or complete the information to create a new server
and database. If you’ve chosen an existing server instance, you may need to specify
the administrative username and password you used when you created the server (it
depends on the type of database server that you’re connecting to); otherwise, simply
name the database and create a new user.
FIGURE 5-2
www.it-ebooks.info
CHAPTER 5 WORKING WITH OTHER FLAVORS OF WINDOWS AZURE WEB SITES
56
When you’ve completed the preceding steps, Windows Azure will happily go o and provision
the assets needed to bake the site for you. It creates the site, deploys the codebase, optionally
provisions a new database server for you, adds a new database to your server, and fi nally creates a
link between your database and your website for easier management of resources down the road.
When the server has done its duties, it returns a message similar to the following in the
notifi cations pane in the command bar:
e deployment of web site “your_site” succeeded. View the connection information on the Confi gure
page. To set up the application now, click Setup.
Here, you can click the Setup link to begin the process of going live with your site.
Confi guring the BoardOnce the template is applied and your site is spun up, there are still a few more steps to get it
running like the one in Figure 5-3. e one-time confi guration provided by phpBB walks you
through these steps quite easily. Follow the onscreen prompts to complete your setup with the
database se ings you captured in the previous section. If you did not save or write down
your database se ings, you can get them with a li le help from the website dashboard in the
portal, where you’ll fi nd the View Connection Strings link under the ick Glance section:
1. Start the confi guration process on the forum. You can either click the Setup link
mentioned in the previous section or browse to your site directly in a web browser.
Without an active confi guration in place, phpBB assumes that the fi rst person accessing
the site is the owner and initial administrator.
2. Click the Install tab. Because you are creating a new forum, you’ll follow the script to
get a new instance running. When you install new versions, you will be able to upgrade
them in place through this installation process from the Convert tab.
3. Click “Proceed to next step” on the welcome screen. ere is a bit of text there spelling
out the requirements, but your database information and everything else you need from
a technical perspective is provided through Azure.
4. Click Start Install from the requirements overview. You might need to scroll down to
see the bu on. Although your site will run without modifi cation, it may be interesting
for you to review the checks that are done and read some warnings about features you’ll
have to install for complete functionality.
5. Enter your database information and click “Proceed to next step”; and a er a successful
connection to the database, click “Proceed to next step” again. Be sure to specify the
MSSQL Server 2005+ [Native] option for the database type. Enter your server hostname,
which will be something similar to “g4si46f1c9.database.windows.net,” and fi ll in your
database name and credentials. ese are the details you recorded in step 4 from the
previous section. You can leave the port number blank, and the prefi x can be le as the
default value of phpbb_.
www.it-ebooks.info
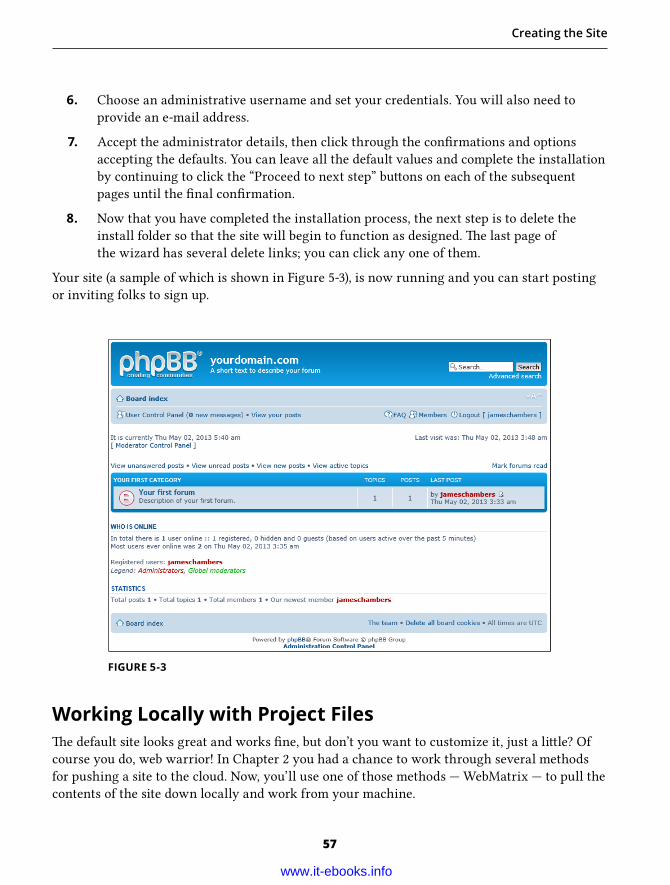
Creating the Site
57
6. Choose an administrative username and set your credentials. You will also need to
provide an e-mail address.
7. Accept the administrator details, then click through the confi rmations and options
accepting the defaults. You can leave all the default values and complete the installation
by continuing to click the “Proceed to next step” bu ons on each of the subsequent
pages until the fi nal confi rmation.
8. Now that you have completed the installation process, the next step is to delete the
install folder so that the site will begin to function as designed. e last page of
the wizard has several delete links; you can click any one of them.
Your site (a sample of which is shown in Figure 5-3), is now running and you can start posting
or inviting folks to sign up.
FIGURE 5-3
Working Locally with Project Files e default site looks great and works fi ne, but don’t you want to customize it, just a li le? Of
course you do, web warrior! In Chapter 2 you had a chance to work through several methods
for pushing a site to the cloud. Now, you’ll use one of those methods — WebMatrix — to pull the
contents of the site down locally and work from your machine.
www.it-ebooks.info
CHAPTER 5 WORKING WITH OTHER FLAVORS OF WINDOWS AZURE WEB SITES
58
ere is more to a website than just a fi le, however, and you’ll need to get the database down
and onto your system as well. In addition, don’t forget that this is a PHP site, so you will have to
confi gure your machine to run PHP. e easiest way to get the job done and get the site up and
running locally is actually through the Windows Azure portal.
When you navigate to your site’s dashboard, recall that there is a WebMatrix bu on in the
command bar of the portal. Clicking this bu on not only enables you to open your site in
WebMatrix, but also pulls down any other dependencies you need to run the site locally. You
can do that now, and prepare to edit the site footer, where you’ll let everyone know about your
newfound cloud skills:
1. Click the WebMatrix icon in the command bar. You’ll need to be logged in to your
Windows Azure Portal. Either select the site from the list of items in your account or
navigate to the site dashboard, where the WebMatrix icon appears.
2. Download any required dependencies to run the site locally. Be sure to review any
licensing agreements and then proceed to install any additional required components to
give yourself the richest development experience on your machine.
3. Select the option to work locally in WebMatrix. Part of the download process lands
inside WebMatrix and prompts you to pull in the site from the cloud source. is will
make a copy of the site and download the database as well as any support fi les related
to phpBB so that you can optionally run the site directly from your machine.
4. Navigate to and open the overall_footer.html fi le in your project. is fi le is used to
render the footer for all pages on the site outside of the administrative control panel and
is located in the styles\prosilver\template directory.
5. Add the following code as the last element in the page_footer div in the fi le. e
page_footer element contains two divs: one a ributed with a class called navbar, the other
with a class called copyright. You’re adding a third div with the same copyright class:
<div class="copyright"> Running on <a href="http://www.windowsazure.com">Windows Azure Web Sites</a>
</div>
6. Save the contents of the fi le. is will save your site locally.
You’re now ready to sync your site with Windows Azure.
Publishing the Customized SiteWith your changes implemented, it’s time to see the fruits of your labor live and running from
within your website on the cloud. In the case of phpBB there are some additional steps to
enable your template, but activating your changes in the forum itself is a separate process from
pushing your code. You’ll fi rst get the changes out into the cloud using the following steps:
www.it-ebooks.info
Creating the Site
59
1. Click the Publish bu on in WebMatrix. is bu on is displayed in the UI by default
when you are editing the local version of the site, but if you have navigated through the
so ware you may need to return to the Home ribbon to see the icon.
2. One of the benefi ts of the Publish mechanism is that only those fi les that have been
added or modifi ed are sent to the server. At this point, you have the option to review
the fi les that meet these criteria (technically known as the computed di erence). For
example, if you have altered only the overall_footer.html page, you’ll just see one fi le in
the review stage.
3. Confi rm your selected fi les and click Continue to publish to Azure. is will move any
selected fi les — in this case, your newly adorned footer — up to your instance of phpBB
in your account.
NOTE Caching in phpBB introduces new fi les into your local project if WebMatrix has
started running your site locally before you publish. is results in many additional fi les
that look like they need to be uploaded to Windows Azure, but you can ignore any fi les in
the cache directory; these fi les will be recomputed on the server.
Next, you need to activate the new version of the template. phpBB creates a cache at startup time
that stores a pre-rendered version of fi les from your template, and the cache needs to be cleared
so that the fi les can be rebuilt. is would happen automatically if you used the built-in editor
in phpBB; but when you save the fi les to disk or publish them through any other means, phpBB
doesn’t know that it needs to invalidate the cache and rebuild. So you need to help the site out:
1. Navigate to your website. ere are many ways to do this, but the easiest might be
through the publishing confi rmation in WebMatrix. You can type the name of the site
directly in the browser, or you can click any of the links in your site’s dashboard in the
Azure portal.
2. Log in to the site and enter the Administration Control Panel (ACP). ere is a link at
the bo om of each page to access the administrative area of the site, and you will be
prompted to confi rm your credentials as you enter.
3. Go to the template management area of the site. To get there, click the Styles tab at the
top, then click the Templates link on the le -hand side of the page under the heading
Style Components.
4. Clear the site cache. Under the Actions column of the Prosilver template, click the
Refresh bu on and accept the prompt to clear the cache.
With the template updated and the cache cleared, phpBB will recompute your footer on the next
visit to the site. As shown in Figure 5-4, the site footer now tells all your visitors where the site
is hosted.
www.it-ebooks.info
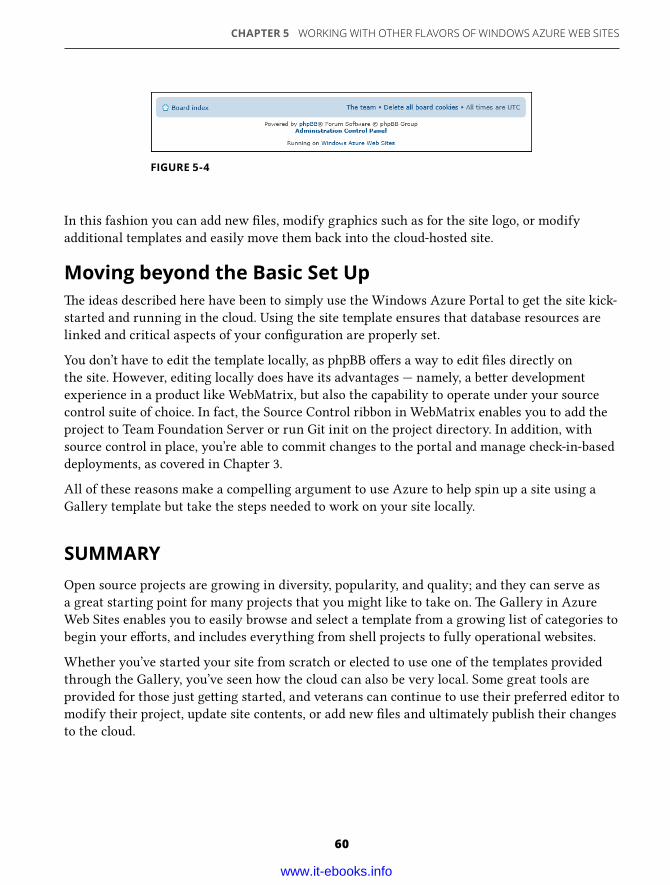
CHAPTER 5 WORKING WITH OTHER FLAVORS OF WINDOWS AZURE WEB SITES
60
In this fashion you can add new fi les, modify graphics such as for the site logo, or modify
additional templates and easily move them back into the cloud-hosted site.
Moving beyond the Basic Set Up e ideas described here have been to simply use the Windows Azure Portal to get the site kick-
started and running in the cloud. Using the site template ensures that database resources are
linked and critical aspects of your confi guration are properly set.
You don’t have to edit the template locally, as phpBB o ers a way to edit fi les directly on
the site. However, editing locally does have its advantages — namely, a be er development
experience in a product like WebMatrix, but also the capability to operate under your source
control suite of choice. In fact, the Source Control ribbon in WebMatrix enables you to add the
project to Team Foundation Server or run Git init on the project directory. In addition, with
source control in place, you’re able to commit changes to the portal and manage check-in-based
deployments, as covered in Chapter 3.
All of these reasons make a compelling argument to use Azure to help spin up a site using a
Gallery template but take the steps needed to work on your site locally.
SUMMARYOpen source projects are growing in diversity, popularity, and quality; and they can serve as
a great starting point for many projects that you might like to take on. e Gallery in Azure
Web Sites enables you to easily browse and select a template from a growing list of categories to
begin your e orts, and includes everything from shell projects to fully operational websites.
Whether you’ve started your site from scratch or elected to use one of the templates provided
through the Gallery, you’ve seen how the cloud can also be very local. Some great tools are
provided for those just ge ing started, and veterans can continue to use their preferred editor to
modify their project, update site contents, or add new fi les and ultimately publish their changes
to the cloud.
FIGURE 5-4
www.it-ebooks.info
Using Peripheral Features with Windows Azure Web Sites6
IN THIS CHAPTER:
➤ Delegating administrative duties for your Windows Azure subscription
➤ Creating links between di erent types of resources and managing linked resources
➤ Working with Windows Azure SQL Database remotely
ere’s a certain sort of allure to staying in a hotel. Hotels are like li le homes you get to stay
in when you can’t be in your own, and you don’t get into too much trouble if you leave the
bathroom messy in the morning. You always come back to a made bed, even if you didn’t make
it before you stepped out. ere’s unlimited ice down the hall and you don’t have to make the
ice cubes. Brilliant.
Not everything you do in your project will deal exclusively with your website. O en you’ll have
other Windows Azure assets associated with your project and it would be nice to have these
easily accessible through the portal. Very few projects lack some kind of database connectivity,
and when you have a database involved, you want to be able to get to your data.
So, what do hotels have to do with Windows Azure Web Sites? Maybe more than you think, so
stick with me to the end to see where this goes, and don’t forget to tip the concierge.
SHARING ADMINISTRATIVE RESPONSIBILITIESWhen you check into a hotel you get a key to your room that enables you to come and go as you
please. e only other people who can get into your room are people with implied trust — folks
that make up part of the cleaning team, or a bellhop that brings your bags to the room for you.
If you are expecting a parcel, you can talk to the front desk and arrange to have it brought to
your room in your absence by a member of that trusted group.
You also have control over explicit trust. When you want to let someone you trust into your
room, you can request a second key to allow them entry and exit privileges as they please,
www.it-ebooks.info
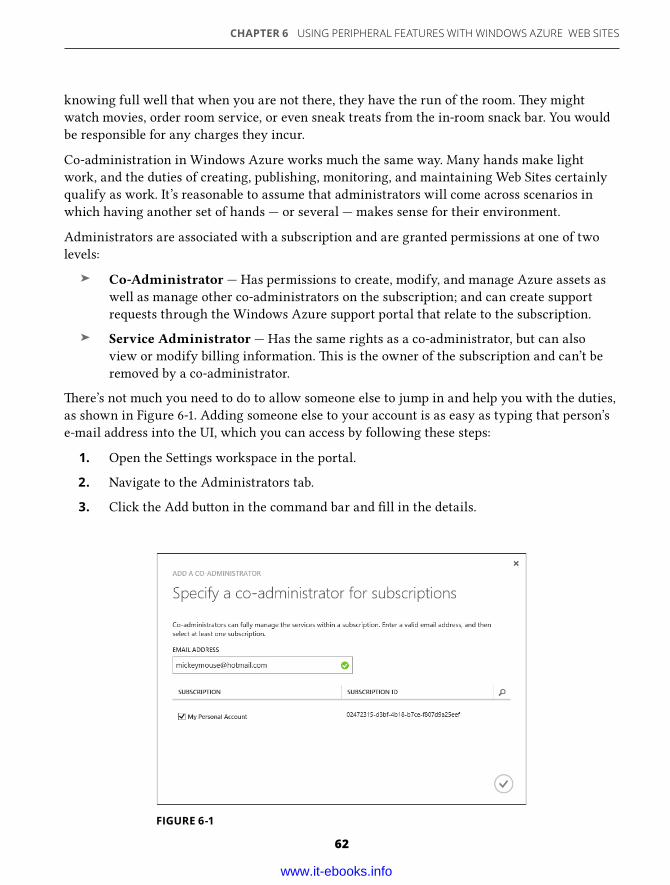
CHAPTER 6 USING PERIPHERAL FEATURES WITH WINDOWS AZURE WEB SITES
62
FIGURE 6-1
knowing full well that when you are not there, they have the run of the room. ey might
watch movies, order room service, or even sneak treats from the in-room snack bar. You would
be responsible for any charges they incur.
Co-administration in Windows Azure works much the same way. Many hands make light
work, and the duties of creating, publishing, monitoring, and maintaining Web Sites certainly
qualify as work. It’s reasonable to assume that administrators will come across scenarios in
which having another set of hands — or several — makes sense for their environment.
Administrators are associated with a subscription and are granted permissions at one of two
levels:
➤ Co-Administrator — Has permissions to create, modify, and manage Azure assets as
well as manage other co-administrators on the subscription; and can create support
requests through the Windows Azure support portal that relate to the subscription.
➤ Service Administrator — Has the same rights as a co-administrator, but can also
view or modify billing information. is is the owner of the subscription and can’t be
removed by a co-administrator.
ere’s not much you need to do to allow someone else to jump in and help you with the duties,
as shown in Figure 6-1. Adding someone else to your account is as easy as typing that person’s
e-mail address into the UI, which you can access by following these steps:
1. Open the Se ings workspace in the portal.
2. Navigate to the Administrators tab.
3. Click the Add bu on in the command bar and fi ll in the details.
www.it-ebooks.info
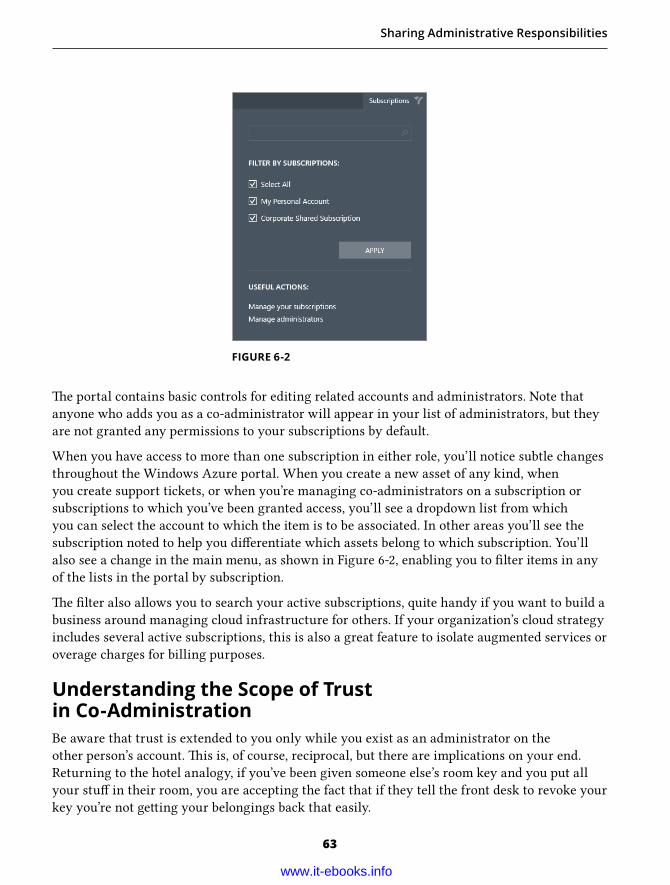
Sharing Administrative Responsibilities
63
e portal contains basic controls for editing related accounts and administrators. Note that
anyone who adds you as a co-administrator will appear in your list of administrators, but they
are not granted any permissions to your subscriptions by default.
When you have access to more than one subscription in either role, you’ll notice subtle changes
throughout the Windows Azure portal. When you create a new asset of any kind, when
you create support tickets, or when you’re managing co-administrators on a subscription or
subscriptions to which you’ve been granted access, you’ll see a dropdown list from which
you can select the account to which the item is to be associated. In other areas you’ll see the
subscription noted to help you di erentiate which assets belong to which subscription. You’ll
also see a change in the main menu, as shown in Figure 6-2, enabling you to fi lter items in any
of the lists in the portal by subscription.
e fi lter also allows you to search your active subscriptions, quite handy if you want to build a
business around managing cloud infrastructure for others. If your organization’s cloud strategy
includes several active subscriptions, this is also a great feature to isolate augmented services or
overage charges for billing purposes.
Understanding the Scope of Trust in Co-AdministrationBe aware that trust is extended to you only while you exist as an administrator on the
other person’s account. is is, of course, reciprocal, but there are implications on your end.
Returning to the hotel analogy, if you’ve been given someone else’s room key and you put all
your stu in their room, you are accepting the fact that if they tell the front desk to revoke your
key you’re not ge ing your belongings back that easily.
FIGURE 6-2
www.it-ebooks.info
CHAPTER 6 USING PERIPHERAL FEATURES WITH WINDOWS AZURE WEB SITES
64
e same principle applies to items you create and contribute to in Windows Azure:
➤ Sites created under someone else’s subscription become their property. It doesn’t
ma er if you create all the assets, architect the data design, write every single line of
code, and are the only person who has ever published to the site; if you create a website
under their account, it belongs to them as far as Windows Azure is concerned.
➤ ere is no way to move a site from one subscription to another. I call this the
“Vegas” clause, because a website created on a subscription stays on a subscription.
You can’t port an asset from one subscription to another without opening a support
ticket. Beyond the scope of shared administration, this is true even if you own both
subscriptions.
➤ Access to sensitive data is shared between administrators on the account. ere
is currently no way to grant someone publishing and scaling permissions but restrict
them from other aspects of the administrative portal. If you have permission to access
the dashboard of a Windows Azure Web Site, you can see the database connection
strings and linked resources, reset publishing credentials, or view log fi les.
➤ You have permission to a ect permissions. Pay a ention to the permissions you
are administering and be aware that if you remove your own permissions you won’t be
able to add yourself back. Be cognizant of the changes you are making so that you don’t
inadvertently grant undue access to others’ subscriptions.
While these are good cautions to keep in mind, they are not inherently bad things nor reasons
to avoid co-administrative duties. You have other ways to provide and restrict access and you
don’t have to share your subscription information with others if and when it’s not appropriate.
Avoiding Shared Administration ere are two scenarios in which you’ll likely need a way to restrict access to either your
subscription or a particular site. Administration is an on/o switch with no middle ground
and yet in some situations you’ll want to have someone help with a site (monitoring, scaling,
database, or other linked resource management) or publish to that site. Said another way, you
have to decide whether you want to give someone a room key or just have them leave your
package at the front desk. You have two solid options to isolate the site itself or restrict the
developer to administering only a specifi c site:
➤ You manage several Windows Azure projects, sites and assets, but want to share
administrative duties on one of them. is scenario can be managed by creating
multiple subscriptions. Fees on Azure are accrued based on usage and overages tied to
specifi c properties. ere are no costs to holding multiple subscriptions, and by creating
a subscription for a single project you can easily add and remove other administrators
without granting them access to all the items in your account. In the hotel analogy this
is the same as giving a trusted person a key to only the room that you want to let
them into.
www.it-ebooks.info
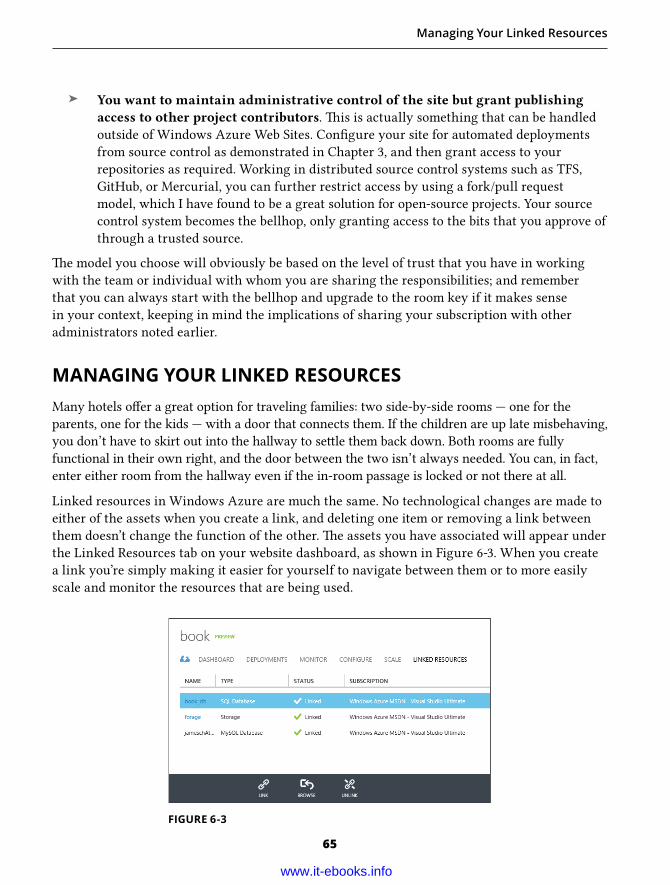
Managing Your Linked Resources
65
➤ You want to maintain administrative control of the site but grant publishing
access to other project contributors. is is actually something that can be handled
outside of Windows Azure Web Sites. Confi gure your site for automated deployments
from source control as demonstrated in Chapter 3, and then grant access to your
repositories as required. Working in distributed source control systems such as TFS,
GitHub, or Mercurial, you can further restrict access by using a fork/pull request
model, which I have found to be a great solution for open-source projects. Your source
control system becomes the bellhop, only granting access to the bits that you approve of
through a trusted source.
e model you choose will obviously be based on the level of trust that you have in working
with the team or individual with whom you are sharing the responsibilities; and remember
that you can always start with the bellhop and upgrade to the room key if it makes sense
in your context, keeping in mind the implications of sharing your subscription with other
administrators noted earlier.
MANAGING YOUR LINKED RESOURCESMany hotels o er a great option for traveling families: two side-by-side rooms — one for the
parents, one for the kids — with a door that connects them. If the children are up late misbehaving,
you don’t have to skirt out into the hallway to se le them back down. Both rooms are fully
functional in their own right, and the door between the two isn’t always needed. You can, in fact,
enter either room from the hallway even if the in-room passage is locked or not there at all.
Linked resources in Windows Azure are much the same. No technological changes are made to
either of the assets when you create a link, and deleting one item or removing a link between
them doesn’t change the function of the other. e assets you have associated will appear under
the Linked Resources tab on your website dashboard, as shown in Figure 6-3. When you create
a link you’re simply making it easier for yourself to navigate between them or to more easily
scale and monitor the resources that are being used.
FIGURE 6-3
www.it-ebooks.info
CHAPTER 6 USING PERIPHERAL FEATURES WITH WINDOWS AZURE WEB SITES
66
If, for example, you are going to use Windows Azure SQL Database with your website, you can
create a link to the database that enables you to easily navigate to the database dashboard from
the website. e connection string for the database, which you’ll still need to wire into your
project, appears on the website’s dashboard. While Windows Azure SQL Database instances are
managed in a separate yet similar interface, you can e ortlessly traverse the cloud and into the
Database workspace simply by clicking the name of the database from the linked resources list.
NOTE Currently, the only assets you can add as linked resources are Windows Azure
SQL Databases, MySQL databases, and Windows Azure storage accounts. I suspect that as
the app platform matures, you will see additional integration points. For now, most third-
party services can be administered from the Add-ons workspace, where relevant links are
added to the Azure portal command bar as required.
Note in Figure 6-3 that not all links can be used for navigation. Azure pr operties, such as
Windows Azure Storage accounts and Windows Azure SQL Databases, have connected or
integrated interfaces into the Windows Azure Management portal, and an HTML link allows
you to click through to those interfaces. A MySQL database hosted with a third-party provider
does not share the same facilities. In this case, you create a separate login for the external
resource and administer it through the provider’s own interface (for MySQL the default
provider is ClearDB).
ere are currently three ways you can create linked resources for your website in the
Windows Azure portal:
➤ When you create your website — Creating a new “custom site” or choosing to create
a new Web Site through one of the templates in the gallery may link one or more
resources to your site. e most common will be a database.
➤ rough the Linked Resources listing on your Web Site dashboard — From the
dashboard you can choose to add links to new databases and storage accounts, or you
can create links to existing Windows Azure assets.
➤ From the Windows Azure Add-on store — Some services can be added fi rst through
the store, then later added as a linked resource to your site. For those that can’t be
linked, you can still manage the add-on from the Add-ons workspace in the portal.
Don’t spend too much time worrying about a particular service, storage account, or add-on not
being available as a linkable resource. Although links can be convenient, they only serve as a
convenience in the portal and don’t automatically integrate the resource into your project; you
still need to do the heavy li ing.
www.it-ebooks.info
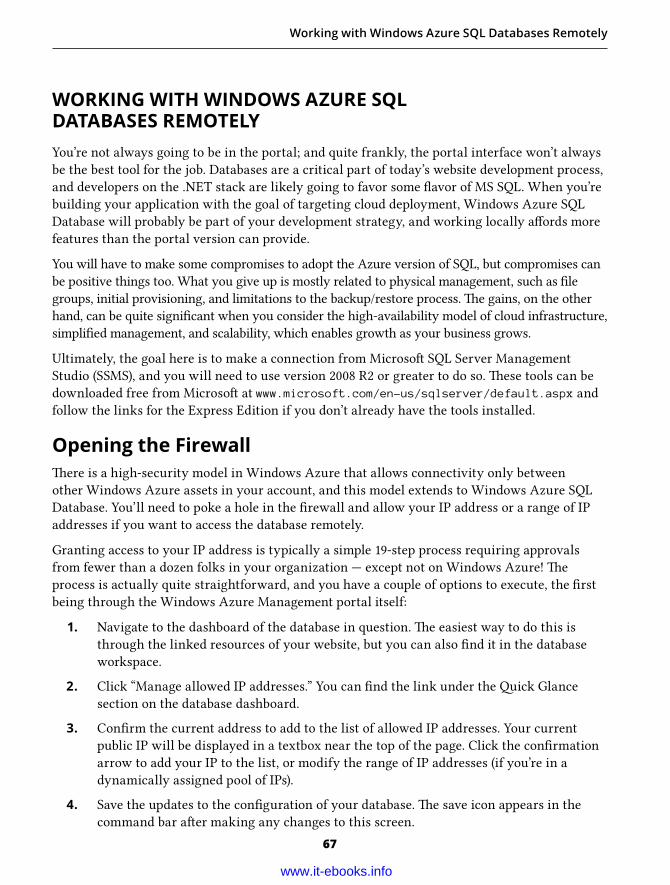
Working with Windows Azure SQL Databases Remotely
67
WORKING WITH WINDOWS AZURE SQL DATABASES REMOTELYYou’re not always going to be in the portal; and quite frankly, the portal interface won’t always
be the best tool for the job. Databases are a critical part of today’s website development process,
and developers on the .NET stack are likely going to favor some fl avor of MS SQL. When you’re
building your application with the goal of targeting cloud deployment, Windows Azure SQL
Database will probably be part of your development strategy, and working locally a ords more
features than the portal version can provide.
You will have to make some compromises to adopt the Azure version of SQL, but compromises can
be positive things too. What you give up is mostly related to physical management, such as fi le
groups, initial provisioning, and limitations to the backup/restore process. e gains, on the other
hand, can be quite signifi cant when you consider the high-availability model of cloud infrastructure,
simplifi ed management, and scalability, which enables growth as your business grows.
Ultimately, the goal here is to make a connection from Microso SQL Server Management
Studio (SSMS), and you will need to use version 2008 R2 or greater to do so. ese tools can be
downloaded free from Microso at www.microsoft.com/en-us/sqlserver/default.aspx and
follow the links for the Express Edition if you don’t already have the tools installed.
Opening the Firewall ere is a high-security model in Windows Azure that allows connectivity only between
other Windows Azure assets in your account, and this model extends to Windows Azure SQL
Database. You’ll need to poke a hole in the fi rewall and allow your IP address or a range of IP
addresses if you want to access the database remotely.
Granting access to your IP address is typically a simple 19-step process requiring approvals
from fewer than a dozen folks in your organization — except not on Windows Azure! e
process is actually quite straightforward, and you have a couple of options to execute, the fi rst
being through the Windows Azure Management portal itself:
1. Navigate to the dashboard of the database in question. e easiest way to do this is
through the linked resources of your website, but you can also fi nd it in the database
workspace.
2. Click “Manage allowed IP addresses.” You can fi nd the link under the ick Glance
section on the database dashboard.
3. Confi rm the current address to add to the list of allowed IP addresses. Your current
public IP will be displayed in a textbox near the top of the page. Click the confi rmation
arrow to add your IP to the list, or modify the range of IP addresses (if you’re in a
dynamically assigned pool of IPs).
4. Save the updates to the confi guration of your database. e save icon appears in the
command bar a er making any changes to this screen.
www.it-ebooks.info
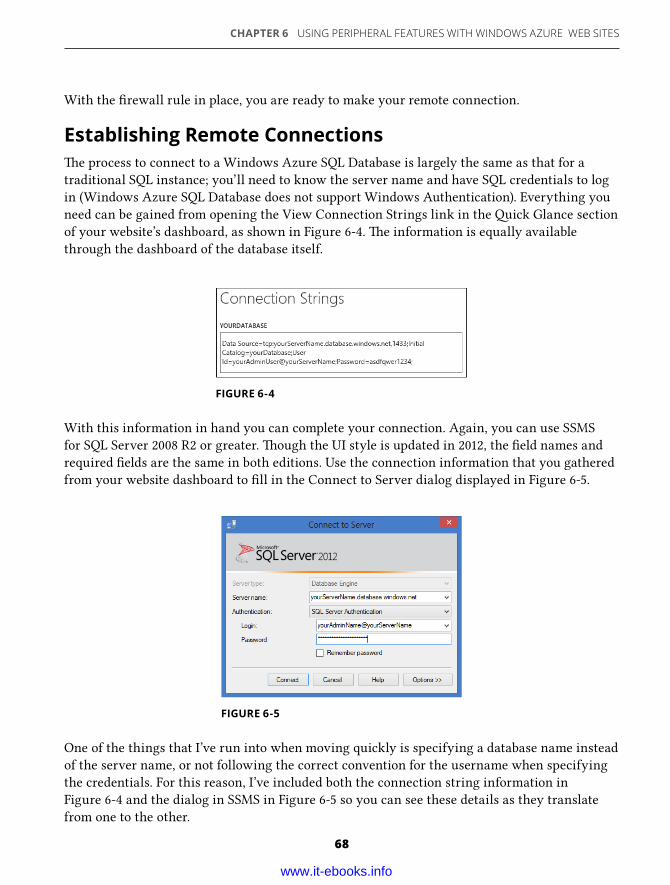
CHAPTER 6 USING PERIPHERAL FEATURES WITH WINDOWS AZURE WEB SITES
68
With the fi rewall rule in place, you are ready to make your remote connection.
Establishing Remote Connections e process to connect to a Windows Azure SQL Database is largely the same as that for a
traditional SQL instance; you’ll need to know the server name and have SQL credentials to log
in (Windows Azure SQL Database does not support Windows Authentication). Everything you
need can be gained from opening the View Connection Strings link in the ick Glance section
of your website’s dashboard, as shown in Figure 6-4. e information is equally available
through the dashboard of the database itself.
FIGURE 6-4
FIGURE 6-5
With this information in hand you can complete your connection. Again, you can use SSMS
for SQL Server 2008 R2 or greater. ough the UI style is updated in 2012, the fi eld names and
required fi elds are the same in both editions. Use the connection information that you gathered
from your website dashboard to fi ll in the Connect to Server dialog displayed in Figure 6-5.
One of the things that I’ve run into when moving quickly is specifying a database name instead
of the server name, or not following the correct convention for the username when specifying
the credentials. For this reason, I’ve included both the connection string information in
Figure 6-4 and the dialog in SSMS in Figure 6-5 so you can see these details as they translate
from one to the other.
www.it-ebooks.info
Summary
69
A er you have entered these details, click the Connect bu on to get your session set up. You’ll
then be able to use the following features of SSMS with your Windows Azure SQL Database:
➤ Create new databases on the server to which you’re connected.
➤ Create queries against any of your existing tables.
➤ Modify the schema of existing objects.
➤ View, manage, or create logins for the server.
➤ Create, manage, and deploy data-tier applications using DACPAC fi les to defi ne schema
and help create migrations.
➤ Create local backups of your SQL Azure Database and restore them on your own
instance of SQL Server through the use of BACPAC fi les.
NOTE Remember to adhere to your established project guidelines when working with
databases remotely. Creating and dropping tables or otherwise modifying schema in SQL
Server Management Studio is a trivial exercise but can put your database out of sync with
mirrored environments or migrations in Entity Framework, possibly rendering your site
inoperable. Remote connections should not be a replacement for proper deployment strate-
gies, but serve as a great utility to query data, build DACPAC fi les, or troubleshoot errone-
ous data state.
ere’s so much more you can do with Windows Azure SQL Database, including creating and
restoring backups through storage accounts, migrating SQL Server Database Engine data out
to the cloud through UI or programmatically using BACPAC fi les, scaling and monitoring, and
more. If you will be working with Windows Azure SQL Database on your project, consider
reading Windows Azure Data Storage, 978-1-118-70883-5 (Wrox, 2013) in this cloud series.
SUMMARYSometimes the most important aspects of a project are the ones that live in the wings, the
ones that you don’t need to touch very o en but are critical when you do. At those times, it’s
important to be able to access them freely and easily, and to call in help when needed.
Windows Azure provides numerous ways to access and manage the assets related to your
websites. You can leverage assistance from trusted administrators, share administrative duties,
or restrict access as required to help deploy and maintain your website. If the need arises, you
can drill into your database using local tools to query, create backups, or modify schema using
tools you’re likely already aware of as a web developer.
With these administrative tools in your belt, it’s time to check out of this chapter and into the
next — a world of confi guration, transformation, and scale.
www.it-ebooks.info
IN THIS CHAPTER:
➤ Understanding your options for scaling your website for performance
➤ Working with diagnostic logs and troubleshooting your live site ➤ Exploring other aspects of confi guration in your Windows
Azure Web Site
Not everyone can come up with that one great website idea, the one that sends you to early
retirement as droves of Internet citizens sing the praises of your creation. No, the reality is that
most of us will be working well past the age of 111100 (in binary); but that’s not to say we won’t
have our ideas, and some may be quite good. What options do you have to host the site?
➤ Buy a single server out of savings and hope that at some point you can scale the
hardware while dealing with growth.
➤ Borrow a friend’s server and live at his or her mercy when you need changes to DNS, or
RAM, or database storage space.
➤ Rent a Virtual Machine (or VM) through a hosting provider and try to fi gure out how to
scale horizontally down the road.
➤ Find a rich aunt or uncle (or angel investor) to pay up-front capital costs to put a bank of
servers into commission, then hope for tra c.
While none of these are intrinsically bad ideas — and there are certainly other (possibly be er)
options out there — they all come with certain restrictions or the potential to make the next
family gathering quite uncomfortable. Going back for more capital before you’ve repaid the
initial investment can be tricky, and not all virtualization scenarios are designed to scale in
both directions (i.e., when your tra c slows down again).
So how’s this for a price point? Free. All Web Sites can start in a free tier of service; then, as the
expectations for performance or the success and growth of your idea dictate, you can scale out
to meet the needs of your users.
Yes, folks, that’s right: Windows Azure Web Sites can make turkey dinner fun again! No more
awkward moments a er having the money conversation.
Scaling, Confi guring, and Monitoring Your Site7
www.it-ebooks.info
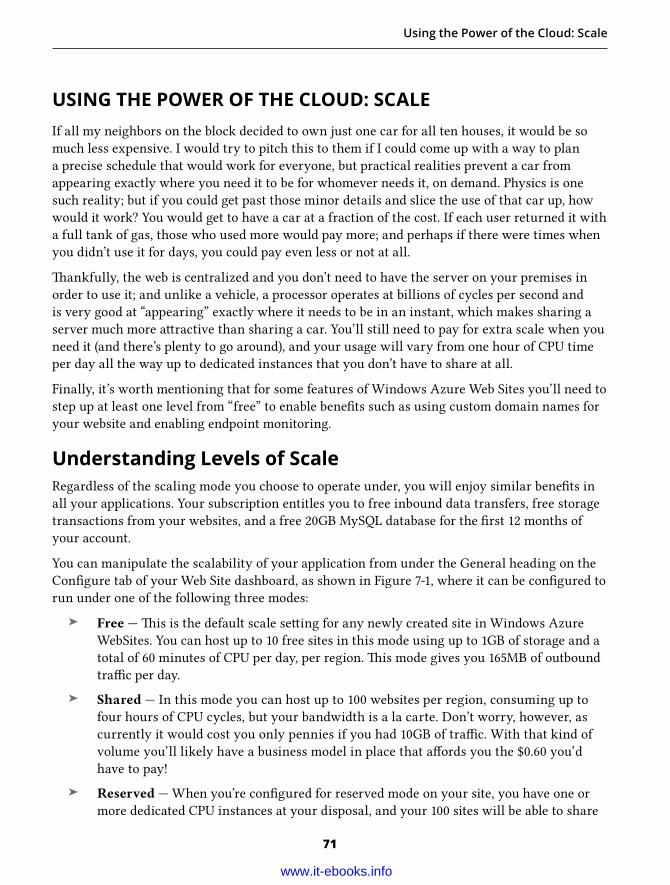
Using the Power of the Cloud: Scale
71
USING THE POWER OF THE CLOUD: SCALEIf all my neighbors on the block decided to own just one car for all ten houses, it would be so
much less expensive. I would try to pitch this to them if I could come up with a way to plan
a precise schedule that would work for everyone, but practical realities prevent a car from
appearing exactly where you need it to be for whomever needs it, on demand. Physics is one
such reality; but if you could get past those minor details and slice the use of that car up, how
would it work? You would get to have a car at a fraction of the cost. If each user returned it with
a full tank of gas, those who used more would pay more; and perhaps if there were times when
you didn’t use it for days, you could pay even less or not at all.
ankfully, the web is centralized and you don’t need to have the server on your premises in
order to use it; and unlike a vehicle, a processor operates at billions of cycles per second and
is very good at “appearing” exactly where it needs to be in an instant, which makes sharing a
server much more a ractive than sharing a car. You’ll still need to pay for extra scale when you
need it (and there’s plenty to go around), and your usage will vary from one hour of CPU time
per day all the way up to dedicated instances that you don’t have to share at all.
Finally, it’s worth mentioning that for some features of Windows Azure Web Sites you’ll need to
step up at least one level from “free” to enable benefi ts such as using custom domain names for
your website and enabling endpoint monitoring.
Understanding Levels of ScaleRegardless of the scaling mode you choose to operate under, you will enjoy similar benefi ts in
all your applications. Your subscription entitles you to free inbound data transfers, free storage
transactions from your websites, and a free 20GB MySQL database for the fi rst 12 months of
your account.
You can manipulate the scalability of your application from under the General heading on the
Confi gure tab of your Web Site dashboard, as shown in Figure 7-1, where it can be confi gured to
run under one of the following three modes:
➤ Free — is is the default scale se ing for any newly created site in Windows Azure
WebSites. You can host up to 10 free sites in this mode using up to 1GB of storage and a
total of 60 minutes of CPU per day, per region. is mode gives you 165MB of outbound
tra c per day.
➤ Shared — In this mode you can host up to 100 websites per region, consuming up to
four hours of CPU cycles, but your bandwidth is a la carte. Don’t worry, however, as
currently it would cost you only pennies if you had 10GB of tra c. With that kind of
volume you’ll likely have a business model in place that a ords you the $0.60 you’d
have to pay!
➤ Reserved — When you’re confi gured for reserved mode on your site, you have one or
more dedicated CPU instances at your disposal, and your 100 sites will be able to share
www.it-ebooks.info
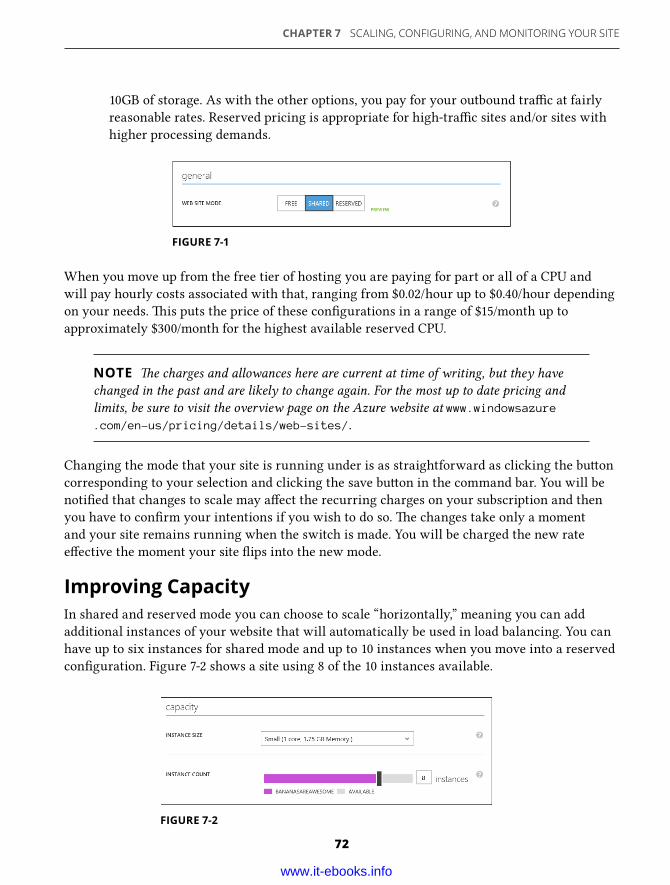
CHAPTER 7 SCALING, CONFIGURING, AND MONITORING YOUR SITE
72
10GB of storage. As with the other options, you pay for your outbound tra c at fairly
reasonable rates. Reserved pricing is appropriate for high-tra c sites and/or sites with
higher processing demands.
FIGURE 7-1
When you move up from the free tier of hosting you are paying for part or all of a CPU and
will pay hourly costs associated with that, ranging from $0.02/hour up to $0.40/hour depending
on your needs. is puts the price of these confi gurations in a range of $15/month up to
approximately $300/month for the highest available reserved CPU.
NOTE e charges and allowances here are current at time of writing, but they have
changed in the past and are likely to change again. For the most up to date pricing and
limits, be sure to visit the overview page on the Azure website at www.windowsazure.com/en-us/pricing/details/web-sites/.
Changing the mode that your site is running under is as straightforward as clicking the bu on
corresponding to your selection and clicking the save bu on in the command bar. You will be
notifi ed that changes to scale may a ect the recurring charges on your subscription and then
you have to confi rm your intentions if you wish to do so. e changes take only a moment
and your site remains running when the switch is made. You will be charged the new rate
e ective the moment your site fl ips into the new mode.
Improving CapacityIn shared and reserved mode you can choose to scale “horizontally,” meaning you can add
additional instances of your website that will automatically be used in load balancing. You can
have up to six instances for shared mode and up to 10 instances when you move into a reserved
confi guration. Figure 7-2 shows a site using 8 of the 10 instances available.
FIGURE 7-2
www.it-ebooks.info
Using the Power of the Cloud: Scale
73
With reserved mode you can also scale “vertically” by increasing the processing power
available to your websites. You can choose from Small (1 core, 1.75GB RAM), Medium (2 cores,
3.5GB RAM), and Large (4 cores, 7GB RAM) instances to help handle your increasing load. Keep
in mind that these numbers will a ect pricing and act as a multiplier on the base hourly rate
used to compute your monthly charges.
Just drag the slider around and use the dropdown box shown in Figure 7-2 to set the overall
processing capacity available to your sites. I have to mention here that this is one of the
beautiful parts of working with the cloud. I have worked with several network administrators
in charge of my server deployments throughout the course of my career, and I can assure you
they do not appreciate being dragged around like a slider. eir dropdown boxes are also very
di cult to locate.
Scaling Linked Resources e size of your website proper — in fact, the size of all websites under your subscription — must
not exceed the maximum quota for your tier of performance. erefore, for the free sites
you can divide the 1GB of space over 10 sites. For shared and reserved modes, you can
split your 100 websites over 1GB or 10GB, respectively. But that’s not the only way your site
can grow.
As described in Chapter 6, there are two types of manageable linked resources in Windows
Azure Web Sites: databases and storage accounts. ese are both mechanisms you can use to
store data required or generated by your websites, and both carry monthly charges associated
with use.
Storage is a linear and decreasing charge as your consumption increases. For basic storage
requirements you’ll pay as li le as $0.07/GB/month of storage space; in a tiered pricing model
that drops down to $0.037/GB/month. When you add in features such as geo-redundant
capabilities, this can be as much as $0.095/GB/month, dropping to as li le as $0.055/GB/month
when you hit around 10,000 TB.
For SQL Database you start with two classifi cation options, Web and Business, which opens the
door to a number of size selections:
➤ Web edition — 1GB or 5GB
➤ Business edition — 10/20/30/40/50GB, 100GB, or 150GB
Pricing for SQL Database is also tiered, costing anywhere from $10/GB/month down to $1/
GB/month as your required capacity increases. Remember to keep in mind that your database
does not include egress charges, so your outbound bandwidth is metered and charged
separately.
www.it-ebooks.info
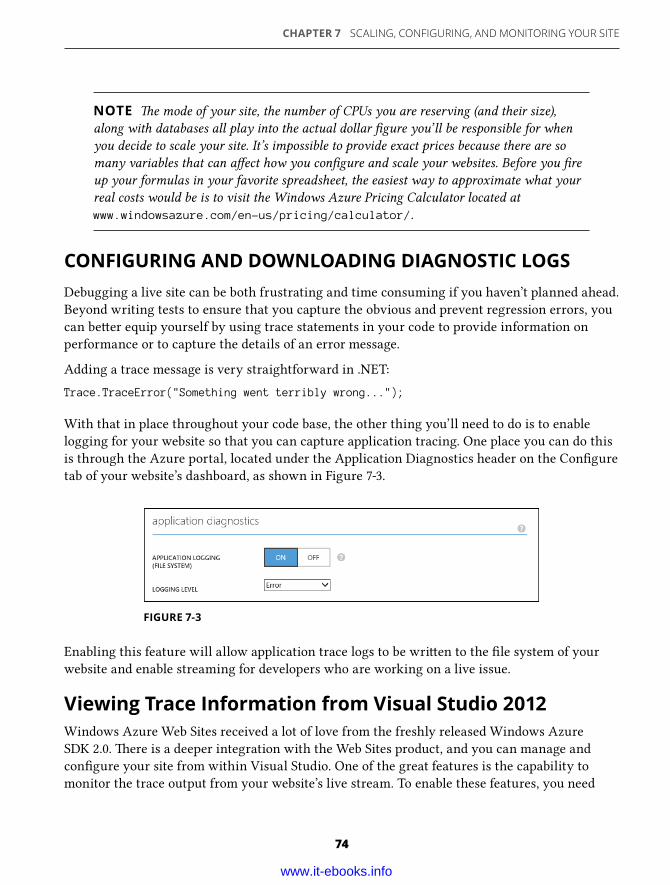
CHAPTER 7 SCALING, CONFIGURING, AND MONITORING YOUR SITE
74
NOTE e mode of your site, the number of CPUs you are reserving (and their size),
along with databases all play into the actual dollar fi gure you’ll be responsible for when
you decide to scale your site. It’s impossible to provide exact prices because there are so
many variables that can a ect how you confi gure and scale your websites. Before you fi re
up your formulas in your favorite spreadsheet, the easiest way to approximate what your
real costs would be is to visit the Windows Azure Pricing Calculator located at
www.windowsazure.com/en-us/pricing/calculator/.
CONFIGURING AND DOWNLOADING DIAGNOSTIC LOGSDebugging a live site can be both frustrating and time consuming if you haven’t planned ahead.
Beyond writing tests to ensure that you capture the obvious and prevent regression errors, you
can be er equip yourself by using trace statements in your code to provide information on
performance or to capture the details of an error message.
Adding a trace message is very straightforward in .NET:
Trace.TraceError("Something went terribly wrong...");
With that in place throughout your code base, the other thing you’ll need to do is to enable
logging for your website so that you can capture application tracing. One place you can do this
is through the Azure portal, located under the Application Diagnostics header on the Confi gure
tab of your website’s dashboard, as shown in Figure 7-3.
FIGURE 7-3
Enabling this feature will allow application trace logs to be wri en to the fi le system of your
website and enable streaming for developers who are working on a live issue.
Viewing Trace Information from Visual Studio 2012Windows Azure Web Sites received a lot of love from the freshly released Windows Azure
SDK 2.0. ere is a deeper integration with the Web Sites product, and you can manage and
confi gure your site from within Visual Studio. One of the great features is the capability to
monitor the trace output from your website’s live stream. To enable these features, you need
www.it-ebooks.info
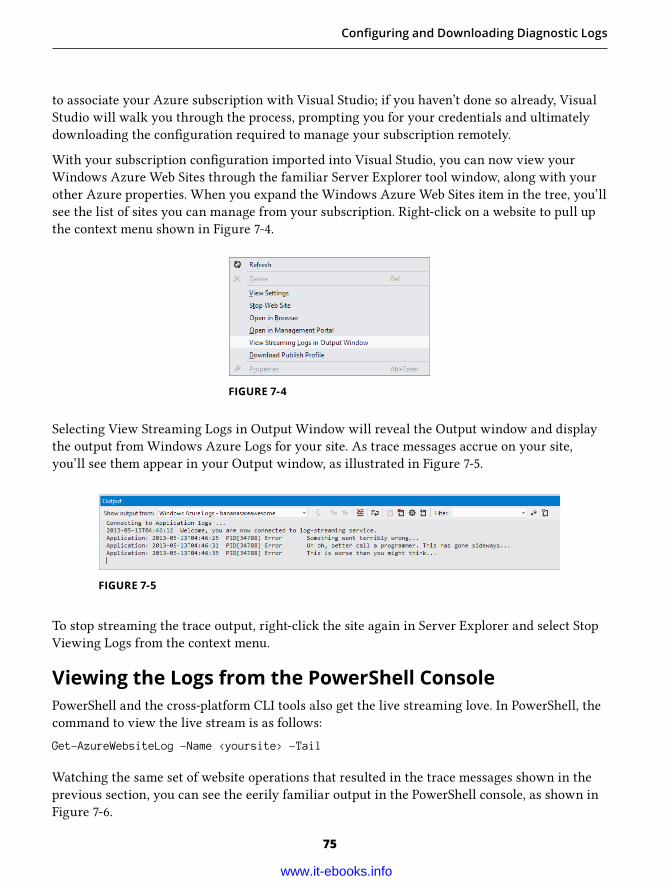
Confi guring and Downloading Diagnostic Logs
75
to associate your Azure subscription with Visual Studio; if you haven’t done so already, Visual
Studio will walk you through the process, prompting you for your credentials and ultimately
downloading the confi guration required to manage your subscription remotely.
With your subscription confi guration imported into Visual Studio, you can now view your
Windows Azure Web Sites through the familiar Server Explorer tool window, along with your
other Azure properties. When you expand the Windows Azure Web Sites item in the tree, you’ll
see the list of sites you can manage from your subscription. Right-click on a website to pull up
the context menu shown in Figure 7-4.
FIGURE 7-4
Selecting View Streaming Logs in Output Window will reveal the Output window and display
the output from Windows Azure Logs for your site. As trace messages accrue on your site,
you’ll see them appear in your Output window, as illustrated in Figure 7-5.
FIGURE 7-5
To stop streaming the trace output, right-click the site again in Server Explorer and select Stop
Viewing Logs from the context menu.
Viewing the Logs from the PowerShell ConsolePowerShell and the cross-platform CLI tools also get the live streaming love. In PowerShell, the
command to view the live stream is as follows:
Get-AzureWebsiteLog -Name <yoursite> -Tail
Watching the same set of website operations that resulted in the trace messages shown in the
previous section, you can see the eerily familiar output in the PowerShell console, as shown in
Figure 7-6.
www.it-ebooks.info
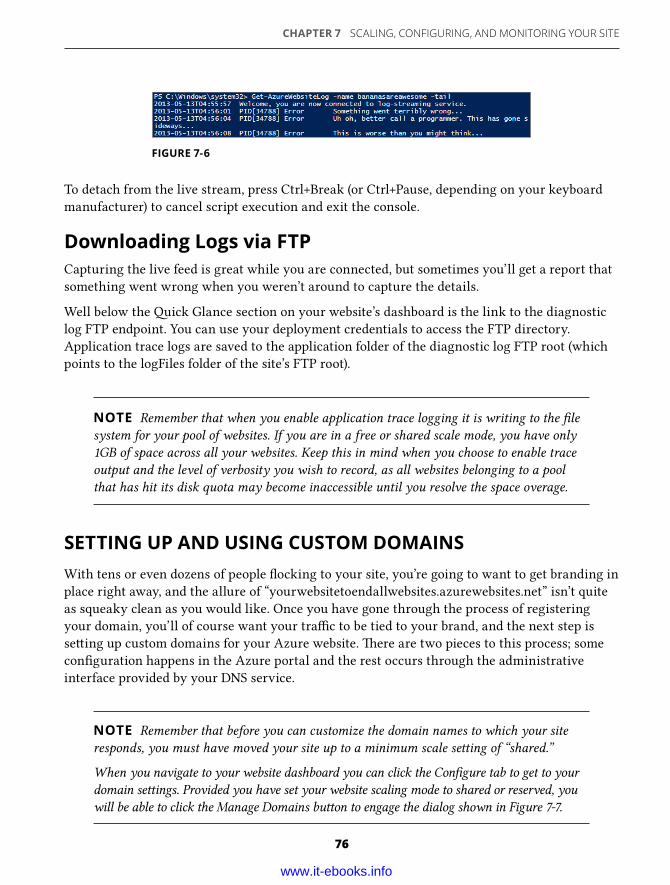
CHAPTER 7 SCALING, CONFIGURING, AND MONITORING YOUR SITE
76
To detach from the live stream, press Ctrl+Break (or Ctrl+Pause, depending on your keyboard
manufacturer) to cancel script execution and exit the console.
Downloading Logs via FTPCapturing the live feed is great while you are connected, but sometimes you’ll get a report that
something went wrong when you weren’t around to capture the details.
Well below the ick Glance section on your website’s dashboard is the link to the diagnostic
log FTP endpoint. You can use your deployment credentials to access the FTP directory.
Application trace logs are saved to the application folder of the diagnostic log FTP root (which
points to the logFiles folder of the site’s FTP root).
NOTE Remember that when you enable application trace logging it is writing to the fi le
system for your pool of websites. If you are in a free or shared scale mode, you have only
1GB of space across all your websites. Keep this in mind when you choose to enable trace
output and the level of verbosity you wish to record, as all websites belonging to a pool
that has hit its disk quota may become inaccessible until you resolve the space overage.
SETTING UP AND USING CUSTOM DOMAINSWith tens or even dozens of people fl ocking to your site, you’re going to want to get branding in
place right away, and the allure of “yourwebsitetoendallwebsites.azurewebsites.net” isn’t quite
as squeaky clean as you would like. Once you have gone through the process of registering
your domain, you’ll of course want your tra c to be tied to your brand, and the next step is
se ing up custom domains for your Azure website. ere are two pieces to this process; some
confi guration happens in the Azure portal and the rest occurs through the administrative
interface provided by your DNS service.
NOTE Remember that before you can customize the domain names to which your site
responds, you must have moved your site up to a minimum scale se ing of “shared.”
When you navigate to your website dashboard you can click the Confi gure tab to get to your
domain se ings. Provided you have set your website scaling mode to shared or reserved, you
will be able to click the Manage Domains bu on to engage the dialog shown in Figure 7-7.
FIGURE 7-6
www.it-ebooks.info
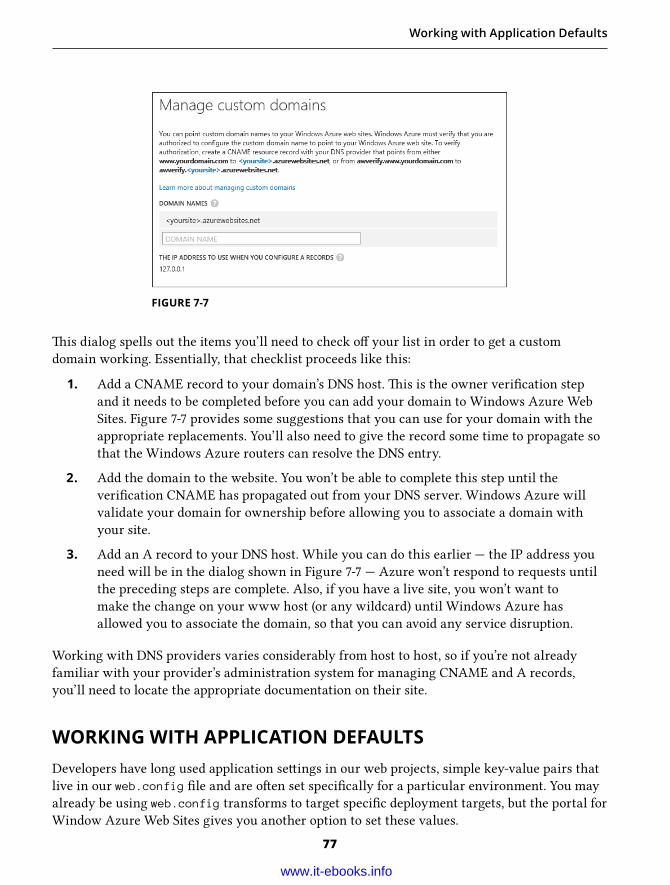
Working with Application Defaults
77
FIGURE 7-7
is dialog spells out the items you’ll need to check o your list in order to get a custom
domain working. Essentially, that checklist proceeds like this:
1. Add a CNAME record to your domain’s DNS host. is is the owner verifi cation step
and it needs to be completed before you can add your domain to Windows Azure Web
Sites. Figure 7-7 provides some suggestions that you can use for your domain with the
appropriate replacements. You’ll also need to give the record some time to propagate so
that the Windows Azure routers can resolve the DNS entry.
2. Add the domain to the website. You won’t be able to complete this step until the
verifi cation CNAME has propagated out from your DNS server. Windows Azure will
validate your domain for ownership before allowing you to associate a domain with
your site.
3. Add an A record to your DNS host. While you can do this earlier — the IP address you
need will be in the dialog shown in Figure 7-7 — Azure won’t respond to requests until
the preceding steps are complete. Also, if you have a live site, you won’t want to
make the change on your www host (or any wildcard) until Windows Azure has
allowed you to associate the domain, so that you can avoid any service disruption.
Working with DNS providers varies considerably from host to host, so if you’re not already
familiar with your provider’s administration system for managing CNAME and A records,
you’ll need to locate the appropriate documentation on their site.
WORKING WITH APPLICATION DEFAULTSDevelopers have long used application se ings in our web projects, simple key-value pairs that
live in our web.config fi le and are o en set specifi cally for a particular environment. You may
already be using web.config transforms to target specifi c deployment targets, but the portal for
Window Azure Web Sites gives you another option to set these values.
www.it-ebooks.info
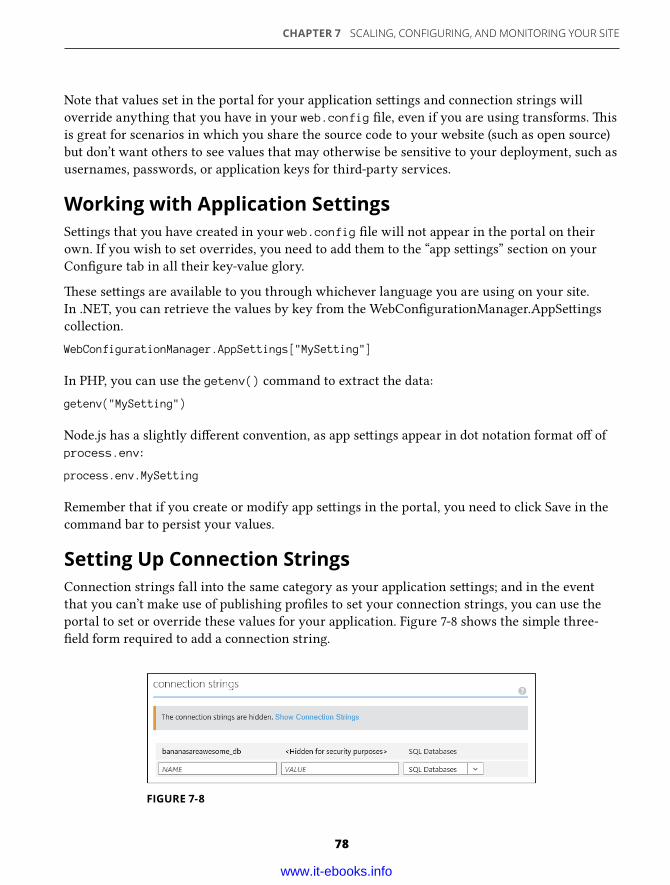
CHAPTER 7 SCALING, CONFIGURING, AND MONITORING YOUR SITE
78
Note that values set in the portal for your application se ings and connection strings will
override anything that you have in your web.config fi le, even if you are using transforms. is
is great for scenarios in which you share the source code to your website (such as open source)
but don’t want others to see values that may otherwise be sensitive to your deployment, such as
usernames, passwords, or application keys for third-party services.
Working with Application SettingsSe ings that you have created in your web.config fi le will not appear in the portal on their
own. If you wish to set overrides, you need to add them to the “app se ings” section on your
Confi gure tab in all their key-value glory.
ese se ings are available to you through whichever language you are using on your site.
In .NET, you can retrieve the values by key from the WebConfi gurationManager.AppSe ings
collection.
WebConfigurationManager.AppSettings["MySetting"]
In PHP, you can use the getenv() command to extract the data:
getenv("MySetting")
Node.js has a slightly di erent convention, as app se ings appear in dot notation format o of
process.env:
process.env.MySetting
Remember that if you create or modify app se ings in the portal, you need to click Save in the
command bar to persist your values.
Setting Up Connection StringsConnection strings fall into the same category as your application se ings; and in the event
that you can’t make use of publishing profi les to set your connection strings, you can use the
portal to set or override these values for your application. Figure 7-8 shows the simple three-
fi eld form required to add a connection string.
FIGURE 7-8
www.it-ebooks.info
Setting Other Confi guration Elements
79
Like many other confi guration se ings in the portal, you need to click Save in the command
bar to commit your changes.
NOTE If you are using Entity Framework (EF) Code First in your project and pass in a
name to the base class constructor of your context, this is the name that you will want to
use as the connection string name in your Windows Azure Web Site. By convention, EF
fi rst a empts to fi nd a connection string of the same name you provide in that constructor,
and this is by far the easiest way to wire up your SQL Database to EF in Windows Azure
Web Sites. is is especially handy if you don’t specify a connection string locally, electing
instead to use the default convention for your local database.
When you looked earlier at linking SQL Database resources in Chapter 6, you’ll recall that
by creating a link to the database the connection string was exposed in the ick Glance
section of your website’s dashboard. You’ll also recall that this does not implicitly make
your application aware of the connection string, largely because you need a name associated
with the value. You can, however, copy this connection string and paste it verbatim into
the preceding form along with the appropriate name that would be expected by your
application.
SETTING OTHER CONFIGURATION ELEMENTSAs you deploy your application you may need to set a few specifi c a ributes of the site that are
typically done once at initial deployment and then very rarely a erwards. You can access all
these elements through the Confi gure tab of your site’s dashboard. While these aren’t the most
exciting things you’ll deal with when deploying or confi guring your website, they can certainly
be important should your site have specifi c technical requirements. is section will help you
locate and control those pieces.
Setting Framework Versions ere are only two groups of options for this higher-level confi guration element: your .NET
version and the PHP version that you wish to run on your site, as shown in Figure 7-9. ese are
easy, push-bu on se ings that can be commi ed to your site confi guration by clicking Save in
the command bar.
Talking about .NET Framework versions is one of the fastest ways to get your head spinning.
For example, any version 2.0 will run on 3.0 and 3.5, both of which are based on, built from,
and run on 2.0. Applications created under any of these versions are likely to run on 4.0, and
therefore 4.5, which is binary compatible with 4.0.
www.it-ebooks.info
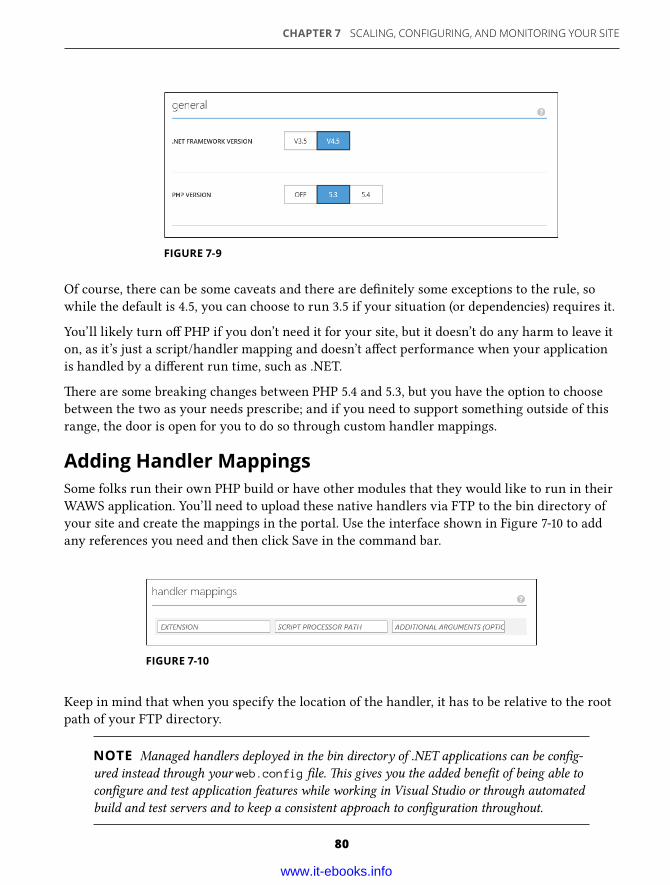
CHAPTER 7 SCALING, CONFIGURING, AND MONITORING YOUR SITE
80
Of course, there can be some caveats and there are defi nitely some exceptions to the rule, so
while the default is 4.5, you can choose to run 3.5 if your situation (or dependencies) requires it.
You’ll likely turn o PHP if you don’t need it for your site, but it doesn’t do any harm to leave it
on, as it’s just a script/handler mapping and doesn’t a ect performance when your application
is handled by a di erent run time, such as .NET.
ere are some breaking changes between PHP 5.4 and 5.3, but you have the option to choose
between the two as your needs prescribe; and if you need to support something outside of this
range, the door is open for you to do so through custom handler mappings.
Adding Handler MappingsSome folks run their own PHP build or have other modules that they would like to run in their
WAWS application. You’ll need to upload these native handlers via FTP to the bin directory of
your site and create the mappings in the portal. Use the interface shown in Figure 7-10 to add
any references you need and then click Save in the command bar.
FIGURE 7-9
FIGURE 7-10
Keep in mind that when you specify the location of the handler, it has to be relative to the root
path of your FTP directory.
NOTE Managed handlers deployed in the bin directory of .NET applications can be confi g-
ured instead through your web.config fi le. is gives you the added benefi t of being able to
confi gure and test application features while working in Visual Studio or through automated
build and test servers and to keep a consistent approach to confi guration throughout.
www.it-ebooks.info

Summary
81
Setting the Default DocumentDefault documents have almost gone the way of the dodo with the advent of friendly URLs
and application-lev el routing, but a default document can still come in handy when your site is
o ine or for use as a landing page while you fi nalize your site. Another scenario is if you are
building a static site from scratch or one of the many available templates on the web.
To modify the order or precedence or set which documents should be considered “default” for
your website, navigate to the Confi gure tab in your website’s dashboard. Default documents
are near the bo om of the page. Use the interface shown in Figure 7-11 to add, remove, or sort
documents.
FIGURE 7-11
Note that in the absence of the fi rst document in your list the web server will a empt to locate
the second document, and so on. e server will work through the list to resolve any request
without a document name in the URL to a directory on your server. is gives you fl exibility
regarding how you name your documents across your website.
SUMMARYWindows Azure Web Sites enables you to start small and scale up as you need, from capacity
and storage space to processing power and handling increased request volume on your site. If
you plan to double your tra c every day, Windows Azure should be able to keep up with your
growth for at least the fi rst few exponents without much trouble at all.
As you push your application to the cloud you are now equipped to modify its confi guration
on the fl y, keep your sensitive data private, and even track down errors more easily with a
number of di erent tools and approaches. In addition, by combining some of this information
with other concepts covered earlier in the book, you should also be able to formulate how these
capabilities can help you out in automation scenarios.
Finally, if you fi nd that you’re missing a critical component in the features of your Windows
Azure Web Site, you’ll now be able to select other options or even extend the included
functionality by incorporating additional functionality and confi guration as required.
www.it-ebooks.info
Deploying and Confi guring a Cloud Application8
IN THIS CHAPTER:
➤ A walk-through of the project’s core assets ➤ Background technical information on how the application is
implemented and operates ➤ Examples of deployment to and confi guration of a site in the
cloud
WROX.COM CODE DOWNLOADS FOR THIS CHAPTER
You need to download the MovieFu.zip fi le.
While the goal of this book centers primarily on deploying and maintaining websites in
Windows Azure, it would be hard to get a full picture of the process and its nuances without
a concrete example from which to work. You can read all you want to about how to ride a horse,
but it’s a whole di erent story when you fi nally get on the saddle! For that reason,
you’re about to saddle up and walk through the deployment and confi guration of an actual
reference application. is will enable you to learn about the various aspects of the deployment
process as well as manage your deployments once they are out in the cloud.
EXPLORING THE MOVIEFU APPLICATIONSo here’s the premise: Imagine you have a great collection of movies that you want to track and
share with your friends. You even want to give them a chance to comment on the movies and
rate them, which is great information to have if you decide to host a movie night. You set up a
website that enables you to create your library of fl icks, search for movies, and keep track of
the directors that make your favorite fi lms. You call the site MovieFu and build the application
using the ASP.NET MVC Framework.
Again, this book — and even this chapter — is not about teaching you how to build websites on
ASP.NET or helping you learn the MVC Framework. ere are many good references out there
for that. is project is not the pinnacle of code quality, it’s not the best-looking date at the UI
design ball, nor is it meant to represent best practices, but it does illustrate the kinds of things
you may be doing when you publish to WAWS.
www.it-ebooks.info
Exploring the MovieFu Application
83
Deploying and Running the Application Locally e fi rst thing you need to do is get the code for the app so that you can start exploring it. If
you have met the requirements described in the What You Need to Use is Book section of the
Introduction, it is ready to go and will run for you out of the box.
Downloading the Code You can fi nd the code for this chapter at Wrox.com. e instructions for locating the code
and downloading it are located in the Introduction to this book. e code itself is in a zip fi le.
Once downloaded, right-click on the fi le in File Explorer and select the Properties option in the
context menu. In the Properties dialog, on the General tab, there is a section labeled Security.
For fi les that have been downloaded from the Internet, this section includes an Unblock bu on.
If you see this bu on, click it, and then click OK. is is not a requirement, but it eliminates
some annoying warning messages when you open the project in Visual Studio.
Now that you have the code in a zip fi le, extract it (by right-clicking on the fi le and selecting
Extract All, or using any other method of your choosing) to a directory.
Launching the ApplicationTake a few minutes to launch the application and ensure that your machine is correctly
confi gured and that you have all the fi les you need to get started:
1. Locate the directory where you saved the project fi les.
2. Navigate to the MovieFu folder where the solution fi le is located.
3. Double-click the MovieFu.sln fi le to launch Visual Studio.
4. Right-click on the solution in Solution Explorer and click Enable NuGet Package Restore.
NOTE If you have multiple versions of Visual Studio installed on your machine you may
be prompted to select the version in which to load the solution. If you’re presented with this
choice, be sure to pick Visual Studio 2012 to take advantage of the features related to pub-
lishing your application to Windows Azure.
5. Press Ctrl+F5 to run the application, or select Debug ➪ Start Without Debugging to
launch the application. e window shown in Figure 8-1 should appear when your
application is running.
at’s it! You can close the browser window at this point and return to Visual Studio. You’ll
examine the application later in this chapter, but fi rst you’re going to look at the bits that make
the website tick.
www.it-ebooks.info
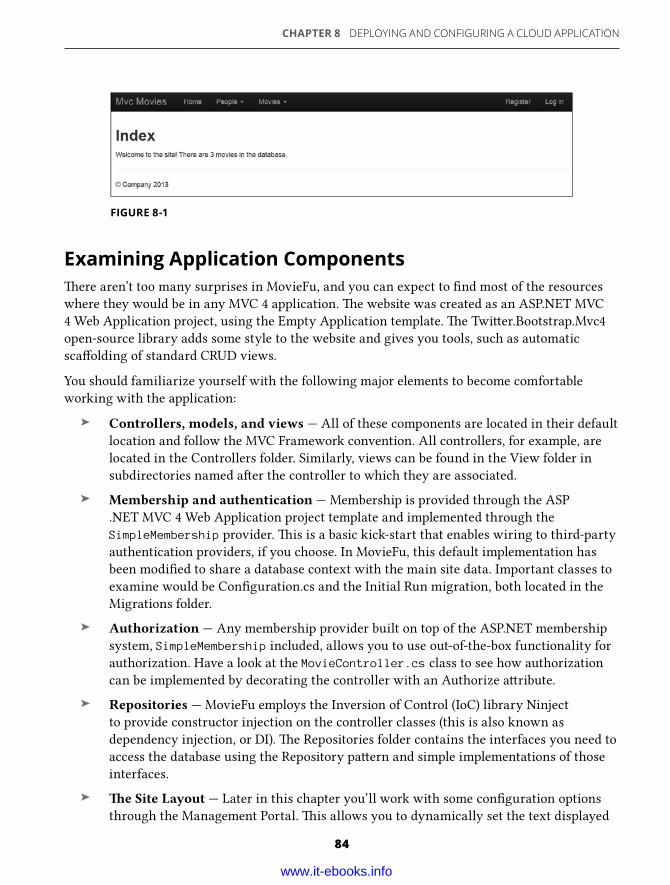
CHAPTER 8 DEPLOYING AND CONFIGURING A CLOUD APPLICATION
84
Examining Application Components ere aren’t too many surprises in MovieFu, and you can expect to fi nd most of the resources
where they would be in any MVC 4 application. e website was created as an ASP.NET MVC
4 Web Application project, using the Empty Application template. e Twi er.Bootstrap.Mvc4
open-source library adds some style to the website and gives you tools, such as automatic
sca olding of standard CRUD views.
You should familiarize yourself with the following major elements to become comfortable
working with the application:
➤ Controllers, models, and views — All of these components are located in their default
location and follow the MVC Framework convention. All controllers, for example, are
located in the Controllers folder. Similarly, views can be found in the View folder in
subdirectories named a er the controller to which they are associated.
➤ Membership and authentication — Membership is provided through the ASP
.NET MVC 4 Web Application project template and implemented through the
SimpleMembership provider. is is a basic kick-start that enables wiring to third-party
authentication providers, if you choose. In MovieFu, this default implementation has
been modifi ed to share a database context with the main site data. Important classes to
examine would be Confi guration.cs and the Initial Run migration, both located in the
Migrations folder.
➤ Authorization — Any membership provider built on top of the ASP.NET membership
system, SimpleMembership included, allows you to use out-of-the-box functionality for
authorization. Have a look at the MovieController.cs class to see how authorization
can be implemented by decorating the controller with an Authorize a ribute.
➤ Repositories — MovieFu employs the Inversion of Control (IoC) library Ninject
to provide constructor injection on the controller classes (this is also known as
dependency injection, or DI). e Repositories folder contains the interfaces you need to
access the database using the Repository pa ern and simple implementations of those
interfaces.
➤ e Site Layout — Later in this chapter you’ll work with some confi guration options
through the Management Portal. is allows you to dynamically set the text displayed
FIGURE 8-1
www.it-ebooks.info
Exploring the MovieFu Application
85
as the website’s title. Have a look in the _BootstrapLayout.basic.cshtml fi le to locate
the application se ing that you’ll be targeting.
Creating the Database with Entity Framework ose of you who are experienced in ASP.NET know that you’re not locked into any specifi c
database platform. is is one of the best things about using a mature framework; you have
not only the freedom to choose which database back end to leverage, but also the fl exibility
to do so when required. It can be very frustrating to work inside a technology stack that
demands specifi c requirements and doesn’t easily allow you to satisfy your project’s functional
requirements. is is especially true in integration projects or extensions to legacy systems
when you aren’t given the option to elect which back end you’ll be building from or adding to.
Whether it is MS SQL, Oracle, MySQL, or a no-SQL solution that you’ll be using to maintain
your application’s data, ASP.NET likely has the providers for you to connect and manipulate
data. As a greenfi eld project, MovieFu is not bound by many constraints and could have used
any number of solutions.
at said, the tools that Microso provides to developers are typically aligned with the
technology stack for which they are actively developing and providing guidance. Visual Studio
has some great tooling and support for MVC and Entity Framework acting in unison, and
Entity Framework is currently the data access technology that is recommended by Microso for
anyone starting a new project. For these reasons, MovieFu was built to dynamically generate
the database using Entity Framework Code First.
NOTE Entity Framework is an object-relational mapper (ORM) that handles most of the
details related to connecting to the database as well as managing entity state and persis-
tence. Entity Framework enables you to defi ne the model in a number of ways. A common
approach for applications for which there is already a database involves using the database
schema to generate the initial model. Customizations can be executed a erwards, but the
entities tend to be very close to the database table structure.
A second approach that recent versions of Entity Framework support is known as Code
First. You start by creating a number of di erent classes, each with its own collection of
properties. en a database schema can be generated based on the properties in each class.
e default templates for many web projects in Visual Studio 2012 now include Entity
Framework by default — which you can verify in the Packages.Config fi le in the root of your
project — but you can also add it to any application or library by installing it through the
Package Manager Console, shown in Figure 8-2.
Alternatively, you can add Entity Framework through the Manage NuGet Packages dialog,
shown in Figure 8-3.
www.it-ebooks.info
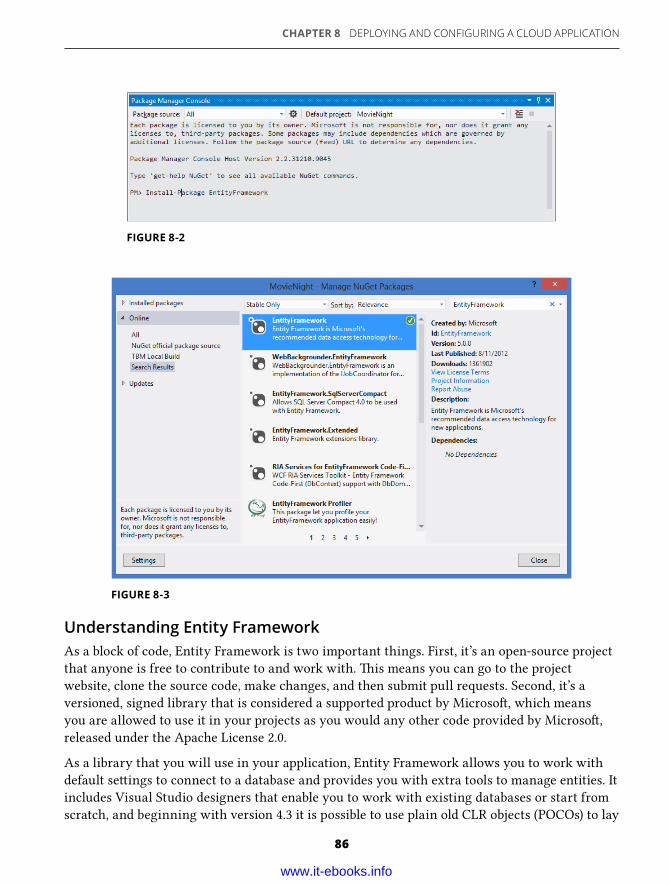
CHAPTER 8 DEPLOYING AND CONFIGURING A CLOUD APPLICATION
86
Understanding Entity FrameworkAs a block of code, Entity Framework is two important things. First, it’s an open-source project
that anyone is free to contribute to and work with. is means you can go to the project
website, clone the source code, make changes, and then submit pull requests. Second, it’s a
versioned, signed library that is considered a supported product by Microso , which means
you are allowed to use it in your projects as you would any other code provided by Microso ,
released under the Apache License 2.0.
As a library that you will use in your application, Entity Framework allows you to work with
default se ings to connect to a database and provides you with extra tools to manage entities. It
includes Visual Studio designers that enable you to work with existing databases or start from
scratch, and beginning with version 4.3 it is possible to use plain old CLR objects (POCOs) to lay
FIGURE 8-2
FIGURE 8-3
www.it-ebooks.info
Exploring the MovieFu Application
87
out your data model with the support of migrations. is is the Code First strategy described
earlier.
Reviewing the Basics of Entity Framework Code First anks to Code First, you can start by writing a simple POCO to represent your entity, such as
the Movie class in Listing 8-1, just as you would in any other project.
LISTING 8-1
public class Movie{ public int MovieId { get; set; } public string Title { get; set; } public string Description { get; set; } public string ImageUrl { get; set; }}
is model is just a class with primitive types as properties to describe a movie that you
will store in the application. However, this class serves as a base that you can augment,
decorate, and e ectively defi ne advanced schema a ributes for what will become a table in
a database and how the model will be validated. Listing 8-2 starts to illustrate how a POCO
can incorporate some of those features, including marking fi elds as required. In the case of
ReleaseYear, the Range a ribute provides framework-level validation instructions that can
be used from JavaScript libraries or in your controller. Virtual members enable you to create
references to other tables and more easily access related data, using a pa ern known as Lazy
Loading; these members are also known as Navigation Properties.
LISTING 8-2
public class Movie{ public Movie() { this.ReleaseYear = DateTime.Now.Year; this.Ratings = new HashSet<Rating>(); }
public int Id { get; set; }
[Required] public string Title { get; set; } [Required] public string Description { get; set; } [Range(1877,2020)]
www.it-ebooks.info
CHAPTER 8 DEPLOYING AND CONFIGURING A CLOUD APPLICATION
88
public int ReleaseYear { get; set; }
public virtual int DirectorId { get; set; } public virtual Person Director { get; set; }
public ICollection<Rating> Ratings { get; set; }
}
By itself, the Movie class is nothing more than a blueprint of an object that you can instantiate,
but when you add the DbContext in Listing 8-3 to your application, you can start to think of
that movie as a row in a database.
LISTING 8-3
public class MovieFuContext :DbContext{ public DbSet<Movie> Movies { get; set; }}
When you create an instance of a MovieFuContext object, Entity Framework uses a series
of conventions to a empt to make a database connection. Failing this connection through a
series of strategies, Code First kicks in, using a default confi guration to create the database
on your behalf and subsequently issuing the commands required to create your tables. At this
point, it is impossible to provide specifi c details regarding what these defaults will be for you,
as it depends on the version mix of Entity Framework and Visual Studio that you are using;
however, looking in web.config will tell you how Entity Framework wired itself up, as shown
in Listing 8-4 from the web.config in MovieFu. In this case, the sample application was created
with Visual Studio 2012, and Entity Framework 5.0 is using Local Db.
LISTING 8-4
<defaultConnectionFactory type="System.Data.Entity.Infrastructure.LocalDbConnectionFactory, EntityFramework"> <parameters> <parameter value="v11.0" /> </parameters></defaultConnectionFactory>
Enabling MigrationsAt this point, you have created a solid solution: low overhead to create tables and the database
itself; default conventions for accessing the database; and the capability to override the defaults
LISTING 8-2 (Continued)
www.it-ebooks.info
Exploring the MovieFu Application
89
to meet your needs. But what happens when you need to add fi elds to a table, or add new tables?
is is where migrations enter the picture, enabling you to control how changes are applied
in the database, modify existing table structures, and seed data — and because these actions
are all expressed through code, you can do some cra y things and handle these processes
di erently depending on where the code is executing.
While migrations are enabled in the solution you’re working through, they are not enabled by
default. If you need to enable them in a project, follow these steps:
1. Open the Package Manager Console, accessible through View ➪ Other Windows ➪
Package Manager Console.
2. Select the project you wish to target from the dropdown menu.
3. In the console type the following command: Enable-Migrations.
is will create a Configuration.cs fi le in your application with a class called Configurationthat inherits from a generic class named DbMigrationsConfiguration. e inheritance
specifi es the DbContext that you have in your project, and a constructor is created for you by
default that disables automatic migrations (this is a good thing!). Only one (useful) override is
available: Seed, which enables you to manipulate the database anytime a migration is applied.
Listing 8-5, the Configuration class for MovieFu, demonstrates one way to ensure that a base
set of data is available in your application through the AddOrUpdate method. AddOrUpdateworks by specifying how you want to identify a seed value — MovieFu uses the name of
Theme — and what value you want to either ensure is in there or adjust. While Theme is a fairly
simple object, imagine more complex objects whose required initial values change throughout a
project’s development.
LISTING 8-5
internal sealed class Configuration : DbMigrationsConfiguration<MovieFu.Models.MovieFuContext>{ public Configuration() { AutomaticMigrationsEnabled = false; }
protected override void Seed(MovieFu.Models.MovieFuContext context) { context.Themes.AddOrUpdate(t => t.Name, new Theme { Name = "Favorite Superhero" }, new Theme { Name = "Retro 80’s" }, new Theme { Name = "Disco Nights" }, new Theme { Name = "Wild, Wild West" }, new Theme { Name = "Favorite Character From the Movie" }, new Theme { Name = "Famous Dead People" },
www.it-ebooks.info
CHAPTER 8 DEPLOYING AND CONFIGURING A CLOUD APPLICATION
90
new Theme { Name = "PJ Party" }, new Theme { Name = "Boring old Plain Clothes" } );
}
}
NOTE Automatic migrations are a groovy but not always practical addition to your tool-
box. ey enable you to easily update the database without having code fi les that provide
explicit instructions on how to do it. Unfortunately, the luxury is not without its costs:
You can’t “downgrade” your database, you don’t get named versions of your database,
and there are a number of things they can’t do for you, such as properly rename columns;
therefore, they should only be used in experimental scenarios. I don’t recommend using
them in any code that is destined for a production environment, but they can be a great
way to explore Entity Framework.
Adding Migrations to Your ProjectWith migrations enabled, you can now start to look at the code that drives the changes. Each
migration is a class that inherits from DbMigration, giving you a rich set of operations to
perform on the database. To see a complete list, visit http://msdn.microsoft.com/en-us/library/system.data.entity.migrations.dbmigration(v=vs.103).aspx.
Migrations can be as simple as renaming a fi eld. For example, consider the code in Listing 8-6,
which renames the MovieTitle column to Title in a table called Movies.
LISTING 8-6
public class SampleMigration : DbMigration{ public override void Up() { RenameColumn("dbo.Movies", "MovieTitle", "Title"); }}
e Up() method is abstract in the base class and thus the only member that you need to
implement. ere is also a virtual method called Down(), illustrated in Listing 8-7, that you
can elect to override, which enables you to change the name of the column back to its original
name.
LISTING 8-5 (Continued)
www.it-ebooks.info
Exploring the MovieFu Application
91
LISTING 8-7
public override void Down(){ RenameColumn("dbo.Movies", "Title", "MovieTitle");}
Why might you want to do this? When you ask Entity Framework to move your database to a
specifi c version, all the explicit migrations from the current version to the target version are
discovered in your project through refl ection and then executed. If you are moving to a higher
version, the Up() method is called on each migration in order until the target version is reached.
Likewise, if you are moving to a lower version, the Down() method is called, if it exists, until
Entity Framework lands on the version you requested. In addition, if you follow the practice of
tying your product releases to a database version, you’ll have code that targets a di erent data
structure, which is precisely why you should implement the Down method in your migrations.
When you start the app a er a downward migration and the code executes, it will try to create
classes, invoke actions, and render views; and it will expect entities to be consistent with the
version in question.
A er you have enabled migrations, you need to create one anytime a fi eld or table change is
required. ankfully, there is a whole set of tooling to help build this out on your behalf.
You create a migration by returning to the Package Manager Console and executing the
Add-Migration command, passing the name of your migration as a parameter:
Add-Migration Your-Migration-Name.
As a best practice, give the migration a meaningful name that lets other developers (and you,
in the future) know what purpose it serves. e example in Listing 8-8 shows the migration I
created when adding an ImageUrl property to the Movie class.
LISTING 8-8
public partial class movieimage : DbMigration{ public override void Up() { AddColumn("dbo.Movies", "ImageUrl", c => c.String()); }
public override void Down() { DropColumn("dbo.Movies", "ImageUrl"); }}
www.it-ebooks.info
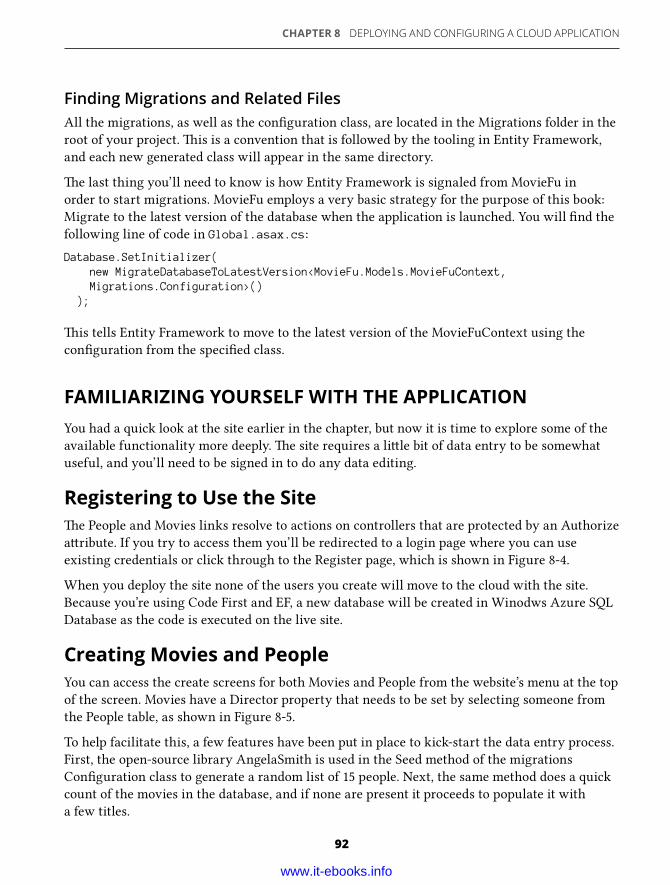
CHAPTER 8 DEPLOYING AND CONFIGURING A CLOUD APPLICATION
92
Finding Migrations and Related FilesAll the migrations, as well as the confi guration class, are located in the Migrations folder in the
root of your project. is is a convention that is followed by the tooling in Entity Framework,
and each new generated class will appear in the same directory.
e last thing you’ll need to know is how Entity Framework is signaled from MovieFu in
order to start migrations. MovieFu employs a very basic strategy for the purpose of this book:
Migrate to the latest version of the database when the application is launched. You will fi nd the
following line of code in Global.asax.cs:
Database.SetInitializer( new MigrateDatabaseToLatestVersion<MovieFu.Models.MovieFuContext, Migrations.Configuration>() );
is tells Entity Framework to move to the latest version of the MovieFuContext using the
confi guration from the specifi ed class.
FAMILIARIZING YOURSELF WITH THE APPLICATIONYou had a quick look at the site earlier in the chapter, but now it is time to explore some of the
available functionality more deeply. e site requires a li le bit of data entry to be somewhat
useful, and you’ll need to be signed in to do any data editing.
Registering to Use the Site e People and Movies links resolve to actions on controllers that are protected by an Authorize
a ribute. If you try to access them you’ll be redirected to a login page where you can use
existing credentials or click through to the Register page, which is shown in Figure 8-4.
When you deploy the site none of the users you create will move to the cloud with the site.
Because you’re using Code First and EF, a new database will be created in Winodws Azure SQL
Database as the code is executed on the live site.
Creating Movies and PeopleYou can access the create screens for both Movies and People from the website’s menu at the top
of the screen. Movies have a Director property that needs to be set by selecting someone from
the People table, as shown in Figure 8-5.
To help facilitate this, a few features have been put in place to kick-start the data entry process.
First, the open-source library AngelaSmith is used in the Seed method of the migrations
Confi guration class to generate a random list of 15 people. Next, the same method does a quick
count of the movies in the database, and if none are present it proceeds to populate it with
a few titles.
www.it-ebooks.info
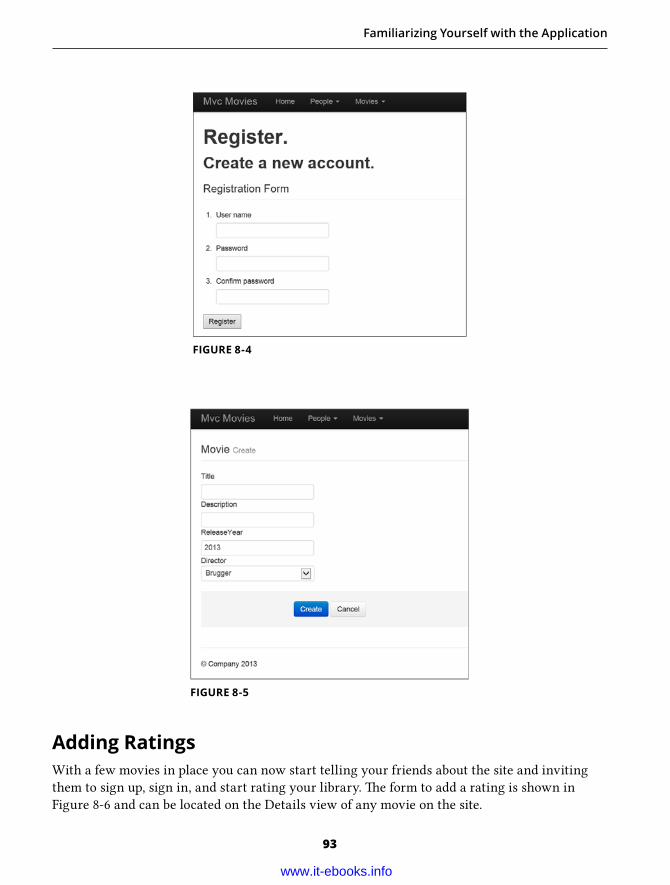
Familiarizing Yourself with the Application
93
FIGURE 8-4
FIGURE 8-5
Adding RatingsWith a few movies in place you can now start telling your friends about the site and inviting
them to sign up, sign in, and start rating your library. e form to add a rating is shown in
Figure 8-6 and can be located on the Details view of any movie on the site.
www.it-ebooks.info
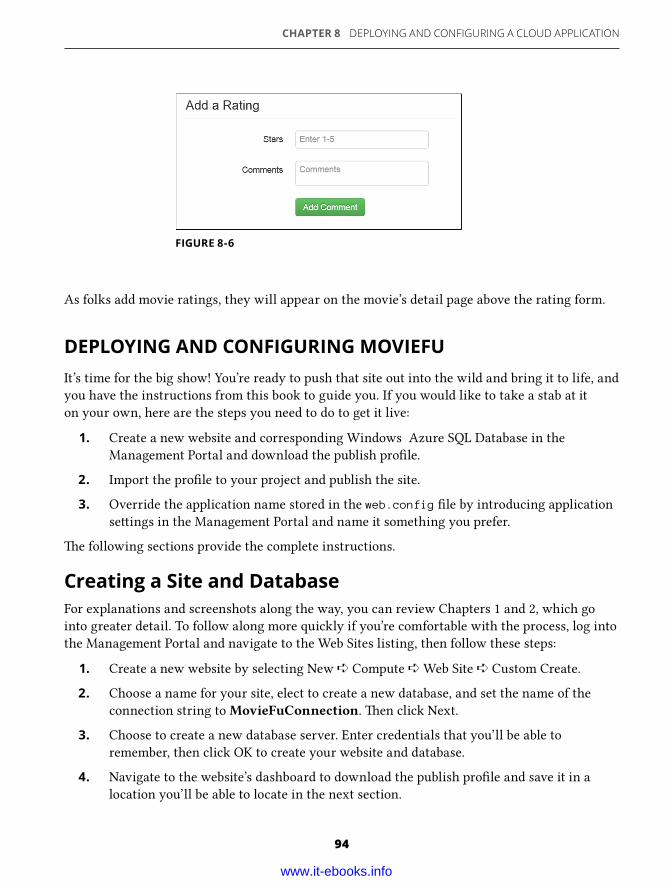
CHAPTER 8 DEPLOYING AND CONFIGURING A CLOUD APPLICATION
94
FIGURE 8-6
As folks add movie ratings, they will appear on the movie’s detail page above the rating form.
DEPLOYING AND CONFIGURING MOVIEFUIt’s time for the big show! You’re ready to push that site out into the wild and bring it to life, and
you have the instructions from this book to guide you. If you would like to take a stab at it
on your own, here are the steps you need to do to get it live:
1. Create a new website and corresponding Windows Azure SQL Database in the
Management Portal and download the publish profi le.
2. Import the profi le to your project and publish the site.
3. Override the application name stored in the web.config fi le by introducing application
se ings in the Management Portal and name it something you prefer.
e following sections provide the complete instructions.
Creating a Site and DatabaseFor explanations and screenshots along the way, you can review Chapters 1 and 2, which go
into greater detail. To follow along more quickly if you’re comfortable with the process, log into
the Management Portal and navigate to the Web Sites listing, then follow these steps:
1. Create a new website by selecting New ➪ Compute ➪ Web Site ➪ Custom Create.
2. Choose a name for your site, elect to create a new database, and set the name of the
connection string to MovieFuConnection. en click Next.
3. Choose to create a new database server. Enter credentials that you’ll be able to
remember, then click OK to create your website and database.
4. Navigate to the website’s dashboard to download the publish profi le and save it in a
location you’ll be able to locate in the next section.
www.it-ebooks.info
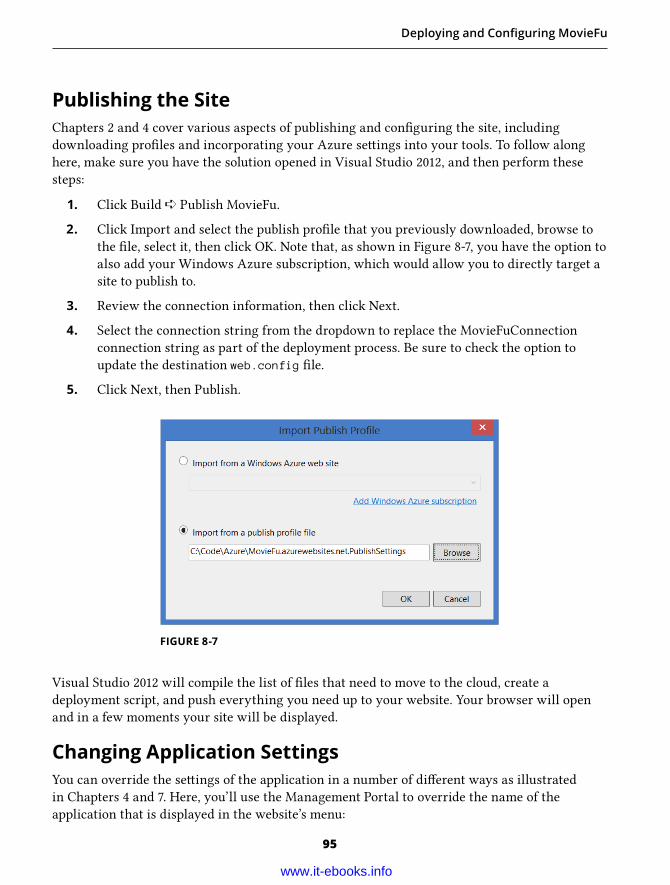
Deploying and Confi guring MovieFu
95
Publishing the SiteChapters 2 and 4 cover various aspects of publishing and confi guring the site, including
downloading profi les and incorporating your Azure se ings into your tools. To follow along
here, make sure you have the solution opened in Visual Studio 2012, and then perform these
steps:
1. Click Build ➪ Publish MovieFu.
2. Click Import and select the publish profi le that you previously downloaded, browse to
the fi le, select it, then click OK. Note that, as shown in Figure 8-7, you have the option to
also add your Windows Azure subscription, which would allow you to directly target a
site to publish to.
3. Review the connection information, then click Next.
4. Select the connection string from the dropdown to replace the MovieFuConnection
connection string as part of the deployment process. Be sure to check the option to
update the destination web.config fi le.
5. Click Next, then Publish.
FIGURE 8-7
Visual Studio 2012 will compile the list of fi les that need to move to the cloud, create a
deployment script, and push everything you need up to your website. Your browser will open
and in a few moments your site will be displayed.
Changing Application SettingsYou can override the se ings of the application in a number of di erent ways as illustrated
in Chapters 4 and 7. Here, you’ll use the Management Portal to override the name of the
application that is displayed in the website’s menu:
www.it-ebooks.info
CHAPTER 8 DEPLOYING AND CONFIGURING A CLOUD APPLICATION
96
1. Navigate to the website’s dashboard in the Management Portal and click the Confi gure
tab.
2. Scroll down to the App Se ings section.
3. Add a new application se ing with a key called “ApplicationName” (without quotes) and
choose a name for your site. Put the name in the Value fi eld.
4. Press Save on the command bar at the bo om of the portal.
As soon as the portal is done saving the confi guration of your site, you can press the Browse
bu on on the command bar to see the changes. Your application name will be updated in the
menu.
Refi ning Your SkillsYou’ve been skinning cats all di erent kinds of ways throughout the book, so why not try your
hand at some additional exercises that will help develop your skills?
➤ Use PowerShell to change the name of the site as it’s displayed by adding or modifying
the appropriate key/value pair.
➤ Rather than deploy the site through Visual Studio, commit your site to a source control
repository and confi gure the website to use deployments.
➤ Experiment with Visual Studio’s integration with Windows Azure Web Sites through
Server Explorer to manage your application state or monitor site logs as they are
wri en.
➤ Explore other options that Azure has to o er, such as the use of a Storage account to
host your static assets and reduce IIS processing load. Media that you have on your
site, such as audio, video, or images, as well as static source fi les for scripts or CSS, are
excellent candidates for storage and could save you money on egress tra c.
SUMMARYMost folks feel be er equipped to learn a new technology when they can start to work from a
place they are already familiar with. roughout this chapter you explored an ASP.NET MVC
website that demonstrates qualities of applications you may already be working on and will be
able to adapt to cloud deployment.
You examined the key components of the application and considered aspects such as
membership, authorization, and database migrations. With MovieFu, a working application
with a lot of room to grow, you can continue to learn, push, poke, prod, and extend an
application that runs in the cloud. Congrats!
www.it-ebooks.info