windows azure native code -...
TRANSCRIPT

Page | 1
Hands-On Lab
Windows Azure and Native Code
Lab version: 2.0.0
Last updated: 11/16/2010
Page | 2
CONTENT
OVERVIEW ........................................................................................................................................................ 3
EXERCISE 1: WINDOWS AZURE AND NATIVE CODE .................................................................................. 5 Task 1 – Creating a Web Cloud Service Project ......................................................................................... 5
Task 2 – Creating a Win32 Project ............................................................................................................. 6
Task 3 – Implementing and Configuring a Win32 Project ......................................................................... 9
Task 4 – Building a Win32 Project ........................................................................................................... 12
Task 5 – Configuring the Azure Service Package ..................................................................................... 17
Task 6 – Enabling Native Code Execution ................................................................................................ 21
Task 7 – Building the Website UI ............................................................................................................. 22
Task 8 – Calling Native Code Using P/Invoke ........................................................................................... 24
Verification .............................................................................................................................................. 26
Troubleshooting ...................................................................................................................................... 29
SUMMARY ....................................................................................................................................................... 34

Page | 3
Overview
One of the features available in Windows Azure environment is the ability to run Web and Worker Roles in
full trust (non-admin). The addition of full trust support in Windows Azure not only allows developers to
access a wider range of .NET CLR features, but also enables access to unmanaged code through P/Invoke.
Objectives
In this hands-on lab, you will:
Build a very simple C++ native assembly
Learn how to enable full trust support in Windows Azure
Create a simple Windows Azure Web role that calls the native assembly using P/Invoke
Prerequisites
IIS 7 (with ASP.NET, WCF HTTP Activation)
Microsoft .NET Framework 4.0
Microsoft Visual Studio 2010 (with Visual C# or Visual Basic .Net, and Visual C++)
Windows Azure Tools for Microsoft Visual Studio 1.2 (June 2010)
For 32-bit systems, in order to compile for a 64-bit platform, you need to install the x64 compiler.
Compiling for 64-bits is required when deploying the cloud service to the Windows Azure
environment. If you plan to execute the steps in this lab and only test the code using the
development fabric on a 32-bit system, you do not need to install the x64 compiler.
◦ To install the x64 compilers, go to Control Panel | Programs | Programs and Features,
select Microsoft Visual Studio 2010 and add the X64 Compiler and Tools option.
Figure 1

Page | 4
Installing the X64 compilers and tools for Visual Studio
Setup
For convenience, much of the code used in this hands-on lab is available as Visual Studio code snippets. To
check the prerequisites of the lab and install the code snippets:
1. Open a Windows Explorer window and browse to the lab’s Source\Setup folder.
2. Double-click the Dependencies.dep file in this folder to launch the Dependency Checker tool and
install any missing prerequisites and the Visual Studio code snippets.
3. If the User Account Control dialog is shown, confirm the action to proceed.
Note: This process may require elevation. The .dep extension is associated with the Dependency Checker
tool during its installation. For additional information about the setup procedure and how to install the
Dependency Checker tool, refer to the Setup.docx document in the Assets folder of the training kit.
Using the Code Snippets
Throughout the lab document, you will be instructed to insert code blocks. For your convenience, most of
that code is provided as Visual Studio Code Snippets, which you can use from within Visual Studio 2010 to
avoid having to add it manually.
If you are not familiar with the Visual Studio Code Snippets, and want to learn how to use them, you can
refer to the Setup.docx document in the Assets folder of the training kit, which contains a section
describing how to use them.
Exercises
This hands-on lab includes the following exercises:
Windows Azure and Native Code
Estimated time to complete this lab: 30 minutes.
Note: When you first start Visual Studio, you must select one of the predefined settings collections. Every
predefined collection is designed to match a particular development style and determines window
layouts, editor behavior, IntelliSense code snippets, and dialog box options. The procedures in this lab
describe the actions necessary to accomplish a given task in Visual Studio when using the General
Development Settings collection. If you choose a different settings collection for your development
environment, there may be differences in these procedures that you need to take into account.

Page | 5
Exercise 1: Windows Azure and Native
Code
In this exercise, you build a C++ native code assembly and then build a Windows Azure Web Role to invoke
this native code on Windows Azure using P/Invoke.
Task 1 – Creating a Web Cloud Service Project
In this task, you create a new Cloud Service project in Visual Studio.
1. Open Visual Studio in elevated administrator mode from Start | All Programs | Microsoft Visual
Studio 2010 by right clicking the Microsoft Visual Studio 2010 shortcut and choosing Run as
administrator.
2. In the File menu, choose New and then Project.
3. In the New Project dialog, expand the language of your preference (Visual C# or Visual Basic) in the
Installed Templates list and select Cloud. Choose the Windows Azure Cloud Service template, set
the Name of the project to WindowsAzureNativeCode, set the location to Ex1-NativeCode\begin
in the Source folder of the lab and ensure that Create directory for solution is checked. Click OK to
create the project.
Figure 2
Creating the Cloud Service project
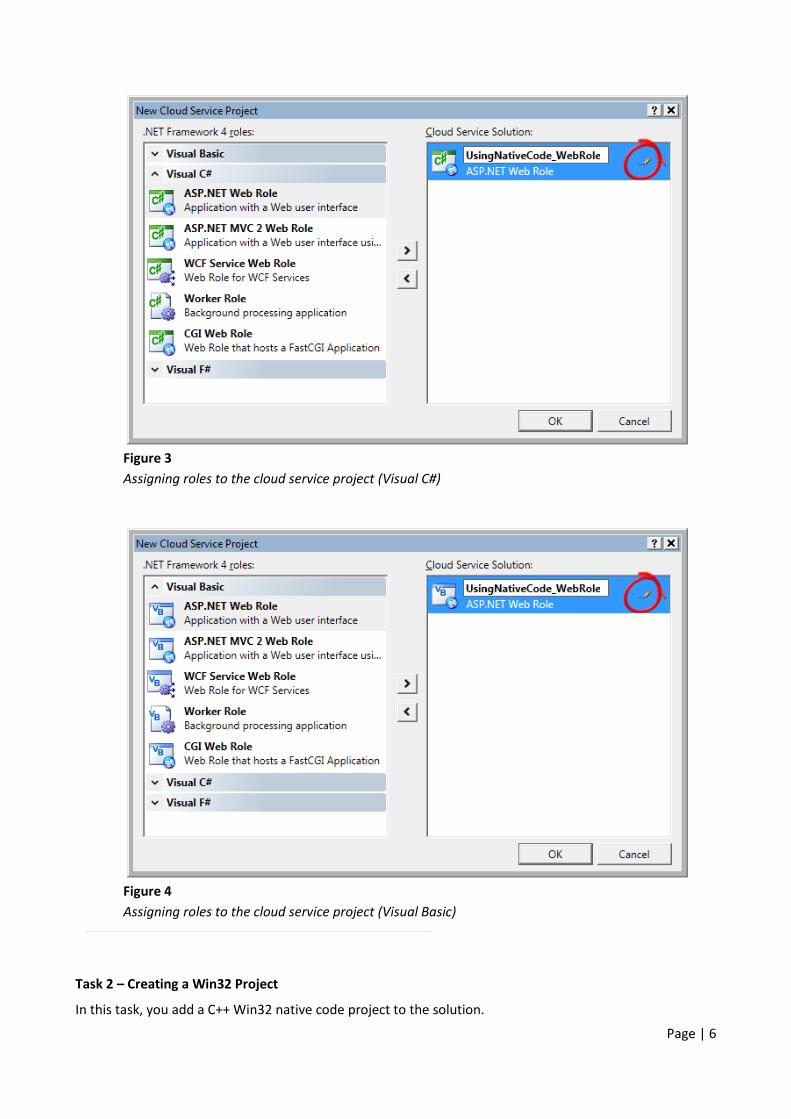
4. In the New Cloud Service Project dialog, select ASP.NET Web Role from the list of available roles
and click the arrow (>) to add an instance of this role to the solution. Before closing the dialog,
select the new role in the right panel, click the pencil icon and rename the role to
UsingNativeCode_WebRole. Click OK to create the cloud service solution.
Page | 6
Figure 3
Assigning roles to the cloud service project (Visual C#)
Figure 4
Assigning roles to the cloud service project (Visual Basic)
Task 2 – Creating a Win32 Project
In this task, you add a C++ Win32 native code project to the solution.
Page | 7
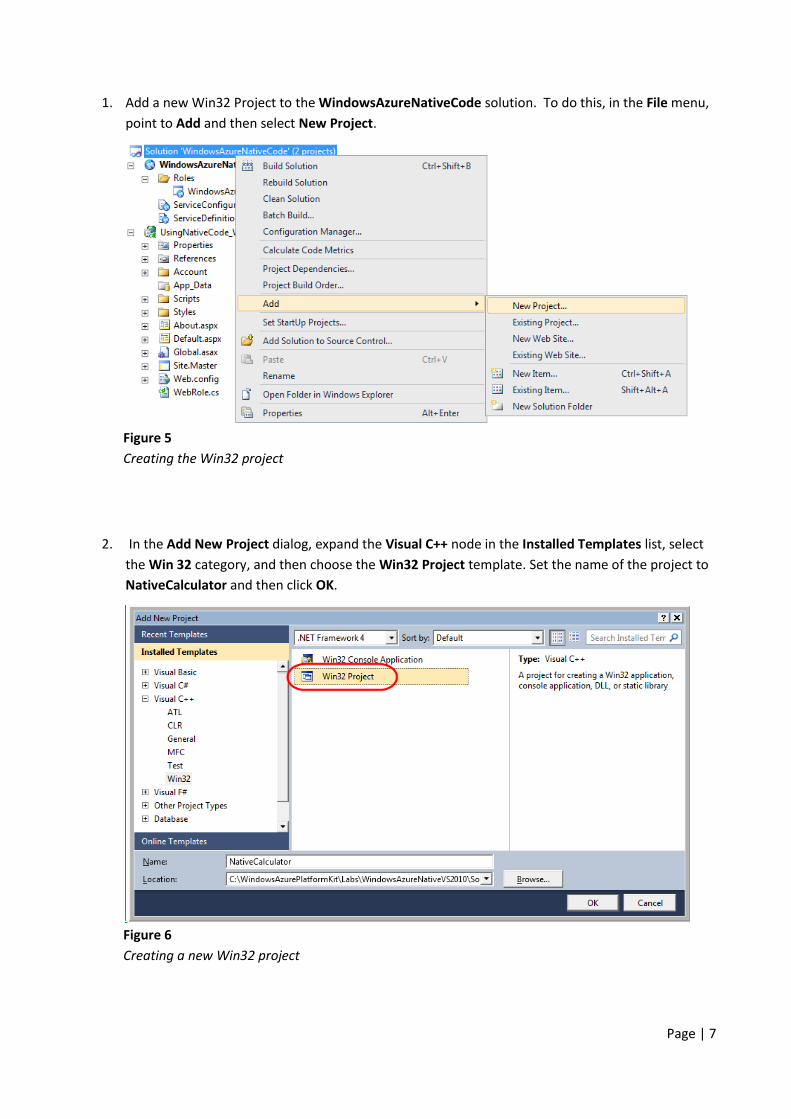
1. Add a new Win32 Project to the WindowsAzureNativeCode solution. To do this, in the File menu,
point to Add and then select New Project.
Figure 5
Creating the Win32 project
2. In the Add New Project dialog, expand the Visual C++ node in the Installed Templates list, select
the Win 32 category, and then choose the Win32 Project template. Set the name of the project to
NativeCalculator and then click OK.
Figure 6
Creating a new Win32 project

Page | 8
3. In the Overview page of the Win32 Application Wizard, click Next to proceed to navigate to the
Application Settings page.
Figure 7
Overview page of the Win32 Application Wizard
4. In the Application Settings page, set the Application type to DLL, check the Export symbols option
under Additional options, and then click Finish.

Page | 9
Figure 8
Configuring Win32 Application Settings
Task 3 – Implementing and Configuring a Win32 Project
In this task, you implement an addition method in theWin32 project, configure it and build it.
1. Open the NativeCaculator.h file inside the Header Files folder of the NativeCalculator project.

Page | 10
Figure 9
Opening the NativeCalculator.h header file
2. Comment out the auto generated nNativeCalculator variable and fnNativeCalculator function
(shown in bolded text) and add the AddNumbers declaration accepting two integer parameters
(shown highlighted below). The resulting content of the NativeCalculator.h file should be as
follows:
NativeCalculator.h
// The following ifdef block is the standard way of creating macros which make
exporting
// from a DLL simpler. All files within this DLL are compiled with the
NATIVECALCULATOR_EXPORTS
// symbol defined on the command line. This symbol should not be defined on any
project
// that uses this DLL. This way any other project whose source files include this
file see
// NATIVECALCULATOR_API functions as being imported from a DLL, whereas this DLL
sees symbols
// defined with this macro as being exported.
#ifdef NATIVECALCULATOR_EXPORTS
#define NATIVECALCULATOR_API __declspec(dllexport)
#else
#define NATIVECALCULATOR_API __declspec(dllimport)
#endif
// This class is exported from the NativeCalculator.dll
class NATIVECALCULATOR_API CNativeCalculator {
public:
CNativeCalculator(void);
// TODO: add your methods here.
};
Page | 11
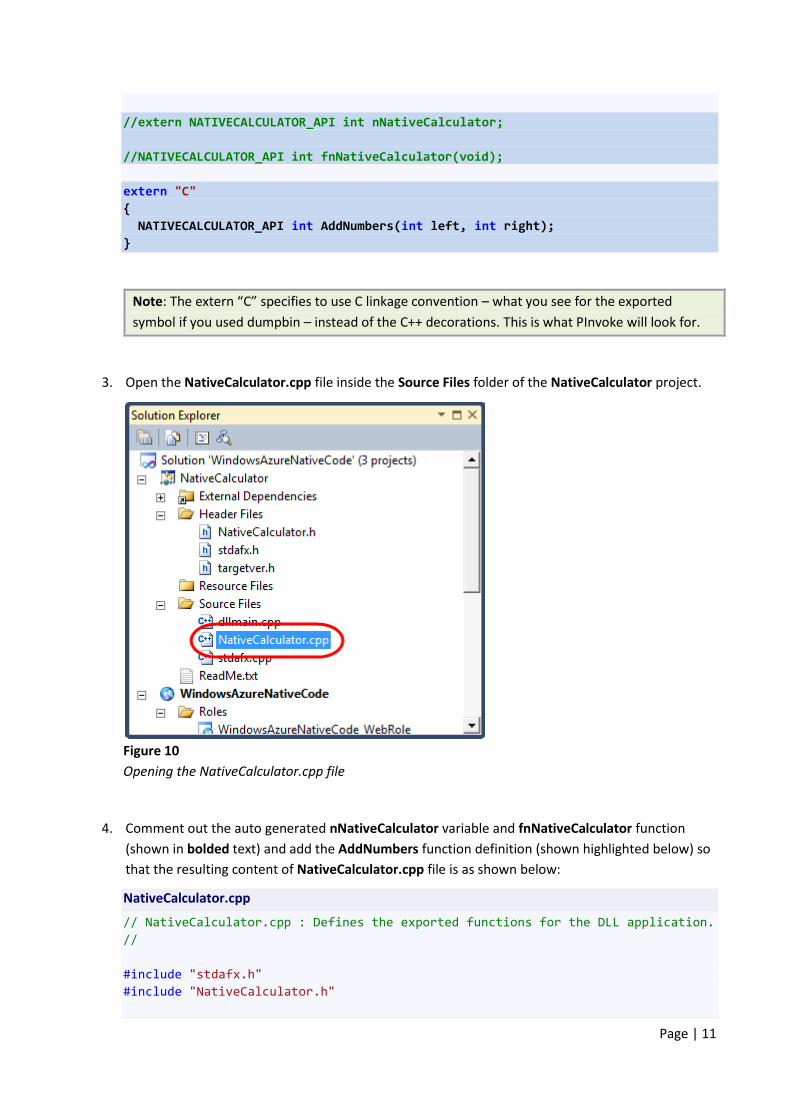
//extern NATIVECALCULATOR_API int nNativeCalculator;
//NATIVECALCULATOR_API int fnNativeCalculator(void);
extern "C"
{
NATIVECALCULATOR_API int AddNumbers(int left, int right);
}
Note: The extern “C” specifies to use C linkage convention – what you see for the exported
symbol if you used dumpbin – instead of the C++ decorations. This is what PInvoke will look for.
3. Open the NativeCalculator.cpp file inside the Source Files folder of the NativeCalculator project.
Figure 10
Opening the NativeCalculator.cpp file
4. Comment out the auto generated nNativeCalculator variable and fnNativeCalculator function
(shown in bolded text) and add the AddNumbers function definition (shown highlighted below) so
that the resulting content of NativeCalculator.cpp file is as shown below:
NativeCalculator.cpp
// NativeCalculator.cpp : Defines the exported functions for the DLL application.
//
#include "stdafx.h"
#include "NativeCalculator.h"

Page | 12
//// This is an example of an exported variable
//NATIVECALCULATOR_API int nNativeCalculator=0;
//
//// This is an example of an exported function.
//NATIVECALCULATOR_API int fnNativeCalculator(void)
//{
// return 42;
//}
// This is the constructor of a class that has been exported.
// see NativeCalculator.h for the class definition
CNativeCalculator::CNativeCalculator()
{
return;
}
NATIVECALCULATOR_API int AddNumbers(int left, int right)
{
return left + right;
}
Task 4 – Building a Win32 Project
In this task, you configure and build the native code project. The Windows Azure fabric is a 64-bit
environment and runs your cloud services on an x64 operating system. The processes in which your role
instances run are also 64-bit processes. When deploying the service to the Azure environment, you need to
build the NativeCalculator as an x64 assembly in order for the Windows Azure service to call your native
code assembly. This is also the case if you execute this hands-on lab in a 64-bit platform. However, for a 32-
bit lab environment, the default build configuration, which creates a 32-bit build of the NativeCalculator
project, is adequate to launch and test the solution in the development fabric.
Note: To deploy and test the solution in Windows Azure, the VC++ x64 bit complier is a pre-requisite when
executing this hands-on lab on a 32-bit operating system. Refer to the Prerequisites section of this lab. If
your system is a 32-bit operating system and you will test the code in the development fabric, proceed to
step 4; otherwise, for 64-bit systems or if you plan to deploy the service to Windows Azure, start with step
1.
If you are using a 64-bit operating system or plan to deploying the service to Windows Azure:
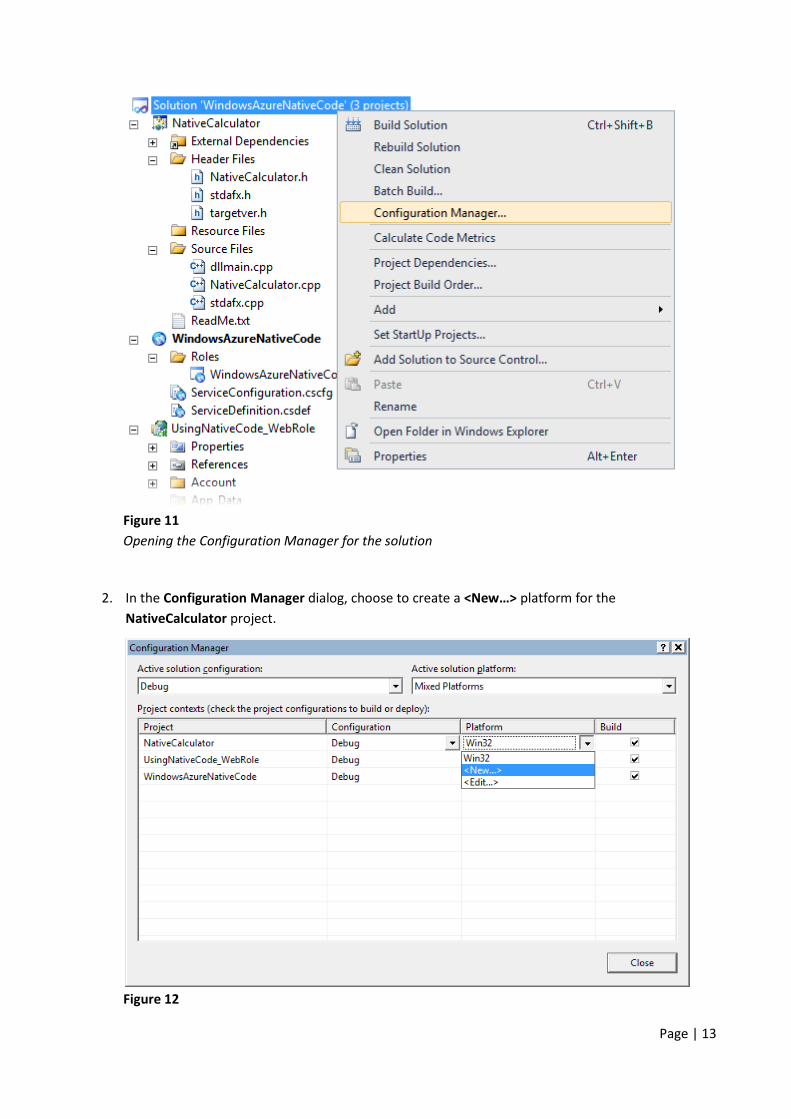
1. Right-click the WindowsAzureNativeCode solution in Solution Explorer and choose
ConfigurationManager.
Page | 13
Figure 11
Opening the Configuration Manager for the solution
2. In the Configuration Manager dialog, choose to create a <New…> platform for the
NativeCalculator project.
Figure 12
Page | 14
Creating a new platform for the NativeCalculator project
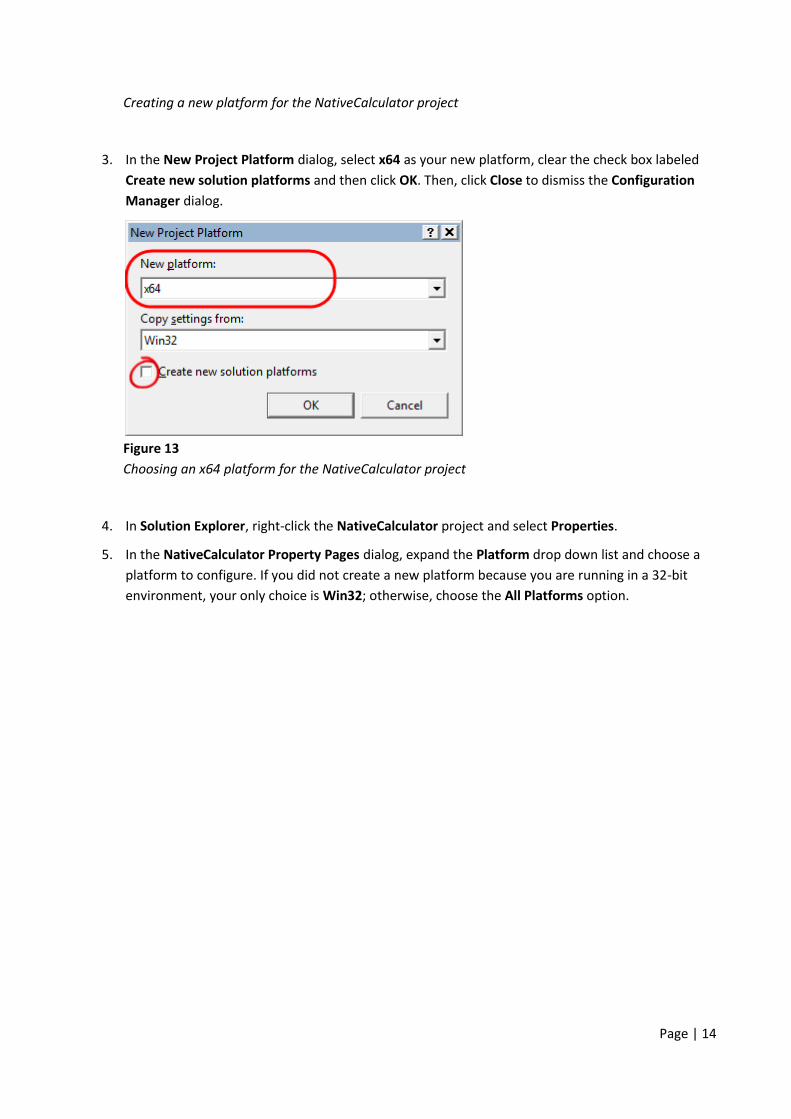
3. In the New Project Platform dialog, select x64 as your new platform, clear the check box labeled
Create new solution platforms and then click OK. Then, click Close to dismiss the Configuration
Manager dialog.
Figure 13
Choosing an x64 platform for the NativeCalculator project
4. In Solution Explorer, right-click the NativeCalculator project and select Properties.
5. In the NativeCalculator Property Pages dialog, expand the Platform drop down list and choose a
platform to configure. If you did not create a new platform because you are running in a 32-bit
environment, your only choice is Win32; otherwise, choose the All Platforms option.
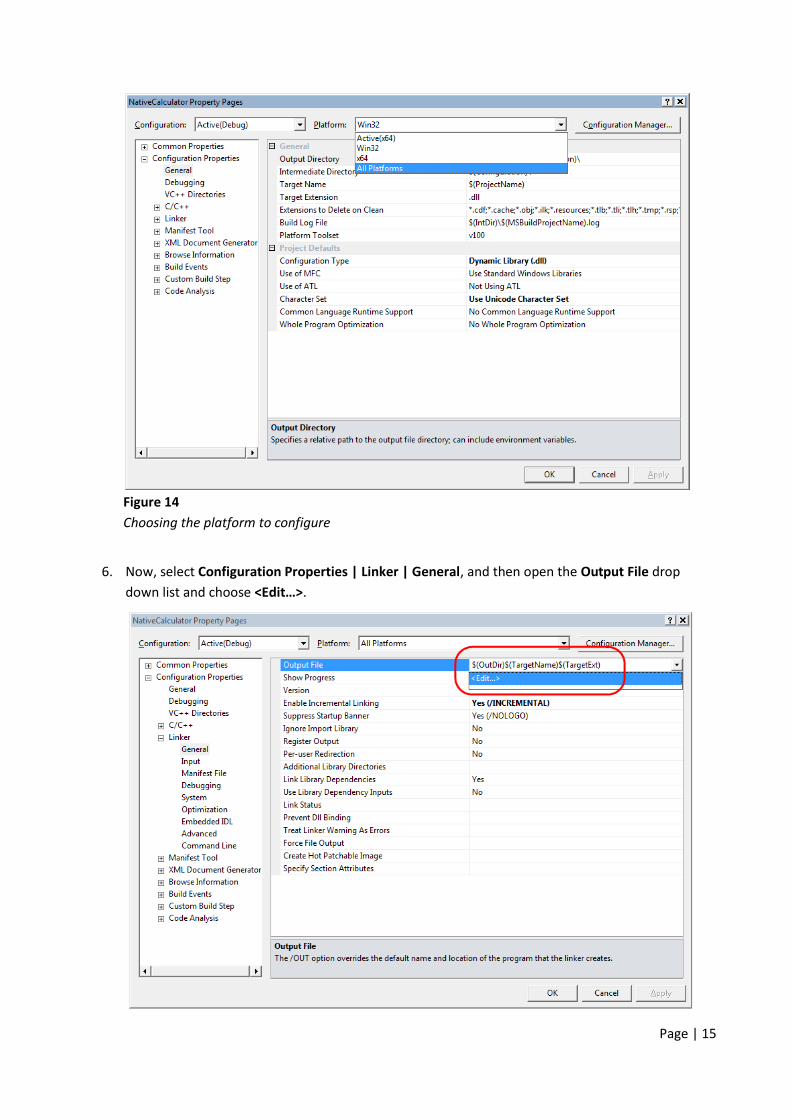
Page | 15
Figure 14
Choosing the platform to configure
6. Now, select Configuration Properties | Linker | General, and then open the Output File drop
down list and choose <Edit…>.
Page | 16
Figure 15
Configuring linker options for the NativeCalculator project
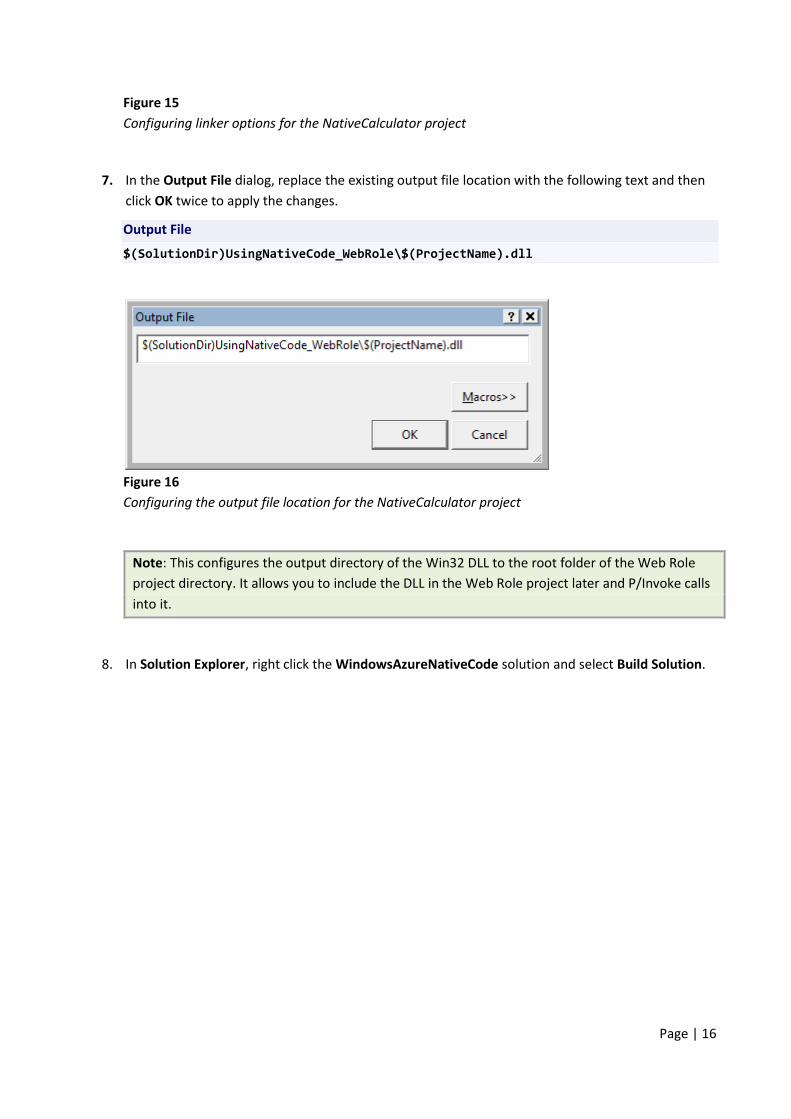
7. In the Output File dialog, replace the existing output file location with the following text and then
click OK twice to apply the changes.
Output File
$(SolutionDir)UsingNativeCode_WebRole\$(ProjectName).dll
Figure 16
Configuring the output file location for the NativeCalculator project
Note: This configures the output directory of the Win32 DLL to the root folder of the Web Role
project directory. It allows you to include the DLL in the Web Role project later and P/Invoke calls
into it.
8. In Solution Explorer, right click the WindowsAzureNativeCode solution and select Build Solution.

Page | 17
Figure 17
Building the solution
Note: By building the solution here, it will generate a NativeCalculator.dll in the Web Role project
folder.
Task 5 – Configuring the Azure Service Package
In this task, you include the C++ native code assembly built in the previous task in the cloud service package
and configure it to be refreshed whenever it is updated.
1. In Solution Explorer, right click the UsingNativeCode_WebRole project and select Add | Existing
Item
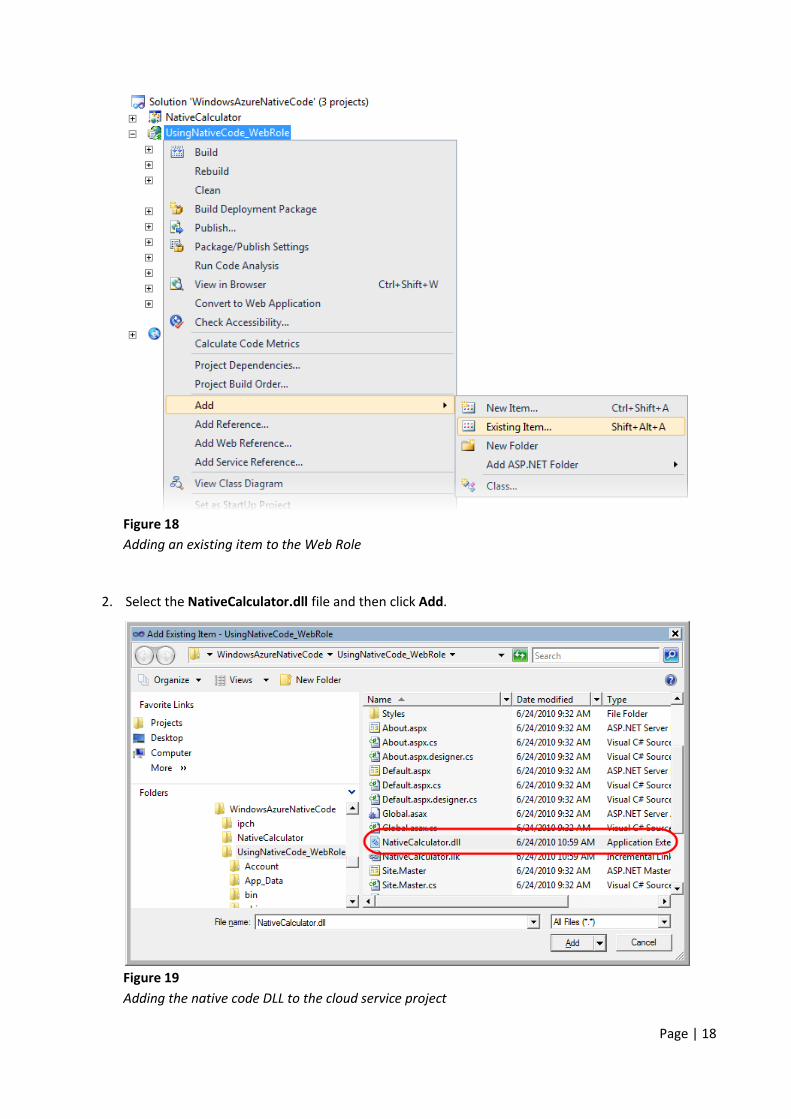
Page | 18
Figure 18
Adding an existing item to the Web Role
2. Select the NativeCalculator.dll file and then click Add.
Figure 19
Adding the native code DLL to the cloud service project
Page | 19
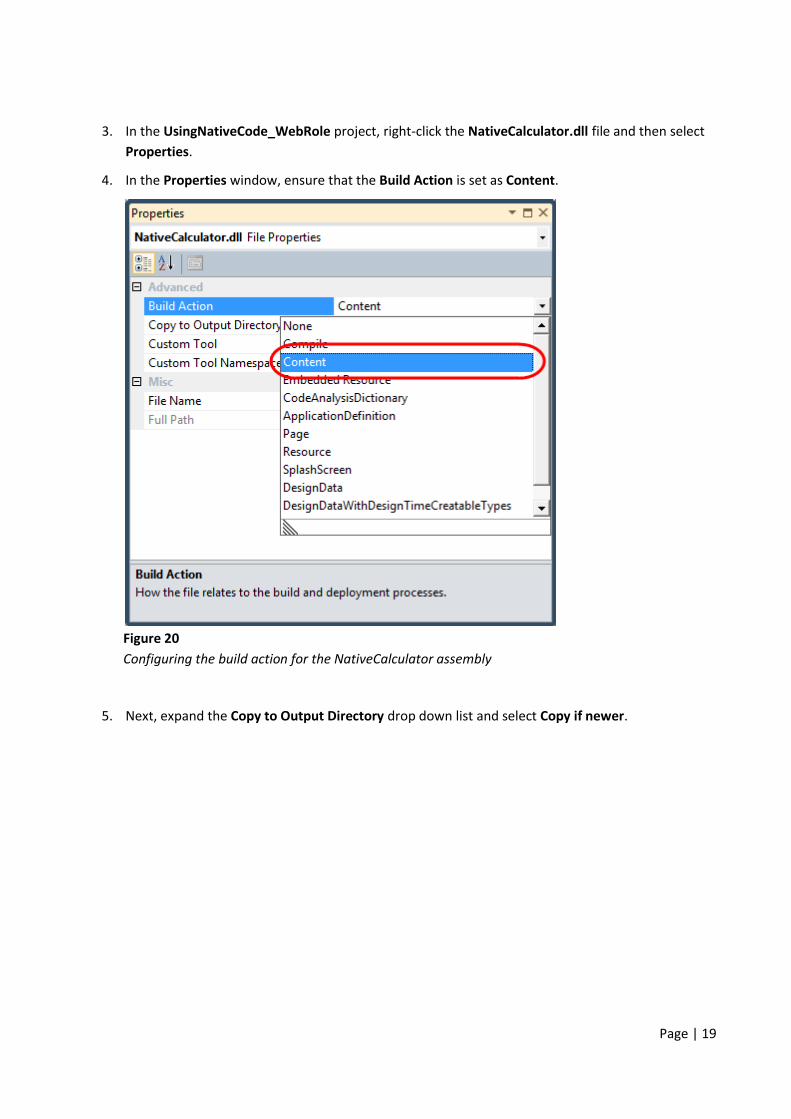
3. In the UsingNativeCode_WebRole project, right-click the NativeCalculator.dll file and then select
Properties.
4. In the Properties window, ensure that the Build Action is set as Content.
Figure 20
Configuring the build action for the NativeCalculator assembly
5. Next, expand the Copy to Output Directory drop down list and select Copy if newer.
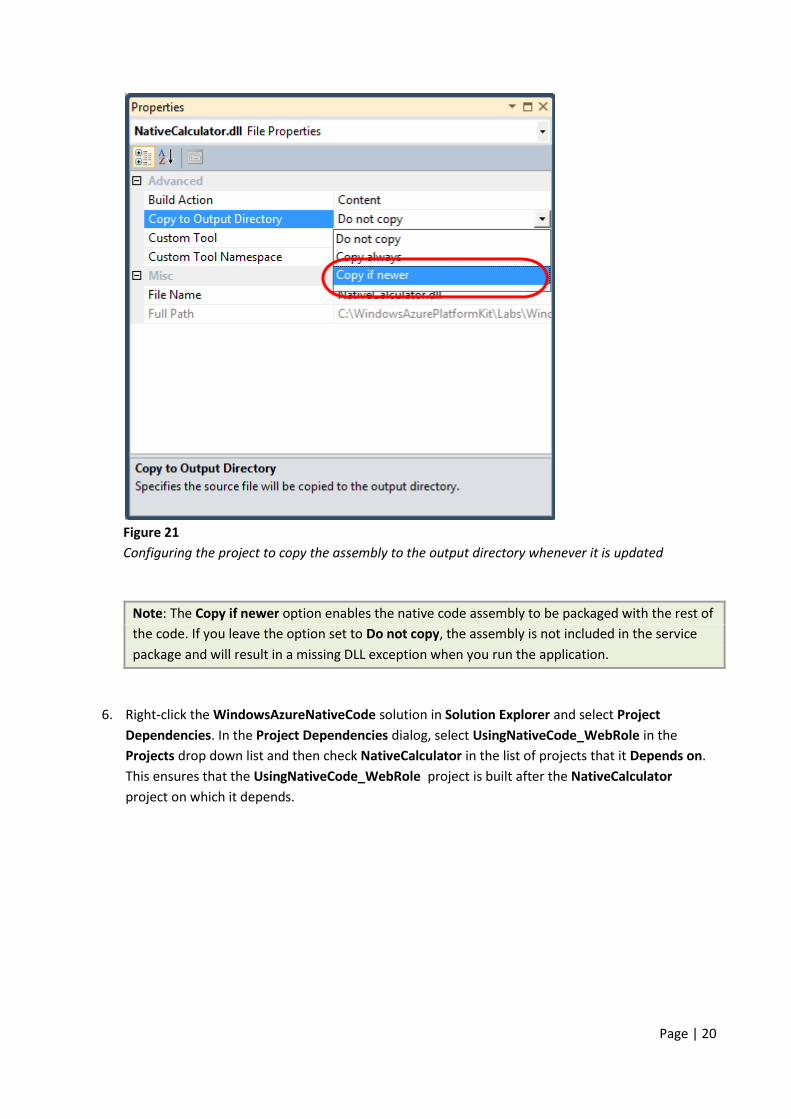
Page | 20
Figure 21
Configuring the project to copy the assembly to the output directory whenever it is updated
Note: The Copy if newer option enables the native code assembly to be packaged with the rest of
the code. If you leave the option set to Do not copy, the assembly is not included in the service
package and will result in a missing DLL exception when you run the application.
6. Right-click the WindowsAzureNativeCode solution in Solution Explorer and select Project
Dependencies. In the Project Dependencies dialog, select UsingNativeCode_WebRole in the
Projects drop down list and then check NativeCalculator in the list of projects that it Depends on.
This ensures that the UsingNativeCode_WebRole project is built after the NativeCalculator
project on which it depends.

Page | 21
Figure 22
Configuring project dependencies
Task 6 – Enabling Native Code Execution
In this task, you configure the Web role to run in full trust (non-admin). This is necessary to execute native
code in the .NET Framework. To set the trust level, you use the UI provided by Visual Studio to define the
role’s configuration.
1. In Solution Explorer, expand the Roles node in the WindowsAzureNativeCode project and then
double-click UsingNativeCode_WebRole to open the properties for this role.
2. In the Configuration tab, make sure that the Full trust option is selected under the .NET trust level
section. This is the default value.
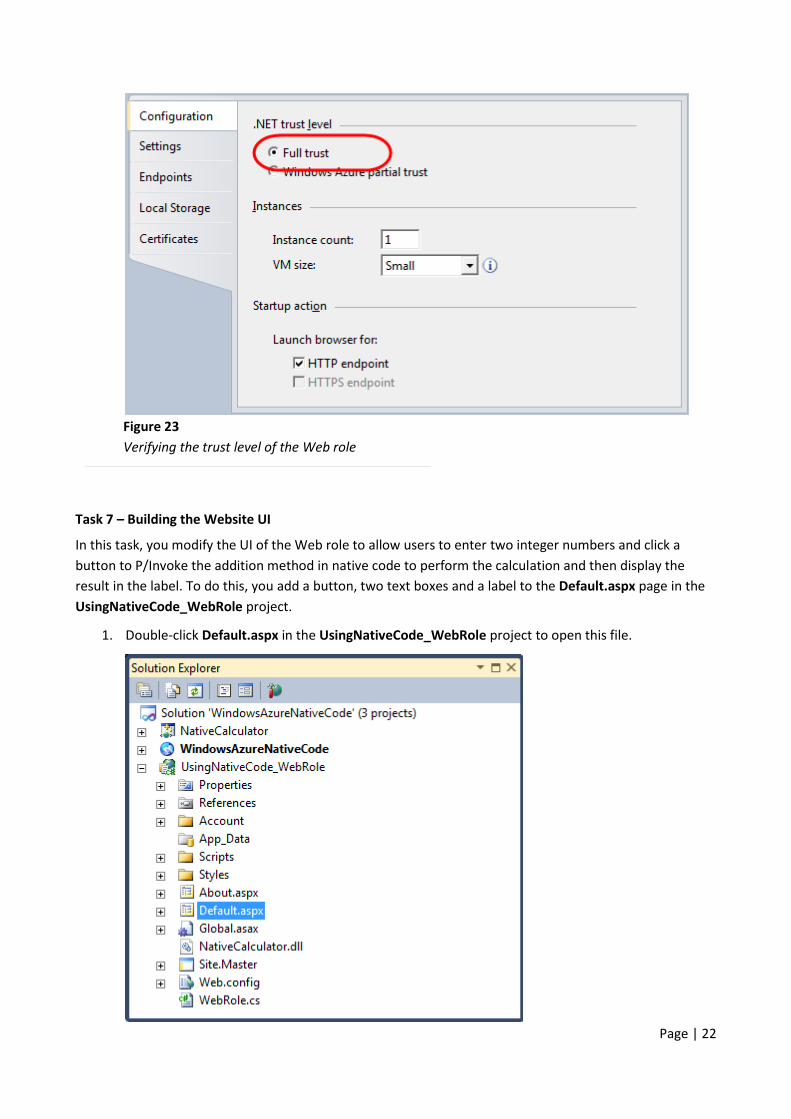
Page | 22
Figure 23
Verifying the trust level of the Web role
Task 7 – Building the Website UI
In this task, you modify the UI of the Web role to allow users to enter two integer numbers and click a
button to P/Invoke the addition method in native code to perform the calculation and then display the
result in the label. To do this, you add a button, two text boxes and a label to the Default.aspx page in the
UsingNativeCode_WebRole project.
1. Double-click Default.aspx in the UsingNativeCode_WebRole project to open this file.

Page | 23
Figure 24
Opening Default.aspx in Visual Studio (Visual C#)
Figure 25
Opening Default.aspx in Visual Studio (Visual Basic)
2. Locate the Content control named BodyContent and replace the existing content generated by the
template inside this control with the following (highlighted) markup. This creates two textboxes,
TextBox1 and TextBox2, with default values 20 and 30 respectively, one label named Label1 and
one button named Button1. In addition, it assigns a handler for the button’s OnClick event, which
you will define in the next task.
HTML
<%@ Page Title="Home Page" Language="C#" MasterPageFile="~/Site.master"
AutoEventWireup="true"
CodeBehind="Default.aspx.cs" Inherits="UsingNativeCode_WebRole._Default" %>
<asp:Content ID="HeaderContent" runat="server"
ContentPlaceHolderID="HeadContent">
</asp:Content>
<asp:Content ID="BodyContent" runat="server" ContentPlaceHolderID="MainContent">
<div>
<asp:TextBox ID="TextBox1" runat="server" Text="20" />
<br />
<asp:TextBox ID="TextBox2" runat="server" Text="30" />
<br />
<asp:Label ID="Label1" runat="server" Text="Addition of two numbers: " />
<br />
<asp:Button ID="Button1" runat="server" Text="Add" OnClick="Button1_Click" />

Page | 24
</div>
</asp:Content>
Note: The preceding ASP.NET code block corresponds to the page in the Visual C# project. For the
VB version, the value of the language attribute on the page is “VB” instead of “C#”.
Task 8 – Calling Native Code Using P/Invoke
In this task, you import the native code assembly with an attribute and declare the native code function
AddNumbers in the code-behind of the Default.aspx page. After that, you define an event handler for the
Click event of the button that uses P/Invoke to call the native code DLL.
1. In Solution Explorer, right-click Default.aspx and then select View Code to open the code-behind
file for this page. Insert the following namespace directive at the top of this file.
C#
using System.Runtime.InteropServices;
Visual Basic
Imports System.Runtime.InteropServices
2. Add the following (highlighted) P/Invoke signature to import the DLL and declare the AddNumbers
function inside the _Default class definition.
(Code Snippet – Windows Azure and Native Code Lab DllImport property – C#)
C#
public partial class _Default : System.Web.UI.Page
{
[DllImport("NativeCalculator.dll", CallingConvention =
CallingConvention.Cdecl)]
static extern int AddNumbers(int left, int right);
protected void Page_Load(object sender, EventArgs e)
{
}
}
(Code Snippet – Windows Azure and Native Code Lab DllImport property – VB)
Visual Basic
Public Class _Default
Inherits System.Web.UI.Page

Page | 25
<DllImport("NativeCalculator.dll", CallingConvention:=CallingConvention.Cdecl)>
_
Shared Function AddNumbers(ByVal left As Integer, ByVal right As Integer) As
Integer
End Function
Protected Sub Page_Load(ByVal sender As Object, ByVal e As System.EventArgs)
Handles Me.Load
End Sub
End Class
Note: The DllImport attribute indicates that the attributed method is exposed by a native code
assembly as a static entry point. It also provides the information needed to call a function
exported from an unmanaged DLL.
Notice that the declaration includes a CallingConvention parameter specified as Cdecl. This is the
default calling convention for C and C++ programs. In the Cdecl calling convention, parameters
are pushed onto the stack in right-to-left order and the caller removes them from the stack after
the function call returns. For the NativeCalculator library, the default calling convention is
specified as cdecl; although, it can be overriden individually by a function. To verify the calling
convention of the NativeCalculator project, in its Properties window, select Configuration
Properties | C/C++ | Advanced | Calling Convention.
Other calling conventions are possible, in particular, the stdcall convention specifies that
parameters are pushed from left-to-right and the callee is responsible for removing them from
the stack. Stdcall is the default calling convention for most of the Win32 API.
For more information about P/Invoke and how to define function signatures, see Marshaling
between Managed and Unmanaged Code.
3. Next, insert the following (highlighted) code to define the event handler for the Click event of the
button. In this method, the code invokes the previously defined method and displays the function’s
result in the label.
(Code Snippet – Windows Azure and Native Code Lab Button On Click property – C#)
C#
public partial class _Default : System.Web.UI.Page
{
...
protected void Button1_Click(object sender, EventArgs e)
{
int num1, num2;
if (Int32.TryParse(TextBox1.Text, out num1) &&
Int32.TryParse(TextBox2.Text, out num2))
{
Page | 26
Label1.Text = String.Format("Addition of two numbers: {0}",
AddNumbers(num1, num2).ToString());
}
}
}
(Code Snippet – Windows Azure and Native Code Lab Button On Click property – VB)
Visual Basic
Public Class _Default
Inherits System.Web.UI.Page
...
Protected Sub Button1_Click(ByVal sender As Object, ByVal e As EventArgs)
Dim num1, num2 As Integer
If Int32.TryParse(TextBox1.Text, num1) AndAlso Int32.TryParse(TextBox2.Text,
num2) Then
Label1.Text = String.Format("Addition of two numbers: {0}",
AddNumbers(num1, num2).ToString())
End If
End Sub
End Class
Verification
In this task, you launch the application in the development fabric to verify that the Web role is able to
P/Invoke into the native code assembly and perform a simple addition.
Note: If you receive a BadImageFormatException when the web role attempts to use the
NativeCalculator assembly while executing the lab, it is likely due to a platform mismatch between the
native code DLL and the current environment. In other words, you are loading the x64 build of the DLL in
a 32-bit operating system, or the Win32 version in a 64-bit system. The Windows Azure OS is 64-bit, so
you always need to deploy the x64 version in this environment. Locally, when running the application in
the development fabric, you need to use the version of the DLL that matches your operating system.
Check the Configuration Manager in Visual Studio to determine the platform used for the current
configuration. If necessary, revisit Task 4 to build the correct version.
Page | 27
Important: If you update the target platform, make sure that you set the linker output directory correctly
for the current build configuration so that the DLL is copied to the UsingNativeCode_WebRole folder. If
you fail to do this, you will deploy the previous built again.
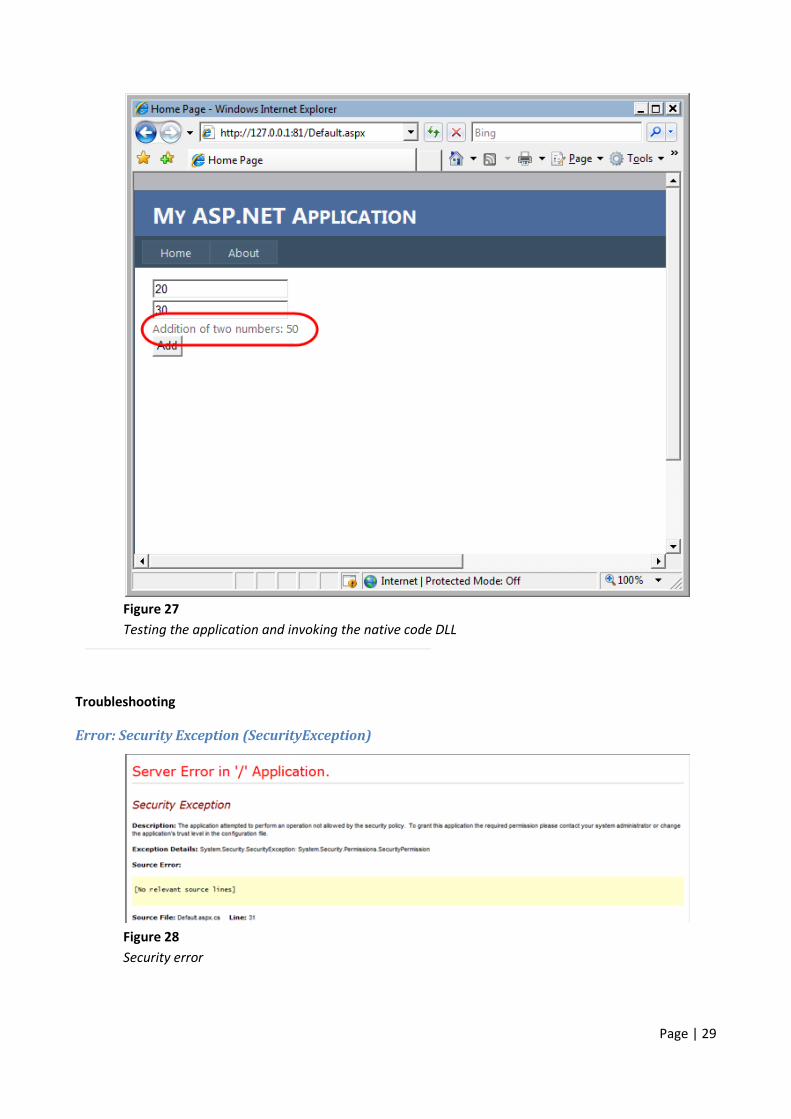
1. In Visual Studio, Press F5 to build and run the application. A browser window launches displaying
the page you defined earlier that contains the textboxes and the button.

Page | 28
Figure 26
Viewing the home page in a browser
2. Click the Add button. You should see the result 50. You have now successfully invoked native code
running on Windows Azure.
Page | 29
Figure 27
Testing the application and invoking the native code DLL
Troubleshooting
Error: Security Exception (SecurityException)
Figure 28
Security error

Page | 30
If you run the application and get a SecurityException, you probably forgot to set the trust level of
the role to Full trust.
You can follow Task 6 to learn how to set the role’s trust level.
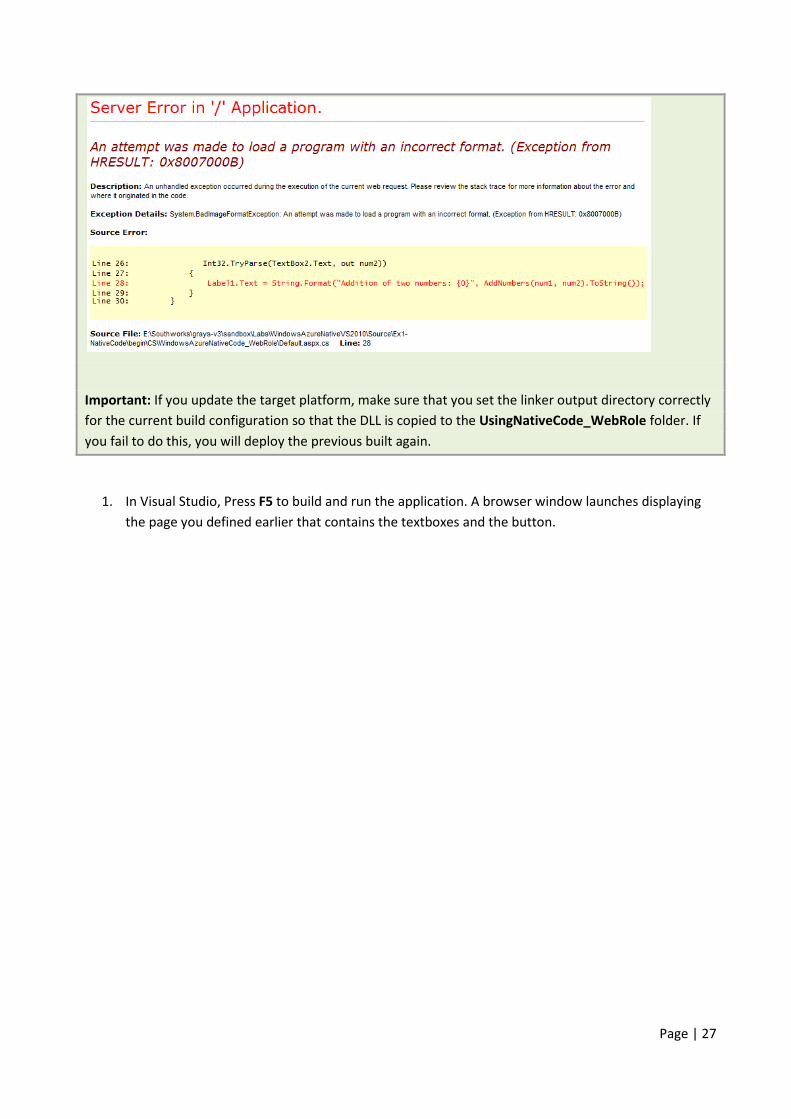
Error: Attempt to load a program with an incorrect format (BadImageFormatException)
Figure 29
Incorrect format error
If you are running on a 32-bit platform, launching the application locally using the development
fabric will cause a BadImageFormatException. To solve this, you need to compile the
NativeCalculator project for 32 bits.
On the other hand, if you deploy the application to the Windows Azure Fabric from your 32-bit
operating system and receive this exception, you will have to compile NativeCalculator project with
the VC++ x64 compiler.
Refer to Task 4 and the Verification section of this lab for more information and to check the
required configuration.

Page | 31
Error: Unable to load DLL <DLL> (DllNotFoundException)
Figure 30
Missing DLL error
If you receive this error when launching the application, then you might be missing the Visual C++
runtime file on Windows Azure.
The most common situation is if you uploaded a debug version of your native code DLL—it uses the
debug version of the VC++ runtime that has a different name and is not available on Windows
Azure.
To solve this, either create a Release build or deploy any necessary DLLs along with your service
package.
When you deploy an application to Windows Azure, you need to ensure that every component that
it depends on is present in the environment where the application executes. This means that each
dependency that is not part of the service package must already be present in the Windows Azure
Guest OS image that you choose for your deployment. For more information, see Configuring
Operating System Versions.
a. In general, to determine the dependencies of a native DLL, open a Visual Studio
Command Prompt and change the current directory to the folder that contains the file.
Provided you followed the lab instructions, the NativeCalculator.dll should be located
inside UsingNativeCode_WebRole in the source folder for the solution.
b. At the command prompt, enter the following command to list the dependencies of the
DLL.
Visual Studio Command Prompt
dumpbin /dependents NativeCalculator.dll

Page | 32
Figure 31
Determining dependencies for the native DLL
Note: Notice that the output shows all its dependencies, which for this file are just two:
the C runtime library (MSVCR100.dll) and KERNEL32.dll. The latter is part of the OS and
you can safely assume that it will exist when deployed to the cloud. However, at the time
of writing, the C runtime library for Microsoft Visual Studio 2010 (MSVCR100.DLL) is not
included in any of the guest OS images that are available. Although this could change by
the time you carry out the steps in this lab, for the time being, you need to include this
file in your package. Note that if you are using Microsoft Visual Studio 2008 instead, the
corresponding runtime library is already present in the guest OS images and you do not
need to perform any additional steps.
In general, you will not need to follow these steps if the C runtime library for the version
of Visual Studio that you are using is already present in the latest OS image when you
execute the lab. If necessary, deploy and test the package, and only include the C runtime
DLL in the package if the application fails when you invoke the native code with a
DllNotFoundException.
c. To include the missing C runtime library DLL in the service package, right-click
UsingNativeCode_WebRole in Solution Explorer and then choose Add Existing Item.
d. In the Add Existing Item dialog, navigate to the installation folder for Microsoft Visual
Studio 10.0—the default location is %Program Files%\Microsoft Visual Studio 10.0.
Inside this folder, go to the folder that contains the redistributable 64-bit components
for the C compiler located at \VC\redist\x64\Microsoft.VC100.CRT , select msvcr100.dll
and click Add.
Note: When deployed to Windows Azure, the application executes in a 64-bit
environment so you need to build a 64-bit version of the NativeCalculator DLL and choose
Page | 33
the matching runtime library in the x64 folder of the redistributable components for the
Microsoft Visual C compiler.
e. In Solution Explorer, expand the UsingNativeCode_WebRole project, right-click the
msvcr100.dll file and then select Properties. In the Properties window, ensure that the
Build Action is set to Content and change the option labeled Copy to Output Directory
to Copy if newer.
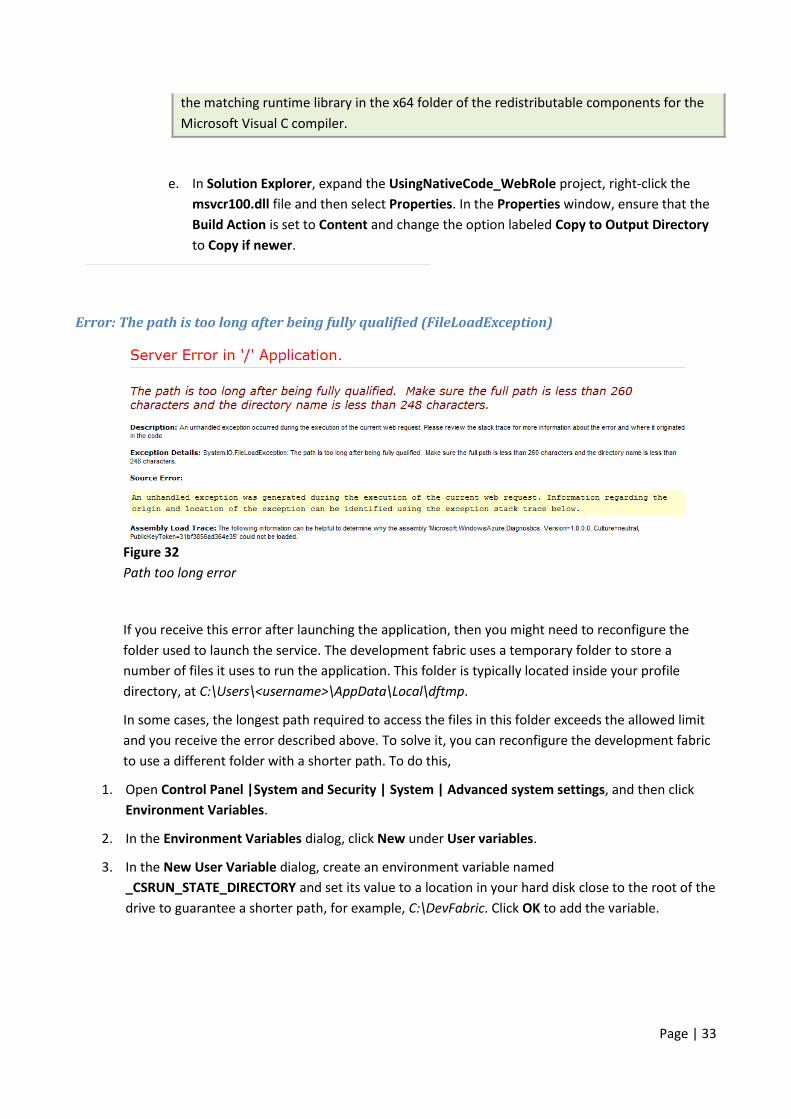
Error: The path is too long after being fully qualified (FileLoadException)
Figure 32
Path too long error
If you receive this error after launching the application, then you might need to reconfigure the
folder used to launch the service. The development fabric uses a temporary folder to store a
number of files it uses to run the application. This folder is typically located inside your profile
directory, at C:\Users\<username>\AppData\Local\dftmp.
In some cases, the longest path required to access the files in this folder exceeds the allowed limit
and you receive the error described above. To solve it, you can reconfigure the development fabric
to use a different folder with a shorter path. To do this,
1. Open Control Panel |System and Security | System | Advanced system settings, and then click
Environment Variables.
2. In the Environment Variables dialog, click New under User variables.
3. In the New User Variable dialog, create an environment variable named
_CSRUN_STATE_DIRECTORY and set its value to a location in your hard disk close to the root of the
drive to guarantee a shorter path, for example, C:\DevFabric. Click OK to add the variable.

Page | 34
Figure 33
Creating an environment variable to relocate the development fabric temporary folder
Note: The location of the Environment Variables dialog varies depending on the platform. For
example, in Windows Server 2008, use Control Panel |System and Maintenance | System |
Advanced system settings.
4. Next, click OK twice to close the Environment Variables followed by the System Settings dialog.
5. If the development fabric is currently running, right-click its icon in the system tray and select Exit.
6. Restart Visual Studio.
Summary
In this lab, you built a native code C++ assembly and successfully invoked the native code running on
Windows Azure.