wimba faculty seminar 2010
DESCRIPTION
This handout provides an overview of Wimba (web conferencing tool) and its features.TRANSCRIPT

2010
Information Technoloy Services
Concordia College, Moorhead, MN
Summar, 2010, Updated December 2010
Wimba
Faculty Handout

2 | P a g e
Wimba
About This Course and Its Goals Wimba is a web conferencing tool that can be used to conduct synchronous training sessions, meetings, or events, and can also be recorded for later viewing (lecture capture). Wimba can be used to conduct classes virtually, invite guest speakers from anywhere in the country or around the globe, and expand the classroom outside of our campus. Wimba can also be used to maintain contact with students during emergencies. Faculty can use Wimba to hold virtual office hours, to help students coordinate virtual team meetings, or as an academic support tool for tutors, teaching assistants, or faculty. Concordia uses Wimba Classroom. Additional tools such as Wimba Voice and Wimba Pronto are available but not currently licensed for use at Concordia. Wimba does integrate with Moodle and can be added as an activity within your Moodle classroom. In this session participants (faculty) will gain hands-on experience using Wimba by participating in a live Wimba session. In this session participants will learn:
How to log into a Wimba session
Understand features of both the presenter and participant interface
Upload a slideshow
Conduct polls
Take screen snapshots
Manage breakout rooms
View an archived session
To create a Wimba room in Moodle (participants are expected to have a Moodle classroom site)
This session will also cover best practices for conducting web conferences.
Logging Into a Wimba Session – SAMPLE INSTRUCTIONS
HOW TO LOG INTO HEISLER’S WIMBA ROOM
1. Navigate to http://cord.wimba.com/ a. FIRST TIME PARTICIPANTS: Click: Run the Setup Wizard· b. Make sure your browser is set to ALWAYS ALLOW POPUPS FROM THIS SITE· c. Accept any defaults, choose next to continue through the wizard
2. Click orange Participant Login button 3. For Name type your first name 4. This brings you to a lobby of Wimba rooms. 5. Select (indicate room name)
Students should use ear buds or a head set to listen to the session otherwise your computer’s speakers will feed back into the microphone which produces an echo.

3 | P a g e
Navigate to http://cord.wimba.com
Whether you log in as a participant or presenter, you should always run the Setup Wizard first even if you use the same computer.
Running the Setup Wizard Step 1 – Click Start
Step 5 – You should hear an audio playback. Step 6 – at this step you should speak into If not, check to make sure your sound is your microphone. Choose Next and Finish. not muted. Choose Next.
Step 2 tests for Popup Windows. Watch the top area near the title bar. If you see that flash yellow, select the area and choose “Allow Pop-ups from this site.” Choose next to continue. Step 3-4 will test to see if you have Java installed and will enable text chat. Follow the prompts and choose the default selections. Choose next to continue.

4 | P a g e
If you experience any problems during the Wimba session, you can log out and log back in rerunning the Setup Wizard. Notice the “Relaunch Wizard” link in the lower left corner of the Setup Wizard screen. If you make an incorrect selection or experience problems while running the wizard, this link allows you to start over without having to log out of the Wizard. Rerunning the wizard usually resolves most technical problems. For persistent audio problems you can direct students or participants to dial into the presentation. They will need the telephone number and PIN number. If you plan to publish an events sheet prior to the presentation, be sure to include this information. (A sample events sheet is located in the appendix.) IMPORTANT: When your Wimba room is set up, you can specify whether you want a public or private room. With a public room participants do not need a special ID or password to log in. This is helpful if you’re inviting guests to class or if managing users can present an issue. With a private room a user ID is required. The user ID is case sensitive and will be similar to: Firstname_Lastname.
The Wimba Interface
Participant login and interface 1. After running the Setup Wizard, participants will see the screen choice to log in as a presenter or
participant. Direct participants to click the orange participant log in button. 2. This brings participants to the screen below. After typing their name or user ID participants should
click the orange enter button.
Next, participants will be presented with a list of Wimba rooms they have access to. Select the link for the appropriate room:
For public rooms enter your name here
For private rooms enter your name here. A password may be necessary.

5 | P a g e
Sample Wimba presentation window:
Orientate your participants to the screen elements indicated above.
1. Text chat area: participants can send messages to everyone or to individuals. 2. The participant area: shows everyone who has logged into Wimba. 3. Media bar: the controls for using Wimba are located here. 4. Content fame: displays the current activity in Wimba.
Log into the Wimba workshop classroom
Text Chat area
Content Frame
Participant Area
Media Bar

6 | P a g e
Presenter login and interface After running the Setup Wizard, presenters should click the grey Presenter Login button then select the link to the appropriate room. The presentation window below appears. Note in the picture below, a slide show is already displayed. You will need to follow additional instructions to display content. This will be discussed next.
Displaying Content
By default Wimba displays a blank screen when first launched. Follow your instructor’s directions for displaying and exploring these elements:
eBoard: click the eBoard button in the presenter console to bring the tool palette into display.
PowerPoint slide show: click the Import PowerPoint button (more information below)
A website: click the web button Advanced techniques:
Sharing: You can share another screen such as a Word document or demonstrate computer applications on the fly. The sharing feature allows you to give control of the cursor to a participant.
Breakout room: click the breakout tab and drag participants’ names to move them to various breakout rooms. Information on managing breakout rooms is covered later.
Display a poll: choose the drop down list to select a poll question. Polls should be uploaded in advance of the presentation. Information on creating polls is covered later.
Presenter Console eBoard

7 | P a g e
Working With the Participant Area
The participant area displays the name of everyone attending your presentation or webcast. The table below lists the functions for the buttons you see in this diagram.
Status Icons When participants have selected a status such as Yes, No, raise hand, or something else, a mark will be made in this column located to the right of their name:
Participants should click this button to respond as “Yes.”
Participants should click this button to respond as “No.”
Participants should click this button to raise their hand. A number will appear alongside the participants name so you will know the order in which students raised their hand.
Status icon – Participants can select from several choices to indicate their status such as Away, Clapping, Laughing, and more.
Show room pulse provides a cross section of participant responses.
Status controls – presenters use this button to clear the status area
Promote and Demote Options You can promote participants to presenter status and you can demote participants’ ability to chat with each other. These controls are found to the far right of their name. Click the plus/minus sign to promote or demote. 1 2 3 4
1: Promote or demote talk 2: Promote or demote web cam 3: Promote or demote chat (applies to main room only) 4: Promote or demote as a presenter

8 | P a g e
Uploading a Slideshow
You must upload a PowerPoint slide show before it can be displayed. Click the Import PowerPoint button located in the Presenter Console. You will be prompted to browse for the location of the file:
After selecting the file, note that you can display the file in these three ways:
The eBoard – provides you with the eBoard annotation tools
The Content Window – no annotation tools
A new window – places the presentation in a window for viewing the full slide Click Import to display the file.
Using the eBoard Annotation Tools
Pictured left to right, the eBoard provides the following annotation tools:
Arrow tool – when selected, you can point and click to place arrows on the screen to highlight information.
Pencil/highlighter tool – make freehand notations such as circling information. Selecting twice toggles the tool between a pencil and a highlighter.
Line tool – draw a straight line.
Circle tool – draw a symmetrical circle.
Text tool – type text.
Undo – applies to last action
Line thickness – preselect this to change the thickness of a line or drawn object.
Color – preselect this to change the color of a line or drawn object. The thick line beneath displays the current chosen color. Clicking the thick line toggles the color back to black or gray.
Erase – removes any annotations or markings.
Clear slide – removes anything currently displayed in the content window and presents a white board.
Import – use this tool to display pictures such as a .JPG file or a Word document.
Save – this command takes a snapshot of the content window. Images are saved as a .JPG file. All others are HTML files.
Enable – lets you enable or disable the eBoard toolbar for specific users.
9 | P a g e
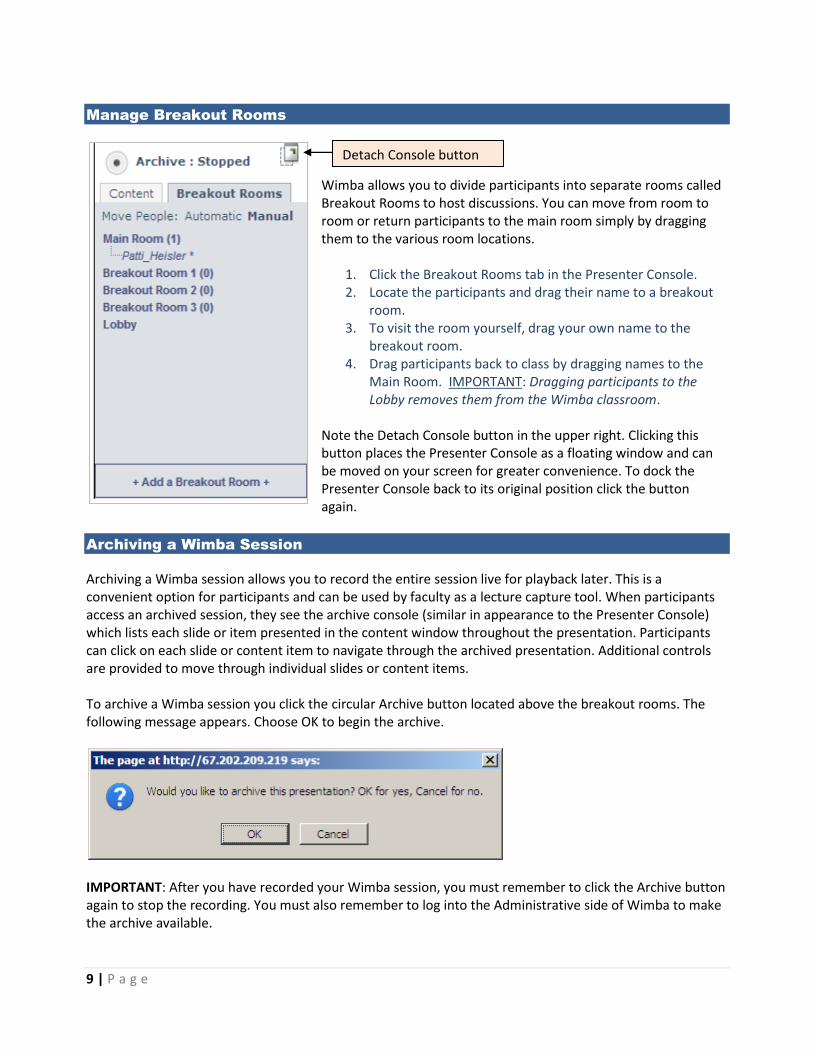
Manage Breakout Rooms
Wimba allows you to divide participants into separate rooms called Breakout Rooms to host discussions. You can move from room to room or return participants to the main room simply by dragging them to the various room locations.
1. Click the Breakout Rooms tab in the Presenter Console. 2. Locate the participants and drag their name to a breakout
room. 3. To visit the room yourself, drag your own name to the
breakout room. 4. Drag participants back to class by dragging names to the
Main Room. IMPORTANT: Dragging participants to the Lobby removes them from the Wimba classroom.
Note the Detach Console button in the upper right. Clicking this button places the Presenter Console as a floating window and can be moved on your screen for greater convenience. To dock the Presenter Console back to its original position click the button again.
Archiving a Wimba Session
Archiving a Wimba session allows you to record the entire session live for playback later. This is a convenient option for participants and can be used by faculty as a lecture capture tool. When participants access an archived session, they see the archive console (similar in appearance to the Presenter Console) which lists each slide or item presented in the content window throughout the presentation. Participants can click on each slide or content item to navigate through the archived presentation. Additional controls are provided to move through individual slides or content items. To archive a Wimba session you click the circular Archive button located above the breakout rooms. The following message appears. Choose OK to begin the archive.
IMPORTANT: After you have recorded your Wimba session, you must remember to click the Archive button again to stop the recording. You must also remember to log into the Administrative side of Wimba to make the archive available.
Detach Console button

10 | P a g e
Accessing an Archived Session
Recall that when participants log into Wimba, they see a lobby of Wimba rooms. At the top of this list of rooms you’ll find a tab called “Archives.” This is where participants can access an archived session. If a participant reports back that they cannot access a session you archived, check to make sure you’ve enabled the archive. For more information, see Wimba’s Administrative Side.
Wimba’s Administrative Side
About the Administrative Side To conduct a presentation you simply create a Wimba room in Moodle. To do more, you’ll need a user ID and password. (Note that presenters can have a user ID only. For administrative uses a password is needed.) Contact Ron Balko or Patti Heisler to set this up. With a user ID you’ll have administrative access and be able to create and track polls, activate archived presentations, copy screen snapshots, or send invitations for your Wimba presentation.
Click to view list of archived sessions

11 | P a g e
About the Administrative Screen To log into the administrative side of Wimba you navigate to:
1. http://cord.wimba.com/admin 2. Enter your username and password 3. Select the link to the room you wish to enter
The following screen appears. In this screen the Rooms tab has been selected and the link for Content is displayed.
Activating an Archived Session By default, archived sessions are not open. To open or activate an archived session:
1. Select the Archives tab 2. Locate the archived session within the list 3. Click the corresponding Open/Close button to open the archive
Selecting and Copying Snapshots Choosing the Save button from the eBoard tools takes a picture of anything displayed in the Content window. Images will be saved as a .JPG file which can be copied and pasted. All other snapshots are saved as an HTML file which cannot be copied. To view Snapshots click the Snapshots link pictured above. Select the image you wish to copy. Right click on the image and choose Copy Image. During a presentation you can open the Snapshots folder to display an image.

12 | P a g e
Managing Presentation Content
Uploading or importing files can take precious time if you do this right before your presentation. You can upload and organize files in advance using the Administrative side of Wimba. As a presenter you need to be able to locate your content quickly; it can become difficult to navigate through content in your Wimba classroom if it is not well organized. You can use the New Folder button (pictured above, previous page) to create folders and organize your content. Note that once you upload content you cannot change its location. You can only rearrange items such as the order of your PowerPoint slides. Files which are uploaded to the Default Content folder are immediately listed for display when the room is opened. To add content you can click the Default Content folder or select the link to a folder you just created. The following choices appear:
Notice there are three things you can do in this window:
1. Upload a file (browse for the file and then choose add. 2. Add a link to a website 3. Create a new poll
Creating and Conducting Polls 1. To create a poll, select the link to the Default Content folder. 2. This will bring you to the screen you see pictured above. Locate “Or Create New Poll” and select the
type of poll: multiple choice, open ended, questionnaire, or bullet list. 3. Choose Create. 4. Specify a name for the question and enter the information.
1
2
3

13 | P a g e
In your presentation, you access the polls the same way you would access a PowerPoint presentation. When participants respond to the poll question you will see the percentage of response. You must click the Publish button to display the poll results. In the administrative side of Wimba you can track poll responses.
Create a Wimba Room in Moodle
You can add a Wimba room to Moodle. Having a Wimba classroom embedded into your Moodle site creates added flexibility for your classes. For example you can conduct (or attend) class live from anyplace that has Internet access, you can have virtual office hours, you can set up special sessions to coach students or project teams, and much more. Using the Firefox browser with Moodle and Wimba is recommended.
1. From the main classroom page in Moodle make sure editing is turned on and choose Add an Activity for the respective week or topic. (Recommendation: if you conduct Wimba sessions throughout your course, you may want to add a single Wimba room as an activity at the top of the page.)
2. Select Wimba Classroom from the pull-down list. 3. Enter the associated activity name:
4. Under Associated Room choose Select and enter a name for your Wimba classroom. This creates a blank Wimba room.
a. Note that you will not be able to select a pre-existing Wimba room. Once you add a room to your Moodle course, you can select the room again within the same course.
5. After choosing create and display, the following window appears:

14 | P a g e
6. IMPORTANT: Note the yellow bar at the top. This will appear if you are using Firefox as your browser. You must choose the options button and select “Allow pop-ups for moodle.cord.edu
a. If using Internet Explorer you will get a security warning. Choose NO.
b. A yellow bar will appear across the top of your screen. Click the bar and choose “Always allow Pop-ups from This Site… “
c. Choose Yes to confirm Always allow pop-ups d. You may need to exit and re-enter the Moodle room from the main classroom site before
you can perform the next step. 7. To open the Wimba room, click the words “this link” indicated in blue above.
Web Conferencing Best Practices
Any new technology can make even the most seasoned presenter uncomfortable. Adopting these best practices for your Wimba presentations can enhance participants’ impression of your professionalism, credibility and expertise particularly when technology glitches do occur.
Before the Web Conference 1. If using a moderator, provide training on Wimba technology and expected responsibilities. Moderating
can be a great opportunity for a student worker. (See appendix for an example list of moderator duties and responsibilities.)
2. Provide written information to participants prior to the presentation by publishing an events sheet. (See appendix for an example.)
Firefox
Internet Explorer

15 | P a g e
a. Include procedures to follow for technical difficulties so those issues do not become a disruption to the web conference. If possible, designate the moderator or Help Desk technician to intervene when needed.
b. Include the instructions YOU will follow if there is technical difficulty on your end and what the plan will be if you are unable to resolve those issues.
c. Provide an opportunity for participants to attend an orientation session, an archived Wimba session, or screen recording before the web presentation to become more familiar.
3. A good video picture conveys to participants your friendliness, approachability, and sincerity. Work with your web camera to make appropriate adjustments to lighting. Check that the background is mostly free from distractions.
Normal ceiling light in your office can darken your face. A table or
desk lamp can bring soft illumination to your face.
Strong front lighting can create hotspots on your face and harshly
emphasize features. Strong background light will darken your
face and create a halo effect.
Try repositioning your web camera to soften facial lighting enough for your participants to
adequately see you.
4. Sound - Misheard song lyrics might be hilarious however misheard words in your presentation are not.
Microphones can emphasize certain sounds. For example, the type of microphone you use and its relative position to your mouth can cause your S’s to hiss and your P’s to pop. It can also cause some consonants like B’s, P’s, and D’s to sound the same.
a. For stationary microphones you must talk into the mic using a consistent angle. Use the sound recorder on your computer to make a quick recording of your voice or to check the performance of your microphone. Choose Start, Programs, Accessories, Entertainment, and Sound Recorder.
During the Web Conference 1. Log into the Wimba session 10-15 minutes early and have the first presentation screen or slide ready
with a welcome message indicating to participants they’ve entered the correct room. On this screen you may want to provide brief instructions on what participants should do if they have technology problems, or indicate the telephone and Pin number they can use to dial in for audio.
2. Have your moderator or a designated individual conduct a sound check with you as early as possible before the session starts. Sound checks can be conducted in a breakout room away from participants.
a. Avoid: “Can everyone hear me?” b. Instead: “If you’re having difficulty hearing the presentation today please follow the
instructions posted on the slide you see or refer to the events sheet e-mailed on…” 3. Spend the first 5 minutes of your presentation (no more) orientating participants to the controls they
will be using during the presentation.

16 | P a g e
4. In addition to the agenda let your participants know what the flow of the presentation will be like. For example, you may state that you will open each topic with a question by using the polling feature, you’ll do status checks along the way, and toward the end you’ll use the chat room to discuss questions as you wrap each topic. When participants understand the flow of your presentation and their expected participation, they will be reluctant to miss any part of it.
5. Use creative ways to take attendance and encourage participants to speak. For example, when you orientate participants to the raise hand feature in the participant status area, use that number to designate the order for student self-introductions.
a. Encourage participants at the beginning of your presentation to announce their name before speaking. “This is Emily from Missouri and I have a question.” Repeat or paraphrase each participant’s question. “Emily is asking a great question about the environmental forces in marketing.”
b. Once that activity has ended tell participants how to clear the status area (you can also clear it yourself.)
6. Motion delay – video requires more bandwidth which means your participants will hear what you say before they see what you say (gestures.) Camera display images are based on sound. You will hear the speaker before you see them. Keep motions and gestures to a minimum to avoid distractions.
Ending the Web Conference 1. Ending your web conference can be awkward if you don’t use a structured approach. Here are several
ways to bring a structured closing to the web conference: a. Review the big idea behind your presentation. b. Briefly review the topics covered and a few key points to remember. c. Ask participants to respond in the chat frame how they plan to use the information they
learned or ways the information could be applied in the workplace. d. Let students and participants know what their next steps are. e. Post a slide indicating the session has concluded. f. Thank the participants for attending and tell them you will be around for a few minutes after
the session for any “offline” questions they have. g. Provide a concluding statement such as, “I’d like to thank you for your participation in today’s
broadcast. From all of us in (division) at Concordia College we wish you a pleasant afternoon/evening. Goodbye everyone.”
h. If the session is being archived, post instructions on a slide indicating how participants can access the archived copy. When you stop the archived recording everyone will hear a message stating that archiving has ended.
2. Provide students and participants with an opportunity outside the presentation to give you feedback on the session such as a website with a link to a survey. If you want this type of feedback, it’s a good idea to provide these instructions in the events sheet prior to the web conference and remind participants in your closing.

17 | P a g e
Appendix
Wimba Live Online Class: The Role of Moderator (EXAMPLE)
Time Commitment 70 hours per semester
3-4 hours per week
Training time
Qualifications Student who has taken (course name) and passed with a B or better. Participants with tutoring experience preferred. Must have good understanding of computer technology.
Responsibilities 1. Attend each webcast 2. Assist participants logging in 3. Gives ‘standby’ messages to participants before session begins 4. Record and archive class session 5. Take role 6. Serve as initial point of contact during live session to avoid distractions 7. Manage student chats/messages 8. Help conduct system and sound checks, troubleshoot audio or video
issues and communicate problems to presenter 9. Type out questions on eBoard as participants verbally ask 10. Assist participants in troubleshooting both online and in audience (live
classroom sessions) 11. Serve as the back-up contact person in the event of a disconnection 12. Use administrative tools to create polls and starting the archive
Knowledge Needed 1. Must know and understand components of the Wimba window 2. Understand Wimba operations (such as connecting an alternate
microphone, creating a poll) 3. Turn chat off and on, compile chat sessions 4. Understand computer peripherals such as web cam operations and
keyboard tools
Availability 1 hour 3 days per week (except tests)
Personal characteristics Cheerful attitude
Patience to work with participants who are learning technology
Outgoing personality
Willingness to learn technology
Ability to work well with a diverse audience
Skills Moderator will Learn
How to conduct a web conference Best practices for web conferencing Learn in-depth operations of Wimba and other programs

18 | P a g e
Wimba Webcast
Presented by Faculty Name
Principles of Marketing: Wednesday, March 4th, 2009
PARTICIPANT PREPARATION
Materials needed: __________________________
Pre-webcast reading: Chapter 11, pages 345-390
Webcast topics:
o Branding and Brand Management
o Brand Personality and Brand Equity
LOGIN INSTRUCTIONS
The Firefox browser is recommended. Participants should run through these steps 10 minutes prior to the
session start time. Participants can repeat these steps to recover from most technology problems.
1. Navigate to http://cord.wimba.com
a. Click Run the Setup Wizard
b. Make sure your browser is set to ALWAYS ALLOW POPUPS FROM THIS SITE
c. Accept any defaults, choose next to continue through the wizard
2. Click the orange Participant Login button
3. For Name type your name.
a. This brings you to a lobby of Wimba rooms.
4. Select the ___________________ Wimba room
TECHNICAL DIFFICULTIES – WHAT TO DO
Most technical problems can be resolved by rerunning the Setup Wizard. If that does not resolve the
problem you should contact the session moderator or Help Desk for assistance. Please do NOT ask the
presenter for assistance.
1. Session moderator: ____________________________________
2. Help Desk: _____________________________________
3. If you are unable to hear audio, you can dial into the webcast by calling:
o Phone number: _____________________________
o PIN: _____________
4. If a irresolvable problem occurs for the presenter, the moderator will instruct participants on how
the presentation will proceed