wiki.spss.net.auwiki.spss.net.au/file/view/report+designer+training+20… · web...
TRANSCRIPT

December 2015
REPORT DESIGNER FOR BEGINNERS
INTRODUCTION..........................................................................3
Report Designer Guide and Resources........................................................................................................... 3
Creating a new report................................................................................................................................... 5Steps to creating a new report..........................................................................................................................5
Modifying an existing report....................................................................................................................... 20
INTRODUCTION TO DATABASES.................................................26
This unit..................................................................................................................................................... 26
Databases................................................................................................................................................... 27
What is SQL?............................................................................................................................................... 29
SLQ Conventions......................................................................................................................................... 29
Basic SQL clauses........................................................................................................................................ 29SELECT and FROM...........................................................................................................................................30DISTINCT.........................................................................................................................................................32ORDER BY........................................................................................................................................................33WHERE............................................................................................................................................................35AND and OR....................................................................................................................................................36Helpful translation SQL functions...................................................................................................................38
PARAMETERS...........................................................................39Pre-built parameters.......................................................................................................................................39
What is a parameter?.................................................................................................................................. 45
Components of a parameter....................................................................................................................... 46The tick box.....................................................................................................................................................46First and Last Entries.......................................................................................................................................46Components of a parameter...........................................................................................................................46
Building our own parameters...................................................................................................................... 46
Basic Report Designer Training Page 1

December 2015Creating the components............................................................................................................................ 51
The Condition and UseParameter()............................................................................................................. 53
UseParameter().......................................................................................................................................... 53So, UseParameter() example..........................................................................................................................56The condition..................................................................................................................................................56
My first parameter...................................................................................................................................... 57
The Between clause.................................................................................................................................... 65
Answers to tasks......................................................................................................................................... 68Components.............................................................................................................................................68Condition...................................................................................................................................................69Ordering Parameters..........................................................................................................................69
MY FIRST JOIN TABLE...............................................................72
Fully qualified names and aliases................................................................................................................ 75
Fully Qualified Names................................................................................................................................. 76
Aliases and AS............................................................................................................................................. 77
Table joins.................................................................................................................................................. 79JOIN and ON....................................................................................................................................................79
Types of table joins..................................................................................................................................... 83
Basic Report Designer Training Page 2

December 2015
INTRODUCTION
We will be looking at:
The Report Navigator The Report Window The Report Tools Window The Report Toolbar SQL Query Builder
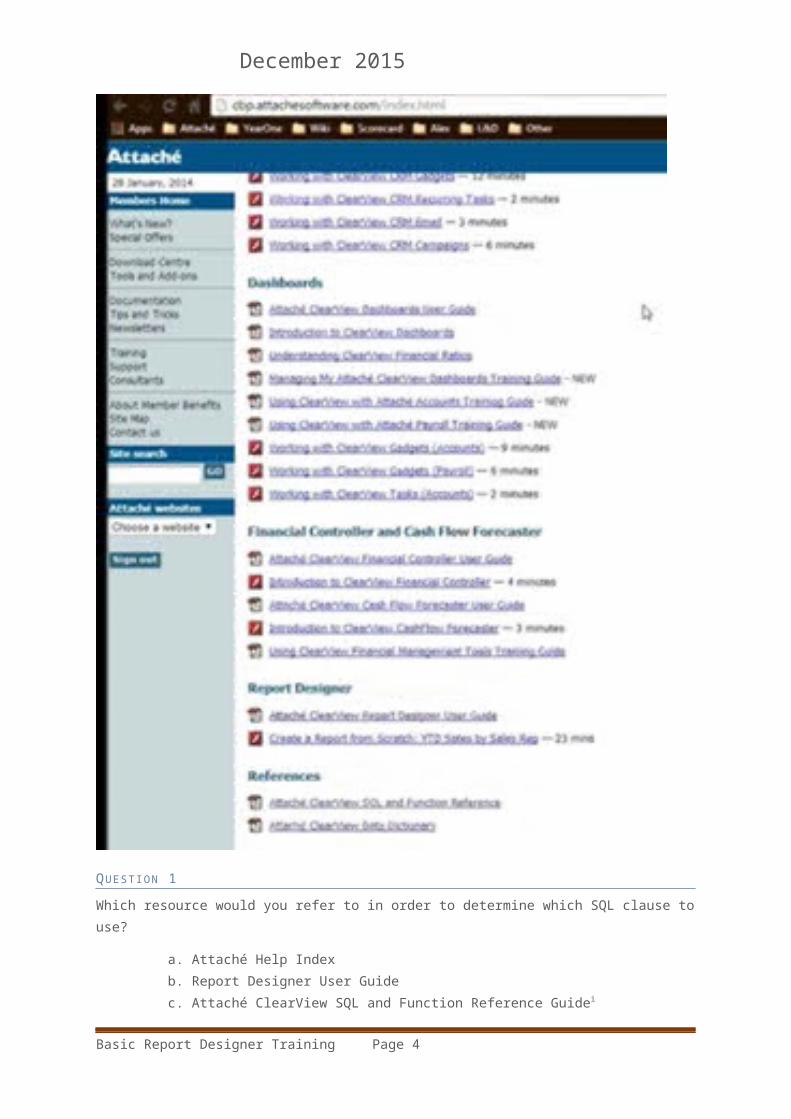
REPORT DESIGNER GUIDE AND RESOURCES
Report Designer User Guideo Basic information about the Report Designero Includes tutorials for getting started
Attaché ClearView SQL and Function Reference Guideo List and explanation of major SQL clauses useable with
report Designero Does NOT cover all possible SQL clauses
Data Dictionarieso ODBC Data Dictionary lists all tables and fields used in
Attachéo ClearView Data Dictionary lists all tables and fields used
in Attaché
To get the latest up to Date resources, go to www.attachesoftware.com , log in, and go to documentation.
Basic Report Designer Training Page 3
December 2015
QUESTION 1Which resource would you refer to in order to determine which SQL clause to use?
a. Attaché Help Indexb. Report Designer User Guidec. Attaché ClearView SQL and Function Reference Guide i
Basic Report Designer Training Page 4

December 2015
CREATING A NEW REPORTSTEPS TO CREATING A NEW REPORT
There are 4 general steps to designing a report
1. Decide what information you need2. Identify the tables and fields that you need that will give you
the right information3. Use the SQL Query Builder or the Report Wizard to extract
information4. Use the Report Window and Report Tools Menu to design your
report.
Example 1: Product sales by product groups
“I would like to see my product sales based on product groups”
1. Decide what information you need:o Product Codeso Product Nameso Product Groupso Sales this yearo Cost of Sales this year
2. Identify the tables and fields that you need that will give you the right information
o PmCode (Product Code)o PmName (Product Name)o PmGrp (Product Group)o PmYSales (Sales this year)o PmYCost (Cost of sales this year)
All these fields can be found in the Product Masterfile , Prod_Mast
3. Use the SQL Query Builder or the Report Wizard to extract information
o For this example, we will use the Report Wizard as all fields come from one file
Basic Report Designer Training Page 5

December 2015
Click on Continue:
Basic Report Designer Training Page 6

December 2015
Click on Next
Choose Prod_mast and click on Next.
Basic Report Designer Training Page 7
December 2015
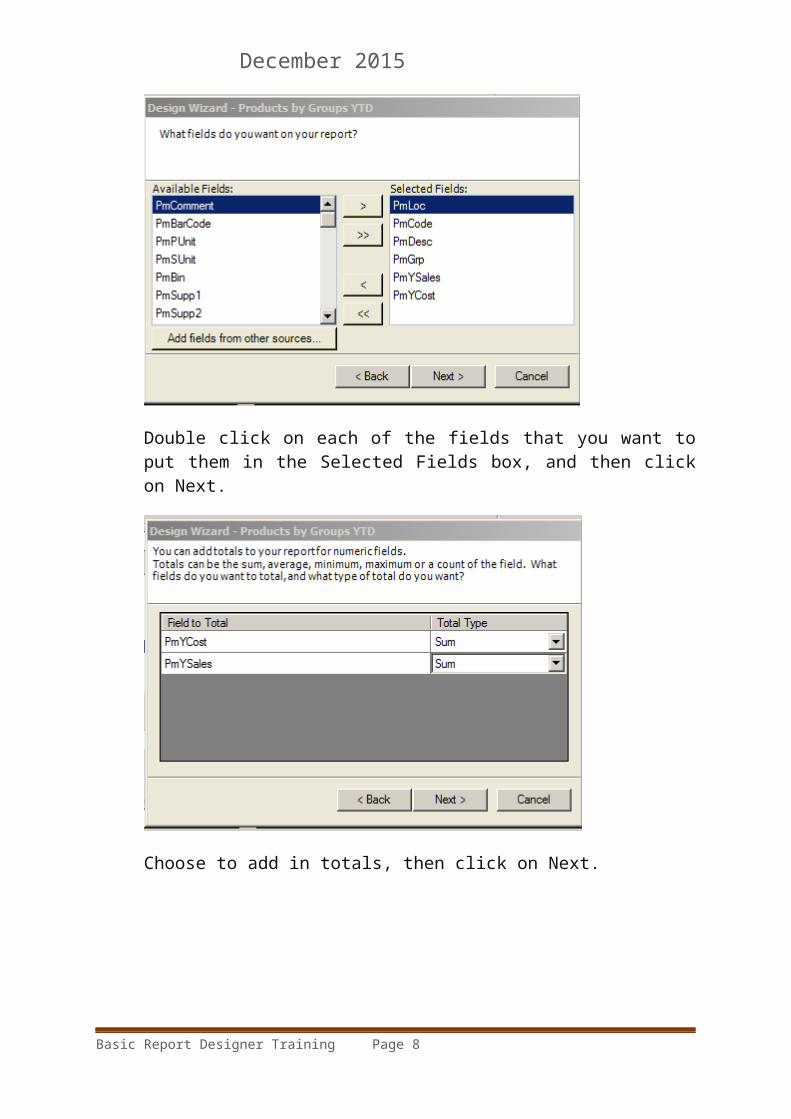
Double click on each of the fields that you want to put them in the Selected Fields box, and then click on Next.
Choose to add in totals, then click on Next.
Basic Report Designer Training Page 8

December 2015
Choose to order by Group, and the Product Code. Click on Next.
Set up a range of product groups, then click on Next.
Basic Report Designer Training Page 9
December 2015
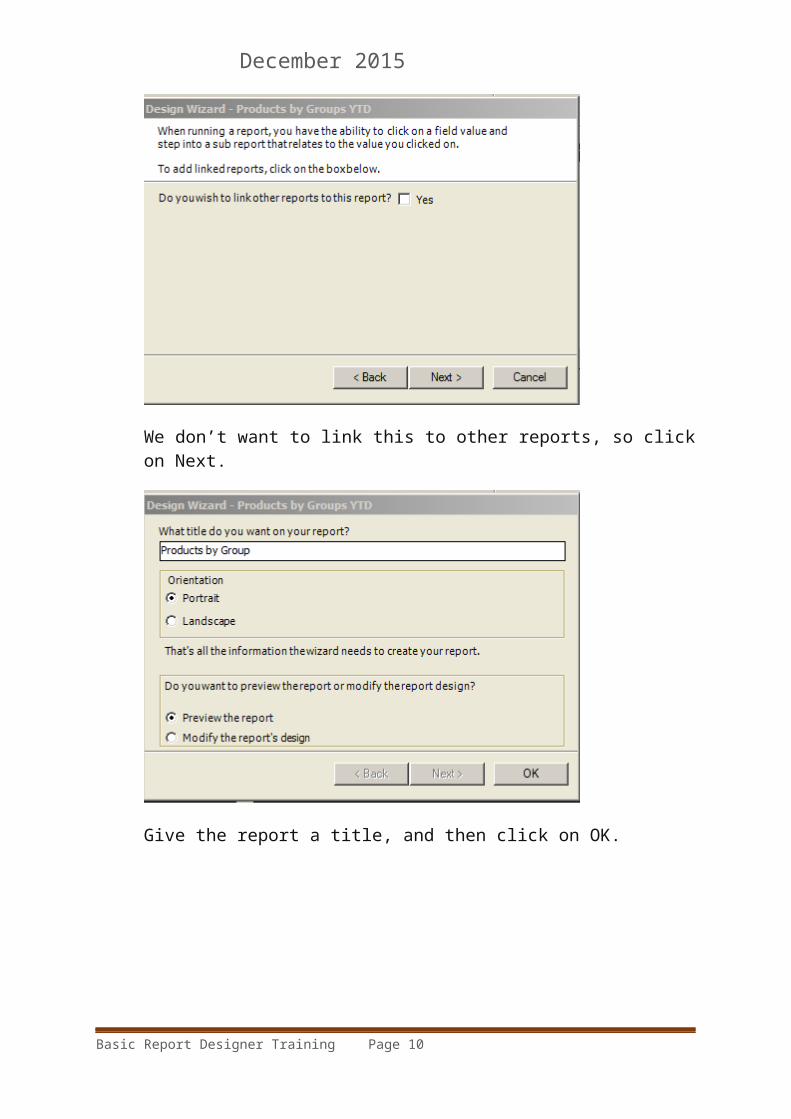
We don’t want to link this to other reports, so click on Next.
Give the report a title, and then click on OK.
Basic Report Designer Training Page 10
December 2015
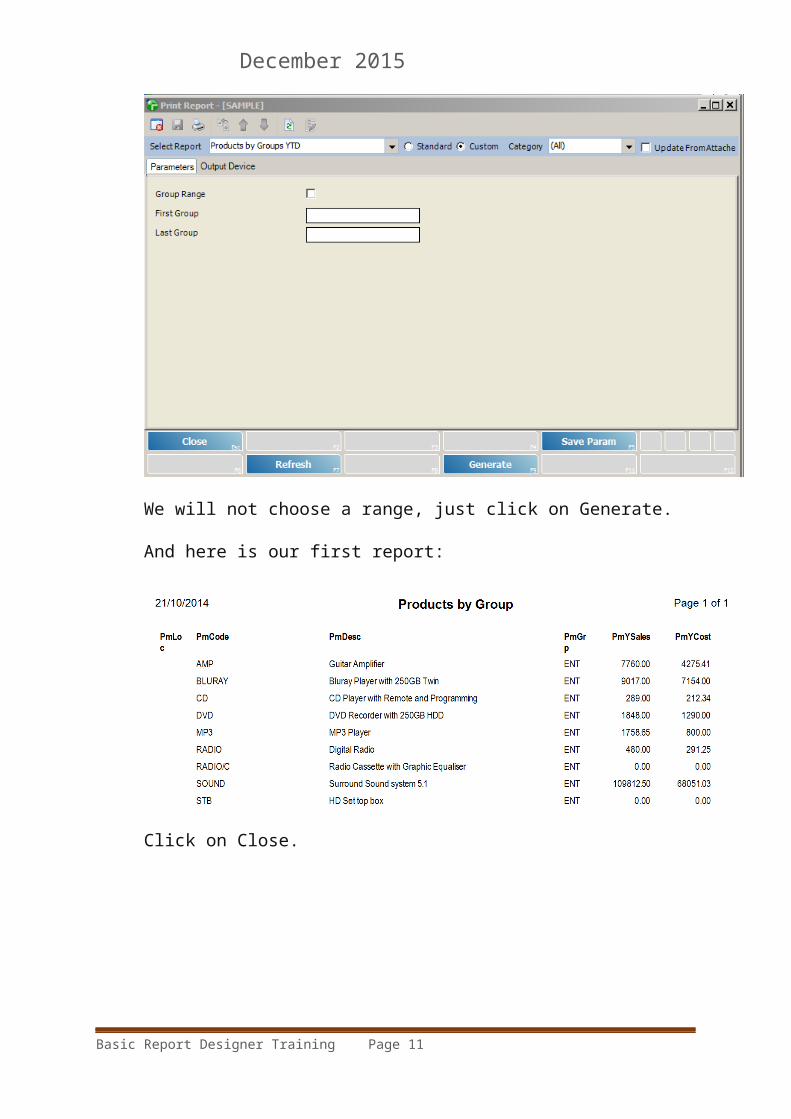
We will not choose a range, just click on Generate.
And here is our first report:
Click on Close.
Basic Report Designer Training Page 11
December 2015
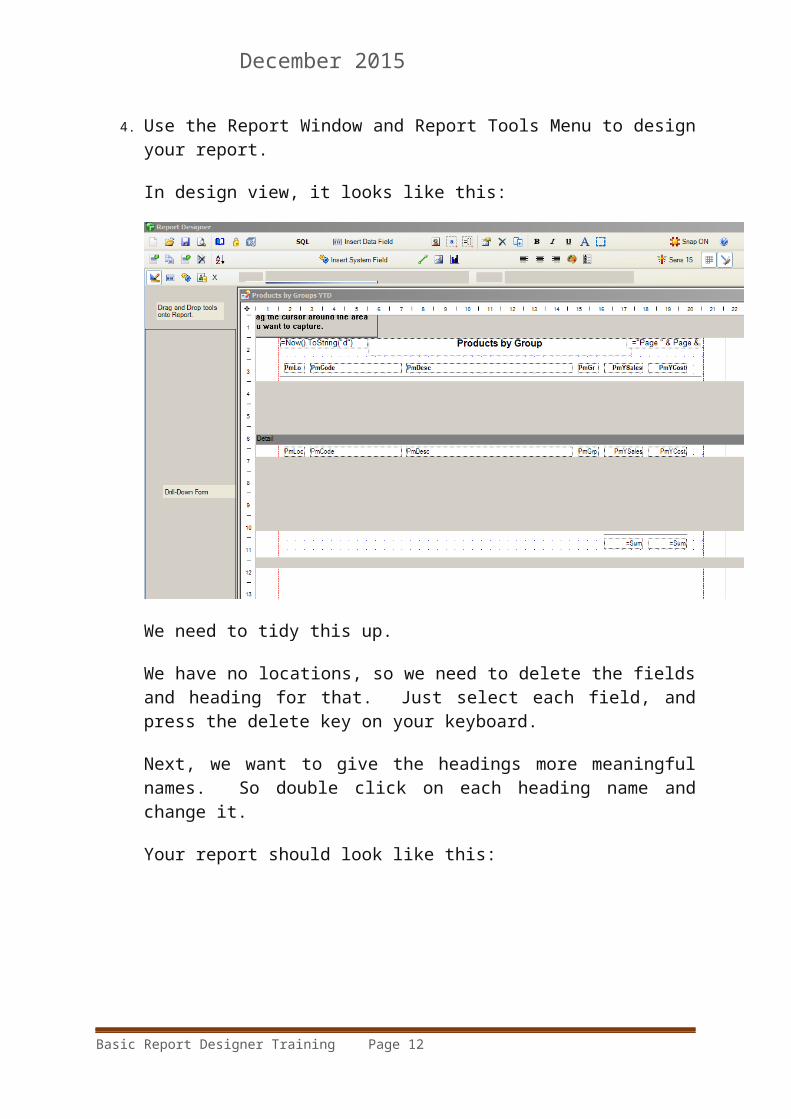
4. Use the Report Window and Report Tools Menu to design your report.
In design view, it looks like this:
We need to tidy this up.
We have no locations, so we need to delete the fields and heading for that. Just select each field, and press the delete key on your keyboard.
Next, we want to give the headings more meaningful names. So double click on each heading name and change it.
Your report should look like this:
Basic Report Designer Training Page 12

December 2015
Now we need to preview the report, so click on :
That is much better, but we really need to separate out the groups.
So, first we drag down the group header section like this:
Basic Report Designer Training Page 13

December 2015
And now we want to move the PmGrp to the header.
Just pick up the header and move it in to place, then pick up the data field and move that into place as well, to look like this:
And now, it would be nice to see some group totals as well, so we drag down the group footer, and copy the totals in the report totals into place so that your report now looks like this:
Basic Report Designer Training Page 14

December 2015
Notice here that I have turned up the sensitivity to line up my data properly: I do this by clicking on the sensitivity tool
Now, let’s look at our report by clicking on print preview.
OK – not bad, but we can do better.
Basic Report Designer Training Page 15

December 2015
We can put in the words: Group total, and Report Total, and we can put in better formatting for the numbers to make them more readable.
Double click on each of the value fields, click on the format tab, and select currency.
Now click on the Insert Label icon and create your total labels.
Basic Report Designer Training Page 16

December 2015
Not bad!
OK now we want to save this, and see how we can run this whenever we want to.
Click on the report properties icon:
Fill out like this:
Basic Report Designer Training Page 17

December 2015
And click on OK.
Now click on the Save icon
And close the report.
You can run this report whenever you want to from here:
Choose:
Basic Report Designer Training Page 18

December 2015
Then click on the down arrow for the select report.
And all custom reports for Products will show here.
Basic Report Designer Training Page 19
December 2015
MODIFYING AN EXISTING REPORT
Steps to modifying an existing report
1. Identify the report that you wish to modify2. Copy the report3. Use the SQL Query Builder to modify the data if required4. Use the Report Window and Report Tools Menu to modify your
report, if required
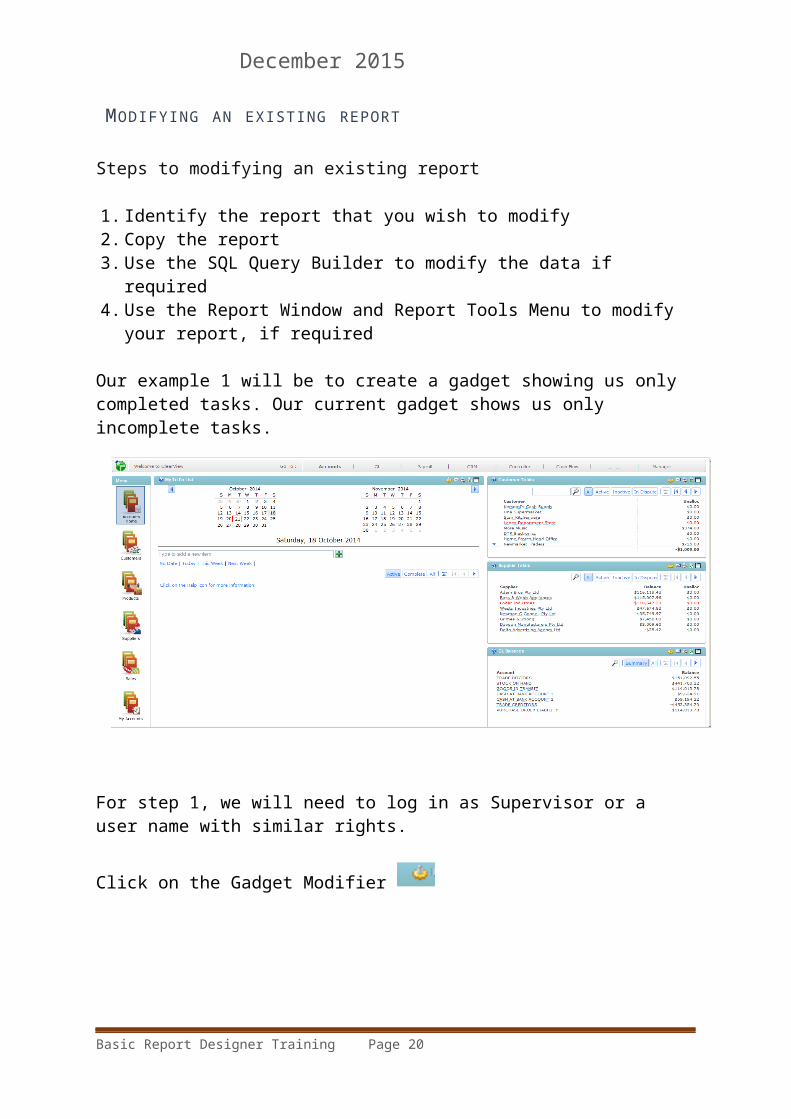
Our example 1 will be to create a gadget showing us only completed tasks. Our current gadget shows us only incomplete tasks.
For step 1, we will need to log in as Supervisor or a user name with similar rights.
Click on the Gadget Modifier
Basic Report Designer Training Page 20

December 2015
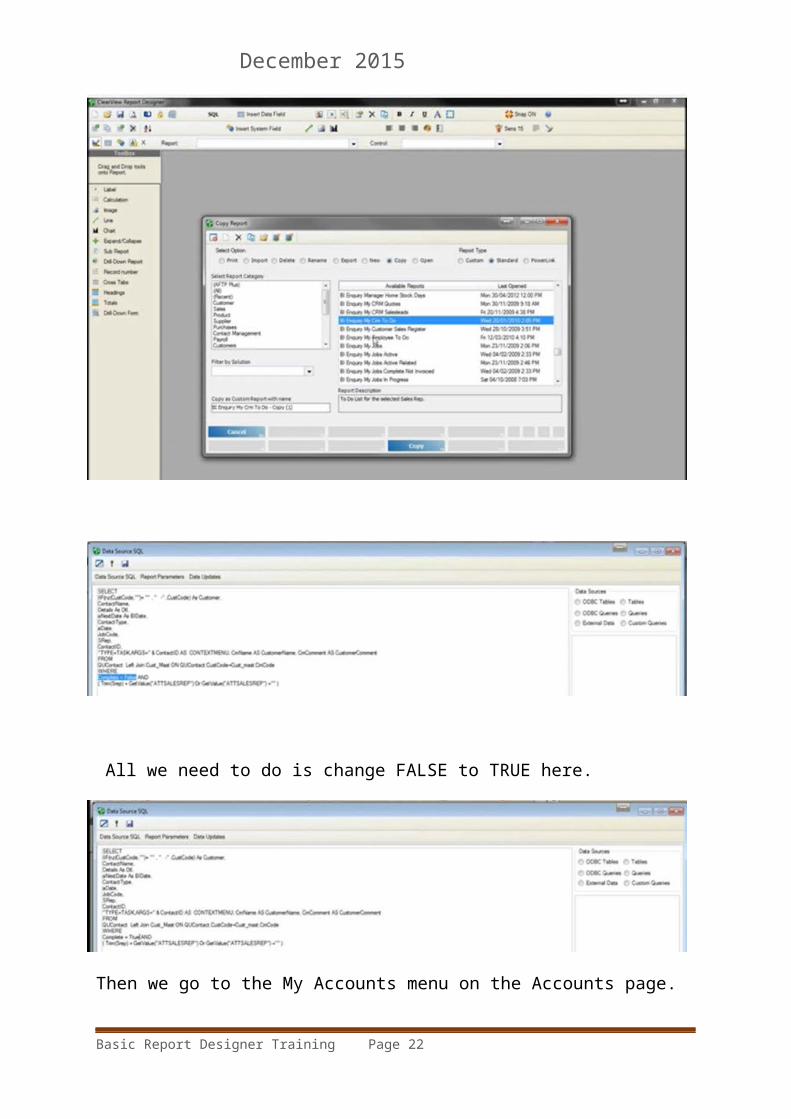
Find the name of the gadget that you want to modify by clicking on the Data Source box and clicking on the find button.
Start up the Report Designer from the main screen or through the menus. Find the report that you want to modify.
Basic Report Designer Training Page 21
December 2015
All we need to do is change FALSE to TRUE here.
Then we go to the My Accounts menu on the Accounts page.
Basic Report Designer Training Page 22

December 2015
1. Identify the report that you wish to modify
a. In this case the report we want to alter is called BI Enquiry CRM To Do.
b. Use the Report Navigator to copy the report.
c. Make the choices as shown
Basic Report Designer Training Page 23

December 2015
d. Click on Copy.
3. Use the SQL Query Builder to modify the data if required
a. Click on b. Currently the SQL statement says “show all tasks that have
not been completed” c. Change the Complete to True d. Save the report.
where level 9 is everyone, level one is the highest level.
4. Use the Report Window and Report Tools Menu to modify your report, if required
Basic Report Designer Training Page 24

December 2015a. In this case we have none to make.b. But now we have to insert our new gadgetc. Click on the yellow screw.d.
e.f. Save
Basic Report Designer Training Page 25

December 2015
INTRODUCTION TO DATABASES
In this unit you will learn about:
What is a database Purpose of databases Rows and columns Example
THIS UNIT
Databases What is SQL SQL Conventions Basic SQL clauses
o SELECT and FROMo DISTINCTo ORDER BYo WHEREo AND and OR
Basic Report Designer Training Page 26

December 2015
DATABASES
Look at this information.
It is very hard to figure out who has the fish from here. It is just a list. If we organize the data though, it is much easier to understand. Organizing it is called a database.
So, the definition of a database is:
A tool for storing data using tables A table organizes data using rows and columns Each column is a category or type of data Each row is an entry
Basic Report Designer Training Page 27

December 2015
So now, if we put our data in a table, it is much easier to see who has the fish.
Basic Report Designer Training Page 28

December 2015
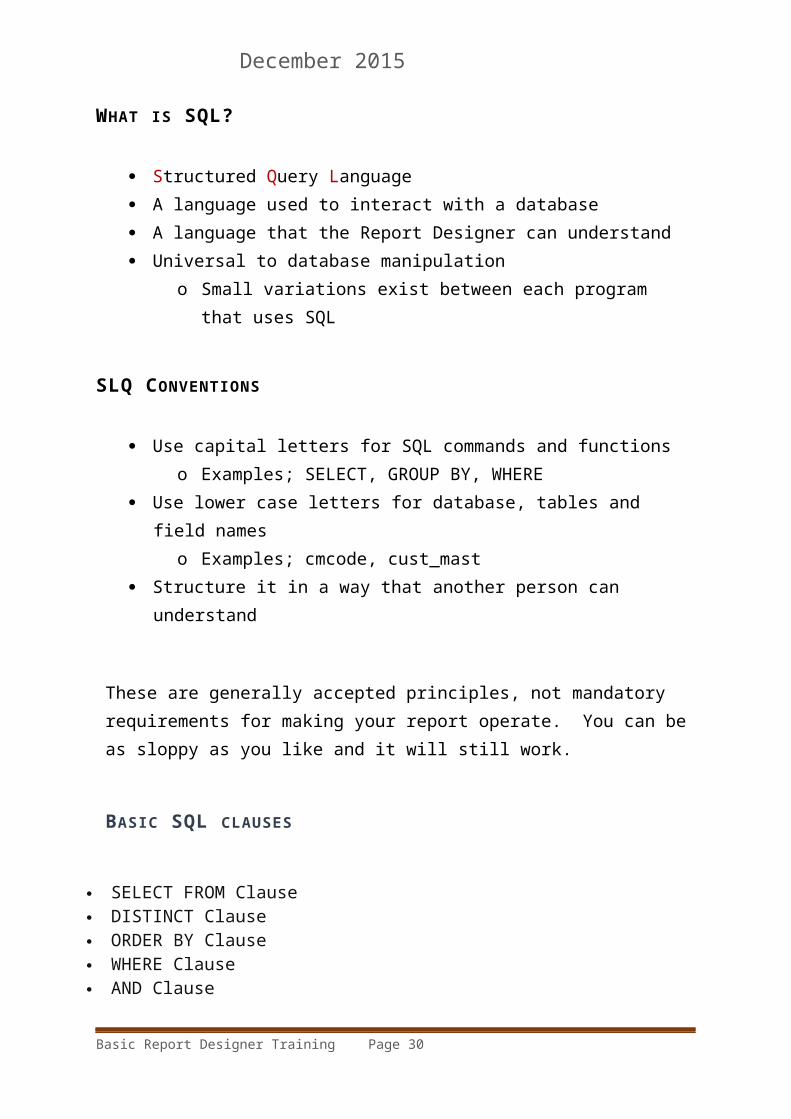
WHAT IS SQL?
Structured Query Language A language used to interact with a database A language that the Report Designer can understand Universal to database manipulation
o Small variations exist between each program that uses SQL
SLQ CONVENTIONS
Use capital letters for SQL commands and functionso Examples; SELECT, GROUP BY, WHERE
Use lower case letters for database, tables and field nameso Examples; cmcode, cust_mast
Structure it in a way that another person can understand
These are generally accepted principles, not mandatory requirements for making your report operate. You can be as sloppy as you like and it will still work.
BASIC SQL CLAUSES
SELECT FROM Clause DISTINCT Clause ORDER BY Clause WHERE Clause AND Clause OR Clause
Basic Report Designer Training Page 29
December 2015
SELECT AND FROM
These are the fundamental clauses used to specify what information your report will show.
SELECT: instruction to go and pick up the fields that the user specifies
FROM: Specifies which table the report should look for the information requested using the SELECT function
Format: SELECT field1, field2, field3 FROM table
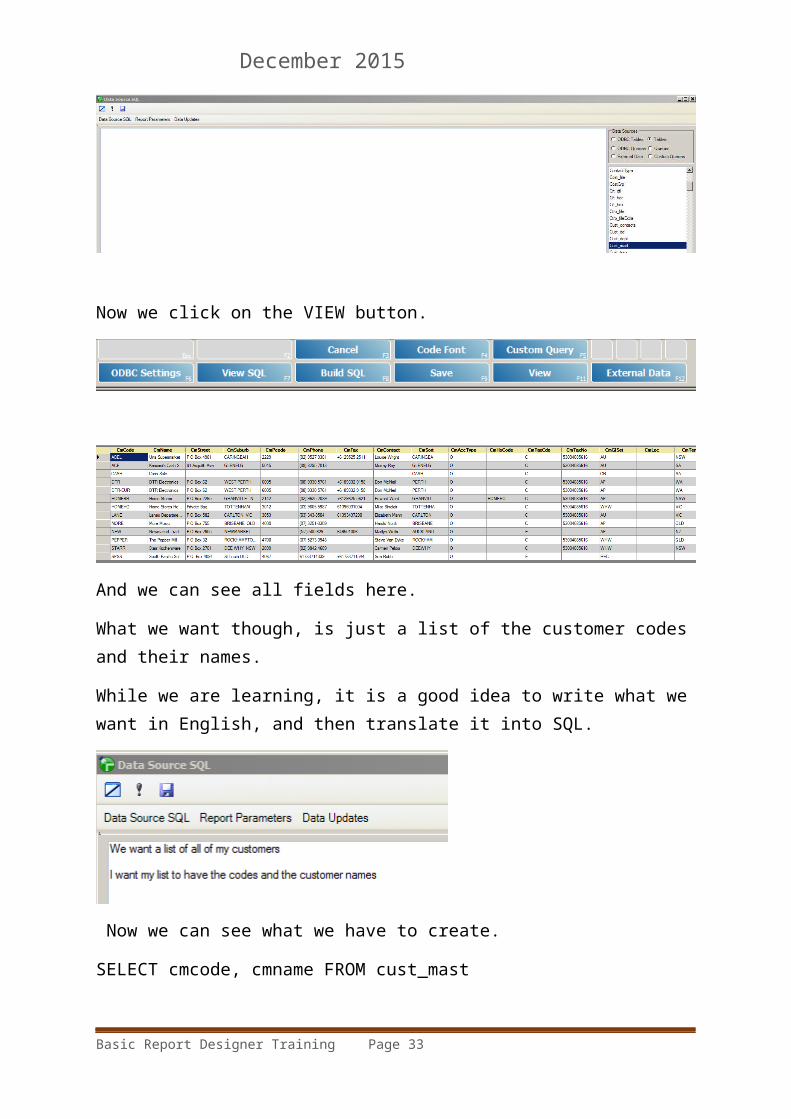
We start a new report.
We click on the SQL button.
We select the table button and highlight cust_mast.
Basic Report Designer Training Page 30

December 2015
Now we click on the VIEW button.
And we can see all fields here.
What we want though, is just a list of the customer codes and their names.
While we are learning, it is a good idea to write what we want in English, and then translate it into SQL.
Now we can see what we have to create.
SELECT cmcode, cmname FROM cust_mast
Basic Report Designer Training Page 31

December 2015
DISTINCT
DISTINCT is used together with the SELECT clause to specify that the report should only show unique entities.
Format: SELECT DISTINCT field FROM table
Let us choose, as an example, seeing which countries we trade with.
Gives us:
Basic Report Designer Training Page 32
December 2015
So, “Show me a list of countries in which my customers are based” translates to
“Select all of the distinct countries found in the customer masterfile but only show each country once”
In SQL this reads:
SELECT DISTINCT cmcountry FROM cust_mast
ORDER BY
Can be used to list results in ascending order
0 to 99999 A to Z 0 to A to Z
Can also be used to list the items in reverse order SQL function is DESC (for descending)
Results are in ascending order by default.
Format is
SELECT x FROM y ORDER BY field
The field used to order your query does not need to be one of the fields selected.
Basic Report Designer Training Page 33

December 2015ORDER BY example
“Give me a list of my customers arranged in reverse alphabetical order”
This translates to
“Select all of the customer names from the customer masterfile and list them in descending order”
In SQL:
SELECT cmname FROM cust_mast ORDER BY cmname DESC
Basic Report Designer Training Page 34

December 2015
WHERE
This is used to specify a condition or a filter for the data selected.
Conditions used, but are not limited to:
Mathematical comparisons Text comparisons True or false statements Other
Format is:
SELECT x FROM y WHERE condition
If the condition is not a field, we need to put it in between “ “
It is also a good idea to put conditions in brackets to make it easier to understand and read.
Basic Report Designer Training Page 35

December 2015
AND AND OR
Used to specify multiple conditions AND is used when multiple conditions must be fulfilled OR is used when only one of multiple conditions must be
fulfilled Most often used in conjunction with the WHERE clause
Format:
SELECT x FROM y WHERE condition1 AND condition2
SELECT x FROM y WHERE condition1 OR condition2
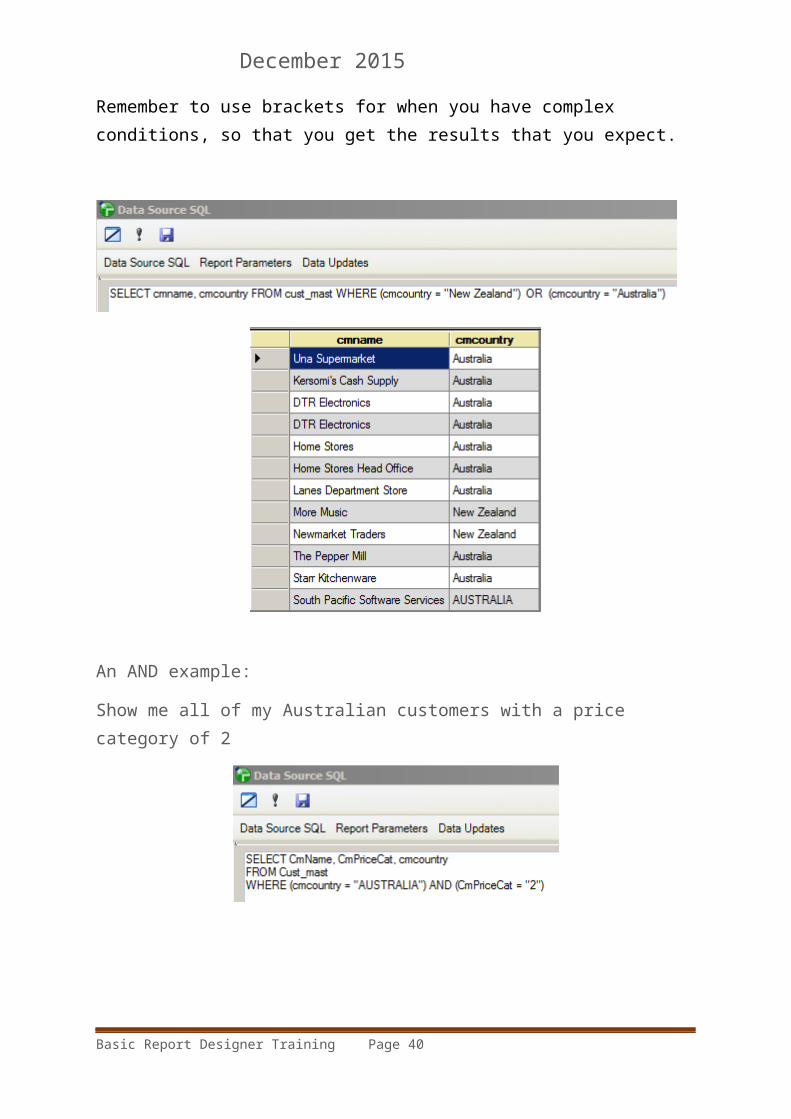
Remember to use brackets for when you have complex conditions, so that you get the results that you expect.
Basic Report Designer Training Page 36

December 2015
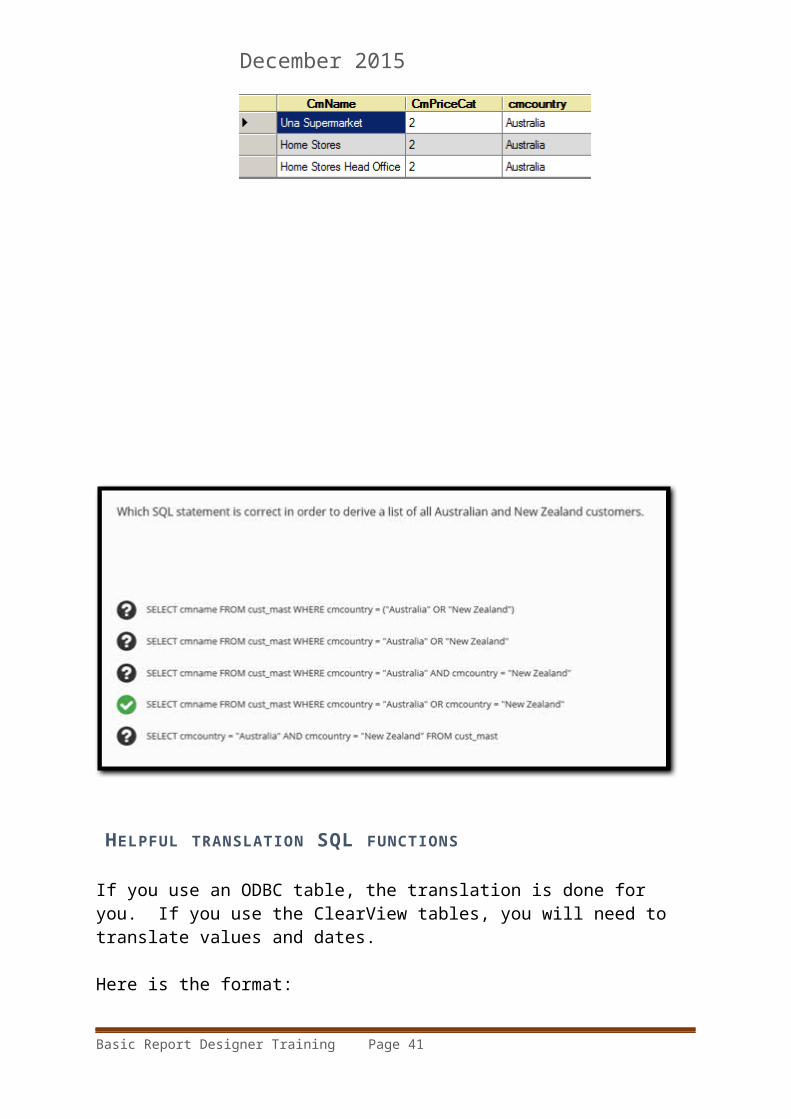
An AND example:
Show me all of my Australian customers with a price category of 2
Basic Report Designer Training Page 37

December 2015
HELPFUL TRANSLATION SQL FUNCTIONS
If you use an ODBC table, the translation is done for you. If you use the ClearView tables, you will need to translate values and dates.
Here is the format:
For a date:
Accessdate(field name)
For a value:
Val(field name)
Basic Report Designer Training Page 38

December 2015
PARAMETERS
Understand the use of parametersUse the prebuilt parametersConstruct your own parametersReference your own parameters in the SQLPRE-BUILT PARAMETERS
1. Open the SQL Query Builder
2. Go to the Report Parameters tab
3. Select your desired parameter from the Add Range Parameter drop down menu. IN our example we will choose the Customer Code.
Basic Report Designer Training Page 39
December 2015
Answer OK.
Basic Report Designer Training Page 40
December 2015
4. Go to the Data Source SQL tab
5. Right click and insert your parameter
Basic Report Designer Training Page 41

December 2015
6. Specify what data the parameter should be compared against
Basic Report Designer Training Page 42

December 2015
Notice that we do not have a drop down list here.
Go back to the parameter tab, and add in this:
So that the program knows which table to search for the data.
We have told it what to get and from where, and also to refresh, or get the latest, data.
Now we have the right drop down list.
Basic Report Designer Training Page 43

December 2015
Basic Report Designer Training Page 44

December 2015
WHAT IS A PARAMETER?
A parameter is used for special report conditions:
Conditions that are unknown at the time the report is written Conditions are specified by the person running the report Conditions that can change each tine the report is written
Components of a parameter:
Tick box First entry Last entry Conditions based on information specified
Basic Report Designer Training Page 45

December 2015
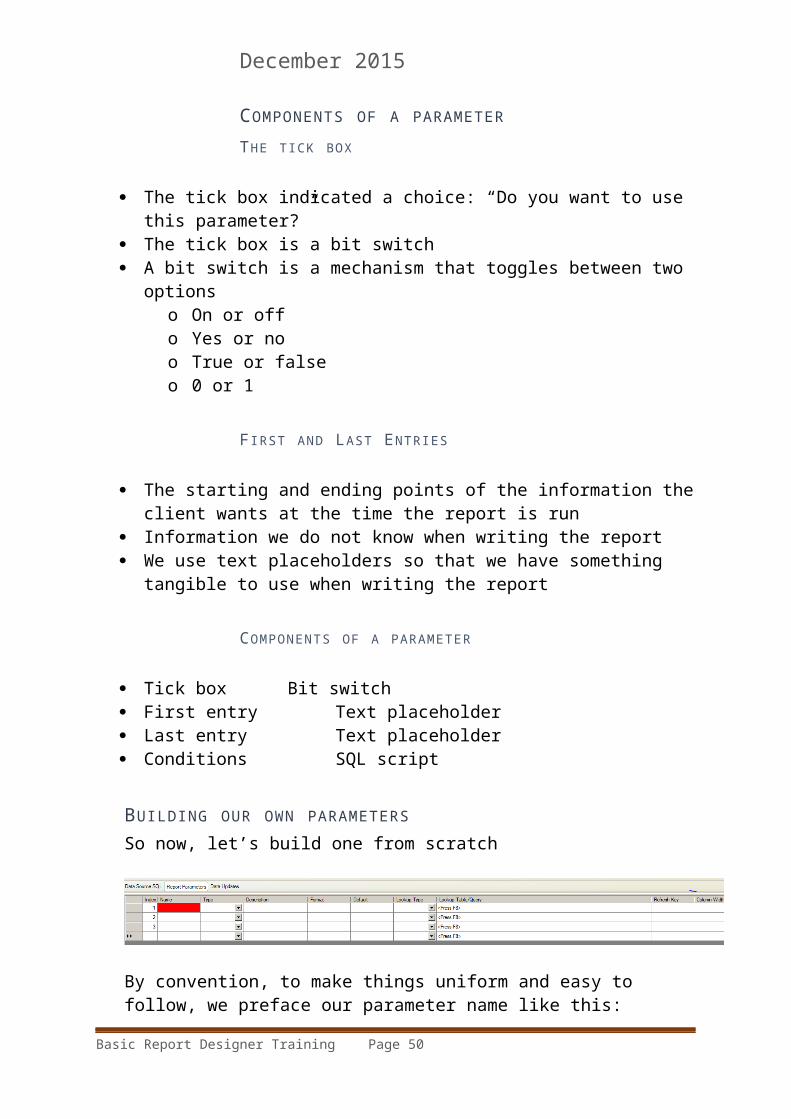
COMPONENTS OF A PARAMETERTHE TICK BOX
The tick box indicated a choice: “Do you want to use this parameter?”
The tick box is a bit switch A bit switch is a mechanism that toggles between two options
o On or offo Yes or noo True or falseo 0 or 1
F IRST AND LAST ENTRIES
The starting and ending points of the information the client wants at the time the report is run
Information we do not know when writing the report We use text placeholders so that we have something tangible
to use when writing the report
COMPONENTS OF A PARAMETER
Tick box Bit switch First entry Text placeholder Last entry Text placeholder Conditions SQL script
BUILDING OUR OWN PARAMETERSSo now, let’s build one from scratch
By convention, to make things uniform and easy to follow, we preface our parameter name like this:
Our example is we are going to range on Supplier Code.
Basic Report Designer Training Page 46

December 2015
We don’t have to use these names; it just makes it much easier to work with.
Next is the type
Type is selected from drop down boxes
Description is what the end user will see, so should be in plain English:
Format is linked to type – so that if we chose date, we could choose short date or long date
Default can be left blank. If not, you put in the values that the user will see before they have made any choices.
Lookup type enables you to tell the system what it can see when the person is searching the parameters.
There are 2 lookup types.
Basic Report Designer Training Page 47

December 2015
Table/Query will look up a table or query to get the values.
Value list, just put in the values, separated by semi colons.
Basic Report Designer Training Page 48

December 2015
Now we need to create an SQL statement to tell this system what to look up
Refresh key tells us to refresh a particular file
Column width tells us how wide the column will be during lookup – these are in pixels
Now we have our parameter set up, we need to insert it, so we go back to the data source SQL tab.
Change the generic data fields to real data fields
Basic Report Designer Training Page 49
December 2015
Basic Report Designer Training Page 50

December 2015
CREATING THE COMPONENTS
Create three entries in the Reports Parameter tabo Index is a unique ID numbero Name is what we use to refer to each component during
the SQL scripting Use the same name for all three components with
the following prefixes
o For example, if you want to name your parameter Customer
Name the bit switch RngCustromer Name the first place holder FstCustomer Name the last placeholder LstCustomer
o This will ensure the report designer knows they are three components of the same parameter.
Type is the type of data each component will holdo In our example, we need one with the type “Bit” and two
with the type “Text” Description is the plain English name used for the component.
This is what appears when running the report Format lets you specify the data format when running the
report For example, date component can have the format
“Short date” Default is used to specify what each component is pre-filled
with For example, a text field may be pre-filled with
ABEL when running the report Lookup Type allows us to select what appears in the
parameter’s drop down menu. SQL script List
Lookup Table/query is where you can specify the SQL script or the items to be listed based on the above
SELECT cmcode FROM cust_mast ABEL;ACE;DTR …. Could be used , for example, to allow
selection of the codes the customer uses for category Refresh key allows us to specify a table to refresh when the
parameters interact with the data
Basic Report Designer Training Page 51

December 2015 Column Widths allows us to specify the width of each column
shown in the drop down menu
Basic Report Designer Training Page 52

December 2015
THE CONDITION AND USEPARAMETER()
“Show all results where the data is between the parameters specified by the user”
The chosen field must be equal to or higher than the first value entered by the user
The chosen field must also be equal to or lower than the last value entered by the client.
USEPARAMETER()
This is not a standard SQL statement. This is specific to ClearView and PowerLink. Therefore, by convention, we do not put this in capital letters.
UseParameter() is used when referring to a parameter during SQL scripting.
Format: UseParameter (“Parameter name”)
So, we are going to do an example where we want a user to select a supplier code, and we will return the supplier name.
First, we set up the parameter.
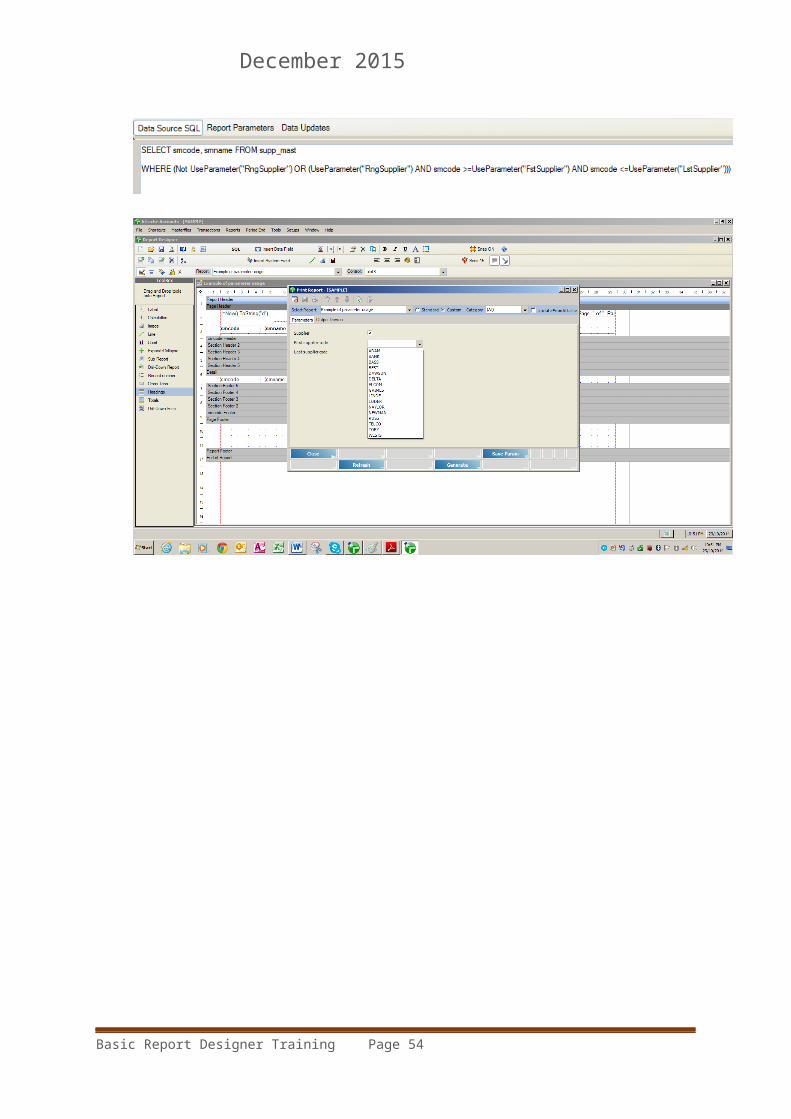
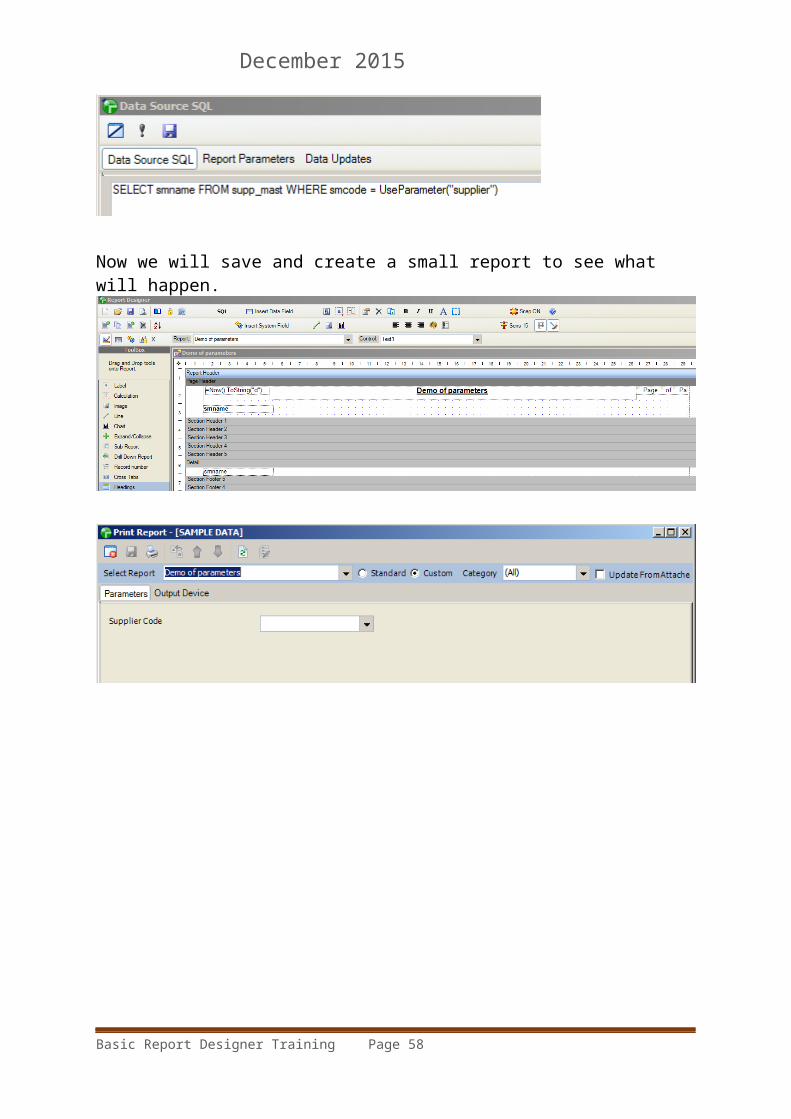
Then we set up the SQL statement
Basic Report Designer Training Page 53
December 2015Now we will save and create a small report to see what will happen.
Basic Report Designer Training Page 54

December 2015
Click on Generate
Basic Report Designer Training Page 55

December 2015
SO, USEPARAMETER() EXAMPLE
“I’m going to specify the supplier code, you tell me the supplier’s name”
This translates to:
“Select all of the supplier names from the supplier masterfile where the supplier code is equal to whatever the client decides”
In SQL:
SELECT smname FROM supp_mast WHERE smcode = UseParameter(“supplier”)
Don’t forget to set up the parameter named supplier.
THE CONDITION
“Show all results where the data is in between the parameters specified by the client”
The chosen field must be equal to or higher than the first value entered by the client”
o X >=UseParameter(“fstvalue”) The chosen field must be equal to or lower than the last value
entered by the client”o X <=UseParameter(“lstvalue”)
Basic Report Designer Training Page 56

December 2015
MY FIRST PARAMETER
Creating a Parameter from Scratch
1. Decide what data you want the parameter to be based on2. Create the components
Tickbox First place holder Last place holder
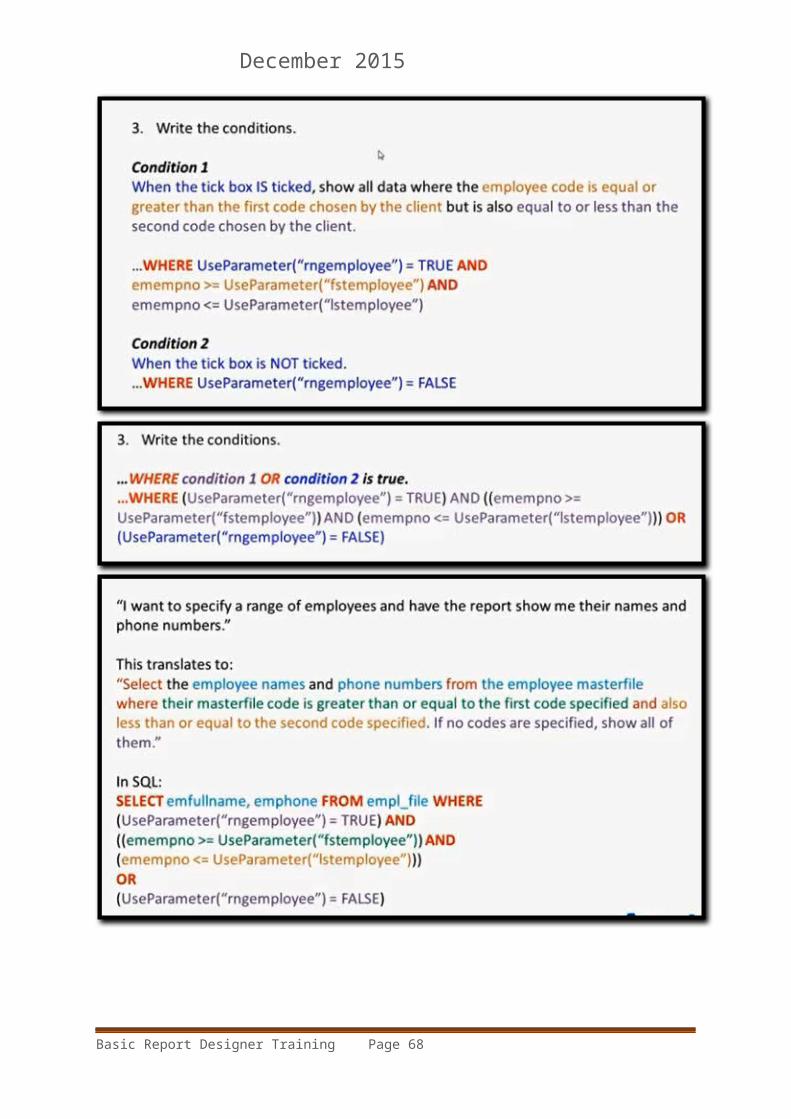
3. Write the conditions
We will be creating an employee based parameter, as this is one that is not available to us.
Now we switch to the data source SQL, and in plain English what we want is:
Basic Report Designer Training Page 57
December 2015
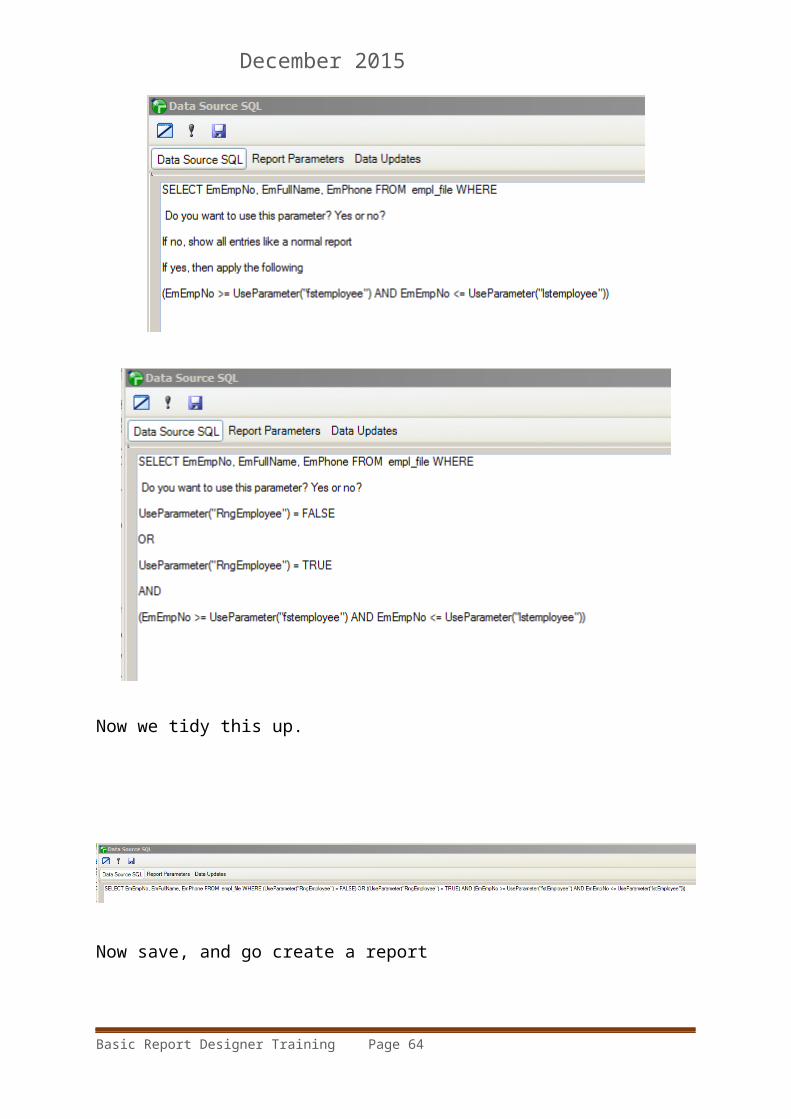
So, now we relace this with the corresponding SQL code
Now we want to tidy up the layout and take out the plain text.
Basic Report Designer Training Page 58

December 2015
To make this very clear, we will put brackets around our AND statement
Now, we have to put in the condtion.
Basic Report Designer Training Page 59

December 2015
Now we tidy this up.
Now save, and go create a report
Basic Report Designer Training Page 60

December 2015
Leaving the tick box unchecked, we get this:
Checking the box, and making a selection, we get this:
Basic Report Designer Training Page 61

December 2015
If I don’t use the checkbox, and put in a range, here is what I get.
Basic Report Designer Training Page 62

December 2015
Basic Report Designer Training Page 63
December 2015
Basic Report Designer Training Page 64

December 2015
THE BETWEEN CLAUSE
This clause is not found in the Atatche SQL and Function Reference Guide.
BETWEEN is a clause that lets you specify a range
BETWEEN is more efficient than using two conditions together
Format: SELECT field FROM table WHERE field BETWEEN a AND b
Note: AND is used here to support the BETWEEN clause, not as a clause on its own.
The KZZZZ is because we want anything that starts with K.
Basic Report Designer Training Page 65

December 2015
Basic Report Designer Training Page 66

December 2015
Practice task 2 - Checkbox parameter
The checkbox is a powerful tool that has more functionality than simply being an on/off switch for report parameters. When used correctly, a series of checkboxes can become an easy to use parameter when there are a reasonable number of choices that a user can make when running a report.
This challenge is to create a simple parameter using 2 checkboxes that will allow users to see their Australian based customers, New Zealand based customers or both.
To complete this challenge, perform the following tasks.
1. Create a new report.2. Create two bit parameter components, one for Australian
customers and one for NZ customers.3. Add conditions to the report so that when the Australia checkbox
is ticked, Australian customers will appear on the report and when the NZ checkbox is ticked, NZ customers will appear on the report. When neither checkbox is selected, show all customers and when both are selected, show only Australian and NZ based customers.
Hints:
Carefully consider how the AND and OR clauses can assist you in completing the challenge.
Basic Report Designer Training Page 67
December 2015
Add a customer from a country other than Australia and New Zealand to test your report.
Basic Report Designer Training Page 68

December 2015
ANSWERS TO TASKS
PRACTICE TASK 1 - S INGLE CHOICE PARAMETER (SOLUTION)
Throughout Attaché and ClearView, there are reports which utilise a range parameter when a single choice parameter would be better. In most cases, users will simply enter the same choice for both first and last entries to reach the desired result.
Challenge task 1 is to add a single choice parameter to a report that has a range parameter.
To complete this challenge, perform the following tasks.
1. Copy a report that normally uses a range parameter but would benefit from having a single choice parameter.
2. Create new parameter components for your single choice parameter.
3. Add conditions to the report that will allow users to select to use either the range based parameter or the new single choice parameter.
4. Edit the parameter components so that the single choice parameter appears first when the report is run.
SOLUTION
This exercise is designed to demonstrate three things:
How to create a single choice parameter How to use more than one parameter in a report How to rearrange the order that parameters appear in when
running a report
Components
The single choice parameter is simpler to construct than the range based parameter. It only requires two components:
A checkbox to let clients decide whether or not they want to use this parameter when they run the report.
Basic Report Designer Training Page 69

December 2015
A placeholder to compare the data to when using the parameter.
For example, create a bit component named Rngsingledate and a date placeholder named Fstsingledate.
Condition
The condition is likewise, simpler to create than the range based parameter's conditions. The data field being used simply needs to match the single placeholder. In our example, this would be:
WHERE datefield = UseParameter("Fstsingledate")
Remember to incorporate the checkbox into the condition:
WHERE (UseParameter("Rngsingledate") = TRUE AND WHERE datefield = UseParameter("Fstsingledate")) OR UseParameter("Rngsingledate") = FALSE
Lastly, to combine this parameter with another, encase the two parameter conditions in their own brackets and use an OR clause:
(Parameter 1's condition) OR (WHERE (UseParameter("Rngsingledate") = TRUE AND WHERE datefield = UseParameter("Fstsingledate")) OR UseParameter("Rngsingledate") = FALSE)
Ordering Parameters
Parameter components appear in the order of their indices so to re-arrange them, simply reassign their index numbers
Basic Report Designer Training Page 70

December 2015
PRACTICE TASK 2 - CHECKBOX PARAMETER (SOLUTION)
The checkbox is a powerful tool that has more functionality than simply being an on/off switch for report parameters. When used correctly, a series of checkboxes can become an easy to use parameter when there are a reasonable number of choices that a user can make when running a report.
This challenge is to create a simple parameter using 2 checkboxes that will allow users to see their Australian based customers, New Zealand based customers or both.
To complete this challenge, perform the following tasks.
1. Create a new report.2. Create two bit parameter components, one for Australian
customers and one for NZ customers.3. Add conditions to the report so that when the Australia checkbox is
ticked, Australian customers will appear on the report and when the NZ checkbox is ticked, NZ customers will appear on the report. When neither checkbox is selected, show all customers and when both are selected, show only Australian and NZ based customers.
Hints:
Carefully consider how the AND and OR clauses can assist you in completing the challenge.
Add a customer from a country other than Australia and New Zealand to test your report.
Basic Report Designer Training Page 71

December 2015
SOLUTION
Recall that a checkbox asks a yes/no question. In this case, our two checkboxes are asking whether or not the user wants to use a certain condition. For example, "Do you want to use the condition cmcountry = "Australia"?
If the user answers "yes", then the condition is applied. If they answer "no" then they simply move on to the next question. If they answer "no" to all questions, the report will show all possible entries as if there were no conditions.
In SQL, each checkbox's conditions will translate to:
UseParameter("country x") = TRUE AND cmcountry = "country x"
This means that if the checkbox is ticked, the parameter "cmcountry = "country x"" will be applied, otherwise, no conditions are applied.
Lastly, the checkbox conditions are simply combined together using OR clauses. By using OR clauses, the checkboxes will work independently of each other.
(UseParameter("Australia") = TRUE AND cmcountry = "Australia") OR (UseParameter("NZ") = TRUE AND cmcountry = "New Zealand")
To better understand this, imagine all of the different scenarios:
If both checkboxes are ticked, the condition is: WHERE cmcountry = "Australia" OR cmcountry = "New Zealand"
If only the Australia checkbox is ticked: WHERE cmcountry = "Australia"
If only the NZ checkbox is ticked: WHERE cmcountry = "New Zealand"
Basic Report Designer Training Page 72

December 2015Finally, if neither is ticked, no conditions are applied and the report would simply display all entries.
Basic Report Designer Training Page 73

December 2015
MY FIRST JOIN TABLE
In this section you will learn about:
How data is stored in the tables Why multiple tables are used within a database How data is read from tables when reports are constructed
Here we have two tables above and the same information in a single table below.
Why are there multiple tables? It would be much easier to write reports if we just had one.
As soon as we add more data, it becomes obvious.
Basic Report Designer Training Page 74

December 2015
Here we can see that if we are to have only one table, Ash is in the table 3 times. Now when we add another third table:
And if we added a third table, we would need to double the entries in our combined table for Ash.
Basic Report Designer Training Page 75

December 2015If we needed to change Ash’s phone number, we would need to access6 records. Not efficient.
What we can do, is temporarily connect smaller tables together when required, when a report is run.
Basic Report Designer Training Page 76

December 2015
FULLY QUALIFIED NAMES AND ALIASES
In this section you will learn about:
What is a table join Requirements in order to join tables Fully qualified names SQL syntax for a fully qualified name Aliases SQL syntax for an alias Reserved aliases
What exactly is a table join? It is an SQL mechanism to create temporary tables by combining tables that each has a relatable field.
This is possible if there is at least one field in each table that is related in some way.
In the example above, the common field is the Name. We can join the two tables and get the combined information.
Basic Report Designer Training Page 77
December 2015
FULLY QUALIFIED NAMES
A fully qualified name is used to refer to the full location of a particular field.In SQL, a fully qualified name appears as <tablename>.<field.name>
For Example, looking at the following statement:
SELECT cmcode FROM cust_mast
Using a fully qualified name, this stamen becomes:
SEWLECT cust.mast.cmcode FROM cust_mast
Why would we use fully qualified names?
When working with multiple tables, fully qualified names help distingush data columns with the same name in different tables.
For example, a fully qualified name is required to refer to the Name column in the tables above as both tables include a column names NAME.
Basic Report Designer Training Page 78

December 2015
ALIASES AND AS
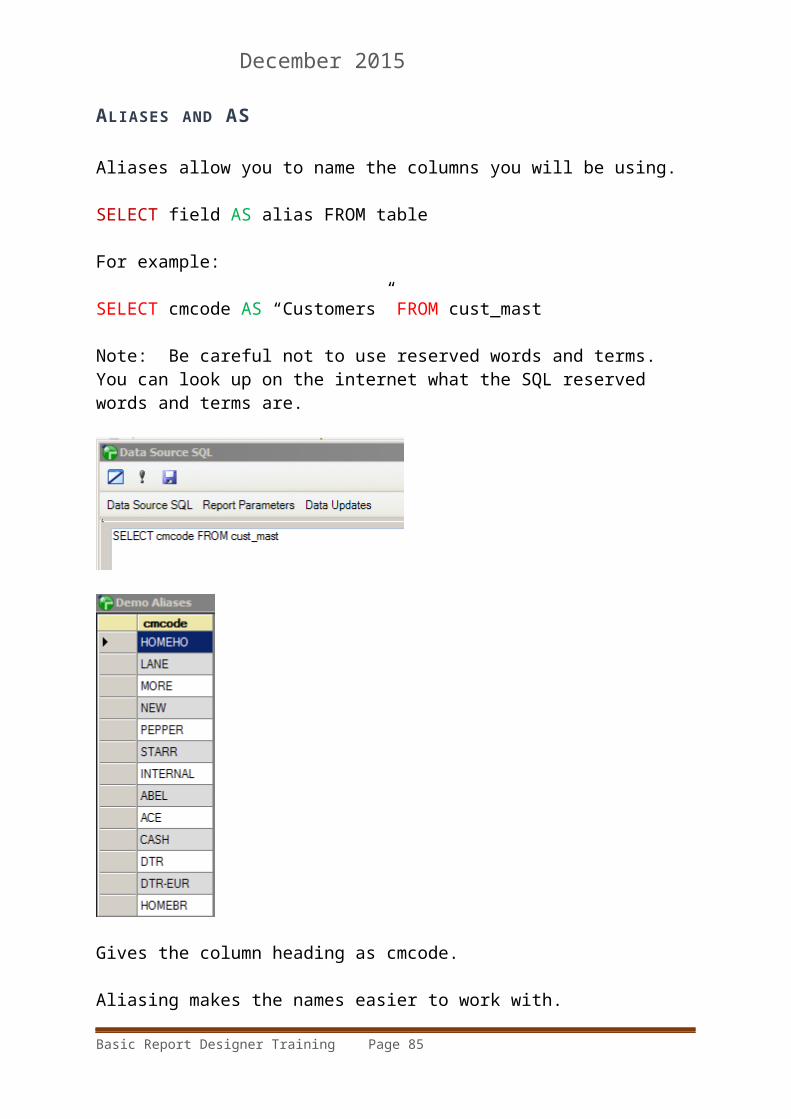
Aliases allow you to name the columns you will be using.
SELECT field AS alias FROM table
For example:
SELECT cmcode AS “Customers” FROM cust_mast
Note: Be careful not to use reserved words and terms. You can look up on the internet what the SQL reserved words and terms are.
Gives the column heading as cmcode.
Aliasing makes the names easier to work with.
Basic Report Designer Training Page 79

December 2015
gives us
Often, field names can be complicated and your end results not easy to read. Using aliases can make your data much easier to understand.
Basic Report Designer Training Page 80

December 2015
TABLE JOINS
In this section you will learn about:
SQL syntax for a table join Example
JOIN AND ON
JOIN is the basic SQL clause used to combine two tables.
ON is the clause used to control how tables are joined together.
Format:
SELECT table1.fields, table2.fields FROM table1 INNER JOIN table2 ON condition
As there are more than one table involved, use fully qualified names.As fully qualified names are involved, well-chosen aliases can assist in keeping the data clear and easy to read.
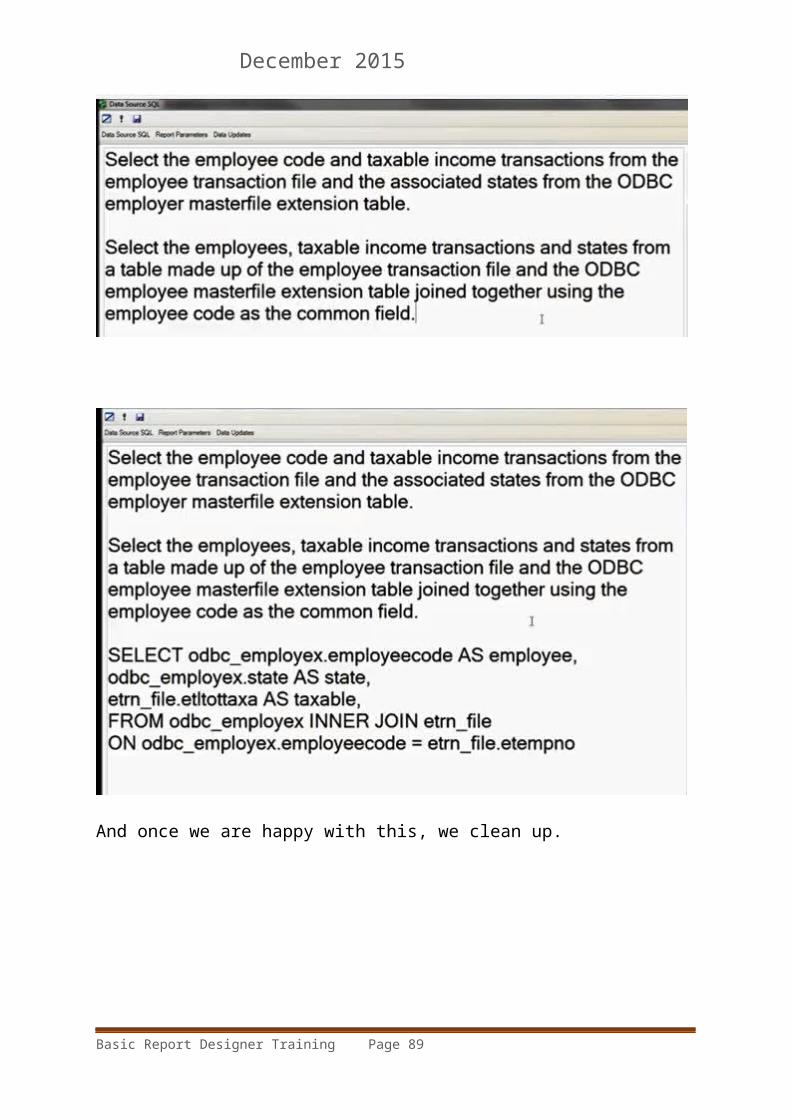
Our example will be to create data that shows all employee taxable income, and their state.
Basic Report Designer Training Page 81

December 2015
And once we are happy with this, we clean up.
Basic Report Designer Training Page 82

December 2015
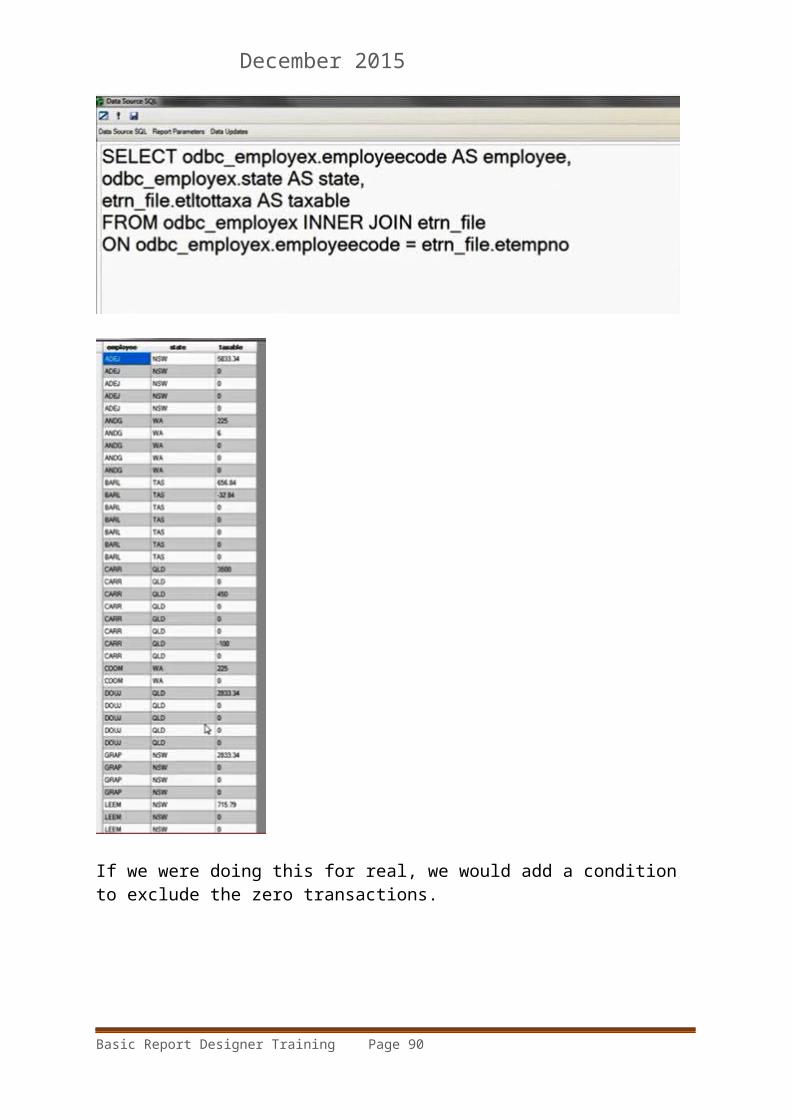
If we were doing this for real, we would add a condition to exclude the zero transactions.
Basic Report Designer Training Page 83

December 2015
Basic Report Designer Training Page 84
December 2015
TYPES OF TABLE JOINS
The next section of this course is Types of table joins.
Depending on the type of join, you will get very different results.
To demonstrate this, we will use the two tables above.
Basic Report Designer Training Page 85

December 2015
So – this is showing data only when there is a match on the join.
Basic Report Designer Training Page 86

December 2015
Basic Report Designer Training Page 87

December 2015
Basic Report Designer Training Page 88
December 2015
We can join many tables together if we wish.
If we want to do something complex, we need tostate it in plain English, space it out, get each part right, copy and paste what we have done to a Word document, so that we can go backwards if necessary,
Then remove all the English, and try our SQL statement results.
Basic Report Designer Training Page 89
i