wi-fi wireless multiroom receiver - august int · august international ltd united kingdom tel: +44...
TRANSCRIPT

August International Ltd
United Kingdom
Tel: +44 (0)845 250 0586
www.augustint.com
WR320
Wi-Fi Wireless Multiroom ReceiverEN
Récepteur Wi-Fi Multiroom Sans-Fil
Schnurloser Wi-Fi Multiroom Empfänger
Ricevitore Wi-Fi Multiroom Senza Fili
Receptor WiFi Multiroom Inalámbrico
FR
DE
IT
ES

En
glis
h
User Manual
Thank you for purchasing the August WR320. This user manual is designed to familiarize you with all the features of this device. Please take the time to read this user manual carefully, even if you are already familiar with a similar product.
Safety
To ensure the safety of yourself and others, please read the Safety Instructions before using this device. Please do not disassemble this product as it can be unsafe and will invalidate the manufacturer's warranty.
Disposal
Please ensure the product and accessories are disposed of in compliance with the WEEE (Waste Electrical and Electronic Equipment) Directive and any other regulations applicable to your country. Always check with the environment agency and any other relevant authorities for current disposal regulations.
Customer Service
You can contact us by phone on: +44 (0)845 250 0586 or by email at: [email protected] should you require further technical support or customer service.
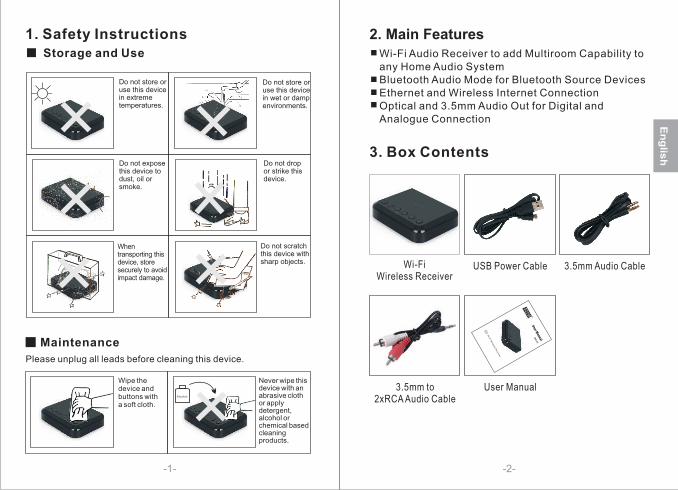
Storage and Use
Do not expose this device to dust, oil or smoke.
When transporting this device, store securely to avoid impact damage.
Do not scratch this device with sharp objects.
Do not store or use this device in extreme temperatures.
Do not store or use this device in wet or damp environments.
Do not drop or strike this device.
Maintenance
Please unplug all leads before cleaning this device.
Alcohol
1. Safety Instructions
Wipe the device and buttons with a soft cloth.
Never wipe this device with an abrasive cloth or apply detergent, alcohol or chemical based cleaning products.
3. Box Contents
2. Main FeaturesWi-Fi Audio Receiver to add Multiroom Capability to any Home Audio SystemBluetooth Audio Mode for Bluetooth Source DevicesEthernet and Wireless Internet ConnectionOptical and 3.5mm Audio Out for Digital and Analogue Connection
Wi-Fi Wireless Receiver
USB Power Cable 3.5mm Audio Cable
En
glis
h
-1-
3.5mm to 2xRCA Audio Cable
-2-
WR
320
Wi-F
i Wire
less R
ece
iver
EN
User Manual

4.2 Back
4.3 Status LED Meaning
Indication Status LED
Entering Wi-Fi Mode Flashing Green
Wi-Fi Mode Green
Line – In Mode Red
Bluetooth Pairing Mode Flashing Blue
Bluetooth Connected Blue
-3-
AUX INLANOPTICAL AUX OUT WPSDC 5VReset
1 2 3 5 6 74
1.Optical-Out
2.LAN
3.AUX-Out
4.AUX-In
5.Micro USB Power Port
6.Reset
7.WPS Button
1. Scan the QR code below with your device or search for
'August Alink' to download and install the app from
Google Play or the Apple Store.
Note: For Blackberry phones, go to www.augustint.com to
download the application as an .apk file and install it.
2. Enable Wi-Fi on your device and connect to your
network.
3. Connect the WR320 to a powered USB port using the
provided cable. The WR320 will switch on automatically
and enter Wi-Fi mode. Once in Wi-Fi mode, the status
LED will light green.
4. Run the App and follow the on-screen guide to set up.
Tip: Once in Wi-Fi mode, you can connect the WR320 to your Wi-Fi directly from your router, without using the application. Press WPS on the WR320, then press theWPS button on your router. They will connect automatically.
En
glis
h
-4-
1.Mode Switch
2.Preset 1
3.Preset 2
4.Previous
5.Play / Pause
6.Next
7.Status LED
M P1 P2
1 2 3 4 5 67
4. Part Names and Functions
4.1 Top
Quick Start Guide
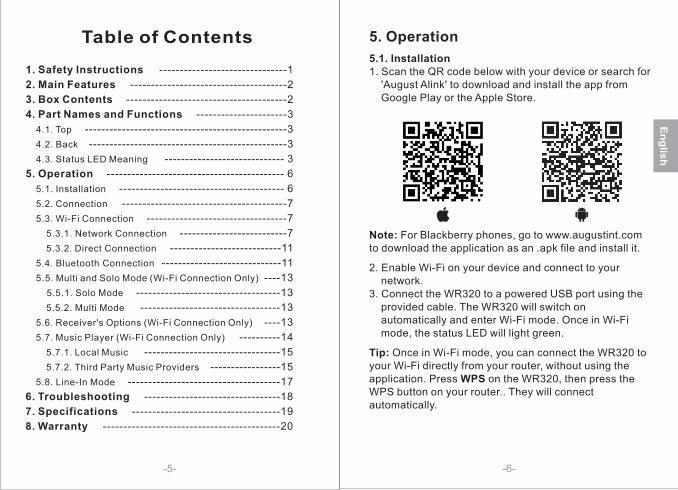
Table of Contents
1. Safety Instructions -------------------------------1
2. Main Features --------------------------------------2
3. Box Contents ---------------------------------------2
4. Part Names and Functions ----------------------3
4.1. Top -------------------------------------------------3
4.2. Back ------------------------------------------------3
4.3. Status LED Meaning ----------------------------- 3
5. Operation ------------------------------------------- 6
5.1. Installation ---------------------------------------- 6
5.2. Connection ----------------------------------------7
5.3. Wi-Fi Connection ----------------------------------7
5.3.1. Network Connection --------------------------7
5.3.2. Direct Connection ---------------------------11
5.4. Bluetooth Connection -----------------------------11
5.5. Multi and Solo Mode (Wi-Fi Connection Only) ----13
5.5.1. Solo Mode -----------------------------------13
5.5.2. Multi Mode ----------------------------------13
5.6. Receiver's Options (Wi-Fi Connection Only) ----13
5.7. Music Player (Wi-Fi Connection Only) ----------14
5.7.1. Local Music ---------------------------------15
5.7.2. Third Party Music Providers -----------------15
5.8. Line-In Mode -------------------------------------17
6. Troubleshooting ---------------------------------18
7. Specifications ------------------------------------19
8. Warranty -------------------------------------------20
5. Operation
5.1. Installation 1. Scan the QR code below with your device or search for 'August Alink' to download and install the app from Google Play or the Apple Store.
Note: For Blackberry phones, go to www.augustint.com to download the application as an .apk file and install it.
2. Enable Wi-Fi on your device and connect to your network.3. Connect the WR320 to a powered USB port using the provided cable. The WR320 will switch on automatically and enter Wi-Fi mode. Once in Wi-Fi mode, the status LED will light green.
Tip: Once in Wi-Fi mode, you can connect the WR320 to your Wi-Fi directly from your router, without using the application. Press WPS on the WR320, then press the WPS button on your router.. They will connect automatically.
En
glis
h
-6--5-
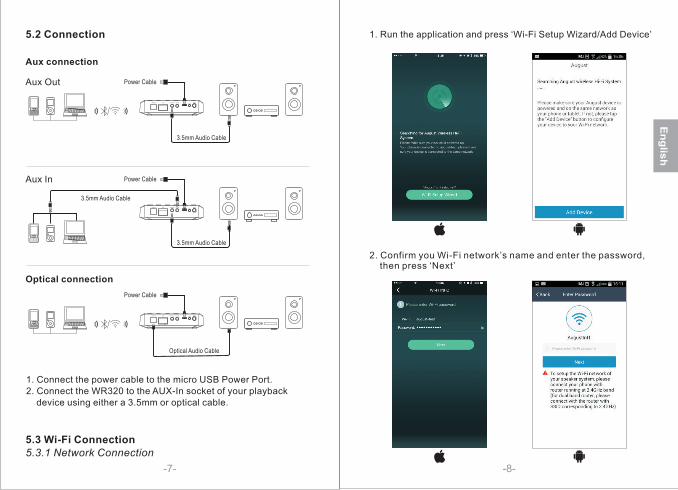
5.2 Connection
5.3 Wi-Fi Connection5.3.1 Network Connection
En
glis
h
-8--7-
Optical connection
3.5mm Audio Cable
Aux connection
AUX INLANOPTICAL AUX OUT WPSDC 5VReset
Power Cable
Optical Audio Cable
AUX INLANOPTICAL AUX OUT WPSDC 5VReset
Power Cable
1. Connect the power cable to the micro USB Power Port.2. Connect the WR320 to the AUX-In socket of your playback device using either a 3.5mm or optical cable.
2. Confirm you Wi-Fi network’s name and enter the password, then press ‘Next’
1. Run the application and press ‘Wi-Fi Setup Wizard/Add Device’
Aux Out
3.5mm Audio CableAUX INLANOPTICAL AUX OUT WPSDC 5V
Reset
Power CableAux In
3.5mm Audio Cable

En
glis
h
-10--9-
3. Press WPS on the WR320, then press 'Next'
4. The application will find the device and set up the Wi-Fi connection. Press 'Cancel/Back' to go back
6. To add another device, press '+' on the 'Device List' page and repeat steps 2-4
5. Once connected, press 'Next/Finish' to finish

5.3.2.Direct ConnectionYou can also connect your phone or tablet directly to the receiver's Wi-Fi network.1. Turn on the Wi-Fi receiver.2. Enter the Wi-Fi setting of your device and connect to the receiver’s Wi-Fi network. The Wi-Fi network’s name is ‘WR320_xxxx’.3. Once connected, your WR320 has become a router and you can play music or add another Wi-Fi device.4. To add another Wi-Fi device, use the same procedure shown in 5.3.1.
Note: To restore the factory settings for the Wi-Fi network, press and hold the Reset button for 10 seconds.
5.4. Bluetooth Connection1. Press 'mode' to change between the Wi-Fi, Bluetooth and Line-in modes.2. The WR320 will enter reconnection mode and will connect automatically to any previously known device. If no known device is available, the WR320 will automatically enter pairing mode after 4 seconds and the status LED will flash blue.3. Enable Bluetooth on the source device.4. Scan for Bluetooth devices on your source device. Select WR320 to connect to it. Once successfully paired, the status LED will light blue.5. To pair to a new device, press and hold the Play / Pause button for 3 seconds to switch WR320 into paring mode again. This can be done either when a device is already connected to the receiver or when
En
glis
h
-11- -12-
the WR320 is in reconnection mode. In pairing mode, the status LED will flash blue.
Note: When the source device is switched off, the WR320 will enter reconnection mode. The LED will flash blue and you will be able to reconnect to any previously paired device.
Windows XP and Windows Vista require third party software to connect to WR320. If you are using a later version of Windows and the WR320 is not outputting audio, please check that the drivers for your PC's Bluetooth module are up to date and that the Audio Output source is set to the receiver.
5.5 Multi and Solo Mode (Wi-Fi Connection Only) Two Speaker playback settings can be selected in the ‘DEVICE LIST’
Tip: The ‘DEVICE LIST’ can be accessed from any screen of the app by sliding the screen towards the left.
5.5.1 Solo ModeSolo mode enables multiple speakers that are connected to the same network to play different music individually. Speakers are by default in solo mode.
5.5.2 Multi ModeMulti mode enables you to group some or all of the speakers connected to a network and have them play the same music. This can be used to separate left and right channels between speakers (see 5.6 Receiver Options). To group speakers, press and hold the icon of a secondary device and drag it towards the main device's icon. To ungroup the speakers, press and hold a secondary device’s icon and drag it down past the dotted line on the screen.
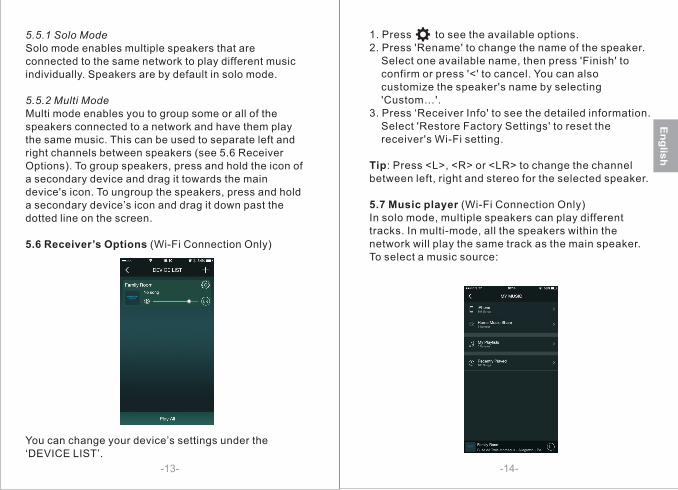
5.6 Receiver’s Options (Wi-Fi Connection Only)
You can change your device’s settings under the ‘DEVICE LIST’.
En
glis
h
-14--13-
1. Press to see the available options. 2. Press 'Rename' to change the name of the speaker. Select one available name, then press 'Finish' to confirm or press '<' to cancel. You can also customize the speaker's name by selecting 'Custom…'.3. Press ‘Receiver Info' to see the detailed information. Select 'Restore Factory Settings' to reset the receiver's Wi-Fi setting.
Tip: Press <L>, <R> or <LR> to change the channel between left, right and stereo for the selected speaker.
5.7 Music player (Wi-Fi Connection Only)In solo mode, multiple speakers can play different tracks. In multi-mode, all the speakers within the network will play the same track as the main speaker.To select a music source:

Tip: the different music sources can be accessed from any screen of the app by sliding the screen towards the right
5.7.1. Local Music• Press the music icon under the ‘DEVICE LIST’. • Press ‘My Music’ to search for local music. • Press the device icon to view all the tracks on the device and select one to play.• Under 'Song', press to see more options.
5.7.2 Third Party Music Providers
• Press ‘Settings’ to change the list of music providers.
• Press the icon of a third party to see its options or open the application.
• Press ‘Search’ to search the online music provider for songs, artists and albums.
En
glis
h
-16--15-
Tip: For albums / stations, select one and press to save this album for easy access. You can access albums / stations from the speaker's settings.
Note: Some third party applications need Air Play and can only be used with IOS.
1. Current music source
2. Current speaker
3. Press to add to the favourites /
remove from the favourites
4. Press to see the current playlist
5. Repeat and Shuffle option
6. Track controls
7. Volume control
21
3 4
5 7
6 6
En
glis
h
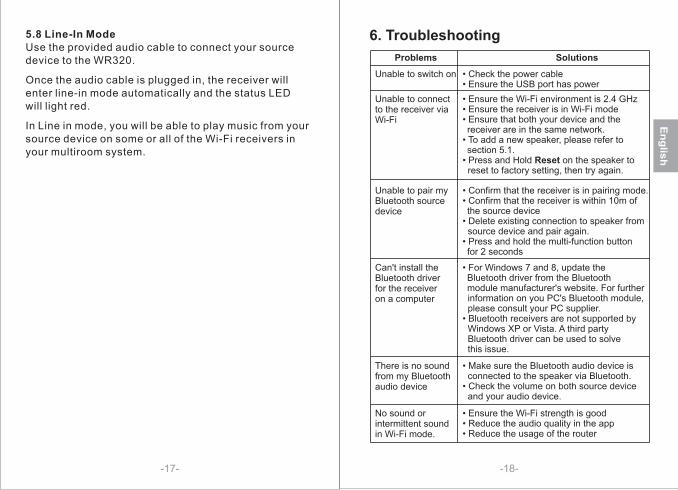
5.8 Line-In ModeUse the provided audio cable to connect your source device to the WR320.
Once the audio cable is plugged in, the receiver will enter line-in mode automatically and the status LED will light red.
In Line in mode, you will be able to play music from your source device on some or all of the Wi-Fi receivers in your multiroom system.
-18--17-
Problems Solutions
Unable to switch on • Check the power cable• Ensure the USB port has power
6. Troubleshooting
Unable to connect to the receiver via Wi-Fi
• Ensure the Wi-Fi environment is 2.4 GHz• Ensure the receiver is in Wi-Fi mode• Ensure that both your device and the are in the same network.• To add a new speaker, please refer to section 5.1.• Press and Hold Reset on the speaker to reset to factory setting, then try again.
receiver
Unable to pair my Bluetooth source device
• Confirm that the is in pairing mode.• Confirm that the receiver is within 10m of the source device• Delete existing connection to speaker from source device and pair again.• Press and hold the multi-function button for 2 seconds
receiver
Can't install the Bluetooth driver for the receiver on a computer
• For Windows 7 and 8, update the Bluetooth driver from the Bluetooth module manufacturer's website. For further information on you PC's Bluetooth module, please consult your PC supplier.• Bluetooth receivers are not supported by Windows XP or Vista. A third party Bluetooth driver can be used to solve this issue.
There is no sound from my Bluetooth audio device
• Make sure the Bluetooth audio device is connected to the speaker via Bluetooth.• Check the volume on both source device and your audio device.
No sound or intermittent sound in Wi-Fi mode.
• Ensure the Wi-Fi strength is good• Reduce the audio quality in the app• Reduce the usage of the router

En
glis
h
7. Specifications
Wi-Fi Profile
Bluetooth Version
Bluetooth Profiles
Bluetooth Operating Range
Power Input
Dimensions
Up to 10m (Class 2 )
DC 5V/500mA
Net Weight
140 x 86.5 x 25mm
165g
This product is guaranteed for twelve months from the date of the original purchase. In the unlikely event of any defect arising due to faulty materials or workmanship, the unit will be either replaced or repaired free of charge (where possible) during this period. An alternative product will be offered in case the product is no longer available or repairable.
This warranty is subject to the following conditions:The warranty is only valid within the country where the
product was purchased.The product must be correctly installed and operated
in accordance with the instructions given in this user manual.
The product must be used solely for domestic purposes.
The warranty covers only the main units and does not cover the accessories.
The warranty does not cover the damage caused by misuse, negligence, accident or natural disaster.
The warranty will be rendered invalid if the product is resold or has been damaged by inexpert repairs. The manufacturers disclaim any liability for incidental or consequential damages.
Please consult one of our customer service advisers before returning any product; we are not responsible for any unexpected product returns.
Any faulty product must be kept and returned in the original packaging with all the accessories and the original copy of the purchase receipt.
The warranty is in addition to, and does not diminish, your statutory or legal rights.
Customer Service:Telephone: +44 (0) 845 250 0586Email: [email protected]
8. Warranty
-19-
802.11 a/b/g/n
V4.0
A2DP, AVRCP, PBAP
SNR
Wi-Fi Operation Range
≥80dB
Up to 100m
-20-
Wi-Fi Band
Frequency Response
Distortion
2.4GHz
20Hz-20KHz
≤1.0% at 1KHz

En
glis
h
This product is in compliance with the essential requirements and other relevant provisions of Directive 1999/5/EC. The declaration of conformity may be consulted at August International Ltd, Rawmec Business Park, Plumpton Road, Hoddesdon, EN11 0EE, United Kingdom.
-22--21-