white paper - heimdal security · websense, fortigate, sonicwall, ... for software center endpoint...
TRANSCRIPT
Unrestricted document
© Copyright 2016 – Heimdal Security A/S. All rights reserved
Heimdal Security
White Paper Technical whitepaper and implementation guide for corporate environments
Technical Whitepaper
Page 2 of 65
1. Table of contents
1. Table of contents .............................................................................................................................................. 2
1.Prelude ................................................................................................................................................................. 4
2. Who is Heimdal Security ................................................................................................................................. 4
3. What is Heimdal Corporate ............................................................................................................................ 4
3.1. Automatic patching of 3rd party software ......................................................................................................... 4
3.2. Traffic scanning - Malicious site blocking, Zero-hour protection, Data protection .......................................... 4
3.3. Detection of data stealing malware and financial malware ............................................................................... 6
4. System Requirements....................................................................................................................................... 7
4.1. PC rights ............................................................................................................................................................ 7
4.2. Resource usage .................................................................................................................................................. 7
4.3. What Changes Do Heimdal Apply When Installed? ......................................................................................... 8
4.4. Software compliance ......................................................................................................................................... 8
4.5. Web based administration module .................................................................................................................. 10
5. Function description ...................................................................................................................................... 10
5.1. Heimdal software client .................................................................................................................................. 10
5.1.1. Installation Process and usage environments.......................................................................................... 10
5.1.2. Creating adapted MSI installation files .................................................................................................. 12
5.1.3. Distribution of Heimdal through Active Directory Group Policy Management ..................................... 16
5.1.4. Heimdal’s Group policies without AD groups ....................................................................................... 24
5.1.5. Heimdal’s Group policies with AD groups ............................................................................................ 24
5.1.6. Heimdal combined with Authentication Proxy ...................................................................................... 27
5.1.7. Internet WebServers ............................................................................................................................... 28
5.1.8. Static IP / DNS Environments Settings .................................................................................................. 28
5.1.9. Virtualization environments ................................................................................................................... 30
5.1.10. Using Heimdal with Cisco Anyconnect VPN ......................................................................................... 31
5.1.11. Other environments ................................................................................................................................ 32
5.1.12. Heimdal VPN compatibility ................................................................................................................... 32
5.1.13. Usage on Terminal servers or Citrix servers .......................................................................................... 32
5.1.14. Internet Protocol Version........................................................................................................................ 33
5.1.15. Multiple Server Mode ............................................................................................................................. 34
5.1.16. Uninstall Process .................................................................................................................................... 34
6. Features ........................................................................................................................................................... 35
6.1.1. Patch Management ................................................................................................................................. 35
6.1.2. Traffic check – Malicious websites, zero-day exploits and data ex-filtration ........................................ 37
6.1.3. Detection of data stealing or financial malware ..................................................................................... 38
6.2. Web based management interface ................................................................................................................... 38
6.2.1. Account activation and install ................................................................................................................ 40
6.2.2. Malware Overview ................................................................................................................................. 41
6.2.3. Vulnerability Overview .......................................................................................................................... 43
6.2.4. DarkLayer Guard Overview ................................................................................................................... 45
6.2.5. Active clients .......................................................................................................................................... 49
6.2.6. Group policy Overview .......................................................................................................................... 51
6.2.7. ROI Report ............................................................................................................................................. 52
Technical Whitepaper
Page 3 of 65
6.2.8. How can I activate my Dashboard account? ........................................................................................... 52
6.2.9. Heimdal ApiKey? ................................................................................................................................... 52
6.2.10. Dashboard Login FAQ ........................................................................................................................... 52
6.2.11. How To Use Google Authenticator On Google Chrome Browser ......................................................... 53
6.2.12. What is Heimdal RC? ............................................................................................................................. 54
7. User interface.................................................................................................................................................. 57
7.1.1. The Overview tab ................................................................................................................................... 57
7.1.2. TRAFFIC SCANNING TAB ................................................................................................................. 57
7.1.3. MALWARE ENGINE TAB ................................................................................................................... 59
7.1.4. PATCHING SYSTEM TAB .................................................................................................................. 60
7.1.5. VIEW LOG SECTION ........................................................................................................................... 62
7.1.6. SETTINGS TAB .................................................................................................................................... 64
Technical Whitepaper
Page 4 of 65
1.Prelude This document contains an in depth technical walkthrough of Heimdal Corporate. The document describes the software
units, communication, system requirements, implementation recommendation and administration processes.
2. Who is Heimdal Security Heimdal is a security product launched in 2011 by Denmark-based company CSIS Security Group. In early 2014,
Heimdal Security spun off from CSIS Security Group and became a separate entity. Today Heimdal Security works
with major corporations, public entities and banks across the world in fighting against e-Crime.
Since its inception in 2011, Heimdal set new standards in financial malware detection by continuously following IT
criminals’ footsteps and providing the best security solution for organizations as well as private individuals.
3. What is Heimdal Corporate Information theft and data leakage increased by more than 50% over the last two years and continue to create new
security challenges for corporations across continents. Heimdal protects a corporation’s private information and data by
combining different safety measures:
3.1. Automatic patching of 3rd party software More than 80% of all attacks happen by using exploits in 3rd party software. Heimdal identifies and automatically
updates 3rd party software on any computer it is installed upon, so that cyber criminals won’t be able to take advantage
of any vulnerability. Heimdal is designed to have low resource consumption, using as few system resources as possible
- only 35 MB of memory - and works without interrupting the user.
3.2. Traffic scanning - Malicious site blocking, Zero-hour protection, Data
protection Both work-related and private Internet usage create challenges for corporations, as it becomes difficult for the average
user to defend himself from advanced malware techniques employed by cyber criminals. Since malicious code can be
executed even from legitimate websites, through drive-by attacks, or through phishing links, checking traffic for
application using web technologies is a must for all company endpoints.
Technical Whitepaper
Page 5 of 65
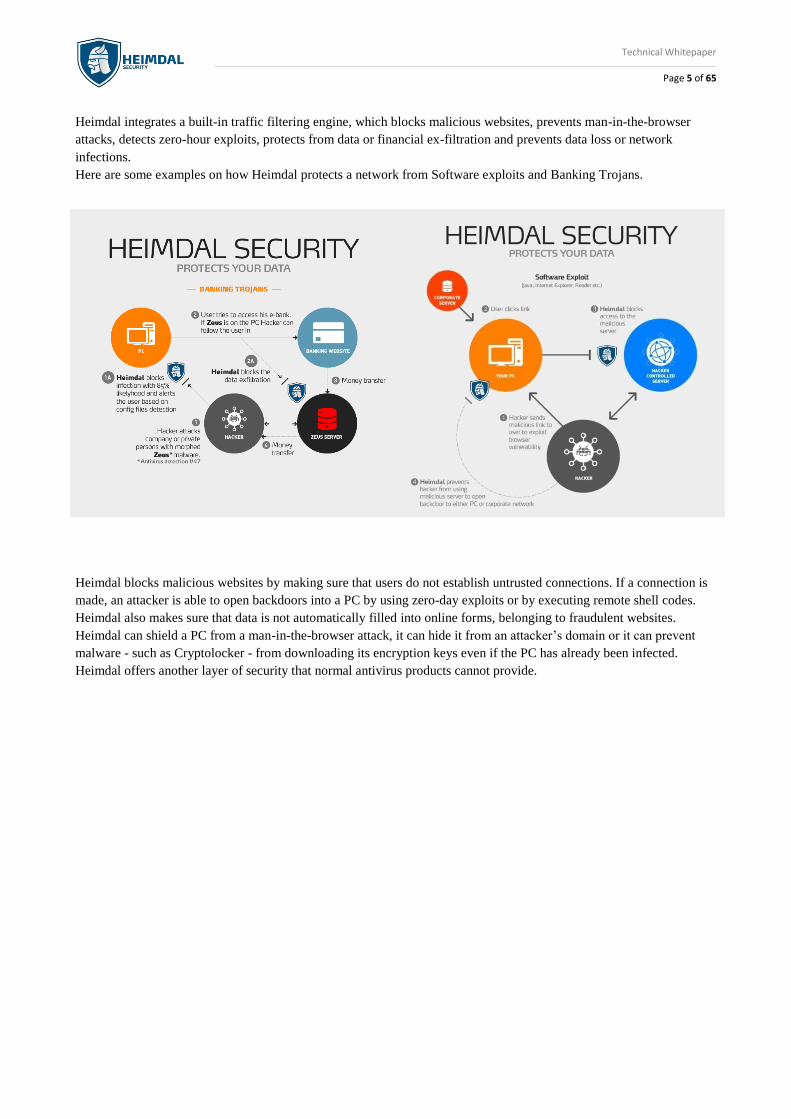
Heimdal integrates a built-in traffic filtering engine, which blocks malicious websites, prevents man-in-the-browser
attacks, detects zero-hour exploits, protects from data or financial ex-filtration and prevents data loss or network
infections.
Here are some examples on how Heimdal protects a network from Software exploits and Banking Trojans.
Heimdal blocks malicious websites by making sure that users do not establish untrusted connections. If a connection is
made, an attacker is able to open backdoors into a PC by using zero-day exploits or by executing remote shell codes.
Heimdal also makes sure that data is not automatically filled into online forms, belonging to fraudulent websites.
Heimdal can shield a PC from a man-in-the-browser attack, it can hide it from an attacker’s domain or it can prevent
malware - such as Cryptolocker - from downloading its encryption keys even if the PC has already been infected.
Heimdal offers another layer of security that normal antivirus products cannot provide.
Technical Whitepaper
Page 6 of 65
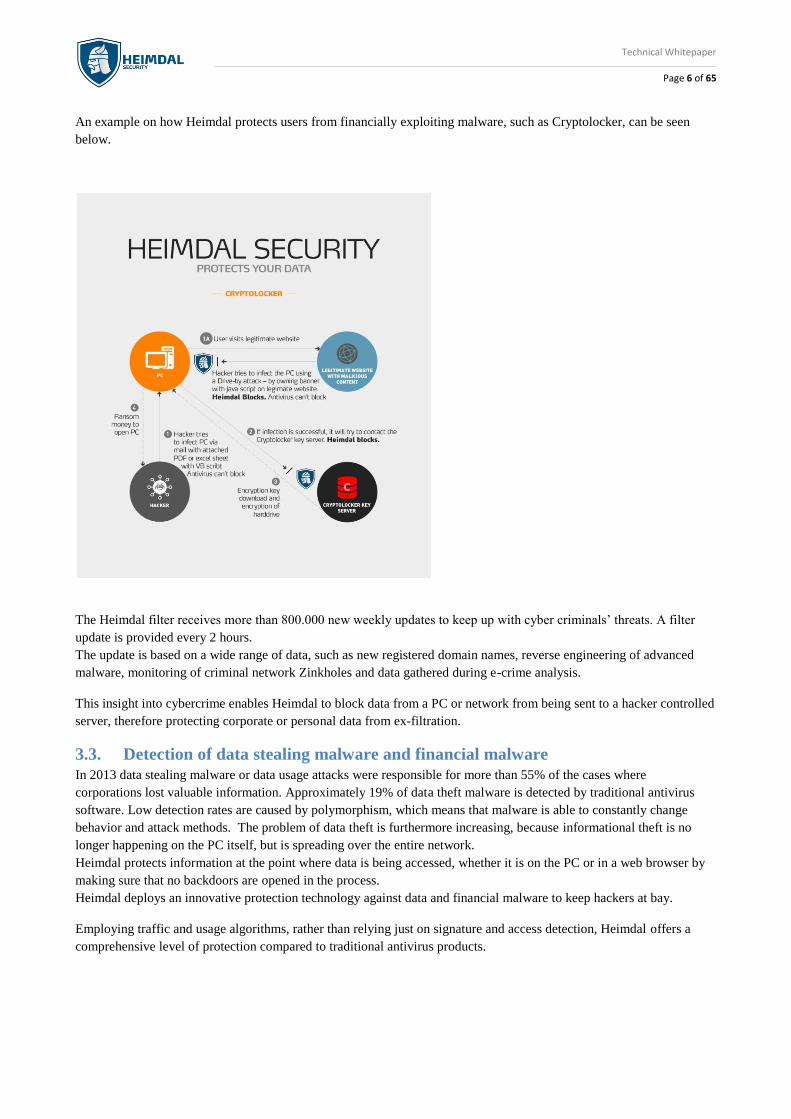
An example on how Heimdal protects users from financially exploiting malware, such as Cryptolocker, can be seen
below.
The Heimdal filter receives more than 800.000 new weekly updates to keep up with cyber criminals’ threats. A filter
update is provided every 2 hours.
The update is based on a wide range of data, such as new registered domain names, reverse engineering of advanced
malware, monitoring of criminal network Zinkholes and data gathered during e-crime analysis.
This insight into cybercrime enables Heimdal to block data from a PC or network from being sent to a hacker controlled
server, therefore protecting corporate or personal data from ex-filtration.
3.3. Detection of data stealing malware and financial malware
In 2013 data stealing malware or data usage attacks were responsible for more than 55% of the cases where
corporations lost valuable information. Approximately 19% of data theft malware is detected by traditional antivirus
software. Low detection rates are caused by polymorphism, which means that malware is able to constantly change
behavior and attack methods. The problem of data theft is furthermore increasing, because informational theft is no
longer happening on the PC itself, but is spreading over the entire network.
Heimdal protects information at the point where data is being accessed, whether it is on the PC or in a web browser by
making sure that no backdoors are opened in the process.
Heimdal deploys an innovative protection technology against data and financial malware to keep hackers at bay.
Employing traffic and usage algorithms, rather than relying just on signature and access detection, Heimdal offers a
comprehensive level of protection compared to traditional antivirus products.
Technical Whitepaper
Page 7 of 65
4. System Requirements You may install Heimdal on computers running the following operating systems:
• Windows 7 (32 and 64 bit)
• Windows 8 (32 and 64 bit)
• Windows 8.1 (32 and 64 bit)
• Windows 10 (32 and 64 bit)
• Windows Server 2008 R2 with SP1
• Windows Server 2012/2012 R2.
• Windows Server 2016
Heimdal has the following system requirements:
• Microsoft .NET Framework 4.6.1
• Takes 100 MB disk space
• Takes 250 MB RAM
• Takes 3% of CPU usage
• Local administrator or domain administrator (if in domain) rights during installations
• User rights during execution
• Internet access
*if Heimdal is used on a server, the .NET Framework version should be locked. We do not recommend to have
the .NET Framework set on auto updating!
For the best experience, we recommend you to use the latest version of any operating system.
4.1. PC rights To install, close or restart Heimdal, you must have administrative rights over that computer.
If you have local user rights, you can still run the user interface or update the product.
Action: Required user rights:
Installation of Heimdal Local administrator
Automatic update of Heimdal* Local user
Patching 3. party software* Local user
Traffic filtering and Malware engine Local user
Reboot or restart of Heimdal Local administrator
Manual starting Heimdal Local administrator
Changing locked setting locally for Heimdal Not Possible
* If the used group policy allows the action to be permitted locally.
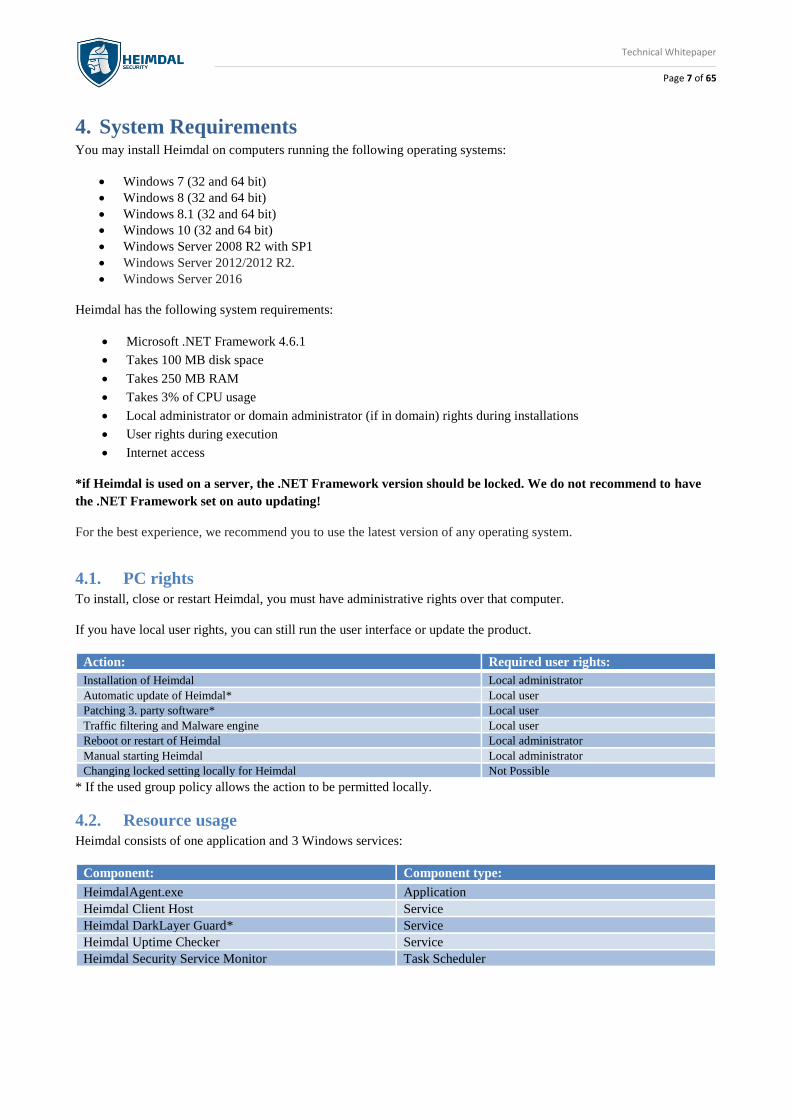
4.2. Resource usage Heimdal consists of one application and 3 Windows services:
Component: Component type:
HeimdalAgent.exe Application
Heimdal Client Host Service
Heimdal DarkLayer Guard* Service
Heimdal Uptime Checker Service
Heimdal Security Service Monitor Task Scheduler
Technical Whitepaper
Page 8 of 65
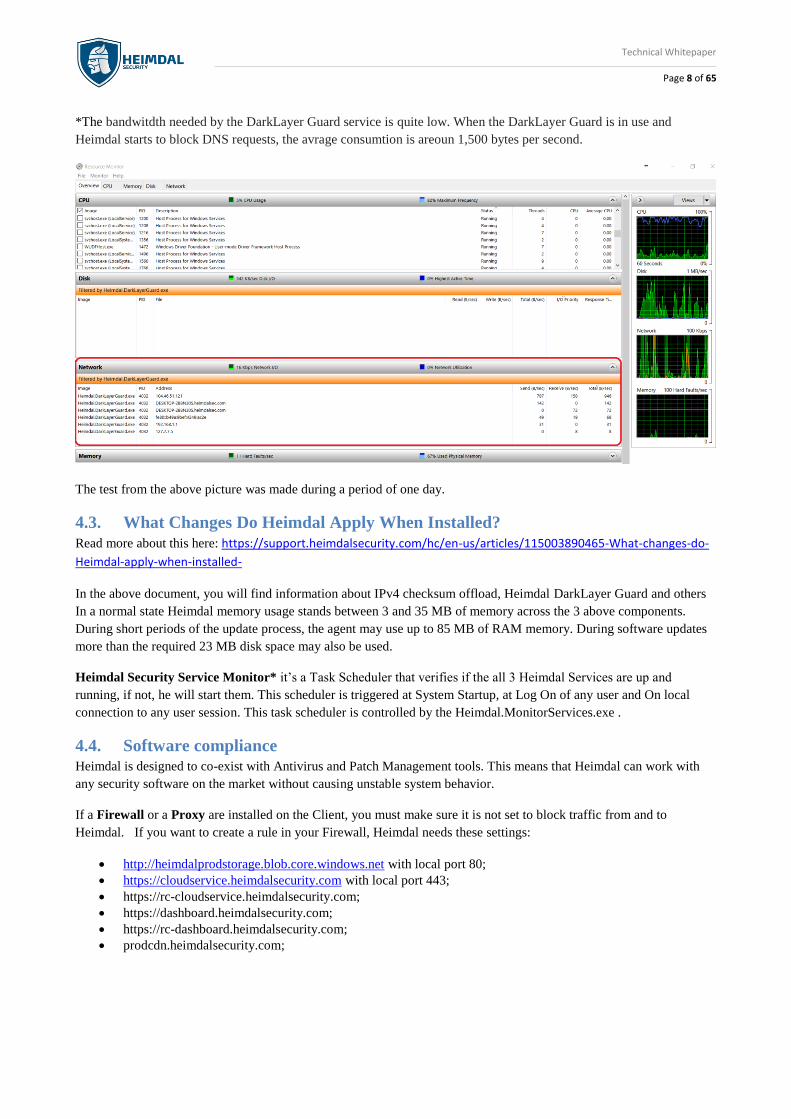
*The bandwitdth needed by the DarkLayer Guard service is quite low. When the DarkLayer Guard is in use and
Heimdal starts to block DNS requests, the avrage consumtion is areoun 1,500 bytes per second.
The test from the above picture was made during a period of one day.
4.3. What Changes Do Heimdal Apply When Installed?
Read more about this here: https://support.heimdalsecurity.com/hc/en-us/articles/115003890465-What-changes-do-
Heimdal-apply-when-installed-
In the above document, you will find information about IPv4 checksum offload, Heimdal DarkLayer Guard and others
In a normal state Heimdal memory usage stands between 3 and 35 MB of memory across the 3 above components.
During short periods of the update process, the agent may use up to 85 MB of RAM memory. During software updates
more than the required 23 MB disk space may also be used.
Heimdal Security Service Monitor* it’s a Task Scheduler that verifies if the all 3 Heimdal Services are up and
running, if not, he will start them. This scheduler is triggered at System Startup, at Log On of any user and On local
connection to any user session. This task scheduler is controlled by the Heimdal.MonitorServices.exe .
4.4. Software compliance Heimdal is designed to co-exist with Antivirus and Patch Management tools. This means that Heimdal can work with
any security software on the market without causing unstable system behavior.
If a Firewall or a Proxy are installed on the Client, you must make sure it is not set to block traffic from and to
Heimdal. If you want to create a rule in your Firewall, Heimdal needs these settings:
• http://heimdalprodstorage.blob.core.windows.net with local port 80;
• https://cloudservice.heimdalsecurity.com with local port 443;
• https://rc-cloudservice.heimdalsecurity.com;
• https://dashboard.heimdalsecurity.com;
• https://rc-dashboard.heimdalsecurity.com;
• prodcdn.heimdalsecurity.com;
Technical Whitepaper
Page 9 of 65
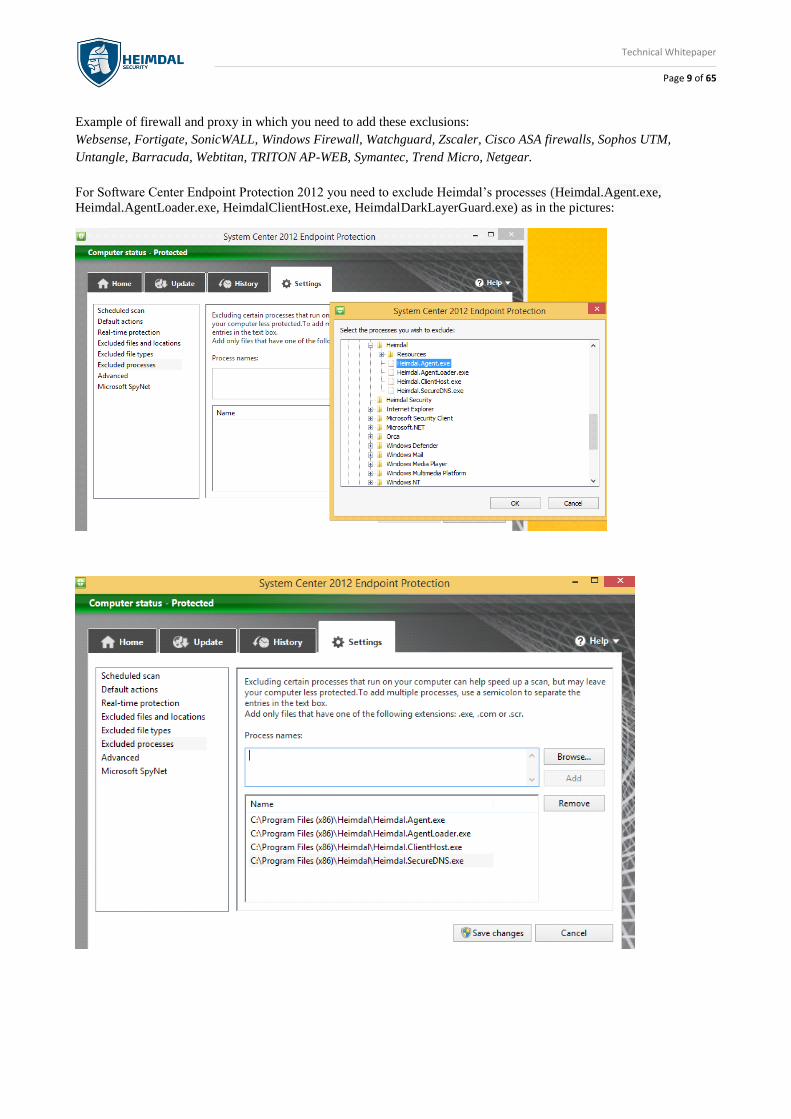
Example of firewall and proxy in which you need to add these exclusions:
Websense, Fortigate, SonicWALL, Windows Firewall, Watchguard, Zscaler, Cisco ASA firewalls, Sophos UTM,
Untangle, Barracuda, Webtitan, TRITON AP-WEB, Symantec, Trend Micro, Netgear.
For Software Center Endpoint Protection 2012 you need to exclude Heimdal’s processes (Heimdal.Agent.exe,
Heimdal.AgentLoader.exe, HeimdalClientHost.exe, HeimdalDarkLayerGuard.exe) as in the pictures:
Technical Whitepaper
Page 10 of 65
4.5. Web based administration module
Heimdal Corporate includes an online management tool, which can be accessed through
https://dashboard.heimdalsecurity.com .
The site is compatible with Chrome, this is the only browser in which the dashboard was tested, but is 99% functional in
all the other browsers as well.
5. Function description Heimdal Corporate consists of 3 elements; a software client, a content delivery network (CDN) and a web based
statistics module.
5.1. Heimdal software client
Heimdal is installed via an installation file and can be deployed automatically in corporate environments, using different
installation triggers.
5.1.1. Installation Process and usage environments
Heimdal can be installed via an MSI based installer.
5.1.1.1. Installation via MSI file
It is also possible to install Heimdal via MSI. The newest version including detailed documentation can be downloaded
below: http://heimdalprodstorage.blob.core.windows.net/setup/Heimdal.msi
In order to be able to install Heimdal Corporate please verify that you have Microsoft .NET Framework 4.6.1 full profile with all
the appropriate updates. If Microsoft .NET Framework 4.6.1 is not installed onto your computer, please download it from here:
https://www.microsoft.com/en-us/download/details.aspx?id=49982
Each time a new version of Heimdal is released, we are also releasing a Beta version that contains fixes, improvements
or other changes that will appear in the next official launch. This is the download link for the beta version:
https://heimdalprodstorage.blob.core.windows.net/setup/Heimdal-rc.msi
If you want to install or test the Beta version of Heimdal, we do not recommend you to do it on more than 1 or 2
machines, because this version can be instable and cause problems.
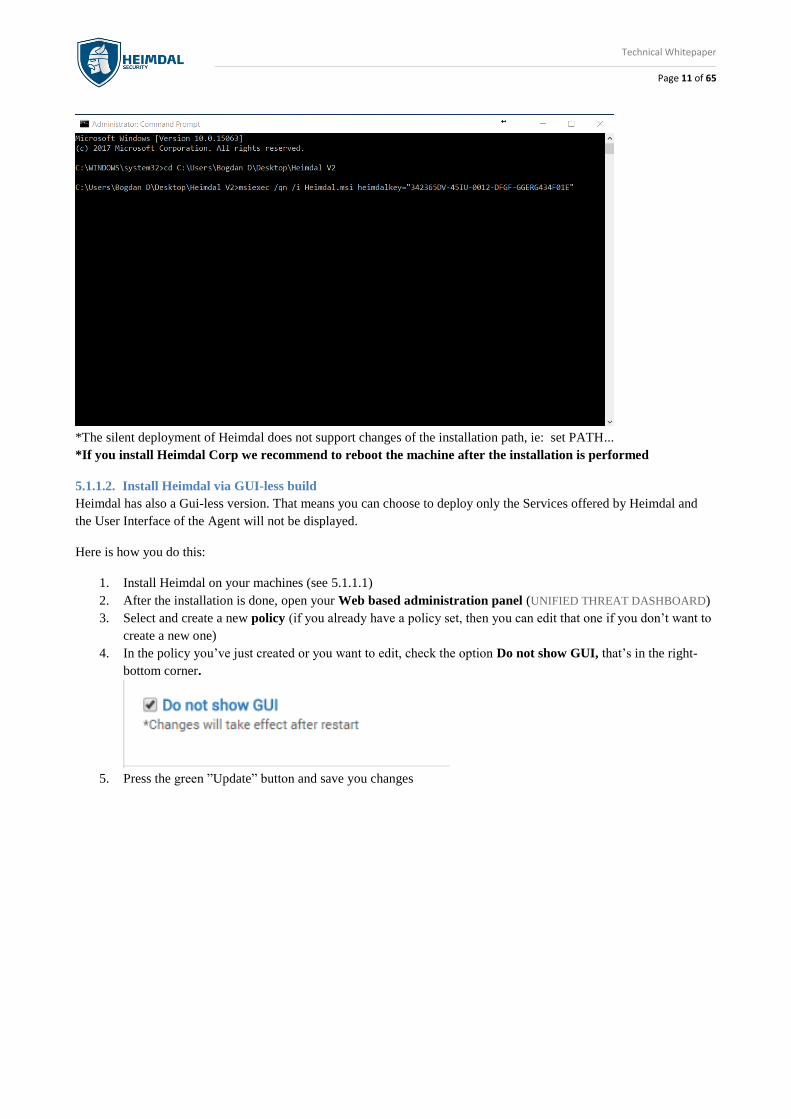
An example of an installation string that would install Heimdal automatically is:
msiexec /qn /i Heimdal.msi heimdalkey="key here"
Technical Whitepaper
Page 11 of 65
*The silent deployment of Heimdal does not support changes of the installation path, ie: set PATH...
*If you install Heimdal Corp we recommend to reboot the machine after the installation is performed
5.1.1.2. Install Heimdal via GUI-less build
Heimdal has also a Gui-less version. That means you can choose to deploy only the Services offered by Heimdal and
the User Interface of the Agent will not be displayed.
Here is how you do this:
1. Install Heimdal on your machines (see 5.1.1.1)
2. After the installation is done, open your Web based administration panel (UNIFIED THREAT DASHBOARD)
3. Select and create a new policy (if you already have a policy set, then you can edit that one if you don’t want to
create a new one)
4. In the policy you’ve just created or you want to edit, check the option Do not show GUI, that’s in the right-
bottom corner.
5. Press the green ”Update” button and save you changes

Technical Whitepaper
Page 12 of 65
The changes will be applied after all the machines on which Heimdal is installed will receive a reboot. It is very
important to reboot the machines, otherwise the Gui-less version will not be activated.
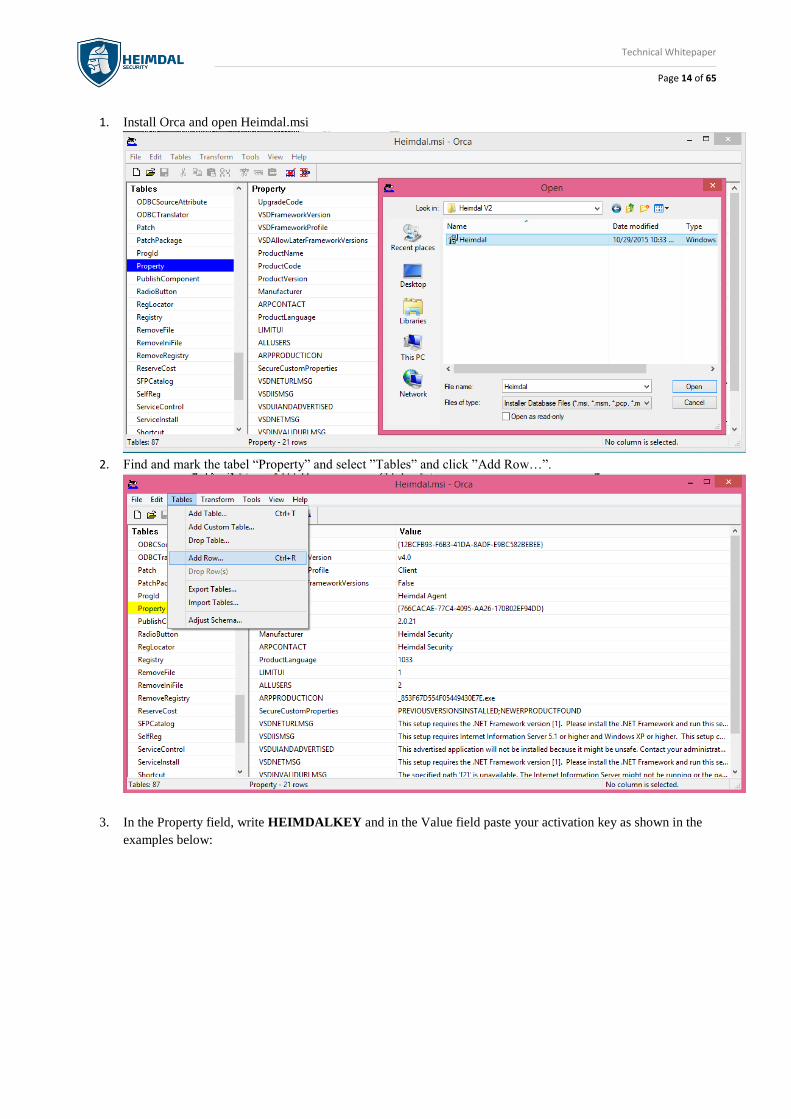
5.1.2. Creating adapted MSI installation files
It is possible to install Heimdal in non-command accepting environments such as Active Directory Group Policy
Management and similar systems.
The activation key can be inserted directly into the MSI, as a row with the property ”HEIMDALKEY” and Value
”[activationkey/serialkey]”. The following section shows the approach to be used when inserting the activation key
using Orca Version 5.0.9600.0
Technical Whitepaper
Page 13 of 65
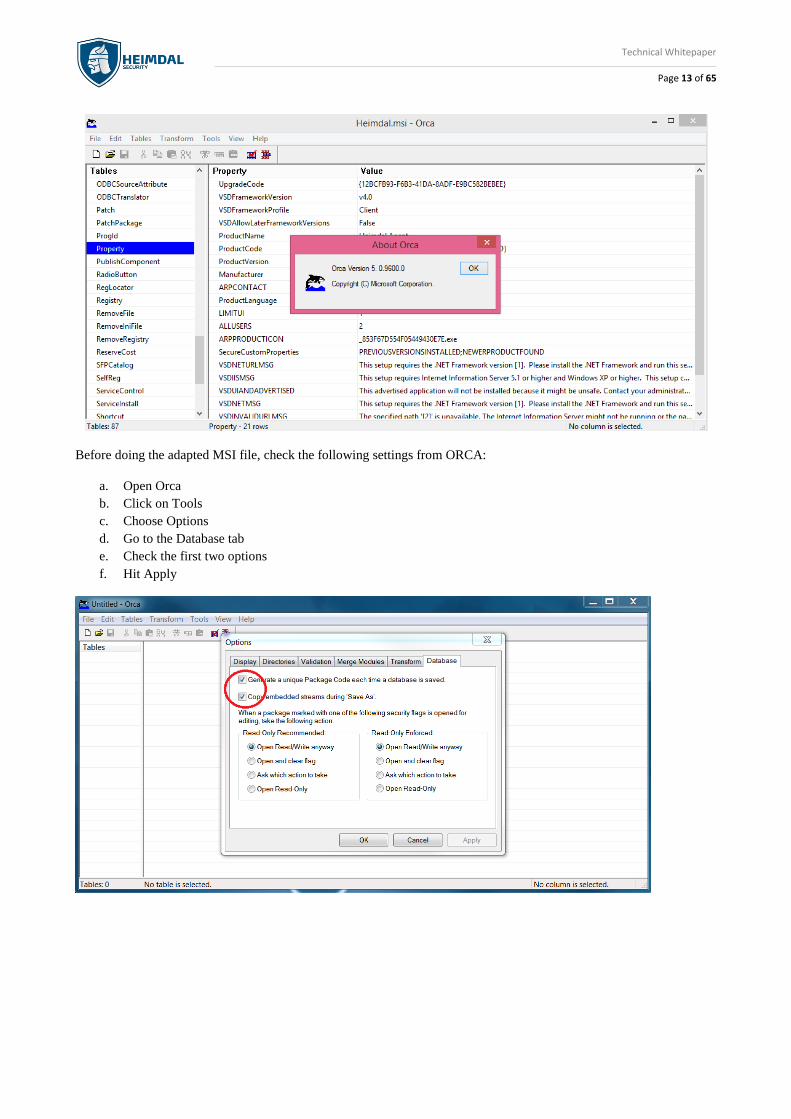
Before doing the adapted MSI file, check the following settings from ORCA:
a. Open Orca
b. Click on Tools
c. Choose Options
d. Go to the Database tab
e. Check the first two options
f. Hit Apply
Technical Whitepaper
Page 14 of 65
1. Install Orca and open Heimdal.msi
2. Find and mark the tabel “Property” and select ”Tables” and click ”Add Row…”.
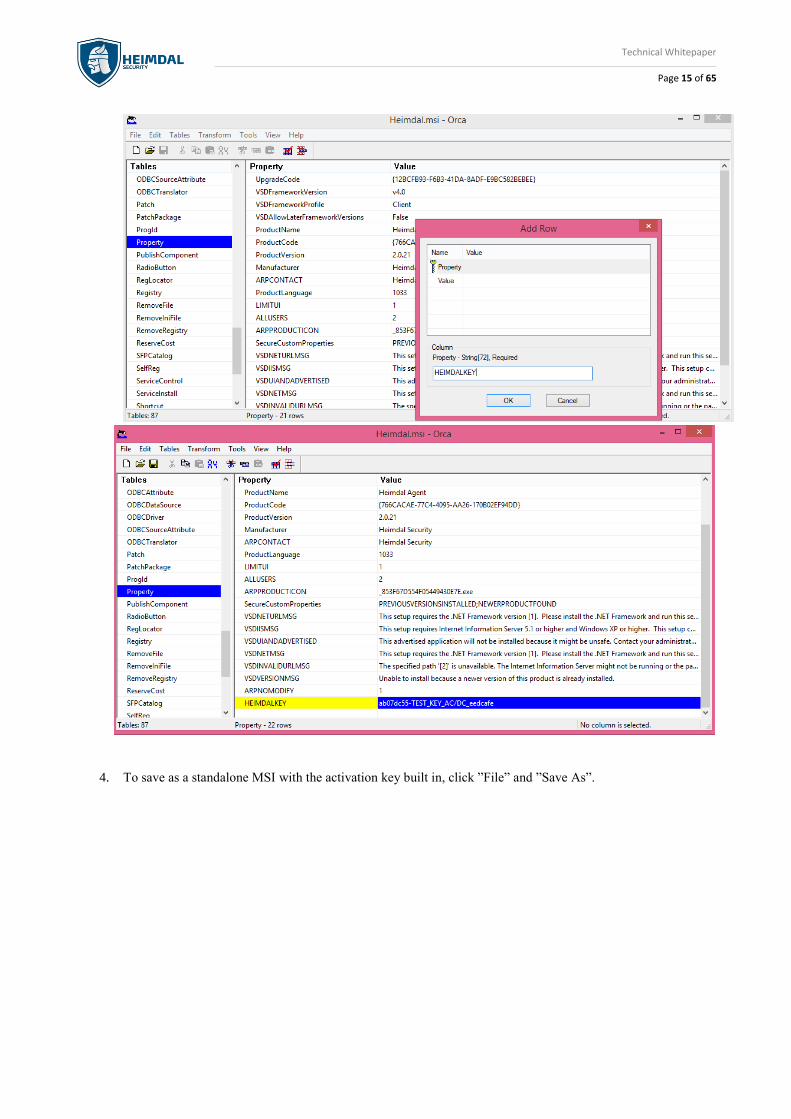
3. In the Property field, write HEIMDALKEY and in the Value field paste your activation key as shown in the
examples below:
Technical Whitepaper
Page 15 of 65
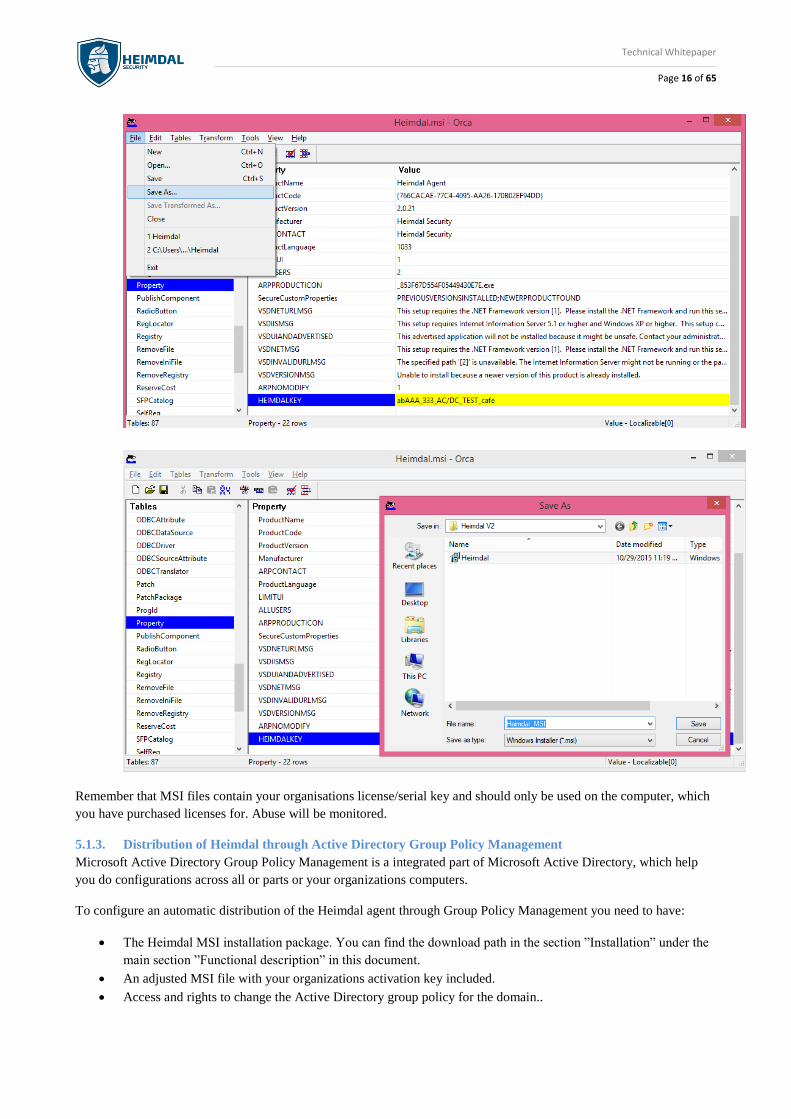
4. To save as a standalone MSI with the activation key built in, click ”File” and ”Save As”.
Technical Whitepaper
Page 16 of 65
Remember that MSI files contain your organisations license/serial key and should only be used on the computer, which
you have purchased licenses for. Abuse will be monitored.
5.1.3. Distribution of Heimdal through Active Directory Group Policy Management
Microsoft Active Directory Group Policy Management is a integrated part of Microsoft Active Directory, which help
you do configurations across all or parts or your organizations computers.
To configure an automatic distribution of the Heimdal agent through Group Policy Management you need to have:
• The Heimdal MSI installation package. You can find the download path in the section ”Installation” under the
main section ”Functional description” in this document.
• An adjusted MSI file with your organizations activation key included.
• Access and rights to change the Active Directory group policy for the domain..
Technical Whitepaper
Page 17 of 65
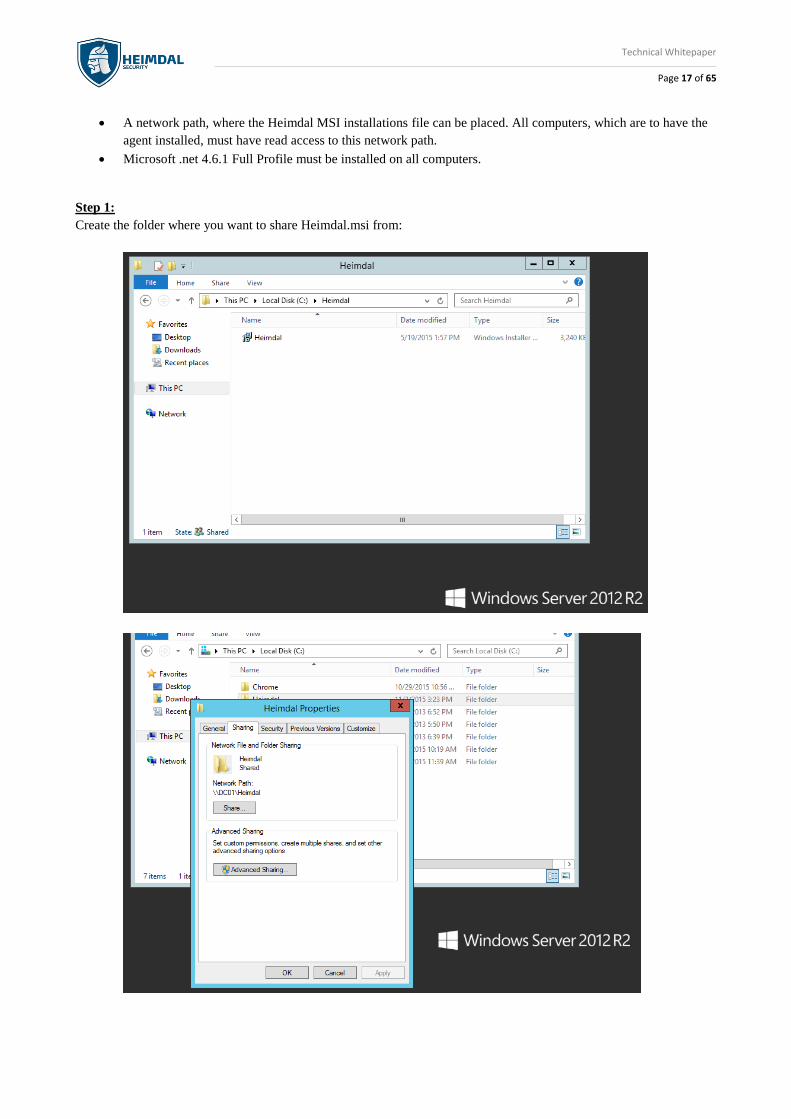
• A network path, where the Heimdal MSI installations file can be placed. All computers, which are to have the
agent installed, must have read access to this network path.
• Microsoft .net 4.6.1 Full Profile must be installed on all computers.
Step 1:
Create the folder where you want to share Heimdal.msi from:
Technical Whitepaper
Page 18 of 65
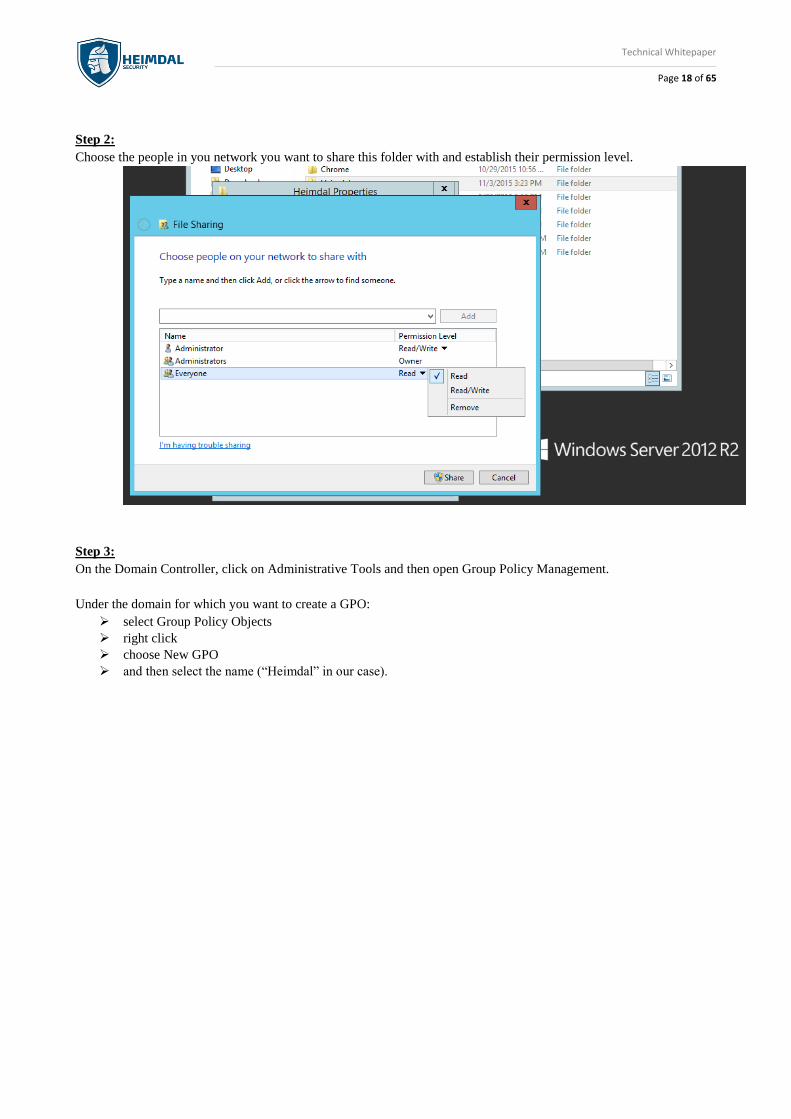
Step 2:
Choose the people in you network you want to share this folder with and establish their permission level.
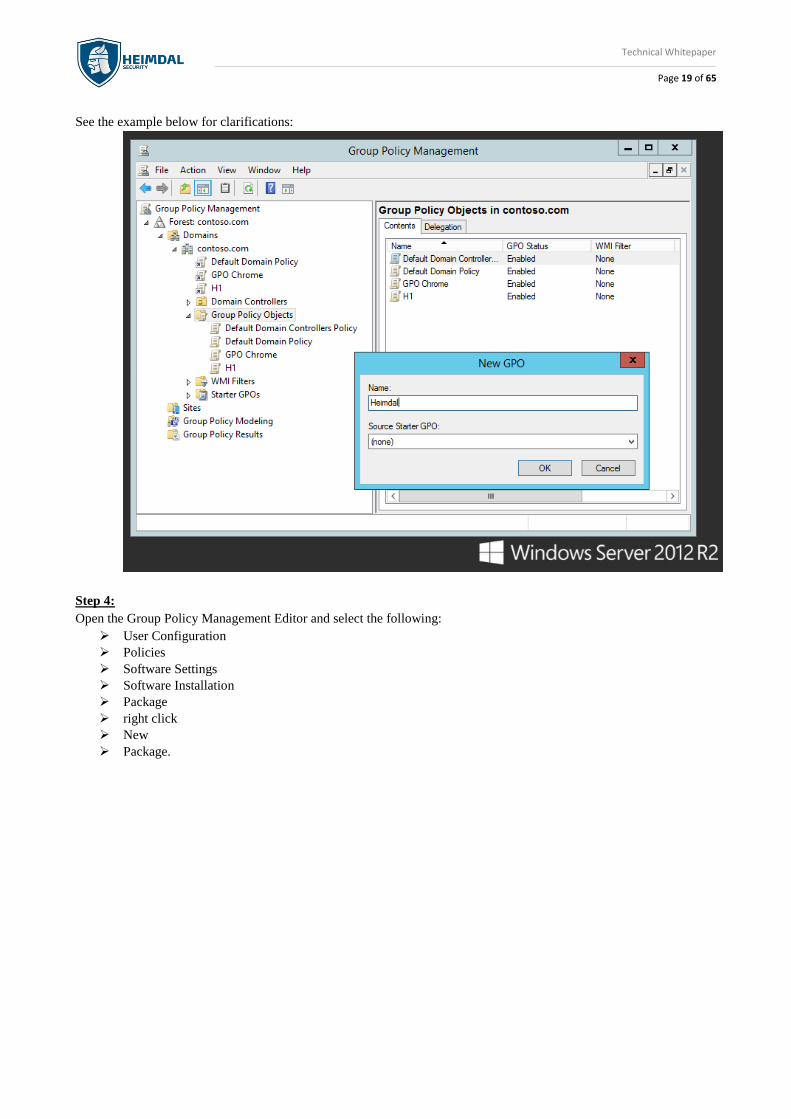
Step 3:
On the Domain Controller, click on Administrative Tools and then open Group Policy Management.
Under the domain for which you want to create a GPO:
➢ select Group Policy Objects
➢ right click
➢ choose New GPO
➢ and then select the name (“Heimdal” in our case).
Technical Whitepaper
Page 19 of 65
See the example below for clarifications:
Step 4:
Open the Group Policy Management Editor and select the following:
➢ User Configuration
➢ Policies
➢ Software Settings
➢ Software Installation
➢ Package
➢ right click
➢ New
➢ Package.

Technical Whitepaper
Page 20 of 65
Technical Whitepaper
Page 21 of 65
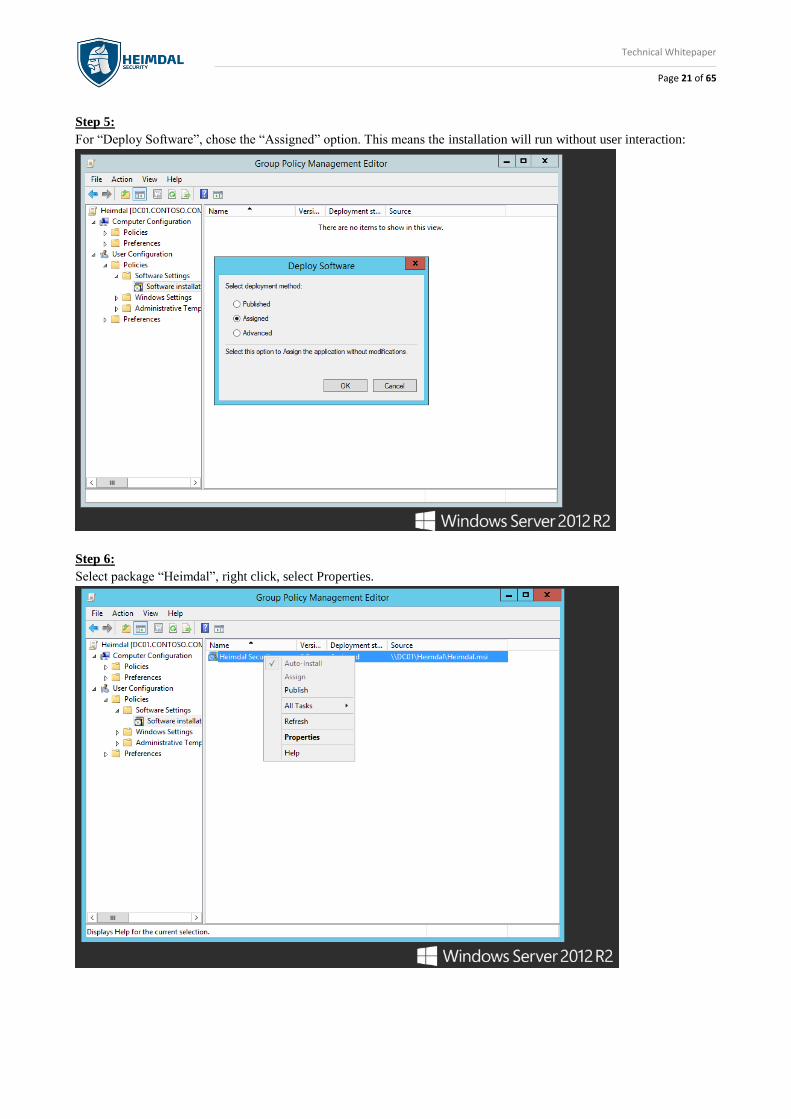
Step 5:
For “Deploy Software”, chose the “Assigned” option. This means the installation will run without user interaction:
Step 6:
Select package “Heimdal”, right click, select Properties.
Technical Whitepaper
Page 22 of 65
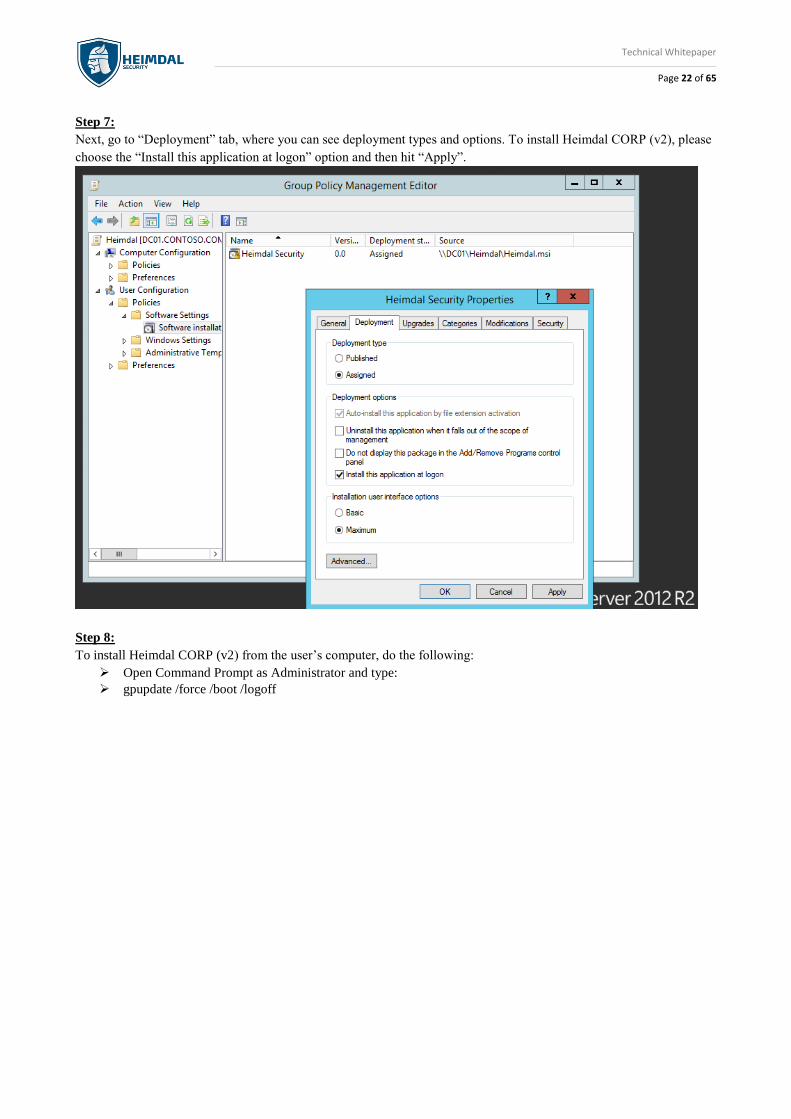
Step 7:
Next, go to “Deployment” tab, where you can see deployment types and options. To install Heimdal CORP (v2), please
choose the “Install this application at logon” option and then hit “Apply”.
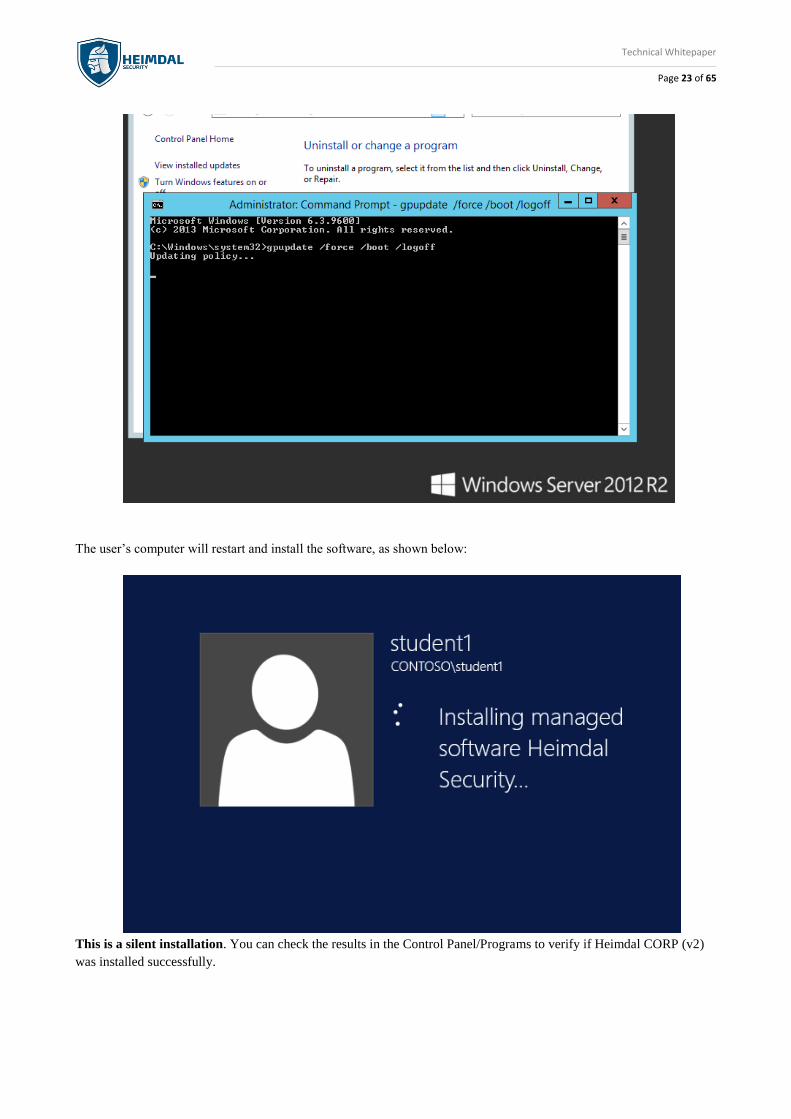
Step 8:
To install Heimdal CORP (v2) from the user’s computer, do the following:
➢ Open Command Prompt as Administrator and type:
➢ gpupdate /force /boot /logoff
Technical Whitepaper
Page 23 of 65
The user’s computer will restart and install the software, as shown below:
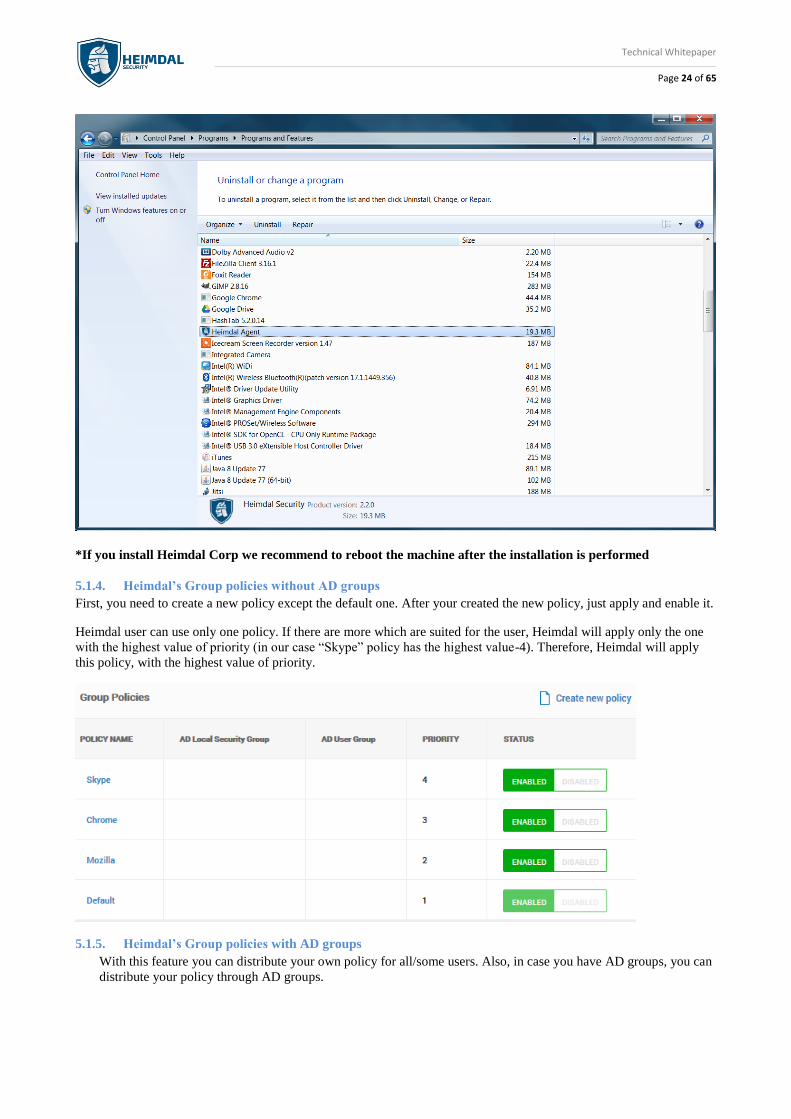
This is a silent installation. You can check the results in the Control Panel/Programs to verify if Heimdal CORP (v2)
was installed successfully.
Technical Whitepaper
Page 24 of 65
*If you install Heimdal Corp we recommend to reboot the machine after the installation is performed
5.1.4. Heimdal’s Group policies without AD groups
First, you need to create a new policy except the default one. After your created the new policy, just apply and enable it.
Heimdal user can use only one policy. If there are more which are suited for the user, Heimdal will apply only the one
with the highest value of priority (in our case “Skype” policy has the highest value-4). Therefore, Heimdal will apply
this policy, with the highest value of priority.
5.1.5. Heimdal’s Group policies with AD groups
With this feature you can distribute your own policy for all/some users. Also, in case you have AD groups, you can
distribute your policy through AD groups.
Technical Whitepaper
Page 25 of 65
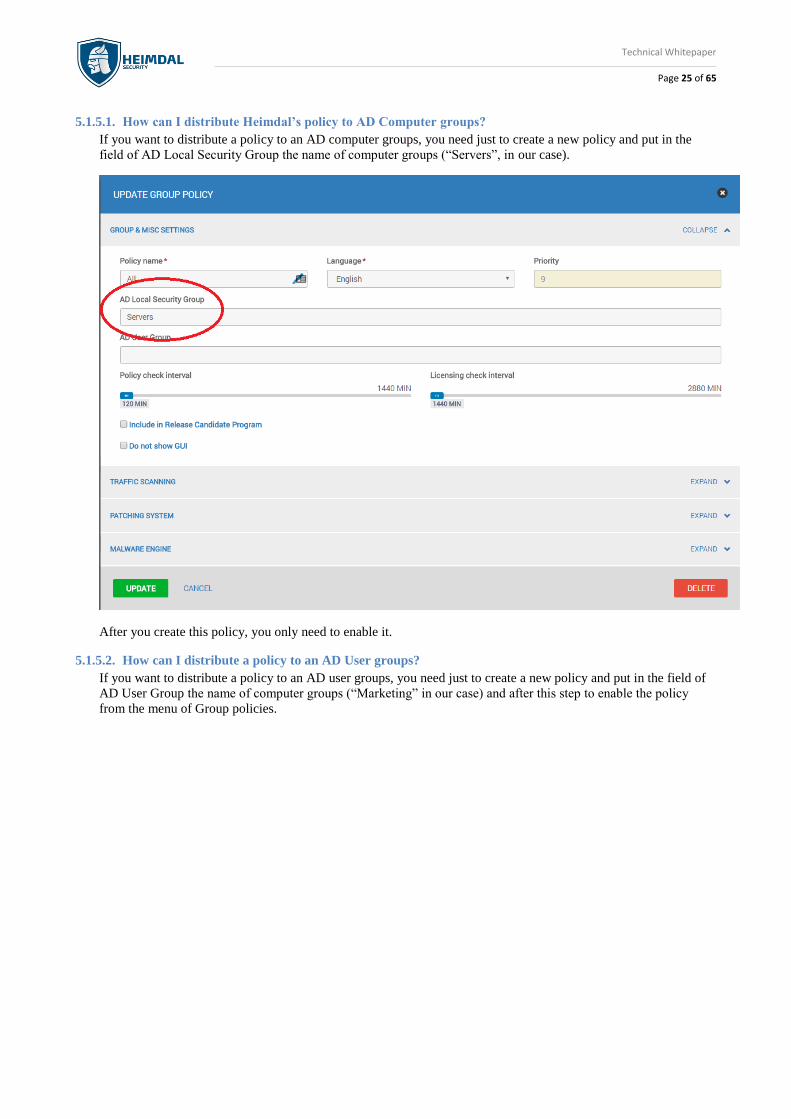
5.1.5.1. How can I distribute Heimdal’s policy to AD Computer groups? If you want to distribute a policy to an AD computer groups, you need just to create a new policy and put in the
field of AD Local Security Group the name of computer groups (“Servers”, in our case).
After you create this policy, you only need to enable it.
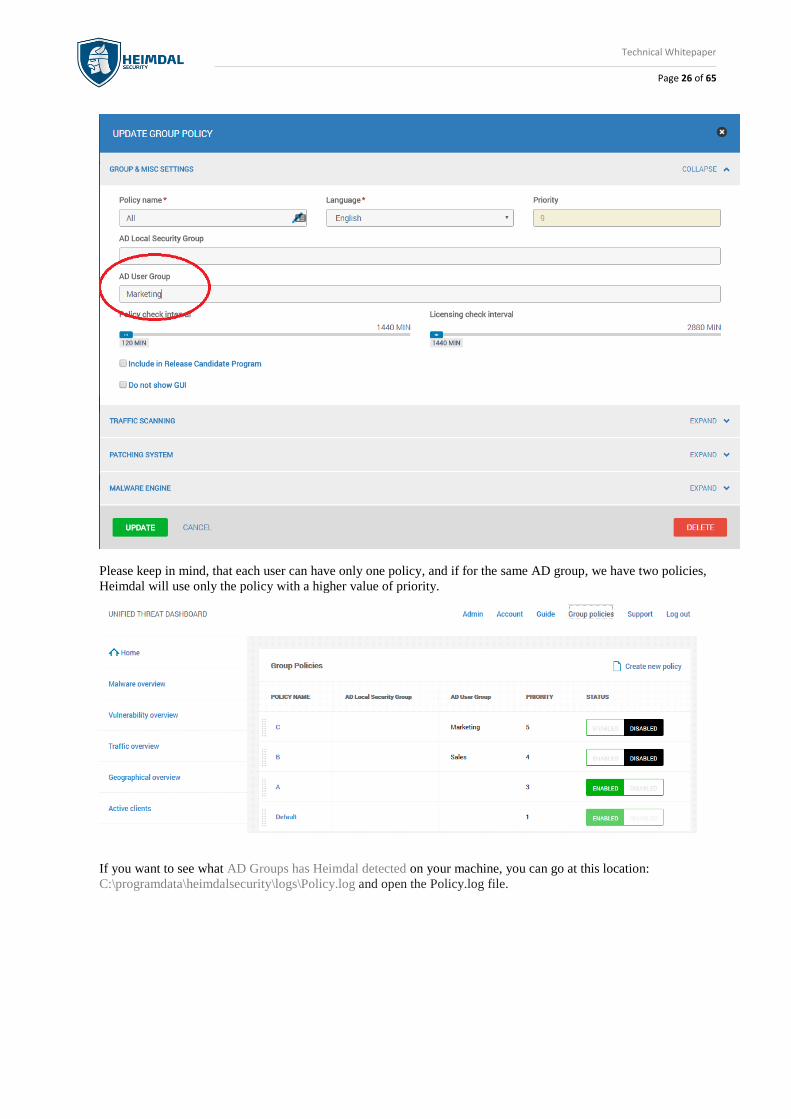
5.1.5.2. How can I distribute a policy to an AD User groups? If you want to distribute a policy to an AD user groups, you need just to create a new policy and put in the field of
AD User Group the name of computer groups (“Marketing” in our case) and after this step to enable the policy
from the menu of Group policies.
Technical Whitepaper
Page 26 of 65
Please keep in mind, that each user can have only one policy, and if for the same AD group, we have two policies,
Heimdal will use only the policy with a higher value of priority.
If you want to see what AD Groups has Heimdal detected on your machine, you can go at this location:
C:\programdata\heimdalsecurity\logs\Policy.log and open the Policy.log file.
Technical Whitepaper
Page 27 of 65
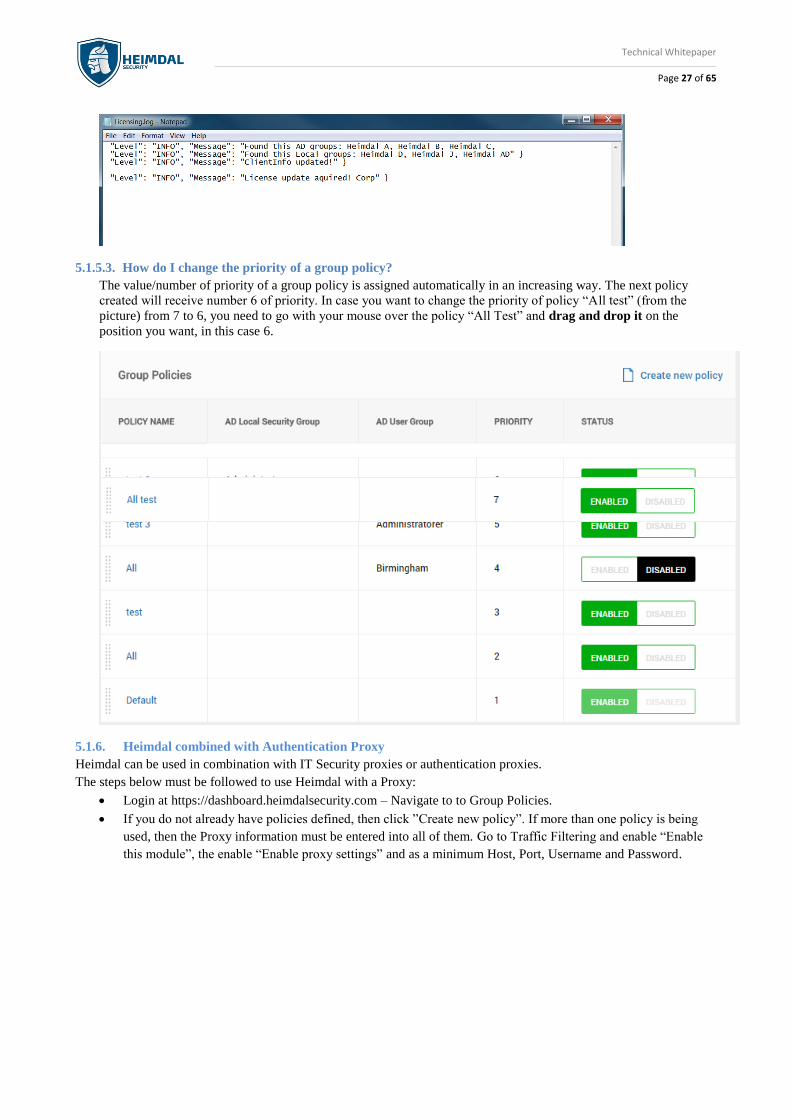
5.1.5.3. How do I change the priority of a group policy? The value/number of priority of a group policy is assigned automatically in an increasing way. The next policy
created will receive number 6 of priority. In case you want to change the priority of policy “All test” (from the
picture) from 7 to 6, you need to go with your mouse over the policy “All Test” and drag and drop it on the
position you want, in this case 6.
5.1.6. Heimdal combined with Authentication Proxy
Heimdal can be used in combination with IT Security proxies or authentication proxies.
The steps below must be followed to use Heimdal with a Proxy:
• Login at https://dashboard.heimdalsecurity.com – Navigate to to Group Policies.
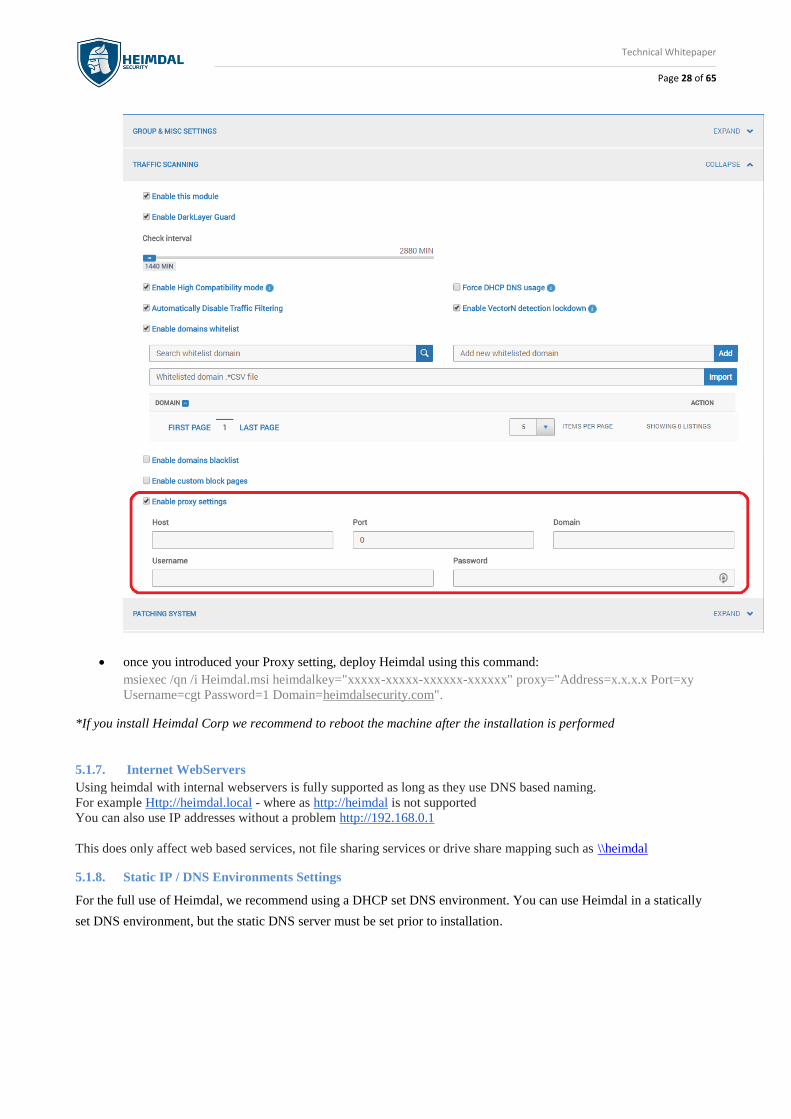
• If you do not already have policies defined, then click ”Create new policy”. If more than one policy is being
used, then the Proxy information must be entered into all of them. Go to Traffic Filtering and enable “Enable
this module”, the enable “Enable proxy settings” and as a minimum Host, Port, Username and Password.
Technical Whitepaper
Page 28 of 65
• once you introduced your Proxy setting, deploy Heimdal using this command:
msiexec /qn /i Heimdal.msi heimdalkey="xxxxx-xxxxx-xxxxxx-xxxxxx" proxy="Address=x.x.x.x Port=xy
Username=cgt Password=1 Domain=heimdalsecurity.com".
*If you install Heimdal Corp we recommend to reboot the machine after the installation is performed
5.1.7. Internet WebServers
Using heimdal with internal webservers is fully supported as long as they use DNS based naming.
For example Http://heimdal.local - where as http://heimdal is not supported
You can also use IP addresses without a problem http://192.168.0.1
This does only affect web based services, not file sharing services or drive share mapping such as \\heimdal
5.1.8. Static IP / DNS Environments Settings
For the full use of Heimdal, we recommend using a DHCP set DNS environment. You can use Heimdal in a statically
set DNS environment, but the static DNS server must be set prior to installation.
Technical Whitepaper
Page 29 of 65
Should you wish to use a DHCP set DNS, with a Static IP configuration environment, then Static IP's must be
configured in the DHCP reservation list of your DHCP server or network router. Using these settings also ensures
avoiding IP collisions on the network.
Set up DHCP Reservation for a Computer
*the example was made on a Windows Server 2008 R2
To set up DHCP reservation in Windows Server 2008 R2 for a DHCP client computer in the network, administrators
must follow the steps given as below:
• Go to the target DHCP client computer and fetch its physical address by typing IPCONFIG /ALL command in
the command line interface and pressing Enter key.
• Log on to Windows Server 2008 R2 DHCP Server computer on which DHCP server role is installed using
domain admin or enterprise admin account credentials.
• From the desktop screen, click the Start button.
• From the displayed menu, go to Administrative Tools > DHCP.
• On DHCP snap-in, from the console tree in the left pane, double-click to expand the DHCP server name.
• From the expanded list, go to IPv4 > <DHCP scope name>.
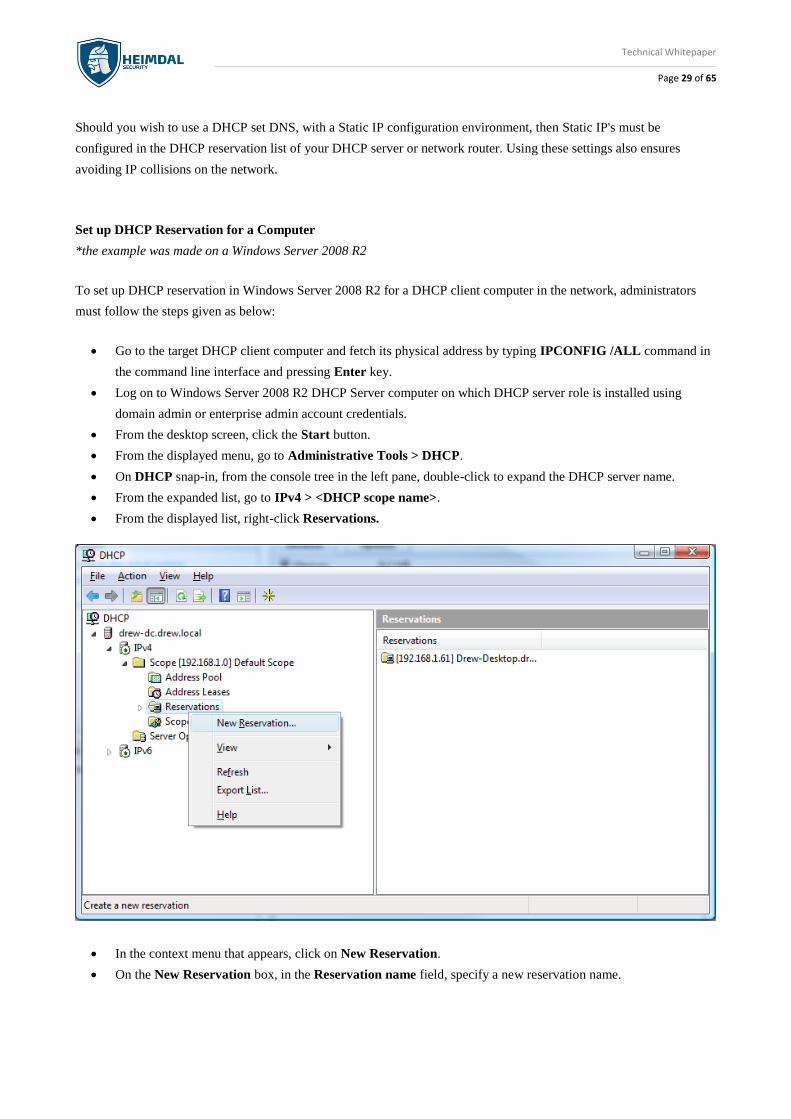
• From the displayed list, right-click Reservations.
• In the context menu that appears, click on New Reservation.
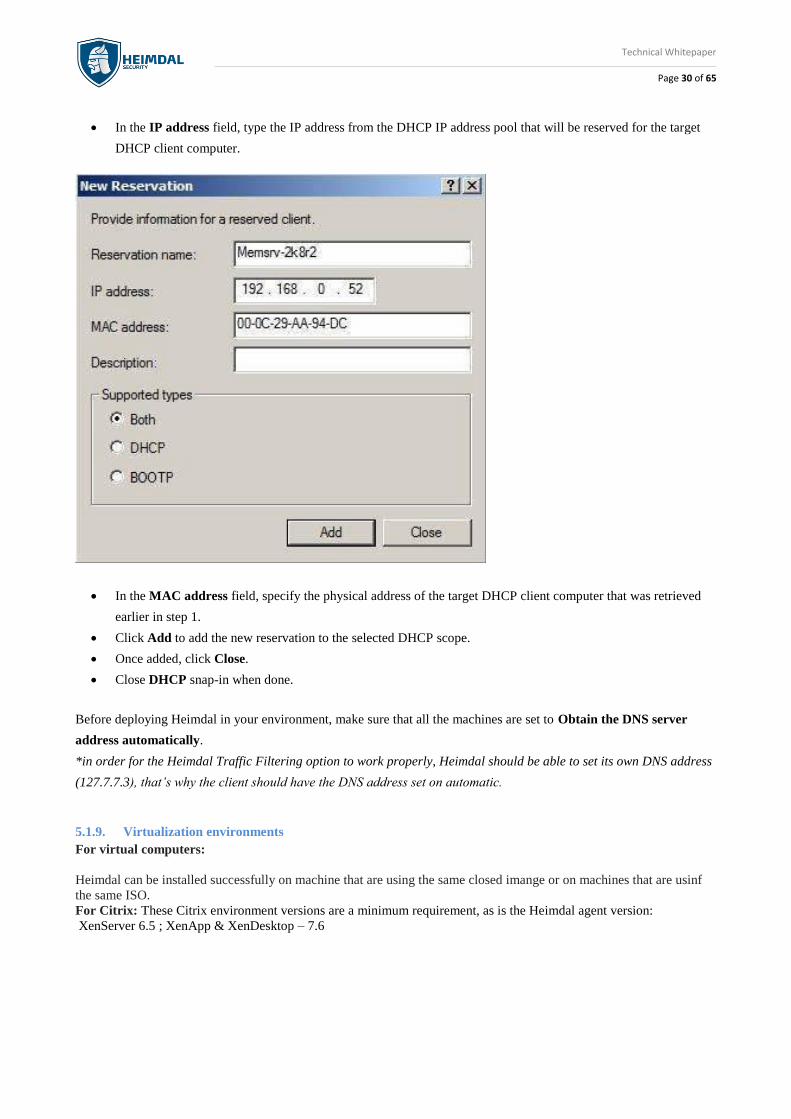
• On the New Reservation box, in the Reservation name field, specify a new reservation name.
Technical Whitepaper
Page 30 of 65
• In the IP address field, type the IP address from the DHCP IP address pool that will be reserved for the target
DHCP client computer.
• In the MAC address field, specify the physical address of the target DHCP client computer that was retrieved
earlier in step 1.
• Click Add to add the new reservation to the selected DHCP scope.
• Once added, click Close.
• Close DHCP snap-in when done.
Before deploying Heimdal in your environment, make sure that all the machines are set to Obtain the DNS server
address automatically.
*in order for the Heimdal Traffic Filtering option to work properly, Heimdal should be able to set its own DNS address
(127.7.7.3), that’s why the client should have the DNS address set on automatic.
5.1.9. Virtualization environments
For virtual computers:
Heimdal can be installed successfully on machine that are using the same closed imange or on machines that are usinf
the same ISO.
For Citrix: These Citrix environment versions are a minimum requirement, as is the Heimdal agent version:
XenServer 6.5 ; XenApp & XenDesktop – 7.6
Technical Whitepaper
Page 31 of 65
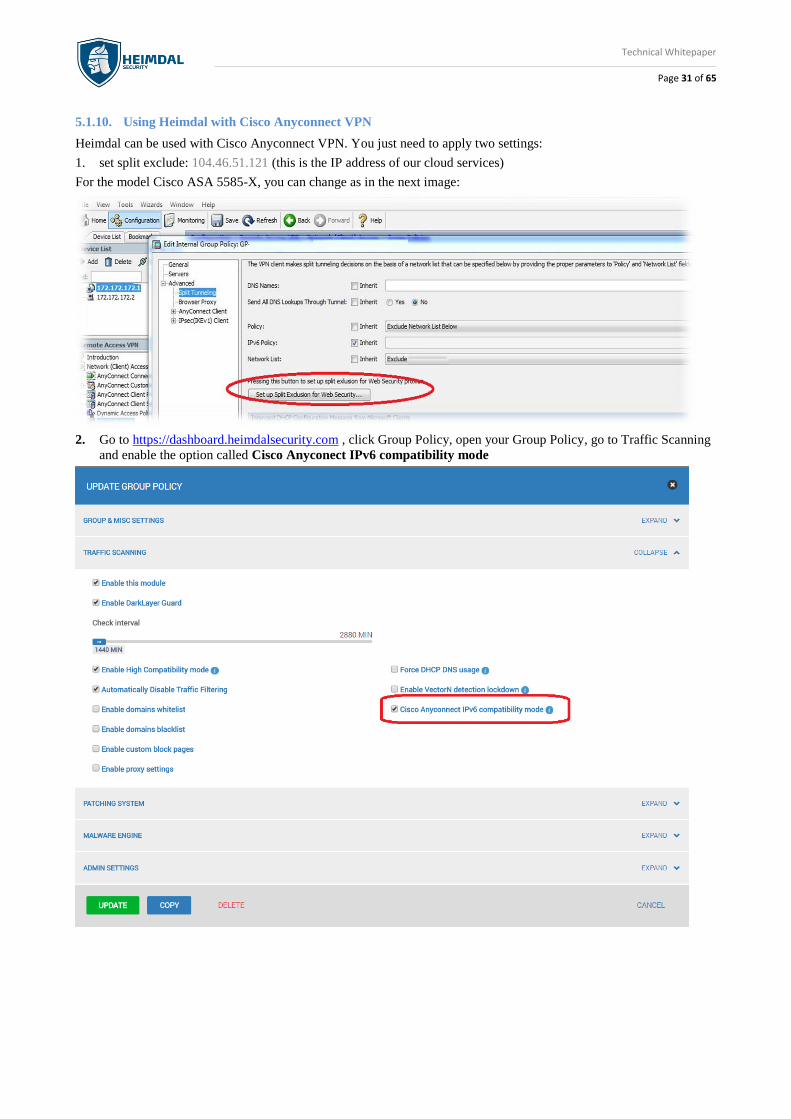
5.1.10. Using Heimdal with Cisco Anyconnect VPN
Heimdal can be used with Cisco Anyconnect VPN. You just need to apply two settings:
1. set split exclude: 104.46.51.121 (this is the IP address of our cloud services)
For the model Cisco ASA 5585-X, you can change as in the next image:
2. Go to https://dashboard.heimdalsecurity.com , click Group Policy, open your Group Policy, go to Traffic Scanning
and enable the option called Cisco Anyconect IPv6 compatibility mode
Technical Whitepaper
Page 32 of 65
5.1.11. Other environments
• Domain Controllers - static IP Address
• DNS Servers - static IP Address
• DHCP Server - static IP Address
• Exchange Server - static IP Address
• SBS(Small Business Server) - static IP Address
• Windows Network Load Balancer - static IP Address
• RD Connection Broker servers - static IP Address
Heimdal can be installed on all of these servers but if Traffic Filtering is enabled, it will change the Primary DNS
Server and Alternate DNS Server addresses and clients will lose connectivity to the Servers. All of these servers have a
requirement from Microsoft to use static IP Address and the Primary DNS Server Address should be the DC/DNS
Server.
For these servers a DHCP lease or a DHCP reservation is not a solution because they were designed to work only with a
static IP Address.
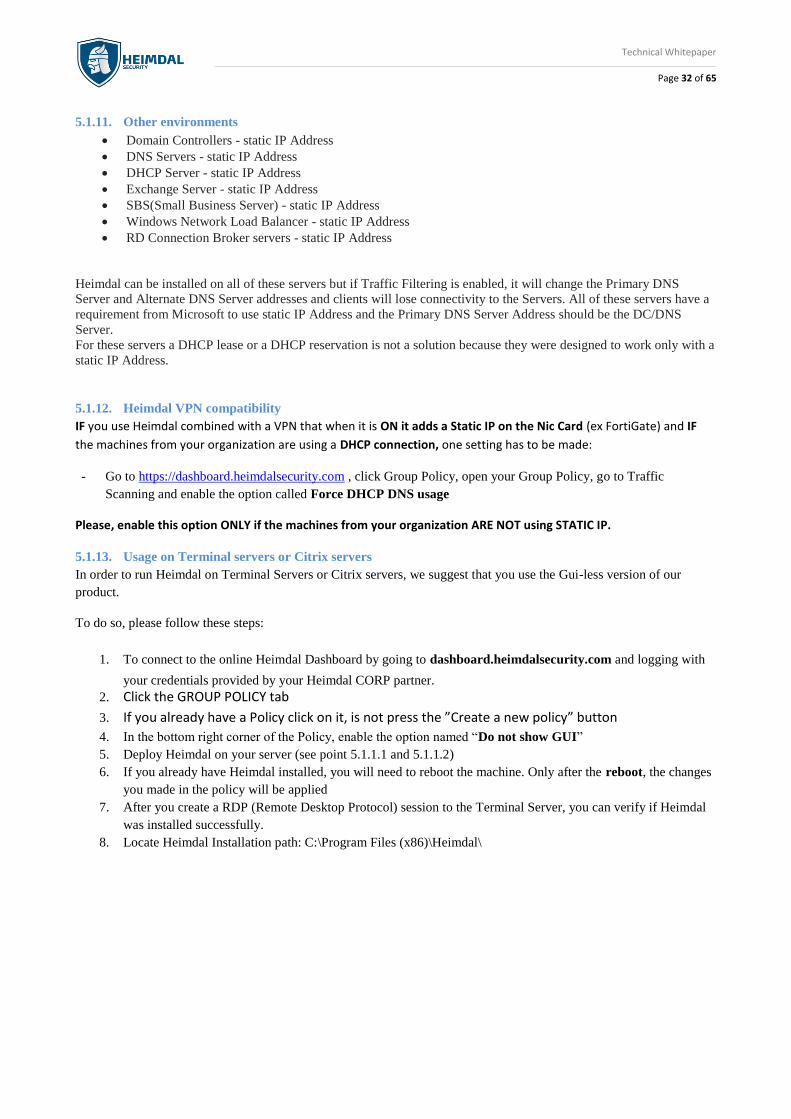
5.1.12. Heimdal VPN compatibility
IF you use Heimdal combined with a VPN that when it is ON it adds a Static IP on the Nic Card (ex FortiGate) and IF
the machines from your organization are using a DHCP connection, one setting has to be made:
- Go to https://dashboard.heimdalsecurity.com , click Group Policy, open your Group Policy, go to Traffic
Scanning and enable the option called Force DHCP DNS usage
Please, enable this option ONLY if the machines from your organization ARE NOT using STATIC IP.
5.1.13. Usage on Terminal servers or Citrix servers
In order to run Heimdal on Terminal Servers or Citrix servers, we suggest that you use the Gui-less version of our
product.
To do so, please follow these steps:
1. To connect to the online Heimdal Dashboard by going to dashboard.heimdalsecurity.com and logging with
your credentials provided by your Heimdal CORP partner.
2. Click the GROUP POLICY tab
3. If you already have a Policy click on it, is not press the ”Create a new policy” button
4. In the bottom right corner of the Policy, enable the option named “Do not show GUI”
5. Deploy Heimdal on your server (see point 5.1.1.1 and 5.1.1.2)
6. If you already have Heimdal installed, you will need to reboot the machine. Only after the reboot, the changes
you made in the policy will be applied
7. After you create a RDP (Remote Desktop Protocol) session to the Terminal Server, you can verify if Heimdal
was installed successfully.
8. Locate Heimdal Installation path: C:\Program Files (x86)\Heimdal\
Technical Whitepaper
Page 33 of 65
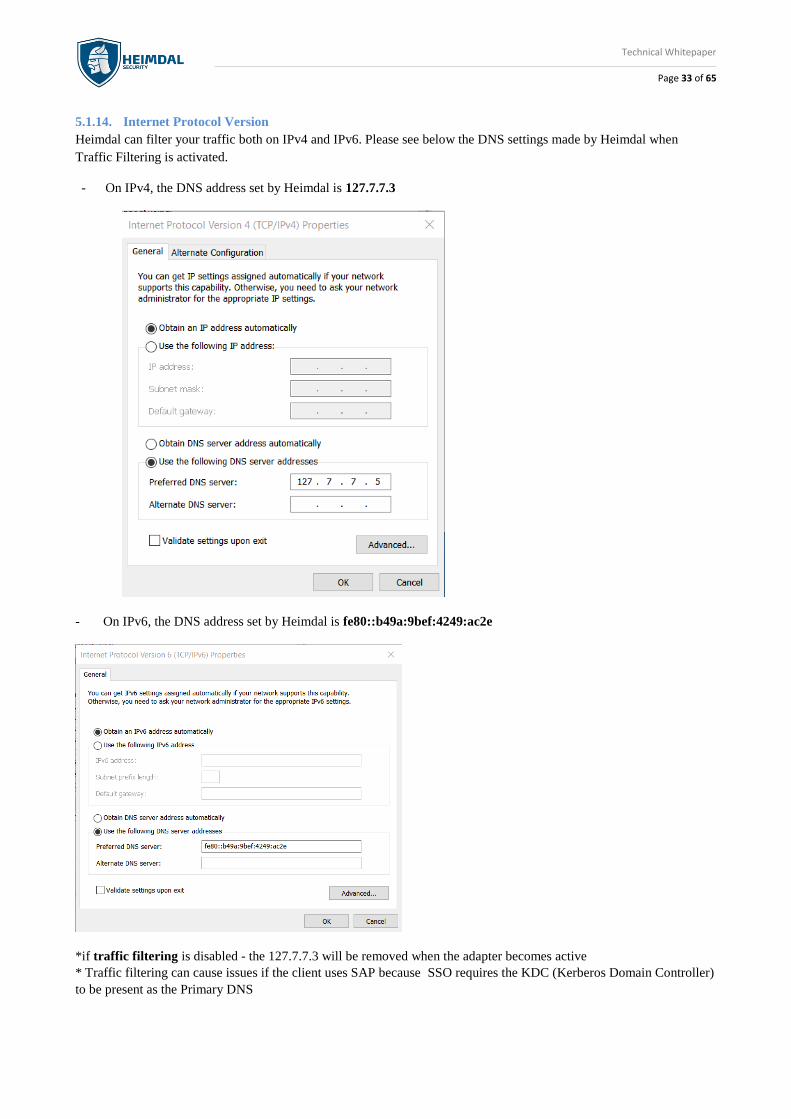
5.1.14. Internet Protocol Version
Heimdal can filter your traffic both on IPv4 and IPv6. Please see below the DNS settings made by Heimdal when
Traffic Filtering is activated.
- On IPv4, the DNS address set by Heimdal is 127.7.7.3
- On IPv6, the DNS address set by Heimdal is fe80::b49a:9bef:4249:ac2e
*if traffic filtering is disabled - the 127.7.7.3 will be removed when the adapter becomes active
* Traffic filtering can cause issues if the client uses SAP because SSO requires the KDC (Kerberos Domain Controller)
to be present as the Primary DNS
Technical Whitepaper
Page 34 of 65
5.1.15. Multiple Server Mode
Multiple Server Mode is an option that allows Heimdal to filter the traffic on more than one active Nic Card. That
means that Heimdal will add its own DNS addresses on all the active Nic Cards.
The DNS addresses added by Heimdal on the Nic Card will start from 127.7.7.3 and continue depending on the number
of active Nic Cards. For example, if you machine has 3 active Nic Cards, Heimdal will add the following DNS
addesses:
• Nic Card 1 - 127.7.7.3
• Nic Card 2 - 127.7.7.4
• Nic Card 3 - 127.7.7.5
*this option is not available for clients, only the Heimdal Technical Support team can enable this for you.
5.1.16. Uninstall Process
If you have a Heimdal.msi based installation, please use the uninstall script below. This applies to both x64 and
x86 systems and it will remove Heimdal silently.
You can see the script here and you can also download the script file that will uninstall Heimdal silently:
https://support.heimdalsecurity.com/hc/en-us/articles/207689335-How-to-uninstall-Heimdal-CORP-silently-
Heimdal also offers you the option to add an Uninstall Password in order to avoid 3rd party tools to remove Heimdal or
make sure your users will not uninstall Heimdal by mistake.
The Uninstall Password feature offer you two options:
1. An Uninstall Password per Group Policy
2. A Master Uninstall Password that can be applied to all your machines
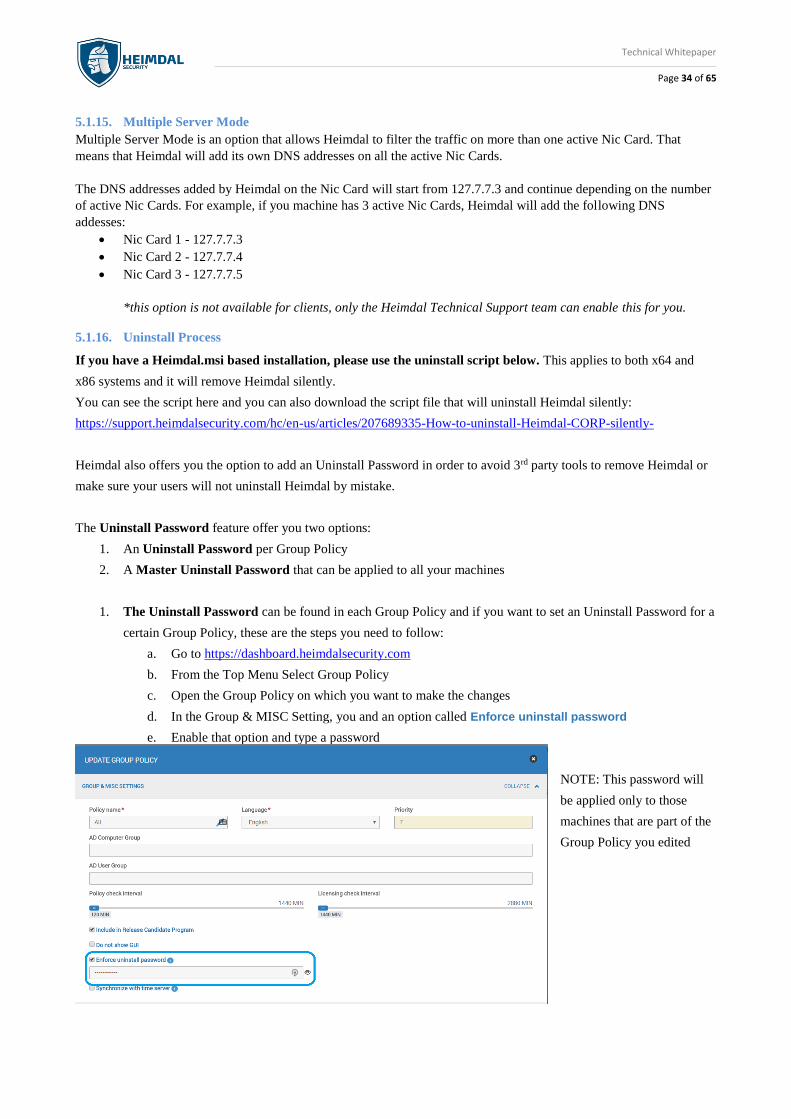
1. The Uninstall Password can be found in each Group Policy and if you want to set an Uninstall Password for a
certain Group Policy, these are the steps you need to follow:
a. Go to https://dashboard.heimdalsecurity.com
b. From the Top Menu Select Group Policy
c. Open the Group Policy on which you want to make the changes
d. In the Group & MISC Setting, you and an option called Enforce uninstall password
e. Enable that option and type a password
NOTE: This password will
be applied only to those
machines that are part of the
Group Policy you edited
Technical Whitepaper
Page 35 of 65
f. After the password is set, scroll down and press the Update button
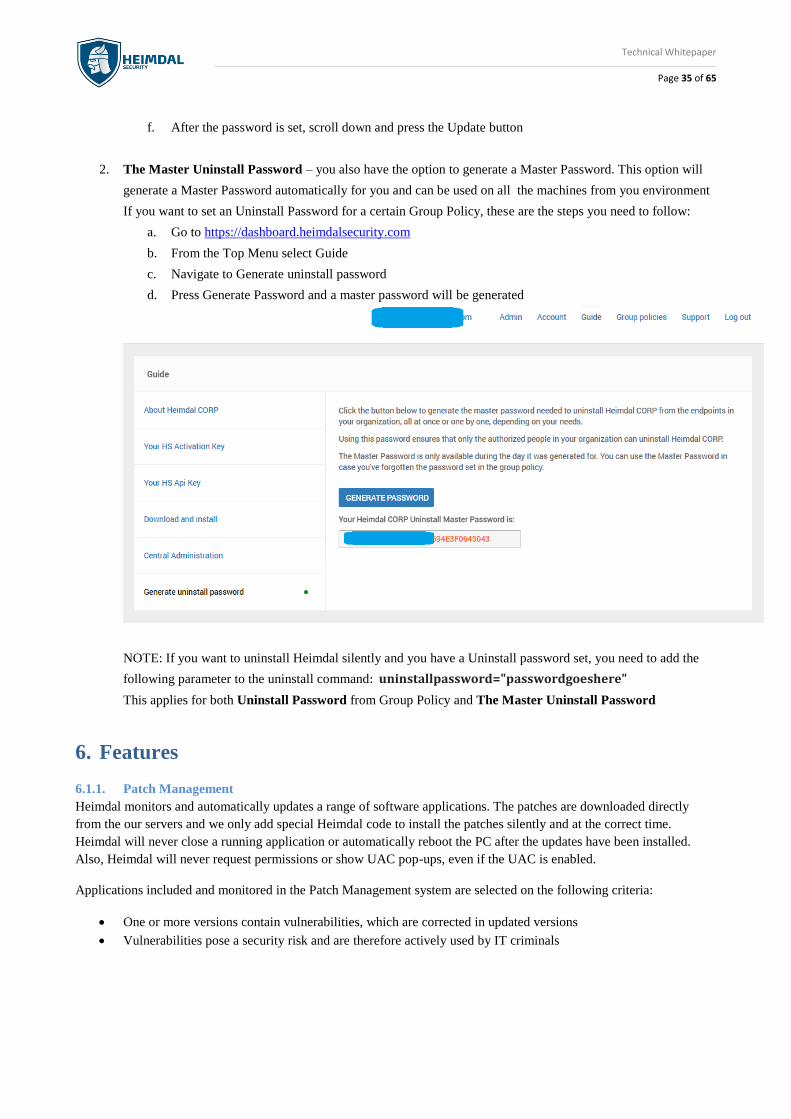
2. The Master Uninstall Password – you also have the option to generate a Master Password. This option will
generate a Master Password automatically for you and can be used on all the machines from you environment
If you want to set an Uninstall Password for a certain Group Policy, these are the steps you need to follow:
a. Go to https://dashboard.heimdalsecurity.com
b. From the Top Menu select Guide
c. Navigate to Generate uninstall password
d. Press Generate Password and a master password will be generated
NOTE: If you want to uninstall Heimdal silently and you have a Uninstall password set, you need to add the
following parameter to the uninstall command: uninstallpassword="passwordgoeshere"
This applies for both Uninstall Password from Group Policy and The Master Uninstall Password
6. Features
6.1.1. Patch Management
Heimdal monitors and automatically updates a range of software applications. The patches are downloaded directly
from the our servers and we only add special Heimdal code to install the patches silently and at the correct time.
Heimdal will never close a running application or automatically reboot the PC after the updates have been installed.
Also, Heimdal will never request permissions or show UAC pop-ups, even if the UAC is enabled.
Applications included and monitored in the Patch Management system are selected on the following criteria:
• One or more versions contain vulnerabilities, which are corrected in updated versions
• Vulnerabilities pose a security risk and are therefore actively used by IT criminals
Technical Whitepaper
Page 36 of 65
6.1.1.1. The list of supported software
Here you can find the full list of the applications that can be installed or patched by Heimdal:
https://support.heimdalsecurity.com/hc/en-us/articles/206845959-Which-software-does-Heimdal-patch-
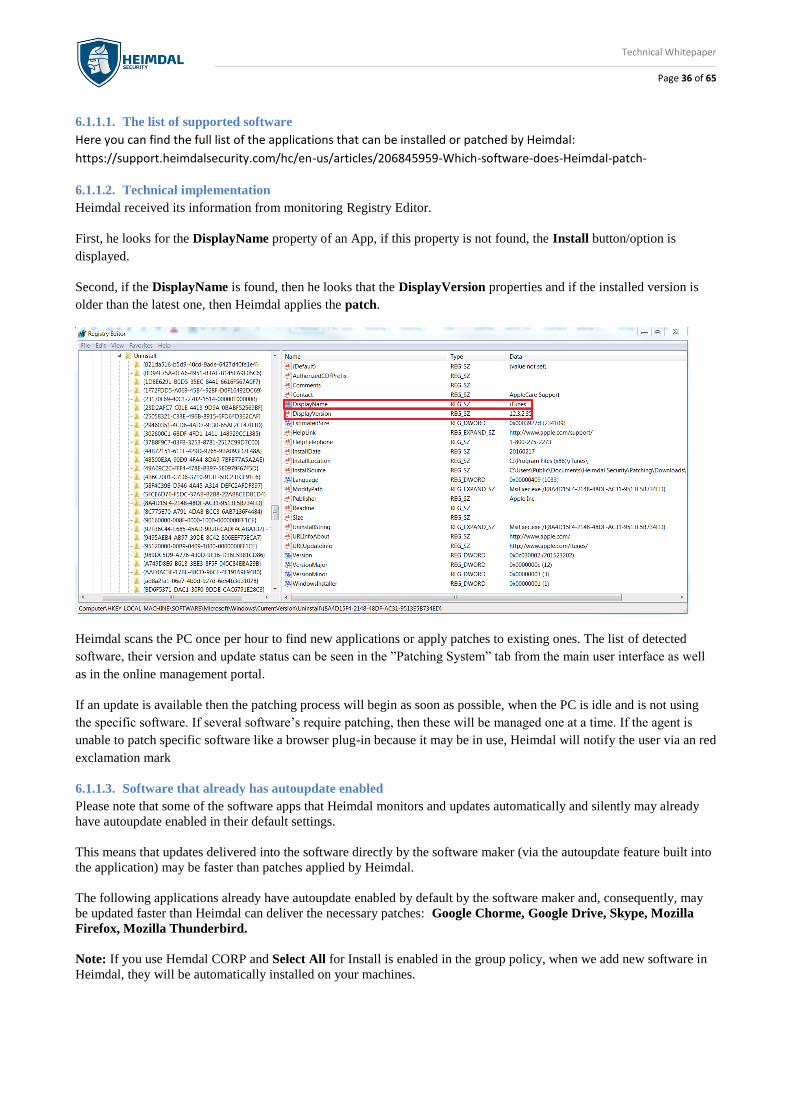
6.1.1.2. Technical implementation
Heimdal received its information from monitoring Registry Editor.
First, he looks for the DisplayName property of an App, if this property is not found, the Install button/option is
displayed.
Second, if the DisplayName is found, then he looks that the DisplayVersion properties and if the installed version is
older than the latest one, then Heimdal applies the patch.
Heimdal scans the PC once per hour to find new applications or apply patches to existing ones. The list of detected
software, their version and update status can be seen in the ”Patching System” tab from the main user interface as well
as in the online management portal.
If an update is available then the patching process will begin as soon as possible, when the PC is idle and is not using
the specific software. If several software’s require patching, then these will be managed one at a time. If the agent is
unable to patch specific software like a browser plug-in because it may be in use, Heimdal will notify the user via an red
exclamation mark
6.1.1.3. Software that already has autoupdate enabled
Please note that some of the software apps that Heimdal monitors and updates automatically and silently may already
have autoupdate enabled in their default settings.
This means that updates delivered into the software directly by the software maker (via the autoupdate feature built into
the application) may be faster than patches applied by Heimdal.
The following applications already have autoupdate enabled by default by the software maker and, consequently, may
be updated faster than Heimdal can deliver the necessary patches: Google Chorme, Google Drive, Skype, Mozilla
Firefox, Mozilla Thunderbird.
Note: If you use Hemdal CORP and Select All for Install is enabled in the group policy, when we add new software in
Heimdal, they will be automatically installed on your machines.
Technical Whitepaper
Page 37 of 65
6.1.1.4. Patches deployment method – Bulk or Staged?
If you are about to deploy Heimdal in your organization and your Group Policy is set to deploy new applications or to
patch existing ones, you must know that the patches will be downloaded as the clients check towards the Dashboard,
they never check at the same time.
This way, we ensure that you'll avoid any traffic load in your organization.
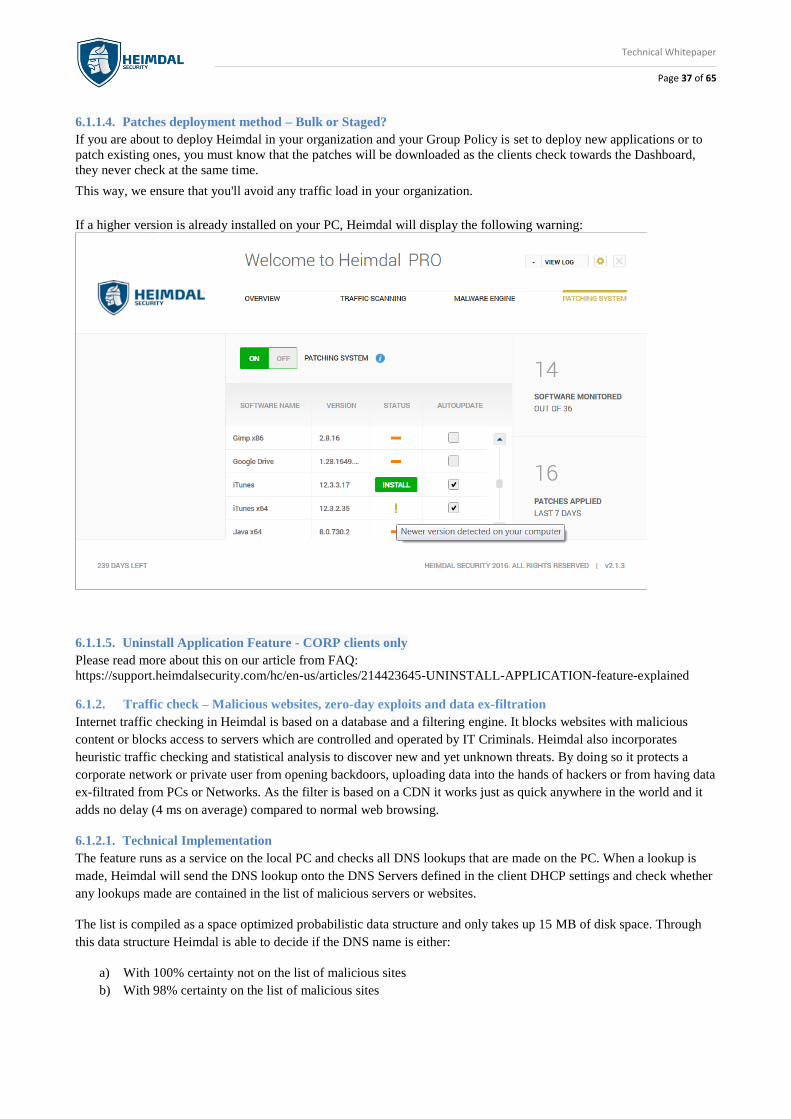
If a higher version is already installed on your PC, Heimdal will display the following warning:
6.1.1.5. Uninstall Application Feature - CORP clients only
Please read more about this on our article from FAQ:
https://support.heimdalsecurity.com/hc/en-us/articles/214423645-UNINSTALL-APPLICATION-feature-explained
6.1.2. Traffic check – Malicious websites, zero-day exploits and data ex-filtration
Internet traffic checking in Heimdal is based on a database and a filtering engine. It blocks websites with malicious
content or blocks access to servers which are controlled and operated by IT Criminals. Heimdal also incorporates
heuristic traffic checking and statistical analysis to discover new and yet unknown threats. By doing so it protects a
corporate network or private user from opening backdoors, uploading data into the hands of hackers or from having data
ex-filtrated from PCs or Networks. As the filter is based on a CDN it works just as quick anywhere in the world and it
adds no delay (4 ms on average) compared to normal web browsing.
6.1.2.1. Technical Implementation
The feature runs as a service on the local PC and checks all DNS lookups that are made on the PC. When a lookup is
made, Heimdal will send the DNS lookup onto the DNS Servers defined in the client DHCP settings and check whether
any lookups made are contained in the list of malicious servers or websites.
The list is compiled as a space optimized probabilistic data structure and only takes up 15 MB of disk space. Through
this data structure Heimdal is able to decide if the DNS name is either:
a) With 100% certainty not on the list of malicious sites
b) With 98% certainty on the list of malicious sites
Technical Whitepaper
Page 38 of 65
If the address is not on the list of malicious servers, Heimdal will approve the request from the used DNS servers.
If the address is with a 98% certainty on the list, Heimdal will perform an extra check towards our servers to verify
whether the address is harmful or not.
a) If it does show up as harmful, the site or traffic is blocked and a notice will be displayed.
b) If the domain address is not harmful the traffic will be allowed.
The advantage of using a probabilistic data structure is that the speed of the service is much higher and the size of the
database is only roughly 0,5% of the total list.
The traffic check works for all services on the PC and on VPN. It also works on internal as well as private networks.
6.1.3. Detection of data stealing or financial malware
The built in detection module for advanced malware cannot be compared to traditional antivirus products, as it works
entirely different. It should not serve as a replacement for antivirus, but as a supplement.
6.1.3.1. Technical implementation Heimdal’s detection of malware is based on configuration files, computer events and Internet traffic as opposed to a
classic antivirus product, which is based on signatures and file access. Heimdal is therefore very effective against data
or financial malware, which rely on these approaches to penetrate computers, but is therefore not effective against
traditional viruses.
Heimdal also incorporates a heuristics traffic detection engine for malware combined with a detection engine based on
statistical analysis.
If data stealing or financial malware is detected a red smiley will be displayed in the client and on the process bar.
Heimdal will also provide a link to a suggested removal tool, but will not attempt to remove the malware itself only
block it from transmitting data from the system to the malicious servers.
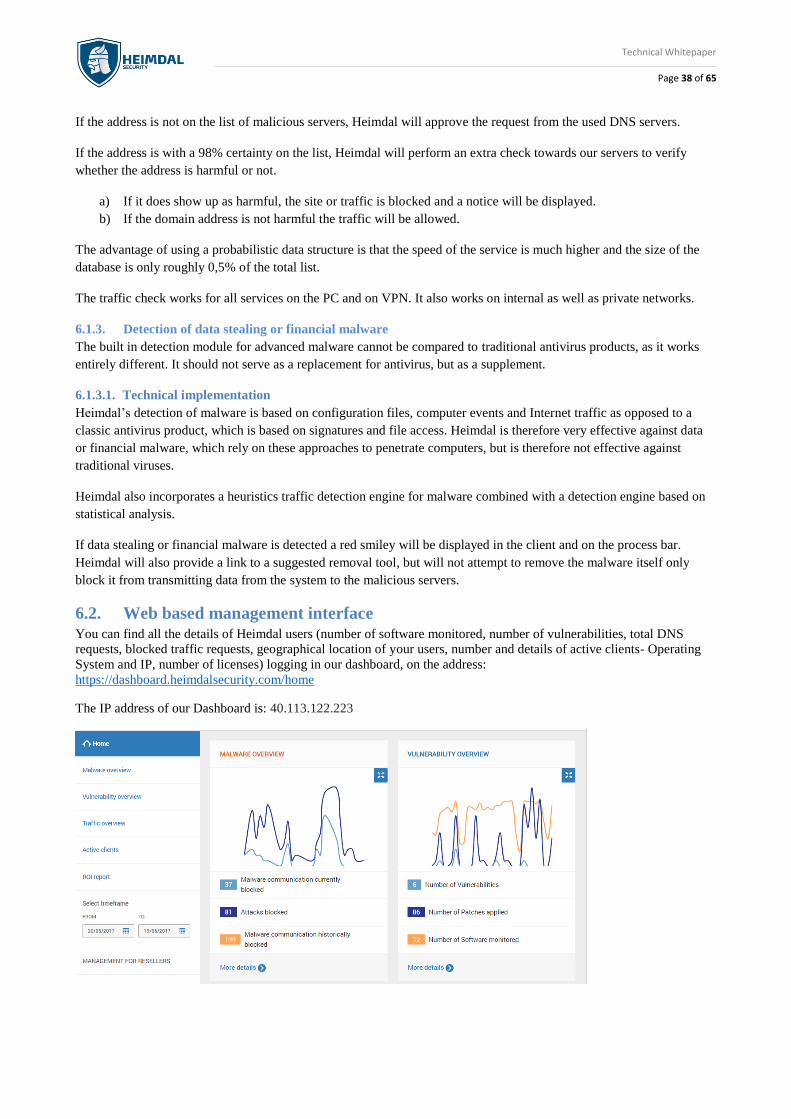
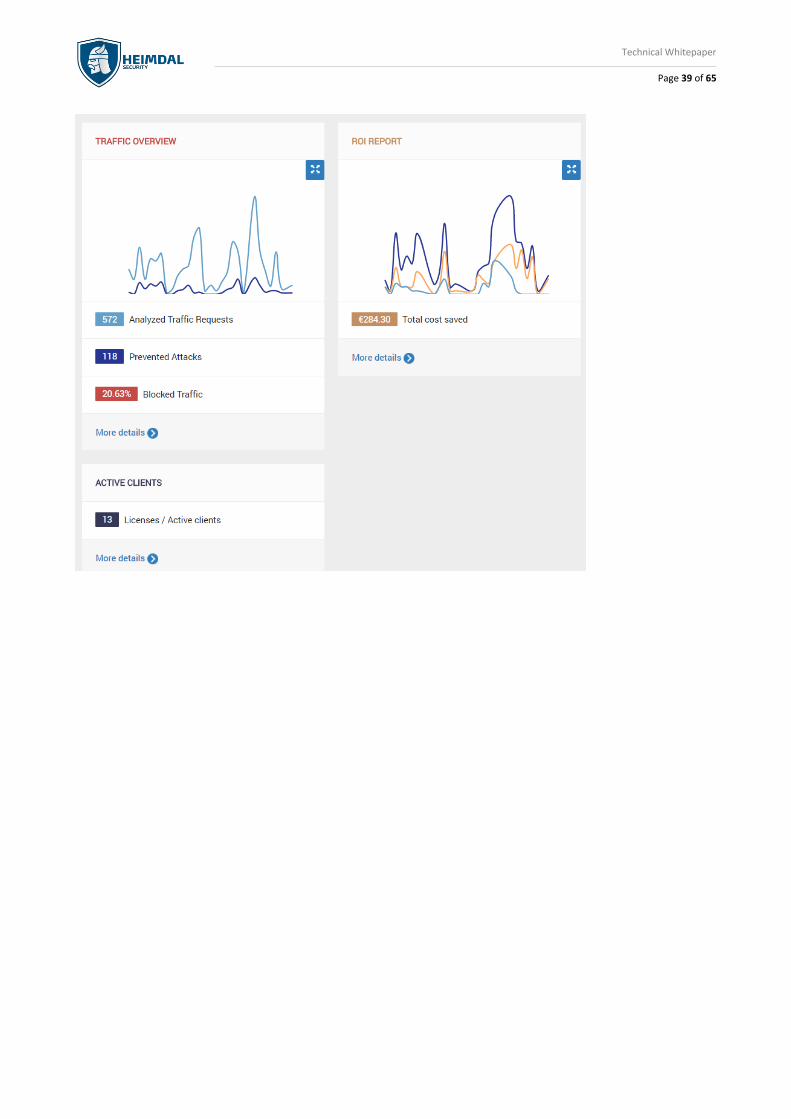
6.2. Web based management interface
You can find all the details of Heimdal users (number of software monitored, number of vulnerabilities, total DNS
requests, blocked traffic requests, geographical location of your users, number and details of active clients- Operating
System and IP, number of licenses) logging in our dashboard, on the address:
https://dashboard.heimdalsecurity.com/home
The IP address of our Dashboard is: 40.113.122.223
Technical Whitepaper
Page 39 of 65
Technical Whitepaper
Page 40 of 65
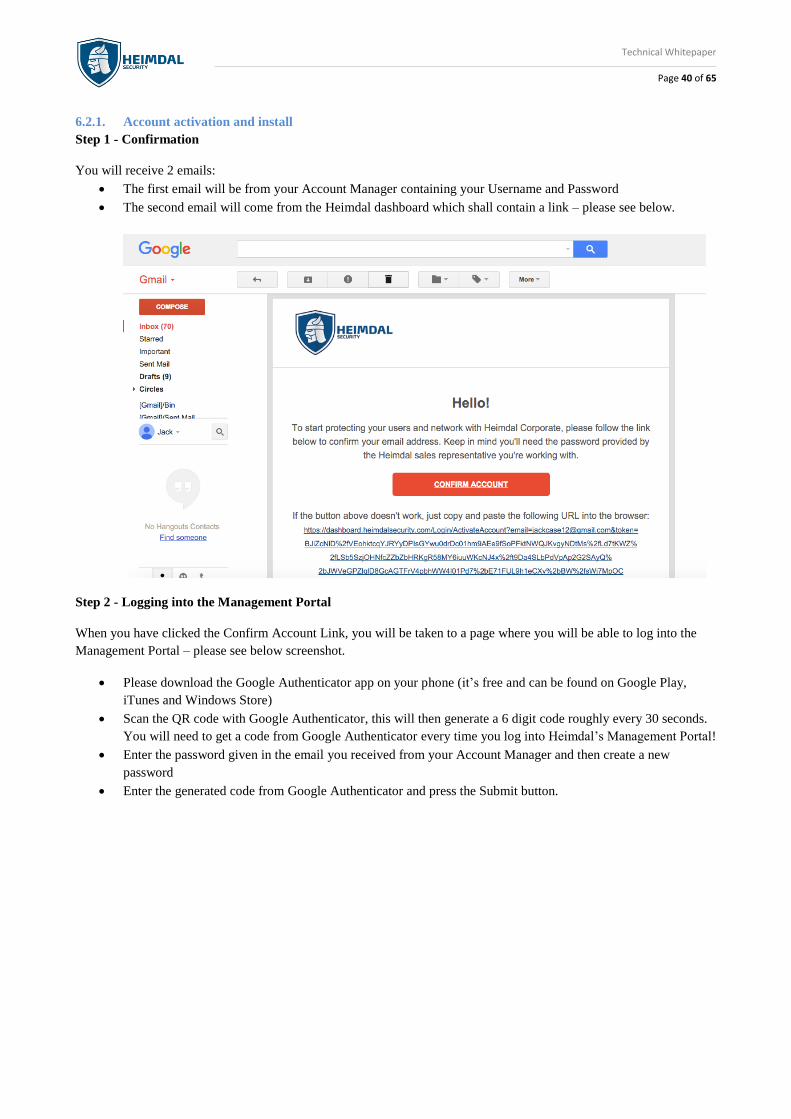
6.2.1. Account activation and install
Step 1 - Confirmation
You will receive 2 emails:
• The first email will be from your Account Manager containing your Username and Password
• The second email will come from the Heimdal dashboard which shall contain a link – please see below.
Step 2 - Logging into the Management Portal
When you have clicked the Confirm Account Link, you will be taken to a page where you will be able to log into the
Management Portal – please see below screenshot.
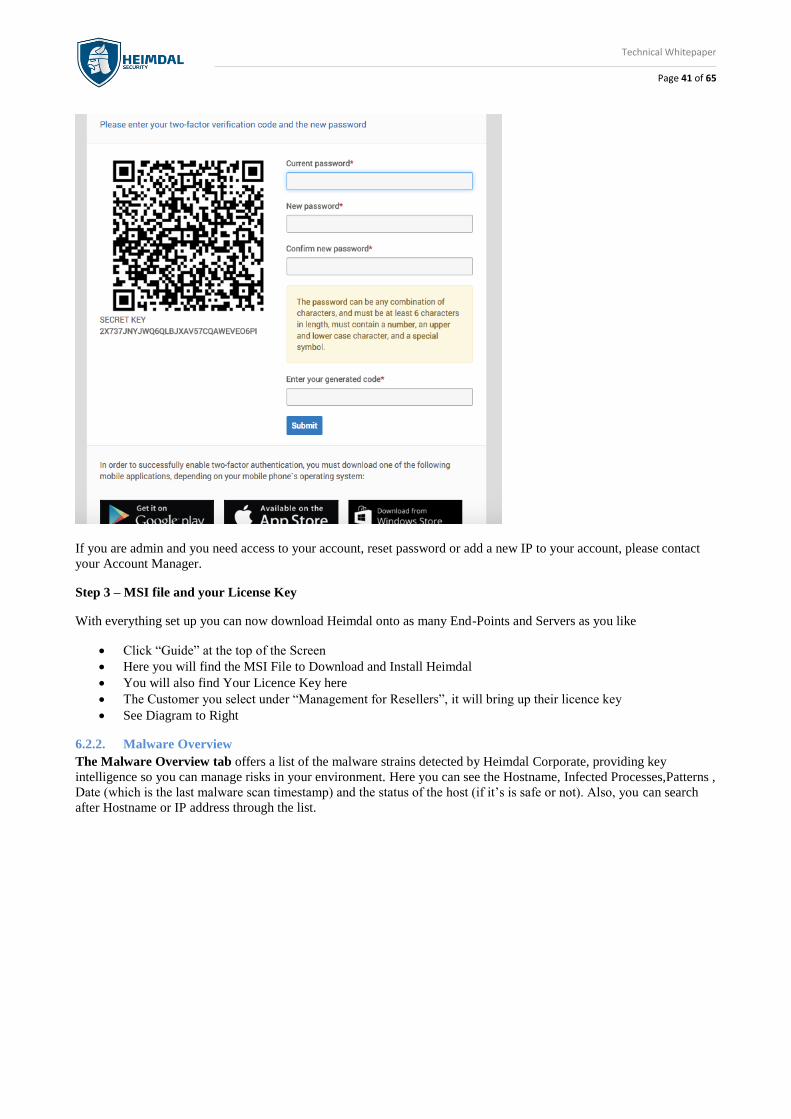
• Please download the Google Authenticator app on your phone (it’s free and can be found on Google Play,
iTunes and Windows Store)
• Scan the QR code with Google Authenticator, this will then generate a 6 digit code roughly every 30 seconds.
You will need to get a code from Google Authenticator every time you log into Heimdal’s Management Portal!
• Enter the password given in the email you received from your Account Manager and then create a new
password
• Enter the generated code from Google Authenticator and press the Submit button.
Technical Whitepaper
Page 41 of 65
If you are admin and you need access to your account, reset password or add a new IP to your account, please contact
your Account Manager.
Step 3 – MSI file and your License Key
With everything set up you can now download Heimdal onto as many End-Points and Servers as you like
• Click “Guide” at the top of the Screen
• Here you will find the MSI File to Download and Install Heimdal
• You will also find Your Licence Key here
• The Customer you select under “Management for Resellers”, it will bring up their licence key
• See Diagram to Right
6.2.2. Malware Overview
The Malware Overview tab offers a list of the malware strains detected by Heimdal Corporate, providing key
intelligence so you can manage risks in your environment. Here you can see the Hostname, Infected Processes,Patterns ,
Date (which is the last malware scan timestamp) and the status of the host (if it’s is safe or not). Also, you can search
after Hostname or IP address through the list.
Technical Whitepaper
Page 42 of 65
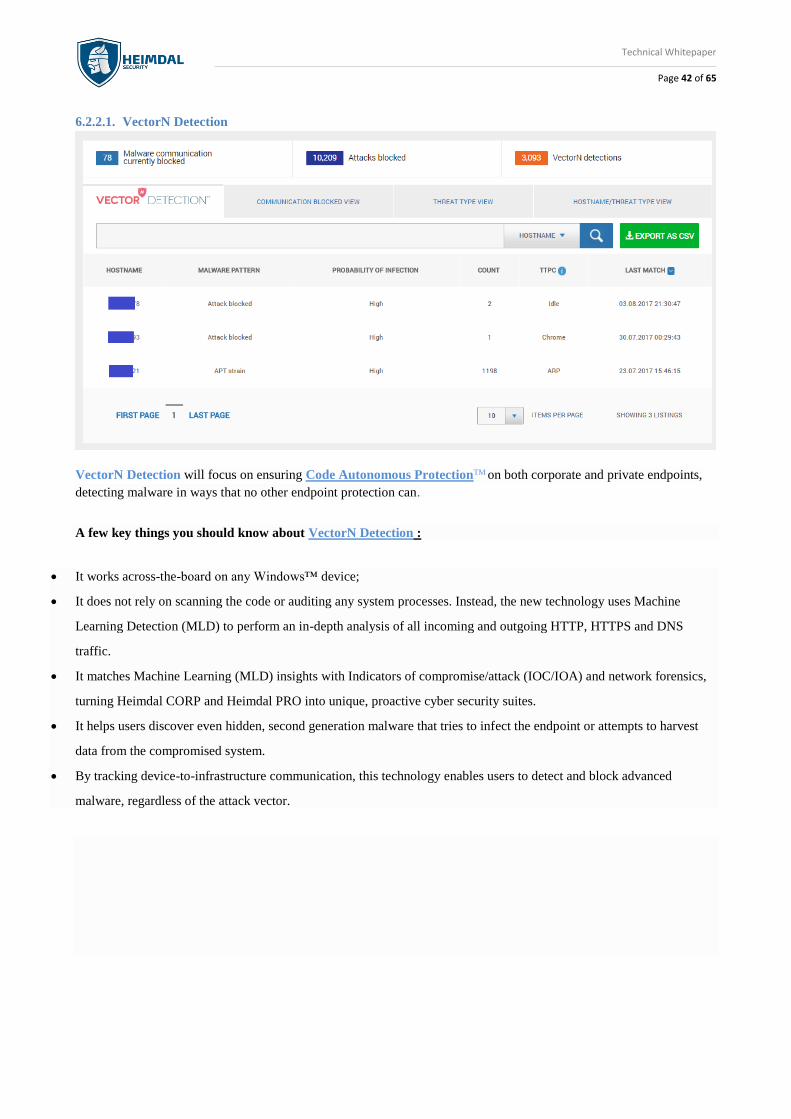
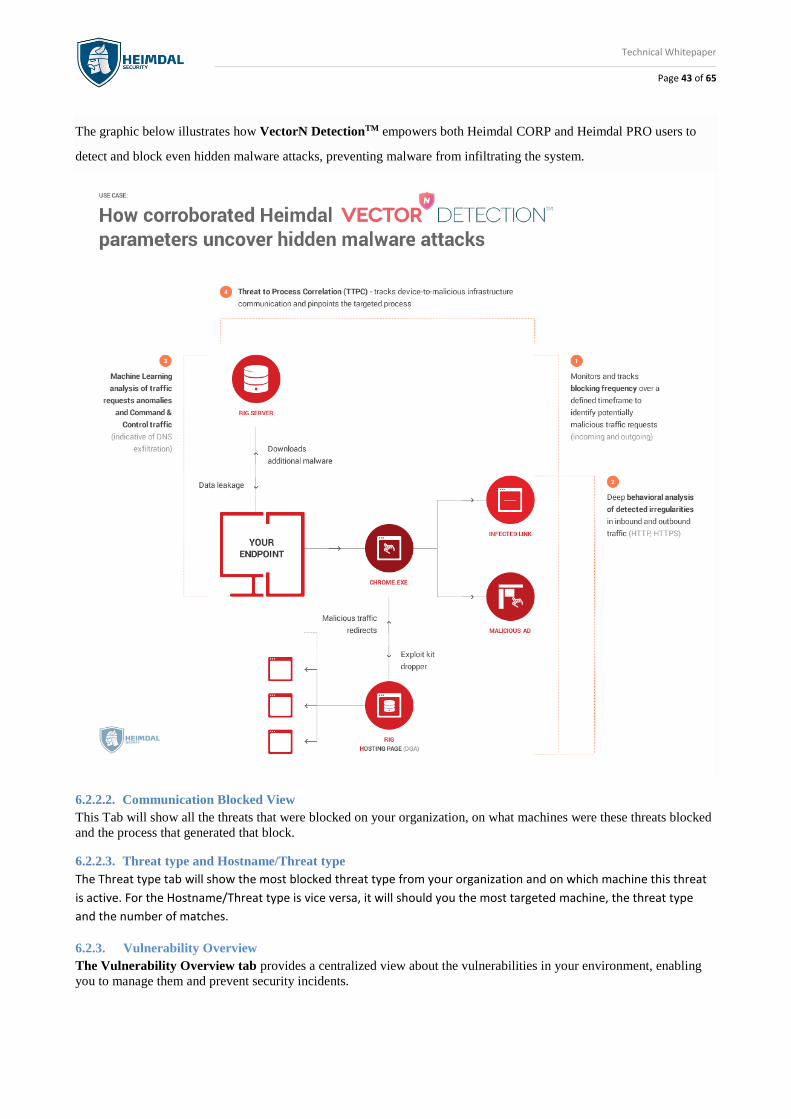
6.2.2.1. VectorN Detection
VectorN Detection will focus on ensuring Code Autonomous ProtectionTM on both corporate and private endpoints,
detecting malware in ways that no other endpoint protection can.
A few key things you should know about VectorN Detection :
• It works across-the-board on any Windows™ device;
• It does not rely on scanning the code or auditing any system processes. Instead, the new technology uses Machine
Learning Detection (MLD) to perform an in-depth analysis of all incoming and outgoing HTTP, HTTPS and DNS
traffic.
• It matches Machine Learning (MLD) insights with Indicators of compromise/attack (IOC/IOA) and network forensics,
turning Heimdal CORP and Heimdal PRO into unique, proactive cyber security suites.
• It helps users discover even hidden, second generation malware that tries to infect the endpoint or attempts to harvest
data from the compromised system.
• By tracking device-to-infrastructure communication, this technology enables users to detect and block advanced
malware, regardless of the attack vector.
Technical Whitepaper
Page 43 of 65
The graphic below illustrates how VectorN DetectionTM empowers both Heimdal CORP and Heimdal PRO users to
detect and block even hidden malware attacks, preventing malware from infiltrating the system.
6.2.2.2. Communication Blocked View
This Tab will show all the threats that were blocked on your organization, on what machines were these threats blocked
and the process that generated that block.
6.2.2.3. Threat type and Hostname/Threat type
The Threat type tab will show the most blocked threat type from your organization and on which machine this threat
is active. For the Hostname/Threat type is vice versa, it will should you the most targeted machine, the threat type
and the number of matches.
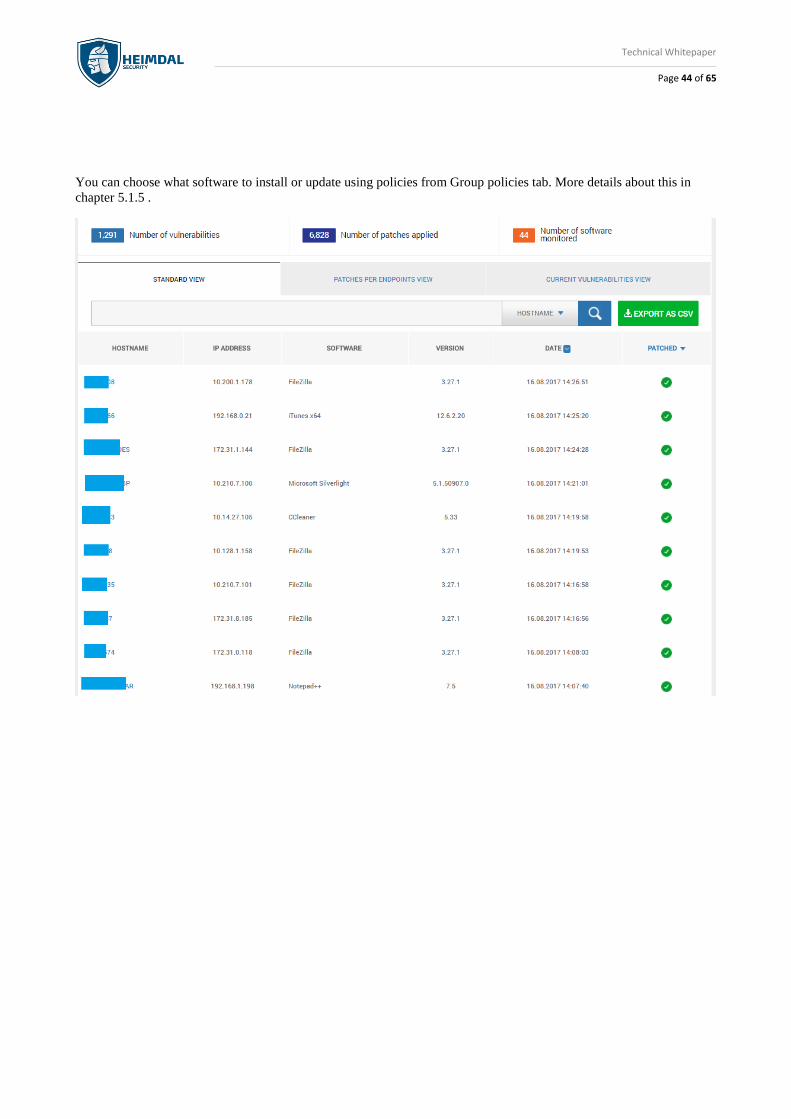
6.2.3. Vulnerability Overview
The Vulnerability Overview tab provides a centralized view about the vulnerabilities in your environment, enabling
you to manage them and prevent security incidents.
Technical Whitepaper
Page 44 of 65
You can choose what software to install or update using policies from Group policies tab. More details about this in
chapter 5.1.5 .
Technical Whitepaper
Page 45 of 65
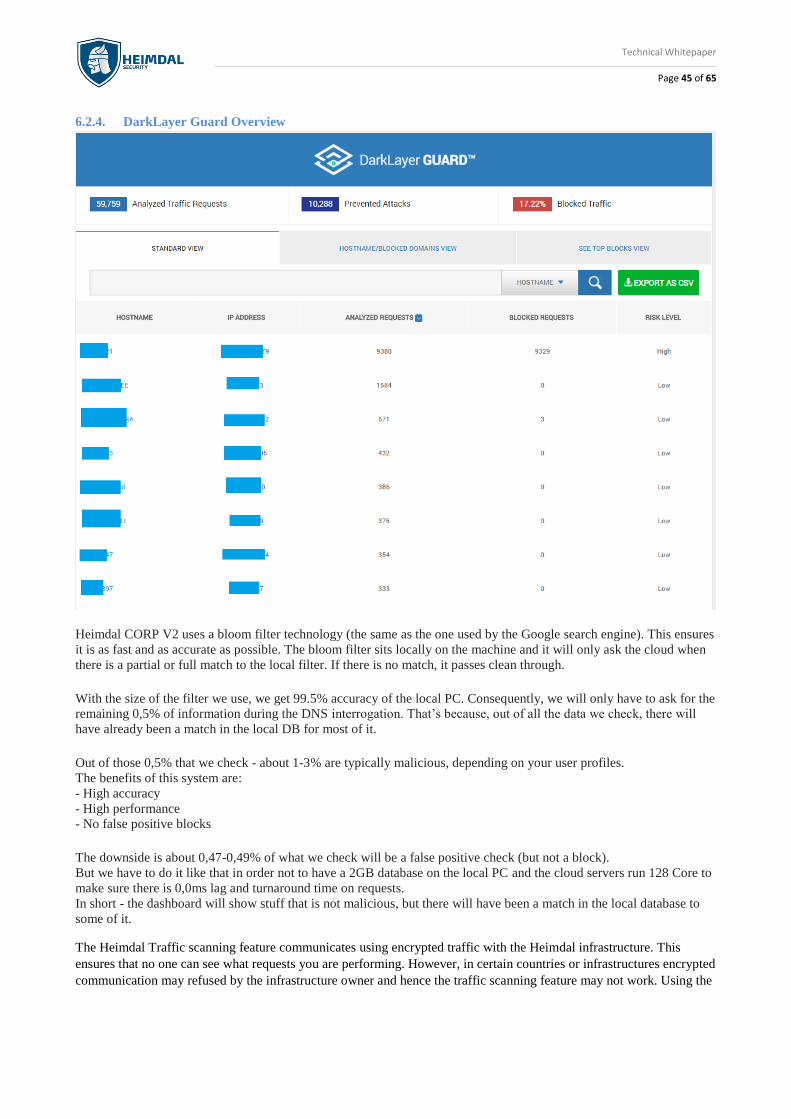
6.2.4. DarkLayer Guard Overview
Heimdal CORP V2 uses a bloom filter technology (the same as the one used by the Google search engine). This ensures
it is as fast and as accurate as possible. The bloom filter sits locally on the machine and it will only ask the cloud when
there is a partial or full match to the local filter. If there is no match, it passes clean through. With the size of the filter we use, we get 99.5% accuracy of the local PC. Consequently, we will only have to ask for the
remaining 0,5% of information during the DNS interrogation. That’s because, out of all the data we check, there will
have already been a match in the local DB for most of it. Out of those 0,5% that we check - about 1-3% are typically malicious, depending on your user profiles. The benefits of this system are: - High accuracy - High performance - No false positive blocks The downside is about 0,47-0,49% of what we check will be a false positive check (but not a block). But we have to do it like that in order not to have a 2GB database on the local PC and the cloud servers run 128 Core to
make sure there is 0,0ms lag and turnaround time on requests. In short - the dashboard will show stuff that is not malicious, but there will have been a match in the local database to
some of it.
The Heimdal Traffic scanning feature communicates using encrypted traffic with the Heimdal infrastructure. This
ensures that no one can see what requests you are performing. However, in certain countries or infrastructures encrypted
communication may refused by the infrastructure owner and hence the traffic scanning feature may not work. Using the
Technical Whitepaper
Page 46 of 65
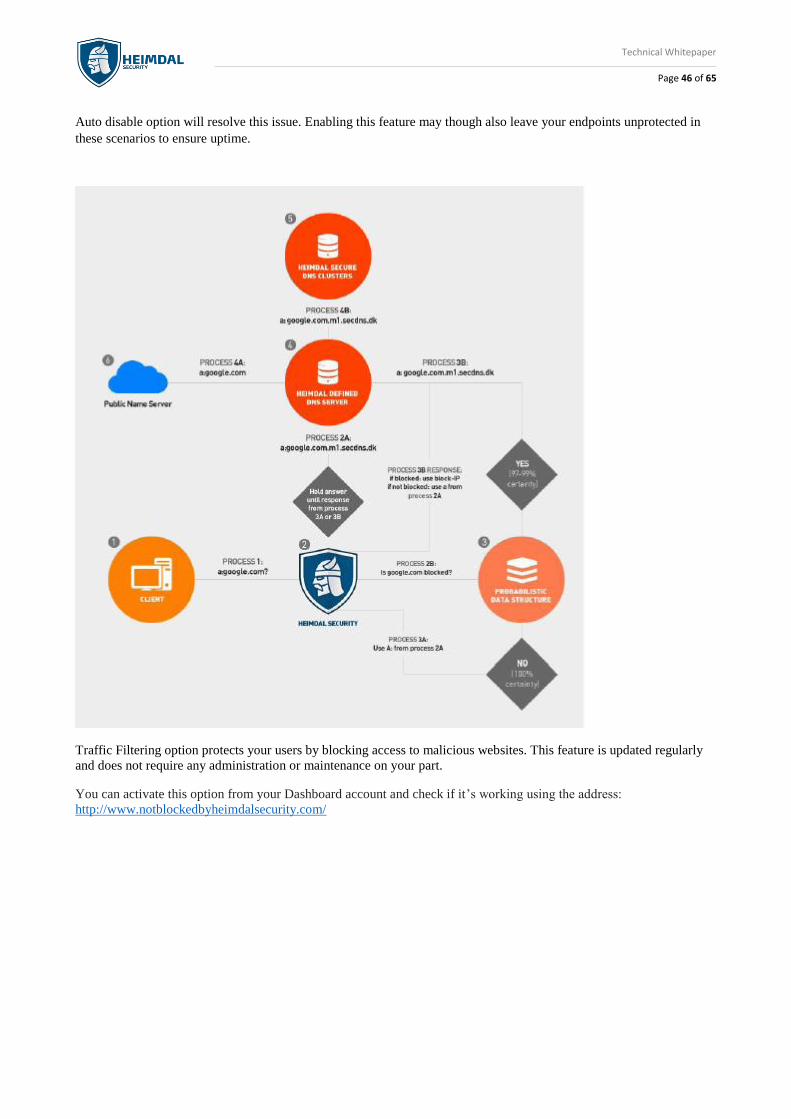
Auto disable option will resolve this issue. Enabling this feature may though also leave your endpoints unprotected in
these scenarios to ensure uptime.
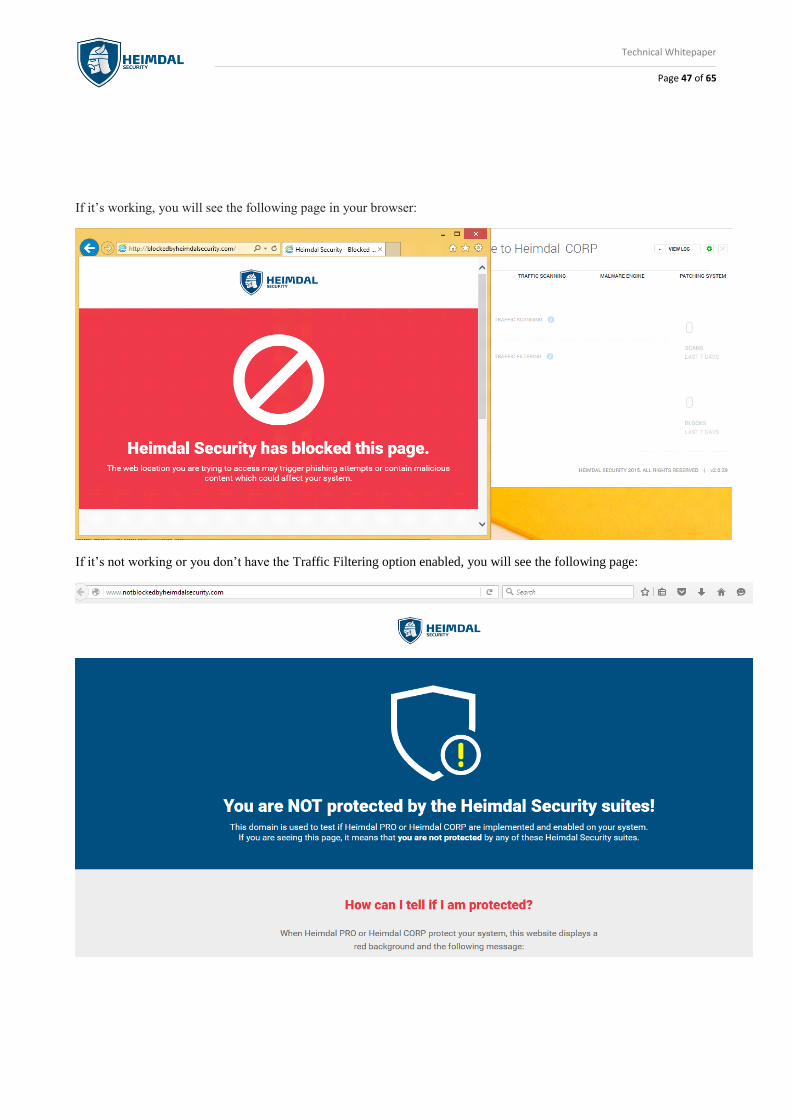
Traffic Filtering option protects your users by blocking access to malicious websites. This feature is updated regularly
and does not require any administration or maintenance on your part.
You can activate this option from your Dashboard account and check if it’s working using the address:
http://www.notblockedbyheimdalsecurity.com/
Technical Whitepaper
Page 47 of 65
If it’s working, you will see the following page in your browser:
If it’s not working or you don’t have the Traffic Filtering option enabled, you will see the following page:
Technical Whitepaper
Page 48 of 65
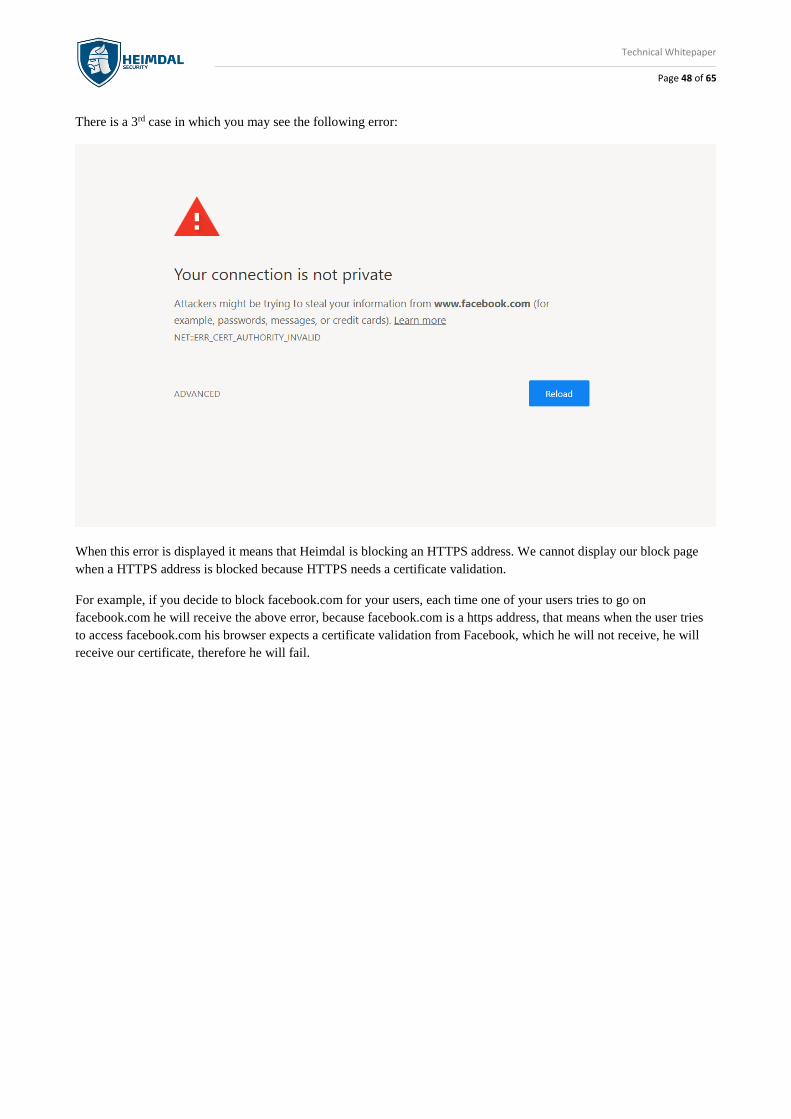
There is a 3rd case in which you may see the following error:
When this error is displayed it means that Heimdal is blocking an HTTPS address. We cannot display our block page
when a HTTPS address is blocked because HTTPS needs a certificate validation.
For example, if you decide to block facebook.com for your users, each time one of your users tries to go on
facebook.com he will receive the above error, because facebook.com is a https address, that means when the user tries
to access facebook.com his browser expects a certificate validation from Facebook, which he will not receive, he will
receive our certificate, therefore he will fail.
Technical Whitepaper
Page 49 of 65
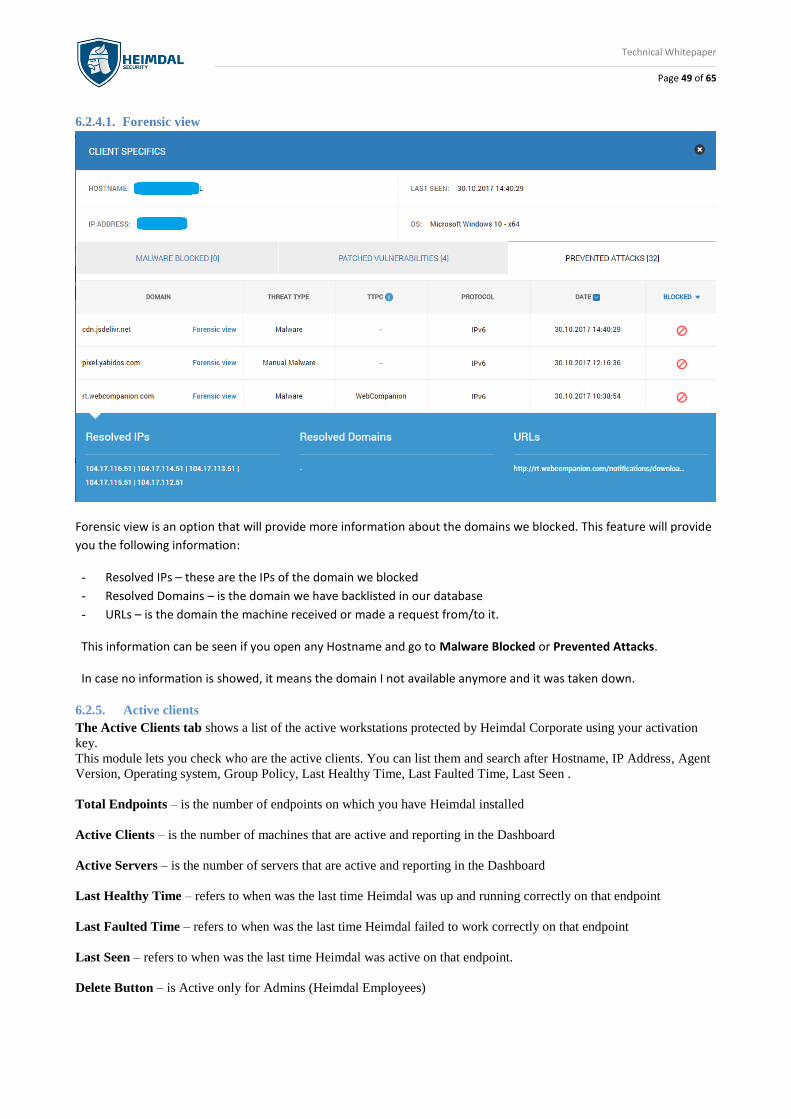
6.2.4.1. Forensic view
Forensic view is an option that will provide more information about the domains we blocked. This feature will provide
you the following information:
- Resolved IPs – these are the IPs of the domain we blocked
- Resolved Domains – is the domain we have backlisted in our database
- URLs – is the domain the machine received or made a request from/to it.
This information can be seen if you open any Hostname and go to Malware Blocked or Prevented Attacks.
In case no information is showed, it means the domain I not available anymore and it was taken down.
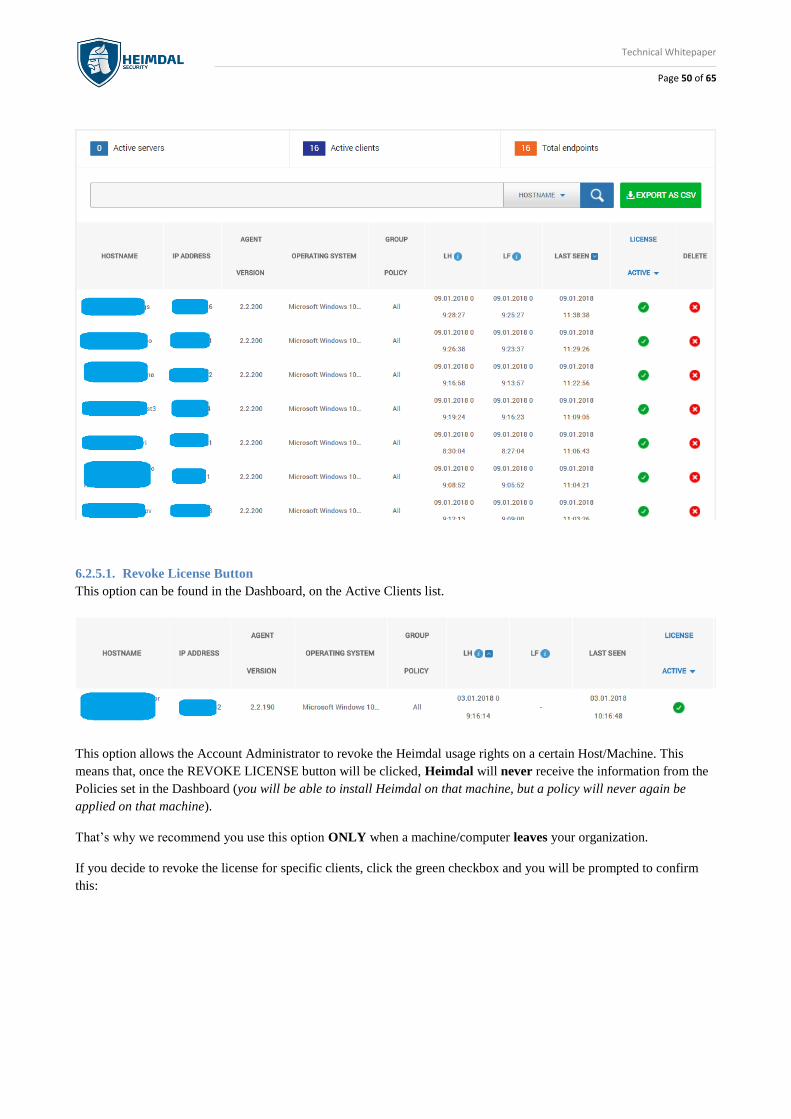
6.2.5. Active clients The Active Clients tab shows a list of the active workstations protected by Heimdal Corporate using your activation
key. This module lets you check who are the active clients. You can list them and search after Hostname, IP Address, Agent
Version, Operating system, Group Policy, Last Healthy Time, Last Faulted Time, Last Seen .
Total Endpoints – is the number of endpoints on which you have Heimdal installed
Active Clients – is the number of machines that are active and reporting in the Dashboard
Active Servers – is the number of servers that are active and reporting in the Dashboard
Last Healthy Time – refers to when was the last time Heimdal was up and running correctly on that endpoint
Last Faulted Time – refers to when was the last time Heimdal failed to work correctly on that endpoint
Last Seen – refers to when was the last time Heimdal was active on that endpoint.
Delete Button – is Active only for Admins (Heimdal Employees)
Technical Whitepaper
Page 50 of 65
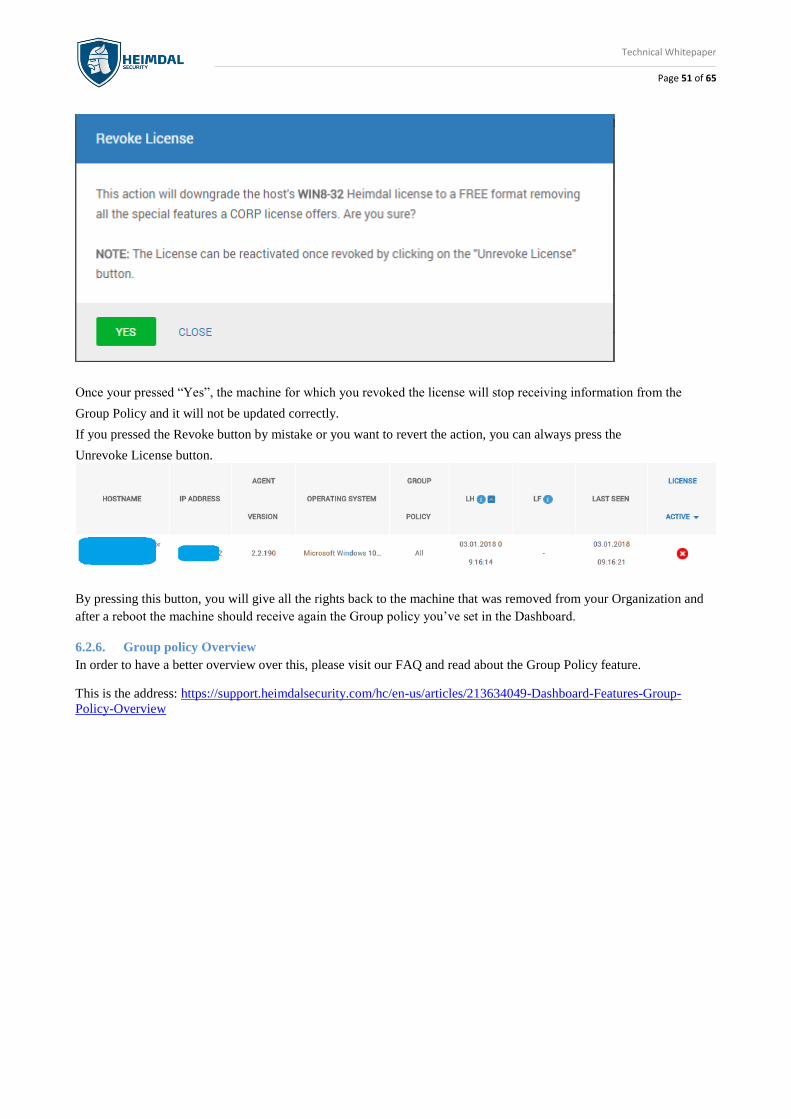
6.2.5.1. Revoke License Button
This option can be found in the Dashboard, on the Active Clients list.
This option allows the Account Administrator to revoke the Heimdal usage rights on a certain Host/Machine. This
means that, once the REVOKE LICENSE button will be clicked, Heimdal will never receive the information from the
Policies set in the Dashboard (you will be able to install Heimdal on that machine, but a policy will never again be
applied on that machine).
That’s why we recommend you use this option ONLY when a machine/computer leaves your organization.
If you decide to revoke the license for specific clients, click the green checkbox and you will be prompted to confirm
this:
Technical Whitepaper
Page 51 of 65
Once your pressed “Yes”, the machine for which you revoked the license will stop receiving information from the
Group Policy and it will not be updated correctly.
If you pressed the Revoke button by mistake or you want to revert the action, you can always press the
Unrevoke License button.
By pressing this button, you will give all the rights back to the machine that was removed from your Organization and
after a reboot the machine should receive again the Group policy you’ve set in the Dashboard.
6.2.6. Group policy Overview
In order to have a better overview over this, please visit our FAQ and read about the Group Policy feature.
This is the address: https://support.heimdalsecurity.com/hc/en-us/articles/213634049-Dashboard-Features-Group-
Policy-Overview
Technical Whitepaper
Page 52 of 65
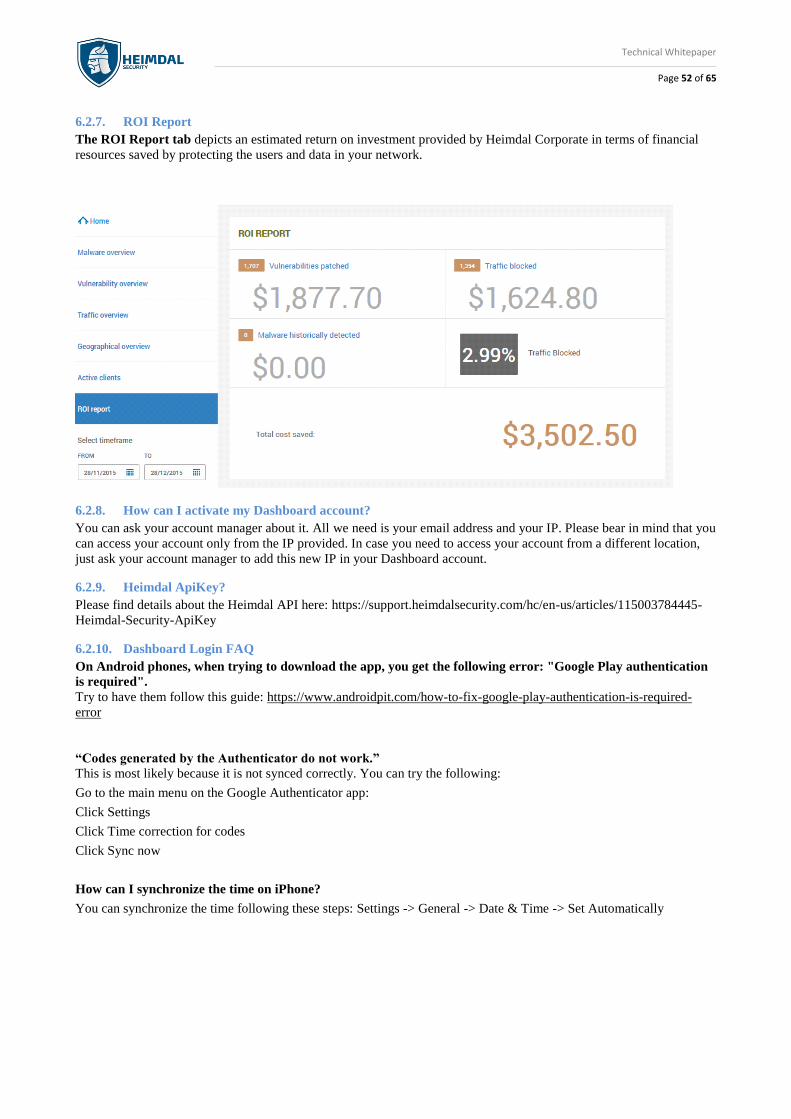
6.2.7. ROI Report The ROI Report tab depicts an estimated return on investment provided by Heimdal Corporate in terms of financial
resources saved by protecting the users and data in your network.
6.2.8. How can I activate my Dashboard account? You can ask your account manager about it. All we need is your email address and your IP. Please bear in mind that you
can access your account only from the IP provided. In case you need to access your account from a different location,
just ask your account manager to add this new IP in your Dashboard account.
6.2.9. Heimdal ApiKey? Please find details about the Heimdal API here: https://support.heimdalsecurity.com/hc/en-us/articles/115003784445-
Heimdal-Security-ApiKey
6.2.10. Dashboard Login FAQ
On Android phones, when trying to download the app, you get the following error: "Google Play authentication
is required".
Try to have them follow this guide: https://www.androidpit.com/how-to-fix-google-play-authentication-is-required-
error
“Codes generated by the Authenticator do not work.”
This is most likely because it is not synced correctly. You can try the following:
Go to the main menu on the Google Authenticator app:
Click Settings
Click Time correction for codes
Click Sync now
How can I synchronize the time on iPhone?
You can synchronize the time following these steps: Settings -> General -> Date & Time -> Set Automatically
Technical Whitepaper
Page 53 of 65
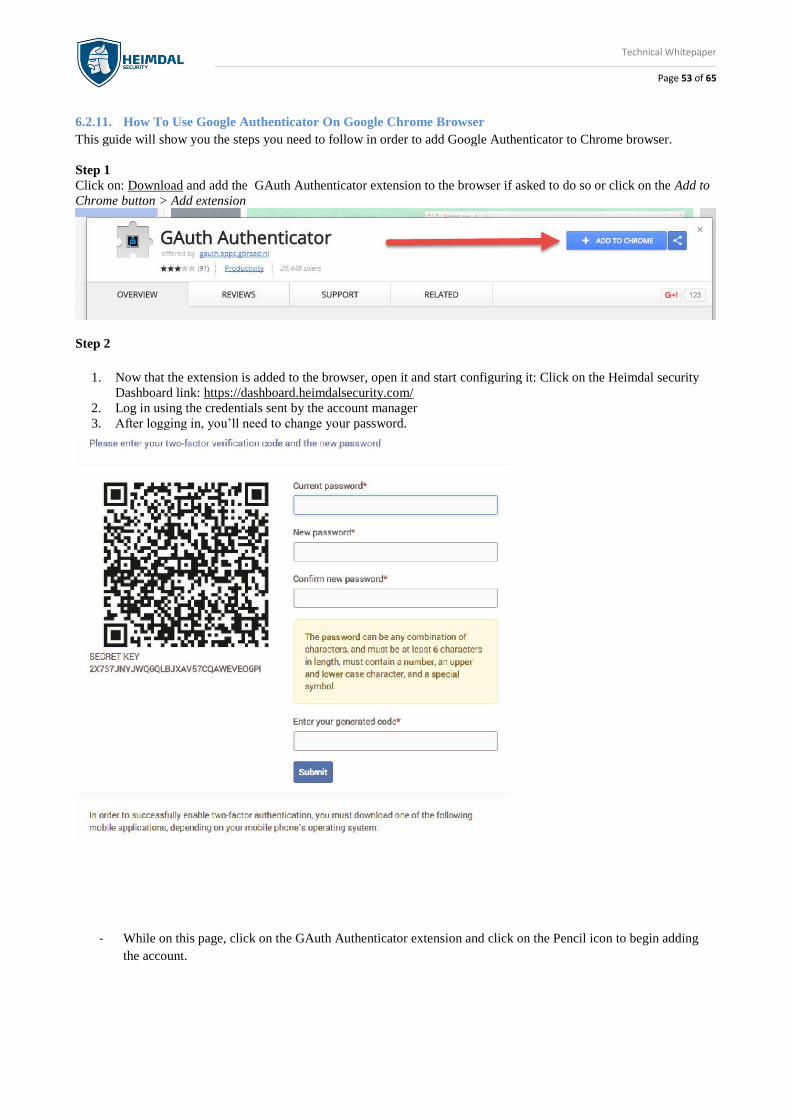
6.2.11. How To Use Google Authenticator On Google Chrome Browser
This guide will show you the steps you need to follow in order to add Google Authenticator to Chrome browser.
Step 1
Click on: Download and add the GAuth Authenticator extension to the browser if asked to do so or click on the Add to
Chrome button > Add extension
Step 2
1. Now that the extension is added to the browser, open it and start configuring it: Click on the Heimdal security
Dashboard link: https://dashboard.heimdalsecurity.com/
2. Log in using the credentials sent by the account manager
3. After logging in, you’ll need to change your password.
- While on this page, click on the GAuth Authenticator extension and click on the Pencil icon to begin adding
the account.
Technical Whitepaper
Page 54 of 65
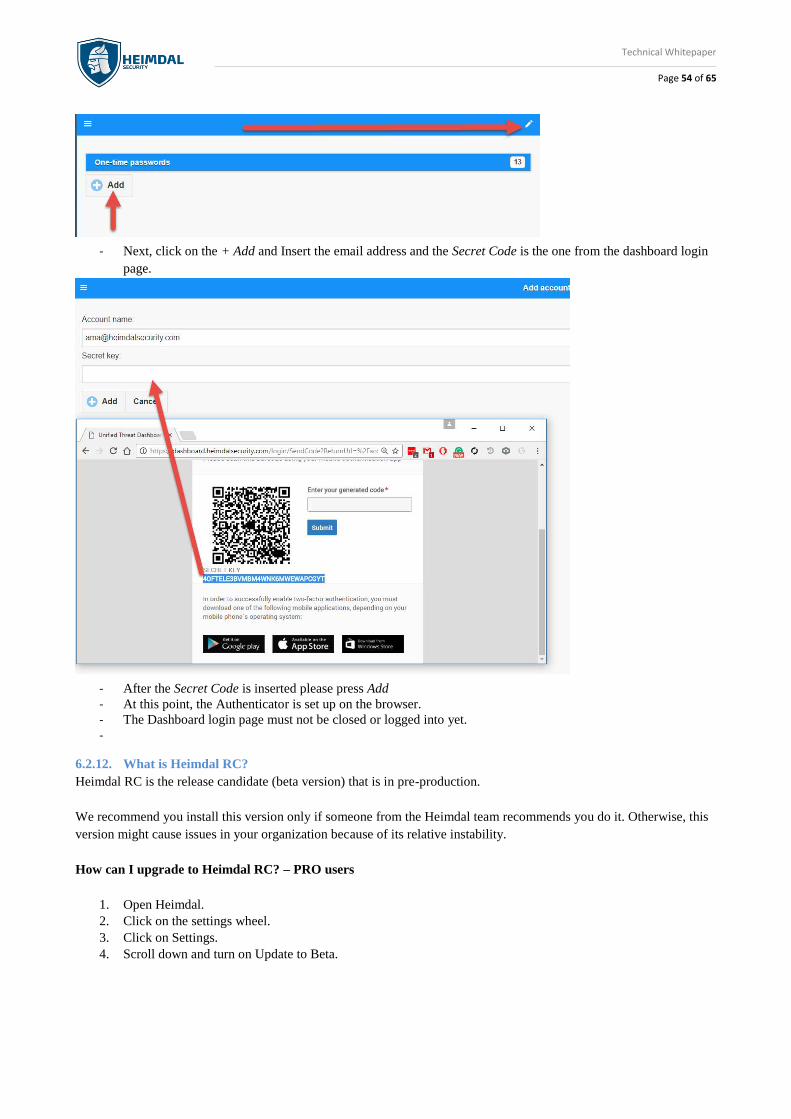
- Next, click on the + Add and Insert the email address and the Secret Code is the one from the dashboard login
page.
- After the Secret Code is inserted please press Add
- At this point, the Authenticator is set up on the browser.
- The Dashboard login page must not be closed or logged into yet.
-
6.2.12. What is Heimdal RC?
Heimdal RC is the release candidate (beta version) that is in pre-production.
We recommend you install this version only if someone from the Heimdal team recommends you do it. Otherwise, this
version might cause issues in your organization because of its relative instability.
How can I upgrade to Heimdal RC? – PRO users
1. Open Heimdal.
2. Click on the settings wheel.
3. Click on Settings.
4. Scroll down and turn on Update to Beta.
Technical Whitepaper
Page 55 of 65
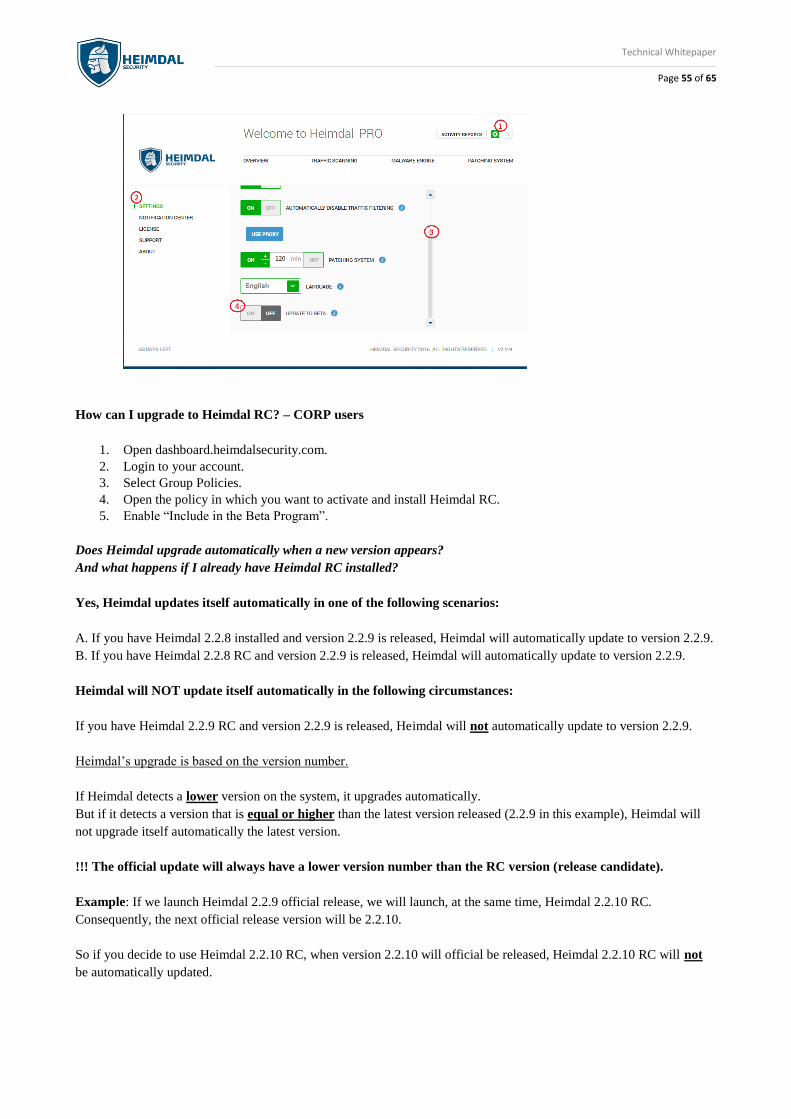
How can I upgrade to Heimdal RC? – CORP users
1. Open dashboard.heimdalsecurity.com.
2. Login to your account.
3. Select Group Policies.
4. Open the policy in which you want to activate and install Heimdal RC.
5. Enable “Include in the Beta Program”.
Does Heimdal upgrade automatically when a new version appears?
And what happens if I already have Heimdal RC installed?
Yes, Heimdal updates itself automatically in one of the following scenarios:
A. If you have Heimdal 2.2.8 installed and version 2.2.9 is released, Heimdal will automatically update to version 2.2.9.
B. If you have Heimdal 2.2.8 RC and version 2.2.9 is released, Heimdal will automatically update to version 2.2.9.
Heimdal will NOT update itself automatically in the following circumstances:
If you have Heimdal 2.2.9 RC and version 2.2.9 is released, Heimdal will not automatically update to version 2.2.9.
Heimdal’s upgrade is based on the version number.
If Heimdal detects a lower version on the system, it upgrades automatically.
But if it detects a version that is equal or higher than the latest version released (2.2.9 in this example), Heimdal will
not upgrade itself automatically the latest version.
!!! The official update will always have a lower version number than the RC version (release candidate).
Example: If we launch Heimdal 2.2.9 official release, we will launch, at the same time, Heimdal 2.2.10 RC.
Consequently, the next official release version will be 2.2.10.
So if you decide to use Heimdal 2.2.10 RC, when version 2.2.10 will official be released, Heimdal 2.2.10 RC will not
be automatically updated.
Technical Whitepaper
Page 56 of 65
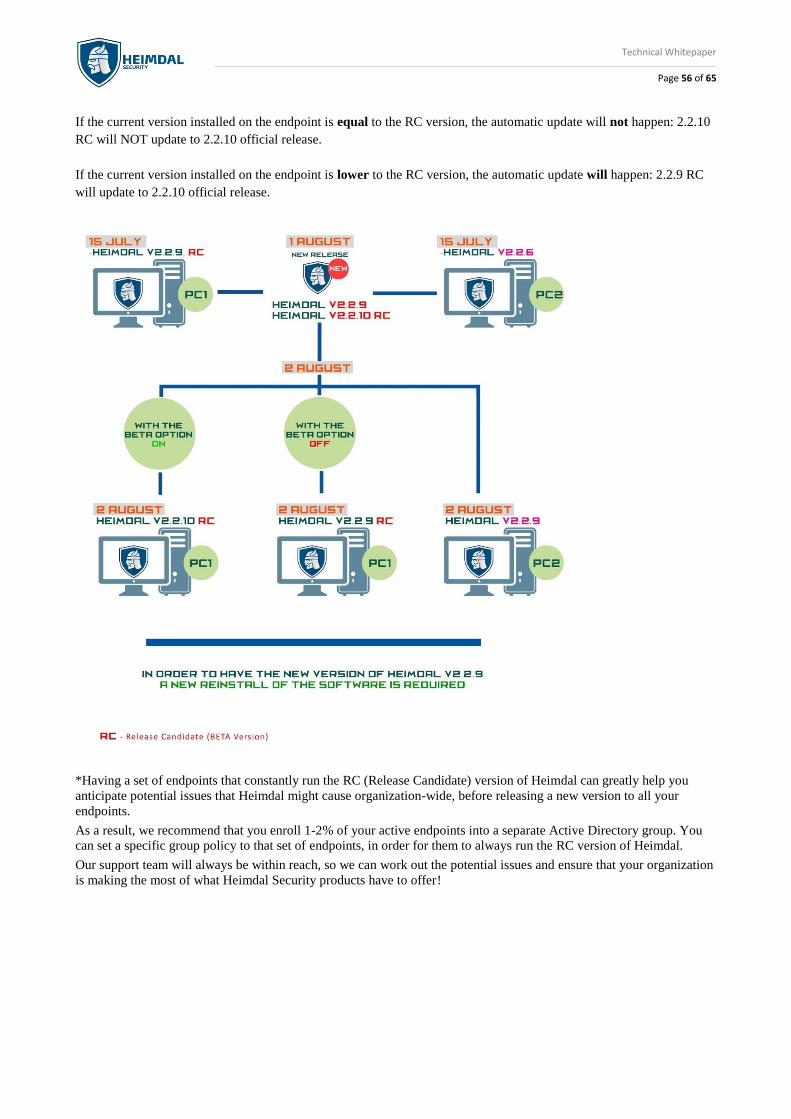
If the current version installed on the endpoint is equal to the RC version, the automatic update will not happen: 2.2.10
RC will NOT update to 2.2.10 official release.
If the current version installed on the endpoint is lower to the RC version, the automatic update will happen: 2.2.9 RC
will update to 2.2.10 official release.
*Having a set of endpoints that constantly run the RC (Release Candidate) version of Heimdal can greatly help you
anticipate potential issues that Heimdal might cause organization-wide, before releasing a new version to all your
endpoints.
As a result, we recommend that you enroll 1-2% of your active endpoints into a separate Active Directory group. You
can set a specific group policy to that set of endpoints, in order for them to always run the RC version of Heimdal.
Our support team will always be within reach, so we can work out the potential issues and ensure that your organization
is making the most of what Heimdal Security products have to offer!

Technical Whitepaper
Page 57 of 65
7. User interface
7.1.1. The Overview tab
Is your home screen for your Heimdal product. It lets you know right away what the overall status of your system is. It
can display 3 types of messages and colors:
• Green + “Your computer is healthy” – when your system is safe
• Yellow + “Your computer must be updated” – when there are outdated applications Heimdal detected and is
currently patching
• Red + “Your computer is at risk!” - when your credentials have been compromised.
You can initiate a Heimdal scan by clicking on the hexagonal button in the overview tab.
On the bottom left corner of your Heimdal dashboard you will always see how many days you have left of your
subscription.
7.1.2. TRAFFIC SCANNING TAB
In the Traffic Scanning tab, you can choose to turn off active traffic scanning or traffic filtering. However, we do not
recommend doing it, because it will substantially decrease your protection level.
If you want to find out more about these options, just click on the information balloon next to them.

Technical Whitepaper
Page 58 of 65
Autodisable traffic filtering feature - If Heimdal can’t connect to the cloud servers from your location, Traffic
Filtering won’t work properly. This may disconnect your PC from the Internet. To avoid this, you can choose to
automatically disable Traffic Filtering. Heimdal will re-enable the feature when it can reconnect to the cloud servers.
If you use Heimdal CORP and you want to activate this option (auto-disable), you can find it in your Group Policy,
under Traffic Scannig.
Additionally, by clicking on the Use Proxy button, you can set up your own proxy to create an additional protection
layer for your system.
On the right hand side, you will see how many web traffic scans Heimdal has performed on your system in the last 7
days. You can also see how many of the web addresses you accessed were blocked, if any.

Technical Whitepaper
Page 59 of 65
7.1.3. MALWARE ENGINE TAB
In the Malware Engine tab, you can choose to turn off active malware scanning. However, we do not recommend doing
it, because it will substantially decrease your protection level.
If you want to find out more about this Heimdal PRO capability, just click on the information balloon next to this option
for details.
On the right hand side, you will see how many malware scans Heimdal PRO has performed on your system in the last 7
days. You can also see how many malware strains Heimdal has cleaned from your system in the same time frame.
Technical Whitepaper
Page 60 of 65
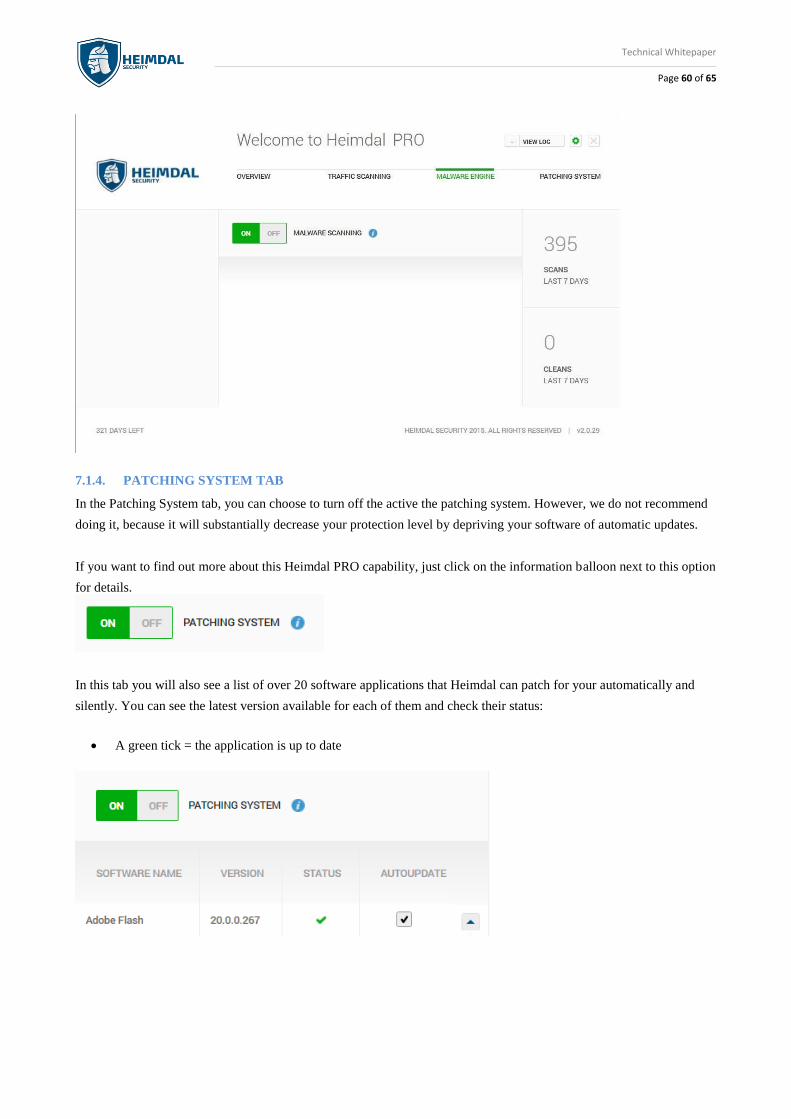
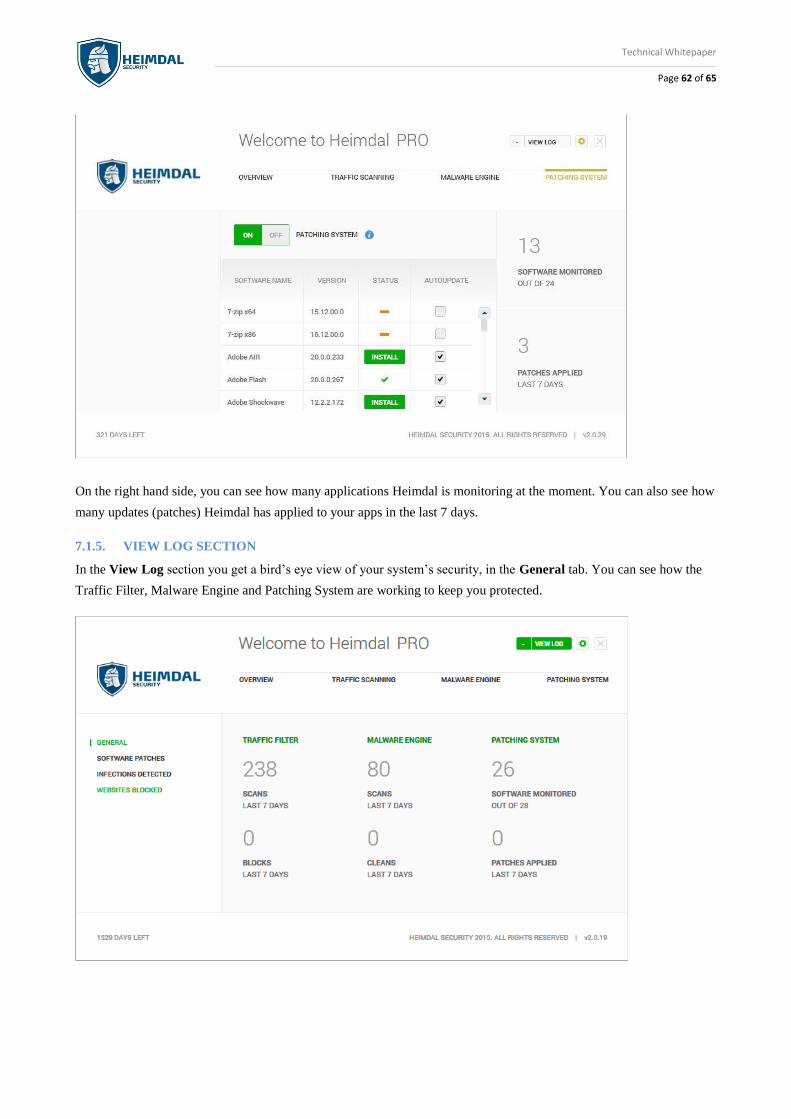
7.1.4. PATCHING SYSTEM TAB
In the Patching System tab, you can choose to turn off the active the patching system. However, we do not recommend
doing it, because it will substantially decrease your protection level by depriving your software of automatic updates.
If you want to find out more about this Heimdal PRO capability, just click on the information balloon next to this option
for details.
In this tab you will also see a list of over 20 software applications that Heimdal can patch for your automatically and
silently. You can see the latest version available for each of them and check their status:
• A green tick = the application is up to date
Technical Whitepaper
Page 61 of 65
• A line of 2 dynamic dots = the application is being updated
• A red exclamation mark = the software couldn’t be patched
• A yellow exclamation mark = the application couldn’t be patched because a newer version is already installed
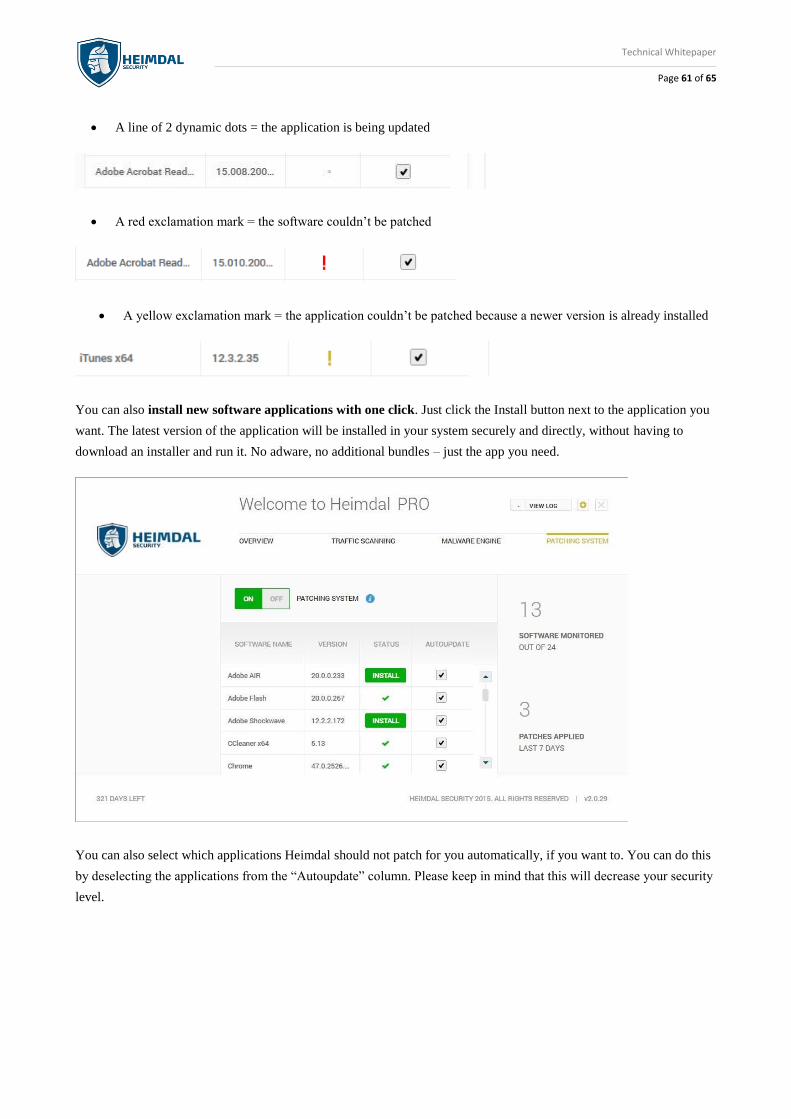
You can also install new software applications with one click. Just click the Install button next to the application you
want. The latest version of the application will be installed in your system securely and directly, without having to
download an installer and run it. No adware, no additional bundles – just the app you need.
You can also select which applications Heimdal should not patch for you automatically, if you want to. You can do this
by deselecting the applications from the “Autoupdate” column. Please keep in mind that this will decrease your security
level.
Technical Whitepaper
Page 62 of 65
On the right hand side, you can see how many applications Heimdal is monitoring at the moment. You can also see how
many updates (patches) Heimdal has applied to your apps in the last 7 days.
7.1.5. VIEW LOG SECTION
In the View Log section you get a bird’s eye view of your system’s security, in the General tab. You can see how the
Traffic Filter, Malware Engine and Patching System are working to keep you protected.
Technical Whitepaper
Page 63 of 65
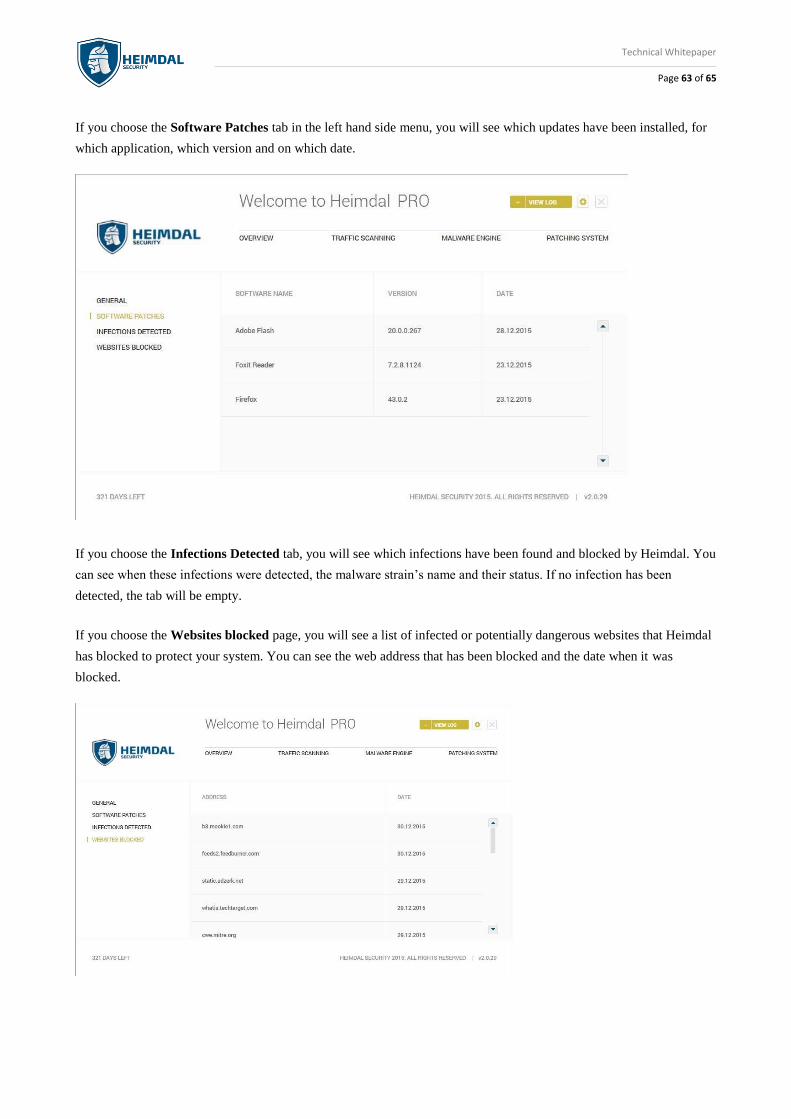
If you choose the Software Patches tab in the left hand side menu, you will see which updates have been installed, for
which application, which version and on which date.
If you choose the Infections Detected tab, you will see which infections have been found and blocked by Heimdal. You
can see when these infections were detected, the malware strain’s name and their status. If no infection has been
detected, the tab will be empty.
If you choose the Websites blocked page, you will see a list of infected or potentially dangerous websites that Heimdal
has blocked to protect your system. You can see the web address that has been blocked and the date when it was
blocked.
Technical Whitepaper
Page 64 of 65
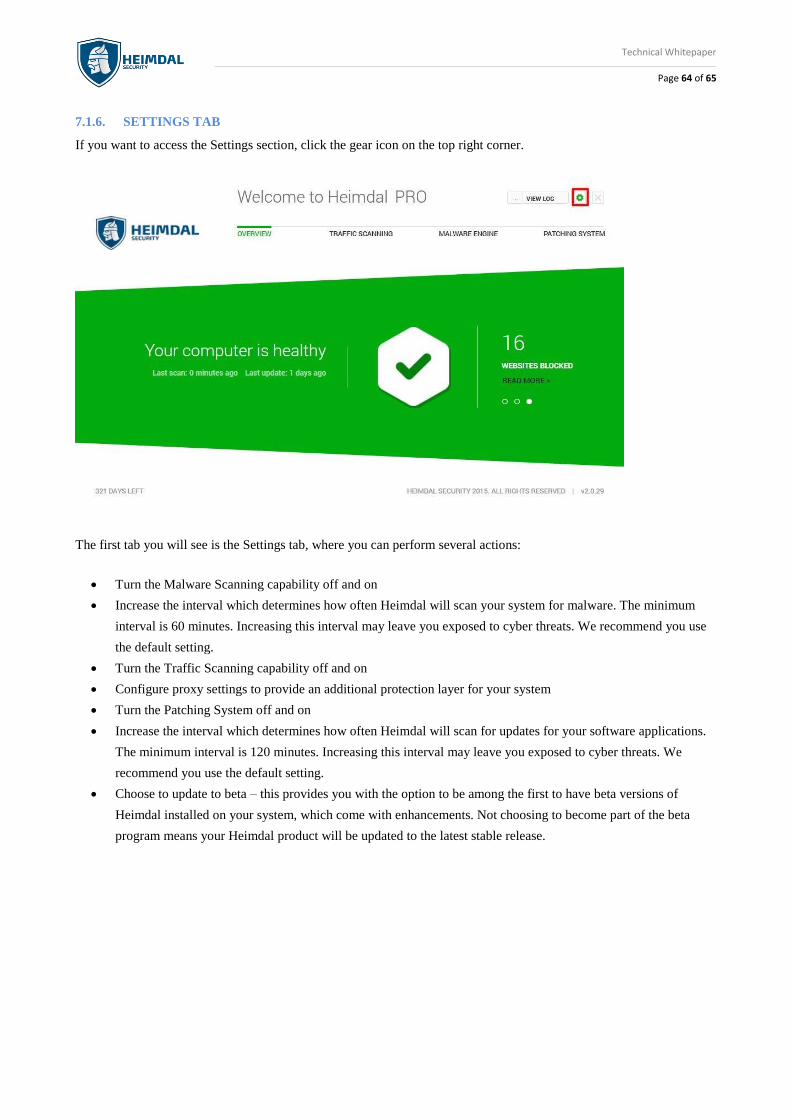
7.1.6. SETTINGS TAB
If you want to access the Settings section, click the gear icon on the top right corner.
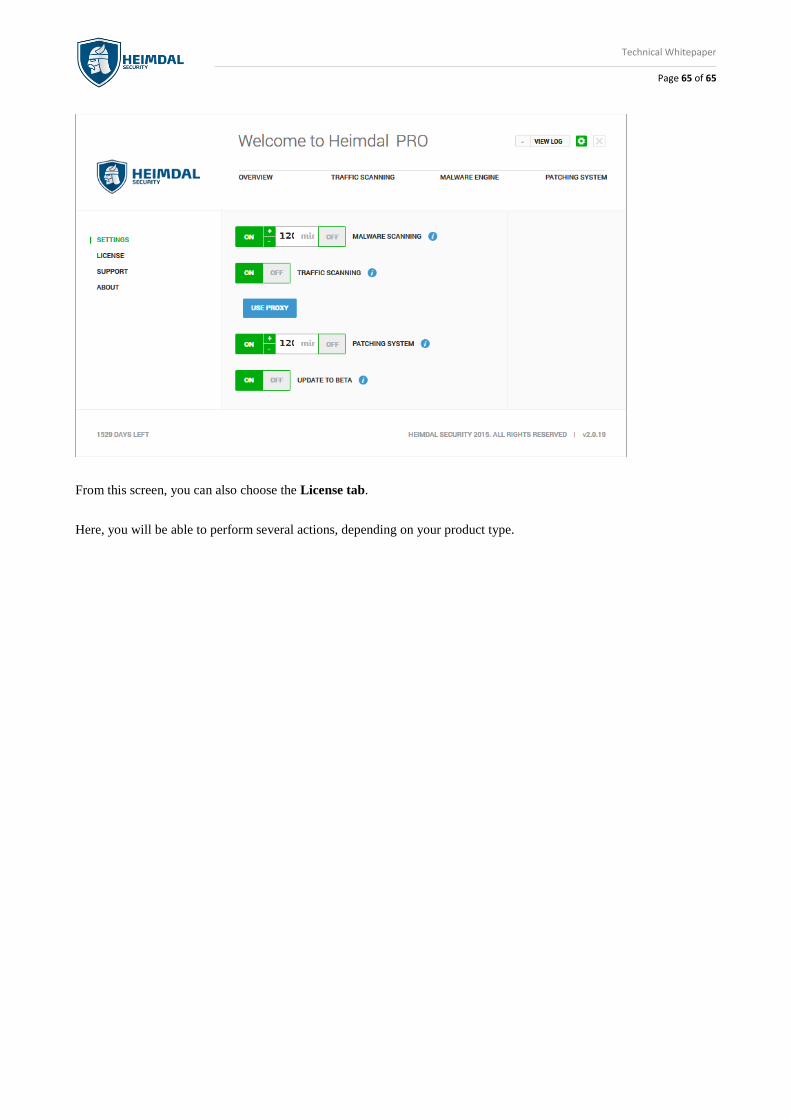
The first tab you will see is the Settings tab, where you can perform several actions:
• Turn the Malware Scanning capability off and on
• Increase the interval which determines how often Heimdal will scan your system for malware. The minimum
interval is 60 minutes. Increasing this interval may leave you exposed to cyber threats. We recommend you use
the default setting.
• Turn the Traffic Scanning capability off and on
• Configure proxy settings to provide an additional protection layer for your system
• Turn the Patching System off and on
• Increase the interval which determines how often Heimdal will scan for updates for your software applications.
The minimum interval is 120 minutes. Increasing this interval may leave you exposed to cyber threats. We
recommend you use the default setting.
• Choose to update to beta – this provides you with the option to be among the first to have beta versions of
Heimdal installed on your system, which come with enhancements. Not choosing to become part of the beta
program means your Heimdal product will be updated to the latest stable release.
Technical Whitepaper
Page 65 of 65
From this screen, you can also choose the License tab.
Here, you will be able to perform several actions, depending on your product type.