while this document is acceptable for ... - undermountain.org · while this document is acceptable...
TRANSCRIPT


Caves of Sydwall
An AD&D 2nd Edition compatible adventure for characters of levels 7th–9th
Design: PaSquall Cover and Interior Art: Brannon Hall
Proofreading: Halaster Blackcloak, Varl Editor, Layout: Steven J. Ege
By using or reading this document, you indicate that you understand, agree to, and accept the following statements. Caves of Sydwall is ©2007 by the BACK IN PRINT PROJECT. This document can only be distributed “as is”. You may not modify this document in any way, shape, or form without express written permission of the BACK IN PRINT PROJECT. You are required to keep this copyright notice and the accompanying distribution information intact with any copies of this document that you do distribute. Distribution of this document is for non-profit purposes only. Any usage of this document as a means of generating revenue is expressly forbidden. The BACK IN PRINT PROJECT logo and identifying marks are copyrights of the BACK IN PRINT PROJECT. All other artwork, symbols, designs, depictions, likenesses, formats, poses, concepts, themes and graphics are also copyrights of the BACK IN PRINT PROJECT. The logo, identifying marks and artwork, may not be used in another publication without the express written permission of the BACK IN PRINT PROJECT. “AD&D” and “Advanced Dungeons & Dragons” are registered trademarks owned by Wizards of the Coast. The BACK IN PRINT PROJECT acknowledges all copyrights, trademarks and registered trademarks used in this work and in no way makes any challenge to the ownership of said property rights.
Come visit us at the BACK IN PRINT PROJECT: http://www.bipproject.com/

- 2 -
Introduction “Caves of Sydwall” is an AD&D 2nd Edition compatible adventure designed for 4-6 characters of levels 7–9 (average 40 total levels). As usual, a good mix of character classes is helpful, though not mandatory. However, one or more fighters and a cleric are probably necessary. “Caves of Sydwall” is a short dungeon adventure and can easily fit into most campaigns or settings, provided they contain some kind of wilderness area. This adventure can likewise be easily converted to 1st Edition. A word of warning: Although the author tried to create a well-balanced challenge, a few rooms can be particularly deadly. The DM should warn his players, so they can think twice before bringing their favorite character inside the caves. Some pre-rolled characters are provided (at the end of this adventure book) for quick play; they can also be useful for the DM to scale the difficulty level of this adventure up or down, if the players bring in their own characters. For a better understanding of the layout of the caves, the adventure background “History of the Caves” should be read carefully.
Adventure Background
History of the Caves The entrance of the caves is located in the Tharuss Hills, in a wilderness zone of the realm. Around 80 years ago: A wandering tribe of orcs decided to settle down in the Tharuss hills, far from human civilization. The tribe had an unusual shaman, named Klastrak. In his long life, Klastrak had been in contact with humans and had learned from them. Klastrak had become one of the wisest shamans of the orcs of the realm. Other shaman and tribal leaders often came to get an advice from him, and eventually other tribes came to settle down in the Tharuss hills, as well. The orcs had discovered very early on a small cave in the hills. In the beginning they used it as a storage area and a shelter during harsh winters, but one day Klastrak decided to turn it into a worship place. A massive door was installed (Area #1). The orcs converted the main cavern (Area #2) into a temple, and the smaller caverns (Areas #3,4,5) were used as a cemetery, a final resting place for the leaders of the tribe with some of their possessions (note that Area #6 and
beyond did not exist at the time). Over the years, the place became famous amongst orcs. Leaders and shamans even of distant tribes asked to be laid to rest in the temple. Around 65 years ago: Klastrak died from old age – the exact date is unknown. Life went on However, it must be noted that even though the new shaman was highly revered, he was far from having as much experience and influence as Klastrak. 52 years ago: At this time, an estimated 6 tribes and 1,200 orcs lived in the Tharuss Hills and its surroundings. This became a major problem – orcs spread far and wide, and began to raid human settlements and villages far from the Tharuss Hills (at least 20 miles). After many of these raids, one king eventually decided to send a detachment of his army to wipe out the orcs. As these orcs had lost a bit of the habit of fighting, they suffered a severe defeat. Most of the males were killed in the battle. The females, the young and the remaining males were scattered and driven into the wilderlands. The Tharuss Hills site was deserted. Over the years plants grew and the entrance of the cave was eventually hidden by bushes. The cave was then only used by foxes, bears and other animals for shelter. 15 years ago: Herasmitus the Sage published his reference work about the orcs' cults and worshipping habits. In a paragraph of this huge book, the Tharuss Hills temple was described and its location shown quite accurately. A few months later, a group of adventurers led by Tarmis “the Strong” looked at Herasmitus’ book and decided to explore the caves. After defeating the bear that had taken residence inside, they looted the tomb and found a few hundred gold coins, some cheap jewelry, a few low-grade magic weapons and shields, and an amulet of protection owned by Klastrak long ago, that Tarmis kept. A few months later Tarmis, in a dire need of money, sold the amulet to a wizard he knew named Sydwall. 12 years ago: Sydwall was a solitary wizard (around 10th level at the time), living in the capital city of the realm. Sydwall had a “problem”. He was of evil morality in a city where most inhabitants were of lawful good alignment. Sydwall was a quiet wizard, only interested in research (mainly conjuration, summoning and constructs) and thus managed to live for a long while in the city undisturbed.

- 3 -
However, one day a group of extremist paladins (“the Heralds of Pure Goodness”) who had heard of his existence decided that Sydwall was a threat and should be eliminated. Luckily, Sydwall had a good contact source in the militia and learned that the paladins were after him, just a few hours before they moved in to capture him. Sydwall knew that the paladins were many and strong, and that he probably would be no match for them. So he wisely decided to leave town. However, he was in quite a hurry and could only take his some of his belongings – money, spellbooks, magic items, expensive spell components, and his most precious books and writings. Sydwall knew that he had to flee very far; otherwise the paladins would eventually hunt him down. He had intended to settle down in a small town in a neighboring realm where he knew a fellow wizard. During his journey, he happened to cross the Tharuss Hills. He recalled what Tarmis had said about them and decided to investigate the caverns. They had thoroughly been looted by adventurers and Sydwall found nothing of value. However, he realized that the stones and minerals he found inside would be useful for his research, and decided that it would be a good place to settle down, so that's exactly what he did. With the help of conjured elementals, he expanded the caverns and created new ones (Area #6). Sydwall didn't feel like disturbing the slumber of the dead, so Areas 3, 4, and 5 were left in their original state (he didn't need them anyway). 11 years ago: Sydwall's peaceful days did not last long. Only a few months after settling in, a group of adventurers came to explore the caves. Sydwall disposed of them easily, but found in one of their backpacks a map of the Tharuss Hills with the location of the caves clearly indicated (this page had been torn from Herasmitus' book). Sydwall realized that others adventurers would come, possibly more powerful ones. So Sydwall decided to expand the caves a bit further, and to install deadly wards. Areas #9, 10, 11, and 12 were dug. He discovered in the process the natural cave of Area #13, with its underground lake and river. These new rooms became Sydwall's living quarters. Areas #1 through 6 were protected with deadly traps. A few guardian creatures were summoned. Sydwall's assumption was right – adventurers kept on coming, two or three times a year. His traps and guardians were usually enough to defeat the intruders – he only had to “help” in person once. However, Sydwall grew paranoid,
fearing that the paladins would discover his lair. He decided to expand the caves further still. Using a potion of gaseous form, Sydwall followed the underground river (the tunnel was too narrow for a normal-sized human to swim inside) and discovered a large natural cavern (Area #15). Sydwall decided that the river was the perfect obstacle for adventurers. He dug Areas #16 through 22, which became his new living quarters and laboratory, and turned Areas #1 through 12 into a huge deathtrap. He created two rings of gaseous form (see Areas #15 and 18) to allow him to cross the underground river easily. Sydwall started to spend all his time perfecting traps, never realizing that his paranoia was increasing by the day. 2 years ago: Sydwall's traps and guardian creatures proved efficient, as very few adventurers could reach Area #13, and those that did never discovered the underground river passage leading to Area #15. However this wasn't enough for Sydwall. The paranoid wizard decided that he needed a special guardian. He had the idea of melding a powerful infernal creature into a hard stone statue, a kind of intelligent stone golem with additional magical powers, under his control (a “fiend-golem”, in other terms). It took him one year to build the statue, and a few more months to prepare the summoning and the melding spell. On that day, the first step, the casting of the conjuration itself, was a success. The second step was a success, as well – the creature was trapped within the statue. However the third step went all wrong. Sydwall had underestimated the power of the fiend, and a terrible battle ensued. Sydwall had the habit of summoning mephits for various tasks. A dozen of them were around the day he began his great summoning. Although he had done extensive research, Sydwall didn't know that this fiend had a powerful ability to dominate others' minds, especially those of lower planar creatures. So the fiend managed to take control of the mephits, and turned them against the wizard. With the help of the mephits and after a long battle, the fiend (named Skeretshh) managed to kill Sydwall. Skeretshh wasn't in a very good situation though. He was trapped in the statue and could only move in Area #22. He was unable to gate back to the lower planes due to the powerful magic used to meld him into the statue. He quickly realized he had to gain strength and energy in order to overcome the melding spell and avoid being trapped forever

- 4 -
in his stone form. The only way to accomplish this was to drain the souls of humans or humanoid creatures. Skeretshh had an advantage – four mephits had survived the fight. They told their new master everything they knew about the history of the caves, their layout, their traps and everything else. Skeretshh devised a strategy to escape his boring fate. Skeretshh obviously wanted adventurers to access his “prison” (Area #22) so that he could drain their power. He managed to teleport the mephits to the entrance of the caves, to wait for adventurers and guide them to avoid traps, and finally bring them close enough to him so he could feed on them. The mephits weren't stupid however, and had other plans. They felt (quite rightfully) that Skeretshh would destroy and consume them as soon as he was freed from the stone statue. So they had no intention of bringing him adventurers – they decided to fully use the traps to screen out the weaker adventurers. They thought that heroes powerful and clever enough to survive all the traps would be able to destroy Skeretshh.
The Current Situation The situation has not changed for two years. A few adventurer parties have come to the caves, but no one yet has survived the traps. Skeretshh is getting a bit impatient now, but has no other solution than to wait. The mephits cannot leave the caves, but enjoy a partial freedom as Skeretshh's control loosens significantly beyond Area #20 (though they cannot completely escape it). During these two years, the mephits had initially thought about gathering a small hoard of treasure (mainly from adventurers not skilled enough to avoid the traps), that they intended to use as a payment for adventurers who could gate them to the lower planes in return. They are changing their minds, however, as they don't feel so homesick anymore, and the prospect of watching many adventurers caught in the traps is getting more and more attractive to these mischievous mephits. To enjoy a complete freedom, they just need Skeretshh to be destroyed.
Magic Inside The Caves Sydwall spent years enchanting the caves. Some effects still remain:
• All walls radiate a faint magic aura. The walls are impervious to stone shape, passwall, meld into stone, transmute rock to mud, and other stone-related spells. Adventurers trying to break the walls with a mace or a hammer discover that the stone is far harder than usual and is unaffected. They are likely to damage their tools or weapons (even magical ones) if they insist on hammering at the walls.
• Teleport, dimension door, and all other teleporting spells
do not work in the caves.
Adventure Hooks A few classic adventure hooks are given below. The DM is of course free (and encouraged!) to create adventure hooks linked to the backgrounds of his player characters and his campaign setting. 1. If one of the adventurers happens to be a half-orc, he has
heard of the caves of the Tharuss Hills as a sacred place (and might even have ancestors who were part of the Klastrak's tribe). He wants to visit the place and meditate upon the grave of Klastrak.
2. If one of the adventurers is a paladin, his order has given
him a mission – check the caves in the Tharuss Hills. Rumor as it that an evil wizard inhabits the cave and has been building sinister plots, and should be dealt with.
3. If one of the adventurers is a thief, a close friend told
him a few weeks ago that he intended to loot the caves of the Tharuss Hills. The adventurer is beginning to worry since he hasn't heard from his friend since then, and considers heading for the caves to find out what happened to him.
4. If one of the adventurers is a cleric, he learns that some
sacred items of his cult, looted by an orc band decades ago, might have reappeared in the Tharuss Hill caves. The high priest wants the cleric to go and check the caves to see if the items are there, and if so retrieve them. (Note: this rumor is completely false).
5. Legends tell of a great treasure waiting for bold
adventurers to seize it in some caves of the Tharuss Hills. Danger lurks though – many adventurers have disappeared in this place, never to be heard from again!

- 5 -
Trip to the Tharuss Hills Assuming the party leaves from a small or major city of the realm, most of the trip to the Tharuss Hills should be uneventful. However the last leg of the journey (in the Tharuss Hills themselves) may prove more difficult as the hills are a wilderness zone and some monsters inhabit the area. The cave's entrance is hidden by bushes and is not obvious. If the adventurers have done thorough research about the cave's exact location before leaving, they find it in 1-4 hours (roll 1d4). If the adventurers have not done this research, it takes 4d4 hours to find it. If a druid or a ranger is part of the group, this time is lowered to 2d6 hours (due to their outdoor skills). For each hour spent in the hills in the daytime, the party has a 10% cumulative chance to be attacked by wandering monsters (see table below). If the adventurers have to camp and spend a night in the hills, they have a 60% chance of being attacked during that night.
Wandering Monsters Table
d100 Monster /(# appearing) 01–15 Brown bear (1) 16–30 Ogre (4) 31–45 Wild dog (11) 46–60 Snake, poisonous (1) 61–70 Badger, giant (4) 71–80 Rock reptile (3) 81–90 Wolf (7) 91–00 Boar (2)
These monsters are either on a hunt (and may even try to surprise the party), or have been disturbed by the adventurers crossing their territory. They have no treasure. The DM should of course adjust their numbers and hit points to make the encounter more or less tough as he sees fit. Note: The ogres speak a crude common, but have no information useful to the adventurers.
The Caves The entrance opens into a fairly large natural corridor – it stretches for around 40 yards, slowly sloping downward, and opens on a cave (Area# 1). General notes about the caves: • Caves are unlit, unless otherwise stated. • All areas are a bit colder than outside – they are dry,
except Areas #13, 14 and 15 (for obvious reasons, see descriptions).
• Air is generally fresh, unless otherwise stated. • Cavern ceilings are usually 15 feet high, unless otherwise
stated. “Living quarters” ceilings (Areas #17-21) are usually 8 feet high.
1. Entrance This is a narrow natural cave that seems empty. On the east wall of the cave is a heavy wooden door, reinforced by iron plates. Some parts of the door are carved, looking like orc faces. Some of them have been deeply scratched. The door is obviously in bad condition – it has already been smashed, and the bottom of the door appears to have been burned. The southern end of the cavern stretches for a few yards beyond the doorway and leads to a dead-end. The adventurers can enter Area #2 with no problem, they simply have to push the door (or what's left of it) aside. An adventurer with some knowledge of art can tell that the carvings are far from being masterpieces (the orc artist who did sculpt the door was not very good). A very close examination of the door reveals that a few runes linger on the wood near the handle. A wizard of at least 5th level can tell that they once were explosive runes, discharged long ago. No magic aura lingers on the door. 2. Decorated Cavern You see a cave littered with debris of all sorts – glass, clay, stone, cloth, and even metal scraps. It seems that this cave was once very well-decorated, as all the debris are remnants of chairs, tapestries, jars and various ornamental items. It is obvious that all these items were systematically smashed a long time ago. The only items to remain intact are three large

- 6 -
stone statues representing orc deities, each of them facing one of the corridors. A three-foot high wooden fence stands at the far end of the cave, separating it from Area #6. There is a small door in the center of the fence which can be pushed or pulled – it does not seem to have a lock. Oddly it has not been smashed like the rest of the furniture. This cave was once decorated with high-quality ornamental items of all sorts, offered to Klastrak by many orc leaders. A previous group of adventurers methodically smashed all those items in search of hidden riches and secret passages. Of course they looted the smallest ones like candlesticks, vases, small rugs. A thorough search fails to yield anything of value. Adventurers may only find parts of gold-embroidered tapestries still in good shape, which could be sold for around 400 g.p.; they are very heavy and bulky however, and will hinder the movement of the adventurer(s) carrying them, halving their speed. If the adventurers carefully check the statues, they will find that they were damaged and repaired. Sydwall once intended to change them into golems, but found the task too difficult and gave up after a few weeks of effort. These statues are harder than normal stone – adventurers will realize this if they try to smash them. The statues have no other special features otherwise.
3. North Tomb #1 This small passage (with an 8-foot ceiling) was dug in stone, and is lined with 3 niches on each side. Each niche contains one skeleton. There seems to be nothing of interest in here. The niches contain orc skeletons. Most of them have deteriorated. It is obvious that other adventurers or grave-robbers have already thoroughly searched and looted this tomb. The only remaining items here are a set of rusty plate armor and a large empty jar, both in the second niche at the right of the entrance. Previous visitors showed no interest in the rusty armor (which was once the property of the orc leader entombed here). If the adventurers insist on taking it, the armor may fit a human, and should be treated as AC 7. Its value is at most 10 g.p.
The large jar was originally sealed and contained wine. The jar was opened long ago and there is no trace of wine anymore. However, the smell still lingers. 4. North Tomb #2 A small cavern very similar to Area #3, with three niches on each side, containing skeletons. Once again, it seems that there is nothing of interest here. The six orc skeletons are even more deteriorated than those of Area #3. One of them has even been smashed to pieces. Even after thorough examination, there is nothing of interest to be found here.
5. South Tomb This is a small cavern similar to Areas #3 and 4. Only 3 niches were dug on the west side though. Two of them are occupied by skeletons, the last one being empty. If the adventurers check the skeletons carefully, they find out that the left thigh-bone of the skeleton nearest the entrance has been carved into a long flute, and put back into place (in fact, it is the work of a bored adventurer while his comrades were busy checking Areas #2, 3, 4, 6 and 7 for secret doors and caches). A bard can tell that the flute sounds haunting yet melodious – this item could be sold for 10 g.p. An obscure orc deity was not very pleased with this, however, and threw a minor curse on the flute. The person owning or carrying it receives a penalty of -3 on all his saving throws. The curse will not be obvious for the adventurer carrying the flute. After a few missed saving throws, the DM should tell the player concerned that his character is feeling a bit unlucky. The flute does not radiate magic. The adventurers will notice that the last skeleton wears very different clothes than the others, more modern ones. If they check carefully, they see that it is not an orc skeleton, but a human one. If they search the clothes, they find a scroll and a small quill. A map of the Tharuss Hills is drawn, with the location of the caves marked. A small note under the map reads “wizard's lair – Sydwall(?) – possibly powerful – beware!”. Another note with a different handwriting has been added – “What's this? We are sent to investigate a wizard's lair and all we're finding is an old orc tomb? I don't like that. I just hope we quickly retrieve the daggers and leave this dismal place”.

- 7 -
The skeleton wears thin green leather gloves. A thief character will recognize them – they bear the mark of the Guild of the Green Hand, the most powerful thieves’ guild of the realm. DM's Info: A party of thieves and mercenaries was sent by the guild to retrieve the twin daggers (see Area #17), personal property of Lord Naznin, and leader of the guild. They had been stolen by a traitorous thief. Hunted by the guild, the traitor tried to flee the realm and on his way had the unfortunate idea to seek shelter in the caves. Sydwall disposed of him easily, and realized that the daggers were powerful magic weapons. He stored them in a cache to study them in detail later, but never found the time for this. The guild managed to track the traitor and sent a group of thieves in the caves a few weeks later. They had underestimated the risks, however. One of them was killed by a magic trap in Area #2. His comrades put the corpse in an unoccupied niche (they were evil thieves on a mission – giving their accomplice a proper burial was not a major concern). The others were later killed by the centipedes and other traps. Lord Naznin is more cautious now, and is taking all the time needed to obtain divination magic and get enough information about the caves. He intends to assemble a more competent team to retrieve the twin daggers. If they should reappear somewhere in the realm though, the adventurers would certainly receive the “friendly” visit of some experienced Green Hand members. The mephits have no clue about the daggers (in case the adventurers ask them later in the adventure – see Area #6). The last niche is completely empty. It was dug just before the orcs were driven away from the Tharuss Hills, and was never used.
6. Room of Many Pillars Note for the DM: This is one of the most important rooms of the adventure. The DM should read it carefully before playing it. This long room (140' x 30') was once a natural cave, but its walls have been carved and smoothly polished. Worn-out frescos depicting flying dragons can still be seen. Eight large pillars rise from the ground and reach the 20-foot high ceiling. They have been masterfully carved and display intricate patterns.
In the southern part of the cave are four pedestals. They are of a greenish color and are not made of the same stone as the rest of the cavern. Each pedestal bears a well-made sculpture of some kind of devilish creature. Each of them stretches out a hand as if begging for something. Each sculpture faces one of the cardinal directions. On each pedestal is engraved this small sentence (in common) – “Help us, satisfy us”. The room is otherwise empty (see Area #7 for the niche in the north-east corner). Any dwarf, gnome or adventurer proficient in architecture or masonry can tell that the eight pillars are not of the same stone as the walls and weren't originally part of the cavern – they have a purely ornamental role (they were added by Sydwall when he expanded the caves). The sculptures on the pedestals are mephits. Priests, bards, adventurers having already encountered mephits, or proficient in monster lore will recognize them. However, they might not be able to tell exactly which type of mephits they are (DM's judgment). Adventurers trying to detect magic on the sculptures will discern a faint alteration aura. That's because they are not mere sculptures, but rather real mephits under the effect of a statue spell. Tupix (the water mephit, see below) knew the command word of a magical ring Sydwall had created (ring of statues, see below) and was able to grab it after the wizard's demise. The mephits have been using it from time to time to test adventuring parties entering the caves – they place themselves on the pedestals and wait to see if the adventurers notice them or simply leave the caves after they fail to open the secret door (since Rotux holds the tokens necessary to open it – see Area#7). When Sydwall lived in this area, the pedestals bore exquisite sculptures and fine porcelain jars. Most of them were looted by other adventurers long ago. If the adventurers place any object of value in one of the mephits' hands (even a single gold piece is enough), they will all (willingly) turn back to their normal form and will heartily greet the adventurers. Their welcome is sincere, as they are pleased to meet adventurers since they might represent a chance to be freed from Skeretshh. If the adventurers try to break or damage the statues in any way, the mephits immediately change back to their normal form and yell something along these lines – “Hey, that HURTS!!! Do you really want to kill four poor mephits

- 8 -

- 9 -
imprisoned in here for so long? Listen to us; we have an interesting challenge for great heroes of your kind.” If the adventurers try to leave the caves, the mephits turn back to their normal form and call them (as they desperately want Skeretshh to be destroyed). If the adventurers are suspicious, they then pretend that they were afraid of being killed and they wanted to ensure that the adventurers weren't of the evil type (this is partly true, anyway). Important Note: The DM should do his best to keep the mephits alive, and stress to the players that the mephits aren't (or don't appear to be) evil. However, if the adventurers still decide to kill them, then so be it. The adventure can be run without them, but it might prove more difficult. Adventurers will have to randomly choose between the doors in Area #9, etc. If the adventurers ask the mephits how they could change into statues, the mephits will brag about their mighty magical powers for awhile, but will be careful not to bore the adventurers too much, at least at the beginning of the adventure. They won't reveal the existence of the ring of statues. In any case, they will do their best to make a good first impression on the adventurers. As soon as they're certain that the adventurers won't attack them, the four mephits introduce themselves: “Master PILAX, star of the silver skies, ultimate icon of liberty, famous from Olympus to the Abyssal planes.” “Lord LAROX, master of tricks and illusion, terror of anything that crawls, my followers are countless.” “His Highness ROTUX, grand counselor of the-one-who-shall-not-be-named, revered by most, feared by all others.” “Sir TUPIX, undeniable master of waters, familiar with the supreme ruler, idol of the infernal planes.” Their statistics are as follows: Pilax, air mephit: AL CN; Mov 12 Fly 24; HD 3; HP 17; AC 4; THAC0 17; #Att 2; Dmg 1-3/1-3; SA: grit breath once every 2 rounds, dmg 1-6; gust of wind 1x/day; SD: blur 1x/hour; regenerate 1 hp/turn; immune to air and gas attacks.
Larox, smoke mephit: AL CN; Mov 12 Fly 24; HD 3; HP 18; AC 4; THAC0 17; #Att 2; Dmg 1-2/1-2; SA: soot ball once every 2 rounds, 1 target, dmg 1-4 + target blinded 1-2 rounds (no save); dancing lights 1x/day; invisibility 1x/day; SD: regenerate 1 hp/turn in smoke. Rotux, ooze mephit: AL CN; Mov 12 Fly 24; HD 3; HP 17; AC 6; THAC0 17; #Att 2; Dmg 1-3/1-3; SA: stinking cloud 10' radius once every 2 rounds; SD: regenerate 1 hp/turn in water, immune to cutting and piercing damage, fire and water attacks; terrible stench in a 30' radius. Rotux owns a ring of statues. Ring of statues (1,500 x.p. / 12,000 g.p.) – Upon speaking the command word, the wearer and up to four other creatures in a 30' radius (maximum) turns into a statue (as per the 7th-level wizard spell, statue), for a duration of one hour (the creatures affected can revert to their original state before the end of the duration, but cannot then go back to statue form – another charge has to be used for this). The other creatures must be willing to be transformed or they aren't affected. One charge is used for each creature transformed. The ring currently contains 10 charges, with a maximum potential of 25 charges. It can be recharged by a wizard of sufficient level to cast the statue spell. Tupix, water mephit: AL CN; Mov 12 Fly 24; HD 3; HP 20; AC 5; THAC0 17; #Att 2; Dmg 1-3/1-3; SA: breath of acid once every 2 rounds, 1 target, dmg 2-8 for 2 rounds (save vs. breath weapon for half damage); SD: regenerate 1 hp/turn if drinking liquids, immune to cutting and piercing damage, fire attacks, toxic liquids. Tupix has a small purse holding the 37 other tokens necessary to solve the puzzle of Area #7. As soon as the mephits are sure that the adventurers will not attack them, they tell this story (Rotux will do most of the talking): “Oh heroes, you have come to the right place! Our master Sydwall, a very powerful mage, was absorbed into a stone statue after one of his dangerous experiments! He managed to teleport us here to the entrance of his lair to welcome and help adventurers like you to reach him. Yes, he said there are one or two traps to avoid. You know, our master didn't like thieves, so... But with our invaluable help, it should be a breeze for heroes of your kind! You must free him! Of course, he will grant a kingly reward for this.”

- 10 -
If this is not enough to convince the adventurers, the mephits insist that the reward will be massive. They even imply that some areas might be looted without Sydwall knowing of it. They also state that they've been waiting for months in these caverns and that it's getting boring, even depressing at times. If the adventurers seem afraid of undertaking this mission or don't seem interested, the mephits try to pull the adventurers' legs (and they're pretty good at this). They tell jokes mocking the adventurers' bravery, or lack of virility (assuming most of them are of the male gender... however they do have lots of bad jokes about fat bottoms, if there are some female adventurers in the group). If the adventurers accept, the mephits are genuinely happy, and tell them to proceed to the northern part of the cave, where there should be a secret door, if they recall correctly. If the adventurers ask a lot of questions, the mephits pretend that they don't know much about the layout and the contents of this part of the caves (Areas #7-14) because they lived in another part of the caves and Sydwall almost never allowed them to visit these areas before, but that they'll help if they can. Of course they know more than they pretend to, but only give at best vague answers to most questions, particularly about the traps (as they want them to be a real challenge to test the mettle of these adventurers). They won't say a single word about Skeretshh. Note for the DM: Due to their inherent mischievous nature, the mephits can't help playing tricks on the adventurers. They aren't evil though, and the DM should keep this in mind, especially if the players wrongly assume right from the start that the mephits are evil and so should be eliminated. In the adventure, they probably will play a few tricks on the adventurers (i.e. loudly singing if the adventurers try to move silently, waking them up for no good reason if they try to sleep in the caves, etc) but nothing really deadly, as they want to give them a good chance to reach Skeretshh and defeat him. However, they want to test the adventurers as well, and if the party appears weak or stupid they won't go to extremes to save them from death. The mephits' behavior is indicated at the end of each room description (DM's notes). Additional notes: ESP, detect lie or similar spells or abilities do not work on these mephits. All of them speak common,
but they will talk in their own language if they don't want the adventurers to understand them. They cannot use their gate spell-like ability in this adventure.
7. Secret Door Enigma There is a 3' deep recess in the east wall. Inside it is a small stone tablet, where a large square divided in nine smaller squares is drawn (see opposite). Eight golden tokens rest on the upper-left square, the others are empty. Several runes are engraved under the square. There is also a small wooden box on the tablet, empty. The box used to contain the missing 37 golden tokens, needed to complete the square. Tupix has taken them, to ensure that the adventurers will “free” them (see Area #6). The secret door cannot be opened without them. Tupix will give them to the adventurers as soon as they examine the stone tablet, saying something along the lines of “Oh, I almost forgot – our master the great Sydwall told us to take these tokens, maybe there is a use for them”. If the adventurers have destroyed one or more tokens before solving the puzzle (and only in this case), the DM might allow them to replace the tokens by coins (of any metal).
The word engraved on the tablet is of an archaic common dialect. Each adventurer has a 25% chance to understand it. A bard or a rogue passing a read languages check (with a 20% bonus), or a wizard or priest casting a tongues spell is able to understand the runes, as well – they mean “magic”. If they check, the adventurers will find that the tablet slightly radiates magic. If a dispel magic is cast, the tablet stops working for one turn and the door cannot open during this time.

- 11 -
The square is in fact a magic square. The adventurers must put the right number of tokens on each square, so that the sum of the three squares for each row, column, or diagonal is 15. One possible solution is given below. Notice that the upper-left number must be eight, and that each case must have at least one token.
8 3 4 1 5 9 6 7 2
If the adventurers find a good configuration, then the secret door in the north wall opens. There is no other way to open it.
The mephits' behavior: the mephits obviously want the adventurers to open the secret door, and also want to appear as helpful creatures. Although they won't reveal the solution, they are likely to give minor clues if the adventurers appear stuck, like “You should use the tablet”, or “I recall there is something to do with the tokens”, or “it's some mathematical thing you know”. 8. Dark Passage The secret door opens on a long and unusually dark corridor – your light sources illuminate the corridor for a very short distance only (approximately 10' for a torch, and 20' at best for a continual light spell). The stone of the walls and even the very air seem to absorb light. No noise can be heard. In the north wall you notice evenly spaced loopholes (approximately one every 6'). They seem to have been built to spy on an adjacent room. The ceiling of this corridor is quite high – approximately 30 feet. Adventurers are not able to see it even with a powerful light source; however they may climb or levitate to achieve

- 12 -
this. If they do so in the second half of the corridor, they notice odd cobwebs growing thicker as they progress to the end of the corridor, where a full nest of ceiling centipedes awaits them (see below). The centipedes will attack any adventurer who climbs to the ceiling – they are not likely to gain surprise though If adventurers try to look through the loopholes, they see a very large and well-lit room, where interesting events are unfolding. The DM should read the following only to those adventurers looking through the loopholes: You see a very large hall, richly decorated with marble statues of various figures. Most of them are humans, but you notice a few elves as well. Colorful paintings line the stone walls. There is a large wooden double door at one end of the hall, guarded by two halberd-carrying soldiers, and a large throne at the other end. A red carpet stretches from the door to the throne. Many people are inside, both men and women. There are approximately 50 people in attendance. Except a few guards, most of them look like courtesans and wear expensive clothing. A few chairs are scattered through the room, but most people are standing and are looking at the throne upon which a fat man with a purple cape and a ruby-inlaid gold crown is sitting. He looks like a king, or at least a very high-ranking noble. Two lackeys are standing at each side of the throne, ready to obey the orders of the king. A few seconds later, a tall and sturdy man with an angry look on his face and wearing shiny chain mail armor enters the hall. He doesn't seem to be one of the king's guards. He then proceeds towards the throne, pushing aside one or two courtesans on his path. He stands just in front of the king, takes a parchment out of one of his pockets and begins to talk to the king. The conversation quickly grows acrimonious and both men seem to shout, though you can't hear anything. Oddly, the guards do not seem bothered by all this. Suddenly, the tall man quickly grabs a small dagger from his boot and stabs the king. He then rushes to the door. The courtesans look panicked – some hide behind the statues, chests or other furniture and do not try to stop the assassin. The guards do not try, either. However, they do not look surprised at all over what has just happened.
During this complete panic you notice that one of the courtesans near the throne, a young dark-haired woman with a blue cloak and short black dress, discreetly took the assassin's dagger and hid it under the throne. It is obvious that one of the guards saw this, but he didn't move. Note: The DM is strongly encouraged to be imaginative and add more details to flesh out this scene and make its description last longer.
The hall and the whole scene are mere illusions – adventurers watching it to the end will be attacked by the centipedes in the ceiling (see below). The centipedes will automatically surprise the adventurers, unless some of their comrades who are not watching can warn them (though they also have a normal chance to be surprised, as the corridor is very dark). The programmed illusion has some quirks however – adventurers watching the scene may have a chance to disbelieve it. The DM should secretly roll a wisdom check if a player clearly states he finds it odd that:

- 13 -
• No light filters through the loopholes. • No sound can be heard in the hall. • Such a hall exists in these caves. Of course any other reasonable quirk (at the DM's judgment) entitles the player a wisdom check roll to disbelieve the illusion. The illusion can be negated with a successful dispel magic against 14th level. If the adventurers have already destroyed the centipedes before watching through the loopholes, they find out that the short scene repeats itself over and over, leaving no doubt as to its illusionary nature. If the adventurers don't look through the loopholes but immediately follow the corridor, the centipedes attack them when they pass under the nest. In this case, they only have a normal chance to surprise the adventurers. Eleven ceiling centipedes inhabit the nest. They are larger than their standard “huge” cousins. Ceiling centipedes (11): AL N; Mov 18; HD 2+2; HP 14; AC 6; THAC0 19; #Att 1; Dmg 1-6; SA poison (see below); SD no. These 2' long grey centipedes usually inhabit caverns or ruins and prey on any animal, including humans or humanoids if they're very hungry. They create cocoons of a material similar to spider web. Poison effect: Victims bitten by the centipedes must save against poison. If successful, they immediately suffer an additional 1-6 points of damage. If they fail, they suffer the additional 1-6 points of damage and lose 1 point of dexterity. The dexterity loss happens only once, on the first failed saving throw. This lost point is regained after one night of sleep. A neutralize poison spell immediately restores the dexterity point lost, but not the hit points. The corridor is otherwise empty. Other adventurers have been caught and devoured by the centipedes, but the mephits take great care to clean the corridor each time it happens, as bones, pieces of clothes, weapons and other items would certainly arouse the adventurers' suspicion. The mephits' behavior: the mephits let the adventurers fight the centipedes (it is their first “combat test”). If the adventurers do not look through the loopholes, the mephits won't try to entice them to because they don't want to be suspected so early on.
9. The Four Doors This is an empty room. There are 4 closed doors on the south wall. Each one is made of a strange dark grey substance, which looks like a stone/metal alloy. They have no locks, only large handles. The head of an animal is carved on each door: Door A has the head of a wolf. Door B has the head of a fox. Door C has the head of a bear. Door D has the head of a frog. As soon as the adventurers move closer to the doors, the mephits warn them that they have heard about this room – three doors are trapped, and only one of them is safe. Each mephit then states something to the adventurers: Pilax: “You must choose the door of the bear or the door of the wolf”. Larox: “You must choose the door of the fox”. Rotux: “One and only one of the two previous mephits lied, and you must choose the door of the bear or the door of the fox”. Tupix: “At least two of the three previous mephits lied, and you must choose the door of the fox.” The mephits then start a loud bickering in their own tongue: the adventurers only understand that they don't seem to agree with one another. It is obvious that the adventurers won't get anything more out of them. The adventurers don't know what to think about the mephits' assertions – some of them may have told the truth, but some of them may be lying or may simply not remember the correct door. Detect lie or ESP spells are of no use here – the mephits won't repeat what they said, and their alien and mischievous ways of thinking prevent the caster from gaining any useful information. The doors are made of a lead-stone alloy that prevents clairvoyance, x-ray vision or any similar spell to see through them. The alloy is very hard. There is no way to smash these doors. If they check, the adventurers find that all doors radiate magic equally. The three wrong doors are heavily trapped – each time they are touched (either by an adventurer or by any object), the following happens:

- 14 -
Door A: 10d6 lightning bolt shoots from the door, automatically hitting the person touching the door (save vs. spell with a -2 penalty for half damage), and then heading towards the closest adventurer (the bolt may rebound on the walls). Door B: 10d6 fireball centered on the door (all 1's rolled are counted as 2's). Door C: a flash of red light bursts in the room. The DM should ask the players to roll saving throws. The flash is virtually harmless, but the DM should try to mislead the players into thinking otherwise. Characters failing their save are blinded for one round. The door opens with no other ill effect. This is the correct door. Door D: a negative energy blast does 3d8 points of damage to all adventurers present in the room, with no saving throw. A successful dispel magic versus 14th level disarms the traps for 1 turn. However it also blocks the correct door, which
cannot be opened by any means during this time. The mephits' behavior: after having talked to the adventurers, they begin blaming each other (in their own tongue) for giving too easy clues. However, they always keep an eye on the adventurers and quickly leave the room if one of them seems ready to open or merely touch a door. 10. Fresco When you illuminate this corridor, you realize that the west wall is almost entirely covered by a fresco. One need not be an expert to realize that it is a true masterpiece. Oddly, it has not been altered by time, or dampness. The scene depicts a clearing in a forest, at dusk. Some kind of evil priest is in the center, wearing a purple robe with several silver runic patterns embroidered on it. He's waving a deep-black hexagonal-shaped talisman in the air. Around him are twelve sturdy bugbears wearing light armor and equipped with longswords, ready to attack any creature who might threaten the priest.

- 15 -
If the adventurers look at the fresco more carefully, they notice a few more details: • Various corpses are strewn on the ground. Three heavily
armored men are lying in the background on the right of the fresco. A dwarf in leather armor, still grasping a dagger, lies on the left. A red-headed woman in a blue robe lies on the left as well.
• The priest wears a thin gold necklace with a small
golden key attached. • The talisman looks as if it were real, so black it even
seems to absorb light. If they check, the adventurers find that the talisman radiates both magic and evil. Any adventurer touching the black talisman is immediately absorbed into the fresco and appears in the clearing. Adventurers who stay in the corridor cannot see what happens in the clearing – the scene depicted doesn't change. They have no way to influence what happens there, unless they touch the talisman and are absorbed by the fresco as well. Once an adventurer has entered the fresco, there's no turning back – the clearing is surrounded by a wall of force that cannot be dispelled, and the only way to come back in the corridor is to touch the talisman again, which is not an easy task since the priest is holding it firmly and is protected by the bugbears. The bugbears immediately attack appearing adventurers and take great care to protect the priest – they fight fearlessly and do not check morale. In the beginning of the fight, the priest stays behind the bugbears, still waving his talisman, shouting orders and casting protective spells if the adventurers seem powerful. Bugbears (12): AL CE; Mov 9; HD 3+1; HP 20; AC 5; THAC0 17; #Att 1 (sword); Dmg 1-8; SA nil; SD regeneration (see below). Due to the talisman, the bugbears regenerate 1 hp per round. The priest regenerates all damage suffered at the end of each round. As long as he keeps his talisman intact, the priest cannot die. There are two ways to stop the priest's regeneration:
• Cast a light-related spell on the talisman, i.e. light, continual light, sunray, dancing lights or faerie fire (and possibly others, at the DM's judgment, however spells that produce light as a side-effect such as fireball will not work). Any item duplicating these spells will work, as well. If the adventurers do not have any of these spells available, the DM can allow the light of a magic weapon to affect the talisman. However, the adventurer must direct his weapon towards the talisman at all times and therefore suffers a -4 penalty on his THAC0 rolls.
• A successful dispel magic cast on the talisman will stop it
from working, but for 5 rounds only. After this duration, regeneration is reactivated.
Killing the priest stops the bugbears' regeneration as well. The talisman is otherwise impervious to physical or magical damage – it cannot be brought out of the clearing. If combat goes badly for the bugbears, the priest (still waving his talisman) will enter the fray, casting spells or fighting with his mace. Priest (1): Str 10, Dex 9, Con 16, Int 9, Wis 15, Cha 13; AL CE; AC 5; Mov 9; Level 5; HP 48; THAC0 18; #Att 1; Dmg 2-7; SA spells; SD no. Spells: 1st Level: cure light wounds x2, command, protection from good, sanctuary. 2nd Level: resist cold, resist fire, silence 15’ radius, spiritual hammer. 3rd Level: summon insects. As soon as the priest or the last bugbear is killed, the atmosphere darkens quickly – adventurers have only three rounds to touch the talisman again and be sent back to the corridor. Adventurers failing to do so remain trapped forever in the fresco, as the process cannot be stopped by any means (short of a wish). Adventurers who stayed in the corridor see the fresco scene darken quickly. After three rounds, the wall has become black and there is no way to enter the clearing. Adventurers in the fresco have only 3 rounds to search the clearing if they wish. Due to the very short time they can only search one of the bodies. However, they can easily grab the priest's golden key if they notice it. Of course, they still can choose to quickly search several bodies, but in this case

- 16 -
they only have a 50% chance for each body to find something valuable. The bugbears have nothing of value. The priest has nothing of value except his purple robe, in very good condition, which can be sold for as much as 150 g.p. The small golden key opens the hidden lock in Area #12. Sydwall wanted to ensure that the adventurers would not bypass the trapped fresco and avoid combat with the bugbears and the priest. The dwarf was a 6th level thief, part of a group of four adventurers (the red-headed woman was part of this group as well, see below; the two other members were human fighters who managed to touch the talisman and flee the fight before it was too late). He still grasps a +2 dagger. He wears three gold rings – two of them are non-magical (30 g.p. value each), but the third one is a ring of protection +2. A small pouch can be found in his trouser pocket, which contains 40 g.p., 16 p.p., a lapis-lazuli (50 g.p. value), an amethyst (250 g.p. value) and an emerald (1,300 g.p. value). The red-headed woman was a 7th level wizard. She turned invisible and tried to flee, but wasn't able to reach the talisman and was mercilessly killed by the bugbears. She still wears her bracers of defense AC 5. Her small backpack contains a potion of fire resistance and two potions of healing, labeled. The three heavily armored men were 3rd level paladins of the Order of the Wise Gold Wyrm, who investigated the caves after having heard rumors about an evil sorcerer. Their bravery was not enough to save them from the bugbears' rage. One of them wears plate armor +2 (of course a three round duration is not enough for the adventurers to strip him of it unless they drag the entire body out of the fresco – in this case it's the only action they can do during these three rounds). Another one has a bastard sword +1/+3 versus undead. The last one has a small jade amulet, which can cure 10 hp once per day (x.p. value 300 / g.p. value 2,000). The mephits' behavior: the mephits have mixed feelings on this one – they want to test the adventurers and have them fight the priest and the bugbears. On the other hand, they don't want them to get the golden key. They know it opens a treasure cache somewhere in Area #12 and are afraid that the adventurers might leave the caves after finding that treasure. As usual, they will pretend that they don't know much about this room. They won't enter the fresco for any reason, though.
11. Angels and Demons The door opens into a wide room (70' x 80', with a 30-foot high ceiling). Near the entrance are two small granite pedestals (approximately 3' wide and 3' high), on each side of the door. A glowing white longsword lies on the pedestal to the left, its hilt representing stylized wings. A black longsword lies on the pedestal to the right, its hilt inlaid with jet-black gems. The ground is paved with large marble slabs (10' wide). Half of them display an image of some kind of demonic head, the other half represents some kind of good-aligned creature. The slabs are arranged in staggered rows (like a checkerboard). There is a heavy stone door in the south wall, which appears to be closed. Note for the DM: Longswords have been chosen because they are usually the most common weapon. If the fighters of the group happen to specialize in another type of weapons, the DM should replace the swords by weapons with which the adventurers are proficient. If the adventurers do not take one of the swords, nothing happens. The door remains closed, however, and there is no way to open it (neither by force, nor by magic). If the adventurers check, they find that the white sword radiates good and the black sword radiates evil. Both swords strongly radiate magic – the slabs radiate a faint magic aura. As soon as the adventurers take (or merely touch) one of the swords, the other one disappears immediately. There is no way to take both of them even if the adventurers try to synchronize and grab them at the same time (the DM should in that case randomly roll to determine which of them disappears). Then, as soon as the adventurers cross (or fly over) the first row of slabs, the following events happen: If the adventurers chose the white sword, dretches materialize on each demon-headed slab (there are 21 of them). They immediately attack and fight to the death. The white sword is +5 vs. demons, and inflicts double damage on natural rolls of 18, 19 or 20. Dretches (21): AL CE; Mov 9; HD 2; HP 16; AC 4; THAC0 19; #Att 3; Dmg 1-4/1-4/2-5; SA no; SD no; MR 10 %.

- 17 -
(Note: these dretches do not have any spell-like or gate powers, but have all the usual resistances and immunities) If the adventurers chose the black sword, a movanic deva appears in the center of the room and immediately attacks. Movanic deva (1): AL G; Mov 12 Fly 30; HD 8; HP 60; AC -1; THAC0 13; #Att 2 (two-handed sword +1, flametongue); Dmg 2-11/2-11; SA spell-like powers; SD parry, protection, never surprised, regeneration, +2 or better weapon to hit, immunities; MR 40 %. The deva targets the adventurer carrying the black sword – if it manages to kill him, the deva disappears and the south door opens (leading to Area #13). In either case, if the adventurers destroy the deva or all the dretches, the sword they chose vanishes and the south door opens. There is a secret door in the west wall leading to Area #12, that the adventurers have a better than usual chance to detect (it should be treated as a concealed door). Note for the DM: If good-aligned adventurers choose the evil sword, they do not earn any x.p. for the battle. The same applies for evil characters that choose the white sword. 12. Treasure Cache The secret door opens on a small room. Inside are two open wooden chests, empty. In the south-east corner of the room lies a large battered metal chest, still closed. It is obvious that previous adventurers tried to bash it but did not succeed. This chest doesn't seem to have a lock. The room is otherwise empty. Sydwall made the secret door of this room easier to find in order to trick adventurers into believing that they had found the “treasure room” and that they reached the end of the dungeon (as Area #13 seems to have no way out – see description for Area #13). One of the wooden chests has a false bottom, which contains a wizard scroll with the following spells (at 12th level of magic-use): enlarge, erase, tongues, dimension door, mass suggestion, stone to flesh. The metal chest is not trapped, but is very hard to open by physical means. No amount of bashing will break it, not even using magic weapons. The chest is, however, very
susceptible to magical damage – any damage dealing spell will destroy it, without altering its content. The chest contains: • 3,000 g.p. • A 2,500 g.p. emerald • A +2 shield, of dwarven make. It will work as a +3 shield
in the hands of a dwarf. • A +1 war hammer • A broken glass flask, broken by previous adventurers
who tried to bash the chest. It once contained oil of acid resistance, but the liquid has since lost its magical properties and is not recoverable.
If the adventurers search for secret doors or carefully check the west wall, they find that a stone in the wall is loosened (located at a height of approximately 5'). If they remove it and search the narrow 8' deep cavity beyond it, they find a small lock inside it. The lock can be opened with the key that the priest on the fresco wears (see Area #10). A thief can attempt to pick the lock, but with a 30% penalty due to the lack of space that hinders hand gestures. If the lock is opened or successfully picked, a loud “click” can be heard at the base of the wall – a stone slab near the wall can then be removed. Under the slab is a small (10”x10”x5”) metal box. It is made of a lead alloy that blocks any type of magic detection or treasure finding attempts. The box contains: • 200 p.p. • A mother of pearl necklace, with 22 pearls. Each of them
is worth 200 g.p. separately. The whole necklace is worth 7,000 g.p. If the adventurers try to detect magic, they will find that one of the pearls is magical: it is a pearl of power (2nd level).
• A dusty rose prism gem, levitating. It is an ioun stone (+1 protection).
The mephits' behavior: the mephits are not exactly overjoyed if the adventurers manage to loot this room. If the adventurers look like they might leave the caves, they quickly point out that their “mission” is not over, and that their master owns far more riches than what they found here. 13. Natural Cavern The door opens into a short corridor which leads to a natural cavern, whose ceiling is covered with thin stalactites. A small

- 18 -
underground river emerges from the east and flows to the west side, forming a tiny lake which fills the majority of the cavern. A few clumps of blue-green lichen can be seen on the upper part of the south wall. Sydwall once used this cavern as a convenient source of fresh water. After many investigations, he found that the river lead to another cavern (Area #15). It took him a few months to successfully create a ring of gaseous form to follow the underground river and reach Area #15. After that, he was able to expand the area and created Areas #16 – 22, which became his living quarters, and changed Areas #1 – 12 into a huge deathtrap. The lake is 5' deep at its center. The water is fresh, but not as cold as one would imagine. There are no animals or algae inside. If the adventurers investigate, they find that there is nothing of interest under the water, only rocks (stalactites fallen from the ceiling through the centuries). The water is fit to drink.
The lichens begin at a height of 6' above the floor and are unremarkable. A druid or ranger can tell that it is a common species that can be found in most temperate forests. They developed when Sydwall lived in the caverns and (accidentally) brought spores from the outside. They have been slowly dwindling since his disappearance.
On the west side the river drains into a small crevice, too small to be explored (even by a halfling). However, the crevice can be entered using gaseous form (see Area #14). After a few minutes, the slow moving underground stream leads to Area #15. The mephits' behavior: the mephits know there is a way to go further, and will tell the adventurers so if they appear stuck. They don't have a clue how to do it, however.
14. Small Cavern This is a small natural cavern branching from Area #13. This cavern looks empty, save for a small zone near the north wall, covered by white fungi. If the adventurers examine the fungi, they find that is has grown on what appears to be a humanoid corpse. It is the size of a small human, or a half-elf (as a matter of fact it was a human thief. He was nearly killed by a trap in Area# 12, couldn't flee, hid in this small cave and died of his wounds shortly thereafter). If the adventurers decide to search the body, they have to cut or move the fungi. A cloud of spores is released, and the DM must secretly roll a saving throw versus poison for each adventurer in a 5' radius, with a -2 penalty for adventurers with open wounds (those injured earlier in the adventure and who haven't received cure wounds spells or potions). Adventurers failing their saving throw are infected by a blood disease – they lose one point of constitution every three hours. They die if their constitution reaches zero, and fungus grows on their body a few days later. A cure disease spells cures it, but constitution points are only regained at the rate of one per day (a restoration spell immediately restores all constitution points lost). All organic items of the corpse have been consumed by the fungus – the only items remaining intact are a normal dagger, a non-magical gold ring worth 250 g.p., a short sword +2 and a large glass flask containing mists of gaseous form. Mist of gaseous form (500 x.p. / 1,000 g.p.): This thick glass flask contains bluish swirling vapors. They are heavier than air and do not leak from the flask if opened. One breath of these vapors turns the creature inhaling it into gaseous form, lasting 12 rounds (the transformation taking 5 segments). It can be used by any class. This flask contains enough vapors for 20 breaths – the adventurers can have a fair idea of the number of breaths remaining, since the vapors turn to a lighter blue each time a breath is used.

- 19 -
The label of the flask is in very bad shape. A small note can be deciphered, however: it reads “... of g... needed for pa...” (the rest of the label has been deteriorated by the fungi). Originally written was “mist of gaseous form – needed for passage”. The thief knew from other adventurers that gaseous form was needed to explore the caverns further and to allow passage to the wizard's quarters. He died before he could use it. The mephits' behavior: as soon as the adventurers figure out the use of the “potion”, the mephits ask the adventurers to let them use it as well, as they believe that adventurers who made it so far have a good chance to defeat Skeretshh. They do not insist much however, as they fear the demon and wouldn't really be overjoyed to fall under his control again.
15. After the River This is a natural cavern similar to Area #13, but brilliantly lit by two light sources on the ceiling, creating odd reflections on the water. The cavern is otherwise empty. There is an exit in the east wall. The light sources are two stalactites under continual light spells. Sydwall placed them for his own reasons, and they have lingered ever since. The river keeps on flowing north-west and drains into a crevice. However, it cannot be followed anymore since it disappears a few dozen yards further, and the water disperses into the ground. There is a secret door in the east wall. The door opens to reveal a square room (10' wide), dug into the wall. The room is empty, save for a small 1' wide closed wooden chest resting on a niche in the east wall. It doesn't seem to have a lock. The chest is not locked, nor trapped. It contains a ring of gaseous form. Ring of gaseous form (1000 x.p. / 5,000 g.p.): This silver ring works in the same fashion as a potion of gaseous form, the effects lasting 2 turns. It can be used by any class, by speaking aloud the command word. The ring contains 20 charges.
Sydwall put this ring here in case of emergency, in the unlikely case he would have to flee from powerful intruders (his “usual” ring being stored in the library – see Area #18). If the adventurers carefully check the chest, they will notice that the word “swish” is written on the bottom. This is the command word for the ring. The mephits' behavior (if they're still with the adventurers): the mephits will try to ensure that the adventurers are in a quite good shape before they fight the stone arms in Area #16, but won't give any clues about it. They will try to prevent the adventurers from finding the secret door, but not enough to raise suspicion.
16. Stone Arms This is a 50' diameter circular room. In the center of the room there is a 5' radius, 10” high pink granite dais. A small 10” wooden statuette stands at its center – it looks like a humanoid creature but details are difficult to make out at this distance. A corridor opens in the south end of the room. It is, however, barred by a massive portcullis. The room is otherwise empty. This room was designed to be Sydwall's final and most deadly trap. The wizard planned to place a “fiend-golem” (see DM's background) on the central dais. The stone claws scattered in the rest of the room (see below) would hold the adventurers entering the room, and the golem would then mercilessly kill them. The magical process went wrong, however (see DM's background), and only the stone claws remain. But they still are a formidable threat. The wood statuette is an exquisite carving of a medusa. An adventurer proficient in sculpture or appraising will value it at roughly 350 g.p.. The statuette has no magical properties and is only an ornamental item. After Sydwall's death, the mephits placed it here to distract the adventurers and have the stone claws ambush them more easily. As soon as the first adventurer crosses the (imaginary) red dotted line on the map, the stone claws that dwell in this room take material form and attack, trying to surprise the adventurers.

- 20 -
Stone claws (50): AL N; Mov 9 ; HD 1; HP 6; AC 2; THAC0 19; #Att 1; Dmg 1-4; SA surprise, grabbing (see below); SD immune to fire, poison and mind-affecting spells. Stone claws are magically created elemental creatures which can move freely through stone. They take the form of stone arms or hands (approximately human-sized) to attack their prey; up to six claws can attack a human or size M creature.
Although the claws can move freely, they must remain linked to the stone ground. They may move through the stone walls of the room and attack adventurers standing near the walls. The claws cannot move into a non-stone area. Stone claws appear seemingly from nowhere, and have a 4 in 6 chance to surprise their opponents. Although non-intelligent, the claws have developed a basic combat tactic – half of them try to grab and hold their opponent(s), the other

- 21 -
half try to kick or claw him for 1-4 points of damage. If a claw trying to grab its opponent makes a successful to-hit roll, the opponent is partially held, loses 1 point of DEX and suffers a – 2 penalty to hit. The other claws have a +1 bonus to hit. These penalties are cumulative (i.e. an adventurer grabbed by three claws would suffer – 3 DEX points and a – 6 to hit, and the other attacking claws would get a +3 bonus to hit). The claws are immune to fire (natural or magical), poison, petrification (obviously) and mind-affecting spells. They take only half damage from electrical attacks. Cold attacks do no damage, but slow them for five rounds. If a claw is destroyed, it slowly regenerates and can reform in 24 hours. The only way to utterly destroy them is with acid-based attacks, which cause permanent damage. The claws are fearless and fight to the death. They won't pursue the adventurers past the portcullis though. The portcullis is indeed a massive one. An adventurer attempting to raise it must make a successful bend bars roll or fail. If two or more adventurers join forces, they add their bend bars percentages and are allowed a roll – they can try again every other round if they fail. There is room for a maximum of five adventurers to try to raise the portcullis. A thief actively seeking traps or an adventurer seeking secret doors around the portcullis has a normal chance to notice a small metal lever hidden between two stones of the wall, in the corridor after the portcullis (see map). The lever is very near the room and can easily be reached from behind the portcullis. Operating this lever causes the portcullis to raise (or lower) slowly, a full round being needed for it to rise completely. There is nothing else of interest in this room. The mephits' behavior (if they're still with the adventurers): the mephits let the adventurers fight the stone claws alone, as this is their final “test”. The claws won't attack the mephits, as they were “programmed” by Sydwall not to do so. If the adventurers survive, however, the mephits are sure to have found good candidates to destroy Skeretshh and will entice them to rest a full night (or two) to regain their strength. If questioned, they will hint that there may be a last fight with the statue that absorbed their master Sydwall, and as usual will pretend that they don't know anything more.
17. Living Room This is a living room. There is a large table with four chairs in the center of the room, a comfortable-looking sofa against the east wall and a small low table just in front of it, a large armchair facing north next to the low table. There is a large empty fireplace in the north wall; the room is lit by a light source on the ceiling in the center of the room. A large emblazoned metal shield is hung up above the fireplace. All is not in good shape however – a 20' long tapestry is still hung on the west wall but has been torn. A few cushions are scattered in the room, and some broken glass can be seen next to the low table. The two doors in the south wall appear normal. This was Sydwall's living room. Although living alone and having very few visitors, Sydwall obviously wanted some comfort. The light comes from a stone in the ceiling, enchanted with a continual light spell. If the adventurers examine the torn tapestry, they find that it was a magnificently designed map of the known world. It was once very valuable, but is now beyond repair and worthless (several uses of the mending spell might restore the tapestry to a decent shape again, fetching a 1,500 g.p. value, though it will never regain mint condition. The tapestry is very heavy and bulky, and adventurers will have a hard time carrying it outside the caves). The low table has a “secret” compartment, obvious if the adventurers examine it closely. It could hold a few bottles and glasses, but is now empty. Oddly, broken glass shards litter the floor around the table. If they're still there, the mephits will admit having smashed the few alcoholic beverage bottles they found in the table. The fireplace is empty and has never seen much use (Sydwall used a fire mephit for heating most of the time). The flue was magically dug by Sydwall – it is far too narrow for the adventurers to climb inside. It leads to the outside, roughly 30 yards to the surface. As the flue is not in a straight line, the outside sky can't be seen from here. An adventurer skilled in heraldry can tell that the shield bears the armories of the De Vrandl, a well-known noble family of the capital city. It was the property of Matthias, one of the De Vrandl sons. He was a skilled fighter, but his adventuring career ended abruptly in Area #9. For some reason, Sydwall kept the shield as a trophy. The shield is a standard non-magical one. However, if the adventurers

- 22 -
bring it back to the De Vrandl family, they will be rewarded with 3,000 g.p. (for sentimental value). If the adventurers check, they have a normal chance to find a secret cache in the north-east corner of the room. Inside it are two nearly identical daggers. If the adventurers examine them very carefully and roll a successful INT check, they realize that the two daggers have symmetrical hilts, one designed for the left hand and one for the right hand (this should be a hint that the daggers were designed to be used together by the same person). The daggers are magical, and are called the twin daggers. Twin daggers (one of them: 300 x.p. / 3,000 g.p.; both: 1,000 x.p. / 10,000 g.p.): These two meteoric-iron daggers were enchanted together and somehow “complement” each other. Each of them is a +2 weapon. On a natural roll of 20, the user immediately gains an extra attack in the same round. If both are used together by the same person, they become +3 weapons, and inflict maximum damage on each successful attack (and the extra attack on a natural 20 still applies). The mephits' behavior (if they're still with the adventurers): the mephits have not trashed this room much. They have found the sofa to their liking, and have only smashed the bottles of alcoholic beverages. Larox tore the tapestry, however, in a burst of anger and homesickness. They don't know anything about the daggers.
18. Library This room is obviously a library. Shelves line the walls. They are fairly empty, however, and only hold about a hundred books. There is a large desk with two drawers and a chair in the center of the room, facing the entrance door. The room is still clearly lit by a light source on the ceiling. A small 2' wide painting of a sirine resting on a beach is hung on the east wall. This was Sydwall's library, lit by a continual light spell cast on one of the ceiling's stones. The shelves don't hold many books (around 100 if the adventurers count them). Sydwall could only carry a very small number of books when he fled the paladins. He later tried to build his library again, but gave up as he became more and more reclusive and paranoid. The painting is simple and not very valuable – it is worth 50 g.p. at most. Sydwall happened to like it for no particular reason. If the adventurers check the books for one turn, they see that half of them are mundane tomes (poetry, basic history and
geography, etc), the other half deal with magic, minerals, and alchemy. They find that no books that radiate magic. If the adventurers check the books more carefully (three turns needed), they may find a few of interest: The Complete History of the Realm, by Pericus the Sage: Written around 30 years ago, this collection of 14 tomes relates the history of the realm and its successive royal families over four centuries. A bard or an adventurer proficient in ancient or local history will realize that finding a complete set is a very rare occurrence. The set could be sold to the right person (a noble, a sage specialized in this field, etc) for around 1,500 g.p. Each tome is quite heavy, however (around three pounds). The complete set is bulky enough to encumber the adventurer carrying it (DM's judgment). Tetragenesis Revealed, by Sir Barronado: This book explains how the Prime Material Plane was created eons ago as the result of a titanic fight between the elder gods of the four elements, and shaped later by minor elemental deities who are still revered under different names. The book has been heavily annotated. Adventurers comparing the writings to those found in the drawers of the desk will find that Sydwall wrote the annotations. Adventurers proficient in planar or elemental lore will notice that Sydwall didn't agree with the author, and concluded the book by an “utter nonsense” notation on the last page. Stone Magic: This small book bears no author's name. However, adventurers familiar with Sydwall's handwriting will recognize it. This book gives tips and methods about spellcasting, especially stone-related spells. Although a non-magical book, a wizard carefully reading it entirely will permanently gain a bonus of 10% to his chance to learn earth, stone and mineral-related spells (dig, stoneskin, passwall, stone shape, wall of stone, move earth, stone to flesh, flesh to stone, statue, and possibly others at the DM's option). This book can only be used once by a given wizard. Further readings by the same wizard won't provide him cumulative bonuses. A few uninteresting notes are scattered on the desk. The first drawer contains blank parchments, inkwells (some full, some empty) and quills. A spellcaster or an adventurer proficient in alchemy can tell that the ink is a basic one and could not be used to write magic scrolls. If the adventurers examine the inkwells very carefully, they find that one of them is made of a clear bluish crystal, worth 350 g.p.

- 23 -
The second drawer contains many notes, all written by Sydwall. If the adventurers look them over briefly, they find that the notes keep track of Sydwall's experiments over the years. A wizard carefully reading the notes for no less than one hour will find useful information: Certain notes relate the construction of a stone golem (the one in which Skeretshh is actually trapped). The notes hint that the golem is made of an enchanted stone, harder than normal. However, Sydwall points out a few weaknesses in its construction – adventurers reading this will gain a +2 THAC0 bonus against the golem when they fight it. Other notes imply that Sydwall did extensive research concerning the conjure elemental spell. A wizard casting this spell and using Sydwall's notes can conjure elementals with two more HD than usual. The second drawer has a false bottom; inside is a ring of gaseous form, similar to the one found in Area #15. Sydwall used it to cross the river from time to time in order to get to Areas #1 – 14 and outside, and ensure that the traps were still in working order. He stored the ring here because he didn't use it very often, and didn't want the mephits to find it. The command word is “foowin”, and is engraved on the inner face of the ring. This ring holds 11 charges. The mephits' behavior (if they're still with the adventurers): The mephits have not trashed this room at all, and are afraid to even enter it (they will follow the adventurers inside however). Before his death, Sydwall enchanted the library with protections and wards. The mephits were instructed never to enter it. One of them did, was killed, and the other mephits learned to avoid the room. The wards have since waned, but the mephits don't know that.
19. Kitchen This room is a kitchen. There is a small round table with two chairs in the middle of the room, a large sturdy closet in the south-west corner, a bench and a sink against the east wall. A small shelf above the sink still bears a few glass pots. The kitchen seems quite tidy, except for a few broken plates and bottles – however it looks like it has not been used for ages. This was Sydwall's kitchen. As he was almost always alone in his lair, this small kitchen never saw much use. Sydwall used a fire mephit to heat and cook the dishes. The mephit died in the battle against Skeretssh.
The large closet was used to store food and various items. There is no food left, as the mephits have destroyed or thrown away what was left after their master's death. It still contains various utensils like forks, knives, spoons, mugs, a few porcelain plates and dishes, trays, dish towels, a green tablecloth, a chopper and a few empty bottles of wine. If the adventurers check, they'll discover that the largest dish (one foot and half in diameter) radiates magic – it is a dish of cooking. Dish of cooking (600 x.p. / 5,000 g.p.): On the utterance of the command word “butter” (engraved under the dish), this dish produces a rich meal for four human-sized beings. The foods are always perfectly cooked. The dish produces different foods each time it is used (of course some foods repeat after a few dozen uses). If a suitable container is placed on the dish before using it, it fills with a beverage (it will only produce usual ones – water, wine, beer, fruit juice), to a maximum of one liter. The dish can be used once per day. Sydwall created the dish in the last months of his life. He had grown so paranoid at the time that he didn't want to take the risk of going outside to gather food anymore, and found it much more convenient to create his own food this way. The kitchen was almost never used afterwards. There is nothing else of interest in the kitchen. The mephits' behavior (if they're still with the adventurers): after Sydwall's death, the mephits broke some plates and bottles. They took care to keep the dish of cooking intact as they still use it quite often to taste the foods. Although they don't really need it, they will strongly and loudly object if the adventurers intend to loot it, especially Pilax (who experiences funny quirks when he flies under the influence of alcohol) and Tupix (who feels chilly and as light as a feather when he's “drunk”). 20. Bedroom This was once a cozy bedroom. Everything is now in quite bad shape however. One side of the bed in the north-west of the room is broken. The sheets and blankets have been ripped to shreds, scattered everywhere along with various items of clothing. The pillows and the mattress have been torn as well, and small grey feathers litter the room. On the west wall, a large and seemingly empty chest is open. A closet with one of its doors broken stands in the south-east of

- 24 -
the room – at first glance, only a few robes seem to remain inside. The only items barely intact are a large and thick rug in the centre of the room, and a fireplace in the north-east of the room with a few logs remaining inside. This place was Sydwall's bedroom. If the adventurers carefully check some of the items littering the room, they'll find that many of them were of good quality and relatively expensive. Of course, they are utterly worthless now. If they're still with the adventurers, the mephits will admit that they had many pillow fights in the room. They'll tell the adventurers not to lose their time searching, for there can't possibly be anything precious left in the room. The rug can still be sold for 300 g.p., but is far too bulky for the adventurers to easily take with them. The chest is empty. The closet holds only a few non-magical wizard robes. The fireplace appears intact. As in Area #17, the flue was magically dug by Sydwall, but narrower – the adventurers cannot climb inside.
If they check, the adventurers will detect a faint evil aura in the fireplace. If they set the fireplace alight, a strange thing happens – the face of a middle-aged human appears in the dancing flames. It is the ghost of Sydwall. Mortally wounded in his fight with Skeretshh in Area #22, the wizard managed to crawl back here and died just next to the fireplace (old blood stains can be noticed on the south door if the adventurers check very carefully). He has come back as a ghost, and will only rest in peace when Skeretshh is destroyed. The ghost is anchored to the fireplace, and there is no other way to conjure him outside of lighting the fireplace. If the adventurers wait for two more rounds, the ghost steps outside the flames and gestures at them to follow him. He then leads them to Area #17, opens the secret cache, and disappears. The ghost has no evil intention, and only wants to see Skeretshh killed (he knows the adventurers will need powerful magic weapons to defeat Skeretshh). His mere sight won't cause aging or panic. If the adventurers attack him, he doesn't fight and simply vanishes. He then stays in the fireplace and cannot be summoned again. If the party priest tries, he finds that the ghost cannot be turned from the fireplace (no turning attempt will succeed). If the adventurers have already found the daggers in the secret cache in Area #17, the ghost appears but won't step out of the flames. If Skeretshh is killed, Sydwall finally rests in peace and the evil aura in the fireplace disappears. The mephits' behavior (if they're still with the adventurers): the mephits genuinely think there is nothing of real interest in this room. They sensed an evil presence though, and won't come closer than 10' to the fireplace. They won't reveal this to the adventurers unless hard-pressed, and will instead try to direct them to the south door, to Skeretshh's location (Area #22).
21. Laboratory A narrow corridor and steep staircase leads to this room, which once was a laboratory. Broken glass flasks and cornucopia litter the floor, only a few of them intact. It is obvious that a furious battle took place in this room, as shelves and even some wooden benches are smashed. The only item to remain intact is a large bench standing against the west wall. The south door looks normal, although slightly larger than usual. The major part of the battle between Sydwall and Skeretshh (in golem form) happened in this room. The adventurers
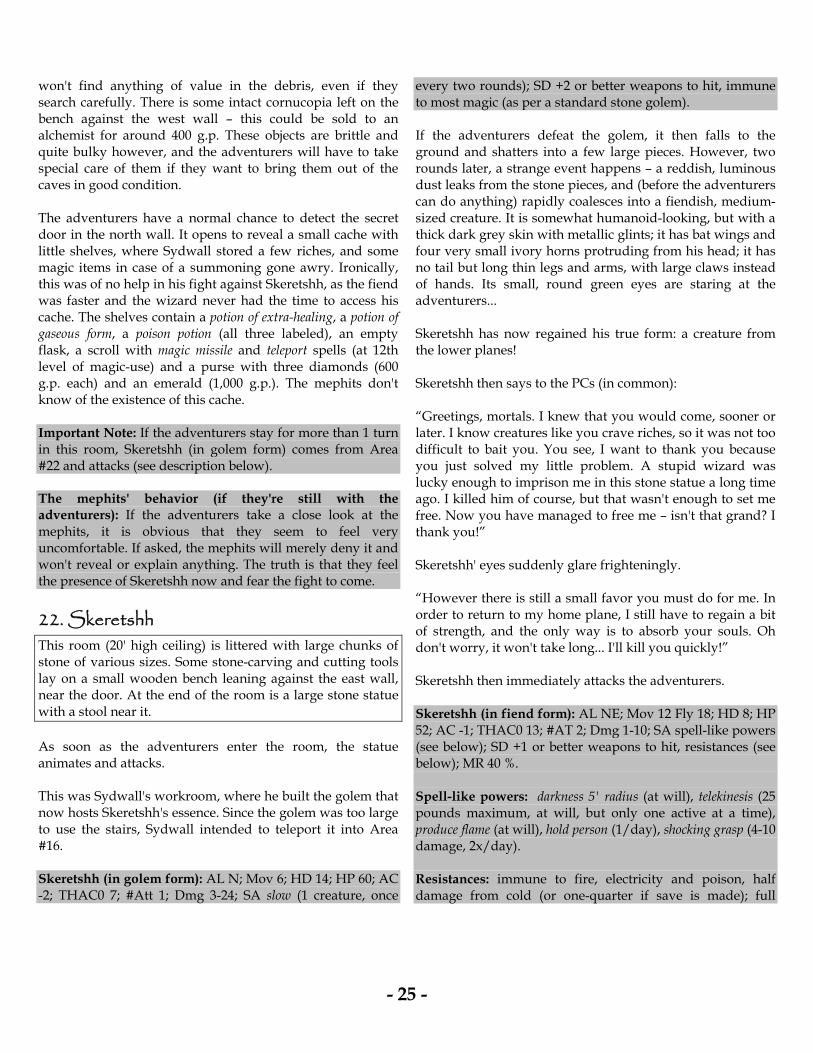
- 25 -
won't find anything of value in the debris, even if they search carefully. There is some intact cornucopia left on the bench against the west wall – this could be sold to an alchemist for around 400 g.p. These objects are brittle and quite bulky however, and the adventurers will have to take special care of them if they want to bring them out of the caves in good condition. The adventurers have a normal chance to detect the secret door in the north wall. It opens to reveal a small cache with little shelves, where Sydwall stored a few riches, and some magic items in case of a summoning gone awry. Ironically, this was of no help in his fight against Skeretshh, as the fiend was faster and the wizard never had the time to access his cache. The shelves contain a potion of extra-healing, a potion of gaseous form, a poison potion (all three labeled), an empty flask, a scroll with magic missile and teleport spells (at 12th level of magic-use) and a purse with three diamonds (600 g.p. each) and an emerald (1,000 g.p.). The mephits don't know of the existence of this cache. Important Note: If the adventurers stay for more than 1 turn in this room, Skeretshh (in golem form) comes from Area #22 and attacks (see description below). The mephits' behavior (if they're still with the adventurers): If the adventurers take a close look at the mephits, it is obvious that they seem to feel very uncomfortable. If asked, the mephits will merely deny it and won't reveal or explain anything. The truth is that they feel the presence of Skeretshh now and fear the fight to come.
22. Skeretshh This room (20' high ceiling) is littered with large chunks of stone of various sizes. Some stone-carving and cutting tools lay on a small wooden bench leaning against the east wall, near the door. At the end of the room is a large stone statue with a stool near it. As soon as the adventurers enter the room, the statue animates and attacks. This was Sydwall's workroom, where he built the golem that now hosts Skeretshh's essence. Since the golem was too large to use the stairs, Sydwall intended to teleport it into Area #16. Skeretshh (in golem form): AL N; Mov 6; HD 14; HP 60; AC -2; THAC0 7; #Att 1; Dmg 3-24; SA slow (1 creature, once
every two rounds); SD +2 or better weapons to hit, immune to most magic (as per a standard stone golem). If the adventurers defeat the golem, it then falls to the ground and shatters into a few large pieces. However, two rounds later, a strange event happens – a reddish, luminous dust leaks from the stone pieces, and (before the adventurers can do anything) rapidly coalesces into a fiendish, medium-sized creature. It is somewhat humanoid-looking, but with a thick dark grey skin with metallic glints; it has bat wings and four very small ivory horns protruding from his head; it has no tail but long thin legs and arms, with large claws instead of hands. Its small, round green eyes are staring at the adventurers... Skeretshh has now regained his true form: a creature from the lower planes! Skeretshh then says to the PCs (in common): “Greetings, mortals. I knew that you would come, sooner or later. I know creatures like you crave riches, so it was not too difficult to bait you. You see, I want to thank you because you just solved my little problem. A stupid wizard was lucky enough to imprison me in this stone statue a long time ago. I killed him of course, but that wasn't enough to set me free. Now you have managed to free me – isn't that grand? I thank you!” Skeretshh' eyes suddenly glare frighteningly. “However there is still a small favor you must do for me. In order to return to my home plane, I still have to regain a bit of strength, and the only way is to absorb your souls. Oh don't worry, it won't take long... I'll kill you quickly!” Skeretshh then immediately attacks the adventurers. Skeretshh (in fiend form): AL NE; Mov 12 Fly 18; HD 8; HP 52; AC -1; THAC0 13; #AT 2; Dmg 1-10; SA spell-like powers (see below); SD +1 or better weapons to hit, resistances (see below); MR 40 %. Spell-like powers: darkness 5' radius (at will), telekinesis (25 pounds maximum, at will, but only one active at a time), produce flame (at will), hold person (1/day), shocking grasp (4-10 damage, 2x/day). Resistances: immune to fire, electricity and poison, half damage from cold (or one-quarter if save is made); full

- 26 -
damage from acid and magic missile. Immune to normal or +1 weapons; +2 weapons do only half damage. Skeretshh fights to the death, as it is his only chance to get back to the lower planes. If he's defeated, his body slowly degenerates into a grey, foul-smelling, acidic slime (the process takes 3 hours to complete). Note: Read the epilogue to see what happens to the mephits if Skeretshh is defeated. If the adventurers search the room, they'll find some treasure hidden behind stone blocks: • A robe of protection AC 3 • A partially burnt book. It was Sydwall's spellbook,
damaged during the fight with Skeretshh. Some pages are still usable: two 1st level spells, three 2nd level spells, one 3rd level spell, three 4th level spells, two 5th level spells and one 6th-level spell (DM's choice).
• A ring of protection +3 • A ring of shooting stars • A wand of earth and stone (38 charges left) • A cube of frost resistance • 12 darts +3 • A small purse with ten 900 g.p. rubies These items were Sydwall's property. Skeretshh looted and hid them here. There is nothing else of interest in this room. The mephits' behavior (if they're still with the adventurers): the mephits are under the control of Skeretshh and do nothing during the fight. Skeretshh doesn't even use them against the adventurers, because he's too self-confident. The mephits don't know about Sydwall's former items, as they avoided as much as possible coming into Areas # 21 and 22 (doing so only on Skeretshh' request).

- 27 -
Epilogue As soon as the adventurers manage to destroy Skeretshh, all mephits shout something along the lines of “We're free!” and appear totally overjoyed. After a few minutes of some kind of happy dancing, Rotux proudly tells the adventurers the following: “Good, very good. Your mission is over, now this troublesome fiend is irrevocably dead.” And before the adventurers can say anything, he adds: “You served us well. Yes, I know, we have used you. We had to do it, you see, because we weren't sure you wouldn't be afraid to fight a dangerous fiend, so we had to create this story to bait you. It seems our plan worked admirably well.” The mephits can then tell the complete truth about Sydwall and the caves, if the adventurers are interested in this (though the DM must remember that the mephits can't tell what they don't know.) They “allow” the adventurers to leave the caves with all the treasure they found (except for the dish of cooking, see Area #19), though they won't risk their lives to keep it if the adventurers really intend to take it with them. If asked about what they will be doing, the mephits explain to the adventurers that they don't intend to be sent back to the lower planes where their fate would be to serve another, even more evil creature, and eventually end up being killed. For now, they want to stay here, although they might change their mind in the future. A charismatic (and somehow foolish?) adventurer of neutral alignment might manage to convince one of the mephits to follow him as a henchman (DM's judgment), but this should not be an easy negotiation – the mephits certainly want some kind of payment for this. These mephits are mischievous and want some “fun” too. Although they won't deliberately try to foil their new master's plans in their future adventures, they might sometimes take “unexpected” actions. And unless they are extremely well treated, their loyalty will be no more than average.
Notes

- 28 -
Pre-rolled Characters Tarkoos (Human Male) Level 8 Fighter
Strength 17 Armor Class 1 Intelligence 10 Hit Points 60 Wisdom 7 No. of Attacks 3/2 Dexterity 16 Base THAC0 13 Constitution 15 Base Damage 1-8 Charisma 13 Alignment LN
Weapons mastered: Battle axe, light crossbow, and 4 others (player's choice) Non-weapon proficiencies: 5 (player's choice) Equipment: plate armor, +2 battle axe, 20 +1 light quarrels, 1 dose of Keoghtom's ointment, potion of levitation, scroll of protection against electricity, basic non-magical equipment (player's choice). Sir Henry (Human Male) Level 7 Paladin
Strength 18/30 Armor Class 0 Intelligence 8 Hit Points 57 Wisdom 13 No. of Attacks 3/2 Dexterity 8 Base THAC0 14 Constitution 16 Base Damage 1-8 Charisma 17 Alignment LG
Weapons mastered: longsword, mace, and 4 others (player's choice) Non-weapon proficiencies: 5 (player's choice) Equipment: +1 plate armor, +1 shield, +2 longsword, +1 mace, potion of diminution, potion of speed, basic non-magical equipment (player's choice). Mylene (Human Female) Level 9 Thief
Strength 9 Armor Class 3 Intelligence 13 Hit Points 42 Wisdom 8 No. of Attacks 1 Dexterity 17 Base THAC0 16 Constitution 15 Base Damage 1-8 Charisma 10 Alignment CN
Weapons mastered: longsword and 3 others (player's choice) Thieving skills: player's choice. Non-weapon proficiencies: 5 (player's choice) Equipment: thieves’ tools, +2 leather armor, +2 longsword, ring of free action, potion of healing, potion of treasure finding, basic non-magical equipment (player's choice). Severyna (Human Female) Level 9 Priest
Strength 10 Armor Class 3 Intelligence 13 Hit Points 48 Wisdom 17 No. of Attacks 1 Dexterity 15 Base THAC0 13 Constitution 11 Base Damage 2-7 Charisma 12 Alignment CG
Weapons mastered: mace, and 3 others (player's choice) Non-weapon proficiencies: 7 (player's choice)
Spells by level: 1st 2nd 3rd 4th 5th 6th 7th 6 6 4 2 1 - -
Equipment: holy symbol, +1 mace, ring of fire resistance, staff of the serpent (python), potion of healing, potion of speed, potion of sweet water, chain mail, shield, basic non-magical equipment (player's choice). Salkitz (Human Male) Level 8 Wizard
Strength 8 Armor Class 4 Intelligence 17 Hit Points 29 Wisdom 10 No. of Attacks 1 Dexterity 16 Base THAC0 18 Constitution 15 Base Damage 1-6 Charisma 9 Alignment N
Weapons mastered: staff, and 1 other (player's choice) Non-weapon proficiencies: 6 (player's choice)
Spells by level: 1st 2nd 3rd 4th 5th 6th 7th 8th 9th
4 3 3 2 - - - - -

- 29 -
Equipment: spellbook, staff of striking (25), ring of water walking, potion of extra-healing, potion of gaseous form, scroll with 3 spells (chosen from the wizard's spellbook – player or DM's choice), basic non-magical equipment (player's choice). Aryell (Elf Female) Level 6 Fighter / Level 6 Wizard
Strength 18/10 Armor Class 3 Intelligence 15 Hit Points 34 Wisdom 8 No. of Attacks 1 Dexterity 14 Base THAC0 15 Constitution 12 Base Damage 2-8 Charisma 14 Alignment NG
Weapons mastered: bastard sword, and 5 others (player's choice) Non-weapon proficiencies: 6 (player's choice)
Spells by level: 1st 2nd 3rd 4th 5th 6th 7th 8th 9th
4 2 2 - - - - - - Equipment: spellbook, ring of protection +2, potion of extra-healing, potion of fire giant strength, scroll with 2 spells (chosen from the wizard's spellbook – player or DM's choice), bastard sword +2, a +1 weapon (other than bastard sword - player or DM's choice), elfin chain, basic non-magical equipment (player's choice). Rikkou-bellayr (Gnome Male) Level 7 Priest / Level 7 Illusionist
Strength 8 Armor Class 5 Intelligence 17 Hit Points 33 Wisdom 14 No. of Attacks 1 Dexterity 16 Base THAC0 16 Constitution 10 Base Damage 2-5 Charisma 9 Alignment NG
Weapons mastered: warhammer, and 2 others (player's choice) Non-weapon proficiencies: 6 (player's choice)
Spells by level: 1st 2nd 3rd 4th 5th 6th 7th 8th 9th Priest 3 3 2 1 - - - n/a n/a Wizard 4+1 3+1 2+1 1+1 - - - - -
(Rikkou-bellayr’s illusionist class requires him to select one illusionist spell for each spell level. The “+1” in each of his wizard spell levels reflects this requirement.) Equipment: spellbook, holy symbol, ring of warmth, potion of healing, potion of polymorph self, scroll with 2 spells (cleric or wizard – player or DM's choice), bracers of defense AC 7, a +1 weapon (player's choice), basic non-magical equipment (player's choice). Barabodurr (Dwarf Male) Level 6 Priest / Level 7 Thief
Strength 7 Armor Class 3 Intelligence 10 Hit Points 32 Wisdom 15 No. of Attacks 1 Dexterity 18 Base THAC0 17 Constitution 11 Base Damage 2-7 Charisma 13 Alignment CG
Weapons mastered: flail, sling and 1 other (player's choice) Non-weapon proficiencies: 6 (player's choice) Thieving skills: player's choice.
Spells by level: 1st 2nd 3rd 4th 5th 6th 7th 3 3 2 - - - -
Equipment: thieves tools, holy symbol, leather armor, +1 flail, 20 +1 sling bullets, potion of healing, potion of water breathing, scroll with 2 spells (player or DM's choice), +1 ring of protection, horn of goodness, basic non-magical equipment (player's choice).


Years ago, an evil wizard settled down in a complex of caves, far away from the town where he was exiled. Soon after, the adventurers started coming, thanks to an old sage and his book. For most, it was
the promise of treasure. For some, it was a mission. For others, it was a sacred place.
None ever returned.
Now, it has fallen upon you to journey to the caves, to discover what lies within. Your reasons are your own, but despite the peril, you and your friends set off towards the Tharuss Hills, and the...
Caves of Sydwall
The Back In Print Project is an online group who work together to develop new adventures and material for the Advanced Dungeons & Dragons® game to use in their own. Currently, the
focus of the Back In Print Project is on the 2nd Edition of Advanced Dungeons & Dragons as many of the Project's members are fans of that system. In the future, it is our intention to
expand our projects to encompass the 1st Edition Advanced Dungeons & Dragons system as well as the Basic Dungeons & Dragons game rules.