what's new - oracle · 2019-03-27 · what's new new features in primavera unifier 18...
TRANSCRIPT

What's New New Features in Primavera Unifier 18
Features introduced in 18.8.4
Company administrators can use the Company Properties page to control user access to basic information of other users, including email addresses.
Two other capabilities for company administrators via Business Process Configuration:
Control if the record creator of a business process can transfer ownership to other users.
Specify if the printing of business process records is captured in the Audit log.
Features introduced in 18.8.3
The Summary tab for Shells is redesigned:
Map View tab is renamed Workspaces. The sub-shell log for parent shell and map has been moved to Workspaces tab.
In Workspaces tab, a map displays a pinned location of the project -- same as current functionality in the Map View tab.
Reposition Workspaces tab and hide it in all user-defined Dashboards – except My Dashboard.
A check box in Workspaces tab allows you to mark the location pins displayed on a map.
Unused data types do not display after you select a data type while adding a new Standard Block in shell dashboards. Placement of existing fields in the New Standard Block window has been updated.
Usability enhancements:
Reorder added links by drag and drop under Links tab in Shell Details form.
Resize columns in Dashboard View Mode for drill-downs and standard/custom blocks when Table or Grid is selected for Display Type.
Resized column is automatically saved without prompt per user.

Drag and drop fields inside the Selected Fields column in Edit Details Block window. The order of fields displayed in the Details block of Dashboard matches the order defined in the Selected Fields column in Edit Details Block window.
Hover and click Remove Items Requiring Attention to remove the block from tabs. Navigate to Add Block > Standard and select Data Type as Items Requiring Your Attention to display the block again.
The Document Manager Picker for adding attachments for business process record now renders files in a flat list. Hierarchical folder structure is not visible in this picker.
Double-click linked mail and linked records to open in the business process record.
User Picker and User Group Pickers now support type ahead feature for quick access to user and group list while routing workflow records.
New UI is supported for Base Commit and Change Commit of Summary Payment Application SOV type.
Enter data for line items via the grid. The grid is supported for both requestor and bidders. The functionality is available for RFB business process of sub type Line Items with CBS codes.
Publish Unifier data for Analytics using the Run now option. Note that this action will only publish the Unifier data for Analytics and will not update the data seen in dashboards and analyses. Analytics ETL must be run again to update them.
Enhanced UI of Document Manager log and right pane tabs for an improved user experience.
View a cost sheet column value as a decimal.
Feature introduced in 18.8.2
When you select checkbox option labeled Apply line item value of <label of DE uuu_spa_per_comp> to costed lines, Unifier copies the value of the data element uuu_spa_per_comp (from the summary lines) into the corresponding costed lines. The subsequent impact on fields uuu_spa_amt_tp / uuu_spa_qty_tp in the costed lines is similar to making a manual edit of uuu_spa_per_comp in the costed lines to trigger the update of these fields.

Features introduced in 18.8
The shell landing page (My Dashboard) has a new look with improved usability. The Summary tab displays three standard tiles – Tasks, Notifications, and Mail with items requiring your attention, and three standard blocks – Image, Details, and Links.
Click on a tile to navigate to the corresponding log in the shell.
Hover over a block to display Print and Expand options.
Click the Administrator name link to view the updated user profile dialog.
Add custom fields to the Details block from the Shell Attribute form and change block title and dimensions (in units). Note that layout types are no longer available. Add new links or modify existing links in the Links block.
In the mini-log of Summary and Map View tabs, subshells are grouped under parent shells for the shell type selected in the View list.
Access Map View by clicking the Map View tab. The mini-log subshells correspond to the pins displayed in the map, if geocoding is enabled.
Use the Edit Dashboard option available in the dashboard list. In the left Tab Name panel, add, modify, show or hide tabs. Click the + list on the right of the page to add blocks of various types. Note the enhanced UI of Edit Block dialogs. Drag and drop to sequence blocks.
Shell-specific dashboards: In shells (Admin mode) and shell templates, the Setup, Dashboards UI has been updated to be consistent with the new log views. Users can temporarily edit the views; edits are lost when the shell’s Home node is refreshed.
Starting with the 18.8 release, Configuration Installation Files will be replaced with Configuration Packages, and the released Base Configuration Packages will be available on My Oracle Support:
Project Controls
Facilities and Asset Management
Combined Package (Project Controls and Facilities and Asset Management)
Note: This setup does not apply to existing customers.
Business process forms of the following types have redesigned UI:
Document With Folder Structure: Attachments folder continues to be the root folder as in previous Unifier versions. Use the context menu options of the folder to add, delete, download attachments, move and copy sub-folders. In the Folder Details tab of a selected folder, click Save and Add Line Items to add line items. Functions such as Import, Copy and Consolidate Line
Items, as well as Get File Index Report (previous seen as Attachment Index hyperlink) are now available on the Actions menu. The Upload window for attachments supports the upload of a folder along with attachments. The remaining functions are similar to the Document - Without Folder Structure type.
Lease toolbar options: Allocation and Payment Schedule are available in View and Edit modes only. When using the Allocation option, click + in the right pane to add rows in a grid format. Associated pickers such as Allocation Template Picker, Seasonal Dates Picker and Generic Cost Code Picker display the new interface.
Text: Upper form redesign is similar to that of line item business processes, and supports Linked Records and Linked Mails tabs. The Response List, seen as a tab, supports the existing text entry and attachments functionality. In View mode, use the Posted By list to filter text entry details by user. Text entry details include username, company, attachments, if any and the creation timestamp.
Preventive Maintenance: UI of Preventive Maintenance BPs of type: Asset, Asset Template, Pm Book, PM Book Template and Meter Reading has been redesigned and modernized.
Change User Defined Report (UDR) owner: The owners and users who have full access permission can now change the UDR owner’s and user’s name.
Document Manager enhancements:
Folder and Document Properties: In the Properties tab of a selected folder or document, modify the editable custom and system defined fields (Categories, Phase). The Properties context menu option is no longer available. Clicking the Owner hyperlink displays the enhanced user profile screen.
Working with Document Logs (Standard View): Flat View enables you to see a flat list (default view) of all files and folders, located in the root (Project Documents) folder. Use Toggle View to toggle or switch between tile and list views. Use Tree View to see a tree view of the folders and documents. You can open any number of folders in the hierarchy and view their contents in the same view.
Folder and Document Attributes: Use the modernized Document Manager User Interface to: Create a new folder or empty documents and review folder or document properties.
Earned Value enhancements:
Earned Value Analysis log has new toolbar options. Use the Grid Performance Indicator to color-code the Earned Value Analysis grid. Use ANSI reports to generate a spreadsheet file and view the performance report.
Activity Sheet: Roll Up Earned Value Analysis to Cost Sheet. The Column Properties window enables you to select your cost sheets. Create User Defined Reports (UDRs) from the data present in the Activity Sheet.
Space Manager:

View the modernized user interface for logs (Standard) in Levels and Spaces, and review record summary, take actions, and make log adjustments. Use the redesigned user interface in the Levels and Spaces log to:
o Review record summary o Take actions o Make log adjustments
Also, use the redesigned user interface (Standard) for new logs, except for advanced log attributes. Changes, if any, must be made in the Standard log.
Exchange Rates:
Create new exchange rate records for effective dates in the past.
Edit the exchange rates defined in existing Exchange Rate records.
Audit all record creations and edited existing records.
Schedule Manager: Disable automatic re-scheduling within Unifier Schedule and integrate Activities (with their dependencies) with the same schedule that exists in P6 and MPP. Also, you can manually schedule activities in Unifier Schedule Sheet.
REST Services has been introduced to assist with performance, scalability, and modification and provide standard communication protocol, in addition to the SOAP Web Services.
Reassigning tasks: Ability to reassign existing (not Started or In-Progress) tasks from one active user to another active user. Unifier sends a notification to the user who receives the reassigned task. For tasks in a workflow, reassign the task to the person who has replaced the original recipient.
Starting with Unifier 18.8, Oracle Web Services Manager is no longer supported.
Configurable Models: View the modernized UI for logs of code-and-record-based configurable managers. Use the redesigned user interface (Standard) for new logs, except for advanced log attributes. Changes, if any, must be made in the Standard log.
Features introduced in 18.7
Type Ahead feature is introduced in pickers. Each picker field displays the option to invoke the picker or begin typing to trigger matched values. The enhanced pickers include Fund, Bid, Currency, Workpackage, Resource, SOV, BP Line Item, Commit Line Item, and Planning Item.

Cloud administrators can inform Unifier end users about scheduled maintenance and outages for Unifier servers hosted in the cloud. In Unifier, click the Announcements icon in the toolbar to view the announcements. The icon appears in red to indicate new announcements are available.
The OIM provisioning process now allows a user to be designated as Standard or Portal. This enhancement is applicable for on-premises customers. The ability to designate a Standard user as an Earned Value Management user is out of scope in this release.
Integration user type has been introduced to execute REpresentational State Transfer integration services for modules. Company Access Control has new corresponding permissions to add integration users, modify status, and view user details. In the Integration Users log, click Create to display an overlay with three collapsible sections: General, which provides general information about the integration user; Security, which captures login username and password; and Permissions, which to accesses REST services for Unifier modules and support all legacy SOAP services. In phase 1, only Document Manager is available for folder and document services.
Define rates in resource currency. Unifier can now handle scenarios where P6 project currency, resource currency, Unifier company currency, and shell currency are different from each other. Unifier uses the exchange rates defined in Exchange Rates Template under Standards & Libraries and in shell details to calculate Activity Sheet costs in company and shell currency, respectively. The Master Rate Sheet and project rate sheets have an additional Currency column in the Resource view. Note that since role currency is always the same as P6 project currency, it is treated as part of P6 project currency. Previously, there was no conversion of resource rates into Unifier company or shell currency, if resource currency was different.
Header/ top navigation options have been rearranged. User Control Panel is now the last option with Sign Out included in the list. User interface of Preferences tabs, Support and Download Plugins, and other dialogs is enhanced. Similar changes are seen on the Bidder portal, except that Preferences – drawn from Vendor information records -- is in read-only mode.

Differentiate between custom data imported via CSV and data integrated from P6 in the Performance Percentage Completion sheet. Columns created when custom data dates and rates are imported via CSV are marked by an asterisk in the column header. A toolbar legend is shown for the identifier.
Earned Value Analysis data structure tables are now available in the ER Views node in Company Workspace Admin mode.
Redesign of business process forms has been extended to Document type Without Folder Structure business process. The upper form redesign is similar to that of simple, line item and cost business processes. The detail form honors the design defined in uDesigner. The Attach Files function is now available next to the Name field. Click on the name hyperlink of the attached file to download it. A Delete icon is available next to the file name until it is saved. Thereafter, the option is available in the context menu of the line item. Actions list provides import and consolidate options. Comments line item tab is not available. An Attachments tab is visible after a line item is created with an attachment. The tab provides preview, review and comment functionality.
Redesign of business process forms has been extended to RFB type business process:
Private Bidding: Upper and detail form redesign is consistent with that of line item business process. The Invite form displays general information about the requestor and bid in the left pane and the list of existing and new invitees in the right pane. The Modify button in the Due Date field is replaced with a calendar icon. The Vendors picker that opens on clicking Add in the right pane’s toolbar displays the redesigned overlay like the BP Picker. After the due date has lapsed, the Received From dialog that opens on clicking Show also displays the enhanced

interface. Preview the upper form of a selected item in the right pane, or open it to view the upper and detail bidder forms in the enhanced UI.
Public Bidding: The redesign is similar to the private bidding scenario. The Invite form redesign pertains to its functional capability.
In the Bidder site, the form style (standard or classic) the bidder sees in a record corresponds to the style in which the requester saved it in.
Edit Permissions and Transfer Ownership dialogs have been enhanced.
Edit Permissions: In non-workflow (multiple or single record) business process logs, use the new Permissions tab to quickly check record level permissions. In the left section of the Edit Permissions dialog, begin typing in the user or group search field to trigger matching strings, or launch the User/Group Picker in the field. Select users or groups and then assign permissions in the right section. Click the Delete icon to revoke a user or group’s permissions. Click Done to save changes and close the dialog.
Transfer Ownership: In the Actions or context menu, select Transfer Ownership. Then, use the type ahead feature or launch the User Picker to select a user and transfer ownership of business process records.
The Manage Views dialog has been revamped. The UI displays four columns instead of three sections. The columns include View Name, Visible, followed by two unnamed columns with the Delete icon for custom views and the Drag Row icon to reorder views. Save button has replaced Apply.
Control the visibility of views, drag and drop to reorder, and delete custom views.
UI in the Document Manager Log tabs has been further refined. Tab border width is consistent in all tabs, Find on Page functionality is available only when invoked, the References tab is seen only when references are present for a selected drawing file, and the expanded Linked Records tab displays the summary of a selected record in the right pane. The Import Folder Structure Template dialog is now rendered in Standard view. – you can preview the folder structure template before importing it. Error message is displayed in case of duplicate folders.

Review documents in the Documents log in the same way as in business process logs. In the context menu of a document, click Open. The left panel also lists other documents, which are at the same level in the same folder. View the content in the central panel and the comments function in the right pane. Create multiple annotations for a comment. Use Clear in the annotations toolbar to clear the annotation. Click Clear in the Comments field to clear both the comment and associated annotations. Use the new Rotation function in the toolbar to rotate the view. Click Save Rotation to save the view or Reset Rotation to revert to the original view. This function is available only when there are no comments and annotations. Note that the ability to add multiple annotations to a document is also available in the Unifier mobile apps.
In a business process record, link mail records from the different folders of Project Mailbox. In the Linked Mail tab of a business process record, click Add, Project Mailbox. In the Mailbox Folder list, select a folder, and then select the mail records you want to link from the available items in that folder.
When you run a user-defined report using Document Manager data sources, the data retrieved is based on your permissions. The enhancement is also supported in scheduled reports. Earlier versions supported business process data sources only.
Summary and costed lines of a summary payment applications record are auto-populated from corresponding fields of the source base commit. Previously, auto-population occurred only in summary lines and you had to manually copy over values from the summary line into its costed lines. Note: If auto-population is configured in the same fields of the summary payment application from SOV or other sources, then this auto-population overrides that from the base commit in summary and costed rows. Also, formula calculations that include such auto-populated fields in the summary payment application are correctly applied.
When a base commit of Summary Payment Applications SOV type is configured to auto-populate fields in associated summary payment applications, both summary and costed lines in the grid of the destination records display the source values.

Features introduced in 18.6
Company Workspace landing page in User mode has been modernized, similar to revised Home page. View a count of pending company-level tasks and notifications in the tiles on the top of the page, and company information in the left section. Upload an image for the landing page in the new image field in Company Properties in Admin mode. View company-level workflow and non-workflow business process details in the grids in the right section. Click on links to navigate to the corresponding sites, business process, tasks or notifications logs in Company Workspace, or view the company contact profile.
Use links on the landing page for company information as well as tasks and logs.
Unifier informs users about the use of session cookies in the application. A notification is displayed in a banner at the top of the page along with an acknowledgement button when you log in for the first time.
Click Got It to acknowledge the cookie notification. The banner is not displayed again.

Add/modify partner users using a CSV file. On the File menu, click Export, Export Structure to download the template as CSV. Click New, Import to import the modified structure template, similar to importing company users. If using a User Attributes form, note that a common integration template, Users, is provided for company and partner users. Direction for the Company data element must be Input or Both to enable import of partner users. In earlier Unifier versions, partner users could not be imported or exported. Bulk Edit functionality of multiple partner users is also supported in the Partner Users log.
Upload or drag/drop a profile picture in the General tab of the User Preferences dialog to personalize the top navigation bar and user profile dialog. The image replaces the placeholder icon bearing your first and last name initials. If using a mobile app for Unifier, the profile picture is displayed in the app. Similarly, if a profile picture is uploaded in a mobile device, it is retained in the web application.
Auto-fill the summary row value of the % Complete to Date (uuu_spa_per_comp ) field to costed line rows when adding detail line items in a Payment Applications that references a Base Commit of SOV Type = Summary Payment Applications. At runtime, in the detail form of the Payment Applications record, select the new Apply line item value of <label of DE uuu_spa_per_comp> to costed lines check box. This also updates Amount this Period and Quantity this Period summary and costed lines. Note that the behavior is a push down of values from summary to costed lines and not vice versa (rollup). Existing line values are not affected, even if the uDesigner check box, Total the Cost Breakdown values to the

line item, is selected. Audit Log captures the action of selecting / clearing the option. In previous Unifier versions, you were required to manually enter values in summary and each costed row of the field.
Select Exists or Does Not Exist operators when configuring query conditions for string attributes of a data picker. The Condition list in the Add Query Condition dialog provides the additional options. At runtime, the picker returns a filtered list of records based on the sub-string value of the defined condition.
Relax restrictions for viewing or editing cost sheet columns. This applies to situations where a user is restricted from using a specific cost sheet column – individually or as a member of a group – but is also a member of another group that is not restricted from using that same column. A new Cost Sheet Restrictions Policy block has been added to the Security tab of the Edit Company dialog. Select the Override column restrictions check box to allow the user to view and edit a previously restricted column in the cost sheet. If unchecked, the earlier Unifier behavior prevails. Note that the user must also have the prerequisite permission to access the cost sheet. The enhancement covers company, program, and project-level cost sheets.
Earned Value enhancements:
Master Rate Sheet: During synchronization, the Master Rate Sheet now captures Resource type (Material, Labor, Non-Labor, etc.) from P6. A new column, Type, displays the resource type in Resource view.
Activity Sheet: On the Actions Menu of the Activity Sheet, use Assign CBS to assign a cost code to multiple activities and their assignments.

Activity Picker: Use the Activity Picker in BP forms to select activities from multiple P6 projects in the Activity Sheet.
Performance Percentage Completion Sheet: Update data dates and corresponding percent complete values in the Performance Percentage Complete Sheet. On the Actions menu, select Update Data, Export CSV Template to export the structure. Import the modified file using Update Data, Import CSV. When refreshed, the Earned Value Analysis sheet reflects the updated data. Previously, you could only export the data as CSV.
Relax the cost sheet rules to include pending positive values in the limit expression and pending negative values in the data expression calculations of the Rules engine. The Rule tab of the Edit Rule dialog displays an additional option in the Limit Expression and Data Expression blocks: Include positive pendings in calculation, and Include negative pendings in calculation. Select one or both check boxes to implement the enhanced rule behavior at runtime. The enhancement is applicable to rules for project cost or project fund control source at all rule levels. In previous Unifier versions, when rules were defined, limit expressions always ignored the positive pending values in calculations, and data expressions ignored the negative pending values. In Unifier, rules are used to limit values as they roll up to the cost sheet (when a cost type workflow BP is routed or a non-workflow BP is submitted) such that the value of a given expression cannot exceed the value of another expression. For example, a contract value cannot exceed the budgeted value of a cost code.
Several company-level cost business processes display the redesigned user interface. The sub-types include Commit at Company Level, Line Items with Company Accounts Code (except Reservation), and Line Items with Multiple Codes (except Lease and Reservation).
Report on user type (uuu_user_type) via user-defined reports and system reports. OIM / IDCS and the SOAP service used to create/update a user also support the attribute for user type. If the user type attribute is not used when creating a user, the default user license type is Standard.
Generic Cost Attributes Picker, Commitment Summary Line Item Picker, Account Code Picker, and Seasonal Dates Picker are now equipped with the new user interface, consistent with other pickers.
Tasks, Drafts, Notifications, and all Mailbox logs have been provided with the enhanced Manage Views dialog. Print (where available) has additional options to export to CSV/Excel in the logs.
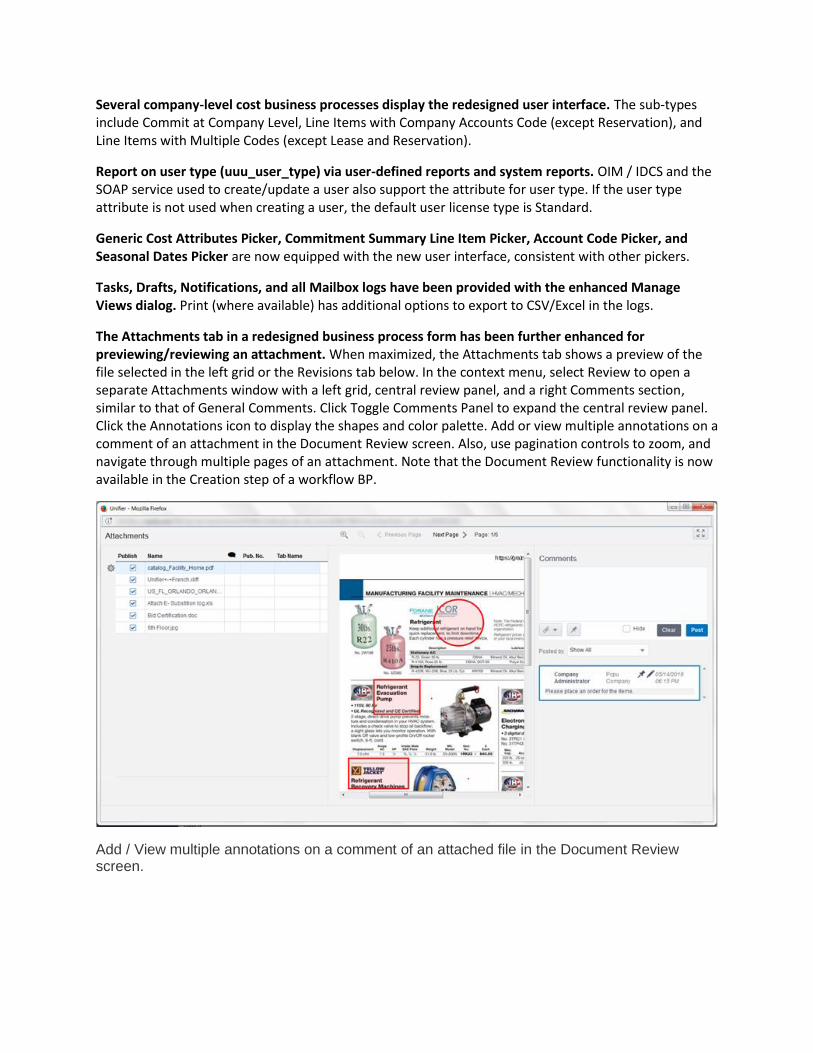
The Attachments tab in a redesigned business process form has been further enhanced for previewing/reviewing an attachment. When maximized, the Attachments tab shows a preview of the file selected in the left grid or the Revisions tab below. In the context menu, select Review to open a separate Attachments window with a left grid, central review panel, and a right Comments section, similar to that of General Comments. Click Toggle Comments Panel to expand the central review panel. Click the Annotations icon to display the shapes and color palette. Add or view multiple annotations on a comment of an attachment in the Document Review screen. Also, use pagination controls to zoom, and navigate through multiple pages of an attachment. Note that the Document Review functionality is now available in the Creation step of a workflow BP.
Add / View multiple annotations on a comment of an attached file in the Document Review screen.

Features introduced in 18.5
Unifier introduces an Earned Value Analysis module using activity and rate data imported from P6 via Gateway. Use the module to calculate earned value and related measures for a project – planned value, actual cost, variances, performance indices, and at completion values.
In Company Workspace Admin mode, two new synchronizations are available in the Gateway node to import P6 activities and rates for EV analysis. Use Select Synchronization to import Activity & Assignment data. Use Select Synchronization to import Role & Rate rates.
In Company Workspace User mode, a Master Rate Sheet node is available. Initiate the synchronizations from the log to create the Master Rate Sheet and fetch the global roles and resources data from P6. Subsequent syncs will update the sheet with changes to the global list but will not overwrite rates.
Shell Details: An Integration tab is added to shell details. Link multiple P6 projects in the tab. Note that earned value analysis can be done on cost-loaded and resource-loaded projects only.
Shell User mode: Activity Manager node is available to store an activity sheet and shell-level rate sheets. In the Earned Value Analysis node, perform earned value analysis corresponding to the activity sheet.
Related areas in Unifier impacted by this enhancement include all permissions and reporting modules and Configuration Package Management.
The Earned Value Management module is an add-on to the Project Controls base product. Its availability is based on license terms. Designate standard users as Earned Value Management module users by selecting the related option in the User Administration, Edit User dialog.
Watch a video demonstrating this feature.

Enable users to create and run user-defined reports using permission-based data sources. The reports only return data that users have permissions to see, including data in hidden blocks or hidden tabs. This release supports business process data sources only. In the User-Defined Reports log at company-, program-, or project-level, New has two options: System Data Sources (uses existing functionality) and Permission Based System Data Sources, which provides a list of business process data types in the Create a new report dialog. A new permission, Create Permission Based, is introduced in User-Defined Reports. A user with only this permission cannot create or copy a report with system data sources. Note that templates support UDRs with system data sources only. The Create Permission Based permission is transferred via configuration packages. When using the getUDR Webservice call to create UDRs, data is not retrieved for permission-based data sources; the output is blank. Reports based on system data sources display existing behavior in displaying generated data.
When a business process record is auto-created via a BP Creator in a source record, the referencing BP data picker on the destination record displays a hyperlink pointing to the source record. For example, a Contracts record auto-creates a Meeting Minutes record. The Contracts data picker placed on the auto-created Meeting Minutes record displays a hyperlink. Click it to view the source Contracts record. This happens whether the destination record is created in the same shell as the source record or a different shell. The enhancement supports both Record to Record and Line-item to Record auto-creation types.

Send emails directly to email addresses associated with the Project Mailbox or move them manually to the destination folders. In this release, Project Mailbox has been converted to a parent node with Inbox as a child node. Additional email addresses you provide are available as folders below the default Inbox. The layout, functionality, and permissions of Project Mailbox are transferred to Inbox. Click the Folder button and complete Name and Email Address Code to add (and manage) folders -- for example, Planning, Construction, Legal, etc. The codes are added as a prefix or suffix to the current project/shell email address based on the pattern selected in Unifier Configurator. A new Actions option, Move, is available when you create additional folders and if you have the permission, Create/Manage Folders to view the Inbox and create the folders. In earlier Unifier versions, a single Project Mailbox contained all email records.
On the License Manager landing page, view an Earned Value Management block with gauge charts indicating license terms, current usage, and overage. Click the Settings icon to define the notification threshold for license terms and overage thresholds. The Earned Value Management block in License Manager is seen only when the module is loaded.
Earned Value Management block is displayed when the module is loaded.

When licenses are provided for the Earned Value Management module in Unifier, an additional Earned Value Management check box is available in the Edit User dialog for standard users. Select the check box to designate users as Earned Value Management module users, within license terms.
Schedule publishing of Unifier data to OBIEE every 4, 6, 8 or 12 hours. In the Schedule Setup dialog, an additional Frequency option is provided to publish at a more granular level based on business needs. In previous Unifier version, the minimum frequency option was Daily.
Access to Consent Notice child nodes – User Consent and Bidder Consent – is now controlled by permissions. Modify and View permissions are available for each node in Access Control and other permission-related modules and templates. A user with Modify permissions can edit the consent notice setup and other details. View permission allows viewing but restricts making any change to the setup. Previously, the company contact and site administrator were the only persons allowed access to the functionality.

Set permissions to control who can see company-wide business process data in Primavera Analytics. In Unifier, additional User Mode Access permissions are added to Company Workspace/Non-navigational Nodes/Analytics: View All Records; View All Company Records; and View All Shell Records. The Analytics button on the top navigation bar is visible if you have any one of these permissions. Previously, a person with access to company records could also view cross-project records. There was only one permission, View, for the corresponding node.
In the Document Manager, the redesigned Unpublished Documents folder displays similar layout and behavior as the Documents folder. In the standard view, use the toolbar functions to publish and download multiple documents, switch between tile and list views, use Search or Find on Page. Gear menu options are available for each row. For each selected document, the right pane displays Properties, and Linked Record tab. A third References tab is displayed if a selected drawing file has associated references.
Expand or collapse all folders in Document Manager or all sub-folders at the same time. Use the toggle Expand/Collapse toolbar function for the Document Manager folders. Folders are collapsed by default. The functionality was absent in prior versions, requiring users to expand or collapse folders one at a time.

Update attributes for already published documents when the corresponding matching fields are updated in the related business process record. Updates occur when a record moves through the workflow, or when Submit is clicked in a non-workflow business process record based on design. In uDesigner, the attachment-related options in the Options tab in Upper Form Properties have been modified and differ based on the BP type:
The top Attachments to overall record block is merged with the bottom Attachment Source block into a single Attachments (or Attachments to overall record) block.
A new field Document Manager Attributes for Record and Line Item Attachments (or Document Manager Attributes) is available with a single option, Update attributes for already Published Documents. Select this option on an upper form to ensure the concurrent update of document attributes when the record is routed from these steps. This is also the case on the End step with an Edit form. The updates occur whether or not the task assignee or editor of a non-workflow record has the Modify Properties permission on the document.
The Manage Views dialog in the Documents log has been enhanced like Tasks and business process logs. Drag and drop views to quickly reorder them, or move them to the Visible Views, Hidden Views, or Views Marked for Deletion section. Select the check box to show hidden views and those marked for deletion. Select a user-defined view and click the Delete icon to move it to Marked for Deletion section.
View the enhanced interface in Fund Detail, SOV Picker, Commit Picker, and Commit Line Item Picker in cost business processes. All existing validations and alerts are also displayed in the enhanced interface.
Business process form redesign has been extended to additional cost business process types:
Line Items with Fund Code: Generic, Transfer
Line Items with both CBS and Fund Codes: Generic, Transfer
Line Items with CBS Code: Base Commit (SOV type - General Spends), Change Commit (SOV type - General Spends), General Spends
In the Reference Records tab of a business process record, specify the number of referenced records to be displayed per node. Maximize the tab and click View Graphic. The options in the new Display ___ Per Node list are 20, 50, 100, and 200. If the number of references exceeds the selected option in a node, pagination controls appear at the bottom of the node. The feature is particularly useful if there are a large number of referenced records associated with the current and other nodes in the graphic.

Features introduced in 18.4
Manage users’ personally identifiable information that is stored in Unifier. The default company contact can enable a consent notice at the global level, which is displayed during login for all users: company (OIM-integrated and on-premises); partner; portal (self-service, bidder, and web (/m)) and Unifier mobile app (iOS and Android devices). If enabled, users must accept the consent notice in order to access the system. The company contact can further track the consent status based on user action in the environment, and reset the content of the notice as applicable. The Company Workspace Admin mode navigator has a new Consent Notice node with two sub-nodes – User Consent and Bidder Consent. Use the former to set up the notice for all users except bidders, which is configured in the latter. The Consent logs have vertical tabs for setup and typing content in supported languages. Enable the Enable Consent Notice switch, type in the notice in the Default Notice field directly or in HTML format, enable/clear the Allow Proxy login for Not Responded Consent Users option, select users and groups to be notified via email when a user rejects the consent notice, and preview the notice. Each of the sub-nodes has a Consent Status sub-node to track users who have accepted, rejected, or not responded to the consent notice. Use the Reset Accepted Consent button to reset users in accepted status to not responded if there are changes in the consent text.
Use the Consent Notice feature to inform end users how personally identifiable information is being collected and used in Unifier. If enabled, users must accept the terms before accessing Unifier.

Rename a document in Document Manager (or Unpublished Documents), if the Name field (uuu_dm_node_name) in the document attribute form design has been changed from Read-Only to Editable (Required). In the gear menu options of a document, select Properties and then change the name. The change is reflected everywhere the document is referenced or linked. The name is also updated in formulas that use file name in its calculations. The file rename action is tracked in the Audit Log tab. If you rename a file with a name that already exists in the same folder, an alert message is displayed. You can either rename the file or choose to keep the same file name. If you choose to keep the same file name, it is appended with an integer, for example: Architecture Diagram.png will be renamed as Architecture Diagram(1).png. In previous Unifier versions, document titles could not be changed in the Document Manager.
Restore a file in Document Manager to an older version along with comments and references associated with it. In the Revisions tab of a selected document, highlight the older version you need to restore, and then select the Restore this Revision option in its gear menu. The restored version becomes the current version and occupies a new row in the tab, with an incremented Pub. No. The action is tracked in the Audit Log. If the Revisions must have same file name option is selected, you cannot restore to a version with a different name. Use the feature to resolve missing references in a drawing file by restoring to a version with existing references. The Revise Document and Resolve References permission is required to use this functionality.
In the Tasks and business process logs, drag and drop log views in the Manage Views dialog to quickly reorder them, instead of using the Move Up/Move Down gear menu options. The Manage Views dialog has three sections: Visible Views, Hidden Views, and Views Marked for Deletion. Drag one or more views to the corresponding section to use, hide or mark them for deletion. Revert hidden and views marked for deletion to visible by selecting the check box in front of them. Note the Drag Row icon in each row, and the Delete icon for user-defined views.

Dock the floating Search dialog to the right or the bottom of the log page using the toggle Dock Right/Dock Bottom icon. Drag it anywhere on the page in order to preview a selected record as you navigate from record to record. The enhancement provides better visibility of records in the Tasks or a business process log.
View a graphical representation of the relationships of the base record with reference records in the Referenced Records tab of a business process record. Preview a record in the right pane of the tab in maximized view. Double-click to open a record. Note the relationship in the first column -- reference, linked to record or linked to line item. Click View Graphic to view the graphical relationship between the base record and its reference and linked records. The enhanced graphic displays color-coded business process nodes with details such as name, record number, title, status, and relationship type. Use mouse control to zoom in for better visibility of details. Filter by business process type in the Business Process list, and/or by relationship type in the Display list. Click + in a BP node to view its referenced and linked records. Select a node and click Transfer Focus to shift the center of focus. Click Reset to return to the default view. Click Print to print the graphic. Selections made in the graphic are displayed dynamically in the grid and vice versa. Note that the Reference Records tab is visible only when the record has been created. Note grouping of line items functionality is available only in standard view. In previous Unifier versions, the graphic only showed reference records.
Expand the graphic view by clicking + in a BP node. The right grid displays the corresponding content in grouping nodes.

CSV and Webservices now support the grouping of line items. The CSV import file has an additional column, Group Name after the Tab Name column in the D row. Optionally, type in group names to assign line items to the corresponding groups after creation. Leaving the cell blank categorizes a line item as Not Grouped. For Webservices, the Input/Output XML includes the additional tag, "li_group_name" for specifying a group name. Webservice methods that support the functionality are Create BP Record; Create Complete BP Record; Add BP Line Item; Add Complete BP Line Item; Get BP Record; Get BP List; and Get Complete BP Record. The functionality is not supported in commitments and payment applications of the Summary Payment Applications SOV type. Note grouping of line items functionality is available only in standard view.
Use the toggle Collapse / Expand All Groups icon to collapse or expand line item groups in a business process form’s detail tab. Sort groups in ascending or descending order by selecting the option from the Actions, Sort Groups menu. The Not Grouped group appears last when sorted in ascending order and first in descending order. The icon is available only when line items groups are present.
The support for financial periods is extended to Cash Flow by CBS, Summary CBS, and Commitment detail levels. In the previous release, the custom financial periods feature was introduced for cash flow at the Project / Shell detail level. Cost business processes of sub-type, Line Item with CBS codes, and classification, Generic, and Transfer display the enhanced form interface. Currency fields display the currency symbol based on user preferences.
View the enhanced interface in CBS Picker, Transaction Currency Picker, Work Package Picker, BPO Picker, and BPO Line Item Picker in cost business processes. All existing validations and alerts are also displayed in the enhanced interface (except those associated with AFC, YTB, and Line items with Fund Code).

Features introduced in 18.3
Create custom financial periods to provide more flexibility in budget forecast and analysis. The current Period Structure, residing under Standards & Libraries, has a new tab to define custom financial periods. Add the sub periods manually or generate by selecting parameters. Financial periods are available in Portfolio Manager, Cash Flow, and in shells and shell templates. Financial period structure selected in a shell’s detail form are seen in the Timescale list in the shell’s cash flow properties. Also, labels and functionality in the Period Close Settings section are enhanced to accommodate the sub-period changes. In Baseline and Forecast type curves, the summary sheet spread and schedule manager spread are assigned to the relevant period. In Actuals, the cost sheet columns and effective dates are used to assign the values to the relevant period. A Portfolio Manager scenario with Financial Period as the period structure uses the data from a shell’s corresponding cash flow curve only if the same financial period is selected in the shell and its cash flow timescale. Configuration packages include financial period structures selected in the above modules and objects. In previous Unifier versions, the Period Structure module allowed you to select time periods from a predefined list of yearly periods, format, and status.
Click Generate and select parameters to generate periods in the Financial Periods tab.

Create folder, document, and log attribute forms for different projects to capture different metadata. The enhancement also allows you to change the attribute form in a project at any time, and select a form during shell creation/update using web services. In uDesigner, open the existing Attribute form in draft mode. In the Folder Properties log, use New or Copy to create a new folder properties form; this will automatically create corresponding document and log properties forms. In the Configuration, Document Manager node, change the status of folder attribute forms. The active attribute forms are available in shell templates and shells in the Details, Options tab. Previously, only one folder and document attribute form was available. Note the enhancement is applicable only for shells.
In uDesigner, create multiple folder attribute forms, which will then create corresponding document and log attribute forms.
Create multiple log views in Administration mode for use in Document Manager. Navigate to the new Configuration, Document Manager node that displays system- and user-defined folder attribute forms. Open any to display a Log Views sub-node for the attribute form. The Log Views page lists all system-defined views. Use Create to add a new log view based on your business needs, change the status of existing views (at least one view must be active), delete inactive views, and reorder views. Only active views are available at runtime. The user-defined sequence of views is retained; new administrator-defined views are appended to the user’s list. Configuration Package Management has been enhanced to support the inclusion of log views associated with selected Document Manager attribute forms. A new Component List node called Log Views is available under Configuration.
Use the Preview gear menu option to preview files in different formats in the Attachments tab of redesigned business process forms. (Use Open in AutoVue to open files in the tab.) SWF and DLL files cannot be previewed; you are prompted to download them instead. This viewer is different from the default Unifier Viewer you select in Preferences.

At runtime, use the new Add to Group record property to group line items in categories. The option is available when you select Allow Add/Copy/Group line items (note the label change) in upper form properties in uDesigner. In a detail tab, add one or more selected line items using Add to Group options. A copied line automatically belongs to the group of the source line. The feature will eventually substitute the add summary line item functionality in a future release.
New system-defined Portal landing page minimizes customization using HTML. The default landing page changes are applicable for only those customers who have not defined a custom landing page in the Unifier application. The Portal site is a light Unifier site that portal users can access to create and monitor service requests such as Move Requests and Space Requests. The Home landing page displays pie charts and grids displaying Portal business process records in various statuses. Left navigation has been removed. Business process names appear as tabs, based on user permissions; they can be reordered but not closed. The business process logs and forms display enhancements consistent with changes seen in the Unifier app. Preferences screens for portal users have also been modernized consistent with changes in the Unifier application.

Unifier now supports the asynchronous upload of folders and files into Document Manager, allowing you to perform other operations in the application while the upload continues in the background. Click the Upload Status indicator in front of the logged-in username to view the status of the upload. The icon uses different colors to visually indicate the upload state – default, in-progress, success or failure. The login session is kept active if there are pending items in the upload window; the upload of pending items is cancelled on signing out. Note: Asynchronous upload is not supported in Internet Explorer and Edge. Also, the upload of DWG files is always synchronous in all browsers.

Create workflow BP templates and records from templates using updated user interface and interactions. On the Actions menu in a BP log, select Create From Template to display the enhanced BP templates log. Click Create to create a new template, or use an existing template listed in the left grid. The right pane of a selected template shows its details in the General and Schedule tabs. Schedule can be set up only after the template has been marked complete. Complete and other functions are available in the template form’s toolbar. Create a record from a template manually or as scheduled. Note that the template form displays the new UI only if the BP type supports it and if the new UI has been enabled from the top of the Unifier page.
Click Create to create a new BP template. Select Create Record menu option of a template to manually create a record from it.
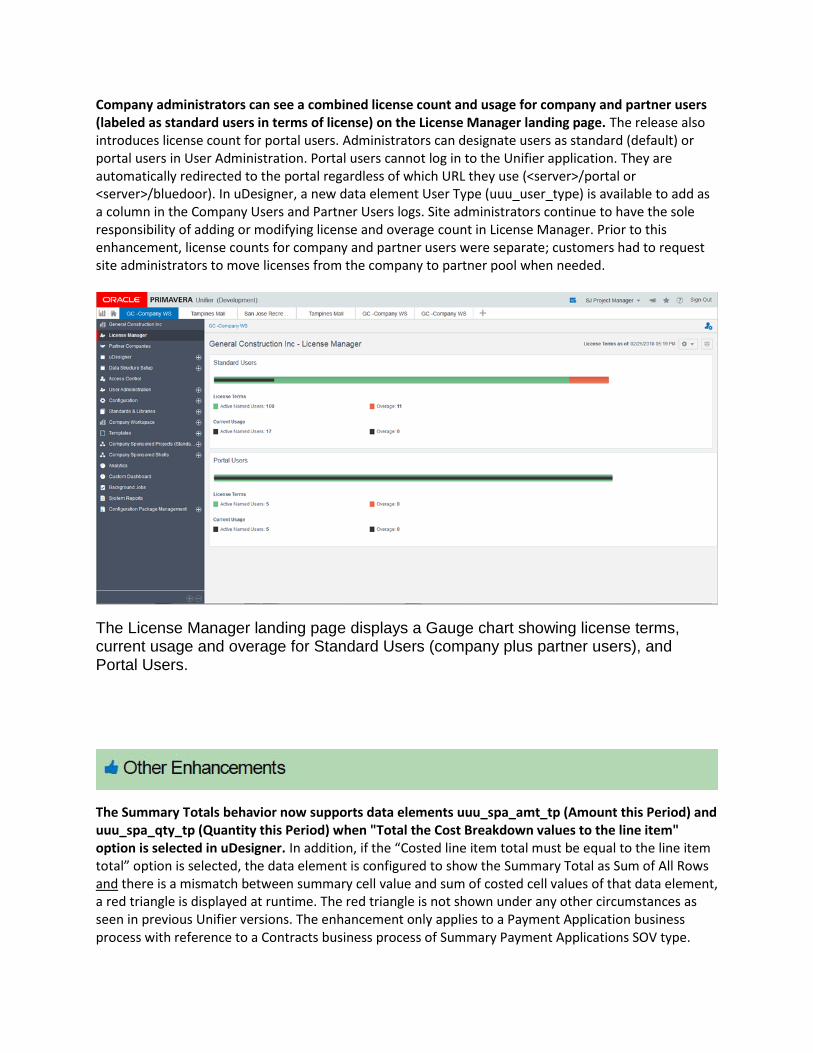
Company administrators can see a combined license count and usage for company and partner users (labeled as standard users in terms of license) on the License Manager landing page. The release also introduces license count for portal users. Administrators can designate users as standard (default) or portal users in User Administration. Portal users cannot log in to the Unifier application. They are automatically redirected to the portal regardless of which URL they use (<server>/portal or <server>/bluedoor). In uDesigner, a new data element User Type (uuu_user_type) is available to add as a column in the Company Users and Partner Users logs. Site administrators continue to have the sole responsibility of adding or modifying license and overage count in License Manager. Prior to this enhancement, license counts for company and partner users were separate; customers had to request site administrators to move licenses from the company to partner pool when needed.
The License Manager landing page displays a Gauge chart showing license terms, current usage and overage for Standard Users (company plus partner users), and Portal Users.
The Summary Totals behavior now supports data elements uuu_spa_amt_tp (Amount this Period) and uuu_spa_qty_tp (Quantity this Period) when "Total the Cost Breakdown values to the line item" option is selected in uDesigner. In addition, if the “Costed line item total must be equal to the line item total” option is selected, the data element is configured to show the Summary Total as Sum of All Rows and there is a mismatch between summary cell value and sum of costed cell values of that data element, a red triangle is displayed at runtime. The red triangle is not shown under any other circumstances as seen in previous Unifier versions. The enhancement only applies to a Payment Application business process with reference to a Contracts business process of Summary Payment Applications SOV type.

Right-side tabs in a BP form are enhanced:
Attachments tab: The Attach button is now represented by a paperclip icon. Revisions and References tabs are displayed only in a maximized state, the latter only if there are references to drawing file attachments. Publish column precedes the Name column in the grid and is enabled only for files attached from the local system.
Comments tab: When a comment is added in the Comments tab, it is hidden by default. Click Post to display the draft comment below the text field, or Clear to delete the text. Attachments of the comment are displayed inline below it. In the draft state, restricted and draft icons are displayed for each comment, as well as details such as username and company name. Use the Posted by list to filter comments by user. Right-click on an existing draft comment to edit, copy or remove it. Click Edit to place a copy of the comment in the text field, which can then be modified and posted again. The color of the restricted icon varies in a draft comment (black) versus an existing comment (red) after a record is created.
Linked Records tab: The tab displays label changes: An Add button to link the current record to existing records, and a renamed Add Records window after you click Add.
Linked Mail tab: The label is now Linked Mail. The Add dropdown options allows you to link an existing mail record from the Project Mailbox (based on permissions) or compose a new mail. In the Add from Project Mailbox, move selected mail from the left Available Items to the right Selected Items pane. After they are linked, the mail appears in the Linked Mail grid. You can no longer link mail from Public Items.
Two draft comments have been posted. The first has attachments; the second is in the process of being edited. Note the Attach button, and icons, context menu and descriptive details in the comments.

Portfolio Manager scenarios now display derived curves and monthly actuals from project cash flow. Select a derived curve as the source for the forecast curve in Portfolio Manager Configuration and select the Display financial period breakdown of Actuals check box. The enhancement extends the existing behavior and validation for forecast curves to derived curves.
View the new business process form design when creating records in the Document Manager. The enhanced overlay for new records automatically displays the origin. In case of workflow business processes, it auto-populates the workflow if a single workflow is set up, or provides a list with multiple workflows. Previously, business process forms displayed the classic view even if the new interface was enabled.
Business process log and form UI enhancements are extended to support the Project/Shell Creation business process type. Its sub-types -- Simple and Line Item – display enhancements similar to the Simple and Generic Line Item type business processes, respectively.
Preferences available in the username list on the top navigation bar has been modernized. The changes are also seen in User Preference templates and User Attributes.

Features introduced in 18.2
Define filter conditions on Cc assignees in a workflow step if they are preassigned or user-select. In workflow configuration, the Assignees block for a step now includes the field: Additional conditions to filter Cc users. Click Define to add filter conditions just like for task assignees. At runtime, Cc users are filtered based on the conditions. This may include preassigned users.

Move a file or folder in the Document Manager using the enhanced Move functionality. Use Move from the gear menu tor move a single folder or file; use Move from the Actions menu to move multiple items. In previous versions, the move would be aborted if a file or folder with the same name existed in the destination folder. Assign the new Move folder/document permission in the source folder. In prior versions, Delete permission was given in the source folder, which allowed users to move and delete a file or folder. Note: For existing customers, if Delete permission was given to selected users and groups, Move will be granted by default after upgrade.

Company administrators can access system jobs data and modify the time zone to trigger jobs. Unifier uses system jobs to perform operations such as autocreation, user-defined report runs, and record creation from workflow templates. A new node called Background Jobs is now available in the Company Workspace administration mode navigator. The log lists the jobs along with status, next start time, type, and priority. An Edit button is visible to only those users with Modify permissions. In previous versions, only the site administrator was able to perform these functions, requiring customers to contact Oracle Support if they did not receive the expected run result.
In the new Background Jobs log, company administrators can modify the time zone to trigger jobs.

In workflow business processes, match the assignee filter results against AND and OR conditions. In earlier versions, only AND was available across all conditions. The Conditions window displays a new column called AND/OR, and a check box for Show results matching any condition. Select the check box to replace the default AND by OR in the column. At runtime, the list of assignees in the To field is drawn based on the filter conditions defined in setup. The list may also include preassigned users.

When consolidating line items, an additional Group By option lists all column headers of the current log view of a business process. Pagination in the top and bottom sections is seen only if the number of records and line items exceeds 1000 and 200, respectively. In the toolbar, the Location icon is moved to the end, and column headers have the same background color as the non-grid portion.
When consolidating line items, group line items by a column header in the Group By list.

The Linked Mails tab of a BP form is divided into left and right sections when maximized. The left section displays the grid, and the right displays the functions, content, and attachments of the selected mail.
The Linked Mails tab displays the list of emails in the left grid and email options and content in the right section.
In picker fields, click X to clear selected values. This replaces the Clear option seen in picker fields. Click Menu Options, Reload to clear all the fields when manual edits are detected in the form.
The enhanced form UI has also been extended to the Master Vendors BP. The Master Vendors BP is typically a generic line item, company-level BP with this option selected: Use this process as RFB master vendor list.
Calendar-enabled simple and line item business processes now support the new form UI. Note that clicking the Calendar option still displays the old calendar UI. Calendar-enabled objects in Unifier have the Enable Calendar option selected in uDesigner.

Query-based tabs in BP forms have a new look with some additional functionality. Create and Copy (available in row menu) options are displayed with the permission to create a new record in the tab. Create will display options if multiple workflows exist for the BP. A Refresh button is available to capture log changes. Search and Find on Page buttons, and Print list, also are displayed.
Overpay on line items of the Summary Payment Applications business process. The Percentage Complete to Date (uuu_spa_per_comp) data element on the detail form/grid can now display a value greater than 100. The system-enforced validation on the element that prevented the value exceeding 100 has been removed. However, to implement this behavior, do not add the column, Commits Remaining Balance in the Summary Payment Applications SOV. If added, the value of Commits Remaining Balance cannot be less than zero, which means that the value of Percentage Complete to Date cannot exceed 100.
Run the Webservice getSOV call to get SOV details of a contract of Summary Payment Applications SOV type. The XML output yields data from all columns and rows of the SOV. Use <SOV_header></SOV_header> tags to include all the column names within <c1></c1>, <c2></c2>, etc. tags. Use <SOV_row></SOV_row> tags to capture summary and costed row data from the SOV within <c1></c1>, <c2></c2>, etc. tags.
In User Picker and User and Group Picker, Search, and Find on Page icons have been replaced by text hyperlinks.

In the Attachments tab, Browse (My Computer in earlier versions), and Document Manager (Unifier Folders in earlier versions) are now available as Attach dropdown options. In the previous release, the options were separate buttons.

Summary Row Totals enhancement applies to a Payment Applications business process with reference to a Contracts business process of Summary Payment Applications SOV type. If you have selected the form option Total the Cost Breakdown values to the line item in uDesigner, you have the option to define how costed lines should roll up to the summary line -- sum of all rows or as defined (manual, formula or auto-populate). In uDesigner, the Elements Properties window of a detail form displays an additional option at the bottom called Summary Total. When you select a data element based on decimal amount, currency amount or integer amount data definition and click Summary Total, you can select an option in the Summary Total pop-up window. At runtime, the selected option is honored.
In uDesigner, define the way costed line values should roll up to the summary line – as defined or sum of all rows.

Override the existing hardcoded calculation on the Previous Amount (uuu_spa_prev_amt) field by selecting a custom data element -- for example, Amount This Period on the standard detail form of the Summary Payment Applications business process. The updated calculation will then display the sum of Total Previous Payments and Amount This Period, instead of Total Previous Payments and Amount. In uDesigner, the Options tab of Payment Applications – Line Items with CBS Code has an additional section, Previous Payment Calculation that allows you to modify the calculation of Total Previous Payments by selecting an option from the list provided. The value is displayed at runtime.
The new Previous Payment Calculation section allows you to modify the calculation of the Total Previous Payments in Summary Payment Applications business processes.

Enhancements to Unifier mobile app for iOS: Support for user-based locale and region formatting; ability to work in the time zone of the device or Unifier server; user select and conditional filtering of step assignees; search the Documents hierarchy for files and folders; copy BP records and line items with or without attachments; and split screen display on iPads.
Enhancements to Unifier mobile app for Android: User-based locale and region formatting; ability to work in the time zone of the device or Unifier server; document management functionality; user select and conditional filtering of step assignees; text type business processes; and viewing the geo-location of projects and business process records.
Both Unifier mobile apps for iOS and Android now support the use of device or Unifier server time zones, as well as user-based locale and region formatting.

Features introduced in 18.1
Unifier’s Home Landing Page has been revamped with interactive tiles and charts, and statistical information about tasks. Announcements are now available by clicking the Announcements icon on the upper-right menu bar. In the navigator, uMail is renamed to Mailbox with Inbox, Notifications, and Sent Mail child nodes. Click the Tasks, Notifications, and Mails tiles to navigate to the respective logs in the Home tab. Charts in the left panel display number of active tasks by status and distribution. Tables in the right panel display number of tasks by business process type and status in your workspaces. Click a business process name to view its log in the workspace.
The location launcher interface is modified. When you click + to add a new tab, the location launcher dropdown displays three sections (instead of tabs in prior versions) – Recent Locations (recently accessed locations), Bookmarks (locations you have saved in Bookmarks), and Key Locations (Company Workspace and single-instance shells). The height of the initial dropdown dynamically varies based on the number of items in Key Locations. On the top of the location launcher screen, a type ahead text field is available to locate a workspace or click the shell picker icon in the text field to use the shell picker.
Business Process enhancements:
Creation of new records: Upper Form
Reduced popups overall
Tabs and menu options that are relevant to the current step are displayed.
New form opens as a popup. You can compare two records of the same BP or different BPs.
The form interface has two panes. Each can be resized and maximized. The left pane displays tabs for the main form (Record Details) and line item tabs (in line item type BPs).
The main form has the associated tabs in the right pane.
Toolbar options are seen on the upper right corner.
Creation of new records: Line Items
Tabs have been relocated
Tabs displays a grid, and the Line items occupy the rows.
Detail form has two additional tabs: Attachments and Linked Records.
Attachments tab is seen only if line item attachments are permitted in form properties.
Linked Records tab supports the linking of records in line items.
The grid has no toolbar options. The options are available in the gear menu for each line item.
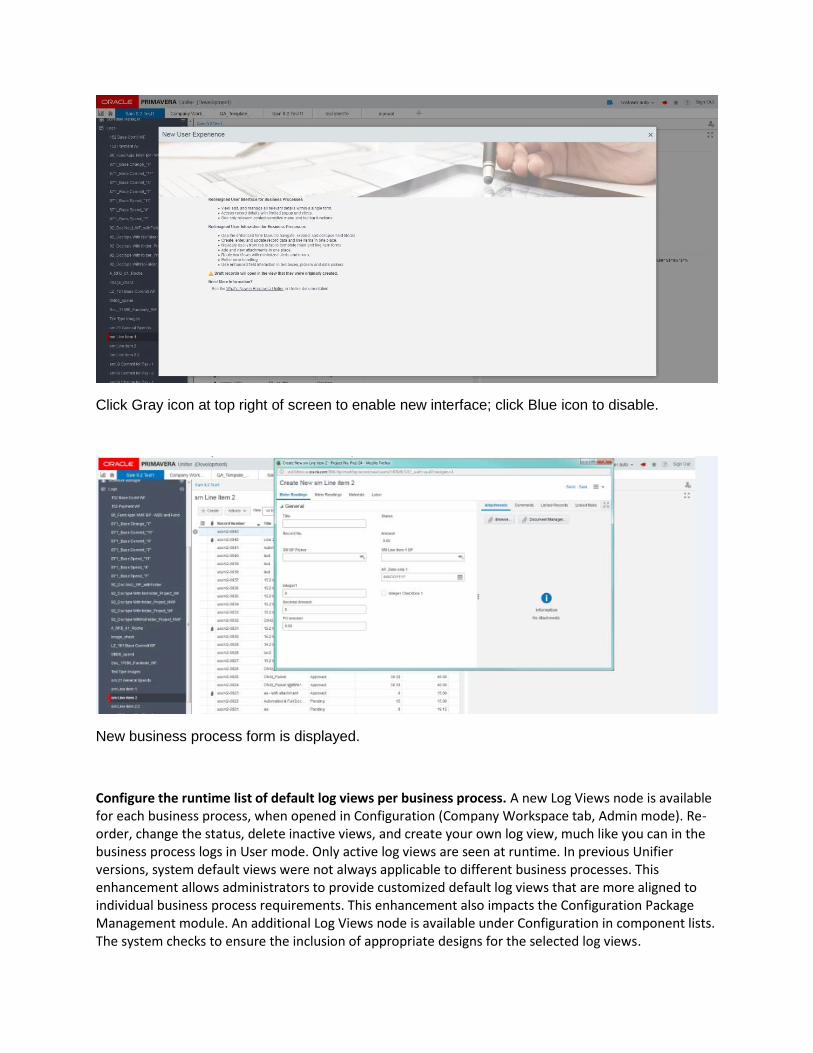
Click Gray icon at top right of screen to enable new interface; click Blue icon to disable.
New business process form is displayed.
Configure the runtime list of default log views per business process. A new Log Views node is available for each business process, when opened in Configuration (Company Workspace tab, Admin mode). Re-order, change the status, delete inactive views, and create your own log view, much like you can in the business process logs in User mode. Only active log views are seen at runtime. In previous Unifier versions, system default views were not always applicable to different business processes. This enhancement allows administrators to provide customized default log views that are more aligned to individual business process requirements. This enhancement also impacts the Configuration Package Management module. An additional Log Views node is available under Configuration in component lists. The system checks to ensure the inclusion of appropriate designs for the selected log views.

WBS label is changed to CBS across Unifier. In previous versions, cost codes in Unifier were treated as Work Break Down or WBS codes. With many customers integrating Unifier with P6, the need was felt to achieve consistent use of terminologies across the products. Note: WBS changes to CBS for Labels and
System Strings, only. For existing customers, by default, WBS does not change to CBS for the Data Structure Data Element labels such as “WBS code” and “WBS item.”
uMail is renamed to Mailbox in all locations. In the Home tab, Mailbox has Inbox, Notifications and Sent Items child nodes. More nodes are available in projects, as in previous versions. Mailbox, located under Mailbox in the project navigator, is now called Project Mailbox. All Mail node pages are redesigned much like the Tasks log, providing a preview of a selected email in the right pane. uMail is the repository for all email communication between Unifier project members. Mailbox handles internal and external emails in a project. The enhancement is based on the need to centralize all email communication.
The Notifications log is redesigned similar to the Tasks log. The toolbar displays Actions, View, Edit View, Print, Find on Page, and Search functions. In the View list, use default or custom views. Selecting a record displays Record Details, Workflow Progress and Attachments tabs in the right pane. Use options in the gear and Actions menu to print or delete one or more notification records respectively. In the Home Notifications page (located under Mailbox), an additional option is available to navigate to the origin. The Drafts log is redesigned similar to the Tasks log -- same as Notifications log except for View options (Saved vs. Received in the Notifications log).
All login screens of the Unifier application have been modified with a standard look and feel. Impacted areas are the Unifier webpage (including the Forgot Password and related secret question screens), Bidder Portal, Self Service Portal and Mobile Browser.
View replies from external users in the Project Mailbox. With this enhancement, when an external user replies to a notification email, the From field is automatically set to the project email address. Replies are then captured in the Project Mailbox, allowing you to track and monitor project email communication. Previously, the From address was set to the system notification e-mail address, preventing the capture of replies in the Project Mailbox.
Choose to display project/shell name or number in the navigation tabs. In the Edit Company window, a new option is available to select the display element. The setting impacts labels and tooltips of navigation tabs, a project/shell’s Home node in the navigator, and bookmarks. In previous Unifier versions, the tabs displayed only the shell name. Since shell name is not unique in Unifier, this caused confusion if shells had duplicate names.
Customize the Total row of the grid in Payment Applications and Summary Payment Applications to accurately reflect its values at runtime. In uDesigner, the Element Properties definition window in the

Standard tab form of these business processes has a new Total button. Click Total to define the Total property for an element as Blank, Sum of All Rows, or Use Formula Definition. Selection of the property option is restricted by the data definitions of the elements. For example, the default selection for custom formula fields is Use Formula Definition. It ensures the same formula is also used for the Total value. Click Manual to permanently return to the previous Sum of All Rows option. Predefined formula fields cannot be changed, except for % Complete to Date. Blank is always disabled for the Amount element. The Total property definition in these business processes are included in configuration packages.
Synchronizations are available in Unifier Gateway node to import P6 activities into Unifier Shell. Initiate the synchronizations from the new company-level Master Rate Sheet node to fetch the global roles and resources data from P6.Link multiple P6 projects in the new Integration tab in shell details. A new Activity Manager node is available to store an activity sheet and shell-level rate sheets. Initiate synchronizations in the Activity Sheet log to get the activities data from the linked P6 projects and the shell-specific resources and roles data (assignment spread and price/units) from the Master Rate Sheet. In the Rate Sheet node, create additional rate sheets, if required. Other impacted areas in Unifier include all permissions-related and reporting modules, and Configuration Package Management.
Unifier Analytics now supports cost code attributes, tab ID and pickers. Cost code attributes: Map cost code attributes (using uuu_cost_code) to related OBI elements in the new Data Mapping - Cost Attributes tab of Cost Sheet subject area. Only string type fields are supported in this release. Data Mapping tab has been renamed to Data Mapping – Columns. Tab ID: Include Tab ID dimension when analyzing or reporting on line items in line item business processes to help identify the tab to which the line items belong. No mapping is required for the system-defined Tab ID field. Pickers: Map data pickers and BP pickers of string data type in Business Processes, Shells and Space subject areas. User data pickers and pickers are also supported. UDF count: Map up to 100 UDFs (string, date and numeric data types) in Business Processes and Shells subject areas. Impact on Configuration Package Management: Inclusion of Analytics, Cost Sheet in a component list requires the inclusion of Cost Code Attributes source design.
The display of monthly actuals in Portfolio Manager has been extended to derived curves, multiple forecast curves, linked/unlinked projects, and yearly plans. Configuration packages are also impacted by the enhancement: Portfolio plans included in configuration packages will carry over the property setup of monthly breakdown of actuals. Cash flows included in configuration packages will carry over derived curve properties to the destination environment.
Configure Portfolio Manager to send notifications to users and groups when a scenario is shared or approved. An Additional Information section is available in the Portfolio Manager Configuration interface to select company-level users and/or groups. The selected recipients must also exist at the project level to receive notifications. In addition, designated recipients must subscribe to the Portfolio Manager Email option, Scenario Shared or Approved in User Preferences.
Keep the current session active in Unifier. When there is inactivity on the Unifier browser tab for the timeout session interval defined in Unifier Configurator, a warning message is displayed 5 minutes before the session timeout. The browser tab also displays a blinking alert. Click Stay Signed In to continue working in the environment. You are redirected to the login page after the session expires. If Unifier is open in multiple tabs and you are inactive in a tab, you will be redirected to the login page only when there is no active session in the other tabs. Click Stay Signed On to activate the sessions in all the browser tabs.

Document Management enhancements:
Advanced search functionality is now available in the Documents log. Initiate search by clicking the Search icon. Type in the single text search box to display suggested areas – for example, Content, Linked Records, etc. Unifier displays a filtered list for the selected area in a search results screen. In the left panel, select a quick filter provided under categories such as Group By, Format, Upload Date, etc. Add multiple criteria or clear the filters. Advanced search capabilities are particularly useful to initiate a business process record with attachments. Gear menu actions allow you to open or download a file or go to its location from the search results screen.
Add frequently visited documents and folders to Favorites. In the gear menu of a specific document or folder, select Add to Favorites. Access favorites from the Favorites window by clicking the star icon in the toolbar. Open a document in the default viewer or AutoVue. You can also choose to open it in the folder view. Manage the favorites list by using Find on Page, Delete and Move Up/Down.
Use templates to update Document Manager changes in shells of the same type. A new function, Update Shells is available in the Documents log of a shell template. Push changes using Structure & Permissions or Permissions Only to all shells or selected shells of the same type. Use History to view updates. Apply changes to a single or the entire folder hierarchy in the shells. Update rules apply to each sub-option – for example, in the Structure & Permissions option, if a folder does not exist in the destination folder hierarchy, it will be added.
The interface of the Documents template of a shell template has been modified for better usability. Use the toolbar functions to create, perform actions, update shells and find folders based on properties. The first four default columns – Comment, Lock, Ref and BP are not available in the template.
Sort columns in the log regardless of the number of pages. Sorting is also enabled on the new Searched Results screen. After sorting is applied, the prefix, (Modified) displays in the View name field. In previous versions, sorting of column cell content occurred only on the current page.
Switch between grid and tile view of the log layout. A new toggle button is available in the toolbar. All grid view functionality is also available in the tile view. In the tile view, folders and files are grouped together. File thumbnails are displayed. Gear menu actions are available on hover. Click the folder/file name hyperlink to open it.
Use the enhanced methods to create, view and manage shortcuts in the Document Manager. Select Create Shortcut in the gear action menu for a specific file or folder to create a shortcut. The new shortcut is then available in a Shortcut window that displays all shortcuts. A Shortcut button is available in the toolbar to access shortcuts. Hover over a shortcut to display the corresponding file or folder in a tooltip. Click it to open the file or folder. The create shortcut option is no longer available in the Create menu, and shortcuts are not displayed in the log.
Toggle between old and new business process form views. The toggle icon, in the upper right menu bar, enables you to switch between the standard and classic views of a supported BP form.
Enhanced Single Record Business Process Log. The logs of single record non-workflow business processes such as Shell Information BP have been enhanced similar to the logs of multiple record BPs.
Unifier Mobile Browser (/m) has been deprecated.

Legal Notices
Oracle Primavera Unifier What’s New
Copyright © 1998, 2018, Oracle and/or its affiliates. All rights reserved.
Oracle and Java are registered trademarks of Oracle and/or its affiliates. Other names may be trademarks of their respective owners.
This software and related documentation are provided under a license agreement containing restrictions on use and disclosure and are protected by intellectual property laws. Except as expressly permitted in your license agreement or allowed by law, you may not use, copy, reproduce, translate, broadcast, modify, license, transmit, distribute, exhibit, perform, publish or display any part, in any form, or by any means. Reverse engineering, disassembly, or decompilation of this software, unless required by law for interoperability, is prohibited.
The information contained herein is subject to change without notice and is not warranted to be error-free. If you find any errors, please report them to us in writing.
If this is software or related documentation that is delivered to the U.S. Government or anyone licensing it on behalf of the U.S. Government, the following notice is applicable:
U.S. GOVERNMENT END USERS: Oracle programs, including any operating system, integrated software, any programs installed on the hardware, and/or documentation, delivered to U.S. Government end users are “commercial computer software" pursuant to the applicable Federal Acquisition Regulation and agency-specific supplemental regulations. As such, use, duplication, disclosure, modification, and adaptation of the programs, including any operating system, integrated software, any programs installed on the hardware, and/or documentation, shall be subject to license terms and license restrictions applicable to the programs. No other rights are granted to the U.S. Government.
This software or hardware is developed for general use in a variety of information management applications. It is not developed or intended for use in any inherently dangerous applications, including applications that may create a risk of personal injury. If you use this software or hardware in dangerous applications, then you shall be responsible to take all appropriate failsafe, backup, redundancy, and other measures to ensure its safe use. Oracle Corporation and its affiliates disclaim any liability for any damages caused by use of this software or hardware in dangerous applications.
This software or hardware and documentation may provide access to or information on content, products and services from third-parties. Oracle Corporation and its affiliates are not responsible for and expressly disclaim all warranties of any kind with respect to third-party content, products, and services. Oracle Corporation and its affiliates will not be responsible for any loss, costs, or damages incurred due to your access to or use of third-party content, products, or services.