what’s new in the gm epc finding the right part faster and ... · epc 4 will be transferred...
TRANSCRIPT

What’s New in the GM EPC The GM Next Gen EPC has numerous new features designed to make finding the right part faster and easier. For detailed instructions on using each feature, select User Guide from the Help menu within the EPC.
Graphical NavigationThis version of the EPC gives you an additional, new way of navigating through the catalog. Graphical navigation is not simply a visual representation of the Group or Major Group index you see in List style. Instead, Graphical navigation groups related parts into six overall categories.
Common Navigation for Every Vehicle
Once you have navigated to a Group or Major Group, or entered a VIN, you can switch
to a Graphical Catalog Navigation Style.

Graphical Navigation
System-based Grouping
All the parts associated with a particular repair will be found in the same group, removing the need to navigate to multiple locations to find the necessary parts.
Note: if you have not entered a VIN, you must manually select an engine type before being able to see the data in groups 3A and 3B.
Detailed Pictures or Text SelectionChoose whichever you prefer. The data is the same in both views, and leads to the traditional side-by-side display.
2
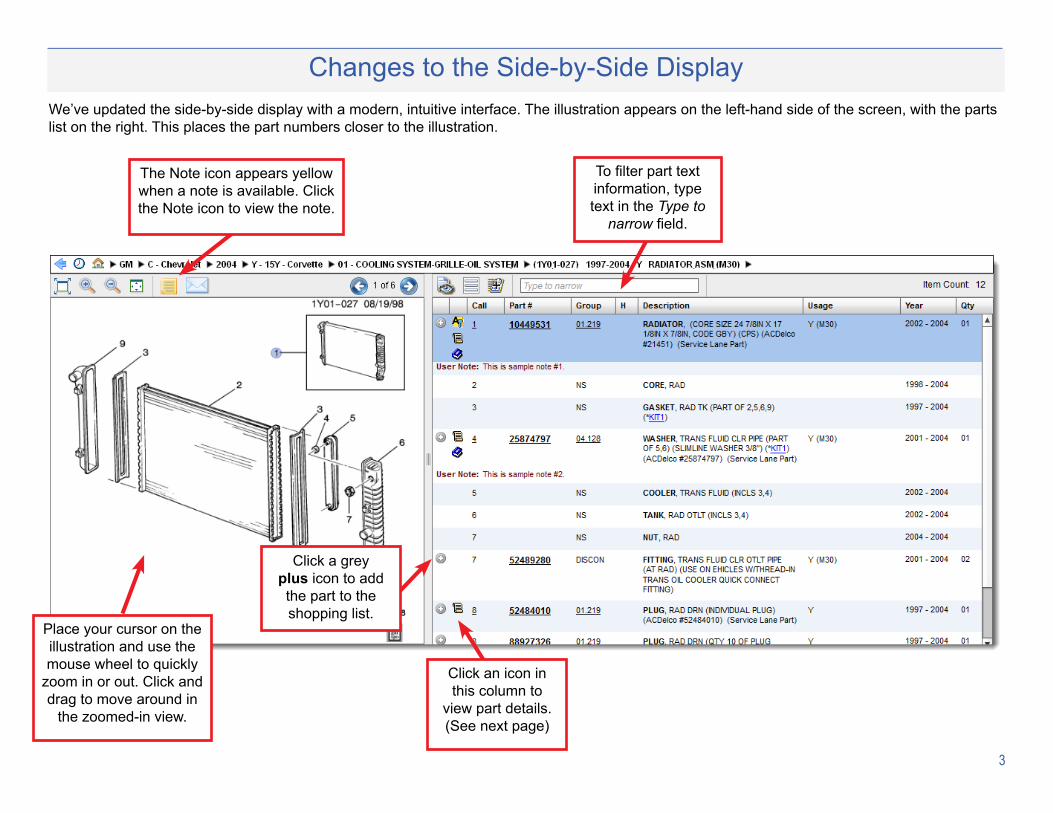
We’ve updated the side-by-side display with a modern, intuitive interface. The illustration appears on the left-hand side of the screen, with the parts list on the right. This places the part numbers closer to the illustration.
Click a grey plus icon to add the part to the shopping list.
Click an icon in this column to
view part details. (See next page)
Changes to the Side-by-Side Display
To filter part text information, type text in the Type to
narrow field.
Place your cursor on the illustration and use the mouse wheel to quickly
zoom in or out. Click and drag to move around in
the zoomed-in view.
The Note icon appears yellow when a note is available. Click the Note icon to view the note.
3

Part Details WindowThe new Part Details window provides access to relevant part information, all in one place.
The top section displays basic
information about the
selected part and its usage.
The bottom section displays more information for the part as determined by the selected tab.
A tab appears only when the associated type of information is available for the selected part.
Buttons at the top let you add the part to your current shopping list, add a note to the part, or, if you accessed the part details from the Search
Results window, go to the location in the EPC that is shown in the Location field.
4

NotesThe Notes feature has been improved to allow users to add notes to parts, VINs, groups, or EPC locations. You can modify, print, or delete any note you create.
VIN Filtering
For example, a new VIN Note indicator displays information about the VIN before you enter the catalog. These notes will appear whenever you enter a VIN that has a note available, including business-critical VIN notes supplied by GM.
You can still enter a complete VIN, or only the last six or the last eight digits of a VIN.
In some regions, you can also enter a Registration number or Tag number.
The updated GM EPC provides improved filtering and a refined VIN information layout.
Click the Vehicle Information icon to open the VIN
Information window.
In the Parts List, right-click the part to open a menu, then select an option.
5

The Jobs feature lets you open multiple job searches simultaneously.
For example, if you are using the EPC to find parts for a customer on the phone, and a service technician needs parts at the counter, you can assist both without losing the work you’ve already done! You can open up to 25 jobs.
When you open the application, a single blank job tab is displayed. As you navigate through the EPC, the tab’s label changes to reflect your location, and can be easily renamed.
Jobs Feature
You can start a new job without closing your current
job. Click the New Job button on the top left to
open a new job as a new tab in the EPC window.
Note: The Save Job feature replaces the EPC 4 Bookmarks tool, which allowed you to open only one job at a time. Any bookmarks you saved in EPC 4 will be transferred automatically to the updated EPC and available in the Manage Jobs window.
New Drop-down MenusThe menu bar is now located at the top right of the EPC window. Use the pull-down menus to view additional parts information, manage user data, configure settings, and view the online help.
If a feature is greyed-out, this means that a vehicle must be selected first or that the feature is not available for that particular catalog.
6
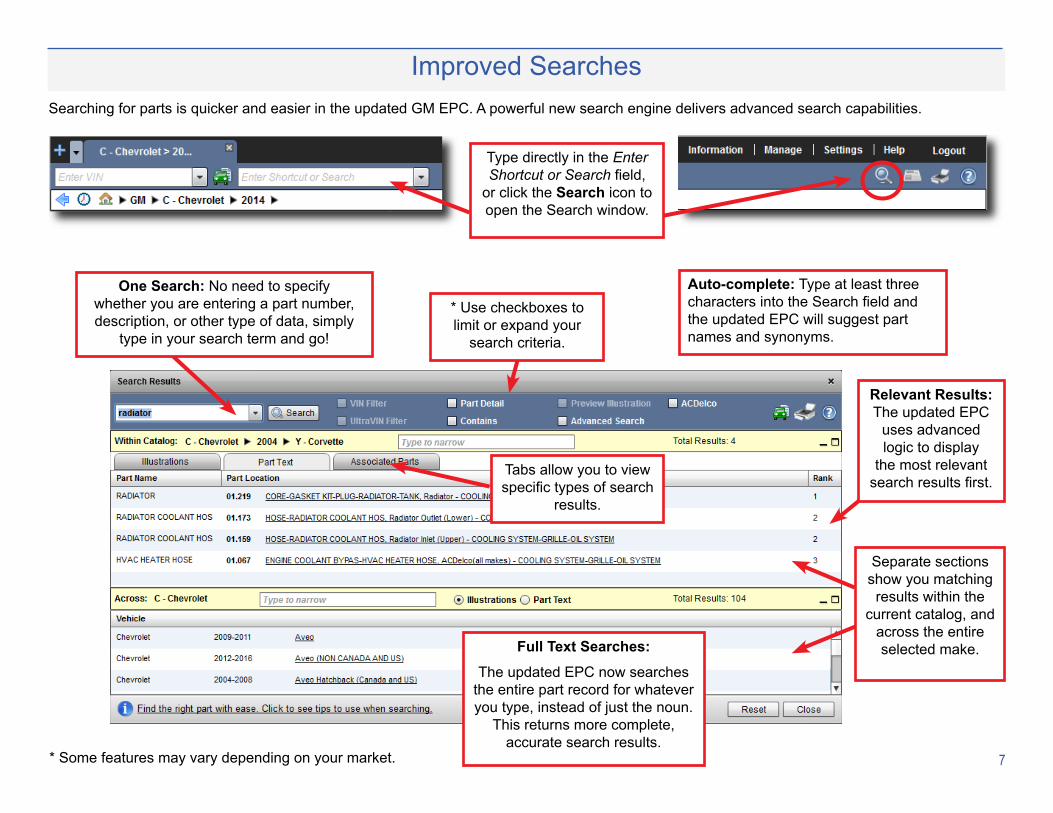
Improved SearchesSearching for parts is quicker and easier in the updated GM EPC. A powerful new search engine delivers advanced search capabilities.
Type directly in the Enter Shortcut or Search field,
or click the Search icon to open the Search window.
Full Text Searches:
The updated EPC now searches the entire part record for whatever you type, instead of just the noun.
This returns more complete, accurate search results.
Auto-complete: Type at least three characters into the Search field and the updated EPC will suggest part names and synonyms.
One Search: No need to specify whether you are entering a part number, description, or other type of data, simply
type in your search term and go!
* Use checkboxes to limit or expand your
search criteria.
Tabs allow you to view specific types of search
results.
Separate sections show you matching
results within the current catalog, and
across the entire selected make.
Relevant Results: The updated EPC
uses advanced logic to display
the most relevant search results first.
* Some features may vary depending on your market. 7

We have made many changes to streamline the shopping list and make it easier to use.
Shopping Lists
Initially, the shopping list is hidden from view. You can see the shopping list toolbar at the bottom of the screen.
Click the Restore Shopping List icon.
The shopping list pane appears at the bottom of
the screen.
Icons on the shopping list toolbar let you manage all your shopping lists, save the current shopping list, add a part manually, clear all parts, email the shopping list, and even send parts to your DMS and choose which prices to show, if you have configured a DMS integration.
You can even use the parts in the shopping list to create an estimate for your
customer with a single click of a button.
See the next page.
To remove a single part
from the shopping
list, click the Delete icon next to the part in the
shopping list.
* Set the pricing level displayed in the shopping list.
* Some features may vary depending on your market.8

Create an EstimateThe Estimate window is divided into three main sections and a button bar.
You can add information about the dealer or
customer, including a PO or Account number.
In the bottom section of the Estimate window,
you can enter labor and shipping information or make adjustments to
the total estimate.
Vehicle information, along with parts
and prices from the shopping list, are
imported automatically into the window.
Use the Hide Part Numbers checkbox to hide or show part
numbers on the estimate.
Use the buttons at the bottom of the window to create a PDF of the estimate, Print or Email the estimate, or Close the
estimate without saving it.9

Service and Parts Bulletins*To view all bulletins available in the selected catalog, select View Service Bulletins from the Information menu.
Where bulletins are available, view, manage, and search service and parts bulletins in a new easy layout. Service bulletins become accessible once you have navigated to a vehicle or entered a VIN.
Type a number or keyword to narrow the list.
To view a bulletin, click the corresponding Attachment icon.
Make a selection from the Type menu to view bulletins of a particular
type.
Use the scroll bar to view information hidden from view.
* Some features may vary depending on your market.10

11
Other Visual Navigation OptionsIf you prefer a visual style of navigation, you can also choose to see Models as thumbnails, instead of a list.
At the top of the screen, click Settings → Application Settings to open the Application Settings window.
On the General Settings tab, click the drop-down arrow in the Model Index Layout field and select List or Thumbnail.
Choose whichever you prefer; the data presented is the same in both views.
List View
Thumbnail View

Adjustable Font Size
Extra Features Benefits of the new GM Electronic Parts Catalog
Part Group/Illustration Index dropdowns
Quick access: Instead of arrows to page one group at a time, use drop-down to go to any group quickly.
‘Where Used’ Results One-click usage: Right click on any part number for a listing of what vehicles use the part.
Part History Data Layout Intuitive view: Part history data now laid out in tree structure.
Enhanced Search New search engine: No need to select what you are looking for, just type what you know and applicable results are displayed.
EPC Migration Designed for easy migration from current GM EPC.
12
Additional Enhancements
Globally change your preferred font size throughout the EPC in a single setting.
At the top of the screen, click Settings → Application Settings to open the Application Settings window. On the General Settings tab, change the Font Size setting, and click Apply.