what's new in adobe premiere elements 15 - laurie callison · new in adobe premiere elements...
TRANSCRIPT
Adobe Premiere Elements Help / What's new in Adobe Premiere Elements 15Adobe Community Help
Applies toAdobe Premiere Elements
Contact support
To the top
Your life is full of family activities and special events—and you shoot videos tocapture them all.Adobe Premiere Elements 15 simplifies the organizing and editing so you canhave fun creatingand sharing great-looking movies. Find clips fast, add style with effects andmusic, and share ondisc, HDTV, Facebook, and YouTube.
Video CollageHaze RemovalMusic RemixAdjustment Layer Guided EditTouch-based editingeLive SearchEnhanced Guided Edit interface
Show All
Adobe Premiere Elements includes Elements Organizer, which helps youorganize your assets. For information about new features in ElementsOrganizer, see What’s new in Elements Organizer 15.
Try the latest Premiere Elements | Explore Elements product suite
Video Collage
New in Adobe Premiere Elements 15
Bring collages to life!

To the top
Collages are a creative way to share your memories and tell a story visually.Photo collages have been around for long; we now bring you video collages.With the new Video Collage feature in Adobe Premiere Elements 15, createdynamic collages with photos and videos. Choose from various designs andlayouts, arrange the media as per your needs, and finally choose how youwant the videos in the collage to be played. Your video collages are perfect forsharing on Facebook, YouTube, and other social sites.
Create your video collage with photos and videos
For more information, see Video Collage.
Haze Removal
New in Adobe Premiere Elements 15
Hazy landscapes? Make every shot look sharp in seconds!
Cut through the haze and fog in your videos with the Haze Removal feature inAdobe Premiere Elements 15. Take landscape videos without having to worryabout the haze on even a clear day - select the video and process it with theAuto Haze Removal feature. For more enhancements, including varying levelsof sensitivity to haze, try it manually.

To the top
Remove haze and fog in your videos
For more information, see Haze Removal.
Music Remix
New in Adobe Premiere Elements 15
Remix music to the perfect length!
Remix any audio clip or mp3 file to match the length of your video. Just dragthe trimming handles, and your audio clip is automatically adjusted to yourtarget duration.
Adobe Premiere Elements 15 creates a natural sound, so you never lose thesoul of your audio.
Remix music automatically

To the top
To the top
To the top
For more information, see Music Remix.
Adjustment Layer Guided Edit
New in Adobe Premiere Elements 15
Easily create a signature look!
Apply same adjustments or effects to multiple clips in one go and createsimilar effects across these clips by adding an Adjustment Layer Guided Edit.To add an adjustment layer, go to Guided mode > Video Adjustments > Addan Adjustment Layer.
Add an Adjustment Layer Guided Edit
For more information, see Adding an Adjustment Layer - Guided Edit.
Touch-based editing
Organizer and Quick Edit mode are now touch-friendly!
Edit and organize videos with your fingertips. Now, you can simply tap to find,sort, and enhance your videos in the Organizer and Quick Edit mode in yourtouch-screen devices.
eLive Search
New in Adobe Premiere Elements 15

To the top
Need help? Find your answers directly from the eLive room. Adobe PremiereElements 15 enables you to search for eLive content, Help pages, andtroubleshooting knowledgebase articles from within eLive room.
For more information, see eLive.
Enhanced Guided Edit interface
Enhanced in Adobe Premiere Elements 15
Visually reimagined for you!
Selecting which Guided Edit to use is now easier with the new interface. InGuided mode, you can now choose the type of adjustment you want to applyto your video - Basics, Video Adjustments, Audio Adjustments, or Fun Edits.Choose one of the types of edits and view a graphical listing of all the GuidedEdits available in that category.

To the top
For more information, see Guided mode.
Face Detection
Enhanced in Adobe Premiere Elements 15
Identify faces (close-up, single face, and group) in a clip with the help of theFace filter. The Face filter is enabled by default and enhances severalworkflows, such as Favorite Moments trimming and Video Story workflow, togive you much better output. You can disable the Face filter from AutoAnalyzer Options under Preferences.
Pan & Zoom
Quick pan-and-zoom movies of people!
Face frames have been added in the Pan & Zoom workflow for images only toautomatically detect faces present in your image for better results. Now withFace Detection, it automatically highlights your favorite people.
For more information, see Use pan and zoom to create video-like effect.
Favorite Moment Trimming
Favorite Moments with favorite people
Now with Face Detection, Favorite Moments automatically finds the people inyour videos and brings them front and center in fun, quick movies. With theFace filter enabled, the Favorite Motions trimming workflow now generatesoutput that focuses on the movements as well as on People and give priorityto close-ups and single/multiple faces.

For more information, see Mark and extract favorite moments.
Smart Trim
Easier to trim what you don't need and keep the people!
Now with Face Detection, Smart Trim gives priority to footage of people whensuggesting places to trim, so you’ get a great movie of friends and family. Withthe addition of the Face Filter in Adobe Premiere Elements, you now have theoption to use the interest slider along with the quality slider in the Smart Trimworkflow. The combination of quality and interest sliders now give you muchbetter output.
For more information, see Trim clips.
Twitter™ and Facebook posts are not covered under the terms of CreativeCommons.
Legal Notices | Online Privacy Policy
Choose your region Products Downloads Learn & Support Company
Copyright © 2016 Adobe Systems Incorporated. All rights reserved.Terms of Use | Privacy | CookiesAdChoices

Adobe Premiere Elements Help / Creating video collageIntroduced in Premiere Elements 15
Adobe Community Help
Applies toAdobe Premiere Elements
Contact support
To the top
Collages are creative way to share your memories and tell the story at once.Photo Collages are the most popular creations in this category and we arenow bringing you Video Collage in Premiere Elements. However, it is notlimited to video memories - you can use your photos and videos to create funand animated video collages. Choose from a list of templates and quickly puttogether your memories to share with your family and friends.
Create a video collage
Follow these easy steps to create video collage:
1. Add media and select a template2. Customize video collage3. Save and export video collage
Add media and select a template
1. To create a video collage, do one of the following:
Elements Organizer: Select the media you want to include in thecollage and then select Create > Video Collage. Premiere Elements: Select Create > Video Collage and then selectthe media you want to include in the collage.

Create Video Collage from Premiere Elements or Elements Organizer
2. Select a layout from the list of templates. Each template is a uniquecombination of number of grids and effect applied on those grids. Forexample, you can select a template with 3 grids and Slide In effect or atemplate with 5 grids and Rotate effect.Hover the mouse over a template to see the name of the effect, click tosee the preview.
Grid 3 templates

Note:
Note:
To the top
3. Drag and drop media from Media bin to the collage. You can preview themedia in the Media bin before adding them to the collage. You can alsodrag media directly from organizer to the collage.
Add photos and videos
A. Preview video B. Preview image
You can add photos and videos to the Media bin from ElementsOrganizer and your computer's hard drive. For more information, see Addmedia from Elements Organizer and Add media from files and folders.
4. Customize the video collage by using contextual controls.
Video Collage
The default effect on an image is pan & zoom.

Resize handles
Pan/Move tool
Zoom slider
Customize video collage
A. Resize handles B. Pan/Move tool C. Zoom slider D. Delete E. Swapmedia F. Trim media G. Mute clip audio
Resize the grid and media by dragging the handles.
Pan: To move the media within the grid, drag the pan tool.
Move: To move the grid's content with the grid, click outside the pantool and drag the selection.
Drag the slider left to zoom out or right to zoom in.

Delete
Swap Media
Trim Media (Video only)
Mute/Unmute clip audio (Video only)
Templates
Playback Settings
One after another
All together
Delete the grid and media.
Note: Once deleted, you cannot add the grid. However, you can undothe delete operation and get the grid back.
Replace the media in the current grid with the media in othergrids. To swap the media, click Swap Media and drag the media to the gridwith which you want to swap the media. The trimmed setting of the swappedvideo is also swapped.To replace the media with the one in the media bin, drag the media from themedia bin to the grid.
Trim the clip to change the duration of your video orto define the frames you want to use.
Mute/Unmute audio of the clip in thecurrent grid.
Video Collage settings
A. Templates B. Playback Settings C. Add Music
Change the template of your video collage with one of thetemplates available. To change the template, double-click a template or selecta template and click Apply.
Specify the playback settings for the collage.
Play media one after another.
Play all media together.

Add music
To the top
Note:
Add background music to your collage from the music library. Toadd music, double-click a music score or select a music score and click Apply.To remove background music from your video collage, select No BackgroundMusic.
Save and export video collage
Save a Video Collage Project
To save a video collage, do one of the following:
In the Taskbar, click Save.Choose File >Save.
The Video Collage Project is saved with a .vc filename extension.
A file with .vct extension is also created at the same location. This fileis required to open the video collage. Do not delete this file.
Open a Video Collage Project
To open a video collage project, do one of the following:
Choose File > Open Project from the Premiere Elements workspace.Choose File > Open Video Project from the Video Collage workspace.
Browse for the .vc file and click Open.
Export a Video Collage
Once you have finalized your video collage, the next step is to share yourcreation. There are a couple of ways to export and share your video collage.
Export to timeline
Click Export to timeline to export your video collage as a video clip to thetimeline. Select this option if you want to make some edits and adjustments toyour collage before sharing it.
Export & Share

Note:
To the top
The Export & Share option includes all the available export formats in a singlepanel. Individual tabs on the Export & Share panel represent the variousmedia options that you can choose from. You can export your video collagefor viewing on the web, mobile phone, computer, and more. For moreinformation, see Export and share your videos.
A video collage cannot be exported to a disc, or as an audio or imagefile.
Video Collage project settings
Video Collage supports composition in 4K or HD resolution. You can createvideo collage in any of the project settings, however, to get the proper outputon timeline create video collage with empty timeline or follow these steps:
1. Create new project with HD 1920*1080 or 4K settings.2. Create video collage, customize it, and export it to timeline.
If you create a video collage with empty timeline, the project settings areautomatically switched to corresponding video collage project (HD/4K).
Twitter™ and Facebook posts are not covered under the terms of CreativeCommons.
Legal Notices | Online Privacy Policy
Choose your region Products Downloads Learn & Support Company
Copyright © 2016 Adobe Systems Incorporated. All rights reserved.Terms of Use | Privacy | CookiesAdChoices

Adobe Premiere Elements Help / Haze RemovalAdobe Community Help
Applies toAdobe Premiere Elements
Contact support
Remove haze, fog, or smog from a video.
You can now remove the dampening effect that environmental or atmosphericconditions have on your videos, particularly videos of landscapes. Using theHaze Removal filter, you can reduce the masking effect that haze, fog, orsmog creates.
You can use the Haze Removal filter in one of the following ways:
Manual haze removal
1. Add a video to the Timeline in the Quick or Expert mode.
2. Do one of the following:
In Quick View: Choose the Effects tab and select Video Effects. Selectand drag the Haze Removal effect onto the desired video.
In Expert View: Choose the Effects tab and select AdvancedAdjustments. Select and drag the Haze Removal effect onto the desiredvideo.

Haze Removal effect in Expert View
You can also search for the effect by typing Haze Removal in thesearch box.
3. The video is processed, and the effect of haze or fog is reduced. You canrepeat step 2 to further apply the effect on more videos.
You can also choose Applied Effects > Haze Removal and use the HazeReduction and Sensitivity sliders to achieve the desired level of hazereduction manually. Uncheck the Auto Haze Removal check box to usethe sliders.
Haze Reduction: Controls the amount of haze or fog in a video.Sensitivity: Specifies the threshold for applying haze removal. Largerthe sensitivity, more aggressive is the haze reduction. This is mainlyused for dealing with sky regions. More aggressive removal of hazecan bring noise in the sky region.
4. Use the toggle icon to see the effectiveness of the Haze Reductionfeature on the video.
5. To cancel haze removal, delete, or hide (using toggle) the effect from theApplied Effects panel.
Auto haze removal
1. Open a video in Premiere Elements, in the Quick or Expert mode andapply the Haze Removal effect on it.
2. Select Haze Removal from the Applied Effects tab.
3. Select Auto Haze Removal that calculates the amount of haze reductionautomatically depending upon the amount of haze in the video.
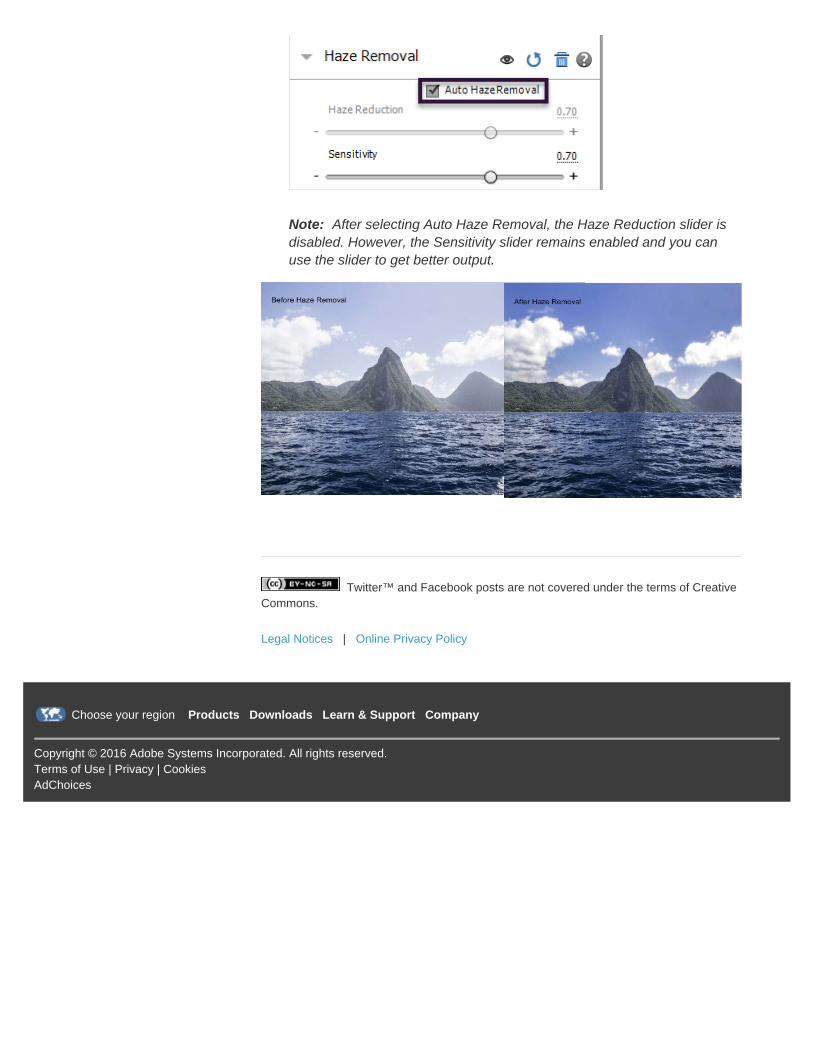
Note: After selecting Auto Haze Removal, the Haze Reduction slider isdisabled. However, the Sensitivity slider remains enabled and you canuse the slider to get better output.
Twitter™ and Facebook posts are not covered under the terms of CreativeCommons.
Legal Notices | Online Privacy Policy
Choose your region Products Downloads Learn & Support Company
Copyright © 2016 Adobe Systems Incorporated. All rights reserved.Terms of Use | Privacy | CookiesAdChoices

Adobe Premiere Elements Help / Music RemixAdobe Community Help
Products AffectedAdobe Premiere Elements
Contact support
To the top
Note:
The Music Remix feature in Premiere Elements allows you to easily increaseor decrease the length of an audio clip to match the desired duration withoutlosing the continuity of the audio content.The Remix tool analyzes your song files, identifying hundreds of loops,transitions, and important segments, and then allows you to quickly remix toany duration.
Music Remix
Remix is enabled by default in Music track in the Quick and the Expert view.To remix an audio clip, do the following:
1. Insert a clip onto an audio track in Quick mode or a music track in Expertmode.
For better results, use audio clips with more instrumentals and lessvocals.
Audio track in Quick mode
Music track in Expert mode

Note:
Note:
2. Resize the clip by dragging the remix handles.
The remix handles are different from the trim handles .
When you drag the remix handles from either side of the audio clip, the audiois remixed to the new duration.
Remixing consists of two parts:
1. Preparing the clip for remixing: In this step, the application scans theaudio clip to identify the segments or parts that can be stitched togetherlater to create the output sequence for desired duration. This is a one-time process while remixing an audio for a session.
Preparing the clip for remixing
2. Remixing the clip: In this step the prospective segments are identified(based on the desired output duration) and stitched together.
Remixing the clip
While remixing, the application tries to change the length of the musicto be as close to the target duration as possible while still attempting to soundnatural. It removes or loops certain parts of music resulting in the output musicbeing exactly same as the target duration.To provide an exact match for output duration, time stretch is applied to theintermediate output sequence making sure that it sounds good. Hence, amessage is displayed if remixing is applied to get the target duration of lessthan 60 seconds.

Note:
To the top
Remixing below 60 seconds
While remixing a clip, a Remix folder gets created in the Project Assets panelwith the newly created remixed audio clip. The remixed audio clip can then beused anywhere on the timeline as a regular audio clip.
The remixed audio clip present in the Remix folder is the original outputfrom the algorithm and that on the timeline is the Time stretched version tomatch exact duration.
Remix settings
Do one of the following to open the Remix settings context menu:
Double click any remixed audio clip in the Music track.
Click the icon in the remixed audio clip in the Music track.

Audio Segments:
Shorter
Longer
Fit Entire Video:
To the top
The audio segments parameter helps in deciding whetherto favor shorter segments with more transitions or longer segments with fewertransitions. If there are frequent changes in the track, then shorter segmentswith more transitions provide a better output. On the other hand, tracks with aconsistent structure and style may benefit from fewer transitions, keeping anychanges to a minimum.
Results in shorter segments, but in more transitions. Thisoption is suited for songs that changes from beginning to end tominimize abrupt changes in dynamics or tempo.
Looks for the longest passages and smallest number ofsegments to minimize transitions.
This option, if selected, changes the length of the music clipto match the length of the video on the timeline. It extends/shortens the lengthfrom the right side of the clip.
Remix preferences
Remix is set as the default behavior for Music track. To set regular trimmingas the default behavior go to Edit > Preferences > Audio > Remix andchoose Trim for the drop-down.
However, you can also switch between remix and regular trimming whileworking on an audio clip by pressing Alt while dragging the handles.

Note:
Remix preferences
The Music Remix feature works on music clips and cannot be used onMusic Scores (downloaded from Music panel), Instant Movie, smart trim,favorite moment trimming, or Video collage outputs.
Twitter™ and Facebook posts are not covered under the terms of CreativeCommons.
Legal Notices | Online Privacy Policy
Choose your region Products Downloads Learn & Support Company
Copyright © 2016 Adobe Systems Incorporated. All rights reserved.Terms of Use | Privacy | CookiesAdChoices

Adobe Premiere Elements Help / Adding an Adjustment Layer - Guided EditAdobe Community Help
Applies toAdobe Premiere Elements
Contact support
Note:
Note:
The Guided mode offers a set of built-in Guided Edits, which take yousequentially through a series of steps to help you perform a specific editingtask. This guided approach helps you easily learn Adobe Premiere Elementsand turn your video clips into professionally edited movies.
To learn about other guided edits, see Guided mode.
Add an Adjustment Layer
This Guided Edit is a walkthrough to apply the same adjustments or effects tomultiple clips.
This Guided Edit works only in the Expert mode.
To add an adjustment layer using this Guided Edit, follow these steps:
1. Click Add media to import the video clips that you want to work with.Ignore if the video clips are already present on the timeline.
Add a minimum of 2 video clips for getting the best results fromthis guided edit.
2. Click Guided > Add an Adjustment Layer.
The Guided Editing message is displayed. You can collapse/expand infowindow. Click Next to go to the next step in the guided edit.
3. Click Project Assets.
4. Select Panel options > New Item > Adjustment Layer to add a newadjustment layer in the project assets.

5. Drag the adjustment layer on Video 2 track in the timeline.
6. Drag the trim handle to cover all the media you want the adjustmentapplied to.
Applying adjustment to multiple video clips
7. Open the Adjustment Panel.

8. Select the adjustment that you want to apply.
You have successfully applied the same adjustment to multiple video clips.
Twitter™ and Facebook posts are not covered under the terms of CreativeCommons.
Legal Notices | Online Privacy Policy
Choose your region Products Downloads Learn & Support Company
Copyright © 2016 Adobe Systems Incorporated. All rights reserved.Terms of Use | Privacy | CookiesAdChoices

Adobe Premiere Elements Help / eLiveAdobe Community Help
Applies toAdobe Premiere Elements
Contact support
eLive view - Content and resources fromwithin Adobe Premiere Elements
Elements Live (eLive) view makes content and resources available to youright from within Adobe Premiere Elements Editor and Organizer. The eLiveview displays articles, videos, tutorials, and more - categorized into channelssuch as Learn, Inspire, and News. You can search for tutorials, Help pages,and troubleshooting articles within this window by simply clicking the searchicon and typing your query.
eLive - a view to access content and resources
By default, all the articles are shown.You can filter the articles for channels available: Learn, Inspire, News
Twitter™ and Facebook posts are not covered under the terms of CreativeCommons.
Legal Notices | Online Privacy Policy

Choose your region Products Downloads Learn & Support Company
Copyright © 2016 Adobe Systems Incorporated. All rights reserved.Terms of Use | Privacy | CookiesAdChoices

Adobe Premiere Elements Help / Guided modeAdobe Community Help
Applies toAdobe Premiere Elements
Contact support
To the top
To the top
The Guided mode offers a set of built-in Guided Edits, which take yousequentially through a series of steps to help you perform a specific editingtask. This guided approach helps you easily learn Adobe Premiere Elementsand turn your video clips into professionally edited movies.
You can access the Guided Edits from both Quick and Expert modes.
To start exploring and using the available Guided Edits, click the Quick tab orthe Expert tab and then click the Guided tab.
Navigation
There are a number of guided edits available as sequential workflows in theguided mode. To explore these workflows, navigate from the Quick or Expertediting modes.
The steps that appear in each Guided Edit are based on which mode youswitched to Guided mode from, Quick or Expert. That is, the steps differ forQuick or Expert editing modes.
Guided Edits
Guided edits help you perform video-editing tasks with ease. From trimmingunwanted footage to animating graphics in your video clips, guided edits helpyou enhance your video clip.
Guided edits are further sub-divided into four categories based on theirfunctionality. Click a guided edit to read and explore it further.

Basics
Get started: This guided edit is a tutorial on how to perform basic edits onyour video clips. You learn how to add clips to your video, arrange them ina sequence, split, and trim the clips. Once you are through with thesebasic editing tasks, it guides you on how to publish your edited clip.Trim & split clips: After recording/shooting your video clips, at times yourealize that there are parts of the footage that are not required. Thisguided edit shows you how to trim unwanted footages.Add Transitions between clips: When two different video clips areplaced next to each other, there is an abrupt change when you play themovie. You can make the changeover smooth by adding a transitionbetween the two clips.Add Title to your movie: You can add titles to your video clips andchoose different fonts and colors as well.
Video Adjustments
Fix Brightness, Color, & Contrast: Use this guided edit to fix the colorand lighting in your video clip. Color Pop: Enhance your videos to display in black and white while youselectively retain one or more colors.Animate Graphics: You can add animations to graphic elements in yourvideos using this guided edit.Add an Adjustment Layer: Use this guided edit to apply the sameadjustments or effects to multiple clips.
Audio Adjustments
Add Narration: Sometimes a movie is incomplete and requires anelement of story-telling. This guided edit helps you add narration to thevideo clips.Add a music score: You can add music scores to your video clips toenhance the atmosphere of the video.
Fun Edits
Add a Video in Title: You can make your video titles interesting anddramatic by adding a video in the title.Create Slow or Fast Motion Effect: Enhance your videos with a slow orfast motion effect.

Create a Picture in Picture: Picture-in-picture guided edit helps yousuperimpose a graphic or video clip on your movie. It appears over the clipwhile the video plays in the background. Apply an Effects Mask: You can apply an effect to a specific part of yourvideo.
Twitter™ and Facebook posts are not covered under the terms of CreativeCommons.
Legal Notices | Online Privacy Policy
Choose your region Products Downloads Learn & Support Company
Copyright © 2016 Adobe Systems Incorporated. All rights reserved.Terms of Use | Privacy | CookiesAdChoices

Adobe Premiere Elements Help / Use pan and zoom to create video-like effectAdobe Community Help
Applies toAdobe Premiere Elements
Contact support
To the top
Apply pan and zoom effectApply pan and zoom effect on videos
Using the pan and zoom tool in Adobe Premiere Elements, you can createvideo-like effects from images or movie clips. For movie clips, the effect worksbest when there is minimal movement of objects within the clip.
When working with the pan and zoom tool, you select objects and the order inwhich they are panned and zoomed into. Adobe Premiere Elements providesyou with customization options using which you can apply the effect accordingto your requirements.
Apply pan and zoom effect
You can apply pan and zoom effect on any image with a format that AdobePremiere Elements supports. For a list of supported image formats, seeSupported devices and file formats.
For movie clips, you can create an image out of a single frame using FreezeFrames. Import the image into the Adobe Premiere Elements timeline andapply the pan and zoom effect.
Open the pan and zoom tool
1. Select the image to which you want to apply the pan and zoom effect.
2. Drag the image to the Timeline.
3. From the menu bar, select Tools > Pan & Zoom.
The tool auto detect faces and automatically create pan and zoom sequencesfocusing on the faces.
The Pan and Zoom tool follows the 'Z' pattern while detecting and creatingsequences for recognized faces. Select Reverse Automatic Panning Directionoption in the settings dialog box to follow the 'S' pattern. You need to resetand re-apply the setting for changes to take place for already applied frames.

Pan and Zoom settings
Adding focus frames
Before you apply the pan and zoom effect, you identify the objects in theimage that you want to pan or zoom into using focus frames. Focus framesare resizable rectangles that identify the location of the object in an image.
For images with more than three focus frames, only the selected focus frame,and the focus frames previous and next to it in the sequence are displayed.
If a picture has not been analyzed previously, the following focus framesappear when you click the pan and zoom tool icon:
Focus frame
A. Resize handlers B. Focus frame C. Frame Number D. Delete focusframe E. Pan duration F. Zoom options for focus frames
Pan and zoom tool: Timeline and thumbnail view
A. Timeline B. Focus frame marker C. Thumbnail view D. CTI (Current timeindicator)

Note:
A focus frame on the complete image.
A focus frame at the center of the image.
In the Pan and Zoom tool, click New Frame to add Focus frames to themedia.
Add focus frames manually
Do one of the following:
Double-click the object or area on which you want to add a focusframe.
Select the frame after which you want the new focus frame to appear,and click New Frame. The new focus frame appears in the center ofthe view area.
Select the new focus frame, and move the cursor over the frame untilthe pan (hand) icon appears. Drag to move the focus frame on top ofthe required object.
In the Timeline, move the CTI. A ghost frame (blank frame with dottedborder) appears onscreen. Move the CTI to the point where you wantto add the new frame and click the ghost frame. A new focus frame isadded at that position.
To add a focus frame between two focus frames, move the CTIbetween their corresponding focus markers in the timeline. Click NewFrame.
For images with more than three focus frames, only the selected focus frameand the focus frames previous and next to it in the sequence are displayed.
Add focus frames to previously analyzed images
Frame hints are red colored rectangles displayed on the media. When youclick a frame hint, it is converted to a focus frame.
Ensure that you click the frame hint only once. Double-clicking a framehint adds two focus frames.
Modifying focus frames
Move focus frames
1. Select the focus frame.
2. Move the cursor over the boundary of the focus frame until the pan (hand)

icon appears.
3. Drag to move the focus frame on top of the required object.
Reorder focus frames to modify panning sequence(photos only)
The number on focus frames determines the panning sequence, the sequencein which objects are panned into. For example, the focus shifts to the objectwith focus frame 3 after the object with focus frame 2 is panned.
Do one of the following to change the numbering of focus frames:
In the timeline, move the focus frame markers around based on thesequence you want the corresponding focus frames to appear.Changing the position of focus frame markers automaticallyrenumbers focus frames in the order of their appearance in thetimeline.
Move the focus frames around in the thumbnail strip.
Resize focus frames
Do one of the following:
Select the focus frame, and move your mouse over any of the cornersuntil the resize (double-sided arrow) icon appears. Drag to resize theframe.
To zoom incrementally, select the focus frame and move your mouseover the focus frame. Click the “+” or “-” zoom controls to incrementallychange the size of the frame.
Delete focus frames
Move the mouse over the focus frame. Click the “X” button, or press theDelete key.
Change pan duration
Changing the pan duration changes the time for moving from one focus frameto the next. The pan duration appears on the connector between two focusframes.
1. Click the pan duration.
2. In the Pan Time dialog, scrub the time duration to the desired value, orenter a value in the dialog box.

Alternatively, you can adjust the focus frame markers in the timeline to changethe pan duration.
Change hold time
Hold time is the duration for which the focus stays on an object before panningcomes into effect. Increasing the hold time increases the time for which theobject is displayed when in focus.
1. Select the focus frame and move the mouse over the focus frame.
2. Click the Hold duration.
3. In Hold Time, scrub the time duration to the required value.
Change hold time
Alternatively, you can change the hold time by horizontally dragging the rightside marker of a focus frame in the timeline.
Preview pan and zoom effect
Click Play Output to preview pan and zoom effect in the preview panel.Alternatively, scrub the CTI to manually preview the effect.
Change default settings
1. In the pan and zoom tool, click Settings.
2. Customize the pan, and hold duration values based on yourrequirements.
Use zoom to accurately position focus frames

To the top
The zoom options in the pan and zoom toolbar help reduce the size of a focusframe beyond what is possible in the normal view.
Zoom option
For example, the focus frame in normal view is now reduced to a size beyondwhich it can be reduced no further. However, the size is still not small enoughfor the object on which you want to focus. In such cases, zoom into the object,and then reduce the size of the focus frame.
Apply pan and zoom effect on videos
Pan and zoom effect works best with videos that have minimal movement ofobjects in the movie clip.
You can create only one focus frame for every movie frame in the movie clip.
1. In the Media panel, right-click the movie clip and select Run AutoAnalyzer.
2. Drag the movie clip to the timeline.
3. Click the pan and zoom icon.
4. To create a focus frame, move the CTI to a position in the timeline wherethere is no other focus frame. Click New Frame.
You can work with focus frames in videos the same way that you work withfocus frames for images. However, only those options that are relevant tomovie clips appear in the pan and zoom tool.
Twitter™ and Facebook posts are not covered under the terms of CreativeCommons.
Legal Notices | Online Privacy Policy
Choose your region Products Downloads Learn & Support Company
Copyright © 2016 Adobe Systems Incorporated. All rights reserved.Terms of Use | Privacy | CookiesAdChoices

Adobe Premiere Elements Help / Mark and extract favorite momentsAdobe Community Help
Applies toAdobe Premiere Elements
Contact support
Using the CTI and the Mark Moment option
A video usually has various favorite moments. Adobe Premiere Elementshelps you mark and extract all your favorite moments in a video as a singlecollated clip or individual clips. You can use the extracted clips of favoritemoments for editing or sharing.
The Favorite Moments feature is available in both Quick and Expert views.
1. Import your video clips in Adobe Premiere Elements using Add Media oraccess them from Project Assets (if you have already imported thevideos).
2. Drag-and-drop the video clips to the timeline. Select the video clip inwhich you want to mark favorite moments.
3. Select Tools > Favorite Moments.
Favorite Moments
4. Select one of the following ways to mark favorite moments:
Locate thedesired start point from where you want to mark the favorite

Using the CTI and the + symbol on the timeline
Playing the timeline and using the Mark Moment option
Using the Auto Mark Moments option
moment, drag the CTI to that point, and click Mark Moment. Youcan mark multiple favorite moments in a video clip.
Drag the CTIto the frame in the video clip from where you want to mark themoment. Click the + symbol to mark the favorite moment.
Playthe timeline (by using the player controls or by pressing thespacebar) and then click Mark Moment to mark the starting pointof a favorite moment. To mark the end of the favorite moment,click Mark Moment again. In this case, the Mark Moment optionworks like a toggle key.
Click Auto MarkMoments for automatically marking favorite moments in yourvideo clip. With the Face filter enabled, the generated output nowfocuses on the activity as well as the face data.
Adobe Premiere Elements displays automatically marked favoritemoments in green. The manually marked moments appear in yellow.
A. Reset, Auto Mark Moments, Settings B. Mark Moment C. Preview D.Automatically marked favorite moment E. Manually marked favoritemoment
5. Use the following options to fine-tune your selection of favorite moments:

Merge two favorite moments
Unmark a favorite moment
Preview favorite moments
Reset
Place moments as combined clip on timeline
Place as individual clips on timeline
Drag the end/ or start of a favoritemoment to overlap it with the next or previous favorite moment inthe timeline.
Click the cross mark in the upper-right corner of the marked favorite moment. The clip is notdeleted.
Unmark a favorite moment
Click Preview to view the favoritemoments marked on the timeline.
Click Reset and then click Yes to remove all markedfavorite moments and start again. Press Ctrl + Z to undo the resetand get the marked moments back.
6. Click Done. Select the option to extract the favorite moments as acombined clip or as individual clips, and click OK.
Extract favorite moments as one clip or individual clips
Select thisoption to place all the favorite moments as a combined clip. Youcan double-click the clip and edit the favorite moments ifnecessary.
Select this option to placethe favorite moments as individual clips on the timeline.

Exit Favorite Moments setting is displayed on the first exit. If you want tochange this setting later, you can use the settings dialog.
You can double-click a favorite moment clip and restart the workflow fortweaking any of the favorite moments or for adding and removing favoritemoments. In the timeline, a favorite moment clip can be split and trimmed likeany normal clip. Once a favorite moment has been created, it is present in theProject Assets bin as an asset.
Player controls for favorite moments
You can navigate better while marking your favorite moments in a video withthe help of player controls.
A. Go to Previous Edit Point B. Step Back (Left) C. Play/Pause Toggle(Space) D. Step Forward (Right) E. Go to Next Edit Point (Page Down)
Favorite moment settings
You can configure the settings of favorite moments automatically marked byAuto Mark moments and other settings when you manually mark favoritemoments.
Settings - Favorite Moments

Duration of the moment segment marked
Seconds to add before and after your Marked Moment
Place moments as combined clip on timeline
Place as individual clips on timeline
Apply default transition between favorite moments
Auto Mark Moment Settings
You can set the slider toincrease or decrease the duration of the moment marked. Crisp marksfavorite moments in the shortest duration, and Relaxed marks favoritemoments with the maximum duration.
Mark Moment Settings
Enter theduration of seconds you want to add before or after your markedmoment.
Exit Settings
Select this option toplace all the favorite moments as a combined clip. You can double-click the clip and edit the favorite moments if necessary.
Select this option to place thefavorite moments as individual clips on the timeline.
Select this option toapply a default transition between favorite moments. To set a transition asdefault, exit the favorite moments dialog and click Transitions on the Actionbar. Right-click and select a transition as a default transition.
You can also customize the keyboard shortcut for the following two features ofFavorite moments. For more information, see Customizing shortcuts.
1. Mark Moments (by default assigned to F)2. Preview (unassigned)
Twitter™ and Facebook posts are not covered under the terms of CreativeCommons.
Legal Notices | Online Privacy Policy

Choose your region Products Downloads Learn & Support Company
Copyright © 2016 Adobe Systems Incorporated. All rights reserved.Terms of Use | Privacy | CookiesAdChoices

Adobe Premiere Elements Help / Trim clipsAdobe Community Help
Applies toAdobe Premiere Elements
Contact support
To the top
About trimming and retrieving clipsAbout Smart trimmingTrim a clip from the Quick view timelineTrim in the Expert view timelineTrim in the Preview window
About trimming and retrieving clips
When you build a movie, you rarely use an entire clip. To define the frames you wantto use, set In and Out points. The In point is the first frame of the clip you want to useThe Out point is the last frame of the clip you want to use.
Setting In and Out points does not delete frames from the hard drive. Instead, itisolates the portion you want included in the movie. In and Out points act like awindow over the clip, showing only the frames from the In point to the Out point. Youcan move In and Out points as needed to regain any frames you might have trimmed.
In and Out points serve as a window over a clip
A. In point B. Trimmed frames C. Out point
You can trim frames from either end of a clip. To trim frames from the middle of aclip, first split the clip (which creates two parts of the original clip). Then, trim theunwanted frames from the end of the first new clip or the beginning of the second.
You can trim a clip in the Preview window, the Monitor panel, the Quick viewtimeline, or the Expert view timeline. You can retrieve frames from source clips (clipsnot yet placed in the Quick view timeline or the Expert view timeline) using thePreview window. You can retrieve frames from clips in the Quick view timeline or the

To the top
Note:
Expert view timeline.
About Smart trimming
You can create a refined good-quality video file by removing unwanted sections.Adobe Premiere Elements enables you to efficiently handle blurred, shaky, andunwanted low-quality sections of your video file. You can easily and quickly edit andfine-tune the video files.
Smart trimming enables you to trim the low-quality sections of a video file. Smarttrim can be done manually and automatically. You can trim clips from the Quick viewtimeline or the Expert view timeline.
Smart trimming is of two types, manual and automatic. Manual Smart trimming is thedefault mode. In this mode, you can specify the options that determine the trimmablesections. In the automatic Smart trim mode, Premiere Elements automaticallydetermines the trimmable sections. You can choose to delete them or retain them.
Smart Trim
Manual Smart Trim
1. To enable Smart Trim, click Tools on the Action bar and then select Smart Trimfrom the Tools panel. By default, Manual Smart Trim Mode is enabled.
When you are in the manual Smart Trim mode, you see themessage, Smart Trim Mode: Trim or Delete The Highlighted Sections,above the Monitor panel. You also see the Smart Trim Options button.
2. (Optional) Click the Smart Trim Options button on top. In the Smart TrimOptions dialog:
Use the Quality slider to specify the Quality level. The values set heredetermine the trimmable sections. If you do not set the options here, defaultsettings are used.Use the Interest slider to specify the Interest level. The value set heredetermine the focus on face data and audio.
Premiere Elements analyzes the clip, and highlights the sections of the clip thatneed trimming. The highlighted sections depend on the values set for the QualityLevel options. Striped patterns are used to highlight the trimmable sections. Thecombination of quality and interest sliders give you a much better output.
3. (Optional) View the bad-quality tags that Adobe Premiere Elements applied onthe trim sections by hovering the mouse over the Smart Trim section of the clip.
4. To select trim sections in a clip, do one of the following:

Trim
Keep
Select All
Smart Trim Options
Double-click the clip in the Expert view timeline to select all the trimmablesections in a single clip.
To select all the trimmable sections in multiple clips, drag a marquee aroundthe selected clips in the Expert view timeline. Right-click/ctrl-click the trimsections, and choose Select All.
To select all the trimmable sections in multiple clips in the Quick viewtimeline or the Expert view timeline, select Ctrl-A. Right-click/ctrl-clicka section > Select All.
The selected trim sections are highlighted. When you select a trimmable section,all trimmable sections turn into blue-striped sections.
Note: To choose selected trim sections from multiple clips, first select theclips, and select the trim sections.
5. Right-click/ctrl-click a trimmable section (the blue-striped region). The followingoptions are displayed:
Enables you to trim the selected trimmable section.
Enables you to retain the selected trimmable section.
Selects all the trimmable sections in the current selection.
Displays the Smart Trim options.
6. Select Trim to trim the trimmable region, or select Keep to retain the trimmablesection. You can also trim clips using the Delete key on the keyboard.
7. (Optional) To undo the previous trim action, right-click/ctrl-click the clip in theExpert view timeline, and select Undo Smart Trim.
To exit the Smart Trim mode, click the Done button.
Automatic Smart Trim
1. To enable automatic Smart Trim, click Tools on the Action bar and then selectSmart Trim from the Tools panel.
2. Click the Smart Trim Options button above the Monitor panel.
3. In the Smart Trim Options dialog, select Automatic.
4. (Optional) Click the Smart Trim Options button on top. In the Smart TrimOptions dialog:
Use the Quality slider to specify the Quality level. The values set here

Note:
Quality Level
Interest Level
To the top
determine the trimmable sections. If you do not set the options here, defaultsettings are used.Use the Interest slider to specify the Interest level. The value set heredetermine the focus on face data and audio.
5. Click Save.
Premiere Elements analyzes the clip and highlights the sections of the clip thatneed trimming. The Automatic Smart Trim confirmation dialog is displayed.
If a clip is not selected, striped patterns are used to highlight theSmart Trim sections of the clip.
Smart Trim options
Smart trimming uses quality factors such as brightness, blur, shaky, and contrastfactors such as face, motion, and dialog as criteria to trim the clips. You can set thelevels of quality and interest before trimming the clips.
Enables you to specify the levels of quality factors thatPremiere Elements uses to determine the trimmable sections. The qualityfactors include blur, shaky, brightness, focus, and contrast. If you move theslider to the extreme right, all low-quality sections are highlighted astrimmable sections. As you move the slider toward the left, the trimmablesections reduce. If you move the slider to the extreme left, only low-qualitysections are highlighted for trimming.
Enables you to specify the levels of interest factors thatPremiere Elements uses. The interest factors include face data and audio. Ifyou move the slider to the extreme right, more focus is there on face data andaudio.
Access Smart Trim options
To access the Smart Trim options, enable Smart Trim and do one of the following:
Click the Smart Trim Options button on the top of the Monitor panel.Right-click/ctrl-click a trimmable selection, and select Smart Trim Options.
Trim a clip from the Quick view timeline
You can directly trim clips in the Quick view timeline.

1. Select the clip in the Quick view timeline.
2. Position the pointer over the edge of the clip you want to trim until the correcticon appears:
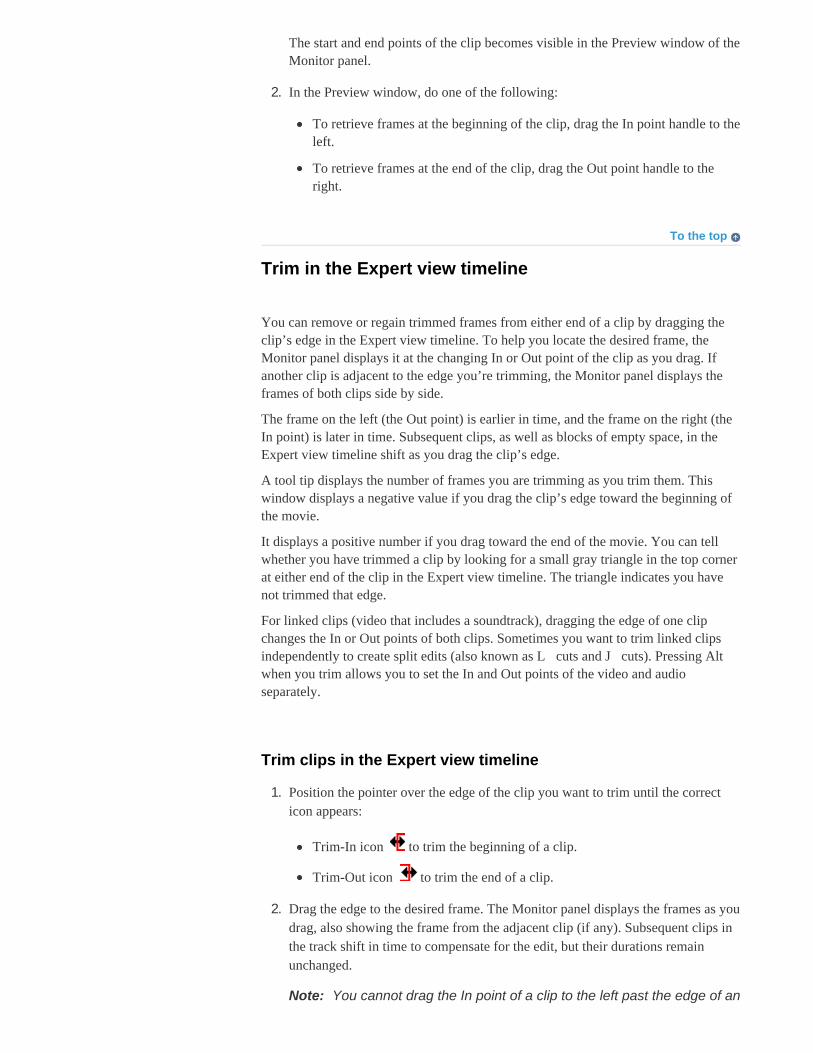
Trim-In icon to trim the beginning of a clip.
Trim-Out icon to trim the end of a clip.
3. Drag the trim handles to the desired frame. The Monitor panel displays theframes as you drag, also showing the frame from the adjacent clip (if any).Subsequent clips in the track shift in time to compensate for the edit, but theirdurations remain unchanged
Remove frames from the middle of a clip
You can retain material at the beginning and end of a clip for your movie, but removematerial from its middle. Split the clip right before the unwanted section begins, tocreate two clips. Then, trim the unwanted material from the beginning of the secondclip.
1. In the Quick view timeline, select the clip containing unwanted material. The clipappears in the Monitor panel.
2. Drag the current-time indicator on the Quick view timeline to the frame wherethe unwanted material begins.
3. Click the Scissor button on the current-time indicator.
The original clip is split into two clips in the Quick view timeline.
4. Double-click the clip to the right of the split. This opens the clip in the Previewwindow.
5. In the Preview window, drag the current-time indicator to the frame just after thelast frame of unwanted material,
6. Click the Set In Point button. This trims the unwanted material from thebeginning of the second clip and shortens the clip in the Quick view timeline,leaving a gap between it and the clip before.
The unwanted material is removed from the beginning of the second clip (or endof the first clip, if you chose to edit that clip). The gap created between the firstand second clips is automatically closed.
7. Right-click/ctrl-click in the gap in the Quick view timeline, and then click DeleteAnd Close Gap.
Retrieve frames in the Monitor panel
1. Double-click a clip in the Quick view timeline.
To the top
Note:
The start and end points of the clip becomes visible in the Preview window of theMonitor panel.
2. In the Preview window, do one of the following:
To retrieve frames at the beginning of the clip, drag the In point handle to theleft.
To retrieve frames at the end of the clip, drag the Out point handle to theright.
Trim in the Expert view timeline
You can remove or regain trimmed frames from either end of a clip by dragging theclip’s edge in the Expert view timeline. To help you locate the desired frame, theMonitor panel displays it at the changing In or Out point of the clip as you drag. Ifanother clip is adjacent to the edge you’re trimming, the Monitor panel displays theframes of both clips side by side.
The frame on the left (the Out point) is earlier in time, and the frame on the right (theIn point) is later in time. Subsequent clips, as well as blocks of empty space, in theExpert view timeline shift as you drag the clip’s edge.
A tool tip displays the number of frames you are trimming as you trim them. Thiswindow displays a negative value if you drag the clip’s edge toward the beginning ofthe movie.
It displays a positive number if you drag toward the end of the movie. You can tellwhether you have trimmed a clip by looking for a small gray triangle in the top cornerat either end of the clip in the Expert view timeline. The triangle indicates you havenot trimmed that edge.
For linked clips (video that includes a soundtrack), dragging the edge of one clipchanges the In or Out points of both clips. Sometimes you want to trim linked clipsindependently to create split edits (also known as L cuts and J cuts). Pressing Altwhen you trim allows you to set the In and Out points of the video and audioseparately.
Trim clips in the Expert view timeline
1. Position the pointer over the edge of the clip you want to trim until the correcticon appears:
Trim-In icon to trim the beginning of a clip.
Trim-Out icon to trim the end of a clip.
2. Drag the edge to the desired frame. The Monitor panel displays the frames as youdrag, also showing the frame from the adjacent clip (if any). Subsequent clips inthe track shift in time to compensate for the edit, but their durations remainunchanged.
You cannot drag the In point of a clip to the left past the edge of an

Note:
Note:
adjacent clip.
Remove frames from the middle of a clip in theExpert view timeline
You can retain content at the beginning and end of a clip for your movie and removecontent from its middle. Split the clip before the unwanted section begins, and thentrim the unwanted material from the beginning of the second clip resulting from thesplit.
1. In the Expert view timeline, drag the current-time indicator to the frame wherethe unwanted section of a clip begins.
The frame appears in the Monitor panel.
2. Click the Split Clip button on the current-time indicator.
This splits the clip at the point selected.
3. Double-click the clip to the right of the split. This opens the clip in the Previewwindow.
You can also open the clip to the left and make the following editsby setting a new Out point.
4. In the Preview window, drag the current-time indicator to the frame just after thelast frame of unwanted material.
5. Click the Set In Point button. This trims the unwanted material from thebeginning of the second clip and shortens the clip in the Expert view timeline,leaving a gap between it and the clip before.
6. Right-click/ctrl-click in the gap in the Expert view timeline, and then click DeleteAnd Close Gap.
Retrieve frames in the Expert view timeline
1. In the Expert view timeline, position the pointer over the edge of the clip youwant to trim until the correct icon appears:
Trim-In icon to retrieve frames from the beginning of a clip.
Trim-Out icon to retrieve frames from the end of a clip.
2. Drag the edge to the desired frame.
To change the In or Out point of only the video or only the audio ofa linked clip, press Alt as you drag. You do not need to hold down the Altkey once you start to drag.

To the top
Extend audio before or after linked video
The audio can begin before the video or extend it after the video into the next clip (orvice versa). Trimming linked audio and video separately is called a split edit. Usually,when you create a split edit in one clip, you must create one in the adjacent clip sothey don’t overlap each other.
You can create two kinds of split edits:
A J-cut, or audio lead, in which audio starts before linked video, or videocontinues after the audio.
An L-cut, or video lead, in which video starts before linked audio, or audiocontinues after the video.
1. In the Expert view timeline, select the clip.
2. If the clip is adjacent to another, Alt-drag the audio portion down to a separatetrack so there is empty space next to it.
3. (Optional) Move the current time indicator to the video frame you want to trim,and make sure Snap is enabled with a check mark. (If it isn’t, choose Timeline >Snap.)
4. Position the pointer over the edge of the video clip you want to trim, and do oneof the following:
If trimming the beginning of the clip, when the Trim In icon appears,press Alt and drag the edge to the desired frame. (You can release the Altkey after you begin dragging.) Notice that the video stays aligned with theprevious clip.
If trimming the end of the clip, when the Trim Out icon appears, pressAlt and drag the edge to the desired frame. (You can release the Alt key afteryou begin dragging.) Notice that subsequent clips in the track shift left.
Tip: Alt-dragging a clip temporarily unlinks the clips. When you wantto move or edit them together, select them again.
5. If you need to trim an adjacent clip so its audio doesn’t overlap with the linkedclips you’ve just trimmed, repeat step 3 on the adjacent audio clip.
Trim in the Preview window
You can preview any clip and set new In and Out points for it before adding it to theExpert view timeline or the Quick view timeline. You might, for example, previewyour clips to determine their quality and trim unusable parts before arranging them.You can preview and trim clips in the Preview window.
Trimming a clip in the Preview window sets its In and Out points for all subsequentinstances in the Expert view timeline or the Quick view timeline. It does not changethe In and Out points of clip instances that are already in the Expert view timeline or

the Quick view timeline. To let all clip instances use the same In and Out points, setthem before placing the clip in either timeline.
Preview window
A. Zoom control B. Clip In point C. Current time D. Playback controls E.Current-time indicator F. Clip Out point G. Clip duration
Preview a clip in the Preview window
In the Project Assets panel, double-click a clip and do any of the following in thePreview window:
To play the clip, click the Play button.
To step back or forward one frame, click the Step Back button or the StepForward button.
Scrubbing the Timecode.
Trim a clip in the Preview window
You can trim a clip in the Preview window before placing it in the Expert viewtimeline. Trimming in the Preview window does not affect instances of the clip thatare already in the Expert view timeline or the Quick view timeline.
Once a clip is in a movie, you can reopen it in the Preview window to change its Inand Out points for subsequent instances. You can either regain frames previouslytrimmed or trim additional frames.
1. In the Project Assets panel, double-click a clip. The Preview window appears.
2. To trim the clip, do any of the following in the Preview window:
To set a new In point, either drag the In point handle or drag the current-timeindicator to the desired location, and click the Set In button.
To set a new Out point, either drag the Out point handle or drag the current-time indicator to the desired location, and click the Set Out button.
3. Click the Close button in the Preview window.

Subsequent clip instances you drag to the Expert view timeline assume the In and Outpoints of the trimmed clip.
Retrieve frames in the Preview window
1. In the Project Assets panel, double-click a clip. The Preview window appears.
2. In the Preview window, do one of the following:
Move the current-time indicator to the frame you want as the first frame ofthe clip, even if it’s to the left of the current In point. Click the Set In Pointbutton.
Move the current-time indicator to the frame you want as the last frame ofthe clip, even if it’s to the right of the current Out point. Click the Set OutPoint button.
Drag the In point or Out point handle to the frame you want.
Adobe also recommendsSplit clipsPreview a movie in the Monitor panelMedia view overviewPreviewing movies
Twitter™ and Facebook posts are not covered under the terms of CreativeCommons.
Legal Notices | Online Privacy Policy
Choose your region Products Downloads Learn & Support Company
Copyright © 2016 Adobe Systems Incorporated. All rights reserved.Terms of Use | Privacy | CookiesAdChoices