what’s new for avid media composer v8 - softwarebox · avid® media composer ... menu...
TRANSCRIPT

What’s New forAvid® Media Composer® v8.5
Revision History
New Features
The following table describes What’s New for the current editor release.
Date Description
March 04, 2016 Added “Context Menu Changes” on page 7 to the Menu Simplification list.
February 19, 2016 Added Read Audio Timecode to the Menu Simplification list.
February 1, 2016 Updated “Trimming with Sync Locks On” on page 9.
Feature Description For More Info
Menu Simplification The editing application menu items have been reorganized and simplified.
See “Menu Simplification” on page 3.
Changes to Linking Media Avid has made some changes to the way Autodetect works when linking to media.
See “Changes to Linking Media” on page 8
Adding a Track in the Timeline
You can simply drag a clip in the Timeline to create another track.
See “Adding a Track in the Timeline” on page 8.
Live Timeline Dragging You can see segments as they are moved in the Timeline.
See “Live Dragging in the Timeline” on page 9.
Trimming with Sync Locks On
A new feature allows you to enable Sync Rollers for Sync Locked Tracks.
See “Trimming with Sync Locks On” on page 9.
Adding Custom Columns The procedure for adding a custom column has been simplified.
See “Adding a Custom Column to a Bin” on page 11.
Adding Multiple Columns The procedure for adding multiple columns to the bin has been simplified.
See “Adding Multiple Columns to a Bin” on page 11.
Quickly Accessing a Setting dialog
The procedure for opening a Setting’s dialog box has been simplified. Simply type the first letter of the setting you want to open,
See “Opening a Settings Dialog in the Project Window” on page 12.
1

64 Audio Tracks The editing application supports 64 tracks of audio.
See “Support for 64 Tracks of Audio” on page 12.
Interactive Video Frame Cache
This release allows you to save generated frames of the current playing sequence into a memory storage cache.
See “Setting Video Memory and Video Frame Cache” on page 14.
FrameFlex Rotation You can choose to rotate the framing box in the FrameFlex source settings when straightening your source image.
See “Frame Flex Rotation” on page 26.
Manage Preset Project Formats
You can modify or delete Custom raster dimensions that you have added to your project formats.
See “Manage Preset Project Formats” on page 16.
HDR Support This release includes color spaces for High Dynamic Range.
See “High Dynamic Range Support” on page 16.
Effects Palette Update The Effects Palette has been improved to allow you to find and filter effects quickly and easily
See “Effect Palette Update” on page 17.
Changing the Background Color of the Project Window or Timeline.
You can change the background color of the Project Window and Timeline.
See “Changing the Background Color of a Project Window or Timeline” on page 18.
Overriding the Font and Font Sizes
You can override the Project and Bin Font and Font Sizes.
See “Overriding Bin and Project Font and Font Size” on page 19.
Group by Audio Waveforms
You can group clips by audio wave analysis. See “Grouping Clips by Audio Waveform Analysis” on page 20.
Timecode Burn-In Effect Update
The Timecode Burn-In effect includes updates for frame count.
See “Timecode Burn-In Effect Update” on page 21.
Copy and Pasting Frame Numbers in a Bin Column
You can apply the same text to a column for multiple items.
See “Applying the Same Text to a Column for Multiple Items” on page 22.
Linking and Importing Broadcast Wave files
Linking and importing Broadcast WAV files has been updated to ensure the beginning of an imported or linked audio clip is not cut off at the beginning of the clip.
See “Linking and Importing Broadcast Wave Files” on page 22.
Audio track order terminology change
Audio Track ordering layout name changes were made to support interoperability with Pro Tools.
See “Audio Track Ordering Layout Name Change” on page 24.
Feature Description For More Info
2

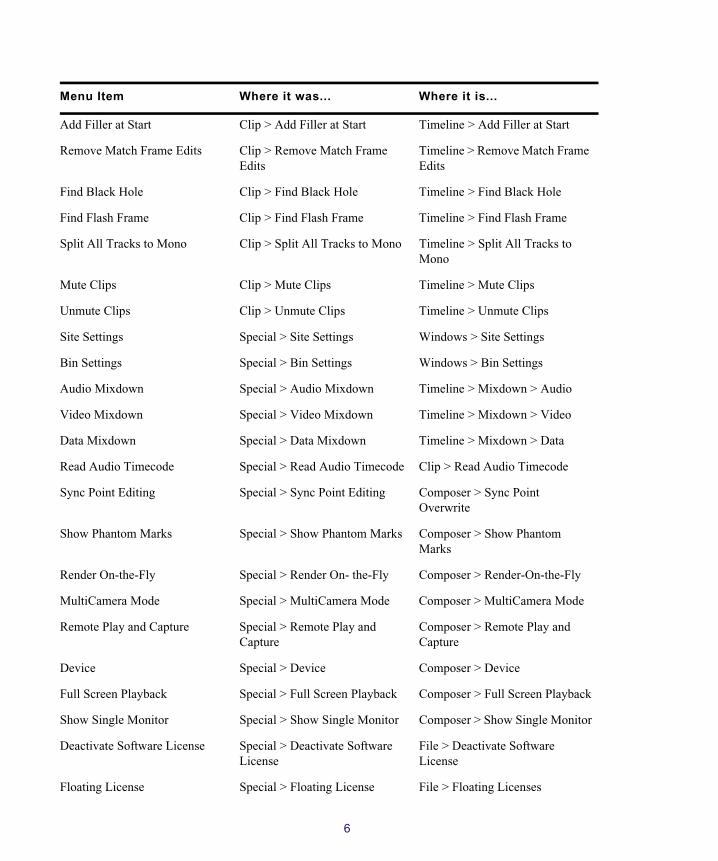
Menu Simplification
The menu items in the editing application have been reorganized. Some menu items have been moved to group them in a more logical location. For example, the Bin menu items now include items that relate to the bin's configuration. The Clip menu items now include items that operate on selected objects in the bin. And the new Timeline menu includes items that operate on the Timeline.
The table below lists the main menu items that have moved, where they appeared in the previous release, and where you can find them now.
Identifying Rendered Effects
You can now choose to display rendered effects separate from Title and Matte key effects. This is helpful when trying to identify clips for deletion.
See “Identifying Rendered Effects” on page 25.
Ancillary Data SCC Import The editing application supports importing Scenarist Closed Caption File (.scc) files.
Feature Description For More Info
Menu Item Where it was... Where it is...
New Bin File > New Bin File > New > New Bin
New Volume for Export File > New Volume for Export File > New > Volume for Export
New Script File > New Script File > New > New Script
AMA File Export File > AMA File Export File > Output > AMA File Export
Export File > Export File > Output >Export to File
Import File > Import File > Input > Import
Send To File > Send To File > Output > Send To
Import EDL File > Import EDL File > Input > Import EDL
Link to Media File > Link to Media File > Input > Link to Media
Link to Stock Footage File > Link to Stock Footage File > Input > Link to Stock Footage
Refresh Media Directories File > Refresh Media Directories File > Media > Refresh Media Directories
3

Load Media Database File > Load Media Database File > Media > Load Media Database
Unmount File > Unmount File > Media > Unmount
Timeline Quick Find Edit > Timeline Quick Find Timeline > Quick Find
Set Font Edit > Set Font Windows > Set Font
Set Bin Background Edit > Set Bin Background While in a Bin, right click and select Set Background Color
AutoSync Bin > AutoSync Clip > AutoSync
Group Bin > Group Clip > Group
Create Stereoscopic clips Bin > Create Stereoscopic clips Clip > Stereoscopic > Create Stereoscopic clips
Update Stereoscopic clips Bin > Update Sterescopic clips Clip > Stereoscopic > Update Stereoscopic clips
Transform SubClips into Stereoscopic clips
Bin > Transform SubClips into Stereoscopic clips
Clip > Stereoscopic > Transform SubClips into Stereoscopic clips
MultiGroup Bin > MultiGroup Clip > MultiGroup
AutoVO Bin > Auto VO Clip > Auto VO
Autosequence Bin > Autosequence Clip > Autosequence
Refresh In-progress Linked Clips Bin > Refresh In-progress Linked Clips
Clip > Refresh In-progress Linked Clips
Custom Sift Bin > Custom Sift Bin > Sift Bin Contents
Reverse Selection Bin > Reverse Selection Bin > Select Reverse
Select Offline Items Bin > Select Offline Items Bin > Select > Offline Items
Select Media Relatives Bin > Select Media Relatives Bin > Select > Media Relatives
Select Sources Bin > Select Sources Bin > Select > Sources
Select Unreferenced Clips Bin > Select Unreferenced Clips Bin > Select > Unreferenced Clips
Loop Selected Clips Bin > Loop Selected Clips Clip > Loop Selected Clips
Align Columns Bin > Align Columns Bin> Align and Fill > Align Columns
Menu Item Where it was... Where it is...
4

Align Selected to Grid Bin > Align Select to Grid Bin> Align and Fill > Align Select to Grid
Fill Window Bin > Fill Window Bin> Align and Fill > Fill Window
Fill Sorted Bin > Fill Sorted Bin> Align and Fill > Fill Sorted
Select Unrendered Title Bin > Select Unrendered Titles Bin > Select > Unrendered Titles
Reset Offline Info Bin > Reset Offline Info
New Sequence Clip > New Sequence Timeline > New > Sequence
New Video Track Clip > New Video Track Timeline > New > Video Track
New Audio Track Clip > New Audio Track Timeline > New > Audio Track
New Data Track Clip > New Data Track Timeline > New > Data Track
Freeze Frame Clip > Freeze Frame Composer > Freeze Frame
Center Pan Clip > Center Pan Clip > Audio > Center Pan
Remove Pan Clip > Remove Pan Clip > Audio > Remove Pan
Apply Gain Clip > Apply Gain Clip > Audio > Apply Gain
Change Sample Rate Clip > Change Sample Rate Clip > Audio > Change Sample Rate
Expert Renders at Position Clip > Expert Renders at Position Timeline > Expert Render
Render at Position Clip > Render at Position Timeline > Render
Clear Renders at Position Clip > Clear Render at Position Timeline > Clear Renders
Create Unrendered Title Media Clip > Create Unrendered Title Media
Timeline > Create Unrendered Title Media
Modify Pulldown Phase Clip > Modify Pulldown Phase Clip > Modify Pulldown Phase
Alternates Relink and Unlink commands in Clip menu
(Windows) Shift + Ctrl + click Clip menu (Mac) Shift + Command + click Clip menu
Clip > Modify > Unlink Media
Archive to Videotape Clip > Archive to Videotape Removed
Restore from Videotape Clip > Restore from Videotape Removed
Menu Item Where it was... Where it is...
5
Add Filler at Start Clip > Add Filler at Start Timeline > Add Filler at Start
Remove Match Frame Edits Clip > Remove Match Frame Edits
Timeline > Remove Match Frame Edits
Find Black Hole Clip > Find Black Hole Timeline > Find Black Hole
Find Flash Frame Clip > Find Flash Frame Timeline > Find Flash Frame
Split All Tracks to Mono Clip > Split All Tracks to Mono Timeline > Split All Tracks to Mono
Mute Clips Clip > Mute Clips Timeline > Mute Clips
Unmute Clips Clip > Unmute Clips Timeline > Unmute Clips
Site Settings Special > Site Settings Windows > Site Settings
Bin Settings Special > Bin Settings Windows > Bin Settings
Audio Mixdown Special > Audio Mixdown Timeline > Mixdown > Audio
Video Mixdown Special > Video Mixdown Timeline > Mixdown > Video
Data Mixdown Special > Data Mixdown Timeline > Mixdown > Data
Read Audio Timecode Special > Read Audio Timecode Clip > Read Audio Timecode
Sync Point Editing Special > Sync Point Editing Composer > Sync Point Overwrite
Show Phantom Marks Special > Show Phantom Marks Composer > Show Phantom Marks
Render On-the-Fly Special > Render On- the-Fly Composer > Render-On-the-Fly
MultiCamera Mode Special > MultiCamera Mode Composer > MultiCamera Mode
Remote Play and Capture Special > Remote Play and Capture
Composer > Remote Play and Capture
Device Special > Device Composer > Device
Full Screen Playback Special > Full Screen Playback Composer > Full Screen Playback
Show Single Monitor Special > Show Single Monitor Composer > Show Single Monitor
Deactivate Software License Special > Deactivate Software License
File > Deactivate Software License
Floating License Special > Floating License File > Floating Licenses
Menu Item Where it was... Where it is...
6

Context Menu Changes
Some of the options that you could select by right-clicking an item in the Bin or right clicking in the Timeline have been reorganized in a more simplified way. For example, when you right click an item in the bin, options such as Center Pan or Remove Pan now appear under the Audio option. There are a few items that have moved from the right-click option and are located under other menu options. This table shows the items that you no longer access by right clicking in a bin or on an item in the bin or in the Timeline.
Capture Tool Tools > Capture Bin > Go to Capture Mode
List Tool Output > List Tool Tools > List Tool
Restore to Default Special > Restore to Default Windows > Restore to Default
Hardware Tools > Hardware Project Window > Info Tab > Hardware
Media Creation Tools > Media Creation File > Media > Media Creation Settings
Export to Device Output > Export to Device File > Output > Export to Device
Digital Cut Output > Digital Cut File > Output > Digital Cut
Menu Item Where it was... Where it is...
Menu Item Where it was... Where it is...
Extract DNxHD Data Right-click on an item in the bin. Clip > Extract DNxHD Data
Update Effects Right-click on an item in the bin. Clip > Update Effects
Revert Effects Right-click on an item in the bin. Clip > Revert Effects
Duplicate Right-click on an item in the bin, or right-click in the Timeline.
Edit > Duplicate
Remove Redundant Keyframes Right-click on an item in the bin. Clip > Remove Redundant Keyframes
Get Bin Info Right-click in a bin. Bin > Bin Info
Add Bin to Favorites Right- click in a bin Bin > Add Bin to Favorites
Default Setup Right-click in the Timeline On the Timeline Fast Menu
Split All Tracks to Mono Right-click in the Timeline Timeline > Split All Tracks to Mono
7

Changes to Linking Media
When you choose File > Input> Link to Media, the Files of Type menu defaults to the Autodetect Plug-in. Avid has made some changes to the way Autodetect works when linking to media. Due to this change, Avid recommends the following:
• When you link to a file, choose the applicable plug-in from the menu.
• When you link to a volume, choose Autodetect.
Note that the following plug-in choices are no longer listed when choosing a plug-in for linking:
• AS-11: You should now use Autodetect or the generic MXF plug-in
• QuickTime (WAV, AIF, AIFF): You should now use the WaveAiff plug
• All (folder) plug-ins: You should now use the Autodetect option
Adding a Track in the Timeline
With this release of the editing application, you can add a track by simply dragging a clip in the Timeline.
To add a track in the Timeline:
1. Click to select a clip in the Timeline.
2. Drag the clip vertically up or down the Timeline.
3. Once you let go of the clip, a new track is added to the Timeline.
n You can only create as many tracks as you are dragging.
8

Live Dragging in the Timeline
With this release of the editing application, you can clearly see the segments as you drag them in either trim or segment mode. When you click and drag a clip you can see the clip as it moves in the Timeline. And as you drag a clip, the movement is transparent allowing you to see the clips you are dragging over in the Timeline. And if Waveforms are turned on, the waveform stays with the clip as you drag, making it much easier to line up clips as you are editing.
You can also see the rippling effect of single roller trim while trimming. Dragging a segment in lift/overwrite (red) mode will show the dragged segment and its contents, such as waveform and marker. Dragging a segment in extract/splice-in (yellow) mode will show the effect of inserting the segment into the track.
n If you prefer the old behavior where you did not see the clip moving in the Timeline, go to the Timeline Settings and enable Wireframe Dragging.
Trimming with Sync Locks On
A new feature allows you to enable Sync Rollers for Sync Locked Tracks. This change makes it easier for you to see what is happening in the Timeline when you perform a trim. In previous releases, you had to wait for the trim to end to see how sync was maintained. When you enter single roller trim, gray sync rollers appear on unselected sync locked tracks making it easier to see which tracks will be affected by the trim. When you are actually performing the trim you will see the effect that the trim has on the sync locked tracks as you are trimming. You will also see tick marks when trimming to show you movement of the segment. These tick marks are for visual reference only. They do not represent frames.
9

Gray sync rollers; Tick marks to show trimming movement
n When you <shift> select a transition on a track with a sync roller, the trim is changed to the selected transition instead of adding another roller.
To enable this feature, select the Trim setting in the Project window, click the Features tab and enable Sync Rollers for Sync Locked Tracks.
10

Adding a Custom Column to a BinIn addition to the standard column headings, you can add your own column headings to describe information about clips and sequences. For example, you might want to add a column heading to describe what kind of shot (close-up, wide shot, master shot, extreme or close-up) is used in a clip.
To add a custom column:
1. While in Text or Script view, place your cursor in any column heading, right click and select Add Custom Column.
The default name Untitled appears as the column heading name.
2. Type the desired name in the column heading and press Enter.
Adding Multiple Columns to a BinIf you select multiple columns to add to the bin, they will appear directly to the right of the selected column. In previous releases, the columns were placed throughout the bin and it was difficult to see where the added columns appeared in the bin.
To add multiple columns:
1. While in Text view, place your cursor in any column heading and right click and select Choose Columns.
A Bin Column Selection dialog appears.
2. Shift + click the column headings you want, and press Enter (Windows) or Return (Macintosh).
Each of the additional columns appear to the right of the selected column.
n If you do not select a column, the new columns will be placed at the far right of the bin.
11

Opening a Settings Dialog in the Project WindowA small change has been made to the Project Window Settings tab that makes it easy to quickly access a Settings dialog. You no longer have to use the mouse in the Settings tab to open a setting’s dialog box.
To quickly open a Settings dialog:
1. In the Project window, select the Settings tab.
2. Type the first letter of the setting you want to open, scroll to the Setting and press Enter (Windows) or Return (Macintosh).
The applicable Settings dialog opens.
Support for 64 Tracks of Audio
In previous releases of the editing application, you were limited to 24 tracks of audio. With this release, you can have 64 tracks of audio in a single sequence.
n If you create a sequence with 64 audio tracks in this version of the editing application and try to open it in a previous version of the editing application, you will receive an error message indicating it cannot open a sequence containing more than 24 audio tracks.
The editing application has a 64 voice limitation:
• 64 - mono tracks = 64 voices
• 10 - 5.1 tracks + 4 - mono tracks = 64 voices
• 8 - 7.1 tracks = 64 voices
12

Audio Mixer Tool Changes
The Audio Mixer Tool has been updated to support 64 tracks of audio. The tool includes triangular openers that allow you to control what parameters are displayed in the Audio Mixer Tool. This helps to easily optimize the vertical space of the Audio Mixer window.
Triangular openers from top to bottom: Show Track Sidebar, Show Group/link/mirror buttons, Show Pan controls, Show effect buttons, Show mute/solo buttons, Show faders/meters
Opening the top triangular opener opens the track selector sidebar. Use the track selector sidebar to select the tracks you want displayed in the Audio Mixer tool. This helps optimize horizontal space when working with higher audio track-counts.
13

You can sort the columns in the track sidebar. Click the first column heading to sort the tracks according to which are enabled. Click the # column to sort by track numbers. Click the Track column to sort by track label (if applicable).
Setting Video Memory and Video Frame Cache
A new Video Memory tab has been added to the Media Cache Settings. Here you can allocate video memory for running the editing application. This might be useful for situations where you experience underruns.
n Increasing the video memory could reduce the underruns.
In the Video Memory tab of the Media Cache settings, you can also turn on interactive video frame cache. Turning the cache on allows you to save generated frames of the current playing sequence into a memory storage cache. This saves the need to regenerate each frame every time it is needed during subsequent playback of the sequence. Enabling the cache will result in faster response times while editing.
14

Setting the Video Memory
To set the video memory:
1. In the Settings list in the Project window, select Media Cache.
2. Click the Video Memory tab.
The Media Cache dialog box opens.
3. Do one of the following to have Media Composer reserve memory for the system whenever the editing application is running.
t Click the Set Low button to set the memory allocation to the lowest recommended amount based on your system configuration.
t Click the Set High button to set the memory allocation to highest recommended amount based on your system configuration
t Use the slider to select a desired memory allocation.
4. Click Apply.
5. Click OK.
Setting the Interactive Video Frame Cache
To specify the size of the cache perform the following.
To set the cache:
1. In the Settings list in the Project window, select Media Cache.
2. Click the Video Memory tab.
15

The Media Cache dialog box opens.
3. Select Enable Interactive Video Frame Cache.
n Enabling the cache can improve performance by reusing recently played frames. Increasing the Video Memory increases the number of frames that are available for reuse.
4. Click Apply.
5. Click OK.
Manage Preset Project Formats
Custom raster dimensions that you have added to your project formats can now be modified or deleted. To modify your presets, click the Manage Presets button in the Project dialog box. In the preset manager, select a preset and overwrite any of the existing values. You can also add or delete presets from this dialog.
High Dynamic Range Support
Media Composer now includes color spaces for High Dynamic Range (HDR). This provides support for a higher range of video signal (typically at 100 IRE).
16

Once the HDR color space is set for the project, the color transformations are handled automatically for all source files. For example, a file with Rec. 709 color space will be mapped to equivalent values in an HDR curve so that you can then view it in an external HDR monitor and color grade with the expanded range.
If you are working in an HD project, Avid recommends using DNxHD444 and HQX because of their 10 bit resolution. For higher than HD, use DNxHR444 and DNxHQX which are 12 bit resolutions.
Effect Palette Update
The Effects Palette has been improved to allow you to find and filter effects quickly and easily. Effects are now divided into two categories for video (Filters and Transitions); and two categories for audio (Clip Effects and Track Effects).
There is also a Quick Find allowing you search for a specific effect. By default, the search is done on all categories, but you can refine this search by selecting the appropriate category.
17

Changing the Background Color of a Project Window or Timeline
You can easily change the background color of the Project Window and the Timeline.
To change the background of the Project Window or the Timeline:
1. In the Settings tab of the Project Window, open the Interface Settings.
The Interface Settings dialog opens.
2. If you want to change the background of the Timeline, select Use custom Timeline background and choose a color from the color picker.
3. If you want to change the background of the Project window, select Use custom Project background and choose a color from the color picker.
4. Click Apply.
18

The colors selected appear in the background of the Timeline and Project window.
Overriding Bin and Project Font and Font Size
Normally, project window fonts are stored in the project file and bin fonts are stored in each bin. You can easily override these fonts for all bins and/or projects via the Interface Setting, which is a User setting. This is useful if you share projects and bins with other users or if you are switching between systems. The font and font size you want to see on a desktop might be different than the one you want to see on a laptop. You can set up multiple Interface Settings and switch between them easily. If you turn off the overrides, you will see the original project and bin fonts.
To override the bin or project font and font size:
1. In the Settings tab of the Project Window, open the Interface Settings.
The Interface Settings dialog opens.
19

2. To override the Project font, click Override Project font and select the desired font from the pulldown menu.
3. To override the Project font size, click Override Project font size and enter a value in the text box.
4. To override all Bin fonts, click Override all Bin fonts and select the desired font from the pulldown menu.
5. To override all Bin font sizes, click Override all Bin font sizes and enter a value in the text box.
6. Click Apply.
The project and bin font and font size change to the selected settings.
Grouping Clips by Audio Waveform AnalysisIn previous releases, you could group clips by IN points, OUT points, or Timecode. With this release, you can also group clips by audio waveform analysis.
To group clips by audio waveform analysis:
1. In the bin, select the clips you want to group.
2. Select Bin > Group Clips.
The Group Clips dialog opens.
3. Select Waveform Analysis:
4. Click OK.
The editing application performs an analysis of the waveforms of the selected clips and creates a group clip. When the analysis is complete, the group clip appears in the bin, with the name of the first clip in the group, followed by the file name extension Grp.n.
The n is the incremental number of group clips with the same name in the same bin.
20

When you play the group clip in 4 split or 9 split mode you can see that the clips are synchronized properly.
Timecode Burn-In Effect Update
In previous releases, the Timecode Burn-In effect would always count from frame 0. When working with third party vendors, some user’s want the ability to refer to the first frame of a segment as frame 1 instead of frame 0. The Burn-In effect provides the option to set the starting frame count at 1.
You can also display a frame count for the effect in feet and frames (35mm 4perf). You can access this in the Timecode burn-in effect, by selecting Edgecode and then selecting Local count.
21

Applying the Same Text to a Column for Multiple Items
You can now apply the same text in a Frame Count Start, DPX, and Ink Number column to multiple items in the bin. This is useful for example if you wanted to apply the same frame count start to multiple items in the bin.
To apply the same text to a column for multiple items:
1. Select the items in the bin to which you want to apply the same text.
2. Right+click the column and select Set <column name> column for selected clips.
3. Enter the text you want to appear in the column for the selected items in the bin.
The text appears in the cells.
Linking and Importing Broadcast Wave Files
Importing and linking Broadcast Wave files has changed with this release. The change ensures the beginning of an imported or linked audio clip is not cut off at the beginning of the clip.
22

Importing Broadcast Wave Files
If importing from a broadcast wave format audio file, and the file indicates a start time in audio samples that is between video frame edges, the beginning of the clip is padded with silence that brings it back to a frame edge. In previous releases, the file’s start time was taken to be the nearest frame edge, which meant that in some cases, it would drop samples from the beginning of the file in order to align it to the frame edge. This change is reflected in both the imported media, and in the computation of the start frame number.
The resulting imported clip will span from the beginning of the video frame that contains the first audio sample to the end of the video frame that contains the last audio sample.
This behavior is controlled through an import setting “Subframe Alignment to Broadcast Wave Start Time.” If the setting is off, the file imports with no padding at the beginning of the file.
Linking Broadcast Wave Files
Prior to this release, AMA linked broadcast wave files linked to begin at the nearest video frame edge to the time indicated in the file. When media start times did not align with frame edges, this resulted in moving the audio by as much as a half-frame. This caused confusion when used in conjunction with media that is aligned more exactly to the time indicated in the file.
With this release, when broadcast wave media is linked through the WaveAIFF plug-in, and the media indicates a start time that is between frame edges, the beginning of the clip is padded with silence that brings it back to a frame edge. This change is reflected in both the linked media, and in the computation of the start frame number. The resulting linked clip will span from the beginning of the video frame that contains the first audio sample to the end of the video frame that contains the last audio sample. This will not apply to any previously linked media, which will continue to play exactly as it did previously.
The Get Info display on the linked master clip indicates how many samples of subframe offset are being applied to the selected clip.
23

Unlike the import behavior, there is no setting to control this.
Whenever subframe placement of the audio is desired for other downstream operations, it is highly recommended that you consolidate or mix down WaveAIFF linked media before export. This is because other applications are unaware of how to use the subframe alignment information required to nudge the audio data. Consolidated and mixed down media will contain the silence padding required to ensure it aligns correctly to video frame edges.
Audio Track Ordering Layout Name Change
A new 7.1 track ordering layout is included with this release. This change supports interoperability with Pro Tools. The new track order name is 7.1 SMPTE-DS and represents the order specified in the SMPTE standard SMPTE ST 428. In addition, the 7.1 SMPTE option in previous releases has been renamed 7.1 EXT which aligns with the Microsoft Wave Extensible track ordering. The difference between these two track orders is the location of channels 5, 6, 7, and 8:
• For 7.1 EXT the order is: Left, Right, Center, Low Frequency Enhancement, Left Rear, Right Rear, Left Side Center, Right Side Center
• For SMPTE-DS (per the SMPTE Standard 428), the order is: Left, Right, Center, Low Frequency Enhancement, Left Side Center, Right Side Center, Left Rear, Right Rear
24

These options appear in the Capture Tool, the Modify MultiChannel Audio window, the Import Settings> Audio tab > Multichannel Audio Edit window, the Link Settings > Link Options > Multichannel Audio Edit window.
These options also appear in the audio Monitoring Mode menu, which is in the Output pane of Audio Project Settings, and in the Audio Mix tool.
Identifying Rendered Effects
You can now easily identify rendered effects media. In previous releases, the Media Tool allowed you to select the option Precompute Clips, which included title media, matte key media, and rendered effects media. The Media Tool now includes options so you can choose to see rendered effect precompute clips separately from Titles and Matte Key precompute clips. This will make it easier to delete the rendered effects media.
You can also choose to display the rendered effect precompute clips and the title and matte key effect precompute clips separately in the bin by choosing the options in the Set Bin Display.
25

Frame Flex Rotation
If you need to straighten or rotate your source image, you can now rotate the framing box in the FrameFlex source settings using the Z Rotation slider. There is also a button to turn ON/OFF the rotation handles (next to the color chip). It does not reset the rotation values. It simply hides the handles so you do not rotate by mistake. The ON/OFF button also appears in the Effect Editor. When the rotation handles are turned ON, an arrow appears to show the orientation.
c IMPORTANT: In Media Composer v8.5, if you use the Z Rotation parameter to rotate your media and then bring that media to a bin on a system running an earlier version of Media Composer, the Z-rotation parameter will no longer be applied when you bring that bin back to Media Composer v8.5.
26

Left: Z Rotation Slider, Rotation handles ON/OFF button, Arrow showing rotation
Once on the Timeline, these adjustments can also be animated using the Effect Editor. All settings are saved with the clip metadata which can be exported to other applications if necessary. See “Reframing your Media” on page 27.
Reframing your Media
For various reasons, it is common practice to shoot at a higher resolution than the final output intentions. Framing charts, that define the dimensions of the final output, have been developed for camera viewfinders so that the camera people can keep the proper perspective in view while filming.
The framing chart used during the onset shoot is usually filmed as the first frame of the shot. Some digital cameras even include these framing parameters in the file metadata that is passed through to the Avid editing application. During post production, these framing parameters serve as guidelines for the editing process, and this intended action area can be automatically framed to the project frame size.
27

During the onset shoot, certain objects (such as lights, flags and other on-set equipment) may inadvertently be recorded within the main viewing area. As part of the dailies process, these objects may be trimmed out from the region of the image that is presented to editorial. If not, then the post editor is required to crop out and reframe the image as necessary.
If the framing parameters were included in the media metadata, then the Framing view will reflect the same area used during the onset shoot. If necessary, the editor can adjust these dimensions manually.
Clips are reframed by applying a spatial adapter on the clip in the bin. The Source Settings dialog has a FrameFlex tab where the dimensions of the framing box can be adjusted. The area within the framing box is what will finally be fit into the project frame when the clip is used in a sequence.
The reformatting settings for each clip are saved in the bin. When the clip is dropped on the Timeline, an icon appears on the clip to indicate that a source adapter effect has been applied. The application accesses the original image and applies the formatting during playback. Effects are applied and rendered based on these settings.
n For clips that have already been used in a sequence, the sequence can be refreshed to frame to the new dimensions.
When transcoding a sequence that has spatial adapters applied, Avid recommends keeping the source dimensions so that the full dimensions of the media are used—see “Using the Transcode Command” in the Media Composer help.
To set the framing dimensions:
1. Select one or more clips in the bin, right-click and choose Source Settings.
2. If the image viewers are not displayed in the Source Settings dialog, click the Show Viewers checkbox.
3. Select the FrameFlex tab.
The framing options display with the framing box outlining the full image.
n If framing parameters were passed from a camera vendor that is an Avid partner, then the framing view used on set may be displayed in the viewer.
4. In the FrameFlex box, adjust the Framing parameters to set the new dimensions of the framing box.
Option Description
Raster Dimension Actual dimensions of the image.
28

Image Size Allows you to override the image resolution for the selected clip. This field is also a good indicator for source media that may have been preprocessed to a proxy resolution.
For example, you transcode a clip from 4K to HD (without applying the reformatting). When you inspect the source properties, the raster dimensions will be HD (e.g. 1920 x 1080), however you will see that this clip is still 4K in size, telling you that you are currently using a proxy and you will likely relink to the full 4K at some point.
Image aspect ratio Allows you to change the size of the image according to the selected aspect ratio.
Pixel aspect ratio Changes the image size according to the selected pixel size. A value of 1 would indicate square pixels (1:1).
Frame aspect ratio Changes the size of the framing box according to the selected aspect ratio.
X Reposition the framing box along either the X or Y axes.
Y
Size Resize the framing box proportionally.
Z Rotation Rotate the framing box.
Size matches project raster Sets the framing box to the same size as the project dimensions.
Color Set color of framing box outline in the viewer.
Reset Resets the framing to the original size.
Reformat
Stretch Stretches the image (disproportionally, if necessary) to fill the project frame.
Pillarbox/Letterbox Scales the image proportionally until either the height or the width extends to the project frame. Black bands will appear on the sides (Pillarbox), or on the top and bottom (Letterbox) in order to pad the empty areas of the frame.
Option Description
29
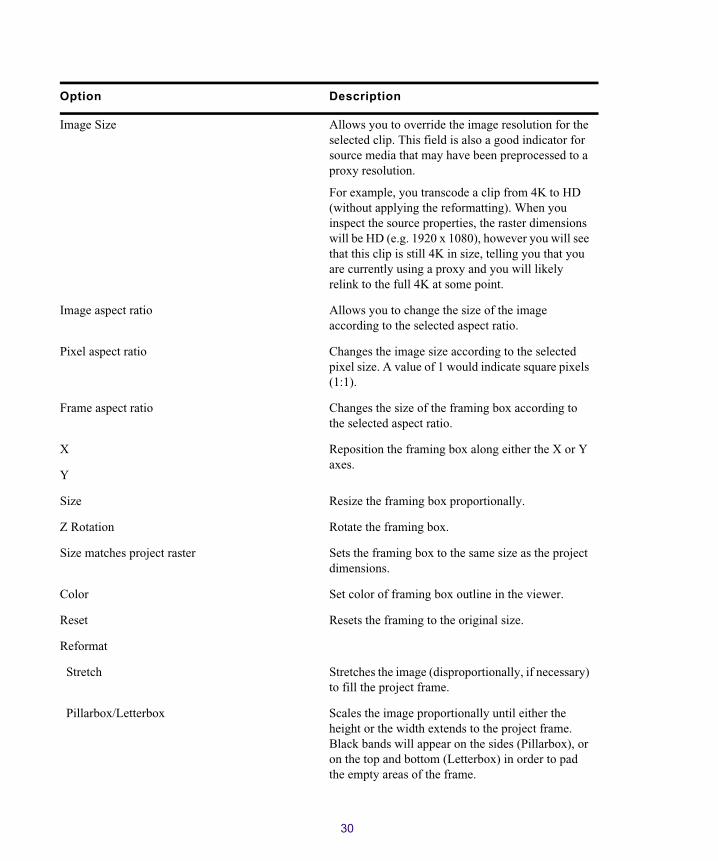
Image Size Allows you to override the image resolution for the selected clip. This field is also a good indicator for source media that may have been preprocessed to a proxy resolution.
For example, you transcode a clip from 4K to HD (without applying the reformatting). When you inspect the source properties, the raster dimensions will be HD (e.g. 1920 x 1080), however you will see that this clip is still 4K in size, telling you that you are currently using a proxy and you will likely relink to the full 4K at some point.
Image aspect ratio Allows you to change the size of the image according to the selected aspect ratio.
Pixel aspect ratio Changes the image size according to the selected pixel size. A value of 1 would indicate square pixels (1:1).
Frame aspect ratio Changes the size of the framing box according to the selected aspect ratio.
X Reposition the framing box along either the X or Y axes.
Y
Size Resize the framing box proportionally.
Z Rotation Rotate the framing box.
Size matches project raster Sets the framing box to the same size as the project dimensions.
Color Set color of framing box outline in the viewer.
Reset Resets the framing to the original size.
Reformat
Stretch Stretches the image (disproportionally, if necessary) to fill the project frame.
Pillarbox/Letterbox Scales the image proportionally until either the height or the width extends to the project frame. Black bands will appear on the sides (Pillarbox), or on the top and bottom (Letterbox) in order to pad the empty areas of the frame.
Option Description
30

Centre Crop Scales the image proportionally to fill the project frame. Areas that fall outside of the project frame will be cropped.
Centre, Keep Size Centers the image in the viewer without modifying its original size. Areas that fall outside of the project frame will be cropped.
Revert Reverses any changes you made since the last time the Apply button was clicked.
Apply Applies all selections that you made so that you can see the changes in the viewers.
Option Description
31
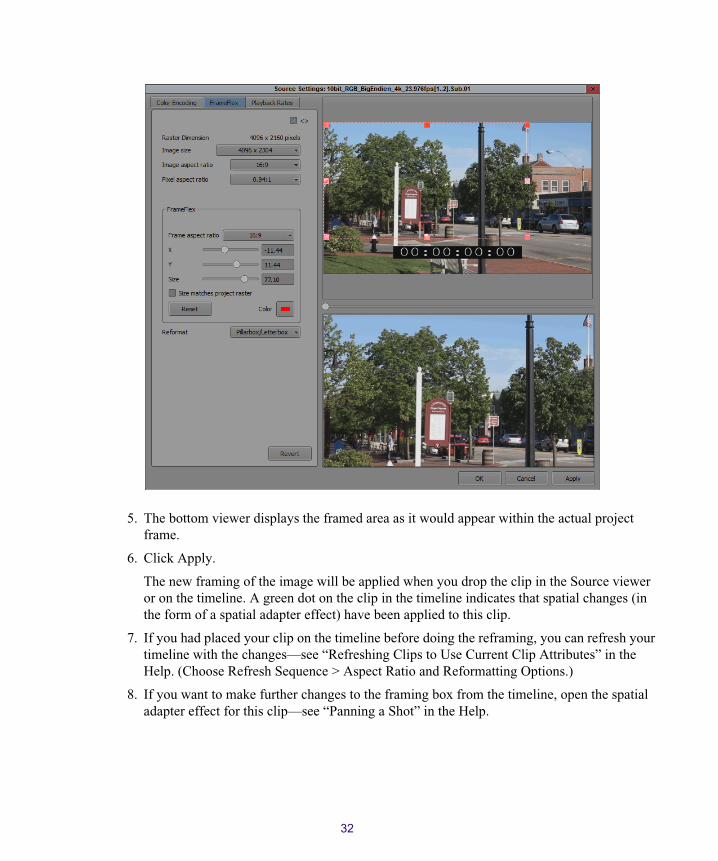
5. The bottom viewer displays the framed area as it would appear within the actual project frame.
6. Click Apply.
The new framing of the image will be applied when you drop the clip in the Source viewer or on the timeline. A green dot on the clip in the timeline indicates that spatial changes (in the form of a spatial adapter effect) have been applied to this clip.
7. If you had placed your clip on the timeline before doing the reframing, you can refresh your timeline with the changes—see “Refreshing Clips to Use Current Clip Attributes” in the Help. (Choose Refresh Sequence > Aspect Ratio and Reformatting Options.)
8. If you want to make further changes to the framing box from the timeline, open the spatial adapter effect for this clip—see “Panning a Shot” in the Help.
32

To rotate the image frame:
1. In the Source Settings dialog, use the Z Rotation option to rotate the image. Alternatively, you can use the center handlebar in the top viewer to rotate the image.
2. The bottom viewer displays the framed area as it would appear within the actual project frame.
3. Click Apply.
The new framing of the image will be applied when you drop the clip in the Source viewer or on the timeline. A green dot on the clip in the timeline indicates that spatial changes (in the form of a spatial adapter effect) have been applied to this clip.
4. If you had placed your clip on the timeline before doing the reframing, you can refresh your timeline with the changes—see “Refreshing Clips to Use Current Clip Attributes” in the Help. (Choose Refresh Sequence > Aspect Ratio and Reformatting Options.)
33

Legal NoticesProduct specifications are subject to change without notice and do not represent a commitment on the part of Avid Technology, Inc.
This product is subject to the terms and conditions of a software license agreement provided with the software. The product may only be used in accordance with the license agreement.
This product may be protected by one or more U.S. and non-U.S patents. Details are available at www.avid.com/patents.
This document is protected under copyright law. An authorized licensee of Avid Media Composer may reproduce this publication for the licensee’s own use in learning how to use the software. This document may not be reproduced or distributed, in whole or in part, for commercial purposes, such as selling copies of this document or providing support or educational services to others. This document is supplied as a guide for Avid Media Composer. Reasonable care has been taken in preparing the information it contains. However, this document may contain omissions, technical inaccuracies, or typographical errors. Avid Technology, Inc. does not accept responsibility of any kind for customers’ losses due to the use of this document. Product specifications are subject to change without notice.
Copyright © 2015 Avid Technology, Inc. and its licensors. All rights reserved.
The following disclaimer is required by Apple Computer, Inc.:APPLE COMPUTER, INC. MAKES NO WARRANTIES WHATSOEVER, EITHER EXPRESS OR IMPLIED, REGARDING THIS PRODUCT, INCLUDING WARRANTIES WITH RESPECT TO ITS MERCHANTABILITY OR ITS FITNESS FOR ANY PARTICULAR PURPOSE. THE EXCLUSION OF IMPLIED WARRANTIES IS NOT PERMITTED BY SOME STATES. THE ABOVE EXCLUSION MAY NOT APPLY TO YOU. THIS WARRANTY PROVIDES YOU WITH SPECIFIC LEGAL RIGHTS. THERE MAY BE OTHER RIGHTS THAT YOU MAY HAVE WHICH VARY FROM STATE TO STATE.
The following disclaimer is required by Sam Leffler and Silicon Graphics, Inc. for the use of their TIFF library:Copyright © 1988–1997 Sam Leffler Copyright © 1991–1997 Silicon Graphics, Inc.
Permission to use, copy, modify, distribute, and sell this software [i.e., the TIFF library] and its documentation for any purpose is hereby granted without fee, provided that (i) the above copyright notices and this permission notice appear in all copies of the software and related documentation, and (ii) the names of Sam Leffler and Silicon Graphics may not be used in any advertising or publicity relating to the software without the specific, prior written permission of Sam Leffler and Silicon Graphics.
THE SOFTWARE IS PROVIDED “AS-IS” AND WITHOUT WARRANTY OF ANY KIND, EXPRESS, IMPLIED OR OTHERWISE, INCLUDING WITHOUT LIMITATION, ANY WARRANTY OF MERCHANTABILITY OR FITNESS FOR A PARTICULAR PURPOSE.
IN NO EVENT SHALL SAM LEFFLER OR SILICON GRAPHICS BE LIABLE FOR ANY SPECIAL, INCIDENTAL, INDIRECT OR CONSEQUENTIAL DAMAGES OF ANY KIND, OR ANY DAMAGES WHATSOEVER RESULTING FROM LOSS OF USE, DATA OR PROFITS, WHETHER OR NOT ADVISED OF THE POSSIBILITY OF DAMAGE, AND ON ANY THEORY OF LIABILITY, ARISING OUT OF OR IN CONNECTION WITH THE USE OR PERFORMANCE OF THIS SOFTWARE.
The following disclaimer is required by the Independent JPEG Group:This software is based in part on the work of the Independent JPEG Group.
This Software may contain components licensed under the following conditions:Copyright (c) 1989 The Regents of the University of California. All rights reserved.
Redistribution and use in source and binary forms are permitted provided that the above copyright notice and this paragraph are duplicated in all such forms and that any documentation, advertising materials, and other materials related to such distribution and use acknowledge that the software was developed by the University of California, Berkeley. The name of the University may not be used to endorse or promote products derived from this software without specific prior written permission. THIS SOFTWARE IS PROVIDED ``AS IS'' AND WITHOUT ANY EXPRESS OR IMPLIED WARRANTIES, INCLUDING, WITHOUT LIMITATION, THE IMPLIED WARRANTIES OF MERCHANTABILITY AND FITNESS FOR A PARTICULAR PURPOSE.
Copyright (C) 1989, 1991 by Jef Poskanzer.
Permission to use, copy, modify, and distribute this software and its documentation for any purpose and without fee is hereby granted, provided that the above copyright notice appear in all copies and that both that copyright notice and this permission notice appear in supporting documentation. This software is provided " as is" without express or implied warranty.
Copyright 1995, Trinity College Computing Center. Written by David Chappell.
34

Permission to use, copy, modify, and distribute this software and its documentation for any purpose and without fee is hereby granted, provided that the above copyright notice appear in all copies and that both that copyright notice and this permission notice appear in supporting documentation. This software is provided " as is" without express or implied warranty.
Copyright 1996 Daniel Dardailler.
Permission to use, copy, modify, distribute, and sell this software for any purpose is hereby granted without fee, provided that the above copyright notice appear in all copies and that both that copyright notice and this permission notice appear in supporting documentation, and that the name of Daniel Dardailler not be used in advertising or publicity pertaining to distribution of the software without specific, written prior permission. Daniel Dardailler makes no representations about the suitability of this software for any purpose. It is provided " as is" without express or implied warranty.
Modifications Copyright 1999 Matt Koss, under the same license as above.
Copyright (c) 1991 by AT&T.
Permission to use, copy, modify, and distribute this software for any purpose without fee is hereby granted, provided that this entire notice is included in all copies of any software which is or includes a copy or modification of this software and in all copies of the supporting documentation for such software.
THIS SOFTWARE IS BEING PROVIDED " AS IS" , WITHOUT ANY EXPRESS OR IMPLIED WARRANTY. IN PARTICULAR, NEITHER THE AUTHOR NOR AT&T MAKES ANY REPRESENTATION OR WARRANTY OF ANY KIND CONCERNING THE MERCHANTABILITY OF THIS SOFTWARE OR ITS FITNESS FOR ANY PARTICULAR PURPOSE.
This product includes software developed by the University of California, Berkeley and its contributors.
The following disclaimer is required by Nexidia Inc.:© 2010 Nexidia Inc. All rights reserved, worldwide. Nexidia and the Nexidia logo are trademarks of Nexidia Inc. All other trademarks are the property of their respective owners. All Nexidia materials regardless of form, including without limitation, software applications, documentation and any other information relating to Nexidia Inc., and its products and services are the exclusive property of Nexidia Inc. or its licensors. The Nexidia products and services described in these materials may be covered by Nexidia's United States patents: 7,231,351; 7,263,484; 7,313,521; 7,324,939; 7,406,415, 7,475,065; 7,487,086 and/or other patents pending and may be manufactured under license from the Georgia Tech Research Corporation USA.
The following disclaimer is required by Paradigm Matrix:Portions of this software licensed from Paradigm Matrix.
The following disclaimer is required by Ray Sauers Associates, Inc.:“Install-It” is licensed from Ray Sauers Associates, Inc. End-User is prohibited from taking any action to derive a source code equivalent of “Install-It,” including by reverse assembly or reverse compilation, Ray Sauers Associates, Inc. shall in no event be liable for any damages resulting from reseller’s failure to perform reseller’s obligation; or any damages arising from use or operation of reseller’s products or the software; or any other damages, including but not limited to, incidental, direct, indirect, special or consequential Damages including lost profits, or damages resulting from loss of use or inability to use reseller’s products or the software for any reason including copyright or patent infringement, or lost data, even if Ray Sauers Associates has been advised, knew or should have known of the possibility of such damages.
The following disclaimer is required by Videomedia, Inc.:“Videomedia, Inc. makes no warranties whatsoever, either express or implied, regarding this product, including warranties with respect to its merchantability or its fitness for any particular purpose.”
“This software contains V-LAN ver. 3.0 Command Protocols which communicate with V-LAN ver. 3.0 products developed by Videomedia, Inc. and V-LAN ver. 3.0 compatible products developed by third parties under license from Videomedia, Inc. Use of this software will allow “frame accurate” editing control of applicable videotape recorder decks, videodisc recorders/players and the like.”
The following disclaimer is required by Altura Software, Inc. for the use of its Mac2Win software and Sample Source Code:©1993–1998 Altura Software, Inc.
The following disclaimer is required by Ultimatte Corporation:Certain real-time compositing capabilities are provided under a license of such technology from Ultimatte Corporation and are subject to copyright protection.
The following disclaimer is required by 3Prong.com Inc.:Certain waveform and vector monitoring capabilities are provided under a license from 3Prong.com Inc.
35

The following disclaimer is required by Interplay Entertainment Corp.:The “Interplay” name is used with the permission of Interplay Entertainment Corp., which bears no responsibility for Avid products.
This product includes portions of the Alloy Look & Feel software from Incors GmbH.
This product includes software developed by the Apache Software Foundation (http://www.apache.org/).
© DevelopMentor
This product may include the JCifs library, for which the following notice applies:JCifs © Copyright 2004, The JCIFS Project, is licensed under LGPL (http://jcifs.samba.org/). See the LGPL.txt file in the Third Party Software directory on the installation CD.
Avid Interplay contains components licensed from LavanTech. These components may only be used as part of and in connection with Avid Interplay.
Attn. Government User(s). Restricted Rights LegendU.S. GOVERNMENT RESTRICTED RIGHTS. This Software and its documentation are “commercial computer software” or “commercial computer software documentation.” In the event that such Software or documentation is acquired by or on behalf of a unit or agency of the U.S. Government, all rights with respect to this Software and documentation are subject to the terms of the License Agreement, pursuant to FAR §12.212(a) and/or DFARS §227.7202-1(a), as applicable.
Trademarks003, 192 Digital I/O, 192 I/O, 96 I/O, 96i I/O, Adrenaline, AirSpeed, ALEX, Alienbrain, AME, AniMatte, Archive, Archive II, Assistant Station, AudioPages, AudioStation, AutoLoop, AutoSync, Avid, Avid Active, Avid Advanced Response, Avid DNA, Avid DNxcel, Avid DNxHD, Avid DS Assist Station, Avid Liquid, Avid Media Engine, Avid Media Processor, Avid MEDIArray, Avid Mojo, Avid Remote Response, Avid Unity, Avid Unity ISIS, Avid VideoRAID, AvidRAID, AvidShare, AVIDstripe, AVX, Axiom, Beat Detective, Beauty Without The Bandwidth, Beyond Reality, BF Essentials, Bomb Factory, Boom, Bruno, C|24, CaptureManager, ChromaCurve, ChromaWheel, Cineractive Engine, Cineractive Player, Cineractive Viewer, Color Conductor, Command|24, Command|8, Conectiv, Control|24, Cosmonaut Voice, CountDown, d2, d3, DAE, Dazzle, Dazzle Digital Video Creator, D-Command, D-Control, Deko, DekoCast, D-Fi, D-fx, Digi 003, DigiBase, DigiDelivery, Digidesign, Digidesign Audio Engine, Digidesign Development Partners, Digidesign Intelligent Noise Reduction, Digidesign TDM Bus, DigiLink, DigiMeter, DigiPanner, DigiProNet, DigiRack, DigiSerial, DigiSnake, DigiSystem, Digital Choreography, Digital Nonlinear Accelerator, DigiTest, DigiTranslator, DigiWear, DINR, DNxchange, DPP-1, D-Show, DSP Manager, DS-StorageCalc, DV Toolkit, DVD Complete, D-Verb, Eleven, EM, Euphonix, EUCON, EveryPhase, Expander, ExpertRender, Fader Pack, Fairchild, FastBreak, Fast Track, Film Cutter, FilmScribe, Flexevent, FluidMotion, Frame Chase, FXDeko, HD Core, HD Process, HDPack, Home-to-Hollywood, HYBRID, HyperControl, HyperSPACE, HyperSPACE HDCAM, iKnowledge, Image Independence, Impact, Improv, iNEWS, iNEWS Assign, iNEWS ControlAir, Instantwrite, Instinct, Intelligent Content Management, Intelligent Digital Actor Technology, IntelliRender, Intelli-Sat, Intelli-sat Broadcasting Recording Manager, InterFX, Interplay, inTONE, Intraframe, iS Expander, ISIS, IsoSync, iS9, iS18, iS23, iS36, ISIS, IsoSync, KeyRig, KeyStudio, LaunchPad, LeaderPlus, LFX, Lightning, Link & Sync, ListSync, LKT-200, Lo-Fi, Luna, MachineControl, Magic Mask, Make Anything Hollywood, make manage move | media, Marquee, MassivePack, Massive Pack Pro, M-Audio, M-Audio Micro, Maxim, Mbox, Media Composer, MediaFlow, MediaLog, MediaMatch, MediaMix, Media Reader, Media Recorder, MEDIArray, MediaServer, MediaShare, MetaFuze, MetaSync, MicroTrack, MIDI I/O, Midiman, Mix Rack, MixLab, Moviebox, Moviestar, MultiShell, NaturalMatch, NewsCutter, NewsView, Nitris, NL3D, NLP, Nova, NRV-10 interFX, NSDOS, NSWIN, Octane, OMF, OMF Interchange, OMM, OnDVD, Open Media Framework, Open Media Management, Ozone, Ozonic, Painterly Effects, Palladium, Personal Q, PET, Podcast Factory, PowerSwap, PRE, ProControl, ProEncode, Profiler, Pro Tools LE, Pro Tools M-Powered, Pro Transfer, Pro Tools, QuickPunch, QuietDrive, Realtime Motion Synthesis, Recti-Fi, Reel Tape Delay, Reel Tape Flanger, Reel Tape Saturation, Reprise, Res Rocket Surfer, Reso, RetroLoop, Reverb One, ReVibe, Revolution, rS9, rS18, RTAS, Salesview, Sci-Fi, Scorch, Scorefitter, ScriptSync, SecureProductionEnvironment, Serv|LT, Serv|GT, Session, Shape-to-Shape, ShuttleCase, Sibelius, SIDON, SimulPlay, SimulRecord, Slightly Rude Compressor, Smack!, Soft SampleCell, Soft-Clip Limiter, Solaris, SoundReplacer, SPACE, SPACEShift, SpectraGraph, SpectraMatte, SteadyGlide, Streamfactory, Streamgenie, StreamRAID, Strike, Structure, Studiophile, SubCap, Sundance Digital, Sundance, SurroundScope, Symphony, SYNC HD, Synchronic, SynchroScope, SYNC I/O, Syntax, TDM FlexCable, TechFlix, Tel-Ray, Thunder, Titansync, Titan, TL Aggro, TL AutoPan, TL Drum Rehab, TL Everyphase, TL Fauxlder, TL In Tune, TL MasterMeter, TL Metro, TL Space, TL Utilities, tools for storytellers, Torq, Torq Xponent, Transfuser, Transit, TransJammer, Trigger Finger, Trillium Lane Labs, TruTouch, UnityRAID, Vari-Fi, Velvet, Video the Web Way, VideoRAID, VideoSPACE, VideoSpin, VTEM, Work-N-Play, Xdeck, X-Form, Xmon, XPAND!, Xponent, X-Session, and X-Session Pro are either registered trademarks or trademarks of Avid Technology, Inc. in the United States and/or other countries.
Adobe and Photoshop are either registered trademarks or trademarks of Adobe Systems Incorporated in the United States and/or other countries. Apple and Macintosh are trademarks of Apple Computer, Inc., registered in the U.S. and other countries. Windows is either a registered trademark or trademark of Microsoft Corporation in the United States and/or other countries. All other trademarks contained herein are the property of their respective owners.
36

FootageArri — Courtesy of Arri/Fauer — John Fauer, Inc.Bell South “Anticipation” — Courtesy of Two Headed Monster — Tucker/Wayne Atlanta/GMS.Canyonlands — Courtesy of the National Park Service/Department of the Interior.Eco Challenge British Columbia — Courtesy of Eco Challenge Lifestyles, Inc., All Rights Reserved. Eco Challenge Morocco — Courtesy of Discovery Communications, Inc.It’s Shuttletime — Courtesy of BCP & Canadian Airlines. Nestlé Coffee Crisp — Courtesy of MacLaren McCann Canada. Saturn “Calvin Egg” — Courtesy of Cossette Communications. “Tigers: Tracking a Legend” — Courtesy of www.wildlifeworlds.com, Carol Amore, Executive Producer." The Big Swell" — Courtesy of Swell Pictures, Inc.Windhorse — Courtesy of Paul Wagner Productions.
Arizona Images — KNTV Production — Courtesy of Granite Broadcasting, Inc., Editor/Producer Bryan Foote.Canyonlands — Courtesy of the National Park Service/Department of the Interior.Ice Island — Courtesy of Kurtis Productions, Ltd.Tornados + Belle Isle footage — Courtesy of KWTV News 9.WCAU Fire Story — Courtesy of NBC-10, Philadelphia, PA.Women in Sports – Paragliding — Courtesy of Legendary Entertainment, Inc.
What’s New for Media Composer v8.5 • Created 3/4/16
37