what is the difference between vector and bitmap images
TRANSCRIPT

8/7/2019 What is the Difference Between Vector and Bitmap Images
http://slidepdf.com/reader/full/what-is-the-difference-between-vector-and-bitmap-images 1/5
8/7/2019 What is the Difference Between Vector and Bitmap Images
http://slidepdf.com/reader/full/what-is-the-difference-between-vector-and-bitmap-images 2/5
C O R E L D R A W C S 3 B Y : H A R V I N D E R S I N G H
1
What is the Bleed Area?
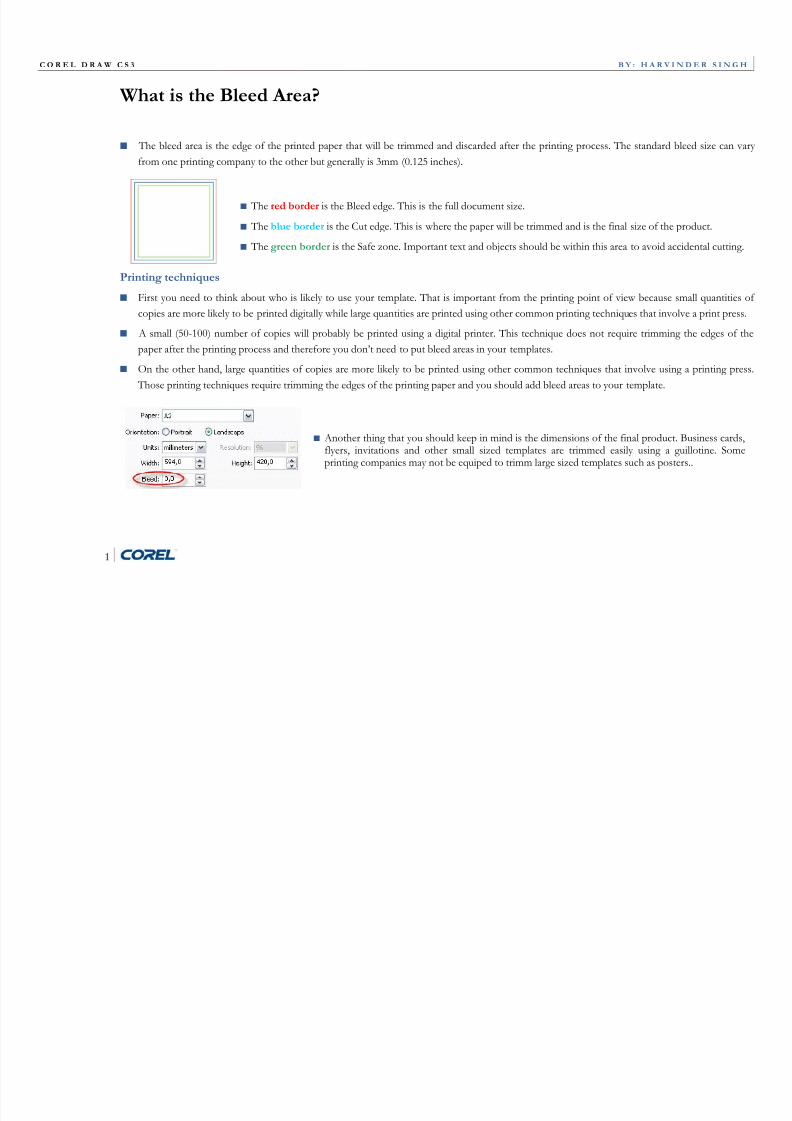
The bleed area is the edge of the printed paper that will be trimmed and discarded after the printing process. The standard bleed size can vary
from one printing company to the other but generally is 3mm (0.125 inches).
The red border is the Bleed edge. This is the full document size.
The blue border is the Cut edge. This is where the paper will be trimmed and is the final size of the product.
The green border is the Safe zone. Important text and objects should be within this area to avoid accidental cutting.
Printing techniques
First you need to think about who is likely to use your template. That is important from the printing point of view because small quantities of
copies are more likely to be printed digitally while large quantities are printed using other common printing techniques that involve a print press.
A small (50-100) number of copies will probably be printed using a digital printer. This technique does not require trimming the edges of the
paper after the printing process and therefore you don’t need to put bleed areas in your templates.
On the other hand, large quantities of copies are more likely to be printed using other common techniques that involve using a printing press.
Those printing techniques require trimming the edges of the printing paper and you should add bleed areas to your template.
Another thing that you should keep in mind is the dimensions of the final product. Business cards,flyers, invitations and other small sized templates are trimmed easily using a guillotine. Someprinting companies may not be equiped to trimm large sized templates such as posters..
8/7/2019 What is the Difference Between Vector and Bitmap Images
http://slidepdf.com/reader/full/what-is-the-difference-between-vector-and-bitmap-images 3/5
C O R E L D R A W C S 3 B Y : H A R V I N D E R S I N G H
2
New Enhanced View in CorelDRAW X3 Displays Overprinting
If you have used a previous version of CorelDRAW® to create designs or illustrations destined for print reproduction, you probably know that
you can use various overprinting options. In case you haven't heard, however, CorelDRAW X3 features an enhanced view that displays live
overprinting results. With this new feature, you can check your overprinted colors on-screen before proofing or printing your work. It's another
of those neat features that you won't see in most other graphics programs. Let's take a closer look at some of the benefits this new feature gives
you.
Activating and viewing overprints
Typically, when you print from CorelDRAW, the nonvisible portions of objects layered behind other objects are removed - an occurrence called
a knockout. This happens automatically and behind the scenes, in conformity with established digital printing standards. If you want, you can
preserve the areas layered behind the fill, or outline portions of the foreground object, so that the colors are overlaid. In simplistic terms, this
technique overlays one color onto another and is commonly referred to as overprinting.
In previous versions of CorelDRAW, you could apply overprints to your object fill or outline so that the colors overprinted any underlying
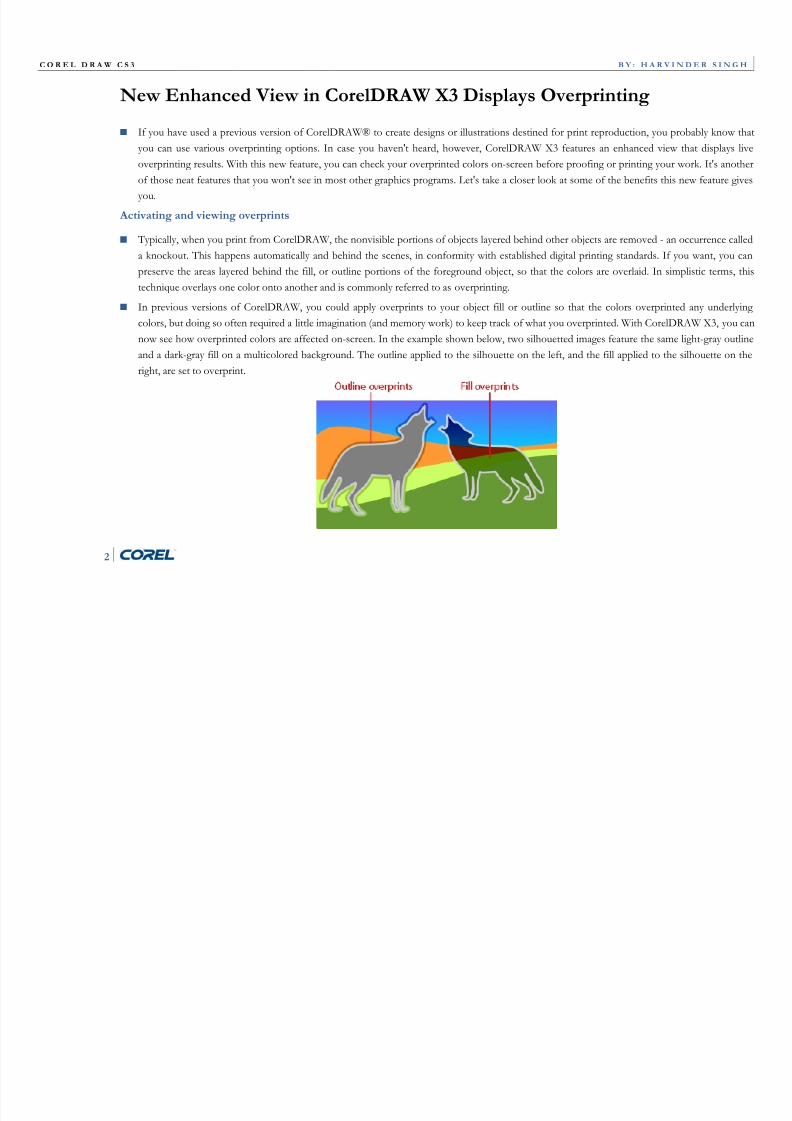
colors, but doing so often required a little imagination (and memory work) to keep track of what you overprinted. With CorelDRAW X3, you can
now see how overprinted colors are affected on-screen. In the example shown below, two silhouetted images feature the same light-gray outline
and a dark-gray fill on a multicolored background. The outline applied to the silhouette on the left, and the fill applied to the silhouette on the
right, are set to overprint.
8/7/2019 What is the Difference Between Vector and Bitmap Images
http://slidepdf.com/reader/full/what-is-the-difference-between-vector-and-bitmap-images 4/5
C O R E L D R A W C S 3 B Y : H A R V I N D E R S I N G H
3
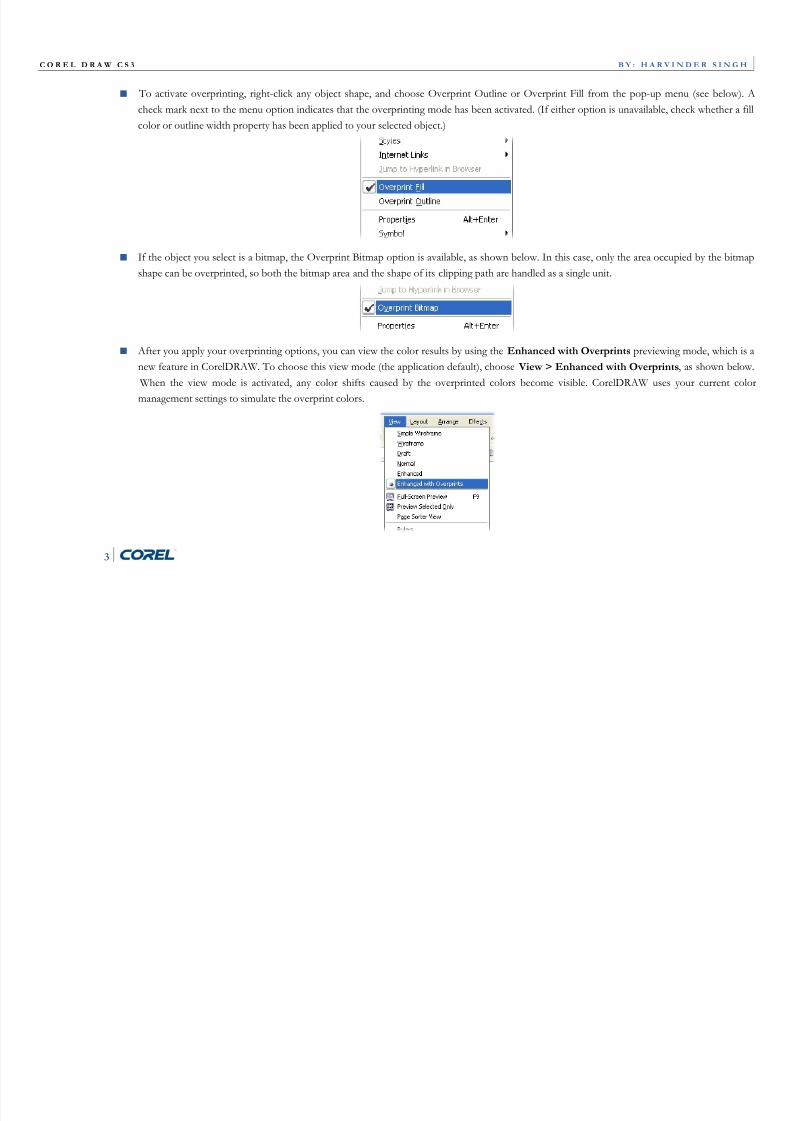
To activate overprinting, right-click any object shape, and choose Overprint Outline or Overprint Fill from the pop-up menu (see below). A
check mark next to the menu option indicates that the overprinting mode has been activated. (If either option is unavailable, check whether a fill
color or outline width property has been applied to your selected object.)
If the object you select is a bitmap, the Overprint Bitmap option is available, as shown below. In this case, only the area occupied by the bitmap
shape can be overprinted, so both the bitmap area and the shape of its clipping path are handled as a single unit.
After you apply your overprinting options, you can view the color results by using the Enhanced with Overprints previewing mode, which is a
new feature in CorelDRAW. To choose this view mode (the application default), choose View > Enhanced with Overprints, as shown below.
When the view mode is activated, any color shifts caused by the overprinted colors become visible. CorelDRAW uses your current color
management settings to simulate the overprint colors.

8/7/2019 What is the Difference Between Vector and Bitmap Images
http://slidepdf.com/reader/full/what-is-the-difference-between-vector-and-bitmap-images 5/5
C O R E L D R A W C S 3 B Y : H A R V I N D E R S I N G H
4
While overprint options are applied to an object, the status bar displays an overprint indication symbol in the Fill Color and Outline Color
indicators (see below) whenever you use the Pick or Shape tools to select the object.