wet soils and water loving plants - lsu agcenter89611ef1-c5e8-431e-9d… · wet soils and water...
TRANSCRIPT

Wet Soils and Water Loving
Plants
47

LSU AgCenter • 4-H Youth Wetlands Program • 2013
Grade Level
Upper Elementary
Middle School
Duration
50-55 minutes
Setting
The classroom
Vocabulary
Organic
Inorganic
Hydric Soils
The Dirt on Soil Teacher Instructions
Focus/Overview
This lesson focuses on the many factors contributing to
wetland loss in Louisiana. Although natural processes have
led to wetland loss, various human factors have expedited the
problem.
Learning Objectives
The students will:
Discover what and where soil comes from and why
soil is important in Louisiana wetlands
Distinguish the difference between inorganic and
organic materials
Observe differences in wetland and upland soils
GLEs Science
4th – (SI-E-A1, A2, A3, B1), (ESS-E-A1, A5)
5th – (SI-M-A1, A2, A7, A8), (ESS-M-A4, A7)
6th – (PS-M-A3, A8)
7th – (LS-M-A4)
8th – (ESS-M-A4, A8)
English Language Arts
4th – (ELA-1-E5, E6), (ELA-4-E2, E5)
5th – (ELA-1-M1) , (ELA-7-M1, M4), (ELA-4-M1, M2, M4, M6)
6th – (ELA-1-M1, M3), (ELA-7-M1), (ELA-4-M1, M2, M4, M6)
7th – (ELA-1-M1, M3), (ELA-7-M1, M4), (ELA-4-M1, M2, M6)
8th – (ELA-1-M1), (ELA-7-M1, M4), (ELA-4-M1,M2, M6)
Materials List
Organic objects – sticks, leaves, tree bark, feather, earthworms, flowers, fruits and
vegetables (teacher provides)
Inorganic objects – rocks, foam, plastic bag, marbles, crayons, markers and
envelope (some provided in box but more can be added to this collection)
Small plastic zipper-seal bags (teacher provides)
Flour (teacher provides)
Sugar (teacher provides)
Crayons (colors provided in kit may not be all needed)
Scissors (3 pairs provided)
Three soil samples (teacher should collect as many different soil colors
and textures that they can find)
Index cards (1 pack of 100 provided)
48

LSU AgCenter • 4-H Youth Wetlands Program • 2013
Hole punch
Tape
Magnifying glasses (5 provided)
Background Information
Learning about soil is important to many people. Farmers and gardeners need to know
what nutrients are in the soil to determine what will best grow there. Construction
companies and homebuilders need to understand the soil to know how to best build roads,
buildings and homes so they will not sink or slide. Soil scientists and water scientists
need to understand things like how much water can move through the soil into the
groundwater and what can be added to the soil to improve its makeup.
So what is the difference between soil and dirt? Dirt is soil out of place! It is the dead
stuff that you find under your fingernails, on the bottom of your shoes and on your car
tires. Soil is ALIVE with lots of solids, liquids and living organisms that help plants to
grow. Soil is considered the protective layer that covers the Earth, made up of minerals
(inorganic matter), organic matter (produced by plant and animal decay), air and water.
Mineral soils are made up of inorganic material that generally is thought to come from a
type of rock. The material from which the soil forms determines the physical properties
of soil, including color, texture and structure. Soil texture is determined by the amount of
sand, silt or clay found in the soil. The size of the particles determines soil type. Sand is
the largest particle, feels gritty and is known to many because it is found on the beach.
Silt particles are the middle size and feel like flour. They can hardly be seen without a
microscope. Clay particles are the smallest, are invisible to the naked eye and feel slick
and gummy when wet. The amount of each of these particles in soil determines the
amount of water the soil can hold. Some soils are better able to absorb and hold moisture
than others.
Most people think all soils are brown, but that is not true! Soils vary in color depending
on their makeup and where they are found. The color is simply the coating on the soil
particles – similar to the colored shell of an M&M candy. Soil color is one of the easiest
physical soil properties to see and helps determine whether or not an area is considered a
wetland habitat.
Wetland soils, also called hydric soils, are waterlogged for several months during the
year and only allow specially adapted plants to grow there. There are two major types of
wetland soils: organic (contain more than 10 percent of decomposed plants and animals)
and mineral (contain little or no decomposed plants and animals). Wet, organic soils
look like black or dark-brown muck. Mineral soils usually are gray, greenish or bluish-
gray. By reading the color of the soil, scientists can tell how long or how many times an
area has been wet.
Follow these hints when looking at wetland soils:
Reddish/brown colors indicate little waterlogging; probably soils found in more
upland areas.
49

LSU AgCenter • 4-H Youth Wetlands Program • 2013
Black mucky soils indicate there is a lot of organic matter that has not completely
broken down due to the presence of water.
Grayish and greenish soils indicate a lot of waterlogging.
Splotchy soils indicate varying wet and dry periods, meaning some water has
been there but you must explore more to determine whether or not this is a
wetland area.
Definitions:
Organic – pertaining to or derived from living organisms
Inorganic – not composed of organic matter; not living
Hydric soil – soil that formed under conditions of saturation, flooding or ponding long
enough during the growing season to develop anaerobic (no oxygen) conditions in the
upper part
Advance Preparation
1. Make copies of worksheets for students.
2. Gather organic and additional inorganic materials for Part 1.
3. Make texture bags as follows:
a. Use three sandwich-size, zippered-seal bags:
i. Pour 1 tablespoon of sugar into a bag and seal it (this represents
sand).
ii. Pour 1 tablespoon of flour into another bag and seal it (this
represents silt).
iii. Pour 1 tablespoon of flour and 1 tablespoon of water into the third
bag. Mix the flour and water and seal the bag (this represents clay).
Procedure
Part 1
1. Review with class the background information on soils.
2. Pass out the Organic Versus Inorganic worksheet to each student.
3. Show students the table of materials you have set up at the front of the class with
various objects.
4. Tell the students you will hold one of these items at a time for everyone to see.
5. As you hold the item, have students write whether they think the object is organic
(is alive or was alive) or inorganic (is not alive and never was alive).
6. Once you have been through all of the objects and every student has completed
his or her worksheet, discuss why the students chose the categories they did. Feel
free to challenge the students if there are varying opinions!
Part 2
1. Review the background information about soil textures with the class.
2. Pass around the bags of the different soil “textures.” Tell students to close their
eyes and feel the samples through the bags.
a. For a messier option, you also can allow them to reach into the bag if you
choose to do so.
50

LSU AgCenter • 4-H Youth Wetlands Program • 2013
3. Discuss what differences they feel and why those differences might be important
to Louisiana wetlands. The following questions can help in this discussion:
a. Ask students which particle they think is largest? (Sand) Smallest? (Clay)
b. Which particles do they think would hold more water? (Clay because of
the smaller particles that absorb more)
c. What particle do they think would stay put during a hurricane? (Clay soils
are heavy and are not easily lost to erosion)
d. What particle do they think would be washed away with large waves or a
hurricane? (Sandy or silty soils tend to wash away easier)
Part 3
1. Review with students the background information on soil colors and what they
help us to identify.
2. Pass out Soil Color Worksheet.
3. Have students color in the circles with the specific colors listed on top of the
circle. These colors are separated by wetland and upland soils.
4. Students should then cut out the dark circle from the middle of the chart.
5. Tell students that they are now going to examine different soils to determine
whether or not the soils are from a wetland area.
6. Break off small sample(s) of each soil that was provided. Pass sample(s) around
to each student and have them place the sample behind the hole that was cut out
of the chart.
7. Holding the chart in one hand and the sample in the other, students should try to
match the soil color to one of the colored circles on their charts.
a. If the color matches the top of the chart, it is a wetland soil.
b. If the color matches the bottom of the chart, it is not a wetland soil.
8. Feel free to collect soils from your area to provide students with more samples to
match. Pick upland and wetland soils to allow more options.
9. Once everyone has matched the soil colors, pass out three index cards to each
student.
10. Students should use a hole punch to make a small circle in the center of three
index cards.
11. Students should cover one side of the hole with clear tape then turn the card so the
sticky side of the tape is facing up.
12. Each student should label the cards A, B and C.
13. Using the soils provided (or any others collected locally), sprinkle a small amount
of each sample on the sticky side of the tape and place another piece of tape over
the sample – making one slide.
a. Repeat this for all soil samples.
14. Then have students use a magnifying glass to carefully examine each soil sample.
15. Students should record observations on each slide and determine which one they
think is from a wetland area.
Blackline Masters
1. Inorganic Versus Organic
2. Soil Colors
51

LSU AgCenter • 4-H Youth Wetlands Program • 2013
Resources
Do you dig wetland soil?
WOW!: The Wonders of Wetlands. 2003: Environmental Concern Inc and The Project
WET International Foundation.
What is in a wetland soil? Wetland Stewards Program Lesson 2.
http://www.fitzwerc.org/wlinks/mslessons.htm#Less2
52

Youth Wetlands Program provided by LSU AgCenter
The Dirt On SoilStudent Activity SheetName
Inorganic Versus OrganicDirections: Examine each item the teacher holds up and decide which is organic and which is inorganic. List each item below in the column that you choose for it.
Organic Items(is alive or was alive)
Inorganic Items(is not alive and was never alive)
53

Youth Wetlands Program provided by LSU AgCenter
The Dirt On SoilStudent Activity SheetName
Soil Colors Directions: Use crayons to color the circles below with the colors listed above the circle. When you are finished, fold the sheet in half and cut out the black circle. To determine if the soil sample comes from a wetland area, hold the chart in one hand and the soil sample in the other. Place the soil sample behind the hole and try to match the color to one of the circles you colored on the chart. If it matches the top colors, it is a wetland soil!
54

LSU AgCenter • 4-H Youth Wetlands Program • 2013
The Dirt on Soil in the T-3 Format
What You Say What You Do What The Students Do
Today we will be learning
about soils and why they are
important.
Lead a discussion with
questions like:
Can anyone tell me the
difference between soil
and dirt?
Where does soil come
from?
Does anyone know the
difference between organic
and inorganic?
Can anyone name three
types of soil textures?
Use the information at the
beginning of the lesson and
the General Wetlands
Information at the front of
the curriculum binder to fully
explain soils, specifically
wetland soils.
Talk about what they know
about soils and those soils
found in wetlands.
We are going to play a little
game to determine what you
know about where soils come
from. Everyone should have
received the “Organic Versus
Inorganic” worksheet.
Pass out Organic Versus
Inorganic worksheet
(Activity No. 1.)
Take worksheet.
At the front of the class you
will see a table full of various
objects from nature, around
the house, around school and
so forth. As I hold up these
items one at a time, you need
to determine whether it is
considered an organic object
or inorganic object.
Point to table at front of class
and answer any questions
about organic and inorganic
(using background
information).
Listen and observe table with
objects.
Write the object under the
column where you think it
belongs – based on whether it
is inorganic or organic.
Hold up objects one at a time
and allow time for students to
observe and record their
answers.
Look at items and fill in
correct columns on
worksheets.
Now that we have gone
through all of the items, let’s
go through your answers all
together. Be sure to tell us
Hold up items again one at a
time and solicit answers from
the class.
Look at items and provide
organic or inorganic answer
for each one.
55

LSU AgCenter • 4-H Youth Wetlands Program • 2013
why you chose the column
you did.
So, if soil comes from
different materials (inorganic
and organic items), do you
think some soils feel different
from others?
Lead a discussion on soil
textures using background
information.
Talk about what they know
about soils and soil textures.
Can anyone tell me the
three different soil
textures?
Which one is the smallest
particle? Largest? Middle?
I am going to pass around
“soil” bags so you can feel
the difference in these three
textures. Close your eyes
when you feel the bags so
you can really imagine you
are working in the field trying
to determine what type of soil
you have.
Pass around soil bags and
have students feel the
different textures.
Close their eyes and feel the
soil bags.
Now, tell me what
differences you felt in the
three soil textures.
See Procedural Step No. 3 (in
Part 2) for questions to lead a
discussion on soil textures
and the importance to
Louisiana wetlands.
Discuss differences in
textures and answer
questions.
So now we know where soil
comes from and what it feels
like, but there is one more
difference you might notice
in different soils?
COLOR!
Use background information
to discuss soil color and the
importance to Louisiana
wetlands.
Talk about what they know
about soils and soil colors.
As I pass out the Soil Color
Worksheet, everyone should
read the instructions at the
top and then select the correct
crayons to color in the circles
on the sheet.
Pass out the worksheet and
direct students to art supplies
with crayons.
Take worksheet and select
crayons to color the circles.
56

LSU AgCenter • 4-H Youth Wetlands Program • 2013
As you start to color the
circles, observe the
differences in the top and
bottom of the sheet. The top
colors represent soil colors
you would find in wetland
soils, and the bottom colors
represent those soils found in
nonwetland areas.
Assist students in coloring
their sheets.
Color circles using crayons.
Once you have finished
coloring all the circles on
your sheet, cut out the black
circle found in the middle of
the chart.
Pass out scissors and assist
with cutting.
Cut out dark circle in middle
of chart.
We are now going to examine
some different soils to
determine whether or not
they are from a wetland area.
This is the same procedure
used by soil scientists when
they are in the field It is a
technique known as the
Munsell Color Chart.
Break off small samples of
each soil provided and pass
them out to a few students at
a time.
Take soil sample.
You should hold the chart in
one hand and the sample in
the other and place the
sample behind the circle that
you just cut out of the chart.
Help students correctly hold
sample and chart.
Place sample behind cutout
circle.
Now, try to match the soil
sample color to one of the
colored circles on the chart. If
the color matches one at the
top, then it is a wetland soil.
If it matches one at the
bottom, then it is not.
Help students correctly hold
sample and chart. Pass out
new soil samples, as needed.
Use chart to determine if soil
is from a wetland.
Now that we have all had a
chance to observe the
different soil colors, we are
going to take a closer look.
Pass out three index cards to
each student.
Listen and take index cards.
57

LSU AgCenter • 4-H Youth Wetlands Program • 2013
Everyone should have three
index cards. Use the hole
puncher to punch a hole in
the middle of each card. Then
place one piece of scotch tape
over the hole. Flip the card
upside down so that the
sticky side of the tape is
facing up.
Assist students with punching
holes and placing tape.
Punch holes and place tape
over hole.
Label the cards A, B and C
(and so on if you provided
more soil samples).
Label the cards.
Using a very small pinch of
soil, sprinkle the soil onto the
sticky piece of the tape. Then
place another piece of tape on
top of the soil. You have just
made a slide!
Assist students with soil
sample and applying second
piece of tape.
Sprinkle soil samples onto
tape. Then place second piece
of tape over it.
Once you have made all three
(or more) of your slides, use a
magnifying glass to examine
the soil sample. What do you
see?
Write your observations
about the soil on your card
next to the sample.
Assist with magnifying
glasses and pass them
around, as needed.
Examine soil with
magnifying glass and record
observations on index card
slides.
Which soils do you think
came from a wetland area?
Where might you find
some of these soil
samples?
Lead discussion to finish
activity and allow students to
take their slides home.
Talk about what they learned
today about where soils come
from, soil texture and soil
color.
58

LSU AgCenter • 4-H Youth Wetlands Program • 2013
Grade Level
Upper
Elementary
Middle School
High School
Duration
50-55 minutes
Setting
The classroom
Vocabulary
Spanish moss
Over-harvesting
Supply
Demand
Consumer
Spanish Moss Teacher Instructions
Focus/Overview
Students will learn about Spanish moss, the history of its exploitation and
why this plant is important to Louisiana. This lesson will engage students
in taking common Spanish moss and developing a product humans would
use but one that would not be harmful to the environment.
Learning Objectives
The students will:
Learn about supply and demand
Create a human-needed, environmentally friendly product out of
Spanish moss
Use marketing skills to “sell” the design to classmates
GLEs Science
4th – (E-1A-ES), (E-1B-E1), (LS-E-C2)
5th – (SE-M-A4)
6th – (SE-M-A6, A8)
7th – (SE-M-A2, A4)
8th – (SE-M-A8, A10)
High School – (SE-H-A4, A7, A9, B5, D4), (SE-M-A4)
English Language Arts
4th – (ELA-1-E5, E6), (ELA-4-E2, E5)
5th – (ELA-1-M1), (ELA-4-M1, M2, M4, M6), (ELA-7-M1, M4)
6th – (ELA-1-M1, M3), (ELA-4-M1, M2, M6), (ELA-7-M1)
7th – (ELA-1-M1, M3), (ELA-4-M1, M2, M6), (ELA-7-M1, M4)
8th – (ELA-1-M1), (ELA-4-M1, M2M M6), (ELA-7-M1, M4)
High School – (ELA-1-H1), (ELA-4-H1, H2, H4, H6), (ELA-7-H1)
Materials List “Haunted Waters, Fragile Lands, Oh! What Tales to Tell” video
Markers (1 pack of 10 is provided)
Construction paper (1 pack provided)
Foil (1 roll provided)
Glue (3 bottles provided)
Scissors (3 pairs provided)
Pencils (1 pack of 24 provided)
Moss (teacher provides – can be purchased in craft section of Walmart or other
craft stores)
Additional arts and crafts materials may be found in your classroom. Feel free to
use what you have available.
59

LSU AgCenter • 4-H Youth Wetlands Program • 2013
Background Information
Spanish moss (Tillandsia usneoides), also known as graybeard, is a flowering plant in the
pineapple family. This moss has threadlike stems with small greenish-blue leaves that
grow on tree limbs and can get up to 20 feet long. It is common in the southeastern part
of the United States – commonly growing on bald cypress trees in the wetlands of
Louisiana.
Many people that Spanish moss is a parasitic plant, meaning that it takes valuable
nutrients from the tree it lives on and eventually leads to the death of the tree. But that is
incorrect! Spanish moss is an epiphyte. Epiphytic plants grow upon or attach to living
plants but do not absorb the nutrients from those plants. Epiphytic plants like Spanish
moss rarely kill the trees they live on, although they may lower a tree’s growth rate by
reducing the amount of light to a tree’s own leaves.
As mentioned in the video, many products from Louisiana wetlands have been used
commercially, and the harvesting of some natural resources has aided the destruction
of valuable marshlands. Due to heavy demand from consumers, Spanish moss was
over-harvested for years and used as a stuffing material in automobile seats, furniture
and mattresses. Over-harvesting is harmful to an ecosystem because it depletes the
species to very low numbers and may drive it to extinction.
Spanish moss can be a sustainable material for use in commercial products, but that’s
possible only if companies are conscious of the harmful effects over-harvesting can
cause. Today, the U.S. Department of Agriculture enforces regulations for the harvesting
of Spanish moss in many states, allowing some companies to use the plant in upholstery,
as a packing material, in gardens and for flower arrangements.
Definitions:
Spanish moss (Tillandsia usneoides) – also called Florida moss, long moss or graybeard.
Spanish moss is not a true moss. It is an epiphytic plant, which grows on another plant
but does not rely on the host plant for nutrients; epiphytes make their own food.
Over-harvesting – occurs when a type of resource (such as an animal or a plant) is too
widely consumed.
Supply – the quantity of a commodity that is in the market and available for purchase or
that is available for purchase at a particular price.
Demand – the desire to purchase, coupled with the power to do so.
Consumer – a person or organization that uses a commodity or service.
Advance Preparation
1. Set up video for class to watch: “Haunted Waters, Fragile Lands, Oh! What Tales
to Tell.”
60

LSU AgCenter • 4-H Youth Wetlands Program • 2013
2. Make copies of student activity sheet for each group of four students.
Procedure
1. Discuss with the class what they learned about Spanish moss from the video.
2. Review the background information about Spanish moss and supply/demand.
3. Divide students into groups of four or less. Each group should have all of the
materials needed for this lesson at its station.
4. Tell students that as a group they are to create a human-needed product using the
moss sample provided. This product must not be of such high demand that the
population of Spanish moss is put in jeopardy of over-harvesting. They must also
come up with ways to offset the harvesting done and ensure well-managed
harvesting of the plant (e.g., rotation of harvest, thinning rather than complete
harvesting of area, determine eco-friendly/sustainable ways to grow it and
planting live oak trees for future security of population).
5. The students can use any of the arts and craft supplies to make the product. (These
items include foil, construction paper, markers and more.)
6. As students work on their products, they should consider the following and
answer the questions on their student activity sheets.
a. How will this product help make the lives of humans easier?
b. Who will use this product? (i.e., age group, gender)
c. How much should this product cost?
d. How could you advertise this product?
e. Is this product harmful to the environment?
f. How will this product affect the marshlands?
7. After they have created their products and completed their worksheets, each group
must come up with an advertisement they will present at the front of the class.
The skit must include the product name, who the product targets, how they will
use sustainable practices and the price of the product.
a. A possible option is to video these advertisements and show to parents or
other groups at a later date. Also, other classes can be brought in to vote
on the best product and advertisement.
Blackline Master
1. Spanish Moss
Resources
BTNEP: Barataria-Terrebonne National Estuary Program, “Haunted Waters, Fragile
Lands, Oh! What Tales to Tell,” 4-6 video guide.
University of Florida 4-H Forest Ecology. Accessed October 15, 2008.
http://www.sfrc.ufl.edu/4h/Spanish_moss/spanmoss.htm.
The Money Instructor. Accessed November 5, 2009.
http://www.moneyinstructor.com/wsp/supplydemand.asp
61
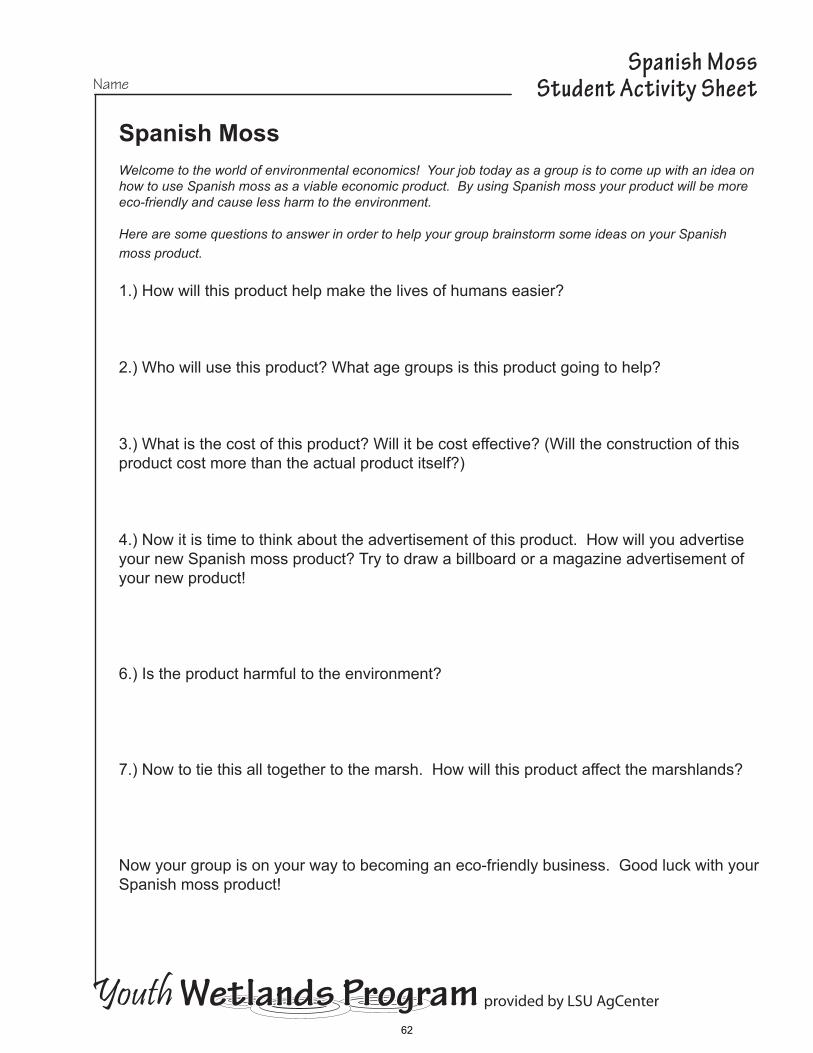
Spanish MossStudent Activity SheetName
Youth Wetlands Program provided by LSU AgCenter
Spanish MossWelcome to the world of environmental economics! Your job today as a group is to come up with an idea on how to use Spanish moss as a viable economic product. By using Spanish moss your product will be more eco-friendly and cause less harm to the environment.
Here are some questions to answer in order to help your group brainstorm some ideas on your Spanish moss product.
1.) How will this product help make the lives of humans easier?
2.) Who will use this product? What age groups is this product going to help?
3.) What is the cost of this product? Will it be cost effective? (Will the construction of this product cost more than the actual product itself?)
4.) Now it is time to think about the advertisement of this product. How will you advertise your new Spanish moss product? Try to draw a billboard or a magazine advertisement of your new product!
6.) Is the product harmful to the environment?
7.) Now to tie this all together to the marsh. How will this product affect the marshlands?
Now your group is on your way to becoming an eco-friendly business. Good luck with your Spanish moss product!
62

LSU AgCenter • 4-H Youth Wetlands Program • 2013
Spanish Moss in the T-3 Format
What You Say What You Do What the Students Do
Have students watch the
video “Haunted Waters,
Fragile Land, Oh! What
Tales to Tell.”
Sit back and watch the
video.
Read background
information and decide
what you would like to
highlight to the students.
What did you learn from the video? Class discusses.
Go over background information of
Spanish moss that you chose.
Read background material
from lesson plan.
Go over basic concepts of
marketing:
• Consumer – target group to sell to
• Supply – how much of your
product you plan on selling.
• Demand – how much is needed.
Now you’re going to create a
product using your moss samples.
The product must be
environmentally friendly and
important to humans.
Assign students to groups
of no more than four; make
sure each group has
materials needed.
Brainstorm an idea and
build a prototype.
Remind students to keep the Four
Ps in mind:
• Product - how will this product
make our lives easier?
• Placement - who will use this
product (gender, age, etc.)?
• Price - how much will this product
cost?
• Promotion - how will we advertise
this product?
Is this product harmful to the
environment; how will it affect the
marshland?
Create an advertisement
for their product using
construction paper and
markers.
Tell the students to create a quick
presentation on their product using
the prototype and their
advertisement.
Students will present
their product to the class.
63

LSU AgCenter • 4-H Youth Wetlands Program • 2013
Grade Level
Upper Elementary
Middle School
High School
Duration
50-55 minutes
Setting
The classroom
Vocabulary
Sea Level
Sea Level Rise
Subsidence
Relative Sea Level Rise
Soil Compaction
Displacement
Losing Ground: Subsidence Teacher Instructions
Focus/Overview This lesson focuses on the loss of Louisiana wetlands to a process
known as subsidence – the sinking of the land. Although this is a
natural process, various human factors have exaggerated the problem.
Learning Objectives
The students will:
Distinguish the manmade and natural causes of sediment loss.
Define sea level and sea level rise and determine why this is
important to the state of Louisiana.
Define subsidence and the effect on Louisiana, resulting in
relative sea level rise.
Identify extraction of products from the ground as a cause of
increased subsidence.
GLEs Science
4th – (SI-E-A1, A2, B1)
5th – (SI-M-A4, A7),(SE-M-A4), (ESS-M-A7)
6th – (SE-M-A6, A8)
7th – (D-2-M), (SE-M-A1, A4)
8th – (ESS-M-A10, A8)
High School – (SI-H-A1, A3, B1), (LS-H-DH), (SE-H-A7)
English Language Arts
4th – (ELA-1-E5, E6), (ELA-4-E2, E5), (ELA-5-E6)
5th – (ELA-1-M1) , (ELA-7-M1, M4), (ELA-4-M1, M2, M4, M6)
6th – (ELA-1-M1, M3), (ELA-7-M1), (ELA-4-M1, M2, M4, M6), (ELA-5-M1)
7th – (ELA-1-M1, M3), (ELA-7-M1, M4), (ELA-4-M1, M2, M6), (ELA-5-M1, M2)
8th – (ELA-1-M1), (ELA-7-M1, M4), (ELA-4-M1, M2, M6)
High School – (ELA-1-H1), (ELA-7-H1), (ELA-4-H1, H2, H4, H6)
Social Studies
4th – (G-1A-E2), (G-1B-E1, E3), (G-1D-E4)
5th – (G-1A-M2)
7th – (G-1A-M2)
8th – (G-1A-A1, M2), (G-1B-M3, H1)
Materials List “Vanishing Wetlands, Vanishing Future” Video
Plastic cups (one per student – teacher provides)
Ice cubes (teacher provides)
Wooden sticks/Popsicle sticks (1 stick per student)
Permanent marker (1 pack of 4 is provided)
64

LSU AgCenter • 4-H Youth Wetlands Program • 2013
Ruler
Soil/dirt from outside (teacher provides)
Scissors (3 pairs are provided)
Balloon (one for each group of two students)
Background Information
Sea Level
The ocean is not flat. Water is influenced by many forces, including winds, tides, large and small
waves, glacier melt and rainfall, which determine height of the sea around the world. Generally
speaking, sea level is the point where the ocean meets the land – or the level of the ocean surface.
Because of all the contributing factors listed above, sea level is not a constant number.
By understanding sea level, we can determine if the oceans are rising or falling over time. It is
thought that a worldwide rise in sea level has been occurring for the past several decades. Although
this is a natural process, the concern is that global warming and other weather changes caused by
humans might be exacerbating this rise in sea level. Global warming causes sea level to rise by
expanding ocean water, melting mountain glaciers and eventually causing polar glaciers to melt or
slide into the oceans.
Subsidence
Land subsidence is a gradual settling or sudden sinking of land caused by the underground
movement of Earth’s materials. Subsidence is due to soil compaction and a loss of support below
ground. In other words, when water is taken out of the soil, the soil collapses, compacts and drops.
Historically in Louisiana, subsidence was offset by the accumulation of new sediments into the
wetlands during flooding from the Mississippi River. Because the levee system was constructed to
eliminate these floods, new sediments do not accumulate, and subsidence gains the advantage.
Subsidence rates vary locally and regionally. In the United States alone, an area roughly the size of
New Hampshire and Vermont combined has been directly affected by subsidence. Although a
natural process, land subsidence often is exacerbated by human activities, such as the removal of
groundwater and petroleum from under the Earth’s surface. This certainly is true in Louisiana. The
amount of canals dug for oil and gas exploration in coastal Louisiana is thought to speed up this
process of subsidence.
Because of the difficulty in separating the effects of subsidence and sea level rise on Louisiana
wetlands, scientists have combined the two rates into a term known as "relative sea level rise."
Average rates in other parts of the world are 1-2 millimeters per year. Due to the combined sea level
rise and subsidence rates, however, Louisiana is sinking at a greater rate of 2.1 to 9.4 millimeters per
year. This is a concern in Louisiana, because coastal areas will be flooded, people will lose their
homes, some freshwater resources will become too salty to use and habitat loss will occur.
See General Wetlands Information at the front of the binder for more information on subsidence.
65

LSU AgCenter • 4-H Youth Wetlands Program • 2013
Definitions:
Sea level – The ocean surface; the mean level between high and low tides.
Sea level rise – Long-term increases in mean sea level.
Subsidence – Sinking or settling of soils so that the surface is disrupted.
Relative sea level rise – The combined rates of sea level rise and subsidence in Louisiana. The
effects of subsidence and relative sea-level change are the most critical environmental and cultural
issues facing southeastern Louisiana.
Soil compaction – Air pockets in the soil collapse under the weight of the soil above.
Displacement – Occurs when an object is immersed in a fluid, pushing it out of the way and taking
its place.
Advance Preparation
1. Have “Vanishing Wetlands, Vanishing Future” video set to sediment loss section.
2. Gather all materials and make copies for students.
Procedure
Part 1
1. View the “Sediment Loss” section of the “Vanishing Wetlands, Vanishing Future” video.
2. Pass out the Causes of Sediment Loss student activity sheet.
3. After students have completed the concept map, have students share their maps and discuss
what they now know about levees, spoil banks and sediment loss.
4. Lead students in a discussion about the concepts learned in this activity.
Part 2
1. Break students into groups of two and pass out a student activity sheet to each group.
2. Give each group two plastic cups and have them label the cups like this:
a. One cup should have two ice cubes in it and be labeled sea ice.
b. The other cup should be left empty and be labeled glacier ice.
3. Students should fill both cups half full with water and make sure the water level is even in
both cups.
4. Mark the water level of both cups on the side with a marker.
5. Have the students place two wooden sticks (not touching) across the top of the cup with no
ice, labeled glacier ice.
6. Ask the students to place two cubes of ice on top the sticks.
7. On their worksheets, have students predict the outcome and suggest reasons for the outcomes
they predict.
8. Let the ice cubes begin to melt and have students check the water level every five minutes
and record this on their activity sheet (a clock or stopwatch must be visible).
9. At the end of 30 minutes, have students mark the new elevations.
66

LSU AgCenter • 4-H Youth Wetlands Program • 2013
10. Teacher Information:
a. The water elevation in the cup that initially had the ice cubes in it (labeled sea ice)
should not have changed. This represents ice already existing in the water, such as an
iceberg, that would not affect sea level if it melted.
b. The water elevation in the cup that had the ice cubes later added to it (glacier ice)
should have changed. These cubes represent glaciers that are located on the land
(above the water) that would contribute to sea level rise when they melted.
11. Lead a discussion about rising sea level due to global climate change using the following
questions:
a. Why might we in Louisiana be concerned about sea level rise? (People living in
coastal areas could lose their homes, cities could flood, salt water intrusion could
damage freshwater ecosystems, etc.)
b. Using what you know on the water cycle, does increased rainfall add to sea level rise?
Why or why not? (Rainfall is part of the water cycle. As water evaporates from oceans
and rises into the atmosphere, it cools, condenses, forms clouds and eventually
precipitates, falling back to Earth as rain, snow, sleet, etc. Ultimately, the water that
evaporates from the Earth will return to the Earth. Thus, sea levels will not rise as a
result of precipitation.)
c. What can we do to help slow the process of global warming and sea level rise? (This
refers to human use of fossil fuels – some answers might be to take public transit
instead of driving; eat local foods; turn off lights and electrical equipment when not
in use; plant a tree; and reduce, reuse and recycle.)
Part 3
1. Review with the class the background information about subsidence. Explain to students that
subsidence can be related to the removal of underground materials, such as oil and gas.
2. Divide students into groups of two.
3. Give each group a plastic jug with the top quarter of the bottle cut off.
4. Cut a small hole (large enough for the tip of a balloon to fit through) about 2 inches above
the bottom of the jug.
5. Fill the bottom of the jug with soil until the soil is just below the hole cut out on the side.
6. Partially blow up the balloon to a size that can fit inside of the jug. DO NOT TIE THE
BALLOON.
7. Place the balloon into the jug and put the mouthpiece of the balloon through the hole.
(Someone must continuously pinch the mouth of the balloon to keep the air from escaping.)
8. Add approximately 4 more inches of soil to the jug (on top of the balloon, until it is
completely buried).
9. Mark the level of the top of the dirt on the jug.
10. Release the air from the balloon and observe.
11. Mark the resulting level of dirt.
12. Explain to students that the air in the balloon represented a natural gas/oil deposit under the
Earth’s surface and what they just demonstrated is what happens to Louisiana wetlands when
these deposits are removed.
13. Have the students suggest possible effects on coastal Louisiana since oil and gas exploration
began in the early 1900s. (These answers will vary but should have information about
increased subsidence; pollution; damage to wetland habitats, plants and animals from oil
spills; and damage to land from the digging of canals)
67

LSU AgCenter • 4-H Youth Wetlands Program • 2013
Extension for Activity Have older students read the article from National Geographic titled “Gone with the Water” and
discuss as a class. This article can be found at
http://ngm.nationalgeographic.com/ngm/0410/feature5/
Blackline Masters
1. Causes of Sediment Loss
2. Sea Level Rise
References
My Science Box. Katrina Case Study. Accessed July 15, 2009. www.mysciencebox.org
The Fragile Fringe: A Guide for Teaching About Coastal Wetlands. USGS NWRC. Accessed July
19, 2009. www.nwrc.nbs.gov/fringe/ff_index.html
Water Science for Schools. USGS NWRC. Accessed August 1, 2009.
http://ga.water.usgs.gov/edu/gwsubside.html.
68
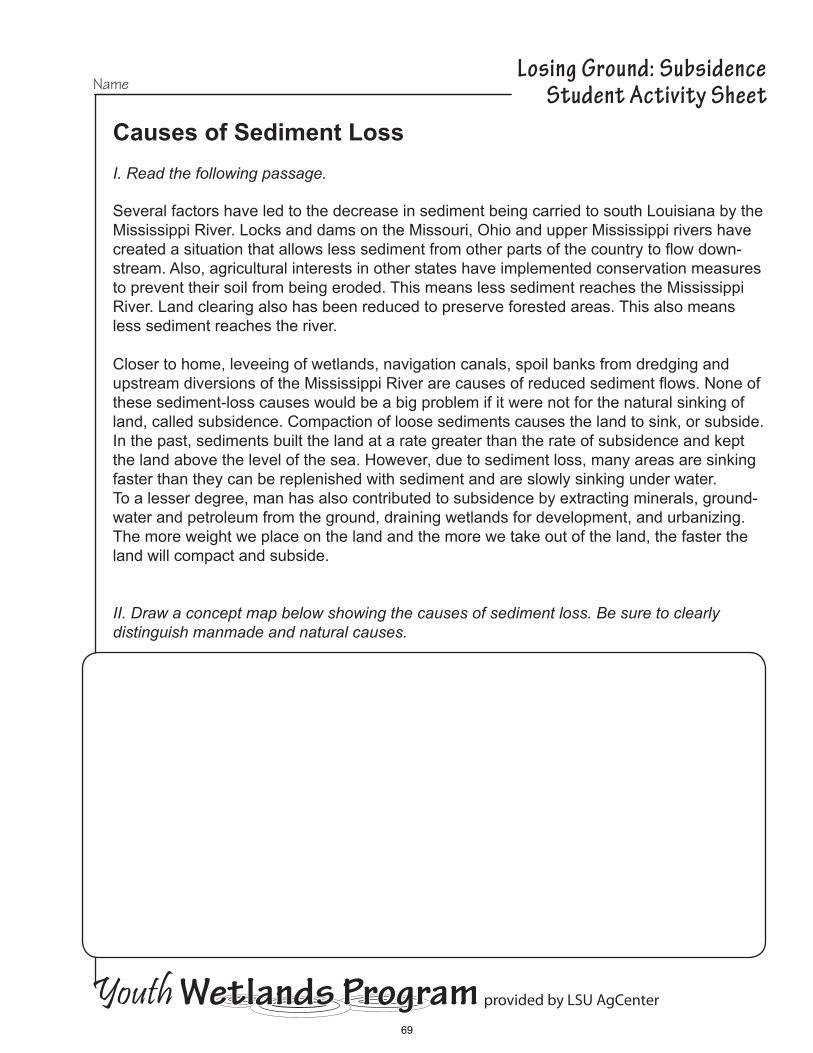
Losing Ground: SubsidenceName Student Activity Sheet
Youth Wetlands Program provided by LSU AgCenter
Causes of Sediment Loss I. Read the following passage.
Several factors have led to the decrease in sediment being carried to south Louisiana by the Mississippi River. Locks and dams on the Missouri, Ohio and upper Mississippi rivers have created a situation that allows less sediment from other parts of the country to flow down-stream. Also, agricultural interests in other states have implemented conservation measures to prevent their soil from being eroded. This means less sediment reaches the Mississippi River. Land clearing also has been reduced to preserve forested areas. This also means less sediment reaches the river.
Closer to home, leveeing of wetlands, navigation canals, spoil banks from dredging and upstream diversions of the Mississippi River are causes of reduced sediment flows. None of these sediment-loss causes would be a big problem if it were not for the natural sinking of land, called subsidence. Compaction of loose sediments causes the land to sink, or subside. In the past, sediments built the land at a rate greater than the rate of subsidence and kept the land above the level of the sea. However, due to sediment loss, many areas are sinking faster than they can be replenished with sediment and are slowly sinking under water. To a lesser degree, man has also contributed to subsidence by extracting minerals, ground-water and petroleum from the ground, draining wetlands for development, and urbanizing. The more weight we place on the land and the more we take out of the land, the faster the land will compact and subside.
II. Draw a concept map below showing the causes of sediment loss. Be sure to clearly distinguish manmade and natural causes.
69

Losing Ground: SubsidenceName Student Activity Sheet
Youth Wetlands Program provided by LSU AgCenter
Sea Level RiseDirections:Using your ruler to measure, record your observations of “sea level” change in the tables below. As soon as your teacher says you are ready to begin, take a measurement of the water level in each cup and write these readings in the “start” column. You will be recording measurements in both cups every five minutes over a 30-minute period.
Predict the outcome and explain why you predict that outcome: ________________________________________________________________________________________________________________________________________________________________________________________________________________________
A. Sea Ice Water level Start 5 min 10 min 15 min 20 min 25 min 30 min
B. Glacier Ice
Water level Start 5 min 10 min 15 min 20 min 25 min 30 min
Questions
A. Sea Ice1. Did the water level change as the sea ice melted?
2. How can you explain this?
B. Glacier Ice1. Did the water level change as the glacier ice melted?
2. How can you explain this?
C. Comparing Sea Ice and Glacier Ice 1. Did the ice melt at different rates? Describe what you saw.
70

LSU AgCenter • 4-H Youth Wetlands Program • 2013
Losing Ground: Subsidence
Answer Key to Sea Level Rise
Questions
A. Sea Ice
1. Did the water level change as the sea ice melted? No
2. How can you explain this? Answers should include something based on the following: Ice
already in the ocean does not contribute to sea level rise. The ice already took up the space in
the water, so when it melted, it just filled in that space. This is called displacement.
B. Glacier Ice
1. Did the water level change as the glacier or continental ice melted? Yes
2. How can you explain this? Glaciers are formed on land (above the water). When glaciers
break off into the ocean they displace existing water (just as a person displaces water when they
enter a bathtub). So when these glaciers melt, they add additional water to the system, causing
the sea level to rise.
C. Comparing Sea and Glacier Ice
1. Did the ice melt at different rates? Describe what you saw. Student answers will vary.
2. Did this experiment support your original hypothesis? Why or why not? Student answers
will vary.
71

LSU AgCenter • 4-H Youth Wetlands Program • 2013
Losing Ground in the T-3 Format
What You Say What You Do What The Students Do
Today we will be learning
some of the reasons we are
losing ground in Louisiana
wetlands.
Does anyone know what a
wetland is?
Can anyone explain what
sea level is?
What about sea level rise?
Did you know that the
coastal marshes of
Louisiana actually are
sinking under the water?
This is a process known as
subsidence.
Use the information at the
beginning of the lesson and
the General Wetlands
Information at the front of
the curriculum binder to fully
explain why we are losing
Louisiana wetlands. Focus on
the effects of sea level rise
and subsidence.
Talk about what they know
about Louisiana wetlands,
why we are losing them, sea
level rise and subsidence.
We are going to watch a short
video about the sediment loss
in Louisiana.
Play the “Sediment Loss”
section of the “Vanishing
Wetlands, Vanishing Future”
video.
View the sediment loss
section of the video.
As I pass out the Causes of
Sediment Loss worksheet,
everyone should read more
about the causes of sediment
loss and identify manmade
and natural causes. Then you
will draw a concept map.
Pass out the student activity
sheet titled Causes of
Sediment Loss.
Read the passage and draw
concept map.
Now that everyone has drawn
their concept maps, who
would like to volunteer to tell
me what they learned about
sediment loss?
Solicit answers. Discuss what they learned
and show their concept maps
to the class.
72

LSU AgCenter • 4-H Youth Wetlands Program • 2013
Now we are going to break
into groups to learn more
about sea level and sea level
rise. I am passing out a
worksheet that will help you
with this activity.
Break students into groups of
two and have each one go to
a station with all the
materials on it. Pass out one
worksheet to each group.
Break into groups; go to
correct station and take
worksheet.
Each group should have two
cups at its station. Using a
permanent marker, label one
cup sea ice and one cup
glacier ice.
Label both cups correctly.
I am passing out two ice
cubes to each group. These
cubes should be placed in the
cup measured sea ice.
The other cup should remain
empty.
Pass out 2 ice cubes to each
group.
Take ice cubes and place in
cup labeled sea ice.
Now, fill your cups halfway
up with water and make sure
the water level is even in both
of the cups.
Show students where they
can go to fill their cups and
assist them.
Go to allowed area to fill
cups with water.
Once back at your stations,
mark the water level of each
cup on the side with a
permanent marker.
Mark water levels on the side
of each cup.
On the cup labeled glacier ice
– the one with no ice cubes in
it – lay the two wooden sticks
across the top. Be sure the
sticks are not touching but are
close enough to rest the ice
cubes on both.
Assist students in placing
sticks.
Lay sticks across top of cup
labeled glacier ice.
73

LSU AgCenter • 4-H Youth Wetlands Program • 2013
I am now going to pass out
two more ice cubes to each
group. These cubes should be
placed on top of the sticks.
Pass out two ice cubes to
each group.
Take ice cubes and place
them on top of sticks.
Now that everyone has their
ice placed on the sticks, take
a moment to predict what you
think the outcome will be and
write this on your worksheet.
Discuss with group and fill
out predicted outcome on
worksheet.
Stand your ruler next to the
cup and measure the water
level in inches (or whatever
you choose). Record this
number in the START
column for both cups.
Assist students with
measuring water level.
Use rulers to measure water
level and record on
worksheet.
When I say GO, the clock
will start and each of your
groups will take a reading
every 5 minutes for the next
30 minutes. I will call out
TIME, and that is when you
should take your reading.
Record any important
observations you want to
discuss at the end of the
experiment.
Say GO when you are ready
for the clock to start. Every 5
minutes, yell TIME and assist
students in recording their
water levels. This should
continue for 30 minutes, and
then you should stay TIME to
finish experiment.
Observe changes in water
level and record
measurements every 5
minutes for 30 minutes.
Now, as a group, answer the
remaining questions on your
worksheets.
Answer questions on
worksheets.
Once everyone is finished
with the worksheet, tell me
what did everyone see? Was
your predicted outcome
correct?
Use Procedural Steps No. 10
and No. 11 to lead discussion
about what the students
observed and about the rising
sea level and what students
can do to slow down this
process.
Talk about what they learned
and what they can do to help
slow the rising sea level.
74

LSU AgCenter • 4-H Youth Wetlands Program • 2013
Sea level rise is happening
everywhere but is a huge
problem in Louisiana when
combined with another
natural process that occurs
here, subsidence.
Can anyone tell me what
subsidence is?
Why would this increase
sediment loss in Louisiana
wetlands?
Use background information
to discuss subsidence.
Talk about what they know
about subsidence in
Louisiana.
In your same groups of two,
we are going to conduct an
experiment on sediment loss
due to subsidence.
At each station should be the
following materials: clear
jug, balloon, scissors and
soil.
Discuss the sinking or
settling of soil so that the
surface is disrupted, creating
a shallow hole and, in turn,
contributing to the altering of
the coastline.
Using these materials, we
will do an experiment to
determine how extracting
materials from underground
affects the surface elevation
of the land.
Demonstrate how the jugs
need to be cut a quarter of the
way from the top and how a
2-centimeter-diameter hole
needs to be cut about two-
thirds from the bottom.
Students cut their jugs in the
same fashion.
Fill bottom of container with
soil until it is just below the
hole.
Fill bottom of container with
soil until it is just below the
hole.
Blow up the balloon to a size
that fits in the jug, but do not
tie the balloon. Hold the
mouthpiece and insert it in
the hole with balloon inside
the jug. Be sure to keep the
balloon sealed; don’t let the
air out yet. Then fill the
remainder of the jug with soil
Blow up the balloon to a size
that could fit in the jug (do
not tie the balloon ). Hold the
mouthpiece and insert it in
the hole with balloon inside
the jug. Then fill the
remainder with enough soil to
bury the balloon. Mark the
soil elevation on the side of
75
LSU AgCenter • 4-H Youth Wetlands Program • 2013
so the balloon is buried.
Mark the soil elevation on the
side of the jug with a
permanent marker.
the jug with a permanent
marker.
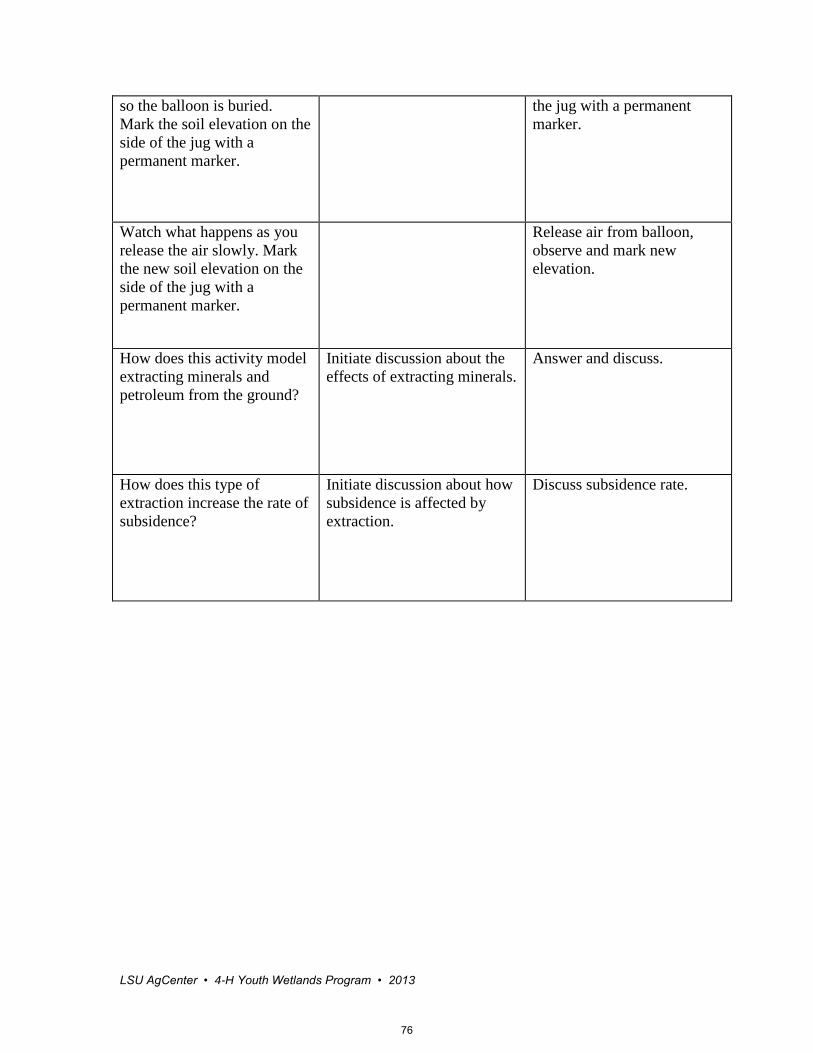
Watch what happens as you
release the air slowly. Mark
the new soil elevation on the
side of the jug with a
permanent marker.
Release air from balloon,
observe and mark new
elevation.
How does this activity model
extracting minerals and
petroleum from the ground?
Initiate discussion about the
effects of extracting minerals.
Answer and discuss.
How does this type of
extraction increase the rate of
subsidence?
Initiate discussion about how
subsidence is affected by
extraction.
Discuss subsidence rate.
76

LSU AgCenter • 4-H Youth Wetlands Program • 2013
Grade Level
Upper Elementary
Middle School
Duration
50-55 minutes
Setting
The classroom and
outdoors
Vocabulary
Dichotomous Key
Scientific Name
Genus
Species
Getting to Know a Plant Teacher Instructions
Focus/Overview
This lesson is designed to introduce students to the parts of a plant
and to how these parts function. Using a dichotomous key, students
will learn how to identify wetland plants that are frequently used in
Louisiana wetland restoration projects.
Learning Objectives
The students will:
Identify the parts of a plant and learn how they function
Understand the use of a dichotomous key
Identify unknown wetland plants using a dichotomous key
Learn key wetland restoration plants used in Louisiana
GLEs Science:
4th – (SI-E-A1, A6), (LS-E-A1, A3, A5, B2)
5th – (SI-M-A1, A3), (LS-M-A4, C1, D1), (SE-M-A7)
English Language Arts:
4th – (ELA-1-E1, E5, E6), (ELA-2-E1-E6), (ELA-3-E1, E2), (ELA-4-E1, E5), (ELA-5-E3, E6)
5th – (ELA-1-M1), (ELA-2-M1, M2), (ELA-3-M2, M3, M4, M5)
6th – (ELA-1-M1, M3), (ELA-2-M1, M2, M6), (ELA-3-M2, M4, M5, ELA-4-M1, M2, M4, M6)
Materials List
Crayons/markers/colored pencils (1 pack of each provided)
Small garden shovel (teacher provides)
Background Information
Like people, every plant has unique characteristics that can be used for identification purposes.
For example, you may know that your friend is short and has blond hair and a birthmark. Based
on these features, you are always able to pick your friend out of a photograph or a crowd of
students. The same is true for plants. Every plant has unique characteristics that allow someone
to identify the plant.
A dichotomous key (DI-COT-TO-MUS) is a tool that can be used to identify plants. This type
of key is used for all sorts of plants, ranging from trees to flowers, as well as for animals, rocks,
fish and more! A dichotomous key contains a series of choices that lead the user to the correct
name of something. "Dichotomous" means "divided into two parts." Therefore, a dichotomous
key will always give two choices in each step. Eventually, when enough questions have been
answered, the identity of the plant, animal or object is revealed.
77

LSU AgCenter • 4-H Youth Wetlands Program • 2013
When identifying plants, most plants have both a common name and scientific name. This may
be a little confusing, but the system of giving scientific names to plants resulted from the fact
that scientists also were confused. So many plants had different common names. People in
different places or people who spoke different languages referred to the same plants by different
common names. In 1758, Carl Linnaeus, a Swedish biologist, proposed a universal system for
naming all living things. That system provides two names for a species: a family name (generic
name or genus name), which always has a capital letter as the first letter, and a personal name
(specific name), which is always in lower case letters – both are underlined or italicized.
Even people have a common and scientific name – each member of a family has a last name
(surname) that identifies the family and a first name (specific or personal name) that identifies an
individual member of the family.
The identification of plants by this scientific name is essential in determining whether or not an
area can be called a wetland habitat. Wetland plant species are different from plants located in
other areas because they are specially adapted to survive in areas with water and low levels of
oxygen. Before students determine if a plant resides in a wetland habitat, however, they must
first be able to identify each part of a plant.
The three most familiar parts of a plant are the roots, stems and leaves.
Stems are used to support the plant and transport water and food throughout the plant.
Leaves are the “factories” of the plants – where raw materials (such as sunlight and water) are
changed into usable food for a plant (through photosynthesis). Blades are individual parts of a
leaf.
The roots of the plant are the vegetative parts that grow primarily underground and are used to
transport water from the surrounding ground to the rest of the plant. The primary root is the first
root that is produced by the germinating seed. Lateral roots extend horizontally from the primary
root and allow for more water uptake.
The nodes of the plant are where the leaves latch onto the stem. Internodes are like nodes; but
they hold buds that will grow into leaves. The petiole is the small stalk that attaches the leaves to
the stems. Finally, the apical bud is the primary bud of the plant; all other buds are produced
below the apical bud.
Definitions:
Dichotomous key – a tool used for the identification of organisms (and some objects) based on a
series of choices between alternative characters
Scientific name – the Latin name given to an organism, consisting of a genus and species
Genus – the major subdivision of a family or subfamily in the classification of organisms
Species – a class of individuals having some common characteristics or qualities
78

LSU AgCenter • 4-H Youth Wetlands Program • 2013
Advance Preparation
1. Gather materials and copy activity sheets for students.
2. Before beginning Activity 2, conduct a walk around your school grounds to locate an
area outside that has a variety of plants. If available, locate a wetland-like area around the
school to perform this activity.
Procedure
Part 1
1. Review with your class the background information on wetlands (see the General
Wetlands Information in the front of binder), plants and a dichotomous key.
2. Pass out Parts of a Plant sheet.
3. Ask students to study the Parts of a Plant activity sheet and guess the role of each
plant part. Write important points from this discussion on the board.
4. Using the background information, share with students what each plant part is used
for and why it is important.
5. Ask students to give their opinions about what plant part they think is the most
important (there is not one correct answer).
6. After this discussion, allow students to fill in the blanks of each part on their
worksheets and review them as a class.
Part 2
1. Pass out a blank sheet of white paper and a writing utensil to each student and prepare
students to go outside for this portion of the activity. (If you have selected to use
garden shovels, bring these along, too.)
2. As a class, walk to your selected area outside and have each student pick a plant from
the area. Encourage students to pick other species besides grasses! If a student selects
a plant growing in the ground, he or she may dig up the plant but must collect the
roots as well as the body of the plant.
3. Once everyone has collected a plant, return to the classroom.
4. Using colored pencils or markers, have each student draw his or her plant on a piece
of paper and write down three reasons why he or she selected that plant.
5. Have the students label the parts of their plants as best they can.
6. Using the background information, explain to students what a dichotomous key is and
how it is used.
7. Pass out Plant Collection Dichotomous Key sheet.
8. Using one student’s plant as an example, review with the class how to use a
dichotomous key.
9. Let students use the dichotomous key worksheet to classify their plants.
10. After everyone is finished keying out their plants, ask for volunteers to present their
plants, tell why they chose them and go over the parts of their plants.
Part 3
1. Divide class evenly into 13 groups.
2. Pass out one Plant Identification Sheet to each group.
3. Tell the students to look at the picture of the plant and then read the plant’s description.
4. Based on information found on the Plant Identification Sheet, tell students to use the
Dichotomous Key sheet to find the plant’s scientific name.
a. Students must capitalize the genus name and underline both the genus and species
name (ex. Spartina alterniflora).
79

LSU AgCenter • 4-H Youth Wetlands Program • 2013
5. If time permits, allow students to trade cards to identify as many plants as they can.
6. Have the groups stand and describe their wetland plants to the class.
Blackline Masters
1. Parts of a Plant
2. Plant Collection Dichotomous Key
3. Dichotomous Key
4. Plant Identification sheets
Resources
Echkhardt Slattery, Britt. WOW! The Wonders of Wetlands. St. Michaels: Environmental
Concern Inc., 2005. Print.
http://www.kckpl.lib.ks.us/schlagle/LESSONS/KEY2TREE.HTM
http://www.educationworld.com/a_lesson/02/lp259-01.shtml
80

Youth Wetlands Program provided by LSU AgCenter
Getting To Know a PlantStudent Activity SheetName
Parts of a PlantDirections: Examine the picture of the plant below. Fill in the blanks by matching the parts of the plant with their definitions.
Fill in the blank. Using the plant chart above, fill in the blanks below with the parts of the plant.
(1)___________ are used to support the plant and transport water and food throughout the plant. Most of a plant’s food is made in its (2) ____________, where plants capture and use sunlight to produce food. (3) ___________ are individual parts of a leaf. The roots of the plant are used to transport water from the surrounding ground to the rest of the plant. The (4) ____________ is the first root that is produced by the germinating seed. A (5) ___________ extends horizontally from the root and allow for more water uptake. The (6) _________ of the plant are where the leaves latch onto the stem. (7) __________ are like nodes, but they hold buds that will grow into leaves. The (8)___________ is the small stalk that attaches the leaves to the stems. Finally, the (9)___________ is the primary bud of the plant; all other buds are produced from this part of the plant.
81

Youth Wetlands Program provided by LSU AgCenter
Getting To Know a PlantStudent Activity SheetName
Plant Collection Dichotomous Key Directions:After you have drawn your plant on a blank sheet of paper, use the following dichotomous key to identify what type of plant you have collected.
Start at number 1 and answer the questions until you discover what type of plant you have found.
1. Are stems or other parts of the plant woody and rigid like a tree? Yes……………………………………Go to 2. No…………………………………….Go to 6.2. Is the plant growing above the ground but leaning on other plants? Yes……………………………………It is a VINE. No…………………………………….Go to 3.3. Is the plant growing above the ground and standing on its own? Yes……………………………………Go to 4.4. Is the plant 20 feet tall or taller? Yes…………………………………….It is a TREE. (Stop Here) No……………………………………..Go to 5.5. Does the plant have more than one main stem? Yes…………………………………….It is a SHRUB. (Stop Here) No……………………………………..It is a sapling (young) TREE. (Stop Here)6. Is the plant a soft (herbaceous) plant like grass? Yes…………………………………………..Go to 7. No…………………………………………..Start over.7. Is the plant growing in open water that is always there, such as a pond, lake or permanent stream? Yes…………………………………………Go to 8. No………………………………………….Go to 10.8. Is the plant growing completely under water, freely floating on the surface or does it have floating leaves? Yes………………………………………..It is an AQUATIC PLANT. (Stop Here) No………………………………………...Go to 10.9. Is the plant growing with roots and part of the stem under water but the rest sticking up above the surface? Yes……………………………………….It is an EMERGENT PLANT. (Stop Here) No……………………………………….. Go to 10.10. Is the plant growing in soil that is saturated, wet, spongy or appears to have been wet at one time (remember that wetlands are not always covered by water)? Yes……………………………………….It is an EMERGENT PLANT. (Stop Here)
The plant type I found was __________________________________
82

Youth Wetlands Program provided by LSU AgCenter
Getting To Know a PlantStudent Activity SheetName
Dichotomous Key Directions:After you have drawn your plant on a blank sheet of paper, use the following dichotomous key to identify what type of plant you have collected!
1. Are stems or other parts of the plant woody and rigid like a tree? Yes……………………………………Go to 2. No…………………………………….Go to 6.2. Is the plant growing above the ground but leaning on other plants? Yes……………………………………It is a VINE. No…………………………………….Go to 3.3. Is the plant growing above the ground and standing on its own? Yes……………………………………Go to 4.4. Is the plant 20 feet tall or taller? Yes…………………………………….It is a TREE. (Go to #13) No……………………………………..Go to 5.5. Does the plant have more than one main stem? Yes…………………………………….It is a SHRUB. (Go to #16) No……………………………………..It is a sapling (young) TREE.6. Is the plant a soft (herbaceous) plant like grass? Yes…………………………………………..Go to 7. No…………………………………………..Start over.7. Is the plant growing in open water that is always there, such as a pond, lake or permanent stream? Yes…………………………………………Go to 8. No………………………………………….Go to 10.8. Is the plant growing completely under water, freely floating on the surface or does it have floating leaves? Yes………………………………………..It is an AQUATIC PLANT. (Go to #11) No………………………………………...Go to 10.9. Is the plant growing with roots and part of the stem under water but the rest sticking up above the surface? Yes……………………………………….It is an EMERGENT PLANT. (Go to #22) No……………………………………….. Go to 10.10. Is the plant growing in soil that is saturated, wet, spongy or appears to have been wet at one time (remem-ber that wetlands are not always covered by water)? Yes……………………………………….It is an EMERGENT PLANT. (Go to #19)11. Are leaves 1 inch to 2 inches long? Yes………………………………………. Go to 12 No……………………………………….. Go to 15 12. Are leaves kidney-shaped? Yes………………………………………. It is Water pennywort (Hydrocotyle spp.) No………………………………………… Go to 1513. Are the leaves on your tree alternate or opposite?
(Picture source unknown)
83

Youth Wetlands Program provided by LSU AgCenter
Getting To Know a PlantStudent Activity SheetName
Opposite……………………………………. Go to 14 Alternate………………………………….… Go to 17 14. Is the fruit on your tree hairy and light green? Yes………………………………It is a black mangrove (Avicennia germinans) No………………………………………… Go to 17.15. Are leaves 0.4 centimeters to 2 centimeters in length and oval-shaped? Yes…………………………………. It is water fern ( Salvinia minima)16. Does your shrub bloom in the spring with brown flowers? Yes…………………………………… It is a wax myrtle (Myrica cerifera) No…………………………………… Go to 18. 17. Is the alternate foliage tiny (1/2 to 3/4 of an inch long and 1/16 of an inch wide) or bigger (3 to 6 inches long and 1/8 to 3/4 of an inch wide? Tiny…………………………… It is a bald cypress (Taxodium distichum) Bigger………………………… It is a black willow (Salix nigra)18. Your shrub probably blooms in June or July. But is the fruit a tiny hard ball that is red to brown in color or is it bright and shiny purple to black berries? Hard ball……………………….. It is a buttonbush (Cephalanthus occidentalis) Berries…………………………. It is an elderberry (Sambucus Canadensis)19. Are the leaves on your emergent plant grass-like or broader (wide)? Grass-like……………………. Go to 20. Wide………………………….. Go to 21.20. Are the stems of your emergent grass plant hollow? Yes……………………………. It is smooth cordgrass (Spartina alterniflora) No (but the bottom of the stem is red)……… It is black needlerush (Juncus roemerianus) 21. Does your emergent grass plant have pink or white flowers? Yes…………………………. It is marsh mallow (Althaea officinalis) No………………………….. Oops, start again!22. Does your emergent plant have a flower that looks like a hotdog? Yes……………………………. It is a cattail (Typha spp.) No……………………………… Go to 23.23. Does your emergent plant have blue to white flowers with two yellow spots? Yes…………………………. It is pickerelweed (Pontederia cordata) No………………………….. Start over at No. 8.
The plant type is __________________________________________.
If trading cards, write answers here:
Plant 1 is _________________________________________________________.Plant 2 is _________________________________________________________.Plant 3 is _________________________________________________________.Plant 4 is _________________________________________________________.Plant 5 is _________________________________________________________.Plant 6 is _________________________________________________________.Plant 7 is _________________________________________________________.Plant 8 is _________________________________________________________.Plant 9 is _________________________________________________________.Plant 10 is ________________________________________________________.Plant 11 is ________________________________________________________.Plant 12 is ________________________________________________________.Plant 13 is ________________________________________________________.
(continued)
84
LSU AgCenter • 4-H Youth Wetlands Program • 2013
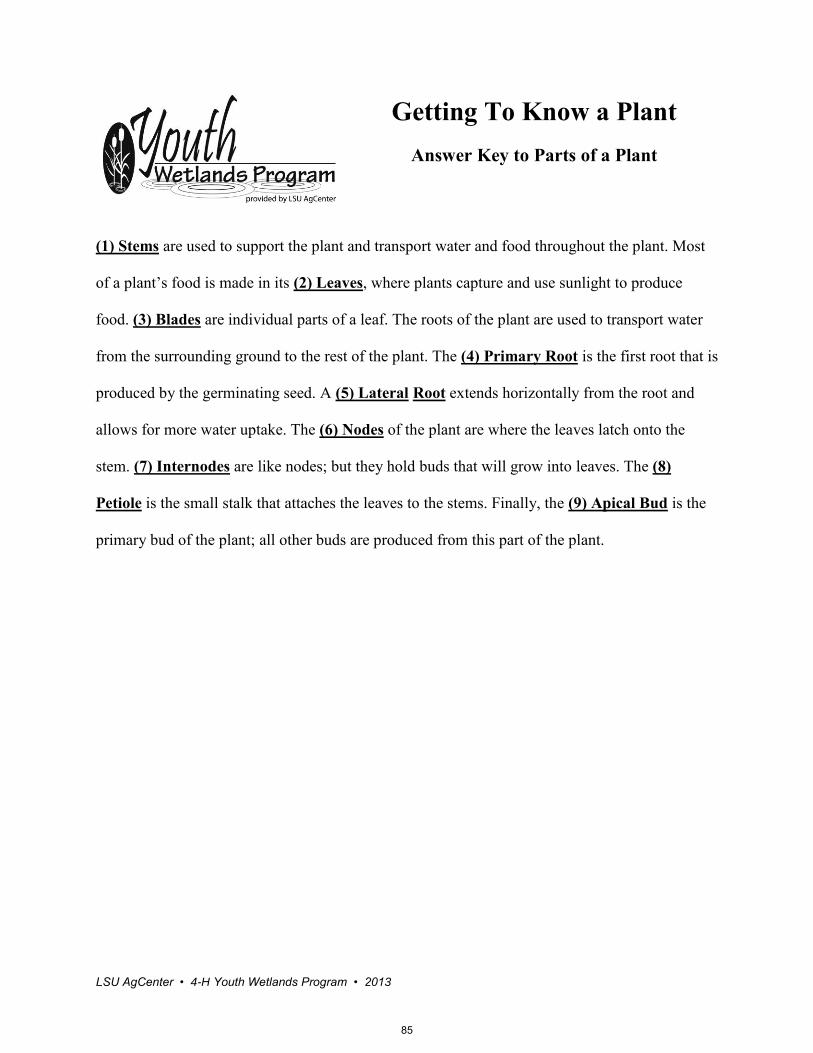
Getting To Know a Plant
Answer Key to Parts of a Plant
(1) Stems are used to support the plant and transport water and food throughout the plant. Most
of a plant’s food is made in its (2) Leaves, where plants capture and use sunlight to produce
food. (3) Blades are individual parts of a leaf. The roots of the plant are used to transport water
from the surrounding ground to the rest of the plant. The (4) Primary Root is the first root that is
produced by the germinating seed. A (5) Lateral Root extends horizontally from the root and
allows for more water uptake. The (6) Nodes of the plant are where the leaves latch onto the
stem. (7) Internodes are like nodes; but they hold buds that will grow into leaves. The (8)
Petiole is the small stalk that attaches the leaves to the stems. Finally, the (9) Apical Bud is the
primary bud of the plant; all other buds are produced from this part of the plant.
85

Youth Wetlands Program provided by LSU AgCenter
Getting To Know a PlantStudent Activity SheetName
Plant Identification Sheet
Name this plant
Identification: Flower: The small white flowers have five regular parts and grow in branching clusters. They bloom in early spring and fall.
Foliage: Leaves are round in appearance and 1 to 2 inches long. They are attached vertically to the stem on small petioles. Leaves have several lobes.
Fruit: Appear on the stem, they are smaller than the leaves, and form umbels.
Trunk: Small perennial plant with creeping stems.
This plant grows on the coast and its seeds provide food for ducks and birds. Nutria eat the plant. Only one type is not eaten by wildlife. Some people say you can eat the foliage raw or cooked.
ResourcesChabreck, R.H. and Condrey, R.E. 1979.Common Vascular Plants of the Louisiana Marsh. Sea Grant Publication, Baton Rouge, La.
Reed, Daniel. 2001. Wildflowers of the Southeastern United States http://2bnthewild.com/plants/H411.htm
Photo by Kiki Fontenot
86

Youth Wetlands Program provided by LSU AgCenter
Plant Identification Sheet
Name this plant
Identification:
Flower: Spring blooming tree (May to June). Dioecious. Yellow-green. Located on catkins that are 1 to 3 inches long. Flowers look like caterpillars.
Foliage: Alternate and simple leaves that are 3 to 6 inches long and one-eighth to three-fourths of an inch wide. Lanceolate shape. Margins are slightly toothed and the top and bottom sides are shiny. They have earlier new growth than other trees.
Fruit: Small cone-like structure that contains many cottony seeds. Needs a moist place to germinate before it dies, which happens quickly. Mature June to July and split at this time.
Trunk: Heavily ridged, dark bark. Branches fall off easily; however, they will root quickly (if not dead), making propagation easy.
This tree is native to North America; it likes to grow along rivers, lakes and ponds. It prefers full sunlight and wet soils but can tolerate some dry conditions. It grows very fast and upright and is considered medium-size. The branches gracefully “weep” downwards giving the tree a soft look.
Fun Facts:• Lives only 15-20 years.• Branches constantly fall off.• Tree will die as soil covers the roots formed on the trunk.• Keep away from drainage pipes
ResourcesOldenwald, N. 1996. Identification, Selection and Use of Southern Plants for Landscape Design, Third Ed. Claitor’s Pub-lishing Division, Baton Rouge, La.
http://www.cnr.vt.edu/dendro/dendrology/syllabus/snigra.htm
Getting To Know a PlantStudent Activity SheetName
Photo by Kiki Fontenot
87

Youth Wetlands Program provided by LSU AgCenter
Getting To Know a PlantStudent Activity SheetName
Plant Identification Sheet
Name this plant
Identification:
Flower: At the end of the stem is a long, brown spike similar in shape to a cigar or hotdog. It can be eaten if boiled.
Foliage: Narrow, upright and 4-6 feet long.
Fruit: A fluff contains the seeds.
Trunk: A grass-like perennial herb that grows from rhizomes.
Many species of this plant provide excellent habitat and food for wildlife such as nutria and muskrats. This plant grows in fresh water and intermediate marshes in Louisiana. Some species can grow even on beaches and in the bay.
Fun Facts:• Waterfowl love to live in areas populated with this plant.
ResourcesChabreck, R.H. and Condrey, R.E. 1979.Common Vascular Plants of the Louisiana Marsh. Sea Grant Publication, Baton Rouge, La.
Reed, Daniel. 2001. Wildflowers of the Southeastern United States http://2bnthewild.com/plants/H230.htm
Photo by Kiki Fontenot
88

Youth Wetlands Program provided by LSU AgCenter
Getting To Know a PlantStudent Activity SheetName
Plant Identification Sheet
Name this plant
Identification:
Foliage: Two leaves grow from each node. They are oval-shaped with a heart-shaped base. The tips are either notched or rounded. A third leaf is under the water that separates into filaments. Shorter leaves lie flat on the waters surface while longer leaves stretch out and stick up vertically. Leaves can be anywhere from 0.4 cm to 2 cm in length. New growth is green, whereas mature leaves turn brown. White stiff hairs cover the leaf surface making a water-repellent coat. Long light-brown hairs are on the bottom side of the leaf.
Fruit: No fruit is present. This plant is considered sterile. On larger plants, however, sporocarps are formed. They are sacs that encase smaller sacs that hold microscopic spores. The spores are about 1 millimeter in size.
Trunk: None. A floating fern, with root-like structures referred to as fronds.
This non-native plant is one of only 10 species in the world all of which do not naturally grow in the United States. It is found in water with high organic content.
Fun Facts:• Only outlawed in Louisiana and Texas. Not on any other invasive species plant list for other states.
ResourcesAnonymous-University of Florida. 2002. Aquatic, Wetland and Invasive Plant Particulars and Photographs http://plants.ifas.ufl.edu/saropic.html
Jacono, C.C. 2003. USGS. http://salvinia.er.usgs.gov/html/identification1.html
Photo by Kiki Fontenot
89

Youth Wetlands Program provided by LSU AgCenter
Plant Identification Sheet
Name this plant
Identification:
Flower: Flowers in summer and fall. Flower appears as long hanging cones at the ends of branches. It pro-duces purple pollen.
Foliage: Alternate foliage appears soft and feathery. The individual leaf is tiny, only measuring three-fourths to 1 1/2 inches long and one-sixteenth inch wide. Foliage changes color in fall appearing rusty brown.
Fruit: A seed-bearing cone. Also changes color from green to purple in the late summer and fall.
Trunk: Straight trunk reddish-brown with a fibrous bark and horizontal branches. One main trunk.
These trees are native to North America. They can live near or in water, but seedlings cannot be success-fully started in standing water. Full sunlight is necessary. This tree grows rapidly in the first years of growth. It grows pyramidal in form at an average height of 50 to 70 feet. The spread is around 30 feet. Scale is a noted problem in the spring.
Fun Facts:• The state tree of Louisiana• Swollen basal trunk commonly called knees grow around the base when tree is located in a moist environ-ment.
ResourcesOldenwald, N. 1996. Identification, Selection and Use of Southern Plants for Landscape Design, Third Ed. Claitor’s Pub-lishing Division, Baton Rouge, La.
Getting To Know a PlantStudent Activity SheetName
90

Youth Wetlands Program provided by LSU AgCenter
Getting To Know a PlantStudent Activity SheetName
Plant Identification Sheet
Name this plant
Identification:
Flower: The flowers are tubular and small blooming from spring into early summer. They are white with four petals and about one-half inch wide. They appear in clusters.
Foliage: Opposite, simple leaves are smooth and leathery. They are shiny above with a grayish pubescent below. They have lateral veins. Their size ranges from 1 to 3 ¼ inches long.
Fruit: The fruit capsule is somewhat hairy and light green. It is 1 to 2 inches long.
Trunk: Dark and scaly bark with an inner reddish bark. Older bark grey to black. Distinct nodes are on the twigs.
This tree is an evergreen tropical. It can be found in salt marshes and flats and estuarine waters. It can reach 80 feet tall. This tree is so common there are special swamps with only this one tree in them.
Fun Facts:• Ashes from the tree can be added to water and is useful as a soap substitute.• The flowers are a good source of honey.• The wood is considered weak.• Smoke from this tree while burning makes a good smudge that keeps mosquitoes away.
ResourcesTiner, R.W. 1993. Field Guide to Coastal Wetland Plants of the Southeastern United States. The University of Massachusetts Press, Amherst.
Duke, James A. 1983. Handbook of Energy Crops. http://www.hort.purdue.edu/newcrop/duke_energy/Avicennia_germinans.html#Uses
Photo by Chris Goodson
91

Youth Wetlands Program provided by LSU AgCenter
Getting To Know a PlantStudent Activity SheetName
Plant Identification Sheet
Name this plant
Identification:
Flower: Subtle green to brown flowers bloom in cluster of two to eight. They grow from just above the middle of the stem and flower from March to October.
Foliage: Very stiff and sharp foliage. The leaves are grass-like and are evergreen. They are olive brown to gray.
Fruit: The fruit capsules have three sides. These are almost one-fifth inch long. The seeds inside are ribbed.
Trunk: Unbranched linear stem. The bottom portion is red. This is a perennial grass. This plant grows in very wet areas that are sometimes covered by water.
Fun Facts:• This grass grows in areas of thick mud buildup. It can withstand high tide flooding.
ResourcesTiner, R.W. 1993. Field Guide to Coastal Wetland Plants of the Southeastern United States. The University of Massachu-setts Press, Amherst.
USGS. 2001. Gulf of Mexico Tidal Wetlands http://coastal.er.usgs.gov/wetlands/gallery/grasses.html
Photo courtesy of Louisiana Sea Grant
92
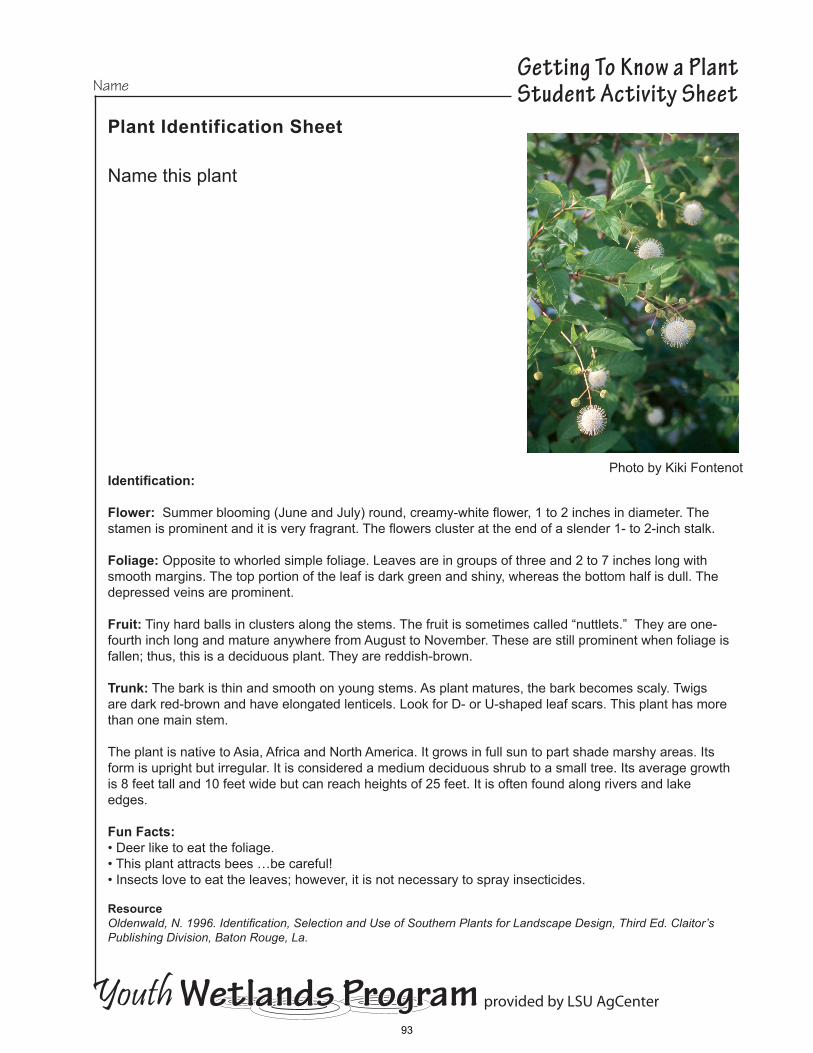
Youth Wetlands Program provided by LSU AgCenter
Getting To Know a PlantStudent Activity SheetName
Plant Identification Sheet
Name this plant
Identification:
Flower: Summer blooming (June and July) round, creamy-white flower, 1 to 2 inches in diameter. The stamen is prominent and it is very fragrant. The flowers cluster at the end of a slender 1- to 2-inch stalk.
Foliage: Opposite to whorled simple foliage. Leaves are in groups of three and 2 to 7 inches long with smooth margins. The top portion of the leaf is dark green and shiny, whereas the bottom half is dull. The depressed veins are prominent.
Fruit: Tiny hard balls in clusters along the stems. The fruit is sometimes called “nuttlets.” They are one-fourth inch long and mature anywhere from August to November. These are still prominent when foliage is fallen; thus, this is a deciduous plant. They are reddish-brown.
Trunk: The bark is thin and smooth on young stems. As plant matures, the bark becomes scaly. Twigs are dark red-brown and have elongated lenticels. Look for D- or U-shaped leaf scars. This plant has more than one main stem.
The plant is native to Asia, Africa and North America. It grows in full sun to part shade marshy areas. Its form is upright but irregular. It is considered a medium deciduous shrub to a small tree. Its average growth is 8 feet tall and 10 feet wide but can reach heights of 25 feet. It is often found along rivers and lake edges.
Fun Facts:• Deer like to eat the foliage.• This plant attracts bees …be careful!• Insects love to eat the leaves; however, it is not necessary to spray insecticides.
ResourceOldenwald, N. 1996. Identification, Selection and Use of Southern Plants for Landscape Design, Third Ed. Claitor’s Publishing Division, Baton Rouge, La.
Photo by Kiki Fontenot
93

Youth Wetlands Program provided by LSU AgCenter
Getting To Know a PlantStudent Activity SheetName
Plant Identification Sheet
Name this plant
Identification:
Flower: Prominent flowers bloom in June and July. They are small and clustered about 10 inches across and are milky white.
Foliage: Opposite pinately compound leaves. Normally have five to seven leaflets with coarse-toothed margins. Leaves can range from oval to lanceolate shape. Prominent lenticels are found on old woody canes and on twigs. The leaves are deciduous.
Fruit: Fruit appears with the flowers. The berries are shiny and color ranges from purple to black. Fruit matures in July through September.
Trunk: Very short trunks (More than one main trunk) with few stems. The bark is smooth and brown but with age it becomes rough. Buds appear red brown and pointed.
This semi-woody shrub can also become a small tree. It is fast growing in soils ranging from very wet to somewhat dry. It grows best in full sun and wet soils. Its form is upright with an umbrella-like canopy. Propagation is possible through seeds, cuttings and root suckers.
Fun Facts:• Only certain fruits can be eaten. Some species are poisonous!• People use berries in wine and jelly.• Wildlife also enjoys the fruit. Look at fence lines where songbirds have helped the spreading of this seed.
ResourcesOldenwald, N. 1996. Identification, Selection and Use of Southern Plants for Landscape Design, Third Ed. Claitor’s Publishing Division, Baton Rouge, La.
Virginia Tech Dendrology. 2004. http://www.cnr.vt.edu/dendro/dendrology/syllabus/scanadensis.htm
Photo by Kiki Fontenot
94

Youth Wetlands Program provided by LSU AgCenter
Getting To Know a PlantStudent Activity SheetName
Plant Identification Sheet
Name this plant
Identification:
Flower: Colors range from rose and pink to white. It is about 1 1/2 inches in diameter. It blooms from August through October.
Foliage: Grayish velvety leaves with somewhat serrated margins.
Trunk: An herbaceous plant. The main stem can grow three to 5 feet tall.
A native to Europe this plant was originally brought to the United States for medicinal purposes. It is found in salt marsh areas.
Fun Facts:• The roots are the original source of …HINT: A sticky treat we use at campfires.• Used to heal upset stomachs and sore throats.
ResourcesArmitage, A.M. 2001. Armitage’s Manual of Annuals, Biennials, and Half-Hardy Perennials. Timber Press, Portland, Oregon.
Anonymous-Connecticut Botanical Society. 2004. http://www.ct-botanical-society.org/galleries/althaeaoffi.html
Photo by Kiki Fontenot
95

Youth Wetlands Program provided by LSU AgCenter
Getting To Know a PlantStudent Activity SheetName
Plant Identification Sheet
Name this plant
Identification:
Flower: Erect spikes contain blue to sometimes white flowers. The flower has six parts, and each spike con-tains small petals that have two yellow spots on them. The tubular flowers have three united upper lobes and three separated lower lobes. The spike can reach 6 inches long. Most are 3 to 4 inches long. Blooms June to October.
Foliage: Single leaf per flowering stem; however, other basal leaves occur. They are alternate and can grow to 10 inches long and 6 inches wide with lanceolate-shaped leaves, but with a wider base and very shiny.
Trunk: A perennial herb started from a rhizome roots grow in muddy flats underneath water.
A native plant to the United States grows 1 to 3 feet tall in fresh marshlands, shallow ponds and lakes. Rhi-zomes and stems are eaten by nutria and ducks enjoy the seeds. This plant usually grows in small clumps.
ResourcesChabreck, R.H. and Condrey, R.E. 1979.Common Vascular Plants of the Louisiana Marsh. Sea Grant Publication,Baton Rouge, La.
Tiner, R.W. 1993. Field Guide to Coastal Wetland Plants of the Southeastern United States. The University of Massachusetts Press, Amherst.
Photo courtesy of Louisiana Sea Grant
96

Youth Wetlands Program provided by LSU AgCenter
Getting To Know a PlantStudent Activity SheetName
Plant Identification Sheet
Name this plant
Identification:
Flower: The flower is a panicle with five to 30 alternate spikes that are 2 to 4 inches long. These have even smaller spikelets attached to them. The flower can be seen June to October.
Foliage: Leaves are 16 inches long and one-half inch wide. They are smooth and pointed at the end but also slightly rolled inward just at the end of the leaf. The margins are smooth and hairy.
Trunk: A perennial grass with hollow stems. Stems are fat and spongy at the base. This plant has two forms: tall and short. HINT: This plant grows half underwater and half above water!
Fun Facts:• Native on the Atlantic coast of the United States but an invasive non-native on the pacific coast of the United States.• Snow geese love this plant.
ResourcesTiner, R.W. 1993. Field Guide to Coastal Wetland Plants of the Southeastern United States. The University of Massachu-setts Press, Amherst.
Anonymous-University of Florida. 2002. Aquatic, Invasive, and Wetland Plant Particulars and Photographs.http://aquat1.ifas.ufl.edu/spaalt.html
Photo by Chris Goodson
97

Youth Wetlands Program provided by LSU AgCenter
Getting To Know a PlantStudent Activity SheetName
Plant Identification Sheet
Name this plant
Identification:
Flower: Blooms in spring, not very prominent. Flowers are brown. Male and female flowers are on separate plants.
Foliage: Leaves are alternate and simple. They have tiny dots on both the top and bottom sides. The tip is pointed and margins are entirely or half toothed. Crush the leaves; they have a strong scent! The branches are hairy.
Fruit: Female plants produce white wax nutlets more than one-eighth inch in diameter and clustered along the stem. They smell like bayberries when crushed.
Trunk: It is an evergreen plant with more than one main trunk.
This is a native shrub. It can grow anywhere from thickets to prairies and swamplands. However, it is found on the east coast and all throughout the Gulf States. It has a fast growth rate and can usually be found after land is disturbed. Propagate it by seeds, cuttings and root cuttings.
Fun Facts:• Wildlife, including many species of birds, eat the berries.• Early settlers used the wax from the berries to make candles.• Plants keep fleas away.• A cutting in a drawer will keep cockroaches away. • Some people use it to make duck blinds for hunting.
ResourcesOldenwald, N. 1996. Identification, Selection and Use of Southern Plants for Landscape Design, Third Ed. Claitor’s Publishing Division, Baton Rouge, La.
Scheper, J. 2003. Myrica cerifera. http://www.floridata.com/ref/m/myrica.cfm
Photo by Chris Goodson
98

LSU AgCenter • 4-H Youth Wetlands Program • 2013
Getting to Know a Plant
Answer Key to Plant Identification Sheets
Plant 1 – Water pennywort (Hydrocotyle spp.)
Plant 2 – Black willow (Salix nigra)
Plant 3 – Cattail (Typha spp.)
Plant 4 – Water fern (Salvinia minima)
Plant 5 – Baldcypress (Taxodium distichum)
Plant 6 – Black mangrove (Avicennia germinans L.)
Plant 7 – Black needlerush (Juncus roemerianus)
Plant 8 – Buttonbush (Cephalanthus occidentalis)
Plant 9 – Elderberry (Sambucus Canadensis)
Plant 10 – Marsh mallow (Althaea officinalis)
Plant 11 – Pickerelweed (Pontederia cordata)
Plant 12 – Smooth cordgrass (Spartina alterniflora)
Plant 13 – Wax myrtle (Myrica cerifera)
99

LSU AgCenter • 4-H Youth Wetlands Program • 2013
Getting to Know a Plant in the T-3 Format
What You Say What You Do What The Students Do
Today we will be learning
about wetland plants and how
to identify them.
Does anyone know what a
wetland is?
Can anyone list some of the
plants found in wetlands?
Use the information at the
beginning of the lesson and the
General Wetlands
Information at the front of the
curriculum binder to fully
explain Louisiana wetlands
and the plants found there.
Talk about what they know
about Louisiana wetlands and
the plants found there.
As I pass out the Parts of a
Plant worksheet, study the
drawing of the plant and try to
guess the role that each of the
parts plays to keep the plant
alive.
Pass out Parts of a Plant sheet Take activity sheet and review
parts of plant.
Can anyone tell me a part of a
plant and why it is important?
Write important points from
discussion on board.
Discuss what they know about
plant parts.
Those are some great guesses!
Now, let’s start at the top of
the plant drawing and review
what each part is and what its
function is.
Using background information
and answer key, go through
each plant part and tell student
what it is used for.
Listen to the descriptions of the
parts of a plant.
What is your opinion about
which plant part is the most
important and why?
Share what part they think is the
most important and why.
Now you will fill in the blanks
on your worksheets for each
part of a plant.
Assist students in completing
the Parts of a Plant worksheet.
They will fill in the blanks on
the Parts of a Plant worksheet.
Now that everyone has
completed the worksheet, let’s
go through the paragraph
together. Shout out the answer
for the blank as I read along!
Read the paragraph aloud with
the correct answer (see Answer
Key). If there are incorrect
answers, hold a discussion on
these.
Listen and call out answers when
prompted by teacher.
100

LSU AgCenter • 4-H Youth Wetlands Program • 2013
Now we are going to go
outside so that each of you
can collect a plant from our
schoolyard.
Lead the students outside to a
previously selected location
where they can find plants to
bring inside.
Follow you outside and begin to
look for their plants.
You may now pick a plant of
your choice. Try to pick a
plant other than grass and
make sure to dig up the entire
plant, not just to where the
stems and ground meet. Once
you have dug your plant,
move to one side so I will
know who is finished.
Aid students in collecting their
plants.
Find a plant of his or her choice
and collect it (dig it up, etc).
Now that everyone has
collected a plant, let’s return
to the classroom.
Bring students back into the
classroom.
Follow you into the classroom.
On this blank sheet of paper,
draw your plant and try to
label as many parts of your
plant as possible. Also, write
three reasons why you
selected this plant.
Hand out blank paper, writing
utensils and any art supplies
you have in the classroom.
Draw their plants on their sheets
of paper, label the parts of their
plants and write three reasons
why they selected their plant.
Now each of you will be able
to classify your plant using a
dichotomous key.
Can anyone tell me what a
dichotomous key is and
what it is used for?
Pass out the Plant Collection
Dichotomous Key worksheet.
See background information to
explain what a dichotomous
key is and how it is used.
Take the worksheet and listen to
the description of a dichotomous
key.
Who would like to help me
work through the
dichotomous key with your
plant at the front of the
classroom?
With the volunteer, work
through the dichotomous key
in front of the class.
Student volunteer will bring his
or her plant to the front of the
class and help you work through
the key. Other students will
listen and observe.
It is now your turn to classify
your plants using the
dichotomous key.
Help students classify their
plants using the dichotomous
key.
Use the dichotomous key to
classify their plants.
101

LSU AgCenter • 4-H Youth Wetlands Program • 2013
Who would like to share their
plant and its classification
with the rest of the class?
Select students to share with
class.
Volunteers present their plants
and each plant’s classification to
the class.
Now that we all know what a
plant is, what each part is used
for and how to classify a
plant, we are going to go over
a few plants that are very
important to our wetlands.
Pass out Dichotomous Key
Handout to every student.
Take activity sheet.
In groups, you are going to
identify some popular
Louisiana wetland plants
using the Dichotomous Key
handout.
Divide class evenly into 13
groups and pass out one Plant
Identification Sheet to each
group.
Break into groups and take
activity sheets.
As a group, look at the picture
of the plant on your card and
read the plant’s description.
Once you have done so, use
your dichotomous key to find
its scientific name and write it
on your worksheet.
Assist students with Plant ID
cards and dichotomous keys
(see answer key).
Read the descriptions on the
cards and then find the scientific
names of the plants using their
dichotomous keys.
Once your group has
determined the scientific
name of the plant on your
card, trade with another group
and start over with that plant.
Observe and encourage groups
to trade cards.
Once they finish their cards,
students will trade with others
and find the scientific names of
the other plants.
Who would like to share their
plant cards with the class?
Ask a few students to present
their plant cards and what they
think the scientific names are.
Ask the rest of the class if they
think each student is correct. If
not, work through the key with
the class in order to find the
scientific name for that plant.
Some students will present their
cards and the scientific names
they have found.
102