weld head series fp400 – fp700 – fp1100
TRANSCRIPT

Original Instructions: German Translation of Original Instructions
76609591EN-FP400-700-1100-V1.0b
Weld Head Series
FP400 – FP700 – FP1100
OPERATING INSTRUCTIONS

FP400 – FP1700 – FP1100
76609591EN-FP400-700-1100-V1.0b.docx 2/19 2015-09-24
Annex:
- Safety Regulations - General References on Resistance Welding - Contact addresses
Version Date Reason of revision
1.0 2013-03 New
1.0a 2015-07 Changed company name
1.0b 2015-09 Design changes
Copyright 2015: AMADA MIYACHI EUROPE GmbH
Lindberghstr. 1, 82178 Puchheim, Germany
Right to make amendments reserved. Deviations may occur.
All rights reserved. The products named in this manual are only used for identification purposes and may be trademarks or registered trademarks of the respective companies.

FP400 – FP1700 – FP1100 Contents
76609591EN-FP400-700-1100-V1.0b.docx 3/19
Contents
1 General Information ............................................................................................. 4
2 Technical Description .......................................................................................... 5
2.1 Overview of Variants .......................................................................................................... 5
2.2 Construction and Mode of Action .................................................................................... 6
3 Commissioning .................................................................................................... 7
3.1 Pneumatic Connections .................................................................................................... 7 3.1.1 Connect Welding Cylinder .............................................................................................................. 7 3.1.2 Connect Locking Cylinder ............................................................................................................... 7
3.2 Electrical Connections ...................................................................................................... 8 3.2.1 Secondary Cables ............................................................................................................................ 8 3.2.2 Voltage Measurement ...................................................................................................................... 9 3.2.3 Connecting Proximity Switches ................................................................................................... 10 3.2.3.1 Proximity Switch „Head/Pincer back” .............................................................................................. 10 3.2.3.2 Proximity Switch „Stroke Cylinder ahead/back” .............................................................................. 11 3.2.3.3 Proximity Switch „Pincer locked” ..................................................................................................... 11 3.2.4 Displacement Measuring Module (optional) ................................................................................ 12 3.2.5 Force Measuring Module (optional) .............................................................................................. 12
3.3 Initial Commissioning ...................................................................................................... 13 3.3.1 Preconditions ................................................................................................................................. 13
3.4 Activating .......................................................................................................................... 13
3.5 Settings ............................................................................................................................. 14 3.5.1 Setting the Welding Force ............................................................................................................. 14 3.5.2 Setting the Electrodes ................................................................................................................... 14 3.5.3 Setting the Electrodes with an Adjusting Gauge ........................................................................ 14
4 Sequence ............................................................................................................ 15
4.1 Sequence with Double-action Weld Cylinder ................................................................ 15
4.2 Sequence Weld Head w. Lower Stroke Cylinder ........................................................... 16
4.3 Sequence Weld Pincer .................................................................................................... 17
5 Indexes ............................................................................................................... 19
5.1 Table of Figures ................................................................................................................ 19
5.2 Headword Index ............................................................................................................... 19

FP400 – FP1700 – FP1100 General Information
76609591EN-FP400-700-1100-V1.0b.docx 4/19
1 General Information
Information about safety regulations, symbols, copyrights, protection rights, usage location conditions and notes on resistance welding can be found in the back section of these operating instructions. Please read this information carefully before using these operating instructions.
These operating instructions should help you familiarize yourself with the system and take advantage of its application possibilities when used as directed.
It contains important notes to help operate the unit safely, properly, and economically.
Observing the notes will help avoid risks, decrease repair costs and down times, and enhance reliability and the service life of the unit.
It is a rule: Safety first!
Warning
Incorrect or inappropriate configuration, installation, settings, handling or use can cause mechanical, electrical or thermal hazards, which may result in serious damage or injury.
Ensure the correct execution of these points and follow the respective notes in the operating instructions. Danger
Do not put the system into operation before you have read the operating instructions!
Danger Persons with cardiac pacemakers and metallic implants are prohibited from
approaching to within a radius of at least 5 m of welding equipment!
Crushing Hazard There is a risk of crushing during the adjustment movement due to closing electrodes, stops for limiting adjustment or stroke movement and the stop on the basic pincers unit for limiting floating movement. Warning
This Class A welding equipment is not supposed to be used in living quarters, where the power supply is carried out by a public low voltage supply.
There it can be difficult to ensure electromagnetic compatibility because of conducted or radiated disturbances. Warning
FP400 – FP700 – FP1100 Technical Description
76609591EN-FP400-700-1100-V1.0b.docx 5/19
2 Technical Description FP400 FP700 FP1100 Welding force max. 400 N 700 N 1100 N
Electric power output limit
with electrodes ø 6 mm: 6 kA
with electrodes ø 10 mm: 18 kA
Force transmission closing stroke / welding pressure
pneumatically
Force adjustment via adjustable pressure control or proportional valve
Electrode holders Quick changer or spot arm (customer specific)
Electrode shape Ø 6 mm or 10 mm; for pincers: 7,5 mm
Electrode stroke max. 30 mm
Weight (w/o secondary cable)
ca. 15 kg ca. 15,5 kg ca. 16 kg
2.1 Overview of Variants
Each weld head is available in 3 basic types:
Automation, stand (with or w/o stroke) and pincer
Type Automation Pincer Stand
Stroke active side 30 mm 30 mm 30 mm
Passive Side -- -- only with stroke: 30 mm
Max. stroke of slide unit
-- 30 mm --
Max. stroke of locking cylinder
-- 5 mm --
Weight ca. 4 kg ca. 14 kg ca. 19 kg
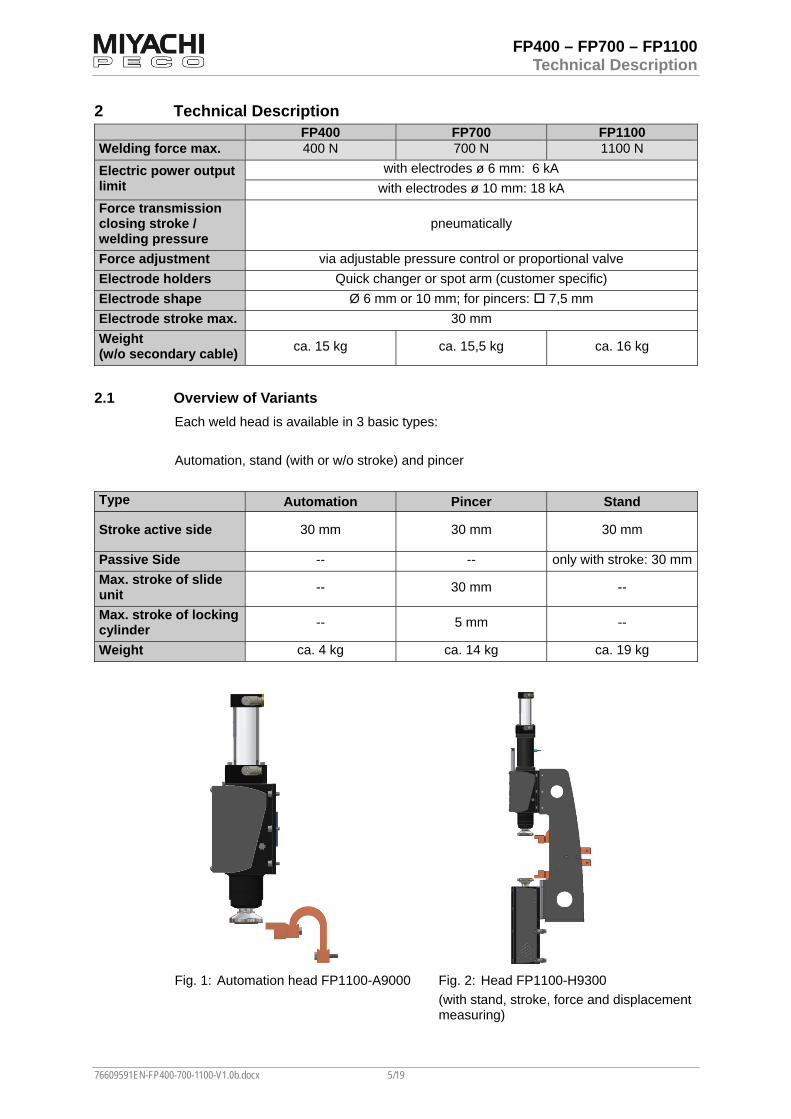
Fig. 1: Automation head FP1100-A9000
Fig. 2: Head FP1100-H9300
(with stand, stroke, force and displacement measuring)

FP400 – FP700 – FP1100 Technical Description
76609591EN-FP400-700-1100-V1.0b.docx 6/19
2.2 Construction and Mode of Action Pneumatically actuated weld heads consist typically of: a guide head in which the guide column is mounted in ball bearing sleeves for
minimum friction
a double action welding cylinder (pneumatic cylinder)
a current band
a stand (only with type stand)
the electrode holder with connections for the secondary cables
the electrode quick-changers
the pair of electrodes
The stand version with lower stroke cylinder also contains the stroke cylinder which
adjusts the counter electrode. Pneumatically-actuated weld pincers also contain: the basic pincer unit for vertical or horizontal installation. The mounting of the weld
head (active side) as well as the passive side on the slide of the basic unit enable the compensation of product tolerances.
the locking unit. This locking unit retains a defined position of the pincer to the product.
Maximum allowed air pressure for all welding components is 6 bar.
Fig. 3: Head FP400-S9000 (with stand)
Fig. 4: Pincer FP400-Z710H

FP400 – FP700 – FP1100 Commissioning
76609591EN-FP400-700-1100-V1.0b.docx 7/19
3 Commissioning
3.1 Pneumatic Connections
3.1.1 Connect Welding Cylinder
Deactivate the compressed air before connecting the plug-in hoses!
Caution
Connect the supply air for the welding
stroke (1) and the supply air for the return stroke (2) via the pneumatic plug-in hoses (outer diameter 6 mm) with the valve bank.
Fig. 5: Compressed air connectors of
welding cylinder (typical)
Correct the return stroke speed with the exhaust throttle (1) in a way that the weld head returns impact free.
3.1.2 Connect Locking Cylinder
Deactivate the compressed air before connecting the plug-in hoses!
Caution
Connect the compressed air connectors of
the locking cylinder with the corresponding connectors of the valve bank.
Fig. 6: Compressed air connectors of
locking cylinder (typical)

FP400 – FP700 – FP1100 Commissioning
76609591EN-FP400-700-1100-V1.0b.docx 8/19
3.2 Electrical Connections
3.2.1 Secondary Cables
Fig. 7: Connectors for secondary cables (typical for weld heads)
Fig. 8: Connectors for secondary cables (typical for weld pincers)
Connect the secondary cables with the corresponding connectors on the weld head / weld pincer and the welding current control or the welding transformer.
For the polarity of the connectors please see manual of the welding current control.
Depending on your application a reverse connection of the poles can be advantageous.
Please ensure the following to maintain as low a current resistance in the secondary circuit as possible:
The cable lugs should make contact with the mounted component over as great a surface area as possible.
Secondary cables should be laid as closely as possible and bound with cable ties to maintain a limited secondary window
Secondary cables should not be contacted to other parts conducting current and should not form shunt circuits
Contact surfaces should be clean
Contact surfaces should not be corroded
Screw connections should not loosen during operation
Caution
The attachment of a second (third) secondary cable to each pole increases the cable
cross section, thus reducing the current resistance. The shorter the secondary cable, the lower the conducting loss. A considerable loss should be expected where cables longer than 1.5 m are used.
Reversed pole connection can be advantageous, depending on the application involved. Voltage is created by the Peltier effect when welding materials which are widely disparate in terms of the electrical voltage sequence. This voltage is added to the voltage of the welding power control (recommended) or acts against it, depending on the secondary cable pole configuration. A secondary cable pole configuration which suits your particular application should therefore always be selected.

FP400 – FP700 – FP1100 Commissioning
76609591EN-FP400-700-1100-V1.0b.docx 9/19
3.2.2 Voltage Measurement
The voltage measuring cable is part of the power control or measuring instrument scope of delivery and is necessary if work is conducted with voltage or power control.
Fig. 9: Connectors on weld head (example with 2 voltage measuring cables)
Fig. 10: Connectors on weld pincer (typical)
Connect the voltage measuring cables with the corresponding connectors (1, 2).
Connect the 5-pole male connector of the voltage measuring cable with the corresponding socket on the welding current control (resp. the socket of the measuring device – if used).

FP400 – FP700 – FP1100 Commissioning
76609591EN-FP400-700-1100-V1.0b.docx 10/19
3.2.3 Connecting Proximity Switches
All proximity switches are fitted depending on the control used. The following preferential types are used:
Risk of injury!
Switch off system before adjusting the proximity switches! Caution
Crushing hazard! During switch on/off the cylinders can move. Ensure that a safe distance is maintained to the weld head.
Fig. 11: Proximity switch (typical)
(behind the cover of the weld head)
Fig. 12: Proximity switch (typical)
(behind the cover of the stroke cylinder)
3.2.3.1 Proximity Switch „Head/Pincer back”
Function: Head back/ Pincer back
Article-No. 770.61293
Type: PNP, make contact, NO
Working triggering distance Sn: 0,8 mm
Voltage range +Vs: 24 V DC
Maximum load current: 100 mA
Voltage drop static max: 3 V
Dimensions: ø 4 mm x 29 mm
Circuit diagram:
The proximity switch “Head/Pincer back” should always be set in a way that the LED illuminates if the weld head/pincer is in rest position. This signal is evaluated during an automated sequence.
0 V
PNP
+ Vs(1)
(4)
(3) loadblue (white)
black (green)
brown
Output

FP400 – FP700 – FP1100 Commissioning
76609591EN-FP400-700-1100-V1.0b.docx 11/19
3.2.3.2 Proximity Switch „Stroke Cylinder ahead/back”
Function:
Stroke cylinder ahead / Stroke cylinder back
Article-No. 770.61293
Type: PNP, Schließer, NO
Working triggering distance Sn: 0,8 mm
Voltage range +Vs: 24 V DC
Maximum load current: 100 mA
Voltage drop static max: 3 V
Dimensions: ø 4 mm x 29 mm
Circuit diagram:
0 V
PNP
+ Vs
(1)
(4)
(3) Lastblau (weiß)
schwarz (grün)
braun
Ausgang
The proximity switch “stroke cylinder back” should always be set in a way that the LED
illuminates if the stroke cylinder is in rest position.
This signal is evaluated during an automated sequence and generally signals the end of a welding sequence.
The proximity switch “stroke cylinder ahead” should always be set in a way that the LED illuminates if the stroke cylinder has reached the upper stroke position. This signal is evaluated so as to subsequently adjust the weld head.
3.2.3.3 Proximity Switch „Pincer locked”
Function: Pincer locked
Article-No 770.60989
Voltage range +Vs: 12 - 27 V AC/DC
Maximum load current: 100 mA
Circuit diagram:
The proximity switch “Pincer locked” should always be set in a way that the LED illuminates if the weld pincer is in rest position. This signal is evaluated during an automated sequence.

FP400 – FP700 – FP1100 Commissioning
76609591EN-FP400-700-1100-V1.0b.docx 12/19
3.2.4 Displacement Measuring Module (optional)
With the optional displacement measuring module (sensor) the electrode penetration can be measured during welding. This measuring enables the evaluation of the welding quality.
It also enables the deactivation of the welding current and can be used for part detection.
Fig. 13: Displacement measuring module
(behind the cover of the weld head)
3.2.5 Force Measuring Module (optional)
With the optional force measuring module you can compare the measured force with the set force (for process control). The module is integrated between welding cylinder (pneumatic cylinder) and guide head
.
Fig. 14: Force measuring module

FP400 – FP700 – FP1100 Commissioning
76609591EN-FP400-700-1100-V1.0b.docx 13/19
3.3 Initial Commissioning
3.3.1 Preconditions
Mechanical preconditions The weld head should be mounted securely and in a stable manner on a table or
frame.
Operating instructions in the annex should be heeded.
Ensure that all connections are correctly fitted.
Electrical preconditions
All fuses have to be implemented and must work properly.
A primary start may not be closed.
The quick stop may not be operated.
Ensure that all connections are correctly fitted.
The welding material can tend to form splashes if you work with low welding pressure and high currents. It is therefore necessary that protective glasses are worn, along with protective clothing!Set the welding pressure if possible in a manner which avoids splashing. Warning
For safety reasons wear protective glasses as well as protective clothes!
3.4 Activating
The cylinders move to their home positions when the compressed air is activated for the first time.
Caution
Crushing hazard! Ensure that a safe distance is maintained to the weld head.

FP400 – FP700 – FP1100 Commissioning
76609591EN-FP400-700-1100-V1.0b.docx 14/19
3.5 Settings
3.5.1 Setting the Welding Force
Via pneumatically-adjusted pressure valve, proportional valve, individual valve or valve strip.
The correct welding force for the welding task must be determined through several trial
welding operations. A generally-applicable rule is that the welding material does not splash when the correct welding force is set.
Always commence a new trial sequence with a higher welding force and optimize the result by reducing the welding force.
Background: the higher the welding force, the lower the transitional resistance between the components and the weaker the weld.
3.5.2 Setting the Electrodes
The electrode distance depends on the individual characteristics of your components.
Set the electrode distance in the open state as short as possible for safety reasons (< 6 mm).
The electrodes should stand vertically and be aligned in relation to each other.
3.5.3 Setting the Electrodes with an Adjusting Gauge
The position of the electrodes in the quick-change holder bracket is set with the optional available adjusting gauge.
For a quick change of used electrodes have always a quick change holder with already adjusted electrodes in store.

FP400 – FP700 – FP1100 Sequence
76609591EN-FP400-700-1100-V1.0b.docx 15/19
4 Sequence
To be able to optimally adjust the weld head or weld pincer please familiarize yourself with the description of a welding sequence below.
The following applies to all sequences:
All times depend on the ambient conditions and the welding task. The optimum setting of a system must be determined through a series of trials to achieve qualitatively high and reproducible welding results.
4.1 Sequence with Double-action Weld Cylinder
+
Start
Stepping contact
Return stroke
Flow diagram
Closingtime
Welding pressure =closing pressure =mains pressure
On-time
currenton
currentoff
Squeeze time
Holdtime
Rest time
power controlprocess
Air pressure p
time t
Fig. 15: Flow diagram of a four-time-welding-process
Select the set-up programming mode on the control for weld head set-up and adjustment. See sequence and current control operating instructions.
Insert the welding material. Pay attention to the safety instructions. Trigger
Start.
When start is triggered, the welding cylinder is supplied with closing pressure (e.g. 0.8 bar), and the electrode moves onto the welding material within the closing time.If closing pressure and closing time have been set correctly, the electrode moves onto the workpiece without jerking. (Set the closing time to infinity when setting up, see operating instructions of the control.)
Now the squeeze time starts and the welding pressure (e.g. 4 bar) builds up.
After the squeeze time has elapsed, the welding current is triggered and the selected weld program (on-time) runs. There is a contact resistance for the welding current at the contact point with the welding material. The high current density creates so much heat that the material liquefies. The material is displaced by the welding pressure and the electrode follows up.
Rapid electrode follow-up is extremely important during welding and for this the correct type of weld head must be used. The quality of the welding material must be consistent in order to produce a consistent welding resistance
FP400 – FP700 – FP1100 Sequence
76609591EN-FP400-700-1100-V1.0b.docx 16/19
The hold time starts. The electrodes remain on the welding material and the melt
cools over them. Then the welding cylinder is vented and the upper electrode opensby return stroke. The return stroke speed can be reduced by rotating the exhaust throttle on the welding cylinder. Option: - The proximity switch at the guide head gives out “Head back”
This is followed by the stepping contact (FK). Now the welding material can be changed.
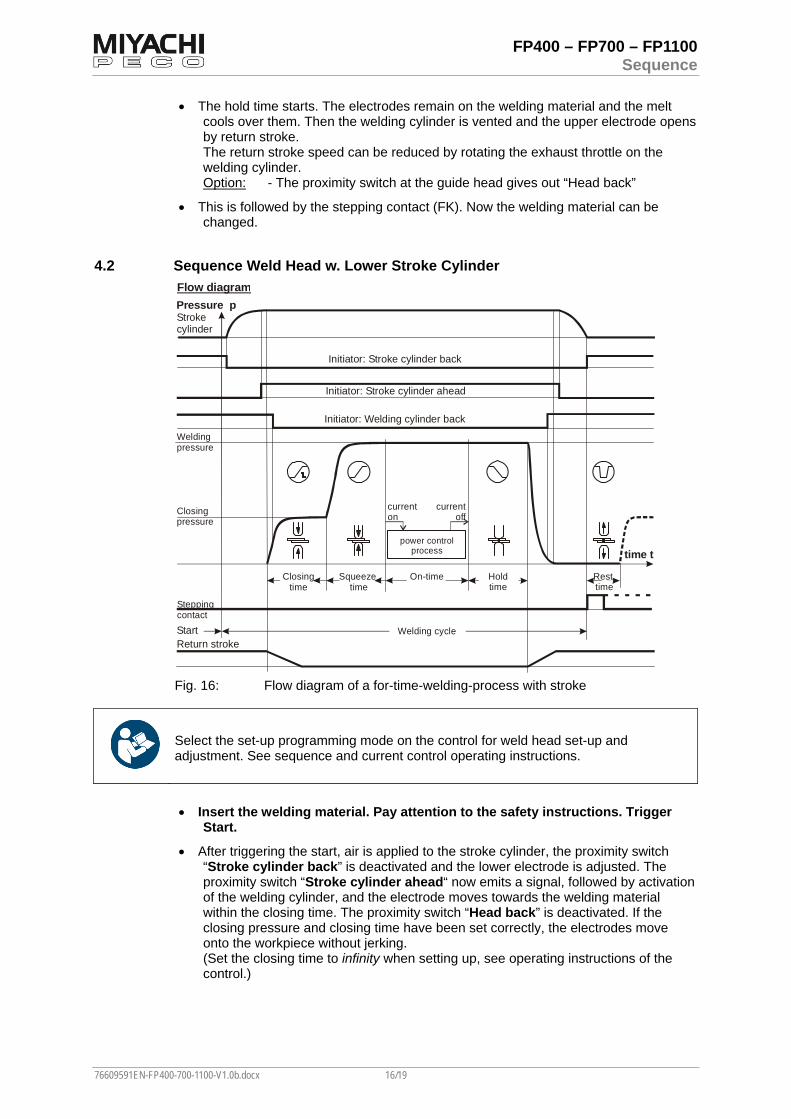
4.2 Sequence Weld Head w. Lower Stroke Cylinder
Start
Strokecylinder
Initiator: Stroke cylinder back
Initiator: Stroke cylinder ahead
Initiator: Welding cylinder back
Return stroke
Flow diagram
Closingtime
Closingpressure
Steppingcontact
Weldingpressure
On-time
currenton
currentoff
Squeeze time
Welding cycle
Holdtime
Rest time
power controlprocess
Pressure p
time t
Fig. 16: Flow diagram of a for-time-welding-process with stroke
Select the set-up programming mode on the control for weld head set-up and adjustment. See sequence and current control operating instructions.
Insert the welding material. Pay attention to the safety instructions. Trigger
Start.
After triggering the start, air is applied to the stroke cylinder, the proximity switch “Stroke cylinder back” is deactivated and the lower electrode is adjusted. The proximity switch “Stroke cylinder ahead“ now emits a signal, followed by activation of the welding cylinder, and the electrode moves towards the welding material within the closing time. The proximity switch “Head back” is deactivated. If the closing pressure and closing time have been set correctly, the electrodes move onto the workpiece without jerking. (Set the closing time to infinity when setting up, see operating instructions of the control.)

FP400 – FP700 – FP1100 Sequence
76609591EN-FP400-700-1100-V1.0b.docx 17/19
Now the squeeze time starts and the welding pressure (e.g. 4 bar) builds up.
After the squeeze time has elapsed, the welding current is triggered and the selected weld program (on-time) runs. There is a contact resistance for the welding current at the contact point with the welding material. The high current density creates so much heat that the material liquefies. The material is displaced by the welding pressure and the electrode follows up.
Rapid electrode follow-up is extremely important during welding and for this the correct type of weld head must be used. The quality of the welding material must be consistent in order to produce a consistent welding resistance.
The hold time starts. The electrodes remain on the welding material and the melt cools over them. Then the welding cylinder is vented and the upper electrode opensby the return stroke. The return stroke speed can be reduced by rotating the exhaust throttle on the welding cylinder. The stroke cylinder is now switched over and moves back. The proximity switch “Stroke cylinder ahead” is deactivated, the proximity switches “Head back” and “Stroke cylinder back” are activated.
This is followed by the stepping contact (FK). Now the welding material can be changed
4.3 Sequence Weld Pincer
Fig. 17: Flow diagram of a four-time-welding-process with pincer
Select the set-up programming mode on the control for weld head set-up and adjustment. See sequence and current control operating instructions.
Mains pressure is applied to the locking cylinder at the start of the sequence. This
holds the pincer in an open defined position. The proximity switches “Pincer locked” and “Pincer back” are activated
Start
Outputinterlockingvalve
Initiator: Welding pincers back
Flow diagramm with pincers
Initiator: Stroke cylinder back
Closingtime
Closingpressure
Stepping contact
Weldingpressure
on-time
currenton
currentoff
Squeeze time
Holdtime
Rest time
power controlprocess
Pressure p
time t
pincers locked

FP400 – FP700 – FP1100 Sequence
76609591EN-FP400-700-1100-V1.0b.docx 18/19
Insert the welding material. Pay attention to the safety instructions. Trigger
Start.
Due to the valve changeover, the mechanism on the locking cylinder now enables the welding pincer. The welding pincers electrodes now move, floating freely on the basic pincer unit. The proximity switch “Pincer locked” is deactivated.
The set closing pressure is simultaneously applied to the welding cylinder. The pincer is closing and the proximity switch “Pincer back” is deactivated.
Closing and squeeze time (= adjustment time) are starting. The adjusting time should last until the pincer is closed. Closing and return stroke speed is set with the two exhaust throttles on the welding cylinder. Set the throttles so that the electrodes touch the welding material without impacting.
The welding current is triggered and the selected weld program (on-time) runs. There is a contact resistance for the welding current at the contact point with the welding material. The high current density creates so much heat that the material liquefies. The material is displaced by the welding pressure and the electrode follows (penetration). Rapid electrode follow-up is extremely important during welding and for this the correct type of weld head must be used. The quality of the welding material must be consistent in order to produce a consistent welding resistance
The hold time starts. The electrodes remain on the welding material and the melt cools over them. Then the welding cylinder opens the electrodes. The proximity switch “Pincer back” is activated.
The locking cylinder locks the pincer in the defined position. The proximity switch “Pincer locked” is activated
This is followed by the stepping contact (FK). Now the welding material can be changed.

FP400 – FP700 – FP1100 Indexes
76609591EN-FP400-700-1100-V1.0b.docx 19/19
5 Indexes
5.1 Table of Figures Fig. 1: Automation head FP1100-A9000 ............................................................................................. 5 Fig. 2: Head FP1100-H9300 ............................................................................................................... 5 Fig. 3: Head FP400-S9000 (with stand) .............................................................................................. 6 Fig. 4: Pincer FP400-Z710H ............................................................................................................... 6 Fig. 5: Compressed air connectors of welding cylinder (typical) ......................................................... 7 Fig. 6: Compressed air connectors of locking cylinder (typical) .......................................................... 7 Fig. 7: Connectors for secondary cables (typical for weld heads) ...................................................... 8 Fig. 8: Connectors for secondary cables (typical for weld pincers) .................................................... 8 Fig. 9: Connectors on weld head (example with 2 voltage measuring cables) ................................... 9 Fig. 10: Connectors on weld pincer (typical) ......................................................................................... 9 Fig. 11: Proximity switch (typical) ........................................................................................................ 10 Fig. 12: Proximity switch (typical) ........................................................................................................ 10 Fig. 13: Displacement measuring module ........................................................................................... 12 Fig. 14: Force measuring module ....................................................................................................... 12 Fig. 15: Flow diagram of a four-time-welding-process ........................................................................ 15 Fig. 16: Flow diagram of a for-time-welding-process with stroke ........................................................ 16 Fig. 17: Flow diagram of a four-time-welding-process with pincer ...................................................... 17
5.2 Headword Index
A
Activating ....................................................... 13 Adjusting Gauge ............................................ 14
C
Commissioning ................................................ 7 Connect Locking Cylinder ................................ 7 Connect Welding Cylinder ............................... 7 Connecting Proximity Switches ..................... 10 Construction and Mode of Action .................... 6 Contents .......................................................... 3
D
Displacement Measuring Module .................. 12
E
Electrical Connections ..................................... 8
F
Force Measuring Module ............................... 12
G
General Information ......................................... 4
H
Headword Index ............................................ 19
I
Initial Commissioning ..................................... 13
O
Overview of Variants ....................................... 5
P
Pneumatic Connections .................................. 7 Preconditions ................................................ 13 Proximity Switch Head/Pincer back .............. 10 Proximity Switch Pincer locked ..................... 11 Proximity Switch Stroke Cylinder ahead/back
................................................................... 11
S
Secondary Cables ........................................... 8 Sequence ...................................................... 15 Sequence Weld Head w. Lower Stroke
Cylinder ..................................................... 16 Sequence Weld Pincer ................................. 17 Sequence with Double-action Weld Cylinder 15 Setting the Electrodes ................................... 14 Setting the Welding Force ............................ 14 Settings ......................................................... 14
T
Table of Figures ............................................ 19 Technical Description ..................................... 5
V
Voltage Measurement ..................................... 9