welcome to webtrain€¦ · you can select the laser power wattage by pressing the up & down...
TRANSCRIPT

Welcome to
WebTrain
01072012DLv1.3 1

The QuickLase units
3w/4w/5w/8w/10w
810nm
6w/12w Dual
810 + 980nm 12w Dual Plus
810 + 980nm
2

Accessories
http://www.quicklase.com/product-category/laser-accessories/ 3

The complete patients marketing Q&A
4

5

6

Connecting the fibre optic cable
Step 1 - Take off the fibre protection cap and keep
IMPORTANT: DO NOT touch end of the fibre
If not connected put the caps back on the fibre and laser connector 7

IMPORTANT: DO NOT touch end of the fibre
If not connected put the caps back on the fibre and laser connector
Connecting the fibre optic cable
Step 2 - Take off the laser fibre protection cap and keep
8

Connecting the fibre optic cable
Step 3 - Insert fibre end & screw-in tight
Once connected, DO NOT disconnect to prevent dirt entering
into the fibre connections.
Do not operate unless the fibre optic cable is fully attached! 9

Connecting the foot pedal
10
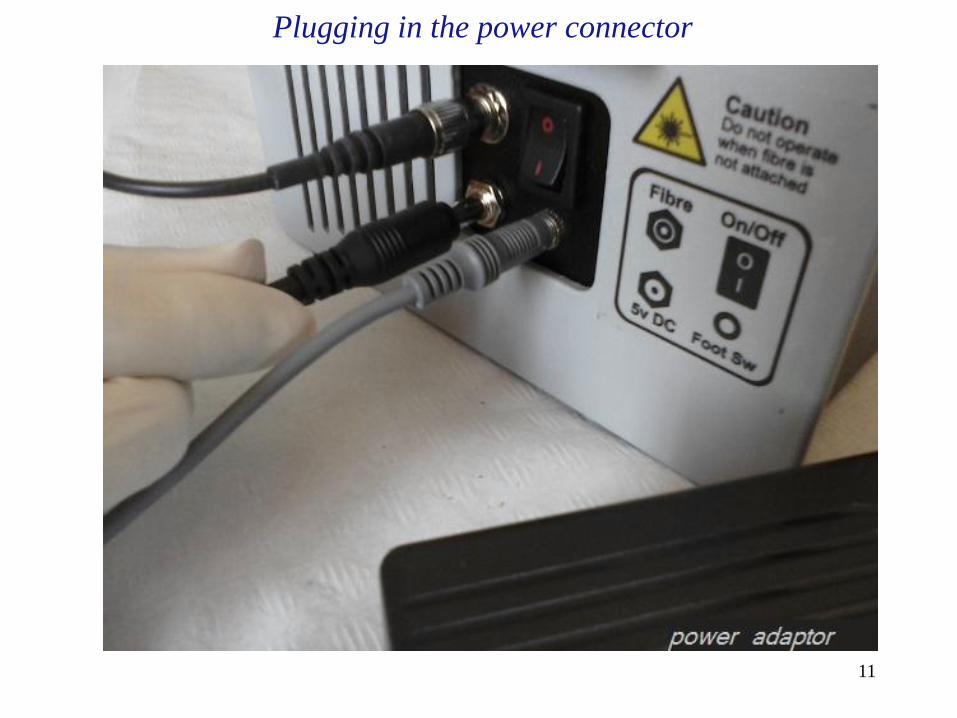
Plugging in the power connector
11

Winding out the fibre optic cable
12

Built-in fibre storage
13

Winding in the fibre optic cable
14

Your burr handpiece cuts hard tissue,
dentaLase cuts soft tissue
• Held exactly the same as burr handpiece
• Cuts on touch like burr handpiece
• Works like burr handpiece, press & drag
Comparing QuickLase handpiece to burr handpiece
15

The strippable fibre hand piece
Handpiece can be autoclaved but take out the white fibre
restrainer. The disposable white tip can not be autoclaved.
To pass fibre optic through handpiece, bend disposable tip
straight for fibre to pass.
Disposable tip Fibre restrainer
16

Stripping the fibre cable
Insert the fibre through the end
of the stripper upto the marker
(push marker to the right)
17

Press and hold top and bottom orange latches and then
pull the fibre to the left to strip
18

Make sure the stripped bit is no longer than 8cm otherwise it will
be too long for the handpiece
19

20

Checking the aiming beam
Hold the handpiece with the aiming beam turned on over a white
surface to check the cleave.
If you have a poor cleave, you can re-cleave or initiate the tip using
articulating/dark ink paper.
Always wear protective glasses before lasing 21

Initiating (carbonising) the fibre optic
Hold the handpiece less than 90 degree angle to avoid reflection and then lase into
dark inked paper 22

Checking the fibre optic
Make sure the fibre is not brittle, if it is, it will snap then you must
re-carbonise 23

Optional handpiece
Non-strippable fixed fibre
non-sterilisable hand piece
Handpiece cannot be autoclaved, chemi wipe only.
Changing the disposable tip with built in fibre is simple. Bendable
tips but more expensive than strippable fibre disposable tips.
24

Operation foot pedal
Press to operate 25

• Designed with colour coded screens for faster navigation
- Blue is the key entry authorisation screen
- Green is the laser power & cutting mode selection screen
- Purple is the preset procedures screen
- White/Light blue is the language selection screen for prests
- Red is the lasing (cutting/ablation) & aiming beam screen
• Designed for ease of use with preset procedures
Troughing, Crown lengthening, Implant Recovery,
Frenectomy, Gingivectomy, Perio, Endo, Whitening, Ulcers,
De-pigmentation, LLLT and other applications
• Power selction to suit your procedures
QuickLase Dentalase colour coded screens
26

Blue screen - Enter Pin screen
3w/4w/5w/8w/10w (810nm)
Enter Pin Code: 1243 then press enter
If your laser is the 6w/12w dual go to page 34
27

Green screen - laser power and cutting modes
3w/4w/5w/8w/10w (810nm)
28

Green screen - laser power with preset procedures
3w/4w/5w/8w/10w (810nm)
29

You can select the laser power settings by pressing the up & down
arrows buttons 5, also select the cutting mode by pressing the
Pulse/CW button 2.
To select a pre-set procedure press the icon no. 6, if you select for
example whitening or therapy procedure a „T‟ will appear next to the
power indicating a 30 secs timed exposure at 2W power. If you
press and hold button 6 for about 5 seconds, you can enter into the
language selection screen, see bellow.
Pressing Lase button 3 will take you into the red Lasing/cutting
screen. Press buttons 1 to select Pulse duration or enter the adjust
Pulse duration on/off.
30

Purple screen - Preset procedures
3w/4w/5w/8w/10w (810nm)
31

White light blue screen - Languages selection for presets
3w/4w/5w/8w/10w (810nm)
32

Red screen - Lasing and Aiming beam screen
3w/4w/5w/8w/10w (810nm)
33

Blue screen - Enter Pin screen
6w/12w Colour (810+980nm)
Enter Pin Code: 1243 then press enter 34

Green screen - laser power and cutting modes
6w/12w Colour (810+980nm)
Continuous
screen Pulsed
screen 35

You can select the laser power wattage by pressing the up & down arrows also
select the pulse or continuous mode by pressing the Pulse/CW button.
Select Pulse duration (preset) either 10, 20 or 50Hz or enter the adjust Pulse
duration on/off (adjustable), by selecting the double arrow button at the bottom of
the screen.
To select a pre-set procedure press the booklet icon on the bottom right, if you
select for example whitening or therapy procedure a „T‟ will appear next to the
power indicating a 30 secs timed exposure at 2W power.
Hold the booklet button for about 5 seconds, to enter into the language selection
screen, see bellow.
Press the wattage display button on the top right, to enter into individual
wavelength 810nm+980nm power selection/adjustment.
Pressing Lase button will take you into the red Lasing/cutting screen.
36

Purple screen - Preset procedures
6w/12w Colour (810+980nm)
37

White light blue screen - Languages selection for presets
6w/12w Colour (810+980nm)
38

Red screen - Lasing and Aiming beam screen
6w/12w Colour (810+980nm)
Continuous
screen Pulsed
screen 39

Individual wavelength power settings & pulsed frequency
6w/12w Colour (810+980nm)
810 & 980nm
settings
Adjustable & pre-set for
10,000 & 20,000 Hz
40

Procedures help screens
6w/12w Colour (810+980nm)
41

Auto Step Lase Function
STEP LASE: When you enter the Red ‘Lase’
screen and press the foot pedal down for the first
time the power will ramp up to your selected
power setting (approx. 1-2 seconds).
Thereafter, each time you press the foot pedal the
output will start at and remain at the actual power
chosen.
This function is helpful for the dentist to
adjust to the power output as well as for
patient comfort.
42

Wear protective glasses provided
43

Stick the yellow caution sticker on your surgery door
You can download more of these labels from our website, www.quicklase.com/product/caution-sign/
44

Abscess
Incision
Crown
Lengthening
Frenectomy
Gingivectomy
Troughing
Accurate
Impression
45

46

Laser
Whitening
47

48

• Soft Tissue Management & Cutting
Gingivectomy, Troughing (accurate impression), Crown lengthening & veneers
tissue re-contouring (Gingivoplasty), Tissue flap, Papillectomy, Frenectomy
Vestibuloplasty, Tooth exposure, Implant Recovery, Perio, Endo, Ortho
• Oral Hygiene Management & Sterilisation Laser Sulcular Debridement, Curettage, Dry socket, Ulcers and Root Canal
sterilisation, lowering the risk of cardiovascular diseases & septicemia
• Homeostasis & Faster Healing time
Stops bleeding, Tissue welding and healing (Low Level Laser Therapy - LLLT)
• Cosmetics Teeth Whitening , smile design and gum pigmentation removal
Some of the uses of a diode laser
49

- No shrinkage - Accurate margins for veneers and crowns
- No retraction cord - Creates better contouring for accurate impression
- Bloodless - Coagulation of bleeding tissue & clear vision
- Sterilisation for root canal & perio pockets
- Less damage to soft tissue - No collateral damage
- Simple removal and shaping of soft tissue surface
- Unlike ElectroSurgery (no need to allow for margins - can touch bone &
implant, can use with pacemaker & high blood pressure patients)
- Fast recovery - no post-op swelling and pain
Some of the benefits using a diode laser...
50

- Less traumatic
- Less Anaesthesia
- Faster recovery
- Decreased practice time
- Control bleeding
- Antisepsis (Kills bugs)
- Reduced fatigue & Stress
...Some of the benefits using a diode laser
51

Red aiming beam for guide
Laser Cutting beam
Must wear glasses,
do not look into the cutting beam
52

Homeostasis
53

No damage to
hard tissue
initiating
54

smooth cut (lambs liver as an example)
55

high power cut
56

smooth clear cut
57

smooth clear cut
58

Using a laser visor
59

• Each treatment area should have a “Laser Caution” warning
sign posted at the entrance to the treatment area.
• This signage serves to warn people not to enter the treatment
area without proper safety eyewear when the laser is in use.
You can download more of these labels from our website, www.quicklase.com/product/caution-sign/
60

The laser is not supplied in sterilised condition. It should be disinfected before use. The
following disinfecting procedures are recommended for the following fixtures and
attachments to the device:
The disposable fibre tips are supplied non-sterile by the manufacturer and are to be
discarded in an infectious waste container after each use. There is no re-use or re-
sterilisation procedure. The disposable fibre tips should be disinfected before use by
immersing them into sterilisation solution and when initiating/carbonising, the fibre tip
would be sterilised.
The tips are not autoclavable.
The handpiece should be disinfected before use by wiping it with a damp cloth with
sterilisation solution or immersing it. It is autoclavable but not the white plastic fibre
restrainer inside the screw top.
Suggested Solutions: Clean and disinfectant solution contains diluted
o-phenylphenol and p-tertiary amylphenol. It is to be used in accordance with the
manufacturer's specifications.
A. BIREX™
B. CIDEX®Steam
61

Diode lasers are part of your CQC surgery equipment, treated like
your xray unit, you should have them inspected and calibrated
annually.
Do I need to register laser equipment?
No. There is no legal requirement to register laser equipment in
England although, before using it, employers should carry out a risk
assessment.
This is a requirement under the general duties of the Management of the
Health and Safety at Work Regulations 1999.
Health & Safety Executive:
http://www.hse.gov.uk/radiation/nonionising/faqs.htm
62

63