welcome to the book! · 2019-08-17 · preface welcome to the book! thanks! thanks for your...
TRANSCRIPT

Preface
Welcome to the Book!Thanks!
Thanks for your interest in developing applications for Android! Android has grownfrom nothing to arguably the world’s most popular smartphone OS in a few shortyears. Whether you are developing applications for the public, for your business ororganization, or are just experimenting on your own, I think you will find Android tobe an exciting and challenging area for exploration.
And, most of all, thanks for your interest in this book! I sincerely hope you find ituseful and at least occasionally entertaining.
The Book’s StructureAs you may have noticed, this is a rather large book.
To make the equivalent of ~3,500+ pages of material manageable, the chapters aredivided into the core chapters and a series of trails.
The core chapters represent many key concepts that Android developers need tounderstand in order to build an app. While an occasional “nice to have” topic willdrift into the core — to help illustrate a point, for example — the core chaptersgenerally are fairly essential.
The core chapters are designed to be read in sequence and will interleave bothtraditional technical book prose with tutorial chapters, to give you hands-onexperience with the concepts being discussed. Most of the tutorials can be skipped,
i

though the first two — covering setting up your SDK environment and creating aproject – everybody should read.
The bulk of the chapters are divided into trails, covering some particular generaltopic, from data storage to advanced UI effects to performance measurement andtuning. Each trail will have several chapters. However, those chapters, and the trailsthemselves, are not necessarily designed to be read in any order. Each chapter in thetrails will point out prerequisite chapters or concepts that you will want to havecovered in advance. Hence, these chapters are mostly reference material, for whenyou specifically want to learn something about a specific topic.
The core chapters will link to chapters in the trails, to show you where you can findmaterial related to the chapter you just read. So between the book’s table ofcontents, this preface, the search tool in your digital book reader, and the cross-chapter links, you should have plenty of ways of finding the material you want toread.
You are welcome to read the entire book front-to-back if you wish. The trails willappear after the core chapters. Those trails will be in a reasonably logical order,though you may have to hop around a bit to cover all of the prerequisites.
The TrailsHere is a list of all of the trails and the chapters that pertain to those trails, in orderof appearance (except for those appearing in the list multiple times, where they spanmajor categories):
Code Organization and Gradle
• Working with Library Projects• Gradle and Legacy Projects• Gradle and Tasks• Gradle and the New Project Structure• Gradle and Dependencies• Manifest Merger Rules• Signing Your App• Distribution• Advanced Gradle for Android Tips
PREFACE
ii

Testing
• JUnit and Android• Testing with JUnit4• MonkeyRunner and the Test Monkey• Testing with UIAutomator
Advanced UI
• Notifications• Advanced Notifications• Introducing GridLayout• The Percent Support Library• Dialogs and DialogFragments• Advanced ListViews• Action Bar Navigation• Action Modes and Context Menus• Other Advanced Action Bar Techniques• Toolbar• AppCompat: The Official Action Bar Backport• ActionBarSherlock• RecyclerView• Implementing a Navigation Drawer• The Android Design Support Library• Advanced Uses of WebView• The Input Method Framework• Fonts• Rich Text• Animators• Legacy Animations• Custom Drawables• Mapping with Maps V2• Crafting Your Own Views• Advanced Preferences• Custom Dialogs and Preferences• Progress Indicators• More Fun with Pagers• Focus Management and Accessibility• Miscellaneous UI Tricks• Event Bus Alternatives
PREFACE
iii

• Tasks• The Assist API (“Now On Tap”)
Home Screen Effects
• Home Screen App Widgets• Adapter-Based App Widgets
Data Storage and Retrieval
• Content Provider Theory• Content Provider Implementation Patterns• The Loader Framework• The ContactsContract Provider• The CalendarContract Provider• The MediaStore Provider• Consuming Documents• Providing Documents• Encrypted Storage• Packaging and Distributing Data• Advanced Database Techniques• Data Backup
Advanced Network Topics
• SSL• Embedding a Web Server• Miscellaneous Network Capabilities
Media
• Audio Playback• Audio Recording• Video Playback• Using the Camera via 3rd-Party Apps• Working Directly with the Camera• The MediaStore Provider• Media Routes• Supporting External Displays• Google Cast and ChromeCast
PREFACE
iv

• The “10 Foot UI”• Putting the TVs All Together: Decktastic• Creating a MediaRouteProvider• Screenshots and Screen Recordings
Security
• SSL• Encrypted Storage• Advanced Permissions• Restricted Profiles and UserManager• Tapjacking• Miscellaneous Security Techniques
Hardware and System Services
• AlarmManager and the Scheduled Service Pattern• PowerManager and WakeLocks• JobScheduler• Accessing Location-Based Services• The Fused Location Provider• Working with the Clipboard• Telephony• Working With SMS• NFC• Device Administration• Basic Use of Sensors• Printing and Document Generation• Dealing with Different Hardware
Integration and Introspection
• Writing and Using Parcelables• Responding to URLs• Plugin Patterns• PackageManager Tricks• Remote Services and the Binding Pattern• Advanced Manifest Tips• Miscellaneous Integration Tips• Reusable Components
PREFACE
v

Other Tools
• Android Studio Dialogs and Editors• Advanced Emulator Capabilities• Lint and the Support Annotations• Using Hierarchy View• Screenshots and Screencasts• ADB Tips and Tricks• Finding CPU Bottlenecks• Finding Memory Leaks
Tuning Android Applications
• Issues with Speed• Finding CPU Bottlenecks• NDK• Improving CPU Performance in Java• Finding and Eliminating Jank• Issues with Bandwidth• Focus On: TrafficStats• Measuring Bandwidth Consumption• Being Smarter About Bandwidth• Issues with Application Heap• Finding Memory Leaks with MAT• Issues with System RAM• Issues with Battery Life• Other Power Measurement Options• Sources of Power Drain• Addressing Application Size Issues
Scripting Languages
• The Role of Scripting Languages• The Scripting Layer for Android• JVM Scripting Languages
Alternatives for App Development
• The Role of Alternative Environments• HTML5
PREFACE
vi

• PhoneGap• Other Alternative Environments
Miscellaneous Topics
• Crash Reporting with ACRA• In-App Diagnostics• Anti-Patterns
Widget Catalog
• AdapterViewFlipper• CalendarView• DatePicker• ExpandableListView• SeekBar• SlidingDrawer• StackView• TabHost• TimePicker• ViewFlipper
Device Catalog
• Chrome and Chrome OS• Kindle Fire• BlackBerry• Wrist Wearables• Google TV• Amazon Fire TV
Appendices
• Appendix A: CWAC Libraries• Appendix B: Android 6.0 Developer Preview
About the UpdatesThis book is updated frequently, typically every 2-3 months.
PREFACE
vii

Each release has notations to show what is new or changed compared with theimmediately preceding release:
• The Table of Contents shows sections with changes in bold-italic font• Those sections have changebars on the right to denote specific paragraphs
that are new or modified
What’s New in Version 7.0?For those of you who have read previous editions of this book, here are some of thehighlights of what is new in Version 7.0:
• Added a chapter on options for taking screenshots and screencasts of yourAndroid app
• Added a chapter on backing up and restoring your app’s data• Added a chapter on using ACRA for collecting crash reports• Added a chapter on the percent library’s layout classes• Added a chapter on ADB tips and tricks• Added a large section on the support annotations to the chapter on Lint• Added screencast recording to the chapter on the media projection APIs• Rewrote and moved the chapter on system services into the core chapters• Expanded coverage of service binding, particularly where the service
validates the signature of the client• Added vector drawables to the chapter on drawable formats• Updated the chapter on memory leaks to focus on Android Studio’s tools
for finding the source of leaks• Lots of bug fixes and general improvements, particularly to older chapters• Removed the chapter on DDMS, with its former material slated to be
blended into other chapters once Android Studio 2.0 ships• Removed the chapter on integrating with Google’s search framework,
pending a possible rewrite
WarescriptionYou (hopefully) are reading this digital book by means of a Warescription.
The Warescription entitles you, for the duration of your subscription, to digitaleditions of this book and its updates, in PDF, EPUB, and Kindle (MOBI/KF8)formats. You also have access to a version of the book as its own Android APK file,
PREFACE
viii

complete with high-speed full-text searching. You also have access to other titlesthat CommonsWare may publish during that subscription period.
Each subscriber gets personalized editions of all editions of each title. That way,your books are never out of date for long, and you can take advantage of newmaterial as it is made available. For example, when new releases of the Android SDKare made available, this book will be quickly updated to be accurate with changes inthe APIs.
However, you can only download the books if either you have an activeWarescription, or until the book is updated after your Warescription expires. Hence,please download your updates as they come out. You can find out when newreleases of this book are available via:
1. The CommonsWare Twitter feed2. The CommonsBlog3. The Warescription newsletter, which you can subscribe to off of your
Warescription page4. Just check back on the Warescription site every month or two
Subscribers also have access to other benefits, including:
• “Office hours” — online chats to help you get answers to your Androidapplication development questions. You will find a calendar for these onyour Warescription page.
• A Stack Overflow “bump” service, to get additional attention for a questionthat you have posted there that does not have an adequate answer.
Book Bug BountyFind a problem in one of our books? Let us know!
Be the first to report a unique concrete problem in the current digital edition, andwe will extend your Warescription by six months as a bounty for helping us deliver abetter product.
By “concrete” problem, we mean things like:
1. Typographical errors
PREFACE
ix
2. Sample applications that do not work as advertised, in the environmentdescribed in the book
3. Factual errors that cannot be open to interpretation
By “unique”, we mean ones not yet reported. Be sure to check the book’s errata page,though, to see if your issue has already been reported. One coupon is given peremail containing valid bug reports.
We appreciate hearing about “softer” issues as well, such as:
1. Places where you think we are in error, but where we feel our interpretationis reasonable
2. Places where you think we could add sample applications, or expand uponthe existing material
3. Samples that do not work due to “shifting sands” of the underlyingenvironment (e.g., changed APIs with new releases of an SDK)
However, those “softer” issues do not qualify for the formal bounty program.
Questions about the bug bounty, or problems you wish to report for bountyconsideration, should be sent to [email protected].
Source Code and Its LicenseThe source code samples shown in this book are available for download from thebook’s GitHub repository. All of the Android projects are licensed under the Apache2.0 License, in case you have the desire to reuse any of it.
If you wish to use the source code from the GitHub repository, please follow theinstructions on that repository’s home page for details of how to use the projects invarious development environments, notably Android Studio.
Copying source code directly from the book, in the PDF editions, works best withAdobe Reader, though it may also work with other PDF viewers. Some PDF viewers,for reasons that remain unclear, foul up copying the source code to the clipboardwhen it is selected.
PREFACE
x

Creative Commons and the Four-to-Free (42F)GuaranteeEach CommonsWare book edition will be available for use under the CreativeCommons Attribution-Noncommercial-ShareAlike 3.0 license as of the fourthanniversary of its publication date, or when 4,000 copies of the edition have beensold, whichever comes first. That means that, once four years have elapsed (perhapssooner!), you can use this prose for non-commercial purposes. That is our Four-to-Free Guarantee to our readers and the broader community. For the purposes of thisguarantee, new Warescriptions and renewals will be counted as sales of this edition,starting from the time the edition is published.
This edition of this book will be available under the aforementioned CreativeCommons license on 1 December 2019. Of course, watch the CommonsWare Website, as this edition might be relicensed sooner based on sales.
For more details on the Creative Commons Attribution-Noncommercial-ShareAlike3.0 license, visit the Creative Commons Web site
Note that future editions of this book will become free on later dates, each four yearsfrom the publication of that edition or based on sales of that specific edition.Releasing one edition under the Creative Commons license does not automaticallyrelease all editions under that license.
AcknowledgmentsI would like to thank the Android team, not only for putting out a good product, butfor invaluable assistance on the Android Google Groups and Stack Overflow.
I would also like to thank the thousands of readers of past editions of this book, fortheir feedback, bug reports, and overall support.
Of course, thanks are also out to the overall Android ecosystem, particularly thosedevelopers contributing their skills to publish libraries, write blog posts, answersupport questions, and otherwise contribute to the strength of Android.
Portions of this book are reproduced from work created and shared by the AndroidOpen Source Project and used according to terms described in the CreativeCommons 2.5 Attribution License.
PREFACE
xi

Core Chapters

Key Android Concepts
No doubt, you are in a hurry to get started with Android application development.After all, you are reading this book, aimed at busy coders.
However, before we dive into getting tools set up and starting in on actualprogramming, it is important that we “get on the same page” with respect to severalhigh-level Android concepts. This will simplify further discussions later in the book.
Android ApplicationsThis book is focused on writing Android applications. An application is somethingthat a user might install from the Play Store or otherwise download to their device.That application should have some user interface, and it might have other codedesigned to work in the background (multi-tasking).
This book is not focused on modifications to the Android firmware, such as writingdevice drivers. For that, you will need to seek other resources.
This book assumes that you have some hands-on experience with Android devices,and therefore you are familiar with buttons like HOME and BACK, the built-inSettings application, the concept of a home screen and launcher, and so forth. If youhave never used an Android device, you are strongly encouraged to get one (e.g., aused one on eBay, Craigslist, etc.) and spend some time with it before starting in onlearning Android application development.
1

Programming Language
The vast majority of Android applications are written exclusively in Java. Hence, thatis what this book will spend most of its time on and will demonstrate with aseemingly infinite number of examples.
However, there are other options:
• You can write parts of the app in C/C++, for performance gains, porting overexisting code bases, etc.
• You can write an entire app in C/C++, mostly for games using OpenGL for3D animations
• You can write the guts of an app in HTML, CSS, and JavaScript, using toolsto package that material into an Android application that can be distributedthrough the Play Store and similar venues
• And so on
Coverage of these non-Java alternatives will be found in the trails of this book, as thebulk of this book is focused on Java.
The author assumes that you know Java at this point. If you do not, you will need tolearn Java before you go much further. You do not need to know everything aboutJava, as Java is vast. Rather, focus on:
• Language fundamentals (flow control, etc.)• Classes and objects• Methods and data members• Public, private, and protected• Static and instance scope• Exceptions• Threads• Collections• Generics• File I/O• Reflection• Interfaces
The links are to Wikibooks material on those topics, though there are countlessother Java resources for you to consider.
KEY ANDROID CONCEPTS
2

Components
When you first learned Java — whether that was yesterday or back when dinosaursroamed the Earth — you probably started off with something like this:
classclass SillyAppSillyApp {publicpublic staticstatic void main(String[] args) {
System.out.println("Hello World!");}
}
In other words, the entry point into your application was a public static voidmethod named main() that took a String array of arguments. From there, you wereresponsible for doing whatever was necessary.
However, there are other patterns used elsewhere in Java. For example, you do notusually write a main() method when writing a Java servlet. Instead, you extend aparticular class supplied by a framework (e.g., HttpServlet) to create a component,then write some metadata that enumerates your components and tell the frameworkwhen and how to use them (e.g., WEB.XML).
Android apps are closer in spirit to the servlet approach. You will not write apublic static void main() method. Instead, you will create subclasses of someAndroid-supplied base classes that define various application components. Inaddition, you will create some metadata that tells Android about those subclasses.
There are four types of components, all of which will be covered extensively in thisbook:
Activities
The building block of the user interface is the activity. You can think of an activity asbeing the Android analogue for the window or dialog in a desktop application, orthe page in a classic Web app. It represents a chunk of your user interface and, insome cases, a discrete entry point into your app (i.e., a way for other apps to link toyour app).
Normally, an activity will take up most of the screen, leaving space for some“chrome” bits like the clock, signal strength indicators, and so forth.
KEY ANDROID CONCEPTS
3

Figure 1: Activity on the screen
Services
Activities are short-lived and can be shut down at any time, such as when the userpresses the BACK button. Services, on the other hand, are designed to keep running,if needed, independent of any activity, for a moderate period of time. You might usea service for checking for updates to an RSS feed, or to play back music even if thecontrolling activity is no longer operating. You will also use services for scheduledtasks (akin to Linux or OS X “cron jobs”) and for exposing custom APIs to otherapplications on the device, though the latter is a relatively advanced capability.
Content Providers
Content providers provide a level of abstraction for any data stored on the devicethat is accessible by multiple applications. The Android development modelencourages you to make your own data available to other applications, as well asyour own — building a content provider lets you do that, while maintaining a degreeof control over how your data gets accessed.
KEY ANDROID CONCEPTS
4

Broadcast Receivers
The system, or applications, will send out broadcasts from time to time, foreverything from the battery getting low, to when the screen turns off, to whenconnectivity changes from WiFi to mobile data. A broadcast receiver can arrange tolisten for these broadcasts and respond accordingly.
Widgets, Containers, Resources, and Fragments
Most of the focus on Android application development is on the UI layer andactivities. Most Android activities use what is known as “the widget framework” forrendering their user interface, though you are welcome to use the 2D (Canvas) and3D (OpenGL) APIs as well for more specialized GUIs.
In Android terms, a widget is the “micro” unit of user interface. Fields, buttons,labels, lists, and so on are all widgets. Your activity’s UI, therefore, is made up of oneor more of these widgets. For example, here we see label (TextView), field(EditText), and push-button (Button) widgets:
Figure 2: Activity with widgets
If you have more than one widget — which is fairly typical — you will need to tellAndroid how those widgets are organized on the screen. To do that, you will use
KEY ANDROID CONCEPTS
5

various container classes referred to as layout managers. These will let you putthings in rows, columns, or more complex arrangements as needed.
To describe how the containers and widgets are connected, you will typically create alayout resource file. Resources in Android refer to things like images, strings, andother material that your application uses but is not in the form of someprogramming language source code. UI layouts are another type of resource. You willcreate these layouts either using a structured tool, such as an IDE’s drag-and-dropGUI builder, or by hand in XML form.
Sometimes, your UI will work across all sorts of devices: phones, tablets, televisions,etc. Sometimes, your UI will need to be tailored for different environments. You willbe able to put resources into resource sets that indicate under what circumstancesthose resources can be used (e.g., use these for normal-sized screens, but use thosefor larger screens).
We will be examining all of these concepts, in much greater detail, as we get deeperinto the book.
Apps and Packages
Given a bucket of source code and a basket of resources, the Android build tools willgive you an application as a result. The application comes in the form of an APK file.It is that APK file that you will upload to the Play Store or distribute by other means.
Each Android application has a package name, also referred to as an application ID.A package name must fulfill three requirements:
1. It must be a valid Java package name, as some Java source code will begenerated by the Android build tools in this package
2. No two applications can exist on a device at the same time with the sameapplication ID
3. No two applications can be uploaded to the Play Store having the sameapplication ID
When you create your Android project — the repository of that source code andthose resources — you will declare what package name is to be used for your app.Typically, you will pick a package name following the Java package name “reversedomain name” convention (e.g., com.commonsware.android.foo). That way, thedomain name system ensures that your package name prefix (com.commonsware) is
KEY ANDROID CONCEPTS
6

unique, and it is up to you to ensure that the rest of the package name distinguishesone of your apps from any other.
Android DevicesThere are well in excess of one billion Android devices in use today, representingthousands of different models from dozens of different manufacturers. Androiditself has evolved since Android 1.0 in 2008. Between different device types anddifferent Android versions, many a media pundit has lobbed the term“fragmentation” at Android, suggesting that creating apps that run on all thesedifferent environments is impossible.
In reality, it is not that bad. Some apps will have substantial trouble, but most appswill work just fine if you follow the guidance presented in this book and in otherresources.
Types
Android devices come in all shapes, sizes, and colors. However, there are fourdominant “form factors”:
• the phone• the tablet• the television (TV)• the wearable (smart watches, Google Glass, etc.)
You will often hear developers and pundits refer to these form factors, and this bookwill do so from time to time as well. However, it is important that you understandthat Android has no built-in concept of a device being a “phone” or a “tablet” or a“TV”. Rather, Android distinguishes devices based on capabilities and features. So,you will not see an isPhone() method anywhere, though you can ask Android:
• what is the screen size?• does the device have telephony capability?• etc.
Similarly, as you build your applications, rather than thinking of those four formfactors, focus on what capabilities and features you need. Not only will this help youline up better with how Android wants you to build your apps, but it will make iteasier for you to adapt to other form factors that will come about such as:
KEY ANDROID CONCEPTS
7

• airplane seat-back entertainment centers• in-car navigation and entertainment devices• and so on
The Emulator
While there are over a billion Android devices representing thousands of models,probably you do not have one of each model. You may only have a single piece ofAndroid hardware. And if you do not even have that, you most certainly will want toacquire one before trying to publish an Android app.
To help fill in the gaps between the devices you have and the devices that arepossible, the Android developer tools ship an emulator. The emulator behaves like apiece of Android hardware, but it is a program you run on your developmentmachine. You can use this emulator to emulate many different devices, withdifferent screen sizes and Android OS versions, by creating one or more Androidvirtual devices, or AVDs.
In an upcoming chapter, we will discuss how you install the Android developer toolsand how you will be able to create these AVDs and run the emulator.
OS Versions and API Levels
Android has come a long way since the early beta releases from late 2007. Each newAndroid OS version adds more capabilities to the platform and more things thatdevelopers can do to exploit those capabilities.
Moreover, the core Android development team tries very hard to ensure forwardsand backwards compatibility. An app you write today should work unchanged onfuture versions of Android (forwards compatibility), albeit perhaps missing somefeatures or working in some sort of “compatibility mode”. And there are well-trodpaths for how to create apps that will work both on the latest and on previousversions of Android (backwards compatibility).
To help us keep track of all the different OS versions that matter to us as developers,Android has API levels. A new API level is defined when an Android version shipsthat contains changes that affect developers. When you create an emulator AVD totest your app, you will indicate what API level that emulator should emulate. Whenyou distribute your app, you will indicate the oldest API level your app supports, sothe app is not installed on older devices.
KEY ANDROID CONCEPTS
8

At the time of this writing, the API levels of significance to most Android developersare:
• API Level 16 (Android 4.1)• API Level 17 (Android 4.2)• API Level 19 (Android 4.4)• API Level 21 (Android 5.0)• API Level 22 (Android 5.1)
Here, “of significance” refers to API levels that have a reasonable number of Androiddevices — 5% or more, as reported by the “Platform Versions” dashboard chart.
The latest production API level for most form factors is 23, representing Android6.0.
Note that API Level 20 was used for the version of Android 4.4 running on the first-generation Android Wear devices. Unless you are specifically developing apps forWear, you will not be worrying much about API Level 20.
Dalvik
In terms of Android, Dalvik is a virtual machine (VM). Virtual machines are used bymany programming languages, such as Java, Perl, and Smalltalk. The Dalvik VM isdesigned to work much like a Java VM, but optimized for embedded Linuxenvironments.
So, what really goes on when somebody writes an Android application is:
1. Developers write Java-syntax source code, leveraging class libraries publishedby the Android project and third parties.
2. Developers compile the source code into Java VM bytecode, using the javaccompiler that comes with the Java SDK.
3. Developers translate the Java VM bytecode into Dalvik VM bytecode, whichis packaged with other files into a ZIP archive with the .apk extension (theAPK file).
4. An Android device or emulator runs the APK file, causing the bytecode to beexecuted by an instance of a Dalvik VM.
From your standpoint, most of this is hidden by the build tools. You pour Java sourcecode into the top, and the APK file comes out the bottom.
KEY ANDROID CONCEPTS
9

However, there will be places from time to time where the differences between theDalvik VM and the traditional Java VM will affect application developers, and thisbook will point out some of them where relevant.
Note that Android is moving to a new runtime environment, called ART. However,the “Dalvik” term will still be used for the bytecode that is generated as part ofbuilding an APK.
Processes and Threads
When your application runs, it will do so in its own process. This is not significantlydifferent than any other traditional operating system. Part of Dalvik’s magic ismaking it possible for many processes to be running many Android applications atone time without consuming ridiculous amounts of RAM.
Android will also set up a batch of threads for running your app. The thread thatyour code will be executed upon, most of the time, is variously called the “mainapplication thread” or the “UI thread”. You do not have to set it up, but, as we willsee later in the book, you will need to pay attention to what you do and do not do onthat thread. You are welcome to fork your own threads to do work, and that is fairlycommon, though in some places Android handles that for you behind the scenes.
Don’t Be ScaredYes, this chapter threw a lot of terms at you. We will be going into greater detail onall of them in this book. However, Android is like a jigsaw puzzle with lots ofinterlocking pieces. To be able to describe one concept in detail, we will need to atleast reference some of the others. Hence, this chapter was meant to expose you toterms, in hopes that they will sound vaguely familiar as we dive into the details.
KEY ANDROID CONCEPTS
10

Choosing Your DevelopmentToolchain
Before you go much further in your Android endeavors (or, possibly, endeavours,depending upon your preferred spelling), you will need to determine what toolchainyou will use to build your Android applications.
Android StudioThe next-generation Google-backed Android IDE is Android Studio. Based off ofIntelliJ IDEA, Android Studio is the new foundation of Google’s efforts to giveAndroid developers top-notch development tools. While it only reached a version 1.0status in December 2014, Android Studio had been in use for ~18 months prior tothat in various early-access and beta stages. While it still has bugs, it is certainlystable enough for app development.
The next chapter contains a section with instructions on how to set up AndroidStudio.
EclipseEclipse is also a popular IDE, particularly for Java development. Eclipse was Google’soriginal IDE for Android development, by means of the Android Developer Tools(ADT) add-in, which gives the core of Eclipse awareness of Android. The ADT add-in, in essence, takes regular Eclipse operations and extends them to work withAndroid projects.
11

Note, though, that Google has discontinued maintenance of ADT. The EclipseFoundation is setting up the “Andmore” project to try to continue work on allowingEclipse to build Android apps. This book does not cover the Andmore project at thistime, and developers are strongly encouraged to not use the ADT-enabled Eclipsefrom Google.
IntelliJ IDEAWhile Android Studio is based on IntelliJ IDEA, you can still use the original IntelliJIDEA for Android app development. A large subset of the Android Studiocapabilities are available in the Android plugin for IDEA. Plus, the commercial IDEAUltimate Edition will go beyond Android Studio in many areas outside of Androiddevelopment.
Command-Line Builds via Gradle for AndroidAnd, of course, you do not need to use an IDE at all. While this may soundsacrilegious to some, IDEs are not the only way to build applications. Much of whatis accomplished via the ADT can be accomplished through command-lineequivalents, meaning a shell and an editor is all you truly need. For example, theauthor of this book did not use an IDE for Android development until 2011.
The recommended way to build Android apps outside of an IDE is by means ofGradle. Google has published a Gradle plugin that teaches Gradle how to buildAndroid apps. Android Studio itself uses Gradle for its builds, so a single buildconfiguration (e.g., build.gradle files) can be used both from an IDE and from abuild automation tool like a continuous integration server.
An upcoming chapter gets into more about what Gradle (and the Android Plugin forGradle) are all about.
Yet Other AlternativesOther IDEs have their equivalents of the ADT, albeit with minimal assistance fromGoogle. For example, NetBeans has support via the NBAndroid add-on, andreportedly this has advanced substantially in the past few years.
You will also hear reference to using Apache Ant for doing command-line builds ofAndroid apps. This has largely been supplanted by Gradle for Android at this time,
CHOOSING YOUR DEVELOPMENT TOOLCHAIN
12

and support for Apache Ant will end soon. Newcomers to Android are encouraged tonot invest time in new work with Apache Ant for Android development projects.
IDEs… And This BookYou are welcome to use Android Studio or Eclipse as you work through this book.You are welcome to use another IDE if you wish. You are even welcome to skip theIDE outright and just use an editor.
This book is focused primarily on demonstrating Android capabilities and the APIsfor exploiting those capabilities. Hence, the sample code will work with any IDE.However, this book will cover some Android Studio- and Eclipse-specificinstructions, since they are the predominant answers today.
The tutorials will have instructions for both Android Studio and Eclipse.
What We Are Not CoveringIn the beginning (a.k.a., 2007), we were lucky to have any means of creating anAndroid app.
Nowadays, there seems to be no end to the means by which we can create anAndroid app.
There are a few of these “means”, though, that are specifically out of scope for thisbook.
App Inventor
You may also have heard of a tool named App Inventor and wonder where it fits inwith all of this.
App Inventor was originally created by an education group within Google, as ameans of teaching students how to think about programming constructs (branches,loops, etc.) and create interesting output (Android apps) without classicprogramming in Java or other syntax-based languages. App Inventor is purely drag-and-drop, both of widgets and application logic, the latter by means of “blocks” thatsnap together to form logic chains.
CHOOSING YOUR DEVELOPMENT TOOLCHAIN
13

App Inventor was donated by Google to MIT, which has recently re-opened it to thepublic.
However, App Inventor is a closed system — at the present time, it does notsomehow generate Java code that you can later augment. That limits you to whateverApp Inventor is natively capable of doing, which, while impressive in its own right,offers a small portion of the total Android SDK capabilities.
App Generators
There are a seemingly infinite number of “app generators” available as onlineservices. These are designed mostly for creating apps for specific vertical markets,such as apps for restaurants or apps for grocers. The resulting apps are mostly“brochure-ware”, with few capabilities beyond a mobile Web site, yet still requiringthe user to find, download, and install the app. Few of these generators provide thesource code to the generated app, to allow the apps to be customized beyond whatthe generator generates.
CHOOSING YOUR DEVELOPMENT TOOLCHAIN
14

Tutorial #1 - Installing the Tools
Now, let us get you set up with the pieces and parts necessary to build an Androidapp.
NOTE: The instructions presented here are accurate as of the time of this writing.However, the tools change rapidly, and so these instructions may be out of date bythe time you read this. Please refer to the Android Developers Web site for currentinstructions, using this as a base guideline of what to expect.
Step #1 - Checking Your Hardware RequirementsCompiling and building an Android application, on its own, is not especiallyhardware-intensive, except for very large projects. However, there are twocommonly-used tools that demand more from your development machine: your IDEand the Android emulator. Of the two, the emulator poses the bigger problem.
The more RAM you have, the better. 8GB or higher is a very good idea if you intendto use an IDE and the emulator together.
A faster CPU is also a good idea. However, the Android emulator only utilizes asingle core from your development machine. Hence, it is the single-core speed thatmatters. The best CPU to use is one that can leverage multiple cores to give whatamounts to a faster single core, such as Intel’s Core i7 with Turbo Boost. For anemulator simulating a larger-screened device (e.g., tablet, television), a Core i7 thatcan “boost” up to 3.4GHz makes development much more pleasant. Conversely, aCPU like a Core 2 Duo with a 2.5GHz clock speed results in a tablet emulator that isnearly unusable.
15
Step #2 - Setting Up Java and 32-Bit Linux SupportWhen you write Android applications, you typically write them in Java source code.That Java source code is then turned into the stuff that Android actually runs(Dalvik bytecode in an APK file).
You need to obtain and install the official Sun/Oracle Java SE SDK (JDK). You canobtain this from the Oracle Java Web site for Windows, OS X, and Linux. The plainJDK (sans any “bundles”) should suffice. Follow the instructions supplied by Oracleor Apple for installing it on your machine. At the time of this writing, Androidsupports Java 6 and Java 7, though Java 7 is required for certain scenarios andtherefore is recommended. Java 8 works, though you may have to do additional workto configure your IDE to have Java 8 emit Java 7-compatible bytecode.
Android also supports the OpenJDK, particularly on Linux environments.
What Android does not support are any other Java compilers, including the GNUCompiler for Java (GCJ).
If your development OS is Linux, make sure that you can run 32-bit Linux binaries.This may or may not already be enabled in your Linux distro. For example, onUbuntu 14.10, you may need to run the following to get the 32-bit binary supportinstalled that is needed by the Android build tools:
sudo apt-get install lib32z1 lib32ncurses5 lib32stdc++6
You may also need lib32bz2-1.0, depending on your version of Linux.
Step #3 - Install the Developer ToolsAs noted in the previous chapter, there are a few developer tools that you can choosefrom.
This book’s tutorials focus on Android Studio. You are welcome to attempt to useEclipse, another IDE, or no IDE at all for building Android apps. However, you willneed to translate some of the tutorials’ IDE-specific instructions to be whatever isneeded for your development toolchain of choice.
TUTORIAL #1 - INSTALLING THE TOOLS
16

With that in mind, visit the Android Studio download page, download the ZIP filefor your platform, and unZIP it to some likely spot on your hard drive. Windowsusers who choose to download the self-installing EXE can just run that file.
Android Studio can then be run from the studiostudio batch file or shell script from yourAndroid Studio installation’s bin/ directory.
At the time of this writing, the current production version of Android Studio is 1.4.x,and this book covers that version. If you are reading this in the future, you may beon a newer version of Android Studio, and there may be some differences betweenwhat you have and what is presented here.
Step #4 - Install the SDKs and Add-OnsNext, we need to review what pieces of the Android SDK we have already andperhaps install some new items. To do that, you need to access the SDK Manager.
When you first run Android Studio, you may be asked if you want to import settingsfrom some other prior installation of Android Studio:
Figure 3: Android Studio First-Run Settings Migration Dialog
For most users, particularly those using Android Studio for the first time, the “I donot have…” option is the correct choice to make.
Then, after a short splash screen, you will be taken to the Android Studio SetupWizard:
TUTORIAL #1 - INSTALLING THE TOOLS
17

Figure 4: Android Studio Setup Wizard, First Page
Just click “Next” to advance to the second page of the wizard:
TUTORIAL #1 - INSTALLING THE TOOLS
18
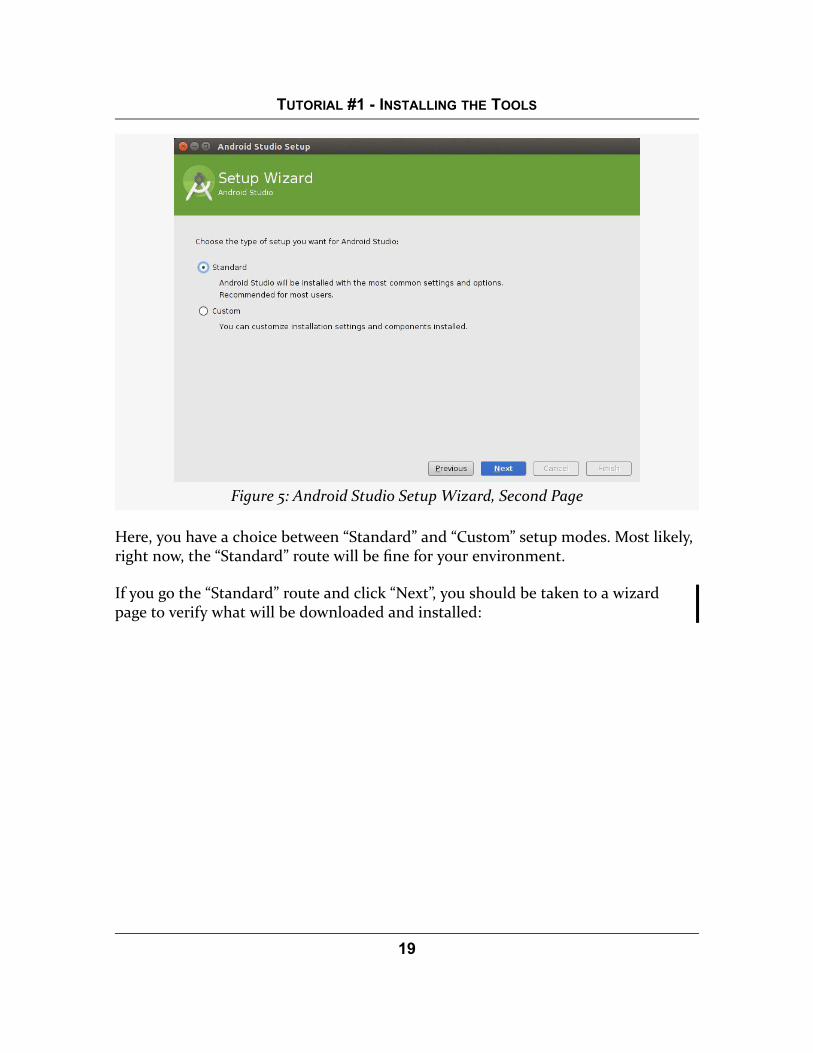
Figure 5: Android Studio Setup Wizard, Second Page
Here, you have a choice between “Standard” and “Custom” setup modes. Most likely,right now, the “Standard” route will be fine for your environment.
If you go the “Standard” route and click “Next”, you should be taken to a wizardpage to verify what will be downloaded and installed:
TUTORIAL #1 - INSTALLING THE TOOLS
19

Figure 6: Android Studio Setup Wizard, Verify Settings Page
Clicking Next may take you to a wizard page explaining some information aboutthe Android emulator:
TUTORIAL #1 - INSTALLING THE TOOLS
20

Figure 7: Android Studio Setup Wizard, Emulator Info Page
What is explained on this page may not make much sense to you. That is perfectlynormal, and we will get into what this page is trying to say later in the book. Justclick “Finsh” to begin the setup process. This will include downloading a copy ofthe Android SDK and installing it into a directory adjacent to where AndroidStudio itself is installed.
If you are running Linux, and your installation crashes with an “Unable to runmksdcard SDK tool” error, go back to Step #2 and set up 32-bit support on yourLinux environment.
When that is done, after clicking “Finish” one last time, you will be taken to theAndroid Studio Welcome dialog:
TUTORIAL #1 - INSTALLING THE TOOLS
21

Figure 8: Android Studio Welcome Dialog
In your case, the contents of the “Recent Projects” list will be empty, as you have notcreated or opened any projects yet.
In very tiny print at the bottom of that dialog is a “Check for updates now” link.Click that, and if there are updates available, install them. This will automaticallyrestart Android Studio. Android Studio should have downloaded the latest updatesas part of the initial setup, so most likely this will indicate that nothing more isneeded.
Then, in the welcome dialog, click Configure, to bring up a configuration sub-menu:
TUTORIAL #1 - INSTALLING THE TOOLS
22

Figure 9: Android Studio Welcome Dialog, Configure Sub-Menu
There, tap on SDK Manager to bring up the SDK Manager.
Using SDK Manager and Updating Your Environment
You should now have the SDK Manager open, as part of the overall default settingsfor Android Studio:
TUTORIAL #1 - INSTALLING THE TOOLS
23

Figure 10: Android SDK Manager, “SDK Platforms” Tab
The “SDK Platforms” tab lists the versions of Android that you can compile against.The latest version of Android is usually installed when you set up Android Studioinitially. However, for the tutorials, please also check “Android 4.4.2” and “Android5.1.1” in the list, and then click the “Apply” button to download and install thoseversions.
When that has completed, you will be returned to the SDK Manager. Click on the“SDK Tools” tab:
TUTORIAL #1 - INSTALLING THE TOOLS
24

Figure 11: Android SDK Manager, “SDK Tools” Tab
This lists tools and related materials for Android development, other than theemulator (which is set up and configured separately). Android Studio usually has theright set up of stuff checked and installed already for you. You may wish to installthe “Documentation for Android SDK”, which amounts to an offline copy of most ofthe material found at http://developer.android.com. The other items in here are abit more esoteric, and you will not be needing them for most of this book.
Some items may be marked with a status indicating that an update is available, inwhich case you may wish to apply those updates. Conversely, if anything labeled“preview” is checked, uncheck and uninstall it. Those items would be related to anoutstanding developer preview of a new version of Android. While developerpreviews are useful, they add complexity for newcomers to Android.
When you are done making these adjustments, you can close up the SDK Managerby clicking the OK button.
TUTORIAL #1 - INSTALLING THE TOOLS
25

In Our Next Episode…… we will create an Android project that will serve as the basis for all our futuretutorials, plus set up our emulator and device.
TUTORIAL #1 - INSTALLING THE TOOLS
26