week 1: adobe illustrator 1.pdfweek 1: adobe illustrator why use illustrator? simple. there are two...
TRANSCRIPT

Toolbar
Windows{Artboard(Layers are simply placed on artboards!)
Control / Application Bar
Selection
Magic Wand
Pen/Anchor Point
Line
Brush
Blob Brush
Rotate/Reflect
Warp
Selection
Mesh
Eyedropper/Measure
Symbol
Artboard
Hand/Tilt
Foreground Color
Click for default
Fill
Gradient
Direct Selection
Lasso
Type
Shape
Pencil/Path
Eraser
Scale/Shear/Reshape
Free Transform
Perspective
Gradient
Blend
Graph
Slice
Zoom
Swap Fill/Stroke
Stroke Color
No Fill
View Settings
Draw Normal/Behind/Inside
week 1: Adobe illustrator Why use Illustrator? Simple. There are two kinds of image files: vector and pixel. Pixel is a normal file like .jpg image that is constrained to one size. If stretched, it becomes pixelated.
Illustrator is a vector-based software. Meaning changing it to all different sizes won’t pixelate it. All of our artwork is created is Adobe Illustrator and is valuable
design resource for .ai, .eps, and .pdf files. We’ll also give you a College Hill guide to the program. Below is the average workspace of Illustrator.
tools The tool bar is the heaviest used window in illustrator. It allows you to select, create, fill, reshape, and enable basic navigation. A lot of using Adobe products is simply practice and allowing oneself to sit down and make mistakes. I’m just here for a brief overview for the tools and windows given.
19WEEK 1: ILLUSTRATOR WALKTHROUGH //

Lets you select objects and groups by clicking or dragging over them. You can also select groups within groups and objects within groups.
20WEEK 1: ILLUSTRATOR WALKTHROUGH //
Selection Tool (V)
Lets you select individual anchor points or path segments by clicking on them, or select an entire path or group by selecting any other spot on the item. You can also select one or more objects in a group of objects. Group Direct Selection allows you to select one item within a group.
Direct Selection Tool (A)
Magic Wand (Y)
Lets you select objects of the same color, stroke weight, stroke color, opacity, or blending mode by clicking the object.
The Pen Tool allows you to freehand a path on your own. Holding your mouse down and dragging (creating anchors) will allow you to make curves.
Lasso Tool (Q)
The Lasso tool selects points or path segments within objects.
Pen Tool (P)

The Line Segment Tool gives the ability to various line shapes that are easy to manipulate. You can also create vectorized rectangular and polar grids as well.
Line Segment Tool (L)
Allows the manipulation of the anchors without the selection of the individual points.
Add/Delete Anchor (+/-)
Lets you select objects of the same color, stroke weight, stroke color, opacity, or blending mode by clicking the object.
Convert Anchors (Shift+C)
21WEEK 1: ILLUSTRATOR WALKTHROUGH //
Adding
Deleting
The type tool offers easy access to create text boxes (or click depending on preference) and use regular typefaces, weights, and sizes either with the control bar or character window. There are actually many possibilties with the type tool menu.
Type Tool (T)
Within shapeOutside of shape/on line
Type up>down in regular text boxType up>down in shape
Type up>down in on line/outside shape

The pencil tool essentially does what the brush tool does without the caligraphic style of curve forming and similar. The pencil tool however, has more path editing tool associated with it.
Pencil Tool (N)
The Brush Tool lets you draw a freehand path with a stylized stroke. The path is vectorized as a line and the stroke can be manipulated with the control bar or the Brushes Window (F5).
Shape Tools
You can create an assortment of basic shapes. The only ones of constant use is the Rectangle Tool (L) and the Elipse Tool (M). At the bottom of the menu, there is a Flare Tool which allows the designer to add little reflections to objects (the little shine spots on sunglasses).
Brush Tool (B)
22WEEK 1: ILLUSTRATOR WALKTHROUGH //
The Blob Brush Tool essentially replicates what the Brush Tool (B) does, but vectorizes into an expanded object rather than the Brush Tool’s line.
Smooth / Path Eraser Tools
The Smooth and the Path Eraser Tools’ names are very straightforward. Draw along an exiting path to smooth out the path with the smooth tool. Use the path eraser to remove it completely.
Blob Brush Tool (Shift+B)
Before
After

Everything in the next two icons are simple transform tools. Rotating (R), reflection (O) (flipping the object), scale (S) with ratio, sheer (basically italicize the objects) and reshape via path rather than points.
Transform Tools
Basically cuts into shapes. The scissors cut shapes into seperate shaes while the snife just slashes into them.
Eraser Tool (Shift+E)
The eraser tool allows you to free hand and remove an object’s material. This cuts paths and actually seperates into seperate shapes. The width and style or the eraser tool can be manipulated just as the brush tool.
Scissors / Knife Tools
23WEEK 1: ILLUSTRATOR WALKTHROUGH //
Free Transform lets you resize and scale an object from and the object will anchor from the opposite point of the object.
Width (Shift+W)/Warp (Shift+R)
The Width Tool alters the width of a path at any given point. This gives a very caligraphic style to existing strokes without use of the Brush Tool. The remaining tools (Warp, Twirl, Pucker, Bloat, Scallop, Crystalize, and Wrinkle) is a warping effect using a hold and drag motion.
Free Transform (E)
Anchored(won’t move)
Scaling point

The Shape Builder tool merges simple shapes to create custom, complex shapes. You simply overlap shapes you create with the regular shapes tools and simply selecting with the Shape Builder Tool will automatically cut the paths from eachother.
Shape Builder Tool (Shift+M)
The Perspective Grid and its Selection Tool (Shift+V) is a resource for designers as they construct an image that requires perspective. This is a handy tool while warping typography or interplaying 3D with 2D type.
You can hide the grid using View > Perspective Grid > Hide Grid.
Live Paint (K)/Selection (Shift+E)
The Live Paint Bucket Tool paints faces and edges of Live Paint groups with the current paint attributes. The Live Paint Selection allows you to select several of these facets to fill them all with one attribute at once.
Perspective Grid (Shirt+P)
24WEEK 1: ILLUSTRATOR WALKTHROUGH //
Moves gridalong y axis
Scales eyeline along y axis
Affects height and orientation of grid
Affects depth of orange side
Affects depth of blue side
The gradient tool works intermittently with the Gradient Window, but this allows a more hands on approach to color location and scale of gradient area.
Mesh Tool (U)
The Mesh Tool gives regular shapes perspective, a 3D look if you will, and you are able assign to color according to points. The Mesh Tool has so many possibilities. This will be a future assignment in week 2.
Gradient Tool (E)Center axis
Delineation of color
Radial scaleLinear scale

It’s very simply.If you click on a object (blue square) and use the Eyedropper Tool to click another object (gradient rectangle), the blue square will take on the gradients rectangle’s fill and stroke. Without previous selection, the Eyedropper Tool will just take the color, but won’t transfer appearance.
Eyedropper Tool (I)
You can actually graph in Illustrator. The graph menu is extensive. You can import data and style the graph cells.
Measure
Drawing a temporary line will accurately measure all aspects of said line.
Graph Tools
25WEEK 1: ILLUSTRATOR WALKTHROUGH //
Would turn into gradient after Eyedropper
Import
Style
Exactly how it sounds! Just choose a symbol in the Symbol Window then hold and drag to create a barage of symbols. The remaining symbol tools from this icon’s menu is all about editing this cluster of symbols (Shifter, Scruncher, Sizer, Spinner, Stainer, Screener, Styler).
Blend Tool (W)
The Blend tool blends symbols and path. If you place two symbol and click between the two of them to “blend” them into a path. You can continue “blending” to other paths as well. You can work with more blending options under Object > Blend > Blend Options.
Symbol Sprayer (E)
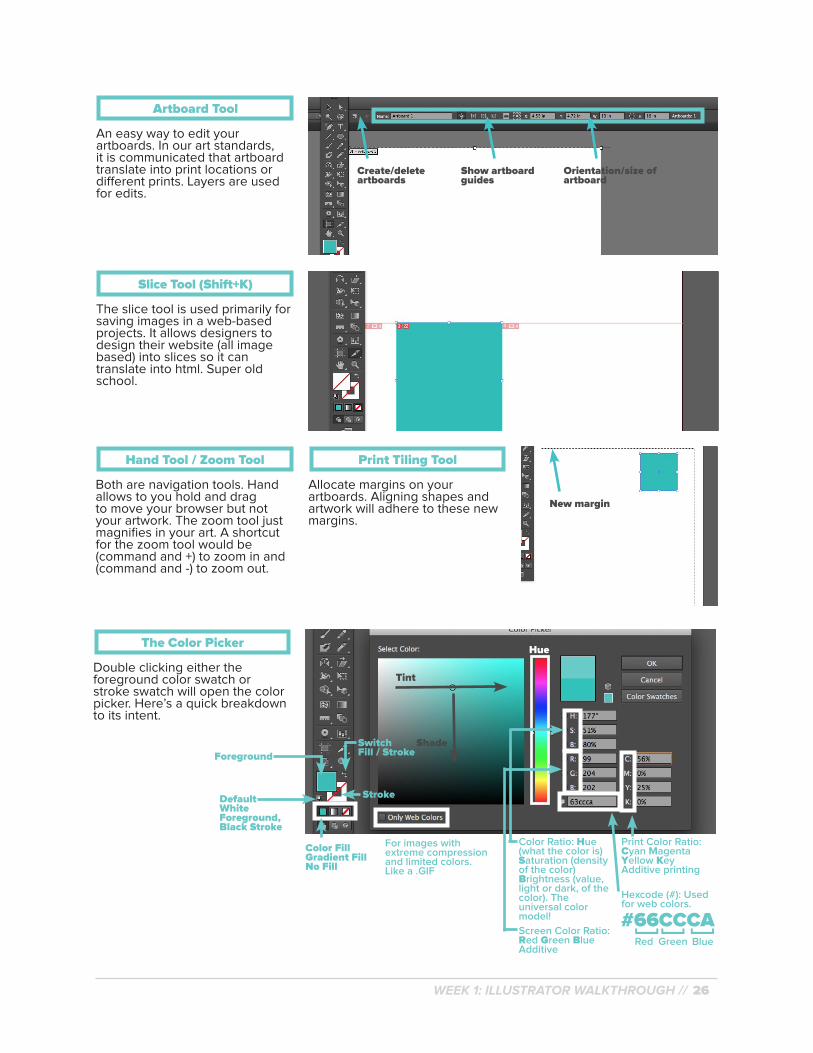
An easy way to edit your artboards. In our art standards, it is communicated that artboard translate into print locations or different prints. Layers are used for edits.
Artboard Tool
Both are navigation tools. Hand allows to you hold and drag to move your browser but not your artwork. The zoom tool just magnifies in your art. A shortcut for the zoom tool would be (command and +) to zoom in and (command and -) to zoom out.
Slice Tool (Shift+K)
The slice tool is used primarily for saving images in a web-based projects. It allows designers to design their website (all image based) into slices so it can translate into html. Super old school.
Hand Tool / Zoom Tool
26WEEK 1: ILLUSTRATOR WALKTHROUGH //
Create/delete artboards
Show artboard guides
Orientation/size of artboard
Allocate margins on your artboards. Aligning shapes and artwork will adhere to these new margins.
Print Tiling Tool
New margin
The Color Picker
Double clicking either the foreground color swatch or stroke swatch will open the color picker. Here’s a quick breakdown to its intent.
Print Color Ratio: Cyan Magenta Yellow KeyAdditive printing
Tint
Shade
Color Ratio: Hue (what the color is)Saturation (density of the color)Brightness (value, light or dark, of the color). The universal color model!
Hexcode (#): Used for web colors.
Screen Color Ratio: Red Green BlueAdditive
#66CCCARed Green
[ [ [
Blue
Hue
For images with extreme compression and limited colors. Like a .GIF
Foreground
Stroke
Switch Fill / Stroke
Color FillGradient FillNo Fill
Default White Foreground, Black Stroke

The last on the toolbar is screen settings and Draw Mode. The left and usual means of Draw Mode is called ‘Normal’ while the right is ‘Behind.’ When you paste an object in, it usually is arranged on top of everything else. While ‘Behind’ mode has new items sent to the back.
Draw Mode
27WEEK 1: ILLUSTRATOR WALKTHROUGH //
Normal
Just pasted in
Behind
windowsWhile the tools are for building and creating, windows and applications add attributes to the objects beyond tool capabilties. Refining objects per se.
The default ‘workspace’ for Illustrator is ‘Essentials.’ There are other workspaces available under Window > Workspace, but other options are often needed in the College Hill world.
As you can see under ‘Window,’ a list of all available windows are listed. Though the tutorial will only be covering ‘Essentials.’

As you’ve already seen the artboard tool in the toolbox description, the layer concept is different. Artboards are the squares you create on. Layers are just stacked on the artboards (hence LAYERS). CH only uses these for past edits or references.
Layers
Brush is only used for calligraphic or individualized strokes for paths. You can use a default stroke listed or create your own brushes by clicking on the “New” Brush icon.
Creating the brush itself is just based on the preview.
Color
Color is very straight forward. You can turn any object into any color format and select a color for it.
Swatches are preordained color or saved colors you’ve made swatches of yourself.
Brushes
28WEEK 1: ILLUSTRATOR WALKTHROUGH //
Different layerSame artboard
Transform
The Transform allows you to rescale and move numerically. The highlight square is the reference point. It’s where the rescaling anchors or where the X and Y is measured from.
The X is the where the reference point is on the x-axis, the y for the y-axis.
W and H are the width and height of the object. The highlighted chainlink means that is you resize the height or width, the other will adapt to the change to keep the shape’s constraints.
The angle or sheer is the angle or sheer from the reference point to its adjacent point.
The other two options retain strokes and alignment.
Visibility (Hide/Unhide)
Lock/Unlock (Allow Edits/Disallow)
Delete Layer
Object highlight per layer Create
Layer
Color bar New color groupCreate swatchDelete swatch
Align
Align allows you to ‘align’ an object in comparison to the artboard or margin. Simply select an object and align horizontally or vertically.

The Pathfinder is similar to the Shape Builder - where you can cut paths and work with intersecting pieces - but on a lot larger of a scale. You can manipulate paths in numerous way. My example ‘00’ is the original two shapes. Let’s see all pathfinder functions with the interaction of these two shapes.
01. Unite Combines the two shapes.
02. Minus Front Removes the shape arranged front and intersection.
03. Intersect Removes all shapes besides intersecting portions.
04. Exclude Removes all intersecting portions.
05. Divide Cuts everything into its own individual shape, but everything still remains on artboard.
06. Trim Removes everything hidden.
07. Merge Removes everything hidden and combines objects with the same fill.
08. Crop Cuts paths, retains path arranged in front, and intersection remains with fill.
09. Outline Cuts paths and creates stroke.
10. Minus Back Removes the shape arranged back and intersection.
Pathfinder
29WEEK 1: ILLUSTRATOR WALKTHROUGH //
01.
02.
03.
04. 05.
06. 07.
09. 10.
00.
08.
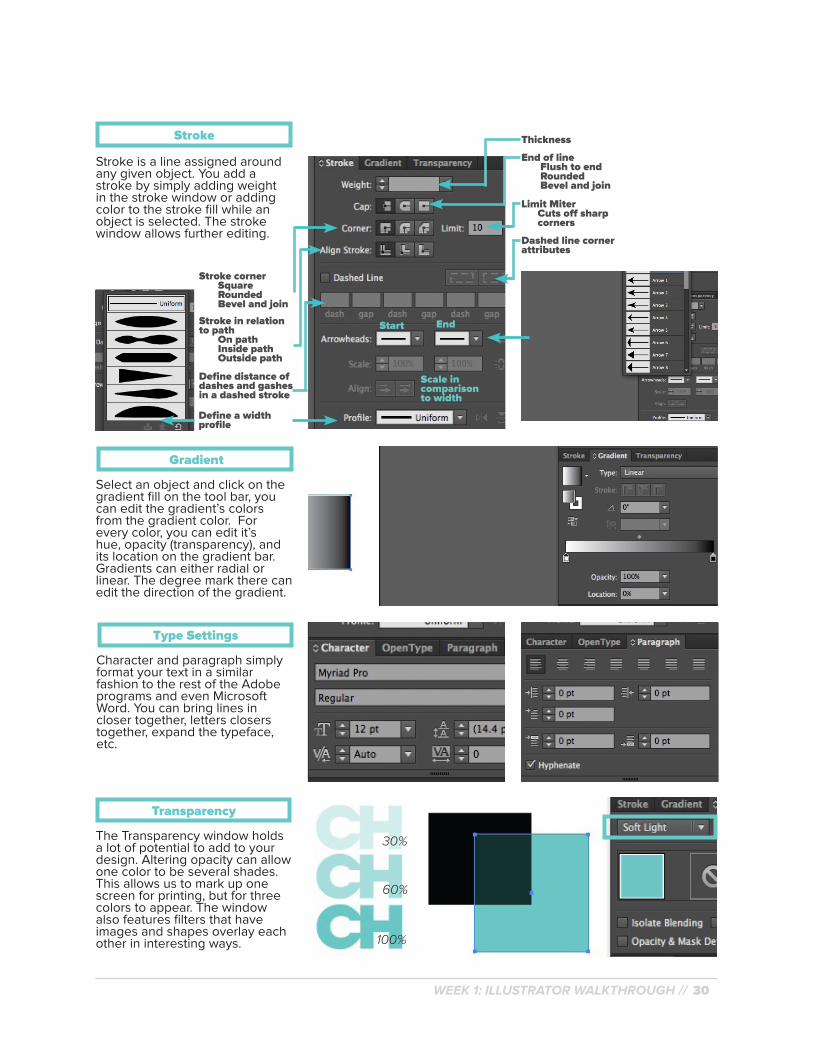
Stroke
Select an object and click on the gradient fill on the tool bar, you can edit the gradient’s colors from the gradient color. For every color, you can edit it’s hue, opacity (transparency), and its location on the gradient bar. Gradients can either radial or linear. The degree mark there can edit the direction of the gradient.
Gradient
30WEEK 1: ILLUSTRATOR WALKTHROUGH //
The Transparency window holds a lot of potential to add to your design. Altering opacity can allow one color to be several shades. This allows us to mark up one screen for printing, but for three colors to appear. The window also features filters that have images and shapes overlay each other in interesting ways.
Type Settings
Character and paragraph simply format your text in a similar fashion to the rest of the Adobe programs and even Microsoft Word. You can bring lines in closer together, letters closers together, expand the typeface, etc.
Transparency
Thickness
End of line Flush to end Rounded Bevel and join
Stroke corner Square Rounded Bevel and join
Stroke in relation to path On path Inside path Outside path
Limit Miter Cuts off sharp corners
Define distance of dashes and gashes in a dashed stroke
Dashed line corner attributes
Start End
Scale in comparison to width
Define a width profile
Stroke is a line assigned around any given object. You add a stroke by simply adding weight in the stroke window or adding color to the stroke fill while an object is selected. The stroke window allows further editing.
60%
30%
100%

Another helpful tool to transparency is the opacity mask. You can add textures to your prints. We often apply a “vintage” texture for clients. Overlay your texture over the design, select BOTH and click on the ‘list icon’ on the right hand corner of the window. Click ‘make opacity mask’ and you’ve got it.
Opacity Mask (Transparency)
Image Trace is one of the most often used applications used at College Hill. Taking a .jpg and tracing it down to a vectorized forms. You can break down your image in any possible way.
First you decide if you want to split by color / black and white / grayscale. You break color and grayscale down by the number of color or shades associated. The black and white is measured by ‘threshold.’ Meaning less threshold is more white space and more threshold is more black.
The advanced setting are simply curve fitting and making more accurate paths for the image chosen. Image trace often defaults to curves, so I often edit ‘corners.’
There are also default image trace options sampled to the far right with the grayscale and outline exempt.
Image Trace
31WEEK 1: ILLUSTRATOR WALKTHROUGH //
Auto High color
Low color Black/white

32WEEK 1: ILLUSTRATOR WALKTHROUGH //
Object type
Foreground color
Stroke color Stroke weightStroke width profile
Brush definition
Opacity(see-through)
Graphic style (patterns and basic effect elements)
Recolor artwork
Align
Reference point
Transform
Isolation mode
Select by similar objects
The isolation mode is selecting an object within a group. You can select items within groups using the isolation mode button or clicking on an object and then double clicking to enter.
Control bar The control bar is at the top of your illustrator file and is basically a shortcut for a lot of menu items as well as windows and tools. It’s a quick fix rather than finding the real window.

Object > Transform
Though there is a transform tool as well as a window, Object > Transform has similar actions of performance, but each have their own dialogue box. It’s a lot easier with a preview look and angle numbers to see while you’re rotating or shearing.
33WEEK 1: ILLUSTRATOR WALKTHROUGH //
Object > Arrange
There’s no visuals associated with this one. It’s just a concept that needs to be understood. Adobe files ‘arrange’ within a layer of a file. Arranging from top to bottom. Something ‘arranged’ at the top of the layer will appear on top of everything else.
menuactions The remainder of the Illustrator tutorial is going through useful menu
items we often use here at CHCT. Sure, it’s not all of Adobe Illustrator, but it’s enough to give you a firm foot in the industry.
Object > Expand
Expand fills paths. This allows you to keep the ratio between the object and the stroke consistant and to expand typefaces. Expanding typefaces means the next person to edit the design or the print shop doesn’t need the font downloaded. A stroke example is right. See how the bottom lost some width?
Expanded
Not expanded
Object > Group
Groups just cluster things together. So when you click on them they’ll move together without you having to select them individually. You can group and ungroup things easily.
Arranged at top
Object > Path
The majority of these windows are path editing tools. If you have a really rough path, use simplify, average, or other methods listed to smooth out the path. Offset path and outline stroke, however allows you to manipulate stroke by adding a stroke on your stroke and adding a background to the object you’re adding stroke to.

A clipping mask is a way to crop rasterized images in Illustrator or add a pattern to a path. Arrange your path above your pattern, select both and then navigate to Object > Clipping Mask > Make. You’ll have a patterned object.
To remove the clipping mask, complete ‘Remove.’
Object > Clipping Mask
Using ‘Compound Path’ helps a lot with strokes. For example this CH (01) here. The C and H are individual paths, so when the stroke gets really big the item arranged on the top will overlap the object on the bottom. The compound path will combine path without using the pathfinder.
Object > Compound Path
34WEEK 1: ILLUSTRATOR WALKTHROUGH //
Objects that can be selected are clipping masks, stray points, brush strokes, and text objects. Basically an easy way to find something that isn’t visible in a complicated design.
Select > Object > Etc.
01. 02.
03. 04. 01.
02. 03.
clipping
compound
Glyphs are more options to the typeface. Some type designers adjust their M for three different interactions. Glyph opens its own window.
Type > Glyphs

This tool is especially helpful and can make any design look really cool. Follow the above navigation to open this 3D Extrude and Bevel window. You can choose from several profiles and drag the perspective you desire as well as add angles. You can asign depth and kind of bevel to your object as well. There are a lot of options.
Effect > 3D > Extrude & Bevel
Rectangle, ellipse, and rounded rectangle are on the list here, but the only one I ever use is rounded rectangle. It’s a quick fix to change one shape into the next with accuracy.
Effect > Convert to Shape
35WEEK 1: ILLUSTRATOR WALKTHROUGH //
Free Distort opens up its own window where you can distort by dragging its four corners or creating points of warp for yourself by clicking.
Effect > Warp
The warp effect lets you manipulate any object with an easy preview and analogue box. It’s mostly used to arc text over or under a design or have a wave like appearance. There’s a lot of possibilities though.
Effect > Free Distort

Marquee
Lasso
Crop
Healing brush
Clone stamp
Blur/Sharpen/Smudge
Quick selection/magic wand
Dodge/Burn/Sponge
week 1: Adobe photoshop Why use Illustrator? Simple. There are two kinds of image files: vector and pixel. Pixel is a normal file like .jpg image that is constrained to one size. If stretched, it becomes pixelated.
Illustrator is a vector-based software. Meaning changing it to all different sizes won’t pixelate it. All of our artwork is created is Adobe Illustrator and is valuable
design resource for .ai, .eps, and .pdf files. We’ll also give you a College Hill guide to the program. Below is the average workspace of Illustrator.
toolsWe’re not going over all of the tools or menus, but what’s relevant to our company and what is not redundant to the previous Adobe Illustrator instructional guide.
WEEK 1: PHOTOSHOP WALKTHROUGH //
Lasso Tool (L)
The lasso is a selection tool with several options as to how you want to select these iteams. The regular lasso is just freehand. The polygonal lasso is point-to-point similar to the pen tool without adjustable anchor. And the last is the ‘magnetic’ lasso where it attempts to outline specific items. It’s very useful as you’re cutting one object from a larger picture.
Marquee Tool (M)
The Marquee tool simply selects areas in a specific shape. With the Selection tool, you can alter and resize from this selection.
37

The Clone Stamp tool paints one part of an image over another part of the same image. You can also paint part of one layer over another layer. You can select your swatch by pressing ‘option’ and selection on spot. Then you drag as if using the bursh tool.
Clone Stamp (N)
The Healing Brush tool lets you correct imperfections, causing them to disappear into the surrounding image. This tool also matches the texture, lighting, transparency, and shading of the sampled pixels to the pixels being healed. As a result, the repaired pixels blend seamlessly into the rest of the image.
Crop (C)
Crop cuts down your artboard with a simple tool. You can alter it’s shape by clicking and dragging from one of it’s corners or sides.
Healing Brush (J)
38WEEK 1: PHOTOSHOP WALKTHROUGH //
Blur / Sharpen / Smudge
These tools primarily alter focus so you blur what you want to be unfocused and sharpen what you want focused.
The smudge tool smears colors. Used in moderation, it can be useful for smoothing out harsh transitions.
Quick Selection/Magic Wand
Other selection tools, the quick selection tool allows you to ‘draw’ over your selection and it will cluster your selection.
The magic wand tool, on the other hand, is just a click for every selection. One click and the tool will cluster all similar pixels attached.

Edit > Fill allows your selections to be filled with any of these menu items. The most popular is ‘content-aware’ which will actually take a selection, erase it, and fill in with what is a common trend for the rest of your picture. John Belushi without a face is pretty creepy.
Edit > Fill
39WEEK 1: PHOTOSHOP WALKTHROUGH //
This rotates or flips your artboard... not much more than that.
Image > Image / Canvas Size
This is how you resize your images and ready them for print. Image size will contrain proportions and determine your resolution. 72 is good for web, 300-600 is what’s required for print.
Canvas just cuts the artboard regardless of its content.
Image > Image Rotation
Blur / Sharpen / Smudge
These tools alter the color of the image. The dodge tool lightens pixels as you paint over them. The burn tool darkens pixels. The sponge tool adjusts the saturation of colors, making them either duller or more vivid.
MenusPhotoshop is primarily for photo editing, so the menus I will be sharing are just some of the basic photoediting resources I use.
This is where you change your color format. RGB is for web and CMYK is for print.
Image > Mode

Image > Adjustments
Image > adjustments is my favorite part of Photoshop. You edit colors with simple to use windows to navigate you. Here is some vocabulary for you though for you to understand these tools:
Hue: just means color.
Saturation: amound of color or “colorfulness.”
Vibrance: activity in color, adds more to saturation.
40WEEK 1: PHOTOSHOP WALKTHROUGH //
Filter > Filter Gallery
The filter gallery allows you to edit images and overlay it with a style. There’s not much explanation for these unless you tweak around with them. You’ll see what I mean!
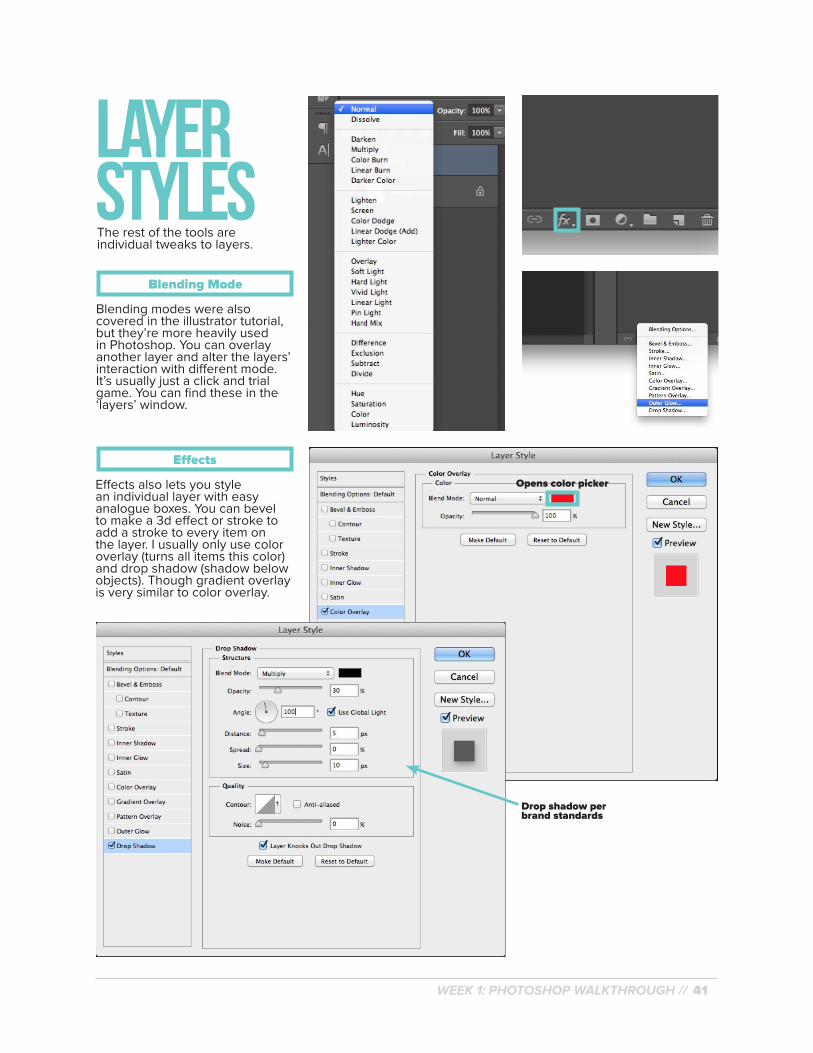
Effects also lets you style an individual layer with easy analogue boxes. You can bevel to make a 3d effect or stroke to add a stroke to every item on the layer. I usually only use color overlay (turns all items this color) and drop shadow (shadow below objects). Though gradient overlay is very similar to color overlay.
Blending Mode
Blending modes were also covered in the illustrator tutorial, but they’re more heavily used in Photoshop. You can overlay another layer and alter the layers’ interaction with different mode. It’s usually just a click and trial game. You can find these in the ‘layers’ window.
Effects
41WEEK 1: PHOTOSHOP WALKTHROUGH //
layer stylesThe rest of the tools are individual tweaks to layers.
Opens color picker
Drop shadow per brand standards

Week 1: back to school & introduction blog
Watch videos:How to get inspirationImage formatposted on blog
A .
Design a back to school shirt: Design a back to school shirt (or
get creative and use another product) not affiliated with Washington state schools. Any collegiate school of your choice.Complete the design on a CH mock up and post the gallery image in your blog post. Explain your process, questions you may have, and how you utilized the CH internship walkthroughs.
B.
Design blogs:Please answer the following questions as well as your back-to-school shirt. Feel free to post pictures and links in accordance with your inspirations!
• Why did you decide on being a graphic designer? • What kind of design experience do you have in the past?• Where do you gather inspiration? Where are your everyday hangouts for design?• What is your style? What is your preference in branding style?• What do you expect to gain technically from this internship?• Is there anything you’re expecting to learn about graphic design firms and the business outside of
designing?• Image format: What kind of file types have you used that are mentioned in the video? How, when,
where, what, and why?
c.
42WEEK 1 CULMINATION //
A .
A .
B .