websphere5.0
TRANSCRIPT

ibm.com/redbooks
IBM WebSphere ApplicationServer - Express V5.0.2Developer Handbookk
Carla SadtlerJustin Bogers
Shailen BorkarAndri Firtiyan
Use WebSphere Application Server - Express to develop applications
Test and deploy applications
Learn by example
Front cover


IBM WebSphere Application Server - Express V5.0.2 Developer Handbook
September 2003
International Technical Support Organization
SG24-6555-01

© Copyright International Business Machines Corporation 2003. All rights reserved.Note to U.S Government Users – Documentation related to restricted rights – Use, duplication or disclosure is subject torestrictions set forth in GSA ADP Schedule Contract with IBM Corp.
Second Edition (September 2003)
This edition applies to WebSphere Application Server - Express V5.0.2 for use with the Windows 2000 and Linux Operating Systems.
Take Note! Before using this information and the product it supports, be sure to read the general information in “Notices” on page xiii.

Contents
Notices . . . . . . . . . . . . . . . . . . . . . . . . . . . . . . . . . . . . . . . . . . . . . . . . . . . . . . xiiiTrademarks . . . . . . . . . . . . . . . . . . . . . . . . . . . . . . . . . . . . . . . . . . . . . . . . . . . xiv
Preface . . . . . . . . . . . . . . . . . . . . . . . . . . . . . . . . . . . . . . . . . . . . . . . . . . . . . . xvThe team that wrote this redbook. . . . . . . . . . . . . . . . . . . . . . . . . . . . . . . . . . . xvNotice . . . . . . . . . . . . . . . . . . . . . . . . . . . . . . . . . . . . . . . . . . . . . . . . . . . . . . . xviiComments welcome. . . . . . . . . . . . . . . . . . . . . . . . . . . . . . . . . . . . . . . . . . . . xvii
Chapter 1. Getting started . . . . . . . . . . . . . . . . . . . . . . . . . . . . . . . . . . . . . . . 11.1 What is IBM WebSphere Application Server - Express V5 . . . . . . . . . . . . . 2
1.1.1 WebSphere Studio Site Developer . . . . . . . . . . . . . . . . . . . . . . . . . . . 31.1.2 Express Application Server . . . . . . . . . . . . . . . . . . . . . . . . . . . . . . . . . 31.1.3 Database support . . . . . . . . . . . . . . . . . . . . . . . . . . . . . . . . . . . . . . . . 41.1.4 CVS server . . . . . . . . . . . . . . . . . . . . . . . . . . . . . . . . . . . . . . . . . . . . . 41.1.5 Web server . . . . . . . . . . . . . . . . . . . . . . . . . . . . . . . . . . . . . . . . . . . . . 51.1.6 Testing and deploying applications . . . . . . . . . . . . . . . . . . . . . . . . . . . 51.1.7 Roles and responsibilities . . . . . . . . . . . . . . . . . . . . . . . . . . . . . . . . . . 6
1.2 Information road map . . . . . . . . . . . . . . . . . . . . . . . . . . . . . . . . . . . . . . . . . 61.3 Bringing up Studio Site Developer for the first time. . . . . . . . . . . . . . . . . . 10
1.3.1 WebSphere Application Server - Express examples . . . . . . . . . . . . 111.3.2 Installing an example application . . . . . . . . . . . . . . . . . . . . . . . . . . . 121.3.3 Using application templates . . . . . . . . . . . . . . . . . . . . . . . . . . . . . . . 14
1.4 The Online Catalog sample. . . . . . . . . . . . . . . . . . . . . . . . . . . . . . . . . . . . 151.4.1 Sample application overview. . . . . . . . . . . . . . . . . . . . . . . . . . . . . . . 151.4.2 Sample database . . . . . . . . . . . . . . . . . . . . . . . . . . . . . . . . . . . . . . . 16
Chapter 2. Application design . . . . . . . . . . . . . . . . . . . . . . . . . . . . . . . . . . . 172.1 Design considerations . . . . . . . . . . . . . . . . . . . . . . . . . . . . . . . . . . . . . . . . 18
2.1.1 System model for e-business applications . . . . . . . . . . . . . . . . . . . . 182.1.2 IBM Patterns for e-business . . . . . . . . . . . . . . . . . . . . . . . . . . . . . . . 21
2.2 Modeling an application. . . . . . . . . . . . . . . . . . . . . . . . . . . . . . . . . . . . . . . 222.2.1 Use-case analysis . . . . . . . . . . . . . . . . . . . . . . . . . . . . . . . . . . . . . . . 23
2.3 Determine the application-flow architecture . . . . . . . . . . . . . . . . . . . . . . . 262.3.1 Model 1 architecture . . . . . . . . . . . . . . . . . . . . . . . . . . . . . . . . . . . . . 262.3.2 Model 2 architecture . . . . . . . . . . . . . . . . . . . . . . . . . . . . . . . . . . . . . 272.3.3 MVC architectural pattern . . . . . . . . . . . . . . . . . . . . . . . . . . . . . . . . . 28
2.4 Reviewing the supporting technologies. . . . . . . . . . . . . . . . . . . . . . . . . . . 322.4.1 JavaScript . . . . . . . . . . . . . . . . . . . . . . . . . . . . . . . . . . . . . . . . . . . . . 322.4.2 Servlets . . . . . . . . . . . . . . . . . . . . . . . . . . . . . . . . . . . . . . . . . . . . . . . 33
© Copyright IBM Corp. 2003 iii

2.4.3 JavaServer Pages. . . . . . . . . . . . . . . . . . . . . . . . . . . . . . . . . . . . . . . 332.4.4 Tag libraries . . . . . . . . . . . . . . . . . . . . . . . . . . . . . . . . . . . . . . . . . . . 342.4.5 XML. . . . . . . . . . . . . . . . . . . . . . . . . . . . . . . . . . . . . . . . . . . . . . . . . . 352.4.6 Web services. . . . . . . . . . . . . . . . . . . . . . . . . . . . . . . . . . . . . . . . . . . 352.4.7 Struts. . . . . . . . . . . . . . . . . . . . . . . . . . . . . . . . . . . . . . . . . . . . . . . . . 36
2.5 Designing the database. . . . . . . . . . . . . . . . . . . . . . . . . . . . . . . . . . . . . . . 372.5.1 Normalization . . . . . . . . . . . . . . . . . . . . . . . . . . . . . . . . . . . . . . . . . . 372.5.2 Indexes . . . . . . . . . . . . . . . . . . . . . . . . . . . . . . . . . . . . . . . . . . . . . . . 382.5.3 Datatypes . . . . . . . . . . . . . . . . . . . . . . . . . . . . . . . . . . . . . . . . . . . . . 392.5.4 Deriving the data model from the use-case model . . . . . . . . . . . . . . 39
2.6 For more information . . . . . . . . . . . . . . . . . . . . . . . . . . . . . . . . . . . . . . . . . 40
Chapter 3. Using Studio Site Developer . . . . . . . . . . . . . . . . . . . . . . . . . . . 433.1 The workspace . . . . . . . . . . . . . . . . . . . . . . . . . . . . . . . . . . . . . . . . . . . . . 44
3.1.1 Recovering files from their local history . . . . . . . . . . . . . . . . . . . . . . 453.2 Perspectives . . . . . . . . . . . . . . . . . . . . . . . . . . . . . . . . . . . . . . . . . . . . . . . 47
3.2.1 Editors . . . . . . . . . . . . . . . . . . . . . . . . . . . . . . . . . . . . . . . . . . . . . . . . 493.2.2 Using fast views . . . . . . . . . . . . . . . . . . . . . . . . . . . . . . . . . . . . . . . . 503.2.3 Customizing perspectives . . . . . . . . . . . . . . . . . . . . . . . . . . . . . . . . . 523.2.4 Setting perspective preferences . . . . . . . . . . . . . . . . . . . . . . . . . . . . 53
3.3 Finding help. . . . . . . . . . . . . . . . . . . . . . . . . . . . . . . . . . . . . . . . . . . . . . . . 54
Chapter 4. Working with Web applications . . . . . . . . . . . . . . . . . . . . . . . . . 574.1 Enterprise application . . . . . . . . . . . . . . . . . . . . . . . . . . . . . . . . . . . . . . . . 58
4.1.1 Enterprise application deployment descriptor . . . . . . . . . . . . . . . . . . 584.2 Web application. . . . . . . . . . . . . . . . . . . . . . . . . . . . . . . . . . . . . . . . . . . . . 59
4.2.1 A Web application in an application server . . . . . . . . . . . . . . . . . . . . 644.3 Working with Web applications . . . . . . . . . . . . . . . . . . . . . . . . . . . . . . . . . 65
4.3.1 Creating an enterprise application . . . . . . . . . . . . . . . . . . . . . . . . . . 654.3.2 Creating a Web project . . . . . . . . . . . . . . . . . . . . . . . . . . . . . . . . . . . 664.3.3 Web project directory structure . . . . . . . . . . . . . . . . . . . . . . . . . . . . . 724.3.4 Application templates . . . . . . . . . . . . . . . . . . . . . . . . . . . . . . . . . . . . 75
Chapter 5. Working with HTML . . . . . . . . . . . . . . . . . . . . . . . . . . . . . . . . . . 775.1 HTML support in Studio Site Developer . . . . . . . . . . . . . . . . . . . . . . . . . . 78
5.1.1 Using the Web perspective . . . . . . . . . . . . . . . . . . . . . . . . . . . . . . . . 785.1.2 Editing with the Page Designer . . . . . . . . . . . . . . . . . . . . . . . . . . . . . 905.1.3 Building applications with Web Site Designer . . . . . . . . . . . . . . . . . . 935.1.4 HTML/XHTML wizard . . . . . . . . . . . . . . . . . . . . . . . . . . . . . . . . . . . 1085.1.5 Using Page templates . . . . . . . . . . . . . . . . . . . . . . . . . . . . . . . . . . . 1095.1.6 Working with framesets. . . . . . . . . . . . . . . . . . . . . . . . . . . . . . . . . . 1125.1.7 Adding tables, links, text, and images. . . . . . . . . . . . . . . . . . . . . . . 1165.1.8 Working with forms, input fields, and buttons . . . . . . . . . . . . . . . . . 1195.1.9 Working with style sheets . . . . . . . . . . . . . . . . . . . . . . . . . . . . . . . . 120
iv IBM WebSphere Application Server - Express V5.0.2 Developer Handbook

5.1.10 Working with WebArt Designer . . . . . . . . . . . . . . . . . . . . . . . . . . . 1225.1.11 Working with animation . . . . . . . . . . . . . . . . . . . . . . . . . . . . . . . . . 128
5.2 Adding HTML pages to the Online Catalog sample . . . . . . . . . . . . . . . . 1355.2.1 Creating HTML pages using Web Site Designer . . . . . . . . . . . . . . 1355.2.2 Customizing a page template . . . . . . . . . . . . . . . . . . . . . . . . . . . . . 1355.2.3 Creating HTML pages . . . . . . . . . . . . . . . . . . . . . . . . . . . . . . . . . . . 143
Chapter 6. Accessing databases . . . . . . . . . . . . . . . . . . . . . . . . . . . . . . . . 1536.1 Java Database Connectivity (JDBC) overview . . . . . . . . . . . . . . . . . . . . 154
6.1.1 Data source versus direct connection . . . . . . . . . . . . . . . . . . . . . . . 1546.2 Working with databases in Studio Site Developer. . . . . . . . . . . . . . . . . . 155
6.2.1 Using the Data perspective . . . . . . . . . . . . . . . . . . . . . . . . . . . . . . . 1566.2.2 Creating the database. . . . . . . . . . . . . . . . . . . . . . . . . . . . . . . . . . . 1586.2.3 Connecting Studio Site Developer to the database . . . . . . . . . . . . 1596.2.4 Importing and working with the database design . . . . . . . . . . . . . . 1626.2.5 DB output view . . . . . . . . . . . . . . . . . . . . . . . . . . . . . . . . . . . . . . . . 1736.2.6 Creating Web pages to access the database . . . . . . . . . . . . . . . . . 1746.2.7 Database connections. . . . . . . . . . . . . . . . . . . . . . . . . . . . . . . . . . . 1946.2.8 Defining a resource reference for the data source (optional) . . . . . 1976.2.9 Testing . . . . . . . . . . . . . . . . . . . . . . . . . . . . . . . . . . . . . . . . . . . . . . 2006.2.10 Building SQL statements using the SQL Query Builder . . . . . . . . 211
Chapter 7. Working with servlets . . . . . . . . . . . . . . . . . . . . . . . . . . . . . . . . 2157.1 Servlet overview . . . . . . . . . . . . . . . . . . . . . . . . . . . . . . . . . . . . . . . . . . . 216
7.1.1 A servlet’s life cycle. . . . . . . . . . . . . . . . . . . . . . . . . . . . . . . . . . . . . 2167.1.2 The servlet’s environment . . . . . . . . . . . . . . . . . . . . . . . . . . . . . . . . 2187.1.3 Servlets in an enterprise application . . . . . . . . . . . . . . . . . . . . . . . . 220
7.2 Studio Site Developer and servlets . . . . . . . . . . . . . . . . . . . . . . . . . . . . . 2217.2.1 Wizards . . . . . . . . . . . . . . . . . . . . . . . . . . . . . . . . . . . . . . . . . . . . . . 2217.2.2 Web perspective . . . . . . . . . . . . . . . . . . . . . . . . . . . . . . . . . . . . . . . 2247.2.3 Deployment descriptor editor . . . . . . . . . . . . . . . . . . . . . . . . . . . . . 229
7.3 Using servlets in the Online Catalog sample. . . . . . . . . . . . . . . . . . . . . . 2327.3.1 Creating a servlet . . . . . . . . . . . . . . . . . . . . . . . . . . . . . . . . . . . . . . 233
7.4 References . . . . . . . . . . . . . . . . . . . . . . . . . . . . . . . . . . . . . . . . . . . . . . . 240
Chapter 8. Working with JSPs . . . . . . . . . . . . . . . . . . . . . . . . . . . . . . . . . . 2418.1 JSP overview. . . . . . . . . . . . . . . . . . . . . . . . . . . . . . . . . . . . . . . . . . . . . . 242
8.1.1 JSP execution model . . . . . . . . . . . . . . . . . . . . . . . . . . . . . . . . . . . 2428.1.2 Syntax for coding JavaServer Pages . . . . . . . . . . . . . . . . . . . . . . . 2448.1.3 JSP 1.2 elements . . . . . . . . . . . . . . . . . . . . . . . . . . . . . . . . . . . . . . 246
8.2 Building JSP pages with Studio Site Developer . . . . . . . . . . . . . . . . . . . 2568.2.1 Preferences and properties. . . . . . . . . . . . . . . . . . . . . . . . . . . . . . . 2578.2.2 Web perspective . . . . . . . . . . . . . . . . . . . . . . . . . . . . . . . . . . . . . . . 2578.2.3 JSP wizard . . . . . . . . . . . . . . . . . . . . . . . . . . . . . . . . . . . . . . . . . . . 263
Contents v

8.3 Using JSPs in the Online Catalog sample. . . . . . . . . . . . . . . . . . . . . . . . 265
Chapter 9. Using tag libraries . . . . . . . . . . . . . . . . . . . . . . . . . . . . . . . . . . 2759.1 Custom tag library (taglibs) concepts . . . . . . . . . . . . . . . . . . . . . . . . . . . 276
9.1.1 Motivation for custom tags . . . . . . . . . . . . . . . . . . . . . . . . . . . . . . . 2769.1.2 When to use . . . . . . . . . . . . . . . . . . . . . . . . . . . . . . . . . . . . . . . . . . 2789.1.3 Common custom tag usages . . . . . . . . . . . . . . . . . . . . . . . . . . . . . 2799.1.4 How they work. . . . . . . . . . . . . . . . . . . . . . . . . . . . . . . . . . . . . . . . . 2799.1.5 An inside look at a taglib . . . . . . . . . . . . . . . . . . . . . . . . . . . . . . . . . 2809.1.6 Using tag libraries . . . . . . . . . . . . . . . . . . . . . . . . . . . . . . . . . . . . . . 285
9.2 Studio Site Developer and tag libraries . . . . . . . . . . . . . . . . . . . . . . . . . . 2889.2.1 JSP wizard . . . . . . . . . . . . . . . . . . . . . . . . . . . . . . . . . . . . . . . . . . . 2889.2.2 Using the Insert custom tag dialog . . . . . . . . . . . . . . . . . . . . . . . . . 2959.2.3 Snippets view . . . . . . . . . . . . . . . . . . . . . . . . . . . . . . . . . . . . . . . . . 2969.2.4 Tag libraries included with Studio Site Developer. . . . . . . . . . . . . . 2969.2.5 Tag libraries used in the example sample applications. . . . . . . . . . 299
9.3 Using a tag library in the Online Catalog sample . . . . . . . . . . . . . . . . . . 3019.3.1 Step 1: Creating a JSP . . . . . . . . . . . . . . . . . . . . . . . . . . . . . . . . . . 3039.3.2 Step 2: Adding a taglib directive . . . . . . . . . . . . . . . . . . . . . . . . . . . 3049.3.3 Step 3: Adding the taglib tags . . . . . . . . . . . . . . . . . . . . . . . . . . . . . 3059.3.4 Step 4: Inserting the final code . . . . . . . . . . . . . . . . . . . . . . . . . . . . 307
9.4 For more information . . . . . . . . . . . . . . . . . . . . . . . . . . . . . . . . . . . . . . . . 308
Chapter 10. Working with XML . . . . . . . . . . . . . . . . . . . . . . . . . . . . . . . . . . 30910.1 XML overview . . . . . . . . . . . . . . . . . . . . . . . . . . . . . . . . . . . . . . . . . . . . 310
10.1.1 XML markup . . . . . . . . . . . . . . . . . . . . . . . . . . . . . . . . . . . . . . . . . 31010.1.2 Well-formed XML documents . . . . . . . . . . . . . . . . . . . . . . . . . . . . 31310.1.3 Document type definitions (DTDs) . . . . . . . . . . . . . . . . . . . . . . . . 31310.1.4 Validation . . . . . . . . . . . . . . . . . . . . . . . . . . . . . . . . . . . . . . . . . . . 31410.1.5 XML namespaces . . . . . . . . . . . . . . . . . . . . . . . . . . . . . . . . . . . . . 31410.1.6 XML schema . . . . . . . . . . . . . . . . . . . . . . . . . . . . . . . . . . . . . . . . . 31510.1.7 Schema and style using XSLT and XSL . . . . . . . . . . . . . . . . . . . . 31810.1.8 XPath . . . . . . . . . . . . . . . . . . . . . . . . . . . . . . . . . . . . . . . . . . . . . . 319
10.2 Working with XML in Studio Site Developer . . . . . . . . . . . . . . . . . . . . . 31910.2.1 The XML perspective . . . . . . . . . . . . . . . . . . . . . . . . . . . . . . . . . . 32110.2.2 Wizards . . . . . . . . . . . . . . . . . . . . . . . . . . . . . . . . . . . . . . . . . . . . . 32210.2.3 Editors . . . . . . . . . . . . . . . . . . . . . . . . . . . . . . . . . . . . . . . . . . . . . . 32510.2.4 XML sample applications in Studio Site Developer. . . . . . . . . . . . 331
10.3 Using XML in the Online Catalog sample . . . . . . . . . . . . . . . . . . . . . . . 33210.4 For more information . . . . . . . . . . . . . . . . . . . . . . . . . . . . . . . . . . . . . . . 353
Chapter 11. Working with Web services . . . . . . . . . . . . . . . . . . . . . . . . . . 35511.1 Web services overview . . . . . . . . . . . . . . . . . . . . . . . . . . . . . . . . . . . . . 356
11.1.1 The concept of a service-oriented architecture (SOA) . . . . . . . . . 357
vi IBM WebSphere Application Server - Express V5.0.2 Developer Handbook

11.1.2 Web services approach for an SOA architecture . . . . . . . . . . . . . 35911.1.3 An introduction to SOAP . . . . . . . . . . . . . . . . . . . . . . . . . . . . . . . . 36011.1.4 An introduction to WSDL. . . . . . . . . . . . . . . . . . . . . . . . . . . . . . . . 36211.1.5 Web Services Invocation Framework (WSIF) . . . . . . . . . . . . . . . . 363
11.2 Studio Site Developer support for Web services. . . . . . . . . . . . . . . . . . 36611.2.1 Web service preferences . . . . . . . . . . . . . . . . . . . . . . . . . . . . . . . 36711.2.2 Wizards . . . . . . . . . . . . . . . . . . . . . . . . . . . . . . . . . . . . . . . . . . . . . 36911.2.3 WSDL editor . . . . . . . . . . . . . . . . . . . . . . . . . . . . . . . . . . . . . . . . . 36911.2.4 Web Services Explorer . . . . . . . . . . . . . . . . . . . . . . . . . . . . . . . . . 370
11.3 Using Web services in the Online Catalog sample . . . . . . . . . . . . . . . . 37211.3.1 Locating and consuming a Web service . . . . . . . . . . . . . . . . . . . . 37211.3.2 Integrating the client into your application. . . . . . . . . . . . . . . . . . . 38011.3.3 For more information. . . . . . . . . . . . . . . . . . . . . . . . . . . . . . . . . . . 381
Chapter 12. Using Struts . . . . . . . . . . . . . . . . . . . . . . . . . . . . . . . . . . . . . . 38312.1 Struts overview . . . . . . . . . . . . . . . . . . . . . . . . . . . . . . . . . . . . . . . . . . . 384
12.1.1 Why we use Struts . . . . . . . . . . . . . . . . . . . . . . . . . . . . . . . . . . . . 38412.1.2 Struts framework . . . . . . . . . . . . . . . . . . . . . . . . . . . . . . . . . . . . . . 385
12.2 Studio Site Developer and Struts . . . . . . . . . . . . . . . . . . . . . . . . . . . . . 38812.2.1 Struts development process . . . . . . . . . . . . . . . . . . . . . . . . . . . . . 38912.2.2 Struts support in a Web project. . . . . . . . . . . . . . . . . . . . . . . . . . . 38912.2.3 Setting Struts preferences. . . . . . . . . . . . . . . . . . . . . . . . . . . . . . . 39312.2.4 Web diagram editor . . . . . . . . . . . . . . . . . . . . . . . . . . . . . . . . . . . . 39812.2.5 Wizards . . . . . . . . . . . . . . . . . . . . . . . . . . . . . . . . . . . . . . . . . . . . . 40512.2.6 Struts configuration file editor . . . . . . . . . . . . . . . . . . . . . . . . . . . . 42212.2.7 Struts explorer view. . . . . . . . . . . . . . . . . . . . . . . . . . . . . . . . . . . . 42312.2.8 Data Mappings view . . . . . . . . . . . . . . . . . . . . . . . . . . . . . . . . . . . 42412.2.9 Struts validation. . . . . . . . . . . . . . . . . . . . . . . . . . . . . . . . . . . . . . . 424
12.3 Using Struts in a sample . . . . . . . . . . . . . . . . . . . . . . . . . . . . . . . . . . . . 42512.3.1 Adding Struts support to the OnlineCatalog project . . . . . . . . . . . 42712.3.2 Creating a Web diagram . . . . . . . . . . . . . . . . . . . . . . . . . . . . . . . . 42712.3.3 Creating the Web page nodes . . . . . . . . . . . . . . . . . . . . . . . . . . . 42912.3.4 Creating the action mapping nodes . . . . . . . . . . . . . . . . . . . . . . . 43012.3.5 Creating connections . . . . . . . . . . . . . . . . . . . . . . . . . . . . . . . . . . 43112.3.6 Editing the ApplicationResources.properties file. . . . . . . . . . . . . . 43212.3.7 Realizing and editing the Web pages . . . . . . . . . . . . . . . . . . . . . . 43312.3.8 Creating the form bean . . . . . . . . . . . . . . . . . . . . . . . . . . . . . . . . . 44012.3.9 Realizing and editing the action classes . . . . . . . . . . . . . . . . . . . . 44412.3.10 Integrating with the Online Catalog sample template . . . . . . . . . 45112.3.11 Understanding the Struts configuration file . . . . . . . . . . . . . . . . . 452
Chapter 13. Deploying applications. . . . . . . . . . . . . . . . . . . . . . . . . . . . . . 45513.1 Application server overview. . . . . . . . . . . . . . . . . . . . . . . . . . . . . . . . . . 456
Contents vii

13.1.1 Configuration and management . . . . . . . . . . . . . . . . . . . . . . . . . . 45613.1.2 Managing test application servers. . . . . . . . . . . . . . . . . . . . . . . . . 457
13.2 Using the Server tools . . . . . . . . . . . . . . . . . . . . . . . . . . . . . . . . . . . . . . 45913.2.1 Setting preferences for the Server perspective. . . . . . . . . . . . . . . 460
13.3 Defining servers and server configurations . . . . . . . . . . . . . . . . . . . . . . 46213.3.1 Server types . . . . . . . . . . . . . . . . . . . . . . . . . . . . . . . . . . . . . . . . . 465
13.4 Using the Express test environment . . . . . . . . . . . . . . . . . . . . . . . . . . . 46513.4.1 Creating a server and server configuration . . . . . . . . . . . . . . . . . . 46613.4.2 Publishing an application to the test environment . . . . . . . . . . . . . 46813.4.3 Updating the server configuration for the application . . . . . . . . . . 47013.4.4 Starting the test environment server . . . . . . . . . . . . . . . . . . . . . . . 47113.4.5 Running the application. . . . . . . . . . . . . . . . . . . . . . . . . . . . . . . . . 472
13.5 Working with an Express server . . . . . . . . . . . . . . . . . . . . . . . . . . . . . . 47513.5.1 Defining the server to Studio Site Developer . . . . . . . . . . . . . . . . 47613.5.2 Publishing the application . . . . . . . . . . . . . . . . . . . . . . . . . . . . . . . 48113.5.3 Updating the server configuration for the application . . . . . . . . . . 48213.5.4 Starting the Express server. . . . . . . . . . . . . . . . . . . . . . . . . . . . . . 48213.5.5 Running the application. . . . . . . . . . . . . . . . . . . . . . . . . . . . . . . . . 483
13.6 Working with server configurations . . . . . . . . . . . . . . . . . . . . . . . . . . . . 48313.6.1 Classloaders and file location . . . . . . . . . . . . . . . . . . . . . . . . . . . . 486
13.7 Server operations . . . . . . . . . . . . . . . . . . . . . . . . . . . . . . . . . . . . . . . . . 48713.7.1 Starting the server. . . . . . . . . . . . . . . . . . . . . . . . . . . . . . . . . . . . . 48713.7.2 Stopping the server . . . . . . . . . . . . . . . . . . . . . . . . . . . . . . . . . . . . 48813.7.3 Restarting the server. . . . . . . . . . . . . . . . . . . . . . . . . . . . . . . . . . . 488
13.8 Deploying applications for production . . . . . . . . . . . . . . . . . . . . . . . . . . 48913.8.1 Exporting an enterprise application to a file location. . . . . . . . . . . 48913.8.2 Exporting an enterprise application using FTP . . . . . . . . . . . . . . . 490
13.9 IBM Agent Controller settings and status . . . . . . . . . . . . . . . . . . . . . . . 49113.10 For more information . . . . . . . . . . . . . . . . . . . . . . . . . . . . . . . . . . . . . . 492
Chapter 14. Testing and debugging. . . . . . . . . . . . . . . . . . . . . . . . . . . . . . 49314.1 Debugging in the Web perspective . . . . . . . . . . . . . . . . . . . . . . . . . . . . 494
14.1.1 Page errors . . . . . . . . . . . . . . . . . . . . . . . . . . . . . . . . . . . . . . . . . . 49414.1.2 Project navigator view . . . . . . . . . . . . . . . . . . . . . . . . . . . . . . . . . . 49614.1.3 Tasks view . . . . . . . . . . . . . . . . . . . . . . . . . . . . . . . . . . . . . . . . . . 49714.1.4 Editors . . . . . . . . . . . . . . . . . . . . . . . . . . . . . . . . . . . . . . . . . . . . . . 49814.1.5 Console view. . . . . . . . . . . . . . . . . . . . . . . . . . . . . . . . . . . . . . . . . 499
14.2 Debugging using the Debug perspective . . . . . . . . . . . . . . . . . . . . . . . 50014.2.1 Debug perspective . . . . . . . . . . . . . . . . . . . . . . . . . . . . . . . . . . . . 501
14.3 Stepping through code using the Online Catalog sample . . . . . . . . . . . 50714.3.1 Setting breakpoints . . . . . . . . . . . . . . . . . . . . . . . . . . . . . . . . . . . . 50714.3.2 Running the application in debug mode . . . . . . . . . . . . . . . . . . . . 50814.3.3 Verifying the variable. . . . . . . . . . . . . . . . . . . . . . . . . . . . . . . . . . . 512
viii IBM WebSphere Application Server - Express V5.0.2 Developer Handbook

Chapter 15. Development in a team environment . . . . . . . . . . . . . . . . . . 51515.1 Team development with CVS . . . . . . . . . . . . . . . . . . . . . . . . . . . . . . . . 516
15.1.1 Non-exclusive checkout . . . . . . . . . . . . . . . . . . . . . . . . . . . . . . . . 51615.1.2 Access to resources . . . . . . . . . . . . . . . . . . . . . . . . . . . . . . . . . . . 51615.1.3 Working with resources. . . . . . . . . . . . . . . . . . . . . . . . . . . . . . . . . 51615.1.4 Change history . . . . . . . . . . . . . . . . . . . . . . . . . . . . . . . . . . . . . . . 51715.1.5 Making changes available to the team . . . . . . . . . . . . . . . . . . . . . 51715.1.6 Conflict resolution . . . . . . . . . . . . . . . . . . . . . . . . . . . . . . . . . . . . . 517
15.2 Team environment using Studio Site Developer . . . . . . . . . . . . . . . . . . 51815.2.1 Typical flow for team development . . . . . . . . . . . . . . . . . . . . . . . . 518
15.3 Connecting to a repository . . . . . . . . . . . . . . . . . . . . . . . . . . . . . . . . . . 51915.4 Adding a new application to the repository . . . . . . . . . . . . . . . . . . . . . . 521
15.4.1 Sharing the project . . . . . . . . . . . . . . . . . . . . . . . . . . . . . . . . . . . . 52115.4.2 Copy (commit) the project to the repository . . . . . . . . . . . . . . . . . 52415.4.3 Creating a version . . . . . . . . . . . . . . . . . . . . . . . . . . . . . . . . . . . . . 52515.4.4 (Optional) changing the sharing information for a Web project . . . 528
15.5 Adding an existing application to your workspace. . . . . . . . . . . . . . . . . 52915.6 Working with the team using the repository . . . . . . . . . . . . . . . . . . . . . 530
15.6.1 Synchronizing with the repository . . . . . . . . . . . . . . . . . . . . . . . . . 53015.6.2 Dealing with conflicting changes . . . . . . . . . . . . . . . . . . . . . . . . . . 53115.6.3 Updating from the repository. . . . . . . . . . . . . . . . . . . . . . . . . . . . . 53515.6.4 Committing changes to the repository. . . . . . . . . . . . . . . . . . . . . . 536
15.7 Using multiple branches . . . . . . . . . . . . . . . . . . . . . . . . . . . . . . . . . . . . 53715.7.1 Creating a new branch . . . . . . . . . . . . . . . . . . . . . . . . . . . . . . . . . 53715.7.2 Accessing the branch from another workbench . . . . . . . . . . . . . . 53915.7.3 Merging branches . . . . . . . . . . . . . . . . . . . . . . . . . . . . . . . . . . . . . 541
15.8 Viewing resource history . . . . . . . . . . . . . . . . . . . . . . . . . . . . . . . . . . . . 54215.9 Comparing resources . . . . . . . . . . . . . . . . . . . . . . . . . . . . . . . . . . . . . . 544
15.9.1 Comparing a resource. . . . . . . . . . . . . . . . . . . . . . . . . . . . . . . . . . 54515.9.2 Comparing two selected files . . . . . . . . . . . . . . . . . . . . . . . . . . . . 54515.9.3 Three-way compare . . . . . . . . . . . . . . . . . . . . . . . . . . . . . . . . . . . 54515.9.4 Working with the comparison . . . . . . . . . . . . . . . . . . . . . . . . . . . . 547
15.10 Determining which files are managed . . . . . . . . . . . . . . . . . . . . . . . . . 549
Chapter 16. Security . . . . . . . . . . . . . . . . . . . . . . . . . . . . . . . . . . . . . . . . . . 55116.1 Terms . . . . . . . . . . . . . . . . . . . . . . . . . . . . . . . . . . . . . . . . . . . . . . . . . . 55216.2 Securing applications in WebSphere Application Server - Express . . . 55216.3 Authenticating users . . . . . . . . . . . . . . . . . . . . . . . . . . . . . . . . . . . . . . . 553
16.3.1 Form-based authentication . . . . . . . . . . . . . . . . . . . . . . . . . . . . . . 55416.4 Securing applications with role-based security . . . . . . . . . . . . . . . . . . . 556
16.4.1 Declarative security . . . . . . . . . . . . . . . . . . . . . . . . . . . . . . . . . . . . 55716.4.2 Programmatic security . . . . . . . . . . . . . . . . . . . . . . . . . . . . . . . . . 568
16.5 JAAS security . . . . . . . . . . . . . . . . . . . . . . . . . . . . . . . . . . . . . . . . . . . . 570
Contents ix

16.5.1 Adding JAAS authentication to a server . . . . . . . . . . . . . . . . . . . . 57116.5.2 Setting up a datasource using JAAS. . . . . . . . . . . . . . . . . . . . . . . 572
16.6 Securing the IBM Agent Controller . . . . . . . . . . . . . . . . . . . . . . . . . . . . 57316.6.1 Implementing SSL for IBM Agent Controller communications . . . 57416.6.2 Importing a security certificate into the Workbench . . . . . . . . . . . 576
16.7 Using SSL with applications . . . . . . . . . . . . . . . . . . . . . . . . . . . . . . . . . 57816.8 For more information . . . . . . . . . . . . . . . . . . . . . . . . . . . . . . . . . . . . . . . 580
Appendix A. Application templates . . . . . . . . . . . . . . . . . . . . . . . . . . . . . . 581Wizard . . . . . . . . . . . . . . . . . . . . . . . . . . . . . . . . . . . . . . . . . . . . . . . . . . . . . . 582Using the Template application wizard. . . . . . . . . . . . . . . . . . . . . . . . . . . . . . 584
Appendix B. Updating Studio Site Developer. . . . . . . . . . . . . . . . . . . . . . 597Using the Update Manager . . . . . . . . . . . . . . . . . . . . . . . . . . . . . . . . . . . . . . 597
Updating features . . . . . . . . . . . . . . . . . . . . . . . . . . . . . . . . . . . . . . . . . . . 601
Appendix C. Online Catalog application . . . . . . . . . . . . . . . . . . . . . . . . . . 611Online Catalog sample application overview . . . . . . . . . . . . . . . . . . . . . . . . . 612
Database architecture . . . . . . . . . . . . . . . . . . . . . . . . . . . . . . . . . . . . . . . . 612Application components . . . . . . . . . . . . . . . . . . . . . . . . . . . . . . . . . . . . . . . . . 614
Application root . . . . . . . . . . . . . . . . . . . . . . . . . . . . . . . . . . . . . . . . . . . . . 614Featured item . . . . . . . . . . . . . . . . . . . . . . . . . . . . . . . . . . . . . . . . . . . . . . 615Site administration. . . . . . . . . . . . . . . . . . . . . . . . . . . . . . . . . . . . . . . . . . . 617Catalog . . . . . . . . . . . . . . . . . . . . . . . . . . . . . . . . . . . . . . . . . . . . . . . . . . . 620Wishlist . . . . . . . . . . . . . . . . . . . . . . . . . . . . . . . . . . . . . . . . . . . . . . . . . . . 621Information request . . . . . . . . . . . . . . . . . . . . . . . . . . . . . . . . . . . . . . . . . . 625Currency conversion . . . . . . . . . . . . . . . . . . . . . . . . . . . . . . . . . . . . . . . . . 625Template and images . . . . . . . . . . . . . . . . . . . . . . . . . . . . . . . . . . . . . . . . 627Deployment descriptor . . . . . . . . . . . . . . . . . . . . . . . . . . . . . . . . . . . . . . . 628Miscellaneous . . . . . . . . . . . . . . . . . . . . . . . . . . . . . . . . . . . . . . . . . . . . . . 629Servlet login . . . . . . . . . . . . . . . . . . . . . . . . . . . . . . . . . . . . . . . . . . . . . . . 629Struts login . . . . . . . . . . . . . . . . . . . . . . . . . . . . . . . . . . . . . . . . . . . . . . . . 631
Appendix D. Additional material . . . . . . . . . . . . . . . . . . . . . . . . . . . . . . . . 633Locating the Web material . . . . . . . . . . . . . . . . . . . . . . . . . . . . . . . . . . . . . . . 633Using the Web material . . . . . . . . . . . . . . . . . . . . . . . . . . . . . . . . . . . . . . . . . 634
How to use the Web material . . . . . . . . . . . . . . . . . . . . . . . . . . . . . . . . . . 634
Related publications . . . . . . . . . . . . . . . . . . . . . . . . . . . . . . . . . . . . . . . . . . 641IBM Redbooks . . . . . . . . . . . . . . . . . . . . . . . . . . . . . . . . . . . . . . . . . . . . . . . . 641
Other resources . . . . . . . . . . . . . . . . . . . . . . . . . . . . . . . . . . . . . . . . . . . . 642Referenced Web sites . . . . . . . . . . . . . . . . . . . . . . . . . . . . . . . . . . . . . . . . . . 642How to get IBM Redbooks . . . . . . . . . . . . . . . . . . . . . . . . . . . . . . . . . . . . . . . 645
IBM Redbooks collections. . . . . . . . . . . . . . . . . . . . . . . . . . . . . . . . . . . . . 645
x IBM WebSphere Application Server - Express V5.0.2 Developer Handbook

Index . . . . . . . . . . . . . . . . . . . . . . . . . . . . . . . . . . . . . . . . . . . . . . . . . . . . . . . 647
Contents xi

xii IBM WebSphere Application Server - Express V5.0.2 Developer Handbook

Notices
This information was developed for products and services offered in the U.S.A.
IBM may not offer the products, services, or features discussed in this document in other countries. Consult your local IBM representative for information on the products and services currently available in your area. Any reference to an IBM product, program, or service is not intended to state or imply that only that IBM product, program, or service may be used. Any functionally equivalent product, program, or service that does not infringe any IBM intellectual property right may be used instead. However, it is the user's responsibility to evaluate and verify the operation of any non-IBM product, program, or service.
IBM may have patents or pending patent applications covering subject matter described in this document. The furnishing of this document does not give you any license to these patents. You can send license inquiries, in writing, to: IBM Director of Licensing, IBM Corporation, North Castle Drive Armonk, NY 10504-1785 U.S.A.
The following paragraph does not apply to the United Kingdom or any other country where such provisions are inconsistent with local law: INTERNATIONAL BUSINESS MACHINES CORPORATION PROVIDES THIS PUBLICATION "AS IS" WITHOUT WARRANTY OF ANY KIND, EITHER EXPRESS OR IMPLIED, INCLUDING, BUT NOT LIMITED TO, THE IMPLIED WARRANTIES OF NON-INFRINGEMENT, MERCHANTABILITY OR FITNESS FOR A PARTICULAR PURPOSE. Some states do not allow disclaimer of express or implied warranties in certain transactions, therefore, this statement may not apply to you.
This information could include technical inaccuracies or typographical errors. Changes are periodically made to the information herein; these changes will be incorporated in new editions of the publication. IBM may make improvements and/or changes in the product(s) and/or the program(s) described in this publication at any time without notice.
Any references in this information to non-IBM Web sites are provided for convenience only and do not in any manner serve as an endorsement of those Web sites. The materials at those Web sites are not part of the materials for this IBM product and use of those Web sites is at your own risk.
IBM may use or distribute any of the information you supply in any way it believes appropriate without incurring any obligation to you.
Information concerning non-IBM products was obtained from the suppliers of those products, their published announcements or other publicly available sources. IBM has not tested those products and cannot confirm the accuracy of performance, compatibility or any other claims related to non-IBM products. Questions on the capabilities of non-IBM products should be addressed to the suppliers of those products.
This information contains examples of data and reports used in daily business operations. To illustrate them as completely as possible, the examples include the names of individuals, companies, brands, and products. All of these names are fictitious and any similarity to the names and addresses used by an actual business enterprise is entirely coincidental.
COPYRIGHT LICENSE: This information contains sample application programs in source language, which illustrates programming techniques on various operating platforms. You may copy, modify, and distribute these sample programs in any form without payment to IBM, for the purposes of developing, using, marketing or distributing application programs conforming to the application programming interface for the operating platform for which the sample programs are written. These examples have not been thoroughly tested under all conditions. IBM, therefore, cannot guarantee or imply reliability, serviceability, or function of these programs. You may copy, modify, and distribute these sample programs in any form without payment to IBM for the purposes of developing, using, marketing, or distributing application programs conforming to IBM's application programming interfaces.
© Copyright IBM Corp. 2003 xiii

TrademarksThe following terms are trademarks of the International Business Machines Corporation in the United States, other countries, or both:
™^™Redbooks (logo) ™developerWorks®ibm.com®iSeries™AIX®
Cloudscape™CICS®DB2®Informix®IBM®MQSeries®OS/400®
Perform™Rational Rose®Rational®Redbooks™VisualAge®WebSphere®
The following terms are trademarks of other companies:
Intel, Intel Inside (logos), MMX, and Pentium are trademarks of Intel Corporation in the United States, other countries, or both.
Microsoft, Windows, Windows NT, and the Windows logo are trademarks of Microsoft Corporation in the United States, other countries, or both.
Java and all Java-based trademarks and logos are trademarks or registered trademarks of Sun Microsystems, Inc. in the United States, other countries, or both.
UNIX is a registered trademark of The Open Group in the United States and other countries.
SET, SET Secure Electronic Transaction, and the SET Logo are trademarks owned by SET Secure Electronic Transaction LLC.
Other company, product, and service names may be trademarks or service marks of others.
xiv IBM WebSphere Application Server - Express V5.0.2 Developer Handbook

Preface
This IBM Redbook introduces IBM WebSphere Application Server - Express V5, an IBM offering that provides a comprehensive development tool and a single-server application server environment designed for the small and medium business customers who want to have a Web presence for their business. It provides development tools and application server capability in a single offering.
IBM WebSphere Application Server - Express V5 users can develop and test applications using WebSphere Studio Site Developer, then test and deploy applications on a lightweight version of IBM’s WebSphere® Application Server. We refer to this lightweight server as the Express Application Server.
This redbook guides you through the process of developing and testing applications. It gives you an overview of Studio Site Developer and how it supports the technology required to build effective Web applications. It provides information on how to use the tools and takes you through the process of building and testing Web applications.
The focus of this book is on the development process. For information about server administration, see WebSphere Application Server - Express V5.0.1 Administrator Handbook, SG24-6976.
The team that wrote this redbookThis redbook was produced by a team of specialists from around the world working at the International Technical Support Organization, Raleigh Center.
Carla Sadtler is a WebSphere Specialist at the International Technical Support Organization, Raleigh Center. She writes extensively in the WebSphere and Patterns for e-business areas. Before joining the ITSO in 1985, Carla worked in the Raleigh branch office as a Program Support Representative. She holds a degree in mathematics from the University of North Carolina at Greensboro.
Justin Bogers is a Web Development Specialist for ASTECH Solutions Inc., a Toronto-based consulting firm and IBM Business Partner. He has seven years of experience in the field of information technology, and five years of experience in analysis, design and development of Web and J2EE applications. He is a graduate of Ryerson University with a Bachelor of Commerce degree in Business
© Copyright IBM Corp. 2003 xv

Information Systems. His areas of expertise include new media development, application development using the Eclipse platform, WebSphere Application Server administration, and Web-enabling existing 5250 applications using the IBM WebFacing Tool.
Shailen Borkar is a Senior Consultant for The Software Company, a consulting firm in Chicago, IL. He holds a degree in electronics engineering and has 12 years of experience in the software application development field. His areas of expertise include data warehousing and Web application development.
Andri Firtiyan is an IT Specialist with the IBM Software Group based in Jakarta, Indonesia. He has seven years of experience in the entire application development life cycle and for the last two years has been involved in presenting and demonstrating various WebSphere technology to IBM customers. He holds a Masters degree in Computer Science from the University of Indonesia. His areas of expertise include WebSphere and MQSeries® family products.
Thanks to the following people for their contributions to this project:
Peter KovariInternational Technical Support Organization, Raleigh Center
Mark EdwardsIBM Raleigh
Kevin PostreichIBM Raleigh
Moji TrastiIBM Raleigh
Tim DeBoerIBM Toronto
Ian BrownASTECH Solutions Inc.
xvi IBM WebSphere Application Server - Express V5.0.2 Developer Handbook

NoticeThis publication is intended to help customers build and deploy Web applications using IBM WebSphere Application Server - Express V5. The information in this publication is not intended as the specification of any programming interfaces that are provided by IBM WebSphere Application Server - Express V5. See the PUBLICATIONS section of the IBM Programming Announcement for IBM WebSphere Application Server - Express V5 for more information about what publications are considered to be product documentation.
Comments welcomeYour comments are important to us!
We want our Redbooks™ to be as helpful as possible. Send us your comments about this or other Redbooks in one of the following ways:
� Use the online Contact us review redbook form found at:
ibm.com/redbooks
� Send your comments in an Internet note to:
� Mail your comments to:
IBM® Corporation, International Technical Support OrganizationDept. HZ8 Building 662P.O. Box 12195Research Triangle Park, NC 27709-2195
Preface xvii

xviii IBM WebSphere Application Server - Express V5.0.2 Developer Handbook

Chapter 1. Getting started
IBM WebSphere Application Server - Express V5 provides a combination of development tool and application server that provides a single integrated package geared towards Web page centric applications. This chapter provides an introduction to the development tool, WebSphere Studio Site Developer, including:
� An overview of WebSphere Studio Site Developer � Starting Studio Site Developer� Loading the samples
1
© Copyright IBM Corp. 2003 1

1.1 What is IBM WebSphere Application Server - Express V5
IBM WebSphere Application Server - Express V5 (referred to in this document as WebSphere Application Server - Express) is an offering that contains the following in one installable package:
� Express Application Server� WebSphere Studio Site Developer � IBM Agent Controller� Pre-loaded samples
Figure 1-1 IBM WebSphere Application Server - Express V5
Express Application Server
WebSphere Studio Site Developer
Express Test
Environment
Web projects
Database Access
Help
Team
Develop
Web Services
DB2 Cloudscape
OracleSQL
Server
Data Access
CVS
Repository
Web Service access
XML
Web client
Server projects
Configure and deploy to test servers
Administratiion
Configure and deploy to production
servers
Production server
Test server
ApplicationApplication
Application
2 IBM WebSphere Application Server - Express V5.0.2 Developer Handbook
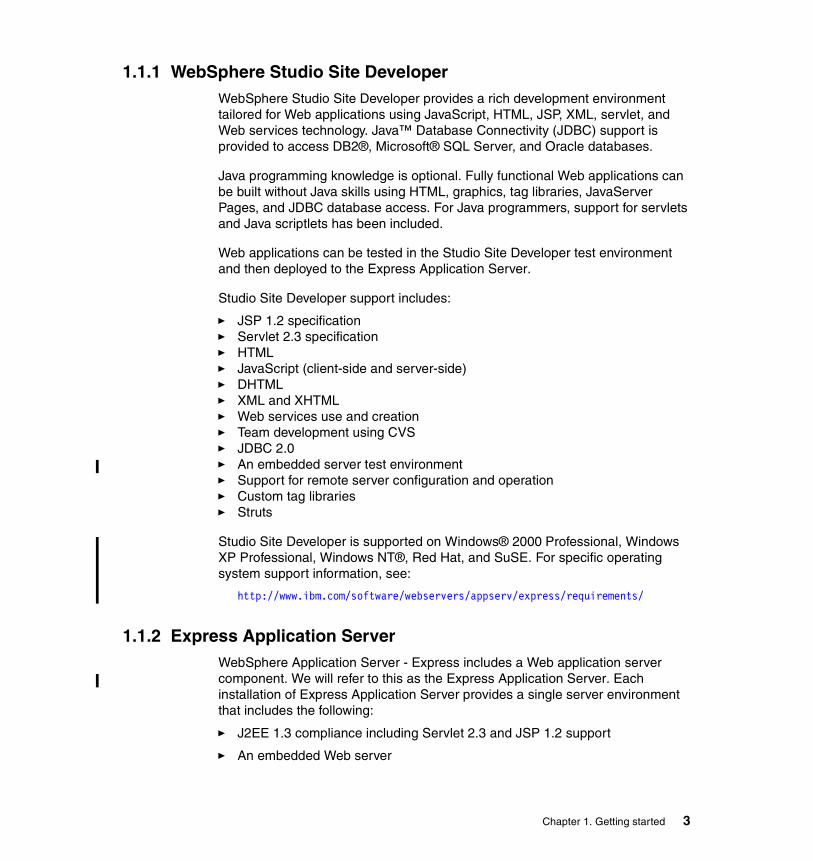
1.1.1 WebSphere Studio Site DeveloperWebSphere Studio Site Developer provides a rich development environment tailored for Web applications using JavaScript, HTML, JSP, XML, servlet, and Web services technology. Java™ Database Connectivity (JDBC) support is provided to access DB2®, Microsoft® SQL Server, and Oracle databases.
Java programming knowledge is optional. Fully functional Web applications can be built without Java skills using HTML, graphics, tag libraries, JavaServer Pages, and JDBC database access. For Java programmers, support for servlets and Java scriptlets has been included.
Web applications can be tested in the Studio Site Developer test environment and then deployed to the Express Application Server.
Studio Site Developer support includes:
� JSP 1.2 specification� Servlet 2.3 specification� HTML� JavaScript (client-side and server-side)� DHTML� XML and XHTML� Web services use and creation� Team development using CVS� JDBC 2.0 � An embedded server test environment� Support for remote server configuration and operation� Custom tag libraries� Struts
Studio Site Developer is supported on Windows® 2000 Professional, Windows XP Professional, Windows NT®, Red Hat, and SuSE. For specific operating system support information, see:
http://www.ibm.com/software/webservers/appserv/express/requirements/
1.1.2 Express Application ServerWebSphere Application Server - Express includes a Web application server component. We will refer to this as the Express Application Server. Each installation of Express Application Server provides a single server environment that includes the following:
� J2EE 1.3 compliance including Servlet 2.3 and JSP 1.2 support
� An embedded Web server
Chapter 1. Getting started 3

� A Web container
� Web services support including SOAP 2.3, WSIF, WSDL, and UDDI client
� XML and XSL support
� JDBC 1.0 support
� Connection pooling
� Simple WebSphere Authentication Method (SWAM) with local OS authorization
Express Application Server can be installed on the same system as Studio Site Developer or on a separate system. A Web-based administrative console is provided to configure the server environment. Administration and operation can also be performed using the server tools in Studio Site Developer, but this is primarily for development testing purposes.
The Express Application Server is supported on Windows NT, Windows 2000, Windows 2003, Windows XP, Red Hat, SuSe, United Linux, AIX®, Solaris, HP-UX, and OS/400®.
For specific operating system support information, see:
http://www.ibm.com/software/webservers/appserv/express/requirements/
1.1.3 Database supportMost applications built for WebSphere Application Server - Express will feature Web access to data stored in a database. WebSphere Application Server - Express supports Cloudscape™, DB2, SQL, SQL Server, Informix®, Sybase, MySLQ, InstantDB, and Oracle.
A development-use only version of DB2 is included with WebSphere Application Server - Express on a separate CD. The DB2 database serves as a testing environment if you wish to test your applications on DB2.
For specific database support information, see the IBM WebSphere Application Server - Express v5.0 Installation Guide (which is shipped with the project).
1.1.4 CVS serverStudio Site Developer provides tools that allow you to use a CVS server to manage team development. This allows multiple developers to work on the same application. The CVS server is not included with WebSphere Application Server - Express but can be downloaded from the CVS site. Information about installing a CVS server can be found in WebSphere Application Server - Express V5.0.1 Administrator Handbook, SG24-6976.
4 IBM WebSphere Application Server - Express V5.0.2 Developer Handbook

1.1.5 Web serverA Web server to act as an application front end is not required, but can be implemented for added security. Express Application Server provides a built-in HTTP server, but it does not contain the type of comprehensive support you would find in a full Web server product.
A Web server plugin is provided with Express Application Server that can be installed with supported Web servers. The plugin allows you to use an external Web server that serves the HTML content of an application and directs requests for servlets and JSPs to the Express Application Server. The Express Application Server administrative console is used to generate and maintain the HTTP plugin configuration file needed to route incoming requests.
1.1.6 Testing and deploying applicationsDevelopers install the Studio Site Developer component on a development machine. An Express Application Server test environment is embedded in Studio Site Developer so a stand-alone Express Application Server for testing is not required. However, it never hurts to perform a test run of new applications in a stand-alone Express Application Server test environment before publishing to a production server. If this is the case, you can install a stand-alone server on the development machine or use a test system set up for that purpose.
Although administration of production servers is usually done using the Web-based administrative console shipped with the Express Application Server, in a test environment, developers may perform administration using the Studio Site Developer server tools.
This book will discuss testing and deploying applications from a developer’s point of view. This means that we will cover using the server tools of Studio Site Developer. This is a perfectly acceptable way of configuring and managing both the embedded test environment and remote servers. As you move into the production environment, it is more likely that you will want to use the administrative console for managing the production server. The administrative console exposes more configuration options and is browser-based, meaning you don’t have to have Studio Site Developer installed on the machine in order to manage an Express Application Server.
Chapter 1. Getting started 5

1.1.7 Roles and responsibilitiesIn this book, you will see references to people that perform specific functions (roles).
� Application developer. The application developer will build and test applications using Studio Site Developer. The application developer will need to have basic Web development skills.
� Express Application Server administrator: The administrator will install and maintain the Express Application Server sites. This includes obtaining and installing hardware, making the appropriate arrangements for security and Internet access, and for deploying applications.
� Database administrator. The applications will more than likely require access to one or more databases. The database administrator is responsible for obtaining, installing, and implementing a database server. This includes creating and maintaining databases.
� CVS administrator. A CVS server is required for the team development environment. The CVS administrator is responsible for obtaining, installing, and implementing the CVS environment.
1.2 Information road mapYou can find an information roadmap for WebSphere Application Server - Express on the IBM WebSphere Developer Domain Web site. The URL for the roadmap is:
http://www7b.boulder.ibm.com/wsdd/zones/was/roadmaps/express/.
You will find the following Web sites, books, and articles useful as you develop and deploy applications for WebSphere Application Server - Express.
General informationTo find information on IBM products, see the following sites:
� The IBM Redbooks site at the following URL:
http://www.ibm.com/redbooks
� The WebSphere Developer Domain Web site at the following URL:
http://www.ibm.com/websphere/developer
Important: This doesn’t mean that you need this many people. All of these roles can easily be performed by one person. It is simply easier for us to distinguish which “hat” that person is wearing at the time.
6 IBM WebSphere Application Server - Express V5.0.2 Developer Handbook

� The product home page for WebSphere Application Server - Express at the following URL:
http://www.ibm.com/software/webservers/appserv/express/
InstallationInstallation information can be found in the following locations:
� WebSphere Application Server - Express V5.0.1 Administrator Handbook, SG24-6976
– Location: The IBM Redbooks site at the following URL:
http://www.ibm.com/redbooks
– Content: An overview of the different ways to set up a WebSphere Application Server - Express, planning information, and installation scenarios.
� Express readme file
– Location before installation: launchpad.exe on the installation CD-ROM.
– Location after installation: Start -> Programs -> IBM WebSphere Application Server -> Express v5.0.2 -> README or <express_install>/readme.html.
– Content: The main readme contains information about the product, known problems and limitations, and links to installation information and release notes.
� IBM WebSphere Application Server - Express v5.0 Installation Guide (which is shipped with the project)
– Location before installation: launchpad.exe on the installation CDROM.
– Location after installation: Link from the Express Readme or <express_install>/install.htm.
– Content: The install guide contains information to help you install the product, including hardware requirements, software requirements, and install instructions.
MigrationFor information on migration issues, see:
� IBM WebSphere Studio Site Developer Version 5.0 Migration Guide (which is shipped with the project)
– Location before installation: launchpad.exe on the installation CDROM.
– Location: <express_install>/migrate.html.
– Content: Information on migrating from previous versions of WebSphere Studio or VisualAge® for Java.
Chapter 1. Getting started 7

� Migrating Applications from IBM WebSphere Application Server Standard Edition to WebSphere Application Server - Express V5, REDP3618
– Location: http://www.ibm.com/redbooks
– Content: Migration process and a sample migration of a simple application.
Application development information:For information on developing applications with WebSphere Studio, see:
� Getting Started (provided with the Studio Site Developer documentation)
– Location before installation: launchpad.exe on the installation CDROM.
– Location: Start -> Programs -> IBM WebSphere Application Server - Express v5.0.2 -> Getting Started or <express_install>/gettingstarted.html
– Content: Information to get you started with application programming using Studio Site Developer, setting up a server environment.
� IBM WebSphere Application Server - Express Handbook, SG24-6555 (this publication)
– Location: http://www.ibm.com/redbooks
– Contains information on the technology supported by WebSphere Application Server - Express, how to use Site Developer to create applications, and how to test applications.
� WebSphere Application Server - Express: A Development Example for New Developers, SG24-6301
– Location: http://www.ibm.com/redbooks
– Contains an example of designing and building an application suitable for WebSphere Application Server - Express.
� Performance tips for WebSphere Studio
– Location: <express_install>/readme/ws/tips.html.
– Content: Contains tips for improving the performance of the Studio Site Developer.
� Application examples
Sample applications are available in Studio Site Developer to illustrate programming techniques. For more information about these samples see 1.3.1, “WebSphere Application Server - Express examples” on page 11, and the Getting Started documentation provided with the Studio Site Developer.
8 IBM WebSphere Application Server - Express V5.0.2 Developer Handbook

� Online help and infopops
The Studio Site Developer provides a complete online help system with information on creating applications, using the features of Studio Site Developer, developing Studio Site Developer plug-ins, and JDK reference information. The online help is accessible from the workbench toolbar.
Infopops are also available for providing help information. To use an infopop, place the cursor in the field you want information for and press F1.
Express Application Server administrationIn V5.0.1, the administrative console was introduced for system administrators that are configuring and maintaining a production Express Application Server environment. Information on using the administrative console can be found in WebSphere Application Server - Express V5.0.1 Administrator Handbook, SG24-6976.
� Location: http://www.ibm.com/redbooks
� Contains information on designing and managing an Express Application Server environment.
Problem determinationFor problem determination information see the support site at:
http://www.ibm.com/software/webservers/appserv/express/support.html
There is also a good problem determination chapter on WebSphere Application Server in the IBM WebSphere Application Server V5.0 System Management and Configuration Handbook, SG24-6195.
Chapter 1. Getting started 9

1.3 Bringing up Studio Site Developer for the first time
If you haven’t installed WebSphere Application Server - Express yet, you should see WebSphere Application Server - Express V5.0.1 Administrator Handbook, SG24-6976 for planning and installation approach information.
The first place to start when getting familiar with WebSphere Application Server - Express is with Studio Site Developer.
1. To get started, bring up Studio Site Developer:
– Windows: Select Start -> Programs -> IBM WebSphere Application Server-Express V5.0.2 -> Studio Site Developer.
– Linux: /opt/IBM/WebSphereStudio/wasexpress.
2. The first time you open Studio Site Developer you will be asked to select a location for the workspace. You can take the default or choose a folder name.
Note: Throughout this publication there are references to specific file locations within WebSphere Application Server - Express. We will use the following terminology:
� <express_install>: Refers to the high-level installation directory, for example, C:\WebSphere\Express502 on Windows or /opt/IBM/WebSphere/Express502 on Linux
� <server_install>: Refers to the installation directory for Express Application Server, for example, C:\WebSphere\Express502\AppServer on Windows or /opt/IBM/WebSphere/Express502/AppServer on Linux
� <studio_install>: Refers to the installation directory for Studio Site Developer, for example, C:\WebSphere\Express502\SiteDeveloper on Windows or /opt/IBM/WebSphereStudio on Linux
� <rac_install>: Refers to the installation directory for the IBM Agent Controller, for example, C:\WebSphere\Express502\RAC on Windows or /opt/IBMRAC on Linux
When using this notation, we will use a generic indicator for the directory structure (forward slashes for all operating systems, versus using a backslash for Windows.)
10 IBM WebSphere Application Server - Express V5.0.2 Developer Handbook

Figure 1-2 Selecting a workspace
3. Load one or more of the WebSphere Application Server - Express examples included with the product (optional). Continue with the next section to learn about the sample applications and how to load them.
1.3.1 WebSphere Application Server - Express examplesStudio Site Developer comes with examples designed to illustrate development and application techniques useful when developing applications with WebSphere Application Server - Express. If you have not used Studio Site Developer before, or if you are new to J2EE 1.3, looking at the examples is a good way to become familiar with the process of application development in this environment.
You can use these sample applications as a basis for your own application or as a reference when coding new applications. You can also use these as a learning tool. Each sample has a readme file that will describe how to do the base setup for the application and will point you to instructions for modifying the sample to add new features.
Among the examples included are five that were specifically developed to illustrate the capabilities of WebSphere Application Server - Express:
� Document management application: the application allows you to store and retrieve documents from the server’s file system. Users of the system fall into one of the following categories: administrator, publisher, or consumer. The sample illustrates techniques for a simple login and user role scheme, storing and retrieving files from the server, database searches (both new and “search on previous search results”). Modification scenarios included are:
– Using SSL– Adding e-mail– Encoding stored passwords
� Survey application: this application has two parts. The first provides a voting booth. Web users can vote on an issue and the votes are tallied for display. Second, the user can fill out a survey. The user can customize the application by selecting a language for the interface to be displayed in. The sample
Chapter 1. Getting started 11

illustrates techniques for internationalization, multi-media, and site usage tracking through logging. Modification scenarios included are:
– Adding a language– Logging new statistics
� Customer service application: the sample uses an insurance scenario to illustrate login to a private, SSL-protected user account. Users can see their claims and update personal information. This sample features personalization.
� Custom home page application: this sample features a per-employee, self-customized home page with links to existing Web-based resources. The home page also has company bulletin, news, stock quotes, and other informational pages. The sample illustrates personalization based on cookies, search capability, sorting, and Web service access.
� Your company application: this sample illustrates using HTML pages, style sheets, tag libraries, and JSPs to build a complete application. It features personalization, search capability, and a simple conference room reservation system. The modification scenario included is:
– Adding a user role for personalization
1.3.2 Installing an example applicationLoading a sample is easy:
1. Select File -> New -> Other -> Examples -> Web -> sample.
2. Click Next.
3. Most, if not all, of the fields in the next panel are filled out for you. The project name and context will default to the example name. You will be prompted to select an enterprise application to add it to or to create a new enterprise application. More than likely, this is your first project, so you will elect to add a new enterprise application (see Figure 1-3 on page 13). You can name this anything you want.
12 IBM WebSphere Application Server - Express V5.0.2 Developer Handbook

Figure 1-3 Adding an example application
4. Click Finish.
The application will be brought into your workspace where you can begin exploring its features. The first thing you will see is an introduction to the application. The introduction is presented in a Web browser window within Studio Site Developer.
Chapter 1. Getting started 13

Figure 1-4 Customer service example
5. Read the introduction. It will describe the function of the application and tell you how to deploy the sample to the WebSphere test environment.
6. Deploy the sample (the instructions are in the introduction) and try it out. If you like what you see, explore the application elements. The best way to get started with this is to first become familiar with the Studio Site Developer environment by browsing through Chapter 3, “Using Studio Site Developer” on page 43.
1.3.3 Using application templatesAnother way to get started quickly with WebSphere Application Server - Express is to create an application based on a template. The end result is a ready-for-deployment application. For example, you could select among the following templates:
� White pages
� Self-service insurance
14 IBM WebSphere Application Server - Express V5.0.2 Developer Handbook

� Resource reservation
� Address book
To begin, select File -> New->Template Application. You will see a list of available templates. Click each one to see a description of the template. There are also additional templates available from a Web site. You can see these by clicking the Download button.
1.4 The Online Catalog sampleThroughout this publication, we use the Online Catalog sample to illustrate the various features of WebSphere Application Server - Express. The application is a simple one that provides a means of publishing an inventory of goods on the Web and allowing customers to place orders via e-mail or by phone. This is by no means a replacement for WebSphere Commerce applications, but simply a way for small businesses to make their products known to potential customers.
The application will provide a simple interface for non-programmers to enter information. Certain items can be identified as feature items. Customers can browse the information and e-mail the company for information.
The application will be generic enough to apply to a variety of businesses. For example:
� A business that sells RVs can publish a current inventory of the campers on its lot.
� A restaurant can publish a takeout menu and provide a call-in number or fax number.
� A cleaning service can provide a list of services and prices.
For information about downloading the application, see Appendix D, “Additional material” on page 633.
1.4.1 Sample application overviewThe Online Catalog application is a simplified shopping-cart application. Navigating through the application with a Web browser, users can view the catalog, search for products, request information, create and manage a wishlist, and submit the wishlist.
Chapter 1. Getting started 15

From a lower-level perspective, we can outline the list of components that provide the aforementioned functionality:
� A main application menu, which lists the options available to the user
� A registration process where new users enter their details
� A search mechanism, which provides shoppers with a fast means to find items of interest, based on a keyword description
� A shopping cart, which lists the items currently selected by the user, and also provides editing functionality for the user to modify his choices
� An order completion mechanism
1.4.2 Sample databaseData used by our sample application is maintained in database tables. In keeping with our intent to keep things simple, the tables were designed with a basic approach in mind, with columns clearly labeled and constraints kept to a minimum. One may notice that, in some places, the use of constraints and triggers might have been justified. However, in cases where implementing these features might have complicated the issue and distracted us from our initial purpose, we made a conscious decision to do away with them.
User information was not stored directly in our application database. Since WebSphere provides functionality to store user profiles in a predesigned SALESAPP database, we decided to make use of this feature to simplify the implementation of an authentication mechanism and storage of user-related data.
Other types of data are stored in the following tables in a custom-designed database: CUSTOMERS, SHIPPING_ORDER, USERS, and ITEM.
16 IBM WebSphere Application Server - Express V5.0.2 Developer Handbook

Chapter 2. Application design
This chapter provides information on the application design process, geared toward the development of applications in WebSphere Application Server - Express.
In this chapter, the following topics are discussed:
� Application design considerations� Application modeling� Application architecture� Supporting technologies� Database design
2
© Copyright IBM Corp. 2003 17
2.1 Design considerationse-business application design presents some unique challenges compared to traditional application design and development. The majority of these challenges are related to the fact that traditional applications were primarily used by a defined set of internal users, whereas e-business applications are used by a broad set of internal and external users such as employees, customers, and partners. Web applications must be developed to meet the varied needs of these end users. The challenges the Web application developer faces include the following:
� The user experience, look, and feel of the site need to be constantly enhanced to leverage emerging technologies, and attract and retain site users.
� New features have to be constantly added to the site to meet customer demands.
� Such changes and enhancements will have to be delivered at record speed to avoid losing customers to the competition.
� e-business applications in essence represent the corporate brand online. Developers have to ensure that the Web site effectively represents the company image.
� Security requirements are significantly higher for e-business applications compared to traditional applications. In order to execute traditional applications from the Web, a special set of security-related software may be needed to access private networks.
2.1.1 System model for e-business applicationsA common model for e-business solution development is based on an n-tier distributed environment where any number of tiers of application logic and business services are separated into components that communicate with each other across a network. In its most basic form, the model can be depicted as a “logical” three-tier computing model. This means that there is a logical, but not necessarily physical, separation of processes. This model is designed to support clients with high-function Web applications and servers for small and large enterprises. Figure 2-1 on page 19 shows a high-level system model for running an e-business application.
18 IBM WebSphere Application Server - Express V5.0.2 Developer Handbook

Figure 2-1 e-business system model
First tierThe main function of the client in this model is to present information and results produced by an application to the user. In this system model, the clients are sometimes referred to as thin clients. This means that little or no application logic is executed on the client and, therefore, relatively little software is required to be installed on the client.
Clients are implemented with industry-standard technologies, interact with the user, communicate with a middle tier via standard protocols, and send and receive standard data formats. Using the thin client in the model improves manageability, flexibility, and time to market. This is contrary to the fat client, which provides higher computing power and storage capacity at the expense of increased management requirements. Clients can range from pervasive devices, such as PDAs, smartcards, and digital wireless telephones, to network computers and PCs.
320
Middle Tier First Tier Third Tier
Web server, Application server, Transaction server,
Servlets, JSP, Business Logic
Beans, Data Access Beans, Connectors
TCP/IP
HTTP(S)
Enterprise Information
Systems
Thin client, Browser
Netscape/IE,PDA,
Mobile phones, HTML pages,
Web TV
Chapter 2. Application design 19

Second tierMiddle-tier servers include a standards-based Web server to interact with the client tier and define user interaction, and a Web application server to execute business logic independently of the client type and user interface style. The Web application server is the platform that provides the runtime environment for the application's business logic. It is implemented using various Internet and Java technologies, including the HTTP server and the Enterprise Java services that enable rapid development and deployment of applications in a distributed network environment.
Java servlets, JavaServer Pages, and Enterprise JavaBeans are examples of the components deployed in the Web application server. These server-side components communicate with their clients and other application components via Hypertext Transfer Protocol (HTTP) or IIOP, and use the directory and security services provided by the network infrastructure. They can also leverage database, transaction, and groupware facilities.
The middle-tier servers incorporate several application integration technologies for communicating with applications, data, and services in other tiers. The middle tier is the core tier in Web enabling an application. The middle tier hosts many servers and services, including:
� Web servers� Web application servers� Transaction servers� Servlets� JavaBeans� JavaServer Pages� Connectors
Third tierThe Enterprise Information System (EIS) tier includes new and existing internal applications, services, data, and external applications.
Note: WebSphere Application Server - Express clients are presumed to be primarily Web browser clients.
Note: WebSphere Application Server - Express provides a Web application server that provides support for servlets, JavaBeans, and JavaServer Pages. The Web application server includes an internal Web server that supports the HTML elements of the application. WebSphere Application Server - Express does not provide support for Enterprise JavaBeans.
20 IBM WebSphere Application Server - Express V5.0.2 Developer Handbook

A significant amount of data resides on the Enterprise Information System. Examples of EIS include:
� Customer Information Control System (CICS®) server� Legacy applications developed on mainframes or legacy systems� Relational databases such as DB2
Connectors provide the link between the new business logic in the middle tier to the vast accumulated assets in a company's existing applications and data systems.
2.1.2 IBM Patterns for e-businessThe job of an IT architect is to evaluate business problems and to design a solution. The architect begins by gathering input on the problem, the desired solution, and any special considerations or requirements that need to be factored in. The architect takes this input and designs a solution that includes one or more applications that provide the necessary functions.
It is to our advantage to capture the experience of these IT architects in such a way that future engagements are made simpler. By taking this experience and crafting a repository we provide a way for architects to use this experience to build future solutions. Using proven scenarios saves time and money for both sides and helps ensure a solid solution that will stand the test of time.
The IBM Patterns for e-business effort does just this. Its purpose is to capture e-business approaches that have been tested and proven. The information captured is thought to fit the majority of situations. By making these approaches available and classifying them into useful categories, we save the e-business planners, architects, and developers both time and money.
These approaches are further refined into useful, tangible guidelines. The patterns and their associated guidelines allow the architect to start with a problem and a vision, find a conceptual pattern that fits this vision, define the necessary functional pieces that the application will need to succeed, and then actually build the application using coding techniques outlined in the guidelines.
The IBM Patterns for e-business Web site (below) contains the information and references you need to design and build a solution from beginning to end.
http://www.ibm.com/developerworks/patterns/
Note: WebSphere Application Server - Express provides JDBC connectivity to back-end relational databases. WebSphere Application Server - Express also supports the creation and use of Web services.
Chapter 2. Application design 21

2.2 Modeling an applicationThe best way to begin an application design is by laying out the function of the application in a model. The model is used to illustrate the way the application is seen by the end users, and shows how the components of the application work together to provide the results required by the user.
The Unified Modeling Language (UML) is the industry standard language for modeling software systems, providing practice for modelling large complex systems. Although WebSphere Application Server - Express is geared toward simpler applications, it is a good idea to become familiar with UML and to use it as a basis for designing your applications. More information about UML can be found at:
http://www.omg.org
In UML, diagrams are used to model a solution. The most basic is the use-case diagram. Use cases are a way to illustrate to the user/developer functionality of a system. The two main components of a use-case model are actors that represent external elements and use cases that represent functions provided by the system.
This discussion is an over-simplification of the process geared toward the more basic applications. For a more in-depth study of application design and modeling, see WebSphere Version 4 Application Development Handbook, SG24-6134.
WebSphere Application Server - Express does not provide a modelling function, but there are many tools available for this; see the following Web sites:
� Rational® Rose® from Rational
http://www.rational.com
� ArgoUML
http://argouml.tigris.org
� Magicdraw
http://magicdraw.com
Note: WebSphere Application Server - Express applications will largely fall into the Self-service pattern. This pattern describes situations where users are interacting with a business application to view or update data.
22 IBM WebSphere Application Server - Express V5.0.2 Developer Handbook

2.2.1 Use-case analysisThe use-case analysis describes the functional requirements of the application under development. It defines how users in specific roles will use the system through use cases. The use case is from the user’s point of view and does not describe how tasks within the application are accomplished.
A use-case analysis basically includes the following elements:
� Actor� Use case� Communication associations between actors and use cases� Relationships between use cases� Flow of events and system sequence diagrams
Together these items provide an overview of the functional requirements and document the expected usage, user interactions, and behavior of the system in different styles and depth. The level of detail you go into is determined by the size and complexity of the application. In the case of our simple application, we will define the use cases and actors, but will not be building any detailed diagrams.
ActorsThe first step in designing the application flow is to determine who will be interacting with the application and what types of activities they will perform. The people that interact with the application are known as actors in UML and are represented by a stick figure in the following figures, as shown in Figure 2-2.
Figure 2-2 UML notation of an actor
Note: Throughout this publication, we will use a sample called the Online Catalog to illustrate the various features of WebSphere Application Server - Express. The application will be a simple one that provides a means of publishing an inventory of goods on the Web and allowing customers to place orders via e-mail or by phone.
Details about the sample application can be found in Appendix C, “Online Catalog application” on page 611.
A c to r
Chapter 2. Application design 23

Actors can be identified by asking users questions such as who uses the system and who manages the system. In our Online Catalog sample the answers to these questions are:
� Buyer � Business owner
As you can see, in our example these actors are fairly simple and distinct. The function of each within the application appears to be different, based on the names. If the distinction is not as clear in your application, consider things such as security levels or training required for the user.
Use cases Use cases depict interaction between the actor and the system. They represent functionality available to an actor. A collection of transactions that can be identified as a unit of work is a good candidate for a use case. Use cases are depicted by a ellipse in UML notation, as shown in Figure 2-3.
Figure 2-3 UML notation of a use case
Use-case model analysis usually starts with an overall main use-case diagram with actors and major use cases. In the case of our sample application, we see two main interaction types with the application. These two interactions are identified as:
� Maintain inventory� Buys item
Figure 2-4 on page 25 shows the main use-case diagram for our sample. You can see the major use cases and the relationship with the actors.
Use Case
24 IBM WebSphere Application Server - Express V5.0.2 Developer Handbook

Figure 2-4 Main use-case diagram
The model can then be decomposed into more detailed use cases, as shown in Figure 2-5.
Figure 2-5 More detailed use-case diagram
B u y e r
B u s in e s s O w n e r
M a in t a in In v e n t o r y
B u y s I t e m
Business Owner
Update Inventory
Update Prices
Validate Buyer Login
Buy Item
Create Shipping Order
View Items
Buyer
Set Featured Item
Register
Request Info
Chapter 2. Application design 25

The maintain inventory use case has been furthered detailed to show the activities that are necessary to keep a current inventory:
� Update inventory� Update prices� Set featured item
The buys item use case has been broken down into the possible activities the customer can perform, including:
� View items� Buy item� Register� Requests info
2.3 Determine the application-flow architectureWeb application developers in the Java and J2EE environment employ technologies such as servlets, JavaServer Pages (JSPs), JavaBeans, and tag libraries to build dynamic interactive Web applications.
Using these technologies, applications can range in complexity from very simple applications that return simple data from local resources, to very complex applications that perform many tasks, including interacting with other applications.
Over time, two programming models have emerged that are often referred to as Model 1 and Model 2 architecture. Model 1 architecture is more suited to small applications where separation of presentation from business logic activities seems to introduce more complexity than is needed. Model 2 architecture addresses the more complex applications where separation of tasks becomes the best method of building efficient, maintainable applications.
2.3.1 Model 1 architectureThe Model 1 architecture is focused on page-centric applications. That is, the browser navigates through a series of JSP pages where the JSPs process their own input. The user will proceed from the first page to the next based on the input provided to the JSP.
The sample applications supplied in WebSphere Application Server - Express were developed using the Model 1 architecture to demonstrate the simplicity of building dynamic, interactive applications to an audience that may have a background with HTML and JavaScript, but only a limited background with Java.
26 IBM WebSphere Application Server - Express V5.0.2 Developer Handbook

Figure 2-6 shows the typical flow of a Model 1 application.
Figure 2-6 Model 1 architecture application flow
For small projects, prototyping, and to quickly get an application completed, the Model 1 architecture is quite popular because of its ease of development. However, more complex applications will need to follow a different approach. That approach is described as Model 2 architecture.
2.3.2 Model 2 architectureThe all servlet and all JSP approach both have inherent problems mixing the business logic of servlets with presentation of HTML. These two approaches cause applications to become difficult to maintain and less flexible. For these reasons, Model 2 architecture was introduced. Model 2 is basically a Model-View-Controller (MVC) architecture (see 2.3.3, “MVC architectural pattern” on page 28) that separates the business logic and content presentation. Model 2 applications are more flexible and easier to maintain and extend because the business logic and the presentation are isolated from one another.
JSP DatabaseBrowser
Application Server
Request
Response
1
2
3
Chapter 2. Application design 27

Figure 2-7 Model 2 architecture application flow
2.3.3 MVC architectural patternThe model-view-controller architectural pattern was conceived in the mid-1980s by developers of the Smalltalk-80 GUI library. It has since then been extensively applied in most object-oriented user interface and application control toolkits. It has also been generalized as a pattern for implementing the separation of concerns among application layers in general, not only the three originally proposed layers.
According to the MVC pattern, a software component (an application, a module, and so forth) should separate its business logic (the model) from its presentation (the view). There are many reasons for this requirement, among which are the following.
Model 1 versus Model 2: It is not the intention of this publication to single out any one model as being better than the other. For the purposes of WebSphere Application Server - Express and the targeted market of WebSphere Application Server - Express, the Model 1 architecture is better suited. As mentioned earlier, Model 1 architecture lends itself towards small projects that can be developed quickly or when development teams do not have strong Java servlet skills. That said, it is important to note that using the Model 1 architecture will hinder future scalability of applications. Extending the application using Model 1 architecture becomes difficult since the page presentation is so tightly coupled to the business logic. If a project is planned for future growth, then a Model 2 or MVC architecture is recommended and encouraged. It may be beneficial to “pay now versus pay later” to gain the flexibility provided by the MVC design pattern.
Database
Input Page(View)
Application Server
Request
ResponseDisplay Page
(View)
Display PageJSP
(View)
1
5
Serlvets(Control)
JavaBean(Model)
3
4
2Interactive
28 IBM WebSphere Application Server - Express V5.0.2 Developer Handbook

� You may have more than one view of the same model. If both the business logic and its presentation were built together, adding an additional view would cause considerable disruptions and increase the component's complexity. A good example of a model with two views would be a banking application that can be accessed through both the Internet and mobile phones.
� You do not want to have to change the model every time you modify the view. The view is definitely dependent on the model, since it presents specific aspects of the model to the user. It makes no sense, however, to have the model depend on the view. Building both together dramatically increases the chances of this happening, and of you having to change the model every time you implement a small change to the view.
This separation can be achieved through the layering of the component into:
� The model layer, responsible for implementing the business logic.
� The view layers, each responsible for rendering the user interface (be it graphical or not) to a specific client type and in a specific fashion.
With these two layers, we can implement the business logic and present it to the user. That solves only half of the problem. We would also like to be able to interact with the model. The implementation of this interaction is better left to a third layer, called controller.
This model-view-controller structure has several benefits:
� You can isolate development effort to some extent, so that implementation changes in one part of the Web application do not require changes to another. The developers responsible for writing the business logic can work independently of the developers responsible for the flow of control, and Web-page designers can work independently of the developers.
� You can more easily prototype your work. For example, you might:
– Create a prototype Web application that accesses several workstation-based programs.
– Change the application in response to user feedback.
– Implement the production-level programs on the same or other platforms.
Outside of the work you do on the programs themselves, your only adjustments are to configuration files or name-server content, not to other source code.
� You can more easily migrate legacy programs, because the user interaction is the same wherever those programs run and however they interact with data stores.
� You can maintain an environment that comprises different technologies across different locations.
Chapter 2. Application design 29

In the following sections, we discuss some of the properties of each of these layers.
ModelThe model layer manages the application domain’s concepts, both behavior and state. It responds to requests for information about its state and responds to instructions to change its state.
Just like any software component, the model should have a public interface that is well defined and as simple as possible. This is usually achieved through the use of a facade. The intent of facades is to provide a simple and unified interface to the otherwise complex model that lies behind it. By doing so, we reduce the dependencies between the model classes and its clients. Fewer dependencies means more freedom to adapt to new requirements.
As an example, consider an appliance with which you are certainly familiar: a television set. You will probably agree that changing TV channels is quite a simple task. Now ask yourself these questions:
� Do you know how the television set represents channels internally?
� Do you know exactly what goes on when you change TV channels?
� Do you think you should know these things?
Chances are that you have answered no to all of the questions above. What is the advantage of not knowing how TVs represent their data and implement their operations? You could buy a new TV, which does these things internally in a completely different way, and you could still change channels.
Figure 2-8 on page 31 shows the model layer with its encapsulated business domain objects and the exposed facade object.
Note: Facade is a documented design pattern. For more information, refer to Design Patterns: Elements of Reusable Object-Oriented Software.
30 IBM WebSphere Application Server - Express V5.0.2 Developer Handbook

Figure 2-8 Model layer
Please note that the model does not have any dependences on views or controllers.
ViewThe view layer implements a rendering of the model. The responsibility of the view is to know what parts of the model’s state are relevant for the user, and to query the model for that information. The view retrieves the data from the model or receives it from the controller, and displays it to the user in a way the user expects.
ControllerThe controller’s responsibility is to capture user events and to determine which actions each of these events implies, depending on both the user’s and the application’s state. This usually involves verifying pre- and post-conditions. These actions can then be translated to messages to the model and view layers, as appropriate.
Dependencies between MVC layersFigure 2-9 on page 32 shows the dependencies allowed in the MVC pattern. Note that the fewer dependencies your layers have, the easier it will be for the layers to respond to requirement changes.
Model
Façade
Chapter 2. Application design 31

Figure 2-9 Dependencies allowed in the MVC pattern
So, to summarize, the MVC pattern is really about separation.
2.4 Reviewing the supporting technologiesApplications written for deployment on WebSphere Application Server - Express are uniquely suited to the following technology options.
2.4.1 JavaScriptBrowser-based or client-side JavaScript is common. WebSphere Application Server - Express also supports server-side JavaScript through the Bean Scripting Framework (BSF) of the Express Application Server.
BSF enables you to use scripting language functions in your Java server-side applications. This framework also extends scripting languages so that you can use existing Java classes and JavaBeans in the JavaScript language. With BSF, you can write scripts that create, manipulate, and access values from Java objects, or you can write Java programs that evaluate and access results from scripts. BSF provides an access mechanism to Java objects for the scripting languages it supports, so that both the scripting language and the Java code can access code exclusive functions. The access mechanism is implemented through a registry of objects maintained by BSF.
BSF in WebSphere Application Server - Express supports the Rhino ECMAScript. The implementation is standard client-side JavaScript with all client object references removed and with the following server-side objects added:
A B <=> A depends on B
Controller View
Model
32 IBM WebSphere Application Server - Express V5.0.2 Developer Handbook

� request � response � pageContext � session � application � out � config � page � exception
2.4.2 ServletsJava servlets are Java alternatives to Common Gateway Interface (CGI) programs. As with CGI programs, Java servlets can respond to user events from an HTML request, and then dynamically construct an HTML response that is sent back to the client. Java servlets have the following advantages over traditional CGI programs:
� Java-based
Because Java servlets are written in Java, they inherit all the benefits of the Java technologies.
� Persistence and performance
A servlet is loaded once by a Web server and invoked for each client request. Java servlets do not incur the overhead of instantiating a new servlet with each request. CGI processes typically must be loaded with each invocation.
Java servlets can work better than CGI programs, especially for business logic and control flow.
However, for a servlet to return an HTML page to a browser, it must output HTML from within the Java code. A Java programmer has to write many out.println statements to return the HTML. This mixes the roles of the content developer and the Java programmer, even limiting the usefulness of content-authoring tools.
JavaServer Pages were developed to address the problem of writing HTML statements in Java source code.
2.4.3 JavaServer PagesJavaServer Pages are an HTML extension for doing server-side scripting in Web pages. JavaServer Pages are similar to HTML files, but provide the ability to display dynamic content within Web pages. Here are some of the advantages of using JavaServer Pages technology over other methods of dynamic content creation:
Chapter 2. Application design 33

� Separation of dynamic and static content
This allows for the separation of application logic and Web page design, reducing the complexity of Web site development and making sites easier to maintain.
� Platform independence
Because JavaServer Pages technology is Java-based, it is platform-independent. JavaServer Pages can run on nearly any Web site application server. JavaServer Pages can be developed on any platform and viewed by any browser because the output of a compiled JSP page is HTML.
� Scripting and tags
JavaServer Pages support both embedded Java and tags. Java is typically used to add page-level capability to the JavaServer Pages. Tags provide an easy way to embed and modify JavaBean properties and to specify other directives and actions.
While JavaServer Pages look like HTML pages that access dynamic data, they are actually Java servlets. The application server compiles JavaServer Pages and executes them. Being a servlet is what allows JavaServer Pages to easily add dynamic content.
Because JavaServer Pages solved the problem of having HTML produced by Java code, many Web applications were written solely as JavaServer Pages (known as JSP Model 1).
However, while JavaServer Pages are good for producing HTML, they are not good for writing business logic and control because having Java code inside JavaServer Pages could easily make them hard to read or maintain.
2.4.4 Tag librariesYou will also notice that the sample applications leverage custom tag libraries whenever possible. Custom tag libraries contain Java code that provides a function. The tag library can be used from any JSP page. They are a powerful way to include server-side logic using HTML-like syntax. All of the complexities of the server-side logic are hidden in the tag library. However, not all methods of server-side beans may be exported as tags. For this reason, the samples occasionally use Java scriptlets to access unexposed methods.
Tag libraries reduce the necessity of embedding large amounts of Java code in JSP pages by moving the functionality provided by the tags into tag implementation classes. In doing so, tag libraries make authoring JSP pages easier, both for the Web page author and for tools that expose the functionality encapsulated by the library to the author.
34 IBM WebSphere Application Server - Express V5.0.2 Developer Handbook

Tag libraries increase productivity by encouraging division of labor between library developers and library users. JSP tag libraries are created by a developer who is an expert at accessing data and other services, and used by Web page authors who can focus on the design of user interfaces.
Finally, JSP tag libraries are portable; they can be used by any JSP page independent of the page's scripting language, any authoring tool supporting tag libraries, and any JSP 1.1-compliant server.
2.4.5 XMLeXtensible Markup Language (XML) is a markup language for the exchange of structured documents. It is a meta-language, meaning a language for defining other languages. XML by itself does not define any tags; it provides a facility to define custom tags and the structural relationships between them.
XML documents are text-based and composed of markup and content:
� Markup instructs XML processors about how to treat the content, and how it is organized.
� Content is the character data you would see on a printed or displayed page.
2.4.6 Web servicesWeb services are self-contained, modular applications that can be described, published, located, and invoked over a network. Web services perform encapsulated business functions, ranging from simple request-reply to full business process interactions.
These services can be new applications or just wrapped around existing legacy systems to make them network-enabled. Services can rely on other services to achieve their goals.
The core technologies used for Web services are:
� XML
� SOAP
� WSDL
� UDDI
Chapter 2. Application design 35

2.4.7 StrutsStruts is an open-source framework for building MVC-based Web applications. Struts is part of the Jakarta project, sponsored by the Apache Software Foundation. The Struts framework provides the benefits of modularity, flexibility, and reusability of components, combined with the easy development associated with MVC-based Web applications.
The goal of the Struts project is to provide an open-source framework useful in building MVC-based Web applications using servlet and JSP technologies. From an MVC point of view, Struts provides the following.
� Model: nothing. The business logic must be provided by the Web application developer, usually as Java objects (JavaBeans or Enterprise JavaBeans).
� View: an org.apache.struts.action.ActionForm class to create form beans that are used to pass data between the controller and the view. In addition, Struts provides custom tag libraries that assist developers in creating interactive form-based applications.
� Controller: an org.apache.struts.action.Action class that developers use to create the classes that control the flow of the application. Also, Struts provides an org.apache.struts.action.ActionServlet class to implement a controller servlet.
Struts also provides utility classes to support XML parsing, automatic population of JavaBeans properties based on the Java reflection APIs, and internationalization of prompts and messages.
A typical Struts Web application has a single servlet that uses an XML file for configuration information. There will be multiple action classes and JSPs (using the Struts taglibs).
For more information on Struts, we recommend the following:
� Go-ForIt Chronicles, Part 19: Struttin' your stuff with WebSphere Studio tutorial from IBM DeveloperWorks. To see the list of tutorials, go to:
http://www.ibm.com/developerworks/
Select the IBM developer solutions product domain and then select Education.
� For information on using Struts with WebSphere Studio products, see Legacy Modernization with WebSphere Studio Enterprise Developer, SG24-6806. Although written for the Enterprise Developer configuration of WebSphere Studio, the information on Struts is also relevant for Studio Site Developer.
� The Jakarta Struts home page at:
http://jakarta.apache.org/struts
36 IBM WebSphere Application Server - Express V5.0.2 Developer Handbook

� The introduction guide at:
http://jakarta.apache.org/struts/userGuide/introduction.html
� The following articles on Struts in the VisualAge for Java zone of WebSphere Developer Domain at:
http://www7b.software.ibm.com/wsdd/
– Apache Struts and VisualAge for Java, Part 1: Building Web-based Applications using Apache Struts
– Apache Struts and VisualAge for Java, Part 2: Using Struts in VisualAge for Java 3.5.2 and 3.5.3
2.5 Designing the databaseDatabase design is one of the most important steps in Web application design. Here we will discuss a few things to be kept in mind as we develop the database model for our application. When you design tables you must choose an appropriate data model and data types for them. You also need to be aware of the pros and cons of creating indexes and be thoughtful in determining their usefulness.
In this section, we will explain some database concepts that need to be applied to create a sound, efficient data model.
2.5.1 Normalization Normalization is the process of determining the structure of database tables. The objective is to introduce flexibility into the structure, while reducing redundant data. The reduction in data can improve the performance of update and delete statements, since the data is only touched once. By normalizing data, you try to ensure that all columns in the table depend on the primary key.
There are four levels or degrees of normalization. We will limit our discussion to the third normal form for the sake of simplicity and to be within the scope of this publication.
First normal formIn the first normal form, each cell in the table is atomic, meaning that it contains only one value.
Second normal formIn the second normal form, each non-key column is dependent upon the entire key and not just part of the composite key.
Chapter 2. Application design 37

Third normal formIn the third normal form, each non-key column is dependent upon the key column as in the second normal form, but is also independent of other non-key columns.
In Table 2-1 we can see that the DeptName column is dependent on the DeptNo column. This table does not conform to the third normal form. If we update DeptName for one employee, it would not automatically update the DeptName column for other employees belonging to the same department
Table 2-1 Table not in third normal form
To normalize this data to conform to the third normal form, we would create two tables. The first table, Table 2-2, contains the relation between the employee and the department number. The second table, Table 2-3, contains the relation between the department number and the department name. An update to the department name only needs to be done once.
Table 2-2 Table in third normal form
Table 2-3 Table in third normal form
One consideration when normalizing tables is that the more you normalize, the better it results in insert and update performance. However, it can slow down the query response time.
2.5.2 IndexesIndexes are used to improve query performance. They provide a faster mechanism to search the database table for a particular column value(s) and avoid expensive and slower table scans. Columns of a table that are often used in search clauses are prime candidates for indexes. The downside of indexes is that they take up disk space and slow execution of insert and update statements.
EMPNO(Primary Key) LastName DeptNo DeptName
001 Brown 01 Support
002 Smith 02 Sales
EMPNO(Primary Key) LastName DeptNo
001 Brown 01
002 Smith 02
DeptNo(Primary Key) DeptName
01 Support
02 Sales
38 IBM WebSphere Application Server - Express V5.0.2 Developer Handbook

2.5.3 DatatypesDatatypes is a column attribute definition used when creating tables. The datatype tells us what kind of data will be held in the column and what length it will be. Care should be taken when selecting datatype and size for a column to ensure that it can hold all possible values for that column and at the same time not be so large that it bloats the table and database size, thus adversely affecting performance.
2.5.4 Deriving the data model from the use-case modelAs we saw in the requirements, the entities that interact with the Online Catalog sample are buyer and business owner. The buyer views and buys items. The business owner maintains the item inventory and pricing information.
We came up with the following entities that map to the business requirements of the Online Catalog sample.
� Customer: This entity contains all attributes/information about a buyer who buys from the online store.
� Item: This entity contains all attributes/information about items on sale in the online store.
� ShippingOrder: This entity contains all information needed to complete a shipping order.
� Users: This entity contains the user name/password of all admin users.
The data model of the tables required by the Online Catalog sample is shown in Figure 2-10 on page 40.
Chapter 2. Application design 39

Figure 2-10 Data model for the Online Catalog sample application
As you proceed through the publication, you will see how the database built based on this model is used by the application.
2.6 For more informationFor more information, see the following sources:
� Understanding JavaServer Pages Model 2 architecture
http://www.javaworld.com/javaworld/jw-12-1999/jw-12-ssj-jspmvc.html
� IBM Framework for e-Business: Technology, Solution, and Design Overview SG24-6248
� More information about UML
http://www.omg.org
� WebSphere Version 4 Application Development Handbook, SG24-6134
CUSTOMER_ID :CHAR(10)CUSTOMER_NAME :VARCHAR(40)ADDRESS :VARCHAR(40)CITY :VARCHAR(40)STATE :CHARACTER(2)EMAIL_ADDRESS :VARCHAR(20)PHONE :CHAR(10)CC_TYPE :CHAR(2)CC_NUMBER :VARCHAR(20)ZIP : CHAR(5)INTEREST1 : CHAR(1)INTEREST2 : CHAR(1)PASSWORD : CHAR(10)
CUSTOMER
USERNAME :CHAR(8)PASSWORD :CHAR(8)
USERSORDER_NUMBER : INTEGERCUSTOMER_ID :CHAR(10)ITEM_NUMBER :CHAR(5)QUANTITY :INTEGERSALE_PRICE :DECIMAL(9,2)ORDER_DATE :DATESTATUS :CHAR(1)
SHIPPING_ORDER
ITEM_NUMBER :CHAR(5)ITEM_SHORT_DESC :VARCHAR(15)ITEM_LONG_DESC : VARCHAR(150)QUANTITY :INTEGERPRICE :DECIMAL(9,2)SOTD_FLAG :CHAR(1)
ITEM
40 IBM WebSphere Application Server - Express V5.0.2 Developer Handbook

� IBM Patterns for e-business
http://www.ibm.com/developerworks/patterns/
� Rational Rose from Rational
http://www.rational.com
� ArgoUML
http://argouml.tigris.org
� Magicdraw
http://magicdraw.com
Chapter 2. Application design 41

42 IBM WebSphere Application Server - Express V5.0.2 Developer Handbook

Chapter 3. Using Studio Site Developer
Studio Site Developer reduces time and effort when creating, managing, and debugging multi-platform Web applications. This easy-to-use toolset supports the visual layout of dynamic Web pages. It is rich in wizards and aids that support Web development and deployment. It includes a unit test environment for testing applications and provides the operational and configuration interface for remote application servers.
This chapter will introduce the Studio Site Developer workbench and its features. The topics covered are:
� Workbench overview� Perspectives, views, and editors� The workspace� Finding help� Recovering files
3
© Copyright IBM Corp. 2003 43
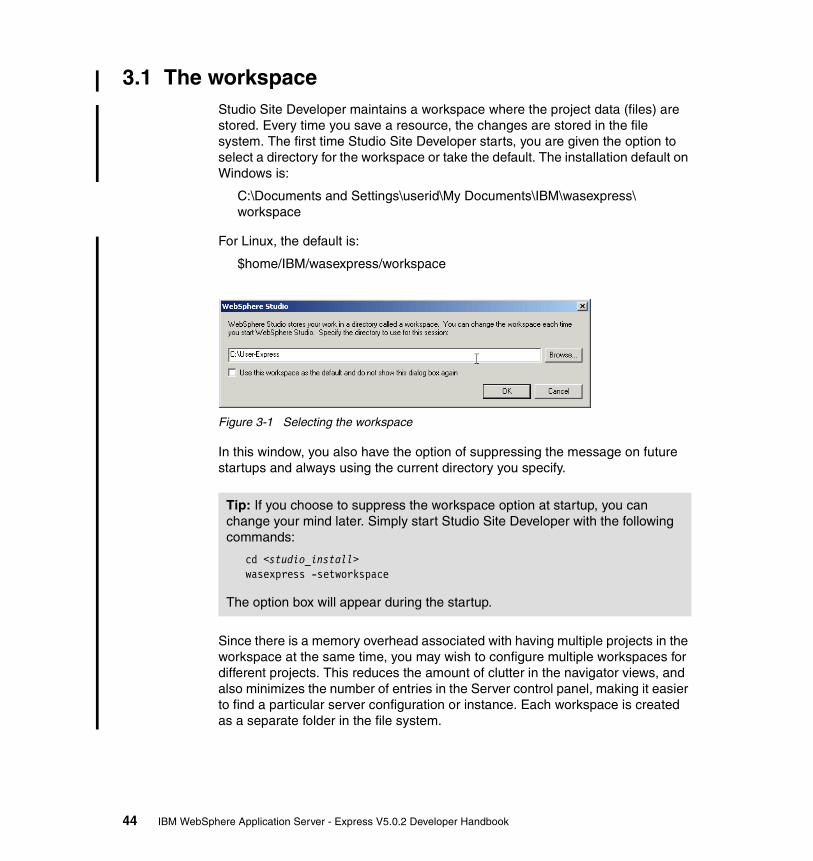
3.1 The workspaceStudio Site Developer maintains a workspace where the project data (files) are stored. Every time you save a resource, the changes are stored in the file system. The first time Studio Site Developer starts, you are given the option to select a directory for the workspace or take the default. The installation default on Windows is:
C:\Documents and Settings\userid\My Documents\IBM\wasexpress\workspace
For Linux, the default is:
$home/IBM/wasexpress/workspace
Figure 3-1 Selecting the workspace
In this window, you also have the option of suppressing the message on future startups and always using the current directory you specify.
Since there is a memory overhead associated with having multiple projects in the workspace at the same time, you may wish to configure multiple workspaces for different projects. This reduces the amount of clutter in the navigator views, and also minimizes the number of entries in the Server control panel, making it easier to find a particular server configuration or instance. Each workspace is created as a separate folder in the file system.
Tip: If you choose to suppress the workspace option at startup, you can change your mind later. Simply start Studio Site Developer with the following commands:
cd <studio_install>wasexpress -setworkspace
The option box will appear during the startup.
44 IBM WebSphere Application Server - Express V5.0.2 Developer Handbook

If you have sufficient memory available on your workstation, it is possible to execute multiple instances of Studio Site Developer running simultaneously using different workspaces. This technique is useful, for example when working on two releases of a project at the same time, such as building a new release and performing maintenance on an old one. Each development branch can have its own workspace and copies of the project files.
3.1.1 Recovering files from their local historyWhen working with Studio Site Developer, there are two things to remember:
� All deletes are permanent. There is no recycle bin.
� A history of all changes is maintained locally and files can be reset to a previous state.
A history of all files that you have changed is cached locally. This allows you to compare a resource with a previous version and, if required, replace it with that version. The local history of each file is updated when you create or modify a file. Each time you save a file, a copy of its previous state is also saved. A new history for a resource is created the first time you modify the base version of it.
This allows you to compare the current file state to a previous state and to replace the file with a previous state. Each state in the local history is identified by the date and time the file was saved.
Comparing a file to the local historyTo view the local history of a file, select the file in the navigator view, right-click, and select Compare with -> Local History from its context menu.
Tip: If you want to skip the option box, but would like to change workspaces, you can start Studio Site Developer with the following command:
wasexpress -data workspace_name
For example:
wasexpress -data c:\user-workspace
If the workspace directory does not exist, it will be created.
Note: Only files have local histories, not projects or folders.
Chapter 3. Using Studio Site Developer 45
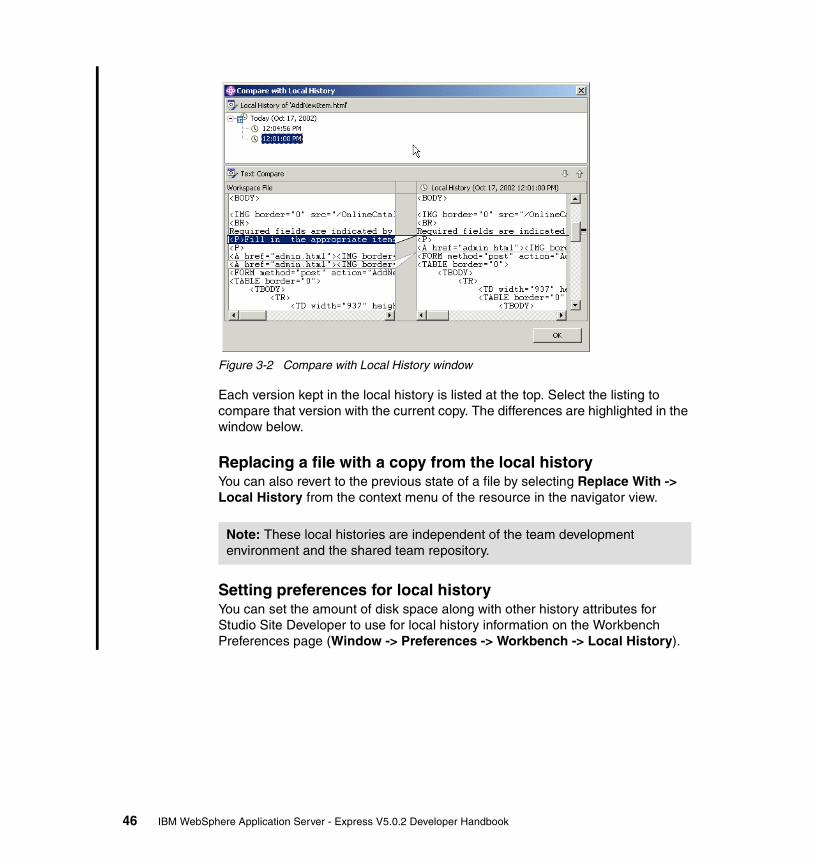
Figure 3-2 Compare with Local History window
Each version kept in the local history is listed at the top. Select the listing to compare that version with the current copy. The differences are highlighted in the window below.
Replacing a file with a copy from the local historyYou can also revert to the previous state of a file by selecting Replace With -> Local History from the context menu of the resource in the navigator view.
Setting preferences for local historyYou can set the amount of disk space along with other history attributes for Studio Site Developer to use for local history information on the Workbench Preferences page (Window -> Preferences -> Workbench -> Local History).
Note: These local histories are independent of the team development environment and the shared team repository.
46 IBM WebSphere Application Server - Express V5.0.2 Developer Handbook
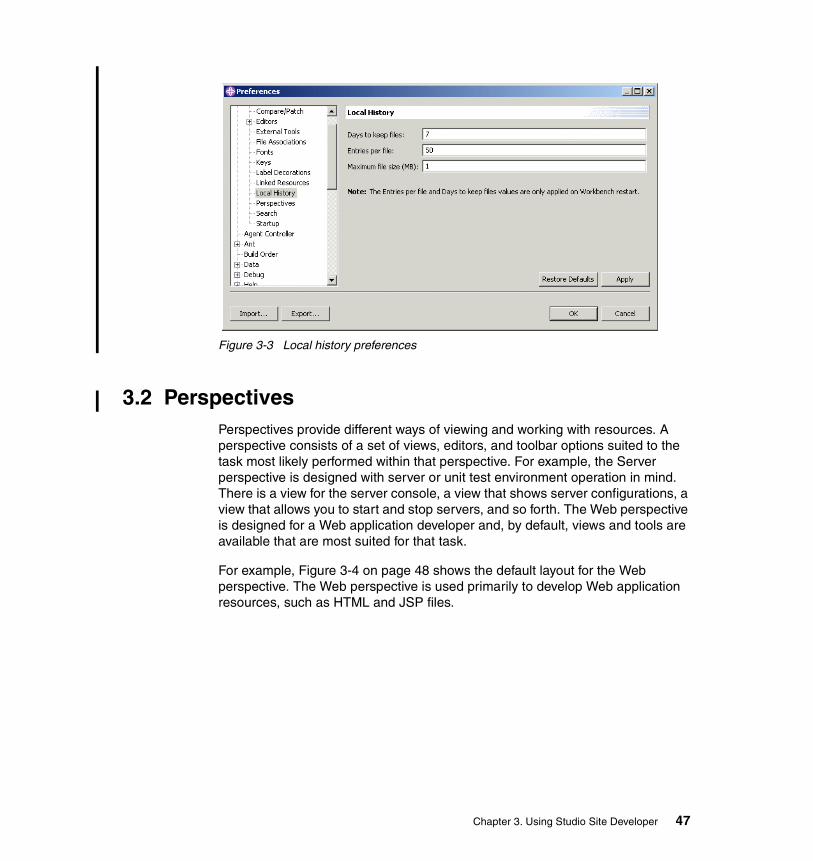
Figure 3-3 Local history preferences
3.2 PerspectivesPerspectives provide different ways of viewing and working with resources. A perspective consists of a set of views, editors, and toolbar options suited to the task most likely performed within that perspective. For example, the Server perspective is designed with server or unit test environment operation in mind. There is a view for the server console, a view that shows server configurations, a view that allows you to start and stop servers, and so forth. The Web perspective is designed for a Web application developer and, by default, views and tools are available that are most suited for that task.
For example, Figure 3-4 on page 48 shows the default layout for the Web perspective. The Web perspective is used primarily to develop Web application resources, such as HTML and JSP files.
Chapter 3. Using Studio Site Developer 47

Figure 3-4 Web perspective
Each pane you see in Figure 3-4 represents a view, and the tabs you see below the panes can be used to toggle that pane to show another view. Note that there are several views visible and some that are not. The toolbar at the top will contain tools relevant to the perspective and view. As you change perspectives or views, you will see the toolbar change also.
For example, the top right pane in this perspective is the editor area. In this area you can see a JSP open in the Source view. By selecting the tab at the bottom of the pane, you can see the same file using the Design view, which presents a graphical view of the file. Multiple files can be open simultaneously for editing.
The workbench window can have several perspectives opened, but only one is visible at one point in time. You can switch easily between perspectives by clicking the different icons in the shortcut bar.
Sh
ort
cut
bar
Multiple files open for editing
Toolbar
Open perspective
48 IBM WebSphere Application Server - Express V5.0.2 Developer Handbook

You can open a new perspective from the toolbar by selecting Window -> Open Perspective or by clicking the top icon of the shortcut bar.
Among the predefined perspectives you will find in Studio Site Developer are those listed in Table 3-1. These are the perspectives we found to be the most commonly used during Web application development in a WebSphere Application Server - Express environment.
Table 3-1 Perspectives
Perspectives can easily be customized to suit your needs and just as easily reset to their original configuration. You can also compose your own perspective by defining the views it should contain. You will see the more commonly used perspectives in more detail in the appropriate chapters.
3.2.1 EditorsResource types used in Web applications have default editors associated with them. When you double-click a resource in the workbench the associated editor for that type opens the file for editing. For example, in Figure 3-4 on page 48, the active editor is the Page Designer, which is associated with JSP and HTML files. If no editor is currently associated with a particular file extension, the Workbench checks to see if there is one associated in the operating system and, if so, uses that editor to open the file.
You can change or add editors associated with a file extension using preference settings:
Perspective Task
Web For building HTML and JSP files. This is the primary perspective used for application development in WebSphere Application Server - Express, and you will see it used throughout the publication.
CVS Repository For team development tasks using Concurrent Version System (CVS). You will see this perspective used in Chapter 15, “Development in a team environment” on page 515.
Data For connecting to JDBC databases and working with database design. You will see this perspective used in Chapter 6, “Accessing databases” on page 153.
Server For configuring and operating the runtime test and production environments. You will see this perspective used in Chapter 13, “Deploying applications” on page 455.
XML For working with XML resources. You will see this perspective used in Chapter 10, “Working with XML” on page 309.
Chapter 3. Using Studio Site Developer 49

1. From the menu bar, select Window -> Preferences.
2. In the left panel, select File Associations under the Workbench hierarchy.
3. You can then select a file extension and associate an internal or external editor for it.
You can have multiple resources that use different editors open simultaneously. Switching between them in the editing pane is as easy as selecting the file name on the top bar above the editor area. If there is an asterisk (*) to the left of the file, it means that it contains unsaved changes.
3.2.2 Using fast viewsYou do not have to recustomize a perspective just to see a view that is not normally available from the perspective. You can open a view as a fast view for temporary use.
Whether a view opens as a fast view or not is determined by the perspective preferences:
1. Open Window -> Preferences -> Workbench -> Perspectives.
2. In the Open a New View box, select As a fast view.
3. Click OK to close the preference box.
This setting says that if you are in a perspective and open a view (Window -> Show View) that is not in the perspective, the view will be opened temporarily in the perspective. An icon representing the view will show in the shortcut bar on the left. The view will only remain in sight as long as it is current (you have the cursor in it). If you move the cursor outside the view and click, the fast view will disappear. You can bring it back by selecting the icon.
For example, in Figure 3-5 on page 51, we have opened the Java Hierarchy view from within the J2EE perspective. The view initially opens in the left half of the perspective and an icon is placed in the shortcut bar.
Tip: When you open a file and then switch perspectives, Studio Site Developer will keep the file synchronized between the perspectives. To conserve system resources it is good practice to do the following:
� Close perspectives that you do not need.
� Do not open multiple perspectives of the same type (it is allowed).
� Close resources open in the editor area when you no longer need them open.
50 IBM WebSphere Application Server - Express V5.0.2 Developer Handbook

Figure 3-5 Using fast views
To remove the icon, right-click it and select Close.
You can also designate views in the perspective as fast views. This effectively removes them from the perspective and puts an icon in the shortcut bar. To do this right-click the title bar of the view and select Fast View. For example, if you took the Properties view in Figure 3-5 and made it a fast view, you would no longer see the Properties tab, but would instead see an icon for the view in the toolbar (see Figure 3-6 on page 52). The view would only be active when you select the icon. Moving the cursor to another view would hide the view.
New icon
Java Hierarchy view
Chapter 3. Using Studio Site Developer 51

Figure 3-6 Designating a view as a fast view
The fast views are only defined for the current perspective and will only exist as long as the perspective is open. This does not mean that you cannot switch from perspective to perspective without losing the fast view, but if you select the perspective in the shortcut bar, right-click, and select Close you will.
If you want to retain the fast views across Studio sessions, you should save the perspective.
3.2.3 Customizing perspectivesYou can customize perspectives by:
� Closing or opening views. Views can be opened with the Window -> Show View option. A view can be closed by clicking the X at the top right corner of the view.
� Maximizing a view by double-clicking the title bar. This is useful when you need a large window for code editing. Double-click again to restore the layout.
� Moving views to other panes or stacking them behind other views. To move a view:
Properties view
New icon
Properties tab has been removed
52 IBM WebSphere Application Server - Express V5.0.2 Developer Handbook

a. Select the view's title bar and start dragging the view.
b. While you drag the view, the mouse cursor changes to a drop cursor. The drop cursor indicates what will happen when you release the view you are dragging:
The floating view appears below the view underneath the cursor.
The floating view appears to the left of the view underneath the cursor.
The floating view appears to the right of the view underneath the cursor.
The floating view appears above the view underneath the cursor.
The floating view appears as a tab in the same pane as the view underneath the cursor.
You cannot dock the floating view at this point.
� Double-clicking the title bar of a view to make it fill the window. Double-click the title bar again to return it to normal size and position.
� Adding views. You can add a view by doing the following:
a. Open the perspective you want to customize.b. From the main menu bar, select Window -> Show View.c. Select the view you want to add and click OK.d. The view will dock in its default position but can be moved to any location.
� Saving the perspective either by overlaying the original definition or under a new name by selecting Window -> Save Perspective As.
To reset a perspective to its saved state, select Window -> Reset Perspective from the main menu.
3.2.4 Setting perspective preferencesThere are a few preferences you can set globally for perspectives. These preferences can be seen by selecting Window -> Preferences -> Workbench -> Perspectives. The options you have are as follows.
Important! Until you are confident that you want to permanently change the perspective, we recommend that you save it as a new perspective. Once you overlay a perspective definition, you cannot reset it to its original state.
Chapter 3. Using Studio Site Developer 53

� Select a default perspective. Selecting a default simply assures that the perspective is visible in the list of perspectives when you select Window -> Open Perspective.
� Determine whether perspectives are opened in the existing window or new window.
� Determine whether views are opened in the existing window or as a fast view.
� By default, when you create a new project, you are automatically switched to the appropriate perspective to work with that project. If the perspective is not already open, it is opened. You can select whether the new perspective is opened in the same window, in a new window, or not opened/switched to.
Figure 3-7 Preferences menu
3.3 Finding helpThe workbench provides an online help system that includes a full-text search engine and context-sensitive interface help designed to help you find any necessary information quickly and easily.
54 IBM WebSphere Application Server - Express V5.0.2 Developer Handbook

You can find help information in one of two ways:
� Infopops show context-related help. You can see infopop information by placing the cursor in the field or window you want help with and pressing F1.
� Online help contains a full set of documentation that you can browse based on the contents or search. To reach the online help select Help -> Help Contents from the workbench menu.
The online help is organized into the following categories:
� Web developer information: Designed for application development. This will be the primary information set for the conventional Studio Site Developer user.
� Tool developer information: Designed for tool developers who are extending the Studio Site Developer workbench to include new application development tools.
� J2SE SDK 1.3.1 APIs and J2EE SDK 1.3.1 APIs: API documentation for the Java 2 SDK. It is based on the API documentation provided by Sun Microsystems for the Java 2 Platform, Standard Edition, Version 1.3.1.
� WebSphere Application Server - Express: Documentation for the Express Application Server component.
� Support Information: Contains FAQs and technical documents related to Site Developer, Application Server V5 and Express, Cloudscape, and DB2UDB.
Figure 3-8 Online help
Chapter 3. Using Studio Site Developer 55

The online help is laid out in an easy-to-use format. From the Help window you can print out a topic so that it can be read off-line or marked up for reference.
To synchronize the navigation frame with the current topic, you can click the Show in Table of Contents button. This is helpful if you have followed several links to related topics in several files and want to see where the current topic fits into the navigation path.
As an alternative to browsing the information in sequence, you can use the search engine. To do so, enter a word or phrase to search in the Search box and click GO.
56 IBM WebSphere Application Server - Express V5.0.2 Developer Handbook

Chapter 4. Working with Web applications
This chapter provides an overview of Web applications, how they are built, and how they are treated at runtime. In this chapter we will discuss:
� Enterprise applications� Web applications� Web projects� Packaging� Deployment descriptors� Studio support and tools� Server support
4
Note: Throughout this publication you will see the terms Web module, Web application, and Web project. For the context of this publication they all mean the same thing and are used interchangeably. The same is true for the terms enterprise application, enterprise application project, and enterprise application module.
© Copyright IBM Corp. 2003 57

4.1 Enterprise applicationAn enterprise application project contains the hierarchy of resources that are required to deploy an enterprise (J2EE) application. It can contain a combination of Web modules, EJB modules, JAR files, and application client modules. It includes a deployment descriptor and an IBM extension document, as well as files that are common to all J2EE modules that are defined in the deployment descriptor. It can contain a complete application that may be a combination of multiple modules. Enterprise applications make it easier to deploy and maintain code at the level of a complete application instead of as individual pieces.
Enterprise Application projects are exported as enterprise archive (EAR) files that include all files defined in the enterprise application project as well as the appropriate module archive file for each J2EE module project defined in the deployment descriptor, such as Web archive (WAR) files and EJB JAR files.
An enterprise application may contain JAR files to be used by the contained modules. This allows sharing of code at the application level by multiple Web or EJB modules.
WebSphere Application Server - Express does not support EJB modules, so the typical enterprise application built and deployed with WebSphere Application Server - Express will consist primarily of Web modules and supporting JAR files.
4.1.1 Enterprise application deployment descriptorThe enterprise application deployment descriptor contains information about the components that make up the enterprise application. This deployment descriptor is called application.xml and is located under the META-INF directory.
Figure 4-1 on page 59 shows the deployment descriptor for an enterprise application called OnlineCatalogEar. The enterprise application contains one Web module called OnlineCatalog.
58 IBM WebSphere Application Server - Express V5.0.2 Developer Handbook

Figure 4-1 Enterprise Deployment Descriptor
As you can see, the deployment descriptor is in XML format. The application element is the root element and contains information about the enterprise application and its elements. The module element represents a single J2EE module, which can contain EJB, Web, or Java elements. You can also see the security-role element that contains the J2EE roles to be used for application security.
4.2 Web applicationThe Java Servlet Specification 2.3 and the J2EE specification contain the concept of a Web application. A Web application contains JavaServer Pages, servlets, applets, Java classes, HTML files, graphics, and descriptive meta information that connects all these elements. The format is standardized and compatible between multiple vendors.
The specification also defines a hierarchical structure for the contents of a Web application that can be used for deployment and packaging purposes. Many servlet containers, including the one provided by Express Application Server, support this structure.
Chapter 4. Working with Web applications 59

Elements contained within a Web applicationAny Web resource can be included in a Web application, including the following:
� Servlets and JavaServer Pages.
� Utility classes: Standard Java classes may be packaged in a Java archive (JAR) file. JAR is a standard platform-independent file format for aggregating files (mainly Java classes files).
� Static documents: HTML files, images, sounds, videos, etc. This term includes all the documents a Web server is able to handle and to provide to client requests.
� Client side applets, beans, and classes.
� Descriptive meta information, which ties all of the above elements together.
� Custom Tag Libraries
� Struts
� XML files
� Web Services
Directory structureThe directory structure for a Web application requires the existence of a WEB-INF directory. This directory contains Java and support classes that contain application logic. Access to these resources is controlled through the servlet container, within the application server.
Figure 4-2 on page 61 shows an example of a typical directory structure under the WEB-INF directory.
60 IBM WebSphere Application Server - Express V5.0.2 Developer Handbook

Figure 4-2 The WEB-INF directory: A sample structure
The required elements are:
� web.xml: This file is required and is the deployment descriptor for the Web application.
� lib: This directory is required and is used to store all the Java classes used in the application. This directory will typically contain JAR files, including tag libraries.
� classes: This directory is also required. Typically, servlet classes and utility classes for the servlets compose this directory. It is possible to keep a package structure in this directory and to put class files under several subdirectories of the classes directory (as it is done for the Servlet2.class file in the subdirectory mypackage in Figure 4-2).
Although there are no other requirements for the directory structure of a Web application, we recommend that you organize the resources in separate logical directories for easy management; for example, an images folder to contain all graphics.
The deployment descriptorAs with the enterprise application, a deployment descriptor exists for the Web application. The Web deployment descriptor, web.xml, contains elements that describe how to deploy the Web application and its contents to the servlet container within the Web server. Note that JSPs execute as servlets and are treated as such in the Web deployment desciptor. The information in the Web deployment descriptor includes:
lib
WEB-INF
classes
Servlet1.class
web.xml
myjar.jar mypackage
Servlet3.classServlet2.class
Chapter 4. Working with Web applications 61

� A set of initialization parameters for the servlet context object. All the servlets running in the same Web application have the same servlet context and can access these attributes.
� Servlet information: For each servlet we will find its name, its fully qualified class name or the path leading to its file for a JSP, and its parameters for initialization (these parameters belong to the servlet and will not be shared with other servlets). We will also find out whether the servlet must be loaded when the server is started, and a set of mapping rules, allowing a servlet to respond to requests for a set of URLs.
� A list of default files (welcome pages) to send to the user when the request does not specify any file in a directory. Typically index.html, index.htm, and index.jsp may be used here.
� A list of error pages to send to the user when the request generates an error. HTTP errors or Java errors (exceptions) may be handled in that way.
� JSP and other tag libraries used within the Web application.
� References to external resources and enterprise beans: These references can then be easily located by the servlets. It can include entries in the JNDI lookup table, the location of enterprise bean interfaces, or simply a declaration of an application’s environment entry.
� Security constraints: the access to some resources can be limited and configured in the deployment descriptor. These resources are grouped into collections and the constraints are on these collections.
� Any other type of information useful during the deployment to the servlet container. It may include the description of the application (including if it is distributable), timeout settings, additional information about mime mapping, and so on.
The deployment descriptor file enables the application configuration to be specified independently from the server. It clearly simplifies the deployment process because the same application can be deployed into different servers without having to review its content.
A Web deployment descriptor is shown in Example 4-1.
Example 4-1 Web deployment descriptor
<?xml version="1.0" encoding="UTF-8"?><!DOCTYPE web-app PUBLIC "-//Sun Microsystems, Inc.//DTD Web Application 2.3//EN" "http://java.sun.com/dtd/web-app_2_3.dtd"><web-app id="WebApp">
<display-name>OnlineCatalog</display-name><servlet>
<servlet-name>SearchItemMasterView</servlet-name><display-name>SearchItemMasterView</display-name>
62 IBM WebSphere Application Server - Express V5.0.2 Developer Handbook

<jsp-file>/Wishlist/SearchItemMasterView.jsp</jsp-file><init-param>
<param-name>username</param-name><param-value>db2admin</param-value>
</init-param><init-param>
<param-name>password</param-name><param-value>db2admin</param-value>
</init-param><init-param>
<param-name>driverName</param-name><param-value>COM.ibm.db2.jdbc.app.DB2Driver</param-value>
</init-param><init-param>
<param-name>url</param-name><param-value>jdbc:db2:SALESAPP</param-value>
</init-param></servlet><servlet>
<servlet-name>LoginServlet</servlet-name><display-name>LoginServlet</display-name><servlet-class>common.LoginServlet</servlet-class>
</servlet><servlet-mapping>
<servlet-name>SearchItemMasterView</servlet-name><url-pattern>/SearchItemMasterView</url-pattern>
</servlet-mapping><servlet-mapping>
<servlet-name>LoginServlet</servlet-name><url-pattern>/LoginServlet</url-pattern>
</servlet-mapping><welcome-file-list>
<welcome-file>index.html</welcome-file><welcome-file>index.htm</welcome-file><welcome-file>index.jsp</welcome-file><welcome-file>default.html</welcome-file><welcome-file>default.htm</welcome-file><welcome-file>default.jsp</welcome-file>
</welcome-file-list><taglib>
<taglib-uri>http://jakarta.apache.org/taglibs/page-1.0</taglib-uri><taglib-location>/WEB-INF/lib/page.jar</taglib-location>
</taglib></web-app>
Chapter 4. Working with Web applications 63

Some elements of Example 4-1 on page 62 are discussed below.
� <web-app> is the root element and encompasses all other elements.
� <servlet> contains information for a servlet or JSP, including initialization parameters.
� <servlet-mapping> defines a mapping between a servlet and a URL pattern. This allows the servlet to be referenced in the application by a generic name.
� <welcome-file-list> contains an ordered list of welcome files in it. This is useful when a valid partial request is received. In such cases the server appends each welcome file in the order mentioned in this element and sends the request to the first resource that it matches.
� <taglib> is used to describe each tag library used in the application.
Web application archive conceptAlong with the Web application concept, the Java Servlet Specification 2.3 also specifies a file format named Web archive (WAR) to package Web applications. All the elements contained within a Web application are compressed into a WAR file for deployment. Using WAR files allow Web applications to be packaged in a platform-independent way.
4.2.1 A Web application in an application serverWithin the server the Web application is rooted at a specific path called the context path. All the requests from clients beginning with this path will be routed to the application.
All the Java components of the same Web application share information and have access to the same pool of resources. This information is encapsulated in the servlet context provided by the servlet container. Since there is one and only one servlet context per Web application, servlet instances of a Web application will point to the same ServletContext instance.
An application server can contain many Web applications with every Web application rooted to a specific path. The server manages a servlet context for each of these Web applications.
The server is responsible for encapsulating the data sent by the client into an HttpServletRequest object. This task includes identifying the following elements, obtained from the client’s request for a URL:
� Context path: The path prefix leading to the Web application. This context path is associated with the servlet context of the application.
� Servlet path: The section of the requested URL that directly corresponds to the mapping that activated this request. Typically, mapping consists of
64 IBM WebSphere Application Server - Express V5.0.2 Developer Handbook

associating a servlet or a resource with a set of URLs. For each request pointing to one of these URLs, the servlet will be invoked.
� Path info: The last part of the URL, not identified as part of the servlet path.
The concatenation of these three elements is the request Uniform Resource Identifier (URI) path or URL path. It represents the URL passed by a request to invoke a servlet. For example, http://www.ibmapp.com/OnlineCatalog/Administration/AddNewtem.jsp can be broken down as follows:
� Request URI path: /OnlineCatalog/administration/AddNewtem.jsp
� Context path: /OnlineCatalog (it represents the path prefix where the Web application was deployed)
� Servlet path: /administration/AddNewItem.jsp
The servlet will have access to these elements that can be configured on the deployment descriptor or later on the servlet container for each Web application.
4.3 Working with Web applicationsStudio Site Developer is designed for working with J2EE applications. It has wizards that aid you with creating enterprise and Web modules, including the required directory structure and elements. The deployment descriptors for both are automatically created and maintained. When you need to update the deployment descriptor, an editor just for this purpose is provided.
4.3.1 Creating an enterprise applicationIn Studio Site Developer, all non-static Web projects belong to an enterprise application project.
There are several ways to go about creating an enterprise application project:
� Use the Create New Enterprise Application Project wizard.
This wizard can be started by selecting File -> New -> Project. Select J2EE in the left pane and Enterprise Application Project in the right.
The wizard creates the enterprise application, the deployment descriptor, and the directory structure. You also have the option to create a Web module and/or an application client module.
Chapter 4. Working with Web applications 65

Although this wizard allows you to create the Web module, it does not take you through the same process as you would see in the Create a New Web Project wizard. Because of this, we found this method of creating an enterprise application project to have limited usefulness. As you will see in the next two bullets, there are other ways to create an enterprise project that we find more useful.
If you do use this method, you will be automatically switched to the J2EE perspective. Be sure to switch back to the Web perspective to continue working on the Web project.
� Create the enterprise application as a part of the Create a New Web Project wizard. This is the method we will use in this example.
� If you are importing a Web project, you can create the enterprise application as you go through the import wizard.
We recommend that you start by creating the Web project and let that wizard create the enterprise application project for you.
4.3.2 Creating a Web projectTo illustrate creating a Web project (Web module) we will use the Online Catalog example. From the Web perspective, do the following:
1. Select File -> New -> Dynamic Web Project (or select New -> Project -> Web -> Dynamic Web Project from the context menu in the Project Navigator view).
2. Enter the project name, OnlineCatalog, and verify that the Configure advanced options check box is selected. Using the advanced options will, among other things, allow you to select the enterprise application for this project.
66 IBM WebSphere Application Server - Express V5.0.2 Developer Handbook

Figure 4-3 Creating a Web Project
3. Click Next.
4. Click New... beside the EAR Project listbox.
Chapter 4. Working with Web applications 67

Figure 4-4 Creating a Web Project
5. Enter OnlineCatalogEAR as the Project name.
68 IBM WebSphere Application Server - Express V5.0.2 Developer Handbook

Figure 4-5 Creating a Web Project
6. Click Finish. This will create the OnlineCatalogEAR Enterprise Application Project.
7. Verify that the J2EE 1.3 level is selected. The context root will default to the Web project name.
Chapter 4. Working with Web applications 69

Figure 4-6 Creating a Web Project
8. Click Next.
9. Select JSP Tag Libraries to include all the supported tag libraries to the project.
Tip: You have several Web Project Features to choose from. These are for your convenience and can be selected after the Web project has been created. To access the Web Project Features, select your Web project and then select Project -> Properties from the main menu. From the Properties window, select Web Project Features. The Available Web Project features list allows you to select the available features for your Web project.
70 IBM WebSphere Application Server - Express V5.0.2 Developer Handbook

Figure 4-7 Creating a Web Project
10.Click Next.
11.Select the Use a default Page Template for the Web Site check box.
12.Select the Sample Page Template radio button.
13.From the Thumbnail selection box, scroll down to and select B-01_blue.htpl.
Important: A new feature of the New Web Project wizard allows you to select a default template for your project. Once selected, the template will be applied to any new pages created using Web Site Designer. Web Site Designer can be accessed by expanding your Web project and double-clicking Web Site Configuration from the project directory structure.
Chapter 4. Working with Web applications 71

Figure 4-8 Creating a Web Project
14.Click Finish.
The new Web project will be created. This includes the appropriate directory structure, the style sheet, and Web deployment descriptor. A module entry for this Web module is added to the enterprise application deployment descriptor.
4.3.3 Web project directory structureFigure 4-9 on page 73 shows the directory structure created for the Web project.
72 IBM WebSphere Application Server - Express V5.0.2 Developer Handbook

Figure 4-9 Directory structure
Next, we describe some of the specifics of the directory structure:
� Web Site Configuration: Double-clicking this item will open up the Web site diagram editor. The Web site diagram has a corresponding file (.website-config) located in the root of the project.
� Web Deployment Descriptor: Double-clicking this item will open up the Web deployment descriptor editor. The editor can also be opened by double-clicking the corresponding web.xml file located in the WebContent/WEB-INF folder.
� JavaSource: Contains the project's Java source code for classes, beans, and servlets. When these resources are added to a Web project, they are automatically compiled, and the generated files are added to the WEB-INF/classes directory. The contents of the source directory are not packaged in WAR files unless an option is specified when a WAR file is created.
Chapter 4. Working with Web applications 73

� WebContent: The location of all Web resources, including HTML, JSP, graphic files, and so on. If the files are not placed in this directory (or in a subdirectory structure under this directory), the files will not be run on the server. The Web Content folder represents the contents of the WAR file that will be deployed to the server.
� WebContent/META-INF: This directory contains the MANIFEST.MF file, which is used to map class paths for dependent JAR files that exist in other projects in the same enterprise application project. An entry in this file will update the runtime project class path and Java build settings to include the referenced JAR files.
� WebContent/theme: The suggested directory for cascading style sheets and other style-related objects, including all files related to any Web site templates as used through Web Site Designer.
� WebContent/WEB-INF: Based on the Sun Microsystems Java Servlet 2.3 specification, this directory contains the supporting Web resources for a Web application, including the web.xml file and the classes and lib directories. You can also access the web.xml file by double-clicking Web Deployment Descriptor from the root of the project.
� WebContent/WEB-INF/classes: This directory is for servlet classes, utility classes, and the Java compiler output directory. The classes in this directory are used by the application class loader to load the classes. Folders in this directory will map to package and class names. Do not place any class files directly into this directory. They are placed here automatically when the Java compiler compiles Java source files. Any files placed directly in this directory will be deleted by the compiler when it runs.
� WebContent/WEB-INF/lib: The supporting JAR files that your Web application references. Any classes in .jar files placed in this directory will be available for your Web application. Tag libraries used in the application are also located in this directory.
� Libraries: Contains the supporting JAR files that your Web application references. This folder mirrors the content of the lib folder. In addition, Web Library Projects, which are "virtual" JAR files that do not physically reside in the Web project, but are associated with Java projects elsewhere in your workspace, are included in this folder.
74 IBM WebSphere Application Server - Express V5.0.2 Developer Handbook

4.3.4 Application templatesInstead of creating applications from scratch, Studio Site Developer users have the option of creating applications based on pre-defined templates. The end result is a ready-to-deploy application, generated with little effort. Studio Site Developer provides a library of predefined templates. You can use these, or add your own templates for future use. Additional templates are also available for download.
The Template Application Wizard (File -> New -> Template Application) guides you through the process of selecting a template, customizing it, and generating the application. The wizard allows you to select a template from the library, from custom templates that you have created and saved, or from the Web using a download button that takes you to the Web site.
Chapter 4. Working with Web applications 75

76 IBM WebSphere Application Server - Express V5.0.2 Developer Handbook

Chapter 5. Working with HTML
The most basic of all Web application components is the HTML Web page. We will continue our discussion on using Studio Site Developer by showing you how to build a simple Web page. The content of this chapter includes:
� Studio Site Developer tool support for working with HTML� The new Web Site Designer support included with WebSphere Application
Server - Express V5.0.2� An example that illustrates how to use the Web Site Designer and page
templates
5
© Copyright IBM Corp. 2003 77

5.1 HTML support in Studio Site DeveloperBuilding HTML pages is probably the most basic of all Web development activities. Studio Site Developer provides extensive support for working with HTML, including tool bars, wizards, content assist aids, validation and syntax checking, graphics tools, and other types of support you would expect from a mature Web development tool.
5.1.1 Using the Web perspectiveThe Web perspective is the primary perspective used to build Web project components. The default views have been selected and placed to facilitate working on HTML and JSP files. The Web perspective can be opened by selecting Window -> Open Perspective -> Web.
Figure 5-1 Web perspective
78 IBM WebSphere Application Server - Express V5.0.2 Developer Handbook

You can see the default layout of the Web perspective in Figure 5-1 on page 78. Project files in the Project Navigator view show a structured view of the application. Double-clicking a file in the navigator will open it in the editor area (center) using the Page Designer.
The toolbar and drop-down options at the top give you easy access to tools and wizards designed to make building Web applications easy. The items in the toolbar change based on the active editor and resource. You can control the options you see to some extent by modifying the toolbar viewing options in the Toolbar drop-down.
The default views in the Web perspective are designed and positioned for optimum efficiency. Note that the default layout for perspectives tends to change over time from one product release to another. This can be due to new views, usability feedback, or just the fact that developers have discovered a more convenient and popular way of doing things. In Studio Site Developer V5.1, the Web perspective has the following views in its default layout:
� Project Navigator� Gallery� Struts Explorer� Attributes� Styles� Thumbnails� Quick Edit� Tasks� Colors� Servers� Palette� Snippets
Other views may appear as you perform tasks. For example, the first time you test an application and use the Servers view, the Console view will appear.
We will discuss a few of the default views briefly here, and in addition, a few other views that we find helpful in working with Web applications. For information about adding views and rearranging the views on your workspace, see 3.2.3, “Customizing perspectives” on page 52. The descriptions of all views can be found in the Studio help text.
Chapter 5. Working with HTML 79

Project Navigator viewThe Project Navigator view shows the application resources in a project-oriented hierarchy. There are three kinds of resources:
Files Files correspond to files in the file system.
Folders Folders are like directories in the file system. They can contain files as well as other folders.
Projects Projects organize resources into logical application components. When you create a new project, for example, an enterprise application or Web project, a new folder is created for the project with the appropriate folder structure beneath it in the workspace.
The structure shown in the navigator aligns with the structure of J2EE enterprise and Web applications.
Attributes viewThe Attributes view shows you the attributes of the selected element in the editor and allows you to change them. For example, if the cursor in the editor is within a table tag, you will see table attributes in the Attributes view. You can set things like the table or cell background colors, text alignment within the cell, and the size of the cell. If the cursor is within a link, the attributes will show you the URL to link to, the window to open, and other link attributes.
In Figure 5-1 on page 78, the cursor in the editor area is immediately after the <BODY> tag. In the Attributes view, you have access to the attributes you can set for that tag. If the cursor was situated within a table, the Attributes view would look like Figure 5-2.
Figure 5-2 Attributes view for table attributes
80 IBM WebSphere Application Server - Express V5.0.2 Developer Handbook

Thumbnail and Gallery viewsThe Gallery view gives you a list of predefined resources that can be placed in the open file. The resources available include images, wallpaper, Webart (buttons, logos, arrows, and illustrations), sound files (.wav and .mid formats), and style sheet files.
When you open any of the folders in the Gallery view, the available files are displayed in the Thumbnail view.
Figure 5-3 Thumbnails and Gallery views
The Gallery view, working together with the Thumbnail view, allows you to easily add or apply the files available in the gallery to your HTML file. To use the gallery:
1. Open the folder (for example, the Image folder) in the Gallery view.
Tip: To set the attributes of an element, you must have that element selected or place the cursor within the tag that defines the element. Sometimes this can be tricky using the Design view since you cannot see the source tags. Add the Outline view to your perspective and use it to select the correct element, then switch back to the Attributes view.
Gallery view
Thumbnails view
Chapter 5. Working with HTML 81

2. From the Thumbnails view, drag the desired thumbnail (image file) to the appropriate location in the HTML page. Or, double click the thumbnail and it will be added to the current cursor location in the open HTML page.
If you select a style sheet (.css) file, the new style will be applied to the target page, and a link to the style sheet will be added to the HTML source in the proper location.
Links viewThe Links view shows Web pages that link to the current file, and the Web pages that the open file links to. The Links view is an important tool in keeping track of the overall flow of the application and in maintaining the integrity of the links in the application.
The current file is the focus (center) of the view. Which file is current depends on where the cursor is. If the cursor is positioned in a file in the editor area, then that file is current and will be in the center of the Links view. If you have selected a file in the Project Navigator view, that file is current.
You can open any of the files in the view by double-clicking their icon. Opening a new file, changes the Links view so that the new file is current. Holding the cursor over a file will give you a pop-up showing you the full directory location. A “+” icon means that the file has links that aren’t displayed in the view. You can display them click clicking the plus sign.
In Figure 5-4, you can see that AddNewItem.jsp is the current file (it is situated in the middle of the view). There is one broken link (represented by a line with double slashes) to back.gif.
Figure 5-4 Links view
Table 5-1 on page 83 shows the symbols you will see in the view and their meaning.
broken link
82 IBM WebSphere Application Server - Express V5.0.2 Developer Handbook

Table 5-1 Links view symbols
Colors viewThe Colors view allows you to select colors for background or text from a color palette. To assign a color to text, highlight the text, select the color in the palette, and select Set as Text Color from the drop-down list. The background color for a table (or cell or row) or for the page can be selected in the same manner by placing the cursor in the appropriate position.
Symbol Description
This arrow indicates that the link is to a file outside the Web content folder.
This icon indicates that the link is to a cascading stylesheet.
This arrow indicates the number of times the file in focus (index.html) links to the file to which it points.
This icon indicates that the link is to a graphic. Links to graphics are sometimes referred to as embedded links because they are rendered as part of the same HTTP request (appear on the same page).
This arrow indicates that the validity of the link cannot be verified.
This icon indicates that the link is to a mailing address.
Links to file types that are not recognized are represented by this icon.
Chapter 5. Working with HTML 83

Figure 5-5 Setting colors using the Colors view
Tasks viewThe Tasks view contains a list of two types of elements:
Problems Problems are tool-determined issues that have to be resolved. Example problems are Java compile errors, syntax errors, or broken links for HTML/JSP files. They are automatically added to the Task view when working with the tool. When you double-click a problem, the editor for the file containing the problem opens and the cursor is pointed at the location of the problem.
Tasks You can manually add tasks yourself. For example, you can add a task that reminds you that you have to implement a Java method. Place the cursor in the method’s implementation, right-click, and select Add -> Task. When you double-click the task, the file opens and the cursor is located in the method. You can also add general tasks that do not refer to a specific file.
Colors view
84 IBM WebSphere Application Server - Express V5.0.2 Developer Handbook

You can set up filters to show only the tasks you really want to see by using the filter icon ( ).
In Figure 5-1 on page 78, the filter has been set to on in this case to limit the items seen to the current file. You can see that one item is in the Tasks view, indicating a problem in the code. Double-clicking the task will bring the line where the error is into focus in the editor. A corresponding icon appears in the editor where the problem is. In this case, it is a broken link. Once the problem is corrected, the entry in the Tasks view will disappear.
Quick Edit viewThe Quick Edit view lets you add short scripts to your HTML and JSP files. The Quick Edit view opens when you select a tag while editing an HTML or JSP file in Page Designer. For example, if you select a button tag on a JSP page, you can then associate a click event with that button and add a script to it.
The left pane displays a list of possible events associated with the selected tag. The right pane is a script editor. After selecting an event in the left pane, you can add a script for that event in one of the following ways:
� Enter the script directly.
� Drag and drop a snippet from the Snippets view.
� Insert simple actions by selecting from a list.
The icons on the toolbar allow you to perform the following actions:
� Select a script language, for example Java or JavaScript.
� Apply the script to the current HTML or JSP file.
� Reset the script currently in the Quick Edit view back to the original document contents.
� Use the drop-down menu to perform additional actions:
– Filter the list of events in the events list.
– Insert or edit the script for a simple action by selecting from a list. In some cases, a dialog box opens so you can enter variables related to the simple action.
As you add or change scripts in the Quick Edit view, the HTML or JSP file is updated if you select another tag, select another event for scripting, or click the Apply Script button on the toolbar.
Besides scripting events, you can use Quick Edit to modify SCRIPT, jsp:scriptlet, jsp:expression, and jsp:declaration scripts.
Chapter 5. Working with HTML 85

Palette viewThe Web tools Palette view lets you quickly drag and drop items onto a file you are editing. You can use this view when you are editing JSP or HTML files in Page Designer.
The Palette view contains a series of drawers that you can open. Each drawer contains related items that you can drag and drop into the active editor. For example, if you are editing an HTML page in Page Designer, you can open the HTML drawer and drag and drop an image into the page. A window will open to let you select an image from the file system to add. The drawers and their contents vary depending on the active editor.
Figure 5-6 Palette view
Palette view
86 IBM WebSphere Application Server - Express V5.0.2 Developer Handbook

You can customize the Palette view. For example, you can add additional items to the HTML drawer (right-click within the Palette view, choose Customize, and then select the additional HTML items to add). Or you can increase the size of the icons (right-click within the palette and choose Use Large Icons).
Snippets viewThe Snippets view allows you to catalog and organize reusable programming objects, such as HTML tagging, JavaScript, and JSP code, along with files and custom JSP tags. The view can be extended based on additional objects that you define and include.
Figure 5-7 Snippets view
To view or collapse the objects in a specific category, or drawer, click the category name.
The Snippets view has the following features:
� Drag-and-drop to Page Designer's Design page and various source editing pages: you can drag items from the view into the active editor and the text will be dropped into the document at the cursor location
Snippets view
Chapter 5. Working with HTML 87

� Double-Click Support: you can double-click an item and have it inserted at the current cursor position in the active editor
� User-defined categories and items: you can define, edit, and remove items from view categories as desired.
� Plugin-defined categories and items: plug-in developers can contribute a default list of items to their own categories.
� Variables in insertions: by default, items will be edited using a dialog and, when inserted, you will be prompted for values and attributes for each of the variables.
� Category filtering: you can select which categories are shown in the Snippets view.
� Custom insertion: plug-in developers can customize the behavior of items so that when they are dropped during a drag-and-drop action, both the text that is inserted and the insertion location are strictly defined.
� Category organization: all categories and items within them are displayed alphabetically by default.
Outline viewThe Outline view gives you an overview of the key elements that make up the resource that is being edited. It allows quick and easy navigation through your resource. By selecting one of the elements in the Outline view, the line in the editor view that contains the selected element is highlighted.
88 IBM WebSphere Application Server - Express V5.0.2 Developer Handbook

Figure 5-8 Outline view
Servers view and Console viewThe Servers view (similar to the one shown below) allows you to manage application servers and configurations used for testing applications. This view displays a list of the defined applications servers and their state. You can use this view to create and delete servers and to manage them (start, stop, etc.).
Outline view
Chapter 5. Working with HTML 89

Figure 5-9 Servers view
When a server is running, the Console view shows server messages.
Testing and deploying applications is discussed further in Chapter 13, “Deploying applications” on page 455.
5.1.2 Editing with the Page DesignerThe Page Designer provides a visual-based environment that enables you to create and work with a file while viewing its elements on the page. When you open HTML or JSP files, the Page Designer is the default editor. The file will open in the editor area where you will have three views to work with: Design, Source, and Preview. You can alternate the way in which you see the file by moving among these views.
For example, you can use the Design view to position graphics in the page, then switch to the Preview view to see how it will look from a Web browser. The Source view can be used to view the raw source code for the file, but not the screen presentation. The Page Designer provides full visual editing capabilities, including the ability to drag and drop from the Project Navigator view, the Thumbnail view, and Microsoft Internet Explorer.
Servers view
90 IBM WebSphere Application Server - Express V5.0.2 Developer Handbook

Design viewThe Design view is the WYSIWYG environment that enables you to create and work with a file while viewing its elements on the page. For example, you can see the graphics that you have inserted into the file and continually check the visual presentation of the Web page as you design it. This is in contrast to the Source page, which shows you the HTML or JSP source code for the file, but not the screen presentation. The Design page provides full visual editing capabilities, including the ability to drag and drop from the Project Navigator view, the Thumbnails view, and Microsoft Internet Explorer.
Figure 5-10 Design view
Source viewThe Source view enables you to view and work with a file's source code directly. You can see the Source view in Figure 5-1 on page 78. The Outline and Attributes views both have features that supplement the Source view.
Chapter 5. Working with HTML 91

Preview viewThe Preview shows you how the current page is likely to look when viewed in an external Web browser. This view is only useful for viewing static content HTML. There is no runtime capability so dynamic content (such as JSP tags) will not be shown. To view JSP dynamic content, you will need to use the Run on Server option (WebSphere test environment) from the page's context menu in the Project Navigator view.
Syntax validationThe HTML Syntax Validator included in Studio Site Developer validates HTML basic syntax and HTML DTD compliance for HTML and JSP files created in Page Designer. You can turn it on or off and configure an option on the preferences page (accessed by clicking Window -> Preferences -> Web and XML Files -> HTML -> HTML Annotations) to also validate your code as your type.
Syntax validators are available for checking basic syntax as you work with files. Before getting started, it is a good idea to check the preferences to make sure that the appropriate validators are active. For example, the HTML syntax validator is not turned on by default.
To enable or disable the validators or to change the default validation options, select Windows -> Preferences -> Validation.
Tip: When you place the cursor within a tag in the Source view, a bar appears to the left that encompasses the entire tag. For example, in Figure 5-1 on page 78 the cursor is after the <BODY> tag. The bar on the left spans all the lines of code between the <BODY> and </BODY> tags. This is especially useful in visually locating the beginning and ending tags for nested lists, tables, etc.
Tip: You can also use the Tools -> Launch External Web Browser menu option to open the current file in an external Web browser.
92 IBM WebSphere Application Server - Express V5.0.2 Developer Handbook

Figure 5-11 Validators
Validation errors are shown in the Task view.
5.1.3 Building applications with Web Site DesignerA new feature of Studio Site Developer V5.1, called the Web Site Designer, has been provided to simplify and speed up the creation of HTML and JSP pages in a Web site. You can view the Web site in a Navigation view to add new pages, delete pages and move pages in the site. The Web Site Designer is especially suited for building pages that use a page template.
The Web Site Designer is used to create the structure for your application in much the same way you would create a book outline to serve as the basis for writing a book. You use the Web Site Designer to visually lay out the flow of the application, rearranging the elements (JSPs, HTML pages) until it fits your needs. Then you continue by creating pages based on this design.
Chapter 5. Working with HTML 93

A typical application development scenario using the Web Site Designer might go through the following steps:
1. Create a Web project. Select a default page template to use for the Web pages. For information about page templates, see 5.1.5, “Using Page templates” on page 109. As you create Web pages, the default template will be used.
2. Open the Web Site Configuration file. You will find this in the root directory of the project. It is automatically created when you create the Web project. This file is actually an XML file called .website-config that will contain Web site design information as you build your Web site using the designer.
3. Begin designing your application by adding pages to the configuration. At this stage, you are simply adding elements to the design that represent JSP and HTML pages, and defining their relation to each other. For example, you could start by creating a top page called index.html.
4. Add additional pages and place them in the design so that the application flow is illustrated. For example, if index.html will have four menu options, you should select the index.html box and add four new child pages (one per option) to the flow.
5. Continue to visually lay out the application flow by creating design elements that represent each HTML and JSP page in the application. You can move elements around the diagram as you go to change the application flow.
6. When you are done, create a real page for each design element (you could also create the Web pages as you go along).
As you build your Web site design, the information is stored in the .website-config file so that navigation links and site maps can be generated automatically. This means that when the structure of a site changes, for example, when a new page is added, the navigation links are automatically regenerated to reflect the new Web site structure.
Important: Using Web Site Designer is not required for developing applications in Studio Site Developer. The HTML/XHMTL wizard can also be used to create Web pages (see 5.1.4, “HTML/XHTML wizard” on page 108). The advantage of using Web Site Designer is in the layout of your application. It may become difficult to remember every page and every link in your application using traditional methods. Web Site Designer, on the other hand, provides you with a high-level picture of your application.
94 IBM WebSphere Application Server - Express V5.0.2 Developer Handbook

This dynamic navigation is accomplished using special comment tags for the navigation bar and site map. These comment tags use the site structure information and other site-related information that Web Site Designer stores in an XML file called .website-config. When you create a Web project, Web Site Designer support is a default feature of the project. The Web project contains a placeholder for the website-config file named Web Site Configuration.
Opening the Web Site Configuration fileDouble-clicking Web Site Configuration launches Web Site Designer and opens .website-config file. Using the Web Site Designer editor, you can add, delete, and rearrange the Web pages that compose the Web site. There are two views in the editor: the Navigation view and the Detail view. The Navigation view shows the structure of the Web site and the Detail view shows a list of all the Web pages used in the site structure.
Figure 5-12 Web site diagram for Online Catalog sample
Adding and editing pagesEach page can be created and opened for editing from the Web site configuration by double-clicking the page icon from the Web Site Designer.
Chapter 5. Working with HTML 95

When opened for editing, the default editor for the page is used. In this case of HTML and JSP pages, the default editor is the Page Designer.
Using page templatesUsing page templates improves the efficiency of developing Web applications. You can alter an existing page template or create your own and then apply the page template to all of the Web pages in your Web site to ensure a consistent design. When editing the page template, you can use the free layout mode to make changes to the layout of each Web page. Instead of making a change (such as altering the size of the navigation bar) on each individual Web page, you can alter the page template instead. Then, you can apply that change to your entire Web site.
Using the Site Parts drawerWhen working with pages, the Site Parts drawer in the Palette view is particularly useful. It contains Web site elements, such as different navigation bars and a site map that you can drag and drop into your Web page.
Important: If a Web page icon has been added to the Web Site Designer (File -> Add New Page), but the page has not been created, you will be asked to create the page in the Create a Page dialog. You can choose to create an HTML or JSP page. Depending on what option is selected, the appropriate wizard will be displayed.
Note: See 5.2, “Adding HTML pages to the Online Catalog sample” on page 135 for an example of using the Web Site Designer.
96 IBM WebSphere Application Server - Express V5.0.2 Developer Handbook

Figure 5-13 Site Parts drawer
Using the Context menuDepending on what area or element is right-clicked within the Web Site Designer, a different context menu is displayed. For the purpose of this discussion, we are going to categorize the areas in the Web Site Designer as:
1. Editor surface - The surface of the Web Site Designer where you add, delete, and modify page icons.
2. Unassociated page icon - A page icon that does not have a physical file (HTML or JSP) associated to it.
3. Associated page icon - A page icon that has a physical file associated to it.
The table below lists (and describes) all the items of the context menu and groups them into the appropriate category.
Table 5-2 Context menu items
Item Sub Item Category Description
Open 3 Opens the associated page in its default editor.
Open With 3 Allows you to open the associated page in the default editor or a different editor.
Chapter 5. Working with HTML 97

Create Page 2 Allows you to create an HTML or JSP page. Depending on what option is selected the appropriate wizard is invoked.
Save 1, 2, 3 Saves any changes made in the Web Site Designer editor.
Cut 2, 3 Removes the page icon from the diagram.
Add New Page As Top 1 Adds a new page icon to the diagram and specifies it as a starting page.
Before 2, 3 Adds a new page icon to the diagram and places it before the selected page icon.
After 2, 3 Adds a new page icon to the diagram and places it after the selected page icon.
As Child 2, 3 Adds a new page to the Web diagram and sets it as a child page of the selected page icon.
Add Existing Pages...
1, 2, 3 Allows you to add existing pages from the project to the diagram.
Item Sub Item Category Description
98 IBM WebSphere Application Server - Express V5.0.2 Developer Handbook

Add New Project Before 2, 3 Allows you to add a project to the diagram before the selected page icon.
After 2, 3 Allows you to add a project to the diagram after the selected page icon.
As Child 2, 3 Allows you to add a project as a child of the selected page icon.
Add Existing Project
Before 2, 3 Allows you to add an existing project to the diagram before the selected page icon.
After 2, 3 Allows you to add an existing project to the diagram after the selected page icon.
As Child 2, 3 Allows you to add an existing project as a child of the selected page icon.
Delete 2, 3 Removes the page icon from the diagram but also prompts you to delete the associated page from the project.
Move... 3 Allows you to move the location of the associated page.
Rename... 2, 3 Allows you to change the file name of the associated page.
Item Sub Item Category Description
Chapter 5. Working with HTML 99

Edit Navigation Label...
2, 3 Allows you to change the navigation label of the page icon.
Navigation Navigation Candidate
2, 3 Allows you to enable or disable the page icon as a navigation candidate. Enabled page icons are indicated with a checkmark beside this item.
Set Navigation Root
2, 3 Allows you to enable or disable the page icon as a navigation root. Enabled page icons are indicated with a checkmark beside this item.
Site Map Site Map Candidate
2, 3 Allows you to enable or disable the page icon as a site map candidate. Enabled page icons are indicated with a checkmark beside this item.
Page Template Apply Template 2, 3 Allows you to apply a template to the page icon. A wizard is invoked when this option is selected.
**Open Template With
3 Allows you to open the applied template in an editor or your choice.
Item Sub Item Category Description
100 IBM WebSphere Application Server - Express V5.0.2 Developer Handbook

**Replace Template...
2, 3 Allows you to replace the existing template with another one of your choice.
**Detach Template 2, 3 Allows you to detach the currently applied template from the page icon.
Style Add CSS Link 3 Allows you to add a CSS link to the page.
Edit CSS 3 Allows you to edit a CSS that is linked to the page.
Remove CSS Link 3 Allows you to remove a CSS link from the page.
Run on Server... 3 Allows you to run the selected page on a test application server.
Display As Top 2, 3 Displays the selected page icon as the top item. You can double-click the yellow arrow to return to the previous view.
Appearance Show Navigation Title
1, 2, 3 Displays the navigation label in the page icon.
Show File Name 1, 2, 3 Displays the associated page name in the page icon.
Show Page Template
1, 2, 3 Displays the template name in the page icon.
Item Sub Item Category Description
Chapter 5. Working with HTML 101

** - These items are only available if a template has already been applied to a page.
Understanding the iconsAfter you have added pages (associated or not) to the Web Site Designer, an icon is added to the editor surface representing each page. Depending on the options selected for the page and the type of page created, the icons will appear differently. Each icon indicates information about the page.
Figure 5-14 Page icon
Show Number of Children
1, 2, 3 When the parent page icons are compressed in the diagram, a number is displayed on the icon indicating the number of associated child pages.
Change Layout Orientation
1, 2, 3 Changes the layout of the diagram to vertical or horizontal.
Set Hanging Style 2, 3 Changes the view of the diagram to a hanging display.
Item Sub Item Category Description
Navigation candidate icon Navigation root icon
Sitemap candidate icon Navigation label
Icon border
102 IBM WebSphere Application Server - Express V5.0.2 Developer Handbook

Navigation candidateIf the Navigation candidate icon is enabled, the Navigation label of the icon will appear in the site navigation of the application. This function is enabled by default. It can be disabled by right-clicking the page icon and selecting Navigation -> Navigation Candidate from the context menu. Setting it as the candidate again is done in the same way.
Navigation rootEnabling the Navigation root function sets the associated page as a navigation root for the site. Traditionally, the index.html page of a site is set as the navigation root. By default, this function is not enabled; to enable (or disable) it, right-click the page icon and select Navigation -> Set Navigation Root from the context menu.
Figure 5-15 Navigation root enabled
Site map candidateA feature of Web Site Designer allows you to create a site map for your application. By default, every page icon is enabled as a site map candidate. If you do not wish to set a page as a candidate, right-click the icon and select Site Map -> Site Map Candidate from the context menu. Setting the candidate again is done in the same way.
Navigation labelThe navigation label of the page icon is the text that will appear in the site navigation menu. Therefore, the label should be simple and descriptive of the page being linked to, for example, Home or View Catalog.
Icon borderIf there is no page associated with an icon, the icon border is dashed (as in Figure 5-14 on page 102). Once a page is created or associated to the icon, the border becomes solid. In addition to the border being changed, a fourth icon will be added to the page icon: the Code icon. If the icon is a less than and greater than sign icon, it means that the associated page is an HTML page. If the icon is a blue diamond, then the associated page is a JSP.
Note: The icons become gray in color if the function associated with the icon is not enabled. For example, in Figure 5-14 on page 102, the Navigation root icon is grayed out because this page icon is not set as a Navigation root.
Chapter 5. Working with HTML 103

Figure 5-16 Associated page icon
Page templates If a page template has been applied to a page, the top part of the icon is blue.
� To add a template to a page, right-click the page icon, select Page Template -> Apply Template... from the context menu, and then follow the wizard instructions.
Figure 5-17 Template applied to page
� To remove the applied template, right-click the page icon and select Page Template -> Detach Template from the context menu.
� When a template is applied to the page, you can also open the template and replace the template. To open the template, right-click the icon and select Page Template -> Open Template With -> Page Designer for Template from the context menu.
� To replace the template, right-click the page icon, select Page Template -> Replace Template... from the context menu, and then follow the wizard instructions.
Inserting a navigation barYou can insert a navigation bar into a Web page by inserting a navigation object from the Palette view.
Code icons
Icon border
104 IBM WebSphere Application Server - Express V5.0.2 Developer Handbook

To insert a navigation bar into a Web page:
1. Double-click a page icon in Web Site Designer to open the Design page in Page Designer.
2. Select the Site Parts drawer in the Palette view. You have the following navigation bar options:
– Horizontal Navigation Bar – Horizontal Graphical Navigation Bar – Vertical Navigation Bar – Vertical Graphical Navigation Bar – Navigation Drop Down
3. Choose the style of navigation you want to insert and drag and drop the palette object onto the page. Depending on which navigation bar you choose, one of several insert dialogs opens.
4. Select whether you want to use a Sample or a User-Defined navigation bar. If you want to use a sample navigation bar, select one of the Thumbnail images and the File name field will be automatically populated. If you have a user-defined navigation bar, you can click Browse to locate the file in the current project or import the file from the file system.
5. Select the type of links that you want to appear in the navigation bar. You can select links based on page relationships. For example, you can select links based on parent-child relationships or you can select links based on sequence (previous and next pages). If you select previous or next links, you can supply a label to appear for those links, such as Back and Forward.
Click OK. The navigation bar is inserted on the page.
Note: If you use a page template to govern the layout and visual design of all the pages in a Web site, you can insert a navigation bar onto the page template, rather than adding the navigation to every page individually. The links in the navigation bar are then updated dynamically for each individual page in the site. For more information on creating a page template, see “Creating a page template” on page 111.
Chapter 5. Working with HTML 105

Inserting a navigation trailYou can insert a navigation trail, sometimes referred to as breadcrumbs, into a Web page by inserting the object from the Palette view.
To insert a navigation trail into a Web page:
1. Double-click a page icon in Web Site Designer to open the Design page in Page Designer.
2. Select the Site Parts drawer in the Palette view and drag and drop the Navigation Trail object onto the page; an insert dialog opens.
3. Select whether you want to use a Sample or a User-Defined navigation trail. If you want to use a sample navigation trail, select one of the Thumbnail images and the File name field is populated. If you have a user-defined navigation trail, you can click Browse to locate the file in the in the Current project or Import the file from the file system.
4. Choose the Separator character, the character that appears between each link in the trail.
5. Choose the Start character and the End character, the characters that appear at the beginning and the end of the trail.
6. Click OK; the navigation trail is inserted on the page.
Inserting a site mapYou can insert a site map into a Web page by inserting the object from the Palette view. Typically, each Web site has one page that contains a map, or organized collection of links, of the whole site.
To insert a site map into a Web page:
1. Double-click a page icon in Web Site Designer to open the Design page in Page Designer.
2. Select the Site Parts drawer in the Palette view and drag and drop the Site Map object onto the page; an insert dialog opens.
3. Select whether you want to use a Sample or a User-Defined site map. If you want to use a sample site map, select one of the Thumbnail images and the File name is populated. If you have a user-defined site map, you can click
Note: If you use a page template to govern the layout and visual design of all the pages in a Web site, you can insert a navigation trail onto the page template, rather than adding the navigation to every page individually. The links in the navigation trail are then updated dynamically for each individual page in the site.
106 IBM WebSphere Application Server - Express V5.0.2 Developer Handbook

Browse to locate the file in the in the current project or import the file from the file system.
4. Choose the start level and the end level, the level of the hierarchy of the site structure included in the site map. For example, if you have six levels of pages in your site, 1 being the top page; you can choose to only include levels 1-3 in your site map (though any limit is allowed). This is useful if the pages below level 3 are very detailed, specific pages and you want the site map to only include links to broader, overview pages.
5. Click OK; the site map is inserted on the page.
Modifying a site part specificationWeb Site Designer generates site parts, such as navigation bars and site maps, from the site structure and appearance definition file, or the specification page. The specification page is an HTML file, named spec.html, that contains special comment tags and expressions. A specification page can be specified as an attribute of siteedit:navbar, siteedit:navtrail, siteedit:navtab and siteedit:sitemap tags, which are the tags inserted in your Web pages when you add site parts.
You can modify the appearance of site parts by editing the associated specification page:
1. In a Web page open in Page Designer, select a site part tag, such as siteedit:navbar.
2. In the Attribute view, click Edit. The specification page opens.
3. Edit the specification page as you would edit any other HTML file.
Note: You must enter tags and expressions in the Source page of Page Designer.
4. Save the specification page when you are finished.
Example 5-1 on page 108 shows an example of a spec.html.
Chapter 5. Working with HTML 107

Example 5-1 spec.html
<HTML><BODY>[< !-- siteedit:forEach var="item" items="${sitenav.items}" varStatuc="status" -->< !-- siteedit:choose -->< !-- siteedit:when test="${item.self}" --><SPAN class="nav">${item.label}</SPAN>< !-- /siteedit:when -->< !-- /siteedit:otherwise -->< !-- /siteedit:choose -->< !-- siteedit:if test="${!status.last}" -->|< !-- /siteedit:if -->< !-- /siteedit:forEach -->]</BODY></HTML>
5.1.4 HTML/XHTML wizardIf you do not want to use the Web Site Designer, you can use the HTML/XHTML wizard to add pages to your project.
Follow these steps to create a new HTML or XHTML file:
1. Select File -> New -> HTML/XHTML File to launch the wizard.
2. Click Browse to select the appropriate location for the file. The folder that you choose should be under the WebContent folder of the Web project. If an HTML file that is included in a dynamic Web project is not stored under this folder, then it will not be included in the WAR file that is deployed to the server. In addition, link validation will not encompass files that are not under the WebContent folder.
3. Type a name for your new file.
4. Ensure that the appropriate HTML or XHTML option is displayed in the Markup Language drop-down list.
5. You have three options for proceeding:
a. If you want to accept the defaults associated with a new HTML or XHTML file, leave the Model field as None and make sure the Configure advanced options is deselected.
b. If you want to apply a page template to your new file, select Page Template in the Model field and click Next.
i. If you want to use one of the sample templates provided, select Sample Page Template and then choose one of the templates shown in the Thumbnail box.
108 IBM WebSphere Application Server - Express V5.0.2 Developer Handbook
ii. If you want to use a template of your own, select User-defined Page Template and then click Browse to select the template from the file system.
c. If you do not want to use a page template, but want to specify or customize the file options, select the Configure advanced options check box and click Next.
i. If you want to select an encoding type, deselect the Use workbench encoding check box to select a new encoding attribute. Select the appropriate encoding value to add to the file's HTML declaration from the Encoding drop-down list.
ii. The default is the value set in the HTML Files preferences page, which is accessed by selecting Window -> Preferences, and then expanding the Web and XML Files preferences.
iii. Ensure that the proper content type is selected in the Content Type drop-down list. The default is text/html.
iv. Select the Document Type that you wish to associate with the HTML or XHTML file. The default for an HTML file is HTML 4.01 Transitional, while the default for an XHTML file is XHTML 1.1.
v. Specify a cascading style sheet (CSS) file to be referenced by the new HTML or XHTML file. Typically, CSS files are located in the theme folder under the WebContent folder. You can click Add to choose a style sheet from the file system. Choose Remove to delete a style sheet from the list, or use the arrow buttons to rearrange the order in which the file references the style sheets. If a style sheet is already associated with the project in which you are creating the new file, that style sheet is the default.
6. Click Finish to create the file in the project that you have selected. As a default, the new file opens in Page Designer, in the Design page.
5.1.5 Using Page templatesPage templates provide a starting point for JSP and HTML pages. By selecting a template to use throughout the application, you ensure a consistent look and feel for the application. Using templates also makes maintenance of this look easy. A change to the template automatically updates all pages using that template.
Studio Site Developer provides a page template library populated with a commonly used templates. You can use these as they are, modify them, or create your own templates. The Web page wizards, Page Designer, and Web Site Designer tools are especially designed to make using templates easy.
Chapter 5. Working with HTML 109

An example of a page template you will find in the library is shown in Figure 5-18 on page 110.
Figure 5-18 Page template
Page templates can be applied to a Web page in one of the following ways:
� By specifying the template when you use a wizard to create the page. This is true regardless of whether you are using the wizard from a navigation view, a tool bar or the Web Site Designer.
� By using the Web Site Designer. You can apply a template as you create pages or to existing pages as you add them to the Web Site Configuration. You can also apply or replace templates to pages already in the configuration.
� By using the Page Designer. With the page open, select Page -> Page Template. You can apply, replace, or detach the template. You also have the option of opening the template for modification.
A default page template can be specified when you create a Web project. If you specify a default template, it will be automatically selected when are given the option in wizards to select a template for a page.
110 IBM WebSphere Application Server - Express V5.0.2 Developer Handbook
Page templates versus style sheetsThough style sheets have not been discussed as of yet (see 5.1.9, “Working with style sheets” on page 120), there may be some confusion about page templates and style sheets. Page templates are used if you wish to create a standard layout for the JSP and HTML pages in your application. For example, you may want each page in your application to have a header, a navigation menu on the left side of the page, and a footer. All of these elements can be created in a page template and then used by the pages in your application; this obviously will aid in the maintenance of your application as changes only need to be made in one area. Style sheets, on the other hand, are used by page templates (or JSP and HTML pages) to set fonts, colors, table formatting, etc. Again, like page templates, maintenance is done in one area, which will save time.
A page template can act as a style sheet if you set your styles within the page template. Since the template is used by every page in your site, any settings in the page template will be reflected in the corresponding pages. That said, this is not the recommended development scenario. It is best to keep the page template and style sheet separate.
Creating a page templateTo create a page template that you can use in Page Designer, follow these steps:
1. Create a new dynamic Web project:
a. Choose File -> New -> Project.
b. Select Web -> Dynamic Web Project and click Next.
c. Enter a Project name and click Finish.
2. Create a JSP, an HTML, or an XHTML file. If you are creating a JSP file, follow these steps:
a. Select the newly created project in the Project Navigator.
b. Choose File -> New -> JSP File. The New JSP File wizard appears.
c. Fill in the Folder and the File Name fields.
d. Select HTML as the Markup language and None as the Model.
e. Click Finish. The new page opens in Page Designer.
3. If you are creating an HTML or XHML file instead of a JSP file, follow these steps:
a. Select the newly created project in the Project Navigator.
b. Choose File -> New -> HTML/XHTML File. The New HTML File wizard appears.
c. Fill in the Folder and the File Name fields.
Chapter 5. Working with HTML 111

d. Select HTML or XHTML as the Markup language and None as the Model.
e. Click Finish. The new page is opened in Page Designer.
4. Right-click the mouse in Page Designer to add content to the page:
a. Enter text directly.
b. Drag and drop items from the palette (Window -> Show View -> Other -> Web -> Palette).
c. Choose Insert -> Page Template -> Content Area. The content area is very important to users because it is the only area in which they can insert or add information. They cannot edit the rest of the page created from the page template.
d. Choose Insert -> Page Template -> Page Fragment. Inserting a page fragment lets you include part of a page from another file (this is similar to an SSI include or a JSP include). Changes in the page fragment are also applied immediately to all the pages created from the template.
5. Choose File -> Save as Page Template. The Save as Page Template window opens and you can select the folder in which to save the template file.
5.1.6 Working with framesetsIn our sample application, we no longer use framesets, but instead, use the page templates. However, framesets are still commonly used in Web applications to control the organization and flow of the Web pages. One common Web page design consists of a banner or title in a horizontal top frame, navigation links in a narrow left frame with content in a wider frame on the right. Studio Site Developer provides you with easy-to-use tools to create and work with framesets.
As an example, let’s build an entry for a Web site using a frameset. We will create a parent frame called index.html. It will have the following frames:
� A frame that spans the top called header.html. It will contain the company logo and links to company information.
� A frame on the lower left called menu.html. It will contain menu options.
� A frame on the lower right called main.html. It will contain the page displayed when the user selects an option.
To build this frameset, you would do the following:
1. Create a new HTML page in the Web Content directory called index.html (New -> HTML/XHTML file).
2. Switch to the Design view and select Frame->Split Frame ->Split Horizontally in the menu bar.
112 IBM WebSphere Application Server - Express V5.0.2 Developer Handbook

3. The frameset parent file is the file that contains tagging which defines the frameset and calls other files into the frames. We want index.html to be the parent, so select In the frameset parent in the Split Frame dialog.
Figure 5-19 Split frame
Click OK.
4. In the Design view, you will see a bar splitting the frame into two horizontal frames. Place the cursor in the bottom frame.
5. On the workbench menu bar, click Frame -> Split Frame -> Split Vertically. A bar is displayed, splitting the bottom frame into two vertical frames. Drag the bars so they are positioned as shown in Figure 5-20 on page 114.
Chapter 5. Working with HTML 113

Figure 5-20 Working with framesets
When you are in the Design view, the source code updated depends on which frame the cursor is in. You can see the current file name in the upper left corner of the editor area.
6. On the workbench menu bar, click File -> Save All. You will have the opportunity to name each page of the frame. In this case:
a. Save newpage1 as header.html.
b. Save newpage2 as menu.html.
c. Save newpage3 as main.html.
As you are asked to save each page, the relevant frame will be identified with a dotted outline in the editor area. You may need to move the wizard window to the side in order to see which window you are naming.
Figure 5-21 on page 115 shows the code generated in index.html.
header.html
main.htmlmenu.html
current file name
toggle betweenframeset and frameparent
114 IBM WebSphere Application Server - Express V5.0.2 Developer Handbook

Figure 5-21 Viewing the frameset source
Note that the frame attributes can be modified for each frame by placing the cursor within the appropriate <FRAME> tags.
Tip: To see the source for index.html, switch to the Source view. When you switch, you will initially see the source for the frame the cursor was in. There will be a drop-down box at the top of the editor pane that lets you select which of the files in the frameset you want to view.
You can also switch to the frameset parent (index.html) in the Design view using the Show Frames toggle switch above the editor pane, but there is no visual indication of the frameset tags so you are limited as to what you can do.
Chapter 5. Working with HTML 115

5.1.7 Adding tables, links, text, and imagesStudio Site Developer provides tools for adding text, tables, links, and images to your HTML or JSP pages.
Working with textWorking with text is simple. Place the cursor in the Source view where you want the text to go and start typing. Pressing the Enter key at the line of text will enter a break tag. To start a new paragraph, just move the cursor down.
As you work with the text, you will find several useful toolbar options. For example, you can select text and use icons to make it bold, center it, enlarge it, change the font, or underline it.
Working with tablesWorking with tables is easy when done from the Design view. Figure 5-22 shows the various tools available for creating tables. The Table drop-down has a variety of options that allow you to manipulate the table configuration. The Attributes view allows you to assign characteristics to tables and rows.
Figure 5-22 Working with tables
116 IBM WebSphere Application Server - Express V5.0.2 Developer Handbook

Adding a tablePosition the cursor to the point where you want the table. Select Insert -> table. Enter the number of rows and columns, then click OK.
Resizing a tableYou can resize the table by selecting the columns, rows, or the complete table and dragging to the new size. Otherwise, the table cells will be the size of whatever their content is.
Table attributesAttributes for the table can be set using the Attributes view. The attributes listed in Table 5-3 can be set.
Table 5-3 Table attribute options
Adding a linkStudio Site Developer provides the tools to easily add links to files or URLs using the Insert -> Link toolbar option. The types of links you can choose from are file, http, FTP, e-mail, or other.
Adding a text linkText links are inserted by selecting Insert -> Link from the toolbar. If you have not selected text in the Source view to represent the link, you can add it during the Insert Link wizard.
Table attributes Cell attributes Row attributes
� Alignment� Text flow� Caption� Width and height� Cell spacing� Cell padding� Border width� Background color and
image
� Cell type (header or data)
� Horizontal and vertical alignment
� Background color� Width and height� Autowrap option� Background color and
image
� Horizontal and vertical alignment
� Background color
Tip: You can also drag and drop files into the page from the Project Navigator bar, the Thumbnail view, or even from Windows Explorer. When you do this, a window opens with options that determine how the file is included. In this window, you simply state that you want a link to the file inserted.
If the file is from a directory outside of the project, the file will be copied into the project directly under the Web Content directory. You can move this to another directory by dragging it to the folder in the Navigator view. The links will be automatically updated to reflect the new location.
Chapter 5. Working with HTML 117
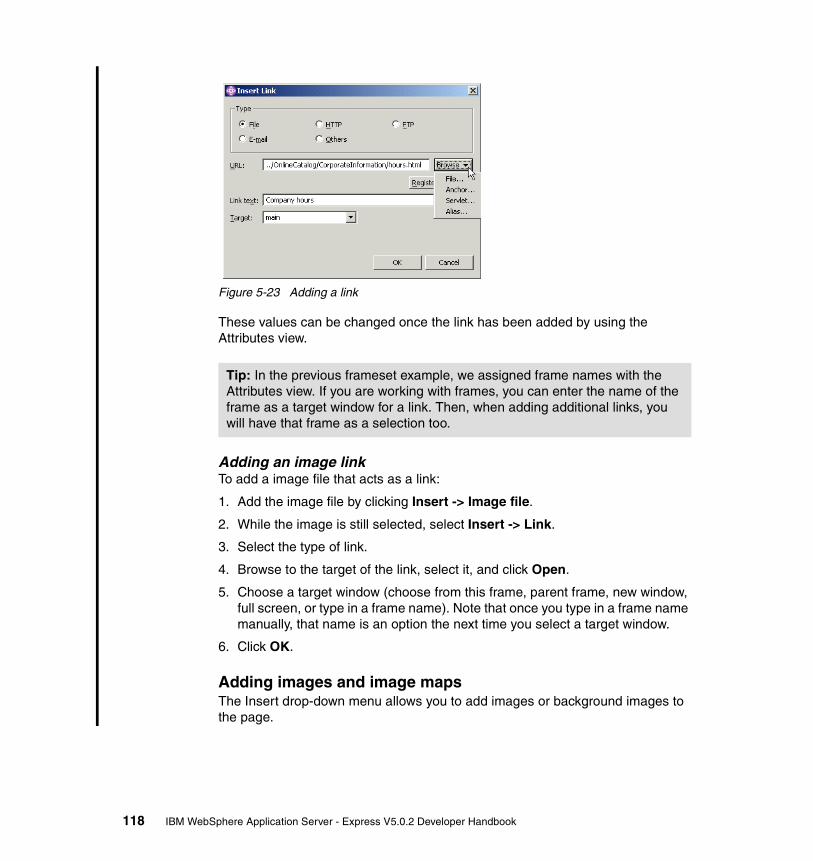
Figure 5-23 Adding a link
These values can be changed once the link has been added by using the Attributes view.
Adding an image linkTo add a image file that acts as a link:
1. Add the image file by clicking Insert -> Image file.
2. While the image is still selected, select Insert -> Link.
3. Select the type of link.
4. Browse to the target of the link, select it, and click Open.
5. Choose a target window (choose from this frame, parent frame, new window, full screen, or type in a frame name). Note that once you type in a frame name manually, that name is an option the next time you select a target window.
6. Click OK.
Adding images and image mapsThe Insert drop-down menu allows you to add images or background images to the page.
Tip: In the previous frameset example, we assigned frame names with the Attributes view. If you are working with frames, you can enter the name of the frame as a target window for a link. Then, when adding additional links, you will have that frame as a selection too.
118 IBM WebSphere Application Server - Express V5.0.2 Developer Handbook

To add an image to the body of a page, you can drag and drop it from another location (including from external files from Windows Explorer), or you can do the following:
1. Place the cursor on the page in the location you want to put the image.2. Select Insert -> Image file -> From file (or from URL).3. Browse to the image, select it, and click Open.
The Attributes view for an image allows you to change the layout of the image or to assign an existing image map.
4. You can add and work with image maps by selecting the image and then clicking Edit -> Image -> Image Map.
5.1.8 Working with forms, input fields, and buttonsAs with the other elements we have seen, Studio Site Developer provides tools, views, wizards, and other aids to make working with forms, input fields, and buttons easy. Forms are a familiar method for collecting data from users in a structured way. Form design in Page Designer is best supported in the Design page, where you can see the spatial and style-related attributes as you construct the form.
Most activities related to creating and editing forms are available by clicking Insert -> Form and Input Fields. To create a form, place the cursor where you want to position the form and select Insert -> Form and Input Fields -> Form.
After determining a layout scheme for your form elements, you can use the options in Insert -> Form and Input Fields to insert the following fields and controls:
� Submit, Reset, Image, General, and Extended buttons � Radio button � Check box � List box � Drop-Down menu � Group box � Text area � Text field � File Selection field
As you add form elements, the dialog for each object will open so that you can supply format, style, and content details.
Chapter 5. Working with HTML 119

5.1.9 Working with style sheetsStyle sheets can be created when you create the Web project, or they can be added later. It is a good idea to decide on the overall theme (color, fonts, etc.) for your Web application in the beginning and create the style sheet at the start of the development effort. Then as you create the HTML and JSP files, you can select that style sheet to ensure that the look of the Web pages will be consistent. Style sheets are commonly kept in the Web Content/theme folder.
Style sheets can be created when the Web project is created (see 4.3.2, “Creating a Web project” on page 66) or at any time using File -> New -> Other -> Web -> CSS File from the toolbar. To work with a style sheet, you open it as you would any other file. A special editor called the CSS Designer will be used to open the file.
Figure 5-24 shows the default style sheet, called blue.css, that is added to Web projects when they are created. You will find it under the Web Content/theme folder.
Figure 5-24 blue.css
120 IBM WebSphere Application Server - Express V5.0.2 Developer Handbook

Two panes will appear in the editor area. On the right, you see the style sheet source. On the left, you can see a preview of the effect that each style setting has. You can select an actual Web page to apply and display styles created by CSS Designer, or use the sample HTML file, which provides a minimal version of the defined styles. The Styles view at the lower left helps you locate and select the element you want to work with.
Individual styles in a style sheet are typically defined as follows:
selector { property : value; }
Creating a new Cascading Style Sheet (CSS)1. From the Web perspective, select File -> New -> CSS File to launch the
Create a CSS File wizard.
2. Select the appropriate container for the file from the list of project folders (and subfolders). Typically, you should place a CSS file in the theme folder located in the WebContent folder. The folder that you choose should be under the WebContent folder of the Web project. If the new file is not under this folder, then it will not be included in the WAR file that is deployed to the server. In addition, link validation will not encompass files that are not under the WebContent folder.
3. Type a file name into the appropriate field. The .css file type will be appended when the file is created.
4. Click Finish to create and open the file in the editing area.
5. Add entries to the file by right-clicking in the Source pane, selecting Add and then the tag type. A window will open that contains selections for the attributes of the tag.
Creating and linking to a new Cascading Style Sheet (CSS)1. Open the Styles view from the Web perspective.
2. Select New Link from the Select and Link to external style sheet tool bar button to launch the Create and Link to a CSS File wizard.
3. Select or enter the appropriate container for the file from the list of project folders (and subfolders). Typically, you should place a CSS file in the theme folder located in the WebContent folder. The folder that you choose should be under the WebContent folder of the Web project. If a style sheet is not under this folder, then it will not be included in the WAR file that is deployed to the server. In addition, link validation will not encompass files that are not under the WebContent folder.
4. Type a file name into the appropriate field. The .css file type will be appended when the file is created.
Chapter 5. Working with HTML 121

5. Select the Link radio button from Insertion type. You can also select the Import radio button from Insertion type. This type is, however, not supported by all browsers. Therefore, it is recommended that you select the Link radio button unless there is good reason to do otherwise. The name of the selected style sheet file appears in the Styles view, and the settings in the style sheet file are applied to the page being edited.
6. Click Finish to create and open the file in the editing area.
Linking to an existing style sheet fileBy setting a link from your page to an existing style sheet file, you can apply the style in that file to your page.
To set an external style sheet link, do the following:
1. Open the Styles view from the Web perspective by selecting Window -> Show View -> Styles.
2. Open the file that you want to link to a cascading style sheet.
3. Select the Select and Link to external style sheet tool bar button in the Styles view, which opens the Select and Link to External Style Sheet dialog.
4. Click the list button to locate the external style sheet that you want to link to. You have the option of either locating the desired .css file within your project workspace (by selecting the Browse menu option), or importing one of the samples provided with WebSphere Studio, using the Import from Samples menu option.
5. Select the Link radio button from Insertion type, and then click the OK button. You can also select the Import radio button from Insertion type. This type is, however, not supported by all browsers. Therefore, it is recommended that you select the Link radio button unless there is good reason to do otherwise. The name of the selected style sheet file appears in the Styles view, and the settings in the style sheet file are applied to the page being edited.
5.1.10 Working with WebArt DesignerWebArt Designer is a program for creating and editing image files. To edit an image file, simply open it from the Project Navigator view. The file will automatically open in the WebArt Designer. If you want to create a new image, you can open the designer by selecting File -> New -> Web -> Image File. Or you can select WebArt Designer from the Tools drop-down if it is visible.
Tip: If you have embedded styles in the HTML file, the embedded styles override the style specifications in an external style sheet file.
122 IBM WebSphere Application Server - Express V5.0.2 Developer Handbook

The WebArt Designer supports the following image types and file extensions:
� WebArt files (*.mif)� GIF files (*.gif)� JPEG files (*.jpg, *.jpeg, *.jpe)� PNG files (*.png)� Bitmap file (*.bmp)
You can see the WebArt Designer in Figure 5-25.
Figure 5-25 WebArt designer - window 1
When the designer opens, you will see three areas:
� Canvas: the canvas is where you build the graphic.
� Template gallery: the gallery is a collection of predefined buttons, logos, and other graphics image types available for use. At the top, you will see two tabs,
Tip: You can insert an image created with WebArt Designer into a Web page in the same way as a regular image file.
GalleryCanvas
ObjectStack
Chapter 5. Working with HTML 123

the WebArt Gallery tab and the Gallery tab. Under each tab is a list of object types from which you can choose. Selecting a type will display the objects of that type in the lower pane. You can use an object by dragging it to the canvas.
� The object stack area: this indicates the relationships of the objects and allows you to select one or more objects in the canvas.
Building an image involves working with objects. The following are object types used in WebArt Designer:
� Shapes: consisting of lines.
� Logos: designed text.
� Buttons: images that resemble a button.
� Photo frames: photo frame that decorates a photographic image.
� Clip art: Windows metafile read by WebArt Designer. Maintains better quality when its size is changed compared to an “image” object.
� Image: all images other than the preceding four types of objects. Any image file created by software other than WebArt Designer is this type of object.
Basically, you will build an image by adding objects to the canvas and saving the canvas for use in projects. You can also save objects to add to the gallery.
Creating a sample objectLet us walk through an example.
1. Open the WebArt Designer by selecting File -> New -> Web -> Image File.
2. Name the file and select the images folder in your project. Select GIF for the file type and click Finish. The WebArt Designer will open with a blank canvas.
3. Open the Gallery tab and select the Materials for Wallpaper folder under the Gallery list. Select an object and drag it to the canvas. You will see the wallpaper object appear in the object stack area. Drag the corner of the object so that the wallpaper covers most of the canvas.
124 IBM WebSphere Application Server - Express V5.0.2 Developer Handbook

Figure 5-26 Using the WebArt Designer - 1
4. Highlight Buttons in the gallery and select the About Us object. Drag the object to the canvas and place it near the top of the wallpaper.
5. Add text by selecting the text icon to the left of the canvas. Move the cursor to the canvas and type Welcome to our Site. As you add each object, notice that it is also placed in the object stack area. The top object is in front of the other objects. You can change the order by dragging objects to a new position in the object stack area. For example, if you put the wallpaper object at the top, all other objects are hidden.
Chapter 5. Working with HTML 125

Figure 5-27 Using the WebArt Designer - 2
6. Add an oval object and stack it over the text. You will need to rearrange the objects in the object stack area so the text appears over the oval. Right-click in the oval and select Edit Object to change the color.
126 IBM WebSphere Application Server - Express V5.0.2 Developer Handbook

Figure 5-28 Using WebArt Designer - 3
7. If you think you will use this new image again in graphic design, you should save the canvas as a WebArt file (*.mif). Just select File -> Save Canvas as. Or, if you want to save certain objects, you can select the object (or group multiple objects into one) and then save the object with File -> Save Object. For example, if you want to save the oval and text in Figure 5-28, select the oval object and the text object in the object stack area. Then group the selected objects using Object -> Group -> Group. With the new grouped object selected, use the File -> Save Object option to save it.
The objects you save as WebArt files are available to you by browsing to the folder where they are stored in the gallery under the Folder option.
Note: You can select multiple adjacent objects by holding the Shift key while you click the objects at both ends of the list. You can use the Ctrl key instead if the objects are not next to each other in the list.
stack the text above the oval
Chapter 5. Working with HTML 127

Figure 5-29 Grouping objects
You will notice that the new group is represented as one object in the object stack area.
8. The last step is to save the canvas as a GIF file so that you can use it in your application. Select File -> Save Canvas as and enter the folder and image name. You can place the image directly into your project (for example, an images file) by browsing to the project location in the workspace. Or you can save it to a local directory and use drag and drop to add it to your Web page.
This example is very basic. To effectively use the WebArt Designer, you need to open the WebArt Designer help. We suggest you read through the help topics before beginning.
5.1.11 Working with animationAn animated GIF is a series of image files in GIF format, displayed sequentially to give the appearance of an animation. You can insert an animated GIF into a page in the same way as a regular GIF image file. Animated GIFs can be viewed on a regular Web browser without any special plug-ins.
128 IBM WebSphere Application Server - Express V5.0.2 Developer Handbook

The AnimatedGif Designer is a program for creating animated GIF files, and comes with a gallery of predefined animation files. With the AnimatedGif Designer, you can:
� Combine several images to create an animation.� Apply an animation effect on a single image to create an animation.� Apply an animation effect on text to create an animated banner.
FrameAn animation created with AnimatedGif Designer is a collection of frames. A frame is displayed in the frame display window. If you double-click a frame, a dialog for setting frame properties appears.
Frames are categorized into three types: the image frame, the attribute frame, and the comment frame, as shown in Figure 5-30 on page 130.
� Attribute frame: the first frame of an animation. You cannot move this frame from its location or delete it. The attribute frame contains information related to the entire animation, such as the specification of the color palette and the repetition count. To view and change those attributes, double-click the attribute frame. This frame does not appear on the screen when the animation is played on a Web browser.
� Image frame: aframe for a single image in an animation. Image frames are generated when you insert image files or when you add animation effects. To change the properties of an image frame, double-click it.
� Comment frame: the frame used for inserting your comments into the animated GIF file. You can insert, for example, the date when the animation was created or the name of the person who created it. To insert a comment frame, click Edit -> Insert Comments on the menu bar. This frame does not appear on the screen when the animation is played on a Web browser.
Chapter 5. Working with HTML 129

Figure 5-30 Type of frames
Creating a sample animationTo use the AnimatedGif Designer, you should open it and select the help from the toolbar. We will take you through a quick example, but this only highlights one specific usage.
The following explains how to create an animation from a set of images.
1. Open the AnimatedGIF Designer by selecting Tools -> AnimatedGIF Designer. In the first window, select Animation Wizard.
2. Select the Create an animation using more than one image option, and then click the Next button (note the other options here).
Note: If you do not see the Tools drop-down, open an HTML or JSP file in the editor.
130 IBM WebSphere Application Server - Express V5.0.2 Developer Handbook

Figure 5-31 Animation Wizard dialog
3. In the next window of the wizard, click the Add Image button, select an image file, and then click the Open button. Each image you select is added to the list. You can repeat this step as many times as you like until you have added all of the images you want to use.
Figure 5-32 Animation Wizard dialog
Tip: If you click files while holding down the Shift key or the Ctrl key, you can select more than one file at a time. The Shift key allows you to select multiple sequential files. The Ctrl key allows you to select files at random.
Chapter 5. Working with HTML 131

The animation is played starting with the first image in the list. Drag the name of the image file to the position you want, or click the First, Up, Down, and Last buttons to rearrange the images. When you have the images in the correct order, click the Next button.
4. The next window allows you to work with the alignment of the images.
Figure 5-33 Animation Wizard dialog
Click Next.
5. In the next screen, specify the repetition count of the animation and the delay time of each frame.
Figure 5-34 Animation Wizard dialog
132 IBM WebSphere Application Server - Express V5.0.2 Developer Handbook

Click Next.
6. The next screen allows you to preview the animation. If you need to make changes, you can step back through the wizard.
Figure 5-35 Animation Wizard dialog
7. Click the Finish button. The Animation Wizard ends and the frames for the images used in the animation are displayed in the animation window with the title newimagex.
8. Click File -> Save As on the menu bar and specify the location and file name of the animated GIF file to be saved. Then click the Save button.
The animated GIF can be added to a Web page just as you would add any other image file.
Tip: A single animation window corresponds to a single animated GIF file.
Chapter 5. Working with HTML 133

Figure 5-36 WebSphere Studio AnimatedGif Designer
The animation you have created is saved as a single animated GIF file.
134 IBM WebSphere Application Server - Express V5.0.2 Developer Handbook

5.2 Adding HTML pages to the Online Catalog sampleThis example will illustrate how to use the Web Site Designer and page templates to build application pages. A standard template will be used as the basis for the Web pages. The template we chose has a place for a company logo at the top and a navigation bar to the left. In this example, we will update the standard template to hold our company logo, then create two pages for the application. The first page, index.html, is the entry point for the application. The second page, aboutus.html, is a company information page. It will be created as a child page of index.html, automatically creating a link from the navigation bar. This link is reflected in all pages using the page template.
5.2.1 Creating HTML pages using Web Site DesignerWeb Site Designer will be used to create the index.html page and to layout the first child page for the Online Catalog sample. Creating pages using the Web Site Designer is an alternative to the method used in previous releases (New -> HTML/XHTML File or New -> JSP File). That method is still valid and available.
5.2.2 Customizing a page templateIn our sample, we have created a Web project and specified the B-01_blue.htpl page template as a default. Because this is a standard template supplied with Studio, we will need to customize it to include our company logo and name before creating our Web pages. All of the files related to the template are stored in the theme folder under the Web Content directory.
1. Expand the Web Content folder within the OnlineCatalog Web project.
2. Expand the theme folder. Notice the six files in the folder. These are all used to create the template.
– B-01_blue.htpl– blue.css– c.gif– footer.html– logo_blue.gif– nav_side.html
Tip on finding the default welcome page for a Web application: The Web deployment descriptor contains a list of file names that will be used to determine the initial application welcome page. This list is seeded with default file names, including index.html, when you create the Web project. To see the list, open the Web deployment descriptor by double-clicking it in the Project Navigator view. When it opens in the editor area, select the Pages view.
Chapter 5. Working with HTML 135

3. To add our company name to the Web site, the B-01_blue.htpl page needs to be edited. Double-click the B-01_blue.htpl file. The page is opened in the Source view of the Page Designer for Template editor.
Figure 5-37 Page Designer for Template editor
4. Change the page title by highlighting the text between the <title> tags and typing Tom, Dick & Harry’s RVs....
136 IBM WebSphere Application Server - Express V5.0.2 Developer Handbook
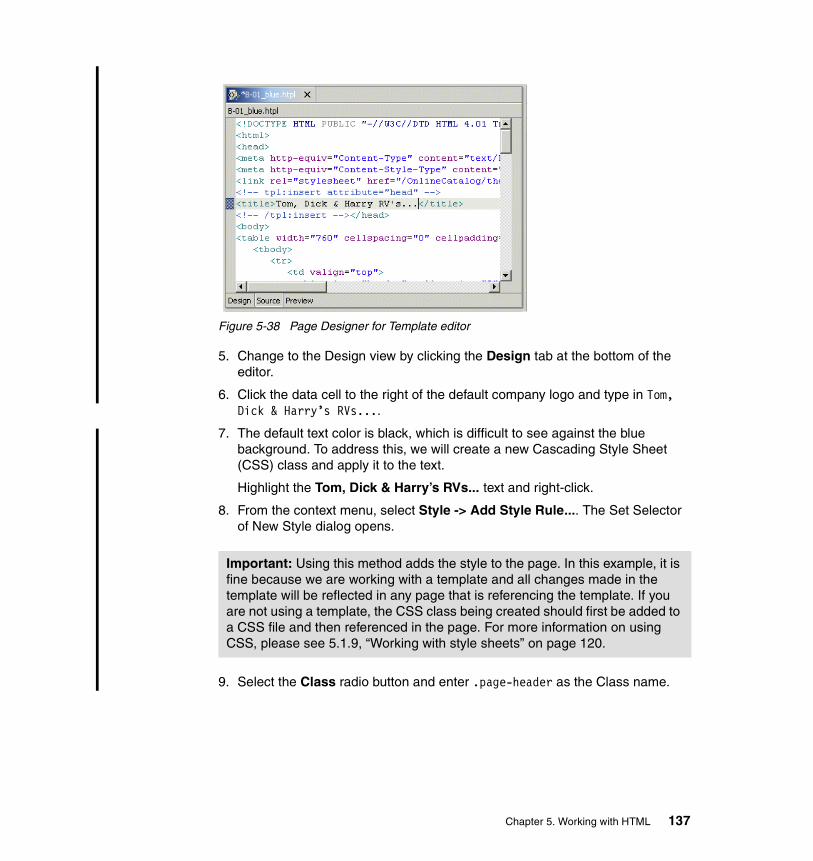
Figure 5-38 Page Designer for Template editor
5. Change to the Design view by clicking the Design tab at the bottom of the editor.
6. Click the data cell to the right of the default company logo and type in Tom, Dick & Harry’s RVs....
7. The default text color is black, which is difficult to see against the blue background. To address this, we will create a new Cascading Style Sheet (CSS) class and apply it to the text.
Highlight the Tom, Dick & Harry’s RVs... text and right-click.
8. From the context menu, select Style -> Add Style Rule.... The Set Selector of New Style dialog opens.
9. Select the Class radio button and enter .page-header as the Class name.
Important: Using this method adds the style to the page. In this example, it is fine because we are working with a template and all changes made in the template will be reflected in any page that is referencing the template. If you are not using a template, the CSS class being created should first be added to a CSS file and then referenced in the page. For more information on using CSS, please see 5.1.9, “Working with style sheets” on page 120.
Chapter 5. Working with HTML 137

Figure 5-39 Set Selector of New Style dialog
10.Click OK. The Add Style dialog opens.
11.Select Fonts from the style element selection window.
12.From the Font family font selection window, scroll down and select the Arial font, then click Add.
13.From the Color drop-down list, select White.
14.In the Size drop-down list, select 18.
138 IBM WebSphere Application Server - Express V5.0.2 Developer Handbook

Figure 5-40 Add Style dialog
15.Select Fonts styles from the style element selection window.
16.From the Weight drop-down list, select Bold.
Chapter 5. Working with HTML 139

Figure 5-41 Add Style dialog
17.Click OK.
18.Now that a new CSS class called .page-header has been created, we can apply it to the text. Highlight Tom, Dick and Harry’s RVs... once again and right-click. From the context menu, select Style -> Apply Class -> page-header. The text will be edited to include the display features that were created.
140 IBM WebSphere Application Server - Express V5.0.2 Developer Handbook

Figure 5-42 Formatted page header text
19.Save the B-01_blue.htpl page by closing the Page Designer for Template Editor and clicking Yes from the Save Resource window.
Figure 5-43 Saving the template
20.The last thing to do before creating the HTML page is to edit the company logo. From the theme folder, double-click the logo_blue.gif file. WebSphere Studio Art Designer is opened and the image is shown in the editor.
Chapter 5. Working with HTML 141
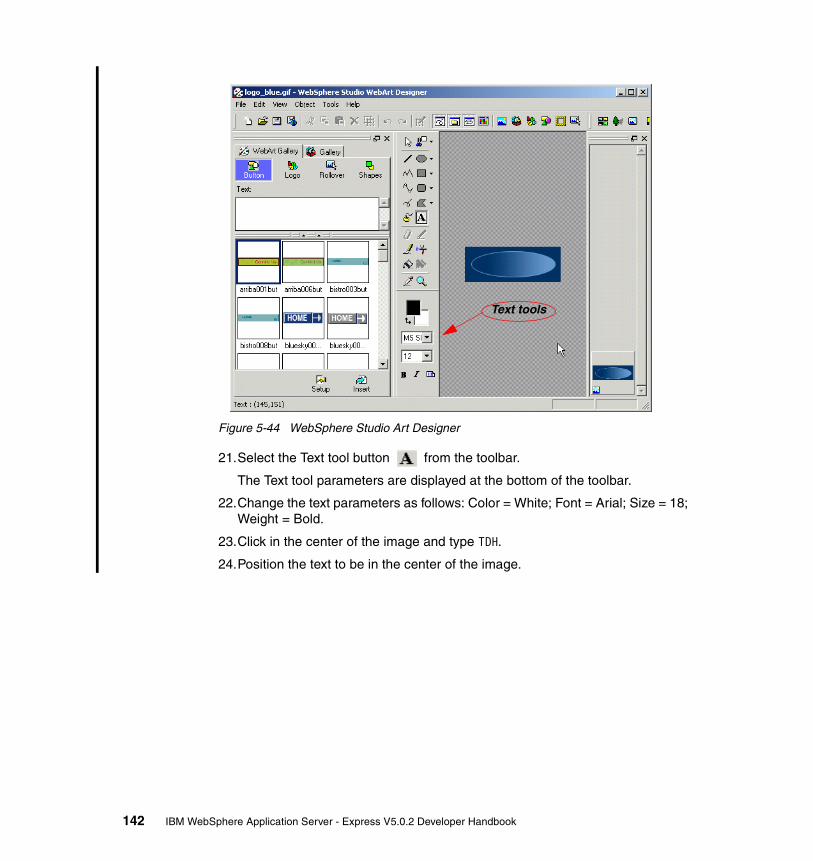
Figure 5-44 WebSphere Studio Art Designer
21.Select the Text tool button from the toolbar.
The Text tool parameters are displayed at the bottom of the toolbar.
22.Change the text parameters as follows: Color = White; Font = Arial; Size = 18; Weight = Bold.
23.Click in the center of the image and type TDH.
24.Position the text to be in the center of the image.
Text tools
142 IBM WebSphere Application Server - Express V5.0.2 Developer Handbook

Figure 5-45 Edited company logo
25.Highlight all the elements of the new image and right-click.
26.From the context menu, select Save Wizard for Web.... The Save Wizard dialog opens.
27.Click Next twice and then click Finish. The Save As dialog opens.
28.Locate the theme folder of the Web project, select the logo_blue.gif file and click Save. The theme folder can be found at:
<workspace>/<Web_app_name>/WebContent/theme
When prompted to replace the previous version, click Yes.
29.Close WebSphere Studio Art Designer.
5.2.3 Creating HTML pagesNow that the template has been updated, we can begin to create our HTML page.
1. Expand the OnlineCatalog Web project and double-click Web Site Configuration.
Chapter 5. Working with HTML 143

Figure 5-46 Opening Web Site Designer
2. The Web Site Designer opens in the editor area with two views: Navigation and Detail. Right-click in the Navigation view and select Add New Page -> As Top.
Figure 5-47 Web Site Designer - Navigation view
A page icon will appear representing a Web application page. The first page created in a new Web site only has the option of becoming the top page, or the top of the navigation hierarchy. The next page that is added can be set in relation to the top page.
144 IBM WebSphere Application Server - Express V5.0.2 Developer Handbook

3. Replace the Navigation Label text newpage with Home.
4. Right-click the Home icon and select Create Page from the context menu.
Figure 5-48 Create a new page
5. You will be prompted to select whether you want to create a new HTML or JSP page. Select HTML and click OK.
6. Make sure that /OnlineCatalog/Web Content is shown as the folder name and enter index for the file name. Verify that HTML and Page Template have been selected for the Markup Language and Model, respectively.
Chapter 5. Working with HTML 145

Figure 5-49 Creating an HTML page
7. Click Next.
8. Verify that the B-01_blue.htpl template has been selected.
146 IBM WebSphere Application Server - Express V5.0.2 Developer Handbook

Figure 5-50 Creating an HTML page
9. Click Finish.
The new file opens in Page Designer.
Chapter 5. Working with HTML 147

Figure 5-51 index.html opened in Page Designer
10.Close Page Designer by clicking the X on the index.html tab and return to the Web Site Designer.
11.Now you have a new Web site with the top page defined. You can continue populating your site by creating page icons in Web Site Designer to map out your site (see Figure 5-52 on page 149). You can use Web Site Designer to plan and layout your whole site's organization, and then create each of the Web page files to fill out the site.
12.To add an additional page icon, right-click in the Navigator view and select Add New Page -> As Child from the context menu. This will add a child page to index.html.
13.Change the Navigation Label text to About Us.
14.Creating the new page is done in the same manner as was done with index.html. Right-click the About Us page icon and select Create Page from the context menu.
15.Select HTML as the file type.
16.Click OK.
17.Name the page aboutus.html and click Next.
148 IBM WebSphere Application Server - Express V5.0.2 Developer Handbook

18.Click Finish.
The new page is opened in Page Designer.
19.Close Page Designer.
20.Save Web Site Designer by pressing Ctrl-S.
Figure 5-52 Web Site Designer - Navigator view
Web Site Designer can be closed by clicking the X on the OnlineCatalog tab.
21.When the Web site is run on the server, the navigation links on the template will dynamically be generated based on the site map created.
Tip: Experienced Web designers may have preferences as to how an HTML page is created. The HTML file preferences allow you to influence many aspects of HTML file content during creation and editing. To set the preferences, select Window -> Preferences -> Web and XML files -> HTML files.
Chapter 5. Working with HTML 149

Figure 5-53 Runtime of index.html
Navigation links
150 IBM WebSphere Application Server - Express V5.0.2 Developer Handbook

Note: By default, every page that is added to the site map will be added as a navigation link. To remove a page from the navigation, right-click it and select Navigation -> Navigation Candidate. Verify that there is no check mark beside the Navigation Candidate option. This will disable the feature for the selected page and the Navigation Label text for that page will not be shown as a navigation link.
The Navigation Root feature is helpful if you wish to set a page in the site as a navigation root. By default, the first page you add to the Web diagram is set as the navigation root and any page added as a child of the navigation root page will have links added to the navigation bar (as long as they are navigation candidates). But what if you wanted to start a different navigation root within your site? Right-click the page in the Web site diagram editor and select Navigation -> Navigation Root from the context menu. This page will no longer contain the child links from the original navigation root page, but rather will have links to any child pages from itself.
The Site Map Candidate feature is also very interesting. If a page in the Web site diagram is enabled as a Site map candidate, the page will show up in the site map if the Site Map item from the Site Parts drawer of the Palette view is used. To enable and disable the site map candidate feature, right-click a page icon in the Web diagram editor and select Site Map -> Site Map Candidate from the context menu. For more information on using a site map, please see “Inserting a site map” on page 106.
Chapter 5. Working with HTML 151

152 IBM WebSphere Application Server - Express V5.0.2 Developer Handbook

Chapter 6. Accessing databases
This chapter provides information on accessing databases and using the information in Web pages. The following topics will be discussed:
� Java Database Connectivity (JDBC) overview� Working with databases in Studio Site Developer
Runtime database access will be discussed in Chapter 13, “Deploying applications” on page 455.
6
Note: This chapter assumes that you have installed a database product. The example assumes that you have installed IBM DB2 on the Studio Site Developer system. Assuming that the development machine, the database server machine, and the application server machine are three separate physical machines, you will need the following:
� Database server: Must have a database product installed
� Development machine (with Studio Site Developer): Must have access to database drivers
� Server machine (with Express Application Server): Must have access to database drivers
© Copyright IBM Corp. 2003 153

6.1 Java Database Connectivity (JDBC) overviewJDBC allows you to make calls to databases from your Java applications or Java applets. JDBC is vendor neutral and provides access to a wide range of relational databases, as well as to other tabular sources of data. It can even be used to get data from flat files or spreadsheets. This portability and versatility are the main attractions of using JDBC for database access in application programs.
Figure 6-1 shows the basic components of a JDBC connection.
Figure 6-1 JDBC overview
The JDBC API sends the SQL commands from the application to the JDBC driver manager, which in turn talks to the vendor-specific driver that actually connects to the database.
6.1.1 Data source versus direct connectionJDBC 2.0 provides two methods of establishing database connections. The first method is done by using the driver manager interface. This is a carry over from JDBC 1.0 and is expensive in terms of performance. Using this method, a connection is created each time you access the database from your program, thereby incurring a substantial processing overhead.
The JDBC 2.0 Standard Extension API introduced an alternative way of handling database connections using data source objects. By using data source objects, you have access to a pool of connections to a data source. Connection pooling gives you the following advantages:
Database
Java Application
JDBC Driver Manager
Vendor-supplied JDBC Driver
JDBC API
JDBC Manager Driver API
154 IBM WebSphere Application Server - Express V5.0.2 Developer Handbook

� It improves performance. Creating connections is expensive; a data source object creates a connection as soon as it is instantiated.
� It simplifies resource allocation. Resources are only allocated from the data source objects, and not at arbitrary places in the code.
� It simplifies connection calls.
Data source objects work as follows:
1. When a servlet or other client wants to use a connection, it looks up a data source object by name from a Java Native Directory Interface (JNDI) server.
2. The data source object then returns a connection to the client.
3. If the data source object has no more connections, it may ask the database manager for more connections (as long as it has not exceeded the maximum number of connections).
4. When the client has finished with the connection, it releases it.
5. The data source object then returns the connection to the available pool.
6.2 Working with databases in Studio Site Developer Studio Site Developer provides a number of features that make it easier to work with relational databases in your projects. These features include:
� The ability to import and use existing database models
� The ability to create your own database objects and generate DDL for the target database
� The ability to generate XML schemas from database models
� An SQL wizard to interactively build and execute SQL queries from an imported database model or via an active connection
� The ability to generate Web pages and supporting Java classes based on existing or new SQL queries
� The ability to access database API from JavaServer Pages using either JavaBeans or JSP tags
Note: Because of the advantages of connection pooling, using data source objects is the preferred method of handling database connections in Web applications. The Express Application Server has full support for connection pooling and for registering data sources via JNDI.
Chapter 6. Accessing databases 155

Using databases in an application involves several steps. From start to finish these steps can be summarized as:
1. Create the database
This is done using the database product, not the Studio Site Developer.
2. Connect Studio Site Developer to the database
This is done to enhance application development. (The server connection to the database for runtime execution is done separately.) Once the connection is made, it will remain for the life of the session. If you restart Studio Site Developer you will need to reconnect to the database in order to use database tools such as the Database Web Pages wizard.
3. Import and work with the database design
Studio Site Developer can look at the database and create design elements (schema, tables, views, etc.) that reflect the structure of the database. You can also use Studio Site Developer to create SQL statements that can be used to add tables, schema, etc.
4. Code JSPs and/or servlets to access the database tables
This can be done manually or using wizards.
5. Connect the runtime environment to the database
The application server needs a JDBC provider definition that points to the driver classes needed to access the database. If a data source connection is used, a data source definition must be defined to the server, naming the database and other access information.
6.2.1 Using the Data perspectiveStudio Site Developer provides a perspective to handle the unique aspects of working with databases called the Data perspective. You use the Data perspective to connect to relational databases for application and database design purposes.
If you are connecting to an existing database, you can import the database design into the project. This makes information about the database available to wizards that assist in building database access code. If you are building an application and have not created a database yet, you can design the database in Studio Site Developer and create the SQL needed by the database product to create the schema and tables needed for the application.
156 IBM WebSphere Application Server - Express V5.0.2 Developer Handbook

Figure 6-2 Data perspective
Here we describe aspects of the Data perspective:
� DB Servers view: Allows you to create database connection definitions, or to connect/disconnect using existing definitions. If a connection is active, the database elements (as they exist in the database) can be seen and imported to a project.
� Data Definition view: Allows you to work with the database elements. For example, you can define new schema or tables. Double-clicking an object in the Data Definition view will open it in the editor for modification. Note that this view shows the database elements as defined to Studio Site Developer. This may not be the same as the elements that actually exist in the database.
� Outline view: Shows a tree structure of the elements in the resource open in the editor.
� DB Output view: Displays information about actions related to stored procedures and user-defined functions.
Chapter 6. Accessing databases 157

6.2.2 Creating the databaseAlthough Studio Site Developer can interact with databases, it cannot create a database for you. To begin, you must use the database product facilities to create the database.
To illustrate the database access features of Studio Site Developer we will take you through the process we used to create and work with the SALESAPP database for our sample application. We recreated the sample using IBM DB2, Oracle, and Microsoft SQL Server.
DB2In DB2 you can use the DB2 Control Center to create a database by selecting Databases -> Create -> Database. Or you can open a DB2 command window and enter:
db2 create db SALESAPP
The user that creates the database will be granted full access. You should consider creating a user ID (on the database server) and giving that user ID the proper access for the application. You can use the DB2 Control Center to do this.
OracleIn Oracle a database name is specified during installation and tablespaces are created afterward to hold data. In this example, we have installed an Oracle instance and are now creating a tablespace named SALESAPP. This can be done either interactively in the Enterprise Manager console, or by doing the following with SQLPLUS:
1. Create a tablespace called SALESAPP. For example:
create tablespace salesapp datafile ‘saleslog’ size 4M reuse autoextend on next 2M maxsize unlimited
2. Create a user and grant the dba option. For example, to add the db2admin user execute the following:
create user db2admin profile default identified by db2admin default tablespace salesapp ;grant dba to db2admin with admin option;
Microsoft SQL ServerIn our sample application database we use a mechanism to generate incremental numbers in columns. In DB2 and Oracle this is achieved by creating a database object of type sequence. In SQL Server this can be achieved by creating a one-column/one-row table that stores order numbers and is manually incremented every time it is used. Unfortunately, since SQL handles this
158 IBM WebSphere Application Server - Express V5.0.2 Developer Handbook

differently than DB2 and Oracle, the Online Catalog sample application pages will not work on a SQL Server database created in the same manner. However, for illustration purposes, here is the command to create a SALESAPP database on a SQL Server.
CREATE DATABASE [salesapp] ON (NAME = N'salesapp_Data', FILENAME = N'C:\Program Files\Microsoft SQL Server\MSSQL\data\salesapp_Data.MDF' , SIZE = 1, FILEGROWTH = 10%) LOG ON (NAME = N'salesapp_Log', FILENAME = N'C:\Program Files\Microsoft SQL Server\MSSQL\data\salesapp_Log.LDF' , SIZE = 1, FILEGROWTH = 10%)
6.2.3 Connecting Studio Site Developer to the databaseNow that we have a database to work with we need to show Studio Site Developer where it is. To do this, we create a connection to the database.
1. Open the Data perspective by selecting Window -> Open Perspective -> Data.
2. Right-click anywhere in the DB Servers view and select New Connection.
Figure 6-3 New connection
Chapter 6. Accessing databases 159

3. This will open the The New Database Connection wizard. For this exercise we used a DB2 database.
We did, however, also test with Oracle and Microsoft SQL Server and will show you the connection for these.
Figure 6-4 Creating a connection to a DB2 database
a. DB2 connection
The values needed in the wizard for connecting to a DB2 database are shown in Figure 6-4.
• The Connection name will be OnlineCatalogConn. This name is only used to identify the connection. It is chosen at random.
• The Database name is SALESAPP. This must be the same value you named your database when you created it using your database software.
• The User ID and Password you enter must have the proper authorization to access the database. In this case, we will use db2admin and db2admin, for the user ID and password.
160 IBM WebSphere Application Server - Express V5.0.2 Developer Handbook

• The Database vendor type drop-down box contains a list of vendor databases that can be used in Studio Site Developer. We chose DB2 Universal Database Express V8.1.
• The database is a local DB2 database, so we select the IBM DB2 APP Driver as the JDBC driver. In this instance, the JDBC driver class to match the selection (COM.ibm.db2.jdbc.app.DB2Driver) is filled in for you.
• Verify that the class location is correct. The drivers are supplied by the database vendor so you will need to have the drivers installed locally, even if you are accessing a remote server.
If you wish to limit the schemas or tables returned use the Filters option. This option is typically used to filter out system tables since they are usually not needed in designing Web applications. It reduces the clutter of tables in the schema. This is not necessary and we did not do this.
b. Oracle connection
Figure 6-5 shows the same connection to an Oracle database. In this case, we chose the Oracle THIN JDBC driver. Oracle 9i is also supported.
Figure 6-5 Connecting to an Oracle database
Chapter 6. Accessing databases 161

Note that the class location points to the Oracle installation libraries.
c. Microsoft SQL Server
The SQL Server location we used was a remote server. We connected to the database using the DataDirect Connect JDBC driver.
Figure 6-6 Setting SQL Server connection
4. Click Finish.
6.2.4 Importing and working with the database designWe now need to import the database design information into our project in order to take advantage of the database tools provided by Studio Site Developer.
Importing the designAssuming you are connected to the database, you can import the design by doing the following:
1. Right-click the new connection in the DB Servers view and select Import to Folder.
162 IBM WebSphere Application Server - Express V5.0.2 Developer Handbook

2. A window will open to allow you to enter or browse to the folder (Web project) where you want the database design imported. Click Browse and select the OnLineCatalog project. Click OK and then Finish.
3. The imported information is stored by the wizard in the Web Content/WEB-INF/databases/SALESAPP directory. If this is the first time you have worked with a database in the project you will be asked if the wizard should create the directory. Click Yes.
In this case, the database has been newly created so the import will just add a folder for the database and a Statements folder underneath. If you had imported a database with existing tables, views, schema, etc., you would see much more.
Creating a schemaWhen you imported the database to the Web project, a directory structure was created under the Web Content/WEB_INF folder to contain the database design information. You can see this in the Data Definition view by expanding the OnlineCatalog Web project folder.
1. Find the Web Content/WEB_INF/databases/SALESAPP directory, right-click, and select New -> New schema definition....
Note: Do you need to reconnect to the database? If you need to re-establish a connection to the database, select the database in the DB Servers view. Right-click and select Reconnect.
Note: If you have installed the sample application and created the database using the DB2 commands included with the additional material, the tables have already been created for you and the following steps do not apply. Just read through them so you will know how we did it.
Chapter 6. Accessing databases 163

Figure 6-7 Create a schema
2. Enter a schema name. For example, a common schema is the user ID of the user that will be accessing the database. For the Online Catalog application we use db2admin.
3. Click Finish.
Creating the database columns and tablesThe sample database will need the following tables to store data:
� Item� Customer� Shipping_Order� Users
We will show you the layout of each table and then show you how to use Studio Site Developer to create the SQL statements needed to create the tables.
164 IBM WebSphere Application Server - Express V5.0.2 Developer Handbook

ITEM tableThe ITEM table contains the inventory items (Table 6-1).
Table 6-1 ITEM table
CUSTOMER tableThe CUSTOMER table contains information about registered customers (Table 6-2).
Table 6-2 CuSTOMER table
Column type Length Nullable Key
ITEM_NUMBER character 5 N Y
ITEM_SHORT_DESC varchar 50 Y N
ITEM_LONG_DESC varchar 150 Y N
QUANTITY integer Y N
PRICE decimal 9,2 Y N
SOTD_FLAG character 1 Y N
Column type Length Nullable Key
CUSTOMER_ID character 10 N Y
CUSTOMER_NAME varchar 40 Y N
ADDRESS varchar 40 Y N
CITY varchar 40 Y N
STATE character 2 Y N
EMAIL_ADDRESS varchar 20 Y N
PHONE character 10 Y N
CC_TYPE character 2 Y N
CC_NUMBER varchar 20 Y N
ZIP character 5 Y N
INTEREST1 character 1 Y N
INTEREST2 character 1 Y N
PASSWORD character 10 N N
Chapter 6. Accessing databases 165

SHIPPING_ORDER tableThe SHIPPING_ORDER table contains orders submitted by customers (Table 6-3).
Table 6-3 SHIPPING_ORDER table
USERS tableThe USERS table contains users with administrative capabilities (Table 6-4).
Table 6-4 USERS table
When you created the schema (db2admin) earlier, a new folder structure for the schema was created under the SALESAPP folder. This structure includes subfolders for database elements (tables, views, etc.). To create the ITEM table in our database schema:
1. Select the WEB-INF/databases/SALESAPP/db2admin/tables folder, right-click, and select New -> New table definition.
2. Enter ITEM for the table name.
Column type Length Nullable Key
ORDER_NUMBER integer N Y
CUSTOMER_ID character 10 N N
ITEM_NUMBER character 5 N N
QUANTITY smallint Y N
SALE_PRICE decimal 9,2 Y N
ORDER_DATE date Y N
STATUS character 1 Y
Column type Length Nullable Key
USERNAME character 8 N Y
PASSWORD character 8 N N
166 IBM WebSphere Application Server - Express V5.0.2 Developer Handbook
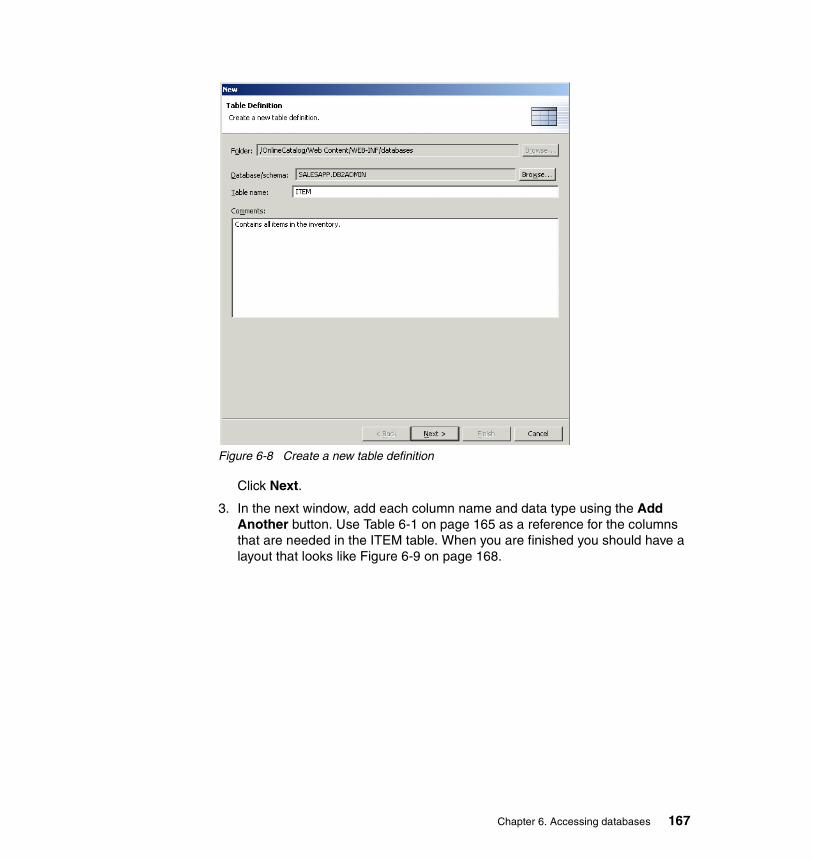
Figure 6-8 Create a new table definition
Click Next.
3. In the next window, add each column name and data type using the Add Another button. Use Table 6-1 on page 165 as a reference for the columns that are needed in the ITEM table. When you are finished you should have a layout that looks like Figure 6-9 on page 168.
Chapter 6. Accessing databases 167

Figure 6-9 Create the table columns
Click Next.
4. Now the wizard prompts for the primary key. In the case of our ITEM table, the ITEM_NUMBER column represents a unique value and so is a candidate for the primary key. All the other columns were nullable and so will not show up as key candidates. When you created the ITEM_NUMBER column you should have selected the Key column field (see Figure 6-9), so the key should already be selected. Change the primary key name to PK_ITEM. The wizard should now look like Figure 6-10 on page 169.
168 IBM WebSphere Application Server - Express V5.0.2 Developer Handbook

Figure 6-10 Specify the primary key
5. Click Next. We do not have any foreign keys so click Finish.
6. Repeat the steps for creating the CUSTOMER, SHIPPING_ORDER, ANDUSERS tables.
Generating DDL statementsAt this point you are probably wondering why Studio Site Developer needs to know about the database design. One good reason is that you can generate DDL statements to use as input to the database server to define the database elements (schema or tables). The alternative would be to create them using the database product, for example, the DB2 Control Center, and then import the design to Studio Site Developer. If you had an existing database with data, then this would be the way to go. But if you are creating the database to support the application, then using Studio Site Developer to create the design would be preferable.
Chapter 6. Accessing databases 169

The next logical step is to create data definition language (DDL) statements for the tables we created. The DDL will contain the necessary SQL to create each table.
1. Right-click the ITEM table in the Data Definition view and select Generate DDL.
Figure 6-11 Generating DDL
2. Enter the name of the folder where you want the generated .sql file to be stored and select options for the generation.
– Generate SQL DDL with fully qualified names: This will include the schema name when referring to tables.
– Generate SQL DDL with delimited identifiers: This option adds enclosing quotes, which are needed by some database vendors.
– Generate associated drop statements: This option helps in dropping existing tables. This option is typically required for incremental database modifications when tables already exist.
– Open SQL DDL file for editing when done: This will open the file at the end of the wizard. You do not need to select this unless you are curious to see the generated SQL. The table.sql file will be placed in the databases folder by default and you can open it at any time for editing or viewing.
170 IBM WebSphere Application Server - Express V5.0.2 Developer Handbook

Figure 6-12 Generate DDL for a database object
3. Click Finish.
4. Find the SQL DDL file you just created, right-click, and select Run on Database Server.
Chapter 6. Accessing databases 171

Figure 6-13 Execute the DDL - step 1
5. Click Next. The next screen will ask you to select the items you want to create. Make sure the statements are selected and click Next.
Figure 6-14 Execute the DDL - step 2
6. Select a commit option.
172 IBM WebSphere Application Server - Express V5.0.2 Developer Handbook

Figure 6-15 Execute the DDL - step 3
7. Click Next. Select the box to use an existing connection and select the connection to the SALESAPP database. For example, our connection was called OnlineCatalogConn (see Figure 6-4 on page 160).
8. Click Finish to create the table in the database.
9. Follow the same procedure to generate and execute the DDL for the rest of the tables.
6.2.5 DB output viewIn the Data perspective, the DB Output view displays information about actions related to stored procedures and user-defined functions. For example, when you run a stored procedure on the database server, the DB Output view displays messages, parameters, and the results of any SQL statements that are executed by the stored procedure. In addition to output from explicit stored procedures and user-defined functions, the DB Output view displays results from sample contents of a selected table.
The DB Output view includes an actions list on the left side of the view and several tabbed pages on the right side. The pages on the right side display information that is related to the action that is selected in the actions list:
� A Messages page displays messages, including the progress of actions
� A Parameters page displays the parameters involved with a certain routine
� A Results page displays the results of SQL statements that are executed by a routine
The left side of the DB Output view contains the following fields:
� Status, which indicates the current state of the statement.
� Action, which indicates what kind of action occurred.
� Object Name, which contains the name of the statement.
Chapter 6. Accessing databases 173

To access the DB Output view:
1. Click Window > Open Perspective > Other to open the Select Perspective window.
2. Select Data and then click OK to open the Data perspective.
3. Click the DB Output tab on the Tasks view to display the DB Output view.
Figure 6-16 DB output view
To view the sample contents of a table, navigate to a table definition in the DB servers view, right-click the table definition and select Sample contents from the context menu. The table contents will be displayed in the DB output view as shown above.
6.2.6 Creating Web pages to access the databaseThe Database Web Pages wizard provides an easy way to quickly create a simple HTML form to solicit user input and JSP pages that show the database access results. This set of pages can then be modified or customized later. This saves a lot of initial repetitive work. In this section we will use the wizard to create Web pages that search the database for a record based on user input.
There are two approaches to using this wizard.
� You can create the pages and assume that you will use them as the basis for the real pages in the application. This implies that you will probably rename the pages created to a naming convention that suits your project, and that you will update the generated code to customize the look and feel for your application or to add additional functions.
� Or you can create the pages in an out-of-the-way location, for example, a folder that is not in the Web Content directory structure. You can open these pages and copy/paste relevant code into pages that you create for the application. By placing the wizard-generated pages somewhere other than the Web Content directory, you can prevent them from being deployed to the
174 IBM WebSphere Application Server - Express V5.0.2 Developer Handbook

server. One consideration to this is that the generated JSPs will be registered as servlets in the Web application deployment descriptor. The servlet page will contain initialization parameters important for connecting to the database. You should remove them and add the pages you create instead.
In this example, we are assuming that we will use the pages as generated and will place them in a folder called Wishlist under Web Content.
1. Switch to the Web perspective.
2. In the Project Navigator view, find and highlight the location where you want to create the pages. This can be directly in the Web Content directory, or in an application-specific directory. In our example, we select the Web Content/wishlist folder under the OnlineCatalog project (note that this folder must already exist).
3. Right-click, and select New -> Other -> Web -> Database Web Pages.
4. Click Next to start the Database Web Pages wizard.
Figure 6-17 Database Web Pages wizard: Panel 1
Chapter 6. Accessing databases 175

Java package: During the wizard you will have a chance to create a front controller for the Web pages. The front controller is a servlet and therefore will be compiled into a class. The Java package determines where the class is stored. If you leave this blank, default package is used.
SQL Statement Type: The SQL statement type determines the type of SQL statements that will be created.
The choices are:
– Select statement– Update statement– Insert statement– Delete statement
In this case since we are querying the database, we choose Select statement.
Model: The model options determine the type of pages that will be created. The options you can choose from depend on the SQL statement type you selected. You can see a description of the option you have selected in the Description area below the model field.
Since we have specified Select Statement as our SQL statement type, we have the following model options:
– IBM Database Access Tag Lib - Select Statement
Using this choice, a select is done against the database for information, which is then displayed in table format to the user. There is no need to allow the user to select an item for further details. Database access is handled using the JSPSQL tag library.
– IBM Database Access Tag Lib - Master Details Pattern
This is similar to the previous pattern, except the database information is displayed in two-tiers. The first database select retrieves high-level information and displays the records in a table format. The user can then select an entry to get further details. This pattern also accesses the database using the JSPSQL tag library.
– IBM Database Access JavaBeans - Master Details Pattern
This is similar to the tag library master details pattern with the exception that it uses JavaBeans instead of tag libraries to access the database. While the tag library patterns fit more into the Model 1 category of design, the JavaBeans pattern is more of a Model 2 type of design. This gives the flexibility of manipulating the data before it is displayed in the JSP.
In our example we select IBM Database Access Tag Lib - Master Details Pattern.
176 IBM WebSphere Application Server - Express V5.0.2 Developer Handbook

Files: The files box shows the pages that will be created based on the options you have selected. This in an informational box only. You can see from our selections that the wizard is going to create four pages: An input form allowing the user to enter search criteria, a JSP page to display the database entries that match the criteria, and a JSP page to display the details of a selected entry. Optionally, a front controller will be created.
5. Click Next.
6. If you have previously saved SQL statements, you will be given the option of selecting a saved SQL file for use in the wizard. Since this is the first time through and we do not have any saved statements we are taken directly to the panel shown in Figure 6-18. This page allows you to specify the database you want to use and the method of creating the SQL statement.
Figure 6-18 Choose the database and SQL create method
Chapter 6. Accessing databases 177

First select the Save SQL Statement option and enter a descriptive name for the saved statement. This way you can reuse the SQL statement you create if you need to do this again.
Your options to create the SQL statement are:
– Be guided through creating an SQL statement– Manually type an SQL statement
In our example we will let the wizard guide us through the process of creating the SQL statement. For short statements or for those that you have stored in a file, you could choose to type in the statement (copy/paste will work).
Finally, you can select a database model to work with. The options are:
– Use existing database model. This implies that you have connected to the database and imported the design to your Web project (as we have in this example).
– Connect to a database and import a new database model. This allows you to go through the connect and import process now.
In our example, we will select the SALESAPP database that we imported to our project by browsing to the correct folder in the Web project.
Note: You can use this same process to build an SQL statement without going through the Database Web Pages wizard. Just select the database folder, right-click, and select New -> Other -> Data -> SQL Statement.
178 IBM WebSphere Application Server - Express V5.0.2 Developer Handbook

Figure 6-19 Find the imported database
Click OK.
7. Click Next to begin creating the SQL statement.
8. Select the Table tab. Select the ITEM table in the Available Tables column. Click > to move it to the Selected Tables column.
Chapter 6. Accessing databases 179

Figure 6-20 Select the tables
9. Move to the Columns tab to choose the columns you want included in the select. You can include each column by selecting it in the Available Columns panel and clicking > to move it to the Selected Columns window. In this case, since we want all the columns, we move them all at once using the >> button.
180 IBM WebSphere Application Server - Express V5.0.2 Developer Handbook

Figure 6-21 Select the columns
10.We will skip the Join tab since all of our information is coming from just one table.
11.Click the Conditions tab. The way we envision our search is that we will look for a match or partial match in the long description (ITEM_LONG_DESC column) based on criteria provided by the user.
Chapter 6. Accessing databases 181

Figure 6-22 Database select condition
The conditions for the search are built by selecting the appropriate values in each condition column:
– Column: Click in the first field under Column and select ITEM_LONG_DESC in the drop-down list.
– Operator: Select LIKE.
– Value: Values are expressions that are used to define the query. They can be as simple as a constant or something more complex. You can type in a value directly or you can use the Expression Builder wizard to build it.
In this case we are going to use the Expression Builder wizard to create a variable (signified with a colon (:) at the beginning) to hold the search criteria. The variable will be represented by an input field on an HTML form and will be filled in by user input.
Select Build Expression. As you go through the wizard you will be asked for the expression type and name. In this sample we want to define a variable called item_desc.
182 IBM WebSphere Application Server - Express V5.0.2 Developer Handbook

The values we enter during the wizard are:
• Type of expression: Constant• Type of constant expression: String constant• String constant type: Host variable name• Variable name: item_desc
At the end of the wizard, click Finish and you will be returned to the Conditions tab to complete the selection conditions.
– And/Or: Leave this blank since there is only one condition for the search.
12.Click the Order tab. We want to list the items in order by using the price. Select Price and move it to the Selected Columns window. Ascending order will be the default but you can change this by clicking under the Sort Order column and selecting DESC (descending).
Figure 6-23 Order the columns
13.Click Next. The SQL Statement page now displays the generated SQL statement and gives you a chance to modify it.
Chapter 6. Accessing databases 183

Figure 6-24 The generated SQL statement
14.Click Parse to make sure the statement is syntactically correct.
4. Click Next. On the Runtime connection page we determine the type of database connection code to generate. We have two choices. Using a data
Note: Testing the SQL: In our sample, we have not populated the database with data, but if you are using a database that contains data you could test your SQL statement by doing the following:
1. Click Execute. A new panel will appear.
2. Click Execute on this panel.
3. A window will pop up asking for a value for the host variable; for example, our search would require the user to enter a description to search on. We would enter something like ‘%Fleetwood%’ (including the single quotes). The case of the argument must match the case found in the database. The % signs allow you to search for any character String containing Fleetwood. The long description for each item would be searched for that character String and the results returned.
In “Update the search argument” on page 193, we will show you how to modify the code generated by the wizard so that the user does not have to enter the % marks or be concerned about case to get a match.
184 IBM WebSphere Application Server - Express V5.0.2 Developer Handbook

source connection has the advantage of connection pooling, so select Use data source connection. Enter the data source name, user ID, and password to use. The data source entry refers to the data source definition on the application server. This entry is created later in “Defining a data source connection to the server” on page 200. Specifically, this value matches the value for the JNDI name in Figure 6-40 on page 206.
Figure 6-25 Using a data source connection
5. Click Next. In the controller page you can make decisions that determine how the flow of control is handled.
Chapter 6. Accessing databases 185

Figure 6-26 Defining the controller page
Following is a brief explanation of each option available.
– Style sheets: This is used to select one or more style sheets to be used in the generated Web pages. Each CSS file listed will be used.
– Use error page: This option allows you to specify a page that the user is forwarded to when an error is encountered while executing one of the generated resources
– Store results in request or session: Storing the results in a session will allow the data to be used in multiple pages for the duration of the session.
Storing the results in a request will allow access to the data only for the duration of the request. The result set is destroyed after the request is processed, freeing up memory on the server.
– Front controller: A front controller is a servlet that serves as the single entry point for all requests to a Web application region. Logically, it is positioned between the browser and the presentation layer, providing a single point to perform all authentication, logging, debugging, and so forth.
186 IBM WebSphere Application Server - Express V5.0.2 Developer Handbook

The controller is responsible for dispatching presentation pages based on request parameters and application state data.
You can choose to automatically create a new controller, reuse an existing controller, or not use a controller at all. If you choose to not use a controller, that functional layer of processing is not performed and the JSP is called directly from the HTML page. In this example, we opt to not use the front controller.
6. Click Next. The following series of pages lets you design the pages. This function is limited but gives you a starting point for future modifications. These changes override CSS Style settings and the new settings are placed in style tags in the corresponding pages. The first page shows you the input HTML page.
– Host variables: Make sure the ITEM_LONG_DESC variable is selected. This is represented by the input field you see on the page. If you deselect this variable, the input field (and label) will be removed from the page on the right.
– Page tab: In the lower left corner of the window you will see two tabs. Clicking the items on the Page tab allows you to change the background, title, and field colors.
Change the page title from the default, Input Form to something more meaningful, like Search Catalog.
– Fields tab: The fields tab lets you change the attributes of the variable selected in the Host Variables view.
Change the label (the text shown to the left of the variable in the page) to Search For.
Chapter 6. Accessing databases 187

Figure 6-27 Design the input form
7. Click Next.
This page lets you make minor changes to the first results page. This page will display a list of all the entries that result from the search in a table format. You can change column titles for the table, change the page title, colors used, and you can select the columns to display.
Because we selected the master detail pattern earlier, the pages are built so that the user can select an item in the table to see the complete details. This means that you can be more selective in what you display on the initial results page.
a. In our example, we are only going to display the item number, price, and the short description. Start modifying this page by de-selecting the other columns.
b. Select the Item_Number column in the Result set columns window, and then select the Fields tab below. Change the value of the Label property to Item. This will change the heading for that column in the output table.
188 IBM WebSphere Application Server - Express V5.0.2 Developer Handbook

The key value is the link between master and detail views. The details page selects data from the database based on the key value passed to it. In this case we want to retrieve the details of the record based on the item number, so we change the key value to true.
Change the column width to 5 to make sure the entire item number can be displayed.
c. Repeat this for each selected column using the following values given in Table 6-5.
d. Change the title of the page to Search Results using the Page tab.
Table 6-5 Master view page fields
Column Label Column width Key value
ITEM_NUMBER Item 5 true
ITEM_SHORT_DESC Description 15 false
ITEM_PRICE Price 12 false
Chapter 6. Accessing databases 189

Figure 6-28 Design the master view page
8. Click Next. The next step is to design the details page. This page is used to display the details of an item selected from the first results page.
a. The process is the same as with the previous pages. Deselect the SOTD_FLAG column. For the other columns change the Field properties to useful values. In our sample we used the information given in Table 6-6.
Table 6-6 Details view page fields
Column Label Size Max length
ITEM_NUMBER Item 5 10
ITEM_SHORT_DESC Description 15 20
ITEM_LONG_DESC More Info 20 40
QUANTITY Quantity 20 40
PRICE Price 20 40
190 IBM WebSphere Application Server - Express V5.0.2 Developer Handbook

Figure 6-29 Final details page
b. Click the Page tab and change the value of the page title to Item Details.
9. Click Next. In the Specify Prefix window, change the prefix to SearchItem. The prefix is used to build the page names.
Chapter 6. Accessing databases 191

Figure 6-30 Renaming the Web pages
10.Click Finish. Click Yes if asked to overwrite any files.
At this point the following items are generated:
� HTML input form: This form is used to input the search criteria. It then calls the Master view.
� MasterView JSP: This JSP gets the search criteria from the input form and executes the SQL statement using the JSPSQL tag library and connection information we provided. The SQL statement used is the one we created using the wizard. This form provides a link to the DetailsView JSP.
� DetailsView JSP: This JSP gets the search criteria from the MasterView JSP and executes an SQL statement to retrieve the details of the selected database record. This JSP is generated as a result of selecting a master details pattern (see Figure 6-17 on page 175).
192 IBM WebSphere Application Server - Express V5.0.2 Developer Handbook

The form and the JSPs are now ready to be run on a server, but before you do that you will need to do one more thing. You will need to give the server the information it needs to connect to the database.
Update the search argumentOne thing we want to do is to update the condition on the SQL statement in SearchItemMasterView.jsp to make sure that if the search argument appears in the item’s long description that we get a match. Currently, we use the “Like” argument. As coded, we will only get a match if the user input matches the long description exactly.
The current code looks like:
<%--Execute the query--%><dab:select id="select_master" scope="request" connectionSpecRef="<%=dsSpec%>"> <dab:sql> SELECT DB2ADMIN.ITEM.ITEM_NUMBER, DB2ADMIN.ITEM.ITEM_SHORT_DESC, DB2ADMIN.ITEM.ITEM_LONG_DESC, DB2ADMIN.ITEM.QUANTITY, DB2ADMIN.ITEM.PRICE, DB2ADMIN.ITEM.SOTD_FLAG FROM DB2ADMIN.ITEM WHERE DB2ADMIN.ITEM.ITEM_LONG_DESC LIKE :item_desc ORDER BY PRICE ASC </dab:sql> <dab:parameter position="1" type="CHAR" value=”<%=inputITEM_LONG_DESC%>”/></dab:select>
Update the code as marked below in bold print.
<%--Execute the query--%><dab:select id="select_master" scope="request" connectionSpecRef="<%=dsSpec%>"> <dab:sql> SELECT DB2ADMIN.ITEM.ITEM_NUMBER, DB2ADMIN.ITEM.ITEM_SHORT_DESC, DB2ADMIN.ITEM.ITEM_LONG_DESC, DB2ADMIN.ITEM.QUANTITY, DB2ADMIN.ITEM.PRICE, DB2ADMIN.ITEM.SOTD_FLAG FROM DB2ADMIN.ITEM WHERE UPPER (DB2ADMIN.ITEM.ITEM_LONG_DESC ) LIKE :item_desc ORDER BY
Chapter 6. Accessing databases 193

PRICE ASC </dab:sql> <dab:parameter position="1" type="CHAR" value='<%="%"+inputITEM_LONG_DESC.toUpperCase()+"%"%>'/></dab:select>
This does two things. It sets the case for both the input and the database values to upper case so they are the same, and it adds a % character to the beginning and end of the input parameter. This changes the input from a specific character string to a pattern allowing any characters before and after the string to be ignored during the match.
6.2.7 Database connectionsLet us take a look at the code generated by the wizard that implements the connection to the database. During the wizard you had a choice of using a data source connection or driver manager connection. We recommend that you use data source, but we will take a look at both.
Data source connectionFigure 6-1 shows the code generated for the master view page.
Example 6-1 Data source connection code
<%-- Connect to the database --%><%! com.ibm.db.beans.DBConnectionSpec dsSpec = null; %><%if (dsSpec == null) {%><dab:dataSourceSpec id="SearchItemConnection" scope="page" userid='<%=config.getInitParameter("username")%>' password='<%=config.getInitParameter("password")%>' dataSource='<%=config.getInitParameter("dataSourceName")%>'/><% dsSpec = SearchItemConnection; }%>
<%--Execute the query--%><dab:select id="select_master" scope="request" connectionSpecRef="<%=dsSpec%>"> <dab:sql>
194 IBM WebSphere Application Server - Express V5.0.2 Developer Handbook

SELECT DB2ADMIN.ITEM.ITEM_NUMBER, DB2ADMIN.ITEM.ITEM_SHORT_DESC, DB2ADMIN.ITEM.ITEM_LONG_DESC, DB2ADMIN.ITEM.QUANTITY, DB2ADMIN.ITEM.PRICE, DB2ADMIN.ITEM.SOTD_FLAG FROM DB2ADMIN.ITEM WHERE DB2ADMIN.ITEM.ITEM_LONG_DESC LIKE :item_desc ORDER BY PRICE ASC </dab:sql> <dab:parameter position="1" type="CHAR" value="<%=inputITEM_LONG_DESC%>"/></dab:select>
The JSPSQL tag library (dab:) is used to connect to and access the database. Tag libraries are discussed later in Chapter 9, “Using tag libraries” on page 275. You do not need to understand tag libraries yet to learn the concepts in this section.
The thing to notice here is that the connection code uses three initialization parameters (user name, password, and dataSourceName) stored in the servlet entry in the Web deployment descriptor to make the connection. When the Database Web Pages wizard created the JSPs, it registered them as servlets in the Web deployment descriptor and created these initialization parameters to define the database connection parameters.
Figure 6-31 Servlet initialization parameters
Chapter 6. Accessing databases 195
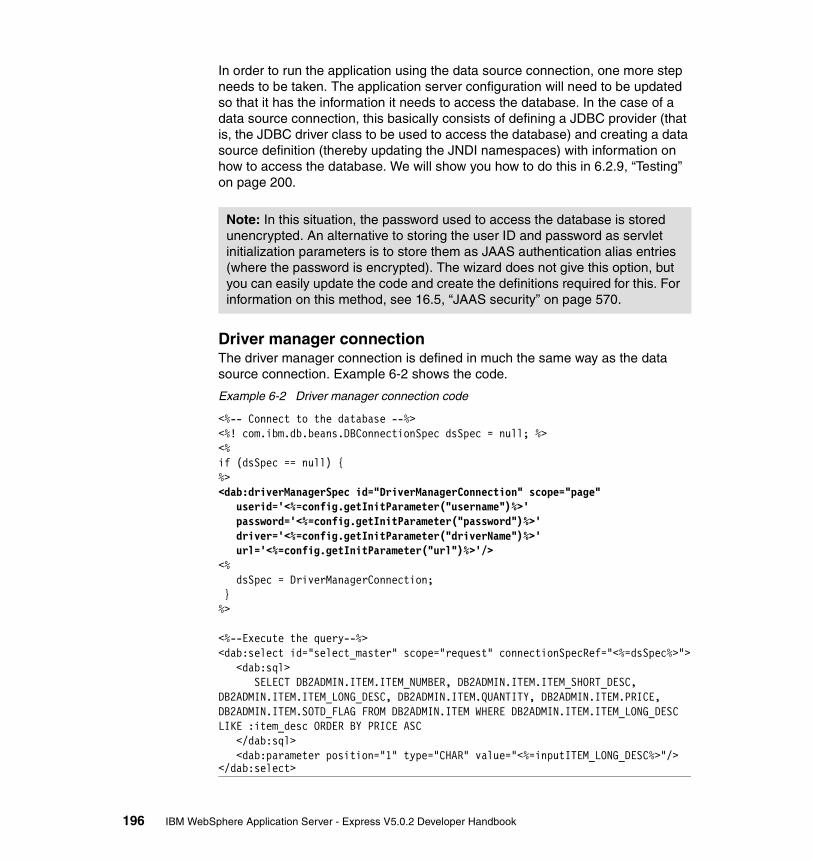
In order to run the application using the data source connection, one more step needs to be taken. The application server configuration will need to be updated so that it has the information it needs to access the database. In the case of a data source connection, this basically consists of defining a JDBC provider (that is, the JDBC driver class to be used to access the database) and creating a data source definition (thereby updating the JNDI namespaces) with information on how to access the database. We will show you how to do this in 6.2.9, “Testing” on page 200.
Driver manager connectionThe driver manager connection is defined in much the same way as the data source connection. Example 6-2 shows the code.
Example 6-2 Driver manager connection code
<%-- Connect to the database --%><%! com.ibm.db.beans.DBConnectionSpec dsSpec = null; %><%if (dsSpec == null) {%><dab:driverManagerSpec id="DriverManagerConnection" scope="page" userid='<%=config.getInitParameter("username")%>' password='<%=config.getInitParameter("password")%>' driver='<%=config.getInitParameter("driverName")%>' url='<%=config.getInitParameter("url")%>'/><% dsSpec = DriverManagerConnection; }%>
<%--Execute the query--%><dab:select id="select_master" scope="request" connectionSpecRef="<%=dsSpec%>"> <dab:sql> SELECT DB2ADMIN.ITEM.ITEM_NUMBER, DB2ADMIN.ITEM.ITEM_SHORT_DESC, DB2ADMIN.ITEM.ITEM_LONG_DESC, DB2ADMIN.ITEM.QUANTITY, DB2ADMIN.ITEM.PRICE, DB2ADMIN.ITEM.SOTD_FLAG FROM DB2ADMIN.ITEM WHERE DB2ADMIN.ITEM.ITEM_LONG_DESC LIKE :item_desc ORDER BY PRICE ASC </dab:sql> <dab:parameter position="1" type="CHAR" value="<%=inputITEM_LONG_DESC%>"/></dab:select>
Note: In this situation, the password used to access the database is stored unencrypted. An alternative to storing the user ID and password as servlet initialization parameters is to store them as JAAS authentication alias entries (where the password is encrypted). The wizard does not give this option, but you can easily update the code and create the definitions required for this. For information on this method, see 16.5, “JAAS security” on page 570.
196 IBM WebSphere Application Server - Express V5.0.2 Developer Handbook

This connection also uses servlet initialization parameters, though they are slightly different from the data source connection. Figure 6-32 shows the servlet initialization parameters for a driver manager connection.
Figure 6-32 Servlet initialization parameters
6.2.8 Defining a resource reference for the data source (optional)Resource references can be defined for many types of objects. In WebSphere Application Server - Express, this will most likely be a data source. The resource reference defines things such as:
Note: The servlet initialization parameters used for a driver manager connection include the JDBC driver class name. You will need to make sure that the server has access to this driver at runtime by adding the JAR file containing the driver to the server class path. This is done in the server configuration (Paths tab). Use the Add External JARS option. Drivers (other than Cloudscape) are provided by the database product. Server configuration is covered in 13.6, “Working with server configurations” on page 483.
Chapter 6. Accessing databases 197

� How credentials are passed to the data source (resource authorization)� Transaction isolation level� Shareability of connections
If you don’t create a resource reference, defaults will be used. In WebSphere Application Server - Express, the defaults are usually sufficient, making this step optional.
To create a resource reference for a data source:
1. Open the Web deployment descriptor (web.xml) and select the References tab.
2. Select Resource at the top of the page.
3. Click Add at the bottom of the Resource References window.
4. When the NewResourceRef entry appears, type over it with an administrative name for the resource reference. In this case, we will use the name of the data source, jdbc/SALESAPP.
5. Click Browse beside the Type in the Details window and type datasource in the Choose a type box. At the bottom select the javax.sql entry. Click OK.
Figure 6-33 Type Selection panel
6. In the Details window, select Application for the authentication type and Shareable for the sharing type.
198 IBM WebSphere Application Server - Express V5.0.2 Developer Handbook

7. Enter the JNDI name in the WebSphere Bindings section. This must match the JNDI name used by the application.
8. Leave the rest as they default and save the configuration.
Figure 6-34 Resource reference for JDBC binding
The source will look like Figure 6-3.
Example 6-3 web.xml resource reference definition
<resource-ref><res-ref-name>jdbc/SALESAPP</res-ref-name><res-type>javax.sql.DataSource</res-type><res-auth>Application</res-auth><res-sharing-scope>Shareable</res-sharing-scope>
</resource-ref>
When the application is installed into a production server using the administrative console, the administrator will map the resource reference to an existing data source definition. In the Express test environment, a data source definition must exist in the server configuration with the same JNDI name.
Chapter 6. Accessing databases 199

6.2.9 TestingWe have not looked at deploying applications yet, but we will take you through the steps necessary to test the pages you just created in the Studio Site Developer test environment. This process assumes that you have not created any servers.
For more explanation on creating servers and deploying applications see Chapter 13, “Deploying applications” on page 455.
1. Use the instructions in 13.4.1, “Creating a server and server configuration” on page 466 to create an Express Application Server test environment.
2. Use the instructions in “Defining a data source connection to the server” on page 200 to define the data source to the test server.
3. Use the instructions in 13.4.2, “Publishing an application to the test environment” on page 468 to add the enterprise application to the server. In this example, we have been building the Online Catalog application. It is a part of the OnlineCatalogEar enterprise application.
4. Use the instructions in 13.4.4, “Starting the test environment server” on page 471 to start the test server.
5. Use the instructions in 13.4.5, “Running the application” on page 472 to test the Web pages. In this case, you will select SearchItemInputForm.html.
Defining a data source connection to the serverWhen you use a data source connection to a database, the data source information must be defined to the server. In this case, we need to define the data source for the SALESAPP database.
1. Open the Server Configuration view in the Web perspective.
2. Double-click the test server to open the configuration. Switch to the Data source tab.
3. The first step is to add a JDBC provider to the configuration. This tells the server which JDBC driver class to use to access the database. Open the Server settings section and take a look at what is already defined under the Server settings section. The Cloudscape driver and data source information is predefined to support the sample applications shipped with WebSphere Application Server - Express.
Note: This step is not necessary if you are using the driver manager connection.
200 IBM WebSphere Application Server - Express V5.0.2 Developer Handbook

Figure 6-35 Data sources tab
4. Click Add beside the JDBC provider list (the top box).
5. Select IBM DB2 in upper window and DB2 JDBC Provider in lower window.
Note: Since this is a single-server environment (one node and one server), you can put all your JDBC provider and data source definitions in the Server settings.
Chapter 6. Accessing databases 201

Figure 6-36 Select database and driver
6. Click Next and enter the information shown in Figure 6-37 on page 203. The name and description can be anything. The implementation class name and class path you see are the default for the DB2 JDBC provider. The driver specified in the class name must be available in the class path specified. Note that in this case, the class path uses a variable. You will see how to ensure that this variable is set correctly a little later.
Note that we left the Native path entry empty. This is only required if the JBDC provider chosen uses non-Java (native) libraries.
202 IBM WebSphere Application Server - Express V5.0.2 Developer Handbook

Figure 6-37 JDBC Driver information
7. Click Finish. The Data sources configuration page now looks like that shown in Figure 6-38 on page 204. Note that the entries in the lower boxes have disappeared. This is because they are not relevant to the selected JDBC driver. Since we just added the DB2 driver, it is selected and there are no data source or resource properties defined for it yet.
Important: By default, the db2java.zip file does not support the JDBC 2.0 specification. You need to open the sqllib\java12 folder and execute usejdbc2.bat to copy the correct drivers to the zip file.
Chapter 6. Accessing databases 203

Figure 6-38 Finished JDBC
8. With the IBM DB2 driver selected in the JDBC provider list, click the Add button next to the data source section.
9. Select DB2 JDBC Provider and Version 5.0 data source.
204 IBM WebSphere Application Server - Express V5.0.2 Developer Handbook

Figure 6-39 Creating a data source
Click Next.
10.Enter the information shown in Figure 6-40 on page 206.
Note: If this is a J2EE 1.2 Web project, you must select Version 4.0 data source. If this is a J2EE 1.3 Web project, you must select Version 5.0 data source.
Chapter 6. Accessing databases 205

Figure 6-40 Data source information
The JNDI name must match the name that you use in the application code. If you used the Database Web Pages wizard to create the application pages, this name is specified during the wizard (see Figure 6-25 on page 185) and is stored as the dataSourceName initialization parameter for the servlet in the Web deployment descriptor.
206 IBM WebSphere Application Server - Express V5.0.2 Developer Handbook

The option at the bottom to use the data source in container-managed persistence (CMP) is not relevant for WebSphere Application Server - Express since it does not support an EJB environment. Selecting this has no effect.
11.Click Next. In the next window select the databaseName property. In the value field, enter SALESAPP.
Note: The JNDI name is case sensitive, so make sure you match what is specified in the code. If you have a connection problem, the messages on the server console will give you enough information to correct the problem.
Note: In 6.2.7, “Database connections” on page 194, you saw that the Database Web Pages wizard generated connection code that specified a user ID and password retrieved from the servlet initiation parameters to authenticate to the database.
An alternative to this is to define the database connection user ID and password in a JAAS authentication entry in the server configuration (under the Security tab) and then specify this entry in the Component-managed authentication alias field in the data source. See 16.5, “JAAS security” on page 570, for an example.
Chapter 6. Accessing databases 207

Figure 6-41 JDBC connection parameters
12.Click Finish.
The Data sources page should now look like Figure 6-42 on page 209.
208 IBM WebSphere Application Server - Express V5.0.2 Developer Handbook

Figure 6-42 Data sources page after configuration
13.You used a variable to define the path to the JDBC driver (see Figure 6-37 on page 203), so you need to switch over to the Variables tab and define the variable. The variable, DB2_JDBC_DRIVER_PATH, is predefined in the node settings for you, but the value is empty.
Chapter 6. Accessing databases 209

Figure 6-43 Server variables page
14.Find the variable in the list and click Edit.
15.Enter the location of the DB2 driver. In this case, this is relative to the Studio Site Developer system because we are using the test environment. If we were working with a remote server, this would need to be the path the server uses to locate the driver.
Figure 6-44 Setting the variable value
16.Click OK to close the window.
17.Close the configuration.
210 IBM WebSphere Application Server - Express V5.0.2 Developer Handbook

18.Start (or restart) the server.
Oracle usersThe process for Oracle is similar to DB2. For example, to create a data source using the Oracle thin driver:
1. Create a JDBC driver:
a. Database type = Oracleb. JDBC Provider = Oracle Thinc. Implementation class name =
oracle.jdbc.pool.OracleConnectionPoolDataSourced. Class path = ${ORACLE_JDBC_DRIVER_PATH}/classes12.zip
2. Create a data source:
a. JDBC Provider = Oracle JDBC Thin Driverb. Data source type = Version 5.0c. Name = database_named. JNDI Name = jdbc/database_namee. Data source helper class name =
com.ibm.websphere.rsadapter.OracleDataStoreHelperf. databaseName property = database_nameg. URL = jdbc:oracle:thin:server_name:1521:database_name
3. Update the ORACLE_JDBC_DRIVER_PATH variable, for example, c:\oracle\ora81\jdbc\lib\.
6.2.10 Building SQL statements using the SQL Query BuilderWe have seen how you can create SQL statements during the Database Web Pages wizard. But there are going to be times when you want to create SQL statements outside of the wizard or to work with statements you have created and saved. This is where the SQL Query Builder comes in handy.
1. Make sure you have created a connection to the database and imported the design to your project.
2. In the Data Definition view, find the Web Content/WEB-INF/databases/database_name/Statements folder under your project. Right-click the Statements folder, select New, then select the type of
Note: If you do not define a resource reference in the Web deployment descriptor, you may see message J2CA0122I on the server console when you access the database, indicating that default values are being used for the resource references. This does not affect execution but can be avoided by defining the resource reference using the procedure outlined in 6.2.8, “Defining a resource reference for the data source (optional)” on page 197.
Chapter 6. Accessing databases 211

SQL statement you want to build from the context menu. In this case we want to create a select statement.
3. In the wizard, enter a descriptive name for the statement. For example, SelectAllItems. You can save and reuse SQL statements you build so give it a name that will identify its purpose. Click OK.
4. The SQL Query Builder will open. The new statement is initialized with a Select * statement.
Figure 6-45 SQL Query Builder
5. The first step is to choose a table to select from. You can do this in several ways, depending on your preference:
– You can drag and drop the table from the Data Definition view into the SQL Source view.
– You can open the context menu from the query in the Outline view and select Add Table.
– You can use the context menu in the Tables view.
We prefer the drag-and-drop method, so we locate the DB2ADMIN.ITEM entry in the database design and drag it to the SQL Source window.
212 IBM WebSphere Application Server - Express V5.0.2 Developer Handbook
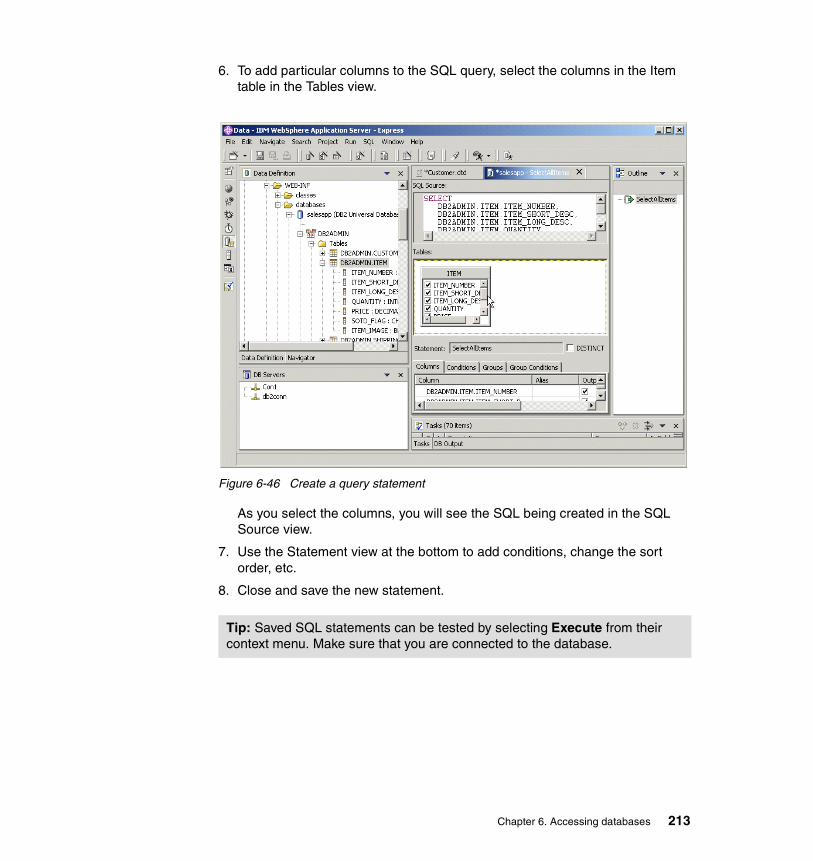
6. To add particular columns to the SQL query, select the columns in the Item table in the Tables view.
Figure 6-46 Create a query statement
As you select the columns, you will see the SQL being created in the SQL Source view.
7. Use the Statement view at the bottom to add conditions, change the sort order, etc.
8. Close and save the new statement.
Tip: Saved SQL statements can be tested by selecting Execute from their context menu. Make sure that you are connected to the database.
Chapter 6. Accessing databases 213

214 IBM WebSphere Application Server - Express V5.0.2 Developer Handbook

Chapter 7. Working with servlets
Servlets are server-side Java classes that are deployed, managed, and executed on a J2EE-compliant server. Servlets are invoked from a URL and the output can be dynamically generated HTML, XML, or text. WebSphere Application Server - Express supports the Java Servlet 2.3 specification. This specification can be found at:
http://java.sun.com/products/servlet/
If you are not familiar with servlets, this chapter will introduce you to the necessary concepts. These concepts are also important in understanding Java Server Pages (JSPs). If you are familiar with servlets, read on to find out how to build servlets with Studio Site Developer. The following topics are discussed in this chapter:
� Servlet overview� Studio Site Developer and servlets� Using servlets in the Online Catalog sample
7
Important: This chapter only outlines and illustrates WebSphere Studio Site Developer support for servlets. If you would like information on Java support, please see the WebSphere Studio Application Developer Version 5 Programming Guide (SG24-6957) redbook.
© Copyright IBM Corp. 2003 215

7.1 Servlet overviewThe servlet mechanism is based on the request/response paradigm, shown in Figure 7-1.
Figure 7-1 Request/response flow for a servlet call
A client makes an HTTP request to a Web server. This Web server manages that request and sends it to a servlet container within an application server. The servlet container calls the servlet, passing objects representing the request and the response to it. The servlet then uses the request object to get the information submitted by the user and executes its business logic, generating a response to be sent back to the client.
Typically, there is only one instance of a servlet class loaded in the servlet container at any time. Clients of the same application asking for the servlet will all deal with the same instance of the object, unless the servlet was reloaded previously.
Servlets are protocol-independent. They are mainly used with the HTTP protocol, but their functionalities can be extended to other protocols. A servlet’s output can be XML content or any other type. However, we will focus on servlets dealing with Web clients in our examples.
7.1.1 A servlet’s life cycleA servlet’s life cycle is defined in the Java Servlet specification. The different states of a servlet are shown in Figure 7-2 on page 217.
Note: The terms servlet container and Web container are used interchangeably in this publication. Both containers serve the same purpose, in that they provide the support classes and context for servlets and JSPs. Web containers, however, also provide an environment to deploy and run Web applications.
Application Server
ClientServlet Container
request
responseServlet
WebServer
request
response
216 IBM WebSphere Application Server - Express V5.0.2 Developer Handbook

Figure 7-2 A servlet’s life cycle
All along its life, a servlet interacts closely with its container. Following the J2EE specification, the container is in charge of providing a runtime execution for the components. It is also responsible for handling a set of services such as concurrency, administration, and security.
The servlet container is implied in all the steps through the servlet’s life cycle:
1. Loading: The servlet container uses a classloader to locate the class file of the servlet and to instantiate it. This operation follows the Java class loading process. An instance of the servlet class (and only one) is then available at the end of this step.
2. Initialization: The container activates the servlet by calling one of its methods, the init() method. The init() method must be implemented by a servlet class. This method is called once by the container and is used to initialize a set of parameters for the servlet instance. The servlet is then ready to handle requests from clients.
3. Service handling: Each client request generates a call to the service() method of the servlet class. This method can either generate the response and transfer it to the Web server (via the servlet container) or dispatch the request to another component within the container.
Initialization
Loading
Service handling
Destruction
Initial state
Final state
Chapter 7. Working with servlets 217

The service() method is called with two parameters:
– Request: This object encapsulates all the data coming from the client and must implement the ServletRequest interface (the HttpServletRequest interface for Web clients).
– Response: This object encapsulates all the data that must be sent back to the client. It implements the ServletResponse interface (the HttpServletResponse interface for Web clients).
Multiple threads may be running the service handling (that is to say the service method) at the same time unless the servlet class implements the SingleThreadModel interface. It could be useful to manage persistency, and in that case the container may use multiple instances of the same servlet class.
4. Destruction: The servlet container calls the destroy() method of the servlet to shut down the servlet. The method can be used to release resources. Any request to the servlet then cannot be handled.
Many vendors provide an implementation of the servlet container in their application server. In Express Application Server, the servlet container is called the Web container.
7.1.2 The servlet’s environmentIn this section, we discuss the environment surrounding the servlet.
The servlet containerThe servlet container acts as a fundamental layer between the Web server and the servlets. It interacts with the Web server from which it receives requests. The container then creates an object implementing the HttpServletRequest interface and delegates the request to the servlet instance. The servlet instance executes its business logic (through a service method call). The container then transmits the response to the Web server.
For each request on the same servlet instance, the container is responsible for creating and managing a new thread to serve the request.
The servlet container provides the same services regardless of the platform it is operating on. This allows the servlet developer to focus on the logic of the component, without considering deployment issues. A servlet container must at least support the HTTP 1.0 protocol. To provide its services, a servlet container interacts with other Java objects, such as the servlet configuration and the servlet context objects.
218 IBM WebSphere Application Server - Express V5.0.2 Developer Handbook

The servlet configurationThis object must implement the ServletConfig interface and is provided by the servlet container as a parameter of the init method of the servlet. The servlet container is responsible for providing a ServletConfig object.
The servlet container uses this object to pass configuration information to its servlet instances, such as the name and the value of a parameter located in the servlet container. The ServletConfig object is accessible to the servlet through its getServletConfig() method. Moreover, a ServletConfig object allows the access to a ServletContext object.
The servlet contextThis object implements the ServletContext interface and is provided to the servlet within the ServletConfig object. During its life cycle, a servlet can access its servlet context through the getServletContext() method.
The servlet container is also responsible for providing an implementation of this interface.
The servlet context provides information about its environment to a servlet. It can be shared by a group of servlets and provides access to the following:
� A set of attributes: a set of name/object pairs that can be shared between servlets and other components to maintain persistency. A servlet can either add or remove an attribute or simply change its content. A servlet can also access its init parameters, which are name/value pairs.
� Resources: servlets sharing the same context can also share resources such as files. They can access these resources via their servlet context.
� A log file: a servlet can write a set of events to a log file.
� A request dispatcher: this object, created and managed by the servlet container, allows a servlet to forward its request to another servlet or to include the content of another servlet into its own response. It allows servlets sharing the same context to communicate with each other.
There can be several servlet context objects in a servlet container at the same time, each managing its pool of servlets. Each servlet instance is running in one of these contexts and all the servlet instances running in the same context will share the same resources. Following that, a servlet class may have more than one instance in a container, with each of these instances attached to a different servlet context.
Finally, the servlet context is the way for the servlet to interact with its environment (its container, but also other resources) without having to reconsider its own logic. Every servlet container has at least a default servlet context.
Chapter 7. Working with servlets 219

7.1.3 Servlets in an enterprise applicationAn enterprise application contains many components. It is important to specify the role of each of the components to understand how to use them in an application. Earlier, in 2.3, “Determine the application-flow architecture” on page 26, we discussed the architecture models for application design. Depending on the architecture you choose, it is important to understand the roles that servlets should play.
The role of servlets in a Model 1 architectureYou will generally see Model 1 architecture used in the more simple, straightforward applications. The bulk of the application is consumed with presenting data to the user. JSPs are well suited for this and simpler to use than servlets, so it follows that you will see more JSP use in a Model 1 type application than you will servlets. There may be situations when servlets are more appropriate due to the complexity of a task but you will probably not make extensive use of servlets in a Model 1 application.
Of course, you have to remember that eventually a JSP becomes a servlet at execution time.
The role of servlets in a Model 2 architectureIf you remember back to the discussion of Model 2 architecture, the application components were divided into three categories: Model, view, and controller.
Servlets in the controller layerThe role of a servlet is to handle a request from a client and to generate the output. To do these tasks, a servlet will communicate with other components such as EJBs for the business logic and JSPs for the presentation of the output.
Servlets are the link between the client request and the model. They must interface with the components performing the business logic of the application.
Typically, a servlet will have to transform a client request in an object that is understandable for the model. It also determines which components are required to perform the request and call these components.
Once the business logic is performed, the servlet will have to interface with the presentation layer, providing an object used to generate the output. So the servlet also manages the link between the model and the presentation and may decide to delegate the output to an HTML page.
220 IBM WebSphere Application Server - Express V5.0.2 Developer Handbook

The first role of a servlet is to act as a controller. A servlet is responsible for taking parameters from the client. It then gives these parameters to the appropriate components that handle the business logic. Finally, the servlet takes the results back and uses them to give a response to the user. The servlet can either return an HTML page to the user or forward the presentation task to a JSP.
7.2 Studio Site Developer and servletsStudio Site Developer provides the necessary tools to build servlets, including:
� Wizards� Web perspective� Deployment descriptor editor
7.2.1 WizardsStudio Site Developer provides wizards that aid in the development of servlets. One is a Servlet wizard and the other is a Package wizard. The Package wizard is not required to create a servlet since the servlet wizard will place the servlet in the default package. If you would like to create your own package for organizational purposes, use the Package wizard.
Package wizardTo create new Java packages in the Package Explorer:
1. Navigate to the JavaSource folder in your project.
2. Right-click the JavaSource folder and select New > Other from the context menu.
3. From the New dialog, select Java from the left pane and then select Package from the right pane.
4. Click Next.
5. Edit the Source Folder field to indicate in which container you want the new package to reside. You can either type a path or click Browse to find the container. If a folder was selected when you chose to create the new package, that folder appears in the Source Folder field as the container for the new package.
6. In the Name field, type a name for the new package.
Chapter 7. Working with servlets 221

Figure 7-3 Package wizard
7. Click Finish to create the package.
Servlet wizardThe Servlet wizard takes you step-by-step through the process of creating a Java servlet and provides you with output files you can use or modify for your Web application.
To create a servlet, do the following:
1. To launch the Servlet wizard, from the Web perspective select File > New > Servlet.
2. In the Create a new Servlet page, supply the following information.
– Specify the folder where the servlet class will be placed, the package that the class will belong to (it is added into a default package if you do not specify one), and a name for the servlet.
Note: See 7.3, “Using servlets in the Online Catalog sample” on page 232 for an example of a servlet being created.
222 IBM WebSphere Application Server - Express V5.0.2 Developer Handbook

– The Class Name value should be the class name of the servlet.
– Specify a superclass for the servlet class. A servlet created by this wizard can have HttpServlet, or any class that has HttpServlet in its hierarchy, as its superclass. Click Browse to choose from the available superclasses.
3. Click Next.
4. Select a modifier to specify whether your servlet class is public, abstract, or final (classes cannot be both abstract and final).
5. Specify whether the servlet you create implements the SingleThreadModel interface by selecting the Use Single Thread Model option. This guarantees that there will not be simultaneous access to the same servlet instance, which has a tendency to stabilize thread execution ordering.
6. The javax.servlet.Servlet is provided as the default Interface. You can also add additional interfaces to implement. Click Add... to open the Interface Selection dialog. In this dialog, as you type the name of the interface that you are interested in adding in the Choose interfaces field, the list of available interfaces listed in the Matching types list box updates dynamically to display only the interfaces that match the pattern. Choose an interface to see the Qualifier and click Add. Click OK when you are finished.
7. Select any appropriate method stubs to be created in the servlet file. The stubs created by selecting the Inherited abstract methods option must be implemented if you do not intend to create an abstract servlet. This is not true for Constructors from superclass.
8. Click Next.
9. If you select the Add to web.xml check box, the servlet, along with its display name, and any URL mappings and initialization parameters associated with the servlet, will be automatically included in the Web project web.xml file. Note that the Class Name value provided in the first page of the wizard is automatically mapped on this page. The mapping is updated if you change the value in the Servlet Name field.
10.Click Finish.
Note: Specifying a value in the Java package field of the servlet wizard will automatically create and add the servlet to the package.
Note: The servlet should be placed in a package in the JavaSource folder of your project.
Chapter 7. Working with servlets 223

7.2.2 Web perspectiveThe Web perspective is the main perspective used for editing the source of servlets. If you double-click a servlet from the Project Navigator view, the servlet will be opened in the Java editor. While editing the source of the servlet in the Java editor, the Outline view can be used to view the structure of the servlet.
Java editorThe Java editor is used to edit the source code of your servlet. It is similar in nature to Page designer.
Figure 7-4 Java editor
The Java editor also provides specialized features for editing Java code. The editor includes the following features:
� Syntax highlighting
� Content assist
� Code formatting
� Quick Fix
Java editor
224 IBM WebSphere Application Server - Express V5.0.2 Developer Handbook

Syntax highlightingWithin the Java source, the different elements of the source are shown with different colors. Examples of Java source elements that are rendered differently are:
� Regular comments
� Javadoc comments
� Keywords
� Strings.
Figure 7-5 Syntax highlighting
Content assist toolContent assist you with the coding process for your servlets. Pop-up windows are provided and suggest possible text choices to complete a phrase. You can select these choices for insertion in the text.
Keywords
Strings
Comments
Chapter 7. Working with servlets 225

Figure 7-6 Content assist
Code formattingThe Java editor supports the formatting of Java code according to your personal preferences.
1. From the workbench menu bar, select Window -> Preferences. The Workbench Preferences page opens.
2. In the left pane, expand the Java category and select Code Formatter. The Code Formatter Preferences page opens.
Content assist
226 IBM WebSphere Application Server - Express V5.0.2 Developer Handbook

Figure 7-7 Code formatter
3. In the New Lines, Line Splitting, and Style tabs, select the code formatting conventions that you want the formatter to follow.
4. Note that at the bottom of the page, you can observe an example effect of each individual code formatting option and see a preview of what your formatted code will look like.
5. Click OK when you are done.
Quick FixThe Java editor offers corrections to problems found while typing and after compiling. To show that correction proposals are available for a problem or warning, a “light bulb” is visible on the editor's annotation bar.
Left-clicking the light bulb or invoking Ctrl+1 (Edit / Quick Fix) brings up the proposals for the problem at the cursor position. To select one of the proposals, double-click it from the pop-up window and it will be inserted into your source code.
Chapter 7. Working with servlets 227

Figure 7-8 Quick Fix
Outline viewAssociated with the Java editor is the Java-specific Outline view, which shows the structure of the active Java compilation unit (for example, the servlet). It is updated as the user edits the compilation unit.
Figure 7-9 Outline view
Clicking the different elements of the structure will position your cursor in the Java editor to the element location in the compilation unit. This can be very useful if your compilation unit contains many elements and you wish to navigate to a specific one.
Quick Fix
228 IBM WebSphere Application Server - Express V5.0.2 Developer Handbook

7.2.3 Deployment descriptor editorThe Servlets page in the Web deployment descriptor editor lets you add an existing servlet or JSP file to the deployment descriptor or remove the selected servlet of JSP file from the deployment descriptor.
To work with the Servlets page of the Web deployment descriptor editor:
1. Open a Web project in the Project Navigator.
2. Double-click the Web project's Web Deployment Descriptor file in the Project Navigator. The Web deployment descriptor editor opens.
3. Click the Servlets tab to open the Servlets page.
Figure 7-10 Servlets page
4. You can edit settings in the following sections of the Servlets page:
– Servlets and JSPs - list servlets and JSPs used in this application. You can add, edit or remove servlets and JSPs from the list.
– Details - lists details about the selected servlet or JSP. Details listed include the servlet class, the display name, and a description.
Chapter 7. Working with servlets 229

Figure 7-11 Details
– URL Mappings - lists URLs mapped to the selected servlet.
• When using the Servlet wizard, the servlet will automatically be mapped if the add to web.xml feature was selected.
• URL mappings are used to provide an alias for a servlet or JSP. This allows the developer to avoid hard-coding the exact path of a resource in other resources. If the location of a resource changes, the developer only needs to modify the URL mapping.
Figure 7-12 URL mappings
– Initialization - lists the initialization parameters that are configured for the selected servlet or JSP file. Initialization parameters could include the user ID, password, URL, and driver properties for a database connection.
Figure 7-13 Initialization
230 IBM WebSphere Application Server - Express V5.0.2 Developer Handbook

– Security role references - list the security roles referenced in the Web application and lets you edit the security roles that are authorized to access the servlet. You can add, remove, or edit security roles. If you add a security role reference, you specify the role name, role link, and a description. See 16.4, “Securing applications with role-based security” on page 556 for additional information.
Figure 7-14 Security role references
– Run as - lists details of the selected servlet's run-as element. See 16.4, “Securing applications with role-based security” on page 556 for additional information.
Figure 7-15 Run as
– Icons - lets you view or change icons (small or large) used to represent the selected servlet or JSP file.
Figure 7-16 Icons
– WebSphere Extensions - list and lets you change the details of the Servlet Extension for the selected servlet. You can add a new extension by clicking Add. The Add Markup Language entry wizard appears.
Chapter 7. Working with servlets 231

Figure 7-17 WebSphere extensions
7.3 Using servlets in the Online Catalog sampleTo illustrate the creation of a servlet using Studio Site Developer we will start the process of creating an administration login function for our site using servlets. The entire process of the login function will not be illustrated here.
The first step in the login process is login.html. This page collects the user name and password from the user and passes control to LoginServlet. LoginServlet captures the user name and password from the login.html form, verifies them using additional database connection wizards, and then forwards the user to the site administration selection page; admin.html.
Important: If you are downloading the Online Catalog sample from the additional material section of the Redbook site, it will not have the servlet login process linked up. The servlet in this example (along with other servlets) will be located in the common package. Any JSPs or HTML pages associated with the example will be located in the servlet_login folder in the WebContent directory.
The login function in the sample will use a JSP to verify that the username and password submitted are valid by referencing a table in the SALESAPP database.
232 IBM WebSphere Application Server - Express V5.0.2 Developer Handbook

Figure 7-18 Servlet login process
7.3.1 Creating a servletThis section will take you through the process of creating the LoginServlet servlet using the Servlet wizard.
1. Open the Web perspective.
2. Expand the OnlineCatalog project in the Project Navigator view.
3. Right-click the JavaSource directory and click New -> Servlet from the context menu to start the Servlet wizard.
4. On the first page verify that the Folder field value is /OnlineCatalog/JavaSource, enter common for the Java package, and enter LoginServlet as the Class name. Everything else should be left as default.
Note: The servlet login function included with the Online Catalog sample uses four servlets, one HTML file, and two properties files. The four servlets (LoginServlet, LogWriter, DBConnection, and DBDriver) can be located in the common package under the JavaSource folder. The two properties files can be located in the root of JavaSource and the single HTML file is located in the servlets_login folder under WebContent.
login.html admin.htmlLoginServlet.java
Database connection servlets
USER table of SALESAPP
Chapter 7. Working with servlets 233

Figure 7-19 Servlet wizard - screen 1
5. Click Next.
6. The Servlet page asks you to specify Modifiers, Interfaces, and method stubs. We are only concerned with having the doPost() method created at this time, so uncheck the doGet() and Inherited abstract methods checkboxes. The other options can be kept as is.
234 IBM WebSphere Application Server - Express V5.0.2 Developer Handbook

Figure 7-20 Servlet wizard - screen 2
7. Click Next.
8. The Deployment Descriptor allows you to add any information to the deployment descriptor related to the servlet being created. Select the Add to web.xml check box to add a URL mapping for the servlet. This is optional but we recommend it. You can also specify and initialization parameters if you wish. For example, you could specify database connection properties here if you required.
Chapter 7. Working with servlets 235

Figure 7-21 Servlet wizard - screen 3
9. Click Finish. Upon creation, the LoginServlet servlet will be opened in the Java editor.
236 IBM WebSphere Application Server - Express V5.0.2 Developer Handbook

Figure 7-22 Working with servlets in the workbench
The final code for the LoginServlet servlet can be seen in the example below.
Example 7-1 LoginSerlvet.java
package common;
import javax.servlet.http.*;import javax.servlet.*;import java.io.*;import java.sql.*;
public class LoginServlet extends HttpServlet {
/*** Process incoming HTTP POST requests * * @param request Object that encapsulates the request to the servlet * @param response Object that encapsulates the response from the servlet*/public void doPost(HttpServletRequest request, HttpServletResponse response) throws ServletException, IOException {
LoginServlet servlet
Chapter 7. Working with servlets 237

// Get data from HTML formString user = request.getParameter("username").trim();String pass = request.getParameter("password").trim();
// Verify that user existsif (hasPriv(user, pass)) {
// Send user to admin page
response.sendRedirect(response.encodeRedirectURL("/OnlineCatalog/administration/admin.html"));
}else {
PrintWriter pw = response.getWriter();pw.println("<font face='Arial' size='2'>LOGIN ERROR - Invalid user or
password</font><br>");pw.println("<font face='Arial' size='2'><a
href='/OnlineCatalog/administration/login.html' >Click here to Try Again</a></font>");
}
}
private boolean hasPriv(String user, String pass) {boolean result = false;
try {// Connect to the databaseDBConnection dbConnection = new DBConnection();
// Query databaseResultSet rs = dbConnection.getFromDB("SELECT password, username FROM
users WHERE username = '" + user + "'");
if (!rs.next()) {try {
common.LogWriter.getInstance().writeToLog("Login Error: Invalid username " + user);
} catch (InterruptedException ex) {}return false;
}//if
// Get password for user from databaseString realPass = rs.getString("password").trim();
238 IBM WebSphere Application Server - Express V5.0.2 Developer Handbook
// If password matches one in database, then successful loginif (realPass.equals(pass)) {
result = true;
} else {try {
common.LogWriter.getInstance().writeToLog("Login Error: Invalid password entered for " + user);
} catch (InterruptedException ex) {}}//if
// Close the connectionrs.close();dbConnection.close();
return result;
} catch (Throwable e) {try {
common.LogWriter.getInstance().writeToLog("Login Exception: " + e);return false;
} catch (InterruptedException ex) {return result;
}}
}}
Note: The login component illustrated in this section is only mentioned here to show the use of servlets in Studio Site Developer. The login component is not a proper Web site security solution and is not recommended for “real-life” situations. To reiterate, when the user logs in, a servlet will verify that the user and password exist in a database table and forward the user to a new page. No session information is used in the process, therefore if the user knew the full path of the location he or she could get there without using the login.
Chapter 7. Working with servlets 239

7.4 ReferencesSome additional references you may find handy are:
� WebSphere Studio Application Developer Version 5 Programming Guide, SG24-6957 (Chapter 5)
� Programming J2EE APIs with WebSphere Advanced, SG24-6124 (Chapter 8)
� Servlet and JSP Programming with IBM WebSphere and VisualAge for Java, SG24-5755 (Chapter 4)
� Building Java Applications for the iSeries Server with VisualAge for Java 3.5, SG24-6245 (Chapter 1)
� Core Servlets and JavaServer Pages, ISBN 0-13-089340-4
� SAMS Teach Yourself Java2 in 21 Days, 2nd Edition, ISBN 0-672-31958-6
240 IBM WebSphere Application Server - Express V5.0.2 Developer Handbook

Chapter 8. Working with JSPs
This chapter discusses how JavaServer Pages (JSPs) can act as the presentation mechanism for dynamic data in your Web application. We will start with a brief introduction to the technology, and then concentrate on the elements that make a JSP. We will then see how JSPs can be used to implement the display of account data in our sample application. In this chapter, the following topics are discussed:
� JSP overview� Studio Site Developer support for JSPs� Using JSPs in the Online Catalog sample
8
© Copyright IBM Corp. 2003 241

8.1 JSP overviewIn the early days of Java development it soon became apparent that, while servlets provided an excellent mechanism for the handling of requests for dynamic content, they did not provide a useful way of displaying the response. The hard-coding of presentation within the servlet code meant that changing the “look and feel” of the presentation layer required changes to the Java files that also provided the business logic, and the resultant recompiling, testing, and deploying. The roles of Web designer and Java programmer were not distinct, leading to development process problems.
Using JSPs offers the following advantages:
� Separation of dynamic and static content
This allows for separation of application logic and Web page design reducing the complexity of Web site development and making the site easier to maintain.
� Platform independence
Because JSPs are Java-based, they are platform independent. JSPs can run on any Web application server. JSPs can be developed on any platform and be viewed by any browser because the output of a compiled JSP page is HTML.
� Component reuse
Using JavaBeans and tag libraries, JSPs leverage the inherent reusability offered by these technologies. This enables code sharing among developers, thus speeding development efforts.
� Scripting and tags
JSPs support both embedded JavaScript and tags. JavaScript is typically used to add page-level functionality to the JSP. Tags provide an easy way to embed and modify JavaBean properties and to specify other directives and actions.
The JSP level mandated by J2EE 1.3 is JSP 1.2.
8.1.1 JSP execution modelIn order to effectively use JSPs, it is first important to understand how they work. Essentially, a JSP file can be thought of as an HTML page with embedded segments of Java code that are executed at runtime. As such, a JSP file looks mostly like normal HTML, and can be edited by a Web designer who maintains responsibility for the look and feel of the site.
242 IBM WebSphere Application Server - Express V5.0.2 Developer Handbook
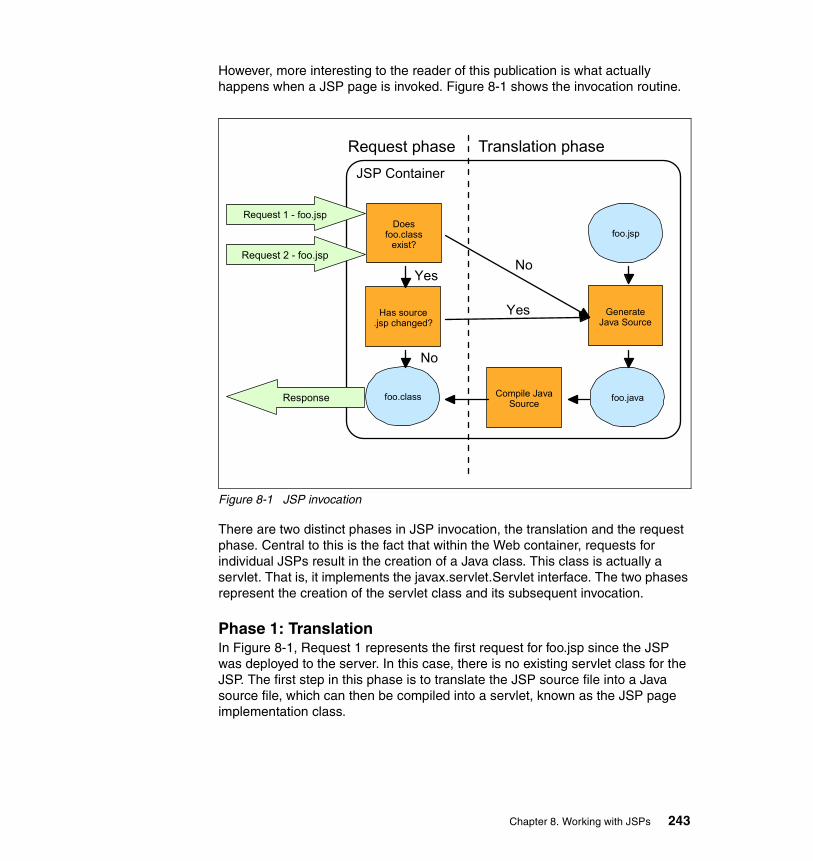
However, more interesting to the reader of this publication is what actually happens when a JSP page is invoked. Figure 8-1 shows the invocation routine.
Figure 8-1 JSP invocation
There are two distinct phases in JSP invocation, the translation and the request phase. Central to this is the fact that within the Web container, requests for individual JSPs result in the creation of a Java class. This class is actually a servlet. That is, it implements the javax.servlet.Servlet interface. The two phases represent the creation of the servlet class and its subsequent invocation.
Phase 1: TranslationIn Figure 8-1, Request 1 represents the first request for foo.jsp since the JSP was deployed to the server. In this case, there is no existing servlet class for the JSP. The first step in this phase is to translate the JSP source file into a Java source file, which can then be compiled into a servlet, known as the JSP page implementation class.
JSP Container
Request 1 - foo.jsp
Request 2 - foo.jsp
foo.jsp
Generate Java Source
Does foo.class
exist?
foo.javaCompile Java Source
foo.class
NoYes
Has source .jsp changed?
No
Yes
Response
Request phase Translation phase
Chapter 8. Working with JSPs 243

In fact, in WebSphere’s JSP implementation, the foo.jsp file is translated into two files: A .java file containing the Java code for the servlet, and a .dat file containing the static elements of the JSP. The .dat file actually contains a serialized array of byte arrays, with each byte array containing the static page elements before the next JSP tag. The .java file is then compiled to create a .class file, which represents the compiled servlet.
The .class and .dat files are stored on the file system. The .java file may or may not be retained after the translation stage. This translation phase is performed once per JSP. If a compiled class file already exists on the file system, then the request for the JSP proceeds directly to phase 2.
Phase 2: Request processingPhase 2 represents the actual invocation of the compiled servlet—the JSP page implementation class—to provide a response to the initial request.
For Request 1, this phase is entered immediately after phase 1. If the servlet is not already loaded, it is brought into memory and the request serviced.
For Request 2, the Web container knows of the existence of an already compiled servlet class loaded in memory, and directly services the request.
By default, the JSP implementation in WebSphere also checks the source .jsp file for changes. If it has been modified it will enter the translation phase. Each subsequent request is handled by the servlet until the servlet is unloaded from memory, for instance, when the application server is stopped. This load/service request/unload life cycle is exactly the same as for servlets.
8.1.2 Syntax for coding JavaServer PagesJavaServer Pages can be coded using two alternative methods: JSP syntax or XML syntax. The two cannot be mixed within a page. Beginning with JSP 1.2, JSP pages written in XML (referred to as JSP documents) can be delivered to the Web container for processing.
The traditional JSP syntax looks like that shown in Example 8-1.
Example 8-1 JSP syntax
<!DOCTYPE HTML PUBLIC "-//W3C//DTD HTML 4.01 Transitional//EN"><HTML><HEAD><%@ taglib uri="jspsql" prefix="dab" %><%@ page language="java" import="java.util.*, java.io.*"contentType="text/html; charset=WINDOWS-1252"pageEncoding="WINDOWS-1252"
244 IBM WebSphere Application Server - Express V5.0.2 Developer Handbook

session="true"%><META http-equiv="Content-Type"
content="text/html; charset=WINDOWS-1252"><META name="GENERATOR" content="IBM WebSphere Studio"><META http-equiv="Content-Style-Type" content="text/css"><LINK href="../theme/Master.css" rel="stylesheet"
type="text/css"><TITLE>AddNewItemProcess.jsp</TITLE></HEAD><BODY><P>Place AddNewItemProcess.jsp's content here.</P></BODY></HTML>
The same JSP as an XML document would look like that shown in Example 8-2.
Example 8-2 JSP document
<jsp:root xmlns:jsp="http://java.sun.com/JSP/Page" xmlns:dab="jspsql"version="1.2">
<jsp:directive.page language="java" import="java.io.*"contentType="text/html; charset=WINDOWS-1252"pageEncoding="WINDOWS-1252" session="true" />
<jsp:text><![CDATA[ <?xml version="1.0" encoding="WINDOWS-1252" ?> ]]></jsp:text><jsp:text><![CDATA[ <!DOCTYPE html PUBLIC "-//W3C//DTD XHTML 1.1//EN" "http://www.w3.org/TR/xhtml11/DTD/xhtml11.dtd"> ]]></jsp:text><html xmlns="http://www.w3.org/1999/xhtml"><head><meta http-equiv="Content-Type"
content="text/html; charset=WINDOWS-1252" /><meta name="GENERATOR" content="IBM WebSphere Studio" /><meta http-equiv="Content-Style-Type" content="text/css" /><link href="../theme/Master.css" rel="stylesheet"
type="text/css" /><title>AddNewItemProcess.jsp</title></head><body><p>Place AddNewItemProcess.jsp's content here.</p></body></html></jsp:root>
A JSP document has jsp:root as its root element. The root element has one mandatory attribute, the version of JSP specification it is using. The root can contain xmlns elements, which enable the use of the standard elements, for example tag libraries.
Chapter 8. Working with JSPs 245

8.1.3 JSP 1.2 elementsThe JSP 1.2 specification defines the following set of basic page elements:
� Directives� Scripting elements� Actions
Each of these elements is described below, but first we introduce some common objects available to every JSP page.
Implicit object variablesFrom the earlier discussion you will remember that JSPs are actually executed as servlets at runtime. During this execution, a number of implicit objects are available to the JSP page. Table 8-1 summarizes the role of these objects, and the variable used to access these from the page.
Table 8-1 JSP implicit objects
Object variable Role
request The request that initiated the invocation of the JSP. For an HTTP request, it is a subtype of javax.servlet.HttpServletRequest.
response The response to the request. For an HTTP request, it is a subtype of javax.servlet.HttpServletResponse.
pageContext A platform-independent utility object that provides access to the vendor-specific implementations of other implicit objects. Also provides accessor methods to objects stored within the page scope.
session Provides access to any available javax.servlet.http.HttpSession object associated with the requestor.
application Provides accessor methods to objects stored within the javax.servlet.ServletContext object for the Web application.
out Provides the mechanism for writing to the Response OutputStream, an instance of javax.servlet.jsp.JspWriter.
config Provides access to the javax.servlet.ServletConfig object for the JSP page.
page Analogous to the Java implicit object.
exception Available when the JSP is acting as an error page. Allows access to the exception object thrown from the calling page.
246 IBM WebSphere Application Server - Express V5.0.2 Developer Handbook

For more information about servlets, see Chapter 7, “Working with servlets” on page 215.
Object scopeEach implicit object belongs to a particular scope within the Web application. Indeed, the same scopes also become important when using JavaBeans within JSPs. Table 8-2 lists the available scopes.
Table 8-2 JSP object scopes
The implicit objects available through the pageContext, request, session, and application variables each provide getAttribute() and setAttribute() methods, which allow objects to be stored and retrieved within the particular scope they are associated with. As such, objects stored using the pageContext.setAttribute() method have the most limited scope: They exist only for the duration of that page invocation. Conversely, objects stored using the application.setAttribute() method have the widest scope: They exist for as long as the Web application is running.
Note: These objects are also available directly in the Bean Scripting Framework (BSF) server-side JavaScript.
Scope Description Applies to
page Objects are available from the javax.servlet.jsp.PageContext for the current JSP page. References to the objects are discarded upon completion of the _jspService() method.
� response� pageContext� out� config� page� exception
request Objects are available from the javax.servlet.http.HttpServletRequest object for the current request. Objects are discarded at the completion of the current request.
request
session Objects are available from the javax.servlet.http.HttpSession object associated with the current client. Objects are discarded when the HttpSession is invalidated.
session
application Objects are available from the javax.servlet.ServletContext object associated with the Web application. Objects are discarded when the ServletContext object is reclaimed.
application
Chapter 8. Working with JSPs 247

DirectivesDirectives give a way to provide information to the Web container, which can be used to determine the behavior and composition of the JSP page. JSP 1.2 defines three types of directive: page, include, and taglib. The taglib directive is covered in detail in Chapter 9, “Using tag libraries” on page 275. For now, we will take a look at the page and include directives.
All directive tags have the same syntax:
<%@ directive {attr=”value”}* %>
Or, in XML syntax:
<jsp:directive.directive {attr=”value”}* />
In both cases, directive represents either page, include, or taglib.
The page directiveThe page directive tag allows for the definition of a number of attributes that are passed to the Web container. As the name suggests, page directives apply to the JSP page as a whole. Multiple attributes can be specified within a single page directive tag, or attributes can be specified in individual page directive tags. However, each attribute can only be specified once within a JSP. The exception to this rule is the import attribute. Multiple import attributes can be declared on a single JSP.
A full list of valid attributes is defined in Table 8-3.
Table 8-3 Valid page directive attributes
Attribute Description
language Defines the scripting language to be used by scripting elements. JSP 1.2 defines the value “java” as the only supported scripting language. If no language attribute is specified, “java” is defaulted to. WebSphere 3.5.2 later also supports scripting languages that in turn support the IBM Bean Scripting Framework (BSF). Currently this is limited to Netscape’s Rhino JavaScript implementation. For more details on BSF, refer to the Web site at:
http://oss.software.ibm.com/developerworks/projects/bsf
extends Allows the JSP page implementation class to extend a class other than the Web container’s implementation of javax.servlet.jsp.JspPage.
248 IBM WebSphere Application Server - Express V5.0.2 Developer Handbook

import Allows the definition of classes and packages that will be available to scripting elements within the JSP. Classes within the following packages are available by default:� java.lang.*� javax.servlet.*� javax.servlet.jsp.*� javax.servlet.http.*
session If true, the implicit object variable session will refer to a session object either already existing for the requesting user, or explicitly created for the page invocation. If false, then any reference to the session implicit object within the JSP page results in a translation-time error. The default is true.
buffer Defines the buffering model for the JspWriter underlying the out implicit object variable. The default is an 8-kb buffer. It can be set to a value of xkb, or none.
autoFlush If true, the buffered output is flushed when full. If false, an exception is thrown should the buffer fill up. A value of false, if the value of the buffer is set to none, will result in a translation-time error. The default is true.
isThreadSafe If true, the JSP page implementation class will implement the javax.servlet.SingleThreadModel interface, and requests for the JSP will be handled sequentially in the order in which they were received.If false, then requests will be dispatched to the page on arrival and handled by individual threads. The default value is false.
info Allows a String object to be defined, which can be returned by calling the getServletInfo() method of the JSP page implementation class. This will override any description provided at deployment time.
isErrorPage Specifies if the page acts as an error page for other JSPs. If true, then the exception implicit object variable is available for use. If false, any reference to exception will result in a translation-time error. The default is false.
errorPage Defines a URL to which any uncaught exceptions thrown during page execution can be directed. The URL must specify a JSP page that has isErrorPage set to true. The exception class is placed in the request object sent to the JSP acting as the error page where it is made available through the exception implicit object variable.
contentType Defines the encoding of the JSP page and the response content.
Attribute Description
Chapter 8. Working with JSPs 249

A point of note concerns the session attribute. As explained, if the session attribute is set to true, or not specified at all, then the session implicit object variable will reference the HttpSession object for the requesting client. If there is no HttpSession object available, then one will be created explicitly. This can create a performance overhead if your JSP page is not intended to interact with session objects. If this is the case, then you should ensure that the <%@ page session=”false” %> directive tag is included within your JSP.
The list in Example 8-3 shows a snippet of JSP source code containing example page directives.
Example 8-3 Page directive example
<!Example page directive tags>
<HTML><HEAD><TITLE>Date and time</TITLE><%@ page import="java.util.*" session="false" isErrorPage="false" %><%@ page errorPage="/error.jsp" %></HEAD><BODY><P>The current date and time is: <%= new Date() %></P></BODY></HTML>
The include directiveThe include directive allows content held in other files on the server file system to be included within the JSP page source at translation time. That is, the contents of the included file will be included in the JSP source at the point where the tag is defined and therefore processed by the JSP page compilation procedure. The included file may contain both static content and other JSP tags. The include page directive takes one attribute: file.
The file attribute defines a relative URL, or URI, to the file to be included within the JSP page. This URI may be either page or context relative.
The included file may contain any valid JSP tags. These tags will be translated to Java source and included in the JSP page compilation class. The rules regarding page directives stated in “The page directive” on page 248 still apply to page directive tags within the included file. A page directive tag contained within the included file will apply to the whole JSP at translation time. Any page directives within the included file that conflict with tags contained in the “including” JSP source will cause compilation time errors. For instance, if a JSP file contains a page directive specifying session=“false”, and then includes another file containing a JSP scripting element referencing the session attribute, a error will occur.
250 IBM WebSphere Application Server - Express V5.0.2 Developer Handbook

One consequence of the fact that the file referenced within the include directive is included during the translation phase is that subsequent changes to the included file will not be picked up by the Web container on subsequent invocations of the JSP. The changes will only be visible when the JSP containing the include directive is itself updated, or its JSP page compilation class is deleted, forcing the translation phase to be carried out. If this behavior is not desirable, you can use the include action tag instead (see “The include action tag” on page 255).
Example 8-4 shows an example of using an include directive.
Example 8-4 file2.jsp
<!DOCTYPE HTML PUBLIC "-//W3C//DTD HTML 4.01//EN"><HTML><HEAD><%@ page session="true" language="java"contentType="text/html; charset=ISO-8859-1"%><META http-equiv="Content-Type" content="text/html"><META name="GENERATOR" content="IBM WebSphere Studio"><META http-equiv="Content-Style-Type" content="text/css"><LINK href="theme/Master.css" rel="stylesheet" type="text/css"><TITLE>File2.jsp</TITLE></HEAD><BODY><%@ include file="file1.jsp" %><P>Place File2.jsp </P> </BODY> </HTML>
The contents of the file to be included, file1.jsp, are shown Example 8-5.
Example 8-5 file1.jsp
<!DOCTYPE HTML PUBLIC "-//W3C//DTD HTML 4.01//EN"><HTML>BODY><P>First File Contents.</P> </BODY> </HTML>
Chapter 8. Working with JSPs 251

Scripting elementsScripting elements allow the insertion of code into the JSP. Technically the actual code is defined by the scripting language. As mentioned in Table 8-3 on page 248, the only scripting language required by the JSP 1.2 specification is Java. In addition, WebSphere Application Server - Express provides support for JavaScript and IBM’s Bean Scripting Framework.
Let us take a look at how the scripting elements can be used to insert segments of Java code into your JSPs.
There are three forms of scripting element:
� Declarations� Scriptlets� Expressions
Each of the types is described below.
DeclarationsDeclarations allow us to perform the declaration of variables and methods within our JSP source. We can then use these variables and methods within other scripting elements on our page. The syntax for a declaration element is:
<%! declaration(s) %>
Or, in XML syntax:
<jsp:declaration>declaration(s)
</jsp:declaration>
For example, to declare a variable, we can use the tag:
<%! int a = 1; %>
To declare a method:
<%! public boolean isPositive(int x){ if (x<0)return false;
else return true;
} %>
Note: After deployment to a server, changes to file1 are not seen by the server until file2 is recompiled.
252 IBM WebSphere Application Server - Express V5.0.2 Developer Handbook

Note that all variables declared within declaration elements will become class instance variables within the JSP page implementation class. Therefore they should not be used to store any invocation-specific data, for example, counters or data relating to a specific client.
ScriptletsA scriptlet is the most general purpose JSP element, but also the element to use with the most caution. They can contain any valid Java code that you could normally place within the body of a Java method, including variable declarations, method calls, and so on. The contents of any scriptlet expressions within a JSP will be included within the jspService() method of the JSP page compilation class. The syntax of a scriptlet tag is:
<% scriptlet %>
Or in XML syntax:
<jsp:scriptlet> scriptlet </jsp:scriptlet>
Individual scriptlets do not have to contain a complete piece of Java syntax, they can interleave themselves with other page elements, allowing you to build up a conditional display of static page elements. However, if the combination of the scriptlets at translation time does not yield valid Java syntax, then a translation-time error will occur.
As you can imagine, excessive use of scripting elements in a confusing manner can make JSP source code hard to read. If you refer back to the start of this chapter you will remember that one of the problems that led to the evolution of JSPs was the presence of presentation elements making Java logic hard to understand. Now with JSPs containing excessive scriptlet use, we could have the opposite: Our presentation logic is hard to understand and develop because it is cluttered with Java code.
One way to avoid this cluttered programming is to evaluate how taglibs can be used instead of hand-coding Java. The Jakarta Web site (http://jakarta.com), among others, has many tag libraries that can be used for common tasks. More on this will be covered in Chapter 9, “Using tag libraries” on page 275.
Another way is to create a bean and then reference it in the JSP page.
ExpressionsExpressions attempt to convert the result of the expression evaluation to a String. Expressions take advantage of the fact that the object within Java can be represented as a String, either through implementing a toString() method, or inheriting one from a parent class or, ultimately, java.lang.Object. Primitive types can also be directly output.
Chapter 8. Working with JSPs 253

The syntax for expression tags is:
<%= expression %>
Or in XML syntax:
<jsp:expression> expression </jsp:expression>
Use of implicit object variables in scripting elementsAll of the available implicit object variables, as described in Table 8-1 on page 246, are available for use from within scriptlets and expressions. For example, objects placed within the HttpServletRequest object or within the HttpSession object can be retrieved and used within scriptlets and expressions via the request and session variables, respectively.
ActionsThe third type of JSP element is the set of action tags. We will only briefly introduce the standard action tags defined within the JSP 1.2 specification here.
The standard action tags are listed in Table 8-4.
Table 8-4 Standard action tags
Action tag Description
<jsp:useBean> Allows access to a Java object, usually a JavaBean, retrieved from a given scope or newly instantiated through a named identifier.
<jsp:setProperty> Sets the value of a bean property.
<jsp:getProperty> Outputs a Bean property, converted to a String.
<jsp:include> Allows inclusion of static and dynamic content within the current JSP page.
<jsp:forward> Forwards the responsibility for request handling to another static or dynamic resource.
<jsp:plugin> Enables the generation of browser-specific HTML to enable use of the Java plug-in with applets or other Java components.
<jsp:param> Used in connection with the include, forward, and plug-in action tags to supply parameters in key/value pairs.
254 IBM WebSphere Application Server - Express V5.0.2 Developer Handbook

For now we will concentrate on the param, include, and forward tags.
All action tags use the same tag syntax, which, unlike the previous tags, is XML compatible. Action tags have two forms, either an open or closed body tag. The exception is the param action, which only appears in the form of a closed body tag.
The param action tagThe param tag usually appears within the body of one of the other tags, and allows the inclusion of a key/value type attribute. For example, to set a parameter named foo with the value bar, the following tag may be used:
<jsp:param name=”foo” value=”bar”/>
The value attribute may be an expression tag that is evaluated at runtime. For example:
<jsp:param name=”surname” value=”<%= customer.getSurname() %>”/>
The include action tagThe include action tag provides a way to include static and dynamic content within the output produced by the JSP page containing the tag. The content included by an include action tag is parsed at request-time. This contrasts with the include directive, which is parsed at translation time.
The syntax of the tag is:
<jsp:include page=”urlSpec” flush=”true”/>
Or as an open-bodied tag:
<jsp:include page=”urlSpec” flush=”true”><jsp:param ... />
</jsp:include>
The page attribute specifies the relative URL, or URI, for the resource to include. The resource may be a static file, JSP, or servlet. The value of the page attribute may be specified via a JSP expression tag. The flush attribute specifies a boolean value indicating whether the page buffer should be flushed before the inclusion.
<jsp:text > Used to enclose template data in XML representation. The interpretation of it to pass its content through to value of out.
Action tag Description
Chapter 8. Working with JSPs 255

The include action tag works in fashion equivalent to the include() method of the javax.servlet.RequestDispatcher class defined in the Servlet 2.2 specification. The request object and any parameters defined are passed to the resource specified in the page attribute. The included resource then takes over responsibility for producing output. Once finished, the responsibility returns to the calling JSP.
If the resource specified in the page attribute is a JSP, then that JSP undergoes the normal life cycle of translation processing/request processing. As it is being included in a runtime context, any change to the included JSP will cause it to go through the translation phase again. If we refer back to our example of the include directive and re-code it to use an include action tag instead, then any changes we make to file1.jsp between invocations of file2.jsp will be reflected in the next invocation.
The forward action tagJust as the include action tag works like the include() method of javax.servlet.RequestDispatcher, so the forward action tag works in the same way as the forward() method. The syntax of the tag is:
<jsp:forward page=”urlSpec”/>
Or as an open-bodied tag:
<jsp:forward page=”urlSpec”><jsp:param .../>
</jsp:forward>
When a JSP page uses a forward action tag, it terminates its own execution and hands responsibility to the resource specified in the page attribute. If the output buffer contains any output written before the forward action tag is processed, then the buffer is cleared before the forward takes place. The resource specified in the page attribute will provide all of the output, including headers.
The JSP 1.2 specification states that any output written to the page buffer will be cleared when the forward tag is called. Therefore, that output will not appear. However, if output has already been flushed from the buffer, or a page directive specifies a buffer size of none and output has been written, the attempt to clear the buffer will result in a request-time exception being thrown.
8.2 Building JSP pages with Studio Site DeveloperStudio Site Developer provides a wide variety of tools, wizards, and aids to assist you in building JSP pages. JSP development takes place primarily in the Web perspective.
256 IBM WebSphere Application Server - Express V5.0.2 Developer Handbook

8.2.1 Preferences and propertiesWithin the workbench preferences and project properties dialogs, there are several options available to you for customization.
PreferencesThe Preferences dialog can be opened by selecting Window -> Preferences from the workbench main menu. The JSP Files page can be displayed by expanding Web and XML Files from the left pane and clicking JSP Files. The JSP Annotations, JSP Macros, and JSP Styles pages can be found by exanding the JSP Files option.
JSP files � Allows you to select line delimiters for the operating system that applies to
your development. Line delimiters are used to indicate the start of a new line.
� Allows you to use the workbench encoding when creating files, or you can specify another one from the Encoding drop-down list.
JSP annotationsAllows you to specify the annotation colors for the default JSP editor.
JSP macrosThis page allows you to create, delete, or edit macros available to you when creating JSPs.
JSP stylesYou can specify the syntax highlighing colors for the default JSP editor.
PropertiesThe Properties dialog can be opened by right-clicking your project and selecting Properties from the context menu. Select JSP Fragment from the left pane to display the page properties.
JSP fragmentsYou can specify the encoding, language, and content type for the JSPs in the project.
8.2.2 Web perspectiveThere are many aids to use when adding code to a JSP in the Web perspective. You can see some of these in Figure 8-2 on page 258. This looks a little messy but it is done for illustrative purposes.
Chapter 8. Working with JSPs 257
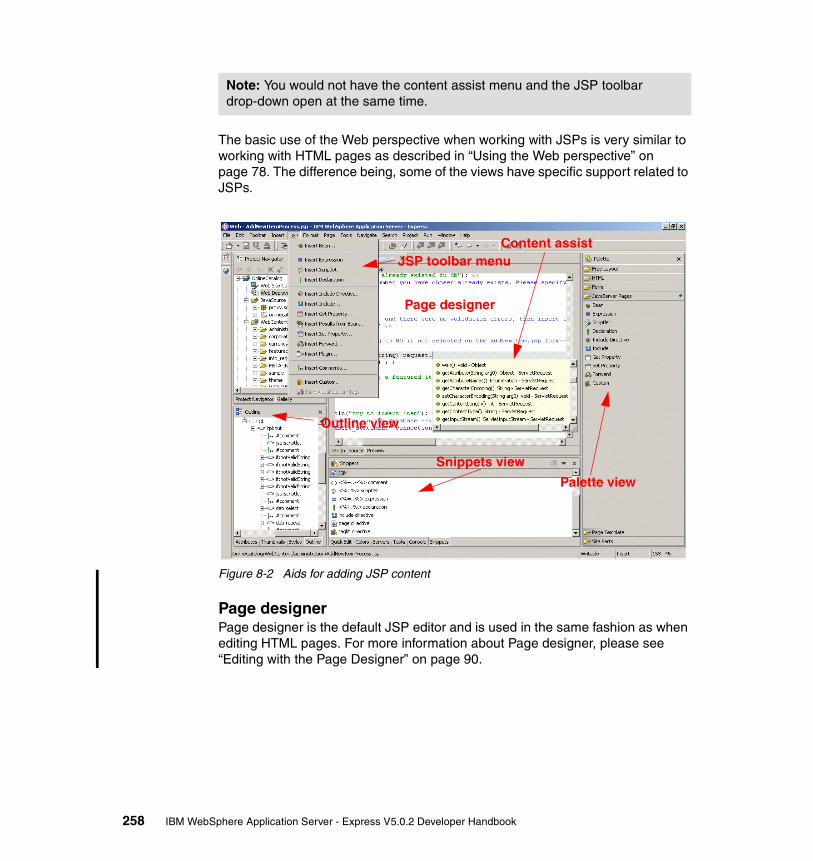
The basic use of the Web perspective when working with JSPs is very similar to working with HTML pages as described in “Using the Web perspective” on page 78. The difference being, some of the views have specific support related to JSPs.
Figure 8-2 Aids for adding JSP content
Page designerPage designer is the default JSP editor and is used in the same fashion as when editing HTML pages. For more information about Page designer, please see “Editing with the Page Designer” on page 90.
Note: You would not have the content assist menu and the JSP toolbar drop-down open at the same time.
Content assist
Palette view
Snippets view
JSP toolbar menu
Outline view
Page designer
258 IBM WebSphere Application Server - Express V5.0.2 Developer Handbook

JSP toolbar menuThe JSP option on the toolbar contains helpful tools to add dynamic content. You can see the current list of options in Figure 8-2 on page 258. If you select an option that needs further clarification, such as parameters, a name, options, etc., a window will pop up allowing you to enter the necessary information. For example, if you select Insert Include from the JSP pull-down, you will see a window (such as Figure 8-3) allowing you to name the file to include and to pass parameters to it.
Figure 8-3 Inserting a JSP include
The resulting code added to the JSP would look like Example 8-6.
Example 8-6 JSP include code
<jsp:include page="login.jsp" flush="true"><jsp:param name="message" value="Invalid login"></jsp:param>
</jsp:include>
For all the options you see, the processing is intelligent. For example, if you select Insert Results from Bean but have not defined a useBean, then you will get a message saying that the useBean needs to be defined first.
Content assistThe content assist menu can be used to select code or tags to enter. You can open the content assist menu by using Ctrl+spacebar, or by right-clicking the editor window and selecting Content Assist.
Chapter 8. Working with JSPs 259

The list you see is relevant to the position of the cursor in the editor. This makes the content assist particularly useful when working with tags. Placing the cursor within the tag will limit the options you see to the tag options. For example, if you have placed the cursor within a custom taglib tag, you will only see options that are valid for that location. Figure 8-4 shows the content assist menu when you have the cursor immediately after the sql: tag. You see a list of all valid tag options to choose from.
Figure 8-4 Using the content assist menu
If you move the cursor over a few spaces so that it follows the sql:statement, then you only see a list of what is expected next. In this case, the id attribute is expected and that is your only choice.
Figure 8-5 Narrowing down the choices
260 IBM WebSphere Application Server - Express V5.0.2 Developer Handbook

Snippets viewThe Snippets view contains reusable JSP objects. The JSP options are shown in Figure 8-6. To use the ojects, simply drag and drop them from the drawer onto the JSP in the source view of Page designer. Opting to insert one of the options places the template for the code in the file at the cursor location.
Figure 8-6 JSP snippet view objects
Outline viewThe Outline view gives you an overview of the structure of the JSP. Clicking an item in the outline highlights that element in the editor window.
Chapter 8. Working with JSPs 261

Figure 8-7 Outline view
Palette viewThe Palette view JavaServer Pages drawer contains items very similar to the JSP toolbar menu options. When using Page designer to edit the JSPs, simply drag and drop the items from the drawer into the source code of the JSP.
262 IBM WebSphere Application Server - Express V5.0.2 Developer Handbook

Figure 8-8 Palette view
8.2.3 JSP wizardThe JSP wizard takes you step-by-step through the process of creating a JSP. To create a new JSP file, do the following:
1. To launch the New JSP File wizard, select File -> New -> JSP File.
2. Select the appropriate container for the file from the list of project folders (and subfolders). The folder that you choose should be under the WebContent folder of the Web project. If a JSP file is not under this folder, then it will not be included in the WAR file that is deployed to the server. In addition, link validation will not encompass files that are not under the WebContent folder.
3. Type a file name into the appropropriate field.
4. Ensure that the appropriate option is displayed in the Markup Language drop-down list. In addition, if you select the Create as JSP Fragment check box, this file will be created as a fragment that can be added to another JSP file. Other JSP files can include JSP fragments using a JSP include directive. Creating a fragment causes the resulting file to end in a .jspf or .jsf extension. You will not be prompted for DOCTYPE information, because a fragment cannot stand alone as a Web page, and it would invalidate any JSP file that included it. Also, depending which markup language you select, you can select the Use XML Style Syntax option to create a JSP file that adheres to XML style tagging.
Chapter 8. Working with JSPs 263

5. You have three options for proceeding:
a. If you want to accept the defaults associated with a new JSP file, leave Model as None and make sure the Configure advanced options is unchecked.
b. If you want to apply a page template to your new file, select Page Template in the Model field and click Next.
i. If you want to use one of the sample templates provided, select Sample Page Template and then choose one of the templates shown in the Thumbnail box.
ii. If you want to use a template of your own, select User-defined Page Template and then click Browse to select the template from the file system.
c. If you want to specify or customize the file options, select the Configure advanced options check box and click Next.
i. You can add tag libraries from a variety of sources by clicking the Add button to locate a TLD file or a JAR file that contains a TLD file. Tag library Universal Resource Identifier (URIs) can be located in one of the following places:
• Defined in the web.xml file
• Within a JAR file located in the project lib directory that contains /META-INF/taglib.tld
• Within a JAR file external to the project
• In a “loose” TLD anywhere in the project
As you add tag libraries, the Available Custom Tags window displays the declaration of the tag along with the tag library directive. If the selected TLD file hasn't been registered in the web.xml file, it will be added automatically.
ii. In the Select a tag library dialog, either select one of the available tag libraries or click the Import button to locate and add a tag library to the list, and then select it. The dialog will automatically populate the informational fields that describe the tag library and its contents. You must specify a Prefix value. Click OK to add the tag library.
iii. Click Next.
iv. If you want to select an encoding type, deselect the Use workbench encoding check box to select a new encoding attribute. Select the appropriate encoding value to add to the file's HTML declaration from the Encoding drop-down list. The default is the value set in the HTML Files preferences page, which is accessed by selecting Window ->
264 IBM WebSphere Application Server - Express V5.0.2 Developer Handbook

Preferences, and then expanding the Web and XML Files preferences.
v. Ensure that the proper content type is selected in the Content Type drop-down list. The default depends on the markup language.
vi. Select the Document Type that you wish to associate with the JSP file. The default depends on the markup language.
vii. Specify a cascading style sheet (CSS) file to to be referenced by the new JSP file. Typically, CSS files are located in the theme folder under the WebContent folder. You can use Add to choose a style sheet from the file system. Use Remove to delete a style sheet from the list, or use the arrow buttons to rearrange the order in which the file references the style sheets. If a style sheet is already associated with the project in which you are creating the new file, that style sheet is the default.
viii.Click Next to select specific method stubs and add deployment information to the Web project's web.xml file. Select any appropriate method stubs to be created in the servlet that is deployed for this JSP file. If you select the Add to web.xml check box, the JSP file, along with its display name, and any URL mappings and initialization parameters associated with the JSP file will be automatically included in the Web project deployment descriptor file. Note that the File Name value provided in the first page of the wizard is automatically mapped to the Servlet Name value on this page, as well the URL Pattern mappings. These mappings are not updated if you change the original value in the File Name field.
6. Click Finish to create the file in the project that you have selected. As a default, the new file opens in Page Designer, in the Design page.
8.3 Using JSPs in the Online Catalog sampleNow that you have seen some of the aids, try using them to build a JSP. Much of the coding that you do will probably end up to be straight typing, but remember that there are many aids to ease the process. It will take practice to become familiar with what is available.
Chapter 8. Working with JSPs 265

In this example, we will be building a page called AddNewItemProcess.jsp. The entry point into this process is an HTML page called AddNewItem.html. This page basically consists of a form with input fields. The fields are used to collect data about the new item that is to be added. When the user clicks the Submit button, AddNewItemProcess.jsp is called to take those fields and add a record to the database based on them. The basic flow of this process is shown in Figure 8-9.
Figure 8-9 Add new item process
Creating a new JSPTo create a new JSP:
1. From the Web perspective and Project Navigator view, select the folder where you want to put the JSP. This can be directly in the Web Content folder of the Web project or in a user-defined folder under it. In this case, we will select the Web Content/administration folder.
2. Right-click the folder and select New -> JSP file. A wizard will begin.
3. On the first page, set the File Name field to AddNewItemProcess.
AddNewItem.html
Add ItemRequired fields are indicated by an asterisk
Item NumberItem NameDescriptionQuantityPrice (US)Featured Item?
SubmitReset
*
Database
AddNewItemProcess.jsp
get request parameters
Look for duplicate items in db
validate item #
If this item is a featured item, unmark others
Add item to the database
266 IBM WebSphere Application Server - Express V5.0.2 Developer Handbook

Figure 8-10 Location of JSP file
4. Click Next. You will be prompted for tag libraries you want to use. We have not discussed tag libraries yet, but for now just be aware that we will be using a tag library to access the application database.
5. Click Add taglib. You will be able to select from a list of tag libraries that have been included in your Web project.
Chapter 8. Working with JSPs 267

Figure 8-11 Adding tag files
For our example, we used the tag libraries listed in Table 8-5.
Table 8-5 Taglibs for sample code
In each case, we will scroll down to the taglib and select it. A prefix (of your choice) is needed to identify the tag library within the JSP. The prefixes we use in the sample code are shown in Table 8-5.
URI Prefix
http://coldjava.hypermart.net/servlets/validtag if
http://coldjava.hypermart.net/servlets/backtag go
jspsql dab
268 IBM WebSphere Application Server - Express V5.0.2 Developer Handbook

6. Click OK and then Next.
7. Click Next. This page allows you to select options that affect the way the page is coded.
Figure 8-12 Specify options to be included in the page
In this case, all the defaults fit our needs, so click Next.
8. The next page allows you to add a servlet entry for the JSP in the Web deployment descriptor. This is optional, but saves you time if you find that you need to do this later. One prime reason for doing this would be to add URL pattern mappings to make it easier to refer to the JSP in the code. Another reason would be to add initialization parameters.
Note: The only tag library in Table 8-5 that is included with Studio Site Developer is the JSPSQL tag library. The others would need to be downloaded and imported to the project. If you are following along with our sample, these libraries are available because they have already been imported into the sample project for your use. Importing tag libraries will be discussed in more detail in 9.2.1, “JSP wizard” on page 288.
Chapter 8. Working with JSPs 269
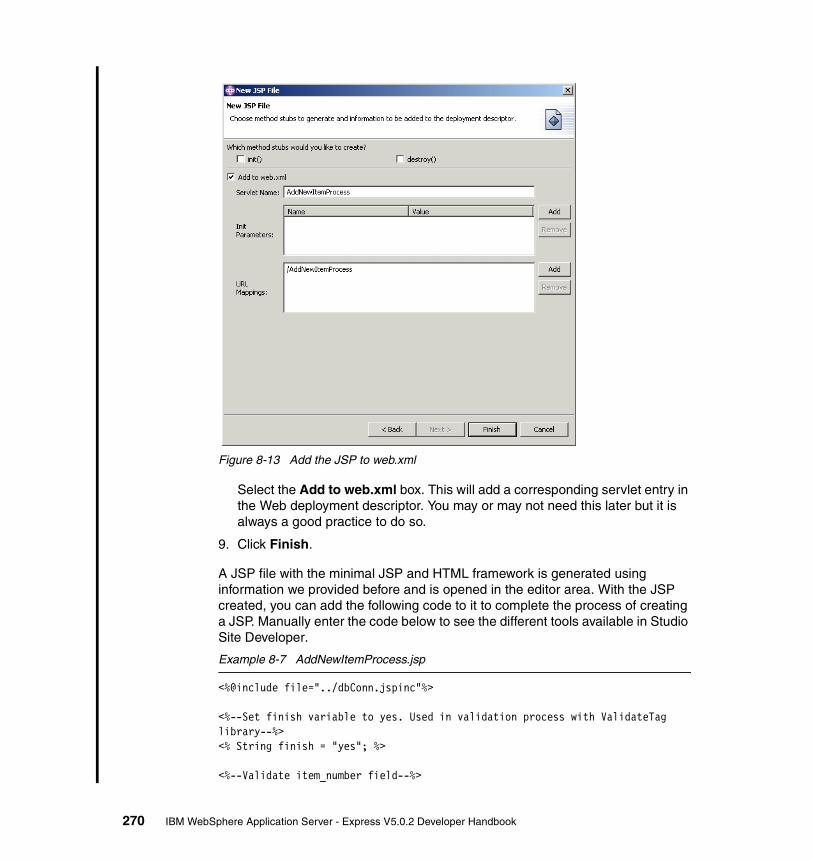
Figure 8-13 Add the JSP to web.xml
Select the Add to web.xml box. This will add a corresponding servlet entry in the Web deployment descriptor. You may or may not need this later but it is always a good practice to do so.
9. Click Finish.
A JSP file with the minimal JSP and HTML framework is generated using information we provided before and is opened in the editor area. With the JSP created, you can add the following code to it to complete the process of creating a JSP. Manually enter the code below to see the different tools available in Studio Site Developer.
Example 8-7 AddNewItemProcess.jsp
<%@include file="../dbConn.jspinc"%>
<%--Set finish variable to yes. Used in validation process with ValidateTag library--%> <% String finish = "yes"; %>
<%--Validate item_number field--%>
270 IBM WebSphere Application Server - Express V5.0.2 Developer Handbook

<if:notValidString value='<%=request.getParameter("item_number")%>' length="5"><go:Back alert="Item Number must be 5 characters in length." />
<% finish = "no"; %> </if:notValidString><if:notValidString value='<%=request.getParameter("item_short_desc")%>' length="1">
<go:Back alert="Item Name is a required field." /> <% finish = "no"; %> </if:notValidString><if:notValidString value='<%=request.getParameter("item_long_desc")%>' length="1">
<go:Back alert="Item Description is a required field." /> <% finish = "no"; %></if:notValidString><if:notValidString value='<%=request.getParameter("quantity")%>' length="1">
<go:Back alert="Quantity is a required field." /> <% finish = "no"; %> </if:notValidString><if:notValidString value='<%=request.getParameter("price")%>' length="1">
<go:Back alert="Price is a required field." /> <% finish = "no"; %></if:notValidString>
<%System.out.println("try to locate the item"); %><!-- select statement to check if item exists. --><dab:select id="find_item" scope="request" connectionSpec="DBConn"> <dab:sql>
SELECT DB2ADMIN.ITEM.ITEM_NUMBER FROM
DB2ADMIN.ITEM WHERE DB2ADMIN.ITEM.ITEM_NUMBER = :itemNumber </dab:sql>
<dab:parameter parmName="itemNumber" type="VARCHAR" value='<%=request.getParameter("item_number")%>' /></dab:select>
<!-- If item was found, then send message --><dab:repeat name="find_item" over="rows" index="index" start="1"> <%System.out.println("item already existed in db"); %> <go:Back alert="The Item Number you have chosen already exists. Please specify a unique item number." /> <% finish = "no"; %> </dab:repeat>
<!-- If item number is unique, and there were no validation errors, then insert into db, otherwise the rest of the page is skipped --><% if (finish.equals("yes")) { %>
Chapter 8. Working with JSPs 271

<%--Set the featured item flag to NO if not selected on the AddNewItem.jsp form--%> <% String inputSotdFlag = (String) request.getParameter("sotd_flag"); if ( inputSotdFlag == null ) { inputSotdFlag = "N"; System.out.println("not a featured item"); }%>
<%System.out.println("try to insert item"); %><%-- Insert the new item in the database --%> <dab:modify id="insert_statement" connectionSpec="DBConn"><dab:sql> INSERT INTO DB2ADMIN.ITEM( ITEM_NUMBER, ITEM_SHORT_DESC, ITEM_LONG_DESC, QUANTITY, PRICE, SOTD_FLAG ) VALUES( :item_number, :item_short_desc, :item_long_desc, :quantity, :price, :sotd_flag )</dab:sql> <dab:parameter position="1" type="char" value='<%=request.getParameter("item_number")%>' /> <dab:parameter position="2" type="varchar" value='<%=request.getParameter("item_short_desc")%>' /> <dab:parameter position="3" type="varchar" value='<%=request.getParameter("item_long_desc")%>' /> <dab:parameter position="4" type="integer" value='<%=request.getParameter("quantity")%>' /> <dab:parameter position="5" type="decimal" value='<%=request.getParameter("price")%>' /> <dab:parameter position="6" type="char" value="<%=inputSotdFlag%>" /></dab:modify>
<%System.out.println("item inserted"); %><%--Success message--%> <span class="site-page-headers">Thank you</span>
272 IBM WebSphere Application Server - Express V5.0.2 Developer Handbook

<P> Item number <%=request.getParameter("item_number")%> has been added!<BR>Do you wish to <A href="AddNewItem.jsp" target="main">add additional items</A> or would you like to return to the <A href="admin.html" target="main">site administration function</A> menu? <% } //end if (finish.equals("yes") %>
In our sample, we use the following line of code to include a file into our JSP. This file contains the database connection information and is referenced by the connectionSpec parameter in the dab tags.
<%@include file="../dbConn.jspinc"%>
We did not hard-code the connection information into the JSP because we were concerned with session data issues related to our Wishlist feature of the site. If we had inserted the connection information into the JSP, we would have lost the connection parameters when the wishlist page was viewed. This occurs because we remove the database session object from the wishlist page. The wishlist page simply uses session attributes to display the users item selections.
Chapter 8. Working with JSPs 273

274 IBM WebSphere Application Server - Express V5.0.2 Developer Handbook

Chapter 9. Using tag libraries
Custom tag libraries provide an abstraction of Java code as opposed to scriptlets, which require Java programming experience. For a Web developer in charge of writing JSPs, using custom tags eliminates the need for in-depth Java knowledge and makes it easy to reuse code.
This chapter provides information on using tag libraries in Web applications. It introduces the concepts of custom tag libraries (taglibs) and gives information on how to use them.
� Tag library concepts� Studio Site Developer and tag libraries� Using tag libraries in the Online Catalog sample
We will focus mainly on understanding the content of tag libraries and how to incorporate existing tag libraries into a Web application. If you are interested in creating tag libraries, please refer to Programming J2EE APIs with WebSphere Advanced Server - Express V5.0.2 Developer Handbook SG24-6124.
9
© Copyright IBM Corp. 2003 275

9.1 Custom tag library (taglibs) conceptstaglibs gives programmers a way of including functions coded in Java without having to code them. By including a custom tag library with existing functions in the application and defining a way to reference these functions, Web site developers can take advantage of the functions they provide with little effort.
Taglibs can be developed by the programmer, but more often are downloaded from existing sources. For example, the following sites contain tag libraries for download:
� Open-source utility tag libraries available from the Apache Group’s Jakarta project:
http://jakarta.apache.org/taglibs
� Other sources we used during this project:
http://coldjava.hypermart.nethttp://jsptags.com/tags/
9.1.1 Motivation for custom tagsJSPs are borne out of the desire to leave application logic free of presentation logic. However, we have seen that although JSPs provide such separation, if not used sensibly they can introduce the opposite problem, where the JSP becomes too cluttered with Java code, especially scriptlets. Such intrusion of Java code into the JSP makes the development and maintenance difficult for a number of reasons, among them are:
� The use of scriptlets requires Java programming experience; they cannot be made much easier to create by programming tools, such as Studio Site Developer.
� Scriptlets are useful for applying conditional logic to the page element display, but doing so makes the markup language hard to understand.
� More Java code within a JSP means that there is increased likelihood of errors occurring in the JSP page compilation class.
� Although we can access beans within our JSPs, if changes need to be made to that bean’s interface, we may need to make coding changes in every JSP that uses it.
Note: The Jakarta Tag Library project is an open-source repository for JSP custom tag libraries and associated projects. Detailed information for each of the Jakarta tag libraries below can be found at:
http://jakarta.apache.org/taglibs/index.html
276 IBM WebSphere Application Server - Express V5.0.2 Developer Handbook

AdvantagesBeginning with JSP 1.1 we have the ability to hide much of this complexity and reduce these problems by abstracting out much of the Java code within our JSPs into a custom tag. By doing this, we can overcome a lot of the problems mentioned above:
� Our JSP authors may find it easier to work with a custom tag that looks like other JSP action tags, rather than to program Java code directly within a scriptlet. Programming tools like Studio Site Developer can automate a lot of the work involved in using the tag.
� The reduced Java code within the JSP makes it much easier to understand. This may be important when trying to maintain other peoples’ JSPs.
� The custom tags can include much more exception and error handling logic without exposing this to the JSP author or clogging up the JSP page. Custom tags can be developed and tested in isolation from the actual JSPs they will be used in.
� We can wrap access to JavaBeans within custom tags. The properties and methods of the bean can be accessed through use of custom tags. Therefore, we can maintain and develop the bean without changing the interface the JSP uses. We can also add new features to our tags while maintaining backwards compatibility, something that is not always easy to do when accessing a Java API directly.
By using custom tags, we can harness the possibility of making our JSP pages quicker and easier to develop, and also more maintainable. What is more, by using them to wrap common tasks, we can also take advantage of portability by reusing custom tags across Web applications. Whole libraries of third-party custom tags are freely available.
There are also advantages possible only by using custom tags. The most notable is the ability to post-process JSP output before it is written. This is a potentially powerful piece of functionality that is not achievable using scriptlets.
DisadvantagesDespite the obvious potential advantages to their use, custom tags should not be viewed as a remedy for the problems associated with JSP development. Overuse of custom tags can lead to other problems:
� Creation of meta-languages: By forcing a multitude of custom tags onto the JSP authors we also force them to learn the syntax of all the tags. Effectively we create another language, which may have a simpler interface than Java, but still needs learning. In any case, custom tags should always be supplied with sufficient documentation and examples.
Chapter 9. Using tag libraries 277

� Controller logic: Many custom tag libraries are available to access APIs, such as JDBC, JNDI, and so forth. Although the tags provide a simple and powerful way to use such services (for example, to access a database), so their use leads to the presence of controller and business logic within the JSP.
� Performance: The runtime work involved in handling custom tags within the Web container does have an overhead. If performance of the Web application is critical then custom tags may not be appropriate.
9.1.2 When to useGiven the advantages and disadvantages listed above, the question of when custom tag usage is appropriate arises. The simple answer to this is that the primary consideration when deciding should be: Will the tag remove the need to put Java code within the JSP? The critical word in that question is need. If you need to implement some functionality within a JSP that will require some non-trivial Java code, then it is probably a good candidate for a custom tag. This is especially true when the same Java code is present within more than one JSP for the reasons of maintainability.
By basing the decision to implement a custom tag on the need to have the functionality, you reduce the temptation to implement some function that really should go elsewhere. The custom tags you implement should stay true to the overall application architecture and design. For some designs (for example, those based on the page-centric model of JSP usage) custom tags for database access and the like may well be necessary. However, if a database tag is used within an MVC-based design, then this suggests that the functionality is implemented in the wrong place.
If we decide that a piece of JSP functionality is a suitable candidate for a custom tag, then there are other questions that arise. The nature of the functionality should be considered. Custom tags can generally be thought of as either generic or domain specific. Generic tags have wide ranging uses. Can you pick up an existing tag for this purpose? Domain tags are more specific, and therefore their scope for reuse may be limited and the effort in creating the functionality within a custom tag may not be paid back if the function is only used on one or two JSPs within your application.
You should also give consideration to the factors surrounding the authoring of the JSPs. If the JSP authors are confident with Java, then they may prefer scripting to using custom tags. Conversely, if the JSP authors are non-Java programmers, then a custom tag interface will be better suited. Custom tags are also useful when the dialog between the JSP author and Java programmer is limited by physical distance or communication factors.
278 IBM WebSphere Application Server - Express V5.0.2 Developer Handbook

In practice, it is often best to provide the JSP author with choice. By implementing the logic of the tag within a bean and providing the custom tag as a wrapper to the bean’s interface, then you may be able to provide the author with the choice of scripting or using custom tags.
9.1.3 Common custom tag usagesWhen custom tags are used, they often perform a function that falls into one of the following categories:
� Markup generation: Generation of markup language output, for example, to create an HTML form.
� Scripting generation: Generation of client-side scripting code such as JavaScript, for example, to perform client-side data validation. This is illustrated in the Online Catalog sample.
� Environment access: Providing access to and modification of implicit objects.
� API access: Simplifying access to APIs such as JDBC, JNDI, and JavaMail. This is illustrated in the Online Catalog sample.
� Content manipulation: Manipulating content before output, and caching of generated content.
9.1.4 How they workIn order for the Web container to understand and execute a custom tag, the code implementing the tag and information on how to translate the tag and find and invoke the code must be available to the container. Tags for a particular function are normally aggregated into a tag library.
Tag libraries, or taglibs, are normally packaged as JAR files. The taglib is made up of the following elements:
� Tag library definition (TLD): An XML file containing elements that describe each tag in the library. The TLD will be used by the Web container during translation time to interpret each tag, and at request time to find and invoke the tag code.
� Tag handler: A Java class that provides the Web container with access to the functionality of the tag. However, this does not necessarily mean that the tag handler implements the tag functionality. As we hinted, this may be contained within other classes/JavaBeans. The taglib will contain a tag handler class for each custom tag.
� Supplemental classes: The implementation of a custom tag may include some optional files that, if used, need to be included within the taglib.
Chapter 9. Using tag libraries 279

These are:
– TagExtraInfo: Provides additional information, over and above that contained within the TLD, about a custom tag.
– BeanInfo class: Tag handlers are themselves JavaBeans, and the Web container will inspect them to obtain properties and methods. This can be aided by a BeanInfo class for each tag handler.
The programmer downloads these files and puts them where they will be available to the application. A directive is added to the JSP that refers to the library and assigns it a prefix. In the JSP code, the prefix is used to invoke tags within the library. The Web application deployment descriptor (web.xml) provides the link between the directive used in the application and the actual JAR file containing the classes that execute the function.
9.1.5 An inside look at a taglibLet us take a look at a simple tag that displays a hello message. The elements of a taglib include:
� An implementation bean� A tag handler class� A tag library descriptor
It is important to note that if you are simply using an existing taglib, the only thing you really need to know is that these things exist. We want to show you a quick example to take the mystery out of taglibs.
Implementation beanThe actual tag implementation is contained within a JavaBean called HelloBean, shown in Example 9-1. The bean supplies one method, hello(), which accepts a String argument. The method outputs a message.
Example 9-1 Simple custom tag example: HelloBean.java
//Simple custom tag example: HelloBean.javapackage com.ibm.itso.j2eebook.tagexamples.beans;
/** * JavaBean which displays a Hello message. * * @author: Adrian Spender */public class HelloBean {
/** * HelloBean default constructor.
280 IBM WebSphere Application Server - Express V5.0.2 Developer Handbook

*/ public HelloBean() { super(); }
/** * Returns a string saying hello to the name argument. * * @return A hello message * @param name java.lang.String The name to say hello to */ public String hello(String name) { return "Hello " + name; }}
Now we have the syntax for our tag defined, and the bean that provides the implementation. The rest of the steps are best described as cookbook code. That is, the code is largely the same whatever tag you are implementing. The classes and methods you need to define are always the same. The first few times you go through these steps will perhaps seem tedious, but creating them soon becomes relatively trivial.
Tag handler classThe tag handler class extends the javax.servlet.jsp.tagext.TagSupport class, and provides an endTag() method that will be executed when our tag has been parsed by the Web container. We also need to create an instance variable called name that will hold the value of our tag’s attribute. Our tag handler class is shown in Example 9-2. Important sections of code are in bold, and comments are provided to explain what is happening.
Example 9-2 Simple custom tag example: HelloTag.java
//Simple custom tag example: HelloTag.javapackage com.ibm.itso.j2eebook.tagexamples;
import java.io.IOException;import javax.servlet.jsp.*;import javax.servlet.jsp.tagext.*;import com.ibm.itso.j2eebook.tagexamples.beans.*;
/** * Handles the hello tag. * * @author: Adrian Spender */public class HelloTag extends javax.servlet.jsp.tagext.TagSupport {
Chapter 9. Using tag libraries 281

// This variable will store the name attribute of the tag private java.lang.String name;
/** * HelloTag default constructor. */ public HelloTag() { super(); }
/** * Called when the end of the tag is reached. Here we simply * call our bean to get our output and then write it out. * * Note that we have access to the pageContext implicit object. * * At the end of the method we return an integer that tells the * Web container whether the rest of the JSP page should be * executed. If set to SKIP_PAGE then the JSP execution will * stop. If set to EVAL_PAGE, execution will continue. * * @return indication to continue page execution * @exception javax.servlet.jsp.JspException */ public int doEndTag() throws JspException {
int result = EVAL_PAGE;
// Here we call our bean to get our message HelloBean hb = new HelloBean(); String mess = hb.hello(name);
try { // and here we write the message back out pageContext.getOut().write(mess); } catch (IOException e) { // whoops e.printStackTrace(); }
release(); return result; }
... as our tag is a bean, we also provide accessor and setter methods}
282 IBM WebSphere Application Server - Express V5.0.2 Developer Handbook

Tag library descriptor (TLD)The hello tag is packaged in a taglib. The TLD provides the Web container with the information it needs about the taglib, including the tag handler class information and the attributes of the tag. The TLD for hello is shown in Example 9-3.
Example 9-3 Simple custom tag example: j2eebook.tld
<!Simple custom tag example: j2eebook.tld><?xml version="1.0" encoding="ISO-8859-1" ?><!DOCTYPE taglib PUBLIC "-//Sun Microsystems, Inc.//DTD JSP Tag Library 1.1//EN" "http://java.sun.com/j2ee/dtds/Web-jsptaglibrary_1_1.dtd">
<taglib><tlibversion>1.0</tlibversion> <jspversion>1.1</jspversion> <shortname>j2eebook</shortname> <info>Tag examples from ITSO J2EE Redbook</info>
<tag> <name>hello</name> <tagclass>com.ibm.itso.j2eebook.tagexamples.HelloTag</tagclass> <bodycontent>empty</bodycontent> <info> Takes a name and says hello
</info><attribute> <name>name</name> <required>true</required> </attribute></tag>
</taglib>
The TLD is an XML document that describes the contents of a tag library to the Web container. It helps the container identify custom tags within a JSP page, find the tag handler, recognize the attributes of the tag, and in combination with any TEI, validate the tag.
The structure of the TLD is pretty self-explanatory. As an XML file, the TLD contains a standard XML root element and DTD statement.
Note: The JSP container uses the TagExtraInfo (TEI) class at translation time to provide information over and above that provided by the TLD.
Chapter 9. Using tag libraries 283

The TLD contains two main elements, taglib and tag. The taglib element defines details of the tag library as a whole. It also contains a tag element for each custom tag within the library. Table 9-1 defines possible subelements within a taglib element.
Table 9-1 Subelements of the <taglib> TLD element
Of these, the URI element is the most important. It ties the taglib directive defined within a JSP page with a specific tag library. Alternatively, the URI may be defined in the web.xml file for the Web application.
The tag element defines most of the information needed by the Web container for a particular tag. The subelements of the tag element are listed in Table 9-2.
Table 9-2 Sub elements of the <tag> TLD element
Sub-element Description
<tlibversion> Defines the version of this tag library.
<jspversion> Defines the version of the JSP specification that the tags within the library need.
<shortname> Defines a name for the tag library.
<uri> Defines a unique reference to the tag library.
<info> A String describing the contents of the tag library.
<tag> A tag element defines the details for a particular custom tag in the library.
Sub element Description
<name> The name by which the tag will be referred to in a JSP page.
<tagclass> The tag handler class.
<teiclass> If the tag has a TEI (TagExtraInfo), then its class is referred here.
<bodycontent> Attempts to define the contents of the tag body.
<info> A sting describing the function of the tag.
<attribute> The attribute element defines the details of a tag attribute.
284 IBM WebSphere Application Server - Express V5.0.2 Developer Handbook

There is one tag element for each custom tag within the library. The bodycontent element is, according to the JSP specification, primarily for use by authoring tools. It may take one of three values: tag dependent, JSP, or empty. In practice, it is most often used to define tags that will have no body content by specifying empty.
The tag element will include an attribute element for each attribute of the tag. The attribute element has three subelements:
� Name: A required element and defines the name of the attribute
� Required element: If true, tells the Web container that a translation-time error should occur if the attribute is not specified within a given tag instance
� rtexprvalue: If true, specifies that the Web container should allow the attribute value to be expressed using a JSP expression tag
9.1.6 Using tag librariesNow that you have seen what a taglib is, you can see how simple it is to use it within an application. The key to using a tag library is to make the TLD available to the Web container. This usually involves three steps:
� Identifying the location of the TLD using a taglib directive in the JSP where the taglib is to be used. The taglib directive can point directly to the TLD, or it can use a URI that maps to a deployment descriptor entry.
� An entry in the Web application deployment descriptor that identifies the TLD location and URI.
� Invoking the taglib in the code.
Taglib directiveThe taglib directive tells the Web container how to find the TLD for the taglib and the identifier (prefix) that will be used in the application to signal that the taglib is to be used. The format for the taglib directive is:
<%@taglib uri=“tag_uri” prefix=“tag_prefix”%>
The URI we specify can be abstracted from the physical location of the TLD, allowing us more flexibility and portability when deploying our Web applications. For example:
<%@taglib uri=“http://jakarta.apache.org/taglibs/utility” prefix=“utils”%>
The URI specified here is absolute, that is, it specifies a protocol, host, and uri. Within the web.xml file for our Web application, we must provide a taglib element to map this to a particular location. The location specifies a relative URI for the location of the TLD.
Chapter 9. Using tag libraries 285
It is possible to avoid the need to specify a mapping within web.xml by making the uri attribute of the taglib directive a relative URI to the TLD itself. For example, in Example 9-5 on page 287, we specified:
<%@ taglib uri="/Web-INF/j2eebook.tld" prefix="book" %>
In this case, the Web container still looks for such a URI within the taglib elements of the web.xml descriptor for the Web application. If we do not specify one then it will use the relative URI to attempt to find the TLD directly.
Finally, the taglib directive may specify a JAR file for the URI. For example:
<%@ taglib uri=“booktags.jar” prefix=“book” %>
In this case, the TLD must be located within the META-INF directory of the booktags.jar file.
Although these latter two techniques can be useful in taglib development, in production absolute URIs ideally should be used to aid portability and maintenance.
Taglib entries in web.xmlThe classes and TLD that make up a tag library are packaged as a JAR file for deployment to the application server. A taglib entry in the Web deployment descriptor, web.xml, associates a URI to a TLD location. An example entry is shown below:
<%Example taglib definition in web.xml><taglib>
<taglib-uri>uri
</taglib-uri><taglib-location>
location</taglib-location>
</taglib>
An example is shown in Example 9-4.
Example 9-4 Taglib entry in web.xml
<taglib><taglib-uri>http://jakarta.apache.org/taglibs/application-1.0</taglib-uri><taglib-location>/WEB-INF/lib/application.jar</taglib-location></taglib>
The URI refers to the uri attribute of a taglib directive on the JSP page on which the tag library is used. The Web container uses the information provided in web.xml to map this uri to a physical TLD defined by the location attribute.
286 IBM WebSphere Application Server - Express V5.0.2 Developer Handbook
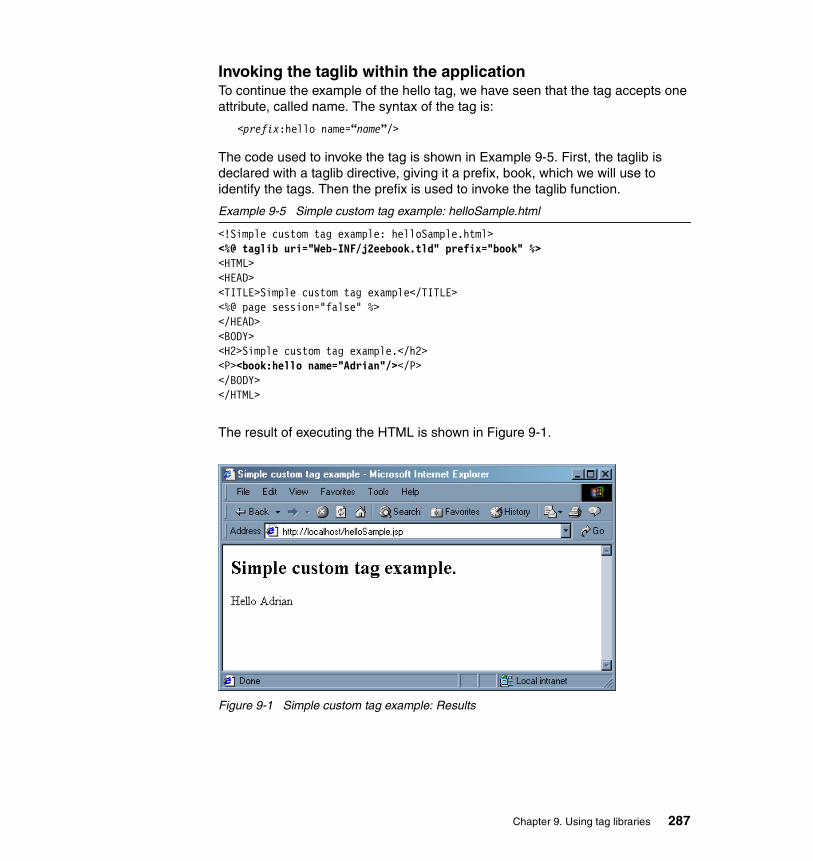
Invoking the taglib within the application To continue the example of the hello tag, we have seen that the tag accepts one attribute, called name. The syntax of the tag is:
<prefix:hello name=“name”/>
The code used to invoke the tag is shown in Example 9-5. First, the taglib is declared with a taglib directive, giving it a prefix, book, which we will use to identify the tags. Then the prefix is used to invoke the taglib function.
Example 9-5 Simple custom tag example: helloSample.html
<!Simple custom tag example: helloSample.html><%@ taglib uri="Web-INF/j2eebook.tld" prefix="book" %><HTML><HEAD><TITLE>Simple custom tag example</TITLE><%@ page session="false" %></HEAD><BODY><H2>Simple custom tag example.</h2><P><book:hello name="Adrian"/></P></BODY></HTML>
The result of executing the HTML is shown in Figure 9-1.
Figure 9-1 Simple custom tag example: Results
Chapter 9. Using tag libraries 287

9.2 Studio Site Developer and tag librariesWebSphere Studio Site Developer contains serveral tools to help with the importing and consumption of tag libraries:
� JSP wizard
� Insert custom tag dialog
� Snippets view
As described in “Using a tag library in the Online Catalog sample” on page 301, the steps to using tag libraries are listed below. Notice that in addition to the steps, some of the tools above are listed. This indicates that these tools can be used to complete a step.
1. Create a JSP (JSP wizard).
2. Add a taglib directive to the JSP (JSP wizard or Insert custom tag dialog or Snippets view).
3. Add the appropriate taglib tags to the JSP (Insert custom tag dialog).
4. Insert the final JSP scriptlet and HTML code into the JSP; this step is optional.
For step two, all three tools are listed. When using the JSP wizard, you can select the tag libraries that you wish to use in the JSP. If a tag library is selected, a taglib directive will be added to the JSP for that tag library. Likewise, in order to use the Insert custom tag dialog, you must first select the tag library; if a tag library is not listed, you can add it. In doing so, a taglib directive will be added to the JSP. The Snippets view simply adds a page directive. Each of these tools is described in greater detail in the following sections.
9.2.1 JSP wizardWhen you create a JSP using the JSP wizard, you have the option of adding taglib directives. If the tag library that you want is not in the provided list, you can import a new tag library into the project and use it. The process of adding taglib directives and importing a new tag library is illustrated below. For the illustration, we have downloaded a validation tag library (validtag) from:
http://coldjava.hypermart.net
1. Switch to the Web perspective.
2. Right-click the Web Content folder and select New -> JSP File from the context menu to start the JSP wizard.
3. On the first page, specify your JSP File Name and click Next.
288 IBM WebSphere Application Server - Express V5.0.2 Developer Handbook

4. On the Tag Libraries page, you will notice that two tag libraries (html and bean) have been alreay added for you.
5. Click Add to open the Select a Tag Library dialog. This dialog displays a full list of all of the tag libraries already included in the project.
Figure 9-2 Included tag libraries
a. You can select a tag library from the list by selecting the check box beside the taglib entry.
i. Once the tag library is selected, you must specify a Prefix to be used.
ii. Click OK to add the tag library to the list of included tag libraries for your JSP.
b. If the tag library you want is not displayed in the list, you can click Import to open the Import JSP Tag Library dialog.
Chapter 9. Using tag libraries 289

Figure 9-3 Importing a tag library
i. Click Browse to locate the tag library .jar file.
ii. Verify that the Add alias URI to deployment desciptor option is checked. If you wish, you can specify a different URI then the default one.
iii. Click Finish to add the tag library to the list of available tag libraries.
iv. Locate the tag library and select the check box beside the tag library entry, then specify the Prefix to be used.
v. Click OK to add the tag library to the list of included tag libraries for your JSP.
290 IBM WebSphere Application Server - Express V5.0.2 Developer Handbook

Figure 9-4 Included tag libraries
6. Click Finish to create the JSP. If you open the JSP, you will notice that the taglib directives have been added to the top of your JSP.
Alternative way of importing a tag libraryIf you wish to import a tag library into your project but you do not wish to create a new JSP at the same time, you can import the tag library .jar file separately and then update the Web deployment descriptor.
For the illustration below, we have downloaded a validation tag library (validtag) from:
http://coldjava.hypermart.net
Assuming you have downloaded the taglib you want to use into a temporary directory, you are ready to import it to your Web application. To import a tag library into your project:
1. Switch to the Web perspective.
2. Right-click your project and click Import from the drop-down menu.
Chapter 9. Using tag libraries 291

3. From the first Import window select File system from the list of import sources and click Next.
4. In the next window, you must specify the taglib location, select the taglib, and specify the destination directory where the selected taglib will be imported (see Figure 9-5).
Figure 9-5 Importing a tag library
The tag library should be imported to the Web Content/WEB-INF/lib folder.
5. Click Finish.
Updating the Web module deployment descriptorNext we will update the Web deployment descriptor, web.xml, to add a new taglib reference to the validtag taglib we just imported.
1. Open the deployment descriptor by double-clicking web.xml or Web Deployment Descriptor in the Navigator view.
292 IBM WebSphere Application Server - Express V5.0.2 Developer Handbook

2. Select the References tab and then click the JSP tag libraries tab from the upper tab menu (see Figure 9-6).
Figure 9-6 Updating the JSP tag library references in web.xml - References view
3. Click Add.
4. A window will open with a list of tag libraries in the WEB-INF/lib folder. Select the Validtag tag library from the window. The URI will be filled in for you and a list of tags in the tag library will appear in the bottom screen.
Chapter 9. Using tag libraries 293

Figure 9-7 Adding the Validtag taglib
5. Click Finish.
6. Save and close the deployment descriptor.
Viewing the TLD file
Hopefully, the site that provided the taglib will also provide information on how to use it, but viewing the TLD file is a quick shortcut into finding out what valid tags and attributes exist.
You will find that when downloading a taglib, the JAR file is all that you are required to download. The JAR file contains the classes required to implement the tag library and the TLD file. However, you usually have the option to download a separate TLD file also.
If you choose to download the TLD file to your file system, you can use a text editor to view it. You can also import it to your project as a separate file, though this is not necessary if it exists in the JAR file.
If you open a TLD file in Studio Site Developer, it will open with the XML editor.
294 IBM WebSphere Application Server - Express V5.0.2 Developer Handbook

9.2.2 Using the Insert custom tag dialogThe Insert custom tag dialog allows you to insert a tag from a tag library into your JSP. If the tag library you want is not listed, you can add one from a list of available tag libraries in the project. As with the JSP wizard, if the tag library has not been added to the project, you may import a new one.
To insert a tag library tag into your JSP, complete the following steps:
1. Click a spot in your JSP where you wish to place the the tag library tag and select JSP -> Insert Custom... from the main menu. The Insert Custom Tag dialog will open.
Figure 9-8 Insert custom tag
2. The left pane of the dialog contains a list of the tag libraries that are found in the JSP. The right pane contains the tags that belong to the selected tag library from the right. Locate the tag you wish to insert and click Insert. The tag will be added to your JSP.
3. If the tag library you want has not been included with the JSP being edited, click Add.... This will open the Select a Tag Library page as shown in 9.2.1, “JSP wizard” on page 288. If you add an incorrect tag library, select the tag library from the left pane and click Remove.
Chapter 9. Using tag libraries 295

9.2.3 Snippets viewThe Snippets view contains an item to add a taglib directive to your JSP. Select the taglib directive item from the JSP drawer and drag it onto your JSP. A dialog will open that requires you to enter in the uri and prefix for the directive. Once you are finished, click Insert and the taglib directive will be added to the top of your JSP.
Figure 9-9 Insert taglib directive
9.2.4 Tag libraries included with Studio Site DeveloperStudio Site Developer includes tag libraries, both from IBM and from Jakarta. One way to include some of these in your application is to select an option at Web project creation time (see 4.3.2, “Creating a Web project” on page 66).
Table 9-3 on page 297 shows these options and what you get. If you did not select an option when you created the Web project, you can add these options later from the Web projects Web property menu. Just right-click the Web project in the Project Navigator view, select Properties, then select Web.
296 IBM WebSphere Application Server - Express V5.0.2 Developer Handbook

Table 9-3 Tag library options for Web projects
Let us take a look at some of these tag libraries.
Application tag library (from Jakarta)The Application custom tag library contains tags that can be used to access information contained in the ServletContext for a Web application.
Tags are provided to access information in “application”-scoped attributes and Web application initialization parameters, which are defined in the /WEB-INF/web.xml file.
Option Tag libraries
JSP standard tag library � jaxen-full.jar� jaxp-api.jar� jdbc2_0-stdext.jar� jstl.jar� sax.jar� saxpath.jar� standard.jar� xalan.jar� xerceslmple.jar
Tag libraries for accessing JSP objects � Application� Page� Request� Response� Session
Tag libraries for database access JSPSQL
Tag libraries for internationalization I18n
Utility tag libraries � DateTime� Utility� String� Mailer
Struts tag libraries - these tag libraries are added only if Struts support is added to the project.
� bean� html� logic� nested� template� tiles
Chapter 9. Using tag libraries 297

Page tag library (from Jakarta)The Page custom tag library contains tags that can be used to access all the information about the PageContext for a JSP page.
Tags are provided to access information in "page"-scoped attributes.
Request tag library (from Jakarta)The Request custom tag library contains tags that can be used to access all the information about the HTTP request for a JSP page.
Tags are provided to access information in the HTTP request for HTTP input parameters from a POST or GET, HTTP headers, cookies, request attributes, and session information related to this request.
Response tag library (from Jakarta)The Response custom tag library contains tags that can be used to set all the information for an HTTP response for a JSP page.
This includes creating cookies and setting their values, setting HTTP headers, returning back an HTTP error, or sending an HTTP redirect.
Session tag library (from Jakarta)The Session JSP tag library provides tags for reading or modifying client HttpSession information.
A servlet container uses an HttpSession to store information about a client’s session on the server. By default, a JSP page will create a session for a user. The user is tied to the session using either a cookie or URL rewriting. This is how you can tie information to a user between multiple HTTP requests to your server.
Session attributes are what makes it possible to store information about a client’s session between multiple HTTP requests. A session attribute consists of a name and value. To save information about a user’s session on your server, use the setattribute tag.
Jspsql tag library (from IBM)IBM provides a tag library of JSP actions for database access. The tag library uses a provided set of beans (dbbeans.jar) that offers an easy alternative to direct use of the JDBC interface for database access. The beans themselves are implemented using the JDBC interface, and are therefore able to access any database that has a JDBC driver.
298 IBM WebSphere Application Server - Express V5.0.2 Developer Handbook

The tag library provides functions that you would otherwise have to implement separately in each JDBC application, such as caching the rows of a result set in memory, and executing updates or deletes on rows of the result set.
I18N tag library (from Jakarta)The I18N custom tag library contains tags that help manage the complexity of creating internationalized Web applications.
DateTime tag library (from Jakarta)The DateTime custom tag library contains tags that can be used to handle date-and time-related functions. Tags are provided for formatting a date for output, generating a date from HTML forum input, using time zones, and localization.
Mailer tag library (from Jakarta)This custom tag library is used to send e-mail.
String tag library (from Jakarta)This custom tag library is used to manipulate Strings.
Utility tag library (from Jakarta)The utility custom tag library contains examples of some basic tags. It illustrates several custom tag library code techniques.
JSP standard tag library (from Jakarta)JSTL is the standardized set of custom tag libraries that are slated to become part of the JSP standard. JSTL will replace many of the current Jakarta tag libraries. Examples of such features are listed below. However, there are many additional features available.
� Basic logic and flow control tags (if, choose, forEach, etc.) � Access to implicit server objects (params, session, etc.) � Reduced scriptlets and use of scoped variables � Date formatting tags
9.2.5 Tag libraries used in the example sample applicationsIn addition to the tag libraries you can select when you create a Web project, Studio Site Developer also includes a few tag libraries in the sample projects. If you see one you want to use, you can load the sample and import the JAR file from the WEB-INF/lib directory.
Table 9-4 on page 300 shows the tag libraries used in the examples applications.
Chapter 9. Using tag libraries 299

Table 9-4 Tag libraries used in example applications
Tip: If you want to see how the taglibs are used in the example applications, a quick way to find them is to use the search facility. Start by loading the application to the workspace. Open the web.xml file and use the References tab to find the URI. Then select Search from the toolbar and enter the URI as the search argument. This will give you a list of files that have the URI, presumably in a taglib directive. Click an entry to open the file to that location. Note the prefix used for the taglib in the code and scan the code for instances of where it is used.
Example Tag library
Document management example DateTimePageRequestResponseSessionStringFileservFileIOFilterUtility
Customer service example JSP standard tag libraryPageRequestResponseSessionDateTimeMailerFilterSslext
Custom home page example DateTimeRequestResponseSessionScrape
Survey example DateTimeI18nPageRequestResponseSession
300 IBM WebSphere Application Server - Express V5.0.2 Developer Handbook

FileIO Tag Library (from IBM)Basic file operations. This library implements a file rename and file delete action on the file system.
Filter tag library (from IBM) This filters HTML markup for presentation of user-entered data. That is, a user enters the following in a text entry field: Hello <b>World</b>. The filter tag is used when data is to be presented on a page. It keeps the HTML markup from being processed and printed as bold text.
SSLext tag library (from IBM)The SSLext tag library provides seamless integration of SSL into the Web application, allowing secure transmission of Web pages between the Web browser and Express Application Server. Information on using this tag library can be found in the readme file for the customer service example application.
Scrape tag libraryThe Scrape tag library can scrape or extract content from Web documents and display the content in your JSP. For example, you could scrape stock quotes from other Web sites and display them in your pages.
9.3 Using a tag library in the Online Catalog sampleWithin the Online Catalog sample, tag libraries are used extensively. This section illustrates the use of the Mailer tag library. We will use this tag library in the Online Catalog sample application to process the input from an information request form.
Your company example DateTimeFileIOFilterFileservI18nPageRequestResponseSession
Example Tag library
Chapter 9. Using tag libraries 301

Each taglib is different and will have different attributes and naming conventions. You will have to locate the documentation for the taglib you are using to find these. For this example, the documentation for the Mailer taglib can be located at:
http://jakarta.apache.org/taglibs/doc/mailer-doc/mailer-1.1/index.html
Figure 9-10 shows how tag libraries are used in a Web application.
Figure 9-10 Using custom tag libraries
The Online Catalog application allows visitors to request information (or comment) about products by sending an e-mail. To do this, the application uses an HTML page called inforequest.html to solicit input from the user. It then calls mailer.jsp to retrieve the contents of the form and send an e-mail to the company using the Mailer taglib.
WEB-INF/lib/taglibs-mailer.jar...mail.classsetrecipient.classfrom.classmessage.classsend.classtaglib.tld...
1
2web.xml<taglib><taglib-uri>http://jakarta.apache.org/taglibs/mailer-1.1</taglib-uri><taglib-location>/WEB-INF/lib/taglibs-mailer.jar</taglib-location></taglib>
mailer.jsp<%@ taglib uri="/WEB-INF/lib/taglibs-mailer.jar" prefix="mt" %>
or
<%@ taglib uri="http://jakarta.apache.org/taglibs/mailer-1.1" prefix="mt" %>
<mt:mail server="<%=request.getParameter(\"server\") %>"><mt:setrecipient type="to"><%=request.getParameter("to")%></mt:setrecipient><mt:from><%=request.getParameter("from")%></mt:from><mt:message>Name:<%=request.getParameter("name")%>Message:<%=request.getParameter("message")%></mt:message><mt:send>
4
3
302 IBM WebSphere Application Server - Express V5.0.2 Developer Handbook

Figure 9-11 Example process
We will assume at this point that the inforequest.html page has already been created and that the values to, server, cc, name, from, subject, and message are the names of the parameters that will be sent to the mailer.jsp when the form is submitted.
The steps in this example are as follows:
1. Create a JSP
2. Add a taglib directive to the JSP
3. Add the appropriate taglib tags to the JSP
4. Insert the final JSP scriptlet and HTML code into the JSP
9.3.1 Step 1: Creating a JSPThe first step in this example is to create a JSP called mailer.jsp. This file should be placed in the info_request folder under the WebContent directory.
1. Open the Web perspective.
2. Navigate to the WebContent/info_request folder of the OnlineCatalog project, right-click it, and select New -> JSP File from the context menu. The New JSP File wizard opens.
3. Specify the File Name as mailer.jsp.
4. Click Next.
5. On the Tag Libraries page, we could add the tab library that we require, but we will do this later on in the example. Click Finish. The mailer.jsp is created and opened in Page designer.
to, server, cc, name,
from, subject, message
<mt:mail server='<%=request.getParameter("server")%>'><mt:setrecipient type="to"><%=request.getParameter("to")%></mt:setrecipient><mt:from><%=request.getParameter("from")%></mt:from><mt:setrecipient type="cc"><%=request.getParameter("cc")%></mt:setrecipient><mt:subject><%=request.getParameter("subject")%></mt:subject><mt:message>
Name: <%=request.getParameter("name")%>Message: <%=request.getParameter("message")%>
</mt:message><mt:send>
<P>The following errors occured<br><mt:error id="err">
<jsp:getProperty name="err" property="error"/><BR></mt:error><BR>Please back up a page, fix the error and resubmit.<P>
</mt:send></mt:mail>Thank you<p></p>Your message has been successfully sent.
.
.
.
.
.
.
inforequest.html mailer.jsp
Chapter 9. Using tag libraries 303

9.3.2 Step 2: Adding a taglib directiveWith the JSP created, we can now add a taglib directive to our page that will allow us to use the tags and functions of the taglib. The taglib that we will be using is the Mailer tag library.
1. With the mailer.jsp still open in Page designer, select Window -> Show View -> Snippets from the main menu of the workbench. This opens the Snippets view to the right of the editor
2. Expand the JSP drawer in the Snippets view and locate the taglib directive item.
Figure 9-12 Snippets view
3. Select taglib directive and drag it to the mailer.jsp; drop it in a location just after the bean taglib directive.
4. The Insert Template:taglib directive dialog opens. Set the uri value to /WEB-INF/ib/taglibs-mailer.tld and the prefix value to mt.
304 IBM WebSphere Application Server - Express V5.0.2 Developer Handbook

Figure 9-13 Adding a taglib directive
5. Click Insert. The mailer taglib directive is added to the mailer.jsp.
9.3.3 Step 3: Adding the taglib tagsWe can now add our Mailer tags to the JSP so that we can process the user input and send an email.
1. With the mailer.jsp still open in Page designer, highlight the <P>Place content here.</P> line of code located between the <BODY> tags and delete it.
Important: By default, the taglibs-mailer.tld will not be located in the WEB-INF/lib folder. You will have to import it into the project. The tld file for the tag library can be found at the Jakarta site or it can be found in the taglibs-mailer.jar file. In either location, it will probably be named tablig.tld, so it will have to be renamed.
There is no problem setting the URI to taglibs-mailer.jar, but in the next section, we wish to use the Insert Custom tool in Studio and the tld file for the taglib must be used or the tags will not be displayed in the dialog. Using the taglibs-mailer.jar file would require us to know all of the tags used in the tag library.
Chapter 9. Using tag libraries 305

2. Select JSP- > Insert Custom... from the main menu of the workbench to open the Insert Custom Tag dialog.
3. Select the mailer tag library from the left pane and then select the mail tag from the right pane.
Figure 9-14 Inserting a tag
4. Click Insert. The mail tag is added to the mailer.jsp.
5. Click Close.
6. Set the server attribute of the mail tag to <%=request.getParameter(\“server\”) %>. This will set the server attribute value to the server parameter when it is received from the input form.
7. Inside the mail tag, insert the following tags in this order:
– setrecipient with the type attribute set to to
– from
– setrecipient with the type attribute set to cc
– subject
– message
– send
– error with the id attribute set to err; the error tag must be located inside the send tag
306 IBM WebSphere Application Server - Express V5.0.2 Developer Handbook

8. Your code should look something like the following example.
Example 9-6 Mailer taglib tags inserted into mailer.jsp
<mt:mail server="<% request.getParameter(\"server\") %>"><mt:setrecipient type="to"></mt:setrecipient><mt:from></mt:from><mt:setrecipient type="cc"></mt:setrecipient><mt:subject></mt:subject><mt:message></mt:message><mt:send>
<mt:error id="err"></mt:error></mt:send>
</mt:mail>
9.3.4 Step 4: Inserting the final codeUnlike the mail tag, the two setrecipient, from, subject and message tags have not received any values from the inforequest.html page. In addition, there is no output to the user to let them know whether or not the submit was successful.
The following example displays the final mailer.jsp. Notice the getParameters inside the mailer tags. Also notice the error and success output that is added.
Example 9-7 mailer.jsp code
<mt:mail server='<%=request.getParameter("server")%>'><mt:setrecipient
type="to"><%=request.getParameter("to")%></mt:setrecipient><mt:from><%=request.getParameter("from")%></mt:from><mt:setrecipient
type="cc"><%=request.getParameter("cc")%></mt:setrecipient><mt:subject><%=request.getParameter("subject")%></mt:subject><mt:message>
Name: <%=request.getParameter("name")%>Message: <%=request.getParameter("message")%>
</mt:message><mt:send>
<P>The following errors occured<br><mt:error id="err">
<jsp:getProperty name="err" property="error"/><BR></mt:error><BR>Please back up a page, fix the error and resubmit.<P>
</mt:send></mt:mail>Thank you<p></p>Your message has been successfully sent.
Chapter 9. Using tag libraries 307

As you are working with taglib code, remember that the content assist menu can be valuable in building the code.
9.4 For more informationFor more information, see the following:
� Programming J2EE APIs with WebSphere Advanced, SG24-6124
� Tag library sources:
http://jakarta.apache.org/taglibshttp://coldjava.hypermart.nethttp://jsptags.com/tags/
308 IBM WebSphere Application Server - Express V5.0.2 Developer Handbook

Chapter 10. Working with XML
eXtensible Markup Language (XML) is a markup language for the exchange of structured documents. It is a meta-language, meaning a language for defining other languages. XML by itself does not define any tags; it provides a facility to define custom tags and the structural relationships between them.
This chapter describes XML use in applications and the support provided in Studio Site Developer.
� XML overview� Working with XML in Studio Site Developer� Using XML in the Online Catalog sample
We will not go into detail on how to build and use XML documents in this publication. For detailed information, see The XML Files: Development of XML/XSL Applications Using WebSphere Studio Version 5, SG24-6586.
10
© Copyright IBM Corp. 2003 309

10.1 XML overviewXML is derived from the Standard Generalized Markup Language (SGML), whose predecessor GML was invented by IBM in the 1960s for describing documents in a device-independent fashion. XML is a subset of SGML and compatible with it. Initial focus is on serving structured documents over the Web.
10.1.1 XML markupXML documents are text-based and composed of markup and content:
� Markup instructs XML processors about how to treat the content, and how it is organized.
� Content is the character data you would see on a printed or displayed page.
There are six kinds of markups that can occur in an XML document:
Elements Elements are the most common form of markup. Elements identify the content they surround: <Date>17.07.2002</Date>.
Elements begin with a start tag <Date> and end with an end tag </Date>.
Non-empty elements contain child elements or character data. Empty elements have no content and can be written in one of two forms: <empty-element></empty-element> or <empty-element/>.
Attributes Attributes are name-value pairs that occur inside element tags after the element name, such as the Price element has a currency attribute: <Price currency="Rp">1000</Price>.
All attribute values must be enclosed in single or double quotation marks. These specify the characteristics of an element.
Entity references Entity references insert reserved characters or arbitrary unicode, refer to repeated or varying text, or include the content of external files:
' <!-- Apostroph -->℞ <!-- Indonesia -->
Entity references begin with the ampersand and end with a semicolon.
310 IBM WebSphere Application Server - Express V5.0.2 Developer Handbook

The XML specification predefines five reserved entity references < > & " and ' representing the characters <, >, &, “, and ‘ respectively. Custom entities can be declared.
Comments Comments are not part of the textual content of an XML document. They begin with <!-- and end with -->:
<!-- This is a comment. -->
An XML processor is not required to pass comments along to an application.
Processing instructions (PIs) PIs are an escape hatch to provide information to an application. Data that follows the PI target is for the application that recognizes the target:
<?PiTarget PiData?>
PIs are not textually part of the XML document, but the XML processor is required to pass them to an application. The targets XML and xml are reserved for future XML standardization efforts.
CDATA sections CDATA sections instruct the parser to ignore most markup characters. They start with <![CDATA and end with ]]>.
<![CDATA[ if( &b <= 3 ) { ... }; ]]>
This CDATA section wraps some source code. & and < do not have to be entity references as elsewhere in the document.
Figure 10-1 on page 312 shows the basic elements of an XML document.
Chapter 10. Working with XML 311

Figure 10-1 XML file
The example in Figure 10-1 spawns the following content structure shown in Figure 10-2.
Figure 10-2 XML document structure
<?xml version="1.0" ?><welcome> <message> Welcome to the ITSO SG24-6555 </message> <book-info> <book-title> WebSphere Express & IBM WSAD </book-title> <date type="firstEdition" > <day>17</day>
<month>07</month> <year>2002</year>
</date> <date type="lastEdition" > <day>17</day> <month>08</month>
<year>2002</year> </date> <email>[email protected]</email> <filename src="sg246555.pdf" /> </book-info>
</welcome>
Processing Instruction
Entity reference
Child element
Root Element
Character data
Begin tagEnd tag
Attribute
Empty element
welcome
message book-info
book-title
date day
month
Document Object Model (DOM)
year
date day
month
yearemail
filename
312 IBM WebSphere Application Server - Express V5.0.2 Developer Handbook

10.1.2 Well-formed XML documentsAlthough XML does not have any predefined tags, there are certain rules that each XML document has to follow in order to be well formed. By definition, if a document is not well formed, it is not XML. The rules are:
� Tags cannot be inferred; they must be explicit.� A document must contain one root element.� All beginning tags and ending tags match up.� Empty tags must end with />.� Tags must nest correctly.� An entity cannot contain a reference to itself.� Entities must be declared before they are used.� Element names are case sensitive.� All attribute values must be enclosed in single or double quotation marks.� No attribute may appear more than once on the same start tag or empty tag.
10.1.3 Document type definitions (DTDs)Well-formed documents offer many of the advantages of XML, such as extensibility and adding structure to a set of data. However, exchanging information through XML documents requires additional functionality: It must be possible to build a common grammar for a set of documents and to check compliance automatically.
Document type definitions (DTDs) address these needs. A DTD defines:
� The allowed sequence and nesting of tags� Elements and their attributes including multiplicity� Attribute values and their types and defaults� Entities and notation
DTDs express meta-information about a document's content. With a DTD, an XML parser can verify the DTD compliance of an XML document. A DTD can be used in one or more XML documents.
Document types can be declared externally:
<!DOCTYPE rootElement SYSTEM "filename.dtd">
Or internally:
<!DOCTYPE rootElement [ ...(declarations)... ]>
Note: Similar rules exist for HTML; the XHTML specification defines them. However, HTML browsers also accept HTML documents that are not well formed.
Chapter 10. Working with XML 313

A DTD identifies the root element of the document and may contain additional declarations. It must be the first item in the document after PIs and comments. A mix of external and internal DTD elements is possible.
Here is an excerpt of the DTD of our example from Figure 10-1 on page 312:
<!ELEMENT welcome (message,book-info*)><!ELEMENT message (#PCDATA)><!ELEMENT book-info (...)>
Because DTDs are superseded by XML schemas, we do not go into more detail here.
10.1.4 ValidationA well-formed document is valid only if it contains a proper document type declaration and if the document obeys the constraints of that declaration.
All valid documents are well formed; not all well-formed documents are valid.
10.1.5 XML namespacesApplications associate the content of a document with its element names (tags). Applications might process two documents with elements using the same tag; however, it is possible that this tag has a different meaning in each of the two documents. Hence, the namespace concept is introduced in order to eliminate naming collisions.
Tag names should be globally unique, but for performance reasons they also should be short; in order to resolve this conflict, the W3C namespace recommendation defines an attribute xmlns, which can amend any XML element. If it is present in an element, it identifies the namespace for this element.
The xmlns attribute has the following syntax:
xmlns=localQualifier:"globallyUniqueName"
The globally unique name uses URI syntax, but it is not a real URI that can be accessed with a browser through HTTP. Predefined global names exist, for example, for the data types defined in XML schema and in the SOAP standard.
In the following customer element definition, an accounting namespace is defined in order to be able to distinguish the element tags from those appearing in customer records created by other business applications:
<acct:customer xmlns:acct="http://www.my.com/acct-REV10"> <acct:name>Corporation</acct:name> <acct:order acct:ref="5566"/>
314 IBM WebSphere Application Server - Express V5.0.2 Developer Handbook
<acct:status>invoice</acct:status></acct:customer>
The namespace definition in the first line assigns the global name http://www.my.com/acct-REV10 to the local qualifier acct. This qualifier is used on the element names such as name in order to attach them to the namespace.
A second application, for example, a fulfillment system, can assign a different namespace to its customer elements:
<ful:customer xmlns:ful="http://www.your.com/ful"> <ful:name>Corporation</ful:name> <ful:order ful:ref="A98756"/> <ful:status>shipped</ful:status></ful:customer>
An application processing both data structures is now able to treat the accounting and the fulfillment data differently.
There is a default namespace. It is set if no local name is assigned in the namespace definition:
<acct:customer xmlns="http://www.my.com/acct-REV10" xmlns:acct="http://www.my.com/acct-REV10”> <name>Corporation</name> <order acct:ref="5566"/> <status>invoice</status></acct:customer>
In this example, all tags in the customer record are qualified to reside in the namespace http://www.my.com/acct-REV10. No explicit prefix is needed because the default namespace is used. Note that the default namespace applies to any attribute definitions.
10.1.6 XML schemaSo far, we have only introduced DTDs as a notation for meta information about XML documents. DTDs have drawbacks; for example, they use a different syntax than the other definitions in an XML file. They also lack data typing capabilities.
XML schemas (XSDs) bring to XML the rich data descriptions that are common to other business systems. A schema allows you to precisely define cardinality constraints and enforce data type compliance. XSDs are defined by a W3C recommendation dating May 2, 2001.
XSDs are XML documents themselves: They may be managed by XML authoring tools or through any XML processor (and can be validated as well). In other words, there is an XML schema for XML schema.
Chapter 10. Working with XML 315
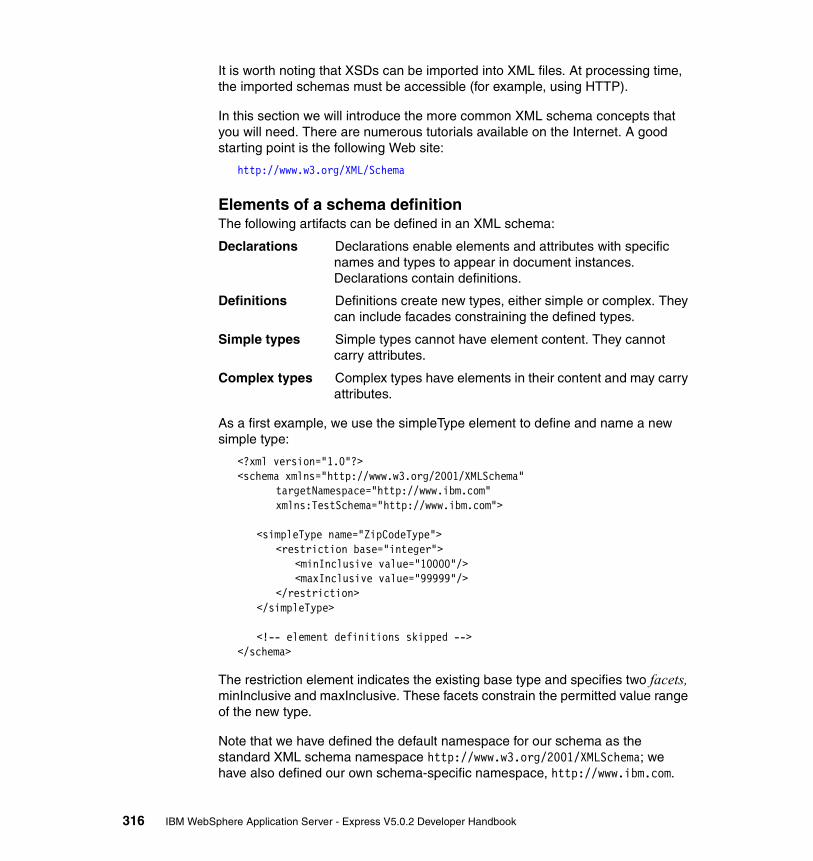
It is worth noting that XSDs can be imported into XML files. At processing time, the imported schemas must be accessible (for example, using HTTP).
In this section we will introduce the more common XML schema concepts that you will need. There are numerous tutorials available on the Internet. A good starting point is the following Web site:
http://www.w3.org/XML/Schema
Elements of a schema definitionThe following artifacts can be defined in an XML schema:
Declarations Declarations enable elements and attributes with specific names and types to appear in document instances. Declarations contain definitions.
Definitions Definitions create new types, either simple or complex. They can include facades constraining the defined types.
Simple types Simple types cannot have element content. They cannot carry attributes.
Complex types Complex types have elements in their content and may carry attributes.
As a first example, we use the simpleType element to define and name a new simple type:
<?xml version="1.0"?><schema xmlns="http://www.w3.org/2001/XMLSchema"
targetNamespace="http://www.ibm.com"xmlns:TestSchema="http://www.ibm.com">
<simpleType name="ZipCodeType"><restriction base="integer">
<minInclusive value="10000"/><maxInclusive value="99999"/>
</restriction></simpleType>
<!-- element definitions skipped --></schema>
The restriction element indicates the existing base type and specifies two facets, minInclusive and maxInclusive. These facets constrain the permitted value range of the new type.
Note that we have defined the default namespace for our schema as the standard XML schema namespace http://www.w3.org/2001/XMLSchema; we have also defined our own schema-specific namespace, http://www.ibm.com.
316 IBM WebSphere Application Server - Express V5.0.2 Developer Handbook

The second part of our example shows several element declarations and two complex type definitions. The resulting schema is suited to represent a list of address records:
<element name="address"><complexType>
<sequence minOccurs="1" maxOccurs="1"><element ref="TestSchema:street"/><element ref="TestSchema:zipCode"/><element ref="TestSchema:city"/>
</sequence></complexType>
</element><element name="street" type="string"/><element name="zipCode" type="TestSchema:ZipCodeType"/><element name="city" type="string"/>
<element name="addressList"><complexType>
<sequence minOccurs="0" maxOccurs="unbounded"><element ref="TestSchema:address"/>
</sequence></complexType>
</element>
sequence is a reserved XSD keyword, defining the inner structure of a complex type (its content model). The other two XSD content models are choice and all.
The type attribute is optional; it contains a reference to the type definition, which is either defined in an XSD file such as ours (for example, TestSchema:ZipCodeType) or a predefined standard data type (for example, string in the default XSD namespace).
Assuming that the XSD defined above is saved as C:\temp\TestSchema.xsd. A sample XML file that validates against this schema is:
<?xml version="1.0"?><x:addressList xmlns:x="http://www.ibm.com"
xmlns:xsi="http://www.w3.org/2001/XMLSchema-instance" xsi:schemaLocation="http://www.ibm.com file:///C:/temp/TestSchema.xsd">
<x:address> <x:street>x:Pesona Khayangan</x:street> <x:zipCode>16411</x:zipCode> <x:city>x:Jakarta</x:city> </x:address> <x:address> <x:street>x:Margonda Raya</x:street> <x:zipCode>16423</x:zipCode> <x:city>x:Depok</x:city>
Chapter 10. Working with XML 317

</x:address></x:addressList>
Note that the XSD file has to be accessible through HTTP. In the example, file:///C:/temp/TestSchema.xsd is a true URL pointing to a location. Namespaces such as http://www.ibm.com, on the other hand, just use the URI notation to be globally unique. Assuming that noProtocol://www.ibm.com is globally unique, it would be a valid namespace name as well.
The syntax of the schema location attribute defined by XML standards is:
xsi:schemaLocation="targetnamespaceURI locationURI">
This is a quite tricky notation because it is not obvious that two different entities with a similar syntax but different semantics appear in the same attribute. Even worse, the locationURI is often not a full network address, but a simple local file name.
Target namespaceSeveral of the XSD elements introduced above can define a target namespace, which is either absent or a namespace name.
The target namespace serves to identify the namespace within which the association between the element and its name exists. In the case of declarations, this association determines the namespace of the elements in XML files conforming to the schema. An XML file importing a schema must reference its target namespace in the schemaLocation attribute. Any mismatches between the target and the actual namespace of an element are reported as schema validation errors.
In our example, the target namespace is http://www.ibm.com; it is defined in the XSD file and referenced twice in the XML file. Any mismatch between these three occurrences of the namespace lead to validation errors.
10.1.7 Schema and style using XSLT and XSLThe extensible style language (XSL) is a language defined by the W3C for expressing style sheets. It has three parts:
� XSL transformations (XSLT), which is used for transforming XML documents.
� The XML path language (XPath), which is a language used to access or refer to parts of an XML document.
� XSL-FO, which is a vocabulary for specifying formatting semantics.
A transformation in XSLT must be a well-formed document and must conform to the namespaces in XML, which can contain elements that may or may not be
318 IBM WebSphere Application Server - Express V5.0.2 Developer Handbook

defined by XSLT. XSLT-defined elements belong to a specific XML namespace. A transformation in XSLT is called a style sheet.
XSL uses an XML notation and works on two principles: pattern matching and templates. It operates on an XML source document and parses it into a source tree; it applies the transformation of the source tree to a result tree, then outputs the result tree to a specified format. In constructing the result tree, the elements can be reordered or filtered, and other structures can be added also. The result tree can be completely different from the source tree.
10.1.8 XPathThe XML path language (XPath) is used to address parts of an XML document. An XPath expression can be used to search through an XML document, and extract information from the nodes (any part of the document, such as an element or attribute) in it. There are four different kinds of XPath expressions:
� Boolean: Expression type with two possible values
� Node set: Collection of nodes that match an expression's criteria, usually derived with a location path
� Number: Numeric value, useful for counting nodes and for performing simple arithmetic
� String: Text fragment that may come from the input tree, processed or augmented with general text
An XPath expression returns a certain node set, which is a collection of nodes. The following is a sample XPath expression:
/ACCOUNT_TABLE/ACCOUNT/ACCID
This expression selects any elements named ACCID (account ID), which are children of ACCOUNT elements, which are children of ACCOUNT_TABLE elements, which are children of the document root.
10.2 Working with XML in Studio Site DeveloperStudio Site Developer provides the tools necessary to work with XML, including a perspective designed just for XML and the necessary editors. Among the many features for working with XML you will find in Studio Site Developer it can:
Note: Studio Site Developer provides tools for creating and working with XPath files, but they are not covered in the following section. Please refer to the product help for more information.
Chapter 10. Working with XML 319

� Create XML documents from DTDs, XML schema, or scratch.
� Create the following XML applications from XML files:
– XML validation– SAX2 parser– SOAP message– SOAP message with attachments
� Generate DTDs from scratch, XML, or XML schema files.
� Generate XML schema from scratch, XML, or DTDs.
� Generate XSLs from scratch
� Generate JavaBeans to create an instance document for a DTD or XML schema.
� Define mappings between XML documents and generate XSLT scripts that transform documents.
� Create an HTML or XML document by applying an XSL style sheet to an XML document.
� Map XML files to create an XSL transformation script and to visually step through the XSL file.
� Define mappings between relational tables and DTD files, or between SQL statements and DTD files, to generate a document access definition (DAD) script used by IBM DB2 XML Extender. This can be used to either compose XML documents from existing DB2 data or decompose XML documents into DB2 data.
� Generate XML artifacts from SQL statements.
� Generate a JavaBean that executes an SQL statement.
� Convert HTML and JSP files to XHTML.
XML options are available from the context menus of the appropriate files types in the navigators, wizards, and the XML perspective.
This chapter covers only a few XML tools of Studio Site Developer. The following topics are discussed:
� XML perspective� Creating a new XML file
Important: This chapter does not go into detail for every tool listed above. For detailed information, see The XML Files: Development of XML/XSL Applications Using WebSphere Studio Version 5, SG24-6586 or refer to the product help.
320 IBM WebSphere Application Server - Express V5.0.2 Developer Handbook

� Creating an XML schema� Creating a DTD� Creating an XSL file� Generating XML from SQL� XML editor� XSL schema editor� DTD editor� XSL editor
10.2.1 The XML perspectiveYou can work with XML in almost any perspective, but the XML perspective is designed for it. It contains the views, icons, and toolbar options that assist you in building XML, XML schemas, XSD, DTD, and integration between relational data and XML.
Figure 10-3 on page 322 shows the default layout for the XML perspective and some of the tools available for XML development. The XML editor is specifically designed for working with XML files. As with other editors you have both a Design view and a Source view. The Outline view contains a hierarchical view of the XML tags in the document. You can also see the options in the XML toolbar drop-down.
Note: Open the XML perspective by selecting Window -> Open Perspective -> XML from the workbench main menu.
Chapter 10. Working with XML 321

Figure 10-3 XML perspective
10.2.2 WizardsSeveral wizards are provided for you for the creation of XML-related files. In this section, we will look at the XML, XML Schema, DTD, and XSL wizards. For information on the additional XML wizards provided in Studio Site Developer, please see the product help.
XML wizardStudio Site Developer provides the Create XML File wizard to take you through the process of creating a new XML file. This can be invoked in either of the following ways:
� Select File -> New -> Other -> XML -> XML File (or use the icon).
� From the context menu of a DTD (.dtd) file or an XML schema (.xsd) file in the Navigator, select Generate -> XML file.
The wizard gives you the following options for creating the XML file:
– From scratch– From a DTD– From an XML schema
Editor
Editor toolbar menu
Outline view
322 IBM WebSphere Application Server - Express V5.0.2 Developer Handbook

When you create an XML file from a DTD or XML schema file, you will have to select a root element. With an XML schema, you also select a namespace.
XML schema wizardStudio Site Developer provides the Create XML Schema wizard to take you through the process of creating a new XSD file. To create a new XML schema file, you have the following options:
� To generate it from scratch, select File -> New -> Other -> XML -> XML Schema (or use the icon).
� To generate it from an existing DTD or XML file:
– From the context menu of a DTD (.dtd) file or an XML (.xml) file in the Navigator, select Generate -> XML Schema.
– From within a DTD file open in the editor, select DTD -> Generate XML Schema.
From within an XML file open in the editor, select XML -> Generate XML Schema.
DTD wizardA Document Type Definition (DTD) has two purposes:
� To serve as a framework and provide a set of elements and attributes that will be used in the XML “templates” used by the application to generate XML documents from raw data retrieved from the back end.
� To validate incoming XML documents sent by the supplier in reply to outgoing purchase orders generated by the customer application.
Studio Site Developer provides the Create DTD wizard to take you through the process of creating a new DTD file.
To create a new DTD file, you have the following options:
� To generate it from scratch, select File -> New -> Other -> XML -> DTD (or use the icon).
� To generate it from an existing XML schema or XML file:
– From the context menu of an XML schema (.xsd) file or an XML (.xml) file in the Navigator, select Generate -> DTD.
– From within an XML schema file open in the editor, select XSD -> Generate DTD.
– From within an XML file open in the editor, select XML -> Generate DTD.
Chapter 10. Working with XML 323

XSL wizardThis is a tool for creating XSL files. To create a new file from scratch, use the New XSL wizard as follows:
1. Select File -> New -> XSL to launch the New XSL wizard.
2. In the File name field, type your XSL file name.
3. Click Finish. The XSL file is created and the XSL editor is automatically opened for you.
XML and SQL Query wizardThis wizard allows you to create an XML file with the results from an SQL query. Before you can use the wizard, you must first create a SQL query using the SQL Query builder (see “Building SQL statements using the SQL Query Builder” on page 211).
Once you have created your query, you can also start the wizard from any perspective. Follow these steps to start the XML from SQL query wizard:
1. Select File -> New -> Other -> XML -> XML and SQL Query, then click Next.
2. Select the Create XML from SQL query radio button, then click Next.
3. On the Select SQL Statements page, expand your project and select your SQL statement. Click Next.
4. Complete the wizard using the options described below.
5. When you have finished selecting your options, click Finish to run the XML from SQL query wizard.
Specify mapping patternsThe wizard allows you to choose from a number of different default patterns when mapping your relational data to an XML format. They include:
� Mapping table columns as elements.
� Mapping table columns as attributes.
� Mapping table columns as elements using primary keys as attributes.
� Mapping using foreign keys as links.
The presence of foreign keys specifies a relationship between two tables. When generating XML files from a table that has a foreign key, there are two options that you can choose from:
� Select Foreign keys as links only. If you select this option, the tool will map all the foreign key relationships into a single XML document. This will create a hierarchical document that reflects the foreign key relationship.
324 IBM WebSphere Application Server - Express V5.0.2 Developer Handbook

� Select Foreign keys as links, and select Recurse though foreign keys. If you select both options, the tool will map each foreign table into a separate XML document.
Generate schema definitionIf you would like to generate a schema definition that will contain information about the structure of your XML file, select either XML Schema or DTD. If you do not need a schema definition, select None.
Generate a template fileOnce you have unit-tested your query and the output XML documents, you may wish to generate them dynamically when running your application within the WebSphere Application Server. To do this, you can save your query in a template file. For more information about using this file to dynamically create your XML documents, see “Using XML in the Online Catalog sample” on page 332.
Select the Output folderSpecify the folder in which you want to store the generated files. Click Browse to browse to a folder.
10.2.3 EditorsStudio Site Developer provides you with numerous XML editors for working with XML-related files. This section will look at XML, XML schema, DTD, and XSL editors.
XML editorThe XML editor is a tool for creating and viewing XML files. You can use it to create new XML files, either from scratch or from existing DTDs or XML schemas. You can also use it to edit XML files, associate them with DTDs or schemas, and validate them.
Important: This section simply describes the different editors. For detailed information on how to use the different editors, please refer to the product help.
Chapter 10. Working with XML 325

Figure 10-4 XML editor
The XML editor can be opened by double-clicking an XML file (*.xml). The XML editor provides two views for editing:
� Source view: Enables you to view and work directly with the source code file. Many of the XML editing features in the XML editor Source view are very similar to those available in the Source view of Page Designer.
The Source view has several text editing features, such as syntax highlighting, unlimited undo/redo, and user-defined macros. Another helpful feature is content assist, which uses the information in a DTD or schema content model to provide a list of acceptable continuations, depending on where the cursor is located in an XML file, or what has just been typed.
The XML editor Source view also includes a “smart” double-clicking behavior. If your cursor is placed in an attribute value, one double-click selects that value, another double-click selects the attribute-value pair, and a third double-click selects the entire tag. This makes it easier to copy and paste commonly used pieces of XML.
XML toolbar
XML editor area
326 IBM WebSphere Application Server - Express V5.0.2 Developer Handbook

� Design view: Represents the XML file simultaneously as a table and a tree.
This makes navigation and editing easier for you. Content and attribute values can be edited directly in the table cells, while pop-up menus on the tree nodes give alternatives that are valid for that location. For example, the Add Child menu item will list only those elements from a DTD or XML schema that would be valid children at a given point.
The Design view is especially helpful if you are new to XML, or need to do form-oriented editing. For example, you could use the Create XML File wizard to create a template XML file for a job description form from a job description DTD. After those steps are completed, you would only have to fill in the form data using the Design view.
Validating an XML fileIt is also a good idea to validate new documents created from a DTD or XML schema to make sure it is well-formed. You can do this using the options in the XML drop-down in the toolbar if the file is open. If not, you can validate it using the context menu of the .xml file in the Navigator view.
XML schema editorThe XML schema editor is a tool for creating, viewing, and validating XML schemas. You can use it to perform tasks such as creating XML schema components, importing and viewing XML schemas, generating DTDs and relational table definitions from XML schemas, and generating JavaBeans for creating XML instances from an XML schema.
Chapter 10. Working with XML 327

Figure 10-5 Using the XML schema editor
The XML schema editor can be opened by double-clicking an XML schema file (*xsd). The XML schema editor has three main views:
� Graph view: You can use the Graph view to add, remove, or rearrange components in your schema.
� Design view: When you select an object in the Graph view, the Design view will display the properties that are associated with that schema component object. You can use the Design view to enter values for the selected object.
� Source view: You can switch to the Source view to edit the schema source directly. The XML schema editor uses the Task view for error reporting.
Tip: By default, the Design view is combined with the Source and Graph views. This can be changed by editing the XML Schema attributes in the Preferences dialog. To open the dialog, select Window -> Preferences from the main menu and then expand the XML option in the left pane and select XML Schema.
XML Schema editor area
XML Schema toolbar
Design view
Source and Graph tabs
328 IBM WebSphere Application Server - Express V5.0.2 Developer Handbook

The content assist (available in the Source view) will use associated XML schema, DTD, or content model information to provide intelligent assistance.
Validating an XML schema fileAn XML schema open in the editor can be validated using the XSD drop-down menu. You can also validate an XML schema file (open or not) using the context menu of the .xsd file in the Navigator view.
DTD editorThe DTD editor is a tool for creating and viewing DTDs. Using the DTD editor, you can create DTDs, generate XML schema files, and generate JavaBeans for creating XML instances of an XML schema. You can also use the DTD editor to generate default HTML forms based on the DTDs you create. The DTD editor can be opened by double-clicking a DTD file (*.dtd).
Figure 10-6 The DTD editor
Note: For information on how to use the views mentioned above, see the WebSphere Studio Site Developer product help.
DTD toolbar
DTD editor area
Chapter 10. Working with XML 329

When you first create a new DTD from scratch, there are no elements in it. The DTD will open in the editor but will look blank. To work with the DTD, switch to the Design view. You will use the Outline view and Design view to build the DTD elements.
Validating DTDsA DTD open in the editor can be validated using the DTD drop-down menu. You can also validate a DTD file (open or not) using the context menu of the .dtd file in the Navigator view.
XSL editorThe XSL editor provides a text editor to handle the source code of the XSL file. It has several text editing features, such as content assist and syntax highlighting. The content assist feature helps you in writing your XSL code, since it is aware of the proper XSL grammar rules. When editing the XSL document, content assist can be invoked to prompt you with a list of possible XSL constructs to use. Concerning the syntax highlighting feature, you will notice that whenever you select any of the XSL file components listed in the Outline view, the corresponding XSL code for that component will be selected, and vice versa.
Figure 10-7 XSL editor
330 IBM WebSphere Application Server - Express V5.0.2 Developer Handbook

Validating the XSL fileAnother useful feature of the XSL editor, as in the rest of the editors, is the incremental validation feature. At any point during your development of an XSL file, you can invoke the Validate process to validate the file. Just right-click the file name in the Navigator view and select the Validate XSL File option. In addition to the manual invocation of the validation process, the validation is also automatically run when you save the document. Any validation errors will be reported in the Task view with a little red marker for the corresponding line in the source code of the XSL file.
10.2.4 XML sample applications in Studio Site DeveloperIf you are new to working with XML, an excellent way to become familiar with the process is to try out some of the sample applications shipped with Studio Site Developer.
You can import the samples to your workspace with the New File wizard. Simply select New -> File -> Other -> Examples. Select the XML folder on the left and choose one of the samples.
Figure 10-8 XML sample applications
Chapter 10. Working with XML 331

10.3 Using XML in the Online Catalog sampleTo illustrate the use to XML in the Online Catalog sample, we will create a featured item page that will display all the items in the ITEM table of the SALESAPP database that have the SOTD_FLAG field set to Y. To do this, we will use the XML and SQL Query wizard and the SQLtoXML Java class.
The XML and SQL Query wizard results in a single execution of the database query with the results stored in a static HTML page. This example will illustrate the use of the SQLtoXML Java class shipped with Studio Site Developer in a servlet to create dynamic content that is executed upon user request. The XML and SQL Query wizard is used first to generate the XSL and XST files used by the servlet.
To create the featured item page, we will step through the following process:
1. Create an SQL statement.
2. Generate XSL and XST (query template) files using the SQL to XML wizard.
3. Set the classpath variables for the project.
4. Add the required libraries to the project build path.
5. Create a servlet that will be used to dynamically create our page content.
6. Add a page to the Web site diagram.
When everything is complete, the user will simply click a link on the index.html page that will open the Featured Item page and display all the featured items in our database. The diagram below illustrates the flow of the different components in this process.
Figure 10-9 Flow diagram for XML component of sample
calls
XML and XSL strings
transforms
HTML stringhome page
creates
Servlet
(output to user)
ITEM tableXST file
requests queries
332 IBM WebSphere Application Server - Express V5.0.2 Developer Handbook

1. To begin, the user will click a link from the home page (index.html) that will invoke the servlet.
2. The servlet will request the XST file query and database connection information.
3. With this information, the servlet will connect to the ITEM table and query the required data.
4. The servlet will then use the queried information to generate an XML and XSL string.
5. Using the data in these strings, the servlet transforms it to an HTML string and then displays the HTML string to the user via an HTML page.
Step 1: Creating an SQL statementTo start, we need to create an SQL statement to retrieve all the items for the database that have the SOTD_FLAG field set to Y. This statement will be used by the SQL to XML wizard to create the XML related files.
1. Open the Data perspective and navigate to the OnlineCatalog/WebContent/WEB-INF/databases/SALESAPP/Statements folder in the Data Definition view. Right-click the Statements folder and click New -> Select Statement from the context menu.
2. In the New Select Statement dialog, enter FeaturedItem as the statement name.
3. Click OK. The SQL Query Builder opens.
4. Use the SQL Query Builder tools (see 6.2.10, “Building SQL statements using the SQL Query Builder” on page 211) to build the following SQL statement, or simply type it in to the Source window.
Note: These instructions assume that you have connected to the SALESAPP database from Studio Site Developer and have imported the design to the project. This was done in Chapter 6, “Accessing databases” on page 153. If you have not made this connection yet, you can still go through the example, though the step-by-step instructions will not match exactly.
If your project doesn’t have a database folder yet (no database connection has been made), you can right-click the Web project and select New -> Other -> Data -> SQL Statement. This wizard will also give you the option to create the database connection. When asked for a folder for the statement, browse to the WEB-INF folder. The databases folder will be created under this folder for you. The method to build the statement will vary somewhat from these instructions, but the wizards make it easy to follow.
Chapter 10. Working with XML 333

Example 10-1 FeaturedItem SQL statement
SELECT DB2ADMIN.ITEM.ITEM_SHORT_DESC AS NAME, DB2ADMIN.ITEM.ITEM_LONG_DESC AS DESCRIPTION, DB2ADMIN.ITEM.PRICE AS PRICEFROM DB2ADMIN.ITEMWHERE DB2ADMIN.ITEM.SOTD_FLAG = 'Y' ORDER BY PRICE ASC
The statement above selects the item_short_desc, item_long_desc, and price fields from the item table and sets the field names as Name, Description, and Price respectively. The items are selected on the condition that they have the sotd_flag field set to Y. This field is an indicator to us that the item has been entered or modified in the table as a featured item.
5. With the SQL statement entered in the SQL Source window, the editor should look something like the following figure.
334 IBM WebSphere Application Server - Express V5.0.2 Developer Handbook

Figure 10-10 SQL statement editor with SQL inserted
6. Close the builder and save the statement.
Step 2: Using the XML and SQL Query wizardWith the SQL statement completed, we can now use the SQL to XML wizard to create the XSL and XST files that we will need later in the sample.
1. Open the Web perspective and switch to the Project Navigator view.
2. Navigate to the WebContent folder, right-click it, and select New -> Folder from the context menu.
3. Enter featured_item as the folder name and click Finish.
4. Navigate to the featured_item folder, right-click it, and select New -> Other from the context menu.
5. In the left pane of the New dialog, select XML and then select XML and SQL Query from the right pane.
6. Click Next.
Chapter 10. Working with XML 335

7. On the next page, select the Create XML from SQL query radio button and click Next.
8. On the next page, navigate to the OnlineCatalog/WebContent/WEB-INF/databases/SALESAPP/Statements folder and select the FeaturedItem file. This is the SQL statement that we created in the previous step.
Figure 10-11 Select SQL Statements page
9. Click Next.
10.On the next page:
– Verify that the Elements radio button has been selected as the Show table columns as option.
– Verify that the None radio button has been selected as the Generate schema definition as option.
– Ensure the Generate query template file check box is selected and the output folder is set to /OnlineCatalog/WebContent/featured_item.
336 IBM WebSphere Application Server - Express V5.0.2 Developer Handbook

Figure 10-12 XML From an SQL Query page
11.Click Finish. Four files will be added to the featured_item folder:
– FeaturedItem.html - This file will not be used in the sample and can be deleted.
– FeaturedItem.xml - This file will not be used in the sample and can be deleted.
– FeaturedItem.xsl - This file will be used within a servlet to dynamically create the XSL output. It contains the data on how the HTML output should be rendered.
Example 10-2 FeaturedItem.xsl
<?xml version="1.0" encoding="UTF-8"?><xsl:transform exclude-result-prefixes="sqltoxml" version="1.0" xmlns:xsl="http://www.w3.org/1999/XSL/Transform"> <xsl:output method="html"/> <xsl:template match="/"> <html> <head> <meta content="text/html; charset=iso-8859-1" http-equiv="Content-Type"/>
Chapter 10. Working with XML 337

<meta content="0" http-equiv="Expires"/> </head> <body> <div> <xsl:apply-templates/> </div> </body> </html> </xsl:template> <xsl:template match="SQLResult"> <table border="2"> <tr> <td>NAME</td> <td>DESCRIPTION</td> <td>PRICE</td> </tr> <xsl:for-each select="ITEM"> <tr> <td> <xsl:value-of select="NAME"/> </td> <td> <xsl:value-of select="DESCRIPTION"/> </td> <td> <xsl:value-of select="PRICE"/> </td> </tr> </xsl:for-each> </table> </xsl:template></xsl:transform>
– FeaturedItem.xst - This file is requested by the servlet to retrieve the SQL query. It is a query template file that contains the logon and query information from the SQL statement we created earlier; see the example below.
Example 10-3 FeaturedItem.xst
<?xml version="1.0" encoding="UTF-8"?><!--- This file contains information required to run an SQL- query. It can be loaded into any application programs- that use the SQLToXML run-time library.- The example code below shows how to load the file.- Example code: QueryProperties.load("FeaturedItem.xst")- Refer to the online help for more information.-->
338 IBM WebSphere Application Server - Express V5.0.2 Developer Handbook

<SQLGENERATEINFORMATION> <DATABASEINFORMATION> <LOGINID>db2admin</LOGINID> <PASSWORD><![CDATA[db2admin]]></PASSWORD> <JDBCDRIVER>COM.ibm.db2.jdbc.app.DB2Driver</JDBCDRIVER> <JDBCSERVER>jdbc:db2:SALESAPP</JDBCSERVER> </DATABASEINFORMATION> <STATEMENT> <![CDATA[ SELECT DB2ADMIN.ITEM.ITEM_SHORT_DESC AS NAME, DB2ADMIN.ITEM.ITEM_LONG_DESC AS DESCRIPTION, DB2ADMIN.ITEM.PRICE AS PRICE FROM DB2ADMIN.ITEM WHERE DB2ADMIN.ITEM.SOTD_FLAG = 'Y' ORDER BY PRICE ASC ]]> </STATEMENT> <OPTIONS> <FORMATOPTION>GENERATE_AS_ELEMENTS</FORMATOPTION> <RECURSE>FALSE</RECURSE> </OPTIONS></SQLGENERATEINFORMATION>
Step 3: Setting the classpath variables for the projectThe SQLTOXML, WAS_V5_XALAN, and XERCES classpath variables need to be set for the project. Switching to the XML perspective automatically initializes these variables.
To verify that the classpath variables have been set:
1. Switch to the XML perspective.
2. Select Window -> Preferences from the main menu.
3. Select Java -> Classpath Variables.
4. Scroll down the displayed list and locate the three variables.
Step 4: Adding the required libraries to the project build pathThe SQLTOXML, WAS_V5_XALAN, and XERCES libraries need to be added to the Java build path for the OnlineCatalog project. Since the libraries are already variables in the classpath, you can simply add the variable to the libraries list for the project. This method of adding JAR files means that the paths are not hard coded and therefore can be relocated.
1. Open the Web perspective.
2. In the Project Navigator view, right-click the OnlineCatalog project and select Properties from the context menu.
3. Click the Java Build Path node from the menu on the left to display the Java Build Path options on the right.
4. Select the Libraries tab. Any libraries already in the project build path are listed here.
Chapter 10. Working with XML 339
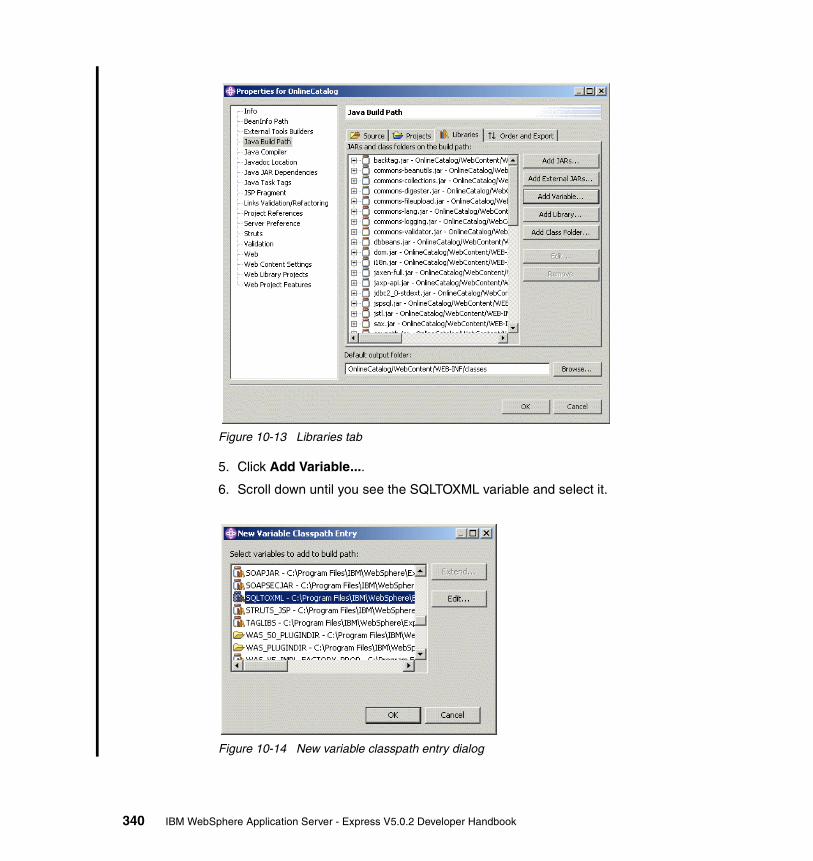
Figure 10-13 Libraries tab
5. Click Add Variable....
6. Scroll down until you see the SQLTOXML variable and select it.
Figure 10-14 New variable classpath entry dialog
340 IBM WebSphere Application Server - Express V5.0.2 Developer Handbook

7. Click OK. Repeat this process for the XERCES and WAS_V5_XALAN variables.
8. Now all the libraries you need have been added to the Java Build Path for the OnlineCatalog project.
9. Click OK.
Step 5: Creating the servletWith the classpath variables and Java build paths in place, we can create the servlet that will be used to dynamically create the featured item page. To begin, we will use the Servlet wizard to create a generic servlet and then we will add some code to it.
1. Open the Web perspective and navigate to the JavaSource folder of the OnlineCatalog project.
2. Right-click the folder and select New -> Servlet from the context menu.
3. Enter featureditem as the Java package FeaturedItemXMLServlets as the class name.
Figure 10-15 Servlet wizard - 1
4. Click Next.
Chapter 10. Working with XML 341

5. Verify that the Public modifier is the only one selected and that no method stubs are selected. Remove the javax.servlet.Servlet interface by selecting it from the Interfaces listbox and clicking Remove.
Figure 10-16 Servlet wizard - 2
6. Click Next.
7. Select the Add to web.xml check box and verify that the URL Mapping value is set to /FeaturedItemXMLServlet.
8. Click Finish. The FeaturedItemXMLServlet.java file will be opened in the Java editor.
342 IBM WebSphere Application Server - Express V5.0.2 Developer Handbook

Figure 10-17 FeaturedItemXMLServlet.java
Notice that the featureditem package has been added to the JavaSource folder for the project and that the FeaturedItemXMLServlet has been added to the package.
We are now ready to add some logic to our servlet to enable it to retrieve the database connect and SQL query information from the FeaturedItem.xst file, and also add the logic to dynamically create an XML and XSL string, then transform the content of these two strings into an HTML string which will eventually be displayed to the user.
1. With the FeaturedItemXMLServlet.java file still opened in the Java editor, copy the code from the example below into the servlet. There are comments throughout the code, so please read through it to get a better understanding of what is being done. Note that you will need to modify the code that points to the .xst file to reflect the location of your workspace.
Example 10-4 FeaturedItemXMLServlet.java
package featureditem;
import javax.servlet.http.*;import java.io.*;
Chapter 10. Working with XML 343

import java.util.*;import java.net.URLEncoder;import java.sql.Connection;import com.ibm.etools.sqltoxml.*;import javax.xml.transform.TransformerFactory;import javax.xml.transform.Transformer;import javax.xml.transform.stream.StreamSource;import javax.xml.transform.stream.StreamResult;
/* * Sample servlet to show a typical use of SQLToXML runtime library. * 1. Retrieves query file name (.xst) and optional where clause parameters. * 2. Builds XML and default XSL streams from the query result. * 3. Generates HTML response to the client. * * In case where the format option is GENERATE_ID_AND_IDREF and RECURSE * is true, this servlet does some interesting thing so explore. * * If you want to use your own connection, then you can create your own * (possible from a connection pool) and provide it to SQLToXML. As an * example, see XMLConnectionPoolServlet.java. */public class FeaturedItemXMLServlet extends HttpServlet{ private String SERVLET = null;
/* * This method will be called by the servlet engine. It is quite long so * be prepared but the logic is pretty simple. I could have used instance variables * instead to reduce the lines but then I did not what to put too much time on * dealing with the thread-safe issues on this sample program. */ public void service(HttpServletRequest req, HttpServletResponse res)
throws IOException {
if (SERVLET == null){ String contextPath = req.getContextPath(); SERVLET = contextPath + "/servlet/FeaturedItemXMLServlet";}
res.setContentType("text/html");PrintWriter response = res.getWriter();
/* * Getting the parameters from the request: * xstFile : Query file name (.xst).
344 IBM WebSphere Application Server - Express V5.0.2 Developer Handbook

* params (optional) : Values to be used for where clause in the query. * query (optional) : Will override the query sting in the xstFile. */
//Sets the location of the xst file - the directory path will need to be changed for you system
String xstFile = "/Documents and Settings/bogers/My Documents/IBM/wasexpress51/workspace/OnlineCatalog/WebContent/featured_item/FeaturedItem.xst";
if (xstFile == null) error(response, new Exception("xstFile parameter is not specfied."));
String params = getParameter(req,"params");String query = getParameter(req,"query"); // if recursive query mode
/* * Generate XML and XSL streams from the query */
try{ QueryProperties prop = new QueryProperties(); prop.load(xstFile);
if (query != null) // Recursive & ID_AND_IDREF query modeprop.setStatement(query); // Override the previous query
SQLToXML sql2xml = new SQLToXML(prop);
ByteArrayOutputStream baosXML = new ByteArrayOutputStream(); PrintWriter xmlWriter = new PrintWriter(baosXML);
//ByteArrayOutputStream baosXSL = new ByteArrayOutputStream(); //Not used in our sample
//PrintWriter xslWriter = new PrintWriter(baosXSL); //Nnot used in our sample
Connection conn = getConnection(prop.getLoginId(),prop.getPassword(),response);
if (conn != null) sql2xml.setConnection(conn); // You are using your own connection
sql2xml.setParameters(params); // null is ok when the query does not contain where clause
sql2xml.setXMLWriter(xmlWriter); // Generate XML //sql2xml.setXSLWriter(xslWriter); // Generate default XSL - Not used in
our sample sql2xml.execute();
Chapter 10. Working with XML 345

//Placeholder for xslContent //
//Adding contents of baoxXML and xslContent to the html string String html = genHTML(baosXML.toString(),xslContent);
//baosXSL.toString() could be used instead of xslContent if allowing the servlet to create the XSL string at runtime
/* * Interesting part begins: * if we are in Recursive & ID_AND_IDREF query mode, the result html * string contains one XSLWriter.TITLE_HREF and many
XSLWriter.CONTENT_HREF * depending on the number of rows found. We need to replace these
strings * with the actual queries to be used before sending the html to the
client. */
if (prop.getRecurse() && prop.getFormat().equals(SQLGenerateOptions.GENERATE_ID_AND_IDREF))
{String base = SERVLET + "?"; // servlet urlbase += "xstFile=" + xstFile; // query filebase += "&query="; // query to override in the query file
// Used for HTML table header foreign key columnString queryNextAll = sql2xml.getNextAllQuery();if (queryNextAll != null){ // You need to encode the query string if the client is Netscape. String headerHref = base + URLEncoder.encode(queryNextAll);
// Used for foreign key column values Vector queries = sql2xml.getNextQueries(); Vector hrefs = new Vector(); if (queries != null) {
String q;String href;for(int i=0; i<queries.size(); i++){ q = (String)queries.elementAt(i); // You need to encode the query string if the client is Netscape. href = base + URLEncoder.encode(q); // build href value hrefs.addElement(href);
346 IBM WebSphere Application Server - Express V5.0.2 Developer Handbook

} }
// Substitute relevant href symbols in html (from the above) // with the href strings we just built. html = substitute(html,XSLWriter.TITLE_HREF,headerHref);
for (int i=0; i<hrefs.size(); i++) {
String href = (String)hrefs.elementAt(i);html = substitute(html,XSLWriter.CONTENT_HREF,href);
}} // end if (queryNextAll != null)
} // end of the interesting part
// Print out the final HTML to the client. response.print(html); response.flush();
xmlWriter.close(); //xslWriter.close(); //Not used in our sample}catch (Exception e){ error(response, e);}
}
private String substitute(String source, String pattern, String value) {
int start = source.indexOf(pattern);if (start == -1) // no foreign keys found from the query return source.toString();else{ int end = start + pattern.length();
StringBuffer sb = new StringBuffer(source); return sb.replace(start,end,value).toString();}
}
private String getParameter(HttpServletRequest req, String param) {
String[] paramValues = null;String paramValue = null;
paramValues = req.getParameterValues(param);
Chapter 10. Working with XML 347

if (paramValues != null) paramValue = paramValues[0];
return paramValue; }
// Generate a HTML page with the error message. protected void error(PrintWriter writer, Exception e) {
writer.println("<html>");writer.println("<head><title>Error</title></head>");writer.println("<body>");writer.println("<h2> " + e + "</h2>");writer.println("</body>");writer.println("</html>");
}
// This method can be overriden if you want to use your own connection. protected Connection getConnection(String uid, String password, PrintWriter pw) {
return null; // Let SQLToXML generate one for us. }
// Take XML and XSL string to transform and return the result HTML string. private String genHTML(String xml, String xsl)
throws Exception {
ByteArrayOutputStream baosHTML = new ByteArrayOutputStream();
TransformerFactory tFactory = TransformerFactory.newInstance();Transformer transformer = tFactory.newTransformer(new StreamSource(new StringReader(xsl)));transformer.transform (
new StreamSource(new StringReader(xml)), new StreamResult(baosHTML));
String html = baosHTML.toString();baosHTML.close();
return html; }}
2. After you enter the code above into the servlet, you will notice that there is an error on the page indicating that the variable xslContent cannot be resolved. This brings us to our next step. We need to insert some code into the servlet that sets the value of xslContent. This string variable will contain the code
348 IBM WebSphere Application Server - Express V5.0.2 Developer Handbook

required to create the XSL string for creating the HTML. The process of creating the HTML also requires an XML file, but we allow the servlet to dynamically create it for us.
ByteArrayOutputStream baosXML = new ByteArrayOutputStream();PrintWriter xmlWriter = new PrintWriter(baosXML);
If we wanted to, we could have allowed the servlet to create the XSL string at runtime, but the output of the HTML would have been very basic. You will notice in the example above that there are a few bolded lines of code. If you remove the comments on these lines and change String html = genHTML(baosXML.toString(),xslContent); to read with baosXSL.toString() instead of xslContent, the servlet will create the XSL for you. For our sample, we wanted to add some style to our output and therefore are setting the value of the XSL string.
3. Find the following comments in the servlet:
//Placeholder for xslContent //
This is the area of the servlet where we are going to add the code to create the xslContent string.
4. Remove the two comments and add the code from the example below.
Example 10-5 xslContent
//Manually creating the xsl file - the xsl content was taken from an xsl file created using the Studio wizards//This is the start of the xslString xslContent = "<?xml version=\"1.0\" encoding=\"UTF-8\"?>";xslContent += "<xsl:transform exclude-result-prefixes=\"sqltoxml\" version=\"1.0\" xmlns:xsl=\"http://www.w3.org/1999/XSL/Transform\">";xslContent += "<xsl:output method=\"html\"/>";xslContent += "<xsl:template match=\"/\">"; xslContent +="<html>";xslContent +="<head>";xslContent +="<meta content=\"text/html; charset=iso-8859-1\" http-equiv=\"Content-Type\"/>";xslContent +="<meta content=\"0\" http-equiv=\"Expires\"/>"; //Adding a link to the blue.css filexslContent +="<link rel=\"stylesheet\" href=\"/OnlineCatalog/theme/blue.css\" type=\"text/css\"/>"; //Continuation of xslxslContent +="</head>";xslContent +="<body>"; xslContent +="<div>";xslContent +="<xsl:apply-templates/>";xslContent +="</div>";xslContent +="</body>";xslContent +="</html>";
Chapter 10. Working with XML 349

xslContent += "</xsl:template>";xslContent += "<xsl:template match=\"SQLResult\">"; xslContent +="Featured Item"; //Title has been added to page with CSS class associatedxslContent +="<p/>";xslContent +="<table width=\"600\" border=\"0\">"; //Added width to table and removed borderxslContent +="<tr>";xslContent +="<td width=\"150\" class=\"table_header\">NAME</td>"; //Added width to cell and associated a CSS classxslContent +="<td width=\"250\" class=\"table_header\">DESCRIPTION</td>"; //Added width to cell and associated a CSS classxslContent +="<td width=\"100\" class=\"table_header\">PRICE</td>"; //Added width to cell and associated a CSS classxslContent +="</tr>";xslContent +="<xsl:for-each select=\"ITEM\">";xslContent +="<tr>";xslContent +="<td>";xslContent +="<xsl:value-of select=\"NAME\"/>";xslContent +="</td>";xslContent +="<td>";xslContent +="<xsl:value-of select=\"DESCRIPTION\"/>";xslContent +="</td>";xslContent +="<td>";xslContent +="<xsl:value-of select=\"PRICE\"/>";xslContent +="</td>";xslContent +="</tr>";xslContent +="</xsl:for-each>";xslContent +="</table>";xslContent += "</xsl:template>";xslContent += "</xsl:transform>";
If you open the FeaturedItem.xsl file we created earlier, you will notice that the code above and the XSL code are very similar. We added a link to a CSS file, a few CSS class references, table enhancements, and text additions (indicated in bold).
350 IBM WebSphere Application Server - Express V5.0.2 Developer Handbook

Importing the SQLToXML jar fileAt runtime, the SQLToXML jar file will be needed to access objects in the servlet. To be available, it needs to be placed in the WEB-INF\lib folder of the project.
1. Open the Web perspective.
2. While in the Project Navigator view navigate to the OnlineCatalog/WebContent/WEB-INF directory and select the lib folder.
3. Select File > Import from the main menu and then select File system from the Import dialog.
4. Click Next.
5. Browse to <studio_install>\wstools\eclipse\plugins\com.ibm.etools.sqltoxml_5.1\jars.
6. Click OK.
7. Expand the jars tree, then select the sqltoxml.jar check box.
8. Set the destination folder to be OnlineCatalog/WebContent/WEB-INF/lib.
9. Click Finish. The JAR file appears in the OnlineCatalog/WebContent/WEB-INF/lib directory. Your application server will need to be restarted before your changes take effect.
Step 6: Adding a page to the Web site diagramWith the FeaturedItemXMLServlet servlet completed, we can add a link to the index.html page of our application that will call the servlet and then output the featured item list.
1. Open the Web perspective.
2. Expand the OnlineCatalog project and open the Web site diagram editor by double-clicking Web Site Configuration.
3. Right-click the index.html page diagram icon and select Add New Page -> As Child from the context menu. This adds a new page icon to the diagram.
4. Change the Navigation Label from newpage to Featured Item.
5. Double-click the Featured Item page diagram icon and enter the page value of FeaturedItemXMLServlet. This is the URL mapping value that we specified when the servlet was created.
Important: If you are using the Online Catalog sample from the IBM Redbooks site, you will notice that the FeaturedItemXMLServlet contains additional lines of code for the xslContent string. We did this because we wanted to incorporate our template into the HTML output.
Chapter 10. Working with XML 351

Figure 10-18 Web site diagram
6. Close the Web site diagram editor and save your changes.
SummaryNow you are ready to run the application. When the Featured Item link is selected from the navigation bar, the FeaturedItemXMLServlet will be executed and you will see a display of the featured items in the item table. The figure below shows a screenshot of the output with the template applied to it.
352 IBM WebSphere Application Server - Express V5.0.2 Developer Handbook

Figure 10-19 Featured item output
10.4 For more informationFor more information, see the following:
� WebSphere Studio Application Developer Programming Guide, SG24-6585
� The XML Files: Development of XML/XSL Applications Using WebSphere Studio V5, SG24-6586
Chapter 10. Working with XML 353

354 IBM WebSphere Application Server - Express V5.0.2 Developer Handbook

Chapter 11. Working with Web services
Our objective in this chapter is to introduce the Web services technology and the support provided for it by WebSphere Studio Site Developer. This chapter will discuss the following:
� Web services overview
� Studio Site Developer support for Web services
� Using Web services in the Online Catalog sample
11
Important: This chapter address the topic of Web service consumption. If you are looking for information on Web service development, please see the redbook WebSphere Studio Application Developer V5 Programming Guide, SG24-6957.
© Copyright IBM Corp. 2003 355

11.1 Web services overviewWhat is a Web service? As you might already have observed, Web service has recently become one of the highly overloaded terms in the IT industry. In this publication, we use the following widely accepted definition: Web services are self-contained, self-describing, modular applications that can be published, located, and invoked across the Web.
Let us further explain the information contained in this definition.
Web services are self-containedOn the client side, no additional software is required. A programming language with XML and HTTP client support is enough to get you started.
On the server side, a Web server and a servlet engine are required. It is possible to Web service enable an existing application without writing a single line of code.
Web services are self-describingNeither the client nor the server knows or cares about anything besides the format and content of request and response messages (loosely-coupled application integration).
The definition of the message format travels with the message; no external metadata repositories or code generation tools are required.
Web services can be published, located, and invokedSome additional standards that are required to do so are:
� Simple Object Access Protocol (SOAP), also known as service-oriented architecture protocol, an XML-based remote procedure call (RPC) and messaging protocol
� Web Service Description Language (WSDL), a descriptive interface and protocol binding language
� Universal Description, Discovery, and Integration (UDDI), a registry mechanism that can be used to look up Web services descriptions
In this chapter we introduce each of these technologies.
Web services are language independent and interoperableClient and server can be implemented in different environments. Existing code does not have to changed in order to have the Web service enabled.
356 IBM WebSphere Application Server - Express V5.0.2 Developer Handbook

Web services are inherently open and standards basedXML and HTTP are the technical foundation for Web services. A large part of the Web service technology has been built using open source projects. Therefore, vendor independence and interoperability are realistic goals.
Web services are dynamicDynamic e-business can become reality using Web services because, with UDDI and WSDL, the Web service description and discovery can be automated.
Web services build on proven mature technologyThere are a lot of commonalities, as well as a few fundamental differences to other distributed computing frameworks. For example, the transport protocol is text based and not binary.
Let us now introduce the overall architecture of the Web services technology framework.
11.1.1 The concept of a service-oriented architecture (SOA)Each component in a service-oriented architecture can play one (or more) of three roles: service provider, broker, and requestor, which perform the operations shown in Figure 11-1 on page 358.
Chapter 11. Working with Web services 357

Figure 11-1 Web services roles and operations
1. The service provider creates a Web service and possibly publishes its interface and access information to the service registry.
Each provider must decide which services to expose, how to make trade-offs between security and easy availability, and how to price the services (or, if they are free, how to exploit them for some other value). The provider also has to decide what category the service should be listed in for a given broker service and what sort of trading partner agreements are required to use the service.
2. The service broker (also known as the service registry) is responsible for making the Web service interface and implementation access information available to any potential service requestor.
The implementers of a broker have to make a decision about the scope of the broker. Public brokers are available all over the Internet, while private brokers are only accessible to a limited audience, for example, users of a company-wide intranet. Furthermore, the width and breadth of the information offered has to be decided. Some brokers will specialize in breadth of listings. Others will offer high levels of trust in the listed services. Some will cover a broad landscape of services and others will focus on a given industry. Brokers
ServiceRequestor Internet Service
Provider
Legacysystem
ServiceBroker
12
3
358 IBM WebSphere Application Server - Express V5.0.2 Developer Handbook

will also arise that simply catalog other brokers. Depending on the business model, a broker may attempt to maximize look-up requests, number of listings, or accuracy of the listings.
3. The service requestor locates entries in the broker registry using various find operations and then binds to the service provider in order to invoke one of its Web services.
One important issue for users of services is the degree to which services are statically chosen by designers compared to those dynamically chosen at runtime. Even though most initial usage is largely static, any dynamic choice opens up the issues of how to choose the best service provider and how to assess quality of service. Another issue is how the user of services can assess the risk of exposure to failures of service suppliers.
11.1.2 Web services approach for an SOA architectureWeb services are a rather new technology that implements the service-oriented architecture. A major focus during the development of this technology was put on the goal of making functional building blocks accessible over standard Internet protocols that are independent from platforms and programming languages.
Web services are self-contained, modular applications that can be described, published, located, and invoked over a network. Web services perform encapsulated business functions, ranging from simple request-reply to full business process interactions.
These services can be new applications or just wrapped around existing legacy systems to make them network-enabled. Services can rely on other services to achieve their goals.
The core technologies used for Web services are as follows.
� XML (eXtensible Markup Language) is the markup language that underlies most of the specifications used for Web services. XML is a generic language that can be used to describe any kind of content in a structured way, separated from its presentation to a specific device.
� SOAP (formerly referred to as Simple Object Access Protocol, or Service-Oriented Architecture Protocol; in fact, like JDBC, it is no longer an acronym) is a network, transport, and programming language neutral protocol that allows a client to call a remote service. The message format is XML.
� WSDL (Web services description language) is an XML-based interface and implementation description language. The service provider uses a WSDL document in order to specify the operations a Web service provides, as well as the parameters and data types of these operations. A WSDL document also contains the service access information.
Chapter 11. Working with Web services 359

� UDDI (universal description, discovery, and integration) is both a client side API and a SOAP-based server implementation which can be used to store and retrieve information on service providers and Web services.
Figure 11-2 provides a first glance at the relationship between the core elements of the SOA.
Figure 11-2 Main building blocks in a SOA approach based on Web services
� All elements use XML, including XML namespaces and XML schemas.
� The service requestor and provider communicate with each other.
� WSDL is one alternative to make service interfaces and implementations available in the UDDI registry.
� WSDL is the base for SOAP server deployment and SOAP client generation.
11.1.3 An introduction to SOAPThe current industry standard for XML messaging is SOAP. IBM, Microsoft, and others submitted SOAP to the W3C as the basis of the XML Protocol Working Group.
WSDL
UDDI (Broker)
SOAP
HTTP
J2EE other
other
ProviderRequestor
XSD
SOA Runtime
Metadata/vocabulary
Runtime transports
Implementation
Service description
XML
360 IBM WebSphere Application Server - Express V5.0.2 Developer Handbook

SOAP has the following characteristics:
� SOAP is designed to be simple and extensible.
� All SOAP messages are encoded using XML.
� SOAP is transport protocol independent. HTTP is one of the supported transports, hence, SOAP can be run over existing Internet infrastructure.
� There is no distributed garbage collection. Therefore, call by reference is not supported by SOAP; a SOAP client does not hold any stateful references to remote objects.
� SOAP is operating system independent and not tied to any programming language or component technology. It is object model neutral.
Due to these characteristics, it does not matter what technology is used to implement the client, as long as the client can issue XML messages. Similarly, the service can be implemented in any language, as long as it can process XML messages.
OverviewHistorically, SOAP was meant to be a network and transport neutral protocol to carry XML messages. SOAP over HTTP became the premier way of implementing this protocol, to the point that the latest SOAP specification mandates HTTP support.
However, conceptually there is no limit to the network protocol that can be utilized. For example, because HTTP is a transport that does not guarantee delivery and is non-transactional, SOAP messages can also be transferred by a messaging software such as MQSeries.
SOAP remote procedure call (RPC) is the latest stage in the evolution of SOAP; the body of a SOAP message contains a call to a remote procedure (expressed in XML) and the parameters to pass in (again, expressed in XML).
The SOAP standard specifies three aspects of XML-based message exchange.
Overall message formatA SOAP message is an envelope containing zero or more headers and exactly one body. The envelope is the top element of the XML document, providing a container for control information, the addressee of a message, and the message itself.
Headers transport any control information such as quality of service attributes. The body contains the message identification and its parameters.
Chapter 11. Working with Web services 361

Encoding rulesEncoding rules define a serialization mechanism that can be used to exchange instances of application-defined data types.
SOAP defines a programming language independent data type scheme based on XSD, plus encoding rules for all data types defined according to this model.
RPC representationThe RPC representation is a convention suited to represent remote procedure calls and the related response messages.
The usage of this convention is optional. If the RPC convention is not used, the communication style is purely message oriented. When working with the message oriented style, also called document-oriented communication, almost any XML document can be exchanged.
11.1.4 An introduction to WSDLIf we want to find services automatically, we have to have a way to formally describe both their invocation interface and their location. The Web services description language (WSDL) 1.1 provides a notation serving these purposes.
OverviewWSDL allows a service provider to specify the following characteristics of a Web service:
� Name of the Web service and addressing information
� Protocol and encoding style to be used when accessing the public operations of the Web service
� Type information: Operations, parameters, and data types comprising the interface of the Web service, plus a name for this interface
A WSDL specification uses XML syntax, therefore, there is an XML schema for it.
A valid WSDL document consists of two parts:
1. The interface part describing the abstract type interface and its protocol binding
2. The implementation part describing the service access (location) information
362 IBM WebSphere Application Server - Express V5.0.2 Developer Handbook

11.1.5 Web Services Invocation Framework (WSIF)The Web Services Invocation Framework is a WSDL-oriented Java API that allows you to invoke Web services dynamically, regardless of what format the service is implemented in or what mechanism is used to access it.
WSIF is transport agnostic, thus a single WSIF client can support multiple runtime protocols simultaneously, such as SOAP, a direct HTTP connection, and a local Java call. For more information on WSIF see:
http://www-106.ibm.com/developerworks/webservices/library/ws-wsif.html
UDDI overviewUDDI stands for universal description, discovery, and integration. UDDI is a technical discovery layer. It defines:
� The structure for a registry of service providers and services� The API that can be used to access registries with this structure� The organization and project defining this registry structure and its API
UDDI is a search engine for application clients rather than human beings; however, there is a browser interface for human users as well.
UDDI is not a full business-oriented discovery or directory service; it operates on the technical level. The core information model is defined in an XML schema that can be found at:
http://www.uddi.org/schema/uddi_v1.xsd
Note that UDDI is an organization currently supported by more than seventy companies, but not a standards body. It works closely with organizations such as the W3C, however.
UDDI registry structureThe following entities comprise the core of the UDDI data model:
Business entity Business entities are the white and yellow pages of the registry. Business entities provide business information about a service provider such as business name, contacts, description, identifiers, and categories.
Business service A business service is a descriptive container used to group a set of Web services related to a business process or group of services. Categorization is available on this level. A business service maps to a WSDL service.
Binding template These are the technical Web service descriptions relevant for application developers who want to find and invoke a Web
Chapter 11. Working with Web services 363

service. A binding template points to a service implementation description (for example, a URL). This entity is sometimes also called access locator. A binding template maps to a WSDL port.
tModel A tModel is a technical fingerprint, holding metadata about type specifications as well as categorization information. Its attributes are key, name, optional description, and URL. The simplest tModel contains some text characterizing a service.
A tModel points to a service interface description (for example, through a URL). The type specification itself, which can be a WSDL document or any other formal specification, is not part of the UDDI model. This entity is sometimes also called service type.
Figure 11-3 displays this data model with the entities introduced above. It also shows their relationships and the link to the WSDL level.
Figure 11-3 UDDI entities and their relationships
The business entity tops the containment hierarchy, containing one or more business service entities and in turn binding template entities. The tModel instances (service types) are not contained by the business entity, but referenced by the binding template entities.
InterfaceDocument
Business Entity
Business Service
tModel(ServiceType)
ImplementationDocumentWSDL
UDDI
1
1
BindingTemplate
findcontains
points to
1
m
n
1
n
0..1
n
0..1
n
1nimport
364 IBM WebSphere Application Server - Express V5.0.2 Developer Handbook

A binding template points to an access point URL where the service can be invoked. This is a common use of the binding template, but not required. The binding template could point to a phone number as a contact point.
A service type entity (tModel) has a reference to a Web service type specification, which typically is a WSDL document. Note that the UDDI registry merely contains a URL pointing to the Web site of the service provider where the document can be found, not the WSDL document itself.
These references are implemented as URLs; therefore, any other specification format can easily be supported as well.
UDDI API overview The UDDI programming API provides publishing and inquiry features.
The inquiry API supports the following operations:
� Find a business entity through its Universal Unique Identifier (UUID).
� Find a business entity through a wild-carded name.
� Find a business entity through categorization information.
� Navigation from business entity to contained services—an optional categorization parameter can be specified.
� Find a service type (tModel).
� Access to detailed information on the found entities.
There are find_xxx and get_xxx methods for business, service, binding template, and service type (tModel).
The publishing API has the following functions:
� Publishing, updating, and unpublishing of business entities
� Publishing, updating, and unpublishing of business services and binding templates
� Publishing, updating, and unpublishing of service types (tModels)
� Methods related to the individual API user—authenticating operations belong to this group of operations
There are save_xxx and delete_xxx methods for the elements of the UDDI object model (business, service, binding, tModel).
Chapter 11. Working with Web services 365

More informationThe Web site of the UDDI organization is rich in content; you can find all UDDI specifications there; for example, the data model and API for Versions 1 and 2. Moreover, there are technical white papers, a best practices section, and an informative list of frequently asked questions:
http://www.uddi.org
Two registries that you can take a look at are:
� UDDI Business Registry
http://www.ibm.com/services/uddi
The UDDI Business Registry is an open, e-commerce service registry maintained by a group of companies, called operators, that have pledged to share all public information about registrants among themselves and with users of the service and to maintain interoperability among the multiple peer nodes of the UDDI service network.
� IBM Test Registry
http://www.ibm.com/services/uddi
A registry for developers to experiment with the technology and test their services.
It is worth noting that these registries use a slightly different terminology than the UDDI object model exposed to API programmers:
� Business service instances are called businesses.� Business services are called services.� Binding templates are called access locators.� tModel instances are called service types.
11.2 Studio Site Developer support for Web servicesSite Developer facilitates the following Web services development tasks to help you build and deploy Web services-enabled applications for your dynamic e-business across a broad range of software and hardware platforms used by today's businesses.
� Discover — Browse the Universal Description Discovery and Integration (UDDI) business registry or a Web Services Inspection Language (WSIL) document to locate existing Web services for integration.
� Create or Transform — Create Web services from existing artifacts, such as JavaBeans, Web sites that take and return data, DB2 XML Extender calls, DB2 stored procedures, and SQL queries.
366 IBM WebSphere Application Server - Express V5.0.2 Developer Handbook

� Build — Wrap existing artifacts as Simple Object Access Protocol (SOAP) and HTTP GET/POST-accessible services and describe them in Web Services Description Language (WSDL).
� Deploy — Deploy the Web service into the WebSphere Application Server or Tomcat test environments.
� Test — Test the Web service as it runs locally or remotely.
� Develop — Generate a sample application to assist you in creating your own Web service client application.
� Publish — Publish your Web services to a private or public UDDI business registry advertising your Web services so that other clients or businesses can access them.
� All Web services support is based on open standards such as UDDI V2, SOAP 2.3, WSDL 1.1, and new support for WSIL 1.0.
� Support Apache Axis 1.0 runtime.
� WSDL Editor — This is a graphical tool for editing WSDL files and embedded XML schemas.
� Enhanced Web Services Explorer — With support for discovering, browsing, invoking, and publishing WSDL.
� Support for creation of WS-I compliant Web Services.
� Command line tool for creation and consumption of Web services.
11.2.1 Web service preferencesStudio Site Developer allows you to set different Web services properties within the workbench. To set any of the Web services preferences listed below, follow these steps:
1. Click Window -> Preferences to open the Preferences dialog.
2. Expand Web services, and click the preference category that you want to set.
3. Select the check boxes that you want to set as the default when creating your Web service.
4. Click OK to apply the changes and close the Preferences notebook.
Backward CompatibilityThe Backward Compatibility preferences enable you to use options that are compatible with previous WebSphere Studio releases. This preference only applies if you are using Web services that use the IBM SOAP runtime.
Chapter 11. Working with Web services 367

Code Generation The Code Generation preferences enable you to:
� Use absolute location URI for WSDL import statements
� Use inline schema when generating code
� Enable element-based mappings to proxy files
� Map XML simple data types to java.lang wrapper classes instead of to Java primitive types
This preference only applies if you are using Web services that use the IBM SOAP runtime.
Dialogs The Dialogs preferences enable you to determine which dialog boxes you want to see when creating your Web service.
JDBC Drivers The JDBC Drivers preferences enables you to add JAR files for additional JDBC drivers. This is used only by the DADX validation code on Linux.
Resource Management The Resource Management preferences enable you to determine the defaults that you want to use when creating your Web service.
Scenario Defaults The Scenario Defaults preferences enable you to determine the defaults that you want to use when creating your Web service.
SOAP Transports Select your default transport: SOAP over HTTP or SOAP over JMS. This preference only applies if you are using Web services that use the WebSphere 5.0.2 runtime.
Web Services Explorer The Web Services Explorer preferences allow you to select whether or not to ignore schemas for SOAP arrays.
WS-I Compliance The WS-I Compliance preferences allow you to select your level of compliance with the WS-I Basic Protocol. This preference only applies if you are using Web services that use the WebSphere 5.0.2 runtime.
368 IBM WebSphere Application Server - Express V5.0.2 Developer Handbook

11.2.2 WizardsStudio Site Developer provides wizards that support the following Web services development activities. All of these wizards can be accessed by selecting File -> New -> Other from the main menu and then selecting the Web Services node from the New dialog.
� Create a Web service client. The wizard assists you in generating a JavaBean proxy and a sample application. The generated JavaBean proxy provides a remote procedure call interface to the Web service and the sample Web application shows how to code the proxy file.
� Create a Web service. The wizard lets you create and publish Web services that are created from JavaBeans, DADX files, and URLs.
� Create DADX files. The wizard helps with the creation of a DADX file from either SQL queries or a DAD file, which is a user-specified file that provides control over the mapping of XML document elements to database columns for querying and updating.
DADX is an XML document format that specifies how to create a Web service using a set of operations that are defined by DAD documents and SQL statements. A DADX Web service enables you to wrap DB2 Extender or regular SQL statements inside a standard Web service. The DADX file defines the operations available to the DADX runtime environment, and the input and output parameters for the SQL operation. The DADX Web service is deployed into a DADX group.
� Create a DADX group configuration. The Web Services DADX Group Configuration wizard assists you in creating a DADX group. The DADX group contains connection information (JDBC and JNDI) and other information that is shared between DADX files within the group. Once you have created a DADX group, use the Web Service wizard to create a new Web service.
� Create JavaBeans for XML schema. The wizard enables you to generate JavaBeans from schema.
� Create WSDL files. The wizard helps you create an empty WSDL file. The WSDL file can be modified using the WSDL editor.
11.2.3 WSDL editorWebSphere Studio provides a WSDL editor for creating, modifying, viewing, and validating WSDL files. The WSDL editor can be opened by double-clicking a WSDL file from the navigator views in the workbench.
Important: For additional information about each of these wizards please refer to the Studio Site Developer help documentation.
Chapter 11. Working with Web services 369

Using the WSDL editor, you can do the following:
� Create new WSDL files
� Validate and edit WSDL files
� Import existing WSDL files for structured viewing
� Generate documentation from a WSDL document.
Figure 11-4 WSDL editor
11.2.4 Web Services ExplorerThe Web Services Explorer is a Web application that supports the publication, discovery, and maintenance of business entities, business services, and service interfaces.
Use the Web Services Explorer to do any of the following tasks:
� Add a registry to the Web Services Explorer
� Add a registry, business entity, business service, service interface, WSIL, or WSDL service to Favorites
� Discover a Web service
WSDL editor
370 IBM WebSphere Application Server - Express V5.0.2 Developer Handbook

� Publish a business entity to a registry
� Publish a business service to a registry
� Remove a business entity, business service, or service interface from a registry
� Update a business entity, business service, or service interface
� Manage referenced services
� Manage publisher assertions
� Explore and modify WSDL
The Web Services Explorer is accessed by selecting Run -> Launch Web Services Explorer from the main menu of the workbench.
Figure 11-5 Web Services Explorer
Chapter 11. Working with Web services 371

11.3 Using Web services in the Online Catalog sampleTo illustrate how to incorporate an external Web service in our application, we will use the Web services client wizard. The Web service we choose performs currency conversion from one country to another for a specified amount. There are several Web services available that provide such a service, but we will use the service provided by XMethods for our sample. Once we have consumed the Web service, we will link up the associated pages to the main page of our application.
11.3.1 Locating and consuming a Web serviceFinding Web services usually means searching the Internet for UDDI registries. In the case of our example, we will use the Web Services Explorer to locate a currency conversion Web service.
1. From the main menu select Run -> Launch the Web Services Explorer.
2. The Web Services Explorer opens in the Web Browser.
Figure 11-6 Web Services Explorer
372 IBM WebSphere Application Server - Express V5.0.2 Developer Handbook

3. From the Navigator window click UDDI Main. This opens the Open Registry page in the Actions window.
4. Select XMethods Registry from the Favorite Registry drop-down box.
5. Click Go. This opens the Registry Details page.
6. Scroll to the bottom of the page and click Find. The Find page opens.
7. Enter CurrencyFind as the name of the query.
8. From the Search for drop-down box select Services.
9. Scroll down the page and in the Name field enter currency.
10.Click Go. The Query Results page opens.
11.From the list of available services click the Currency Exhange Rate link.
Figure 11-7 Query results page
12.The Service Details page opens and displays information about the Currency Exchange Rate service.
a. Scroll to the bottom of the page and click Launch Web Service Wizard. This opens the Launch Web Service Wizard page.
b. Verify that the Web Service Client radio button is selected and click Go.
13.The Web Services Client wizard opens.
Chapter 11. Working with Web services 373

Figure 11-8 Web services page
a. Verify that the Client proxy type drop-down value is set to Java proxy.
b. Select Test the generated proxy. This creates a sample that will use the Web service. The sample can be a starting point for the code in your application.
c. Select Create folders when necessary. The wizard will be creating files and folders during the Web services client generation. This allows the folders to be created as you go.
d. Click Next.
14.On the Client Environment Configuration page you are required to select a runtime protocol and server for the client environment. In the Client-Side Environment Selection area select the Choose Web service runtime protocal first radio button. Two windows will be displayed in the lower part of the page.
374 IBM WebSphere Application Server - Express V5.0.2 Developer Handbook

Figure 11-9 Client environment configuration page
a. From the Web service runtime window select IBM SOAP and from the Server window, expand Server Types, WebSphere V 5.0, and select WebSphere Express V5.0 Test Environment.
b. Verify that the Client Web Project value is set to OnlineCatalog and click Next.
15.The Web Service Selection page is displayed and prompts for the WSDL file location. This is where we enter the URL of the WSDL. This will be filled in for us since we invoked this wizard from the Web Services Explorer.
Chapter 11. Working with Web services 375

Figure 11-10 Web service selection page
16.Click Next. The wizard will attempt to access the WSDL file at the URL entered, analyze the information in the file, and then present the Web Service Binding Proxy Generation page.
376 IBM WebSphere Application Server - Express V5.0.2 Developer Handbook

Figure 11-11 Web service binding proxy generation page
a. This page allows you to select the type of binding (SOAP, httpget, httpost) that you want to use. The options are based on the binding information found in the WSDL file. In this example, only one type of binding, SOAP, was defined. However, you may find that multiple types have been defined that you can select.
For this example, we can leave the defaults for all fields.
b. Click Next.
17.The Web Service Test page lets you generate a sample Web application to use the Web service. Change the Folder field to currency_conversion.
Chapter 11. Working with Web services 377
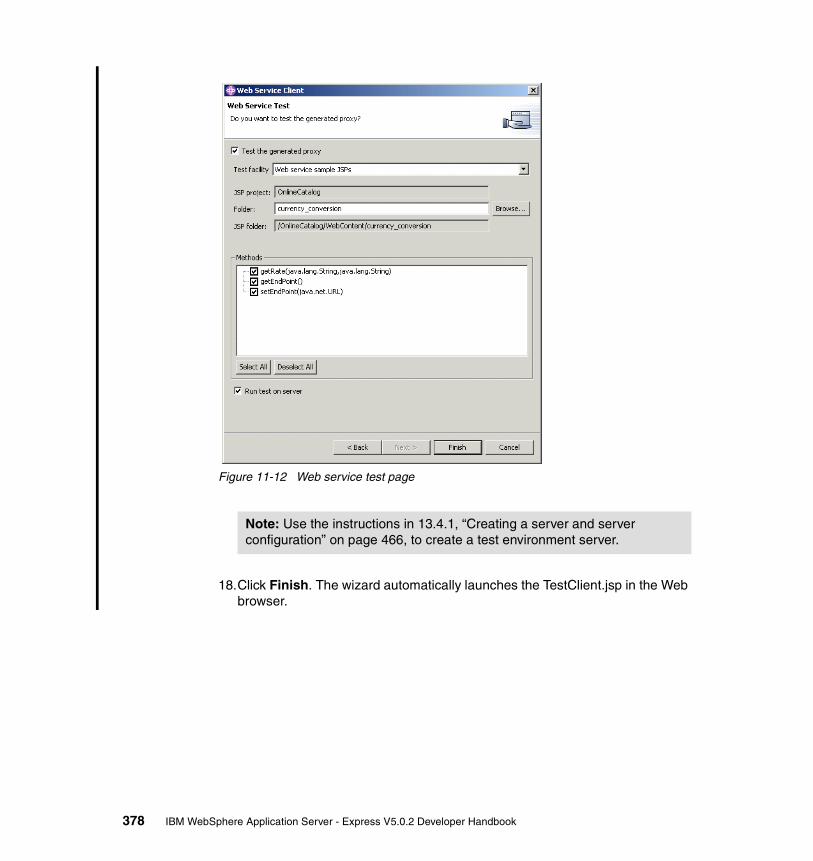
Figure 11-12 Web service test page
18.Click Finish. The wizard automatically launches the TestClient.jsp in the Web browser.
Note: Use the instructions in 13.4.1, “Creating a server and server configuration” on page 466, to create a test environment server.
378 IBM WebSphere Application Server - Express V5.0.2 Developer Handbook

Figure 11-13 TestClient.jsp
19. The wizard also copies the files needed and generates the sample client. The JavaBean proxy files are placed in the JavaSource directory and sample JSPs under the folder specified in the wizard (currency_conversion). The wizard produces the following files:
– To test the generated proxy, the following files are created in the currency_conversion folder:
• TestClient.jsp: this is basically the parent of a frameset. The frameset consists of the next three JSPs. This is what is created and launched to test the Web service.
• Method.jsp: this contains a list of the methods available in the Web service to test.
• Input.jsp: this displays a form customized to the method to allow the user to enter input and submit the test.
• Result.jsp: this invokes the proxy class as a useBean and shows the results produced by the Web service.
Chapter 11. Working with Web services 379

– Proxy: The proxy class makes the call to the Web service provider:
• JavaSource/proxy.proxytype/service_nameproxy.java
• WebContent/WEB-INF/classes/proxy/proxytype/service_nameproxy.class
In summary, Input.jsp JSP takes the source and target countries from the user and calls Result.jsp. Result.jsp passes the country information to the proxy bean, which fetches the conversion rate using the Web service and then passes the results back to Result.jsp.
11.3.2 Integrating the client into your applicationThe sample JSPs generated by the wizard serve as a good starting point for incorporating the Web service into your application. For example, in the Online Catalog application, we took this client and made the following modifications:
� We created a new entry point page to replace TestClient.jsp and called it conversion.html. The new page consists of two iframes, Input.jsp and Result.jsp.
� We changed Input.jsp and Result.jsp to match the overall motif of the application.
� We added a field in Input.jsp to allow the user to enter an amount to be converted and added code to do that conversion and to select the country from a list in a drop-down list box.
� We added code in Result.jsp to convert the amount entered using the rate retrieved by the Web service.
� We added the conversion.html to the Web site diagram and then applied the template to it.
The finished result now looks like Figure 11-14 on page 381.
380 IBM WebSphere Application Server - Express V5.0.2 Developer Handbook

Figure 11-14 Reworked sample
11.3.3 For more informationThis topic has looked at the most elementary use of Web services, that of a client. For more information on developing Web services see:
� WebSphere Studio Application Developer V5 Programming Guide, SG24-6957.
� Web Services Wizardry with WebSphere Studio Application Developer, SG24-6292. This is written to WebSphere Studio Version 4 but has a lot of appropriate material.
� The Studio Site Developer online Web developer help.
� IBM Web Services home page at:
http://www.ibm.com/software/solutions/webservices/
� IBM Web Services ToolKit:
http://www.ibm.com/software/solutions/webservices/wstk-info.html
Chapter 11. Working with Web services 381

� WSDL 1.1 specification at:
http://www.w3.org/TR/wsdl
� For more information on WSIF, see:
http://www-106.ibm.com/developerworks/webservices/library/ws-wsif.html
382 IBM WebSphere Application Server - Express V5.0.2 Developer Handbook

Chapter 12. Using Struts
In this chapter, we introduce you to the Jakarta Struts framework and WebSphere Application Server - Express support for building Struts-based Web applications.
In this chapter, the following topics are covered:
� Struts overview
� Studio Site Developer and Struts
� Using Struts in the Online Catalog sample
For more information, we suggest that you read the following:
� WebSphere Application Server - Express: A Development Example for New Developers, SG24-6301
� Writing a Simple Struts Application using WebSphere Studio V5 by Jane Fung and Colin Yu at:
http://submit.boulder.ibm.com/wsdd/techjournal/0302_fung/fung.html
12
© Copyright IBM Corp. 2003 383

12.1 Struts overviewStruts is an open source framework for building Web applications according to the Model-View-Controller (MVC) architectural pattern (see 2.3.3, “MVC architectural pattern” on page 28). Struts is part of the Jakarta project, sponsored by the Apache Software Foundation. For reference, see:
http://jakarta.apache.org/strutshttp://jakarta.apache.org/struts/userGuide/introduction.html
12.1.1 Why we use StrutsThe Struts open source framework was created to make it easier for developers to build J2EE Web applications. Like a building, a Web application must have a solid foundation from which the rest of the structure can grow. Using Struts as the foundation allows developers to concentrate on building the business application rather than on the infrastructure.
The Struts framework has gained considerable attention because of its ease of use and ability to fit the needs of today’s developers in building applications fast. Struts combines servlets, JSPs, custom tags and message resources into a unified infrastructure and saves the developer the time it takes to code an entire MVC model, which is a considerable task.
The model 2 approach is concerned with separating responsibilities in Web applications. Application development and maintenance are much easier if the different components of a Web application have clear and distinct responsibilities.
As an example, consider an appliance with which you are certainly familiar: a television set. You will probably agree that changing TV channels is quite a simple task. Now ask yourself these questions:
� Do you know how the television set represents channels internally?
� Do you know exactly what goes on when you change TV channels?
� Do you think you should know these things?
Chances are that you have answered no to all of the questions above. What is the advantage of you not knowing how TVs represent their data and implement their operations? You could buy a new TV, which does these things internally in a completely different way, and you could still change channels.
Note: WebSphere Application Server - Express includes support for Struts V1.02 and V1.1.
384 IBM WebSphere Application Server - Express V5.0.2 Developer Handbook

12.1.2 Struts frameworkTrue to the MVC design pattern, Struts applications have three major components: a servlet (the controller), JSPs (the view), and the application's business logic (the model).
Struts model componentStruts does not define its own model component. In a Web application (and a Struts application), most of the model (the business logic) can be represented using Java beans or EJBs. Access to the business logic is through Struts action objects (classes that subclass org.apache.struts.action.Action).
The action object can handle the request and respond to the client (usually a Web browser), or indicate that control should be forwarded to another action. For example, if a login succeeds, a loginAction object may want to forward control to a mainMenu action.
Action objects are linked to the application controller, and so have access to the methods of the servlet. When forwarding control, an object can indirectly forward one or more shared objects, including Java beans, by placing them in one of the standard collections shared by servlets.
An action object can, for instance, create a shopping cart bean, add an item to the cart, place the bean in the session collection, and then forward control to another action, which may use a JSP to display the contents of the user's cart. Because each client has its own session, each also has its own shopping cart.
Struts view componentIn general, a view represents a display of the domain model in a user interface.
The view in a Struts application is made up of various components. JSPs are the main component. JSPs, of course, are not Struts components. However, Struts provides additional components that can be used by or with JSPs:
� Form beans
� Custom tags
� HTML documents
Form beansA form bean is an instance of the org.apache.struts.action.ActionForm class subclass that stores HTML or JSP form data from a submitted client request or input data from a link that a user has clicked. A form bean is a type of Java bean. An HTML or JSP form comprises fields in which the user can enter information.
Chapter 12. Using Struts 385

When a browser submits an HTML form, the Struts ActionServlet does the following:
1. Looks at the field names from the HTML form
2. Matches them to the properties' names in the form bean
3. Automatically calls the setter methods of these variables to put the values retrieved from the HTML form
The form bean can be used to collect data from the user, to validate what the user entered, and by the JSP to repopulate the form fields
In the case of validation errors, Struts has a shared mechanism for raising and displaying error messages. It automatically invokes the ActionForm.validate method whenever the JSP page containing the form corresponding to this ActionForm submits the form. Any type of validation can be performed in this method. The only requirement is that it return a set of ActionError objects in the return value. Each ActionError corresponds to a single validation failure, which maps to a specific error message. These error messages are held in a properties file to which the Struts application refers.
Custom tagsThere are four tag libraries included in Struts:
1. The HTML tag library, which includes tags for describing dynamic pages, especially forms.
2. The beans tag library, which provides additional tags for improved access to Java beans and additional support for internationalization.
3. The logic tag library, which provides tags that support conditional execution and looping.
4. The template tag library for producing and using common JSP templates in multiple pages.
Using these custom tags, the Struts framework can automatically populate fields to and from a form bean, providing two advantages:
� The only thing most JSPs need to know about the rest of the framework is the proper field names and where to submit the form. The associated form bean automatically receives the corresponding value.
� If a bean is present in the appropriate scope, for instance after an input validation routine, the form fields will be automatically initialized with the matching property values.
386 IBM WebSphere Application Server - Express V5.0.2 Developer Handbook

Therefore, an input field declared in a JSP using Java code as:
<input type="text"name="fName"value="<%=bean.getFirstName()%>">
can be replaced by a more elegant and efficient Struts tag:
<html:text property="fName"/>
with no need to explicitly refer to the Java bean from which the initial value is retrieved. That is handled automatically by the JSP tag, using facilities provided by the framework.
HTML documentsAlthough HTML documents generate only static content, you can use standard HTML documents within your Struts application. Of course, they will not be able to render any dynamic data, but they are still valid to use whenever the view is static.
For example, a login page may just be an ordinary HTML document that invokes a Strut login action.
Struts controller componentThe most important Struts controller responsibilities are:
� Intercepting client requests
� Mapping each request to a specific business operation
� Collecting results from the business operation and making them available to the client
� Determining the view to display to the client based on the current state and result of the business operation
In the Struts framework, several components are responsible for the controller duties and they can be classified in two parts: the action servlet and action classes.
Action servletThe Struts framework provides the org.apache.struts.action.ActionServlet class for servlets. The action servlet bundles and routes HTTP requests from the client (typically a user running a Web browser) to action classes and corresponding extended objects, deciding what business logic function is to be performed, then delegates responsibility for producing the next phase of the user interface to an appropriate view component such as a JSP.
Chapter 12. Using Struts 387

When initialized, the action servlet parses a configuration file. The configuration file defines, among other things, the action mappings for the application. The controller uses these mappings to turn HTTP requests into application actions.
At least, a mapping must specify:
� A request path
� The object type to act upon the request
Each mapping defines a path that is matched against the request URI of the incoming request, and the fully qualified class name of an action class.
Action classAn action class is one that extends org.apache.struts.action.Action. The action classes interface with the application’s business logic. Based on the results of the processing, the action class determines how control should proceed. The action class specifies which JSP or servlet control should be forwarded to.
12.2 Studio Site Developer and StrutsThe Struts application development tools that are provided by WebSphere Studio Site Developer make it easy for you to build and manage a Struts-based Web application. Studio Site Developer acts as follows:
� A Web project which can be configured for Struts. This adds the Struts runtime (and dependent JARs), tag libraries and action servlet to the project and creates skeleton Struts configuration and application resources files. Studio Site Developer provides support both for Struts 1.02 and 1.1 beta 2, selectable when setting up the project.
� A set of component wizards to define ActionForm classes, action classes with action forwarding information, and JSP skeletons with the tag libraries included.
� A configuration file editor to maintain the control information for the action servlet.
Note: The action class can contain the actual business logic, in which case it would be considered the model and not the controller. However, this practice is not recommended, since the application’s business logic woold then be mixed with the Struts framework code: this would limit the ability to reuse the business logic. The advised practice is to use the action class as an interface to the business logic, and allow it to share in the controller role, guiding the flow of the application.
388 IBM WebSphere Application Server - Express V5.0.2 Developer Handbook

� A design tool to edit a graphical view of the Web application from which components (forms, actions, JSPs) can be created using the wizards. This graphical view is called a Web diagram. The Web diagram editor provides top-down development (developing a Struts application from scratch), bottom-up development (that is, you can easily diagram an existing Struts application that you may have imported) and meet-in-the-middle development (that is, enhancing or modifying an existing diagrammed Struts application).
� A Web Structure view that provides a hierarchical (tree-like) view of the application. This view shows the artifacts, such as Web pages and actions, and you can expand the artifacts to see their attributes. For example, an action can be expanded to see its forwards, which can then be expanded to see its links. This is useful for understanding specific execution paths of your application. The Web Structure view is available in the Web perspective.
� Page Designer support for rendering the Struts tags, making it possible to properly view Web pages that use the Struts JSP tags. This support is customizable using the preferences settings.
� Validators to validate the Struts XML configuration file and the JSP tags used in the JSP pages.
12.2.1 Struts development processYou would typically set up and use Struts in an application in the following manner:
1. Create a new project with Struts support.
If you have an existing project, you must add Struts support to the project.
2. Use wizards to:
– Draw a Struts application Web diagram to visually model the application flow.
– Develop the JSPs in the Web diagram using the custom Struts HTML and bean tags.
– Generate templates for ActionForm and action mapping classes and modify them to add the business logic.
– Edit the Struts configuration file to map actions to Web pages and vice versa.
12.2.2 Struts support in a Web projectBy default, Struts support is not added to a project in Studio Site Developer. Support can be added when creating a new project and can also be added to an existing project by modifying the project properties.
Chapter 12. Using Struts 389

Adding Struts support to a new projectCreating a Web project with Struts support is done in the same manner as illustrated in Chapter 4, “Working with Web applications” on page 57. The only difference is that on the Features Page of the New Web Project wizard, you must select the Add Struts support and JSP Tag Libraries features.
Figure 12-1 Adding Struts support
As you continue through the wizard, you will notice that a new page is available for configuring. The Struts Settings page allows you to override the default Struts settings.
Note: Once Struts support has been enabled, numerous files are added to the directory of the project in the WEB-INF folder, both in the root and in the lib folder.
390 IBM WebSphere Application Server - Express V5.0.2 Developer Handbook

Figure 12-2 Struts settings page
Click the Override default settings box and specify the changes:
� To specify a different version of Struts, select from the Struts version drop-down menu.
� To change the default Java package prefix, edit the Default Java package prefix field.
� To create a resource bundle for your Struts project, make sure that the Create a Resource Bundle for the Struts Project box is selected and that a Java package name and a resource bundle name are specified.
Clicking Finish will create the project and you will now be ready for Struts application development.
Enabling Struts support in an existing projectIf you have an existing project that was created without Struts support, you can enable the feature by modifying the project properties.
1. Right-click the Web project in the Project Navigator view and select Properties from the context menu. The properties dialog will open.
2. Select Web Project Features from the left menu box to display the Web project features.
Chapter 12. Using Struts 391

3. Select Add Struts support and JSP Tag Libraries if not already selected.
Figure 12-3 Web project properties dialog
4. Click Apply.
5. The Struts Settings page is displayed. This page allows you to override the default Struts settings.
392 IBM WebSphere Application Server - Express V5.0.2 Developer Handbook

Figure 12-4 Struts settings page
6. Click Finish to update the project properties with Struts support.
7. Click OK to close the project properties dialog.
12.2.3 Setting Struts preferencesVarious preferences settings affect the Web diagram editor, the Struts configuration file editor, and other Struts tools. To set Struts preferences, complete the following steps:
1. In the workbench, click Window -> Preferences. The Preferences window opens.
2. In the Preferences window, click Web Tools and then one of the following menu selections:
– Struts Tools
– Struts Tools -> Page Designer Struts Support
– Struts Tools -> Web Diagram Editor
3. Change the preferences as desired and click Apply and then OK.
Chapter 12. Using Struts 393

Struts toolsYou can set the following general Struts preferences.
Figure 12-5 Struts preferences - Struts tools
� Restart local server when a Struts configuration file changes
Automatically restarts the test server when a registered Struts configuration file changes. The options are Prompt, Yes, and No.
� Default Java package prefix
Used by various Struts wizards when building package names for new Java classes such as Action and ActionForm subclasses.
394 IBM WebSphere Application Server - Express V5.0.2 Developer Handbook

Page designer Struts supportYou can set the following Struts-related preferences for the JSP page designer.
Figure 12-6 Struts preferences - Page designer Struts support
� Display error messages for <html:errors> tag
Indicates whether the <html:errors> tag should render error messages. The error messages displayed are either the default list or the ones specified in the JSP.
� Error messages to display for <html:errors> tag
Specifies the default error messages to be displayed for <html:errors> tags. You can override these in each JSP by specifying the keys of error messages in the application's resource bundle.
� List of options for <html:options> tag
Specifies the list of options to be rendered for <html:options> tags.
Chapter 12. Using Struts 395

� Evaluate conditional logic tags to true
Indicates whether the conditional logic tags such as <logic:equal> should be evaluated to true. If this option is on, the body of the conditional tag will be rendered. If this option is off, nothing will be rendered for the conditional logic tag. You can override this option in each JSP.
� Count for <logic:iterate> tag
Specifies the number of times the body of a <logic:iterate> tag should be rendered. You can override this option in each JSP.
� Display messages for <html:messages> tag
Indicates whether the <html:messages> tag should render messages. The messages displayed are either the default list or the ones specified in the JSP.
� Messages to display for <html:messages> tag
Specifies the default messages to be displayed for <html:messages> tags. You can override these in each JSP by specifying the keys of messages in the application's resource bundle.
Web diagram editorYou can specify the following preferences that pertain to the Web diagram editor.
396 IBM WebSphere Application Server - Express V5.0.2 Developer Handbook

Figure 12-7 Struts preferences - Web diagram editor
� Delete resource when deleting graphics representation
Specifies one of the following actions to take when you delete a part from the free-form surface:
– Delete the part's underlying resource – Not delete the part's underlying resource – Ask you whether to delete the part's underlying resource
� Preferred action on double-clicking an unrealized action mapping Specifies whether you want the Struts configuration file editor opened or the Action wizard invoked.
� Preferred action on double-clicking an unrealized form bean
Specifies whether you want the Struts configuration file editor opened or the ActionForm wizard invoked.
Chapter 12. Using Struts 397

� Graphical connection format
Specifies the visual representation of the following connections:
– Unrealized connection – Realized connection – General connection – Action Mapping Input connection – Procedural data reference connection – Declared data reference connection
12.2.4 Web diagram editorA Web diagram is a file that helps you visualize the application flow of a Struts-based Web application. Because of the levels of indirection involved in a Struts application, being able to visualize the application's flow can help you to better understand the application itself.
Figure 12-8 Web diagram
398 IBM WebSphere Application Server - Express V5.0.2 Developer Handbook

Within the Web diagram editor , you can add different Struts components (actions, form beans, Web pages) to create a Struts-based application. The editor also allows you to invoke wizards and editors for the different components of the Web diagram.
Web diagram terminologyBelow is a list and description of some of the common Web diagram terms.
� Free-form surface: A free-form surface (FFS) is the area of the Web diagram editor that allows you to add nodes and connections.
� Node: A Web page, action mapping, bean, or form bean as represented on the free-form surface.
� Module: A Struts module is a Struts configuration file and a set of corresponding actions, form beans, and Web pages. By default, a Struts application contains only one module, but more than one module can be added.
� Action: A Struts action is an instance of a subclass of an Action class, which implements a portion of a Web application and the perform or execute method of which returns a forward.
� Action mapping: An action mapping is a configuration file entry that, in general, associates an action name with an action. An action mapping can contain a reference to a form bean that the action can use, and can additionally define a list of local forwards that is visible only to this action.
� Form bean: A form bean (type of Java bean) is an instance of a subclass of an ActionForm class that stores HTML form data from a submitted client request or that can store input data from a Struts action link that a user has clicked. To create a form bean, you must create both a form bean and a form-bean mapping.
� Dynaform: A dynaform (type of form bean) is an instance of a DynaActionForm class or subclass that stores HTML form data from a submitted client request or that stores input data from a link that a user has clicked. To create a dynaform, you need create only a form-bean mapping; a form bean will be dynamically created for you at runtime.
� Exceptions: A Struts exception is an element defined in a Struts configuration file that specifies how to handle Java exceptions that occur during execution of Struts actions. An exception can be local or global. Global exceptions are only available in Struts 1.1.
Note: For more information on how to create a Web diagram, see “Web diagram wizard” on page 420. After a Web diagram file (*.gph) is created, you can double-click the file to open the Web diagram editor.
Chapter 12. Using Struts 399

� Forwards: A Struts forward is an object returned by an action; it has two fields: a name and a path. The path indicates where a request is to be forwarded. A forward can be local (pertaining to a specific action) or global (available to any action).
� Connections: In a Struts diagram, a connection is a line that represents either logic flow or data flow.
– Logic flow
A logic flow connection in a Web diagram represents how a page or an action “flows” to the next page or action. For example, a link from a Web page to another page represents how the first page can go to the next page. This type of connection is represented in a Web diagram with a black line. Possible types of logic flow connections include:
• Web page to Web page• Web page to action mapping• Web page to Web application• Action mapping to action mapping
– Data flow
A data flow connection is a line that represents a possible flow of data through beans from a Web page or an action mapping. Two types of data flow connections exist:
• Declared data reference: This connection type is shown, by default, as a blue line. Types of declared data reference connections include:
• Action mapping to form bean, where the form bean is the form bean specified in the action mapping declaration.
• Web page to Java bean, where the bean is referenced in a Web page by a useBean tag
• Web page to form bean, where the bean is referenced in a Web page by a useBean tag
Note: The first connection made from an action mapping to a form bean is assumed to be the connection to the action mapping's defined form bean. Any subsequent connections from that action mapping to other form beans are assumed to represent bean references from within the action mapping's action class and are shown as procedural data references.
400 IBM WebSphere Application Server - Express V5.0.2 Developer Handbook

• Procedural data reference: This connection type is shown, by default, as agreen line. Types of procedural data reference connections include:
• Action mapping to Java bean
• Action mapping to form bean
Context menuIn the Web diagram editor, the context menu displays an appropriate list of possible actions. The context menu can be accessed by right-clicking anywhere on the free-form surface or on an object within the free-form surface.
The content of the list depends on which object on the free-form surface is selected. Listed below are the context menu actions built into the diagram editor.
Table 12-1 Context menu actions
Item Parent Function Icon
Connection Draws a connection from the selected node to a target.
Draw All From Draw Draws all targets and connections from the selected node.
Draw Selected From
Draw � Displays a pop-up dialog that lists all links and forwards from the selected node.
� You can select which links or forwards you want drawn.
Chapter 12. Using Struts 401

Draw All Draw Draws all targets and connections from the selected node and then recursively performs the same action on each of the targets.
Action Mapping Node
New Primes the cursor ready to drop a new action mapping onto the FFS.
Form Bean Node New Primes the cursor ready to drop a new form bean onto the FFS.
Java Bean Node New Primes the cursor ready to drop a new Java bean onto the FFS.
Web Page Node New Primes the cursor ready to drop a new Web page onto the FFS.
Web Application Node
New Primes the cursor ready to drop a new Web application onto the FFS.
Struts Module Node
New Primes the cursor ready to drop a new Struts module onto the FFS.
Open Opens the part in its default editor.
Open Other For those parts that have more then one editor, this opens the part in the other editor.
Item Parent Function Icon
402 IBM WebSphere Application Server - Express V5.0.2 Developer Handbook

Struts tools drawer from the Palette viewThe Palette view provides a Struts tools drawer that contains much of the same actions as the Web diagram context menu mentioned previously.
Figure 12-9 Struts tools drawer
Change Path Changes the path of the part.
Change Description
Changes the description of the part.
Change Module Association
Changes the module association for the diagram.
Undo Undoes the last undoable action.
Redo Redoes that last undone action.
Delete Deletes the selected part.
Item Parent Function Icon
Chapter 12. Using Struts 403

To use an action, select it from the drawer and then click anywhere on the free-form surface to place it. With connections, click Connection from the drawer, then click one node and then another to create the connection.
Realizing Web diagram partsOnce you have added a node to the Web diagram editor, it will be unrealized. An unrealized node is represented as a grayed out icon within the Web diagram editor. When the node becomes realized, the icon will change color. Simply put, an unrealized node is a node that is just an icon on the free-form surface and is yet to be created (realized); think of it as a place holder for the node.
To realize an unrealized node, double-click the node to invoke the appropriate wizard. For a JSP, HTML page, action mapping, Web application, Java bean, and form bean, only one wizard exists. When double-clicking a Module node, either the Module wizard or Action Mapping wizard will be invoked. The Module wizard is opened if the module does not exist and the Action Mapping wizard will open if the entry point action mapping does not exit.
To realize a declared or procedural data reference connection, you must first realize the source of the connection. If the source is realized, the appropriate editor is launched where you are able to enter the required code to make the connection realized.
For a detailed explanation of the wizards, see 12.2.5, “Wizards” on page 405..
12.2.5 WizardsStudio Site Developer also provides you with the following wizards to aid in the creation of a Struts-based application. These wizards can be found by selecting File -> New -> Other -> Web -> Struts from the workbench main menu.
Note: Unrealized connections are indicated in the Web diagram editor with a dashed line. As soon as the connection is realized, the line becomes solid.
Note: You can also realize an unrealized node by identifying it as an existing node. If doing this, there are resolution rules that need to be followed for each node. Please refer to the WebSphere Studio Site Developer product help for more information.
404 IBM WebSphere Application Server - Express V5.0.2 Developer Handbook

Figure 12-10 Struts wizards
In addition, some of the wizards can be accessed through the Web diagram editor and/or the Struts explorer.
Action wizardTo create an action and optionally create an action mapping, complete the following steps:
1. In the Project Navigator of the Web perspective, right-click the name of a project.
2. Left-click New -> Other -> Web -> Struts -> Action Class -> Next.
3. On the New Action Class page, complete the following steps:
Chapter 12. Using Struts 405

Figure 12-11 Action wizard
– In the Action class name field, type the name of the new action.
– In the Folder field, specify the name of the folder in which the new class is to be created.
– In the Java package field, specify the name of the Java package in which the class is to be created.
– If you want to specify modifiers that apply to the new class, select one or more of the following boxes: public, abstract, final.
– Make sure that a value is supplied in the Superclass field.
– For each interface that you want to create, click Add and type the interface name, the names of matching types, and any qualifiers.
– If you want to create method stubs, click the check boxes to select the ones you want.
– For the code generation model, select Generic Action Class.
4. Click Finish.
406 IBM WebSphere Application Server - Express V5.0.2 Developer Handbook

5. If you want to create an action mapping in addition to creating an action, on the Create a mapping for your Action class page, complete the following steps:
Figure 12-12 Action wizard
– Make sure that the Add new mapping box is checked.
– Make sure that a configuration file name is specified
– If you want to change the default mapping path, type the path name in the Action Mapping Path field.
– To specify forwards, click Add and specify the forward's name and path and, if the forward is context-relative, change the Context relative? value to true.
– To delete a forward, select the forward name and click Remove.
– If you want to specify a form bean, select the name from the Form Bean Name drop-down menu.
Chapter 12. Using Struts 407

– If you want to specify a form bean scope, from the Form Bean Scope drop-down list select request or session. The default behaves as if request were selected.
6. Click Finish.
Action mapping wizardTo create an action mapping that associates a Struts action with a forward, complete the following steps:
1. In the Project Navigator of the Web perspective, right-click the name of a project or any artifact within the project.
2. Left-click New -> Other -> Web -> Struts -> Action Mapping.
Note: There are four other ways to invoke the Module wizard.
– Double-clicking an unrealized action mapping node in the Web diagram editor.
– Right-clicking the project in the Struts Explorer view and selectingNew -> Action Mapping from the context menu.
– Expanding the project directory in the Struts Explorer view, right-clicking the module, and selecting New -> Action Mapping from the context menu.
– Expanding the module folder in the Struts Explorer view, right-clicking the Actions folder, and selecting Add Action Mapping... from the context menu.
408 IBM WebSphere Application Server - Express V5.0.2 Developer Handbook

3. On the New Action Mapping page, complete the following steps:
Figure 12-13 Action mapping wizard
a. Specify the configuration file name or accept the default.
b. Specify the action mapping path or accept the default.
c. To specify forwards, click Add and specify the forward's name and path and, if the forward is context-relative, change the Context relative? value to true.
d. If you want to use a form bean, select a form bean name from the Form Bean Name drop-down menu and select the scope from the Form Bean Scope drop-down menu.
Chapter 12. Using Struts 409

– If you want to reuse an existing class for your mapping's type, click the An existing Action class radio button and select a fully qualified class name from the drop-down menu. Otherwise, click the Create an Action class radio button and select one of the following models from the Model drop-down list:
• Generic Action Mapping• Reuse an existing class
4. Click Finish.
5. If you want to create an action class in addition to creating an action mapping, on the Create a Action class for your mapping page, complete the following steps:
6. On the New Action Class page, complete the following steps.
410 IBM WebSphere Application Server - Express V5.0.2 Developer Handbook

Figure 12-14 Action mapping wizard
a. In the Action class name field, type the name of the new action.
b. In the Folder field, specify the name of the folder in which the new class is to be created.
c. In the Java package field, specify the name of the Java package in which the class is to be created.
d. If you want to specify modifiers that apply to the new class, select one or more of the following boxes: public, abstract, final.
e. Make sure that a value is supplied in the Superclass field.
f. For each interface that you want to create, click Add and type the interface name, the names of matching types, and any qualifiers.
Chapter 12. Using Struts 411

g. If you want to create method stubs, click the check boxes to select the ones you want.
7. Click Finish.
ActionForm wizardTo create a Struts form bean and optionally create a form bean mapping, complete the following steps:
1. In the Project Navigator of the Web perspective, right-click the name of a project or artifact within a project.
2. Click New -> Other -> Web -> Struts -> ActionForm Class -> Next.
3. On the New ActionForm Class page in the ActionForm class name field, type the name of the ActionForm subclass that you are creating.
4. Fill out the other fields as appropriate for the subclass you are creating, and click Next.
5. On the Choose new fields for your ActionForm class page, click the check box beside the name of each node for which you want a get and a set method created. Check boxes exist for every node in the following hierarchy:
– Project – Module – Folder – Web page – Form – Form field (leaf)
If you click the check box beside the name of a form field, you will generate a corresponding field, get method, and set method in your form bean. If you click the check box beside the name of a parent, you will generate a corresponding field, get, and set for every leaf underneath that parent. Click Next.
6. On the Create new fields for your ActionForm class page, click Add and type the field name and type for each field you want to create. If you want to create a form-bean mapping, click Next. Otherwise click Finish and skip the final step.
7. On the Create a mapping for your ActionForm class page, make sure that the Add new mapping box is selected and that the correct configuration file name and mapping name are specified. Then click Finish.
412 IBM WebSphere Application Server - Express V5.0.2 Developer Handbook

Form bean mapping wizardTo create a Struts form-bean mapping, complete the following steps:
1. In the Project Navigator of the Web perspective, right-click the name of a project.
2. Click New -> Other -> Web -> Struts -> Form-Bean Mapping -> Next.
3. On the New Form-Bean page, complete the following steps:
a. Make sure that the correct configuration file name and mapping name are specified.
b. Click one of the following radio buttons:
• An existing ActionForm • Create an ActionForm class or Struts dynaform using DynaActionForm
c. If you selected the second option in the previous step, you must select one of the following models from the drop-down menu:
• Generic Form-Bean Mapping • dynaform using DynaActionForm
d. Click Next.
4. On the Choose new fields for your ActionForm class page, click the check box beside the name of each module for which you want a get and a set method created. Then click Next.
5. On the Create new fields for your ActionForm class page, click Add and type the field name and type for each field you want to create. If you chose Generic Form-Bean Mapping, click Next; otherwise click Finish.
6. On the Create a mapping for your ActionForm class page, click the Add new ActionForm class box and complete the following steps:
a. Specify the name for the new ActionForm class.
b. Specify the path name of the folder in which the class will be created, or accept the default.
Note: There are three other ways to invoke the Form bean mapping wizard.
– Double-clicking an unrealized form bean node in the Web diagram editor.
– Expanding the project directory in the Struts Explorer view, right-clicking the module, and selecting New -> Form Bean from the context menu.
– Expanding the module folder in the Struts Explorer view, right-clicking the Form Beans folder, and selecting Add Form Bean... from the context menu.
Chapter 12. Using Struts 413

c. Specify the name of the Java package, or accept the default.
d. Click any of the check boxes that describe the characteristics of the class that you want to create:
• public • abstract • final
e. Specify the name of the superclass in which the class will be created, or accept the default.
f. For each interface that you want to create, click Add and type the interface name, the names of matching types, and any qualifiers.
g. Click the check boxes for the method stubs that you want created, or accept the defaults. The choices are as follows:
• inherited abstract methods • constructors from superclass • reset(..., HttpServletRequest) • reset(..., ServletRequest) • validate(..., HttpServletRequest) • validate(..., ServletRequest)
h. Click Finish.
JSP wizardA Struts JSP file is a JSP file that uses Struts tag libraries. If you select Struts support in the JSP wizard as described below, you can (optionally) create a form in the new JSP file that contains fields from a user-specified form bean.
To create a Struts JSP file:
1. In the Project Navigator of the Web perspective, right-click WebContent in a project folder.
2. Click New -> JSP File.
3. Fill out fields on the first New JSP File page, making sure that Struts JSP is specified in the Model field.
Note: There are two other ways to invoke the JSP wizard.
– Double-clicking an unrealized Web Page node in the Web diagram editor.
– Expanding the module folder in the Struts Explorer view, right-clicking the Web Pages folder, and selecting Add JSP File... from the context menu.
414 IBM WebSphere Application Server - Express V5.0.2 Developer Handbook

4. If you want to create the new JSP file with all the defaults, click Finish. The JSP file will contain the two most frequently used Struts tag-library declarations but will not contain a form. If you want to change other information or include a form in the new JSP file, click the Show advanced options box, and then click Next.
5. In the Tag libraries box on the Tag Libraries page, select the names of any tag libraries that you want added to the new JSP file. If these are the only tag libraries you want, click Next.
If you want to add other tag libraries, click Add and complete the following actions:
a. Click the check box for each tag library you want to add, and choose any of the available customizations that you want.
b. To specify a tag library that is not in the list, click Import, specify the path name of a JAR file, and click Finish.
c. Click OK.
6. If you want to remove a tag library from the list on the New JSP File page, select the name of the library and click Remove.
7. When the Tag libraries list on the New JSP File page is as you want it, click Next.
8. On the next two New JSP File pages, provide the information requested, and click Next.
9. If you want to include a form in the new JSP file, complete fields on the Form Field Selection page:
a. If your application comprises more than one module and you want to specify a module other than the default, type the path name of the module in the Form bean module field.
b. In the Form bean entry field, type the name of the entry or select one from the drop-down list. As you type the entry, the Bean name field is automatically filled out with the same name for the Java bean.
c. To specify an action to be invoked by the JSP file, type the name of the action or click Browse.
d. If you selected an existing form bean entry and it references an existing ActionForm subclass, the Fields list automatically contains the properties of the ActionForm subclass. You can select which fields you want to include in your form.
e. Click Next.
Chapter 12. Using Struts 415

10.On the Design the Form page, you can change how the fields are created in the new JSP file:
a. Select each field that you want to change. The properties of the selected field will be displayed, and you can change their values.
b. To see nested fields, click the + icon next to a field. If the selected field is an array, the properties being displayed refer to each array item.
c. To change the title of the new JSP file, click the Page tab.
d. Click Finish. The JSP file is created and the JSP editor starts.
Configuration file wizardA Struts configuration file is created automatically when you create a Struts project or a Struts module. However, you can have more than one configuration file for the default module. To create a Struts configuration file, complete the following steps:
1. In the Project Navigator, select the name of a project.
2. Navigate the following menu path: File -> New -> Other.
3. Select Web and then Struts in the left pane and Struts Configuration File in the right pane.
4. Click Next. A new window appears.
416 IBM WebSphere Application Server - Express V5.0.2 Developer Handbook

Figure 12-15 Configuration file wizard
5. Type the name of the new Struts configuration file and click Finish.
Exception wizardTo create a Struts exception, complete the following steps:
1. In the Project Navigator of the Web perspective (Window -> Open Perspective -> Web), right-click the name of a project.
2. Click New -> Other -> Web -> Struts -> Struts Exception -> Next.
Chapter 12. Using Struts 417

Figure 12-16 Exception wizard
a. Select a configuration file from the Configuration file drop-down menu.
b. Click Browse and select an exception type.
c. Type the path name of your exception handler to be created.
d. Click Browse and select an exception handler class name.
e. Click one of the following radio buttons to select the exception context:
• Global • Local to action-mapping
f. Specify a key name for your exception.
Note: The Exception wizard can also be invoked from the Struts Explorer view. Right-click the module folder and select New -> Global Exception for the context menu or expand the module, right-click the Global Exceptions folder and select Add Global Exception... from the context menu to invoke the wizard. This folder only contains Global exceptions, so if you create a Local exception, it will not be reflected in this folder but will be reflected in the configuration file.
418 IBM WebSphere Application Server - Express V5.0.2 Developer Handbook

3. Click Finish.
Module wizardA Struts module is created automatically when you create a Struts project. To create an additional Struts module, complete the following steps:
1. In the Project Navigator of the Web perspective (Window -> Open Perspective -> Web), select the name of a project.
2. On the main menu bar, click File -> New -> Other.
3. Select Web and then Struts in the left pane and Struts Module in the right pane.
4. Click Next. The Create a Struts module window appears.
Figure 12-17 New struts module wizard
Note: There are two other ways to invoke the Module wizard. Double-clicking an unrealized Module node in the Web diagram editor will invoke the Module wizard; right-clicking the project in the Struts Explorer view and selecting New -> Module from the context menu will also invoke the Module wizard.
Chapter 12. Using Struts 419

5. Type the name of the new Struts module and change any defaults as desired by selecting the Override default settings option.
– Deselecting the Create module directory option will not create a module directory in the WebContent directory of your Web project.
– If you wish to change the name of the Struts configuration file, you can, but it is recommended that you leave the default value since it includes the module name you specified and can easily been recognized if you are looking for it.
– Deselect the Create a Resource Bundle for the Struts Project option if you do not want to create a resource bundle for the module.
A Resource bundle contains locale-specific objects. For example, a Resource bundle could include a properties file that contains the label text for all the buttons in your application. Instead of hard-coding the text onto the buttons, you can call the values from the properties file. This is very beneficial if you ever want to change the language of your application.
– You can change the name of the Resource bundle Package if you like, but again, it is best to leave the default value since it contains the module name you specified and can be easily recognized if required.
– Editing the value in the Resource bundle Name field will change the name of the default application resources properties file.
6. Click Finish. A Struts configuration file is created.
Web diagram wizardTo create a Web diagram, complete the following steps:
1. In the Project Navigator, select the name of a project.
2. Right-click and select the following menu path: New -> Other -> Web -> Struts -> Web Diagram.
Note: When the Create a Resource Bundle for the Struts Project option is selected, a properties file called ApplicationResources.properties is created and placed in the Web Content/WEB-INF/classes/<module name>/resources directory. This file is read by the Struts framework at runtime.
In this file, it is possible to specify properties which can be used by your application. For example, you could create a property called page.title and specify the value as “My New Page”. This property could be used in a page called page.jsp to set the page title. This is potentially beneficial if you ever want to change the language of your application.
420 IBM WebSphere Application Server - Express V5.0.2 Developer Handbook

3. Click Next. The Create a Web diagram page appears with a default parent folder name provided.
Figure 12-18 Web diagram wizard
a. If you want to specify a different parent folder, type the name or select it from the choices in the box beneath the Enter or select the parent folder field.
b. In the File name field, type the name of the Web diagram file that is to be created.
c. If you want to associate the Web diagram with a module other than the default Struts module, select a module from the Module drop-down menu.
Note: The Web diagram wizard can also be invoked by right-clicking the project name in the Struts explorer view and selecting New -> Web Diagram from the context menu.
Chapter 12. Using Struts 421

d. If you want to associate the Web diagram with a file in the file system, click Advanced, check the Link to file in the file system box, click Browse, and select a file.
4. Clicking Finish creates a new Web diagram file (*.gph) and places it in the specified folder.
12.2.6 Struts configuration file editorA Struts configuration file (struts-config.xml) is an XML document that describes all or part of a Struts application and is used to configure the interaction between Struts objects.
Figure 12-19 Configuration file editor
The struts-config.xml file is located in the WEB-INF folder of the Web project. Double-clicking the file opens the Struts configuration file editor. Once you have completed making your changes to the configuration file, you must save it to apply your changes.
422 IBM WebSphere Application Server - Express V5.0.2 Developer Handbook
The Struts configuration file editor contains the following options:
� Action Mappings: Add, remove, and edit action mappings, local forwards, and local exceptions.
� Global Forwards: Add, remove, and edit global forwards.
� Form Beans: Add, remove, and edit form beans.
� Data Sources: Add, remove, and edit data sources.
� Global Exceptions: Add, remove, and edit Global exceptions.
� Controller: Add, remove, and edit Controller attributes.
� Message Resources: Add, remove, and edit message resources.
� Plug-ins: Lets you define plug-ins associated with the configuration file.
� Source: Lets you edit the XML source of the file.
12.2.7 Struts explorer viewThe Struts Explorer view provides you with a way to navigate through the various referenced parts of a Web application from a starting point such as a Web page , an Action mapping, a Global forward, or a Global exception.
Objects contained in the Struts explorer view can be dragged and dropped onto the free-form surface of the Web diagram editor.
In addition, configuration files, modules, action mappings, form beans, Web pages, global forwards, and global exceptions can be created in the Struts explorer view. Please refer to 12.2.5, “Wizards” on page 405 for more information.
To view the organization of a Struts project in the Struts Explorer, complete the following steps:
1. In the Web perspective, click Window -> Show View -> Struts Explorer. The Struts Explorer view lists the names of the J2EE Web projects that exist in your workspace.
2. In the Struts Explorer, you can click the + signs to expand the list into a tree that lists the Web pages contained in a project. If the project is a Struts Web application, you can also get a list of Struts artifacts that are associated with the project.
3. You can expand each Web page to see the links that the page contains.
4. You can follow a link to the next page or action to see how the Web application flows from the initial page.
Chapter 12. Using Struts 423

12.2.8 Data Mappings viewThe Struts Data Mappings view lets you see how a Web page form controls data maps to the destination formBean class. You can then use this mapping to determine whether there is a mismatch between the input (form) and the target (formBean).
Figure 12-20 Data Mappings view
This viewer takes selections from Struts Explorer and Web diagram editor as the context, and if the selection is valid, the Data Mappings Viewer refreshes with the new input.
When a valid input is selected, a table with two columns appears. The columns contain the following information:
� A list of all the fields that this form link contains, including the hidden fields
� A list of properties in the form bean that can be set
12.2.9 Struts validationStruts validation is built upon the validation framework in the workbench. By default, the following aspects of a Struts project are automatically validated when a relevant file is closed:
� Syntax of Struts configuration file
� Syntax of Struts tags in web.xml file
� Resolution of Struts links and references in various Struts files
424 IBM WebSphere Application Server - Express V5.0.2 Developer Handbook

These validators can be turned on and off in the workbench preferences and/or the project properties. For more information about syntax validation, see “Syntax validation” on page 92.
12.3 Using Struts in a sampleTo illustrate the use of Struts, we will create an administrative login sample that will allow a user to log in as either a “read access” administrator or a “write access” administrator.
Let’s assume that up to this point in our application, we have created all the front-end content for our Web site. We now need to add the back-end content and the administrative login will be the entry point.
Depending on the user name and password submitted, the user will see a different administrative maintenance page. The “read access” administrator (admin1) will see options to view customers and orders. The “write access” administrator (admin2) will see the options to view, edit, and delete products.
Struts will be used to first validate the user name and password entries and then, depending on the submitted values, the action will forward the user to the appropriate page. A Struts action will also be used to log the user out of the administrative section of the site.
The following JSPs and Java classes are created in this sample:
� login.jsp - provides the interface to log in to the administration page
� LoginForm.java - an instance of this class is used to validate the user input parameters from the login.jsp page
� LoginAction.java - an instance of this class is used to authenticate the user
� admin1.jsp - displays the options to view a customer or an order
� admin2.jsp - displays the options to view, edit, and delete products
� LogoutAction.java - an instance of this class is used to log the user out of the administration page and redirect the user to the login page.
Chapter 12. Using Struts 425

The following diagram illustrates the sequence of events that occur when a user attempts to log in to the administrative function of the site as a “write access” administrator.
Figure 12-21 Login flow for admin2 user
The steps in this sample will follow the same flow as outlined in 12.2.1, “Struts development process” on page 389. The only difference is that after the Struts components have been created, we will integrated the login.jsp page with the rest of the application by adding a hyperlink to all of the pages.
Note: We did not follow this sample through to completion. There are four actions that are referenced in the code but not coded: customer.do, orders.do, additem.do, and edititem.do. This sample is designed to show you how to use the tools to create the Struts components. For an end-to-end example, see WebSphere Application Server - Express: A Development Example for New Developers, SG24-6301.
Web Browser
ActionServlet LoginAction
LoginFormadmin2.jsp
1
46
5
2
37
8
426 IBM WebSphere Application Server - Express V5.0.2 Developer Handbook

12.3.1 Adding Struts support to the OnlineCatalog projectWhen we originally created the OnlineCatalog project, we did not add Struts support. In order for us to continue, we need to enable Struts support on the project.
1. In the Project Navigator view of the Web Perspective, right-click the OnlineCatalog Web project and select Properties from the context menu.
2. Select Web Project Features from the left menu box to display the Web Project Features in the dialog.
3. Select the Add Struts support check box from the features list box.
4. Click Apply. The Struts Settings page is displayed. This page allows you to override the default Struts settings; see “Enabling Struts support in an existing project” on page 391 for more information.
5. Click Finish to update the project properties with Struts support.
6. Click OK to close the project properties dialog.
12.3.2 Creating a Web diagramNow that Struts support has been added to the OnlineCatalog project, we can create a Web diagram.
1. In the Project Navigator view, navigate to the OnlineCatalog\WebContent\struts_login folder.
Important: If you are downloading the Online Catalog sample from the additional material section of the IBM Redbook site, this sample will be included in the project but will not be incorporated into the application. The classes created in this example will be located in the onlinecatalog.actions and onlinecatalog.forms packages. Any JSPs or HTML pages associated with the example will be located in the struts_login folder in the WebContent directory.
The login function in the sample will use a JSP to verify that the user name and password submitted are valid by referencing a table in the SALESAPP database.
Chapter 12. Using Struts 427

2. Right-click the folder and select New -> Other from the context menu.
3. In the New dialog, select Web -> Struts in the left pane and Web Diagram in the right pane.
4. Click Next. The Web diagram wizard opens.
5. In the Create a Web Diagram window, accept the defaults and enter LoginProcess in the File name field.
Figure 12-22 Creating a Web diagram
6. Click Finish. This creates a new Web diagram file, LoginProcess.gph, under the WEB-INF folder and opens it in the Web diagram editor.
Note: The Web diagram file (*.gph) does not have to be added to the struts_login folder. The file can be placed anywhere in the WebContent folder, but it is recommended that it be placed in a location that will be remembered.
428 IBM WebSphere Application Server - Express V5.0.2 Developer Handbook

12.3.3 Creating the Web page nodesWith the Web diagram created, we can add the Web page, Action mapping, and Form bean nodes. We will start with the Web page nodes. Recall that we need to create three Web page nodes: login.jsp, admin1.jsp, and admin2.jsp.
1. Double-click Web Page Node in the toolbar to the right. This will prime the cursor to drop a new Web page onto the free-form surface.
2. Click where you want the page to be. A Web page icon is displayed on the free-form surface.
3. Change the default name /page.jsp to /struts_login/login.jsp.
4. Follow the same process to create Web page nodes for the two administration pages, modifying the default names to /struts_login/admin1.jsp and /struts_login/admin2.jsp.
5. Save the LoginProcess Web diagram (Ctrl+ S).
Figure 12-23 Adding Web page nodes to the Web diagram
Chapter 12. Using Struts 429

12.3.4 Creating the action mapping nodesFor the verification of the user name and password, we need to add an action mapping node to the free-form surface. We will also add an action mapping node for the logout action.
1. Double-click Action Mapping Node in the toolbar to the right. This will prime the cursor to drop a new action mapping onto the free-form surface.
2. Click where you want the action to be. An action mapping icon is displayed on the free-form surface.
3. Change the default path from /action to /login.
4. Similarly, create an action mapping node for the logout action and change the path to /logout.
Figure 12-24 Adding Action mapping nodes to the Web diagram
5. Save the LoginProcess Web diagram.
Important: Notice that the icons are grey. Once the nodes become realized, these icons will change color.
430 IBM WebSphere Application Server - Express V5.0.2 Developer Handbook

12.3.5 Creating connectionsThe application flow is depicted by connecting the nodes within the Web diagram. To create a connection between two nodes, right-click the first node, select Connection from the context menu and then click the second node.
For our application, we need to create the following connections:
� From the login.jsp page to the /login action mapping.
� From the /login action mapping to the admin1.jsp page. Change the default forward name to admin1page.
� From the /login action mapping to the admin2.jsp page. Change the default forward name to admin2page.
� From the /login action mapping to the login.jsp page. Change the default forward name to failure.
� From the admin1.jsp page to the /logout action mapping.
� From the admin2.jsp page to the /logout action mapping.
� From the /logout action mapping to the login.jsp page. Change the default forward name to success.
Figure 12-25 Adding connections to the Web diagram
Chapter 12. Using Struts 431

12.3.6 Editing the ApplicationResources.properties fileThe ApplicationResources.properties file is used to specify properties that can be used throughout the application. We are going to add some properties to the file for later use in our pages. You will see how some of these are used as we go through the sample.
1. Navigate to the ApplicationResources.properties file in the Web Content/WEB-INF/classes folder. It will be located in the resources folder under the folder hierarchy for the Struts Java package prefix (you can see this in the Struts preferences).
2. Double-click the file to open it in the default text editor.
3. Replace the contents of the file with the text shown in Example 12-1.
Example 12-1 ApplicationResources.properties
errors.header = <h3><font color=”red”>The following errors were detected:</font></h3><ul>errors.prefix = <li>errors.suffix = </li>erros.footer = </ul>
login.title = <span class=”site-page-headers”>Administration Login</span>login.username = User Namelogin.password = Passwordlogin.submitlabel = Login
logout.label = Logoutlogout.submitlabel = Logout
error.username.required = Please specify a user name.error.password.required = Please specify a password.error.password.mismatch = Invalid username or password entered.
admin1.title = <span class=”site-page-headers”>Administration Menu - Read Access</span>admin2.title = <span class=”site-page-headers”>Administration Menu - Write Access</span>
4. Close the file and save it when prompted.
Important: Notice that the connection lines in the diagram are dashed. When the connections are realized, the lines will become solid.
432 IBM WebSphere Application Server - Express V5.0.2 Developer Handbook

12.3.7 Realizing and editing the Web pagesUp to this point, we have added the Web pages, action mappings, and connections to the Web diagram. All of the nodes are unrealized (grey icon) and we will now go through the process of realizing them.
Login pageTo realize the login Web page node:
1. From the LoginProcess Web diagram, double-click the login.jsp Web page node to invoke the JSP wizard.
2. Verify that the File Name field value is login.jsp and that the Model drop-down has Struts JSP selected.
3. Click Finish. The login.jsp page is created and opened in Page Designer.
4. View the source of the page using the Source tab. Note that the taglib directives are automatically added into the JSP. Also, a Struts-html form tag is inserted with action /login.
Example 12-2 login.jsp
<!DOCTYPE HTML PUBLIC "-//W3C//DTD HTML 4.01 Transitional//EN">
<%@ taglib uri="/WEB-INF/struts-html.tld" prefix="html" %><%@ taglib uri="/WEB-INF/struts-bean.tld" prefix="bean" %>
<html:html><HEAD><%@ page language="java" contentType="text/html; charset=ISO-8859-1" pageEncoding="ISO-8859-1" %><META http-equiv="Content-Type" content="text/html; charset=ISO-8859-1"><META name="GENERATOR" content="IBM WebSphere Studio"><TITLE></TITLE></HEAD><BODY>
<html:form action="/login"></html:form>
</BODY></html:html>
Tip: When you cursor over a node on the free-form surface of the Web diagram editor, the name or path of the node is given. It also tells you if the node is unrealized or realized.
Chapter 12. Using Struts 433

You will notice that there is a warning on the page indicating that the target /login cannot be resolved. We will resolve this later by defining the corresponding action class.
Figure 12-26 login.jsp warning
5. Right after the <BODY> tag, add a bean message tag by selecting JSP -> Insert Custom from the main menu. An alternative way to do this is to drag and drop the Custom icon from the toolbar on the right to the desired location in the editing area. Both methods will cause the Insert Custom Tag dialog to open.
6. Select the tag library with the prefix bean from the left pane and select the message tag from the right pane.
Figure 12-27 Insert custom tag dialog
7. Click Insert. You will notice that a <bean:message> tag has been added.
434 IBM WebSphere Application Server - Express V5.0.2 Developer Handbook

Example 12-3 Adding a bean message tag
<BODY><bean:message></bean:message><html:form action="/login"></html:form>
</BODY>
8. Click Close.
9. Add the key attribute to the bean message tag and set the value to login.title.
<bean:message key=”login.title”></bean:message>
This value corresponds to a property set in the ApplicationResources.properties file. At runtime, the Struts framework reads the value of the property and the bean message tag displays it.
10.Click a spot inside the <html:form action=”/login”></html:form> tags and add another bean message tag.
11.Add the key attribute to the bean message tag and set the value to login.username.
<bean:message key=”login.username”></bean:message>
12.Add a <br> tag after the closing tag of the bean message.
13.Add another bean message after the <br> tag and set the key attribute to login.password.
Example 12-4 Adding a second bean message tag
<bean:message key="login.title"></bean:message><html:form action="/login">
<bean:message key="login.username"></bean:message><br><bean:message key="login.password"></bean:message>
</html:form>
14.Click a spot after the username bean message tag and before the <br> tag; add a custom HTML text tag and set the property attribute to username. This is done in the same way as adding a custom bean tag, except that this time, you must select the tag library with the html prefix (see Figure 12-27 on page 434).
Chapter 12. Using Struts 435

Example 12-5 Adding a html text tag
<bean:message key="login.title"></bean:message><html:form action="/login">
<bean:message key="login.username"></bean:message><html:text property="username"></html:text><br><bean:message key="login.password"></bean:message>
</html:form>
15.Click a spot after the password bean message tag and add a custom HTML password tag.
16.Set the property attribute to password.
<html:password property=”password”></html:password>
17.Add a <br> tag after the closing tag of the HTML password tag.
18.Insert an HTML submit tag after the <br> tag.
Example 12-6 Adding a html submit tag
<bean:message key="login.title"></bean:message><html:form action="/login">
<bean:message key="login.username"></bean:message><html:text property="username"></html:text><br><bean:message key="login.password"></bean:message><html:password property="password"></html:password><br><html:submit></html:submit>
</html:form>
19.Click a spot between the opening and closing HTML submit tags and insert a bean message tag; set the key attribute to login.submitlabel.
Example 12-7 Adding a bean message tag
<bean:message key="login.title"></bean:message><html:form action="/login">
<bean:message key="login.username"></bean:message><html:text property=""></html:text><br><bean:message key="login.password"></bean:message><html:password property="password"></html:password><br><html:submit>
<bean:message key="login.submitlabel"></bean:message></html:submit>
</html:form>
436 IBM WebSphere Application Server - Express V5.0.2 Developer Handbook

20.Right above the <BODY> tag, insert an HTML errors tag.
When the login action redirects the user to the login page because of an error, the errors will be displayed at the top of the login.jsp page.
21.Verify that the code is similar to the example below.
Example 12-8 Content area of login.jsp
<html:errors></html:errors><BODY><bean:message key="login.title"></bean:message><html:form action="/login">
<bean:message key="login.username"></bean:message><html:text property="username"></html:text><br><bean:message key="login.password"></bean:message><html:password property="password"></html:password><br><html:submit>
<bean:message key="login.submitlabel"></bean:message></html:submit>
</html:form></BODY>
22.While in the Preview page of Page designer, the login.jsp page should look similar to Figure 12-28.
Figure 12-28 Preview page of login.jsp
Chapter 12. Using Struts 437

23.Save your changes and exit the Page designer.
Admin1 pageTo realize the admin1 Web page node, follow these steps.
1. Realize the admin1.jsp page node in the same fashion that the login.jsp page node was realized.
2. Once the admin1.jsp page is created and opened in Page designer, click the Source tab. Note that the Struts HTML form tag is automatically inserted into the JSP withthe action set to /logout.
3. Since the admin1 page does not contain any input parameters, we do not need an HTML form tag. Remove the code associated with the HTML form tag.
4. Add a message bean tag after the <BODY> tag and set the key attribute to admin1.title.
<bean:message key=”admin1.title”></bean:message>
5. After the message bean title tag, insert the code shown in the following example.
Example 12-9 Menu for admin1.jsp
<p></p><ol><li><html:link href="/OnlineCatalog/customerforward.do">View Customers</html:link></li><li><html:link href="/OnlineCatalog/orderforward.do">View Orders</html:link></li><li></li></ol>
Ignore the two warnings indicating the broken links. We are not concerned at this point with what the menu system does, rather we simply wish to get the login function working for our site.
6. Between the third set of <li></li> tags, add an HTML link tag and set the href attribute to /OnlineCatalog/logout.do. This inserts a link to the Logout action which redirects the administrator to the login page. As was the case in the login.jsp page, a warning is displayed indicating that the target logout.do cannot be resolved. This will be created later in the sample.
7. Between the HTML link tags, add a message bean tag and set the key attribute to logout.label.
8. Verify that the code is similar to the following example.
438 IBM WebSphere Application Server - Express V5.0.2 Developer Handbook

Example 12-10 admin1.jsp
<BODY><bean:message key="admin1.title"></bean:message><p></p><ol><li><html:link href="/OnlineCatalog/customerforward.do">View Customers</html:link></li><li><html:link href="/OnlineCatalog/orderforward.do">View Orders</html:link></li><li>
<html:link href="/OnlineCatalog/logout.do"><bean:message key="logout.label"></bean:message>
</html:link></li></ol></BODY>
9. While in the Preview page of Page designer, the admin1.jsp page should look similar to the following diagram.
Figure 12-29 Preview page of admin1.jsp
10.Save your changes and exit the Page Designer.
Chapter 12. Using Struts 439

Admin2 pageThe admin2.jsp page will be identical to the admin1.jsp page, however the message bean title tag will have a key attribute set to admin2.title and the menu of the page will contain two different options.
1. Realize the admin2.jsp and then verify that the code added to it is similar to the code shown in the example below.
Example 12-11 admin2.jsp
<bean:message key="admin2.title"></bean:message><p></p><ol><li><html:link href="/OnlineCatalog/additem.do">Add Item</html:link></li><li><html:link href="/OnlineCatalog/edititem.do">Modify or Delete Item</html:link></li><li>
<html:link href="/OnlineCatalog/logout.do"><bean:message key="logout.label"></bean:message>
</html:link></li></ol>
2. Save your changes and exit the Page designer.
12.3.8 Creating the form beanWith all of the Web pages in place, we can now create a form bean using the ActionForm wizard. An instance of this class is used to validate the input parameters from the login.jsp page. Note that it is not always necessary to create an ActionForm class for each JSP within the application.
To create a form bean:
1. In the Project Navigator view in the Web Perspective, navigate to the OnlineCatalog/JavaSource folder.
2. Right-click the folder and select New -> Other from the context menu.
3. In the New window, select Web -> Struts from the left pane and ActionForm class from the right pane. Click Next to invoke the ActionForm class wizard.
4. Change the ActionForm class name field value from Form to LoginForm.
440 IBM WebSphere Application Server - Express V5.0.2 Developer Handbook

Figure 12-30 Creating an ActionForm class
5. Click Next.
6. On the next page, navigate to the Web Pages folder and select the box beside the login.jsp page.
Chapter 12. Using Struts 441

Figure 12-31 Creating an ActionForm class
7. Click Next.
8. On the next page, you will notice that the password and username fields have been created.
Figure 12-32 Creating an ActionForm class
9. Click Next.
10.Leave the defaults on the Create a mapping for your ActionForm class page and click Finish.
442 IBM WebSphere Application Server - Express V5.0.2 Developer Handbook

Figure 12-33 Creating an ActionForm class
This generates the template code for the LoginForm class and opens the corresponding file in the Java editor.
11.Replace the validate method with the following code.
Example 12-12 Validate method code
public ActionErrors validate(ActionMapping mapping,HttpServletRequest request) {
ActionErrors errors = new ActionErrors();// Validate the fields in your form, adding each error to
this.errors as found.
if((username == null) || (username.length() < 1))errors.add("username", new
ActionError("error.username.required"));
if((password == null) || (password.length() < 1))errors.add("password", new
ActionError("error.password.required"));
return errors;
Note: In the JavaSource folder of the OnlineCatalog project, a package called onlinecatalog.forms has been created and contains the LoginForm.java file.
Chapter 12. Using Struts 443

The method returns errors if either the username or password is not specified in the login.jsp page. Note the parameters used to construct an instance of ActionError class. Each string parameter represents a property set in the ApplicationResources.properties file. The Struts framework handles the task of reading the property values from this file at run-time.
12.Once you add the code above, you will get an error on two lines stating that ActionError cannot be resolved or is not type. To fix these errors, add the following import statement at the top of the LoginForm code (with the other import statements):
import org.apache.struts.action.ActionError;
13.Save your changes and close the Java editor.
12.3.9 Realizing and editing the action classesAs depicted in the Web diagram, the application uses two action classes; one to handle the administrator login and another to handle administrator logouts.
Login action classTo realize the action class for login:
1. Double-click the /login action mapping node in the Web diagram editor to invoke the Action mapping wizard.
2. On the New Action Mapping page, select loginForm as the Form Bean Name from the drop-down list.
444 IBM WebSphere Application Server - Express V5.0.2 Developer Handbook

Figure 12-34 Creating /login action mapping
3. Click Finish. This generates the template code for the LoginAction class and opens the corresponding file in the Java editor. Replace the code for the LoginAction class with the code from the following example.
Note: A package called onlinecatalog.actions has been created in the JavaSource folder of the OnlineCatalog project. It contains the code for the LoginAction.java file.
Chapter 12. Using Struts 445

Example 12-13 LoginAction class
public class LoginAction extends Action {
public ActionForward execute(ActionMapping mapping,ActionForm form,HttpServletRequest request,HttpServletResponse response)throws Exception {
ActionErrors errors = new ActionErrors();
//return valueActionForward forward = new ActionForward();
//Get the Form to read the user's inputLoginForm loginForm = (LoginForm) form;
String userName = loginForm.getUsername();String password = loginForm.getPassword();
// Write logic determining how the user should be forwarded.// For simplicity, the user input is checked against a known set// of userid/passwords. In a business application, the// the username/password validation is done against an underlying// database storing users' information.
//START LOGIN LOGICif (userName.equals("admin1") && password.equals("admin1")){
forward = mapping.findForward("admin1page");}else if (userName.equals("admin2") && password.equals("admin2")){
forward = mapping.findForward("admin2page");}else{
errors.add(ActionErrors.GLOBAL_ERROR, new ActionError("error.password.mismatch"));
forward = mapping.findForward("failure");}//END LOGIN LOGIC
//Report any errors we have discovered. These errors are displayed//on the destination page respresented by the 'forward' object
if(!errors.isEmpty())
446 IBM WebSphere Application Server - Express V5.0.2 Developer Handbook

{saveErrors(request, errors);
}
//Finish withreturn (forward);
}}
4. Save your changes and close the Java editor.
5. From the Web diagram editor, double-click the /login action mapping node to open the Configuration file editor.
6. The editor opens to the Action Mappings tab with the /login action mapping selected.
7. Select the Local Forwards tab at the top of the page. Notice that the forwards have been set for the /login action mapping.
Note: For simplicity, the logic of authenticating the administrator has been implemented within the action class itself. In a practical Web application, the action class should invoke model objects which implement the business logic.
Chapter 12. Using Struts 447

Figure 12-35 Local forwards for the /login action mapping
8. Select the Action Mappings tab at the top of the page and verify that the Form Bean Name field value is set to loginForm.
9. In the Action Mapping attributes area of the page, enter /login.jsp in the Input field.
448 IBM WebSphere Application Server - Express V5.0.2 Developer Handbook

Figure 12-36 Action mapping attributes for the /login action mapping
10.Save the changes and close the Configuration file editor.
Logout action classTo realize the action class for logout:
1. Double-click the /logout action mapping node in the Web diagram editor to invoke the Action mapping wizard.
2. Leave all the defaults and click Finish. This generates the template code for the LogoutAction class and opens the corresponding file in the Java editor.
3. Replace the code for the LogoutAction class with the code from the following example.
Note: In the JavaSource folder of the OnlineCatalog project, a package called onlinecatalog.actions has been created and contains the LogoutAction.java file.
Chapter 12. Using Struts 449

Example 12-14 LogoutAction class
public class LogoutAction extends Action {
public ActionForward execute(ActionMapping mapping,ActionForm form,HttpServletRequest request,HttpServletResponse response)throws Exception {
ActionErrors errors = new ActionErrors();
// return valueActionForward forward = new ActionForward();
// Write logic determining how the user should be forwarded.forward = mapping.findForward("success");
// Finish withreturn (forward);
}}
The perform method returns an instance of ActionForward corresponding to success.
4. Save your changes and close the Java editor.
5. With all of the nodes created, your LoginProcess Web diagram should look similar to Figure 12-37 on page 451.
450 IBM WebSphere Application Server - Express V5.0.2 Developer Handbook

Figure 12-37 LoginProcess Web diagram
12.3.10 Integrating with the Online Catalog sample templateIn the Online Catalog sample, we used the Web Site Designer to model and create some of the HTML and JSP pages in our application. These pages were based on a default page template we selected when creating the Web project.
The final step in this process is to integrate the login.jsp page with the application. To do so, we will add the page to the Web site diagram. This will automatically add a hyperlink to all the pages in the application using the predefined template we originally selected when we created the project.
Chapter 12. Using Struts 451

1. From the Project Navigator view of the Web perspective, navigate to Web Site Configuration and double-click it to open the Web site diagram for the application.
2. With the diagram open, locate the login.jsp page, drag it from the Project Navigator view and drop it behind the index.html page to create a child of the index.html page.
3. To apply the template, select Page Template -> Apply Template... from the context menu.
4. Disable the Navigation Candidate property by right-clicking the pages and selecting Navigation -> Navigation Candidate from the context menu. If you do not do this, all of the pages will appear in the site navigation.
5. Add admin1.jsp and admin2.jsp. to the Web Site Configuration and apply the template.
6. Save the Web site diagram.
12.3.11 Understanding the Struts configuration fileUp to this point, you have created Web pages, action forms and action classes to implement the site administration login process. As you created these components, Studio Site Developer internally modified the Struts configuration file.
Navigate to the struts-config.xml file in the WEB-INF of the project and double-click it to open the editor. Click the Source tab and take a look at the tags in the file to understand how the various components work together within the Struts framework.
During runtime, when the user enters the username and password in the login.jsp page and submits it, the following occurs:
1. The ActionServlet forwards the user input to the form class represented by loginForm to validate the user input. The loginForm class and login.jsp should
Important: If you use the Struts framework for this function of your application, you have to apply it to all the pages added thereafter.
For example, you cannot hyperlink the menu functions of either the admin1.jsp or admin2.jsp pages to other pages. You would have to create an action for each forward. If you are forwarding for forms, you would be required to create form beans to capture the data and then create an action to perform any logic. This would be done in the same fashion as was illustrated above.
452 IBM WebSphere Application Server - Express V5.0.2 Developer Handbook

have a one-one relationship. The name of the input parameters in the login.jsp page must exactly match the field names of the loginForm class.
2. If the input validation fails, the loginForm class returns an instance of the ActionErrors class. The ActionServlet then redirects the user to the login.jsp page.
3. If the user entered a valid input, the ActionServlet invokes the perform method on an instance of onlinecatalog.LoginAction class passing the user input wrapped in an instance of loginForm class.
4. Depending on the logic implemented in the perform method, the ActionServlet is returned an instance of ActionForward corresponding to one of the forwards in the action tag.
Example 12-15 Struts configuration file entry
<action path="/login" name="LoginForm" input="/administration/login.jsp" type="onlinecatalog.actions.LoginAction">
<forward name="admin1page" path="/administration/admin1.jsp" contextRelative="true">
</forward><forward name="admin2page" path="/administration/admin2.jsp"></forward><forward name="failure" path="/administration/login.jsp"
contextRelative="true"></forward>
</action>
For example, if the user authentication fails, the perform method returns an ActionForward object corresponding to failure.
5. The ActionServlet then reads the ActionForward object and performs the specified action. For example, if ActionForward to admin1page is returned, the ActionServlet redirects the user to the admin1.jsp page.
Struts ActionServlet URL mappingIn the web.xml file, under the OnlineCatalog/Web Content/WEB-INF folder, an entry is created to register the Struts’ ActionServlet with a corresponding mapping to ensure that Struts requests get passed to it. A common convention is that a URL mapping ending with do is a Struts request, such as /logout.do.
In our sample, the admin1.jsp and admin2.jsp pages consist of the following lines of code to insert a link to logout of the menu page.
<html:link href=”/OnlineCatalog/logout.do”><bean:message key=”logout.label”></bean:message>
</html:link>
Chapter 12. Using Struts 453

The ActionServlet handles the request, as specified by the URL mapping in the web.xml file, and checks the Struts configuration file for routing information. In our case, the configuration file consists of an entry for the logout action which corresponds to the URL request /OnlineCatalog/logout.do.
454 IBM WebSphere Application Server - Express V5.0.2 Developer Handbook

Chapter 13. Deploying applications
WebSphere Application Server - Express provides two application server environments for the deployment of applications. First, the WebSphere test environment provides a runtime test environment within Studio Site Developer. Second, the Express Application Server is provided as a standalone application server environment. It can be installed locally on the Studio Site Developer server or on a remote system.
From a developer’s viewpoint, either can be used for testing applications, however, the management, operation, and deployment issues may differ depending on whether you are using the embedded test environment, a standalone application server reserved for testing, or deploying to a standalone production application server.
This chapter provides information on the following:
� Express Application Server and the WebSphere test environment� Server configuration and management using the Server tools� Deploying applications to production servers
13
© Copyright IBM Corp. 2003 455

13.1 Application server overviewWebSphere Application Server - Express consists of two major components. You have seen the development component, Studio Site Developer. Now we will take a look at the application server component which provides the runtime environment for the applications.
WebSphere Application Server - Express supports the following runtime environments:
� WebSphere test environment: This is an instance of Express Application Server that is installed as a part of Studio Site Developer. It is used to test applications as you are developing them.
� Express Application Server: This is a standalone application server. It can be installed on the same machine as Studio Site Developer, or on a remote system. This standalone version of the application server is used to run the applications in a production environment. You may also have the case where a standalone application server has been installed for test purposes.
Express Application Server is intended to be a single application server environment. It does not support the use of multiple servers for workload distribution. However, it is possible that you will have multiple servers defined for testing purposes.
The primary component of the Express Application Server is the Web container. It provides the runtime environment for JSPs and servlets. It also contains an embedded HTTP server capable of serving static HTML Web pages.
13.1.1 Configuration and managementThe methods you use to configure and manage an application server depend primarily on the circumstances.
� Express Application Server administrative console and commands
In a production environment, the administrative console application provided with Express Application Server is the preferred method of administration. It provides a Web-based console that can be used from any Web browser. It also exposes more configuration options than you find in the Studio Site Developer Server tools. You can use the administrative console to configure the server, deploy applications to it, and monitor server activity. You cannot, however, start and stop the application server from the administrative console. This is because the console is actually an application running on the server. Commands that can be entered from the operating system command line are provided for these functions.
456 IBM WebSphere Application Server - Express V5.0.2 Developer Handbook

� Studio Site Developer Server tools
Developers who have control over an application server, whether it be in the Studio Site Developer test environment, or a remote application server set up for their use, will use the Server tools provided with Studio Site Developer, including elements like the Server perspective, Servers view, and Console view. The person managing and configuring the server is doing so from a workstation with Studio Site Developer installed. Using the Server tools, you can define servers, configure them, start and stop them, monitor their activity, and publish applications to them. In addition, you have access to the administrative console from the Server tools.
In this redbook, we will discuss using the Server tools to manage application servers and deploy applications to them. Information about the administrative console and commands can be found in the WebSphere Application Server - Express V5.0.1 Administrator Handbook, SG24-6976.
13.1.2 Managing test application serversFigure 13-1 on page 458 shows an application development scenario. In this example, when WebSphere Application Server - Express was installed on the development machine, the default install options were taken, meaning that both Studio Site Developer (including the WebSphere test environment) and a standalone Express Application Server were installed. In addition, Express Application Server was installed on three remote systems to allow testing on multiple platforms.
Important: As a general rule, an application server should only be administered in one way. In other words, if you use the administrative console to administer a server, do not also use the Server tools to administer it. Any changes made by the administrative console will not be seen by the Server tools and vice versa.
Chapter 13. Deploying applications 457

Figure 13-1 WebSphere Application Server - Express development and runtime environment
Multiple servers, both local and remote, can be managed from Studio Site Developer. Each server is a separate entity, meaning no workload management is implied.
The IBM Agent Controller (installed with the Express Application Server) provides the mechanism for communication between the Server tools and the application server.
An FTP server is used on the remote systems to receive the application files to be deployed.
WindowsAgentController
Express Application Server
Web container
JSP
servlet
Embedded HTTP Server
AgentFTP
server
WebSphere StudioWebSphere Test
Environment
Windows / Linux
Express Application
Server
AgentController
FTP
TCP/IPApplication developer
Internet user
Internet
app1.ear
iSeriesAgentController
Express Application Server
Web container
JSP
servlet
Embedded HTTP Server
AgentFTP
server
LinuxAgentController
Express Application Server
Web container
JSP
servlet
Embedded HTTP Server
AgentFTP
server
458 IBM WebSphere Application Server - Express V5.0.2 Developer Handbook

13.2 Using the Server toolsStudio Site Developer provides wizards and views that make configuring and managing an application server environment simple. To illustrate these tools, we will look at them from the Server perspective. The views and wizards available from this perspective are designed to working with application servers easy and intuitive. The Server perspective puts these tools at your fingertips, but note that most of the views are also available in the Web perspective by default.
Let us take a look at some of the views (as seen in Figure 13-2).
� The Server Configuration view (bottom left) enables you to define or modify server instances and configurations, and bind them to a project. When you double-click the server in the Server Configuration view, the Server Configuration editor opens.
� The Servers view (bottom right) lists all the currently defined server instances. Here you can start or stop their execution, or assign another server configuration to a server instance.
� The Console view (currently hidden by the Servers view) shows all the output listed by a running server instance.
Figure 13-2 The Server perspective
Chapter 13. Deploying applications 459

13.2.1 Setting preferences for the Server perspectiveThere are preference settings that you may want to update once you start using the Server perspective. To define these preferences, do the following:
1. From the toolbar, select Window -> Preferences -> Server.
2. Expand the Server entry.
Figure 13-3 Server preferences window
The default options are shown in Figure 13-3. Among the options, we recommend paying attention to the following:
– Automatically publish before starting servers
Specifies that all the files should automatically be published before starting the server.
Note: The Web perspective also contains the Servers view, the Server Configuration view, and the Console view. You may find it easier to work in the Web perspective when you are testing an application.
460 IBM WebSphere Application Server - Express V5.0.2 Developer Handbook

– Keep publishing dialog open after publishing
Specifies that a monitor opens to display messages when files are published. This is helpful if you have a problem with publishing, but for the most part it is not necessary.
– Automatically restart servers when necessary
Specifies that Studio Site Developer can automatically restart the server when it detects that the server must be restarted to handle resource changes in the workspace. This setting is fine for the test environment, but you probably do not want this setting if other people will be using the server.
– Prompt before making irreversible changes with an editor
Specifies that the server tools will prompt you before you make a change in a editor that cannot be undone.
– Save dirty editors before starting the server
Determines whether to save editors with unsaved changes before starting the server.
– Repair invalid servers
Occasionally, the server configuration may become out of sync with existing conditions in the workspace. This usually happens when an EAR file has been modified or deleted so the information in the server configuration is incorrect. This is easily fixed by allowing Studio Site Developer to perform repairs but it is probably a good idea to select the Prompt option so you have a chance to decline the repairs.
– Publishing method:
• Smart publish (select): Specifies that you only want to publish changed resources to the server. All resources that no longer exist in the workspace are deleted on the server. This is the default value.
• Prompt user: Specifies that you want to choose which resources to publish to the server or to remove from the server.
• Publish all: Specifies that you want to publish all resources to the server, regardless of whether they have changed. No resources are deleted from the server.
3. Click Apply and then OK to save your changes.
Chapter 13. Deploying applications 461

13.3 Defining servers and server configurationsEvery server instance you plan to use, whether it is a local server, remote server, or the WebSphere test environment, must be represented by a server definition and a server configuration definition.
The server definition defines the host where the server resides and the directory information needed to locate the application server. Each server definition has an associated server configuration that contains the information needed to set up the runtime environment, such as port information, data sources, MIME types, and session management information.
Figure 13-4 Servers and server configurations
Server and server configuration definitions are usually created at the same time and for all practical purposes look like the same thing. They are represented by one entry in the standard Server Configuration view. To view both the server and server configurations, you will need to change the Server Configurations view to its advanced setting.
Server configuration b
Server 1Host name: server1.ibm.comWebSphere installation directoryWebSphere deployment directoryDB2 driver locationRemote file transfer definitionsOperating system
or
Server configuration a
application 2
application 1
Data sourcesClass pathsSecurity settingsHost aliasPortsSession managementClass loader policy
Server configuration c
Server 2Host: server2.ibm.comWebSphere installation directoryWebSphere deployment directoryDB2 driver locationRemote file transfer definitionsPlatform
application 4
application 3
application 2
application 1
462 IBM WebSphere Application Server - Express V5.0.2 Developer Handbook

Figure 13-5 Advanced Server Configuration view
To create a server or server configuration independent of one another, you need to use the context menu for the Servers project in the Navigator view.
Chapter 13. Deploying applications 463

Figure 13-6 Creating servers and server configurations
The server - server configuration relationship is a one-to-one relationship; however, you can create alternate configurations and switch the server to use the new configuration. Note that the server has to be stopped before you can switch the configuration. You can switch configurations from the context menu of the server in the Server Configurations view.
When you open a server, the editor will show the information in a series of tabs. The server definition consists of the items you see on the server tab when you open it. The remaining tabs contain the server configuration information. You can see this for yourself by opening a server that has no configuration associated with it (you will only see the Server tab) or by opening a configuration that isn’t associated with a server (you will see all the tabs but the Server tab).
464 IBM WebSphere Application Server - Express V5.0.2 Developer Handbook

13.3.1 Server typesTable 13-1 lists the types of servers supported by Studio Site Developer.
Table 13-1 Summary of server types
We will focus on the Express server and Express test environment. For information on the others, please refer to the help contents in Studio Site Developer.
13.4 Using the Express test environmentThe easiest way to get started with testing applications is to begin with the WebSphere test environment. This should be the first place you deploy an application during development and where you test at each development stage.
To use the test environment, you need to do the following:
1. Create a server and server configuration.
2. Publish the enterprise application to the server.
Server type Use
WebSphere Version 5.0
Express server Express Application Server installed locally or remotely.
Express test environment The Express Application Server internal to Studio Site Developer.
Express server attach Used to attach to an application server and then debug the Web objects running on it.
Other types
J2EE Publishing server Used for publishing static Web and J2EE projects to a remote location or a J2EE application server (assumes port 80). This just copies the application to the specified directory. It does not update httpd.conf, nor does it allow you to start or stop the server. It is always “started.” There is no stop option.
Static Web publishing server Used for publishing Web projects to an HTTP server.
TCP/IP monitoring server Allows you to monitor TCP/IP activity between the Web browser and application server (does not publish or run applications).
Chapter 13. Deploying applications 465

3. Update the server configuration for application-specific values (variables, data sources, etc.).
4. Start the server.
5. Run the application.
13.4.1 Creating a server and server configurationThe first step is to create the test environment server.
To create the server:
1. Right-click the Servers folder in the Navigator view and select New -> Server and Server Configuration.
Figure 13-7 Create a server and configuration
2. Enter a server name and select the Express Test Environment option under WebSphere Version 5.0.
Tip: If you are doing Web application development, you can create and use the server environment directly from the Web perspective, as we are doing here. You do not need to open the Server perspective.
466 IBM WebSphere Application Server - Express V5.0.2 Developer Handbook

Figure 13-8 Select the server type
3. Click Next.
4. Leave the default (7080) for the HTTP port. This option allows you to specify a unique port for the server to avoid conflicts with other processes on the system or with other servers. If you define multiple servers, setting this port to a unique number for each server is not enough to allow you to run the servers simultaneously. Servers actually use several port numbers in addition to this. When the server configuration is complete, you can open it to the Ports tab to view or change the ports.
5. Click Finish.
The new server environment will be configured and you will see it in the Server Configuration view.
Chapter 13. Deploying applications 467

13.4.2 Publishing an application to the test environmentTo publish an application to the test environment, do the following:
1. Select the server in the Servers view or the Server Configuration view. Right-click and select Add and remove projects....
Figure 13-9 Add an application to the server
2. Select the enterprise application from the Available Projects list and click Add.
468 IBM WebSphere Application Server - Express V5.0.2 Developer Handbook

Figure 13-10 Select the enterprise application to publish
3. The application will be deployed to the test environment and you will see an entry for the application appear under the server.
4. In the Servers view, you will see the server listed. The Server State column indicates that the server needs to be republished. Although we have associated an application with the server configuration, we have not actually put the application on the server.
Note: Only enterprise applications can be added to a server. If you have been working with a Web module but have not added it to an enterprise application project, you will need to do this first.
You can create an enterprise application by selecting File -> New -> Project. Select J2EE and Enterprise Application Project. Once you have created the enterprise application, open the application deployment descriptor (application.xml), switch to the Modules tab, and add the Web module.
Chapter 13. Deploying applications 469

5. Select the server in the Servers view, right-click, and select Publish.
Figure 13-11 Publish the application
Once the publish is complete, the server state should indicate that the server is synchronized.
13.4.3 Updating the server configuration for the applicationIf the application you are testing has requirements for the runtime environment, you will need to add them at this point. For example, if you are using a data source to access a database, you will need to define the JDBC driver and data source. If you are using JAAS for database authentication, you will need to add the JAAS authentication entry. These steps are the same whether you are using the Express test environment or a standalone Express Application Server. To update the server configuration to add these resources, see 13.6, “Working with server configurations” on page 483.
Note: If you have not changed the server preferences from the default, the publish will happen automatically when you start the server and you will not need to perform the next step, which publishes the server manually. You can check the preferences by clicking Window -> Preferences -> Server. The Automatically publish before starting servers option should be selected.
470 IBM WebSphere Application Server - Express V5.0.2 Developer Handbook

13.4.4 Starting the test environment serverSo far, you have defined a server and published an application to it. The next step is to start the server.
1. Select the server in the Servers view, right-click, and select Start (or highlight the server and select the Start the Server icon at the top of the view).
Figure 13-12 Start the server
2. The Console view will open automatically, showing you the server runtime messages. Monitor the console for error messages as the server starts. If you see problems or if the server doesn’t start, review the console messages, correct the problem, and try again.
Chapter 13. Deploying applications 471

Figure 13-13 Check the console for messages
The message you need to see is the last one shown in Figure 13-13, Server server1 open for e-business. This indicates that the server started successfully.
13.4.5 Running the applicationThe last step in the process is to test the application.
1. Find the project or file you want to test in the Navigation view, right-click, and select Run on Server.
472 IBM WebSphere Application Server - Express V5.0.2 Developer Handbook

Figure 13-14 Run the application
Note that in this case, we tested the application by selecting the Web project. You could also test segments of the application by selecting a specific file. Obviously, the file you select needs to be a logical starting point in the application.
2. You will be asked to select a server. Select the test environment server that you just created and continue.
Chapter 13. Deploying applications 473

Figure 13-15 Select a server
3. The application will open in a Web browser. You can exercise the application code from there.
Tip on setting a server preference: If you don’t want this prompt in the future, you can select the Set server as project default box. To change the setting or preference later, use the Web project preferences. Select the Web project in the Navigator view, right-click, and select Properties. Select the Server Preference menu.
When you run the application, it will run on the server set in the preferences. If the server is stopped, Studio Site Developer will attempt to start it. This can be confusing if you have multiple servers and have not set the ports for each server to be unique. If another server is running, you will see port conflicts when the second server is started.
474 IBM WebSphere Application Server - Express V5.0.2 Developer Handbook

Figure 13-16 Test the application
Be sure to keep an eye on the Console view to see if any error messages are generated.
13.5 Working with an Express serverYou have tested the application in the WebSphere test environment and are now ready to deploy the application to a “real” server. This server can be a local instance of Express Application Server or a remote instance.
Tip: If you select Run on Server for an application that has not been published you will be given the opportunity to create a new server or to run on an existing server. This is a shortcut to the steps we have just been through; however, we found that it did not save us any time and we liked controlling the server creation and publishing process ourselves.
Chapter 13. Deploying applications 475

The following are the steps required to do this:
1. Install the Express Application Server.
The installation will include the IBM Agent Controller which is used to enable communication between Studio Site Developer and Express Application Server. The only indication you will see that the IBM Agent Controller is installed is the presence of the <express_install>/RAC directory in the installation path, and on Windows, you will see a new service called IBM Agent Controller.
You will also need a file sharing mechanism, either a shared disk or FTP between the two servers so that the application files can be transferred to the server.
2. Define the server and server configuration. This will identify the location of the server and its characteristics.
3. Publish the enterprise application to the server. The application files will be copied or FTP’ed to the server location.
4. Update the server configuration for application-specific values (variables, data sources, etc.)
5. Start the server.
6. Run the application.
13.5.1 Defining the server to Studio Site Developer
As we have seen from using the test environment, the first step to deployment is to define the server to Studio Site Developer. Defining a remote server (remote to Studio Site Developer, not necessarily on a remote system) is a little more involved than defining the test environment. Additional information, such as the location of the server, the remote server installation path, how to transfer the application and deployment information to the server, and how to access the HTTP port, is needed in order for Studio Site Developer to operate the server and to deploy applications to it.
To define a remote Express Application Server:
1. Right-click the Servers folder in the Navigator or Server Configuration view and select New -> Server and Server Configuration.
2. Enter a server name and select the Express Server option under WebSphere Version 5.0, then enter a name for the server.
476 IBM WebSphere Application Server - Express V5.0.2 Developer Handbook

Figure 13-17 Select the server type
Click Next.
3. Enter the IP address or host name of the remote server. If the server is on the same machine, enter 127.0.0.1 or localhost and click Next.
4. If the IBM Agent Controller is working properly, the directory location for the WebSphere installation should be filled in for you. If you are going to use a DB2 server for application data, enter the location of the DB2 driver on the server system.
Chapter 13. Deploying applications 477

Figure 13-18 Define the remote server settings
Click Next.
5. When an application is published from Studio Site Developer to the server, the application files must be copied to the server. In this panel, you select the file transfer mechanism to use when publishing applications to the server.
478 IBM WebSphere Application Server - Express V5.0.2 Developer Handbook

Figure 13-19 Select a file transfer or copy instance
Because we are defining a server on the local machine, the copy mechanism makes the most sense. This is also a good choice if you are copying files to another Windows system and have a network mapping to the application server’s local disk.
If you select the FTP file transfer mechanism, make sure that you have an FTP server on the target system.
Click Next.
6. The next panel will differ depending on the file transfer mechanism you selected. It allows you to enter the information necessary for the transfer to take place, including the target directory (the server home directory). Figure 13-20 on page 480 shows the window for the copy file option.
Chapter 13. Deploying applications 479

Figure 13-20 Defining the copy settings
The definitions you enter will be stored for future use in other server configurations. The Project folder and Remote file transfer name fields are used to determine where this definition will be stored.
Accept the defaults and click Next.
Tip: The remote file transfer settings are stored with a file type of .rft. You can see these under the Servers folder in the Navigator view of the Server perspective.
480 IBM WebSphere Application Server - Express V5.0.2 Developer Handbook

7. Select an HTTP port. The default is 7080.
8. Click Finish.
13.5.2 Publishing the applicationPublishing an application to a remote server works the same way as in the test environment. To publish an application to the remote server:
1. Select the server in the Server Configuration view, right-click, and select Add and remove projects....
2. Select the enterprise application in the Available Projects list and click Add.
3. Click Finish. You will see an entry for the application appear under the server in the Server Configuration view.
4. Select the server in the Servers view, right-click, and select Publish.
5. If the application will require any server definitions (for example, class path or data source information), see 13.6, “Working with server configurations” on page 483 for information on how to make these configuration changes.
What happens when you deploy an applicationWhen you deploy an application to an Express Application Server, the file structure required by the server is created and the files are copied to the server.
You can see the new folders in two places on the server:
� <server_install>/installedApps/DefaultNode/<ear_name>.ear� <server_install>/config/cells/DefaultNode/applications/<ear_name>.ear
Tips: To predefine file transfer mechanisms, you can set up the copy or file transfer mechanisms ahead of time by using File -> New -> Other -> Remote Transfer File. Give each remote file transfer definition a meaningful name (for example, ToServerx or ToLocalTest) so you can easily select the appropriate profile when you are creating server configurations.
To change the file transfer mechanism used to publish to a server: If you want to change the remote file transfer definition to be used to publish to a server, open the Server definition (in the Servers Configuration view) and change the designation on the Servers page.
Chapter 13. Deploying applications 481

Figure 13-21 Deployed application files on the server
13.5.3 Updating the server configuration for the applicationIf the application you are testing has requirements for the runtime environment, you will need to add them at this point. For example, if you are using a data source to access a database, you will need to define the JDBC driver and data source. If you are using JAAS for database authentication, you will need to add the JAAS authentication entry. These steps are the same whether you are using the Express test environment or a standalone Express Application Server. To update the server configuration to add these resources, see 13.6, “Working with server configurations” on page 483.
13.5.4 Starting the Express serverThe next step is to start the server.
1. Select the server in the Servers view, right-click, and select Start or highlight the server and select the Run icon at the top of the view.
482 IBM WebSphere Application Server - Express V5.0.2 Developer Handbook

2. The Console view will open automatically. Look for messages indicating that the server started properly. If you get error messages or if the server does not start, review the console messages, correct the problem, and try again.
The message you want to see is Server server1 open for e-business.
13.5.5 Running the applicationThe last step in the process is to test the application.
1. Find the Web module or individual Web resource you want to run in the Navigator view, right-click, and select Run on Server.
If you haven’t set a server preference, you will be asked to select a server. If so, select the server you just created and continue.
2. The application will open in a Web browser. You can exercise the application code from there.
3. Now access the application from an external Web browser using the URL http://<server_name>:7080/<context_root>/.
13.6 Working with server configurationsIn some cases, applications published to a server will run with no further intervention. However, there are usually things the server will have to be aware of that are not handled during the creation of the server and server configuration. For instance, if you are accessing a database then you will need a JDBC driver, and if the connection is a data source connection then you will need a data source definition. If you are connecting to a database using a driver manager definition, make sure the path to the driver class is included in the server class path.
Note: If you have installed the Express Application Server on the same machine as your Studio Site Developer system, there will be port conflicts between the Express Application Server and the test environment. You will need to stop one server in order to run the other. To run both at the same time, you will need to alter the port numbers (for example, advance the number by 1) for one of the servers. The port numbers are defined on the Server Configuration Ports page.
Note: The context root is defined when you create the Web project (see Figure 4-4 on page 68). To see the context root, open the EAR deployment descriptor to the Module page and select the module.
Chapter 13. Deploying applications 483

The server configuration can be opened with an editor, just like any other file. Just find the server in the Servers or Server Configuration view and double-click it to open.
Figure 13-22 Working with a server configuration
Note: You will notice as you go through the server configuration options, many of the pages will give you the choice of entering information at the cell, server, or node level. For WebSphere Application Server - Express, this does not mean much since it is a single cell/node/server environment. Just follow the lead of the examples. It is best to be consistent. If you define things at the node level, then try to define everything at the node level.
484 IBM WebSphere Application Server - Express V5.0.2 Developer Handbook

The following settings for the server can be configured:
� Server: These are the settings you enter when you create the server and server configuration. The most common change you might make here would be to change the FTP configuration associated with the server.
� Configuration: The configuration settings include the server configuration name, whether to enable the universal test client (for testing Web services), and classloader behavior.
� Environment: When you create an application, any classes required by the application must be accessible at runtime. These class files are usually packaged as JAR files and stored in the WEB-INF/classes directory. On this page, you can add entries to the global system class path and to the WebSphere classloader path (ws.ext.dirs). Environment settings also allow you to enter JVM arguments and system properties.
� Web: This option allows you to modify MIME mappings and session management options. With the session management options you can select to use cookies, URL rewriting, or both for session management. If both mechanisms are chosen, cookies will take precedence over URL rewriting.
� Data source: Creating a data source configuration is covered in “Defining a data source connection to the server” on page 200. Adding a data source definition updates the server’s JNDI name space.
� Ports: Several processes in the Express Application Server require TCP/IP ports. There are defaults for all of these but they can be changed if you have a conflict with another process.
� Variables: Express Application Server can make use of variables to limit the amount of hardcoding required in the server configuration. A good example is the DB2_JDBC_DRIVER_PATH variable. When you define a JDBC driver, the default driver path uses this variable. This means that if you change the installation path for DB2, you do not have to redefine the JDBC drivers. You only need to change the variable.
Note: Server configuration settings are stored in XML files on the server. Settings are stored in a location that reflects the level of setting (node, cell, or server). Settings at multiple levels are merged. If the same setting is specified at multiple levels, the lowest (most specific) level takes precedence.
� Server: <express_install>AppServer\config\cells\DefaultNode\nodes\ DefaultNode\servers\server1
� Node:<express_install>AppServer\config\cells\DefaultNode\nodes\ DefaultNode
� Cell: <express_install>AppServer\config\cells\DefaultNode
Chapter 13. Deploying applications 485

� Trace: Allows you to enable WebSphere tracing and to specify the output file.
� Security: Contains security settings for WebSphere security. Security is covered in Chapter 16, “Security” on page 551.
� Applications: Allows you to specify classloader mode and policy.
13.6.1 Classloaders and file location
At runtime the server will need to be able to load the classes and JAR files used by the application. Classloaders are part of the JVM code and are responsible for finding and loading these files.
The key to success is to understand how files are loaded and where to locate them for proper loading. In order to understand this, we suggest that you read J2EE Class Loading Demystified at:
http://www7b.boulder.ibm.com/wsdd/library/techarticles/0112_deboer/deboer.html
For now, take the default classloader settings in the server configuration and use the following guidelines taken from this article:
� If your JAR file is only used in a single Web application, always put the JAR file in the Web project's Web Content/WEB-INF/lib folder. JAR files in this folder are automatically added to the Java build path, and will not require any further setup when moving to a different server.
� If the JAR file is used by multiple modules within the same application, put the JAR file in the enterprise application. You will need to use the Edit Module Dependencies feature to set up the manifest files and the Java build class paths.
� You can also put the JAR on one of the global class paths (using the Paths servlet configuration page), but we don't recommend this. It complicates your deployment and leaves your application vulnerable to incompatibility problems if those JARs are later upgraded.
� If you still want to put the JAR file on the global class path, you must decide whether it should go on the class path or ws.ext.dirs. If the JAR file needs to access any J2EE or WebSphere classes, or any other JARs that have been added to ws.ext.dirs, it must also be placed on the ws.ext.dirs property. Otherwise, you are free to use either property.
� If you have dependencies on the JAR file, update the Java build path of each project that uses the JAR file. Adding it to the global class path or ws.ext.dirs
Tip: If you are getting a ClassNotFoundException, it is time to read that article.
486 IBM WebSphere Application Server - Express V5.0.2 Developer Handbook

properties also means that you will have to publish the JAR file separately from your application, and you will have to set up the server class path again when you move to a different server.
13.7 Server operationsServers can be started, stopped, published to, or restarted using the Server perspective. The Servers view shows the status of each server and allows you to control it.
13.7.1 Starting the serverYou can start a server from the Servers view by right-clicking the server project and selecting Start.
When starting the server:
� If the Automatically publish before starting servers check box in the server preferences (Window -> Preferences) is selected, the Server tools feature checks to see if your project and files on the remote server are synchronized prior to starting the server. If they are not, the project and the files are automatically updated on the remote when the server is started.
� The Console view opens automatically and displays the messages as they occur. It will take a minute to start the server.
� A successful start is indicated by the Server server1 open for e-business message. In the Status column of the Servers view, the status of the server changes to Started. If the server fails to start, check the console for an indication of what might be wrong.
Chapter 13. Deploying applications 487

Figure 13-23 Server console view
Example 13-1 Server successfully started
[8/5/02 18:47:45:047 EDT] 50453444 WsServer A WSVR0001I: Server server1 open for e-business
13.7.2 Stopping the serverIf you want to stop the server, select the server in the Servers view, and then select Stop from the context menu, or use the “stop the server” icon ( ).
13.7.3 Restarting the serverYou need to restart the server when the server is started and one of the following situation occurs:
� Changes are made to a file. However, if the file is a JSP file, an HTML file, a JPEG file, or a GIF file, you do not need to restart the server.
� Changes are made to the server configuration, such as the port number.
� Changes are made to the Web module, such as adding a JAR file.
Note: You can also start the server by clicking the “start the server” icon ( ) on the toolbar above the Servers view.
If a server is set as the preferred server for a Web project, it will be automatically started when you select Run on Server for the Web module.
488 IBM WebSphere Application Server - Express V5.0.2 Developer Handbook

You may either restart the server automatically or manually. If you have selected the Automatically restart servers when necessary check box under the server preferences, the server will automatically start when one of the above-mentioned situations occurs.
To restart a server manually:
1. In the Servers view, select the server you want to restart.
2. Click the ‘restart the server” icon ( ) on the toolbar. In the Status column of the Servers view, the status of the server changes to Stopped and then to Started if the server was previously started. If the server was previously started in debug mode, the status changes to Started in debug mode. If the server was previously started in profiling mode, the status changes to Started in profiling mode.
13.8 Deploying applications for productionApplications are deployed to the Express Application Server as enterprise applications. When you are testing, this is done for you by the Server tools when you publish the application to the server.
In a production environment, it is likely that the Express Application Server is being managed from the administrative console and not from Studio Site Developer. In this case, you will need to export the application and place it on the application server for deployment.
The steps involved in deploying an application are as follows.
1. Ensure there are no errors in the application.
2. Export the application to the server, either to a file or using FTP.
3. Using the administrative console for the server, add any required resources such as data source definitions, install the application and start it. Using the administrative console to deploy an application is covered in WebSphere Application Server - Express V5.0.1 Administrator Handbook, SG24-6976.
13.8.1 Exporting an enterprise application to a file locationTo export the enterprise application to an EAR file for deployment:
1. Find the enterprise application project in the Navigator view, right-click, and select Export.
2. Select the EAR file and click Next.
Chapter 13. Deploying applications 489

3. Enter the EAR file name to export the resources to. A possible location is the <server_install>/installableApps directory of the Express Application Server, but you can export to anywhere in the file system.
Figure 13-24 Exporting and enterprise application
4. Make sure that the three options are deselected. Because the EAR file will be used in a production system, we do not want to include the source files or the meta-data.
5. Click Finish to export the EAR file. The EAR file will be copied to the new directory. Notify the administrator of the application’s location and provide any information needed to install, for example, the name and location of databases used.
13.8.2 Exporting an enterprise application using FTPTo export project resources to an FTP server, do the following:
1. Select File -> Export.
2. In the Export dialog, either double-click FTP or select FTP and click Next.
490 IBM WebSphere Application Server - Express V5.0.2 Developer Handbook

3. In the Export resources to an FTP Server wizard page, specify the FTP host information. Also verify that the Folder field contains the correct path to the folder that you want exported. In the FTP folder field, enter a name of the folder that you want to export the files to.
4. In the FTP Options area:
– PASV, or Passive mode, allows a client rather than the FTP server to initiate the transfer operation, which enables transfers through firewalls that allow outgoing network connections only. If you select the Use Firewall option and select Settings, you will be prompted to define setting for a socks server or an FTP proxy server. If you select the FTP Proxy radio button, you must choose one of the available firewall types.
5. Optionally, supply an FTP Connection Timeout value, in milliseconds.
6. Click Next to supply FTP server login information.
7. Click Finish to export the Web site.
8. When the export is complete, verify the resulting directory structure and file data integrity.
13.9 IBM Agent Controller settings and statusThe IBM Agent Controller must be installed and running on the server system before you can use a server with the Server tools, even if the server is local to the Studio Site Developer machine. This should be done automatically when you install Express Application Server, but check to make sure everything is working.
1. Verify that the IBM Agent Controller has started.
– Windows: Use the Windows services panel (Start -> Programs -> Administrative tools -> Services) and make sure the IBM Agent Controller service has started. If not, start the service. By default the service will start when you complete the install and will be set to start automatically.
– Linux: Execute RAStart.sh in the <rac_install>/bin directory.
2. Check the IBM Agent Controller configuration settings to make sure that the WAS_HOME_V5 setting is correct.
Chapter 13. Deploying applications 491

Example 13-2 IBM Agent settings
<AgentControllerEnvironment configuration="default"><Variable name="PATH" value="C:\WebSphere\Express Beta\RAC\bin"
position="prepend"/><Variable name="WAS_HOME_V4" value="%WAS_HOME%" position="replace"/><Variable name="WAS_HOME_V5" value="C:\WebSphere\Express\AppServer"
position="replace"/>
</AgentControllerEnvironment>
The configuration settings are in the <express_install>/RAC/config/serviceconfig.xml directory.
Messages relating to the remote server operations can be seen in the IBM Agent Controller log. The log is located on the server machine at <express_install>/RAC/config/servicelog.log.
13.10 For more information� For information on using the administrative console to manage an Express
Application Server, see WebSphere Application Server - Express V5.0.1 Administrator Handbook, SG24-6976.
� For information on the Express Application Server runtime architecture, see WebSphere Application Server Architecture, REDP3721.
492 IBM WebSphere Application Server - Express V5.0.2 Developer Handbook

Chapter 14. Testing and debugging
This chapter provides information on the process of testing and debugging Web applications using Studio Site Developer.
This chapter describes the following topics:
� Debugging using the Web perspective
� Debugging using the Debug perspective
� Stepping through code using the Online Catalog sample
When developing an application, you will constantly be addressing any warnings and errors as indicated by the Tasks and Project navigator views within Studio Site Developer. After development, you will begin your testing procedure where you will verify the appearance and function of each resource. During this testing, you make come across resource errors that are not indicated in the Tasks or Project navigator views. Error determination may be possible using the Console view or the Debug perspective. For more information about each of these tools, please read the following sections.
14
© Copyright IBM Corp. 2003 493

14.1 Debugging in the Web perspectiveThe Web perspective provides several tools to aid you in debugging your Web applications. Tools include:
� Project navigator view
� Tasks view
� Console view
� Editor marker bars
� Quick Fix tool
14.1.1 Page errorsWeb servers generate error messages when they encounter unexpected conditions. If WebSphere Application Server - Express encounters an error in your application at runtime, it will display the appropriate error page in the Web browser. Two of the most common errors that you may encounter during your development are the 404 and 500 errors.
404 errorThe 404 error page is displayed when a page being requested is non-existent. This error could be the result of several problems:
� The requested page has been moved or is named incorrectly.
� The requesting page may be pointing to the incorrect URL for the requested page.
494 IBM WebSphere Application Server - Express V5.0.2 Developer Handbook

Figure 14-1 404 error page
To address the error, verify first that the page being requested is in the correct location and is named correctly and then verify that the link that is requesting the page is correct. For a 404 error, your best bet is to look at the Project navigator and Tasks views for answers. For more information about these views, see 14.1.3, “Tasks view” on page 497 and 14.1.2, “Project navigator view” on page 496.
500 errorThe 500 error page is displayed when an internal server error has occurred. With Java development, this is most likely the result of an error occurring when a class or JSP was compiled.
Error message
Chapter 14. Testing and debugging 495

Figure 14-2 500 page error
These error pages do not really provide you with any significant information, but they do point you in the correct direction. 500 errors can also be located using the Project navigator or Tasks views, but the Console view may be of more help. For more information about the Console view, see 14.1.5, “Console view” on page 499.
14.1.2 Project navigator viewErrors and warnings on resources (including Java, HTML/JSP, and Links Builder errors and warnings) are indicated with a red error or yellow warning next to the resource with the error, as well as the parent folders all the way up to the project folder.
For example, in Figure 14-3 on page 497, there is an error in FeaturedItemXMLServlet.java. This is indicated with an error icon for that file and the files above it in the hierarchy.
Error message
496 IBM WebSphere Application Server - Express V5.0.2 Developer Handbook

Figure 14-3 Project navigator view
You can navigate to the resource using the Project navigator view and then double-click it to open it in its default editor. The editor can then be used to correct the warning or error.
14.1.3 Tasks viewEach warning or error will have an entry in the Tasks view providing you with information about the problem, including the description, resource, resource folder, and line location. Double-clicking an item from the Tasks view opens the corresponding resource in its default editor at the line of code causing the problem. For additional information about the Tasks view, please refer to “Tasks view” on page 84.
Chapter 14. Testing and debugging 497

Figure 14-4 Tasks view
14.1.4 EditorsThe Page Designer and Java editors are used to correct the conditions that caused the warnings or errors. Two common ways of opening the offending file and finding the errors are:
� Double-click an entry in the Tasks view. The file with the error will be opened using its default editor and the current line will be the line where the warning or error exists.
� Double-click a file with an error or warning icon in the Project Navigator view. The file will be opened using its default editor, however the current line will not be set to the line with the error (there may be more than one). You will need to scan down the editor marker bar for the error or warning icons.
Editor marker barsIf a resource is opened and the warning or error is not displayed, you can use either the left or right marker bars in the editor to locate it. The right marker bar will display all the warnings and errors contained in the resource using either a yellow (warning) or red (error) bar. Double-clicking the bar will take you to the line
Note: The Tasks view can be opened in the Web perspective by selecting Window -> Show View -> Tasks from the main menu of the workbench.
498 IBM WebSphere Application Server - Express V5.0.2 Developer Handbook

containing the warning or error. The left marker bar can be used in the same way as the right marker bar, but you must scroll down to locate the warning or error icons. In either case, moving the cursor over either the icons or bars will display the warning or error message.
Figure 14-5 Editor marker bars
If an error is indicated with then the Quick Fix feature may be used to assist in fixing it. This is only available in the Java editor. For more information on using Quick Fix, please see “Quick Fix” on page 227.
14.1.5 Console viewThe previous views discussed are used while you are editing an application. The errors and warnings are a result of the automatic verification processes that take place as you are developing.
The Console view shows errors that happen at runtime. When you test an application by running it on a server controlled through Studio Site Developer, this view will display server console messages.
The console shows three different kinds of text, each in a different color. You can choose the different colors for these kinds of text on the preferences pages (Window -> Preferences -> Debug -> Console).
Chapter 14. Testing and debugging 499

� Standard output: Default color blue
� Standard error: Default color red
� Standard input: Default color green
When an error has occurred in a process, the Console view will display a message similar to the figure below. The Console view is a good starting point when a 500 error is received. The console messages may not give you the exact location of the error, but they will give you the resource name where the error occurred. This will allow you to debug the resource and locate the error.
Figure 14-6 Console view
14.2 Debugging using the Debug perspectiveStudio Site Developer includes an integrated debugger that makes it easy to trace the execution of code and to quickly find and fix problems. You can debug standalone Java code, servlets, JSPs, JavaScript, etc. Debugging can be done locally or remotely.
500 IBM WebSphere Application Server - Express V5.0.2 Developer Handbook

The debugger allows you to control the execution of your program by setting breakpoints, suspending launches, stepping through your code, and examining the contents of variables.
14.2.1 Debug perspectiveThe Debug perspective has many views designed to assist you with problem diagnosis. Among them are:
� Debug view with running processes
� Servers view for monitoring and controlling servers
� Source view, showing the source of the Java program with the current line highlighted
� Outline view, showing the outline of the source code
� Console view, showing the server output
� Breakpoint view, showing all defined breakpoints
� Variables view, showing variables and their values at each step
You can open the Debug perspective by selecting Window -> Open Perspective -> Debug from the main menu of the workbench.
Chapter 14. Testing and debugging 501

Figure 14-7 Debug perspective
Breakpoint viewThe Breakpoints view lists all the breakpoints you have set in the workbench projects. You can double-click a breakpoint to display its location in the editor. In this view, you can also enable or disable breakpoints, delete them, or add new ones.
502 IBM WebSphere Application Server - Express V5.0.2 Developer Handbook

Figure 14-8 Breakpoint view
Debug viewThis view allows you to manage the debugging or running of a program in the workbench. It displays the stack frame (it holds the return address, local variables used, and procedure parameters within a thread) for the suspended threads for each target you are debugging. Each thread (a single sequential flow of control within a program) in your program appears as a node in the tree. It displays the process for each target you are running. If the thread is suspended, the stack frames are shown as child elements.
Figure 14-9 Debug view
Threads
Stack frame
Chapter 14. Testing and debugging 503

Variables viewThis view displays information about the variables in the currently-selected stack frame. If you look at Figure 14-10, you will notice that the view has been divided into two areas. The upper area is a list of all the variables that have been used in the corresponding file. Selecting a variable displays the variable value in the lower area of the view.
Figure 14-10 Variables view
Setting breakpointsBreakpoints are indicators to the debugger that it should stop execution at specific places in the code, and let you step through it. Breakpoints can be set to trigger always or when a certain condition has been met.
Note: For additional information on the Debug view, please see the product help documentation.
504 IBM WebSphere Application Server - Express V5.0.2 Developer Handbook

In the editor area, open the file where you want to add the breakpoint. Directly to the left of the line where you want to add the breakpoint, open the marker bar (vertical ruler) pop-up menu and select Add Breakpoint. You can also double-click the editor marker bar next to the source code line. A new breakpoint marker appears on the marker bar, directly to the left of the line where you added the breakpoint. Also, the new breakpoint appears in the Breakpoints view list.
Figure 14-11 Setting a breakpoint
Breakpoint propertiesRight-click the breakpoint in the breakpoint view, and select Breakpoint Properties from the context menu. A window opens where more detailed options about the breakpoint are displayed (Figure 14-12 on page 506).
Tip: Breakpoints can be set in Java and JSP resources on an executable line of a program. However, within JSPs you can only set breakpoints in Java code and <jsp> tags.
Note: Enabled breakpoints are indicated with a blue circle. If the enabled breakpoint is successfully installed in a class in the JVM at runtime, it is indicated with a check mark overlay.
Chapter 14. Testing and debugging 505

Figure 14-12 Breakpoint properties
The Enable Hit Count property, when set, causes the breakpoint to be triggered only when the lines has been executed as many times as the hit count specified. Once triggered, the breakpoint is disabled.
The other property of interest here is Enable Condition. If set, then the breakpoint is reached only when the condition specified in the entry field evaluates to true. This condition is a Java expression.
The Restrict to Selected Thread(s) list is only filled if a server is running in debug mode already; otherwise the list in empty.
Click OK to close the breakpoint properties. In the Breakpoints view, the breakpoint is now marked with a question mark , which indicates that it is a conditional breakpoint.
506 IBM WebSphere Application Server - Express V5.0.2 Developer Handbook

14.3 Stepping through code using the Online Catalog sample
When stepping through code using the debugger, the application will stop when each Web object is loaded by the server; this is also referred to as the step-by-step mode. At this point, you can step into or over each statement in the code, inspecting variables and using other debugging features.
Studio Site Developer has extensive help information on this topic, including debugging Java, JavaScript, stored procedures, and compiled language applications. This section will take you through a common debug scenario and point out the highlights of the debugger.
Let’s assume for this sample that we want to verify that the xslFile variable of the FeaturedItemXMLServlet servlet is being set to the correct value. To do this, we are going to set a breakpoint in the servlet, run the application in debug mode, and then check the variable value using the Variables view.
14.3.1 Setting breakpoints1. Open the Web perspective.
1. Navigate to the featured_item package in the JavaSource folder and expand it.
2. Open the FeaturedItemXMLServlet.java in the Java editor by double-clicking it.
3. Place your cursor in the left editor marker bar on the line String html = genHTML(baosXML.toString(),xslContent);. Use the Edit -> Find/Replace option to find the string if you don’t see it right away.
4. Double-click to set a breakpoint. A marker will be shown at the line.
Chapter 14. Testing and debugging 507

Figure 14-13 Setting a breakpoint in FeaturedItemXMLServlet.java
14.3.2 Running the application in debug modeOnce you have set the breakpoint, the Web application can be started for debugging.
1. From the Web perspective, right-click the OnlineCatalog project and select Debug on Server... from the context menu. The Server Selection dialog opens.
2. Select an existing server or create a new one and click Finish.
3. Studio Site Developer switches to the Debug perspective automatically.
4. You should now see index.html displayed in the Web browser view. This might take a minute or so if the server is new. Click the Featured Item link from the navigation menu.
Important: The server used for testing must be either stopped or already started in debug mode. Otherwise, an error message will be displayed.
508 IBM WebSphere Application Server - Express V5.0.2 Developer Handbook

Figure 14-14 OnlineCatalog running in debug mode
5. You are prompted to step into the featureditem.FeaturedItemXMLServlet.doGet method. This is a feature, step-by-step mode, in the debugger to allow you to debug code without setting breakpoints. Select the Skip radio button and click OK. The servlet is executed.
Chapter 14. Testing and debugging 509

Figure 14-15 Skip method
6. As soon as the breakpoint in FeaturedItemXMLServlet.java is reached, execution stops and the FeaturedItemXMLServlet.java source file is displayed with the line containing the breakpoint highlighted. The thread is suspended in debug, but other threads might still be running.
Note: For additional information about the Debug perspective, refer to the product help documentation.
510 IBM WebSphere Application Server - Express V5.0.2 Developer Handbook

Figure 14-16 Debug perspective when stopped at breakpoint
Breakpoints viewClick the Breakpoints tab in the upper right window of the perspective to see the Breakpoints view. Notice that the breakpoint that we set earlier is listed. If we had additional breakpoints set in the current servlet or in other resources within the OnlineCatalog project, they would be listed here as well. Double-clicking the breakpoint will open the associated resource in its default editor and highlight the breakpoint line in the source code.
Breakpoint
Suspended thread
Chapter 14. Testing and debugging 511

Figure 14-17 Breakpoint view
14.3.3 Verifying the variableThe purpose of this example was to illustrate how the debugging features can be used to verify the value of a variable. Click the Variables tab in the upper right window to display the Variables view. Scroll down until you locate the variable xstFile.
Figure 14-18 Variables view
Click xstFile and notice the value beside it and in the lower view area. The value displayed is /Documents and Settings/bogers/My Documents/IBM/wasexpress51/workspace/OnlineCatalog/WebContent/featured_item/FeaturedItem.xst, which is what we are required to have for the application. Had this been the incorrect value, we could have right-clicked xstFile and selected Change Variable Value from the context menu to open the Set Variable Value dialog and entered a different value with which to test.
512 IBM WebSphere Application Server - Express V5.0.2 Developer Handbook

Figure 14-19 Set variable value dialog
You can continue to step through the application by clicking Resume in the Debug view. You will again be prompted to skip or step into the next method. If you wish to end the debug session, stop the application server from the Servers view.
Chapter 14. Testing and debugging 513

514 IBM WebSphere Application Server - Express V5.0.2 Developer Handbook

Chapter 15. Development in a team environment
In most cases a developer does not work alone but as a part of a team, making the use of a version control system important. Version control systems provide two important features required for working in a team environment:
� A history of the work performed by the team members� A way to coordinate and integrate this work
Studio Site Developer delivers an adapter for a Concurrent Versions System (CVS) to provide team development management. This chapter provides information on team development using CVS, including the following:
� Team development and CVS overview� Sharing an application for the first time� Using CVS in a team development environment� Tracking the history of changes and reverting back to previous versions
15
© Copyright IBM Corp. 2003 515

15.1 Team development with CVSCVS provides a client/server environment for team development. Studio Site Developer provides the client component. To complete the team development environment, you will need to download and install a CVS server (see WebSphere Application Server - Express V5.0.1 Administrator Handbook, SG24-6976 for more information). Some of the highlights of CVS are discussed in the following sections.
15.1.1 Non-exclusive checkoutCVS operates on the principle that the development team is unlikely to produce many real conflicts, meaning that the developers have a logical separation of tasks and are most likely working on separate files within the project. Files that are checked out are not locked, meaning resources can be checked out by multiple developers at the same time. It is up to the developers to resolve true conflicts correctly.
15.1.2 Access to resourcesTypically each user will have an account on the server so that actions can be logged to a particular user. The creation of users and groups is done by the server administrator.
Unlike some other repositories, the Studio Site Developer does not have any notion of object ownership. Write access is controlled only by the write permission to the directory that holds the resource. Anyone who is authorized to access the resource can create, edit, or delete it.
15.1.3 Working with resourcesProjects are stored in a repository for access by users. Project versions are unmodifiable copies of the project. Projects stored in a branch are modifiable.
A branch is a shared workspace on a team server where project data is stored. Teams share and integrate their ongoing work in branchs. Resources can be changed in the team members’ individual workspaces without affecting the branch. Each developer must explicitly commit changed resources to the branch.
Every repository has at least one branch. Under certain conditions, more than one branch can exist in a repository.
516 IBM WebSphere Application Server - Express V5.0.2 Developer Handbook

15.1.4 Change historyCVS maintains a history of source code in a tree structure that shows all changes. Each change is stamped with the time it was made and the user name of the person who made it. As a rule, developers will also provide a description of the change. Given that information, CVS can help developers find answers to questions such as:
� Who made the change?� When was it made?� Why was it made?� What other changes were made at the same time?
CVS records all changes to a given project in a directory tree called a repository. CVS does not work with ordinary directory trees; you need to work within a directory that CVS created for you. Just as you check out a book from a library before taking it home to read it, you use the cvs checkout command to get a directory tree from CVS before working on it.
15.1.5 Making changes available to the teamWhile you are working on the project on your workstation, all changes are local. For others to access a resource you have changed you have to commit it to the branch. At the same time, others may have committed changes to the branch. To bring your local and repository systems up-to-date you need to synchronize your local workspace with the repository. Two distinct process are involved in synchronizing resources: Update and commit.
Conflicts arise when you have modified a resource for which a more recent version is available in the branch. In this situation, you can do one of three things: Update the resource from the branch, commit your version of the resource to the branch, or merge your work and the branch resource.
15.1.6 Conflict resolutionWhat happens if more then one developer has changed the same file or the same line? Whose changes should prevail? It is generally impossible to answer this question automatically and CVS does not make any attempts to resolve such a conflict. It simply recognizes that a conflict exists. Studio Site Developer provides the tools to make conflict resolution easy.
It is important to realize what CVS does and does not consider a conflict. CVS's understanding of conflicts is strictly textual and it does not understand the semantics of your program. From its perspective your source code is simply a tree of text files.
Chapter 15. Development in a team environment 517

15.2 Team environment using Studio Site DeveloperDevelopers using Studio Site Developer can:
� Check out resources.� Modify the resources.� Resolve conflicts with code changes made by other developers.� Check the new code back into the server.� Create versions of a project.
The Studio Site Developer team environment works under the assumption that the division of labor among the developers reduces the likelihood of true conflicts (two developers altering the same resource).
15.2.1 Typical flow for team developmentThere are some important but subtle issues related to working with a repository:
� Each project is associated with a specific branch in a specific repository. Different projects can be associated with different repositories, which may in fact be on completely different servers.
� The branch contains all projects in the repository. Individual users can pick which projects they are interested in and add them to their workspaces. From that point on they are synchronizing those projects only with respect to the branch.
� The branch represents a large in-progress collection of all known projects. From the branch's perspective everything is always open for change. The default branch that most users work with is known as the HEAD branch. Other branches are sometimes created to split the development effort, but at some point will need to be merged back into the HEAD branch.
� The act of versioning a project effectively snapshots it and places it into the Project Versions section of the repository; however, the “branch copy” of it is still open for changes.
� When you version the project you should do so by versioning the project as it appears in your workbench. This is where you can easily control what it looks like and test it to ensure that there are no errors.
The following is a typical team environment scenario. The steps are:
1. Create and share an application by versioning it to the repository.
a. Create the Web project.
b. Connect to the CVS repository.
c. Share the application by committing (copying) it to the repository.
518 IBM WebSphere Application Server - Express V5.0.2 Developer Handbook

d. Create a version of the application to act as a stable copy that developers can use as a starting point.
2. The team members connect to the repository and add the version to their workspaces.
3. As resources are created and modified, the team members synchronize with the repository. Synchronization steps are:
a. Update from the repository to accept incoming changes from other developers.
b. Resolve conflicts when the work of two developers hits the same resource.
c. Commit the new resolved code to the repository.
4. When the application reaches a stable level or one that you want to preserve, version the project.
15.3 Connecting to a repositoryTo begin working in a team environment you need to connect to the repository the team will be using. The primary interface for the team environment is from the CVS Repository Exploring perspective.
1. Open the perspective by selecting Window -> Open Perspective -> CVS Repository Exploring.
2. With the cursor in the Repositories view, right-click and select New -> Repository Location from the context menu.
3. Enter the information needed to connect to the repository.
a. In the Host Name field, type the host address of the CVS server machine. If the CVS server is on the same machine, use localhost.
b. In the Repository Path field, type the path to the repository on the host.
c. In the Authentication section enter the user ID and password to use to connect to the repository. This user must have access to files in the repository directory.
Note: Until we added this user ID to the Administrators group on the CVS server we had problems using CVS. It was not enough to give the CVS user access to the repository.
Chapter 15. Development in a team environment 519

d. Select the connection type (authentication protocol) of the CVS server from the connection type drop-down menu (for example, pserver).
• pserver: The authentication will be performed by the CVS password server on the CVS server machine. The password server defaults to port 2401, though this could be changed. In this case, you would need to know the server port and enter it in the Use Port field.
• ext: Use an external connection program.
• extssh: Use an external secure shell (ssh) connection.
In our example we have installed the CVS server on a Windows 2000 server and are using the CVS authentication so we select pserver. We have set up the CVS server to use the local operating system security so the user name and password entered here must be valid on that system.
e. Select Validate connection on finish to test the connection to the server. Deselect this option if you want to authenticate later.
Figure 15-1 CVS Repository Location wizard
4. Click Finish.
The repository will be added to the CVS Repositories view and, assuming the connection information is correct, you can browse the repository contents.
520 IBM WebSphere Application Server - Express V5.0.2 Developer Handbook

Figure 15-2 CVS Repository perspective
15.4 Adding a new application to the repositoryAssume that you have created a Web project and now you want to put it in the repository to share with the team. The basic steps to do this are:
1. Select the project and “share” it with the team.2. Commit the project to the repository.3. Create an initial version of the project.
15.4.1 Sharing the projectIn this section we discuss sharing the project.
Important: As you work with the CVS repository, keep in mind that the files you are seeing are outside of Studio Site Developer. When updates are made to the repository, whether you make them or someone else does, you may need to use the refresh button ( ) to see the updates.
Chapter 15. Development in a team environment 521

The first time you want to share a project by putting it in the team repository, do the following:
1. From the Project Navigator view in the Web perspective (or any Navigator view) select the Web project, right-click, and select Team -> Share Project from the context menu.
2. The Share Project wizard will open and you will have a chance to choose an existing repository location or to add a new one.
Figure 15-3 Share Project wizard screen 1
3. The next screen gives you a chance to specify a different module name. The default is to use the project name as the module name. Click Next.
4. The final screen is informational so click Finish.
At this point three things have happened as a result of the wizard processing:
� The information you have entered is stored as a Web project property. A new folder called CVS and two new files under it called Root and Repository are created in the workspace under the Web project folder to hold this
Note: When you share a project you designate a repository to hold the project. Sharing a project does not automatically copy the resources to the repository but simply sets up the definitions needed in your workspace and in the CVS server to hold the project in the repository.
522 IBM WebSphere Application Server - Express V5.0.2 Developer Handbook

information. As you continue working with the project, CVS folders are created under each project folder to hold information relevant to team processing. You will never access these directly so they are not visible from the Studio Site Developer navigators. We only mention them here so you will get a feel for the processing that is taking place.
� A folder is created on the CVS server in the repository. The folder is empty since nothing has been committed to it yet.
� The Synchronize window opens in the workbench to show you the discrepancies between the project in your workspace and the project in the repository. Since nothing has been put in the repository yet, you will see all the resources of the project listed in the Outgoing view. The resources will have a gray arrow with a + in them, indicating they are new changes to be sent to the repository.
Figure 15-4 The Synchronize view
Note: When you disconnect a project from the repository you have the option to delete these files. If you keep them, the next time you share the project it will use these files for the connection. If you are changing repositories, you should delete them when you disconnect.
Chapter 15. Development in a team environment 523

15.4.2 Copy (commit) the project to the repositorySo far you only have a place holder in the CVS repository for the project. Other users will be able to see the project in the repository but there are no resources in it. To make the resources available for sharing, you must commit the project, which will result in the resources being copied to the CVS repository. The resources will be placed in the HEAD branch only. No version is created.
Each time you commit a resource a new revision tag is associated with it.
In Figure 15-4 on page 523, you see the Synchronize view with the project showing in the Outgoing Mode view. To commit you do the following:
1. Switch to the Outgoing Mode view in the Synchronize view, select the project at the top, right-click, and select Commit.
Or select the project in the Project Navigator view, right-click the Web project, and select Team -> Commit.
Note: Committing a project or a resource causes it to be copied from your workspace to the branch in the repository. A resource must be initially committed as a part of a project commit before it can be committed individually.
Note: When you initially commit a Web project, a revision tag is associated with each resource in the project because each resource is new to the repository. This initial revision tag is 1.1.
Each time you commit a resource the revision tag is changed to the next level (1.2, 1.3, etc.). If you commit at the Web project level, only changed resources get a new revision tag, and that revision tag will be the next number in the sequence for that resource.
524 IBM WebSphere Application Server - Express V5.0.2 Developer Handbook

2. Enter a comment and click OK. If asked if you want to add the resources to version control, click Yes.
The comment will be shown when you view the history of resources committed with this action. If, for example, you are committing a project, you might want to add a comment like Bug 0010 fixed in HTML files. If you are committing an individual HTML or JSP file, you might want to add a comment like Changed to use session attributes vs request parameters. The comment should give you an idea of what happened in the revision.
If you are using the Synchronize view, you will notice that the entries in the Outgoing view will disappear since they are no longer conflicting with the repository.
3. Close the Synchronize view and switch to the CVS Repository Exploring perspective to view the repository. You should now be able to see the Web project and its resources under the HEAD branch. You may need to use the refresh button ( ) to see the updates
15.4.3 Creating a versionThe last step in sharing a project is to create a base version.
Tip: If you are using the Team menu in the Project Navigator and you have added resources since a previous commit, you will have to take an additional step before you can commit: Select the new resource, right-click, and select Team -> Add to version control.
You will know that you need to do this because the option to commit will be grayed out in the menu. In addition, a reminder is added to the Tasks view when you add a resource.
It does not hurt to spot check the CVS repository to make sure you are copying all the resources you intend to. If they are missing from the repository, go back and add them to version control.
Note: Versions are a snapshot of the state of a project at a given time. They are not modifiable but are used as a reference point when comparing code or as a starting point for development.
Chapter 15. Development in a team environment 525

It makes sense to do this when you first share the project in order to give everyone a good comparison point. Future versions can be made whenever the code has reached a point that you would want to save. Adding the project to version control in the commit is not the same as creating a version. Versions can be made in either of the following ways:
� From the branch in the CVS Repositories view. This creates a version from the repository branch copy of the project. Use this option if you want all committed changes from all developers of the project.
� From the Team menu in the Project Navigator view. This creates a version from the project in your workspace. Only resources that you have committed will be included. If you have uncommitted resources you will be notified and given an option to continue without them. If you use this option you will not pick up any committed changes from other users. Versioning a project with uncommitted or outgoing changes is handy if you have to split the project at the point where you started making changes to the resources and commit the resources to another branch.
Version from branchYou can version from the branch in the CVS Repository Exploring perspective by selecting the project under the desired branch. When versioning from the branch you are versioning the latest resource versions that are in the branch at that moment in time.
In order to version a project it must be associated with a branch. If this is not the case, you must first associate it.
To create a version from the branch:
1. Open the CVS Repository Exploring perspective.
2. Select the Web project in the CVS Repositories view under the branch (for example, HEAD), right-click, and select Tag as Version.
3. Enter a comment and click OK.
Version from workspaceWhen versioning a project from the workspace, the base version of the resources in the workspace is captured as part of the project version. This is the preferred method of versioning a project because you know exactly which resource versions will be in the project version.
Note: You should not version your projects from the branch if you are not sure what is currently committed in the branch.
526 IBM WebSphere Application Server - Express V5.0.2 Developer Handbook

This operation is allowed if you have outgoing changes or uncommitted changes. Uncommitted changes are simply ignored, and resources with outgoing changes can still have their base versions be part of the project version.
To create a version from your workspace:
1. Open the Web perspective.
2. Add any new resources to version control by selecting the resource, right-clicking, and selecting Team -> Add to version control.
3. Commit to the repository using Team -> Commit and enter a comment.
4. Select the Web project Project Navigator view, right-click, and select Team -> Tag as Version.
5. Enter a comment and click OK.
Once again, the comment should be meaningful, for example, BaseVersion, Version1, etc. It will appear as a comment in the resource history in the Tag column and beside the version in the CVS Repositories view.
A look at the new version in the CVS Repository Exploring perspective will show you the resources that make up the version and their revision tags. Figure 15-5 on page 528 shows a version that has resources at two different revision levels. The index.jsp resource is at revision 1.3. The Master.css resource is at revision 1.1.
Note: As you will see later, you should always synchronize with the repository before committing changes so that you do not overlay changes made by others. For simplicity we will assume you have done this.
Chapter 15. Development in a team environment 527

Figure 15-5 Viewing the project version
15.4.4 (Optional) changing the sharing information for a Web projectThe information you entered is treated as a Web project property and can be changed to a limited extent. To view this information select Properties from the Web project context page and then select the CVS option.
To change the information click the Change Sharing button. You will be given a list of repository locations that you can switch to. The only change allowed is to another user ID on the same repository. In other words, the only repository locations you can switch to must have the same server and repository.
If you want to send the project to a different repository you will need to disconnect the project (Team -> Disconnect) from the current repository. This does not affect the CVS server, but it erases the association between the project and that repository. Then you follow the steps for adding an application to a repository to put it on the other one.
528 IBM WebSphere Application Server - Express V5.0.2 Developer Handbook

Figure 15-6 Web project CVS properties
15.5 Adding an existing application to your workspaceNow that a project has been added to the repository, other members of the development team can begin working on it. They will need to begin by creating a connection to the repository, as in 15.3, “Connecting to a repository” on page 519.
Getting a copy of the current project is easy. The project should be available under the HEAD branch.
1. Expand the HEAD branch in the CVS Repositories view and select the project.
2. Right-click and select Check Out As Project from the context menu.
The project will be copied into your local workspace and you can switch to the Web perspective to begin work.
Chapter 15. Development in a team environment 529

15.6 Working with the team using the repositoryAs the team members update and create resources they will need to synchronize with the branch periodically. This ensures they have the latest code from other developers and that conflicts are resolved early in the process. The primary steps are:
1. Synchronize your workspace copy with the current branch.2. Resolve conflicts if necessary.3. Update from the repository (receive changes from the repository).4. Commit your changes to the repository.
15.6.1 Synchronizing with the repositoryThe synchronization process will compare the resources in your workspace with those in the branch and report the differences.
To synchronize:
1. Select the project that you want to synchronize with the branch from the Project Navigator view.
2. From the context menu of resource, select Team -> Synchronize with Repository.
The project in your workspace will be compared to the branch. If there are differences you will see them in the Synchronize view. There are three modes in which resources are synchronized in the view:
– Incoming mode: Shows incoming changes only (resources in the steam that differ from what is in the workbench).
– Outgoing mode: Shows outgoing changes only (resources that have been modified in the workbench only).
– Incoming/Outgoing mode: Shows both incoming and outgoing changes.
You can switch to any of these three modes by using the view’s toolbar buttons.
Note: The local history of a resource will be reset every time you synchronize with the branch.
530 IBM WebSphere Application Server - Express V5.0.2 Developer Handbook

Figure 15-7 Synchronizing with the repository
To see the difference in a workspace resource and the same resource in the repository, double-click the resource in the Structure Compare area and both versions will be opened in the Text Compare area. The workbench file is on the left side and the repository file is on the right side.
15.6.2 Dealing with conflicting changesIf you have modified a resource and no one else has committed a change for the same resource to the repository, then there is no conflict and you can continue with a commit. But if you have changed a resource and the copy you started with was also changed by someone else and committed, then you have a true conflict.
To see true conflicts, click the Show only conflicts button on the Structure Compare toolbar. Conflicts are indicated by a red arrow in the view.
Chapter 15. Development in a team environment 531

Figure 15-8 Working with conflicts
If you find that you have a conflict, you can choose to do one of the following:
� You can take the change from the branch (update to it) and discard your local changes.
This could be the right action to take if you have made unintended changes locally, or if you realize that the version in the branch is “better” than yours. Overwriting your local changes should be done with caution since you are in essence throwing work out.
� You can commit your change, overwriting the copy in the branch.
� You can resolve the conflicts manually and mark the resource in your workspace as “merged”. You may then later choose to commit this merged result.
Merging will typically be the preferred option because of the risk of unintentionally losing work associated with the other two options.
Note: This should be done only with great caution and, if possible, after consulting with the other developer(s). In essence you are throwing away someone else's work. The change you are overwriting may have other dependencies in the branch.
532 IBM WebSphere Application Server - Express V5.0.2 Developer Handbook

Merging changesThe Synchronize view shows those resources that are in conflict with the repository. For a given resource in conflict, typically you will want to merge your changes with changes in the branch’s resource.
For example, let us assume that both you and another team member have modified the same HTML page. Selecting that resource in the Synchronize view will display a comparison of the local resource and the branch version. By cycling through and resolving the individual conflicts by manually updating the code, you can decide for each change whether to accept the incoming change, reject it, or merge it with your local changes. When you are finished resolving the conflicts, you save your changes in your workspace. You can subsequently commit this merged resource.
Figure 15-9 Resolving conflicts
You can resolve conflicts in the Incoming/Outgoing view in the following ways.
� Whole document: In the Structure Compare editor, select the resource that you want to merge so that the resource is displayed in the Text Compare editor. In the Text Compare editor, click the Copy all from right to left button to entirely replace the text in your local editor with the contents of the repository copy.
Chapter 15. Development in a team environment 533

� Current change: In the Text Compare editor, either use the Select Next Change and Select Previous Change buttons to navigate to the conflict that you want to resolve, or simply click in either source pane somewhere in the desired change difference section. Click the Copy current change from right to left button when you want to overwrite the highlighted fragment with the corresponding modification in the repository.
� Manually: If you want to combine the two changes you can use copy and paste to move data from the repository copy to the local copy.
When you are done, you can save your local version by selecting Save in the context menu of the text compare area for the local copy.
This will prompt you to save your changes. If you have updated your working copy you will be reminded to mark the new file as merged when you are done. This flags the resource as an outgoing change.
Figure 15-10 Mark as merged
To mark the resource as merged, select it in the Structure Compare area, and select Mark as Merged in the context menu.
Note: You will see more on comparing two files in 15.9.4, “Working with the comparison” on page 547.
534 IBM WebSphere Application Server - Express V5.0.2 Developer Handbook

Figure 15-11 Marking the new local copy as merged
15.6.3 Updating from the repository
Updating is the act of taking changes committed by others to the branch and copying to your workspace, replacing your copy.
You can update your workspace with the work that has been done by other team members and committed to the branch since you last synchronized. To update workbench resources:
1. Select the resource or project in the navigator view you want to update.
2. From the context menu, select Team -> Synchronize with Repository.
3. In the Synchronize view, select the Incoming mode button on the view’s toolbar. The resources that are different in the respository will be flagged. If you want to see the actual differences you can double-click the resource and the two versions will open in the Text Compare area.
4. Click the Show only conflicts icon to see a list of resources that have true conflicts. If there are no conflicts (no red arrows), you can update the resources in the workbench without losing any changes you have made.
Chapter 15. Development in a team environment 535
If there is a conflict, use the Text Compare area to resolve the conflicts.
5. Once you are ready to bring in the changes from the repository, select the top-most resource in the hierarchy in the Structure Compare area and select Update from the context menu.
15.6.4 Committing changes to the repositoryWhen you have made changes to a resource, you need to commit the resource to the repository for use by other team members. Committing a resource copies it from your local workbench to the repository branch. As a result, these changes are then seen as incoming changes when other developers update from the branch later.
To commit a resource:
1. Select the resource you want to commit from the Project Navigator view.
2. From the resource’s context menu, select Team -> Synchronize with Repository.
3. In the Synchronize view, select the Outgoing mode button on the view’s toolbar. You can see the outgoing changes in the Text Compare area.
4. If there are no conflicts, you can commit the resource, creating a new revision of the resource in the branch.
If there is a conflict, use the Text Compare area to resolve your conflicts first. Once all the conflicts have been resolved, you are ready to commit.
5. In the Structure Compare area, select the top-most resource in the hierarchy and select Commit from the context menu.
Note: The branch itself is not changed when you update. When you accept incoming changes, these changes are applied to your workspace. The branch is only changed when you commit or merge your outgoing changes.
Note: Update first! You should update your local copy from the current branch before committing your changes. This ensures that you have the very latest work from the other team members.
536 IBM WebSphere Application Server - Express V5.0.2 Developer Handbook

15.7 Using multiple branchesThe current resources in a project in the repository are stored in a branch. The CVS repository always has a default branch called HEAD. This is the main trunk in the repository where development typically takes place.
In some circumstances it may be convenient to create a new branch. This allows you to isolate the work you are doing from other developers. For example, if you are trying to debug a problem you could create a separate branch to work from. This keeps changes that others are making from affecting your debugging efforts. It also gives you the freedom to change things that might normally affect other components. In the meantime, the primary development efforts can continue to take place in the HEAD branch.
When you have accomplished your task in the secondary branch you can merge the relevant changes back into the HEAD branch.
15.7.1 Creating a new branchCreation of a new branch in the CVS Repositories view can be seen as defining a new branch name. The underlying CVS branch is not created until you explicitly copy a project version or commit contents to the repository. Branch name definitions persist between workspace sessions until explicitly removed within the CVS Repositories view.
There are two options for putting a project in a branch:
� Based on a project version
Choose this option if you are splitting based on an existing project version in the repository, for example, to fix a bug in a previous version of your project.
Note: You need to be careful when using alternate branches. Adding a project from the branch to the workspace via the CVS Repositories view or associating it with another branch in another repository deletes all existing synchronization information currently managed for the given project and reinitializes with the new information for the newly added/reassigned project.
Using another branch in the same repository does not change the synchronization information.
Chapter 15. Development in a team environment 537

� Based on the project in your workspace
Sometimes you don't want to commit your changes to everyone in the team but would still like to version them. You may want to do this, for example, if your changes are not yet stable, or if it will take a long time before you are ready to commit them to the team. In this case, you may want to create a new branch to commit your changes to.
Creating a new branch based on a project versionTo create a new branch from an existing project version, do the following:
1. Open the CVS Repository Exploring perspective.
2. Find Branches in the CVS Repositories view, right-click, and select Add to Branch List... from the context menu.
3. Enter the new branch name and click OK. The new tag is created and you are ready to add a project to this new branch.
4. In the CVS Repositories view, select the project under the HEAD branch that you want to split off into the new branch you just created. Select Tag with Existing from the context menu.
5. Expand the versions folder and select the version. Click OK.
6. You can now expand the project under the new branch. The resources are now there and should have the same revision levels you see in the original version.
7. Highlight the new project under the branch and select Check Out As Project from the context menu. Note that this will overwrite the copy that you have in your workspace.
Creating a new branch from the workspaceThe first step is to define a new branch in your workspace and associate the project with it:
1. From the Project Navigator view, select the project you want to create a branch for, and from the context menu select Team -> Branch.
2. Enter a new branch name (for example, DebugLoginBranch), select Start working in the branch, and click OK.
The new branch exists in your workspace and you can continue working with the project. Any commits you perform will be done to the new branch.
If you want multiple projects associated with this branch, simply repeat these steps and enter the same branch name for each project.
538 IBM WebSphere Application Server - Express V5.0.2 Developer Handbook

15.7.2 Accessing the branch from another workbench Though the new branch exists in the repository, it is not automatically visible to other users. Anyone wanting to work in the same branch will have to manually add the branch name in the CVS Repositories view.
1. Go to the CVS Repositories view and select the Branches folder under the repository where you want to create the new branch.
2. From the context menu, select Refresh Branches....
3. Select the corresponding projects from the available list of the Select Projects dialog and click Finish.
Figure 15-12 Select project(s)
Note: When you create a new branch, whether from the workspace or from the repository, a new version is created in the repository.
Chapter 15. Development in a team environment 539

In the CVS Repositories view, expand Branches and observe that it now contains the new branch.
To begin working with a project in the new branch, you will need to do one of two things:
� If you do not already have the project in your workbench, choose the project under the new branch and select Check Out As Project from the context menu. Switch to the Web perspective and you will see the new project.
� If you do have the project in your workspace and want to associate it with the new branch:
a. Switch to the Web perspective and select the project in the Project Navigator view. From the context menu, select Team -> Branch.
b. Enter the new branch name. If you need a reminder of the branch names, click Details. Click OK.
If the above operation does not result in the discovery of any tags, it is probable that the folder in the repository does not have a .project file in it. The .project file is the default file used by the tag discovery process. The file can be changed for individual projects using Configure Branches and Versions.
To discover existing branch and version tags for a single project folder:
1. Switch to the CVS Repository Exploring perspective or add the CVS Repositories view to the current perspective.
2. In the CVS Repositories view, expand the repository location.
3. Expand HEAD and select the root folder whose tags are to be discovered.
4. From the pop-up menu for the CVS Repositories view, select Configure Branches and Versions. The Tag Configuration dialog will open.
5. In the top pane on the left (titled Browse files for tags), expand one or more projects to find a file that is known to have tags that should be added to the CVS Repositories view.
6. Select a file in the top left pane. If the file selected has tags defined on it, they will be displayed in the right top pane (titled New tags found in selected files).
7. Select or deselect the tags in the right pane as desired.
8. Click Add Checked Tags to add the checked tags to the list of remembered tags.
Tip: You can see existing branch names for a project by viewing the CVS resource history for a resource in the project. See 15.8, “Viewing resource history” on page 542.
540 IBM WebSphere Application Server - Express V5.0.2 Developer Handbook

9. Click OK to add the remembered tags to the selected repository location or project.
15.7.3 Merging branchesMerging two branches involves identifying changes that have been made between two points in the new branch and merging them into a workspace that contains the HEAD branch.
The following is a scenario for working with multiple branches. It assumes that a new branch was created to add maintenance fixes. Once the maintenance is complete, the new branch is merged back into the HEAD branch.
Table 15-1 Working with multiple branches
Note: It is important to realize that the destination of the merge is always the project in your workspace. After the merge has completed, you should first test the changes locally and only then commit them to the new branch.
Developer 1 (maintenance developer) Developer 2
Checks out the project from the HEAD branch
Checks out the project from the HEAD branch
� Defines a branch tag (BeginMaint)� Tags project in workspace as new
branchA new version called Root_BeginMaint is also created
Adds & changes files in the BeginMaint branch
Adds and changes files in the HEAD branch
Commits changes to the BeginMaint branch
Commits changes to the HEAD branch
Loads the HEAD branch into the workspace� Select the project in the Web
perspective.� Select Replace with -> Another
Branch or Version from the context menu.
� Select the HEAD branch.
Chapter 15. Development in a team environment 541

15.8 Viewing resource historyYou can view the history of a resource in the CVS Repositories view from almost any navigator where you can select a project resource. The history will show you a list of all revisions, who created the revision, the date and time, revision comments, and associated tags. Versions will be indicated by the associated tags.
To see the CVS server history for a resource select Team -> Show in Resource History from the context menu of the resource in the navigator view. If you are in the CVS Repository Exploring this is simply Show in Resource History.
Merges changes made to the HEAD branch since the new branch was created into the workspace� Select project in Web perspective.� Team -> Merge.� Merge start point is Root_BeginMaint.� Merge changes from BeginMaint
branch.
Uses the Structure Compare and Text Compare views to update from the repository and to resolve conflicts
Adds new files picked up during the merge to version control and commits the newly merged code to the HEAD branch
Synchronizes with HEAD to pick up the fixes
Deletes the BeginMaint branch
Developer 1 (maintenance developer) Developer 2
542 IBM WebSphere Application Server - Express V5.0.2 Developer Handbook

Figure 15-13 shows an example of the history of a resource.
Figure 15-13 Viewing the CVS repository history of a resource
Chapter 15. Development in a team environment 543

You will find the following information in the CVS Resource History view:
� Revision: The repository-generated revision number. Each revision represents a commit for the resource. The commit only happens when the resource is changed so a revision indicates a change in the resource.
� Tags: When a new version or branch is created the resources involved have a tag associated with that revision. The tag is entered by the person making the change. When you select a project and then tag it as a version, you enter the tag name. For a branch, it is the branch name.
When a resource is associated with a new branch and committed, a tag is added to the revision indicating the branch. For example, you can see in Figure 15-13 on page 543 that revision 1.6 was used as the basis for two new branches. The first branch name is Dev2sBranch. The version created when the project was committed to the branch is Root_Dev2sBranch. The second branch is Dev1sBranch.
� Date: When the revision was created (committed).
� Author: Who created (committed) this version.
� Comment: If any were added by its author.
You might need to maximize this view in your perspective to be able to see the complete information. Each column can be sorted in ascending order by clicking the column heading.
15.9 Comparing resourcesYou can compare two selected resources to view the differences between them. You can do the compare at the file, folder, or project level. You can also compare a resource with other states in the local edit history or with other versions of that resource.
When a comparison is performed, all applicable compare editors appear in the editor area. You can browse through the differences and copy/move the highlighted differences between the compared resources. You can then save changes to resources that were made in the compare editor.
Tip: You can compare two revision levels of the resource in this view by selecting both entries (Ctrl+click each) and select Compare from the context menu.
544 IBM WebSphere Application Server - Express V5.0.2 Developer Handbook

15.9.1 Comparing a resourceThe first type of compare you can perform is to compare a resource to another state of the same resource. To do this:
1. Select the resource in a navigator, and then select one of the following from the context menu:
– Compare a workbench resource with a branch or version: When you select a resource in the workbench, you can compare it with a branch or version of the resource that has been committed to the repository.
– Compare a workbench resource with the latest from the repository: When you select a resource in the workbench, you can compare it with the the copy of the resource currently committed to the branch.
– Compare a workbench resource with its local history: When you select a resource in the workbench that has been modified, you can compare it with its state prior to modification. This is because the base version denotes the version that you have loaded.
2. In the compare dialog that will be opened, you can now browse to select the version with which you want to compare the workbench resource. Notice you can see the differences between the version and the workbench resource in the text compare area.
15.9.2 Comparing two selected filesA two-way compare shows the differences between two selected files. To compare two resources in the workspace:
1. Ctrl+click to multi-select two resources in a navigator or the CVS Repositories view.
2. From the resources context menu, select Compare.
3. The Comparison editor displays, showing the differences between the resources.
15.9.3 Three-way compareThree-way compare shows the differences between two resources and their common ancestor. This feature is most useful when merging or synchronizing resources.
Note: If you have not added the resource to version control then you will only see the option to compare to local history.
Chapter 15. Development in a team environment 545

When such a situation occurs, you will be able to view the differences between these three different resource versions:
� The resource in the workbench� The version of the resource that is committed in the branch� The common ancestor on which the two conflicting versions is based
The differences that will be highlighted show you what has been changed in the workbench resource as compared to the common ancestor, and what has been changed in the branch resource as compared to the common ancestor.
A typical scenario to do this comparison would be:
1. Synchronize with the repository.
2. Open the Show only conflicts.
3. Select a resource that is in conflict and open it in the Text Compare area by double-clicking it.
Figure 15-14 Two-way compare
4. Select the Show Ancestor button to have the original file come up.
546 IBM WebSphere Application Server - Express V5.0.2 Developer Handbook

Figure 15-15 Three-way compare
15.9.4 Working with the comparisonAny comparison will cause a comparison editor to open.
Chapter 15. Development in a team environment 547

Figure 15-16 File (text) compare editor
There are two parts in the compare editor's local toolbar. The right group of local toolbar buttons allows you to move to the next or previous change:
� Click the Select Next Change button to select the next change.� Click the Select Previous Change button to move to the previous change.
The left group of local toolbar buttons allows you to merge changes from the left file to the right file and vice versa. There are four types of merges you can perform:
� Copy whole document from left to right.� Copy whole document from right to left.� Copy current change from left to right.� Copy current change from right to left.
Typically the copy whole document actions are used when you are sure that the entire file on either the left or right can just be replaced by the contents of the other file. The Copy current change button allows you to merge the single changes one by one.
You can close and save the workspace copy by selecting Save from the context menu of the left comparison window.
548 IBM WebSphere Application Server - Express V5.0.2 Developer Handbook

15.10 Determining which files are managedFiles are not automatically managed by the repository. As you have seen in the previous discussions, adding a file to version control is a conscious decision. If you do not add a file to version control, it is not copied to the repository, even though you may commit the entire project.
When you first commit a project, you are given the opportunity to add the resources currently in the project to version control. If you select this option all files will be included.
However, there may be some files that you never want to send to the repository, for example, .class files. You can automatically exclude these from any commits by doing one of the following:
� Use the global ignore facility to specify file names or patterns that apply to all projects in the workbench.
To add a global ignore pattern for the workbench, simply select Window -> Preferences to open the Workbench preferences dialog and select the Team -> Ignored Resources category. Click Add to add the pattern to ignore.
� Use the CVS Ignore facility to specify file names or patterns that apply to a specific project directory.
For example, if you want to create a .cvsignore file that will keep anything in the classes folder from being sent to the repository:
a. Select the WEB-INF/classes folder, and select Team -> Add to .cvsignore from the context menu.
b. Select the wildcard extension option. This will create an entry in .cvsignore to exclude all files with an extension like the one you selected, or if you selected a folder, all files in the folder.
c. Click OK.
To work with the .cvsignore file you will need to switch to the Resource perspective. You will not see it in the Project Navigator view. When using this method, it is a good idea to:
a. Create the .cvsignore files before you commit for the first time.
b. Add the .cvsignore files to version control so they are copied to the repository and others pick them up with the project.
Note: The ignore file only relates to the files and folders contained in that directory, so you may require many .cvsignore files throughout the project.
Chapter 15. Development in a team environment 549

550 IBM WebSphere Application Server - Express V5.0.2 Developer Handbook

Chapter 16. Security
As new business practices emerge, most enterprises are finding that their existing security infrastructure is not capable of meeting the rapidly changing and more rigorous demands of business over the Internet. The demands of network security have now gone far beyond simply managing user accounts and restricting access between internal and external networks.
Physical security is the most basic type of security, providing protection against physical access to the computers. Logical security involves protecting the applications and network from unauthorized access or harm. This normally involves the use of firewalls and other security products that filter out unwanted network traffic and ensure that only valid users can access the applications and resources that constitute the business.
This chapter will address the security options provided by WebSphere Application Server - Express.
16
© Copyright IBM Corp. 2003 551

16.1 TermsBefore starting this topic, take a minute to review the following security terms:
� Authentication: The process of establishing whether a client is valid in a particular context. A client can be an end user, a machine, or an application. Typically you would think of this as a login process.
� Authorization: The process of checking whether the authenticated user has access to the requested resource.
� Principal: an entity in the computer system to which permissions are granted.
� Realm: A collection of users that are controlled by the same authentication policy.
As we discuss the security options in WebSphere Application Server - Express, you will see these terms and should have an understanding of what they mean.
16.2 Securing applications in WebSphere Application Server - Express
Implementing security in WebSphere Application Server - Express is relatively easy. The basic steps needed to secure your applications are:
� Determine the authentication method.
� Determine the actions that you want to restrict and define a scheme of roles that can be used for authorization purposes. If you simply want to restrict access to certain pieces of JSP or servlet code, you can do this without changing any application code. For more advanced techniques, you can introduce code in your application that will perform authorization before allowing the user to perform certain actions.
� Define users and groups to the WebSphere Application Server - Express operating system and assign those users and groups to the roles you have defined.
� Enable WebSphere security and/or code applications to implement security.
552 IBM WebSphere Application Server - Express V5.0.2 Developer Handbook

16.3 Authenticating usersAuthentication is the process of identifying a user and determining whether the user is who he claims to be. This is typically the first security check done in a Web application, and is done by collecting a user ID and password from the user and comparing that to a user registry. The login ID becomes the principal used in future authorization actions.
� Basic authentication
The user is challenged and must enter a user ID and password. The user ID and password are encoded by the browser and included in the HTTP request to the server. If you select basic authentication, Express Application Server provides the login forms and authenticates using the operating system security.
� Form-based authentication
This method allows the developer to control the authentication process. This means that whenever a resource is accessed and authentication is required, your form will be used to collect and process the login information. By default, the user ID and password values supplied by the end user are transmitted in clear text as parameter values in the HTTP request. To secure the user information during transmission, this channel should be encrypted.
The authentication method is configured in the Web deployment descriptor under the Pages tab.
Note: WebSphere Application Server - Express can only secure components that it owns. In many instances, you will be providing an HTML interface into your applications using an external Web server. Any static pages that are served from the Web server must be protected using Web server related security mechanisms. These mechanisms are transparent to the WebSphere Application Server - Express.
Note: For any type of authentication to take place, you must have enabled WebSphere security and secured at least one resource.
Chapter 16. Security 553

Figure 16-1 Web module deployment descriptor: Pages
16.3.1 Form-based authenticationForm-based authentication (login) enables the application developer to customize the login process and present an application-specific form for login.
Form login works in the following manner:
1. An unauthenticated user requests a protected resource.
2. The application server redirects the request to the login form defined by the Web deployment descriptor.
3. The user is presented with the HTML login form, enters a user ID and password, and submits the form.
4. The form submission triggers a special WebSphere Application Server - Express servlet called j_security_check. After receiving a request for the j_security_check servlet, the Web container dispatches the request into another WebSphere Application Server - Express servlet that authenticates the user.
5. If the servlet authenticates the user successfully, the requested resource is displayed.
554 IBM WebSphere Application Server - Express V5.0.2 Developer Handbook

The following steps illustrate how to implement a form-based login.
1. Create a login form. In this case we will create a login form called login.html.
– The action required for the HTTP POST method is j_security_check. This method automatically registered on the level of the context root.
– j_username should be the input field in which a user will write the user ID.
– j_password should be the input filed into which a user will write the password.
Example 16-1 shows a sample login form.
Example 16-1 Sample custom login form
<!-- ............... --><form method="post" action="/itsobank/j_security_check"><table width="80%"><tr><td width="20%" align="right">Userid:</td><td><input size="20" type="text" name="j_username" maxlength="25"></td></tr><tr><td align="right">Password:</td><td><input size="20" type="password" name="j_password" maxlength="25"></td></tr><tr><td></td><td><input type="submit" name="action" value="Login"> <input type="reset" name="reset" value="Clear"></td></tr></table></form><!-- ............... -->
2. Open the Web deployment descriptor (web.xml) for the project and select the Pages tab.
a. Enter a realm name.
b. Click the drop-down list and select FORM as the authentication method.
c. In the Login page click Browse and select login.html.
d. In the Error page click Browse and select loginerror.html. (We have used the same page for log in and error. You can define a custom error.jsp page that will present an actual error code and error message.)
3. Save and close the deployment descriptor.
Note: The j_security_check servlet will not work when global security is disabled; the application server will return a page not found error. See “Enable WebSphere global security” on page 566.
Chapter 16. Security 555

16.4 Securing applications with role-based securityApplication security is implemented using J2EE role-based security. Security roles provide a mechanism whereby application developers determine the security policies for an application by creating named sets of users (for example, managers, customers, employees) that will have access to secure resources and methods.
At application development time, these sets of users, or security roles, are not tied to any real users or groups of users. Instead, they are placeholders that are later mapped to real users and groups at application deployment time, during a process called security role mapping.
Figure 16-2 Security roles
This two-phase security administration approach allows for a great deal of flexibility and portability. Deployers of an application have full control over how their local users and groups are mapped to the application’s security roles, and over what authorization and authentication mechanisms are used to determine role membership.
Web Component Resources
JSPs
Servlets
Static ContentConsultant
Manager
Accountant
Staff
Security RolesPrincipals and Groups
Daffa
Iza
Department XYZ
Security Role Mapping
556 IBM WebSphere Application Server - Express V5.0.2 Developer Handbook

At deployment time, security roles can be mapped to users, groups of users, or to two special subjects available in Express Application Server:
� All authenticated users� Everyone
Role-based security can be implemented in one of two ways:
� Declarative security means the security policies are configured at application assembly time, external to the application code.
� Programmatic security is used when an application must be “security aware”. For instance, a method might need to know the identity of the caller for logging purposes, or it might perform additional actions based on the caller’s role. The J2EE specification provides an API that includes methods for determining both the caller’s identity and the caller’s role.
For many applications, securing methods using declarative security will be sufficient. However, there may be times when you need more specific control than declarative security provides. For example, if you have a servlet that handles the transfer of money from one account to another, you can protect the methods in the servlet so that only users with the Customer role can execute it. This means that only users with the Customer role can transfer money.
With programmatic security, you can go further by checking the roles before allowing certain actions to take place. For example, if a customer tried to transfer over 50 percent of her balance from one account to another, the servlet could check to see if the customer had the GoldenClub role and only allow the transfer if true.
16.4.1 Declarative securityWhen using declarative security, application developers are free to write component methods that are completely unaware of security. By making changes to the deployment descriptor, an application’s security environment can be radically changed without requiring any changes in application code.
Servlets can be protected at the method level by naming roles that are authorized to use the method. The key here is to remember that when it comes to running a JSP on a server, the JSP is actually executed as a servlet. So when we talk about securing servlets, you can mentally include JSPs in the discussion.
Protecting servlet methods using J2EE security involves the following steps:
1. Define users and groups to the server operating system. Express Application Server will use the security system of the server’s local operating system to authenticate users and groups.
Chapter 16. Security 557

2. Define roles to represent a logical grouping of users. Example roles would be Customer, Administrator, Operator. Roles are defined in both the Web deployment descriptor and EAR deployment descriptor.
3. Define constraints to protect servlet and JSP HTTP methods by role. This is done in the Web deployment descriptor.
4. Assign users or groups to roles. Real users and groups defined to the operating system must be associated to the roles defined in the application. This is done in the enterprise application deployment descriptor.
5. Enable WebSphere global security. WebSphere global security must be enabled to activate the role-based security checking. This is done in the server configuration.
Example: Securing a JSPAs an example, let us take the Online Catalog application and introduce security measures. It is easy to see several logical roles that could be used, for example, shoppers, catalog administrators, and order department.
The process will consist of:
1. Defining the role.
2. Defining a constraint.
3. Assigning the role to the constraint.
4. Identifying the authentication method and the realm.
5. Defining the roles to the enterprise application.
6. Identifying real users defined to the local operating system that have the CatalogAdmin role.
7. Enabling global security on Express Application Server.
Figure 16-3 on page 559 shows an overview of the security settings for an application and their relation to each other.
Note: In this example we are actually adding a second layer to the our application security. The first layer is programmed using the login servlet. To get past that checkpoint, they need to know the user ID and password stored in the application database (admin/admin). This method was used to illustrate a simple login procedure based on information stored in a user database and is not related to WebSphere security.
In the second layer of security we are going to ignore this first login and secure the application at the JSP level using J2EE role-based security.
558 IBM WebSphere Application Server - Express V5.0.2 Developer Handbook

Figure 16-3 Web module deployment descriptor security options
Define the roleRoles are defined in the Web deployment descriptor for each Web module, then later rolled up into the application deployment descriptor. We will start by defining the CatalogAdmin role.
1. Open Web Content/META-INF/web.xml.
2. Select the Security tab.
3. Select security roles at the top and click Add below the window.
4. Type in the name of the role, CatalogAdmin.
rolesCatalogAdminOrderDept
Authorized rolesCatalogAdminOrderDept
(optional)
web.xml (security tab)
servletsMasterCatalogView
URLs/MasterCatalogView/Administration/MasterCatalogView
URLs/Administration/OrderCatalogView
OrderCatalogView
Authorized rolesCatalogAdminOrderDept
(optional - can be used for programmatic security)
web.xml (servlets tab)
application.xml (security tab)
Security constraint (2)Methods
URLs
Get methodPut method
/Administration/OrderCatalogView
Security constraint (1)Methods
URLs
Get methodPut method
/MasterCatalogView/Administration/MasterCatalogView/AddNewItemProcess
user-roleCatalogAdmin
OrderDept
admin1
orderadmin1
Chapter 16. Security 559

Figure 16-4 Add a role
Define the constraintThe security constraints define the URLs and methods whose execution is limited to users who have the appropriate role(s). In this case we will say that only users with the CatalogAdmin role can view customers. To do this, we will secure CustomerMasterView.jsp.
1. The first thing you will need to know is the URL(s) of the servlet that you want to protect. In the Servlets tab of web.xml you can see the registered JSPs and servlets. Note that there are two URL mappings for CustomerMasterView.
560 IBM WebSphere Application Server - Express V5.0.2 Developer Handbook
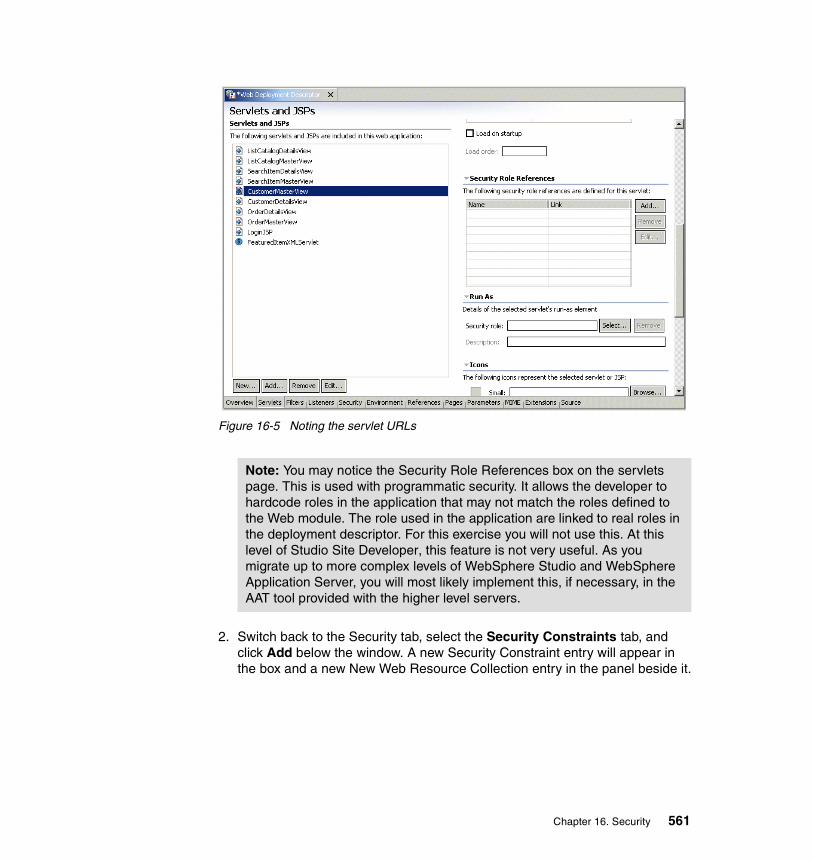
Figure 16-5 Noting the servlet URLs
2. Switch back to the Security tab, select the Security Constraints tab, and click Add below the window. A new Security Constraint entry will appear in the box and a new New Web Resource Collection entry in the panel beside it.
Note: You may notice the Security Role References box on the servlets page. This is used with programmatic security. It allows the developer to hardcode roles in the application that may not match the roles defined to the Web module. The role used in the application are linked to real roles in the deployment descriptor. For this exercise you will not use this. At this level of Studio Site Developer, this feature is not very useful. As you migrate up to more complex levels of WebSphere Studio and WebSphere Application Server, you will most likely implement this, if necessary, in the AAT tool provided with the higher level servers.
Chapter 16. Security 561

Figure 16-6 Adding a constraint
3. Select the New Web Resource Collection entry and click Edit. This allows you to enter the URL(s) or URL patterns for the Web resources you want to protect. Enter the patterns and select the HTTP methods you want to protect.
562 IBM WebSphere Application Server - Express V5.0.2 Developer Handbook

Figure 16-7 Add the servlets and methods to protect
In this case it is sufficient to select the GET and POST methods, but it does not hurt to specify all of them.
Click OK.
Tip: If a servlet is called using some type of redirection on the server side, security will be bypassed. A good example is the front controller created by the Database Web Pages wizard. Let us say you used the wizard to create the following:
� ListCatalogInputForm.html� ListCatalogController.class� ListCatalogMasterView.jsp� ListCatalogDetailsView.jsp
The user starts with ListCatalogInputForm.html where the following code is used to invoke ListCatalogMasterView.jsp (via ListCatalogController.class):
<FORM name="myForm" method="POST" action="ListCatalogController"><A href="javascript:submitForm('ListCatalogMasterView')">
You must secure ListCatalogController.class in order to get an authentication challenge.
Chapter 16. Security 563

Assign a role to the constraintWith the constraint still highlighted, click Edit beside the Authorized Roles box. When the window opens, select the roles allowed to access the servlets. In order to access the Web resource, the user must have been granted at least one of the roles selected.
Figure 16-8 Associate the role with the constraint
Define the authentication methodTo define the authentication method:
Note: You also have a user data constraint option on the Security page. The user data constraint options allow you to chose a transport guarantee, which defines how the communication between the client and the server is to be protected. There are three options to choose from:
� None
No constraint indicates that the application does not require any transport guarantee.
� Integral
This ensures that data cannot be changed in transit. In practice, this means that a request must be transmitted over an SSL-encrypted channel.
� Confidential
This ensures that data cannot be changed or viewed in transit. In practice, this means that the request must be transmitted over an SSL-encrypted channel.
564 IBM WebSphere Application Server - Express V5.0.2 Developer Handbook

1. Select the Pages tab in the Web deployment descriptor.
2. Select Basic for the authentication method.
3. Enter a realm name. The realm name basically identifies the user registry that will be used to authenticate. A user that accesses resources in multiple realms can simply look at the realm name presented with the challenge screen to know which system, and thus user ID/password combination, to use.
Figure 16-9 Define the authentication method
Gather the roles and assign real usersThe next step is to update the EAR deployment descriptor with the roles you have defined.
1. Open the EAR deployment descriptor and select the Security tab.
Chapter 16. Security 565

Figure 16-10 Enterprise application security settings
2. Click Gather to collect the roles defined in the Web modules. Note that this allows you to define the roles in multiple Web modules that belong to this enterprise application and easily collect all roles with the click of a single button.
3. Assign users to the roles. If you want to select individual users or groups select the Users/Groups box. Two other special categories are available, Everyone and All authenticated users. Selecting Everyone is effectively the same as not securing the resource. Selecting All authenticated users has the effect of allowing anyone who successfully logged in to access the resource.
Enable WebSphere global securityThe user registry used for authentication is the local operating system. Basically this means that all security authentication is done by requesting that the user supply a user ID and password and then authenticating that against users defined in the local operating system.
Note: The “Security Role Run as Bindings” settings only apply to EJBs.
566 IBM WebSphere Application Server - Express V5.0.2 Developer Handbook

In order to use the J2EE role-based security mechanisms provided by Express Application Server, you first must turn on WebSphere global security for the server. You can do this from the server configuration.
1. Switch to the Server perspective.
2. Open the appropriate server configuration in the Server Configuration view.
3. Switch to the Security tab.
4. Select the Enable Security option.
5. Enter a user ID and password. This can be any valid user on the server operating system. The user ID and password will be used when starting the server. Note that if you leave this blank or fill in a user ID/password combination that is not valid, you will not be able to start the server.
Figure 16-11 Global security
You will need to republish the application and restart the server for all changes to take effect. The next time you attempt to execute the JSP, you will be challenged for a user ID and password. The user ID you enter must be assigned the CatalogAdmin role.
Chapter 16. Security 567

16.4.2 Programmatic securityThe declarative J2EE security provided by WebSphere provides a security infrastructure for application security that is transparent to the application developer. That is, the developer does not need to code for security, since it will all be handled at deployment and runtime.
Having said that, when developing servlets there are a few security calls available if the developer wants greater control of what the end user is allowed to do than is provided by the infrastructure. Programmatic security can be used as an extension of declarative security.
The Servlet 2.3 specification defines three methods that allow programmatic access to the caller’s security information of the HttpServletRequest interface:
� String getRemoteUser()
The getRemoteUser method returns the user name that the client used to log in.
String user = request.getRemoteUser()
� Boolean isUserInRole(String roleName)
The isUserInRole method allows the developer to perform additional checks on the authorization rights of a user, which is not possible (or is more difficult) to perform through the deployment descriptor of the servlet.
if (request.isUserInRole("Manager")) {// the user is in the manager role// ...
}
Tip: If you are using Internet Explorer, once you have authenticated with basic authentication, the Web browser remembers this. There is no logout mechanism. You will not be challenged on subsequent accesses to secure resources. This is OK if you are accessing a resource that requires the same user ID and password, but may cause a problem if you need a second challenge to enter a new user ID/password. The only way to force a new challenge is to close the browser and reopen it.
With form-based authentication, the user has the option to log out of one user ID and log in with another.
568 IBM WebSphere Application Server - Express V5.0.2 Developer Handbook

� java.security.Principal getUserPrincipal()
The getUserPrincipal method allows the developer to get the name of the current caller. To do this, you need to call getName() on the java.security.Principal object returned.
Principal principal=request.getUserPrincipal();String username=principal.getName();
If you opt to program J2EE calls into your application, you need to do the following:
1. Define users and groups to the Express Application Server operating system.
2. Define roles for the application in the Web module deployment descriptor.
3. Define constraints (optional).
4. Assign users or groups to roles in the Web module deployment descriptor.
5. Define the authentication method.
6. Code the servlets to retrieve and check the user role.
7. Enable global security on the Express Application Server.
Note that the first four steps are the same as those needed to implement declarative security. The difference is that you do not need to enable WebSphere global security and you must add code into your application to provide authorization.
Sample usage of security methodsExample 16-2 shows a sample of implementing programmatic security. In the following code the servlet checks to see if the principal attempting to execute the code is in the proper role before allowing the code to be executed.
Example 16-2 Sample code using the servlet security methods
// getting the environment variables for restricted role// and for maximum transferable amountrestrictedRole=(String)environment.lookup("RestrictedRole");maxWebTransferAmount=(Integer)environment.lookup("MaximumWebTransferAmount");// checking if the user is restricted to a certain amount of transferif(request.isUserInRole(restrictedRole) && transferAmount>maxWebTransferAmount.intValue()) {
// create an error message// the user cannot transfer the requested amount// forward the request to the response page with the message
Important: getRemoteUser() and getUserPrincipal() return null as a result, even if the user is logged in, unless the servlet or the JSP itself is secured.
Chapter 16. Security 569

}// get the principal from the requestPrincipal principal=req.getUserPrincipal();// print out the user information about the servlet invocationSystem.out.println("Transfer Servlet was invoked by user: "+req.getRemoteUser()+", principal: "+principal.getName());
16.5 JAAS securityJava Authentication and Authorization Services (JAAS) is an alternative to the built-in security support in WebSphere allowing programmatic authentication and authorization to be used within an application. It is a standard extension to the Java 2 SDK Version 1.3 and it is part of Java 2 SDK Version 1.4. The current version for JAAS is 1.0.
To illustrated this type of security, let us take an example from the Online Catalog sample. As supplied with this publication, the sample uses two different methods of authenticating to the SALESAPP database.
In the first method, the user ID and password required to access the database are coded within the Web module. The JSPs generated by the Database Web Pages wizard use this method. The wizard registers each JSP as a servlet in the Web deployment descriptor and defines three initialization parameters to hold values for accessing the database: The data source name, the user ID, and password.
When the JSP connects to the database, the user ID and password are retrieved from the initialization parameters and used by the jspsql taglib to authenticate to the database. This method is a little awkward in larger applications because every JSP that accesses the database need to have the user name and password initialization parameters defined in the deployment descriptor. The wizard does this for you automatically, but if you ever need to change the values you have to update every servlet. Secondly, the password is stored in the clear.
In the second method, JAAS security is used for authentication. This is shown in Figure 16-12 on page 571. In this case, you do not supply the user ID or password for database authentication in the application. They are stored under an alias in the server configuration, and a pointer to that alias is put in the data source. Whenever the database is accessed, the user ID and password information in the alias is used for authentication. The advantage is that the user ID and password are stored in one place and the password is encrypted.
570 IBM WebSphere Application Server - Express V5.0.2 Developer Handbook

Figure 16-12 Using JAAS authentication entries
16.5.1 Adding JAAS authentication to a serverThe development environment supports the JAAS architecture and extends the access control architecture to support role-based authorization for J2EE resources, including servlet, JSP, and EJB components. JAAS maps an authenticated WebSphere user identity to a set of user authentication data (user ID and password) for a specified back-end Enterprise Information System (EIS).
Note: JAAS authentication can only be added to a WebSphere V5.0 server.
To add JAAS authentication, follow these steps:
1. Expand Servers in the Server Configuration view.
2. Double-click your WebSphere server. The server editor opens.
3. Click the Security tab at the bottom of the editor.
4. Click the Add button beside the JAAS authentication entries list table. The Add JAAS Authentication Entry dialog box opens.
5. In the dialog box, fill in an alias, user ID, password, and description for the authentication entry. For example, you could enter the alias, DB2 user ID, and DB2 password to access a DB2 database. For more information about any of the fields on this dialog box, select the field and then press F1. Click OK.
<%@ page language="java" session="true" contentType="text/html;charset=UTF-8" %>
<%@ taglib uri="/WEB-INF/lib/jspsql.jar" prefix="dab" %><dab:dataSourceSpec id="DBConn" scope="session" dataSource="jdbc/SALESAPP"/>.....<dab:select id="find_user" scope="request" connectionSpec="DBConn">
LoginJSP.jsp
Name: SALESAPPJNDI name: jdbc/SALESAPPComponent-managed authentication alias: salesAlias
JAAS authentication entry:Alias: salesAliasUser ID: db2adminPassword: ********
Data source
Security
Server configuration
Chapter 16. Security 571

Figure 16-13 JAAS security
6. Save your changes and close the editor. A JAAS authentication alias has been added to the server.
16.5.2 Setting up a datasource using JAASSetting up a datasoure using JAAS is done in the same manner as setting up a standard datasource (see 6.2.7, “Database connections” on page 194), but you must select a value for the Container-managed authentication alias.
572 IBM WebSphere Application Server - Express V5.0.2 Developer Handbook

Figure 16-14 Enabling JAAS within a datasource
16.6 Securing the IBM Agent ControllerYou will need to secure the IBM Agent Controller for a production environment. This is achieved by restricting access to the agent to certain hosts or addresses. You can restrict access using the Hosts setting in the serviceConfig.xml file in the <rac_install>/config directory.
The default configuration is as follows:
<Hosts configuration="default"><Allow host="ALL"/>
</Hosts>
Chapter 16. Security 573

This configuration allows access to all hosts. To limit access, list the hosts and network mask that identify the addresses and use the Allow or Deny keywords. For example:
<Hosts> <Deny net="192.168.0.1" mask="255.255.255.255"/> <Allow net="192.168.0.0" mask="255.255.0.0"/> <Allow host="steamboat"/> </Hosts>
This configuration will allow access from all machines in the 192.168.0.0 C-class network except 192.168.0.1. It will also allow access from the host “steamboat”. All other requests are denied.
16.6.1 Implementing SSL for IBM Agent Controller communicationsWhen you install the application server component of WebSphere Application Server - Express, the system is inspected for a copy of the Global Security ToolKit (GSK). If one is not already installed, a copy will be installed with Express. Express installs the GSK at the following locations:
� Windows: C:\Program Files\IBM\GSK5� Linux: /usr/local/ibm/gsk5
By default, SSL is not used between Studio and the agent.
To turn on this function in Linux, do the following:
cd /opt/IBMRAC/binexport JAVA_HOME=/opt/IBM/WebSphere/Express/AppServer/java./RACSecurityOn.bat
To turn on this function in Windows:
1. Execute <rac_install>/bin/RACSecurityOn.bat on the application server. You will need to include the install path for WebSphere Application Server - Express as part of the command:
<rac_install>\bin\RACSecurityOn.bat <express_install>
(If you want to turn security off, use RACSecurityOff.bat.)
2. The script will ask you to enter the directory path of the GSK. Once you enter the path, the RAC configuration file will be updated with a security stanza and RAC will be restarted.
Figure 16-15 on page 575 shows an example of executing the command.
574 IBM WebSphere Application Server - Express V5.0.2 Developer Handbook

Figure 16-15 Turning on RAC security
Once security is turned on and RAC has been restarted, you will receive a logon prompt when you attempt to access the server. RAC authenticates against the operating system security so the user must be a valid user on the server operating system. On Windows, domain name passwords will not be authenticated. You must provide local user name and password pairs. An internal certificate is used so there is no need to obtain one.
The security settings for RAC are found in <rac_install>/config/serviceconfig.xml. When you run RACSecurityOn, a new Security stanza will be added.
Example 16-3 serviceconfig.xml
<Security configuration="default" library="GSK_SSL" clientAuthenticate="FALSE" aclEnabled="TRUE" keyDB="c:\websphere\express\RAC\security\ibmrac.kdb" keyDBPasswordStashFile="c:\websphere\express\RAC\security\ibmrac.sth">
<UserDefinition name="ANY" authenticationType="OS"/></Security>
The user definition elements define a single user with ANY being a wildcard for any user with a user ID on the host system. If you want to restrict access to specific users, you would need to define a <UserDefinition name="ANY" ..../> element for each user (see Example 16-4).
Example 16-4 Restricting access to specific users
<Security configuration="default" library="GSK_SSL" clientAuthenticate="FALSE" aclEnabled="TRUE" keyDB="d:\progra~1\ibm\websphere\express\RAC\security\ibmrac.kdb" keyDBPasswordStashFile="d:\progra~1\ibm\websphere\express\RAC\security\ibmrac.sth">
<UserDefinition name="wasadmin" authenticationType="OS"/><UserDefinition name="mark" authenticationType="OS"/>
</Security>
C:\WebSphere\Express\RAC\bin>racsecurityon c:\websphere\expressTurning RAC Security onGSK installed location: c:\program files\ibm\gsk5
The IBM Agent Controller service was stopped successfully.
The IBM Agent Controller service is starting.The IBM Agent Controller service was started successfully.
RAC security now on, only users of this computer may access RAC
Chapter 16. Security 575

Enabling security when installingDuring the installation of the Agent Controller, you can choose to enable the communications security protocol. By enabling the security, you ensure that communication to the Agent Controller will be encrypted, and that all connections will be forced to authenticate using Secure Sockets Layer (SSL) technology. The SSL security protocol ensures elements such as data encryption, authentication, and authorization.
To enable the communications security protocol during the installation process, follow these steps:
1. From the Agent Controller InstallShield Wizard, click Enable Security (Recommended for Production Systems). Click the Next button.
2. The Secure User Access window opens. Enter the user names that should be granted access to the Agent Controller. Click the Next button when finished.
3. The Host List window opens. Choose the hosts that will be able to access the Agent Controller. Click the Next button when finished.
After you have enabled (or disabled) the security, you can continue with the installation process.
16.6.2 Importing a security certificate into the WorkbenchSecurity certificates are used during the authentication process to provide secure connections when using the Agent Controller. A security certificate is essentially a digital statement that confirms the identity of an entity (such as a person or a company). By using security certificates, you ensure that all connections using the Agent Controller will be forced to authenticate using Secure Sockets Layer (SSL) technology.
To import a security certificate into the Workbench, follow these steps:
1. From the Workbench, open the Preferences window by clicking the Windows menu item, and then by clicking Preferences.
2. From the Preferences window, select Agent Controller from the left pane.
Note: Enabling the security is recommended. If, during the installation process, you choose to disable the security, communication to the Agent Controller will not be encrypted and access control will be limited to the defined host list.
576 IBM WebSphere Application Server - Express V5.0.2 Developer Handbook

Figure 16-16 Agent contoller preferences
3. To add a certificate, click Add and then locate the Security Certificate and specify an Alias name in the Add Certificate window. You may create more than one if required.
Figure 16-17 Add certificate window
4. Click Apply and then OK when you are finished.
Chapter 16. Security 577

16.7 Using SSL with applicationsThree things are required for the use of SSL with applications.
� The application must be coded to use SSL through the use of security taglibs or other programming techniques (not covered in this publication).
� The server must be configured so SSL is supported on the ports the application uses for SSL.
� A certificate must be obtained and stored for use by the server.
Configuring the server ports for SSLThe configuration of SSL for the server is done on the Ports tab of the Configure Server Screen in Studio Site Developer.
To enable SSL:
1. Select the Sever perspective and open the server configuration.
2. Select the Ports tab.
3. Click Add next to the HTTP transport list in the Server Settings section.
Figure 16-18 HTTP Transport configuration
4. Enter the port number and select the Enable SSL check box.
5. Click OK.
This will add a new port to your server. If the Enable SSL check box is checked, then this port will be used in a secure environment. Now the applications that are running on this port will be accessible using SSL only.
Adding a certificate to your application serverIn order to use SSL you will need to get a certificate. These can be obtained from Certification authorities and service providers that provide security certificates.
578 IBM WebSphere Application Server - Express V5.0.2 Developer Handbook

In order to use this certificate you need to add it to your WebSphere Application Server - Express server configuration:
1. Open the server configuration and select the Security tab.
2. Under SSL Configuration Repertoires, click Add.
Figure 16-19 Certificate configuration
3. Enter the certificate information and click OK.
4. Save your server configuration, republish, and restart the server.
Chapter 16. Security 579

16.8 For more informationFor information on WebSphere security, we recommend the following resources:
� IBM WebSphere Version 5.0 Security WebSphere Handbook Series, SG24-6573
� The sample application that comes with JAAS v1.0; you can download the extension from Sun’s Java site:
http://java.sun.com/products/jaas
Note: For additional SSL information, please see IBM WebSphere V5.0 Security WebSphere Handbook Series, SG24-6573
580 IBM WebSphere Application Server - Express V5.0.2 Developer Handbook

Appendix A. Application templates
The Template Application feature provided with Studio Site Developer allows you to use a wizard to step you through the process of customizing a predefined application template. An application template is really the skeleton of an application. It includes the entire application and may be either fully configured or may have certain parts that remain to be specified. This enables users with minimal or no programming skills to quickly build a fully operational application based on simple wizard-guided settings.
At the time of writing, Studio Site Developer V5.1 included four solution templates, two IT templates, and one tutorial template. Aside from these seven templates, the wizard also enables you to download additional templates from:
http://www7b.software.ibm.com/wsdd/zones/studio/rad/
After the Template application wizard has been used, a Web project is added to the workbench that includes all the necessary JSPs, HTML pages, Java Beans, etc. to form a viable end-to-end Web application. All of the resources related to the project can be modified and deleted in the same manner as they would in a new Web project. You can also expand on the foundation of the Web project and added resources were required.
A
© Copyright IBM Corp. 2003 581

WizardThe Template application wizard is comprised of two distinct display areas. The right side of the wizard displays the content area where the wizard prompts you to fill in the parameters required by the selected template. It also gives you the opportunity to enter parameters, labels, and Web page titles that control the functionality and look of the resulting application. The left side of the wizard displays the wizard roadmap. This roadmap presents a list of the tasks you need to perform in order to produce a viable application.
Figure A-1 Template application wizard
The roadmap provides visual cues as to your progress through the wizard. You can use the roadmap icons to see which tasks you have completed and what remains to be done. An arrow indicates your current position in the task sequence. You can return to a previously completed task of the roadmap by
Roadmap
Content area
582 IBM WebSphere Application Server - Express V5.0.2 Developer Handbook

clicking the relevant icon. If you make changes that conflict with other task information you have already entered, the Template Application Wizard will display a message indicating the wizard pages where changes must be made. These pages will be visually marked with an error symbol on the roadmap.
Below is a table describing the task icons that appear in the Template Application Wizard roadmap.
Table A-1 Template application wizard icons
Icon Name Description
Information Enter a project name, description, and author, and select a location for the generated application.
Properties Specify aspects of the generated application, such as the type of generated code, style, and logo.
Features Define features of the generated application, with the help of displayed feature descriptions.
Database Connection Set database information and view the database requirements.
Menus Section title for the menus of the generated application, which appear indented below this icon.
Menu configuration pages View the menu structure presented on the Web pages and change the menu labels.
Appendix A. Application templates 583

Using the Template application wizardFor this tutorial we are going to use the Resource Reservation application template provided in Studio Site Developer. The Resource Reservation template will generate an application that lets users reserve resources such as rooms, equipment, parking, and so forth. Users are prompted to reserve their selection for a specific date and time. Every reserved time slot is equal to one hour.
1. Select File -> New -> Project from the main menu of the workbench. This displays the New Project dialog.
2. From the left page of the dialog select Web and then select Template Application from the right pane.
3. Click Next. The Template Application wizard is invoked.
Web Pages Section title for the Web pages of the generated application, which appear indented below this icon.
Web content pages Set appearance and content for the generated application's Web pages.
Additional Data Map fields that are used for application logic, but are not displayed on any Web page.
Icon Name Description
584 IBM WebSphere Application Server - Express V5.0.2 Developer Handbook

Figure A-2 Template application wizard
The Templates page is comprised of three folders: Solution Templates, IT Templates, and Tutorial. Selecting a template folder displays different template application options. To see a preview of a template application select one of the template options and then click Preview <application template name>.... For example, if we select the Self Service Insurance template option we can click Preview Self Service Insurance... to see a preview of the application within a browser.
Template folders
Template optionsPreview button
Appendix A. Application templates 585

Figure A-3 Template application preview
If you want to see additional template applications click Download.... This requires Internet access. Once you click the button a browser opens and the RAD Technologies is displayed. Scroll to the bottom of the page and click Downloads. Click GA Templates to forward to a page that displays a list of template applications. Once you have located a template you wish to use, download the zip file to your local system. Close the browser. From the wizard click Add... and locate the zip that was just downloaded and click Open. The template application is added to an Imported Templates folder.
586 IBM WebSphere Application Server - Express V5.0.2 Developer Handbook

Figure A-4 Downloading templates
4. Select the Solution Templates folder and then select the Resource Reservation template option.
Note: Some templates have an associated database that you can download and use to map your data sources and fields for the template. Download this database and unzip it under the TemplateLibrary\Sample Data Sources directory. This directory is located in the default template library location specified in your RAD preferences (Window -> Preferences -> RAD -> Template Applications). Make sure that you have run the Template Wizard at least once before unzipping this database to ensure that the template library exists in the location specified in your preferences.
Appendix A. Application templates 587

Figure A-5 Template selection
5. Click Next.
6. On the Application Information page, specify the Project name or keep the default. You can also specify a Description and/or Author for the project. For this tutorial, we keep the default values. Notice the roadmap on the left side of the wizard. An arrow is placed beside your current location in the roadmap.
588 IBM WebSphere Application Server - Express V5.0.2 Developer Handbook

Figure A-6 Application information page
7. On the Application Properties page, you can specify the type of application generated. If the template has defined these features as adjustable, you can also choose a style and a logo that will determine the application's appearance. We keep the defaults for this tutorial.
Note: If you make changes that conflict with other task information you have already entered, the wizard will display a message indicating the wizard pages where changes must be made. These pages will be visually marked with an error symbol of the roadmap.
If there are no conflicts, the pages in the roadmap will be visually marked with a checkmark symbol once they are completed.
Note: At any point during the wizard, click Preview Application... to view the current look of the application. The preview will reflect the wizard customizations that have been specified.
Appendix A. Application templates 589

Figure A-7 Application properties page
8. Click Next.
9. The Application Features page allows you to select the features that affect the structure and flow of the generated application.You can check any feature to see its description at the bottom of the page, and to see how it affects the structure of the application, as reflected in the roadmap at left. Check those features that you want to include in your application. This page will be slightly different for each template. We keep the defaults for this tutorial.
590 IBM WebSphere Application Server - Express V5.0.2 Developer Handbook

Figure A-8 Application features
10.Click Next.
11.The Database Connection page allows you to define the database to which your application is connected. Verify whether the database that is specified is the one you want to use. If you need to change the database connection, click Set Database... and define the connection parameters. To see the structure of the database click Database Requirements.... A window will open that displays a list of the tables and columns for the database. Click OK to close the window. We keep the defaults for this tutorial.
Appendix A. Application templates 591

Figure A-9 Database connection page
12.Click Next.
13.The Menu Configuration page presents the menu (navigation bar) of the application and allows you to edit the labels of the menus presented on the various pages of the generated application. To edit the menu labels select the menu item and click Rename.... Enter in the label name and click OK. We keep the defaults for this tutorial.
592 IBM WebSphere Application Server - Express V5.0.2 Developer Handbook

Figure A-10 Menu configuration page
14.Click Next.
15.The Web Page Content page allows you to edit adjustable data for the Web pages of your application. If adjustable, you can modify the title of the Web pages and the title of the Web pages' views. You can also edit the label, type, and order of the widgets in the Web page, as well as the mapping of the widgets to the tables and columns in your database. The various buttons are enabled only if that function is available for the selected Web page object.
– Use Add to place additional widgets in your application.
– Use Edit to change the settings for the type, label, table or column of each field. When editing the field properties, remember to replace items only with other compatible items.
– Use Remove to remove a custom data element from the Web page (widgets predefined by the template cannot be removed).
Note: Aside from being able to preview the application you can also preview the individual web pages. To do this, click Preview Page... and then select the page that you wish to view. This option is only available in the Menu Configuration page and each of the Web Page Content pages.
Appendix A. Application templates 593

– Up moves the widget up within the Web page, while Down moves the widget down within the Web page.
Figure A-11 Web page content pages
16.Click Next for each of the Web Page Content page as we are keeping the defaults for this tutorial.
17.The Additional Data page allows you to map data fields that are used for the internal logic of the application, and are not displayed in the application's interface for user input or information. Depending on the features and properties you selected in previous tasks, these fields may or may not require configuration. To configure the fields click Edit.... We keep the defaults for this tutorial.
594 IBM WebSphere Application Server - Express V5.0.2 Developer Handbook

Figure A-12 Additional data page
18.Click Finish. This saves your template customizations and then generates the code for the application. A notification window will be displayed indicating to you that the code was generated successfully. The window will ask if you would like to run the application on the server. Click Yes to run the application in a test server or click No to close the wizard. The Web project will be added to the workspace and will be displayed in any navigator view.
Figure A-13 Project has been added to the workspace
Appendix A. Application templates 595

596 IBM WebSphere Application Server - Express V5.0.2 Developer Handbook

Appendix B. Updating Studio Site Developer
This section demonstrates how to search for updates and how to install updates for WebSphere Application Server - Express.
Using the Update ManagerWebSphere Application Server - Express contains an Update Manager. The update manager can be used to discover, download, and install updated features and plug-ins from special Web-based update sites.
The basic underlying mechanism of the update manager is simple:
� The files for a feature or plug-in are always stored in a subdirectory whose name includes a version identifier (for example, 2.0.0).
B
Note: If updating a remote server installation of WebSphere Application Server - Express, please visit:
http://www-3.ibm.com/software/webservers/appserv/express/support/
This site will provide a listing of PTFs available for download. Follow the installation instructions provided with the PTF.
© Copyright IBM Corp. 2003 597

� Different versions of a feature or plug-in are always given different version identifiers, thereby ensuring that the multiple versions of the same feature or plug-in can co-exist on disk.
� This means that installing or updating features and plug-ins requires adding more files, but never requires deleting or overwriting existing files.
� Once the files are installed on the local computer, the new feature and plug-in versions are available to be configured.
� The same installed base of files is therefore capable of supporting many different configurations simultaneously. Installing and upgrading an existing product are reduced to formulating a configuration incrementally newer than the current one.
� Important configurations can be saved and restored to active service in the event of an unsuccessful upgrade.
You can launch the update manager by selecting Help -> Software Updates -> Update Manager from the menu bar. This opens the Install/Update Perspective. Note that you can also open the perspective Install/Update directly.
Figure B-1 Update Manager
598 IBM WebSphere Application Server - Express V5.0.2 Developer Handbook

Install/update perspectiveThe Install/Update perspective allows you to check to see whether there are updates for a product's existing features. Working with this perspective usually requires access to the Internet.
Figure B-2 Install/Update perspective
The Install/Update perspective contains these views:
Install configurationThis view allows you to manage your workspace configuration. The Current Configuration folder shows which local installation locations are part of the workspace configuration, and which features are installed in those locations. The Configuration History folder shows a history of changes made to your workspace configuration. The Saved Configurations folder show any configurations that were preserved.
Appendix B. Updating Studio Site Developer 599

Figure B-3 Install configuration view
Feature updatesThis view allows you to locate and install new features and feature updates.
Selected UpdatesThis view displays a list of all selected updates. Updates are added and removed from this list by checking or unchecking the Install by adding to the Selected Updates check box on the update preview pages.
Figure B-4 Selected updates view
If you right-click an update you can install it by selecting Process from the context menu. If you wish to install all of the updates in the view right-click inside the view and select Process All from the context menu.
600 IBM WebSphere Application Server - Express V5.0.2 Developer Handbook

Feature Search ResultsThis view displays information about the available updates after a feature update search has been completed.
PreviewThis view displays detailed information about the current active selection. Its content changes according to your selection.
External previewThe External Preview view, which is part of the Install/Update perspective, is an embedded browser used to display HTML information. This view is available only on Windows systems. In general, the External Preview is used when links are followed to HTML pages.
Updating featuresThere are two ways to update features using WebSphere Application Server - Express:
� New updates feature
� Feature updates view
New updates featureTo check to see whether there are updates for a product's existing features (requires Internet access):
1. Click Help -> Software Updates -> New Updates. This will contact the Web sites associated with the product's features to discover what versions of those features are available. The potential upgrades are presented in an Available Updates page.
2. Select the feature versions that you wish to upgrade, and click Next.
3. Carefully review the license agreements for the upgraded features. If the terms of all these licenses are acceptable, check "I accept the terms in the license agreements." Do not proceed to download the features if the license terms are not acceptable.
4. Feature versions can be digitally signed by the company that provides them. This allows the user to verify more easily that the features and plug-ins that are about to be downloaded and installed are coming from a trusted supplier. Click Install to allow the downloading and installing to proceed.
5. Once all the features and plug-ins have been downloaded successfully and their files installed into the product on the local computer, a new configuration that incorporates these features and plug-ins will be formulated. Click Yes when asked to exit and restart the Workbench for the changes to take effect.
Appendix B. Updating Studio Site Developer 601

Feature updates viewThe Feature updates view provides three different techniques for updating features. The view contains three standard folders. The Sites to Visit folder contains update sites pre-configured by the product you are using. The Available Updates is a built-in search results folder used for searching update sites. The My Computer folder is a file explorer that can be used to navigate to updates located in the file system.
Figure B-5 Feature updates view
Site to visit folderThis folder contains updates sites preconfigured by the product you are using. By default there are three site bookmarks set:
� IBM WebSphere Application Server - Express Discovery
� IBM WebSphere Application Server - Express Discovery
� IBM WebSphere Application Server - Express Fixes
To check to see whether there are updates for a product's existing features (requires Internet access):
1. Expand a site bookmark to locate feature updates.
2. Click an update to open it in the Preview view
Tip: When an update feature is displayed in the Preview view you can check the Install by adding to the Selected Updates check box to add the update to the Selected Updates view.
602 IBM WebSphere Application Server - Express V5.0.2 Developer Handbook

.
Figure B-6 Site to visit folder
3. Click Install Now to install the update. The Feature Install wizard opens.
4. The Feature Install wizard confirms the details of the feature you are about to install. Click Next.
Appendix B. Updating Studio Site Developer 603

Figure B-7 Feature install wizard - 1
5. Carefully review the license agreements for the upgraded features. If the terms of all these licenses are acceptable, check “I accept the terms in the license agreements”. Do not proceed to download the features if the license terms are not acceptable.
604 IBM WebSphere Application Server - Express V5.0.2 Developer Handbook

Figure B-8 Feature install wizard - 2
6. If a feature selected for install include optional features, a page will show up allowing you to select whether you want them installed or not. Optional features typically carry functionality that is not essential for proper functioning of the main feature.
7. The Install Location page controls where the new feature's files are to be installed on the local computer. Select the directory into which the product is installed and click Next (If the product is installed in a directory to which you do not have write access, you should contact your system administrator and get them to install this feature so that it will be generally available. The other option is to click Add and point to a directory to which you do have write access; however, features installed there are only available when using the current workspace.).
Appendix B. Updating Studio Site Developer 605

Figure B-9 Feature install wizard - 3
8. Feature versions can be digitally signed by the company that provides them. This allows you to verify more easily that the features and plug-ins that are about to be downloaded and installed are coming from a trusted supplier.
9. Click Install to allow the downloading and installing to proceed.
10.Once the new feature and plug-ins have been downloaded successfully and their files installed into the product on the local computer, a new configuration that incorporates these features and plug-ins will be formulated. Click Yes when asked to exit and restart the workbench for the changes to take effect. To add other new features at the same time before restarting, click No and repeat.
You can also add site bookmarks by right-clicking the Site to visit folder and selecting New -> Site Bookmark.... This opens the New Site Bookmark dialog. Specify the Name and URL for the bookmark. You can also specify the type of bookmark as an Eclipse update site or a Web site. Lastly, you can specify which folder to add the bookmark to. If no value is entered the bookmark will be added to the root of the Feature updates view.
606 IBM WebSphere Application Server - Express V5.0.2 Developer Handbook

Figure B-10 Adding a site bookmark
Available updates folderThis feature is very similar to the new updates tool mentioned above. To check to see whether there are updates for a product's existing features (requires Internet access):
1. Click the folder title to open the Available updates search window in the Preview view.
Appendix B. Updating Studio Site Developer 607

Figure B-11 Available updates search page
2. Specify your Query and Scope settings:
Query settings
• Available Updates allows search for available updates to selected features.
• Regular Expression allows search for features using expression matching.
• Plug-ins in Features allows search for features containing specified plug-ins.
Scope settings
• Include My Computer in search will cause the selected local roots to be searched for local update sites containing features
• Search sites in "Sites to Visit" folder will cause the preconfigured sites to be searched
• Search bookmarked sites will cause bookmarked sites to be searched
• Only include features applicable to this environment will only consider features that match the current runtime environment to be included in the results
608 IBM WebSphere Application Server - Express V5.0.2 Developer Handbook

3. Once you have set your query and scope settings click Search Now to search for updates. Any updates that are found will be displayed in the Feature search results view.
4. Click an item from the Feature search results view to open it in the Preview pane and then click Install Now to install the update using the Feature Install wizard. Follow steps 4 to 10 from “Site to visit folder” on page 602 to install the update.
My computer folderThis folder is a file explorer that can be used to navigate to updates located in the file system. This method is used if you previously dowloaded updates from the WebSphere Application Server - Express and/or WebSphere Studio Site Developer support Web sites:
http://www-3.ibm.com/software/webservers/appserv/express/support/http://www-3.ibm.com/software/awdtools/studiositedev/support/
Once you have download the update file(s), you receive a ZIP file. To install this update, you have to extract the ZIP file.
Expand the My Computer tree to the folder where you have unzipped the package and click Install Now in the Preview view to open the Feature Install wizard. Follow steps 4 to 10 from “Site to visit folder” on page 602 to install the update.
Appendix B. Updating Studio Site Developer 609

Figure B-12 My computer folder
610 IBM WebSphere Application Server - Express V5.0.2 Developer Handbook

Appendix C. Online Catalog application
Throughout this publication we use the Online Catalog sample to illustrate the various features of WebSphere Application Server - Express. The application is a simple one that provides a means of publishing an inventory of goods on the Web and allowing customers to place orders via e-mail or by phone. This is by no means a replacement for WebSphere Commerce applications, but simply a way for small businesses to make their products known to potential customers.
The application will provide a simple interface for non-programmers to enter information. Certain items can be identified as feature items. Customers can browse the information and e-mail the company for information.
The application will be generic enough to apply to a variety of businesses. For example:
� A business that sells RVs can publish a current inventory of the campers on its lot.
� A restaurant can publish a takeout menu and provide a call-in number or fax number.
� A cleaning service can provide a list of services and prices.
C
© Copyright IBM Corp. 2003 611

Online Catalog sample application overviewThe Online Catalog application is a simplified shopping-cart application. Navigating through the application with a Web browser, users can view the catalog, search for products, request information, create and manage a wishlist, and submit the wishlist.
From a lower-level perspective, we can outline the list of components that provide the aforementioned functionality:
� A main application menu, which lists the options available to the user
� A registration process where new users enter their details
� A search mechanism, which provides shoppers with a fast means to find items of interest, based on a keyword description
� A shopping cart, which lists the items currently selected by the user, and also provides editing functionality for the user to modify his choices
� An order completion mechanism
Database architecturePersistent data from our sample application is maintained in database tables. In keeping with our intent to keep things simple, the tables were designed with a basic approach in mind, with columns clearly labeled and constraints kept to a minimum. One may notice that, in some places, the use of constraints and triggers might have been justified. However, in cases where implementing these features might have complicated the issue and distracted us from our initial purpose, we took a conscious decision to do away with them.
User information was not stored directly in our application database. Since WebSphere provides functionality to store user profiles in a predesigned SALESAPP database, we decided to make use of this feature to simplify the implementation of an authentication mechanism and storage of user-related data.
Other types of data are stored in the following tables in a custom-designed database: CUSTOMERS, USERS, SHIPPING_ORDER, and ITEM.
Important: The FeaturedItem.xst and db.properties files all contain the database connection parameters. If you are not using the same parameters we specified you must change the values in these files.
612 IBM WebSphere Application Server - Express V5.0.2 Developer Handbook

ITEM tableThe ITEM table contains the inventory items.
Table C-1 ITEM table
CUSTOMER tableThe CUSTOMER table contains information about registered customers.
Table C-2 CuSTOMER table
Column type Length Nullable Key
ITEM_NUMBER character 5 N Y
ITEM_SHORT_DESC varchar 50 Y N
ITEM_LONG_DESC varchar 150 Y N
QUANTITY integer Y N
PRICE decimal 9,2 Y N
SOTD_FLAG character 1 Y N
Column type Length Nullable Key
CUSTOMER_ID character 10 N Y
CUSTOMER_NAME varchar 40 Y N
ADDRESS varchar 40 Y N
CITY varchar 40 Y N
STATE character 2 Y N
EMAIL_ADDRESS varchar 20 Y N
PHONE character 10 Y N
CC_TYPE character 2 Y N
CC_NUMBER varchar 20 Y N
ZIP character 5 Y N
INTEREST1 character 1 Y N
INTEREST2 character 1 Y N
PASSWORD character 10 N N
Appendix C. Online Catalog application 613

SHIPPING_ORDER tableThe SHIPPING_ORDER table contains orders submitted by customers.
Table C-3 SHIPPING_ORDER table
USERS tableThe USERS table contains users with administrative capabilities.
Table C-4 USERS table
Application componentsThe following sections give an overview of the Online Catalog application components.
Application rootThe index.html page is the entry point of the application and it is located in the WebContent folder. This page contains links to the other main components of the site. For additional information about this component please see “Adding HTML pages to the Online Catalog sample” on page 135.
Column type Length Nullable Key
ORDER_NUMBER integer N Y
CUSTOMER_ID character 10 N N
ITEM_NUMBER character 5 N N
QUANTITY smallint Y N
SALE_PRICE decimal 9,2 Y N
ORDER_DATE date Y N
STATUS character 1 Y
Column type Length Nullable Key
USERNAME character 8 N Y
PASSWORD character 8 N N
614 IBM WebSphere Application Server - Express V5.0.2 Developer Handbook

Figure C-1 Web site diagram view of application root
Featured itemThe Featured item component of the application is comprised of a servlet and XST file. The servlet takes information from the XST file and creates HTML output for the user. The output is a table that lists the feature items as indicated by the SOTD_FLAG field of the ITEMS table. The diagram below illustrates the flow of the different components in this process.
Appendix C. Online Catalog application 615

Figure C-2 Flow diagram for XML component of sample
The table below lists the main files involved in this portion of the application.
Table C-5 Featured item items
Item Folder/Package Description
FeaturedItemXMLServlet.java featureditem This servlet is used to create the HTML output of the featured item list. It uses the query and database connection information supplied from the FeaturedItem.xst file.
FeaturedItem.xst featured_item This file contains the query and database connection information used by the FeaturedItemXMLServlet servlet to create the featured item list.
FeaturedItem.xsl featured_item Though this file is not physically used by the FeaturedItemXMLServlet servlet, the content within it was used to create the string within the servlet.
calls
XML and XSL strings
transforms
HTML stringHomepage
creates
Servlet
(output to user)
ITEM tableXST file
requests queries
616 IBM WebSphere Application Server - Express V5.0.2 Developer Handbook

Site administrationAdministrators can update the catalog by going through the Site administration option. This prompts a login. By default the application uses a simple login mechanism that requests the user ID and password, then compares that to entries in the SALESAPP database.
Figure C-3 Web site diagram view of administration component
The table below lists the main files involved in this portion of the application.
Table C-6 Site administration items
Note: For additional information about this component please see “Using XML in the Online Catalog sample” on page 332.
Item Folder/Package Description
login.jsp administration This page is accessed from index.html, and it allows the user to log into the site administration main page by submitting a user ID and password to LoginServlet.java.
LoginJSP.jsp administration This page verifies (from the SALESAPP database) the user ID and password values submitted from login.jsp. If the values are correct the user is forwarded to admin.html. If not, the user is redirected to login.jsp.
Appendix C. Online Catalog application 617

admin.html administration This page has links to ModDelItem.jsp (Modify or Delete Item), AddNewItem.html (Add Item), CustomerMasterView.jsp (View Customers), and OrderMasterView.jsp (View Orders).
AddNewItem.html administration This page is used to add a new item to the SALESAPP database using an HTML form. The user submits item information to AddNewItemProcess.jsp for processing. This page is accessed from admin.html.
AddNewItemProcess.jsp administration This page takes the new item information from AddNewItem.html for processing. The data is first validated. If the data passes the validation it is submitted into the SALESAPP database. If the data does not pass validation, then the user is informed of the error and then sent back to the previous page.
ModDelItem.jsp administration This page displays all the items from the SALESAPP database and gives the user the option to modify or delete the item. If the user clicks Modify for an item then the item information is sent to ModifyItem.jsp to be modified. If the user clicks Delete for an item, the item information is sent to DeleteItem.jsp to be deleted. This page is accessed from admin.html.
Item Folder/Package Description
618 IBM WebSphere Application Server - Express V5.0.2 Developer Handbook

ModifyItem.jsp administration This page gets the item information from ModDelItem.jsp and allows the user to modify the item information. Once the user submits the page the information is sent to DoModifyItem.jsp for processing.
DoModifyItem.jsp administration This page gets the item information from ModifyItem.jsp and updates the item in the SALESAPP database. The user is then forwarded back to ModDelItem.jsp.
DeleteItem.jsp administration This page gets the item information from ModDelItem.jsp and allows the user to delete an item. Once the user submits the page the information is sent to DoDeleteItem.jsp for processing.
DoDeleteItem.jsp administration This page gets the item information from DeleteItem.jsp and deletes the item from the SALESAPP database. The user is then forwarded back to ModDelItem.jsp.
OrderMasterView.jsp administration This page is linked from admin.html. It is one of the site administration functions and it allows the user to view all the orders in the SALESAPP database.
Item Folder/Package Description
Appendix C. Online Catalog application 619

CatalogUsers of the site can display the entire catalog or search for items in the catalog. If the user sees an item of interest, she can display the details of the item and then add it to a wishlist, if desired.
Figure C-4 Web site diagram view of catalog component
The table below lists the main files involved in this portion of the application.
OrderDetailsView.jsp administration This page gives specific details on an order that was selected from OrderMasterView.jsp. As was the case in the master page, the data is retrieved from the SALESAPP database.
CustomerMasterView.jsp administration This page is linked from admin.html. It is one of the site administration functions and it allows the user to view all the customers in the SALESAPP database.
CustomerDetailsView.jsp administration This page gives specific details on a customer that was selected from CustomerMasterView.jsp. As was the case in the master page, the data is retrieved from the SALESAPP database.
Item Folder/Package Description
620 IBM WebSphere Application Server - Express V5.0.2 Developer Handbook

Table C-7 Catalog items
WishlistOnce the user has added items to the wishlist, this list can be sent to the company by adding it to the Orders table in the SALESAPP database. In order to do this, the customer must be a registered user. Being registered means that an entry with customer information has been stored in the Customers table of the SALESAPP database.
Item Folder/Package Description
catalog.html wishlist This page allows the user to view either a full list of the items in the SALESAPP database using ListCatalogMasterView.jsp, or the user can search the contents of the SALESAPP database by using SearchItemMasterView.jsp. This page is linked from the index.html page.
ListCatalogMasterView.jsp wishlist This page lists all the items from the SALESAPP database. The user can select a specific item and view the details in ListCatalogDetailsView.jsp.
ListCatalogDetailsView.jsp wishlist This page displays details on a specific item as per selected in ListCatalogMasterView.jsp. The user can add the viewed item to a wishlist if he wishes.
SearchItemMasterView.jsp wishlist This page lists all the items from the SALESAPP database as per the search criteria submitted from catalog.html. The user can select a specific item and view the details in SearchItemDetailsView.jsp.
SearchItemDetailsView.jsp wishlist This page displays details on a specific item as per selected in the SearchItemMasterView.jsp. The user can add the viewed item to a wishlist if he wishes.
Appendix C. Online Catalog application 621

Figure C-5 Web site diagram view of wishlist component
The table below lists the main files involved in this portion of the application.
Table C-8 Wishlist items
Note: To add items to the wishlist the HTTPSession class was used. For more information please see “HttpSession” on page 623.
Item Folder/Package Description
managewishlist.jsp wishlist This page is accessed from index.html and is used to display the contents of a user’s wishlist. The user can also remove the items from his wishlist if he wishes. It also allows the user to submit there wishlist if he is a current customer of the site, or he can register as a new customer.
AddNewCustomer.html wishlist This page allows users to add a new customer to the SALESAPP database using an HTML form. The user submits customer information to NewCustomer.jsp for validation and processing.
NewCustomer.jsp wishlist This page takes the customer information from AddNewCustomer.html for processing. The data is first validated. If the data passes the validation, it is submitted into the SALESAPP database. If the data does not pass validation then the user is informed of the error and then sent back to the previous page.
622 IBM WebSphere Application Server - Express V5.0.2 Developer Handbook

HttpSessionThe HttpSession class supports built-in session tracking between the client and the server, by user. The Web container provides an implementation of the HTTPSession interface giving the application’s Web components access to the methods of the HTTPSession interface.
The container recognizes a user by assigning him or her a unique session identifier. An object is associated with this identifier and the servlet may store, retrieve, and remove objects from this user session. The objects belong to a particular session and represent the session data for a particular user.
Every time the client makes a request, the servlet gets the session object associated to him or her through the identifier (a new session is created if the user does not have any) and performs operations on it.
The session identifiers are managed by the container which ensures that there is one session for each user. The API provides methods to destroy a session, typically used when a user logs out.
The following shows an example of handling the HttpSession objects; this code can be included in the service method of a servlet.
Example: C-1 Using the HttpSession interface
HttpSession session = request.getSession(true);if (session.isNew()) {
// perform actions for a new user...
// set an attribute in the user session
CurrentCustomer.jsp wishlist This page receives the user and password information from managewishlist.jsp. The page verifies that the user exists and submits the wishlist contents and customer information to the order table. Is also updates the quantity item table in the SALESAPP database and removes all the items from the wishlist. If the user does not exist then the user is informed of the error and is asked to try again or to register as a new customer using AddNewCustomer.html.
Item Folder/Package Description
Appendix C. Online Catalog application 623

session.setAttribute("att1", o);...
}else {
// perform actions for a user identified...
// retrieve an attribute from the sessionObject o = session.getAttribute("att1");
...}
There are two getSession methods in the HttpServletRequest interface which can provide the session to the servlet:
� public HttpSession getSession(): This method returns the session associated with the request and creates one if there is not one already.
� public HttpSession getSession(boolean create): This method does the same thing unless create is set to false. In that case, the method returns null if there is no session associated with the request.
Here are some of the more useful methods of HttpSession:
� public boolean isNew(): This method returns a value that indicates whether the session was just created or not.
� public void setAttribute(String name, Object value): This method is used to add the object specified to the session, it will be retrieved by its name.
� public Object getAttribute(String name): This method is called to retrieve an object by its name.
� public void invalidate(): This method “destroys” a session. All the objects stored in the session are unbound.
� public void removeAttribute(String name): This method is used to remove the name-value pair from the hashtable. In order to manage scarce server resources, it is important to remove state information that is no longer required.
Session objects are stored on the server and provide the standard interface to manage sessions in applications. Session data objects (that is to say, the objects stored in the sessions) must implement the Serializable interface and they are stored on the server (within the HttpSession instances).
624 IBM WebSphere Application Server - Express V5.0.2 Developer Handbook

The Web container recognizes a user with the identifier attached to its requests. This identifier is stored in the user’s browser and is the only piece of data stored in the client-side.
The Java Servlet API supports two ways to associate multiple requests with a session: cookies and URL rewriting. In either case, the implementation details in the servlet are the same. The unique session ID is used to track multiple requests from the same client to the server, and this is what is passed as the URL or cookie parameter. The actual session object that we are tracking is maintained on the server.
Information requestCustomers can request additional information by sending an e-mail to the company.
Figure C-6 Web site diagram view of information request component
The table below lists the main files involved in this portion of the application.
Table C-9 Information request items
Currency conversionThe currency exchange option uses a Web service to convert amounts from one country’s currency to another’s.
Item Folder/Package Description
inforequest.html info_request This page allows users to request information pertaining to a product or products using a HTML form. The user submits the information to mailer.jsp for validation and processing. This page is accessed from index.html.
mailer.jsp info_request This page receives the data passed from inforequest.html and e-mails it if it passes the validation.
Note: For additional information about this component please see “Using a tag library in the Online Catalog sample” on page 301.
Appendix C. Online Catalog application 625

Figure C-7 Web site diagram view of currency conversion components
The table below lists the main files involved in this portion of the application.
Table C-10 Currency conversion items
Item Folder/Package Description
conversion.html currency_conversion This page is accessed from menu.html and is the main page used for the currency exchange Web service. This page is a frameset that is comprised of two frames, Input.jsp and Result.jsp. Input.jsp and Result.jsp are displayed in these frames respectively.
Input.jsp currency_conversion This page allows the user to enter in an amount to be converted, a target, and a source country, and then passes the information to Result.jsp for processing.
626 IBM WebSphere Application Server - Express V5.0.2 Developer Handbook

Template and imagesThe themes folder in the WebContent directory of the project contains all the template and image files that are used throughout the application. For additional information about this component please see “Adding HTML pages to the Online Catalog sample” on page 135.
Result.jsp currency_conversion This page takes the data that is passed from Input.jsp and calls a java proxy bean (CurrencyExchangeProxy.java), which makes a call to the Web service. The page then gets the result back from the bean and displays the converted amount by multiplying the original amount by the rate as retrieved from the bean.
CurrencyExchangeProxy.java proxy.soap This JavaBean gets installed by the Web service and is called from Result.jsp. It uses the source and target country’s parameters from Input.jsp and makes the call to xmethods (Web service provider) Web service. If successful, it gets the conversion rate, which it passes back to Result.jsp.
Note: For additional information about this component please see “Using Web services in the Online Catalog sample” on page 372.
Item Folder/Package Description
Appendix C. Online Catalog application 627

Figure C-8 theme folder
Deployment descriptorNumerous URL mappings have been set in the Web deployment descriptor. Click the entries of the Servlets and JSPs page to see the mappings. If these mappings are not set, you will see warnings in the Tasks view indicating that broken links exist. All of the database driven JSPs also have an initialization parameter set for the data source. The action entry also has initialization parameters set that are required for the Struts login component.
Figure C-9 Servlets and JSPs page of deployment descriptor
628 IBM WebSphere Application Server - Express V5.0.2 Developer Handbook

MiscellaneousThere are two additional files included with the project that are used in the application. One of which are used in numerous locations throughout the application. The help.html file (located in WebContent) contains a legend of button images and descriptions. This file is linked from every list and detail database driven JSPs (for example, CustomerMasterView.jsp, SearchItemDetailsView.jsp, etc.). The second file (aboutus.html) is located in the corporate_information folder and is accessed from index.html. This file contains information about the company.
Servlet loginThe first step in the login process is login.html. This page collects the user name and password from the user and passes control to LoginServlet. LoginServlet captures the user name and password from the login.html form, verifies them using additional database connection wizards, and then forwards the user to the site administration selection page; admin.html.
Figure C-10 Servlet login process - LogWriter.java not shown
The table below lists the main files involved in this portion of the application.
login.html admin.htmlLoginServlet.java
Database connection servlets
USER table of SALESAPP
DBDriver.javaDBConnection.java
Appendix C. Online Catalog application 629

Table C-11 Servlet login items
Item Folder/Package Description
login.html servlet_login Provides the interface to login to the administration page.
LoginServlet.java common This servlet gets the login data from login.html and verifies that the user and password exist in the SALESAPP database. If they are verified, the user is sent to admin.html (in the administration folder). If not, the user is sent to a servlet-generated page that asks the user to try logging in again. This is all done using the database connection established by DBConnection.java.
LogWriter.java common This servlet outputs any errors that occur in the login process. If an invalid user or password is entered in LoginServlet.java, this servlet outputs it in a login file as specified in the util.properties file. This servlet will also output any database connection errors that occur in DBConnection.java or DBDriver.java.
db.properties JavaSource This file contains the database connection information for DBDriver.java.
util.properties JavaSource This file contains the path where log files are created by LogWriter.java.
DBConnection.java common This servlet gets the database connection information from DBDriver.java and creates a connection to the SALESAPP database.
DBDriver.java common This servlet gets the database connection information from the db.properties file.
Note: For additional information about this component please see “Using servlets in the Online Catalog sample” on page 232.
630 IBM WebSphere Application Server - Express V5.0.2 Developer Handbook

Struts loginDepending on the user name and password submitted, the user will see a different administrative maintenance page. The “read access” administrator (admin1) will see options to view customers and orders. The “write access” administrator (admin2) will see the options to view, edit, and delete products.
Struts will be used to first validate the user name and password entries and then, depending on the submitted values, the action will forward the user to the appropriate page. A Struts action will also be used to log the user out of the administrative section of the site.
Figure C-11 Web diagram of Struts login component
The table below lists the main files involved in this portion of the application.
Table C-12 Struts login items
Item Folder/Package Description
login.jsp struts_login Provides the interface to login to the administration page.
admin1.jsp struts_login Displays the options to view a customer or an order.
admin2.sjp struts_login Displays the options to view, edit, and delete products.
LoginForm.java
LoginAction.java LogoutAction.java
Appendix C. Online Catalog application 631

LoginAction.java onlinecatalog.actions An instance of this class is used to authenticate the user. The user ID and password data is retrieved from the LoginForm.java class. Using forwards, this class determines which administration page to forward the user to.
LoginForm.java onlinecatalog.forms An instance of this class is used to validate the user input parameters from the login.jsp page. If the validation is successful the login data is sent to the LoginAction class for authentication.
LogoutAction.jsp onlinecatalog.actions An instance of this class is used to logout the user from the administration page and redirect to the login page.
Note: For additional information about this component please see “Using Struts in a sample” on page 425.
Item Folder/Package Description
632 IBM WebSphere Application Server - Express V5.0.2 Developer Handbook

Appendix D. Additional material
This redbook refers to additional material that can be downloaded from the Internet as described below.
Locating the Web materialThe Web material associated with this redbook is available in softcopy on the Internet from the IBM Redbooks Web server. Point your Web browser to:
ftp://www.redbooks.ibm.com/redbooks/SG246555
Alternatively, you can go to the IBM Redbooks Web site at:
ibm.com/redbooks
Select Additional materials and open the directory that corresponds with the redbook form number, SG24-6555.
D
© Copyright IBM Corp. 2003 633

Using the Web materialThe additional Web material that accompanies this redbook includes the following files. These files are included in the sg246555.zip file.
Table D-1 Application files
How to use the Web material
After you have installed the Studio Site Developer component of WebSphere Application Server - Express, perform the steps described in the following section.
Download the additional materials zip fileTo download the additional materials zip file:
1. Download the zip file from the IBM Redbooks site and store it in a temporary directory. The application can be found by going to the following Web site:
http://www.redbooks.ibm.com/abstracts/sg246555.html
2. Select the Additional Material link.
3. Create a subdirectory (folder) on your workstation and unzip the contents of the sg246555.zip file into this folder.
Filename Description
OnlineCatalog.war Sample application Web module.
.website-config This is the Web site diagram for the application.
Step 1-RunCreateDB.cmd Creates the database used by the sample application.
Step 2-RunSalesapp.cmd Creates and populates the tables used by the sample application.
Important: This sample was created during the redbook project as a way of discovering things about the product. It is provided for your convenience in case you want to browse through the code. It is a “living” sample, which means it may change over time. What you see in the downloaded sample may or may not be exactly the same as you see in the book. We can also almost guarantee that you will find bugs in the code that were not fixed during the project.
634 IBM WebSphere Application Server - Express V5.0.2 Developer Handbook

Import the sampleThe OnlineCatalog application is contained in OnlineCatalog.war. To view or run the sample you need to import it into Studio Site Developer.
To import the sample:
1. Start Studio Site Developer by selecting Start -> Programs -> IBM WebSphere Application Server - Express V5.0.2 -> Studio Site Developer on Windows, or by /opt/IBM/WebSphereStudio/wasexpress on Linux.
2. Take the default workspace location.
3. Open the Web perspective by selecting Window -> Open Perspective -> Web.
4. Select File -> Import.
5. Select WAR file and click Next. This opens the Import dialog.
6. Browse to the OnlineCatalog.war file you downloaded and click Open.
7. Click New... to define the new project name. Enter OnlineCatalog. Check the Configure advanced options box and click Next.
8. Enter OnlineCatalogEAR as the EAR project name. Verify that the J2EE level is 1.3.
9. Click Next.
10.On the Features page, check Add Struts support and JSP Tag Libraries and uncheck Default style sheet (CSS file).
11.Click Finish. This creates the OnlineCatalog Web project and the OnlineCatalogEAR enterprise application project.
12.Click Finish to complete the import process. The OnlineCatalog WAR file will be imported and added to the OnlineCatalogEAR application.
Import the .website-config fileThe .website-config file is used to define the structure and navigation site and is placed in the root of the Web project.
1. While still in the Web perspective, right-click the OnlineCatalog project and select Import... from the context menu. This opens the Import dialog.
2. Select File system and then click Next.
3. Locate the .website-config file and verify that the Into folder field is specified as OnlineCatalog.
4. Click Finish. When prompted to overwrite the file click Yes.
Appendix D. Additional material 635

Update the FeaturedItemXMLServlet servletThe FeaturedItemXMLSevlet.java file has the path to the FeaturedItem.xst file hardcoded. The current path in the servlet is set to the path of our test machine. You must change the path to point to your local machine.
1. In the Web perspective, expand the JavaSource folder and then expand the featureditem package.
2. Double-click FeaturedItemXMLServlet.java to open the servlet in the Java editor.
3. Locate the line in the servlet that sets the xstFile variable and change the /Documents and Settings/bogers/My Documents/IBM/wasexpress51/workspace value to point to the workspace path on your local machine.
4. Save your changes and close the editor.
Set up the databaseThe sample uses a DB2 database called SALESAPP. If you do not have DB2, a development copy is supplied with WebSphere Application Server - Express.
1. Install DB2. During the installation you will be asked to provide a name and password for the administrator. Use db2admin for both the name and password. This user will be created for you on the operating system.
By default, the db2java.zip file does not support the JDBC 2.0 specification. You need to open the sqllib\java12 folder and execute usejdbc2.bat to copy the correct drivers to the zip file.
2. Open a command window and change to the directory where you unzipped the additional materials file.
3. Execute Step 1-RunCreateDB.cmd.
4. Open the DB2 Control Center. Right click the SALESAPP database and select Authorities.
5. Click Add User.
6. Select the DB2ADMIN user and click OK.
7. Select (highlight) DB2ADMIN in the list of users and click Grant All.
8. Close the Control Center.
Note: If you use a user ID and password other than db2admin, you may run into problems. These are assumed several places in the application. If you use something else, be sure to change the dbconn.jspinc, FeaturedItem.xst, and db.properties files in the application.
636 IBM WebSphere Application Server - Express V5.0.2 Developer Handbook

9. Execute Step 2 -RunSalesapp.cmd.
Create the test server environmentTo create the test server environment:
1. In the Web perspective, open the Servers view.
2. Right-click in the view and select New -> Server and Server Configuration.
3. Enter a Server name (LocalTestServer, for example) and select the Express Test Environment option under WebSphere version 5.0.
4. Click Finish.
Configure a data sourceThe JSPs used within the Online Catalog sample use a data source for all database connections. To setup a data source in Studio Site Developer:
1. Open the Server perspective.
2. From the Server Configuration view, right-click the WebSphere Express V5.0 Test Environment server and select Open from the context menu. This opens the server configuration editor.
3. Click the Data source tab. The Data sources page is displayed.
4. Click Add... beside the JDBC provider list table. The Create a JDBC Provider dialog opens.
5. Select IBM DB2 from the Database type select box and then select DB2 JDBC Provider from the JDBC provider type select box.
6. Click Next.
7. Enter the value DB2 Driver in the Name field.
8. Click Finish. The JDBC provider is added to the list box.
9. Select the DB2 Driver entry from the JDBC provider list and then click Add... beside the Data source defined in the JDBC provider selected above table. The Create a Data Source dialog opens.
10.Verify the DB2 Legacy CLI-based Type 2 JDBC Driver is selected as the JDBC provider type and verify that the Version 5.0 data source radio button is selected.
11.Click Next.
12.Enter SALESAPP in the Name field.
13.Enter jdbc/salesapp in the JNDI name field.
14.Click Next.
Appendix D. Additional material 637

15.On the Create a Resource Properties page select the databaseName resource property and enter the value salesapp.
16.Click Finish. The data source has now been added.
17.Save the server configuration. Leave the configuration editor open as it is required for the next step.
Enable JAAS authenticationTo enable JAAS authentication:
1. With the server configuration editor still open click the Security tab. The Security Options page is displayed.
2. Click Add... beside the JAAS Authentication Entries table. The Add JAAS Authentication Entry dialog is displayed.
3. For the Alias, User ID, and Password fields enter the values SALESAPPJAAS, db2admin, and db2admin, respectively.
4. Click OK. The JAAS entry is added.
5. Click the Data source tab to display the Data sources page.
6. Select the SALESAPP entry from the Data source defined in the JDBC provider selected above table and click Edit.... The Modify Data Source dialog opens.
7. From the Container-managed authentication alias drop-down box, select SALESAPPJAAS.
8. Click Finish. JAAS authentication has now been added to the SALESAPP data source.
9. Save the server configuration.
10.Close the server configuration editor.
PUBLISH the sampleTo publish the sample:
1. Select the server (LocalTestServer) in the Servers view, right-click, and select Add and remove projects.
2. Select OnlineCatalogEAR from the Available Projects list and click Add.
3. Click Finish.
4. Select the server in the Server view, right-click, and select Control -> Publish.
638 IBM WebSphere Application Server - Express V5.0.2 Developer Handbook

Start the serverTo start the server, select the server in the Server view, right-click, and select Start.
Run the applicationTo run the application:
1. Switch the top left view back to the Project Navigator view.
2. Find the OnlineCatalog Web project, right-click, and select Run on Server.
3. If you select the Site Administration link, use admin as both the user ID and password.
Appendix D. Additional material 639

640 IBM WebSphere Application Server - Express V5.0.2 Developer Handbook

Related publications
The publications listed in this section are considered particularly suitable for a more detailed discussion of the topics covered in this redbook.
IBM RedbooksFor information on ordering these publications, see “How to get IBM Redbooks” on page 645.
� WebSphere Application Server - Express: A Development Example for New Developers, SG24-6301
� WebSphere Application Server - Express V5.0.1 Administrator Handbook, SG24-6976
� Migrating Applications from IBM WebSphere Application Server Standard Edition to WebSphere Application Server - Express Version 5, REDP3618
� Migrating to WebSphere Version 5.0: An End-to-End Migration Guide, SG24-6910
� IBM WebSphere Application Server V5.0 System Management and Configuration, SG24-6195
� IBM Framework for e-Business: Technology, Solution, and Design Overview SG24-6248
� IBM WebSphere Version 5.0 Security WebSphere Handbook Series, SG24-6573
� Servlet and JSP Programming with IBM WebSphere Studio and VisualAge for Java, SG24-5755
� The XML Files: Development of XML/XSL Applications Using WebSphere Studio Version 5, SG24-6586
� WebSphere Version 5 Web Services Handbook, SG24-6891
� WebSphere Studio Application Developer Version 5 Programming Guide, SG24-6957
© Copyright IBM Corp. 2003 641

Other resourcesThese publications are also relevant as further information sources:
� Information roadmap for WebSphere Application Server - Express
http://www7b.boulder.ibm.com/wsdd/zones/was/roadmaps/express/
� Apache Struts and VisualAge for Java, Part 1: Building Web-based Applications using Apache Struts, found in the VisualAge for Java zone of IBM WebSphere Developer Domain at (search on Struts)
http://www7b.software.ibm.com/wsdd/
� Apache Struts and VisualAge for Java, Part 2: Using Struts in VisualAge for Java 3.5.2 and 3.5.3 found in the VisualAge for Java zone of IBM WebSphere Developer Domain (search on Struts)
http://www7b.software.ibm.com/wsdd/
� Core Servlets and JavaServer Pages, ISBN 0-13-089340-4
� Go-ForIt Chronicles, Part 19: Struttin' your stuff with WebSphere Studio tutorial from IBM DeveloperWorks
http://www.ibm.com/developerworks/
� J2EE Class Loading Demystified at:
http://www7b.boulder.ibm.com/wsdd/library/techarticles/0112_deboer/deboer.html
� SAMS Teach Yourself Java2 in 21 Days, 2nd Edition, ISBN 0-672-31958-6
� Understanding JavaServer Pages Model 2 Architecture
http://www.javaworld.com/javaworld/jw-12-1999/jw-12-ssj-jspmvc.html
� Web service invocation sans SOAP
http://www-106.ibm.com/developerworks/webservices/library/ws-wsif.html
Referenced Web sitesThese Web sites are also relevant as further information sources:
� akarta tag library information
http://jakarta.apache.org/taglibs/index.html
� Apache Jakarta Project
http://jakarta.apache.org
� Apache Jakarta Project Struts home page
http://jakarta.apache.org/struts
642 IBM WebSphere Application Server - Express V5.0.2 Developer Handbook642 IBM WebSphere Application Server - Express V5.0.2 Developer Handbook

� Apache Jakarta Project taglib home page
http://jakarta.apache.org/taglibs
� Coldbeans Software Web site for Net presentations
http://coldjava.hypermart.net
� CVS home page
http://www.cvshome.org
� CVS NT Server download
http://www.cvsnt.com
� IBM DB2 XML Extender library
http://www.ibm.com/software/data/db2/extenders/xmlext/library.html
� IBM DeveloperWorks
http://www.ibm.com/developerworks/
� IBM developerWorks BSF project
http://oss.software.ibm.com/developerworks/projects/bsf
� IBM Patterns for e-business
http://www.ibm.com/developerworks/patterns
� IBM Web Services and UDDI home page
http://www.ibm.com/services/uddi
� IBM Web Services home page
http://www-3.ibm.com/software/solutions/webservices/
� IBM Web Services ToolKit
http://www.ibm.com/software/solutions/webservices/wstk-info.html
� IBM WebSphere Application Server - Express home page
http://www-3.ibm.com/software/webservers/appserv/express/
� IBM WebSphere Application Server - Express support page
http://www.ibm.com/software/webservers/appserv/express/support.html
� IBM WebSphere Developer Domain
http://www7b.software.ibm.com/wsdd/
� J2EE 1.3 specification
http://java.sun.com/j2ee/1.3/docs/
� J2EE Class Loading Demystified
http://www7b.boulder.ibm.com/wsdd/library/techarticles/0112_deboer/deboer.html
Related publications 643

� Java Authentication and Authorization Service (JAAS) at Sun’s Java site
http://java.sun.com/products/jaas
� Java Servlet 2.3 specification
http://java.sun.com/products/servlet/
� <jsptags.com>
http://jsptags.com
� MagicDraw home page
http://www.magicdraw.com
� Mailer taglib documentation
http://jakarta.apache.org/taglibs/doc/mailer-doc/mailer-1.0/index.html
� Object Management Group (OMG) home page
http://www.omg.org
� Rational home page
http://www.rational.com
� Tigris.org Open Source Software Engineering ArgoUML project
http://argouml.tigris.org
� UDDI.org home page
http://www.uddi.org
� Understanding JavaServer Pages Model 2 architecture
http://www.javaworld.com/javaworld/jw-12-1999/jw-12-ssj-jspmvc.html
� WSDL 1.1 specification
http://www.w3.org/TR/wsdl
� WSIF information
http://www-106.ibm.com/developerworks/webservices/library/ws-wsif.html
� XMethods home page
http://www.xmethods.net
� XML Schema home page at the W3C Architecture Domain
http://www.w3.org/XML/Schema
� XML schema layout
http://www.uddi.org/schema/uddi_v1.xsd
644 IBM WebSphere Application Server - Express V5.0.2 Developer Handbook644 IBM WebSphere Application Server - Express V5.0.2 Developer Handbook
How to get IBM RedbooksYou can order hardcopy Redbooks, as well as view, download, or search for Redbooks at the following Web site:
ibm.com/redbooks
You can also download additional materials (code samples or diskette/CD-ROM images) from that site.
IBM Redbooks collectionsRedbooks are also available on CD-ROMs. Click the CD-ROMs button on the Redbooks Web site for information about all the CD-ROMs offered, as well as updates and formats.
Related publications 645

646 IBM WebSphere Application Server - Express V5.0.2 Developer Handbook646 IBM WebSphere Application Server - Express V5.0.2 Developer Handbook

Index
Symbols 283–284
Numerics404 error 494–495500 error 495–496, 500
Aaccess locators 366action 406action class 388, 406, 444, 447, 452action form 452action mapping 389, 400–401, 404, 406, 408–409, 430action mappings 423action object 385action servlet 387–388ActionErrors 453ActionForm 386ActionForm class 388–389, 412–413ActionForm subclass 415ActionForward 453ActionServlet 452–453Add External JARS 197animated GIF 128AnimatedGif Designer 129–130animation 128, 132–133Apache
Software Foundation 384applet 60application 33
design 18object variable 246running 483scope 247
application client module 58, 65application.xml 58ApplicationResources.properties 420, 432, 435, 444attributes
animated GIF 129autoFlush 249
© Copyright IBM Corp. 2003
buffer 249contentType 249DTD 313, 323errorPage 249extends 248history 46image 119import 249info 249isErrorPage 249isThreadSafe 249JSP page directive 248language 248link 118quality of service 361schema 316servlet 219session 298table 117tag library 283, 294, 297–298, 302tModel 364view 80XML 310
authentication 552–553, 555–556, 558, 563–564, 569–570authorization 552, 556autoFlush attribute 249
Bbasic authentication 553bean 60Bean Scripting Framework (BSF) 32BeanInfo class 280binding
template 363branch 518, 524–526, 529–530, 532–533, 535–541, 544–545
comparing resources 545creating 537merging 541
breakpoint 504–505, 507, 510condition 506properties 505
647

broker 357BSF 32buffer attribute 249business
entity 363service 363
button 119, 124
Ccanvas 123–125, 128CDATA section 311class
HttpServletRequest 64, 218, 624HttpServletResponse 218HttpSession 623–624RequestDispatcher 256Servlet 243ServletConfig 219ServletContext 64, 219ServletRequest 218ServletResponse 218TagSupport 281
classes directory 61, 74classloader 217, 485–486ClassNotFoundException 486classpath 481, 483, 485–487clip art 124Cloudscape 197, 200CMP 207color 83, 187–188
WebArt Designer 126comment
XML 311commit 517, 524–527, 531–533, 536–538, 541, 544, 549compare
three-way 545two-way 545
complex data type 316component-managed authentication alias 207Concurrent Versions System (see CVS)condition
breakpoint 506config 33
object variable 246constraint 558, 560, 564, 569content assist 259, 329contentType attribute 249
context menu 401, 403context path 64context root 69controller 220–221, 278
MVC 31cookies 485CSS 120, 186–187CSS Designer 120CVS
team development 515CVS Ignore 549
DDAD 369DADX 369
group 369Data perspective
DB output view 157data source 154–156, 184–185, 194, 197–198, 200–201, 203–204, 470, 482, 485
componentmanaged authentication alias 207version 4 vs. version 5 205version 5 204
databasebuilding SQL expressions 182connecting Studio to 159create DB2 158create Oracle 158creating columns 164creating tables 164, 166creating Web pages to access 174defining SQL conditions 181design 37import design into Studio 162key column 168reconnect 163schema 163–164, 166, 169
databases directory 163, 166DataDirect Connect JDBC driver 162datatypes 39DB2 158, 169, 204, 477, 485DB2 App Driver 161DB2 XML Extender 320, 643DB2_JDBC_DRIVER_PATH 209, 485db2java.zip 203, 636dba 158DDL 155, 169–170
executing 171
648 IBM WebSphere Application Server - Express V5.0.2 Developer Handbook

debugger 507, 509declarations 252declarative security 557deployment descriptor 65, 211, 286, 292, 555, 558–559, 565
application.xml 58created by wizard 65enterprise application 58, 72format 59servlet entry 269servlet initialization parameters 195Web application 61Web module 61–62web.xml 61welcome pages 135
document type definition (see DTD)driver class 483driver manager 154, 194, 196–197DTD 283, 313, 315, 320–323, 325, 327, 329DynaActionForm 399, 413dynaform 399, 413
EEAR file 58editor 49
file associations 49editor marker bar 498, 505EJB module 58
not supported in Express 58element
XML 310e-mail 302Enable Hit Count 506encoding 362enterprise application 57–58, 220, 468, 481, 558enterprise application module 57enterprise application project 57
creating 65Enterprise Information System (EIS) 20entity
reference 311envelope 361error page 186, 555errorPage attribute 249EVAL_PAGE 282exception 33
object variable 246expressions 252–253
extends attribute 248eXtensible Markup Language (see also XML) 35, 309
Ffacade 30fast view 50–52, 54file transfer 478, 480–481filter
limiting database schemas and tables 161form 119form bean 385–386, 399–401, 404, 408–409, 412–415, 423form bean mapping 412–413form bean scope 408form-based authentication 553–554, 568formBean class 424forward tag 256frame 129
animated GIFs 129, 133attribute 129comment 129image 129
frameset 115, 118framesets 112, 114free-form surface 399front controller 176–177, 186–187FTP 479, 485
GGET 563get method 412global classpath 486global security 558, 566grant 158GSK 574
HHEAD 537help 55–56
infopops 55online 54synchronize navigation 56
history 515, 517, 525local 530, 544–545resource 527, 540, 542
hit count 506
Index 649

host variable 184, 187HTML 60
creating pages 135HTTP 1.0 218HTTP request 216HttpServletRequest 254, 568HTTPSession 623HttpSession 298, 623–624
IIBM Agent Controller 476–477, 491, 573image 60, 122, 127
adding 118adding to animated GIF 131building with WebArt Designer 124map 118
implicit object variables 254import attribute 249include directive 250include tag 255index 38info attribute 249input field 119installableApps 490interface 362isErrorPage attribute 249isThreadSafe attribute 249
Jj_password 555j_security_check 554–555j_username 555J2EE Publishing server 465JAAS 207, 470, 482, 570JAR 60Java build path 486Java Native Directory Interface (see JNDI)Java package 176Java scriptlets 34Java Source directory 73, 233java.lang.* 249JavaScript 32, 242javax.servlet.* 249javax.servlet.http.* 249javax.servlet.jsp.* 249JDBC 2.0 Standard Extension API 154JDBC driver 483JDBC driver class 161, 196–197
JDBC overview 154JDBC provider 156, 196, 200–202JNDI 62, 155, 196, 206, 278–279, 485JNDI name 185, 207JSP
actions 246directives 246, 248elements 246expressions 253forward 254getProperty 254include 254include directive 251overview 242page directive 250param 254plugin 254request phase 243–244root 245scripting elements 246, 252setProperty 254syntax 244tags 250translation phase 243, 250useBean 254XML syntax 252
JVM 486JVM arguments 485
Kkey
foreign 169primary 168
Llanguage attribute 248lib directory 61, 74Libraries directory 74link
adding 117image 118text 117
local history 45–46comparing with 45
log file 219logos 124
650 IBM WebSphere Application Server - Express V5.0.2 Developer Handbook

Mmerge 517, 532–533, 536–537, 541–542, 548
branches 541from a stream 541
messageJ2CA0122I 211SOAP 361
META-INF 286, 559META-INF directory 74methods
destroy() 218doEndTag 282endTag() 281forward() 256getAttribute() 247getRemoteUser() 568–569getServletConfig 219getServletContext() 219getSession 624getUserPrincipal() 569include() 256init() 217invalidate 624isNew 624isUserInRole() 568jspService() 253removeAttribute 624service 623service() 217–218setAttribute 624setAttribute() 247
Microsoft SQL Server 158, 162MIME 462model 30Model 1 architecture 26, 220Model 2 architecture 26–27, 220Model-View-Controller (see MVC)MQSeries 361MVC 27, 36, 278, 384–385
controller 31model 30pattern 32view 31
Nnamespace 314–315, 318
XML 314native path 202
navigation bar 96, 104–105navigation candidate 151, 452navigation root 151navigation trail 106normalization 37
Oobject scope 247object stack area 125operating system support 4Oracle 158, 160–161
connecting Studio to 161create a user 158defining a data source 211defining JDBC provider 211
out 33object variable 246
Ppage 33
object variable 246scope 247
Page Designer 498page directive 248, 256page-centric 26PageContext 298
object variable 246pageContext
JavaScript 33param tag 255pattern
MVC 28Patterns for e-business 21perspective 50
customize 52CVS Repository 49CVS Repository Exploring 519, 525–527, 538Data 49, 159data 156Debug 500–501definition 47J2EE 50performance 50preferences 53Resource 549Server 47, 49, 455, 459–460, 466, 480, 487, 567Web 47, 49, 66, 78–79, 175, 200, 233, 266,
Index 651

460, 466, 522, 527, 529, 540–541XML 49, 320
photo frames 124plug-in 423port 467, 476, 481, 483, 485POST 555, 563preferences
file associations 50HTML files 149Server perspective 460validation 92
principal 552, 569processing instructions 311profiling mode 489programmatic security 557, 561, 568Project Navigator 66provider 357proxy 374, 379–380publish 460–461, 470–471, 475, 478, 481, 483, 487
QQuick Fix 499
Rreadme file 11realm 552, 555, 558, 565Redbooks Web site 645
Contact us xviiredirection 563remote procedure call (see RPC)repository 516–531, 533, 535–537, 539, 542–545, 549request 33, 186
object variable 246scope 247
requestor 357resource 420resource bundle 420resource reference 198, 211response 33
object variable 246revision tag 524, 527Rhino ECMAScript 32role 552, 556, 558, 560, 564, 566–567
security 59, 556root element 311RPC 356, 361–362
rtexprvalue 285
SSAX2 320schema 163–164, 166, 169schemaLocation 318scope
application 247page 247request 247session 247
scripting elements 252scriptlet 252–253, 276–277, 299sequence 317server
defining 462starting 471, 482, 487state 469stopping 488
server configuration 459, 461–462, 469, 484–486, 488server-side Java 215server-side logic 34service
broker 358provider 358registry 358requestor 359
servlet 195, 215, 243–244, 246, 557–558, 563, 568–569
configuration 219context 219initialization parameters 197, 269life cycle 216overview 216
servlet container 59, 217–219servlet context 62servlet path 64ServletContext 297servlets
initialization parameter 206session 33, 186
object variable 246scope 247
session attributeattributes
session 249session management 462, 485
652 IBM WebSphere Application Server - Express V5.0.2 Developer Handbook

set method 412SGML 310shapes 124simple counter servlet 216simple type 316Simple WebSphere Authentication Method (see SWAM)SingleThreadModel 218site map 96, 106–107, 151site map candidate 151site part 107Site Parts drawer 96, 105–106SKIP_PAGE 282smart publish 461SOA 377SOAP 314, 320, 356, 359, 362
encoding 362envelope 361introduction 360message 361over HTTP 361RPC 361
sound 60SQL
testing 184using saved statements 177
SQL Query Builder 211–212, 333SQL Server 158
connecting Studio to 162create a database 159
SQL to XML 333SQLPLUS 158SSL 564, 578Static Web publishing server 465step-by-step mode 507Struts 36–37, 384, 642
Action 399Action mapping 399Configuration file 452configuration file editor 422Deployment descriptor 453exception 417exceptions 399, 417, 423forwards 400, 409, 423Module 399, 419node 399preferences 393validation 424
struts-config.xml 422, 452
style sheet 120, 186, 320style sheets 120superclass 407SWAM 4synchronize 517, 519, 527, 530, 535, 542, 546synchronize navigation with help 56
Ttable 116
add 117attributes 117creating 117resize 117resizing 117
tablespacecreate Oracle 158
tag element 284–285tag handler 279, 283tag handler class 280–281, 283tag library 34, 267, 269
see also taglib 275beans 386definition (see also TLD) 279HTML 386Jakarta project 276JSPSQL 192, 195, 269logic 386template 386utility taglibs 276
TagExtraInfo 280taglib
Application 297DateTime 297, 299–301directive 285, 287FileIO 300–301Fileserv 300–301Filter 300–301I18N 299I18n 297, 300–301importing 291JSP Standard tag library 299–300JSPSQL 297Jspsql 298Mailer 297, 299–300, 302, 644Page 297–298, 300–301Request 297–298, 300–301Response 297–298, 300–301Scrape 300–301
Index 653

Session 297–298, 300–301Sslext 300String 297, 299–300tag libraries for accessing JSP objects 297tag libraries for database access 297tag libraries for internationalization 297Utility 297, 299–300utility tag libraries 297
tags 544tasks
adding to Tasks view 84TCP/IP monitoring server 465TEI 283template 71, 74
application 75page 96, 105–106, 135page templates 94, 109–110
template gallery 123text
bold 116working with 116
themedirectory 74
thin client 19thread 503, 506, 510tier 19–20TLD 279–280, 283–286, 294tModel 364, 366tools drawer 403trace 486transport guarantee 564
UUDDI 356–357, 360
API 365organization 366overview 363registry structure 363
universal test client 485Universal Unique Identifier
see UUID 365update 517, 519, 530, 532, 536, 542URI 65, 250, 284
taglib 285–286, 293URL pattern 562URL rewriting 485use case 39usejdbc2.bat 203, 636
utility classes 60
Vvalidation
DTDs 330XML 314, 320, 327XML schema 329
validators 92variable 209–210, 485, 503, 512version 515, 517–519, 521, 524–528, 532–534, 537–539, 541–542, 544–546, 549version control 525, 527version from stream 526versioning 518video 60view
adding 53Attributes 80, 116–118Breakpoint 501–502Breakpoints 506, 511Colors 83Console 459, 471, 475, 483, 487, 501CVS Repositories 520, 526–527, 529, 537–539, 542, 545CVS Resource History 544Data Definition 157Data Mapping 424Data Mappings 424DB Servers 157, 159Debug 501, 503Design 81, 116, 321, 327–328fast 50–52floating 53Gallery 81icons 53Incoming/Outgoing 533J2EE Navigator 175Java Hierarchy 50Links 82MVC 31Outgoing 523, 525Outgoing Mode 524Outline 81, 157, 261, 321, 501Palette 104, 403Project Navigator 79–80, 122, 135, 233, 266, 522, 524, 526–527, 530, 536, 538, 549Properties 51Repositories 519
654 IBM WebSphere Application Server - Express V5.0.2 Developer Handbook

Server 471, 481–482Server Configuration 200, 459, 481, 567Server Configurations 462Servers 459–460, 469–470, 487–489, 501Source 48, 116, 326, 328, 501Struts Explorer 408, 418–419, 423Synchronize 523–525, 530, 533, 535–536Tasks 84, 525Variables 501, 504, 512Web Structure 389
Wwallpaper 124–125WAR files 64WAS_HOME_V5 491Web
services 359Web application 59
see also Web module 57Web applications
see also Web project 57Web container 4, 251, 456Web Content directory 74Web diagram 403, 420Web diagram editor 393, 398–399, 401, 404–405Web module 58, 65, 72, 488, 559, 566
see also Web application 57see also Web project 57creating 66
Web project 72, 524see also Web application 57see also Web module 57creating 66directory structure 72
Web service client 369Web services 485
binding 377overview 356
Web Services Invocation Framework (see WSIF)Web site designer
Context menu 97Page icons
Border 103Code 103Navigation candidate 103Navigation label 103Navigation root 103Site map candidate 103
web.xml 61, 270, 280, 284, 286, 292, 555, 559–560WEB_INF 163WebArt Designer 122, 124, 128
grouping objects 127WebArt file 127WEB-INF 60–61, 74, 163, 166, 292–293, 299, 485–486WebSphere test environment 455–456, 462, 465, 475welcome page 62, 135well-formed XML document 313wizard
Create XML File 322, 327Database Web Pages 174–175, 178, 206–207, 563, 570New Database Connection 160New File 331
workbench 48workload management 458workspace 44
changing 45resetting startup option 44running multiple Studios 45
ws.ext.dirs 486WSDL 356–357, 359, 362, 375, 377
document 362implementation 362interface 362
WSIF 363
XXML 279, 283
attribute 311comment 311document 310element 310markup 310namespace 314processor 311sample applications 331tag 311validation 314
XML editor 326XML file 485XML schema 155, 314–315, 321–322, 327, 329, 369XML schema (see also XSD) 315XML Schema Editor 328
Index 655

XML schema editorgraph view 328
xmlns 314–315XPath 319XSD 315, 317–318, 321, 323, 329, 362XSL 318, 320
transformation 318XSLT 318XSLT script 320
656 IBM WebSphere Application Server - Express V5.0.2 Developer Handbook

IBM W
ebSphere ApplicationServer - Express V5.0.2 Developer Handbook


®
SG24-6555-01 ISBN 0738425184
INTERNATIONAL TECHNICALSUPPORTORGANIZATION
BUILDING TECHNICALINFORMATION BASED ONPRACTICAL EXPERIENCE
IBM Redbooks are developed by the IBM International Technical Support Organization. Experts from IBM, Customers and Partners from around the world create timely technical information based on realistic scenarios. Specific recommendations are provided to help you implement IT solutions more effectively in your environment.
For more information:ibm.com/redbooks
IBM WebSphere ApplicationServer - Express V5.0.2Developer Handbook
Use WebSphere Application Server - Express to develop applications
Test and deploy applications
Learn by example
This IBM Redbook introduces IBM WebSphere Application Server - Express V5, an IBM offering that provides a comprehensive development tool and a single-server application server environment designed for small and medium business customers who want to have a Web presence for their business.
This publication shows how to use WebSphere Application Server - Express to build, test, and deploy Web applications. It will help you install the product, build a simple Web application, and deploy that application to the server.
This publication is applicable to the Linux and Windows platforms.
Back cover