websphere lab jam application infrastructure websphere ......websphere lab jam application...
TRANSCRIPT

WebSphere Lab Jam
Application Infrastructure
WebSphere Application Server V8 Developers
Lab Exercise

WebSphere
Lab Number
© Copyright IBM Corporation, 2011
US Government Users Restricted Rights - Use, duplication or disclosure restricted by GSA ADP Schedule Contract with IBM Corp.

IBM Software
Contents Page 3
Contents
LAB 1 DEVELOPING A MOBILE WEB APP WITH RATIONAL APPLICATION DEVELOPER AND THE WEB 2.0 & MOBILE FEATURE PACK FOR WEBSPHERE. ...................................................................................... 7 1.1 START THE MYSURANCE PROJECT ............................................................................................................. 9 1.2 CREATE THE WEB PAGE .......................................................................................................................... 10 1.3 CREATE THE HOME VIEW......................................................................................................................... 16 1.4 CREATE THE MY PROFILE VIEW ............................................................................................................... 22 1.5 TEST WITH THE MOBILE BROWSER SIMULATOR ......................................................................................... 25 1.6 ADD A FORM TO THE MY PROFILE VIEW .................................................................................................... 29 1.7 ADD THE PROFILE PAGE CONTROLLER CLASS........................................................................................... 33 1.8 TEST WITH THE MOBILE BROWSER SIMULATOR. ........................................................................................ 36 1.9 CREATE THE ACCIDENT TOOLBOX VIEWS .................................................................................................. 37 1.10 ADDING THE GOOGLE MAP WIDGET TO THE POLICE VIEW ........................................................................... 39 1.11 ADDING THAT FINAL USABILITY TOUCH ...................................................................................................... 42 1.12 TESTING THE FINAL MYSURANCE APP ....................................................................................................... 46 1.13 SUMMARY ............................................................................................................................................. 48
LAB 2 INTRODUCTION TO JAX-RS........................................................................................................................... 49 2.1 PART 1 WHAT THIS EXERCISE IS ABOUT .................................................................................................... 49 2.2 PART 2 WHAT YOU SHOULD BE ABLE TO DO .............................................................................................. 49 2.3 PART 3 INTRODUCTION ........................................................................................................................... 49 2.4 PART 4 WORKSPACE SETUP ................................................................................................................... 50 2.5 PART 5 RUN BACK-END SERVERS ............................................................................................................ 51 2.6 PART 6 CREATING REST BASED SERVICES ............................................................................................. 54 2.7 PART 7 CLEAN UP THE SERVER FOR NEXT EXERCISE ............................................................................... 76
LAB 3 INTRODUCTION TO OSGI ............................................................................................................................... 78 3.1 BEFORE YOU BEGIN................................................................................................................................ 78 3.2 ABOUT THE APPLICATION YOU WILL DEVELOP ........................................................................................... 78 3.3 A CLOSER LOOK AT THE OSGI APPLICATION ............................................................................................. 79 3.4 A CLOSER LOOK AT THE SCA APPLICATION ............................................................................................... 80 3.5 CONVENTIONS ....................................................................................................................................... 80 3.6 PART 1: START RAD AND THE WAS TEST ENVIRONMENT ......................................................................... 81 3.7 PART 2: DEVELOP THE OSGI API BUNDLE ............................................................................................... 82 3.8 PART 3: DEVELOP THE OSGI IMPLEMENTATION BUNDLE ............................................................................ 85 3.9 PART 4: DEVELOP THE OSGI WEB BUNDLE .............................................................................................. 91 3.10 PART 5: DEVELOP THE OSGI APPLICATION .............................................................................................. 95 3.11 PART 6: IMPORTING THE SCA PROJECT AND COMPOSITE ........................................................................... 99 3.12 PART 7: INVESTIGATE THE WIRES, REFERENCES AND SERVICES ................................................................ 101 3.13 PART 8: DEPLOY THE APPLICATION ........................................................................................................ 104 3.14 PART 9: USE THE OSGI BANKINGAPPLICATION WEB APP ........................................................................ 105 3.15 PART 10: USE THE SCA STOCKTRADER WEB SERVICE ........................................................................... 107 3.16 PART 11: RETRIEVE THE SCA LOGGINGSERVICE ATOM FEED .................................................................. 110 3.17 CONCLUSIONS ..................................................................................................................................... 111
APPENDIX A. COMMON TASKS .............................................................................................................................................. 7
APPENDIX B. NOTICES ........................................................................................................................................................ 129
APPENDIX C. TRADEMARKS AND COPYRIGHTS ............................................................................................................. 131

IBM Software
Page 4 WebSphere Lab Jam
THIS PAGE INTENTIONALLY LEFT BLANK
IBM Software
Lab 1 - Developing mobile web apps Page 7
Lab 1 Developing a mobile web app with Rational Application Developer and the Web 2.0 & Mobile Feature Pack for WebSphere.
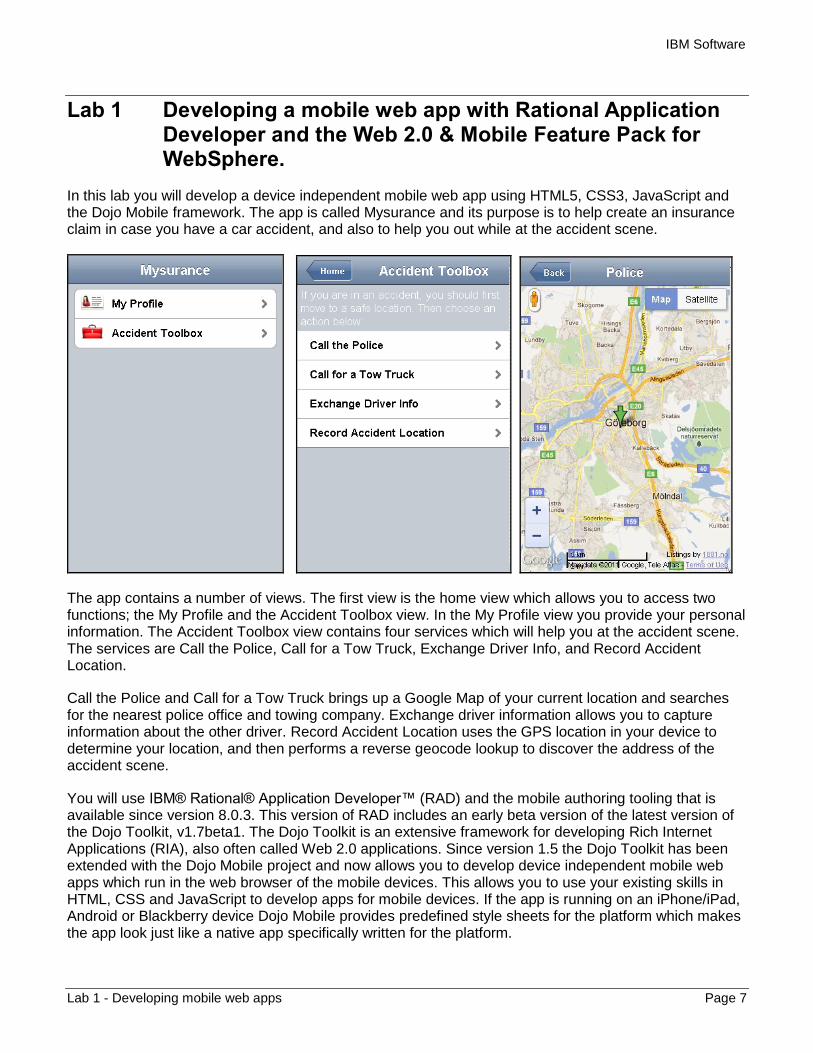
In this lab you will develop a device independent mobile web app using HTML5, CSS3, JavaScript and the Dojo Mobile framework. The app is called Mysurance and its purpose is to help create an insurance claim in case you have a car accident, and also to help you out while at the accident scene.
The app contains a number of views. The first view is the home view which allows you to access two functions; the My Profile and the Accident Toolbox view. In the My Profile view you provide your personal information. The Accident Toolbox view contains four services which will help you at the accident scene. The services are Call the Police, Call for a Tow Truck, Exchange Driver Info, and Record Accident Location.
Call the Police and Call for a Tow Truck brings up a Google Map of your current location and searches for the nearest police office and towing company. Exchange driver information allows you to capture information about the other driver. Record Accident Location uses the GPS location in your device to determine your location, and then performs a reverse geocode lookup to discover the address of the accident scene.
You will use IBM® Rational® Application Developer™ (RAD) and the mobile authoring tooling that is available since version 8.0.3. This version of RAD includes an early beta version of the latest version of the Dojo Toolkit, v1.7beta1. The Dojo Toolkit is an extensive framework for developing Rich Internet Applications (RIA), also often called Web 2.0 applications. Since version 1.5 the Dojo Toolkit has been extended with the Dojo Mobile project and now allows you to develop device independent mobile web apps which run in the web browser of the mobile devices. This allows you to use your existing skills in HTML, CSS and JavaScript to develop apps for mobile devices. If the app is running on an iPhone/iPad, Android or Blackberry device Dojo Mobile provides predefined style sheets for the platform which makes the app look just like a native app specifically written for the platform.

IBM Software
Page 8 WebSphere Lab Jam
This lab focuses on the client side code, the code running on the mobile device, of the Mysurance app. No server side code is being developed. There are also no functions developed to actually transmit an insurance claim to a server. For a fully functioning solution this portion would need to be implemented, and there would also need to be a server side REST service which receives and processes the claims.
Upon completion of this exercise you should have gained basic understanding of
how a mobile web app using Dojo Mobile is designed
how to use the mobile authoring tooling in RAD to visually create a mobile web app
how to test a mobile web app using the Mobile Browser Simulator
how to create Dojo classes and widgets to extend existing components
You should possess basic knowledge of HTML, CSS and JavaScript. Familiarity with IBM® Rational® Application Developer™ or the Eclipse Platform is an asset, but is not required.
Important note!
In our lab we will develop a fully functional mobile web app using Dojo Mobile. However we will not create a so called Dojo Custom Build which combines all the Dojo JavaScript files our app requires into one single file and shrinks it. This step is highly recommended before putting a Dojo application into production (or even on test servers) as it significantly reduces the load time and the amount of data transferred over the wire.

IBM Software
Lab 1 - Developing mobile web apps Page 9
1.1 Start the Mysurance project
In this first part of the exercise you will first start the VMWare image, copy some pre-created resource files, launch Rational Application Developer and then create a project for the Mysurance app.
1.1.1 Start the environment
__1. Start Rational Application Developer
__a. In the VMWare image double-click the Rational Application Developer Standard Edition icon on the desktop.
__b. At the Select a workspace prompt accept the default location of C:\Labfiles80\mobile\workspace and click OK
__c. Expand the Mysurance project by clicking the plus sign in front of it in the Enterprise Explorer view. The WebContent folder is the document root for the web app and is where we have the artifacts we have built for this lab.
__d. Click the plus sign to expand the WebContent folder. The Dojo framework is located in the dojo folder under WebContent. You can expand this folder as well to see how the Dojo framework is organized. The Dojo Mobile components live in the dojo/dojox/mobile folder. Should you ever want to see the source files this is where to find them.
__e. Among the files that have been built already are some images in the images folder, some JavaScript files in the js folder, some Dojo classes and widgets in the mysurance folder, and some Mysurance custom style sheets for iPhone and Android in the themes folder. Dojo Mobile also has platform specific style sheets for Blackberry but we have not added any Mysurance-specific style sheets for Blackberry. The _extra folder contains some files you will use to copy/paste throughout the rest of the exercise.

IBM Software
Page 10 WebSphere Lab Jam
1.2 Create the web page
A Dojo Mobile web app is built up from a static web page, often called index.html. This file contains one or more views. Only one view is visible at the time. On the views you add widgets and information that should be displayed in each particular view. Transitions between views is handled by the Dojo Mobile framework, and there are several different transition effects. Let’s start creating the web page and the views for Mysurance.
__1. Create index.html web page
__a. Right-click the WebContent folder and select New > Web Page.
__b. In the File Name field enter index.html.

IBM Software
Lab 1 - Developing mobile web apps Page 11
__c. In the Template section select Mobile HTML/XHTML. Click the Options button.

IBM Software
Page 12 WebSphere Lab Jam
__d. With Document Markup selected in the left pane, select UTF-8 as Encoding in the right pane. Select HTML5 as the Document Type.
__e. Click Mobile Web Page in the left pane. Dojo Mobile provides a class called deviceTheme which automatically detects the device’s platform and loads the platform-specific style sheets. To use this method you would select Detect Device. If instead you would like to tailor your app for a specific platform you would select dojox.mobile.stylesheet and select the appropriate style sheet. If you would like to handle loading the correct style sheet yourself you would select the No CSS option. For our current purposes leave Detect Device selected.

IBM Software
Lab 1 - Developing mobile web apps Page 13
__f. We will also add two JavaScript files that you have created already. Click JavaScript Files in the left pane. Then click the Add button.
__g. In the JavaScript dialog expand WebContent/js folder and select geolocation.js.
Then click OK.
__h. Click the Add button again and repeat the procedure to add the utils.js file as well. Click the Close button when done. We have now configured how we want the index.html page to be generated.
__i. Click the Finish button to generate the page. If the Note for Web Page Browsing alert appears dismiss it by clicking OK.
__2. Examine the web page generated
__a. RAD now opens the index.html page using the default Page Designer. This editor does not support proper rendering of the Dojo Mobile widgets so this is not what we want to use for mobile authoring. Close the editor.

IBM Software
Page 14 WebSphere Lab Jam
__b. Right-click the index.html file and select Open With > Rich Page Editor (beta).
This opens up the new enhanced editor which supports What-You-See-Is-What-You-Get (WYSIWYG) authoring of Dojo Mobile apps.
In the upper left corner is the Design view showing the selected device’s canvas. This is where we can drag and drop Dojo Mobile widgets to build our app. At the bottom is the Source view showing the HTML code for the page. These two are kept in sync by the

IBM Software
Lab 1 - Developing mobile web apps Page 15
Rich Page Editor. Remember that in the current release of RAD the Rich Page Editor is still in beta so not all of the Dojo Mobile widgets are supported, but the majority are.
__c. Click the Vertical mode icon on top. This places the two panes side by side and gives you more screen estate for the device canvas. Let’s first examine the HTML which was generated.
__d. Click the Source tab at the bottom to enlarge the HTML source. At the top of the HTML our two JavaScript files, geolocation.js and utils.js, have been added: <script language="JavaScript" src="js/geolocation.js"></script>
<script language="JavaScript" src="js/utils.js"></script>
Note that the files have been added with the language=”JavaScript” tag, which is obsolete in HTML5. You may want to change that to type="text/javascript" instead, which validates ok. Below that are some new meta tags which you may not have seen before. The first tells the device’s browser that it should display our app full screen, and with no option to change its size: <meta name="viewport" content="width=device-width, initial-
scale=1, maximum-scale=1, user-scalable=no">
The second tells the device’s browser that it should hide the normal browser address field, back/forward buttons and any menus: <meta name="apple-mobile-web-app-capable" content="yes">
Combining these two meta tags means our app will cover the whole device’s screen. Note: There are several other meta tags that can be used to customize an app, such as specifying an icon to be used when bookmarking the app to your device’s home screen, setting the color of the status bar etc. This is widely documented on the Internet. Below these meta tags are the line that loads the Dojo framework and configures its parser: <script type="text/javascript" djconfig="isDebug: false,
parseOnLoad: true" src="dojo/dojo/dojo.js"></script>
And finally below that are some lines that import the necessary Dojo classes using the dojo.require statement: dojo.require("dojox.mobile.parser");
dojo.requireIf(!dojo.isWebKit, "dojox.mobile.compat");

IBM Software
Page 16 WebSphere Lab Jam
dojo.require("dojox.mobile.deviceTheme");
dojo.require("dojox.mobile.View");
The dojox.mobile.parser runs as soon as the HTML has been loaded into the browser (but before the DOM has been finalized). It parses the HTML and injects the JavaScript code for any Dojo widgets found. The browsers on mobile device’s such as iOS and Android are based on the WebKit HTML rendering engine. In case you would view the page on a non-WebKit browser (such as Mozilla Firefox) the dojox.mobile.compat layer is loaded as well to provide compatibility with such browsers. The dojox.mobile.deviceTheme is the class that detects the device’s platform and loads the correct style sheet. The final imported class is the dojox.mobile.View class. This is the Dojo Mobile widget that gives us a view in the web page. In the <body> tag you can see that RAD has already given us a default view. The data-dojo-type specifies which Dojo class this is (dojox.mobile.view) and the data-dojo-props specifies any properties that the class needs in order to render. Note: The data-dojo-* tags are compliant with the HTML5 specification and are preferred over the previously used dojoType tag (for specifying the class name) and any custom tags. With this all loaded and explained we are ready to start adding widgets to our app.
1.3 Create the home view
__1. Adding widgets to the home view
__a. Click the Split tab to see both the Design and the Source views.
__b. The default view added by RAD was given an id of “view0”. In the source code change this from “view0” to “home” to give it a more meaningful name.
Press Ctrl-S to save the changes.

IBM Software
Lab 1 - Developing mobile web apps Page 17
__c. While developing it can be useful to use a device which has a smaller screen size to leave more screen estate to the other views. Click the device selection dropdown in the upper right corner and select Mobile > Apple iPhone 3GS.
__d. The rightmost pane on the screen contains three tabs; Outline, Snippets and Palette. Click the Palette tab. In the Palette find and click the Dojo Mobile Widgets section to reveal the widgets available.

IBM Software
Page 18 WebSphere Lab Jam
__2. Create the header
__a. Select the Heading widget and drag it to the upper left corner of the design view. A placement icon will appear telling you that the current insertion point is "Insert into <div>". Drop the heading here.
Should you make any mistake, just press Ctrl-Z to undo the last action and retry. Now look at the source code (scroll all the way to the right) you can see that a <h1> heading with a Dojo type of dojox.mobile.Heading has been inserted into the view div: <h1 data-dojo-type="dojox.mobile.Heading" data-dojo-
props="label:'Heading'"></h1>
__b. To change the label double-click the white “Heading” text in the Design view. Replace the text with “Mysurance” and press Enter.

IBM Software
Lab 1 - Developing mobile web apps Page 19
__3. Create the action list
__a. Next step is to lay out buttons for the two functions available from the Mysurance home view; My Profile and Accident Toolbox. For now we will just place these in a dojox.mobile.RoundRectList widget. Later we will improve the look and feel of the main screen. Select the RoundRectList widget from the palette on the right and drag it onto the canvas. Make sure the insertion point says "Insert after <h1>" and drop it. The mouse cursor should be to the right in the light blue area below the heading for the correct insertion point to appear.
__b. Double-click the “Item” text and replace it with “My Profile”. Then press Enter.
__c. In the Design view, select the My Profile widget and click the Insert After icon which appears above the widget to insert another Item widget.

IBM Software
Page 20 WebSphere Lab Jam
__d. Double-click the “Item” text and replace it with “Accident Toolbox”, and press Enter.
__e. We now want to add a small icon before the text to improve the visual appearance. Select the My Profile item and click the Properties tab below the Design/Source/Split tabs. Then click Mobile List and then List Items in the list at the bottom left.

IBM Software
Lab 1 - Developing mobile web apps Page 21
__f. Click the Icon field (which is currently empty) and then click the small dotted browse icon that appears. See picture above.
__g. In the Insert Image dialog click the Browse button and then the Select button. Browse to the Mysurance/WebContent/images folder and select the profile_small.png icon.
Then click OK. The icon is now added before the My Profile text.
__h. Repeat the process for the Accident Toolbox but select the toolbox_small.png icon.
__i. Press Ctrl-S to save.
Our home view is now almost ready and we can move on to the next view in our app, the My Profile view.
IBM Software
Page 22 WebSphere Lab Jam
Checkpoint!
If you have made any mistakes or your view does not look like the one in the picture above, you can now replace the entire contents of your index.html file with the contents of the WebContent/_extra/solution/indexhtml_AfterHomeView.html file.
1.4 Create the My Profile view
__1. Create the My Profile view
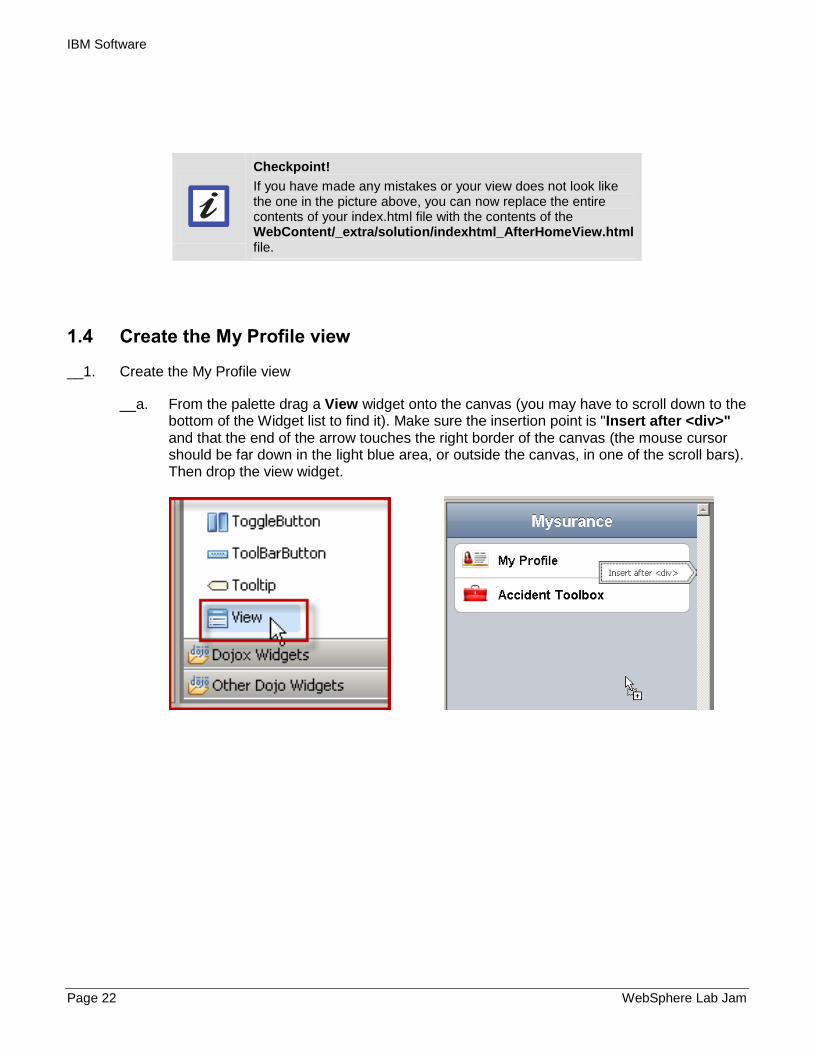
__a. From the palette drag a View widget onto the canvas (you may have to scroll down to the bottom of the Widget list to find it). Make sure the insertion point is "Insert after <div>" and that the end of the arrow touches the right border of the canvas (the mouse cursor should be far down in the light blue area, or outside the canvas, in one of the scroll bars). Then drop the view widget.

IBM Software
Lab 1 - Developing mobile web apps Page 23
__b. In the Dojo Mobile View dialog: Enter myInfo as the Id. Select the Include heading checkbox. Enter My Info in the Label field, Home in the Back button label field, and make sure home is selected in the Back button target dropdown.
Then click Finish. RAD now adds a new dojox.mobile.view widget in a <div> on its own.

IBM Software
Page 24 WebSphere Lab Jam
__c. Press Ctrl-S to save your work. Now let’s have a look at what has been generated so far. In the Source code view press Ctrl-Shift-F to reformat the code and make it easier to read. The code within the <body> should now look like the following:
<body>
<!-- HOME VIEW -->
<div data-dojo-type="dojox.mobile.View" id="home"
data-dojo-props="selected:true">
<h1 data-dojo-type="dojox.mobile.Heading"
data-dojo-props="label:'Mysurance'"></h1>
<div data-dojo-type="dojox.mobile.RoundRectList">
<div data-dojo-type="dojox.mobile.ListItem"
data-dojo-props="label:'My
Profile',icon:'images/profile_small.png'"></div>
<div data-dojo-type="dojox.mobile.ListItem"
data-dojo-props="label:'Accident
Toolbox',icon:'images/toolbox_small.png'"></div>
</div>
</div>
<!-- MY PROFILE VIEW -->
<div data-dojo-type="dojox.mobile.View" id="myInfo"
data-dojo-props="selected:false">
<h1 data-dojo-type="dojox.mobile.Heading"
data-dojo-props="label:'MyInfo',
back:'Home',moveTo:'home'"></h1>
</div>
</body>

IBM Software
Lab 1 - Developing mobile web apps Page 25
__2. Connect the My Profile button with the My Info view.
__a. Click the My Profile item in the design view and then click the Properties tab at the bottom. Click Mobile List and then List Item at the lower left. In the Move To column for the My Profile view (first row) select myInfo. On the same row select slide as the Transition effect.
__b. Press Ctrl-S to save your work. You can see that there is now a right arrow in the My Profile item in the Design view. This indicates that clicking this items transitions to another view. The My Profile list item in the Source view has now been modified to read:
<div data-dojo-type="dojox.mobile.ListItem" data-dojo-props="label:'My
Profile',icon:'images/profile_small.png',
moveTo:'myInfo',transition:'slide'"></div>
1.5 Test with the Mobile Browser Simulator
Before we enhance our app further we will first verify that what we have done so far works properly. For this purpose RAD includes a Mobile Browser Simulator which can simulate many different phone models and other mobile devices.

IBM Software
Page 26 WebSphere Lab Jam
__1. Launch the Mobile Browser Simulator
__a. In the Enterprise Explorer view on the left find the index.html file. Click the right mouse button and select Run As > Run on Mobile Browser Simulator.
__b. In the Run On Server dialog select the AJAX Test Server and click Finish.
RAD will now publish the project onto the AJAX Test Server and start it, and then bring up the Mobile Browser Simulator.

IBM Software
Lab 1 - Developing mobile web apps Page 27
__c. Test your app by clicking My Profile item. This should take you to the My Profile view, which is currently empty. Clicking the Home button in the upper left should take you back to the home view.

IBM Software
Page 28 WebSphere Lab Jam
__d. You can also add additional devices to see what your app will look like. Click the Add Device dropdown and select another phone, e.g. an HTC Desire Android phone.
__e. If you have multiple devices with different platforms (such as iPhone and Android) you may see that they both use the iPhone stylesheet, so the app on the Android phone actually looks like an iPhone app. If this is the case then click the Enable Useragent Switching checkbox. This tells the Mobile Browser Simulator to send the correct user agent string, uniquely identifying each mobile device. Then refresh the browser by pressing F5. Note: The first time you use the Mobile Browser Simulator and you enable useragent switching you will be prompted to install a Firefox extension. This extension handles the useragent switching and also provides some Mobile Browser Simulator support for non-Wekbit based browsers such as Firefox. Follow the instructions on the screen to install it.

IBM Software
Lab 1 - Developing mobile web apps Page 29
__f. The Mobile Browser Simulator also allows you to adjust the size of the phone on the screen to its actual physical size. In the Scale All Devices dropdown select Physical device size. This brings up a blue credit card shape.
__g. Now take a real physical credit card from your wallet and place it over the card on the screen. Adjust the screen card so it is the same size as your credit card. Then click the X in the upper right of the Physical Size Calibration dialog to close it.
__h. You can also click the Rotate button to see what the Mysurance app looks like in landscape orientation. We will use the Mobile Browser Simulator later to see our improvements to the app, so keep it running.
1.6 Add a form to the My Profile view
On the My Profile page we will display a form where the user can enter information about himself. To group the fields of the form we use a Dojo Mobile RoundRectList widget. Since the form is quite long you will copy and paste much of it to save time typing. We will also do this in the Source view to show you the content assist for JavaScript that RAD brings.
__1. Adding the form container
__a. Switch back to RAD and make sure index.html is visible on the screen.
__b. Position the cursor below the <h1 data-dojo….></h1> section in the myInfo view. Make sure it’s positioned after the closing </h1> but before the closing </div>.

IBM Software
Page 30 WebSphere Lab Jam
__c. Start typing <ul data and then press Ctrl-Space. This brings up RAD's content assist feature for JavaScript. We want the unordered list (ul) to be rendered as a Dojo widget, so select data-dojo-type in the drop down list.
__d. Position the cursor between the double quotes and type dojox.mobile. and then press Ctrl-Space. Scroll down to dojox.mobile.RoundRectList and press Enter. Then add a > character at the end of the line.

IBM Software
Lab 1 - Developing mobile web apps Page 31
__e. Press Enter a few times to get some space below. Then close the unordered list by typing </ul>. The section should now look like:
__f. Save your work by pressing Ctrl-S.
__2. Adding the form To make it easy for us to parse the form values and save its contents to the device browser’s local persistent storage we will use features of Dojo's Model-View-Controller framework, called dojox.mvc.
__a. Between the <ul...> and </ul> add the following: <div data-dojo-type="dojox.mvc.Group" ref="profileCtrl.profileModel"
id="profileGroup">
</div>
This defines a dojox.mvc.Group class and tells it to use the profileModel field of the profileCtrl class as its target. We will add this profileCtrl class later.
__b. Add a few lines between the <div...> and </div> to make room for all the fields.
__c. Expand the WebContent/_extra folder and open the myprofile_form.html file. Press Ctrl-A to select all of it, and then Ctrl-C to copy the content.
__d. Switch back to index.html and position the cursor between the <div …> and </div> you added. Press Ctrl-V to paste the code in. This adds the complete My Profile form to your index.html page.

IBM Software
Page 32 WebSphere Lab Jam
__e. Since we now have typed in code manually RAD has not added the necessary import statements for these Dojo classes so we need to do that ourselves. At the top of the index.html source add the following lines last in the list of dojo.require import statements: dojo.require("dojox.mvc");
dojo.require("dojox.mvc.Group");
dojo.require("dojox.mvc.Output");
dojo.require("dojox.mobile.TextBox");
dojo.require("dojox.mobile.ToolBarButton");
__f. Before we are done with the My Profile page we will also add a small button in the upper right corner of the view to be able to clear the form fields. Find the beginning of the My Profile view. Then find the <h1 data-dojo-type….></h1> section which defines the header. Position the cursor between the > and < and press Enter a few times. Then insert the following line in the space: <div data-dojo-type="dojox.mobile.ToolBarButton" class="mblDomButton"
style="float: right;" onClick="profileCtrl.clearProfile();">Clear</div>
This adds a Clear button and places it to the right (float:right) on the heading row.
__g. When a user clicks the Home (back) button in the upper left corner we want to save the current profile to the browser’s persistent storage. For this we need to invoke the leaveProfile() method. Modify the <h1…> line and add the onClick invocation as shown in bold below:
<h1 data-dojo-type="dojox.mobile.Heading"
data-dojo-props="label:'My Info',back:'Home',moveTo:'home'"
onClick="profileCtrl.leaveProfile();">
__h. Press Ctrl-S to save your work. The whole <h1> header section should now look like the following:
Our My Profile view is now complete.

IBM Software
Lab 1 - Developing mobile web apps Page 33
Note however that you can not run the app in the Mobile Browser Simulator yet since it now depends on the profileCtrl class which we have not yet created.
1.7 Add the Profile Page Controller class
The Dojo Toolkit allows you to write well structured JavaScript code and reuse and extend existing components in an object oriented fashion. This is not a requirement, however. With Dojo you can still, should you ever want to, write your JavaScript code in a plain flat file model, perhaps even all inlined in a single large HTML file. Using Dojo classes however makes the code much more maintainable as your project grows.
For the purpose of the Mysurance app we will create so called Controller classes for the various views. These follow the Model-View-Controller design pattern, with the Controller class being responsible for dealing with the information coming in from the view, and going back out to the view.
__1. For the My Profile view we will create a ProfileController class using Dojo.
__a. Select the WebContent folder and click the right mouse button. Select New > Dojo Class.

IBM Software
Page 34 WebSphere Lab Jam
__b. In the Dojo Class dialog enter mysurance.controllers the Module Name field. Enter ProfileController the Class Name field. Leave the other fields at their defaults. Then click Finish.
This creates the ProfileController Dojo class.
__c. Spend a moment to understand the code generated. As you can see this class defines the mysurance/controllers/ProfileController class, extending the plain dojo class. A constructor is added, and this method is executed when the class is being instantiated.
__d. Expand the WebContent/_extra folder and open the ProfileController.js file. Press Ctrl-A to select all and then Ctrl-C to copy the content.
__e. Switch back to the empty ProfileController class you just created and replace all of it with the current content of the clipboard, by pressing Ctrl-A and then Ctrl-V (to select all and paste to replace it). Press Ctrl-S to save your work.

IBM Software
Lab 1 - Developing mobile web apps Page 35
__f. Spend a moment to understand the code. The first few lines defines some variables. The constructor initiates the profileModel variable to a dojox.mvc.newStatefulModel and passes the empty profileDefault as input. After that a number of methods defined. Pay attention to the syntax of the method definitions, and also that the methods (and the variables at the top) are separated with a comma character. Look at the loadProfile method. It looks for existing profile data in the browser’s HTML5 localStorage. If a saved profile is found it is read and the profileModel variable is updated. It then calls the setRef method (defined in utils.js) which connects the profileGroup (defined in the My Profile form’s dojox.mvc configuration) with the profileModel. When we click the Home (back) button on the My Profile form the leaveProfile method is invoked (using a regular onClick JavaScript invocation). This method converts the fields of the form to a JSON object and then saves it to the browser’s localStorage. Instead of using multiple onClick invocations to call our methods you could use Dojo’s dojo.behaviour feature which is a convenient method to connect events with methods.
__g. To instantiate the ProfileController class in the index.html file we need to add a few more lines. Switch back to index.html again.
__h. For Dojo to find our new PageController class we need to register its path. Below the existing dojo.require statements add the following two lines:
dojo.registerModulePath("mysurance", "../../mysurance");
dojo.require("mysurance.controllers.ProfileController");
__i. We now also need to add some JavaScript code to instantiate the ProfileController class and call the loadProfile method when the page is loaded. Below the dojo.require statements (but before the closing </script> statement) add the following lines:
var profileCtrl = new mysurance.controllers.ProfileController();
dojo.ready(function() {
profileCtrl.loadProfile();
});
The dojo.ready method is invoked when the whole page has been loaded into the browser, Dojo has parsed the source and the DOM has been setup. This is the place to put code you want executed as the web page is ready for action.

IBM Software
Page 36 WebSphere Lab Jam
__j. Save your work by pressing Ctrl-S.
Checkpoint!
If you have made any mistakes or have any problems with your app you can now replace the entire contents of your index.html file with the contents of the WebContent/_extra/solution/indexhtml_AfterMyProfileView.html file which we have provided for you.
1.8 Test with the Mobile Browser Simulator.
__1. Switch to the Mobile Browser Simulator again.
__a. Hit F5 to refresh the browser.
__b. Click the My Profile to show the form you just created. Fill in your information in the fields.

IBM Software
Lab 1 - Developing mobile web apps Page 37
__c. Click the Home button to go back. This calls the leaveProfile which saves the form to persistent local storage. You can then refresh (F5) the browser to reload the page, or even close the browser completely and reopen it. When displaying the My Profile view again the information you entered should remain since it was persisted to the browser’s local storage and reread as our app started. The form currently looks a bit skewed because the input fields are not properly aligned. We will fix that later when we add our own customized Mysurance style sheet.
1.9 Create the Accident Toolbox views
The Accident Toolbox view displays a menu with four options to choose from; call the police, call for towing help, collect information about the other driver, and save the location for the accident. Each of these four activities is displayed in a view of its own.
__1. Since these different views involves a lot of typing we will save you time by allowing you to copy/paste all of it from a pre-created file.
__a. Open the WebContent/_extra folder and find the accidenttoolbox_views.html file. Open it and press Ctrl-A and then Ctrl-C to select and copy the entire content of the file.
__b. Go back to your index.html file and in the source find the last closing </div> tag just before the closing </body> tag. Add a few empty lines between the </div> and the </body> tag.
Then press Ctrl-V to paste the content before the </body> tag.

IBM Software
Page 38 WebSphere Lab Jam
These new views also use Page Controllers for their data flow. The necessary Page Controller classes were already imported into the WebContent/mysurance/controllers folder. You may want to spend a few minutes understanding what they do. You will see that they follow the similar pattern as the ProfileController class you created before. However for these classes to be made available we must first import them using dojo.require.
__c. In the source find the line which imports the the ProfileController:
dojo.require("mysurance.controllers.ProfileController");
Then add the following two lines below:
dojo.require("mysurance.controllers.AccidentInfoController");
dojo.require("mysurance.controllers.AccidentLocationController");
__d. Then find the following line which instantiates the ProfileController:
var profileCtrl = new mysurance.controllers.ProfileController();
and add the following two lines below:
var accInfoCtrl = new mysurance.controllers.AccidentInfoController();
var accLocCtrl = new mysurance.controllers.AccidentLocationController();
__e. Finally add the following two lines last in the dojo.ready method:
accInfoCtrl.loadAccidentInfo();
accLocCtrl.loadLocation();
The whole section should now look like:
…
…
dojo.registerModulePath("mysurance", "../../mysurance");
dojo.require("mysurance.controllers.ProfileController");
dojo.require("mysurance.controllers.AccidentInfoController");
dojo.require("mysurance.controllers.AccidentLocationController");
var profileCtrl = new mysurance.controllers.ProfileController();
var accInfoCtrl = new mysurance.controllers.AccidentInfoController();
var accLocCtrl = new mysurance.controllers.AccidentLocationController();
dojo.ready(function() {
profileCtrl.loadProfile();
accInfoCtrl.loadAccidentInfo();
accLocCtrl.loadLocation();
});

IBM Software
Lab 1 - Developing mobile web apps Page 39
This code imports the three Page Controller classes, instantiates them and calls their respective load method to load data from the browser’s persistent local storage when the page has initialized.
__f. The long HTML code chunk you pasted uses some new Dojo Mobile widgets so also add the following two lines to your dojo.require list to import them as well:
dojo.require("dojox.mobile.RoundRectCategory");
dojo.require("dojox.mobile.EdgeToEdgeList");
dojo.require("dojox.mobile.FixedSplitter");
dojo.require("dojox.mobile.Button");
1.10 Adding the Google Map widget to the police view
When the user clicks the Call the Police button we want to show a Google Map of the current location, and do a search for the local police offices. For this purpose we will create a new Dojo Widget which handles the map for us.
Dojo Widgets are based on the Dojo Dijit framework which contains a number of predefined widgets, ranging from basic widgets such as Button, Checkbox, and ValidationTextBox, to more advanced widgets such as gauges, charts and legends. You can easily extend the predefined widgets to create your own even more feature-rich customized widgets in an object oriented fashion.
But for the purpose of this lab we will just extend the basic dijit._Widget class.
__1. Create a new Dojo Widget
__a. Select the WebContent folder and click the right mouse button. Select New > Dojo Widget.

IBM Software
Page 40 WebSphere Lab Jam
__b. In the Dojo Widget dialog enter mysurance.widgets in the Module Name field. Enter GoogleMap in the Widget Name field. Leave the other values as their defaults.
Then click the Finish button.
__c. RAD now creates the mysurance.widgets.GoogleMap widget class and fills in some skeleton code for you. Inspect the code and see if you can understand what it does. RAD has also created two new folders in the mysurance/widgets folder, called templates and themes. These contain skeleton HTML template and CSS files that we could use for styling our widget. We will not need this for our Google Map widget so you can delete these folders if you like (or leave them as is, since they will not interfere with our work).

IBM Software
Lab 1 - Developing mobile web apps Page 41
__d. Since our GoogleMap widget involves quite a lot of code you will copy/paste it from pre-created source. Open the WebContent/_extra folder and find the GoogleMap.js file. Open it and press Ctrl-A to select all of it, and then Ctrl-C to copy the entire content.
__e. Switch back to the GoogleMap.js class you created. Position the curson inside the file and press Ctrl-A to select all of it, and then Ctrl-V to paste and replace with the content you copied from the pre-created GoogleMap.js file.
__f. Press Ctrl-S to save your work. Look at the top of the file and you see that it defines a number of variables, one of them is called reqtype. When we call the Google Map widget we will pass a text string to this field, and that will be used to search the Google Maps API for nearby resources such as police offices or towing companies. You may want to spend a few minutes looking at the code to see what it is doing. Also open the WebContent/js/geolocation.js file and see how the getLocation function uses the HTML5 navigator.geolocation API to determine the current GPS position.
__g. For the Google Map to work we also need to import the Google Maps JavaScript API. Add the following line to the top of the index.html file where utils.js and geolocation.js are imported:
<script type="text/javascript"
src="http://maps.googleapis.com/maps/api/js?sensor=false&libraries=places">
</script>
__h. And finally we also need to import our widget into the HTML page. Add the following lines below the dojo.requires which imports the other mysurance classes (Note: these lines must not be added above the dojo.registerModulePath line):
dojo.require("mysurance.widgets.GoogleMap");
dojo.require("mysurance.widgets.FixedSplitter");
The Accident Toolbox view and the four sub-views are now completed.

IBM Software
Page 42 WebSphere Lab Jam
1.10.1 Connect the home view with the Accident Toolbox view
__1. To be able to access the Accident Toolbox view we need to add a transition to it from the home view.
__a. In the Design view (or Split) click the Accident Toolbox item. Click the Properties tab at the bottom. Then click Mobile List and List Items at the bottom left.
__b. Click the Move To field for the Accident Toolbox row and select the accHelp view. Then click the Transistion field and select slide.
__c. Save your work by pressing Ctrl-S.
1.11 Adding that final usability touch
To make our app more user friendly and look better we will do some final improvements.
1.11.1 Custom style sheets
For the Google Map to work at all and to align the forms we need to add some custom style sheets to our app. We have provided our own setupStyleSheets method in the utils.js file which does this for us.
__1. Add the setupStyleSheets method invocation
__a. Add the following line to index.html after the dojo.require statements but before the instantiation of the mysurance.controller classes:

IBM Software
Lab 1 - Developing mobile web apps Page 43
setupStyleSheets(); // Add the correct style sheets
The section should now look like the following:
1.11.2 Adapting for tablets such as iPad
In case our app is running on a tablet device we can benefit from the larger screen size to give a better user experience.
At the bottom of the index.html file you should have a view with an id of ”accHelpFrames” which sets up a mysurance.widgets.FixedSplitter widget (which extends the dojox.mobile.FixedSplitter widget) to always show the four Accident Toolbox options on the left, and the respective views with maps and forms on the right. Compare this to the phone layout which shows the Accident Toolbox and then slides out the Accident Toolbox view and slides in the view for the selected function, completely replacing the Accident Toolbox view on the screen.
__1. Initialize the FixedSplitter in case of a tablet device.
__a. Find the opening <body> tag in index.html.
__b. Replace the line with the following line, which invokes the setupIfTablet method:
<body onload="setupIfTablet();">
The setupIfTablet method is defined in utils.js. You may want to take a look at it to understand what it is doing.
1.11.3 Improving the usability of the home view
To make the home view a little more appealing we will replace the simple RoundRectList and the two ListItems with two large icons for easier access.
__1. Rename the current home view to homeold to keep it as a backup.
__a. Find the current home view and change its id from “home” to “homeold”.

IBM Software
Page 44 WebSphere Lab Jam
__b. Modify the “selected:true” to “selected:false” to make sure the old view is hidden.
__2. Add a new improved home view
__a. Expand the WebContent/_extra folder and open the home_view_new.html file. Press Ctrl-A to select and then Ctrl-C to copy all of its content.

IBM Software
Lab 1 - Developing mobile web apps Page 45
__b. Switch back to your index.html file and position your cursor before the old home view’s opening <div> (right after the <body….> tag). Then press Ctrl-V to paste the new view.
This view adds two icons and sets up an onClick event for them. The events, myInfoClicked and accHelpClicked, are defined in utils.js. If you look at the accHelpClicked method in utils.js you can see that if we are running on a phone (the PHONE variable is initialized in the first line of utils.js) we make a programmatic slide transition to the accHelp view. If we are running on a tablet we make a transition to the accHelpFrames view instead.
__c. Save your work by pressing Ctrl-S now.
Checkpoint!
If you have made any mistakes or your app does not work properly you can now replace the entire contents of your index.html file with the contents of the WebContent/_extra/solution/indexhtml_final.html file.

IBM Software
Page 46 WebSphere Lab Jam
1.12 Testing the final Mysurance app
__1. We are now ready to give this final version a test drive.
__a. Switch to the Mobile Browser Simulator and hit F5 to refresh your browser. You should now see a fancier home view with two large icons instead of the previous simple RoundRectList (first image below).
__b. Click the Accident Toolbox and then Call the Police. This should bring up a Google Map of your current location (actually the location where your outbound IP address has been recognized by Google, so it may not be spot on).
__c. If you are in a non-english speaking country a search for “police” may not return any hits for you (as is the case for the map picture in the picture above). If this is the case you can modify index.html and make the “police map” search for the word police in your language. To do this find the police map page view in index.html and change the word “police” on the GoogleMap <div> to your language’s translation (after the reqtype). Then refresh the Mobile Browser Simulator again. Another option is to hard code the location to a US city, e.g. Las Vegas. To do this open the geolocation.js file in the js folder. Swap the comment on the following two lines so

IBM Software
Lab 1 - Developing mobile web apps Page 47
that the first becomes active and the second is commented out:
// var loc = new google.maps.LatLng(36.175, -115.1363889);
var loc = new google.maps.LatLng(position.coords.latitude,
position.coords.longitude);
__d. The current version of the Mobile Browser Simulator simulator does not report the correct width and height of the browser screen to the app. This means that since we in utils.js detect if we are running on a phone or a tablet by looking at the screen size our current detection mechanism doesn’t work well in the Mobile Browser Simulator. Simulating an iPad 2 e.g. reports a screen size of 200x200 pixels and our app detects that as a phone. If you want to see what your app would look like on an iPad you can use Google Chrome and browse to http://localhost:8080/Mysurance/index.html and ensure the window is large enough (>600 pixels in both width and height). You should then be able to see the difference of the Accident Toolbox page with the menu always available on the left with the Tablet layout, as shown below.
Note: Since Firefox in a non-Webkit browser it works best within the Mobile Browser Simulator. Chrome on the other hand works well outside of the Mobile Browser Simulator, but on the other hand does not support useragent switching, not even inside the Mobile Browser Simulator (a limitation of the Google Chrome browser architecture). So depending on what you want either Firefox or Chrome will help you out.

IBM Software
Page 48 WebSphere Lab Jam
1.13 Summary
In this lab you have learned how to use the mobile authoring capabilities of Rational Application Developer to build a platform independent mobile web app. You have seen how using Dojo and Dojo Mobile can help you speed up development and make your app more user friendly, and also give you a nice clean separation of components and classes in your app. You have also seen how to use the Mobile Browser Simulator to get a visual of what your app will look like on a real physical device.
As a next step to make the app production ready you should create a Custom Dojo Build to merge all the different Dojo JavaScript files into one single file, and shrink it. This improves page load time significantly and should always be done before releasing a Dojo application for production use. Rational Application Developer provides access to the Dojo Build system but this exercise is left to the reader.

IBM Software
Lab 2 –introduction to JAX - RS Page 49
Lab 2 Introduction to JAX-RS
2.1 Part 1 What this exercise is about
This exercise introduces to building REST based services using JAX-RS. JAX-RS is the Java Standard for exposing Java Artifacts as RESTful based web services. WebSphere Application Server version 8 is a Java EE v6 Server and contains JAXRS
2.2 Part 2 What you should be able to do
At the end of this exercise, you should be able to
Create JAX-RS Services for your Java EE applications.
Learn how to do content negotiation with JAX-RS
Note: See the section later in this template about using bulleted and numbered lists.
2.3 Part 3 Introduction
In this exercise you will learn how to create RESTful Web Services using JAX-RS. JAX-RS is the Java Standard for creating REST Services and will be part of Java EE 6.
REST is an acronym that stands for REpresentational State Transfer, and is a style of coding pioneered by Roy Fielding, one of the principal authors of the HTTP specification..
In this lab, you will model a simple REST API for the ProductSearchService. You will be utilizing the GET verb primarily. The class diagram is shown below for the service.
IBM Software
Page 50 WebSphere Lab Jam
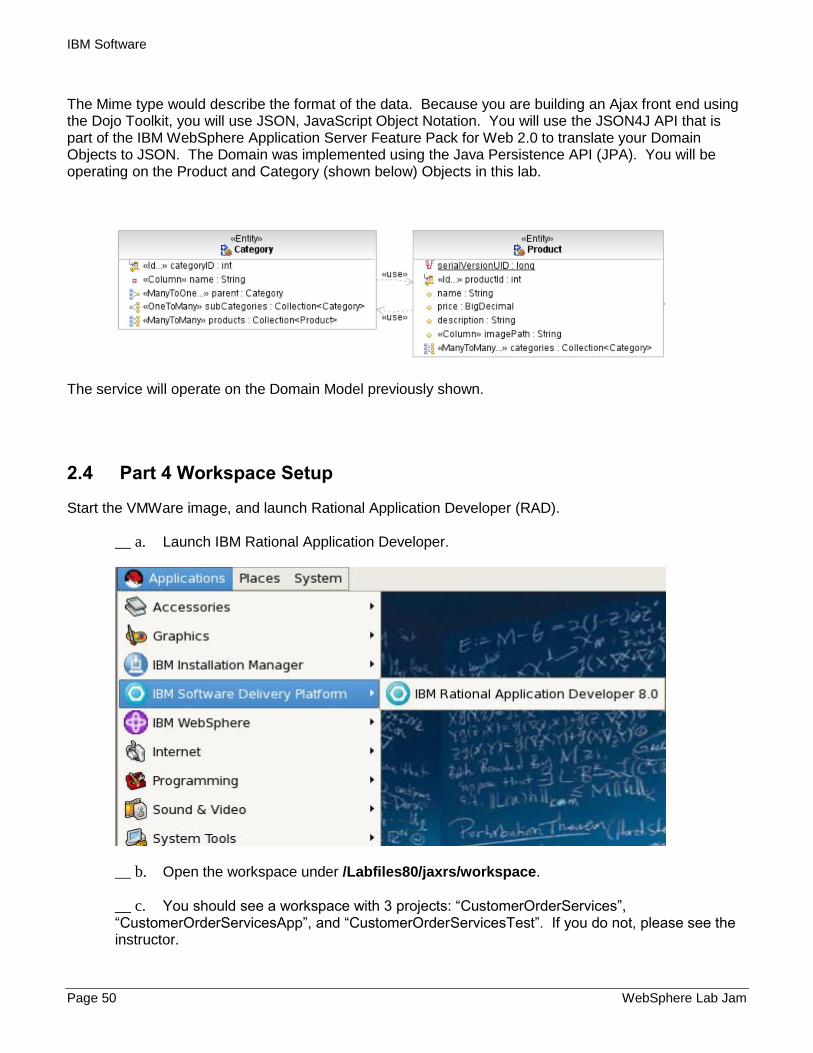
The Mime type would describe the format of the data. Because you are building an Ajax front end using the Dojo Toolkit, you will use JSON, JavaScript Object Notation. You will use the JSON4J API that is part of the IBM WebSphere Application Server Feature Pack for Web 2.0 to translate your Domain Objects to JSON. The Domain was implemented using the Java Persistence API (JPA). You will be operating on the Product and Category (shown below) Objects in this lab.
The service will operate on the Domain Model previously shown.
2.4 Part 4 Workspace Setup
Start the VMWare image, and launch Rational Application Developer (RAD).
__ a. Launch IBM Rational Application Developer.
__ b. Open the workspace under /Labfiles80/jaxrs/workspace.
__ c. You should see a workspace with 3 projects: “CustomerOrderServices”, “CustomerOrderServicesApp”, and “CustomerOrderServicesTest”. If you do not, please see the instructor.
IBM Software
Lab 2 –introduction to JAX - RS Page 51
2.5 Part 5 Run back-end Servers
In order to ensure that the application is working, a test case is provided. The Test Cases will populate the database and test that the Services are running.
__ 1. Verify that you are in the Java EE or J2EE perspective
__ a. In the upper right corner, you should see “Java EE”:
__ b. if this is not your current perspective, click Window > Open Perspective > Other > Java EE
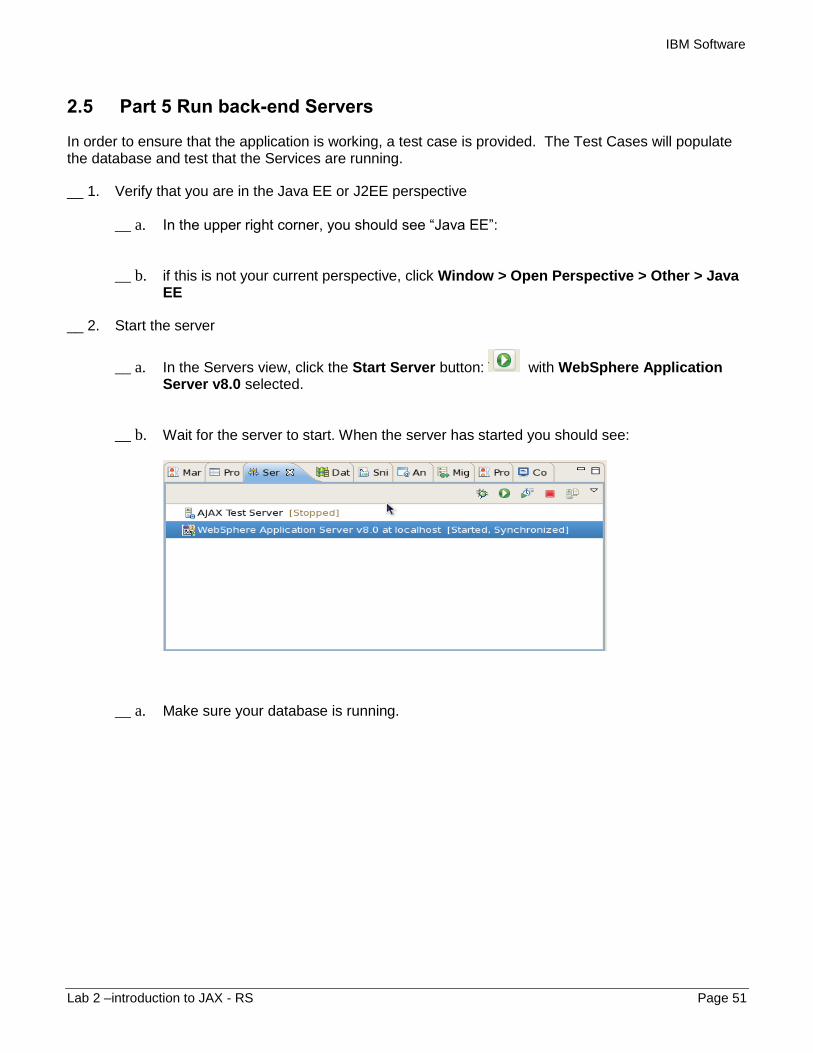
__ 2. Start the server
__ a. In the Servers view, click the Start Server button: with WebSphere Application Server v8.0 selected.
__ b. Wait for the server to start. When the server has started you should see:
__ a. Make sure your database is running.

IBM Software
Page 52 WebSphere Lab Jam
__ b. Open a Terminal Window by clicking the terminal icon as shown below.
__ c. Type su – db2inst1. This will temporarily switch your user to a valid db2 user.

IBM Software
Lab 2 –introduction to JAX - RS Page 53
__ d. Type db2start to start the database.
__ 3. Launch the enterprise application on the server
__ a. In Rational Application Developer open the Servers view
__ b. Right-click the server and select Add and Remove Projects
__ c. Select CustomerOrderServicesApp and select Add.
__ d. Select Finish

IBM Software
Page 54 WebSphere Lab Jam
__ e. Wait for the application to start. The Console should display:
Now the back-end services have been started and are running properly.
2.6 Part 6 Creating REST Based Services
Now you are ready to start using JAX-RS to build your REST Services. You will create a New Dynamic Web Project for your REST Resources. You should keep your test cases in separate projects. This new project will be the basis for your Web 2.0 application.
2.6.1 Create a new web project
__ 1. First, create your web project.
__ a. From the main file menu, select File->New->Dynamic Web Project as shown below.

IBM Software
Lab 2 –introduction to JAX - RS Page 55
__ b. Name the project CustomerOrderServicesWeb, press Modify… next to the Configuration Button as shown in the screenshot.
__ c. Select JAX-RS (REST Web Services)
__ d. Press OK and then Next. Leave the default values for Java and press Next

IBM Software
Page 56 WebSphere Lab Jam
__ e. Press OK and then Next. Check Generate web.xml deployment descriptor and click Next. Leave the default values for Context Root and Content Directory and press Next
__ f. On the JAX-RS Capabilities page, notice that IBM WebSphere JAX-RS Library for WAS v8.0 is selected. Uncheck the Udpate deployment descriptor. Accept the defaults and press Finish.

IBM Software
Lab 2 –introduction to JAX - RS Page 57
__ g. When prompted to open the Web Perspective, click Yes.
__ h. Right click your newly created Web project and select properties. Go to Deployment Assembly, select the Manifest Entries. Press Add and select the CustomerOrderService.jar, which contains our Java EE artifacts you are going to expose.
__ 2. There are various ways of adding JAXRS support to your Web Application. In order to take advantage of the WebSphere Application Server v8 annotation scanning, you need to create a JAXRS application class.
__ a. Create a new Java class in the Web Project.

IBM Software
Page 58 WebSphere Lab Jam
__ b. Name the package org.pwte.example.app. Name the class CustomerServicesApp. You superclass should be javax.ws.rs.core.Application. Press Finish.
__ c. Add the annotation @ApplicationPath and set the URL pattern to “jaxrs/*” as shown below. To correct the error, add the statement import javax.ws.rs.ApplicationPath; as shown below.

IBM Software
Lab 2 –introduction to JAX - RS Page 59
__ 3. You are now going to create your JAX-RS Resource. You will create a REST resource for the/Product/{id} resource.
__ a. Create a new package in the CustomerOrderServicesWeb project as shown in the figure.
__ b. For the package name, use org.pwte.example.resources, then click Finish.

IBM Software
Page 60 WebSphere Lab Jam
__ c. Import the file ProductResource.java from the file system
__ i Right click on the newly created package and select Import…
__ ii Choose File System and click Next
IBM Software
Lab 2 –introduction to JAX - RS Page 61
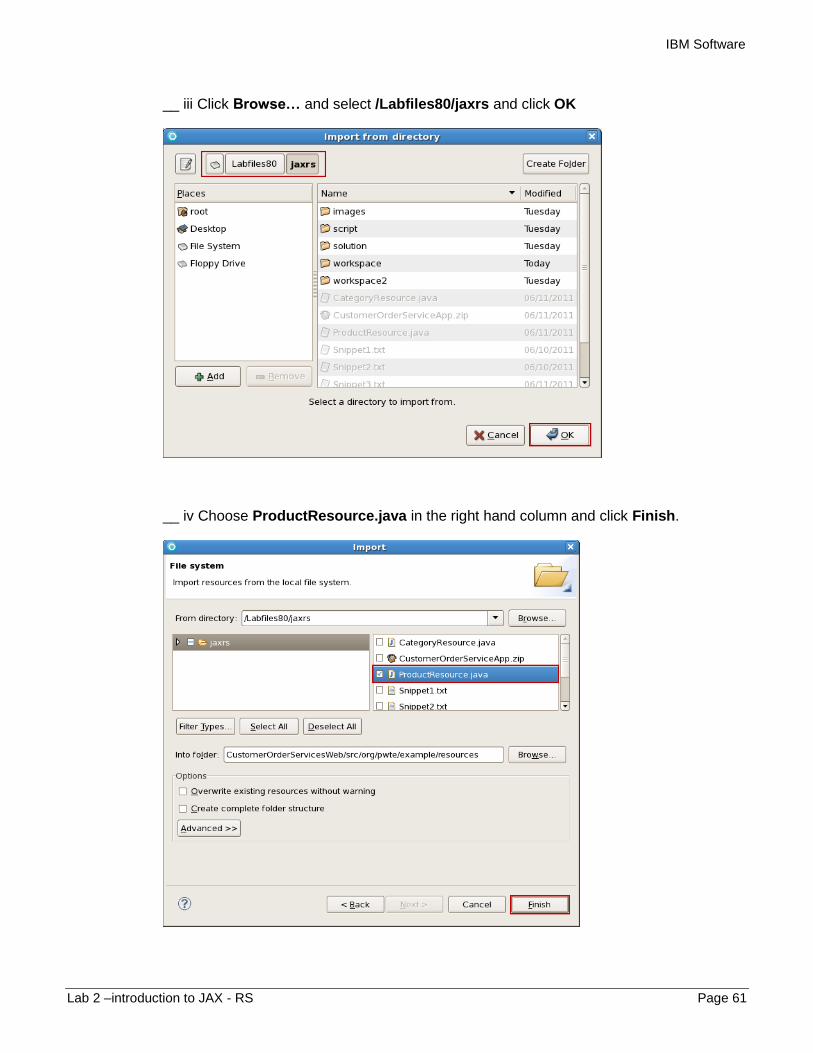
__ iii Click Browse… and select /Labfiles80/jaxrs and click OK
__ iv Choose ProductResource.java in the right hand column and click Finish.

IBM Software
Page 62 WebSphere Lab Jam
__ d. Double click ProductResource.java to open it in the editor.
__ e. Examine the file. The @Path(“/Product”) annotation describes the web page path.This makes your class a JAX-RS resource. @Singleton makes it a Singleton EJB. EJB 3.1 now allows you to define EJB’s in the Web Container. This is often referred to as EJB 3.1 Light because not all parts of the EJB spec is supported in the web container.
__ f. Continuing down the file, note the following JAX-RS annotations.
__ i @GET is used to define your HTTP Verb
__ ii @Path on the method will append it to the /Product path. The {id} indicates it is a dynamic pattern.
__ iii @Produces means that this resource will produce JSON.
__ iv @PathParam tells JAXRS to populate the value of productid from the URI pattern /Product/{id}. For example, /Product/1.
__ 4. Next, you will annotate your Business Data for JSON Serialization. WebSphere Application Server v8 uses the JSON Jackson provider for POJOs.
__ a. In the CustomerOrderServices project, open the Product Entity under ejbModule/org.pwte.example.domain as shown below.

IBM Software
Lab 2 –introduction to JAX - RS Page 63
__ b. We are only interested in serializing the top level properties. To the getter and setter of Category, add @JsonIgnore as shown in the figure below. This will tell the Jackson parser not to include it in the json payload.
__ c. Next, add the @JsonProperty annotation and set the value to “id” on the getter and setter of the productId as shown. This will change the attibute name in the json to id.
__ d. Similarly, add a @JsonProperty(value=”image”) to the getter and setter of the imagePath attribute to change the attribute name to image.

IBM Software
Page 64 WebSphere Lab Jam
__ e. If you have any errors, add the following import statements:
import org.codehaus.jackson.annotate.JsonIgnore;
import org.codehaus.jackson.annotate.JsonProperty;
__ 5. Save changes and publish them to the server
__ a. Select File > Save All or strike Shift+Ctrl+S to save all the changes you made
__ b. Select WebSphere Application Server v8.0 in the Server view -> right click -> select Publish to publish updates to the server
__ 6. You can exercise you resource now. We will use the firefox plugin POSTER for this initial test.
__ a. Open the POSTER plugin. You can do this by selecting the P icon on the bottom right hand corner of the browser window.

IBM Software
Lab 2 –introduction to JAX - RS Page 65
__ b. Enter the following URL (http://localhost:9080/CustomerOrderServicesWeb/jaxrs/Product/1). Press GET as shown.
__ c. You should see your JSON result as shown below.

IBM Software
Page 66 WebSphere Lab Jam
__ d. Try another ID in POSTER like 44, you should get a 404 not found as shown in the figure below.
__ 2. Next, you are going to review the /Product?categoryId=? resource.
__ a. Back in your Web Project, open the ProductResource as shown.

IBM Software
Lab 2 –introduction to JAX - RS Page 67
__ b. Review the method getProductsByCategory. This code is very similar to the previous code, except that there is no @Path which means you use the class level /Product. Also, there is a @QueryParam annotation. This will allow you to access the query parameters. (Organize your imports)
__ c. Now, back in POSTER, test your resource. Select Headers and make it to receive json output as below
__ d. As shown below, for the URL, enter http://localhost:9080/CustomerOrderServicesWeb/jaxrs/Product?categoryId=1

IBM Software
Page 68 WebSphere Lab Jam
__ e. You should get a list of products back.
__ f. Change the CategoryId to 133 as shown and press GET.

IBM Software
Lab 2 –introduction to JAX - RS Page 69
__ g. You should get back an empty List back as shown.
__ h. Change categoryId=133 to category=133 as shown below and press GET. You should get back a 400 Bad Request response.
__ 3. Now, you are going to create another resource for the Category resources.
__ a. Import CategoryResource.java from the file system following the same instructions as before.

IBM Software
Page 70 WebSphere Lab Jam
__ b. Examine the file, you should see similarities between this file and ProductResource.java.
__ c. Back in CustomerOrderServices EJB project, open the Category JPA Object as shown below.

IBM Software
Lab 2 –introduction to JAX - RS Page 71
__ d. Use the Jackson Annotations like you did before. Look at the screenshot below. If you get errors, try adding the following imports for packages:
import org.codehaus.jackson.annotate.JsonIgnore; import org.codehaus.jackson.annotate.JsonProperty;
__ e. Select File > Save All or strike Shift+Ctrl+S to save all the changes you made

IBM Software
Page 72 WebSphere Lab Jam
__ f. Select WebSphere Application Server v8.0 in the Server view -> right click -> select Publish to publish updates to the server
__ g. Back in POSTER, test the new resource with the URL http://localhost:9080/CustomerOrderServicesWeb/jaxrs/Category/1 as shown. Notice the serialization of subcategories.
IBM Software
Lab 2 –introduction to JAX - RS Page 73
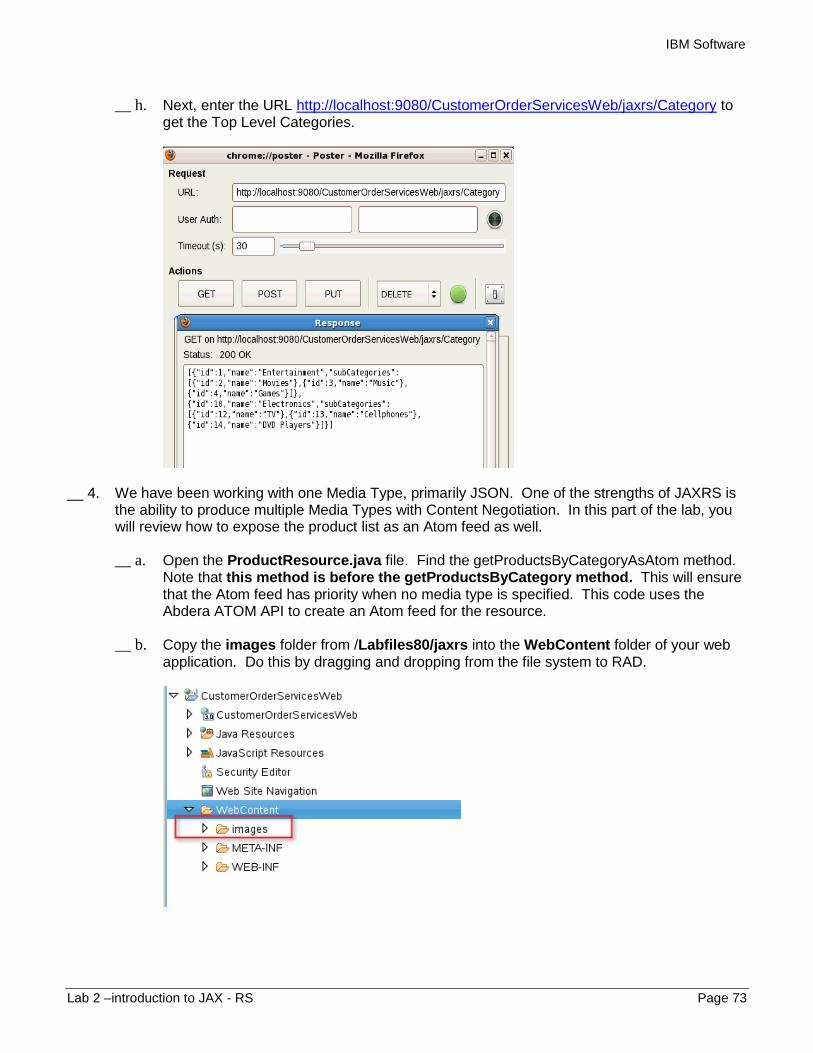
__ h. Next, enter the URL http://localhost:9080/CustomerOrderServicesWeb/jaxrs/Category to get the Top Level Categories.
__ 4. We have been working with one Media Type, primarily JSON. One of the strengths of JAXRS is the ability to produce multiple Media Types with Content Negotiation. In this part of the lab, you will review how to expose the product list as an Atom feed as well.
__ a. Open the ProductResource.java file. Find the getProductsByCategoryAsAtom method. Note that this method is before the getProductsByCategory method. This will ensure that the Atom feed has priority when no media type is specified. This code uses the Abdera ATOM API to create an Atom feed for the resource.
__ b. Copy the images folder from /Labfiles80/jaxrs into the WebContent folder of your web application. Do this by dragging and dropping from the file system to RAD.
IBM Software
Page 74 WebSphere Lab Jam
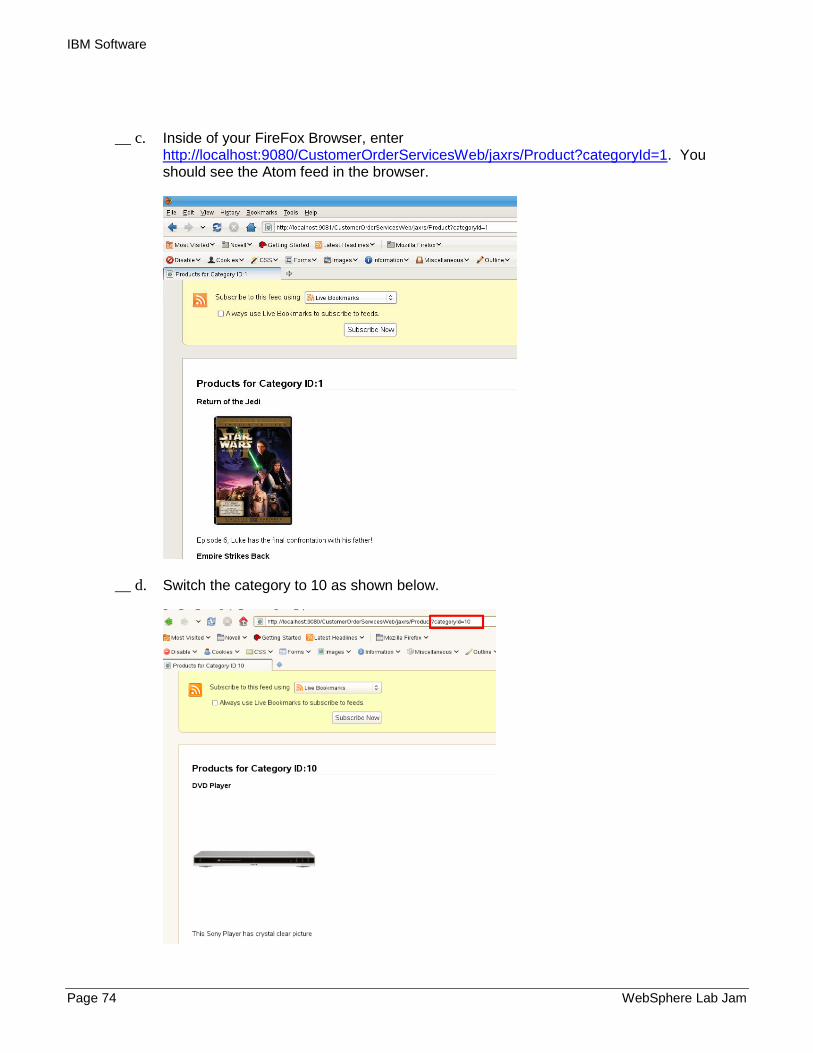
__ c. Inside of your FireFox Browser, enter http://localhost:9080/CustomerOrderServicesWeb/jaxrs/Product?categoryId=1. You should see the Atom feed in the browser.
__ d. Switch the category to 10 as shown below.

IBM Software
Lab 2 –introduction to JAX - RS Page 75
__ e. Next go into POSTER and enter the URL as shown. Go into the Headers tab and enter an Accept Header of application/atom+xml as shown in the figure below. Then issue a GET
__ f. Notice the result is an XML Atom Feed.

IBM Software
Page 76 WebSphere Lab Jam
__ g. Next, switch the Accept Header to application/json and issue the request again as shown.
__ h. Now you should see the same resource with JSON.
2.7 Part 7 Clean Up the Server for Next Exercise
Before moving on, you have to clean up the server so the other applications run smoothly.

IBM Software
Lab 2 –introduction to JAX - RS Page 77
__ 1. Expand the WebSphere Application Server v8.0 Server as shown below. Right click the CustomerOrderServicesApp and select Remove as shown in the figure below.
__ 2. After the server Publishes, Stop the Server as shown below.
Congratulations!
You have reached the end of the exercise!

IBM Software
Page 78 WebSphere Lab Jam
Lab 3 Introduction to OSGI
3.1 Before you begin This exercise guides you through the development of a modular, heterogeneous service-oriented application using two strategic technologies: OSGi, the module system for Java, and Open Service Component Architecture (SCA) v1.00.
You will use IBM® Rational® Application Developer for WebSphere® Software (RAD) version 8.0.2 to develop the application, and IBM® WebSphere® Application Server (WAS) version 8.0 Test Environment with OSGi and JPA 2.0 to run and test it.
Upon completing this exercise you should have gained a basic understanding of
the value and basic concepts of OSGi,
the value and basic concepts of SCA,
how OSGi and SCA work together, and
how to use RAD to develop, run and unit test OSGi and SCA applications.
You should possess basic knowledge of the Java™ programming language. Familiarity with IBM® Rational® Application Developer™ for WebSphere® Software or the Eclipse Platform is an asset, but is not required.
To follow this exercise, you will require:
• This document.
• The Java files and other resources that accompany this exercise.
• IBM® Rational® Application Developer for WebSphere® Software 8.03, henceforth RAD, including the features “Service Component Architecture Development Tools” and “OSGi Development Tools”, installed on a supported operating system.
• IBM® WebSphere® Application Server Version 8.0 Test Environment 8.0 (henceforth “WAS”) including features “ Service Component Architecture” (version 1.0.1) and “OSGi and Java Persistence API 2.0”.
3.2 About the Application you will Develop You will develop a business application that manages bank accounts and that trades shares in stock. The business application consists of three smaller and loosely integrated applications, two of which you will develop, and one of which is given to you ready to run.
1. The StockManagerApplication Java EE enterprise application provides a list of stock ticker symbols and the market value of a share of each stock. Development of Java EE applications is outside the scope of this exercise, therefore this application is provided to you completed and ready to deploy.
2. The BankingApplication OSGi application provides operations to open, close, deposit to,

IBM Software
Lab 3 –introduction to OSGI Page 79
withdraw from and access bank accounts. It also provides operations to work with bank account owners. It includes a front-end JSP Web application for working with bank accounts and their owners.
3. The StockTrader SCA application provides operations to buy and sell stocks, and exposes these operations via a SOAP Web service. The application keeps a log of stock transactions retrievable over an Atom feed. The application relies on the services of StockManagerApplication and BankingApplication to function.
This diagram depicts the overall design of the business application:
3.3 A closer look at the OSGi application The “BankingApplication” OSGi application is a deployable unit containing three bundles that work together to provide banking services including management of accounts and account owners.
1. The API bundle, com.ibm.example.banking.api, contains a Java interface and two data classes that together define the public API of the banking application. There is no business logic within the bundle.
2. The implementation bundle, com.ibm.example.banking.impl, contains the main Java implementation class that implements the Java interface in the API bundle, and has the business logic that does all the internal work of creating, storing, accessing, updating and deleting bank accounts and bank account owners.
The bundle also defines the implementation class as an OSGi Blueprint bean, and defines an OSGi Blueprint service based upon the bean and described by the implementation's parent interface from the API bundle.

IBM Software
Page 80 WebSphere Lab Jam
3. The Web bundle, com.ibm.example.banking.web, contains a JSP Web application for working with the bank accounts and account owners. The Web application consults the WAS JNDI service to locate the Blueprint service registered by the implementation bundle so that it can invoke operations without requiring a direct dependency on the implementation bundle or the implementation class within it.
3.4 A closer look at the SCA application The “StockTrader” SCA contribution contains a single deployable composite with three components that interact with each other and with a separate Java EE enterprise application to provide stock trading operations.
1. The AccountManager component provides bank account management services. It's implementation is provided by the OSGi BankingApplication.
2. The LoggingService component and its plain Java implementation records stock transactions. It provides two services. One of the services offers operations to log transaction records, and is invoked via a reference from the StockTrader component. The other service has an Atom binding and provides a live Atom feed of all transactions that have been logged.
3. The StockTrader component and its plain Java implementation offers a service with operations to buy and sell stock. The service is equipped with a Web service binding so that it can be invoked from any Web service client. The StockTrader component has references wired to the AccountManager and LoggingService components since they provide the bank account and logging services that StockTrader needs. It has a third reference with an EJB binding directed at the EJB within the StockManager Java EE enterprise application since StockManager provides information on stock share prices.
There are a variety of approaches to developing SCA assemblies, two of the most basic being “top down” and “bottom up”. In a top down approach, components and their implementations are created to satisfy given service and reference interfaces such as might originate from a SoaML model. In a bottom up approach, components and their service and reference interfaces are derived from existing implementation artifacts.
While there are overtones of both approaches in the design of the SCA application in this exercise, the actual development process follows the bottom up approach.
3.5 Conventions The bold typeface is used for text you need to enter or controls or objects such as push buttons and tree nodes that you need to interact with.
The italic typeface is used for dialog titles, control labels and other information displayed by the tools.
A few “variables” are used in this exercise to represent host names, port numbers and other configurable aspects of RAD and WAS. The values shown here match the configuration of the VMware images accompanying the exercise. If you are following this exercise on your own installation, you may need to substitute different values.

IBM Software
Lab 3 –introduction to OSGI Page 81
Variable Value Explanation
<FILES> /Labfiles
80/OSGi
The directory containing files needed to
complete the exercise.
<HOST> Think The local host name.
<BOOTSTRAP-PORT> 2809 The WAS bootstrap and JNDI port number.
This is used within the EJB binding on the
StockTrader component's reference to the
StockManager EJB.
<HTTP-PORT> 9080 The WAS HTTP port number. This is used in
the URLs of the StockTrader component's
SOAP Web service endpoint and associated
WSDL document, the LoggingService
component's Atom feed, and the OSGi
application's JSP Web front end in the
com.ibm.example.banking.web bundle.
3.6 Part 1: Start RAD and the WAS Test Environment In this part of the exercise you will start RAD on a new workspace, start the WAS Test Environment if it is not already started, configure your RAD workbench, and import and deploy the StockManager Java EE enterprise application.
__1. Start RAD.
a) From Desktop Menu, select Applications > IBM Software Delivery Platform > IBM Rational Application Developer 8.0
b) When the Workspace Launcher dialog appears, type /Labfiles80/OSGi/workspace for workspace location and press OK.
c) If the Welcome screen appears, close it. d) If the Web perspective is not already showing, select Window > Open Perspective >
Web to open it. This is a good perspective to use for this exercise since it suits the development of Java, JSP, CSS and other Web friendly technologies.
e) Select Window > Web Browser > Firefox to enable RAD to use the external Mozilla® Firefox® browser.
__2. Start WAS.
a) Select the Servers view.

IBM Software
Page 82 WebSphere Lab Jam
b) If WebSphere Application Server v8.0 at localhost shows it is [Stopped], right-click on it
and select Start. c) The Console view will appear automatically to show feedback from WAS while it starts.
This will take several seconds. Once WAS has finished starting, select the Servers view and confirm the status of the server shows [Started, Synchronized].
__3. Run the StockManager Java EE enterprise application.
a) In the Enterprise Explorer, right-click StockManagerApplication and select Run As > Run on Server.
b) If the Run On Server dialog appears, press Finish. The status of the server will change to [Started, Publishing...]. After a few seconds of activity in the Console view, the status of the server will return to [Started, Synchronized].
__4. Review the EJB interface and implementation.
a) In the Enterprise Explorer, expand StockManagerModule > ejbModule > com.ibm.example.stock.
b) Double-click StockManager.java to open and review it in the Java editor. This EJB remote interface as signified by the @Remote annotation declares three operations, getTickerSymbols, isTickerSymbol and getValue.
c) Close the Java editor. d) Double-click StockManagerEJB.java to open and review it in the Java editor. This
stateless session EJB as signified by the @Stateless annotation implements the StockManager interface and its operations. The implementation is very simple, keeping a short static list of a few stick ticker symbols and stock share values.
e) Close the Java editor. f) In the Enterprise Explorer, collapse StockManagerModule.
In this part of the exercise you started RAD and the WAS Test Environment, opened the Web perspective, enabled RAD to use the external Firefox browser, and deployed the Java EE “StockManagerApplication” enterprise application and the “StockManagerModule” EJB module project it contains to the WAS Test Environment. The EJB within this application provides operations to look up and get the share prices of stocks by their ticker symbols. These operations will be used by the StockTrader SCA component later on in the exercise.
3.7 Part 2: Develop the OSGi API bundle In this part of the exercise you will develop the com.ibm.example.banking.api OSGi bundle, the first of three bundles of the BankingApplication.
A bundle is the basic unit of modularity in the OSGi programming model. A bundle is a normal jar that also includes an OSGi MANIFEST.MF metadata file that an OSGi runtime uses to identify the bundle, resolve its dependencies with other bundles, manage its activation and deactivation, and so forth.

IBM Software
Lab 3 –introduction to OSGI Page 83
The com.ibm.example.banking.api bundle defines and exports three Java API interfaces and classes that the other two bundles rely upon. It does not contain any business logic that implements, extends or use the API.
Separating API and business logic into different bundles is a best practice. It allows the freedom to define multiple implementations that extend or use the API without having to duplicate the API interfaces and classes themselves.
__1. Create the bundle project.
a) Select File > New > Project... to open the New Project wizard.
b) Select OSGi > OSGi Bundle Project and press Next >.
c) In the Project name field enter com.ibm.example.banking.api.
d) Insure the Target runtime is set to WebSphere Application Server v8.0.
e) Insure all options under Configuration are un-checked.
f) Un-check Add bundle to application.
g) Press Finish.
h) If the Technology Quickstarts view opens, close it.
__2. Import the Java API source files.
The Java source files for the bundle have been provided to you to save time typing in code.
a) In the Enterprise Explorer, right-click com.ibm.example.banking.api and select Import....
b) In the Import wizard, select General > File System and press Next >.
c) In the From directory field, enter
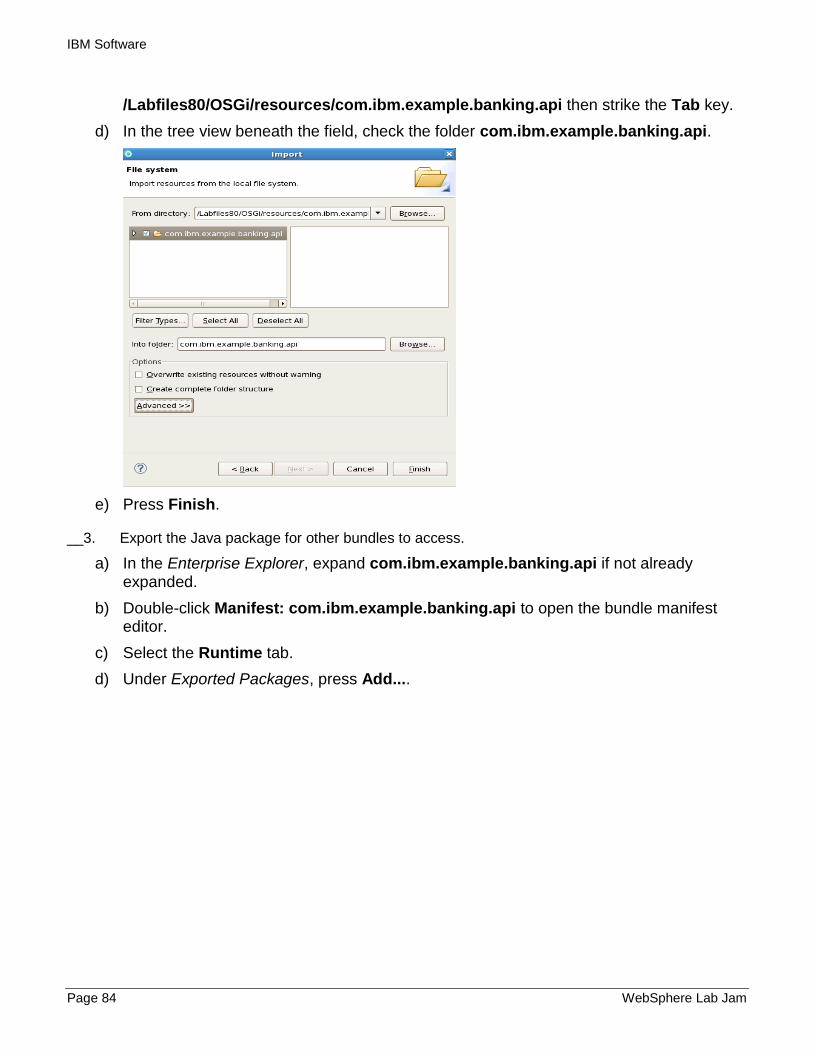
IBM Software
Page 84 WebSphere Lab Jam
/Labfiles80/OSGi/resources/com.ibm.example.banking.api then strike the Tab key.
d) In the tree view beneath the field, check the folder com.ibm.example.banking.api.
e) Press Finish.
__3. Export the Java package for other bundles to access.
a) In the Enterprise Explorer, expand com.ibm.example.banking.api if not already expanded.
b) Double-click Manifest: com.ibm.example.banking.api to open the bundle manifest editor.
c) Select the Runtime tab.
d) Under Exported Packages, press Add....

IBM Software
Lab 3 –introduction to OSGI Page 85
e) Select com.ibm.example.banking and press OK.
f) Press Properties... , enter 1.0.0 in the Version field and press OK.
g) Select File > Save or strike Ctrl-S to save the updated manifest.
In this part of the exercise you created an OSGI Java bundle project containing some reusable API consisting of a business interface and two data beans. You used the bundle manifest editor to export the package containing the API. The bundles you will create in the next new parts of the exercise will depend on the API exported by this bundle.
3.8 Part 3: Develop the OSGi implementation bundle In this part of the exercise you will develop the com.ibm.example.banking.impl OSGi bundle which contains the implementation of the BankingApplication business logic. The com.ibm.example.banking.impl bundle relies on the API exported by the com.ibm.example.banking.api bundle you created in the previous part.
__1. Create the bundle project.
a) Select File > New > Project... to open the New Project wizard.
b) Select OSGi > OSGi Bundle Project and press Next >.
c) In the Project name field enter com.ibm.example.banking.impl.
d) Insure the Target runtime is set to WebSphere Application Server v8.0.
e) Under Configuration, check Generate blueprint file. Leave all other options under Configuration un-checked.
f) Un-check Add bundle to application.

IBM Software
Page 86 WebSphere Lab Jam
g) Press Finish.
h) If the Technology Quickstarts view opens, close it.
__2. Import the API classes from com.ibm.example.banking.api.
a) In the Enterprise Explorer, expand com.ibm.example.banking.impl if not already expanded.
b) Double-click Manifest: com.ibm.example.banking.impl to open the bundle manifest editor.
c) Select the Dependencies tab.
d) Under Imported Packages, press Add... to open the Package Selection dialog.

IBM Software
Lab 3 –introduction to OSGI Page 87
e) In the Exported Packages field, enter com.ibm.example.banking, then press OK to return to the editor. Notice that as you type in the package name, the dialog will help to find available matching packages.
f) Press Properties... , enter 1.1.0 in the Maximum Version field and press OK. This follows the OSGi semantic versioning policy for API implementors (i.e. only imports API definitions that are compatible for implementations).
g) Select File > Save or strike Ctrl-S to save the updated manifest.
__3. Import the Java implementation source file.
The Java source file for the bundle have been provided to you to save time typing in code.
a) In the Enterprise Explorer, right-click com.ibm.example.banking.impl and select Import....
b) In the Import wizard, select General > File System and press Next >.
c) In the From directory field, enter /Labfiles80/OSGi/resources/com.ibm.example.banking.impl then strike the Tab key.

IBM Software
Page 88 WebSphere Lab Jam
d) In the tree view beneath the field, check the folder com.ibm.example.banking.impl.
e) Press Finish.
__4. Open the Blueprint XML Editor.
a) In the Enterprise Explorer, expand com.ibm.example.banking.impl > BundleContent > OSGI-INF > blueprint.
b) Double-click blueprint.xml to open the Blueprint XML editor.

IBM Software
Lab 3 –introduction to OSGI Page 89
c) The editor is equipped with Design and Source tabs. Select the Design tab if it is not
already selected.
__5. Create the Blueprint Structure, the blueprint content have been provided to you to save time.
a) Select the Source tab.
b) Open the given blueprint file /Labfiles80/OSGi/resources/blueprint.xml
c) Select all content from the given blueprint file then press CTRL+C

IBM Software
Page 90 WebSphere Lab Jam
d) Paste the given content on the original blueprint.xml file
e) Select File > Save or strike Ctrl-S to save the blueprint.xml file.
f) Go to the Design Tab striking Design Tab Button
g) A new blueprint structure was created, In that structure we have
1. AccountManagerBean referring to AccountManagerImpl
2. AccountManagerService referring to AccountManagerBean and exposing AccountManager interface as Service Interface.
h) Close the editor.
In this part of the exercise you created another OSGI Java bundle project containing the central business logic of the BankingApplication. You used the bundle manifest editor to establish a dependency from this bundle on the API package exported by the com.ibm.example.banking.api bundle. You defined a Blueprint bean and service that will be used by the third and final bundle in the next part of the exercise.

IBM Software
Lab 3 –introduction to OSGI Page 91
3.9 Part 4: Develop the OSGi Web bundle In this part of the exercise you will develop the com.ibm.example.banking.web OSGi Web bundle which contains a simple JSP Web application for interacting with the BankingApplication. The com.ibm.example.banking.web bundle relies on the API exported by the com.ibm.example.banking.api bundle, and the AccountManager service provided by the com.ibm.example.banking.impl OSGi Blueprint bundle you created in the previous two parts of the exercise.
__1. Create the bundle project.
a) Select File > New > Project... to open the New Project wizard.
b) Select OSGi > OSGi Bundle Project and press Next >.
c) In the Project name field enter com.ibm.example.banking.web.
d) Insure the Target runtime is set to WebSphere Application Server v8.0.
e) Under Configuration, check Add Web support and insure Web 2.5 is selected in the control to the immediate right. Leave all other options under Configuration un-checked.
f) Un-check Add bundle to application.
g) Press Finish.

IBM Software
Page 92 WebSphere Lab Jam
h) If the Technology Quickstarts view opens, close it.
__2. Import the API classes from com.ibm.example.banking.api.
a) In the Enterprise Explorer, expand com.ibm.example.banking.web if not already expanded.
b) Double-click Manifest: com.ibm.example.banking.web to open the bundle manifest editor.
c) Select the Dependencies tab.
d) Under Imported Packages, notice that several packages in support of the Java Servlet and JSP programming models have been automatically added as a result of having checked Add Web support in step [1.e] above. You may also notice that these versions have no upper-bound which goes against the OSGi semantic versioning policy. This is because these are Java EE APIs which are not versioned semantically. Press Add... to open the Package Selection dialog.
e) In the Exported Packages field, enter com.ibm.example.banking, then press OK to return to the editor. Notice that as you type in the package name, the dialog will help to find available matching packages.
f) Press Properties... , enter 2.0.0 in the Maximum Version field and press OK. This follows the OSGi semantic versioning policy for API clients (i.e. only imports API definitions that are compatible for users of the API).
g) Select File > Save or strike Ctrl-S to save the updated manifest.

IBM Software
Lab 3 –introduction to OSGI Page 93
__3. Import the web.xml, Java servlet, JSP and CSS source files.
The web.xml, Java servlet, JSP and CSS files for the Web bundle have been provided to you to save time typing in code.
a) In the Enterprise Explorer, right-click com.ibm.example.banking.web and select Import > Import....
b) In the Import wizard, select General > File System and press Next >.
c) In the From directory field, enter /Labfiles80/OSGi/resources/com.ibm.example.banking.web then strike the Tab key.
d) In the tree view beneath the field, check the folder com.ibm.example.banking.web.
e) Press Finish.
f) If a Question dialog appears asking to overwrite web.xml, press Yes To All.

IBM Software
Page 94 WebSphere Lab Jam
2. Review the imported files.
a) In the Enterprise Explorer, expand com.ibm.example.banking.web > Java Resources > src > com.ibm.example.banking.web and confirm the presence of six Java classes: AddAccountServlet.java, AddOwnerServlet.java, BalanceServlet.java, DepositServlet.java, PurgeServlet.java and WithdrawServlet.java.
b) Double-click BalanceServlet.java to open and review it in the Java editor. This is one of six Java servlet classes that process HTTP POST messages from index.jsp. The class' implementation of the inherited doPost method extracts parameters from the incoming HTTP message that originated from fields of index.jsp, uses the javax.naming.InitialContext API to look up AccountManager service which you created in the com.ibm.example.banking.impl bundle's Blueprint XML configuration file, then invokes appropriate business methods on the AccountManager service. Notice that the code does not care which bundle provides the actual service implementation of the AccountManager interface. The task of identifying and injecting the service is left to the OSGi runtime.
c) Close the Java editor.
d) Optionally, you may open and review the other servlet classes, however, they all have implementations similar to BalanceServlet.

IBM Software
Lab 3 –introduction to OSGI Page 95
e) In the Enterprise Explorer, collapse Java Resources, then expand WebContent and confirm the presence of index.css, index.html and index.jsp. Also expand WEB-INF and confirm the presence of web.xml.
f) Double-click index.jsp to open it in the Page Designer.
g) Page Designer provides four tabs for editing Web application content including HTML, JSP, JSF, JavaScript and Dojo. Select the Split tab if it is not already selected. Use the upper or “WYSIWYG” portion of the editor to explore the visual appearance of the JSP Web application. Use the lower portion of the editor to review the source code. As with the servlets, you will find code near the beginning of the JSP that looks up and invokes operations on the AccountManager service.
h) Close Page Designer.
In this part of the exercise you created the third and final OSGI bundle – in this case, a Web bundle – containing the JSP Web front-end application for working with bank accounts and bank account owners. As in the com.ibm.example.banking.impl bundle, you used the bundle manifest editor to establish a dependency from this bundle on the API package exported by the com.ibm.example.banking.api bundle.
3.10 Part 5: Develop the OSGi Application In this part of the exercise you will create the deployable OSGi application which contains the three bundles. In addition to group bundles together into a deployable unit, the OSGi application also serves as the implementation asset for one of the components in the SCA assembly you

IBM Software
Page 96 WebSphere Lab Jam
will develop in the remaining parts of the exercise.
__1. Create the OSGi application project.
a) Select File > New > Project... to open the New Project wizard.
b) Select OSGi > OSGi Application Project and press Next >.
c) In the Project name field enter BankingApplication.
d) Insure the Target runtime is set to WebSphere Application Server v8.0.
e) Press Next >.
f) On the Contained OSGi Bundles page of the wizard, press Select All and confirm all three bundles appear checked in the Contained Bundles list.
g) Press Finish.
h) If the Technology Quickstarts view opens, close it.
__2. Add upper-bounds to the Application contents.
a) In the Enterprise Explorer, expand BankingApplication.

IBM Software
Lab 3 –introduction to OSGI Page 97
b) Double-click Manifest: BankingApplication to open the OSGi Application Manifest editor.
c) Select the Overview tab and notice that the three OSGi bundles are all listed under the Contained Bundles (Application-Content) section of the editor.
d) Select com.ibm.example.banking.api 1.0.0
e) Select Properties... and enter 1.1.0 in the Maximum Version field. Change the option for this field to Exclusive. This range follows the OSGi semantic versioning policy allowing bug fixed content bundles to be provisioned for the application.

IBM Software
Page 98 WebSphere Lab Jam
f) Repeat the previous step for com.ibm.example.banking.impl and com.ibm.example.banking.web.
__3. Export the AccountManager service.
a) Under General Information, in field Version, delete the default value of 1.0.0.qualifier and enter 1.0.0.
b) Under Exported Services (Application-Exports), press Add....
c) In the first entry field of the resulting OSGi services dialog, enter AccountManager. Service com.ibm.example.banking.AccountManager should appear in the Matching items list.
d) Select com.ibm.example.banking.AccountManager, then press OK to return to the editor.

IBM Software
Lab 3 –introduction to OSGI Page 99
e) Select File > Save or strike Ctrl-S to save the updated manifest.
In this part of the exercise you created an OSGi application containing the three OSGi bundles, and exporting a service for use by the SCA assembly you will develop over the next few parts of the exercise. As of this point you have completed development of the OSGi BankingApplication. In the next few parts of the exercise you will turn your attention to the development of the StockTrader SCA assembly.
3.11 Part 6: Importing the SCA project and composite In this part of the exercise you will create an SCA project and an initially pre-configured SCA composite. In the following parts of the exercise you will develop the components, services, references, bindings and interconnecting wires inside the composite, add the composite to a new contribution, and run and test the completed application on WAS.
__1. Import the SCA project.
a) Select File > New > Import to open the Import wizard.

IBM Software
Page 100 WebSphere Lab Jam
b) Select Existing Project into Workspace
c) Select Select Archive file check item and as target file enter /Labfiles80/OSGi/resources/StockTrader.zip
d) In the Enterprise Explorer, expand project StockTrader > src to verify four packages' worth of Java classes have been successfully imported into the project. You should find a total of nine Java source files spread across four packages.

IBM Software
Lab 3 –introduction to OSGI Page 101
e) In the Enterprise Explorer, expand project StockTrader > SCA Content > Composites, then select StockTrader to verify the SCA composite that have been imported with the project. Inside SCA Composite we have 3 SCA Components.
f) The SCA Composite has been provided in order to save you time typing and configuring code.
3.12 Part 7: Investigate the wires, references and services In this part of the exercise you will investigate how the components are wired inside the composite so that they can talk to each other and to applications that reside outside of the SCA domain. Without wires or bindings, the components would be effectively isolated from the world

IBM Software
Page 102 WebSphere Lab Jam
around them.
__1. the loggerRef reference to the Logger service
The StockTrader component needs the help of a logging service as indicated by its loggingRef reference. The LoggingService component has a compatible service to offer named Logger.
.
__2. accountManagerRef reference to the AccountManager service
The StockTrader component needs the help of a bank account manager as indicated by its accountManagerRef reference. The AccountManager component has a compatible service to offer named AccountManager.
__3. EJB binding to the stockManagerRef reference.
The StockTrader component needs the help of a stock manager as indicated by its stockManagerRef reference. The EJB in the StockManagerApplication you imported and deployed back in Part 1 of the exercise has a compatible service to offer. Unlike the other two references which are satisfied by wires to other components that will be deployed to the same SCA domain, this reference needs to be connected to an artifact outside of the SCA domain. This is when bindings come in handy.
a) In the composite editor, select stockManagerRef reference of the StockTrader component.
b) The Properties view for Component Reference - stockManagerRef will appear below the
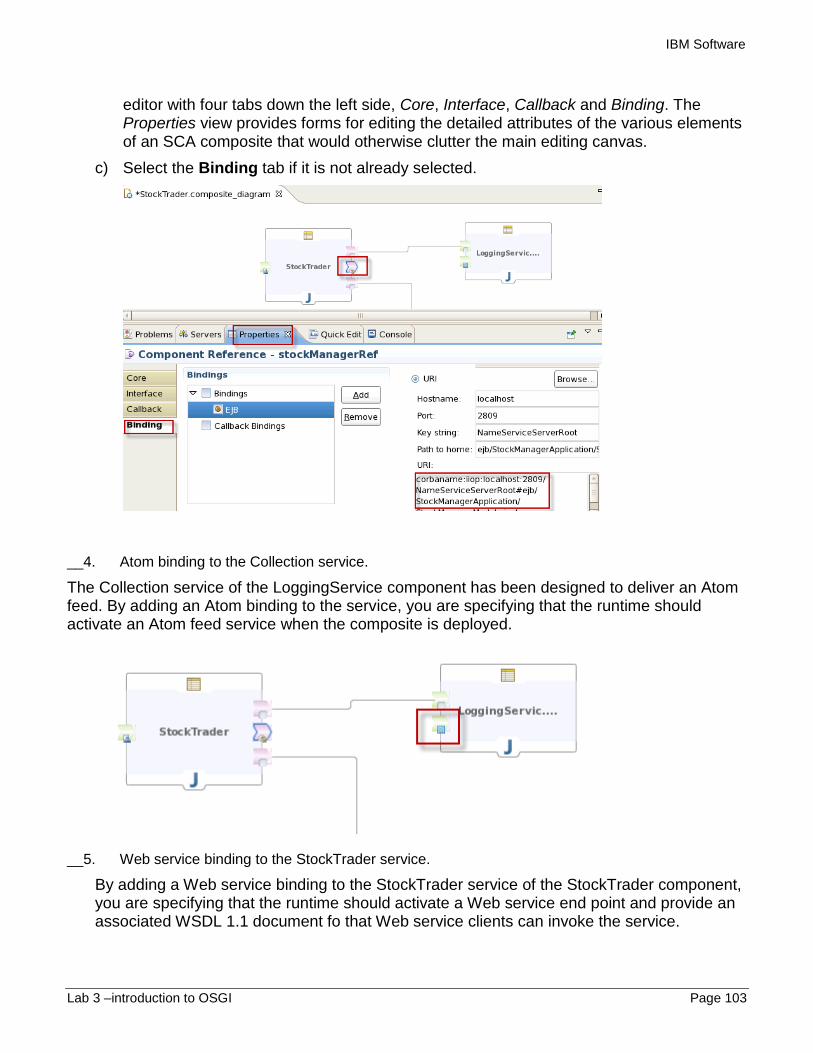
IBM Software
Lab 3 –introduction to OSGI Page 103
editor with four tabs down the left side, Core, Interface, Callback and Binding. The Properties view provides forms for editing the detailed attributes of the various elements of an SCA composite that would otherwise clutter the main editing canvas.
c) Select the Binding tab if it is not already selected.
__4. Atom binding to the Collection service.
The Collection service of the LoggingService component has been designed to deliver an Atom feed. By adding an Atom binding to the service, you are specifying that the runtime should activate an Atom feed service when the composite is deployed.
__5. Web service binding to the StockTrader service.
By adding a Web service binding to the StockTrader service of the StockTrader component, you are specifying that the runtime should activate a Web service end point and provide an associated WSDL 1.1 document fo that Web service clients can invoke the service.

IBM Software
Page 104 WebSphere Lab Jam
__6. Close the composite editor.
In this part of the exercise you investigated the loggingRef and accountManagerRef references on the StockTrader component to services on the LoggingService and AccountManager components. You looked at an EJB binding on the stockManagerRef reference of the StockTrader component to point to the EJB within the Java EE application StockManagerApplication, You saw an Atom binding on the Collection service of the LoggingService component. Last but not least, you took a look at a Web service binding on the StockTrader service of the StockTrader component. Remember that wires are used for communication between components deployed to the same SCA domain, while bindings are used for communication between components and applications residing outside the SCA domain.
3.13 Part 8: Deploy the application In this part of the exercise you will deploy the application to WAS.
1. Run the SCA contribution on WAS.
a) In the Enterprise Explorer, expand StockTrader > SCA Content > Contributions > sca-contribution.
b) Right-click on sca-contribution and select Run As > Run on Server.
c) In the resulting Run On Server dialog, confirm WebSphere Application Server v8.0 at localhost is selected, then press Finish.
d) The status of the server will change to [Started, Publishing...]. After a few seconds of activity in the Console view, the status of the server will return to [Started, Synchronized].

IBM Software
Lab 3 –introduction to OSGI Page 105
e) In the Servers view, fully expand StockTrader. The OSGi BankingApplication appears as a child of StockTrader, and the three OSGi bundles appear as children of BankingApplication.
In this part of the exercise you deployed the SCA StockTrader contribution to WAS. During the deployment process, the tools detected a component with an OSGi application implementation – BankingApplication – and automatically deployed the OSGi application as well. If you wanted to deploy the OSGi application on its own without the SCA StockTrader contribution, you would instead right-click on the BankingApplication OSGi application project and select Run As > Run On Server.
3.14 Part 9: Use the OSGi BankingApplication Web app In this part of the exercise you will use the Web front-end of the OSGi application to create an account owner, open a bank account and deposit some funds.
__1. Launch the Web application in the external Firefox browser.
a) In the RAD main toolbar, select (Open Web Browser).
b) Open http://localhost:9080/com.ibm.example.banking.web/index.jsp
c) The International Bank of Bundles Web application should appear.

IBM Software
Page 106 WebSphere Lab Jam
__2. Create an account owner.
d) In the Administer Clients section of the Web application, enter names into the First name and Last name fields, then press Add new client.
e) The status message “Owner 100 added successfully“ should appear in the grey status area.
f) Back in RAD, in the Console view, you should also see several lines of output produced by System.out.println(...) calls that are instrumented throughout the Java implementation classes of the application. For instance, after step [a] above, the last few lines of the console should read as follows:
com.ibm.ws.webcontainer.servlet.ServletWrapper init SRVE0242I:...
[OSGi] AccountManagerImpl.getOwners() = []
[OSGi] AccountManagerImpl.getAccounts() = []
[JSP] index.jsp: owners = []
[JSP] index.jsp: accounts = []
com.ibm.ws.webcontainer.servlet.ServletWrapper init SRVE0242I:...
[Servlet] AddAOwnerServlet(...
[Servlet] AddAccountServlet(...) firstName=Max
[Servlet] AddAccountServlet(...) lastName=Max
[OSGi] AccountManagerImpl.createOwner(Max,Rich) = 100
[OSGi] AccountManagerImpl.getOwners() =
[Owner{id=100,firstName=Max,lastName=Rich}]
[OSGi] AccountManagerImpl.getAccounts() = []
[JSP] index.jsp: owners =
[Owner{id=100,firstName=Max,lastName=Rich}]
[JSP] index.jsp: accounts = []
__3. Create an account.
a) In the Administer Accounts section of the Web application, enter the client number 100 into the Client ID field, then press Add new account.
b) The status message “Account 1000 opened successfully“ should appear in the grey status area.

IBM Software
Lab 3 –introduction to OSGI Page 107
__4. Deposit funds into the account.
a) In the Access Accounts section of the Web application, enter account number 1000 into the Deposit: Account number field, enter 10000 into the $ field, then press Deposit.
b) The status message “Funds in the amount $10,000.00 deposited to account 1000. The new balance s $10,000.00.” should appear in the grey status area.
In this part of the exercise you used the OSGi Web application to create a new account owner (or client) and a new bank account. You deposited funds into the bank account which will be important if you are going to buy any stock in the next part of the exercise.
3.15 Part 10: Use the SCA StockTrader Web service In this part of the exercise you will use the Web Services Explorer to buy a few shares of stock.
__1. Launch the Web Services Explorer
a) In RAD, select Run > Launch the Web Services Explorer.
b) The Web Services Explorer should open in the external Firefox browser.
c) In the Web Services Explorer (WSE) tool bar, select the icon for the (WSDL Page) icon to switch the WSE from the default UDDI view over to the WSDL view.
d) In the Navigator pane, select WSDL Main to display the Open WSDL form.
__2. Open the StockTrader WSDL document.
a) When you deployed the SCA StockTrader application in Part 13 above, WAS detected the Web service binding on the StockTrader component service and activated a SOAP 1.1 Web service endpoint (http://localhost:9080/StockTrader/StockTrader) as well as a means to retrieve the live WSDL document description of the service (http://localhost:9080/StockTrader/StockTrader?WSDL).
b) In the Actions pane, in the WSDL URL field, enter
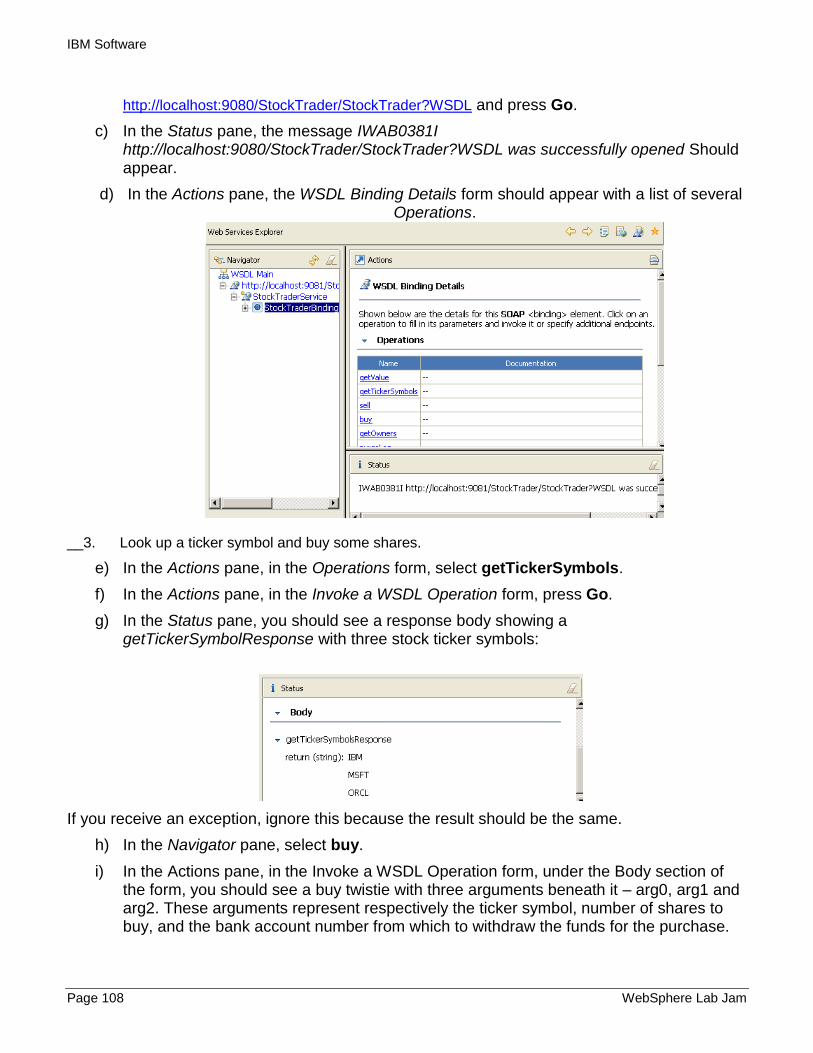
IBM Software
Page 108 WebSphere Lab Jam
http://localhost:9080/StockTrader/StockTrader?WSDL and press Go.
c) In the Status pane, the message IWAB0381I http://localhost:9080/StockTrader/StockTrader?WSDL was successfully opened Should appear.
d) In the Actions pane, the WSDL Binding Details form should appear with a list of several Operations.
__3. Look up a ticker symbol and buy some shares.
e) In the Actions pane, in the Operations form, select getTickerSymbols.
f) In the Actions pane, in the Invoke a WSDL Operation form, press Go.
g) In the Status pane, you should see a response body showing a getTickerSymbolResponse with three stock ticker symbols:
If you receive an exception, ignore this because the result should be the same.
h) In the Navigator pane, select buy.
i) In the Actions pane, in the Invoke a WSDL Operation form, under the Body section of the form, you should see a buy twistie with three arguments beneath it – arg0, arg1 and arg2. These arguments represent respectively the ticker symbol, number of shares to buy, and the bank account number from which to withdraw the funds for the purchase.

IBM Software
Lab 3 –introduction to OSGI Page 109
j) Next to arg0, click Add.
k) Enter IBM into the Values entry field beneath the argument.
l) Next to arg1, click Add.
m) Enter 10 into the Values entry field beneath the argument.
n) Next to arg2, click Add.
o) Enter 1000 into the Values entry field beneath the argument.
p) Press Go.
q) In the Status pane, you should see a response body showing a buyResponse identifying the stock grant that was purchased in terms of the number shares, share price and ticker symbol.
__4. Check the balance of the bank account

IBM Software
Page 110 WebSphere Lab Jam
r) In Firefox, select the Bundle Bank tab to re-display the International Bank of Bundles OSGi Web application.
s) Near the bottom of the Web application, press Refresh.
t) In the Administer Accounts table, the balance of account number 1000 should be updated to $8,351.60.
In this part of the exercise you In this part of the exercise you used the Web Services Explorer to drive the StockTrader application via its Web service entry point. When you used the “buy” operation to purchase stock, you exercised all three components of the SCA assembly, the Blueprint service within the OSGi application, and the EJB in the Java EE StockManager application.
3.16 Part 11: Retrieve the SCA LoggingService Atom feed In this part of the exercise you will
__1. Examine the Atom feed
a) In Firefox, open a new tab (Ctrl-T).
b) Open http://localhost:9080/LoggingService/Collection

IBM Software
Lab 3 –introduction to OSGI Page 111
c) The browser should display a feed with a single entry – a record of the stock purchase you executed in the previous part of the exercise. The feed is being delivered via the Atom binding on the Collection service of the LoggingService component.
d) Optionally, review the System.out.println(...) output in the Console view in RAD for a glimpse into the sequencing and execution of the various Java classes that make of the OSGi, SCA and Java EE applications.
e) Stop the server for the next lab.
In this part of the exercise you pointed Firefox at the Atom feed delivered by the Atom binding on the Collection service of the LoggingService component, which the StockTrader component invokes within the SCA composite to record stock transactions.
Congratulations!
You have reached the end of the exercise!
3.17 Conclusions In this exercise, you used IBM Rational Application Developer for WebSphere Software with the WebSphere Application Server Test Environment to create, run and test an application based on the OSGi and SCA programming models.
You explored several of the wizards, editors and other features of RAD for developing OSGi and SCA assemblies, such as the New OSGi Bundle Project wizard, the New OSGi Application Project wizard, the OSGi bundle manifest editor, the OSGi application manifest editor, the new SCA Project wizard, the new SCA Composite wizard, the SCA composite editor, the SCA contribution editor, and the Validators and Server tools that simplify the deployment of OSGi applications and SCA contributions to the WebSphere Application Server.
You learned about the basics of the OSGi programming model which supports a modular approach to the design and deployment of Java application code. You learned how to create bundles with different kinds of application content, and to specify the contract between bundles using package import and export lists. You learned how to define a Blueprint bean and a Blueprint service, and saw how in Java to look up and use a Blueprint service – the basis for

IBM Software
Page 112 WebSphere Lab Jam
building loosely coupled, fine grained, container managed service components in the Java language.
You learned about the basic of the SCA assembly model which supports the organization of diverse IT assets into reusable service components capable of interacting with other IT assets over a variety of communication protocols. You sampled a few of the implementation kinds supported by SCA: The Java class and the OSGi application. RAD and WAS also support Spring applications, Java EE enterprise applications and HTML documents as implementation kinds. You sampled a few of the bindings supported by SCA: The EJB binding, Web service binding and Atom binding. RAD and WAS also support JMS and HTTP bindings.

IBM Software
Lab 3 - High Performance Extensible Logging Page 113

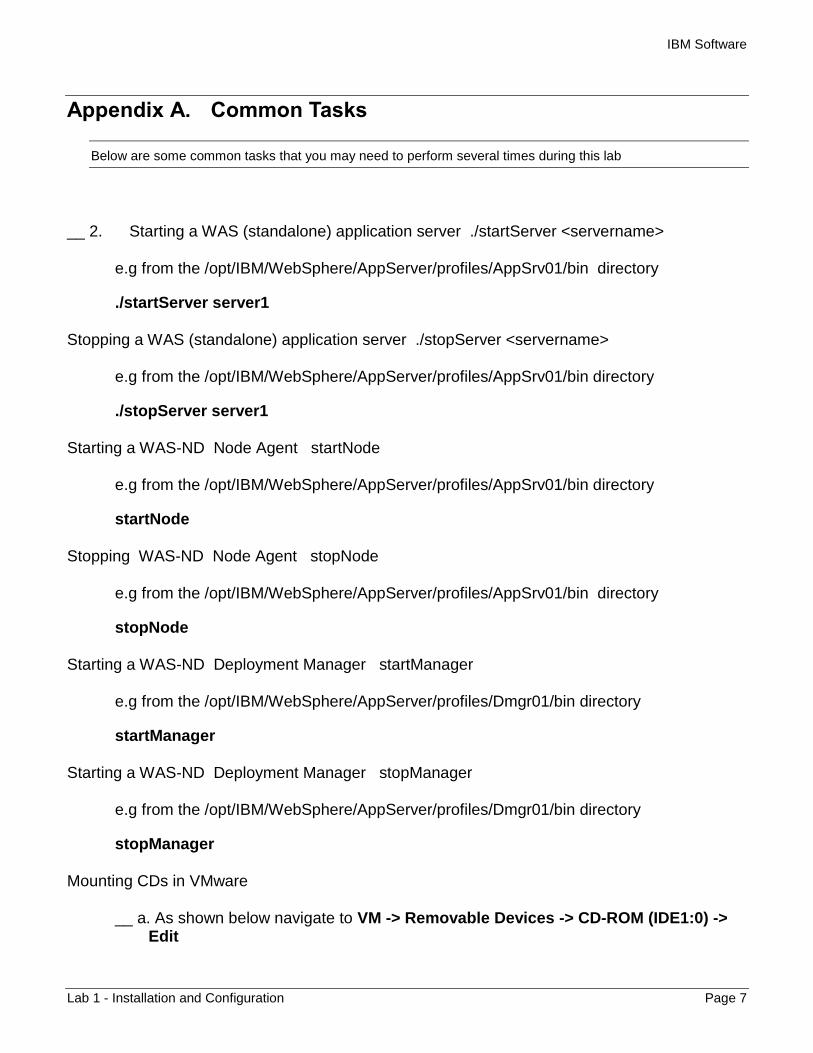
IBM Software
Lab 1 - Installation and Configuration Page 7
Appendix A. Common Tasks
Below are some common tasks that you may need to perform several times during this lab
__ 2. Starting a WAS (standalone) application server ./startServer <servername>
e.g from the /opt/IBM/WebSphere/AppServer/profiles/AppSrv01/bin directory
./startServer server1
Stopping a WAS (standalone) application server ./stopServer <servername>
e.g from the /opt/IBM/WebSphere/AppServer/profiles/AppSrv01/bin directory
./stopServer server1
Starting a WAS-ND Node Agent startNode
e.g from the /opt/IBM/WebSphere/AppServer/profiles/AppSrv01/bin directory
startNode
Stopping WAS-ND Node Agent stopNode
e.g from the /opt/IBM/WebSphere/AppServer/profiles/AppSrv01/bin directory
stopNode
Starting a WAS-ND Deployment Manager startManager
e.g from the /opt/IBM/WebSphere/AppServer/profiles/Dmgr01/bin directory
startManager
Starting a WAS-ND Deployment Manager stopManager
e.g from the /opt/IBM/WebSphere/AppServer/profiles/Dmgr01/bin directory
stopManager
Mounting CDs in VMware
__ a. As shown below navigate to VM -> Removable Devices -> CD-ROM (IDE1:0) -> Edit

IBM Software
Page 8 WebSphere Lab Jam
__ a. As shown below in In the CD-ROM (IDE:1.0) panel 1) Click Browse 2) Select the ISO image desired 3) Click Open 4) Check Connected 5) Click OK

IBM Software
Appendix Page 129
Appendix B. Notices
This information was developed for products and services offered in the U.S.A.
IBM may not offer the products, services, or features discussed in this document in other countries. Consult your local IBM representative for information on the products and services currently available in your area. Any reference to an IBM product, program, or service is not intended to state or imply that only that IBM product, program, or service may be used. Any functionally equivalent product, program, or service that does not infringe any IBM intellectual property right may be used instead. However, it is the user's responsibility to evaluate and verify the operation of any non-IBM product, program, or service.
IBM may have patents or pending patent applications covering subject matter described in this document. The furnishing of this document does not grant you any license to these patents. You can send license inquiries, in writing, to:
IBM Director of Licensing IBM Corporation North Castle Drive Armonk, NY 10504-1785 U.S.A.
For license inquiries regarding double-byte (DBCS) information, contact the IBM Intellectual Property Department in your country or send inquiries, in writing, to:
IBM World Trade Asia Corporation Licensing 2-31 Roppongi 3-chome, Minato-ku Tokyo 106-0032, Japan
The following paragraph does not apply to the United Kingdom or any other country where such provisions are inconsistent with local law: INTERNATIONAL BUSINESS MACHINES CORPORATION PROVIDES THIS PUBLICATION "AS IS" WITHOUT WARRANTY OF ANY KIND, EITHER EXPRESS OR IMPLIED, INCLUDING, BUT NOT LIMITED TO, THE IMPLIED WARRANTIES OF NON-INFRINGEMENT, MERCHANTABILITY OR FITNESS FOR A PARTICULAR PURPOSE. Some states do not allow disclaimer of express or implied warranties in certain transactions, therefore, this statement may not apply to you.
This information could include technical inaccuracies or typographical errors. Changes are periodically made to the information herein; these changes will be incorporated in new editions of the publication. IBM may make improvements and/or changes in the product(s) and/or the program(s) described in this publication at any time without notice.
Any references in this information to non-IBM Web sites are provided for convenience only and do not in any manner serve as an endorsement of those Web sites. The materials at those Web sites are not part of the materials for this IBM product and use of those Web sites is at your own risk.
IBM may use or distribute any of the information you supply in any way it believes appropriate without incurring any obligation to you.
Any performance data contained herein was determined in a controlled environment. Therefore, the results obtained in other operating environments may vary significantly. Some measurements may have

IBM Software
Page 130 Discovering the Value of WebSphere Cast Iron Cloud Integration
been made on development-level systems and there is no guarantee that these measurements will be the same on generally available systems. Furthermore, some measurements may have been estimated through extrapolation. Actual results may vary. Users of this document should verify the applicable data for their specific environment.
Information concerning non-IBM products was obtained from the suppliers of those products, their published announcements or other publicly available sources. IBM has not tested those products and cannot confirm the accuracy of performance, compatibility or any other claims related to non-IBM products. Questions on the capabilities of non-IBM products should be addressed to the suppliers of those products.
All statements regarding IBM's future direction and intent are subject to change or withdrawal without notice, and represent goals and objectives only.
This information contains examples of data and reports used in daily business operations. To illustrate them as completely as possible, the examples include the names of individuals, companies, brands, and products. All of these names are fictitious and any similarity to the names and addresses used by an actual business enterprise is entirely coincidental. All references to fictitious companies or individuals are used for illustration purposes only.
COPYRIGHT LICENSE:
This information contains sample application programs in source language, which illustrate programming techniques on various operating platforms. You may copy, modify, and distribute these sample programs in any form without payment to IBM, for the purposes of developing, using, marketing or distributing application programs conforming to the application programming interface for the operating platform for which the sample programs are written. These examples have not been thoroughly tested under all conditions. IBM, therefore, cannot guarantee or imply reliability, serviceability, or function of these programs.

IBM Software
Appendix Page 131
Appendix C. Trademarks and copyrights
The following terms are trademarks of International Business Machines Corporation in the United States, other countries, or both:
IBM AIX CICS ClearCase ClearQuest Cloudscape
Cube Views DB2 developerWorks DRDA IMS IMS/ESA
Informix Lotus Lotus Workflow MQSeries OmniFind
Rational Redbooks Red Brick RequisitePro System i
System z Tivoli WebSphere Workplace System p
Adobe, Acrobat, Portable Document Format (PDF), and PostScript are either registered trademarks or trademarks of Adobe Systems Incorporated in the United States, other countries, or both.
Cell Broadband Engine is a trademark of Sony Computer Entertainment, Inc. in the United States, other countries, or both and is used under license therefrom.
Java and all Java-based trademarks and logos are trademarks of Sun Microsystems, Inc. in the United States, other countries, or both. See Java Guidelines
Microsoft, Windows, Windows NT, and the Windows logo are registered trademarks of Microsoft Corporation in the United States, other countries, or both.
Intel, Intel logo, Intel Inside, Intel Inside logo, Intel Centrino, Intel Centrino logo, Celeron, Intel Xeon, Intel SpeedStep, Itanium, and Pentium are trademarks or registered trademarks of Intel Corporation or its subsidiaries in the United States and other countries.
UNIX is a registered trademark of The Open Group in the United States and other countries.
Linux is a registered trademark of Linus Torvalds in the United States, other countries, or both.
ITIL is a registered trademark and a registered community trademark of the Office of Government Commerce, and is registered in the U.S. Patent and Trademark Office.
IT Infrastructure Library is a registered trademark of the Central Computer and Telecommunications Agency which is now part of the Office of Government Commerce.
Other company, product and service names may be trademarks or service marks of others.

NOTES

NOTES


© Copyright IBM Corporation 2011.
The information contained in these materials is provided for
informational purposes only, and is provided AS IS without warranty
of any kind, express or implied. IBM shall not be responsible for any
damages arising out of the use of, or otherwise related to, these
materials. Nothing contained in these materials is intended to, nor
shall have the effect of, creating any warranties or representations
from IBM or its suppliers or licensors, or altering the terms and
conditions of the applicable license agreement governing the use of
IBM software. References in these materials to IBM products,
programs, or services do not imply that they will be available in all
countries in which IBM operates. This information is based on
current IBM product plans and strategy, which are subject to change
by IBM without notice. Product release dates and/or capabilities
referenced in these materials may change at any time at IBM’s sole
discretion based on market opportunities or other factors, and are not
intended to be a commitment to future product or feature availability
in any way.
IBM, the IBM logo and ibm.com are trademarks or registered
trademarks of International Business Machines Corporation in the
United States, other countries, or both. If these and other IBM
trademarked terms are marked on their first occurrence in this
information with a trademark symbol (® or ™), these symbols
indicate U.S. registered or common law trademarks owned by IBM at
the time this information was published. Such trademarks may also be
registered or common law trademarks in other countries. A current
list of IBM trademarks is available on the Web at “Copyright and
trademark information” at ibm.com/legal/copytrade.shtml
Other company, product and service names may be trademarks or
service marks of others.