website designer overview choose a site...
TRANSCRIPT

1
Website Designer Overview
Click ‘View’ (View your website)
Note: The default Home Page is the ‘Search’ Template (above). To switch templates and
customize the Home Page, click ‘Customize’ in step 3 above.
Website Designer Overview – Choose a Site Template
Click ‘Website Designer’
Click ‘View’ to view website
Click ‘Customize’ to choose Template and customize pages
2
1
3
1
2
3
2

2
Click ‘Customize’
3
Choose Template:
To preview site template, click
‘Preview’ for any Template
To choose the site template or
customize site, click the radio button
Click ‘Save’ or ‘Cancel’
1
3
2
1
3
2
In essence, all three templates are the same except for the home page. Each home page has
‘Content’ cells that can be customized and changed. User can customize contents in any cell
with wizards. If user deletes contents within a cell, user can choose any ‘Content’ for that
cell from ‘Add Content’. (see below) The Agent and Luxury Templates require some
customization for photos and awards.
Website Designer Choose Site Template

3
Website Designer – ‘Search’ Template
Website Designer Search Template
2 1
3 6
8
4
7
5
Click on URL or icon to view website Click in any cell to edit contents
Click ‘Edit’ to change website settings Click ‘Add’ to add Pages to website
Click on URL or icon to view individual page Click Page Title & edit button to customize
Click ‘Edit’ to edit individual page Click ‘Delete’ to delete page
2
1
7
6
5
3
4 8

4
Website Designer – ‘Agent’ Template
Click on URL or icon to view website Click in any cell to edit contents
Click ‘Edit’ to change website settings Click ‘Add’ to add Pages to website
Click on URL or icon to view individual page Click Page Title & edit button to customize
Click ‘Edit’ to edit individual Click ‘Delete’ to delete page
2
1
7
6
5
3
4 8
Website Designer Agent Template
2 1
3 6
8
4
7
5

5
Website Designer – ‘Luxury’ Template
Website Designer Luxury Template
2 1
3
8
4
5
Click on URL or icon to view website Click in any cell to edit contents
Click ‘Edit’ to change website settings Click ‘Add’ to add Pages to website
Click on URL or icon to view individual page Click Page Title & edit button to customize
Click ‘Edit’ to edit individual Click ‘Delete’ to delete page
2
1
7
6
5
3
4 8
6
7

6
Edit Website Settings
Search Engine Optimization
Site Theme - Color
Create a meta description (to
describe your website to the search
engines and appear in search results)
Click ‘Next’
1
2
Select website color theme by
clicking on box
Click ‘Next’
1
2
1
2
1
2
Website Designer Edit Website Settings

7
Connected Domain Names
Site Property Tracker Account Restrictions
Google Analytics
Click the ‘Add’ button
In the new window, enter
Domain Name to point to website
Click ‘Verify’
Click ‘Next’
1
3
2
Click drop down menu and
choose maximum number of listings
to activate (Default is ‘Unrestricted’)
Click ‘Save’
1
2
1
4
2
3
4
1
2
Website Designer Edit Website Settings
Account Identifier is assigned
Click ‘Save’
1
2
1
2

8
Edit Page – Settings
SEO Page Settings
Page Template
Custom CSS and JavaScript
4
1
2
1
Insert ‘SEO Page Title’ (this will
appear in search engine results)
Insert ‘Description’ (this will
appear under title in search engine
results)
Enter keywords or phrases
separated by a comma (used to
increase SEO and not seen by public)
Click ‘Next’
1
Choose a Page Template
Click ‘Next’
‘Rows’ stretch across the screen
‘Rows and Columns’ have some
cells stretch across the screen
‘Grid’ has rows that stretch
across the screen and split rows
The previewer shows each layout
1
Click ‘Save’
Custom CSS and Java Script are for
advanced users and website
designers.
1
2
1
2
3
2
3
4
Website Designer Edit Page-Settings
Click ‘Edit’
Click ‘Settings’
1
2 1 2

9
Edit Page – Page History
Select a page version to preview
and/or rollback and publish – Click
any row to select
Switch between pages to view all
previous page versions
Select items/versions per page
Click ‘Cancel’ to return to page
editor
1
2
3
4
1
2 3
4
1 2
3
5
Click ‘Preview’ to preview
version in a new window
Click ‘Rollback’ to load version in
page editor
Click ‘Back’ to return to previous
step
Click ‘Cancel’ to return to page
editor
Click ‘Publish’ in page editor to
publish ‘selected’ previous version
1
2
3
5
4
4
Website Designer Edit Page-History & Publish

10
Edit ‘Search’ Template Page
Website Designer Edit Search Template Page
Click ‘Edit’
Click ‘Tap to configure’ in any cell
to configure and edit content
1
2
1
2
Note: This is the agent/broker
default site; each cell has preloaded
content type. To change content
type of any cell, click the trash can
icon to delete Content Type and
then choose a different content to
configure and edit. (see below)

11
Edit ‘Search Background Image’ – Remove Image
Edit ‘Search Background Image’ – Add Image
Choose an Image from the Library
Website Designer Edit Search Template Page-Search Masthead
Click ‘Remove’ to delete the
default background image and to
add a new image
1
3
1
Click ‘Add’ to add a new image
2
3
2
Choose and click a Library
Choose and click on photo/image
Click ‘Set’ to add image
3
5
4
3
5
4

12
Upload a new Image
Override or Hide Default (Picture, Name and Title)
Override
1
To upload a new Image to Library
Click ‘Upload’ to upload a new
image to the Library
In the new window, choose
Picture Library and double click on
image from Picture Library
To select new Image, follow step
above
1
3
2
2
Click ‘Hide Default’ to hide
Photo, Name and Title
Click ‘Override’ to change default
Click ‘Save’ to save changes
1
1 2
1
3
2
Use the editor to edit default
text
Click ‘Override’
1
2 1
2
Website Designer Edit Search Template Page-Search Masthead
3

13
Edit Callout Buttons
1
To edit Callout Buttons,
Click ‘Remove’
Click ‘Add’ to add Callout Button
Click ‘Add’ to choose Button
Click ‘Back’
Click ‘Save’
1
2
2
4
5
3
3
4
5
Website Designer Edit Search Template Page-Callout Buttons

14
Edit ‘Featured Listings’ – Step 1: Title Bar
Edit ‘Featured Listings’ – Step 2: Choose Listings
Edit ‘Featured Listings’ – Step 3: Choose Display Style
1
Check the box to include title bar
Enter title
Click ‘Next’
1
2
1
2
3
1
2
Choose and click radio button to
display ‘My Listings’ or listings from a
Property Tracker Saved Search
If choosing ‘My Listings’, click
and check the boxes for Active,
Pending, Sold or New on Market
Click ‘Next’
(Featured Listings with Property
Tracker Saved Searches can be used
to create interior pages on website
to promote neighborhoods or
specialty searches)
1
3
2
Select Grid or Carousel display
(choice is highlighted in green)
Click ‘Next’
1
2
2 3
3
Website Designer Edit Search Template Page-Featured Listings

15
Edit ‘Featured Listings’ – Step 4: Grid Display
Edit ‘Featured Listings’ – Step 4: Carousel Display
Edit ‘Featured Listings’ – Step 5: Add Manually Listings
1
2
3
Choose number of listings
displayed in Grid
Check box for multiple page
display (an advance button will
appear below the Grid if ‘Show
multiple pages’ is chosen)
Choose ‘Sort by’ (Default is by
price High-Low)
Select ‘Order by’ if Default is not
chosen
Click ‘Next’
1
3
2
1
2
Select ‘Yes’ or ‘No’ (choice is
highlighted in green)
Click ‘Next’
1
2
4
4
5 5
1
Choose number of listings
displayed in Carousel
Choose ‘Sort by’ (Default is by
price High-Low)
Select ‘Order by’ if Default is not
chosen
Click ‘Next’
1
2
2 3 3
4
4
Website Designer Edit Search Template Page-Page History

16
Edit ‘Featured Listings’ – Step 5: Add Manual Listings – By MLS Number
Edit ‘Featured Listings’ – Step 6: Exclude Listings Manually
Edit ‘Featured Listings’ – Step 6: Exclude Listings Manually – By MLS Number
1
2
1
1
2
Enter MLS number and click the
‘Search’ icon (MLS additions appear
under ‘Additions’)
Click ‘Next’
1
2
Select ‘Yes’ or ‘No’ (choice is
highlighted in green)
Click ‘Next’
1
2
Enter MLS number and click the
‘Search’ icon (exclusions will appear
under ‘Exclusions’)
Click ‘Next’
1
2
2
Website Designer Edit Search Template Page-Featured Listings

17
Edit ‘Featured Listings’ – Step 7: Preview Featured Listings
1
2
Preview ‘Featured Listings’
Click ‘Save’
1
2
Website Designer Edit Search Template Page-Featured Listings

18
‘Tap to Add New Content’
Choose Content Type
To learn more about how to add each individual Content Type, see the Add Content Pages.
Click on ‘Content Box’ and follow
steps in Wizard
Click ‘Cancel’ to return to Home
Page
1
2
Website Designer Edit Search Template Page-Add New Content
Tap in box to add new content 1
1

19
Edit ‘Agent’ Template Page
Website Designer Edit Agent Template Page
Click ‘Edit’
Click ‘Tap to configure’ in any cell
to configure and edit content
1
2
1
2
Note: each cell has content type and
content preloaded. Some content
may need editing. To change content
of any cell, click the trashcan icon to
delete Content Type and then
choose a different content to
configure and edit.

20
Edit ‘Brand Masthead’ – Choose a background image or upload a new image
Edit ‘Brand Masthead’ – Choose a background image or upload a new image
Click ‘Remove’ to delete the
default background image and to
add a new image
1
1
Website Designer Edit Agent Template Page-Brand Masthead
Choose and click a Library
Choose and click on photo/image
Click ‘Set’ to add image
3
5
4
3
5
3
Click ‘Add’ to add a new image
2
2
4

21
Upload a new Image
Add Photo (no background PNG photo)
Add Photo (no background PNG photo)
1
To upload a new Image to Library
Click ‘Upload’ to upload a new
image to the Library
In the new window, choose
Picture Library and double click on
image from Picture Library
To select new Image, follow step
above
1
3
2
1 2
Website Designer Edit Agent Template Page-Search Masthead
Click ‘Add’
1
1
1
3
4
Choose and click a Library
Choose and click on photo/image
Click ‘Set’ to add image
2
4
3
2

22
Upload a new Image
Override or Hide Default (Picture, Name and Title)
Override
2
Click ‘Hide Default’ to hide
Name, title, tag line and contact
details
Click ‘Override’ to change default
Click ‘Save’ to save changes
Click ‘Save’ to save changes
1
1
3
2
Use the editor to edit default
text
Click ‘Override’
1
2 1
2
3
1
To upload a new Image to Library
Click ‘Upload’ to upload a new
image to the Library
In the new window, choose
Picture Library and double click on
image from Picture Library
To select new Image, follow step
above
1
3
2
1 2
Website Designer Edit Agent Template Page-Search Masthead

23
Add Awards
Edit ‘Brand Masthead’ – Step 3: Set your Brand Masthead Text
1
2
4
1
Click ‘Add’
1
Choose and click on Library
Choose and click on Image
Click ‘Set’ and continue if needed
2
Click ‘Save’ when finished 1
3
3
4
Website Designer Edit Agent Template Page-Brand Masthead

24
Edit Callout Buttons
Edit ‘Paragraph’
3
2
1
Use the edit tool bar to edit Text
Add/edit Text
Click ‘Next’
1
2
3
1
To edit Callout Buttons,
Click ‘Remove’
Click ‘Add’ to add Callout Button
Click ‘Add’ to choose Button
Click ‘Back’
Click ‘Save’
1
2
2
4
5
3
3
4
5
Website Designer Edit Agent Template Page-Callout Buttons

25
Edit ‘Search Background Image’ – Remove Image
Edit ‘Search Background Image’ – Add Image
Choose an Image from the Library
Website Designer Edit Agent Template Page-Search Masthead
Click ‘Remove’ to delete the
default background image and to
add a new image
1
3
1
Click ‘Add’ to add a new image
2
3
2
Choose and click a Library
Choose and click on photo/image
Click ‘Set’ to add image
3
5
4
3
5
4
26
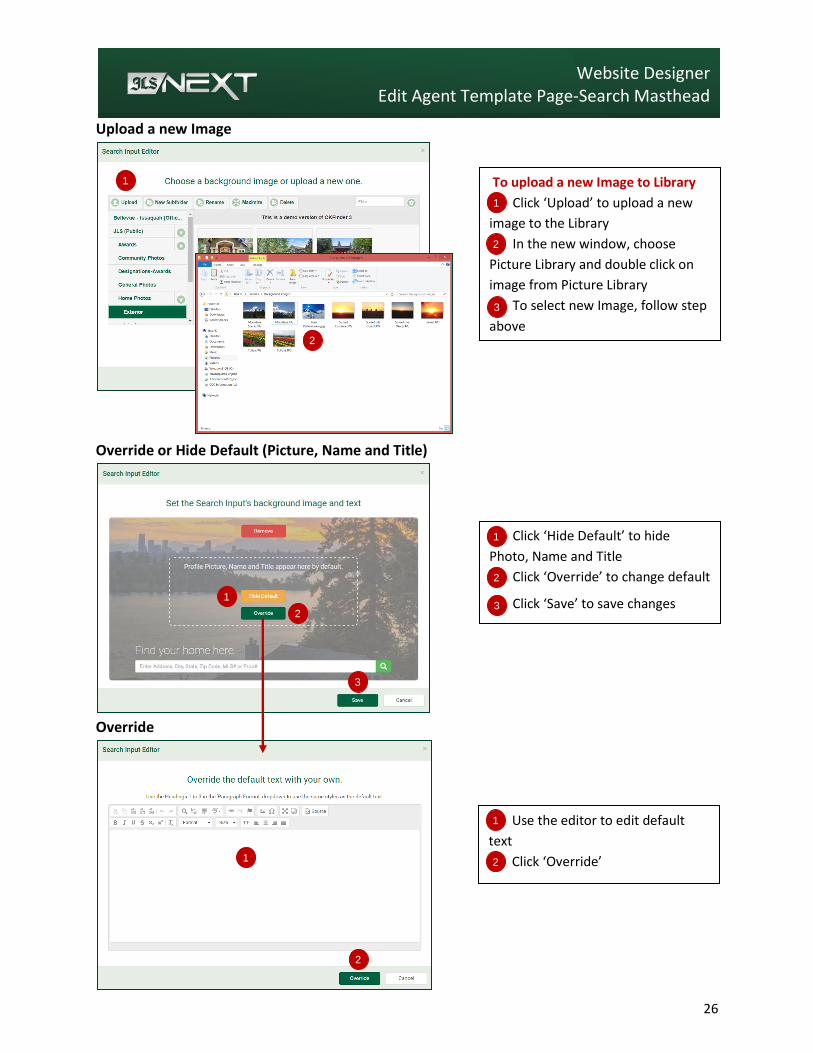
Upload a new Image
Override or Hide Default (Picture, Name and Title)
Override
1
To upload a new Image to Library
Click ‘Upload’ to upload a new
image to the Library
In the new window, choose
Picture Library and double click on
image from Picture Library
To select new Image, follow step
above
1
3
2
2
Click ‘Hide Default’ to hide
Photo, Name and Title
Click ‘Override’ to change default
Click ‘Save’ to save changes
1
1 2
1
3
2
Use the editor to edit default
text
Click ‘Override’
1
2 1
2
Website Designer Edit Agent Template Page-Search Masthead
3

27
Edit ‘Featured Listings’ – Step 1: Title Bar
Edit ‘Featured Listings’ – Step 2: Choose Listings
Edit ‘Featured Listings’ – Step 3: Choose Display Style
1
2
3
1
2
Select Grid or Carousel display
(choice is highlighted in green)
Click ‘Next’
1
2
Website Designer Edit Agent Template Page-Featured Listings
1
Check the box to include title bar
Enter title
Click ‘Next’
1
2
2 3
3
Choose and click radio button to
display ‘My Listings’ or listings from a
Property Tracker Saved Search
If choosing ‘My Listings’, click
and check the boxes for Active,
Pending, Sold or New on Market
Click ‘Next’
(Featured Listings with Property
Tracker Saved Searches can be used
to create interior pages on website
to promote neighborhoods or
specialty searches)
1
3
2

28
Edit ‘Featured Listings’ – Step 4: Grid Display
Edit ‘Featured Listings’ – Step 4: Carousel Display
Edit ‘Featured Listings’ – Step 5: Add Manually Listings
1
Choose number of listings
displayed in Carousel
Choose ‘Sort by’ (Default is by
price High-Low)
Select ‘Order by’
Click ‘Next’
1
2
1
2
Select ‘Yes’ or ‘No’ (choice is
highlighted in green)
Click ‘Next’
1
2
2
3
3
4
4
Website Designer Edit Agent Template Page-Featured Listings
1
2
3
Choose number of listings
displayed in Grid
Check box for multiple page
display (an advance button will
appear below the Grid if ‘Show
multiple pages’ is chosen)
Choose ‘Sort by’ (Default is by
price High-Low)
Select ‘Order by’ if Default is not
chosen
Click ‘Next’
1
3
2
4
4
5 5

29
Edit ‘Featured Listings’ – Step 5: Add Manual Listings – By MLS Number
Edit ‘Featured Listings’ – Step 6: Exclude Listings Manually
Edit ‘Featured Listings’ – Step 6: Exclude Listings Manually – By MLS Number
1
2
1
1
2
Enter or Search for MLS numbers
(additions will appear under
‘Additions’)
Click ‘Next’
1
2
Select ‘Yes’ or ‘No’ (choice is
highlighted in green)
Click ‘Next’
1
2
2
Website Designer Edit Agent Template Page-Featured Listings
Enter or Search for MLS numbers
(exclusions will appear under
‘Exclusions’)
Click ‘Next’
1
2

30
Edit ‘Featured Listings’ – Step 7: Preview Featured Listings
1
2
Preview ‘Featured Listings’
Click ‘Save’
1
2
Website Designer Edit Agent Template Page-Featured Listings

31
‘Tap to Add New Content’
Choose Content Type
Click on ‘Content Box’ and follow
steps in Wizard
Click ‘Cancel’ to return to Home
Page
2
3
Website Designer Edit Agent Template Page-Add New Content
Tap in box to add new content 1
2
3
1

32
Edit ‘Luxury’ Template Page
Website Designer Edit Luxury Template Page
Click ‘Edit’
Click ‘Tap to configure’ in any cell
to configure and edit content
1
2
1
2
Note: each cell has content type and
content preloaded. Some content
may need editing. To change content
of any cell, click the trashcan icon to
delete Content Type and then
choose a different content to
configure and edit.

33
Edit ‘Luxury Masthead’ – Choose a background image or upload a new image
Edit ‘Luxury Masthead’ – Choose a background image or upload a new image
Click ‘Remove’ to delete the
default background image and to
add a new image
1
1
Website Designer Edit Luxury Template Page-Brand Masthead
Choose and click a Library
Choose and click on photo/image
Click ‘Set’ to add image
3
5
4
3
5
3
Click ‘Add’ to add a new image
2
2
4

34
Upload a new Image
Add Photo (no background PNG photo)
Add Photo (no background PNG photo)
1
To upload a new Image to Library
Click ‘Upload’ to upload a new
image to the Library
In the new window, choose
Picture Library and double click on
image from Picture Library
To select new Image, follow step
above
1
3
2
1 2
Website Designer Edit Luxury Template Page-Search Masthead
Click ‘Add’
1
1
1
3
4
Choose and click a Library
Choose and click on photo/image
Click ‘Set’ to add image
2
4
3
2

35
Upload a new Image
Override or Hide Default (Picture, Name and Title)
Override
2
Click ‘Hide Default’ to hide
Name, title, tag line and contact
details
Click ‘Override’ to change default
Click ‘Save’ to save changes
Click ‘Save’ to save changes
1
1
3
2
Use the editor to edit default
text
Click ‘Override’
1
2 1
2
3
1
To upload a new Image to Library
Click ‘Upload’ to upload a new
image to the Library
In the new window, choose
Picture Library and double click on
image from Picture Library
To select new Image, follow step
above
1
3
2
1 2
Website Designer Edit Luxury Template Page-Search Masthead

36
Add Awards
Edit ‘Luxury Masthead’ – Step 3: Set your Luxury Masthead Text
1
2
4
1
Click ‘Add’
1
Choose and click on Library
Choose and click on Image
Click ‘Set’ and continue if needed
2
Click ‘Save’ when finished 1
3
3
4
Website Designer Edit Luxury Template Page-Brand Masthead

37
Edit ‘Search Background Image’ – Remove Image
Edit ‘Search Background Image’ – Add Image
Choose an Image from the Library
Website Designer Edit Luxury Template Page-Search Masthead
Click ‘Remove’ to delete the
default background image and to
add a new image
1
3
1
Click ‘Add’ to add a new image
2
3
2
Choose and click a Library
Choose and click on photo/image
Click ‘Set’ to add image
3
5
4
3
5
4

38
Upload a new Image
Override or Hide Default (Picture, Name and Title)
Override
1
To upload a new Image to Library
Click ‘Upload’ to upload a new
image to the Library
In the new window, choose
Picture Library and double click on
image from Picture Library
To select new Image, follow step
above
1
3
2
2
Click ‘Hide Default’ to hide
Photo, Name and Title
Click ‘Override’ to change default
Click ‘Save’ to save changes
1
1 2
1
3
2
Use the editor to edit default
text
Click ‘Override’
1
2 1
2
Website Designer Edit Luxury Template Page-Search Masthead
3

39
Edit Callout Buttons
Edit ‘Paragraph’
3
2
1
Use the edit tool bar to edit Text
Add/edit Text
Click ‘Next’
1
2
3
1
To edit Callout Buttons,
Click ‘Remove’
Click ‘Add’ to add Callout Button
Click ‘Add’ to choose Button
Click ‘Back’
Click ‘Save’
1
2
2
4
5
3
3
4
5
Website Designer Edit Luxury Template Page-Callout Buttons

40
Add Content – Image
Add Content – Vimeo Video
3
2
1
Choose and click on Library
Choose and click on Image
Click ‘Save’
3
2
1 Enter Vimeo ID
Click ‘Save’
2
1
Website Designer Edit Luxury Template Page-Image and
Video
2
1

41
Edit ‘Featured Listings’ – Step 1: Title Bar
Edit ‘Featured Listings’ – Step 2: Choose Listings
Edit ‘Featured Listings’ – Step 3: Choose Display Style
1
2
3
1
2
Select Grid or Carousel display
(choice is highlighted in green)
Click ‘Next’
1
2
Website Designer Edit Luxury Template Page-Featured Listings
1
Check the box to include title bar
Enter title
Click ‘Next’
1
2
2 3
3
Choose and click radio button to
display ‘My Listings’ or listings from a
Property Tracker Saved Search
If choosing ‘My Listings’, click
and check the boxes for Active,
Pending, Sold or New on Market
Click ‘Next’
(Featured Listings with Property
Tracker Saved Searches can be used
to create interior pages on website
to promote neighborhoods or
specialty searches)
1
3
2

42
Edit ‘Featured Listings’ – Step 4: Grid Display
Edit ‘Featured Listings’ – Step 4: Carousel Display
Edit ‘Featured Listings’ – Step 5: Add Manually Listings
1
Choose number of listings
displayed in Carousel
Choose ‘Sort by’ (Default is by
price High-Low)
Select ‘Order by’
Click ‘Next’
1
2
1
2
Select ‘Yes’ or ‘No’ (choice is
highlighted in green)
Click ‘Next’
1
2
2
3
3
4
4
Website Designer Edit Luxury Template Page-Featured Listings
1
2
3
Choose number of listings
displayed in Grid
Check box for multiple page
display (an advance button will
appear below the Grid if ‘Show
multiple pages’ is chosen)
Choose ‘Sort by’ (Default is by
price High-Low)
Select ‘Order by’ if Default is not
chosen
Click ‘Next’
1
3
2
4
4
5 5

43
Edit ‘Featured Listings’ – Step 5: Add Manual Listings – By MLS Number
Edit ‘Featured Listings’ – Step 6: Exclude Listings Manually
Edit ‘Featured Listings’ – Step 6: Exclude Listings Manually – By MLS Number
1
2
1
1
2
Enter or Search for MLS numbers
(additions will appear under
‘Additions’)
Click ‘Next’
1
2
Select ‘Yes’ or ‘No’ (choice is
highlighted in green)
Click ‘Next’
1
2
2
Website Designer Edit Luxury Template Page-Featured Listings
Enter or Search for MLS numbers
(exclusions will appear under
‘Exclusions’)
Click ‘Next’
1
2

44
Edit ‘Featured Listings’ – Step 7: Preview Featured Listings
1
2
Preview ‘Featured Listings’
Click ‘Save’
1
2
Website Designer Edit Luxury Template Page-Featured Listings

45
Add Content – Search Masthead
Edit ‘Search Background Image’ – Remove Image
Edit ‘Search Background Image’ – Add Image
Choose an Image from the Library
Website Designer Add Content-Search Masthead
Click ‘Remove’ to delete the
default background image and to
add a new image
1
3
1
Click ‘Add’ to add a new image
2
3
2
Choose and click a Library
Choose and click on photo/image
Click ‘Set’ to add image
3
5
4
3
5
4

46
Upload a new Image
Override or Hide Default (Picture, Name and Title)
Override
1
To upload a new Image to Library
Click ‘Upload’ to upload a new
image to the Library
In the new window, choose
Picture Library and double click on
image from Picture Library
To select new Image, follow step
above
1
3
2
2
Click ‘Hide Default’ to hide
Photo, Name and Title
Click ‘Override’ to change default
Click ‘Save’ to save changes
1
1 2
1
3
2
Use the editor to edit default
text
Click ‘Override’
1
2 1
2
Website Designer Add Content-Search Masthead
3

47
Add Content – Brand Masthead
Edit ‘Brand Masthead’ – Choose a background image or upload a new image
Edit ‘Brand Masthead’ – Choose a background image or upload a new image
Website Designer Add Content-Brand Masthead
Click ‘Remove’ to delete the
default background image and to
add a new image
1
1
Choose and click a Library
Choose and click on photo/image
Click ‘Set’ to add image
3
5
4
3
5
3
Click ‘Add’ to add a new image
2
2
4

48
Upload a new Image
Add Photo (no background PNG photo)
Add Photo (no background PNG photo)
1
To upload a new Image to Library
Click ‘Upload’ to upload a new
image to the Library
In the new window, choose
Picture Library and double click on
image from Picture Library
To select new Image, follow step
above
1
3
2
1 2
Website Designer Add Content -Search Masthead
Click ‘Add’
1
1
1
3
4
Choose and click a Library
Choose and click on photo/image
Click ‘Set’ to add image
2
4
3
2

49
Upload a new Image
Override or Hide Default (Picture, Name and Title)
Override
2
Click ‘Hide Default’ to hide
Name, title, tag line and contact
details
Click ‘Override’ to change default
Click ‘Save’ to save changes
Click ‘Save’ to save changes
1
1
3
2
Use the editor to edit default
text
Click ‘Override’
1
2 1
2
3
1
To upload a new Image to Library
Click ‘Upload’ to upload a new
image to the Library
In the new window, choose
Picture Library and double click on
image from Picture Library
To select new Image, follow step
above
1
3
2
1 2
Website Designer Add Content-Brand Masthead

50
Add Awards
Edit ‘Brand Masthead’ – Step 3: Set your Brand Masthead Text
1
2
4
1
Click ‘Add’
1
Choose and click on Library
Choose and click on Image
Click ‘Set’ and continue if needed
2
Click ‘Save’ when finished 1
3
3
4
Website Designer Add Content-Brand Masthead

51
Add Content – Paragraph
Add Content – Image
3
2
1
Use the edit tool bar to edit Text
Add/edit Text
Click ‘Save’
1
2
3
3
2
1
Choose and click on Library
Choose and click on Image
Click ‘Save’
3
Website Designer Add Content-Paragraph
and Image
1
2

52
Add Content – Vimeo Video
Add Content – YouTube Video
Add Content – HTML/Embed
2
1 Enter Vimeo ID
Click ‘Save’
2
1
2
1 Enter YouTube ID
Click ‘Save’
2
1
2
1 Paste HTML
Click ‘Save’
2
1
Website Designer Add Content-Video and HTML/Embed

53
Add Content – Callout Buttons
Edit ‘Paragraph’
Website Designer Add Content-Callout Buttons
3
2
1
Use the edit tool bar to edit Text
Add/edit Text
Click ‘Next’
1
2
3
1
To edit Callout Buttons,
Click ‘Remove’
Click ‘Add’ to add Callout Button
Click ‘Add’ to choose Button
Click ‘Back’
Click ‘Save’
1
2
2
4
5
3
3
4
5

54
Add Content – ‘Featured Listings’ – Step 1: Title Bar
Edit ‘Featured Listings’ – Step 1: Title Bar
Edit ‘Featured Listings’ – Step 2: Choose Listings
Edit ‘Featured Listings’ – Step 3: Choose Display Style
Website Designer Add Content-Featured Listings
1
2
3
1
2
Select Grid or Carousel display
(choice is highlighted in green)
Click ‘Next’
1
2
1
Check the box to include title bar
Enter title
Click ‘Next’
1
2
2 3
3
Choose and click radio button to
display ‘My Listings’ or listings from a
Property Tracker Saved Search
If choosing ‘My Listings’, click
and check the boxes for Active,
Pending, Sold or New on Market
Click ‘Next’
(Featured Listings with Property
Tracker Saved Searches can be used
to create interior pages on website
to promote neighborhoods or
specialty searches)
1
3
2

55
Edit ‘Featured Listings’ – Step 4: Grid Display
Edit ‘Featured Listings’ – Step 4: Carousel Display
Edit ‘Featured Listings’ – Step 5: Add Manually Listings
1
Choose number of listings
displayed in Carousel
Choose ‘Sort by’ (Default is by
price High-Low)
Select ‘Order by’
Click ‘Next’
1
2
1
2
Select ‘Yes’ or ‘No’ (choice is
highlighted in green)
Click ‘Next’
1
2
2
3
3
4
4
Website Designer Add Content-Featured Listings
1
2
3
Choose number of listings
displayed in Grid
Check box for multiple page
display (an advance button will
appear below the Grid if ‘Show
multiple pages’ is chosen)
Choose ‘Sort by’ (Default is by
price High-Low)
Select ‘Order by’ if Default is not
chosen
Click ‘Next’
1
3
2
4
4
5 5

56
Edit ‘Featured Listings’ – Step 5: Add Manual Listings – By MLS Number
Edit ‘Featured Listings’ – Step 6: Exclude Listings Manually
Edit ‘Featured Listings’ – Step 6: Exclude Listings Manually – By MLS Number
1
2
1
1
2
Enter or Search for MLS numbers
(additions will appear under
‘Additions’)
Click ‘Next’
1
2
Select ‘Yes’ or ‘No’ (choice is
highlighted in green)
Click ‘Next’
1
2
2
Website Designer Add Content-Featured Listings
Enter or Search for MLS numbers
(exclusions will appear under
‘Exclusions’)
Click ‘Next’
1
2

57
Edit ‘Featured Listings’ – Step 7: Preview Featured Listings
1
2
Preview ‘Featured Listings’
Click ‘Save’
1
2
Website Designer Add Content-Featured Listings