webcampus help resources
TRANSCRIPT

Webcampus Manual Student Edition
FDU Webcampus – Student Manual Page 2
WEBCAMPUS HELP RESOURCES
FDU Technical Assistance Center
Now Available 24 Hours a Day! The online course software running on the Webcampus server is called Blackboard. Specifically, FDU is using Blackboard Version 9. If you have questions about any Webcampus/Blackboard features, you can contact University Technical Assistance Center, the University helpdesk support organization. Students, faculty and staff may contact UTAC to initiate support requests for online courses as well as other issues with computer technology the University supports. UTAC’s procedure is to initiate your support request, verify your contact information, assist with troubleshooting and problem-solving, and to escalate to more specialized assistance, if necessary. The goal is to provide timely and effective support, so that you may focus on your work, and your goals. Phone: (973) 443-UTAC Same as: (973) 443-8822
Email: [email protected] WWW: http://isweb.fdu.edu/depts/utac.html
Notice: The contents of this manual have been adapted from material copyrighted by Blackboard. All modifications have been made by the Center for Teaching and Learning with Technology, Fairleigh Dickinson University.

FDU Webcampus – Student Manual Page 3
TABLE OF CONTENTS
WEBCAMPUS HELP RESOURCES ............................................................................ 2
FDU Technical Assistance Center ....................................................................................... 2
TABLE OF CONTENTS ............................................................................................ 3
WHAT DO I NEED TO GET STARTED? ...................................................................... 4
Minimum Hardware Requirements....................................................................................... 4
Supported Browsers and Operating Systems .................................................................... 4
Software requirements: ............................................................. Error! Bookmark not defined.
Computer-Related Services .................................................................................................. 5
HOW DO I ACCESS MY ONLINE COURSE? ............................................................... 6
OVERVIEW OF THE MY FDU PORTAL ....................................................................... 7
GLOBAL NAVIGATION MENU .................................................................................. 8 Global Navigation Options .............................................................................................. 9
Webcampus In-Depth: Tools .............................................................................................. 19
OVERVIEW OF AN ONLINE COURSE ....................................................................... 20
Using the Navigation Menu/Buttons .................................................................................. 21
Navigating in a Course ........................................................................................................ 22 Navigating Between Content Areas .............................................................................. 22 Navigating Within a Content Area................................................................................. 22
Course Tools and Resources ............................................................................................. 23 Announcements ............................................................................................................. 23 Course Information ........................................................................................................ 24 Faculty Information ........................................................................................................ 24 Course Materials ............................................................................................................. 24 Assignments ................................................................................................................... 25 Assignments Continued (SafeAssign) ......................................................................... 27 Communication .............................................................................................................. 32 Sending E-mail ................................................................................................................ 33 Discussion Board ........................................................................................................... 35 Collaboration................................................................................................................... 40 Check Grade.................................................................................................................... 41
WEBCAMPUS HELP RESOURCES .......................................................................... 42

WHAT DO I NEED TO GET STARTED?
Webcampus courses require the use of a reasonably up-to-date computer with Internet access. We recommend the following basic hardware and software (although individual instructors may have specific additional requirements):
Minimum Hardware Requirements
PC Macintosh
Windows XP or newer 400 MHz Pentium 3 Processor (800 MHz P4 for Vista) 56 Kbps phone line or broadband Modem Sound Card and Speakers Access to a printer
Mac OS X (As necessary to run software, below) PowerPC or Intel Processor 56 Kbps phone line or broadband Modem Speakers Access to a printer
Supported Browsers and Operating Systems
Blackboard™ Learn Release 9.1 As of 11th
November 2015
Certified: fully tested and supported.
Compatible: partially tested but should function properly.
Provisional: future technologies considered supported by Blackboard Support.
Unsupported: either impossible or not tested.
Microsoft® Windows® Operating System

Apple® Mac OS® Operating System
WINDOWS OS
Blackboard strives to make all its products as accessible as possible. JAWS for Windows
11 and 12 were used during accessibility testing.
Blackboard Learn requires the latest version of Java Runtime environment (JRE 6). The
JRE can be downloaded from http://java.sun.com/javase/downloads/index.jsp. JRE 7 is
not supported.
The following technologies are not supported:
Internet Explorer 6 and Internet Explorer 7
Firefox 1.x, 2.0, 3.0, and 3.5
Safari 2.0, 3.x (or any version on Windows)
Mac OSX 10.4 "Tiger"
Java 5
Internet Explorer 8 and Internet Explorer 9 are tested in Standards Mode. Some known
issues can be resolved by using Compatibility Mode (emulates IE7 behavior).
Both Google Chrome and Mozilla Firefox have moved to a rapid release cycle. At the
time of testing, Chrome 16.0 and Firefox 9.0 were the latest available versions. Since
then, new stable versions may have been released and widely adopted. Blackboard is
supporting all newer stable versions of Chrome and Firefox.
Computer-Related Services
Internet Service Provider (ISP)
For Internet access
FDU Webmail address If you have not yet created your FDU email account, you should immediately visit the website: http://webmail.fdu.edu

HOW DO I ACCESS MY ONLINE COURSE?
You must have a Webmail account and be officially registered for the course.
Step 1: Register for Webmail account.
If you need to, you can create your account by going to http://webmail.fdu.edu. Click on the “create new webmail account” link and follow the directions. If you have trouble, please call (973) 443-8822 or email [email protected].
Note: It may take as long as 24 hours to create your Webmail account, so be sure to take care of this as soon as possible.
Step 2: Go to FDU’s home page http://www.fdu.edu
Step 3: Go to the WEB SHORTCUTS pulldown menu.
Step 4: Select “Webcampus” from the pulldown menu.
Step 5: Enter your Webmail username and password in the “Login Here” box.

Note: Your username is your entire Webmail login address (e.g. [email protected]) and your password is your Webmail password.
Step 6: Click the Login button.
Having Trouble with Your Password? Passwords are case sensitive, so you may want to check the capitalization of your password. If you have forgotten your password, you can reset it at https://webmail.fdu.edu. If you still have problems, please contact (973) 443-8822 or email [email protected].
OVERVIEW OF THE MY FDU PORTAL
The first page you will see is the “My FDU Portal page”, or simply the portal page. The next few pages will show you the various areas of the Portal page. The picture below is a snapshot of how your Portal page may appear.

You can see from this picture that the portal page is really divided into two main sections.
Global Header: The top of the portal page shows you the Global Header, which is a global navigation scheme. You will be able to access different resources by clicking on the assorted buttons and tabs. The My FDU tab will always bring you back to the portal page.
Global Navigation Menu: A bar on the top right-hand corner of the portal page provides access to the Global Navigation Menu. This provides a short-cut for you to navigate among many of the time-sensitive areas in your Webcampus course.
Tools and Content Area: This is where you will access specific areas of the system, including your courses. At the top of this section, you should see the word “Welcome,” followed by your name. You should see an area on the left side of the screen called Tools. These tools will allow you to quickly access course tools. Although this area doesn’t have an official title, we are going to call it the Contents Page from now on.
GLOBAL NAVIGATION MENU
The Global Navigation menu lets you navigate among all Webcampus Posts, Updates, My Grades and Calendar entries for all Webcampus courses you are enrolled in. You can also reply to Discussion board posts directly in the Global Navigation Menu. First log in to Webcampus. Click to expand the Global Navigation Menu located in the upper-right hand corner of the Webcampus screen.

Expanding the Global Navigation Menu
Global Navigation Options
Bb Home:
Select this option to view multiple notifications for all of your Webcampus courses. The types of notifications that will be displayed include: Calendar, Due Today, Due This Week, Recently Graded, and Posts.
Bb Global Navigation Home Page

Viewing and Replying to Posts:
Click the Posts icon in the Global Navigation Menu. You will be taken to the Posts page of the Global Navigation Menu. Previews of all posts will be listed on the left hand panel. Click on the preview of the post in the left hand panel if you want to reply. The post will then be displayed in the right hand panel. The two options for replying to a post from the Notification Center include “Reply” or “Quote”. The “Quote” option allows you to include a quote of the initial post in your reply, using the Visual Text Box Editor. The “Reply” option allows for a simple reply using the Visual Text Box Editor.
Options for Replying to a Post
Viewing Updates:
The Updates page of the Global Notifications Dashboard will list all COURSES WITH UPDATES in the left hand panel followed by all ANNOUNCEMENTS listed below the course updates. You may navigate to a course to view the new update by clicking the updates title.

Clicking on the update of the title
You may navigate to a specific update by clicking on the title of the update listed in the right hand corner of the All menu.
Clicking the title link

Accessing your Webcampus Calendar
Click the Calendar icon in the Global Navigation Menu.
Navigating to your Calendar
By default the Calendar will display all entries for the current month. There are three views for the Calendar: Day view, Week View and Month view. To change the default view of your Webcampus calendar, click either the “Day” “Week” or “Month” option to cycle among views.
Viewing the display options
You can cycle between calendar entries by clicking either the last or next option. If you want to display the information for the current day, click the “Today” button.

Navigating to Today’s events
By default all calendars will be displayed. To choose which calendars are displayed, unselect the check box in the Calendar group next to the course you do not want to display.
Reviewing the filter options

How to make calendar entries
Calendar entries can be created for any course regardless of whether you are logged in to the actual course. Note: You will not need to create an entry for any Webcampus item that has a due date associated with it. Start by clicking the “+” icon in the upper right hand corner of the Calendar page.
Click the “New Event Name…” field and enter a Name for the event.
Providing a name for the event
By default the entry will be created for your Personal calendar. To associate the event with a course, click the drop down icon in the Calendar field. Next, select the course that you are creating the entry for from the menu.

Selecting the Calendar Review the Start and End period for the calendar entry. To change the Start or End period of the entry double click the “Starts:” field then click the day for the entry. Next slide the bar to set the hour and the minute of the start period. Repeat the previous steps for the “Ends:” field.
Setting the Starts period
Events can be set for an All-day or Repeat occurrence. If this is a reoccurring event click the “Repeat” check box.

Clicking the Repeat check box
The reoccurrence menu will expand. Options for an event to repeat include: Daily, Weekly or Monthly. Click the “Repeats:” drop down menu and click the appropriate option for the event to repeat.
Reviewing the Repeats: period
For weekly repeats, click either the up arrow or down arrow in the “Every:” field to specify how many weeks this occurrence will repeat.

Reviewing the number of weeks for the occurrence
Next click the appropriate days in the “On Day(s)” field to set on which days the event will repeat.
Reviewing the days for the Repeats: settings
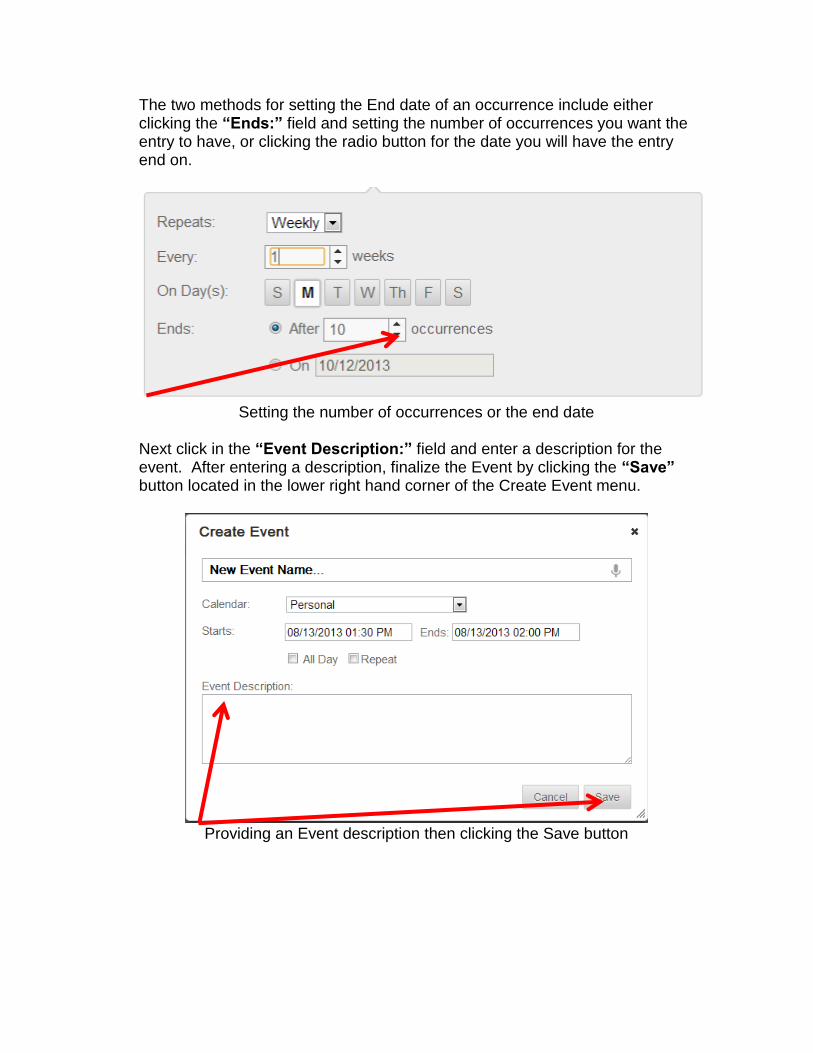
The two methods for setting the End date of an occurrence include either clicking the “Ends:” field and setting the number of occurrences you want the entry to have, or clicking the radio button for the date you will have the entry end on.
Setting the number of occurrences or the end date
Next click in the “Event Description:” field and enter a description for the event. After entering a description, finalize the Event by clicking the “Save” button located in the lower right hand corner of the Create Event menu.
Providing an Event description then clicking the Save button

Webcampus In-Depth: Tools
Now we are going to look at the Tools section in depth.
Announcements – Users can view important messages from faculty whose courses they are taking, as well as messages from the System Administrator (at the Center for Teaching and Learning with Technology).
Calendar – Users can manage their course and personal events; there are three possible views – daily, weekly, or monthly.
Tasks – The Tasks page organizes your projects and allows you to track their status. A user can post personal tasks to their page, or faculty might post tasks specific to your courses.
My Grades – Some faculty might choose to use the Online Gradebook feature of the Blackboard software. If they do, you can check your grades for their course(s) here.
Send E-mail – Users can access email functions for your specific courses, and can send email messages to other users in your courses.
Address Book – Just like the address book for your email, you can add contact information of your friends here. Keep in mind, you must enter a profile for one of your classmates or friends, even if they are already a system user.
Personal Information – Your contact information is automatically entered into the Webcampus system. Since your contact information is tied directly to the FDU Webmail system, you will need to make changes to your contact information in the Webmail system. Please keep in mind the following information:
Note: You will not be able to change your email address. You
can, however, have your Webmail forwarded to another address by using the Account Maintenance link at https://webmail.fdu.edu.
Note: If you want to change your password, you will need to do so through Webmail at https://webmail.fdu.edu using the Account Maintenance link.

OVERVIEW OF AN ONLINE COURSE
A course website consists of three areas, or frames.
The Course Path allows users to return to any page accessed between the main course page and the current page. Sometimes called the breadcrumb trail, because you can see where you are in the course. Click on a blue link to move back in the course.
The Navigation Menu/Buttons links users to content areas and tools.
The Content frame displays the course material.
The image presented above is an example of how an online course will appear when you first access the course. If you’ve been following along on your own computer, you will probably also notice that the Global Header also appears – just above the Course Path identified in the picture. Since this header will follow a user everywhere in the Blackboard system, we are going to exclude it from our images. Click on links in the Navigation panel to move between parts of the course (course components). These components appear in the Main Course panel. When the Navigation panel is visible, there is a button with a leftward-pointing arrow next to the Main Course panel. Clicking that will collapse the view of the
Course path
Navigation menu
Content

Navigation panel. Clicking on the button with the rightward-pointing arrow will expand the Navigation panel.
Navigation panel open.
Navigation panel closed.
Using the Navigation Menu/Buttons
The most important thing for you to pay attention to is the navigation system that appears down the left-hand side of your course page. Your instructor may choose to use either buttons or a text menu. Your instructor has complete control over the options used for navigation but here is a list of the more common menu options, along with their features:
Announcements: This is the default page that opens when you first access your course. You can access previous announcements by using the tabs that appear at the top of the frame.
Course Information: General information concerning your course, such as the syllabus, grading policies, and links to the FDU Academic Integrity Policy.
Faculty Information: Contact information for your instructor, including office hours, email address, and office phone number.
Course Material: This is where the actual content of your course is likely to be located. You will find your readings, assignments, and links to recommended websites. Some faculty members prefer to call this button Course Documents.
Communication: There are several methods of communicating with your instructor and fellow classmates. Your instructor may decide to have

separate buttons for these methods (so don’t be surprised if you see separate buttons for Send E-mail, Discussion Board, or Virtual Classroom.)
Tools: This feature is similar to the Tools section from the portal page, so you will probably see options like Calendar, Tasks, and Address Book.
Navigating in a Course
You navigate within the Webcampus environment just like you navigate in any Website – you click on “hyperlinks” that take you to a new destination. There are really two types of navigation that you will need to be aware of: navigating between content areas, and navigating within a content area.
Navigating Between Content Areas
As you probably already guessed, you navigate between content areas by clicking on any of the navigation buttons or menu options located on the left-hand side of the screen.
Navigating Within a Content Area
The content of your course will be presented in an orderly structure, making it easy for you to navigate between units of your course. To open folders and files:
Step 1: Click on a folder title (usually blue and underlined) to open the folder.

Step 2: Click on the name of a link to access a specific file.
In addition, internal navigation buttons will appear at the top of each page to allow you to move within a section easily (in this example, we are moving around Week #1: A. Introduction, which is inside Unit One – Science and the Global Challenge).
Course Tools and Resources
Announcements
The Announcements page is usually the very first screen you will see when you enter your course. Your instructor will use the announcements to notify you about new information pertaining to your course. These announcements might contain information about when assignments are due, changes to the syllabus, and corrections to the materials.
Click here
Course Information
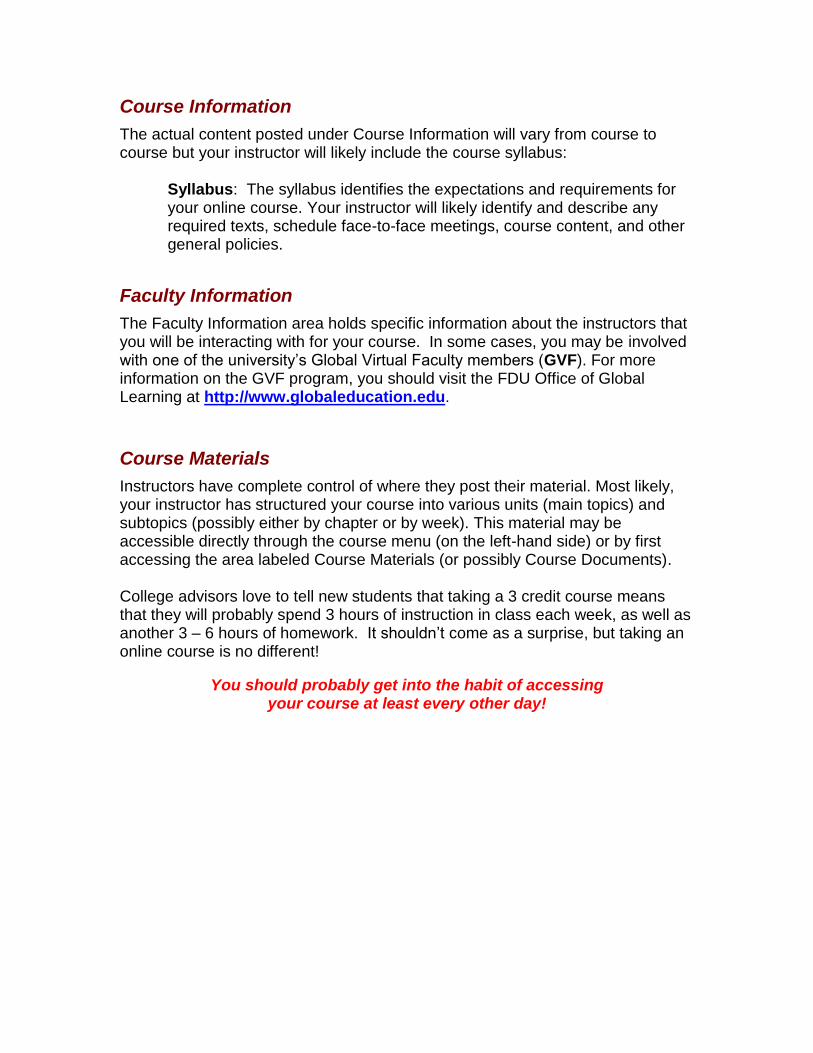
The actual content posted under Course Information will vary from course to course but your instructor will likely include the course syllabus:
Syllabus: The syllabus identifies the expectations and requirements for your online course. Your instructor will likely identify and describe any required texts, schedule face-to-face meetings, course content, and other general policies.
Faculty Information
The Faculty Information area holds specific information about the instructors that you will be interacting with for your course. In some cases, you may be involved with one of the university’s Global Virtual Faculty members (GVF). For more information on the GVF program, you should visit the FDU Office of Global Learning at http://www.globaleducation.edu.
Course Materials
Instructors have complete control of where they post their material. Most likely, your instructor has structured your course into various units (main topics) and subtopics (possibly either by chapter or by week). This material may be accessible directly through the course menu (on the left-hand side) or by first accessing the area labeled Course Materials (or possibly Course Documents). College advisors love to tell new students that taking a 3 credit course means that they will probably spend 3 hours of instruction in class each week, as well as another 3 – 6 hours of homework. It shouldn’t come as a surprise, but taking an online course is no different!
You should probably get into the habit of accessing your course at least every other day!

Assignments
The Webcampus software provides you with a way to submit completed assignments to your instructor. Assignments may consist of essays, reports, group projects, presentations or SafeAssignments. These assignments may be presented under Course Material or Assignments. Below is an example of an assignment. You will be provided with information about the assignment.
Your instructor may require that you submit your work in a certain format (e.g., in Microsoft Word). If you aren’t sure what version your instructor is using, it might be a good idea for you to save your assignment in a file format that can be read on most machines. The section that follows explains how to save your file in hypertext markup language (HTML), which is the same format that is used to create web pages.
Submitting a Document As an Assignment
Step 1: Navigate to the appropriate location under Assignments or Course Material.
Step 2: Click the Assignment link.
Step 3: Enter any Comments that you would like your instructor to receive.
Step 4: Click the Browse button. This will open a small pop-up window.

Step 5: Navigate to the location where you saved the file. Choose your saved file by selecting it. Then, click the Open or Select button.
Step 6: If necessary, use the Add Another File option.
Step 7: Click the Submit button. You will receive a confirmation receipt.
Reviewing Submission / Checking Grades
Step 1: Navigate to the appropriate location under Assignments or Course Material.
Step 2: Click View/Complete.
Step 3: You will receive a message stating that the assignment has already been completed. Click OK.
Step 4: Your comments and file(s) will be appear under My Work.
Step 5: Any grades, comments, and files will appear under Feedback From Instructor.

Assignments Continued (SafeAssign)
Assignments Using SafeAssign
Instructors can use the SafeAssign service to check submitted assignments for potential plagiarism. SafeAssign compares your submitted assignments against a set of academic papers to identify areas of overlap between the submitted assignment and existing works.
SafeAssign is based on a unique sentence-matching algorithm capable of detecting exact and inexact matching of sentences from your paper and other source material. Assignments are compared against several different databases containing millions of articles dating from the 1990s to the present. After the comparison, SafeAssign generates a report that provides detailed information about the matches found.
Your instructor is using SafeAssign if you see a SafeAssign statement and a list of supported file types on the submission page.
Originality Reports
After a paper is processed, SafeAssign generates a report detailing the percentage of text in the submitted paper that matches existing sources. The report also shows the suspected sources for each section that returns a match. When the paper is a

continuation of a previously submitted work, your instructor can delete matching sources from the report and process it again.
The originality report does not state whether a phrase that matches a source is properly referenced. Your instructor must read the report and determine if you used proper citations.
Your instructor decides if you can see the report.
Access the Report
If your instructor has allowed access to the SafeAssign originality report, you can
check if you properly cited your sources.
In the course area, click the assignment link to access the Review Submission
History page. A SafeAssign section appears in the grading sidebar. While the report
is processing, the following statement appears:Report in progress...
When the report is ready to view, a percentage appears in the grading sidebar.
Expand the SafeAssign link and click View Originality Report to view the results in
a new window.

Report Layout
A SafeAssign originality report is divided into three areas:
Report information
Citations
Manuscript text
If you need more space for viewing the paper's text, you can collapse the right panel
with the right-pointing arrow. The highlighting colors remain in the collapsed view.
Report information
Report information appears in the right panel of the report. When you reduce the
width of the viewing area, this information appears at the top. You can view data
about the paper, such as the percent of matching text, word count, and when it was
submitted. If you included multiple attachments, they appear with the report
information. You also have an option for viewing a printable version. This printable
version is the most effective view of the report for users who rely on assistive
technology to access Blackboard Learn. At the top of the page, click Print to view
the printable version. Download the PDF to email to others.

Citations
The sources that include text that matches the submitted paper's text are listed in the
right panel of the report.
Manuscript text
The submitted paper appears in the left panel of the report. All matching blocks of
text are identified. Each source has a color specific to the source—up to 30 unique
colors for 30 different sources. Text matching a source is highlighted in the source
color and identified with a number. In the right panel, you can clickShow/Hide All
Highlighting to turn source highlighting off and on for all sources at one time. You
can turn the highlighting off and on for only one citation. Click Remove or Show
Highlighting next to a citation.
Click a matching block of text to display information about the original source and the
probability that the block or sentence was copied from the source.
Multiple Attachments and Attempts
SafeAssign recognizes your multiple attempts for an individual assignment as
submitted by the same student for the same assignment. SafeAssign does not check
the contents of your current attempt against content from previous submissions.
If you include more than one attachment with an assignment, they are listed in the
report. Click a file name link to view the file's text in the left panel and view its word
count in the right panel.

Interpret SafeAssign Scores
Sentence matching scores represent the percentage probability that two phrases
have the same meaning. This number reflects the reciprocal to the probability that
these two phrases are similar by chance. For example, a score of 90 percent means
that there is a 90 percent probability that these two phrases are the same. There is a
10 percent probability that they are similar by chance and not because the submitted
paper includes content from the existing source—whether appropriately attributed or
not.
The overall SafeAssign score indicates the probability that the submitted paper
contains matches to existing sources. This score is a warning indicator only. Review
papers to see if the matches are properly attributed.
Scores below 15 percent: These papers typically include some quotes and few
common phrases or blocks of text that match other documents. Typically, these
papers do not require further analysis as there is no evidence of plagiarism.
Scores between 15 percent and 40 percent: These papers include extensive
quoted or paraphrased material, or they include plagiarism. Review these papers to
determine if the matching text is properly referenced.
Scores over 40 percent: A very high probability exists that text in these papers
was copied from other sources. These papers include quoted or paraphrased text in
excess, and need to be reviewed for plagiarism.

How Students View Their Instructor’s Comments
Your instructor can provide comments about your paper directly on Webcampus or upload a document with his/her comments.
Follow these steps to view or download your instructor's comments:
Step 1: Return to the SafeAssignment and click
View/Complete.
Step 2: Scroll to the bottom to see the comments (if the
instructor has entered any directly).
Step 3: If the instructor has attached a separate file
with comments, you will see an option to
Download.
Step 4: Click to download the file with the comments.
Communication
The Blackboard software provides you with many ways to communicate with your instructor, Global Virtual Faculty, and fellow students. These include e-mail, discussion boards, group chats and file transfers. As was the case with the navigation buttons, this area can be customized by your instructor, so some of the options listed here may not be available to you:
Information such as assignment due dates, syllabus changes, and corrections.
Create and manage blogs for course and group work.
Asynchronous tool with discussion threads and responses.
Listing of groups in the course and access to private group areas.
Displays detailed information about your grades in the course.
Send email to students and other instructors in the course.

Sending E-mail
The Webcampus Send E-mail tool is a quick and easy way to send email to your instructor as well as other students. You can e-mail individual students, groups of students, all students, or all course members (including Global Virtual Faculty). The most important thing for you to remember is that this tool only supports outgoing e-mail. Messages that are sent using this tool will be received at your FDU Webmail account (webmail.fdu.edu). If you are using your own computer, you might want to configure an e-mail client (like Eudora or Outlook Express) to receive your Webmail. You can find instructions on how to configure your system at isweb.fdu.edu, or under the View Documentation link on the Webmail (webmail.fdu.edu). If you would like, you can set up your Webmail account to automatically forward all mail to another email account. For instance, you might want to use this option if you have a Hotmail or AOL account that you use regularly. Please be advised that you will still need to remember your Webmail user information (remember – this information is how you will log into your course in the first place!) If you are interested, you should access the webmail.fdu.edu site and choose the Account Maintenance option.
In the example that follows, we will show you how to send e-mail to another student:
Step 1: Click on the Communication button.
Step 2: Select the Send E-Mail option.
Step 3: Click on the Select Users option.

Step 4: In the Available to Select box, click to select the name of the user you want to send a message to, or control-click or shift-click to select multiple names. Click on the rightward pointing arrow button between the Available to Select and Selected boxes to add names to the list of users you want to send your message to.

Step 5: Use the Subject field to provide some description of the topic of your message, so users know why they are getting this message, and are more likely to open it.
Step 6: Type your message In the Message field.
Step 7: Click the Submit button. The Blackboard system will indicate if the submission was successful.
Step 8: Click the OK button.
Discussion Board
Webcampus provides a discussion board as a communication tool to use for your online course. This feature is designed for asynchronous use, so users do not have to be online at the same time in order to carry on a conversation. Discussion board conversations are logged and organized using Forums that contain threads. You should think of a Forum as a main topic – like “Rain Forests.” Threads are more like questions about a topic. In this case, a thread might say something like “Annual destruction of rain forests.” Replies to a thread will be indented, giving the user a sort of hierarchical structure to illustrate the relationship between messages.
Accessing the Discussion Board
To begin: Your instructor may provide a link directly to the appropriate Discussion Board in an Announcement. Simply click on the link provided
OR
Click on the Discussion Board button or menu text from the navigation bar. Click the name of the Forum that you would like to access.
Click on link – Week #4

Tree View or List View
Webcampus provides two ways to look at threads and posts in a discussion board. You can change views at the thread detail level by clicking on one or the other buttons in the upper right part of the screen

Tree View arranges the posts in a thread in indented collapsible and expandable lists under their parent posts. Click on the box with a plus sign to expand, and on the box with a minus sign to collapse those lists of subposts. List View simply arranges the posts in chronological order, based on the times when posts were submitted. List view will also show you whether posts have been “tagged,” and will let you select all the posts in a thread that have been tagged with the same category or tag, by clicking on the tag in the List View list.
To Read and Respond to a Post
Step 1: Click the name of the message (thread) that you would like to read or respond to.
Step 2: Read the message, at the bottom of the page. Click the Reply button to post a reply.
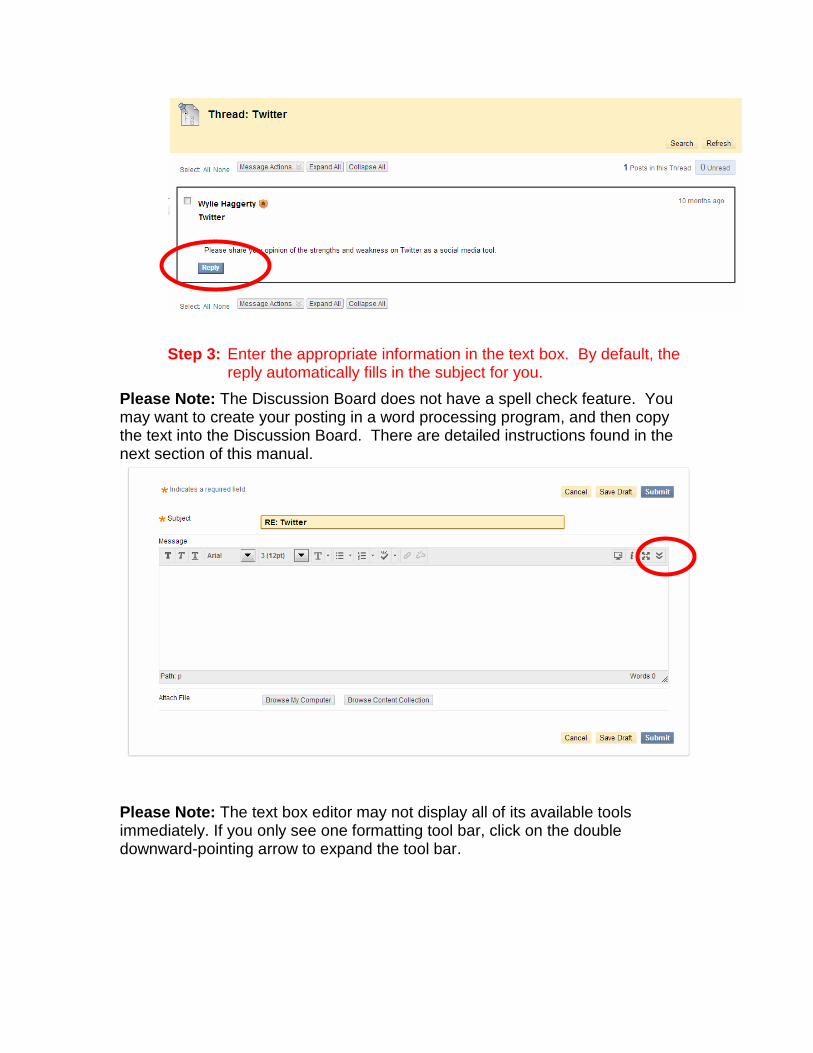
Step 3: Enter the appropriate information in the text box. By default, the reply automatically fills in the subject for you.
Please Note: The Discussion Board does not have a spell check feature. You may want to create your posting in a word processing program, and then copy the text into the Discussion Board. There are detailed instructions found in the next section of this manual.
Please Note: The text box editor may not display all of its available tools immediately. If you only see one formatting tool bar, click on the double downward-pointing arrow to expand the tool bar.

Step 4: Your instructor may make it possible for you to post anonymously. Check the box to post as Anonymous. This is not recommend, and will be rare, for special reasons.
Step 5: If you wish to attach a file to your posting, click the Browse My Computer button. You will need to locate and select the file from your computer (or disk), and then click Open or Select.
Step 6: Click Save Draft to save your message as a draft.
Step 7: Click Submit to post your message.

Step 8: Then click OK to enter another forum or click a link to view another message in the current forum.
Starting a New Thread
Your instructor may give you the ability to create a new thread. To check if you have this ability, look for a Create Thread button.
Step 1: In the forum where you’d like to start a new thread, click the Create Thread button.
Step 2: The rest is the same as posting a message. Enter the Subject and Message to be posted.
Step 3: Select the appropriate Options.
Step 4: If you wish to attach a file to your posting click the Attach a file link and locate the file.
Step 5: Click Submit to post your message.
Collaboration
Group Collaboration
Occasionally, your instructor may want you to conduct group research or to work with other students in a collaborative manner. If this is the case, your instructor will probably ask you to use the Groups tools to keep in communication with the members of your Group. Your instructor can grant you access to a number of Group tools (which are simply group versions of the Communication tools that we have already seen earlier in this manual). These tools include Send E-mail, Discussion Board, Virtual Classroom, and File Exchange. Keep in mind that these group tools are separate from the class communication tools. Only users assigned to a specific group will be able to access the Group tools.
Step 1: Click on the Communication button or text link from the course menu.
Step 2: Click the Group Pages option.
Step 3: Click on the name of the group that you are assigned to.
Step 4: Select the Group Tool that you would like to use (you can refer to other parts of this manual for detailed instructions on how to use these features.)

Check Grade
If your instructor has made this feature available, then you will be able to check your grade by selecting the My Grades option from the Navigation menu. Please note that you will only be able to see your grades – not those of your classmates. Similarly, none of your classmates will be able to see how you have scored on assignments.
Generally speaking, your final grade in the class will be a combination of how you have performed on tests, essays and projects, as well as a class participation component. Your instructor might not use the Grade tool for all assignments, so your total points listed may not reflect your actual grade in the course.

WEBCAMPUS HELP RESOURCES
FDU Technical Assistance Center
Now Available 24 Hours a Day!
The Fairleigh Dickinson University Technical Assistance Center (UTAC) is the university helpdesk support organization. Students, faculty and staff may contact the UTAC to initiate support requests for online courses as well as other software and/or hardware issues. UTAC’s primary goal is to initiate your support request, verify your contact information, assist with troubleshooting and resolution, or to swiftly escalate to resolving parties so that you may focus on your work, and your goals.
Phone: (973) 443-UTAC (973) 443-8822
Email: [email protected] WWW: http://isweb.fdu.edu/depts/utac.html