laviemathematique.files.wordpress.com€¦ · web viewskip this step if your district does not...
TRANSCRIPT

Class Update FormIf there are any steps that aren’t working for you, please contact me and I’ll try to help! To save some time, I created a Sample Class Roster and a Sample Update Form.
Sample Roster : Sample Update Form : goo.gl/QztNrA goo.gl/AUJjRY
1. When you click those links, it will ask you if you’d like to make a copy. Click “Make a copy”. It will create a new Form and Sheet in your Google Drive with the names “Copy of…” You can change the names to whatever you want.
2. Go to the Roster. The top row needs to stay that way (if your district does not give students their own Google Apps usernames, it would be easiest to leave this column blank), but you will need to fill in the rest of the information for your classes. I suggest leaving your name in one row of it so that you can test it. This is what the Form is going to use to know who to send emails to and what other information to collect without the students having to answer more questions in their survey.
3. SKIP THIS STEP IF YOUR DISTRICT HAS CHROMEBOOKS FOR EVERY STUDENT WITH THEIR OWN GOOGLE APPS USERNAME!!! Go to the Update Form. Add a question that asks for the students’ names. Make the Question Type either “Multiple choice” or “Choose from a list”. Fill in the names in the list exactly how you have them written in the “Name” column of your Roster. You should drag this question so that it is the first question. Make sure this is a required question.
You can actually copy and paste the column into the first choice box for the question and it should copy the rest of the names into the other choices to save time!
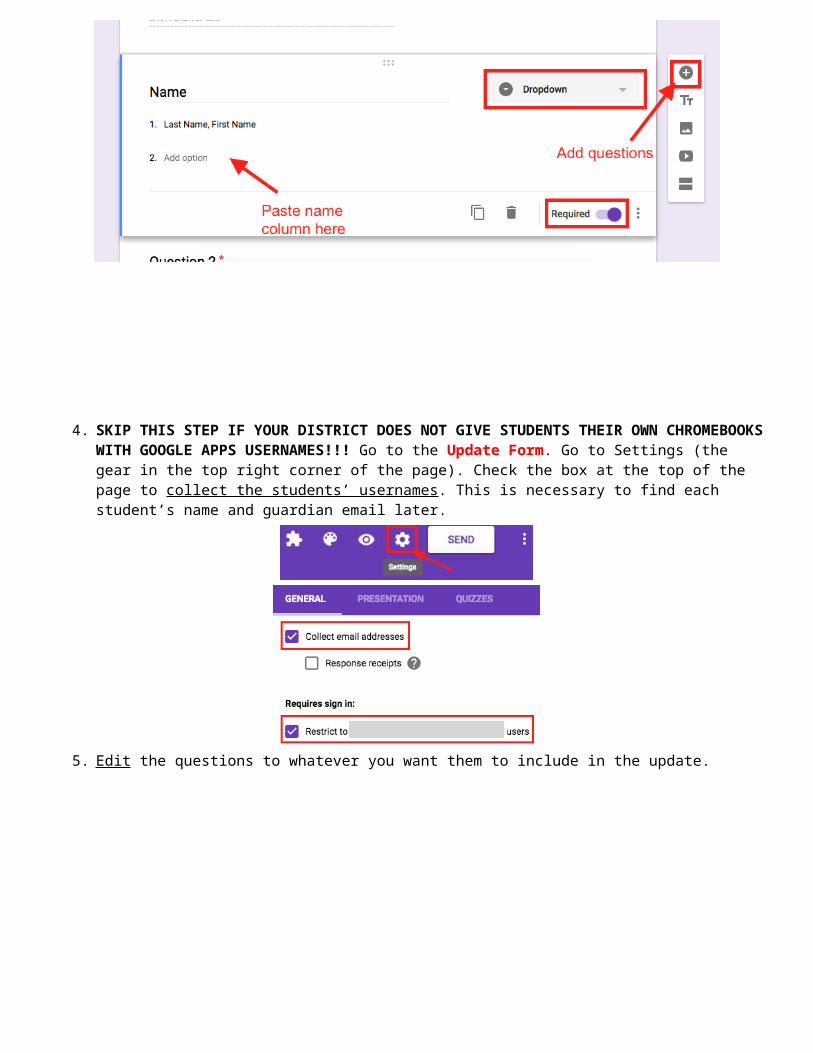
4. SKIP THIS STEP IF YOUR DISTRICT DOES NOT GIVE STUDENTS THEIR OWN CHROMEBOOKS WITH GOOGLE APPS USERNAMES!!! Go to the Update Form. Go to Settings (the gear in the top right corner of the page). Check the box at the top of the page to collect the students’ usernames. This is necessary to find each student’s name and guardian email later.
5. Edit the questions to whatever you want them to include in the update.
6. Click Preview (the eye in the top right corner of the page) and take your survey (you will need your name in your Roster to do this). The responses don’t matter as long as you select your name (if you did step 3) or you have your school username collected (if you did step 4).
7. Go back to the Form and click “Responses”. Then, click the green square on the right to make a Responses Sheet in your Google Drive. When it asks you to create a new spreadsheet, click Ok.

This is where the fun stuff starts…
8. Add a sheet and rename it “ImportedParentRoster”.
9. In cell A1 of ImportedParentRoster, type (without the brackets) =IMPORTRANGE("[Roster’s Spreadsheet Key]","[Name of Sheet being used in Roster]!A:D").
Mine looks like: =IMPORTRANGE("1QwQhxoEUFgIzxR7mScfDt2NHOPU-6IcAGptPRB_NtOw","Period 1!A:D")
10. When you hit enter, you will see #REF in the cell. Don’t worry! You just need to hover over that cell and a popup will appear that asks you to “Allow Access”. Click that and then some magic should happen – your Roster should appear!
11. Go back to the Form Responses 1 sheet. In the first blank column (if you left the same amount of questions as my sample form, this will be cell H1), type =VLOOKUP($B1,ImportedParentRoster!$A:$C,3,0). When you press enter, it should make that cell turn into “Student First Name”. This formula looks at the B column to find the name that goes with the Student First Name in your Roster.Mine looks like =VLOOKUP($B1,ImportedParentRoster!$A:$C,3,0)
12. Copy that cell and paste it into the cell under it (H2). This should look at the test response you did and find your first name from the Roster.
13. In the next blank column (if you left the same amount of questions as my sample form, this will be cell I1), type =VLOOKUP($B1,ImportedParentRoster!$A:$D,4,0). When you press enter, it should make that cell turn into “Guardian Email”. This formula looks at the B column to find the name that goes with the Guardian Email in your Roster.
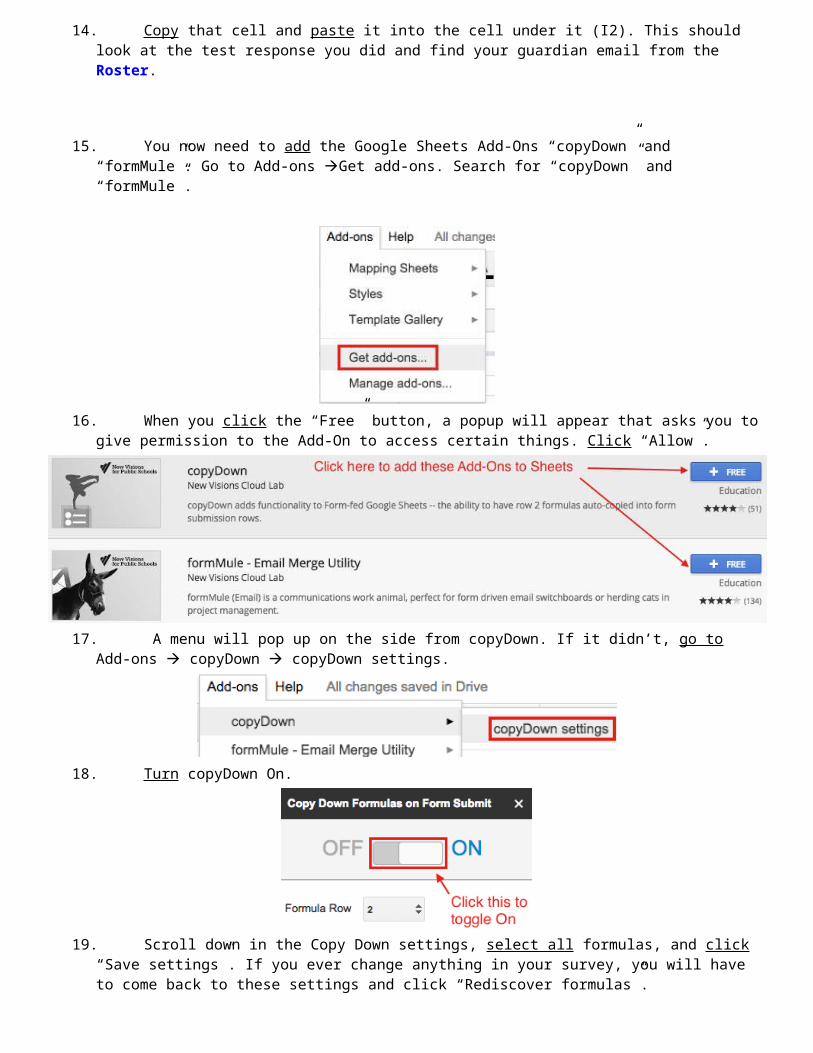
Mine looks like =VLOOKUP($B1,ImportedParentRoster!$A:$D,4,0)14. Copy that cell and paste it into the cell under it (I2). This should look at the test response you did and find your
guardian email from the Roster.

15. You now need to add the Google Sheets Add-Ons “copyDown” and “formMule”. Go to Add-ons Get add-ons. Search for “copyDown” and “formMule”.
16. When you click the “Free” button, a popup will appear that asks you to give permission to the Add-On to access certain things. Click “Allow”.
17. A menu will pop up on the side from copyDown. If it didn’t, go to Add-ons copyDown copyDown settings.
18. Turn copyDown On.
19. Scroll down in the Copy Down settings, select all formulas, and click “Save settings”. If you ever change anything in your survey, you will have to come back to these settings and click “Rediscover formulas”.
20. Open formMule by going to Add-ons formMule Launch
21. Select “Form Responses 1” as the sheet that contains your email addresses and merge source data. Then, turn on the Form Trigger. Click “Next: Templates and send conditions”.
22. Do not change anything on this screen. Just click “Save template settings”.

23. Now click “Next: Edit templates”.
24. You can now build the email that gets sent out however you want. Anything that appears in << >> in this screen will be replaced by the response from the survey. When you are done, click “Preview and send all”.

25. The email that gets sent out will now be shown. If you don’t like it, click “Edit template(s)”. If you like it, you can click “Send now”. Once you click “Send now”, it will save and send this email template every time the survey gets submitted!
26. To send the survey to students, go to your Update Form and click “Send” in the top right corner. If you click the middle button after “Send via”, it will give you a link to share with your students. I put mine on the About page in my Google Classroom since they go to the same form every week.
You are now ready to use the Class Update! You can add more information to your roster to be found by =VLOOKUP, such as grades, as long as you follow the same formula. Really anything can be added to these updates!
***Note: If you aren’t using an EDU Google Apps account, you will only be able to send 100 emails a day through this. ***If you had the Name question, I suggest taking out your name from the choices once you are ready to send the form to students.
I hope that you were able to follow the steps and are excited to use this in your class! Please let me know if there is anything that isn’t working for you.