memberfiles.freewebs.commemberfiles.freewebs.com/55/27/97422755/documents… · web viewall...
TRANSCRIPT

Welcome to the Legend of the Crystal Skull walkthrough! If it’s your first time to play any Nancy Drew game, then start on Junior Detective because the puzzles are easier. Also, if you want to, consult the “How to be a Detective” book on Nancy’s desk for guidance to become your very own detective. However, if it’s not your first Nancy Drew game, choose whatever difficulty you want. All spoilers that appear in this walkthrough will be in red, italicized, and have the word “spoiler” in front of them.
A Knockout Introduction
Nancy’s at the Bolet Mansion to check up on Henry Bolet, who’s taking care of his deceased uncle’s estate, Bruno Bolet, at Ned’s request.
When Nancy gets to the front door, knock on it and then Nancy will open the door and walk through it. She’ll notice the footprints on the floor and turn into the first room off the hallway, which is where the footprints lead. Nancy will see a skeletal figure looking at something across the room. The figure will turn around and see Nancy standing there trying to talk to it. Then the figure will disappear when the room goes dark and reappear as a bolt of lightning lights up the room. He’ll show up right in front of Nancy. When that happens, the figure will throw stuff in Nancy’s face, causing her to knock out. When she wakes up, Renee Amande, Henry’s uncle’s housekeeper, will offer Nancy a drink (concoction more like it) that’s supposed to help Nancy. It doesn’t matter if Nancy drinks it or not, it’s not detrimental to the rest of the game. After Nancy either denies or accepts the drink, she’ll explain what happened and she’ll introduce herself to Renee. Renee will then introduce herself to Nancy and will then suggest that they should call the police and report the skeleton, but Henry won’t have it. When Nancy and Renee are done talking, Renee will go pot plants in the garden.
Get up from the chair and then go over and talk to Henry. He’ll let Nancy investigate, but warns her about his uncle’s exotic pets. Some of them are still alive and Bruno didn’t believe in cages. Go look at Bruno Bolet’s trophies. Pick up the tall silver one in front and hear something rolling in it. Look at the top and pick up the lid. Grab the eye that Nancy finds in the trophy. Then go over to the left of the fireplace and look at the bookshelf with the teeth on it. Look at the shelves with the teeth on it and click on one of the books. The books move! Look at the shelves above the teeth and click on one of the books, which also move. This means that they’re used for something other than reading. Nancy will figure this out later.
The Great Room and Bolet Crypt
Head out of the room and down the hallway. Go into the room that the skeleton figure was, which is the great room. Look at the model cemetery across the room. He was looking at something in it. Look at the puzzle on the model crypt in the upper left corner. Nancy will need to know what picture goes in which place to solve it. The actual crypt in the cemetery might help Nancy with it. Then look at the model crypt in the Forty Winks Mausoleum and pick up the eye inside the crypt. Then leave the model cemetery and turn right until Nancy sees a piece of paper on the ground. Pick up the paper and notice that it looks like it’s part of the puzzle in the model cemetery. Where did it come from? Also, notice that one of the paintings is missing.

Then go look at the coffee table and notice a puzzle is in it. Solve the puzzle by blocking the lasers with the balls and using the square to get the balls in the right positions. Nancy uses the pusher to move the block and balls. The balls move in all directions and won’t stop until they hit something. That’s why the block’s there. Move the blocks and marbles until the pusher can push the eye at the other end of the table puzzle.
Spoiler: Here are the moves to get the balls and block in the right position. Junior Detective: Move the block upx5, rightx2. Move the left marble up; it hits the block. Move the block rightx2, down, rightx2. Move the left marble right, up. It now blocks the first laser. Move the right marble left. It now blocks the second laser. Move the block rightx2, up, rightx3, downx3, leftx2, down, right, down, right. It now blocks the third laser. Senior Detective: Move the block upx3, rightx4. It now partially blocks the first laser. Move the middle marble left, up, right. It now blocks the first laser. Move the lower marble up; it hits the upper left marble. Move the block rightx2. Move the lower marble right, up. It now blocks the second laser. Move the block up, right. Move the upper left marble right, up. It now blocks the third laser. Move the right marble left. Move the block right. Move the right marble up. It now blocks the fourth laser. Move the block up, rightx3, downx3, leftx2, down, right, down, right. It now blocks the fifth laser.
When Nancy gets the eye out of the puzzle, grab it and then go look in the fireplace. Pick up some charcoal and the scrap piece of paper from Zeke’s. Then head outside and to the cemetery. It’s through the iron gates across the garden. Head over to the crypt that’s in the upper corner of the cemetery. If Nancy need help finding, then look at the paths in the model cemetery. Nancy will see that she needs to go up twice to get to the crypt. The gate’s locked, but there’s something at the base of each of the pillars. The raven picture came from one of these pillars. The skeleton man rubbed the picture on the paper. Nancy will need to do the same for the other three pillars and she’ll need to find paper. Nancy already has charcoal from the fireplace in the great room.
Head back to the house and talk to Renee, who’s outside of the library, about getting some paper. She says that she has paper in her room. Nancy can take some paper if she brings Renee a Koko Kringle bar. Renee will give Nancy the key to her room that’s upstairs. Go inside and head upstairs. Enter the door at the first landing and look inside the drawer in the nightstand next to the empty bed. Take the eye and then exit the room. Climb the rest of the stairs and go to Renee’s room. Use the key in the lock and enter the room. Go to the nightstand and open the drawer. Take some paper and then go to the lower drawer and grab a Koko Kringle bar for Renee. Look at part of Renee’s wall that’s near the door. There are some weird symbols on it. Then look at the chest in the corner near the window. In order to open the box, Nancy needs to press four buttons that makes the symbols in each of the corners of the box.
Spoiler: Label the buttons either from 1-18 or A-R. 1 or A should be the top button and it should go around clockwise. If using numbers: Top left drawing: 1, 4, 7, 15. Top right drawing: 5, 8, 10, 12. Bottom left drawing: 2, 9, 16, 17. Bottom right drawing: 11, 13, 14, 18. If using letters: Top left drawing: D, O, G, A. Top right drawing: E, H, J, L. Bottom Left Drawing: B, I, Q, P. Bottom right drawing: N, K, M, R.
When Nancy has gotten one correct, the symbol will disappear from its corner. After Nancy has completed the puzzle, the box will open. Read through the book on hoodoo and pay attention to the

sign chart inside. Nancy can translate the signs on the wall using the chart in the book. Translate the symbols and remember it for later.
Spoiler: Bah-Zah-Loo-Pah-Dee-Moo-Kah.
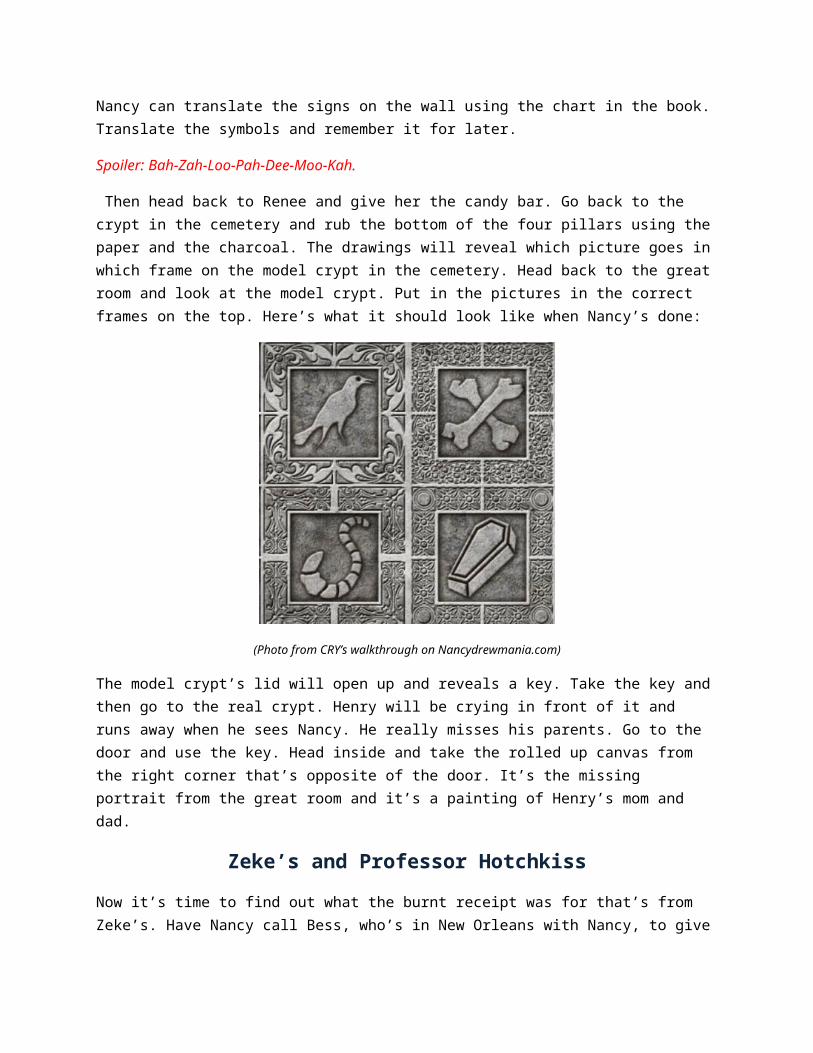
Then head back to Renee and give her the candy bar. Go back to the crypt in the cemetery and rub the bottom of the four pillars using the paper and the charcoal. The drawings will reveal which picture goes in which frame on the model crypt in the cemetery. Head back to the great room and look at the model crypt. Put in the pictures in the correct frames on the top. Here’s what it should look like when Nancy’s done:
(Photo from CRY’s walkthrough on Nancydrewmania.com)
The model crypt’s lid will open up and reveals a key. Take the key and then go to the real crypt. Henry will be crying in front of it and runs away when he sees Nancy. He really misses his parents. Go to the door and use the key. Head inside and take the rolled up canvas from the right corner that’s opposite of the door. It’s the missing portrait from the great room and it’s a painting of Henry’s mom and dad.
Zeke’s and Professor Hotchkiss
Now it’s time to find out what the burnt receipt was for that’s from Zeke’s. Have Nancy call Bess, who’s in New Orleans with Nancy, to give Bess an assignment. When Nancy calls Bess, the game will switch from Nancy to Bess. Nancy asks Bess to find what the receipt had on it and who sold the stuff to Zeke’s. Bess, reluctantly, agrees to find out and to call Nancy when she finds out. Head over to Zeke’s by clicking on the sign across the street. Go inside and to the back of the store. Talk to Lamont, who’s the current owner of the store, and ask about the receipt. Nancy will have given Bess the receipt number over the phone. Lamont tells Bess that he bought some unknown assorted items from Henry. Why’s Henry selling some of the Bolet estate off to the shop? Head outside and call Nancy, who’ll insist that Bess finds out what Henry sold off. The stuff he sold is in Lamont’s back room, which is behind the counter he stands
behind. Go back into Zeke’s and look at the powders on Bess’s left. Take the sneezing powder and then go to the area where the piano is. Arrange the stuff that’s there so that the sneezing powder will make Lemont sneeze when he comes over. The contraption should look like this when it’s ready:
(Photo from CRY’s hint and tips page on UHS-Hints.com)
When Bess is done with the contraption, inflate the balloon to get it going. Bess will call Lamont to help her get something on the top shelf and he’ll start sneezing when the powder spills. Lamont tells Bess that he has some nasal spray that’ll help him stop sneezing in the back room and asks her to go get it. Go to the back room and go to the stuff that Henry sold to Lamont. Take the stuff out of the box and look at it. There’s a picture with part of the inscription covered by the frame, a costume, and a locked box. Look at the paper on the locked box. They’re references to something. Look at the letter that’s also attached to the top of the box. Use the references on the paper to get the letters that’ll unlock the box. Bess will start on the first letter since that’s the letter that the first reference is to. Then count the number of spaces necessary to get the next letter. Repeat step number 2 until all the references produce a word. Use that word to unlock the box.
Spoiler: the word is Lebenundtod.
After Bess opens the box, she’ll call Nancy and tell her what Henry sold to Lamont. She’ll tell Nancy that the box for “the Whisperer” is here, but there’s only an indent and a note inside. While they’re talking, the game will switch from Bess to Nancy. Nancy needs to find out more about this whisperer thing. Head over to the library and go to the books that have the iguana on them. As Nancy gets closer to the box, Iggy the iguana will run away and knock the books over. Nancy will need to put the books back in place before she can read anything else. All of the books need to fit snugly in the box, but there are many solutions to this puzzle. Here’s one of the solutions:

(Photo from CRY’s walkthrough on Nancydrewmania.com)
Pick up the book about the crystal skulls and see that Professor Hotchkiss’s number is written down in the front of it. Read through the book before calling Hotchkiss. In the middle of the book, there’s a piece of paper with writing on it. Grab it; it’ll come in handy later. Call Hotchkiss and ask her about the Whisperer. She’ll remember Bruno Bolet and tell Nancy that he told her that “the ayes have it!” The glass eyes that Nancy has been finding have to be significant after all. Keep talking to Hotchkiss until there’s nothing left to say. Hotchkiss will tell Nancy sometime during the conversation that all who had the Whisperer have died of unnatural causes.
Bruno’s Death and the Secret Room
Maybe Bruno’s death certificate will help Nancy in seeing if his death was unnatural. Talk to Henry and he’ll show Nancy the certificate. The certificate will have Dr. Gilbert Buford’s signature on it. Call the number listed for him and Nancy will get his answering service. The service will tell Nancy that Dr. Buford hangs out at the corner of Rampart and Dumaine, which is where Nancy’s and Bess’s hotel is. Call Bess and get her to talk to Dr. Buford. The game will automatically switch from Nancy to Bess during the phone call. Go across the street and talk to Dr. Buford about Bruno’s death. He’ll tell Bess that he’s sure that Bruno died from a heart attack. He’ll also tell Bess that he’s seen the crystal skull and that Bruno was reading a letter when he died. Keep talking to him until Bess can’t say anything else. Then call Nancy to tell her the information about Bruno that Dr. Buford told Bess. While they’re talking, the game will switch from Bess to Nancy.
Now go to the great room and to the portrait area. Put the portrait of Henry’s parents in the empty frame. Nancy can move them around, but what position should they be put in? Look at the paper that Nancy got from Hotchkiss’s book. Each of the letters is the first of a word of an object that’s in each of the paintings (i.e. T is for toothbrush). Here’s the solution, which provides the words that have an object in each of the paintings:

(Photo from CRY’s hints and tips page from UHS-Hints.com)
A secret door will open when Nancy puts the paintings in the correct spots. Go through the secret door and into a passageway. Listen to Henry’s half of the conversation with his girlfriend, Summer. She wants Henry to send her money for something. Head over to the peephole and use the zoom to focus on the book, “Eye of the Beholder,” across the room in the library. Nancy will look at that later. Go upstairs and look at the design next to the lock on the door. It looks like a spider web with strings around the parameter. It’ll also show dotted lines around the strings. That shows which string should be plucked and in which order so the door will unlock. Head outside and then go to the fountain in the garden. Look at the bottom of the fountain and at the spider web covering the hole with a key in it. There’s a spider on the key, so reaching in it would be deadly. Click on the strings in the order according to the picture on the door in the secret passageway. If Nancy needs help, here’s the solution:
(Photo from CRY’s walkthrough on Nancydrewmania.com)

When Nancy’s plucked the strings in order, the key will come up on a block. That’ll chase away the spider. Grab the key and then a glass eye will appear at the bottom of the well. Grab that too. Head back inside and into the secret passageway. Put the key in the lock and then head into the secret room. Look at the desk on the right. Pick up the book and read through the book. Then look at the letter and the picture frame. Look at the perpetual motion machine and notice the eye that’s attached to one of the strings. Nancy will need to get it, so flip the switch to start the machine. Grab the eye on its first bounce to the right. Flip through the calander and Nancy will notice that the Jolly Rodger Krewe is having a meeting that night. Look at the chart above the desk. It’s on teeth, which makes sense because Bruno was a dentist. Back away from the desk and look at the doll with the box hanging around its neck. Enter the sounds that are on Renee’s wall. (The spoiler is above if it’s needed.) The eye will pop out when Nancy presses the buttons correctly. Look in the dummy’s eye socket and pick up the coin and the piece of paper.
Turn around and go to the gumball machine. Enter the token and grab the eye. Then go to the skeeball machine across the room. The goal is to get all of the squares from teeth to eyes. It’ll take two hits per square to get it to the eyes. Also, Nancy has to angle and power the balls just right so that each one is hit. If she needs help, use the pictures below for both the power and the angle to hit each square:
(Photos from CRY’s walkthrough on Nancydrewmania.com)
An eye will come out of the space where the balls come out of. Then go to the box on the wall with the octopus on it. Open it up and find another eye. This must be where all of the eyes go, which means that there are twenty five eyes. Nancy needs to keep an eye out for the rest of those eyes. Now turn around and go to the vent. This is where Iggy can be found, but he won’t come to Nancy since she chased him off earlier. He’ll come when there’s fruit though. Nancy just needs to find some. Turn around and go to the table where the gumball machine is. Pull the brass candle holder on the wall next to the table. A door will open and lead to the empty bedroom.
The Clock, the Second Tune, and the “Eye of the Beholder”
Head outside and to the spider web in the fountain. Play the tune from the jack-in-the-box that’s in the secret room using the strings. When Nancy’s done, she’ll get another eye. She now has ten eyes.
Spoiler: middle Cx3, D, Ex3, D, middle C, D, E, middle C

Go inside and look at the book—the one titled “Eye of the Beholder.” Open it up and take the eye inside. Then look at the “Time Will Tell” story in Bruno’s book. It lists some times in it. Head over to the clock at the end of the main hallway. Use the clock hands to enter each of the times mentioned in the book. Press the eye at the top of the clock each time Nancy puts the correct time in. When Nancy’s done, she’ll get three eyes. She’ll have a total of fourteen eyes.
Spoiler: First set of times: 12:00, 3:00, 5:00, 8:00, 2:00, 11:00. Second set of times: 12:00, 7:00, 10:00, 3:00, 2:00, 1:00. Third set of times: 12:00, 8:00, 10:00, 4:00, 9:00, 11:00
A Librarian’s Tale and Quincy T. Booker’s Teeth History
Read the story in Bruno’s book that’s titled “A Librarian’s Tale.” It mentions that “The title's the thing, addition's the hook.” Head over to the bookshelf with the cabinet next to the trophies in the library. Look up “A Librarian’s Tale” using the calling cards in the cabinet. It’s on the above shelf, so look at it. It’s locked, which is why Bruno wrote “addition’s the hook” in his story. Look at the calling cards again and add all of the numbers connected to the book that have the word “eye” in them. When Nancy has that number, enter it in the lock on the book. Open the book and grab the eye.
Spoiler: 1540
Then read the story titled “The History of Quincy T. Booker’s Teeth” in Bruno’s book. Look at the bookshelf that has the teeth bookends. Each book’s representing a tooth. The dark blue bookshelf represents adult teeth, while the light blue books—the ones with the teeth bookends—represents baby teeth. Press the books according to Bruno’s story. Start with the baby teeth and then go to the adult teeth. If Nancy needs help identifying which tooth goes where, then go back to the secret room and look at the teeth pictures above the desk. Here’s the order that Nancy needs to press the teeth in:
(Photo from CRY’s hints and tips page on UHS-Hints.com)

When Nancy presses the books in order, another eye will pop out. Grab it and then talk to Henry. Ask him about Bruno and the receipt from Zeke’s. See if Nancy can see Henry’s keychain, which has one of Bruno’s eyes on it. If he refuses to let Nancy have it, then tell him about overhearing the conversation with Summer, his girlfriend. He’ll give Nancy the eye.
The Statues are Key, Stepping in the Right Direction, and Mushrooms
Go to the garden and go to the right of the fountain. Turn right and look at Bruno’s crypt. It’s guarded by five buzzard statues. Look at the buzzard at the head of the crypt and notice the feathers on top of its head. The feathers can change heights when Nancy messes with the other four buzzard heads. Nancy needs to get the feathers to look like the picture in Bruno’s book about the statues. To help get there, label the buzzards, left to right, from 1 to 4, like the picture below. Then move the heads until the feathers are in the correct order.
(Photo from CRY’s walkthrough on Nancydrewmania.com)
Spoiler: 3, 3, 2, 1, 1, 4.
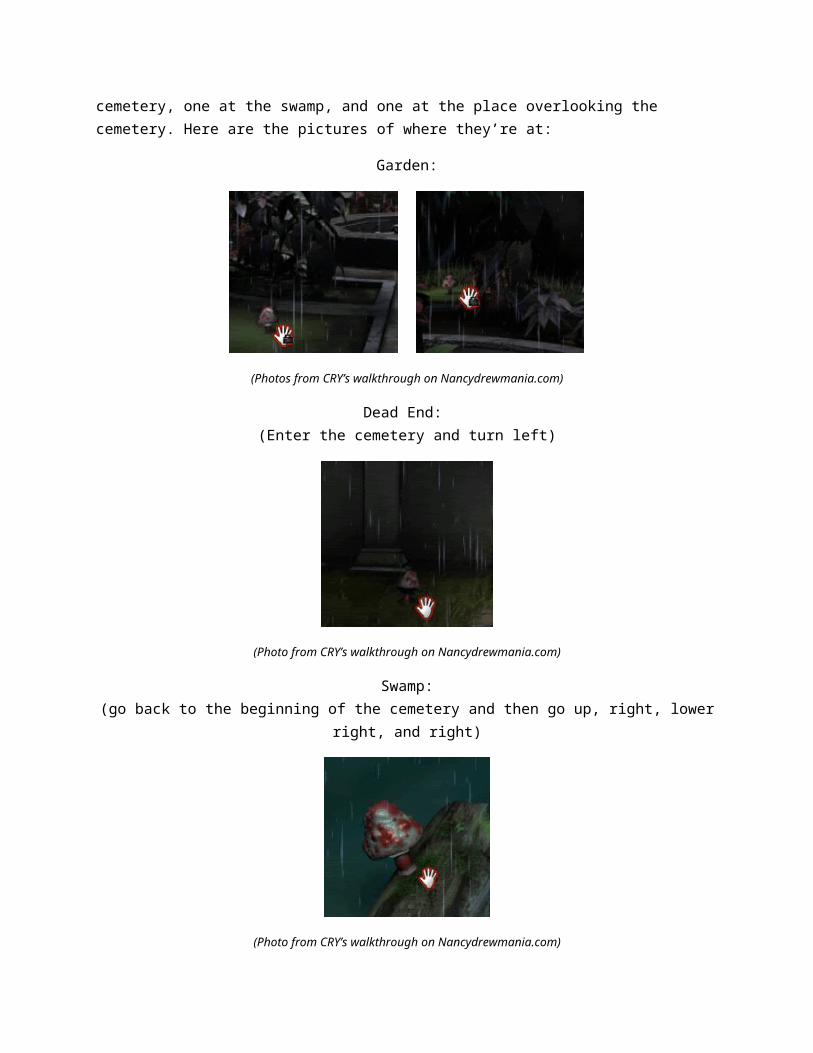
When Nancy moved the heads in the correct order, a key in the shape of a feather will fall from the head buzzard. Pick it up and look at the bases of the four buzzards. Use the feather key on each of the bases in the feather indentation and grab the eyes. Read Bruno’s story about the steps in the right direction. In the story, Bruno speaks of a very special shovel, which is hanging behind Renee on the wall. As Nancy tries to take it, Renee will take notice and ask Nancy to collect five mushrooms. There’s two in the garden, one at the first dead end in the cemetery, one at the swamp, and one at the place overlooking the cemetery. Here are the pictures of where they’re at:
Garden:
(Photos from CRY’s walkthrough on Nancydrewmania.com)

Dead End: (Enter the cemetery and turn left)
(Photo from CRY’s walkthrough on Nancydrewmania.com)
Swamp:(go back to the beginning of the cemetery and then go up, right, lower right, and right)
(Photo from CRY’s walkthrough on Nancydrewmania.com)
The Overlook:(From the swamp go left, lower left, up, lower left, and up)
(Photo from CRY’s walkthrough on Nancydrewmania.com)
When Nancy has all five mushrooms, go back to Renee and give her the mushrooms. She’ll let Nancy take the shovel, so go behind her and grab the shovel. Next, Nancy needs to find out where Charlie Wicker’s buried. Go back to the great room and look at the book on the pedestal. The book is to keep track of who’s buried where in the cemetery. Charlie Wicker’s buried in Seeping Meadow. Head over to

Seeping Meadow and look at Wicker’s crypt. There’s directions engraved into it, so have Nancy rub them on a piece of paper. Then go past the crypt and to the right. Nancy will be in an empty plot and the shovel’s handle will show how many times Nancy needs to go in one direction. When Nancy moves in one of the directions that’s on Wicker’s crypt, go that direction as many times that the shovel tells Nancy to go.
Spoiler: Westx4, Northx2, Eastx1, Southx3, Westx2, Northx2, Westx3, Southx3, Eastx1, Northx2, Eastx1, Northx3, Eastx4, Southx5, and Westx2.
After Nancy has followed the directions, use the shovel to dig up an urn. Look inside and grab an eye. Pick up the shovel’s handle; Nancy will use it later.
Bruno’s Dog and the Riddle
Go back to the great room and then look at the riddle that Nancy got from the dummy. It’s a riddle and it wants Nancy to put in the name of the last person who was buried in the cemetery. Look at the cemetery book (the book that’s on the pedestal) and flip to the last page. Put in the last name that’s written down and then go to the place where that person’s buried. There will be another hint there about where to go next. Enter the names that go with the riddles. Nancy can flip through the cemetery book if needed.
Spoiler: Tammy Tassleman, Constance Norring, Justin Thyme, Manny Kinn, Owen Moore, Neil Down, Myra Maines, Rose Winterspring, Polly Ester Givens.
When Nancy enters the last name on the list, go to the grave of the person, Polly Ester Givens, and press on the name. The name will open up and reveal a note within the panel. Read the note. Nancy now has to find out the name of Bruno’s dog. Call Bess and ask her to distract Lamont again so she can find the name of the dog. During the call, the game will switch from Nancy to Bess. Talk to Lamont and Bess will apologize for what happened earlier with the sneezing powder. She’ll ask him if she can get him something and he’ll tell Bess that she could get him some gumbo from the food truck out front. But he’ll tell Bess not to put hot sauce on it—it upsets his stomach. Go outside and get Lamont some gumbo and put hot sauce on it. Then head back inside and give the gumbo to Lamont. He’ll excuse himself because his stomach’s bothering him. Head to the back room and look at the picture in the box. Remove the frame and notice the name “Grant.” Bess will automatically call Nancy and tell her the name of the dog. Look at the cemetery book and find the person with the last name of Grant. Nancy will find someone named “Derek Grant,” who’s buried at Withering Roots Memorial, in the book. Go to the gravesite and open the compartment underneath the engraving. Get the eye and the pirate hat. The hat must be Iggy’s.
Iggy’s Dress-Up and the Letter
Nancy has to get Iggy to bring her stuff. Go to the tree in the garden that’s up the stone steps. Use the spray to kill the wasps and get a loquat. Nancy will only take one at a time, so she’ll have to go back for more. Head to the secret study and put the loquat in the vent. Iggy will come and eat the loquat. Now

Nancy can dress Iggy up. Iggy will bring different things depending on how he’s dressed up. First, dress him up as an optometrist. Put glasses, the collar with the I.D. on it and the belt with the otoscope on him. Iggy will bring Nancy an eye.
Then dress him up as a mailman. Put the mailman hat, collar with the tie, and the messenger bag on him. He’ll bring back the letter Bruno was reading when he died. It told him that the Whisperer was faked and that Renee knew about the skull, which she lied about. The letter will also give a number to the guy that did the testing. Now dress Iggy like a pirate. Put the pirate hat, the collar with the bird, and the sword on him. He’ll bring Nancy a locked chest. Nancy will need to find out what the Jolly Rodger Krewe opened up their meetings with in order to unlock the chest.
The Chest, the Meeting and the Letter
Call the guy’s number that’s one the letter and ask him about the crystal skull. He’ll tell Nancy that it was an authentic skull and will tell her how they can find out if it’s faked or authentic. If there is carbonate in the skull, it’s made with machines. If there isn’t carbonate, it was hand carved. When Nancy’s done talking to the guy, call Bess and tell her that she needs to get into the secret meeting that the Krewe’s holding that night at the corner of Rampart and Dumaine. While Nancy’s talking, the game will switch to Bess. Bess will reluctantly agree, but she’ll have to get a costume. She can’t distract Lamont because the store’s closed, so she’ll have to break in and enter. Go into the alleyway and then turn at the first door on Bess’s left. This is the back door to Zeke’s. Bess has a compact with her. Use that on the buttons on the door. It’ll show fingerprints on the buttons that are used for the code. Press them in order of the clearest fingerprints to the ones that are almost unintelligible.
Spoiler: 28905.
When Bess has press them in the right order, the door will open up. Go to the box inside and take the costume. Bess will automatically put the costume on. Exit Zeke’s through the back door and turn left. Head down the alley and knock on the door at the end of it. Someone will open the slot in the door and ask for a password. Nancy would have told Bess that the password is “Scuttled Bones,” so use that and he’ll let Bess in. The meeting’s starting and the members are yelling “Jean Laffitte.” That has to be the password to the chest. Bess’s cell phone will go off when the leader starts talking, who sounds like Dr. Buford! Bess will get caught because her cell phone and will get her head covered with a bag. Then she’ll be tied to a chair and the bag will be taken off her head. Dr. Buford will start talking and then Bess will interrupt him. Then Bess and Dr. Buford will start talking privately.
The next scene has Bess calling Nancy and telling her what happened at the meeting and what it started with. While they’re talking, the game will switch from Bess to Nancy. However, Bess and Nancy will be cut off because of the lightning. Nancy should still be in the secret room, so go to the locked chest and put in “Jean Laffitte.” Grab the eye inside.
The Ayes Have It!
Nancy should have all the eyes. If she doesn’t, then it’s probably the one on the keychain that Henry has and Nancy should go ask him about it. If she does, go to the panel with the octopus on it. Nancy will put all of the eyes in their proper places. Turn the eyes to the specifications in the story titled “Plentiful Pirates and Nautical Nonsense" in Bruno’s book.
Spoiler:
South, West, South, East, LeftDown, Down, Up, Down, EastEast, Left, East, Down, Down
Down, Down, Left, North, WestRight, Left, Down, Right, Left
The panel will open up to reveal a diagram and an eye structure. It’ll show that Nancy’s missing a piece that’s found in the garden. Go into the garden and to the ivy on the other side of the garden on the left. Head past the fireflies and push the ivy aside. Some of the stones are able to be pushed in, so push them in. Then go through the gate and turn around. Climb the rocks and grab the rod.
The Whisperer and the Culprit
Go to Bruno’s crypt and put the rod in the middle of the engraving. Put the shovel handle on top of the rod and the decorative eye on top of that. The crypt will open and Nancy will go inside. In the crypt is the Whisperer. However, the crypt will start closing on Nancy and the culprit will show up. The culprit will give aid after Nancy throws up the crystal skull. Throw up the skull and the culprit will deny Nancy aid. The crypt will close on Nancy, but there’s another way out. Look down and find another puzzle. It’s a matching puzzle, so it’s not too hard. Except it’s dark in the crypt and lightning will flash sometimes. Match the symbols and Nancy will be able to get out of there. Then follow the footprints out to the cemetery, where they’ll stop. Nancy will hear a boat, which means the culprit will escape from the swamp. Go to the swamp and talk to the culprit until Bernie, the alligator, surfaces. When he surfaces, kick the log and Bernie will get the boat.
The End… Or Is It?
Congratulations on completing the Legend of the Crystal Skull! If this is your first time playing, I hope you found this walkthrough helpful and the game super fun. If it is or isn’t your first game, hopefully it’ll lead you to play the other, fun Nancy Drew games done by HerInteractive. Thanks for playing! NDFan.