wd tv hd media player manual
TRANSCRIPT
8/6/2019 WD TV HD Media Player Manual
http://slidepdf.com/reader/full/wd-tv-hd-media-player-manual 1/81
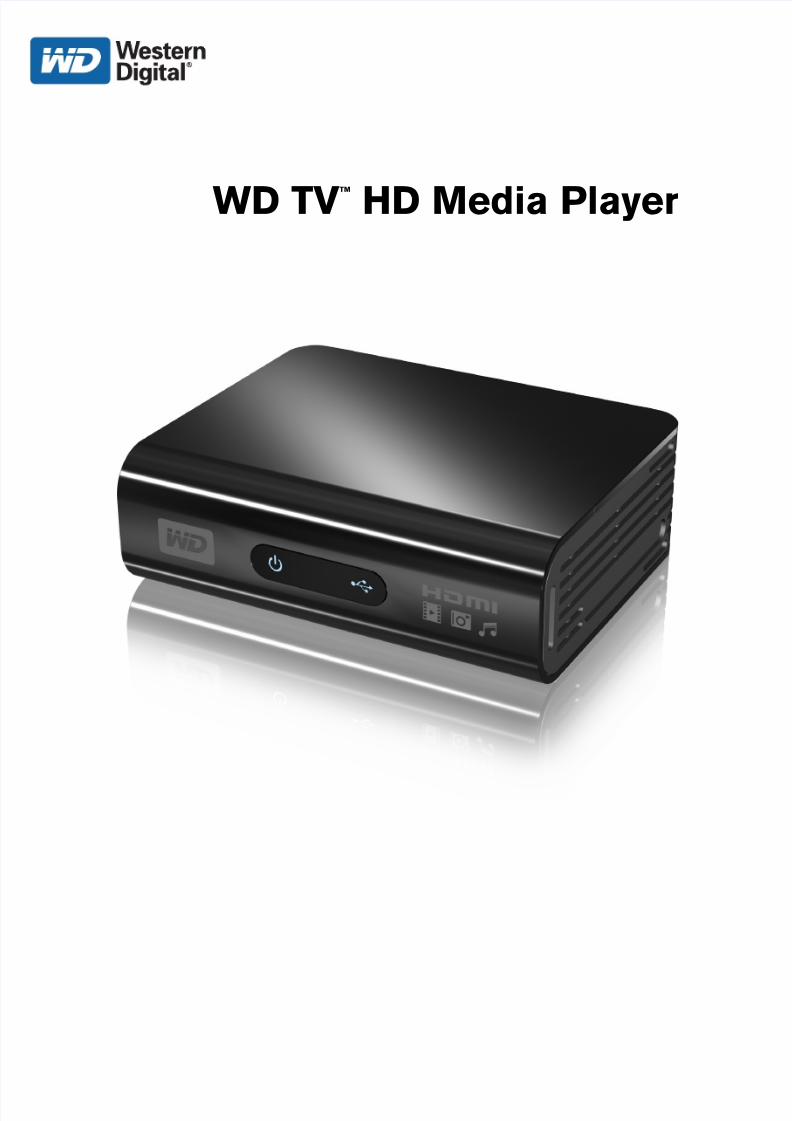
WD TV™ HD Media Player
8/6/2019 WD TV HD Media Player Manual
http://slidepdf.com/reader/full/wd-tv-hd-media-player-manual 2/81
TABLE OF CONTENTS – i
Table of Contents
1 Important User Information. . . . . . . . . . . . . . . . . . . . .1
Important Safety Instructions . . . . . . . . . . . . . . . . . . . . . . . . . . . . . . . . . 1
WD Technical Support . . . . . . . . . . . . . . . . . . . . . . . . . . . . . . . . . . . . . . 2
Recording your WD Product Information . . . . . . . . . . . . . . . . . . . . . . . 4
Registering your WD Product . . . . . . . . . . . . . . . . . . . . . . . . . . . . . . . . 4
Accessories . . . . . . . . . . . . . . . . . . . . . . . . . . . . . . . . . . . . . . . . . . . . . . 4
2 Product Overview . . . . . . . . . . . . . . . . . . . . . . . . . . . . .5
3 Features and Functions . . . . . . . . . . . . . . . . . . . . . . .6
Features . . . . . . . . . . . . . . . . . . . . . . . . . . . . . . . . . . . . . . . . . . . . . . . . . . 6
Connections . . . . . . . . . . . . . . . . . . . . . . . . . . . . . . . . . . . . . . . . . . . . . . 7LED Indicators . . . . . . . . . . . . . . . . . . . . . . . . . . . . . . . . . . . . . . . . . . . . . 8
Remote Control . . . . . . . . . . . . . . . . . . . . . . . . . . . . . . . . . . . . . . . . . . . . 9
4 Getting Started . . . . . . . . . . . . . . . . . . . . . . . . . . . . . .10
Package Contents . . . . . . . . . . . . . . . . . . . . . . . . . . . . . . . . . . . . . . . . 10
Installation Requirements . . . . . . . . . . . . . . . . . . . . . . . . . . . . . . . . . . . 10
Installation Procedure . . . . . . . . . . . . . . . . . . . . . . . . . . . . . . . . . . . . . . 10
5 Operating the HD Media Player . . . . . . . . . . . . . . . .20
Using the Remote Control . . . . . . . . . . . . . . . . . . . . . . . . . . . . . . . . . . 20
Using the WD HD TV Media Player Menu . . . . . . . . . . . . . . . . . . . . . 21
6 Watching Video . . . . . . . . . . . . . . . . . . . . . . . . . . . . . .22
Video Playback . . . . . . . . . . . . . . . . . . . . . . . . . . . . . . . . . . . . . . . . . . . 22
Video Playback Controls. . . . . . . . . . . . . . . . . . . . . . . . . . . . . . . . . . . . 24
Video Playback Options . . . . . . . . . . . . . . . . . . . . . . . . . . . . . . . . . . . . 24

8/6/2019 WD TV HD Media Player Manual
http://slidepdf.com/reader/full/wd-tv-hd-media-player-manual 3/81
TABLE OF CONTENTS – ii
7 Playing Music . . . . . . . . . . . . . . . . . . . . . . . . . . . . . . .28
Music Playback . . . . . . . . . . . . . . . . . . . . . . . . . . . . . . . . . . . . . . . . . . . 28
Music Playback Controls . . . . . . . . . . . . . . . . . . . . . . . . . . . . . . . . . . . 30
Music Playback Options . . . . . . . . . . . . . . . . . . . . . . . . . . . . . . . . . . . . 30
8 Viewing Photos . . . . . . . . . . . . . . . . . . . . . . . . . . . . . .32
Photo Display. . . . . . . . . . . . . . . . . . . . . . . . . . . . . . . . . . . . . . . . . . . . . 32
Photo Display Options . . . . . . . . . . . . . . . . . . . . . . . . . . . . . . . . . . . . . 33
Photo Slideshow . . . . . . . . . . . . . . . . . . . . . . . . . . . . . . . . . . . . . . . . . . 35
9 Settings and Advanced Features . . . . . . . . . . . . . . .40
Settings Navigation Buttons . . . . . . . . . . . . . . . . . . . . . . . . . . . . . . . . 40
Audio/Video . . . . . . . . . . . . . . . . . . . . . . . . . . . . . . . . . . . . . . . . . . . . . 41
Music . . . . . . . . . . . . . . . . . . . . . . . . . . . . . . . . . . . . . . . . . . . . . . . . . . . 43Movie . . . . . . . . . . . . . . . . . . . . . . . . . . . . . . . . . . . . . . . . . . . . . . . . . . 44
Photo . . . . . . . . . . . . . . . . . . . . . . . . . . . . . . . . . . . . . . . . . . . . . . . . . . 44
System . . . . . . . . . . . . . . . . . . . . . . . . . . . . . . . . . . . . . . . . . . . . . . . . . 47
Media Library . . . . . . . . . . . . . . . . . . . . . . . . . . . . . . . . . . . . . . . . . . . . 52
Locating Media Content . . . . . . . . . . . . . . . . . . . . . . . . . . . . . . . . . . . . 55
10 System Maintenance . . . . . . . . . . . . . . . . . . . . . . . . .60
System Firmware Upgrade . . . . . . . . . . . . . . . . . . . . . . . . . . . . . . . . . 60
Troubleshooting . . . . . . . . . . . . . . . . . . . . . . . . . . . . . . . . . . . . . . . . . . 63Common Error Messages . . . . . . . . . . . . . . . . . . . . . . . . . . . . . . . . . . 65
FAQs. . . . . . . . . . . . . . . . . . . . . . . . . . . . . . . . . . . . . . . . . . . . . . . . . . . . 66
11 Appendix. . . . . . . . . . . . . . . . . . . . . . . . . . . . . . . . . . . .67
Supported formats. . . . . . . . . . . . . . . . . . . . . . . . . . . . . . . . . . . . . . . . . 67
Regulatory Compliance . . . . . . . . . . . . . . . . . . . . . . . . . . . . . . . . . . . . 70
Warranty Information . . . . . . . . . . . . . . . . . . . . . . . . . . . . . . . . . . . . . . 73
8/6/2019 WD TV HD Media Player Manual
http://slidepdf.com/reader/full/wd-tv-hd-media-player-manual 4/81
WD TV HD Media PlayerUser Manual
IMPORTANT USER INFORMATION – 1
Important User Information
Important Safety Instructions
This device is designed and manufactured to assure personal safety. Improper usecan result in electric shock or fire hazard. The safeguards incorporated into this unit
will protect you if you observe the following procedures for installation, use, andservicing.
• Read these instructions.• Keep these instructions.• Heed all warnings.• Follow all instructions.• Do not use this apparatus near water.• Clean only with dry cloth.• Do not block any ventilation openings. Install in accordance with the
manufacturer’s instructions.
• Do not install near any heat sources such as radiators, heat registers, stoves, orother apparatus (including amplifiers) that produce heat.• Do not defeat the safety purpose of the polarized or grounding-type plug. A
polarized plug has two blades with one wider than the other. A grounding typeplug has two blades and a third grounding prong. The wide blade or the thirdprong are provided for your safety. If the provided plug does not fit into your outlet,consult an electrician for replacement of the obsolete outlet.
• Protect the power cord from being walked on or pinched particularly at plugs,convenience receptacles, and the point where they exit from the apparatus.
• Only use attachments/accessories specified by the manufacturer.• Unplug this apparatus during lightning storms or when unused for long periods
of time.
• Refer all servicing to qualified service personnel. Servicing is required when theapparatus has been damaged in any way, such as power-supply cord or plug isdamaged, liquid has been spilled or objects have fallen into the apparatus, theapparatus has been exposed to rain or moisture, does not operate normally, or hasbeen dropped.
• Carefully read and follow the Quick Install Guide and User Manual.• Do not operate this device outside the temperature range of 5°C–35°C
(41°F–95°F).• Do not drop or shake the device.• Do not move the device when it is powered on.• Power supply cords should be routed so that they are not likely to be walked on or
pinched by items placed upon them or against them.• Do not overload wall outlets.
For additional safety information, refer to www.wdc.com.
1

8/6/2019 WD TV HD Media Player Manual
http://slidepdf.com/reader/full/wd-tv-hd-media-player-manual 5/81
WD TV HD Media PlayerUser Manual
IMPORTANT USER INFORMATION – 2
WD Technical Support
Important: Should you encounter any problem, please do not return thisproduct to the store before carefully reading the user manual. You can also findanswers to your technical support questions through our knowledge base ore-mail support service at support.wdc.com. If you still need assistance, please
contact WD at the numbers on the following page. Your WD product includes 30 days of free technical support during the applicablewarranty period for your product. The 30-day period commences on the date of yourfirst telephone contact with WD technical support. To help us keep you informed ofnew features and services, remember to register your WD product online athttps://www.wdc.com/register .
Accessing Online Support
If you need additional information or help for this product, visit our product supportwebsite at support.wdc.com and choose from these topics:
Downloads - Download drivers, software, and updates for your WD product. Registration - Register your WD product to get the latest updates and special offers. Warranty & RMA Services - Get Warranty, Product Replacement (RMA), RMA Status, and
Data Recovery Information. Knowledge Base - Search by keyword, phrase, or answer ID. Installation - Get online installation help for your WD product or software.
8/6/2019 WD TV HD Media Player Manual
http://slidepdf.com/reader/full/wd-tv-hd-media-player-manual 6/81
WD TV HD Media PlayerUser Manual
IMPORTANT USER INFORMATION – 3
Contacting WD Technical Support
When contacting WD for support, have your WD product serial number, systemhardware, and system software versions available.
Western Digital20511 Lake Forest DriveLake Forest, California 92630 U.S.A.
North America
800.ASK.4WDC
Latin America 800.832.4778
Spanish 800.832.4778
Asia Pacific
Australia 1 800 42 9861China 800 820 6682/ +65 62430496Hong Kong +800 6008 6008India 1 800 11 9393 (MNTL)/1 800 200 5789 (Reliance)/
011 26384700 (Pilot Line)Indonesia +803 852 9439Japan 00 531 650442Korea 02 703 6550Malaysia +800 6008 6008/1 800 88 1908/+65 62430496Philippines 1 800 1441 0159Singapore +800 6008 6008/+800 608 6008/+65 62430496Taiwan +800 6008 6008/+65 62430496
Europe (toll free) +800 ASK4 WDEU
Austria
Belgium
Denmark
France
Germany
Ireland
Italy
The Netherlands
Norway
Spain
Sweden
Switzerland
United Kingdon
Europe +31 880062100
Middle East +31 880062100
Africa +31 880062100

8/6/2019 WD TV HD Media Player Manual
http://slidepdf.com/reader/full/wd-tv-hd-media-player-manual 7/81
WD TV HD Media PlayerUser Manual
IMPORTANT USER INFORMATION – 4
Recording your WD Product Information
In the following table, write the serial and model numbers of your new WD product.You can find this information on the label on the bottom of the device. You should alsonote the date of purchase. This information may be required when requestingtechnical support.
Registering your WD Product
Your WD product includes 30 days of free technical support during the applicablewarranty period for your product. The 30-day period commences on the date of yourfirst telephone contact with WD technical support. Register your WD product onlineat register.wdc.com.
Accessories
For U.S. residents, visit shopwd.com to view additional accessories available for yourWD TV HD Media Player. For users outside the U.S., visit support.wdc.com.
Serial Number:
Model Number:
Purchase Date:
System and Software Notes:
8/6/2019 WD TV HD Media Player Manual
http://slidepdf.com/reader/full/wd-tv-hd-media-player-manual 8/81
WD TV HD Media PlayerUser Manual
PRODUCT OVERVIEW – 5
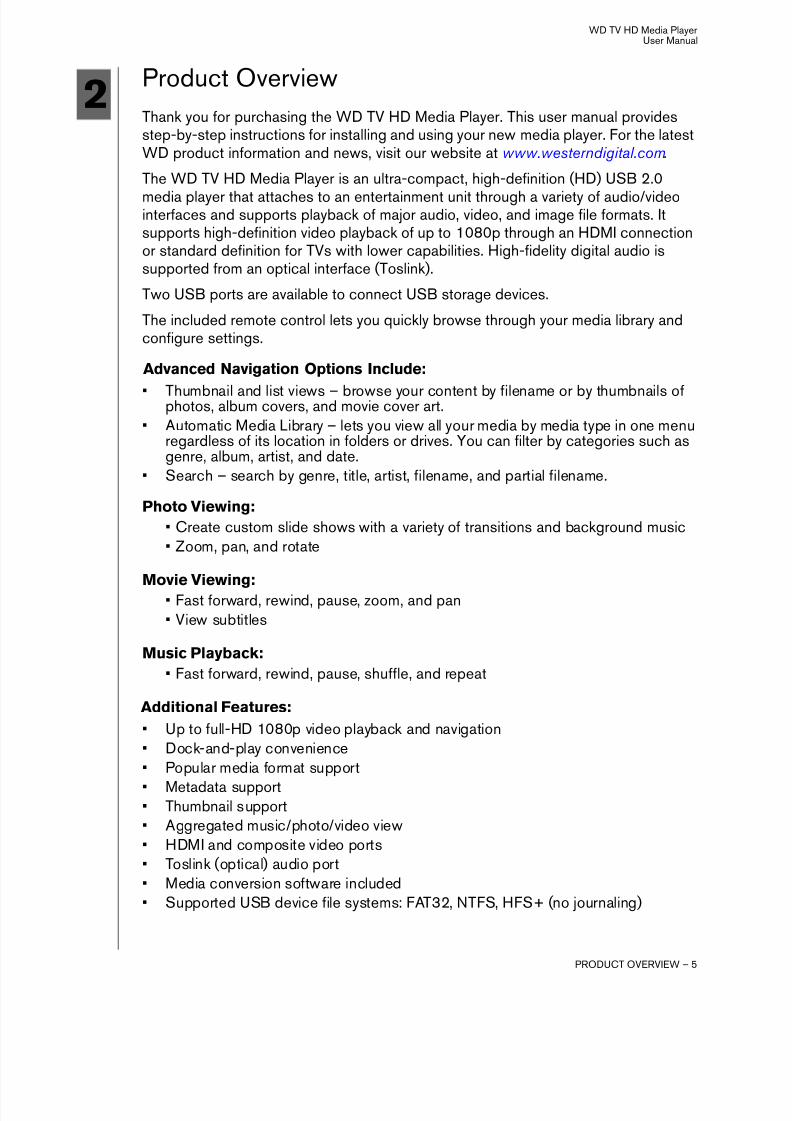
Product OverviewThank you for purchasing the WD TV HD Media Player. This user manual providesstep-by-step instructions for installing and using your new media player. For the latestWD product information and news, visit our website at www.westerndigital.com.
The WD TV HD Media Player is an ultra-compact, high-definition (HD) USB 2.0
media player that attaches to an entertainment unit through a variety of audio/videointerfaces and supports playback of major audio, video, and image file formats. Itsupports high-definition video playback of up to 1080p through an HDMI connectionor standard definition for TVs with lower capabilities. High-fidelity digital audio issupported from an optical interface (Toslink).
Two USB ports are available to connect USB storage devices.
The included remote control lets you quickly browse through your media library andconfigure settings.
Advanced Navigation Options Include:
• Thumbnail and list views – browse your content by filename or by thumbnails ofphotos, album covers, and movie cover art.• Automatic Media Library – lets you view all your media by media type in one menu
regardless of its location in folders or drives. You can filter by categories such asgenre, album, artist, and date.
• Search – search by genre, title, artist, filename, and partial filename.
Photo Viewing:
• Create custom slide shows with a variety of transitions and background music• Zoom, pan, and rotate
Movie Viewing:
• Fast forward, rewind, pause, zoom, and pan• View subtitles
Music Playback:
• Fast forward, rewind, pause, shuffle, and repeat
Additional Features:
• Up to full-HD 1080p video playback and navigation• Dock-and-play convenience• Popular media format support
• Metadata support• Thumbnail support• Aggregated music/photo/video view• HDMI and composite video ports• Toslink (optical) audio port• Media conversion software included• Supported USB device file systems: FAT32, NTFS, HFS+ (no journaling)
2

8/6/2019 WD TV HD Media Player Manual
http://slidepdf.com/reader/full/wd-tv-hd-media-player-manual 9/81
WD TV HD Media PlayerUser Manual
FEATURES AND FUNCTIONS – 6
Features and Functions
Features
Audio/Video Interface
• HDMI interface for digital audio and high-definition video
• Composite interface (RCA, yellow/white/red) for analog AV connection• Toslink (optical) audio for high-fidelity digital audio• Autosource function enables the HD media player to detect and switch to a new
interface connection. For example, the HD media player automatically switches toHD mode when it is connected through an HDMI cable.
• Video output resolution includes 480i (using the composite interface), or 480p,576p, 720i, 720p, 1080i, and 1080p (available when using the HDMI interface)
• Stereo or multi-channel digital surround audio output
Multiformat Content Playback
Multiformat is a file type that groups other files of the same digital content but may be
encoded in different digital formats. For example, a single video file may actuallyinclude a few components such as video, audio, and photo grouped together.WD HD TV Media Player is capable of playing several different types of multiformatfiles. For a detailed list of supported formats, refer to “Supported formats” on page67.
*2-channel only. 2+channel signal is sent via digital pass through to a receiver. Manufactured under license fromDolby Laboratories. “Dolby” and the double-D symbol are trademarks of Dolby Laboratories.
**Single layer only.
Plug-n-Play USB 2.0 Support*
• USB storage device with a USB connector• Portable media players with USB connector• Digital cameras with USB connector*For a list of tested, compatible USB devices, see Article #2581 in our knowledge base at support.wdc.com.
Audio Audiocontainer
Video Videocontainer
Photo Subtitle Playlist
MP3 AIFF MPEG 1 AVI GIF SRT PLS
MP2 Ogg Vorbis MPEG 2 VOB BMP WPL
WAV/PCM/LPCM
MKA MPEG 4(ASP, AVCHD/H.264)
Xvid JPEG M3U
DolbyDigital*
WMV9 DVR-MS TIF/TIFF**
FLAC MKV PNG
WMAAAC*
3
8/6/2019 WD TV HD Media Player Manual
http://slidepdf.com/reader/full/wd-tv-hd-media-player-manual 10/81
WD TV HD Media PlayerUser Manual
FEATURES AND FUNCTIONS – 7
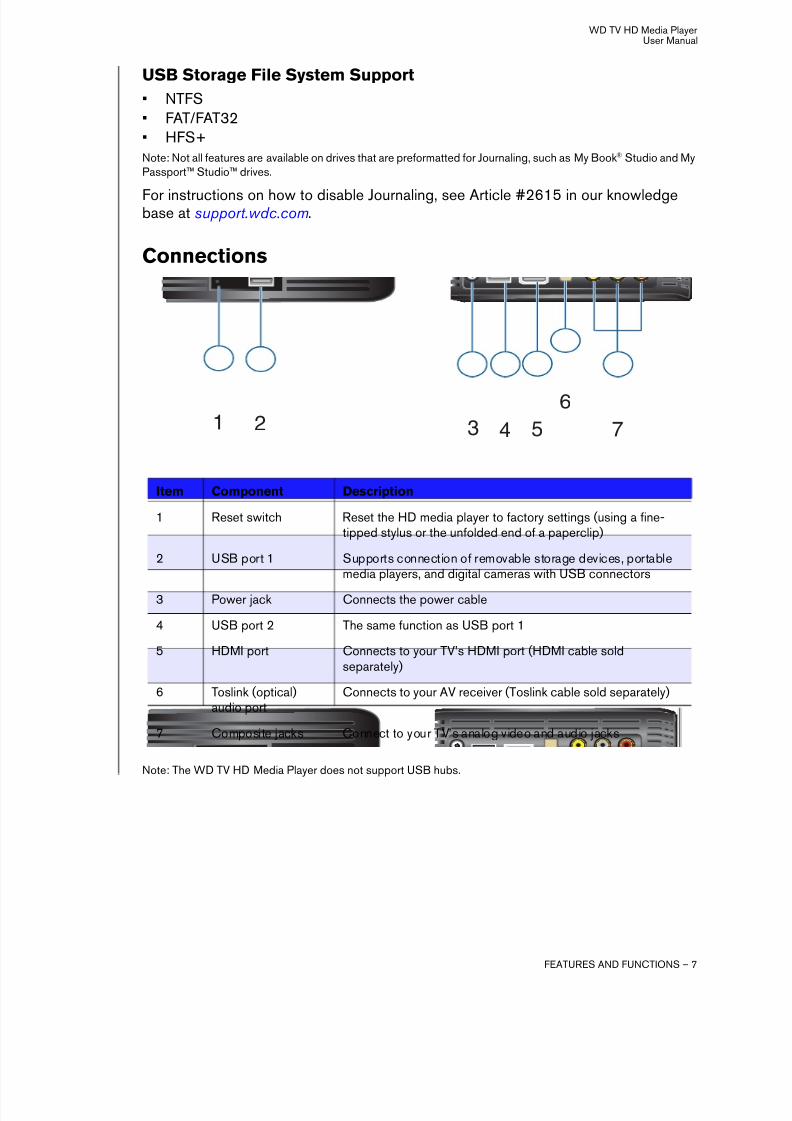
USB Storage File System Support
• NTFS• FAT/FAT32• HFS+Note: Not all features are available on drives that are preformatted for Journaling, such as My Book® Studio and MyPassport™ Studio™ drives.
For instructions on how to disable Journaling, see Article #2615 in our knowledgebase at support.wdc.com.
Connections
Note: The WD TV HD Media Player does not support USB hubs.
Item Component Description
1 Reset switch Reset the HD media player to factory settings (using a fine-tipped stylus or the unfolded end of a paperclip)
2 USB port 1 Supports connection of removable storage devices, portablemedia players, and digital cameras with USB connectors
3 Power jack Connects the power cable
4 USB port 2 The same function as USB port 1
5 HDMI port Connects to your TV’s HDMI port (HDMI cable soldseparately)
6 Toslink (optical)audio port
Connects to your AV receiver (Toslink cable sold separately)
7 Composite jacks Connect to your TV’s analog video and audio jacks
2 3 5 7
6
14
8/6/2019 WD TV HD Media Player Manual
http://slidepdf.com/reader/full/wd-tv-hd-media-player-manual 11/81
WD TV HD Media PlayerUser Manual
FEATURES AND FUNCTIONS – 8
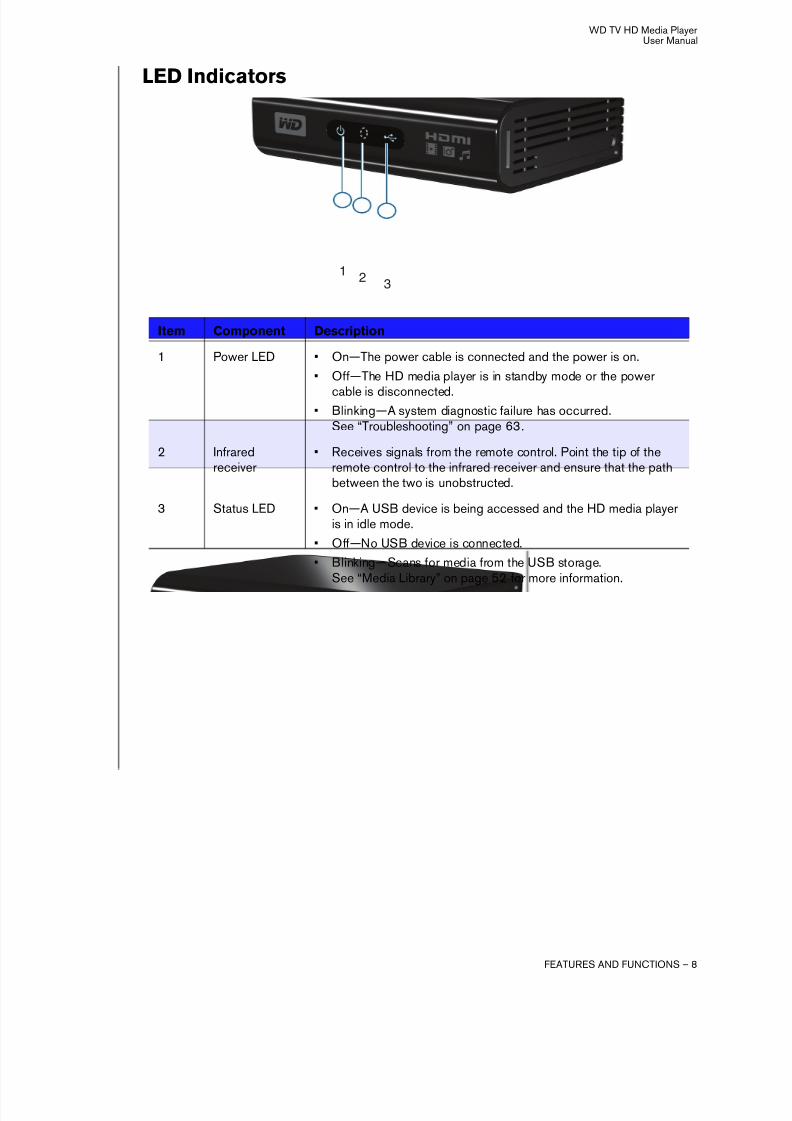
LED Indicators
Item Component Description
1 Power LED • On—The power cable is connected and the power is on.
• Off—The HD media player is in standby mode or the power
cable is disconnected.• Blinking—A system diagnostic failure has occurred.
See “Troubleshooting” on page 63.
2 Infraredreceiver
• Receives signals from the remote control. Point the tip of theremote control to the infrared receiver and ensure that the pathbetween the two is unobstructed.
3 Status LED • On—A USB device is being accessed and the HD media playeris in idle mode.
• Off—No USB device is connected.
• Blinking—Scans for media from the USB storage.See “Media Library” on page 52 for more information.
12
3
8/6/2019 WD TV HD Media Player Manual
http://slidepdf.com/reader/full/wd-tv-hd-media-player-manual 12/81
WD TV HD Media PlayerUser Manual
FEATURES AND FUNCTIONS – 9
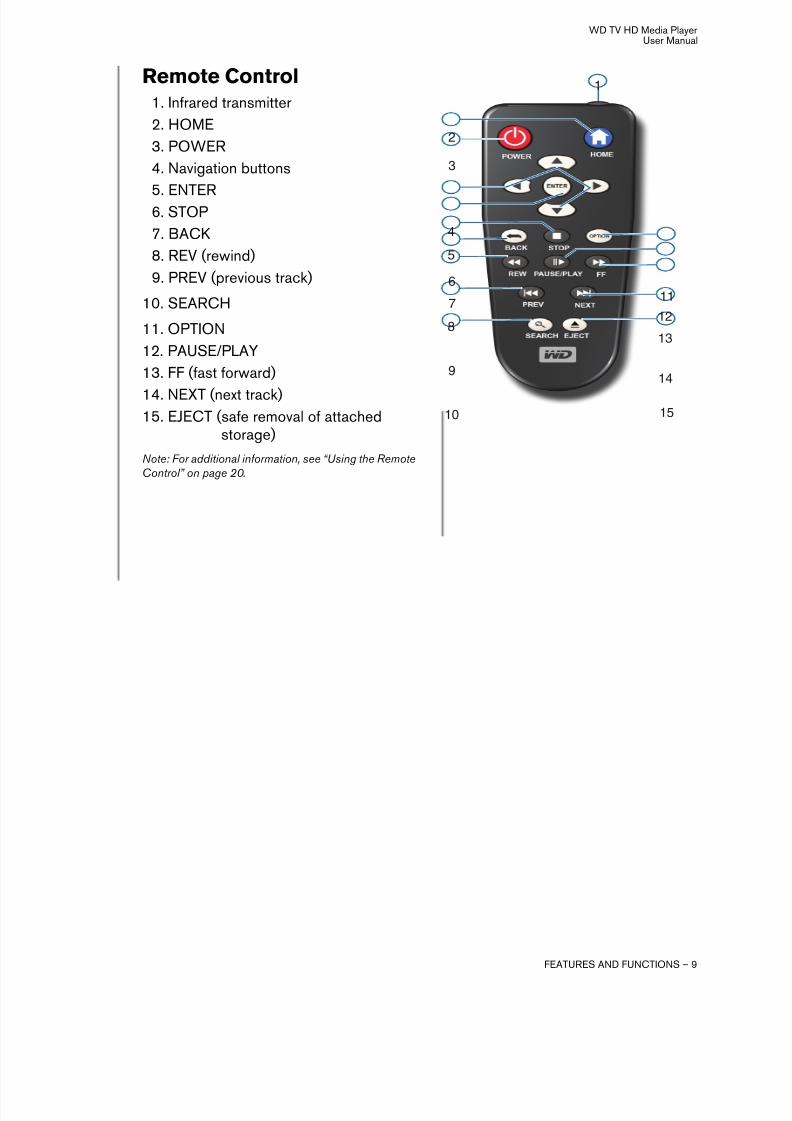
Remote Control1. Infrared transmitter
2. HOME
3. POWER
4. Navigation buttons
5. ENTER6. STOP
7. BACK
8. REV (rewind)
9. PREV (previous track)
10. SEARCH
11. OPTION
12. PAUSE/PLAY
13. FF (fast forward)
14. NEXT (next track)15. EJECT (safe removal of attached
storage)
Note: For additional information, see “Using the RemoteControl” on page 20.
1
2
3
4
5
6
7
8
9
10
11
12
13
15
14

8/6/2019 WD TV HD Media Player Manual
http://slidepdf.com/reader/full/wd-tv-hd-media-player-manual 13/81
WD TV HD Media PlayerUser Manual
GETTING STARTED – 10
Getting Started
Package Contents
Installation Requirements• Standard or HD TV with an HDMI or composite audio/video input• USB storage device with a USB 2.0 connector• Media Library support requirement —1% of total storage capacity
Optional: TV, stereo, or AV receiver with an optical digital (Toslink), or stereo audioinput jack (audio playback only)
Installation Procedure
The HD media player installation procedure is outlined below:
1. Transfer content from your computer to the USB storage media.
2. Connect the HD media player to your TV or entertainment unit through the desiredinterface option.
3. Connect the power cable.
4. Insert the batteries into the remote control.
5. Connect the USB device containing your media content.
4
5
EU/KO
EU/KO
MinimumInstallationRequirements•Standard orHDtelev isionwithHDMIorcompositev ideo
input.•WDstoragedev icewithUSB2.0interface.Optional:TV,stereo,orA/Vreceiverwithopticaldigital(toslink),orstereo audio input (audio pl aybackonly ).MinimumInstallationRequirements•Standard orHDtelev isionwithHDMIorcompositev ideo
input.•WDstoragedev icewithUSB2.0interface.Optional:TV,stereo,orA/Vreceiverwithopticaldigital(toslink),orstereo audio input (audio pl aybackonly ).MinimumInstallationRequirements•Standard orHDtelev isionwithHDMIorcompositev ideo
input.•WDstoragedev icewithUSB2.0interface.Optional:TV,stereo,orA/Vreceiverwithopticaldigital(toslink),orstereo audio input (audio pl aybackonly ).MinimumInstallationRequirements•Standard orHDtelev isionwithHDMIorcompositev ideo
input.•WDstoragedev icewithUSB2.0interface.Optional:TV,stereo,orA/Vreceiverwithopticaldigital(toslink),orstereo audio input (audio pl aybackonly ).MinimumInstallationRequirements•Standard orHDtelev isionwithHDMIorcompositev ideo
input.•WDstoragedev icewithUSB2.0interface.Optional:TV,stereo,orA/Vreceiverwithopticaldigital(toslink),orstereo audio input (audio pl aybackonly ).MinimumInstallationRequirements•Standard orHDtelev isionwithHDMIorcompositev ideo
input.•WDstoragedev icewithUSB2.0interface.Optional:TV,stereo,orA/Vreceiverwithopticaldigital(toslink),orstereo audio input (audio pl aybackonly ).MinimumInstallationRequirements•Standard orHDtelev isionwithHDMIorcompositev ideo
input.•WDstoragedev icewithUSB2.0interface.Optional:TV,stereo,orA/Vreceiverwithopticaldigital(toslink),orstereo audio input (audio pl aybackonly ).MinimumInstallationRequirements•Standard orHDtelev isionwithHDMIorcompositev ideo
input.•WDstoragedev icewithUSB2.0interface.Optional:TV,stereo,orA/Vreceiverwithopticaldigital(toslink),orstereo audio input (audio pl aybackonly ).
MinimumInstallationRequirements•StandardorHDtelev isionwithHDMIorcompositevideo
input.•WD storagedev icewithUSB2.0 interface.Optional:TV,stereo,orA/Vreceiverwithopticaldigital(toslink),orstereo audio input (audio playbackonly).MinimumInstallationRequirements•StandardorHDtelev isionwithHDMIorcompositevideo
input.
•WD storagedev icewithUSB2.0 interface.Optional:TV,stereo,orA/Vreceiverwithopticaldigital(toslink),orstereo audio input (audio playbackonly).MinimumInstallationRequirements•StandardorHDtelev isionwithHDMIorcompositevideo
input.•WD storagedev icewithUSB2.0 interface.Optional:TV,stereo,orA/Vreceiverwithopticaldigital(toslink),orstereo audio input (audio playbackonly).MinimumInstallationRequirements•StandardorHDtelev isionwithHDMIorcompositevideo
input.•WD storagedev icewithUSB2.0 interface.Optional:TV,stereo,orA/Vreceiverwithopticaldigital(toslink),orstereo audio input (audio playbackonly).MinimumInstallationRequirements•StandardorHDtelev isionwithHDMIorcompositevideo
input.•WD storagedev icewithUSB2.0 interface.Optional:TV,stereo,orA/Vreceiverwithopticaldigital(toslink),orstereo audio input (audio playbackonly).MinimumInstallationRequirements•StandardorHDtelev isionwithHDMIorcompositevideo
input.•WD storagedev icewithUSB2.0 interface.Optional:TV,stereo,orA/Vreceiverwithopticaldigital(toslink),orstereo audio input (audio playbackonly).MinimumInstallationRequirements•StandardorHDtelev isionwithHDMIorcompositevideo
input.•WD storagedev icewithUSB2.0 interface.Optional:TV,stereo,orA/Vreceiverwithopticaldigital(toslink),orstereo audio input (audio playbackonly).MinimumInstallationRequirements•StandardorHDtelev isionwithHDMIorcompositevideo
input.•WD storagedev icewithUSB2.0 interface.Optional:TV,stereo,orA/Vreceiverwithopticaldigital(toslink),orstereo audio input (audio playbackonly).
MinimumInstallationRequirements•Standard orHDtelev isionwithHDMIorcompositev ideo
input.•WDstoragedev icewithUSB2.0interface.Optional:TV,stereo,orA/Vreceiverwithopticaldigital(toslink),orstereoaudioinput(audioplaybackonly ).MinimumInstallationRequirements•Standard orHDtelev isionwithHDMIorcompositev ideo
input.
•WDstoragedev icewithUSB2.0interface.Optional:TV,stereo,orA/Vreceiverwithopticaldigital(toslink),orstereoaudioinput(audioplaybackonly ).MinimumInstallationRequirements•Standard orHDtelev isionwithHDMIorcompositev ideo
input.•WDstoragedev icewithUSB2.0interface.Optional:TV,stereo,orA/Vreceiverwithopticaldigital(toslink),orstereoaudioinput(audioplaybackonly ).MinimumInstallationRequirements•Standard orHDtelev isionwithHDMIorcompositev ideo
input.•WDstoragedev icewithUSB2.0interface.Optional:TV,stereo,orA/Vreceiverwithopticaldigital(toslink),orstereoaudioinput(audioplaybackonly ).MinimumInstallationRequirements•Standard orHDtelev isionwithHDMIorcompositev ideo
input.•WDstoragedev icewithUSB2.0interface.Optional:TV,stereo,orA/Vreceiverwithopticaldigital(toslink),orstereoaudioinput(audioplaybackonly ).MinimumInstallationRequirements•Standard orHDtelev isionwithHDMIorcompositev ideo
input.•WDstoragedev icewithUSB2.0interface.Optional:TV,stereo,orA/Vreceiverwithopticaldigital(toslink),orstereoaudioinput(audioplaybackonly ).
OR
WDTV™ HDMediaPlayer
WD HD TV Media PlayerComposite AV cables
Remote control andTwo AAA batteries
AC power adapter
Quick Install Guide
Documentation andsoftware CD My Passport stand
Rubberfeet
8/6/2019 WD TV HD Media Player Manual
http://slidepdf.com/reader/full/wd-tv-hd-media-player-manual 14/81
WD TV HD Media PlayerUser Manual
GETTING STARTED – 11
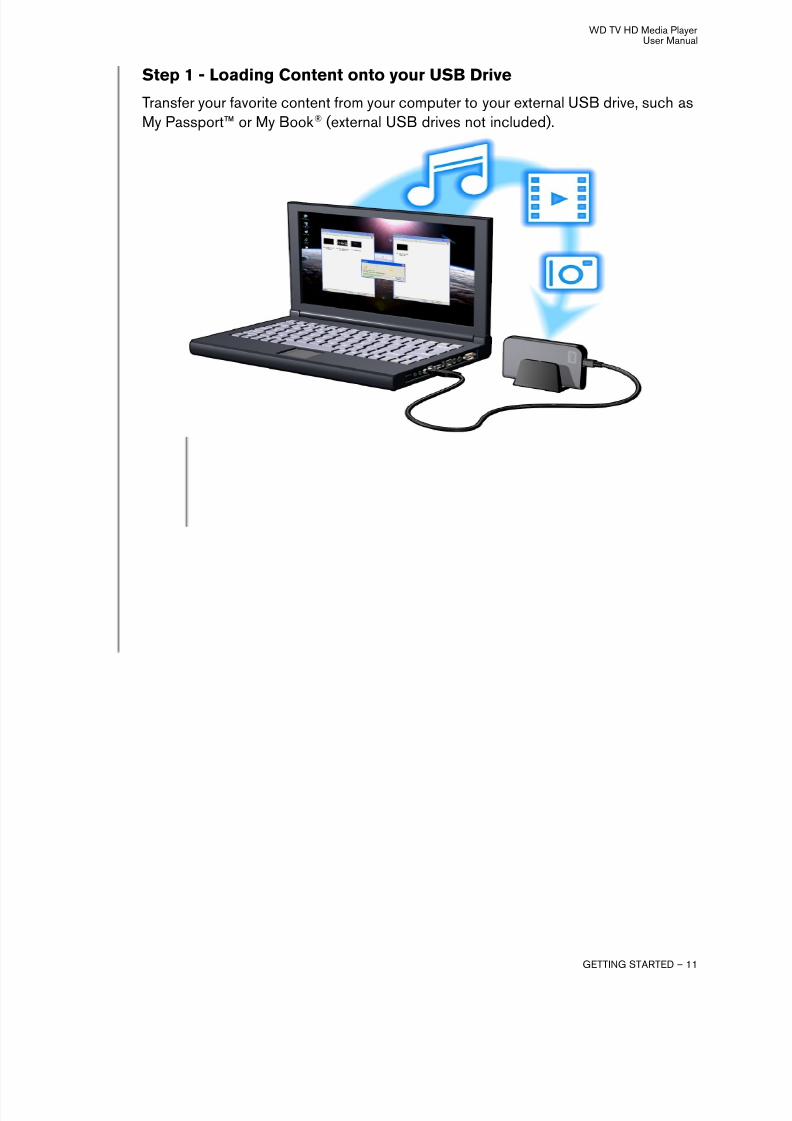
Step 1 - Loading Content onto your USB Drive
Transfer your favorite content from your computer to your external USB drive, such asMy Passport™ or My Book® (external USB drives not included).
8/6/2019 WD TV HD Media Player Manual
http://slidepdf.com/reader/full/wd-tv-hd-media-player-manual 15/81
WD TV HD Media PlayerUser Manual
GETTING STARTED – 12
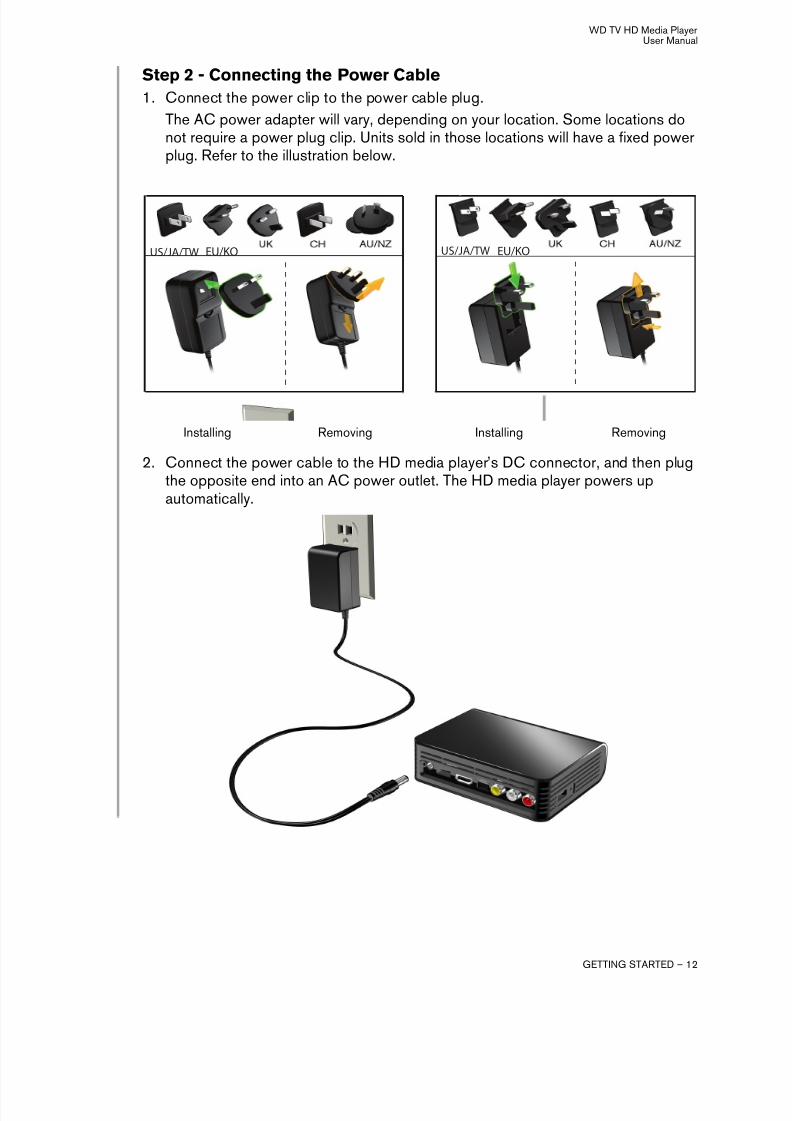
Step 2 - Connecting the Power Cable
1. Connect the power clip to the power cable plug.
The AC power adapter will vary, depending on your location. Some locations donot require a power plug clip. Units sold in those locations will have a fixed powerplug. Refer to the illustration below.
2. Connect the power cable to the HD media player’s DC connector, and then plugthe opposite end into an AC power outlet. The HD media player powers upautomatically.
EU/KO EU/KOUS/JA/TW US/JA/TW
Installing InstallingRemoving Removing

8/6/2019 WD TV HD Media Player Manual
http://slidepdf.com/reader/full/wd-tv-hd-media-player-manual 16/81
WD TV HD Media PlayerUser Manual
GETTING STARTED – 13
Wait a few seconds for your TV to detect the HD media player. If the HD mediaplayer is not detected, you may need to change the input source on your TV toHDMI or composite, depending on your connection. Check the userdocumentation of your TV for more information.
Once the HD media player is detected, the splash screen displays to indicatesystem bootup, then the home screen of the user interface opens.
For more information, see “Using the WD HD TV Media Player Menu” on page 21.
Step 3 - Connecting the WD TV HD Media Player
The following figures illustrate the cable connections supported by the HD mediaplayer. The standard connection uses the included composite AV cables.
Note: HDMI and Toslink (optical) cables are sold separately.
Choosing the Best Connection
The quality of the picture produced by your TV depends on the quality of your TV andits connection to the HD media player.
Connection Quality Connectors
HDMI Best Specialized, high-definition connector
Composite Good • Yellow = video
• Red = right audio
• White = left audio
Composite (Standard Definition) Home theater (High Definition)
HDMI (High Definition) Digital Audio (High Definition)
8/6/2019 WD TV HD Media Player Manual
http://slidepdf.com/reader/full/wd-tv-hd-media-player-manual 17/81
WD TV HD Media PlayerUser Manual
GETTING STARTED – 14
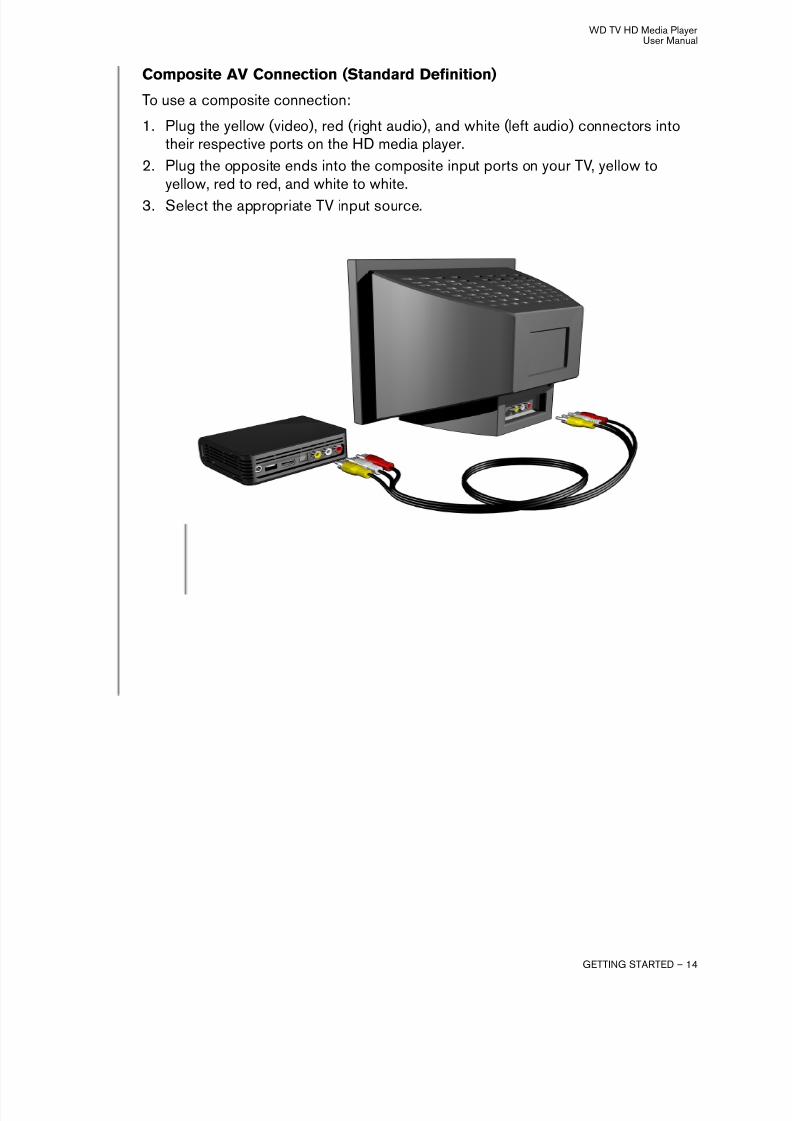
Composite AV Connection (Standard Definition)
To use a composite connection:
1. Plug the yellow (video), red (right audio), and white (left audio) connectors intotheir respective ports on the HD media player.
2. Plug the opposite ends into the composite input ports on your TV, yellow toyellow, red to red, and white to white.
3. Select the appropriate TV input source.

8/6/2019 WD TV HD Media Player Manual
http://slidepdf.com/reader/full/wd-tv-hd-media-player-manual 18/81
WD TV HD Media PlayerUser Manual
GETTING STARTED – 15
HDMI Video and Audio (High Definition)
HDMI combines high-definition video, multi-channel audio, and inter-componentcontrol in a single digital cable. This interface provides video quality resolution of upto 1080p.
To connect your HD media player using an HDMI cable:
1. Plug an HDMI cable into the HDMI connector on the HD media player.
2. Plug the opposite end into the HDMI port on your TV or audio/video system (ifavailable).
As an option, for higher quality multi-channel audio:
3. Plug a Toslink (optical) cable into the S/PDIF (optical digital) connector on the HDmedia player.
4. Plug the opposite end into the optical digital port on your receiver or home theatersystem.
Note: HDMI and Toslink cables are sold separately.
5. Select the appropriate TV input source.
8/6/2019 WD TV HD Media Player Manual
http://slidepdf.com/reader/full/wd-tv-hd-media-player-manual 19/81
WD TV HD Media PlayerUser Manual
GETTING STARTED – 16
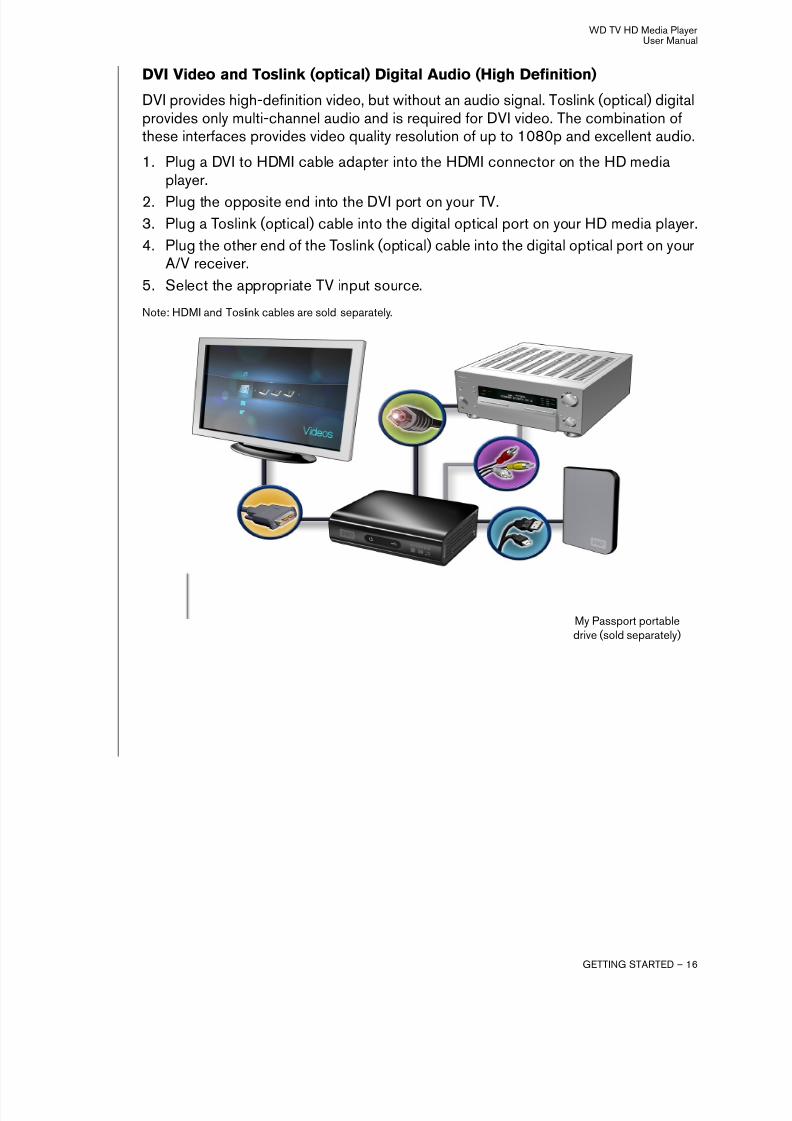
DVI Video and Toslink (optical) Digital Audio (High Definition)
DVI provides high-definition video, but without an audio signal. Toslink (optical) digitalprovides only multi-channel audio and is required for DVI video. The combination ofthese interfaces provides video quality resolution of up to 1080p and excellent audio.
1. Plug a DVI to HDMI cable adapter into the HDMI connector on the HD mediaplayer.
2. Plug the opposite end into the DVI port on your TV.3. Plug a Toslink (optical) cable into the digital optical port on your HD media player.
4. Plug the other end of the Toslink (optical) cable into the digital optical port on yourA/V receiver.
5. Select the appropriate TV input source.
Note: HDMI and Toslink cables are sold separately.
My Passport portabledrive (sold separately)
8/6/2019 WD TV HD Media Player Manual
http://slidepdf.com/reader/full/wd-tv-hd-media-player-manual 20/81
WD TV HD Media PlayerUser Manual
GETTING STARTED – 17
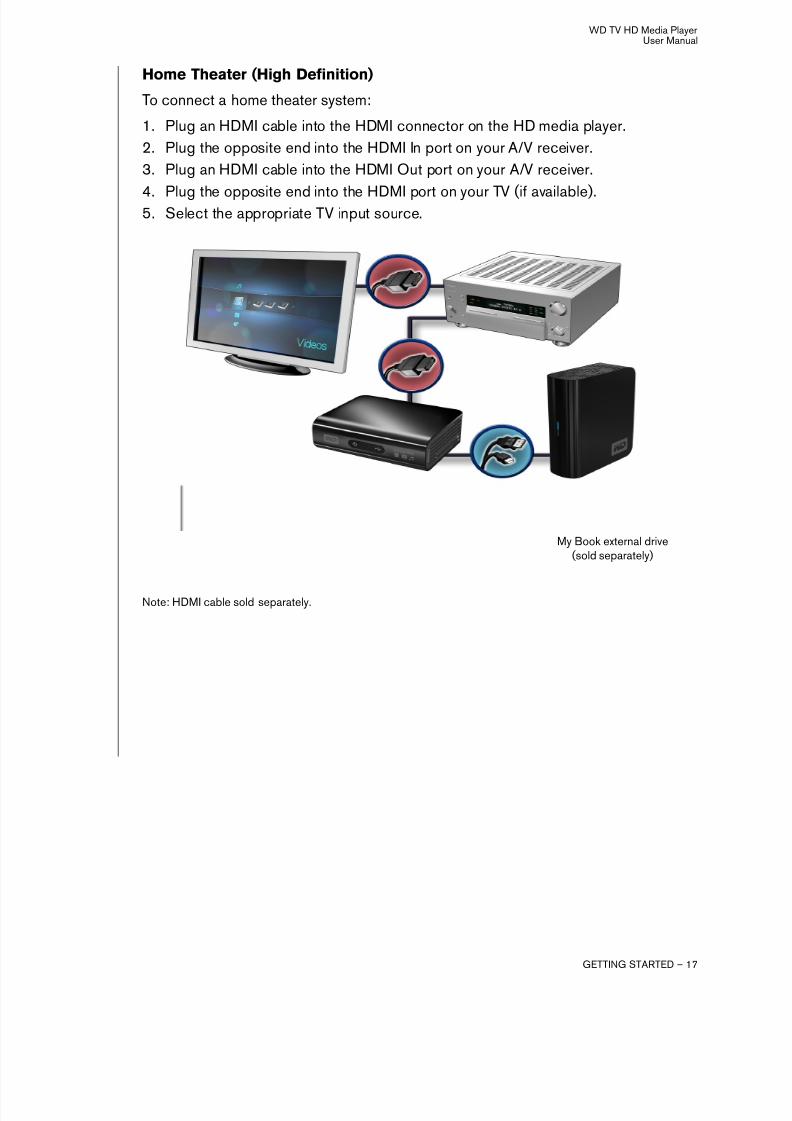
Home Theater (High Definition)
To connect a home theater system:
1. Plug an HDMI cable into the HDMI connector on the HD media player.
2. Plug the opposite end into the HDMI In port on your A/V receiver.
3. Plug an HDMI cable into the HDMI Out port on your A/V receiver.
4. Plug the opposite end into the HDMI port on your TV (if available).5. Select the appropriate TV input source.
Note: HDMI cable sold separately.
My Book external drive(sold separately)

8/6/2019 WD TV HD Media Player Manual
http://slidepdf.com/reader/full/wd-tv-hd-media-player-manual 21/81
WD TV HD Media PlayerUser Manual
GETTING STARTED – 18
Step 4 - Connecting a USB Device
The HD media player has two USB ports that support playback from WD USBexternal drives.*
* For a list of supported WD external drives, see article #2581 in or knowledge base atsupport.wdc.com.
The use of USB hubs is not supported. Not al l features are available on drives that are preformatted for HFS+
Journaling, such as My Book Studio and My Passport drives. HFS+Journaling must be disabled prior toconnecting your external drive to your HD media player. For information on disabling HFS+Journaling, see Article# 2615 in our knowledge base at support.wdc.com.
To connect the USB device:
1. Connect the USB device to either of the HD media player’s USB ports.
2. Wait for a few moments while the HD media player scans the USB device formedia files. (Scanning is enabled by default. If you want to turn off automaticscanning, go to “Enabling/Disabling the Media Library” on page 53.)
This may take several minutes, depending on the storage capacity of the USB deviceand the number of available media files. When the USB device is detected, the status
LED turns on and the Home screen displays the new USB directory icon . If theHD media player does not detect any storage devices, “No storage present” appearson the screen. You can still navigate within the folders, but the folders will be empty.
For Apple UsersFor HFS, Journaling must be disabled on the storage device connected to the HDmedia player. For information on disabling Journaling, see page 7.
My Book external drive(sold separately)
My Passport portabledrive (sold separately)

8/6/2019 WD TV HD Media Player Manual
http://slidepdf.com/reader/full/wd-tv-hd-media-player-manual 22/81
WD TV HD Media PlayerUser Manual
GETTING STARTED – 19
Removing a USB Device
To prevent data loss, it is highly recommended that you first press the EJECT buttonon the remote control before removing a USB device.
To remove a USB device:
1. Press the EJECT button on the remote.
2. Select the USB device you want to remove.3. Highlight OK on the eject prompt, then press ENTER.
4. Disconnect the USB device from the HD media player.
8/6/2019 WD TV HD Media Player Manual
http://slidepdf.com/reader/full/wd-tv-hd-media-player-manual 23/81
WD TV HD Media PlayerUser Manual
OPERATING THE HD MEDIA PLAYER – 20
Operating the HD Media Player
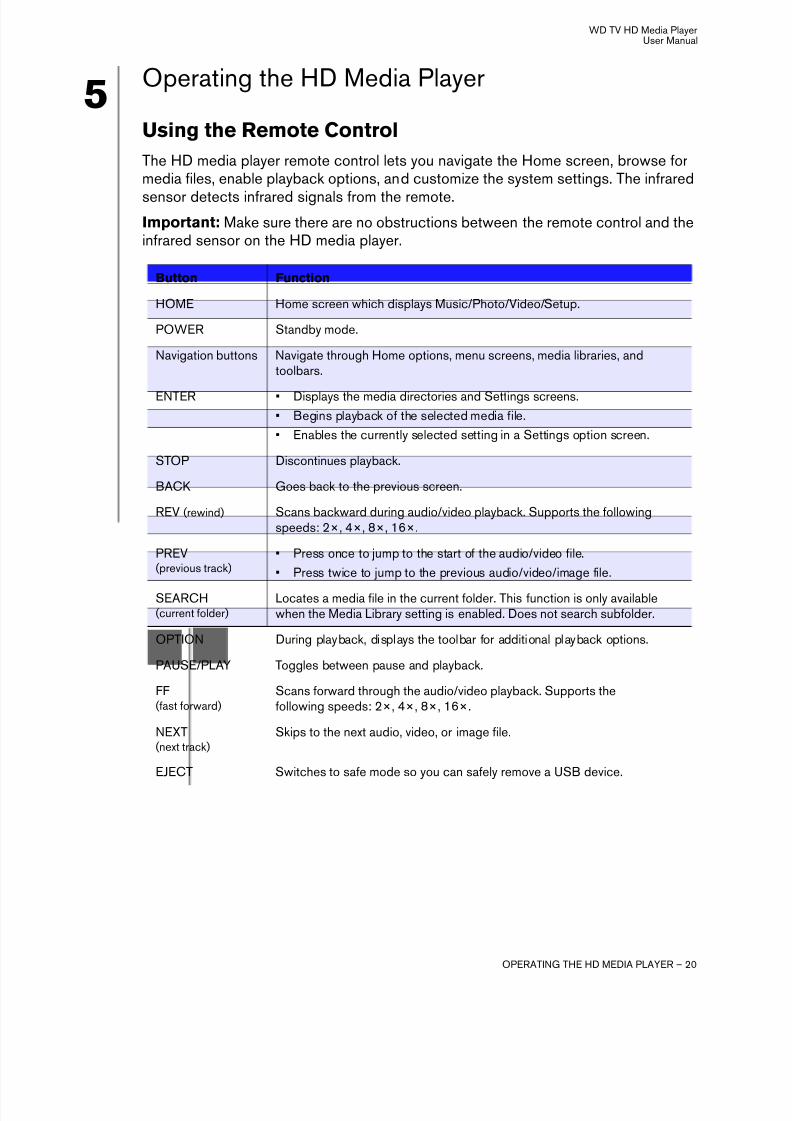
Using the Remote Control
The HD media player remote control lets you navigate the Home screen, browse formedia files, enable playback options, and customize the system settings. The infrared
sensor detects infrared signals from the remote.Important: Make sure there are no obstructions between the remote control and theinfrared sensor on the HD media player.
Button Function
HOME Home screen which displays Music/Photo/Video/Setup.
POWER Standby mode.
Navigation buttons Navigate through Home options, menu screens, media libraries, andtoolbars.
ENTER • Displays the media directories and Settings screens.• Begins playback of the selected media file.
• Enables the currently selected setting in a Settings option screen.
STOP Discontinues playback.
BACK Goes back to the previous screen.
REV (rewind) Scans backward during audio/video playback. Supports the followingspeeds: 2×, 4×, 8×, 16×.
PREV(previous track)
• Press once to jump to the start of the audio/video file.
• Press twice to jump to the previous audio/video/image file.
SEARCH(current folder)
Locates a media file in the current folder. This function is only availablewhen the Media Library setting is enabled. Does not search subfolder.
OPTION During playback, displays the toolbar for additional playback options.
PAUSE/PLAY Toggles between pause and playback.
FF(fast forward)
Scans forward through the audio/video playback. Supports thefollowing speeds: 2×, 4×, 8×, 16×.
NEXT(next track)
Skips to the next audio, video, or image file.
EJECT Switches to safe mode so you can safely remove a USB device.
45
8/6/2019 WD TV HD Media Player Manual
http://slidepdf.com/reader/full/wd-tv-hd-media-player-manual 24/81
WD TV HD Media PlayerUser Manual
OPERATING THE HD MEDIA PLAYER – 21
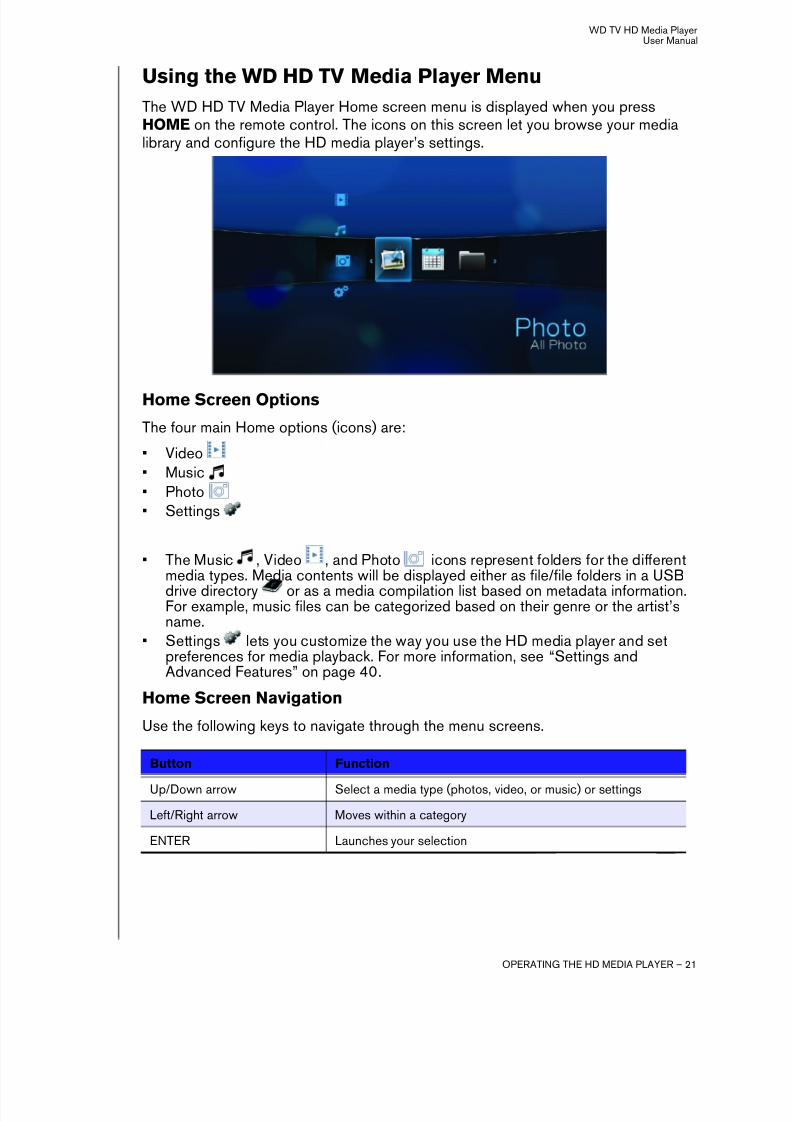
Using the WD HD TV Media Player Menu
The WD HD TV Media Player Home screen menu is displayed when you pressHOME on the remote control. The icons on this screen let you browse your medialibrary and configure the HD media player’s settings.
Home Screen Options
The four main Home options (icons) are:
• Video• Music• Photo• Settings
• The Music , Video , and Photo icons represent folders for the differentmedia types. Media contents will be displayed either as file/file folders in a USB
drive directory or as a media compilation list based on metadata information.For example, music files can be categorized based on their genre or the artist’sname.
• Settings lets you customize the way you use the HD media player and setpreferences for media playback. For more information, see “Settings andAdvanced Features” on page 40.
Home Screen Navigation
Use the following keys to navigate through the menu screens.
Button Function
Up/Down arrow Select a media type (photos, video, or music) or settings
Left/Right arrow Moves within a category
ENTER Launches your selection
8/6/2019 WD TV HD Media Player Manual
http://slidepdf.com/reader/full/wd-tv-hd-media-player-manual 25/81
WD TV HD Media PlayerUser Manual
WATCHING VIDEO – 22
Watching VideoYou can watch videos on your TV using the HD media player.
Supported Video Formats
The following video file formats are supported.
• MPEG 1• MPEG 2• MPEG 4 (ASP, AVC HD/H.264)• WMV9• AVI• Xvid• DVR-MS• MKV• DAT (VCD/SVCD)
Video Playback To play back video:
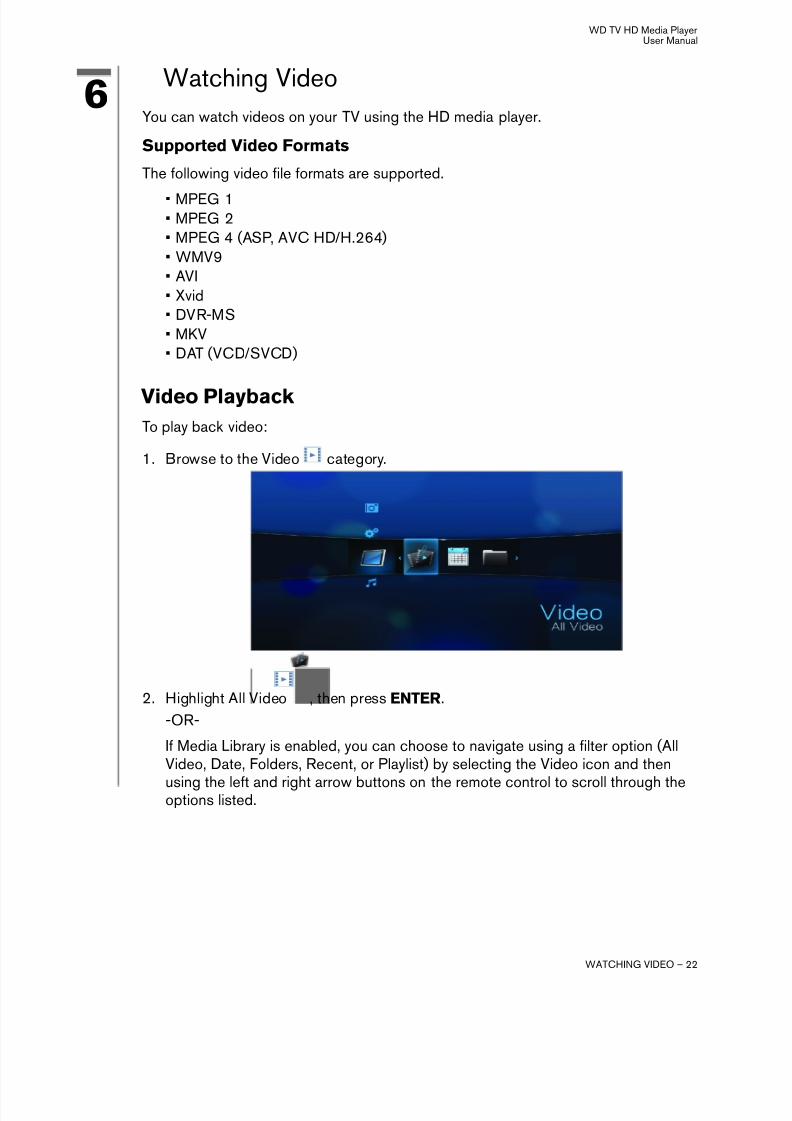
1. Browse to the Video category.
2. Highlight All Video , then press ENTER.
-OR-
If Media Library is enabled, you can choose to navigate using a filter option (AllVideo, Date, Folders, Recent, or Playlist) by selecting the Video icon and then
using the left and right arrow buttons on the remote control to scroll through theoptions listed.
6

8/6/2019 WD TV HD Media Player Manual
http://slidepdf.com/reader/full/wd-tv-hd-media-player-manual 26/81
WD TV HD Media PlayerUser Manual
WATCHING VIDEO – 23
The screen will display available video files and video folders. The display willeither be in thumbnail (default) or list mode depending on your Browser Displaysetting (see “Browser Display” on page 49 for more information. Only video filessupported by the HD media player are displayed.
3. Locate the video file you want to play.
• To begin playback of a single video file, highlight the file, and then press ENTER.• To begin playback of a video playlist, highlight the playlist name, then press
PAUSE/PLAY.• To begin playback of all video files in a folder, highlight a video in that folder, then
press PAUSE/PLAY.
If you try to open a video file that has been partially played before, you areprompted to choose whether to play the file from the beginning or resumeplayback from the last playback position. Select OK to resume playback orCancel to start playback from the beginning.

8/6/2019 WD TV HD Media Player Manual
http://slidepdf.com/reader/full/wd-tv-hd-media-player-manual 27/81
WD TV HD Media PlayerUser Manual
WATCHING VIDEO – 24
Video Playback Controls
Use these buttons on the remote control to control video playback:
Video Playback Options
The Video toolbar has several command icons to customize the way you watch yourvideos.
• To display the Video toolbar, press OPTION.• To hide the toolbar, press BACK or OPTION again.
Displaying the Video Information Panel
Use this option to display the Video Information Panel on the bottom of the screen.
This panel shows the following information about the current video:
Button Function
STOP Discontinues video playback
PAUSE/PLAY Pauses or resumes video playback1. Press FF (fast forward) or REV
(reverse) to scan video (pressrepeatedly to select the scan speed)
2. Press PAUSE/PLAY to resumeplayback on the selected position
Scans the video playback forward or backward
The HD media player supports the following scanspeeds: 2x, 4x, 8x, 16x
Press PREV (previous track) once Starts playback from the beginning
NEXT Plays the next video file in the video folder/playlist
Press PREV (previous track) twice Plays the previous video fi le in the video folder/playlist
Video playback progress bar Video filename Elapsed and totalplayback times
The icon for the current repeat mode is displayed, if enabled.
8/6/2019 WD TV HD Media Player Manual
http://slidepdf.com/reader/full/wd-tv-hd-media-player-manual 28/81
WD TV HD Media PlayerUser Manual
WATCHING VIDEO – 25
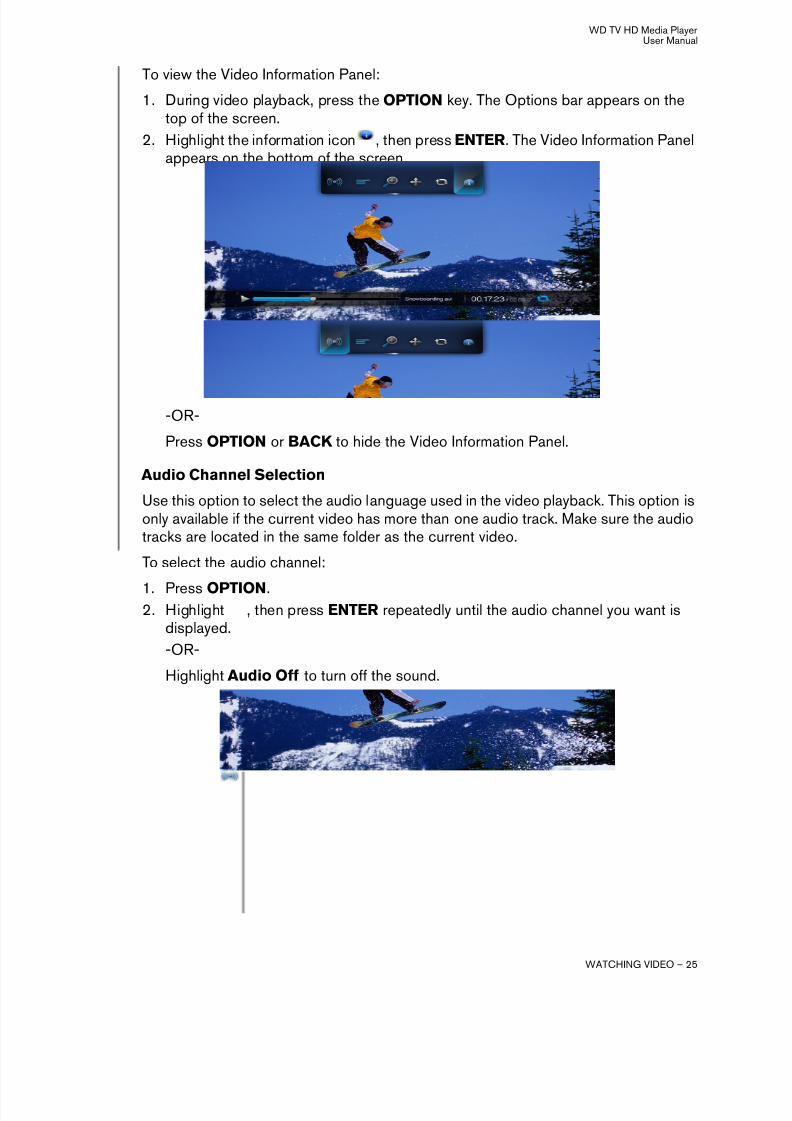
To view the Video Information Panel:
1. During video playback, press the OPTION key. The Options bar appears on thetop of the screen.
2. Highlight the information icon , then press ENTER. The Video Information Panelappears on the bottom of the screen.
-OR-
Press OPTION or BACK to hide the Video Information Panel.
Audio Channel Selection
Use this option to select the audio language used in the video playback. This option isonly available if the current video has more than one audio track. Make sure the audiotracks are located in the same folder as the current video.
To select the audio channel:
1. Press OPTION.2. Highlight , then press ENTER repeatedly until the audio channel you want is
displayed.
-OR-
Highlight Audio Off to turn off the sound.
8/6/2019 WD TV HD Media Player Manual
http://slidepdf.com/reader/full/wd-tv-hd-media-player-manual 29/81
WD TV HD Media PlayerUser Manual
WATCHING VIDEO – 26
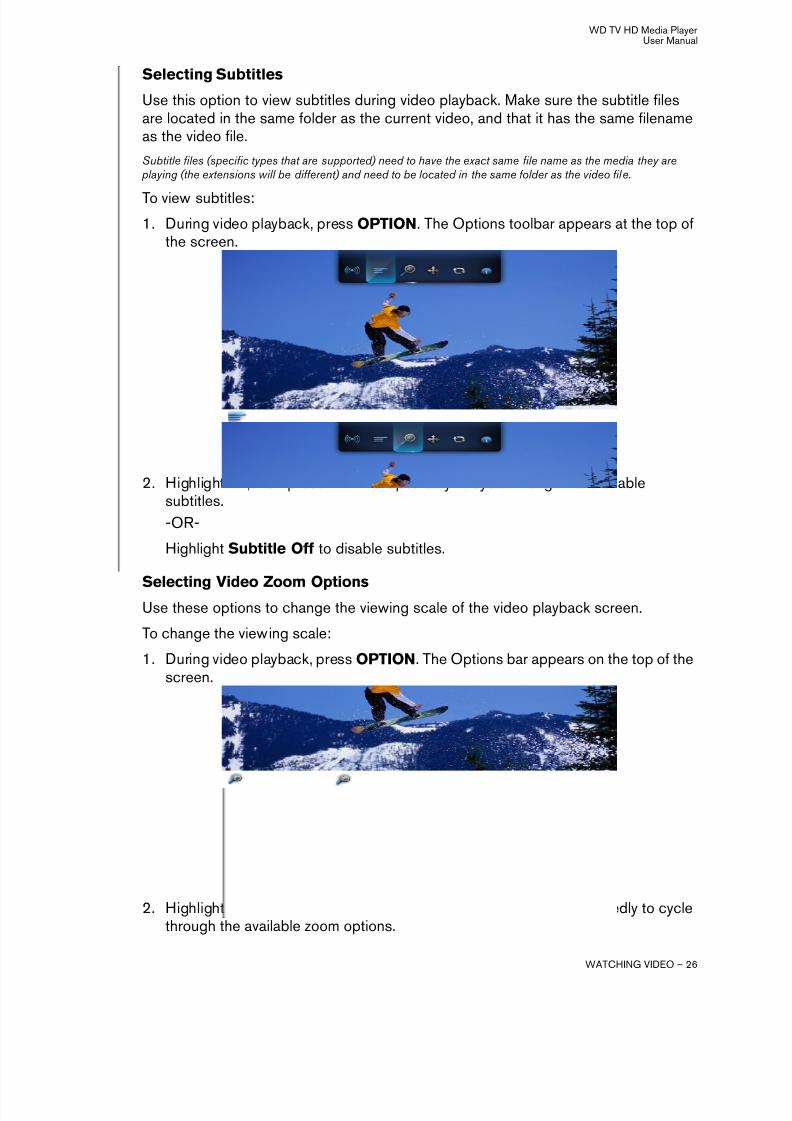
Selecting Subtitles
Use this option to view subtitles during video playback. Make sure the subtitle filesare located in the same folder as the current video, and that it has the same filenameas the video file.
Subtitle files (specific types that are supported) need to have the exact same file name as the media they are playing (the extensions will be different) and need to be located in the same folder as the video file.
To view subtitles:1. During video playback, press OPTION. The Options toolbar appears at the top of
the screen.
2. Highlight , then press ENTER repeatedly to cycle through the availablesubtitles.
-OR-
Highlight Subtitle Off to disable subtitles.
Selecting Video Zoom OptionsUse these options to change the viewing scale of the video playback screen.
To change the viewing scale:
1. During video playback, press OPTION. The Options bar appears on the top of thescreen.
2. Highlight to zoom in or to zoom out, then press ENTER repeatedly to cyclethrough the available zoom options.
8/6/2019 WD TV HD Media Player Manual
http://slidepdf.com/reader/full/wd-tv-hd-media-player-manual 30/81
WD TV HD Media PlayerUser Manual
WATCHING VIDEO – 27
-OR-
Press OPTION or BACK to revert to the default viewing scale.
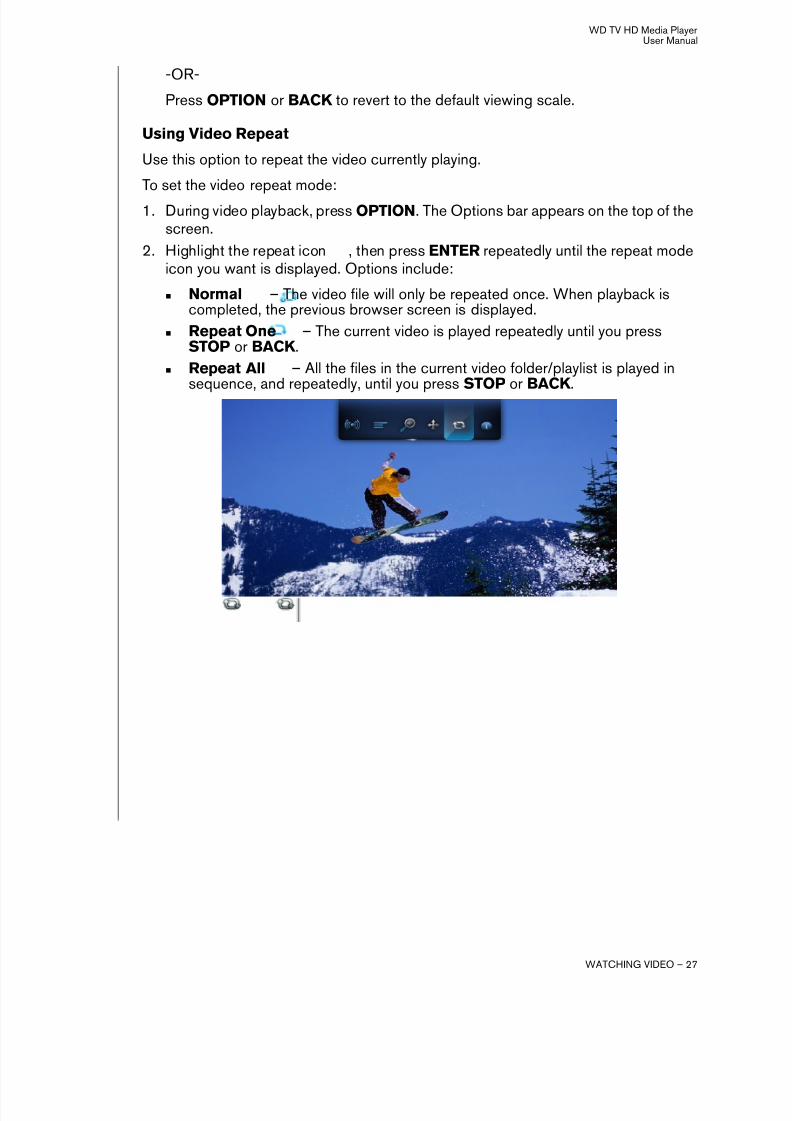
Using Video Repeat
Use this option to repeat the video currently playing.
To set the video repeat mode:
1. During video playback, press OPTION. The Options bar appears on the top of thescreen.
2. Highlight the repeat icon , then press ENTER repeatedly until the repeat modeicon you want is displayed. Options include:
Normal – The video file will only be repeated once. When playback iscompleted, the previous browser screen is displayed.
Repeat One – The current video is played repeatedly until you pressSTOP or BACK .
Repeat All – All the files in the current video folder/playlist is played insequence, and repeatedly, until you press STOP or BACK .
8/6/2019 WD TV HD Media Player Manual
http://slidepdf.com/reader/full/wd-tv-hd-media-player-manual 31/81
WD TV HD Media PlayerUser Manual
PLAYING MUSIC – 28
Playing MusicWith the HD media player you can copy your music library to a USB device and listento it from your entertainment unit. The following audio file and audio codec formats aresupported.
• Audio – MP3, MP2, WAV/PCM/LPCM, Dolby Digital, FLAC, and WMA
• Audio containers/codecs – AIFF, Ogg Vorbis, and MKA
Music Playback
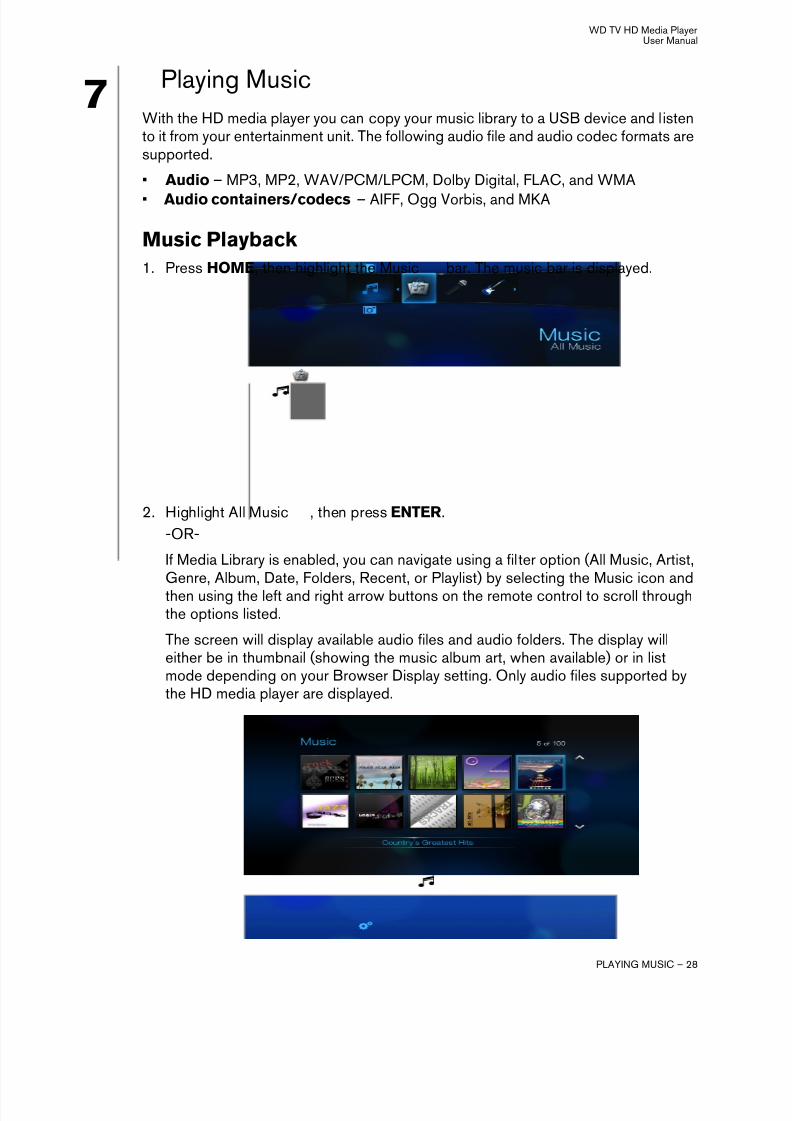
1. Press HOME, then highlight the Music bar. The music bar is displayed.
2. Highlight All Music , then press ENTER.
-OR-
If Media Library is enabled, you can navigate using a filter option (All Music, Artist,Genre, Album, Date, Folders, Recent, or Playlist) by selecting the Music icon andthen using the left and right arrow buttons on the remote control to scroll throughthe options listed.
The screen will display available audio files and audio folders. The display willeither be in thumbnail (showing the music album art, when available) or in listmode depending on your Browser Display setting. Only audio files supported bythe HD media player are displayed.
7
8/6/2019 WD TV HD Media Player Manual
http://slidepdf.com/reader/full/wd-tv-hd-media-player-manual 32/81
WD TV HD Media PlayerUser Manual
PLAYING MUSIC – 29
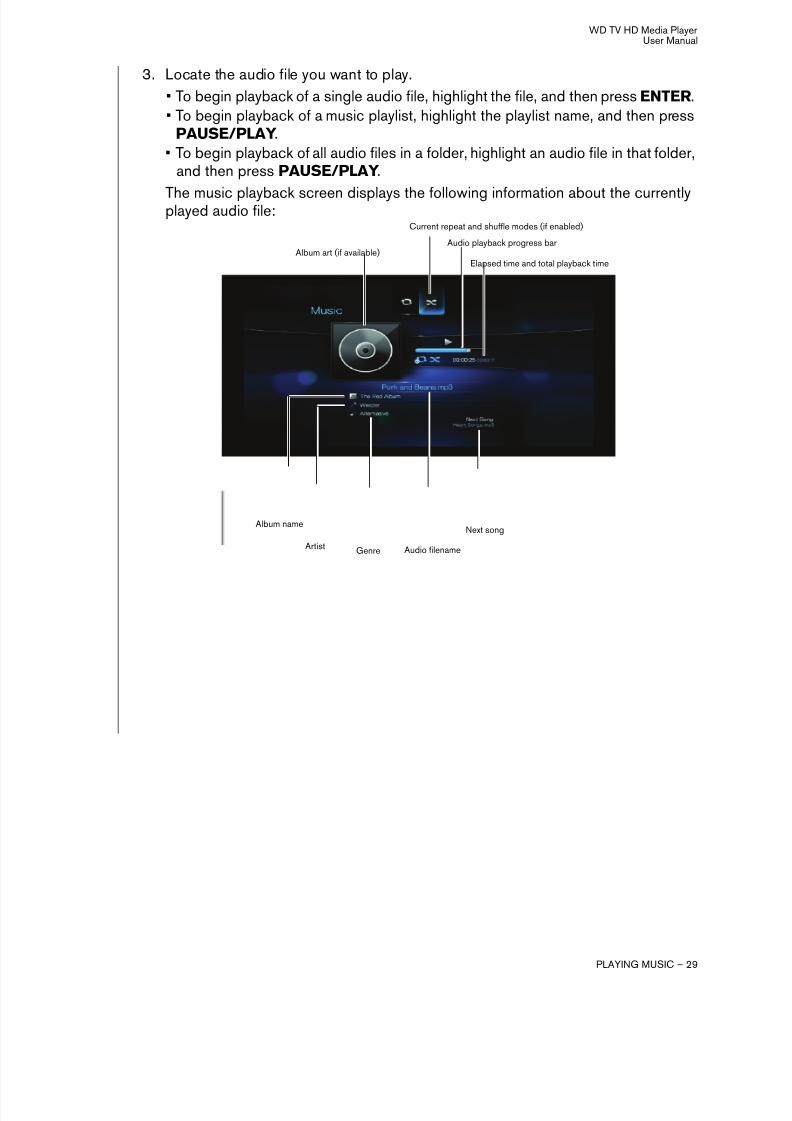
3. Locate the audio file you want to play.
• To begin playback of a single audio file, highlight the file, and then press ENTER.• To begin playback of a music playlist, highlight the playlist name, and then press
PAUSE/PLAY.• To begin playback of all audio files in a folder, highlight an audio file in that folder,
and then press PAUSE/PLAY.
The music playback screen displays the following information about the currentlyplayed audio file:
Album art (if available)Audio playback progress bar
Elapsed time and total playback time
Current repeat and shuffle modes (if enabled)
Album name
Artist Genre Audio filename
Next song

8/6/2019 WD TV HD Media Player Manual
http://slidepdf.com/reader/full/wd-tv-hd-media-player-manual 33/81
WD TV HD Media PlayerUser Manual
PLAYING MUSIC – 30
Music Playback Controls
Use these buttons on the remote control to control music playback:
Music Playback Options
The two command icons on the Music toolbar let you set music repeat and shufflemodes.
• To display the music toolbar, press OPTION.• To hide the toolbar, press BACK or OPTION again.
To set the music repeat mode:
1. During music playback, press OPTION. The music toolbar opens at the top of thescreen.
Button Function
STOP Stop audio playback
PAUSE/PLAY Pause or resume audio playback1. Press FF (fast forward) or REV (rewind) to
scan the audio file (press repeatedly toselect the scan speed).
2. Press PLAY to resume playback on theselected position.
Scan the audio playback forward or backward
The HD media player supports the following scanspeeds: 2×, 4×, 8×, 16×
Press PREV (previous track) once. Start playback from the beginning
Press NEXT Play the next audio track in the music folder/playlist
Press PREV (previous track) twice. Play the previous audio track in the music folder/
playlist

8/6/2019 WD TV HD Media Player Manual
http://slidepdf.com/reader/full/wd-tv-hd-media-player-manual 34/81
WD TV HD Media PlayerUser Manual
PLAYING MUSIC – 31
2. Highlight , then press ENTER repeatedly until the repeat icon you want isdisplayed. Options include:
Normal – The audio track will only be played once. When playback iscompleted, the previous browser screen is displayed.
Repeat One – The current audio track is played repeatedly until you pressSTOP or BACK .
Repeat All – All the audio files in the current music folder/playlist is playedin sequence and repeatedly until you press STOP or BACK .The icon for the enabled repeat mode will appear below the playback progressbar.
Music Shuffle Mode
Use this option to set the audio tracks in the current music folder/playlist to play inrandom order.
To enable music shuffle mode:
1. During music playback, press OPTION. The music toolbar opens at the top of the
screen.
2. Press ENTER repeatedly until the shuffle icon is displayed.
Playing music from your iPod®
Apple® uses a proprietary naming scheme and because of this the HD media player isunable to display the original names for the folders and files as they are in your iPod.The HD media player instead reassigns new names for the folders and files, but onlywhile in use with the HD media player. The original file information is preserved in youriPod. You can view the original file information when you play a file where the screen
will display the metadata.Note: WD TV HD Media Player does not support playback of protective content such as iTunes.
To use your iPod with the HD media player, simply plug your iPod in to the USB andnavigate through the interface menu.
Note: The WD TV HD Media Player only supports mass USB storage mode. iTouch is not set to mass USBstorage and is therefore not supported.

8/6/2019 WD TV HD Media Player Manual
http://slidepdf.com/reader/full/wd-tv-hd-media-player-manual 35/81
WD TV HD Media PlayerUser Manual
VIEWING PHOTOS – 32
Viewing PhotosWith the HD media player you can view your digital photo album in the comfort ofyour living room. It’s perfect for sharing fun times with your friends and family. Thefollowing image file formats are supported:
• GIF (Animated GIFs are not supported)
Older format still widely available on the Internet for photos, web pages, andclipart.
• BMP (non-compressed)Windows bitmap file. Widely used in Microsoft® Windows® for pictures andbackground.
• JPEG (grayscale, RGB, YCbCy)(does not support CMYK or YCCK) The JPEG format is the Internet and digitalphoto format standard used by most digital cameras.
• TIF/TIFF (RGB)(does not support CMYK, YMC, YMCK, or KCMY) Tagged Image File Format isa rastor file format.
• PNG (Non-alpha channel only)Portable Network Graphics standard is created in response to limitations in theGIF file format.
Photo Display
1. Press HOME, then select the Photo bar. The photo bar is displayed. .
2. Select the All Photo icon , then press ENTER.
-OR-
If Media Library is enabled, you can choose to navigate using a filter (All Pictures,Date, Folders, and Recent) by selecting the Photo icon and then using the left andright arrow buttons on the remote control to scroll through the options listed.
8
8/6/2019 WD TV HD Media Player Manual
http://slidepdf.com/reader/full/wd-tv-hd-media-player-manual 36/81
WD TV HD Media PlayerUser Manual
VIEWING PHOTOS – 33
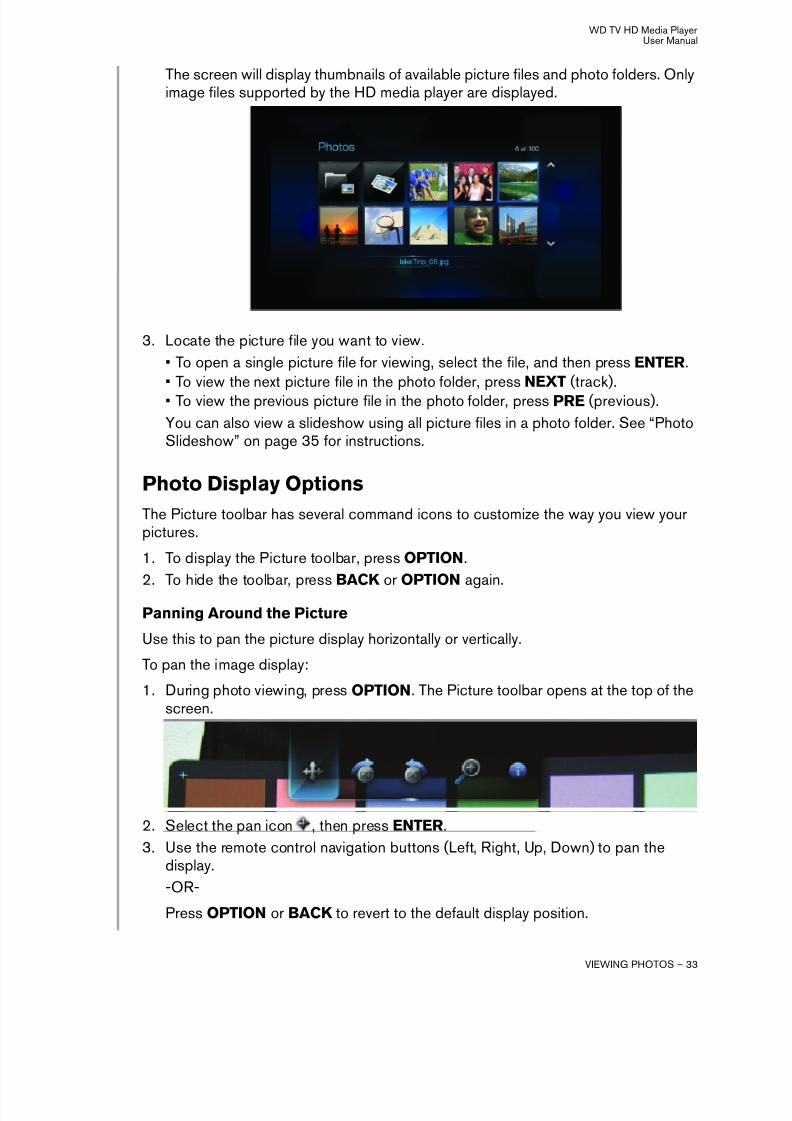
The screen will display thumbnails of available picture files and photo folders. Onlyimage files supported by the HD media player are displayed.
3. Locate the picture file you want to view.
• To open a single picture file for viewing, select the file, and then press ENTER.• To view the next picture file in the photo folder, press NEXT (track).• To view the previous picture file in the photo folder, press PRE (previous).You can also view a slideshow using all picture files in a photo folder. See “PhotoSlideshow” on page 35 for instructions.
Photo Display Options
The Picture toolbar has several command icons to customize the way you view yourpictures.
1. To display the Picture toolbar, press OPTION.
2. To hide the toolbar, press BACK or OPTION again.
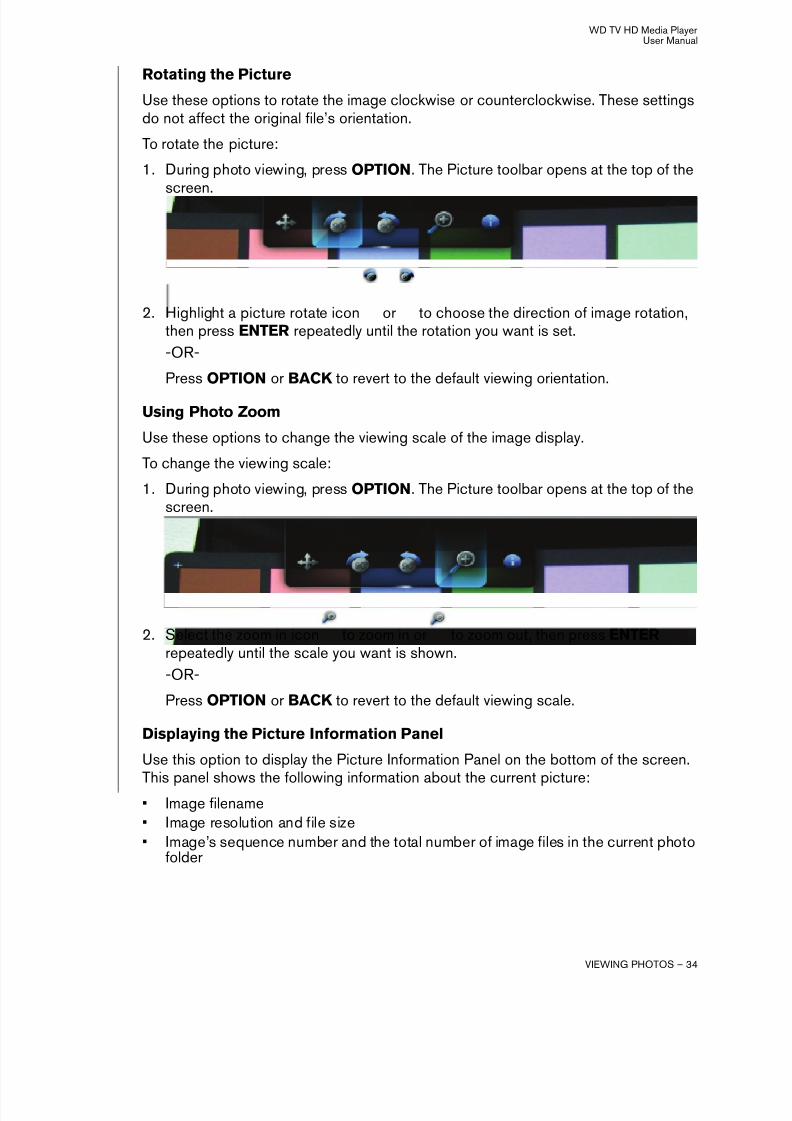
Panning Around the Picture
Use this to pan the picture display horizontally or vertically.
To pan the image display:
1. During photo viewing, press OPTION. The Picture toolbar opens at the top of thescreen.
2. Select the pan icon , then press ENTER.
3. Use the remote control navigation buttons (Left, Right, Up, Down) to pan thedisplay.
-OR-
Press OPTION or BACK to revert to the default display position.
8/6/2019 WD TV HD Media Player Manual
http://slidepdf.com/reader/full/wd-tv-hd-media-player-manual 37/81
WD TV HD Media PlayerUser Manual
VIEWING PHOTOS – 34
Rotating the Picture
Use these options to rotate the image clockwise or counterclockwise. These settingsdo not affect the original file’s orientation.
To rotate the picture:
1. During photo viewing, press OPTION. The Picture toolbar opens at the top of thescreen.
2. Highlight a picture rotate icon or to choose the direction of image rotation,then press ENTER repeatedly until the rotation you want is set.
-OR-
Press OPTION or BACK to revert to the default viewing orientation.
Using Photo Zoom
Use these options to change the viewing scale of the image display.
To change the viewing scale:
1. During photo viewing, press OPTION. The Picture toolbar opens at the top of thescreen.
2. Select the zoom in icon to zoom in or to zoom out, then press ENTER repeatedly until the scale you want is shown.
-OR-
Press OPTION or BACK to revert to the default viewing scale.
Displaying the Picture Information Panel
Use this option to display the Picture Information Panel on the bottom of the screen.
This panel shows the following information about the current picture:• Image filename• Image resolution and file size• Image’s sequence number and the total number of image files in the current photo
folder

8/6/2019 WD TV HD Media Player Manual
http://slidepdf.com/reader/full/wd-tv-hd-media-player-manual 38/81
WD TV HD Media PlayerUser Manual
VIEWING PHOTOS – 35
To view the Picture Information Panel:
1. During photo viewing, press OPTION. The Picture toolbar opens at the top of thescreen.
2. Select the Picture Info icon , then press ENTER.
-OR-
Press OPTION or BACK to hide the Picture Information Panel.
Photo Slideshow
The HD media player allows you to create a slideshow using the contents of a photofolder.
To start a slideshow:
1. Locate the photo folder containing the image files you want in the slideshow. (See“Photo Display” on page 32.)
2. Select the photo folder, then press PAUSE/PLAY to start the slideshow.
To listen to background music with a slideshow:
1. Navigate to the music folder containing the audio file/playlist you want toaccompany the slideshow. (See “Music Playback” on page 28.)
2. Select the audio file/playlist, and then press PLAY.
• If you selected a single audio file, you may want to enable it to play repeatedly soit doesn’t stop before the slideshow is done.
• If you selected a music playlist, you can choose to enable the repeat or shufflemode.

8/6/2019 WD TV HD Media Player Manual
http://slidepdf.com/reader/full/wd-tv-hd-media-player-manual 39/81
8/6/2019 WD TV HD Media Player Manual
http://slidepdf.com/reader/full/wd-tv-hd-media-player-manual 40/81
WD TV HD Media PlayerUser Manual
VIEWING PHOTOS – 37
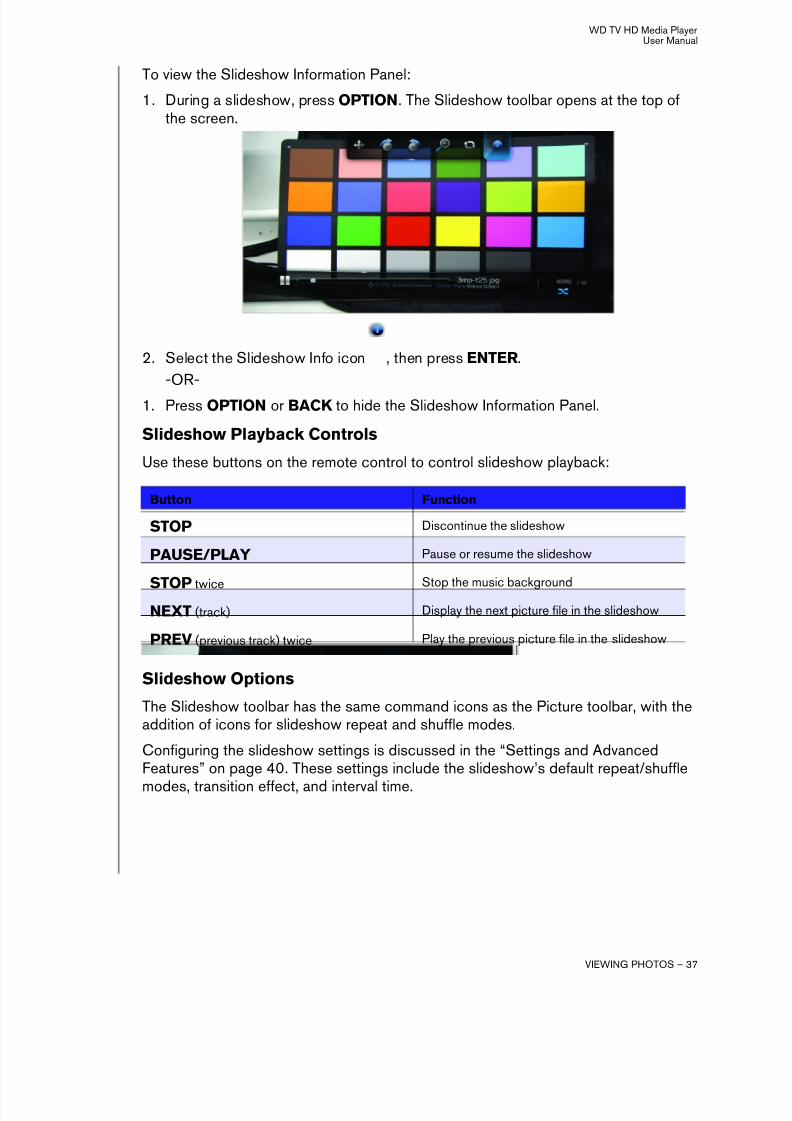
To view the Slideshow Information Panel:
1. During a slideshow, press OPTION. The Slideshow toolbar opens at the top ofthe screen.
2. Select the Slideshow Info icon , then press ENTER.
-OR-
1. Press OPTION or BACK to hide the Slideshow Information Panel.
Slideshow Playback Controls
Use these buttons on the remote control to control slideshow playback:
Slideshow Options
The Slideshow toolbar has the same command icons as the Picture toolbar, with theaddition of icons for slideshow repeat and shuffle modes.
Configuring the slideshow settings is discussed in the “Settings and AdvancedFeatures” on page 40. These settings include the slideshow’s default repeat/shuffle
modes, transition effect, and interval time.
Button Function
STOP Discontinue the slideshow
PAUSE/PLAY Pause or resume the slideshow
STOP twice Stop the music backgroundNEXT (track) Display the next picture file in the slideshow
PREV (previous track) twice Play the previous picture file in the slideshow
8/6/2019 WD TV HD Media Player Manual
http://slidepdf.com/reader/full/wd-tv-hd-media-player-manual 41/81
WD TV HD Media PlayerUser Manual
VIEWING PHOTOS – 38
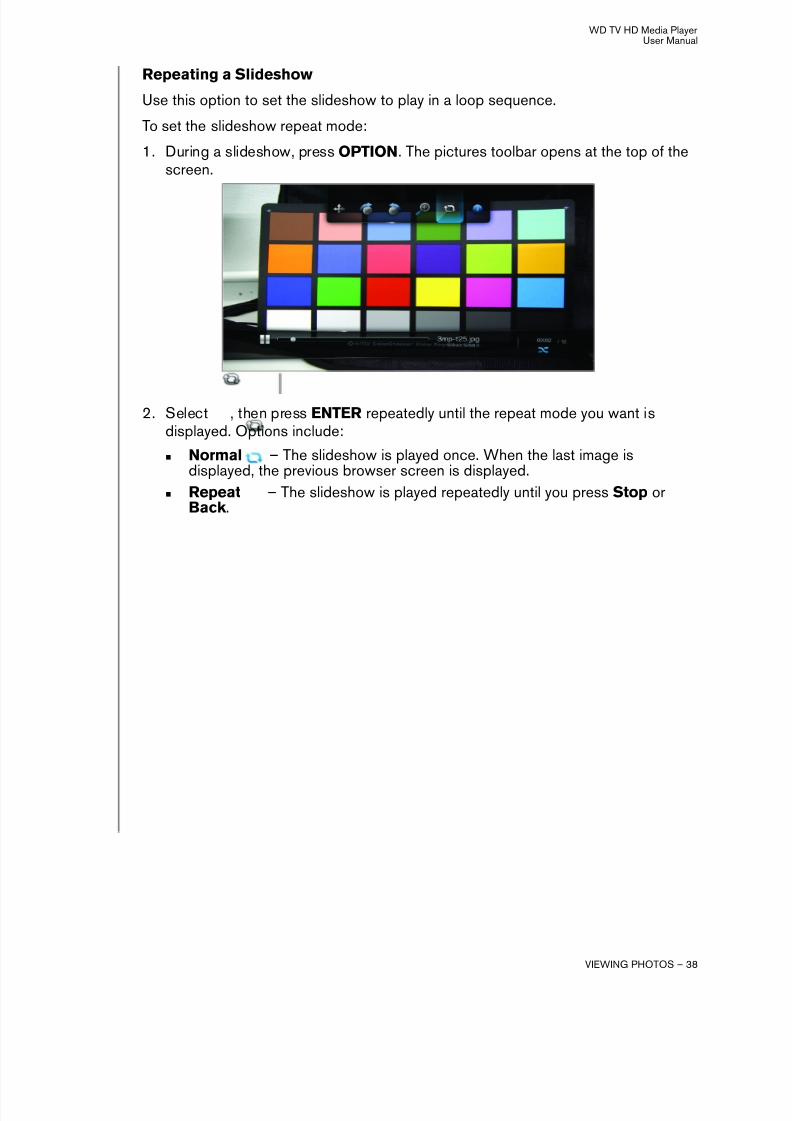
Repeating a Slideshow
Use this option to set the slideshow to play in a loop sequence.
To set the slideshow repeat mode:
1. During a slideshow, press OPTION. The pictures toolbar opens at the top of thescreen.
2. Select , then press ENTER repeatedly until the repeat mode you want isdisplayed. Options include:
Normal – The slideshow is played once. When the last image isdisplayed, the previous browser screen is displayed.
Repeat – The slideshow is played repeatedly until you press Stop orBack .

8/6/2019 WD TV HD Media Player Manual
http://slidepdf.com/reader/full/wd-tv-hd-media-player-manual 42/81
WD TV HD Media PlayerUser Manual
VIEWING PHOTOS – 39
Shuffling a Slideshow
Use this option to display the slideshow pictures in random order.
To enable the slideshow shuffle mode:
1. During a slideshow, press OPTION. The pictures toolbar opens at the top of thescreen.
2. Select , then press ENTER. The Shuffle icon appears on the SlideshowInformation Panel.
3. To disable the shuffle mode, press OPTION, then select the Shuffle icon againand press ENTER.

8/6/2019 WD TV HD Media Player Manual
http://slidepdf.com/reader/full/wd-tv-hd-media-player-manual 43/81
WD TV HD Media PlayerUser Manual
SETTINGS AND ADVANCED FEATURES – 40
Settings and Advanced FeaturesThe Settings menu lets you customize the way you use the HD media player and setpreferences for media playback.
To select a Settings category:
1. Press HOME, then select the Settings icon .
2. Use the Left/Right navigation buttons to select a Settings category, then pressENTER.
There are five Settings categories, including Audio/Video , Music , Movie ,
Photo , and System .
Settings Navigation Buttons
Use these buttons on the remote control to navigate within and between the Settingsscreens.
Button Function
Up/Down • Selects a menu
• Selects a menu setting in an optionscreen
ENTER Displays the option screen for theselected menu
1. Press ENTER. A confirmation prompt appears.
2. Select OK , then press ENTER.If you fail to select OK within 15 seconds, the newsetting will not be applied.
If your entertainment unit cannot support theselected setting, no change is made and theoriginal setting is retained.
Applies the selected menu setting
BACK Displays the previous menu screen
89

8/6/2019 WD TV HD Media Player Manual
http://slidepdf.com/reader/full/wd-tv-hd-media-player-manual 44/81
WD TV HD Media PlayerUser Manual
SETTINGS AND ADVANCED FEATURES – 41
Audio/Video
Use the menus in this category to configure playback for audio and video files.
Display Resolution
Use this menu to select the video display resolution when using the HDMI interface.Default setting is Auto.
Note: The further down the list the setting, the higher the resolution and clearer the picture.

8/6/2019 WD TV HD Media Player Manual
http://slidepdf.com/reader/full/wd-tv-hd-media-player-manual 45/81
WD TV HD Media PlayerUser Manual
SETTINGS AND ADVANCED FEATURES – 42
Aspect Ratio
Use this menu to select the way videos are displayed. Options include:
• Normal (4:3)• Widescreen (16:9)
The HD media player’s default setting is Widescreen. Make sure your TV can support
widescreen resolution, or this default setting can result in a distorted video display.
Audio Output
Use this menu to select the audio output mode. Options include:
• Stereo - Recommended if you are using a 2- or 4-speaker entertainment unit.• Digital - Select this option if you are using an Toslink (optical) connection to
output surround sound.
8/6/2019 WD TV HD Media Player Manual
http://slidepdf.com/reader/full/wd-tv-hd-media-player-manual 46/81
WD TV HD Media PlayerUser Manual
SETTINGS AND ADVANCED FEATURES – 43
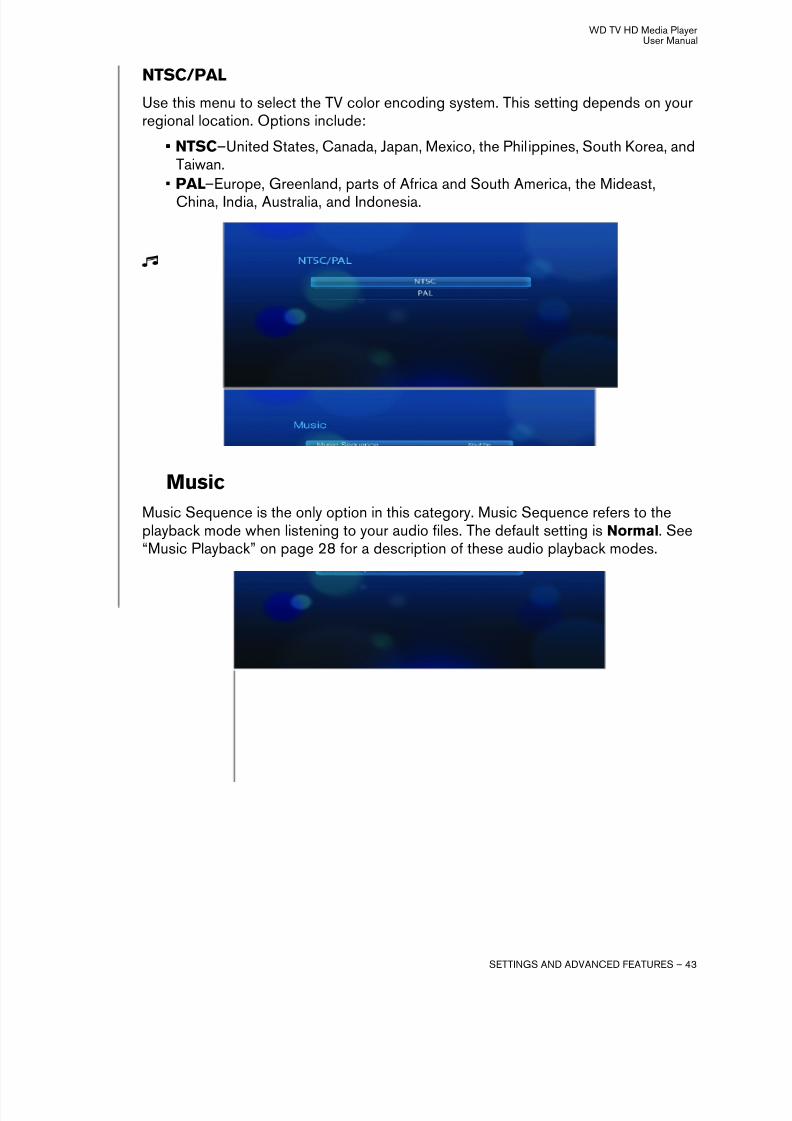
NTSC/PAL
Use this menu to select the TV color encoding system. This setting depends on yourregional location. Options include:
• NTSC–United States, Canada, Japan, Mexico, the Philippines, South Korea, andTaiwan.
• PAL–Europe, Greenland, parts of Africa and South America, the Mideast,China, India, Australia, and Indonesia.
Music
Music Sequence is the only option in this category. Music Sequence refers to theplayback mode when listening to your audio files. The default setting is Normal. See“Music Playback” on page 28 for a description of these audio playback modes.
8/6/2019 WD TV HD Media Player Manual
http://slidepdf.com/reader/full/wd-tv-hd-media-player-manual 47/81
WD TV HD Media PlayerUser Manual
SETTINGS AND ADVANCED FEATURES – 44
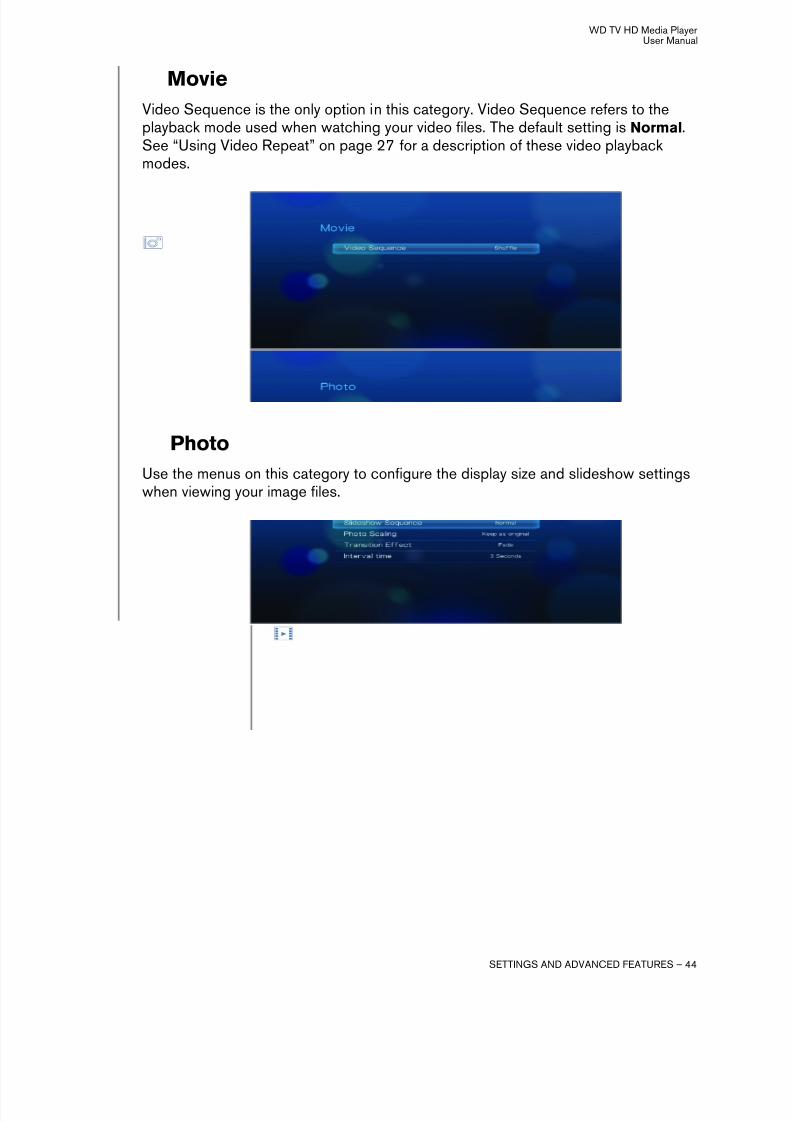
Movie
Video Sequence is the only option in this category. Video Sequence refers to theplayback mode used when watching your video files. The default setting is Normal.See “Using Video Repeat” on page 27 for a description of these video playbackmodes.
Photo
Use the menus on this category to configure the display size and slideshow settingswhen viewing your image files.

8/6/2019 WD TV HD Media Player Manual
http://slidepdf.com/reader/full/wd-tv-hd-media-player-manual 48/81
WD TV HD Media PlayerUser Manual
SETTINGS AND ADVANCED FEATURES – 45
Slideshow Sequence
Use this menu to set the slideshow sequence mode. The default setting is Normal.See “Repeating a Slideshow” on page 38 for a description of these slideshowsequence modes.
Photo Scaling
Use this menu to define how pictures are scaled when you view them. This alsoapplies when pictures are viewed in a slideshow. Options include:
• Keep as original – Maintains the original resolution of the image (default).• Fit to screen – Fills as much of the display area as possible while maintaining
correct image proportions.• Display in full screen– Fills the display area with the image (this can lead to
image distortion).

8/6/2019 WD TV HD Media Player Manual
http://slidepdf.com/reader/full/wd-tv-hd-media-player-manual 49/81
WD TV HD Media PlayerUser Manual
SETTINGS AND ADVANCED FEATURES – 46
Transition Effect
Use this menu to select the method used to display the next slide in a slideshow.Options include:
• Fade (default)• Random
• None

8/6/2019 WD TV HD Media Player Manual
http://slidepdf.com/reader/full/wd-tv-hd-media-player-manual 50/81
WD TV HD Media PlayerUser Manual
SETTINGS AND ADVANCED FEATURES – 47
Interval Time
Use this menu to set the time interval between pictures in the slideshow. You canselect from 3 seconds (default) to 5 minutes.
SystemUse the menus in this category to configure the HD media player’s general functions.
Language
Use this menu to select the display language.
8/6/2019 WD TV HD Media Player Manual
http://slidepdf.com/reader/full/wd-tv-hd-media-player-manual 51/81
WD TV HD Media PlayerUser Manual
SETTINGS AND ADVANCED FEATURES – 48
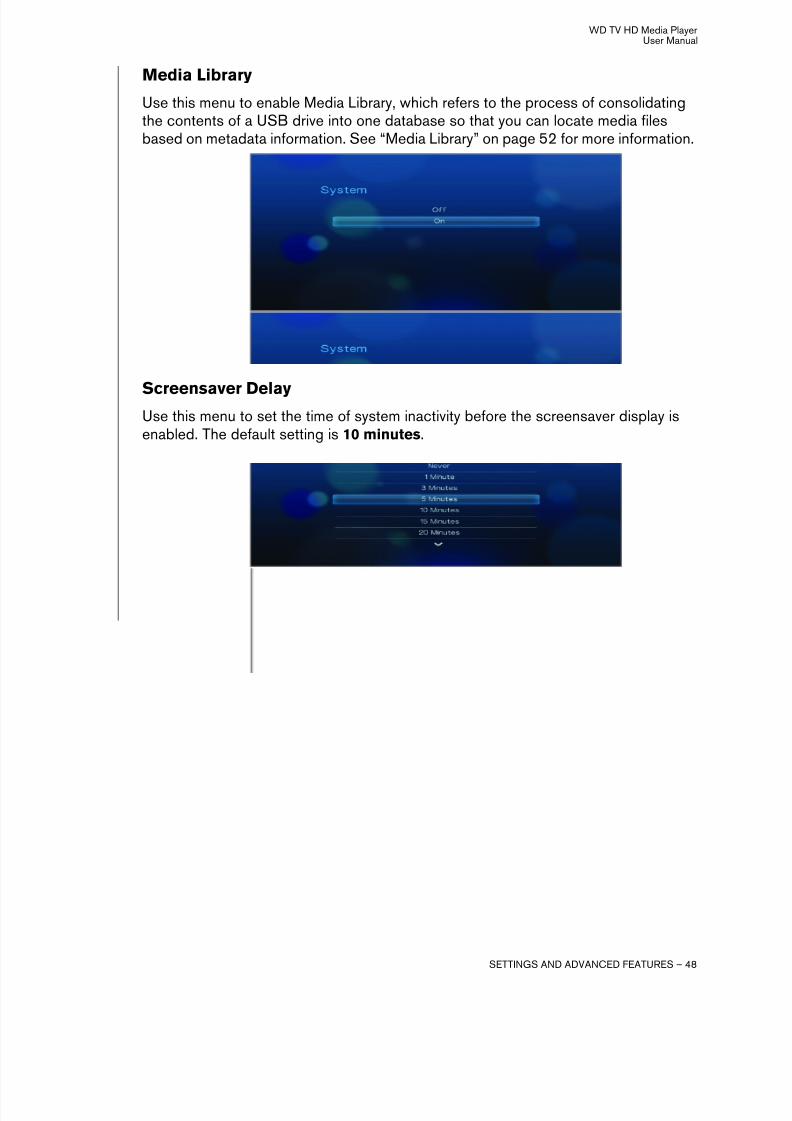
Media Library
Use this menu to enable Media Library, which refers to the process of consolidatingthe contents of a USB drive into one database so that you can locate media filesbased on metadata information. See “Media Library” on page 52 for more information.
Screensaver DelayUse this menu to set the time of system inactivity before the screensaver display isenabled. The default setting is 10 minutes.

8/6/2019 WD TV HD Media Player Manual
http://slidepdf.com/reader/full/wd-tv-hd-media-player-manual 52/81
WD TV HD Media PlayerUser Manual
SETTINGS AND ADVANCED FEATURES – 49
Browser Display
Use this menu to select how media files are displayed in their respective folders. Thedefault setting is Thumbnail. In the Music directory, this displays thumbnails ofavailable album art. In the Video directory, this displays thumbnails of available movieposters. In the Photo directory, this displays thumbnails of available image files.
Thumbnail mode List mode
8/6/2019 WD TV HD Media Player Manual
http://slidepdf.com/reader/full/wd-tv-hd-media-player-manual 53/81
WD TV HD Media PlayerUser Manual
SETTINGS AND ADVANCED FEATURES – 50
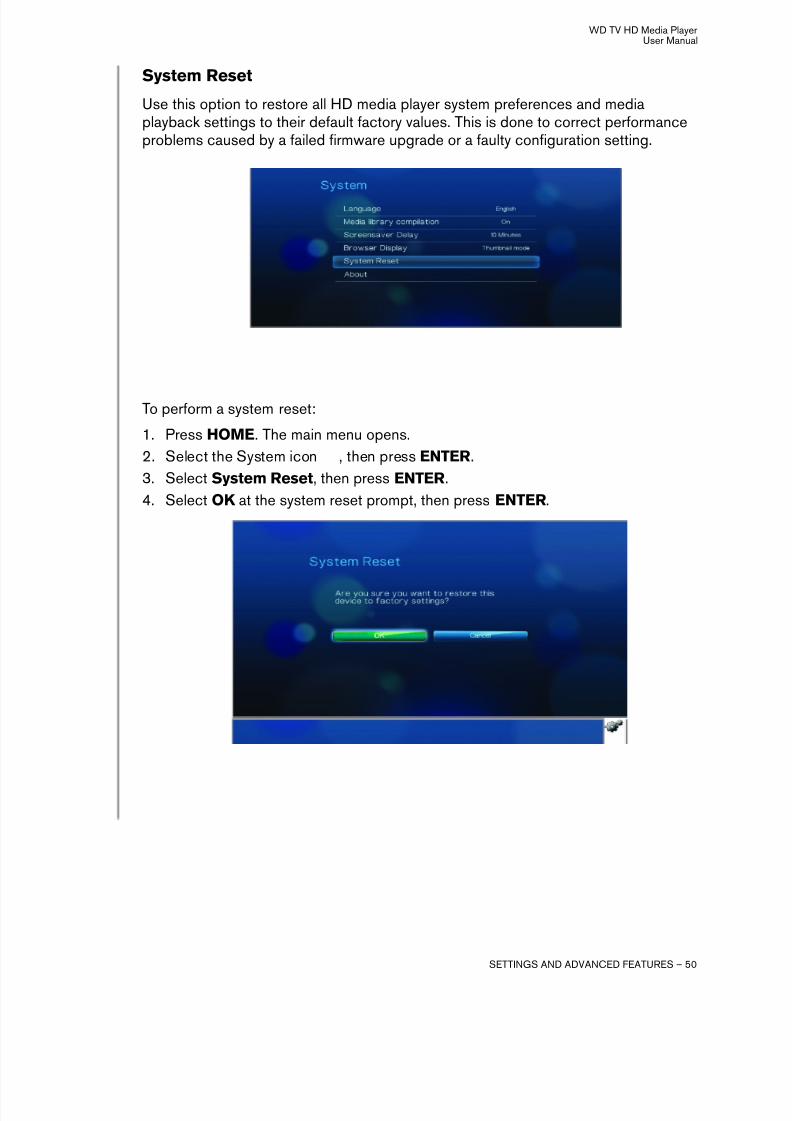
System Reset
Use this option to restore all HD media player system preferences and mediaplayback settings to their default factory values. This is done to correct performanceproblems caused by a failed firmware upgrade or a faulty configuration setting.
To perform a system reset:
1. Press HOME. The main menu opens.
2. Select the System icon , then press ENTER.
3. Select System Reset, then press ENTER.
4. Select OK at the system reset prompt, then press ENTER.

8/6/2019 WD TV HD Media Player Manual
http://slidepdf.com/reader/full/wd-tv-hd-media-player-manual 54/81
WD TV HD Media PlayerUser Manual
SETTINGS AND ADVANCED FEATURES – 51
About
Select this option to display the current hardware and firmware configurations.
8/6/2019 WD TV HD Media Player Manual
http://slidepdf.com/reader/full/wd-tv-hd-media-player-manual 55/81
WD TV HD Media PlayerUser Manual
SETTINGS AND ADVANCED FEATURES – 52
Media Library
Media Library scans and consolidates the media contents of a USB drive into adatabase through which you can easily locate media files. This feature is on bydefault.
The following conditions will prevent the Media Library from processing your media.
• The USB device has read-only protection.• The USB device is using the HFS+Journaling file system.• There is not enough hard drive space on the USB device. Your HD media player
needs some space to cache information, so that searches and scans are faster.
A note about metadata
Metadata is information about the data in a file that describes how, when, and bywhom a particular set of data (video, music, photographic, or any other type of data)was collected, and how the data is formatted.
Not all files have metadata loaded. To add and edit metadata so that Media Library
can aggregate the files properly, you can use one of several tools including:• Adobe® Bridge (part of the Adobe Creative Suite)• abcAVI Tag Editor (freeware)• XnView 1.93.2 (freeware)• iTunes• Windows Media Player
Editing metadata
Editing metadata with iTunes:
1. Open iTunes and click the song you want to edit.
2. Open the File menu, then click Get Info.A window opens, showing all of the information you can edit for the song that youselected. You can edit the song’s:
Name Artist
Year released Album name Composer Track number Genre
3. When you are done, click OK . To edit the next song listed in your iTunes library,click Next.
Editing metadata with Windows Media Player:
1. Open Windows Media Player.
2. Click the Library tab.
3. Right-click the title or other item to edit.
4. When the menu opens, click Edit.

8/6/2019 WD TV HD Media Player Manual
http://slidepdf.com/reader/full/wd-tv-hd-media-player-manual 56/81
WD TV HD Media PlayerUser Manual
SETTINGS AND ADVANCED FEATURES – 53
Enabling/Disabling the Media Library
To enable the Media Library:
1. Press Home, Settings , then the Settings category. The System menu opens.
2. Highlight Media Library, then press ENTER. The System screen opens.
3. Highlight On or Off, and then press ENTER. A Media Library prompt appears. (Toturn automatic Media Library off, highlight Off).
4. Press ENTER.
When the currently attached USB drive has not been previously scanned, the HDmedia player begins the Media Library process. The status LED starts blinking toindicate that this process is taking place. The process duration varies from a fewseconds to several minutes, depending on the storage capacity of the USBdevice and the number of available media files.
When the status LED stops blinking, the process completes and the compilationresults display.

8/6/2019 WD TV HD Media Player Manual
http://slidepdf.com/reader/full/wd-tv-hd-media-player-manual 57/81
WD TV HD Media PlayerUser Manual
SETTINGS AND ADVANCED FEATURES – 54
Media Library Categories
Once the Media Library process completes, all available media files are organizedwith similar types of media grouped in separate folders. By default, media contentsdisplay as thumbnails (music album or movie poster thumbnails). The contentcategories are listed in the following table.
Media Type Icon Category Description
Music All Music Files are listed in alphabetical order
Artist Content is categorized based on the artist name
Genre Content is categorized based on genre
Album Content is categorized based on album names
Date Content is arranged based on creation or modified
date
Folders Contents display in file folders
Recent Displays a list of audio folders/files that have beenplayed recently (the 30 most recent in each category)
Playlist Displays a list of music playlists
Video All Video Files are listed in alphabetical order
Date Content is arranged based on creation or modifieddate
Folders Contents display in file folders
Recent Displays a list of video folders/files that have beenplayed recently (the 30 most recent in each category)
Playlist Displays a list of video playlists
Photo All Photos Files are listed in alphabetical order
Date Content is arranged based on creation or modifieddate
Folders Contents display in image fi le folders
Recent Displays a list of image folders/files that have beenviewed recently (the 30 most recent in each category)
8/6/2019 WD TV HD Media Player Manual
http://slidepdf.com/reader/full/wd-tv-hd-media-player-manual 58/81
WD TV HD Media PlayerUser Manual
SETTINGS AND ADVANCED FEATURES – 55
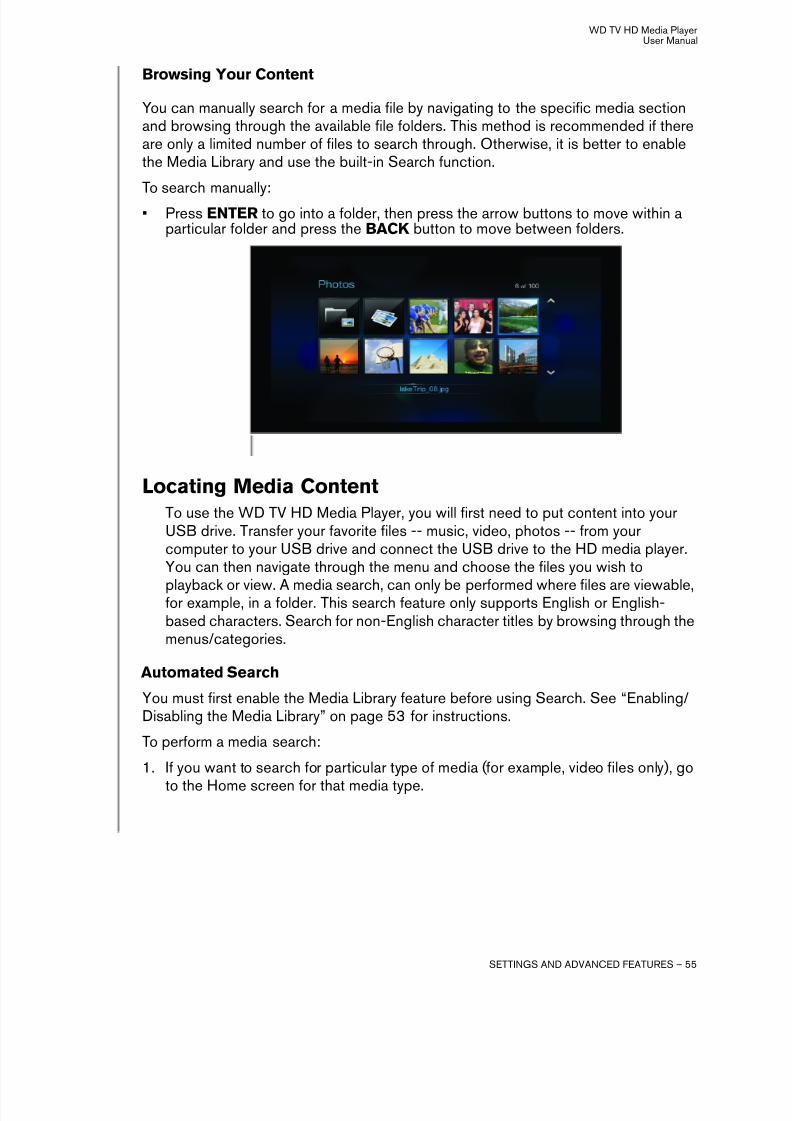
Browsing Your Content
You can manually search for a media file by navigating to the specific media sectionand browsing through the available file folders. This method is recommended if thereare only a limited number of files to search through. Otherwise, it is better to enablethe Media Library and use the built-in Search function.
To search manually:
• Press ENTER to go into a folder, then press the arrow buttons to move within aparticular folder and press the BACK button to move between folders.
Locating Media ContentTo use the WD TV HD Media Player, you will first need to put content into yourUSB drive. Transfer your favorite files -- music, video, photos -- from yourcomputer to your USB drive and connect the USB drive to the HD media player.You can then navigate through the menu and choose the files you wish to
playback or view. A media search, can only be performed where files are viewable,for example, in a folder. This search feature only supports English or English-based characters. Search for non-English character titles by browsing through themenus/categories.
Automated Search
You must first enable the Media Library feature before using Search. See “Enabling/Disabling the Media Library” on page 53 for instructions.
To perform a media search:
1. If you want to search for particular type of media (for example, video files only), go
to the Home screen for that media type.
8/6/2019 WD TV HD Media Player Manual
http://slidepdf.com/reader/full/wd-tv-hd-media-player-manual 59/81
WD TV HD Media PlayerUser Manual
SETTINGS AND ADVANCED FEATURES – 56
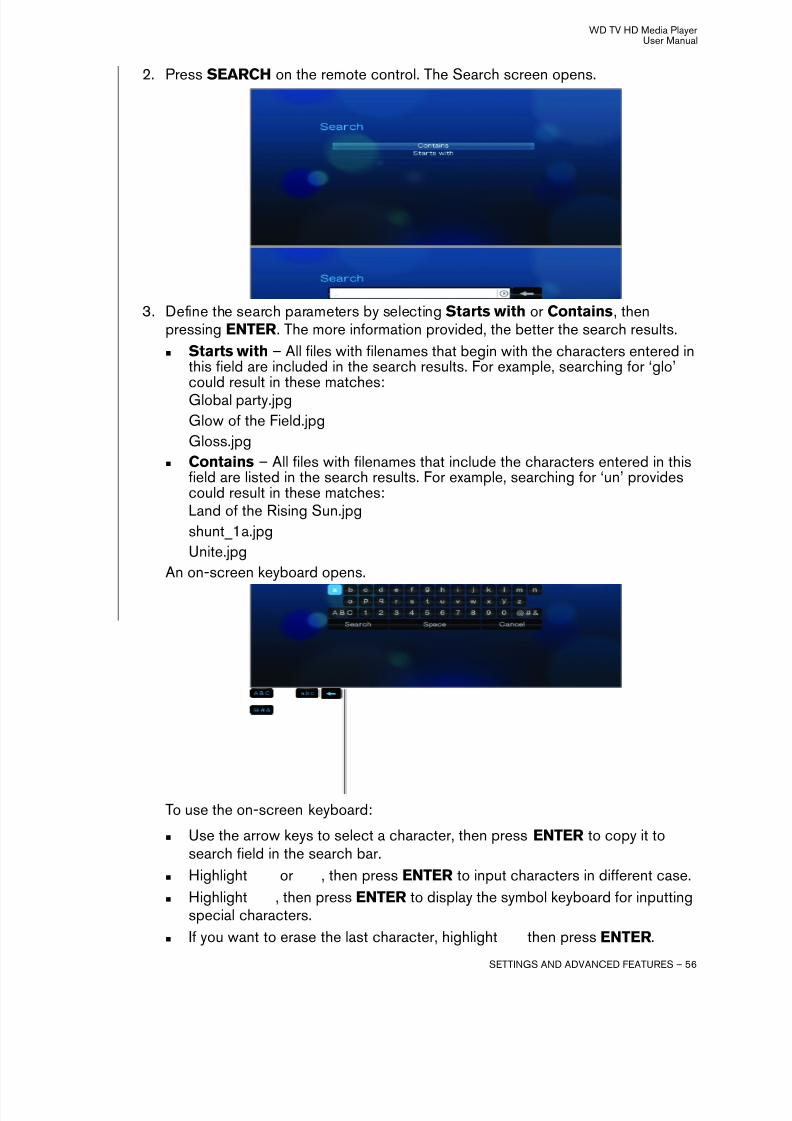
2. Press SEARCH on the remote control. The Search screen opens.
3. Define the search parameters by selecting Starts with or Contains, thenpressing ENTER. The more information provided, the better the search results.
Starts with – All files with filenames that begin with the characters entered inthis field are included in the search results. For example, searching for ‘glo’could result in these matches:Global party.jpgGlow of the Field.jpgGloss.jpg
Contains – All files with filenames that include the characters entered in thisfield are listed in the search results. For example, searching for ‘un’ providescould result in these matches:Land of the Rising Sun.jpgshunt_1a.jpgUnite.jpg
An on-screen keyboard opens.
To use the on-screen keyboard:
Use the arrow keys to select a character, then press ENTER to copy it tosearch field in the search bar.
Highlight or , then press ENTER to input characters in different case.
Highlight , then press ENTER to display the symbol keyboard for inputtingspecial characters.
If you want to erase the last character, highlight then press ENTER.
8/6/2019 WD TV HD Media Player Manual
http://slidepdf.com/reader/full/wd-tv-hd-media-player-manual 60/81
WD TV HD Media PlayerUser Manual
SETTINGS AND ADVANCED FEATURES – 57
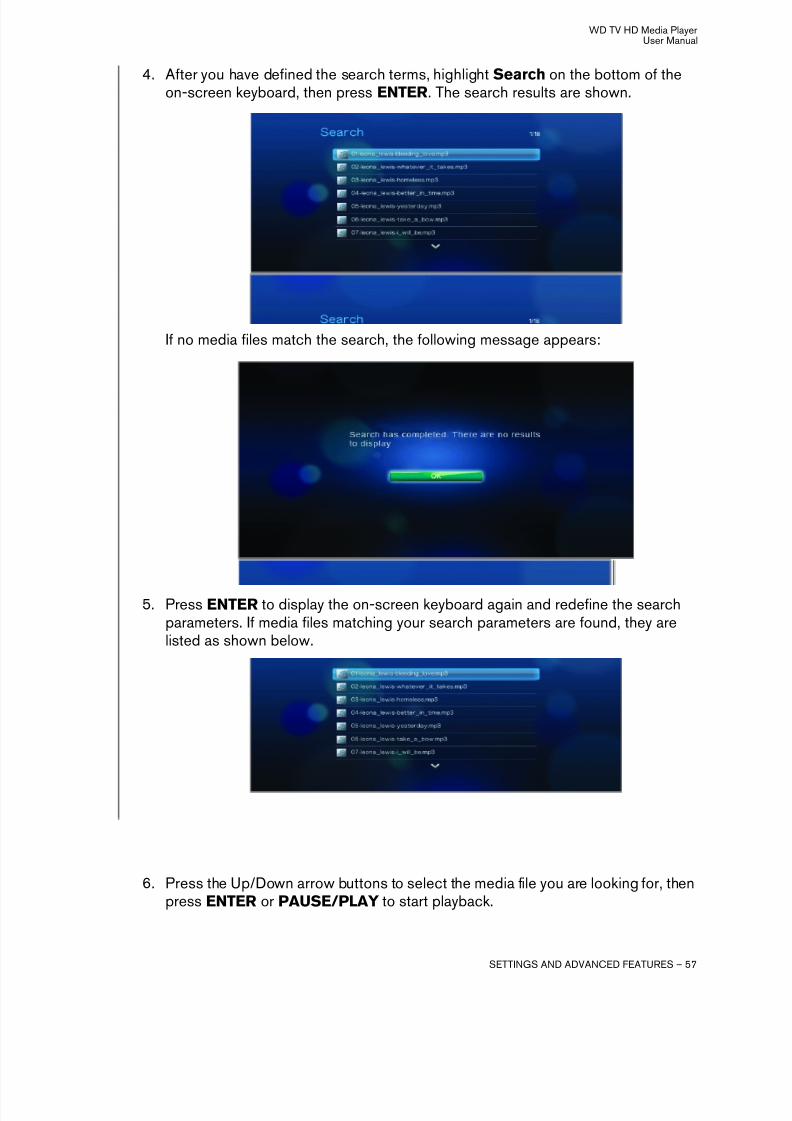
4. After you have defined the search terms, highlight Search on the bottom of theon-screen keyboard, then press ENTER. The search results are shown.
If no media files match the search, the following message appears:
5. Press ENTER to display the on-screen keyboard again and redefine the searchparameters. If media files matching your search parameters are found, they arelisted as shown below.
6. Press the Up/Down arrow buttons to select the media file you are looking for, thenpress ENTER or PAUSE/PLAY to start playback.

8/6/2019 WD TV HD Media Player Manual
http://slidepdf.com/reader/full/wd-tv-hd-media-player-manual 61/81
WD TV HD Media PlayerUser Manual
SETTINGS AND ADVANCED FEATURES – 58
Converting the content into a usable format
WD TV HD Media Player comes with ArcSoft MediaConverter, a fast, easy-to-useapplication that converts photo, video, and music files into formats optimized for useon your WD TV HD Media Player. The software also allows simultaneous conversionof multiple files in batches regardless of their original formats.
Note: WD HD TV Media Player does not support protective content.
Installing Arcsoft MediaConverter:
1. Insert the CD into the CD/DVD drive of your computer.
2. When the installer screen displays, click Accept on the terms of agreement tocontinue.
3. Click the ArcSoft MediaConverter button then follow the screens as prompted.
To convert files to usable format using Arcsoft MediaConverter:
1. Connect your external USB drive to the desktop or laptop computer on which youinstalled ArcSoft MediaConverter.
2. Open the ArcSoft MediaConverter application.
3. Select the files or folders you want to convert.
4. Set the USB drive as the Convert To location.
5. Set the location where you want the converted files placed as the Local
Directory.6. Click Start. The files are converted and copied to the USB drive.
8/6/2019 WD TV HD Media Player Manual
http://slidepdf.com/reader/full/wd-tv-hd-media-player-manual 62/81
WD TV HD Media PlayerUser Manual
SETTINGS AND ADVANCED FEATURES – 59
Examining your files
MediaInfo (free software) can provide technical and tag information about your videoor audio files.
MediaInfo provides the following kinds of information:
• General—title, author, director, album, track number, date, and duration
• Video—codec, aspect, fps, and bitrate• Audio—codec, sample rate, channels, language, and bitrate• Text—language of the subtitles• Chapters—number and a list of chapters
MediaInfo supports the following formats:
• Video—MKV, OGM, AVI, DivX, WMV, QuickTime, Real, MPEG-1, MPEG-2,MPEG-4, DVD (VOB) (Codecs: DivX, XviD, MSMPEG4, ASP, H.264, AVC)
• Audio—OGG, MP3, WAV, RA, Dolby Digital, AAC, M4A, AU, AIFF• Subtitles—SRT, SSA, ASS, and SAMI
With MediaInfo, you can:
• Read many video and audio file formats• Use several methods of viewing information, such as text, sheet, tree, and HTML• Customise views• Export information as text, such as CSV and HTML
To examine your files:
1. Use your browser and go to http://mediainfo.sourceforge.net/en.
2. Download the software and install it on your computer.
3. Follow the instructions as prompted.

8/6/2019 WD TV HD Media Player Manual
http://slidepdf.com/reader/full/wd-tv-hd-media-player-manual 63/81
WD TV HD Media PlayerUser Manual
SYSTEM MAINTENANCE – 60
System MaintenanceThe system software of your WD TV HD Media Player can be upgraded to the latestrelease, which can improve support for media file playback and includes bug fixes andproduct enhancements. To ensure that you receive the latest update, we recommendregistering your product at https://www.wdc.com/register .
This chapter describes how to upgrade the system firmware and perform simpletroubleshooting. If you encounter an error message, refer to the “Common ErrorMessages” on page 65 for possible corrective action.
Solutions to more serious problems may require contacting your dealer or anauthorized service center for assistance. For more information, refer to “WD TechnicalSupport” on page 2.
System Firmware Upgrade
Firmware is an important set of instructions that tells your HD media player how to
operate, what the interactive screens look like, and how to do what you tell it to do.Upgrading the firmware is important because WD is always developing newer, faster,and more efficient ways of doing things that your HD media player needs to know.
Important: Make sure the HD media player’s AC power adapter remains connectedduring the firmware update. A power disruption during the update process cancorrupt the system firmware. Also, make sure that you do not unplug the USB storagedevice.
To update the firmware:
1. Go to support.wdc.com and download the latest firmware update file for yourUSB storage.
2. Click "Downloads" then the product name (or photo).
3. Copy the firmware update file to a USB drive’s root folder.
4. Connect the USB drive to the HD media player's USB port.
5. Press HOME, then select the Settings bar.
6. Select the firmware upgrade icon , and then press ENTER.
810
8/6/2019 WD TV HD Media Player Manual
http://slidepdf.com/reader/full/wd-tv-hd-media-player-manual 64/81
WD TV HD Media PlayerUser Manual
SYSTEM MAINTENANCE – 61
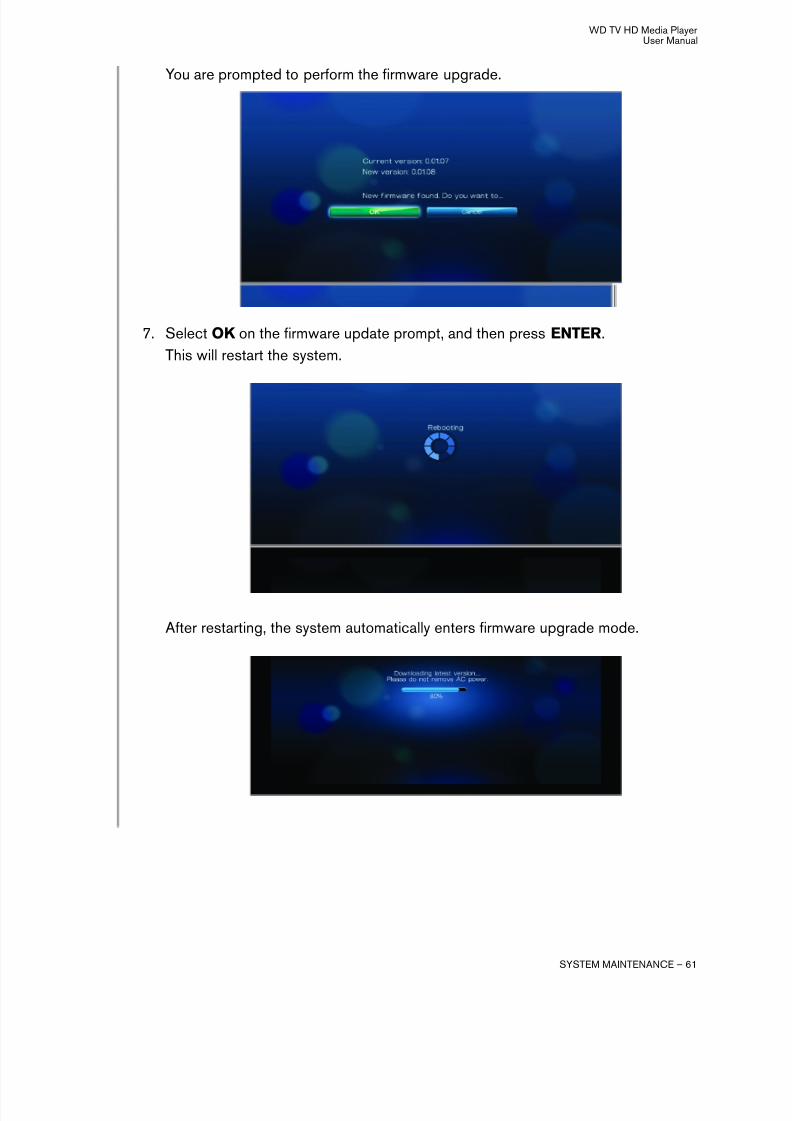
You are prompted to perform the firmware upgrade.
7. Select OK on the firmware update prompt, and then press ENTER.
This will restart the system.
After restarting, the system automatically enters firmware upgrade mode.

8/6/2019 WD TV HD Media Player Manual
http://slidepdf.com/reader/full/wd-tv-hd-media-player-manual 65/81
WD TV HD Media PlayerUser Manual
SYSTEM MAINTENANCE – 62
Once the update process is completed, the following message appears and theHD media player will restart again.
Once the HD media player restarts, the new firmware is automatically loaded.
8/6/2019 WD TV HD Media Player Manual
http://slidepdf.com/reader/full/wd-tv-hd-media-player-manual 66/81
WD TV HD Media PlayerUser Manual
SYSTEM MAINTENANCE – 63
Troubleshooting
Problem Solution
DISPLAY The TV screen is blank and the HD
media player power LED remains off.
• Make sure the TV is turned on.
• Make sure that the power adapter and power outletare okay.
• Make sure that the interface cable is properlyattached to the correct terminals on both the TVand the HD media player.
The TV screen is blank and the HDmedia player power LED is blinking.
A system diagnostic failure occurred. Turn off your HDmedia player, wait 10 minutes, then turn it on again. Ifthe same thing happens, contact the WD TechnicalSupport for assistance (see “WD Technical Support”on page 2).
The TV screen is blank and the HD
media player power LED is on.
• Make sure the TV is turned on.
• Make sure that the interface cable is properlyattached to the correct terminals on both the TVand the HD media player.
• Press the reset button for 10 seconds.
The TV screen is blinking and fuzzy. • Make sure that the interface cable is properlyattached to the correct terminal(s) on both the TVand the HD media player.
• Make sure the HD media player power LED is on.
• If you are using a CRT TV, navigate to the Home |Settings | System screen and:
- Make sure that the Composite option is
selected as the video output.- Make sure the TV system setting matches the
system used in your region.
• If you are using an LCD TV, navigate to the Home |Settings | System screen and:
- Make sure that the HDMI option is selectedas the video output.
- Make sure that the video resolution option isset as Auto.
The video display is cut off or appearsin a sidebar.
Navigate to the Home | Settings | Audio/Video screenand make sure that aspect ratio is set as Normal.
The slideshow pictures are distorted. Navigate to the Home | Settings | Photo screen andselect Keep as original or Fit to screen in the PhotoScaling field.
FILES
File does not play. • Verify compatibility. Refer to “Supported formats”on page 67.
• Run ArcSoft MediaConverter and convert the file.
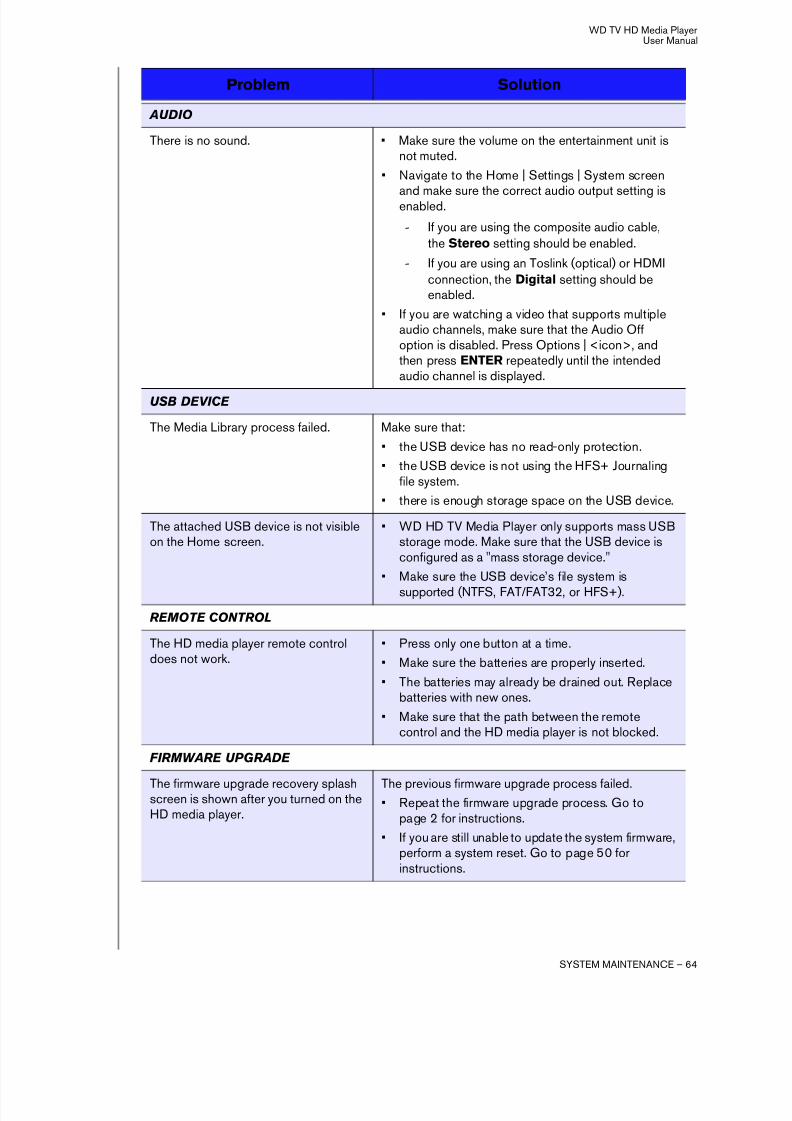
8/6/2019 WD TV HD Media Player Manual
http://slidepdf.com/reader/full/wd-tv-hd-media-player-manual 67/81
WD TV HD Media PlayerUser Manual
SYSTEM MAINTENANCE – 64
AUDIO
There is no sound. • Make sure the volume on the entertainment unit isnot muted.
• Navigate to the Home | Settings | System screen
and make sure the correct audio output setting isenabled.
- If you are using the composite audio cable,the Stereo setting should be enabled.
- If you are using an Toslink (optical) or HDMIconnection, the Digital setting should beenabled.
• If you are watching a video that supports multipleaudio channels, make sure that the Audio Offoption is disabled. Press Options | <icon>, andthen press ENTER repeatedly until the intendedaudio channel is displayed.
USB DEVICE The Media Library process failed. Make sure that:
• the USB device has no read-only protection.
• the USB device is not using the HFS+ Journalingfile system.
• there is enough storage space on the USB device.
The attached USB device is not visibleon the Home screen.
• WD HD TV Media Player only supports mass USBstorage mode. Make sure that the USB device isconfigured as a "mass storage device."
• Make sure the USB device’s file system is
supported (NTFS, FAT/FAT32, or HFS+).
REMOTE CONTROL
The HD media player remote controldoes not work.
• Press only one button at a time.
• Make sure the batteries are properly inserted.
• The batteries may already be drained out. Replacebatteries with new ones.
• Make sure that the path between the remotecontrol and the HD media player is not blocked.
FIRMWARE UPGRADE
The firmware upgrade recovery splashscreen is shown after you turned on theHD media player.
The previous firmware upgrade process failed.• Repeat the firmware upgrade process. Go to
page 2 for instructions.
• If you are still unable to update the system firmware,perform a system reset. Go to page 50 forinstructions.
Problem Solution

8/6/2019 WD TV HD Media Player Manual
http://slidepdf.com/reader/full/wd-tv-hd-media-player-manual 68/81
WD TV HD Media PlayerUser Manual
SYSTEM MAINTENANCE – 65
Common Error Messages
If this message appears Perform this action
HOME
Hard drive cannot aggregate. There are different conditions under which this errormessage may appear. The message will specify the
issue. For example, not enough space is used on thestorage or a journaled file system.
No storage present. Attach the USB device that contains your media files.
Media Library requires more storagespace: [XXXMB]
1. Eject and disconnect the USB device from the HDmedia player.
2. Connect the USB device to your computer anddelete unnecessary files to meet the requiredstorage space.
3. Attach the USB device to the HD media playeragain.
Please turn off journaling on theattached storage's file system for themedia player to compile the medialibrary.
1. Eject and disconnect the USB device from the HDmedia player.2. Connect the USB device to your Apple computer
and disable the journaling function. Refer to theApple Help for information.
3. Attach the USB device to the HD media playeragain.
Unable to compile media library onread-only storage.
1. Eject and disconnect the USB device from the HDmedia player.
2. Connect the USB device to your computer andmake sure the read-only protection is disabled.
3. Attach the USB device to the HD media playeragain.
Unable to compile media library. Pleasecheck your storage setting.
1. Eject and disconnect the USB device from the HDmedia player.
2. Connect the USB device to your computer and<what action should be taken here?>
3. Attach the USB device to the HD media playeragain.
Unrecognized storage. The USB device model is not supported. Use anotherUSB device.
Question XX: WD USB HDD
Trouble Shooting
This indicates a system diagnostic failure. Contact WD
Technical Support for assistance.
CONTENT PLAYBACK
This folder is empty. There are no supported media files in the selectedfolder. Select another folder that contains media filesof the correct format.

8/6/2019 WD TV HD Media Player Manual
http://slidepdf.com/reader/full/wd-tv-hd-media-player-manual 69/81
WD TV HD Media PlayerUser Manual
SYSTEM MAINTENANCE – 66
FAQs
How do I find media files and create playlists?
Several media player applications are currently available, such as Winamp andiTunes, that let you play, arrange, and edit media files. These media players also let
you create playlists and edit the metadata information for media files. You can searchthe Internet with your browser to locate where these applications are available fordownload.
How do I copy the files from my music CD to my computer?
Digital audio extraction, or Ripping, is the process of copying audio (or video) contentto a hard drive, typically from removable media, such as CDs or DVDs, or from mediastreams.
To rip music from CDs to a computer:
1. Insert the CD into the optical drive of your computer.
2. Open the program that you use to rip the music to your computer, such as iTunesor Windows Media Player.
3. Press the Import button (using iTunes),
- OR -
Press the Rip button (using Windows Media Player.
4. Click the music you want to copy (Windows Media Player) and note where themusic files are saved after they are copied. iTunes imports the entire CD into youriTunes music library.
5. Click the Start Rip button (Windows Media Player).
6. When ripping is complete, remove the CD. The music is now on your computer.Some music may be covered by copyright laws which prevent its copying or distribution.
Can I use use a universal remote control with the WD TV HD media player?
You can use most popular universal remote control devices such as the LogitechHarmony models.
Unable to play the selected file. Pleaserecreate the file by using the includedmedia editing software.
1. Eject and disconnect the USB device from the HDmedia player.
2. Connect the USB device to your computer andmake sure the file format is correct.
You can use the media editing software included
in the WD Documentation CD. (See “How do Ifind media files and create playlists?” on page 66)
3. Attach the USB device to the HD media playeragain.
If this message appears Perform this action

8/6/2019 WD TV HD Media Player Manual
http://slidepdf.com/reader/full/wd-tv-hd-media-player-manual 70/81
WD TV HD Media PlayerUser Manual
APPENDIX – 67
Appendix
Supported formats
Filename extension Codec Format/container
VIDEO
m1v mpeg1 None
m2v mpeg2 None
m4v mpeg4 None
dat Video: mpeg1Audio: mpeg audio
cdxa
mpeg Video:mpeg1mpeg2
mpeg ps
mpeg
avi Video:mpeg4AVCWMV3
Audio:mpeg audioDolby Digitalpcm(Microsoft)
AVI
mov Video:mpeg4
quicktime
mp4
dvr-ms Video:mpeg2
Audio:mpeg audioDolby Digital
asf
wmv Video:wmv3
asf
asf
mkv Video:mpeg1mpeg2mpeg4AVC
Audio:mpeg audiopcm (Microsoft)Dolby Digitalaac
11

8/6/2019 WD TV HD Media Player Manual
http://slidepdf.com/reader/full/wd-tv-hd-media-player-manual 71/81
WD TV HD Media PlayerUser Manual
APPENDIX – 68
Video notes:PS11. mpeg-2 MP@HL up to 1920x1080p24, 1920x1080i30 or 1280x720p60 resolution.2. mpeg4.2 asp@HL. Rectangular shape video decoding up to 1280x720p30 resolution, support for B Pictures, data partitioning and error
resiliency. No support for global motion compensation (GMC).3. WMV9(wmv3) up to 1280x720p60) (<90% of the P-picture macroblocks have 4 motion vectors) or 1920X1080p24 resolution. Up to
1280x720p30 or 1920x1080p24 resoltuion if unconstrained 4 MV bitstrea.
4. mpeg-4.10 (H.264) (AVC) BP@L3 up to 720x480p30 or 720x576p25 resolution, include FMO and ASO.5. mpeg-4.10 (H.264) (AVC) [email protected] and [email protected] up to 1920x1080p24, 1920x1080i30 or 1280x720p60 resolution.PS21. Any file must be interleave (<100ms)2. Audio sample rate must be: 8000, 11025, 12000, 16000, 22050, 24000, 32000, 44100, 48000
AUDIO
mp1 mpeg audio none
mp2
mp3
mpa
aac mpeg2/4 AACLC/HE
1. ADTS2. ADIF
m4a mpeg2/4 AACLC/HE
quick time
mp4a
flac flac flac
wav pcm wave
lpcm pcm none
pcm
ogg ogg vorbis ogg
wma 1. wma asf
aid pcm aiff
aiff
Dolby Digital Dolby Digital none
mka 1. mpeg audio2. mpeg 2/4 AAC LC/HE
3. pcm (Microsoft)
matroska
Filename extension Codec Format/container

8/6/2019 WD TV HD Media Player Manual
http://slidepdf.com/reader/full/wd-tv-hd-media-player-manual 72/81
WD TV HD Media PlayerUser Manual
APPENDIX – 69
TypeFile
nameCodec Resolution Other limitation
PHOTOS
BMP bmp Uncompressed (mostcommon)
2048x2048
TIFF tif/tiff Uncompressed 24-bitRGB (most common)
2048x2048 Multi-page not supported,only shows 1st page
LZW (loss less) 2048x2048
PNG png DEFLATE (loss less) 2048x2048
GIF gif LZW (loss less 2048x2048 For animation, only sup-ports 1st page
JPEG jpeg/jpg JPEG (lossy) (most
common)
4096x4096 CMYK not supported
Progressive 1280x720
Thumbnail Support Limitation
MUSIC
Filenameextension
Only supports ID3 and EXIF format have thumbnail
mp3 Yes Thumbnail in the id3 tag (“APIC” or “PIC” tag)
wma Yes Thumbnail in the asf format (“WM/Picture” in the extended info)
m4a Yes Thumbnail in the quicktime format (“moov/udta/meta/ilst/covr”)
mp4a Yes Thumbnail in the quicktime format (“moov/udta/meta/ilst/covr”)
flac Yes
asf Yes Thumbnail in the asf format (“WM/Picture” in the extended info)
wmv Yes Thumbnail in the asf format (“WM/Picture” in the extended info)
mp4 Yes Thumbnail in the quicktime format (“moov/udta/meta/ilst/covr”)
jpg Yes Thumbnail in the exif
jpe Yes Thumbnail in the exif
tiff Yes Thumbnail in the exif
tif Yes Thumbnail in the exif
jpeg Yes Thumbnail in the exif
8/6/2019 WD TV HD Media Player Manual
http://slidepdf.com/reader/full/wd-tv-hd-media-player-manual 73/81
WD TV HD Media PlayerUser Manual
APPENDIX – 70
Regulatory Compliance
FCC Class B Information
This equipment has been tested and found to comply with the limits for a Class Bdigital device pursuant to Part 15 of the FCC Rules. These limits are designed toprovide reasonable protection against harmful interference in a residential installation.
This equipment generates, uses, and can radiate radio frequency energy and, if notinstalled and used in accordance with the manufacturer’s instruction manual, maycause interference with radio communications. However, there is no guarantee thatinterference will not occur in a particular installation. If this equipment does causeharmful interference to radio or television reception, which can be determined byturning the equipment off and on, you are encouraged to try to correct theinterference by one or more of the following measures:
• Reorient or relocate the receiving antenna.• Increase the separation between the equipment and the receiver.• Connect the equipment into an outlet on a circuit different from that to which the
receiver is connected.
• Consult the retailer or an experienced radio/television technician for help.
ICES-003/NMB-003 Statement
Cet appareil numérique de la classe B est conforme à la norme NMB-003 duCanada.
This device complies with Canadian ICES-003 Class B.
Safety Compliance
Approved for US and Canada. CAN/CSA-C22.2 No. 60065:03, UL-60065,7th Ed: Audio, Video and Similar Electronic Apparatus - Safety Requirements.
Approuvé pour les Etats-Unis et le Canada. CAN/CSA-C22.2 No. 60065:03, UL-60065 7th Ed. Appareils audio, vidéo et appareils électroniques analogues -Exigences de sécurité.
This device is only for use with the compatible UL Listed AC adapter.
Cet appareil n'est destiné qu'a` des adaptateur compatibles marqués "UL Listed.”
CE Compliance for Europe
Marking by the CE symbol indicates compliance of this system to the applicableCouncil Directives of the European Union, including the EMC Directive (2004/108/
EC) and the Low Voltage Directive (2006/95/EC). A “Declaration of Conformity” inaccordance with the applicable directives has been made and is on file at WesternDigital Europe.
Die Markierung mit dem CE-Symbol zeigt an, dass dieses Gerät mit denanwendbaren Richtlinien der Europäischen Union übereinstimmt. Hierzu zählen auchdie EMV-Richtlinie (2004/108/EG) sowie die Niederspannungsrichtlinie (2006/95/EG). Eine "Konformitätserklärung" in Übereinstimmung mit den anwendbarenRichtlinien ist erstellt worden und kann bei Western Digital Europe eingesehenwerden.

8/6/2019 WD TV HD Media Player Manual
http://slidepdf.com/reader/full/wd-tv-hd-media-player-manual 74/81
WD TV HD Media PlayerUser Manual
APPENDIX – 71
Le symbole CE indique que ce système est conforme aux directives du Conseil del'Union Européenne, notamment à la Directive CEM (2004/108/CE) et la DirectiveBasse tension (2006/95/CE). Une " déclaration de conformité " aux directivesapplicables a été déposée auprès de Western Digital Europe.
I marchi con il simbolo CE denotano la conformità di questo sistema alle direttive delConsiglio dell'Unione europea, ivi compresa la Direttiva EMC (2004/108/CE) e la
Direttiva Bassa Tensione (2006/95/CE). In adempimento con le vigenti direttive èstata rilasciata una "Dichiarazione di conformità", depositata presso Western DigitalEurope.
La marca con el símbolo CE indica el cumplimiento de este sistema con las corre-spondientes directivas del Consejo de la Unión Europea, que incluye la DirectivaCEM (2004/108/CE) y la Directiva de bajo voltaje (2006/95/CE). Se ha realizadouna "Declaración de conformidad" de acuerdo con las directivas correspondientes yse encuentra documentada en las instalaciones de Western Digital en Europa.
Märkning av CE-symbolen anger att detta systemet uppfyller kraven enligt detEuropeiska Parlamentet och Rådets direktiv, inklusive EMC-direktivet (2004/108/EC)
och Direktivet om Lågspänning (2006/95/EC). En "Försäkran om Överensstäm-melse" har gjorts enligt de gällande direktiven och har registrerats hos Western Digi-tal Europa.
Merking med CE-symbolet indikerer dette systemets overholdelse av gjeldende direk-tiver for EU, inkludert EMC-direktivet (2004/108/EC) og lavspenningsdirektivet(2006/95/EC). En "samsvarserklæring" i henhold til gjeldende direktiver har blitt skre-vet og finnes arkivert hos Western Digital Europe.
CE-merkintä osoittaa tämän järjestelmän yhdenmukaisuuden sovellettavissa olevienEuroopan unionin neuvoston direktiivien kanssa, mukaan lukien EMC-direktiivi (2004/108/EC), sekä alijännitedirektiivi (2006/95/EC). "Yhdenmukaisuusvakuutus" sovellet-
tavien direktiivien kanssa on tehty ja se on arkistoituna Western Digital Europe:ssa.

8/6/2019 WD TV HD Media Player Manual
http://slidepdf.com/reader/full/wd-tv-hd-media-player-manual 75/81
8/6/2019 WD TV HD Media Player Manual
http://slidepdf.com/reader/full/wd-tv-hd-media-player-manual 76/81
WD TV HD Media PlayerUser Manual
APPENDIX – 73
Warranty Information
Obtaining Service
WD values your business and always attempts to provide you the very best of service. If thisProduct requires maintenance, either contact the dealer from whom you originally purchasedthe Product or visit our product support Web site at support.wdc.com for information on howto obtain service or a Return Material Authorization (RMA). If it is determined that the Product
may be defective, you will be given an RMA number and instructions for Product return. Anunauthorized return (i.e., one for which an RMA number has not been issued) will be returnedto you at your expense. Authorized returns must be shipped in an approved shippingcontainer, prepaid and insured, to the address provided on your return paperwork. Youroriginal box and packaging materials should be kept for storing or shipping your WD product.To conclusively establish the period of warranty, check the warranty expiration (serial numberrequired) via support.wdc.com. WD shall have no liability for lost data regardless of thecause, recovery of lost data, or data contained in any Product placed in its possession.
Limited Warranty
WD warrants that the Product, in the course of its normal use, will for the term defined below,be free from defects in material and workmanship and will conform to WD’s specificationtherefor. The term of your limited warranty depends on the country in which your Product waspurchased. The term of your limited warranty is for 1 year in the North, South and CentralAmerica region, 2 years in the Europe, the Middle East and Africa region, and 1 year in theAsia Pacific region, unless otherwise required by law. The term of your limited warranty periodshall commence on the purchase date appearing on your purchase receipt. WD shall have noliability for any Product returned if WD determines that the Product was stolen from WD orthat the asserted defect a) is not present, b) cannot reasonably be rectified because ofdamage occurring before WD receives the Product, or c) is attributable to misuse, improperinstallation, alteration (including removing or obliterating labels and opening or removingexternal enclosures, unless the product is on the list of limited user-serviceable products andthe specific alteration is within the scope of the applicable instructions, as found atsupport.wdc.com), accident or mishandling while in the possession of someone other thanWD. Subject to the limitations specified above, your sole and exclusive warranty shall be,
during the period of warranty specified above and at WD’s option, the repair or replacementof the Product. The foregoing warranty of WD shall extend to repaired or replaced Productsfor the balance of the applicable period of the original warranty or ninety (90) days from thedate of shipment of a repaired or replaced Product, whichever is longer.
The foregoing limited warranty is WD’s sole warranty and is applicable only to products soldas new. The remedies provided herein are in lieu of a) any and all other remedies andwarranties, whether expressed, implied or statutory, including but not limited to, any impliedwarranty of merchantability or fitness for a particular purpose, and b) any and all obligationsand liabilities of WD for damages including, but not limited to accidental, consequential, orspecial damages, or any financial loss, lost profits or expenses, or lost data arising out of or inconnection with the purchase, use, or performance of the Product, even if WD has beenadvised of the possibility of such damages. In the United States, some states do not allow
exclusion or limitations of incidental or consequential damages, so the limitations above maynot apply to you. This warranty gives you specific legal rights, and you may also have otherrights which vary from state to state.
8/6/2019 WD TV HD Media Player Manual
http://slidepdf.com/reader/full/wd-tv-hd-media-player-manual 77/81
WD TV HD Media PlayerUser Manual
APPENDIX – 74
Information furnished by WD is believed to be accurate and reliable; however, no responsibility is assumed by WD for itsuse nor for any infringement of patents or other rights of third parties which may result from its use. No license is grantedby implication or otherwise under any patent or patent rights of WD. WD reserves the right to change specifications atany time without notice.
Western Digital, WD, the WD logo, and My Book are registered trademarks; and WD TV, and My Passport aretrademarks of Western Digital Technologies, Inc. Other marks may be mentioned herein that belong to other companies.
© 2008 Western Digital Technologies, Inc. All rights reserved.
Western Digital20511 Lake Forest DriveLake Forest, California 92630 U.S.A. 4779-705014-000 September 2008
8/6/2019 WD TV HD Media Player Manual
http://slidepdf.com/reader/full/wd-tv-hd-media-player-manual 78/81
WD TV HD Media PlayerUser Manual
INDEX – 75
Index
A
Accessories 4Apple users 18aspect ratio
normal 42troubleshooting 63widescreen 42
audio channel 25audio output 42
Settings menu 42audio/video
autosource function 6supported interfaces 6
Audio/Video menusaspect ratio 42audio output 42display resolution 41NTSC/PAL 43
autosource function 6
B
browser displaylist mode 49thumbnail mode 49
C
composite AV
connection 14connectors 7
D
display troubleshooting 63DVI
connection 16
E
Eject functionbutton 20procedure 19
environmental compliance (China) 72error messages 65
F
featuresAV interfaces 6supported file formats 6supported file systems 7USB support 6
file formatsaudio 28image 32playlist 6
subtitle 6troubleshooting 66video 22
file systemsupported 7troubleshooting 65
firmware upgradeprocedure 60troubleshooting 64
H
HD media player
error messages 65features 6firmware information 51firmware upgrade 60hardware information 51home screen 21I/O connectors 7installation procedures 10installation requirements 10language setting 47LED indicators 8operating 20
overview 5package contents 10preferences 40regulatory compliance notices 70remote control 9screensaver delay 48technical support 2troubleshooting 63warranty 73
HDMIconnection 15connectors 7resolution setting 41
Homebutton 20error messages 65Music directory 28overview 21Photo directory 32screen navigation 21
8/6/2019 WD TV HD Media Player Manual
http://slidepdf.com/reader/full/wd-tv-hd-media-player-manual 79/81
WD TV HD Media PlayerUser Manual
INDEX – 76
Settings screen 40Video directory 22
Home Theaterconnection 17
I
I/O connectors
composite AV 7HDMI 7Toslink 7USB ports 7
information panelmusic 29photos 35slideshow 36, 37videos 25
installationcomposite AV connection 14HDMI connection 15, 16, 17power connection 12, 13requirements 10USB connection 18
L
language setting 47LED indicators
power 8status 8
list mode 49locating media content
manual search 55Search function 55
M
maintenancesystem 60
media contentlocating 55
media librarycategories 54exemptions 52
media library compilation
enable 53error messages 65LED indicator 8overview 52Settings menu 48
musicalbum art 28media library categories 54playback controls 30
playback procedures 28playback screen 29sequence setting 43shuffle mode 31supported formats 6use in slideshow 35
music playback options 30
N
navigation buttons 20NTSC 43
O
operating precautions 1
P
package contents 10PAL 43panning
photos 33photo display options 33Photo menus
interval time 47photo scaling 45slideshow sequence 45transition effect 46
photosinformation panel 34media library categories 54panning 33
rotating 34scaling settings 45supported formats 6view 32zoom options 34
playlistsupported formats 6videos, playback 23, 29
powerAC connector 7cable connection 12global AC adapter configurations 12
LED indicator 8power button 20turn on 13
productaccessories 4obtaining service 73overview 5recording information 4registration 4
8/6/2019 WD TV HD Media Player Manual
http://slidepdf.com/reader/full/wd-tv-hd-media-player-manual 80/81
WD TV HD Media PlayerUser Manual
INDEX – 77
regulatory compliance 70safety information 1warranty 73
R
regulatory complianceenvironmental compliance (China) 72
remote control 9layout 9transmission range 20troubleshooting 64
repeat modemusic 30slideshow 38videos 27
RoHS 72
S
screensaver delay 48Search function
button 20procedure 55
settingsapply new values 40Audio/Video menu 41Movie menu 44Photo menu 44Settings menu bar 40Settings screen navigation 40System menu 47
shuffle modemusic 31slideshow 39
slideshowinterval time 47music background 35playback controls 37repeat mode 38sequence setting 45shuffle mode 39transition effect 46troubleshooting 63
view 35slideshow options 37subtitle
enable 26supported formats 6
System menusAbout screen 51browser display 49language 47
media library 48reset 50screensaver delay 48
system preferencesaudio/video quality 41general functions 47music sequence 43
navigation buttons 40photo function 44Settings menu bar 40video sequence 44
system resetprocedures 50
T
technical supportWD contact information 3
thumbnail mode 49Toslink
connectors 7transition effect 46troubleshooting
audio 64content playback 65display 63error messages 65firmware upgrade 64media library compilation 65remote control 64system reset 50
USB device 64WD contact information 3
U
USB deviceconnection 18Eject button 20error messages 65LED indicator 8media library 52removal 19supported devices 6
troubleshooting 64USB ports 7
V
video playback options 24videos
aspect ratio 42audio channel 25display resolution setting 41
8/6/2019 WD TV HD Media Player Manual
http://slidepdf.com/reader/full/wd-tv-hd-media-player-manual 81/81
WD TV HD Media PlayerUser Manual
information panel 24media librarian categories 54playback controls 24playback procedures 22repeat mode 27sequence setting 44subtitles 26
supported formats 6supported resolutions 6zoom options 26
W
warranty information 73widescreen setting 42
Z
zoom optionsphotos 34videos 26