wcpss google apps - calendars google apps - calendar€¦ · if you’ve never used google calendar...
TRANSCRIPT
www.google.com/calendar or via mobile device app
Access It At...
• create a calendar that can be viewed/edited by yourself and/or others
• Available via all devices, anytime, anywhere
• Embed your calendar on other websites/services
• Create as many calendars as you wish
At a Glance...
Required Knowledge...
• Basic MS Windows / PC operation• Helpful: Previous MS Office / web authoring
experience
Username / Password
• Username: WCPSS email address• then, use your WakeID and WakeID password
WCPSS Google Apps - CalendarWCPSS Google Apps - Calendar March 2017
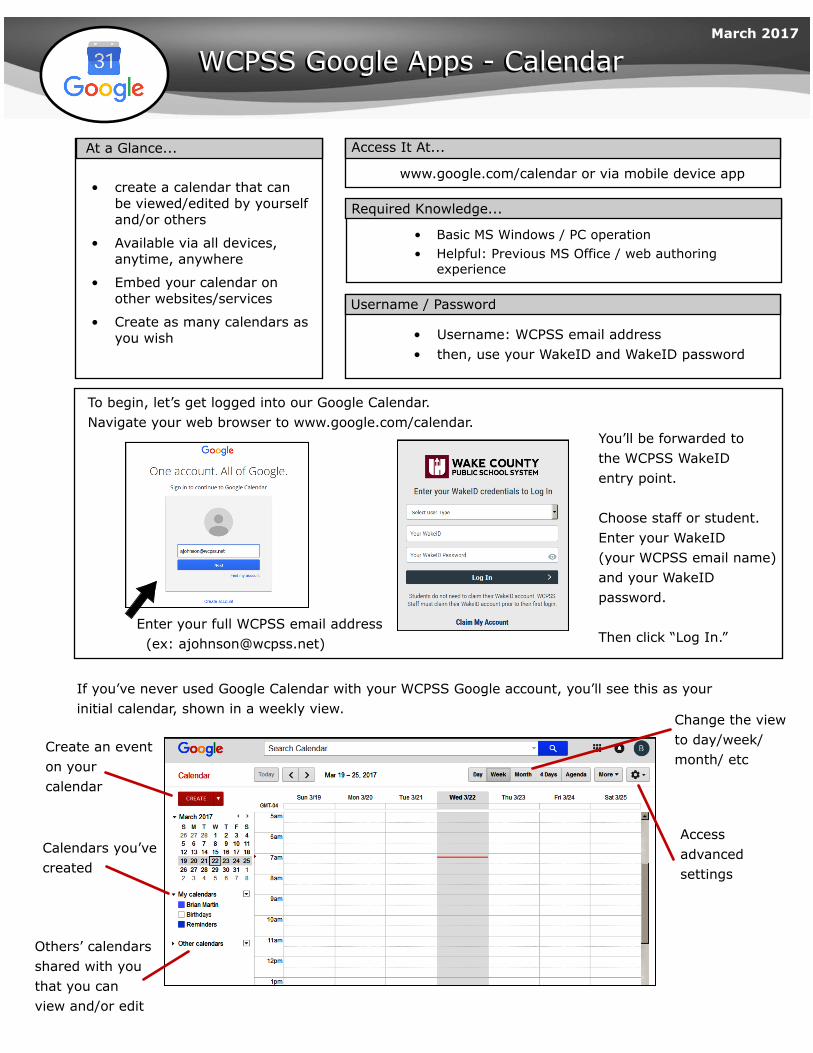
To begin, let’s get logged into our Google Calendar.Navigate your web browser to www.google.com/calendar.
Enter your full WCPSS email address (ex: [email protected])
You’ll be forwarded tothe WCPSS WakeIDentry point.
Choose staff or student.Enter your WakeID(your WCPSS email name)and your WakeIDpassword.
Then click “Log In.”
If you’ve never used Google Calendar with your WCPSS Google account, you’ll see this as yourinitial calendar, shown in a weekly view.
Create an eventon yourcalendar
Calendars you’vecreated
Others’ calendarsshared with youthat you canview and/or edit
Change the viewto day/week/month/ etc
Accessadvancedsettings
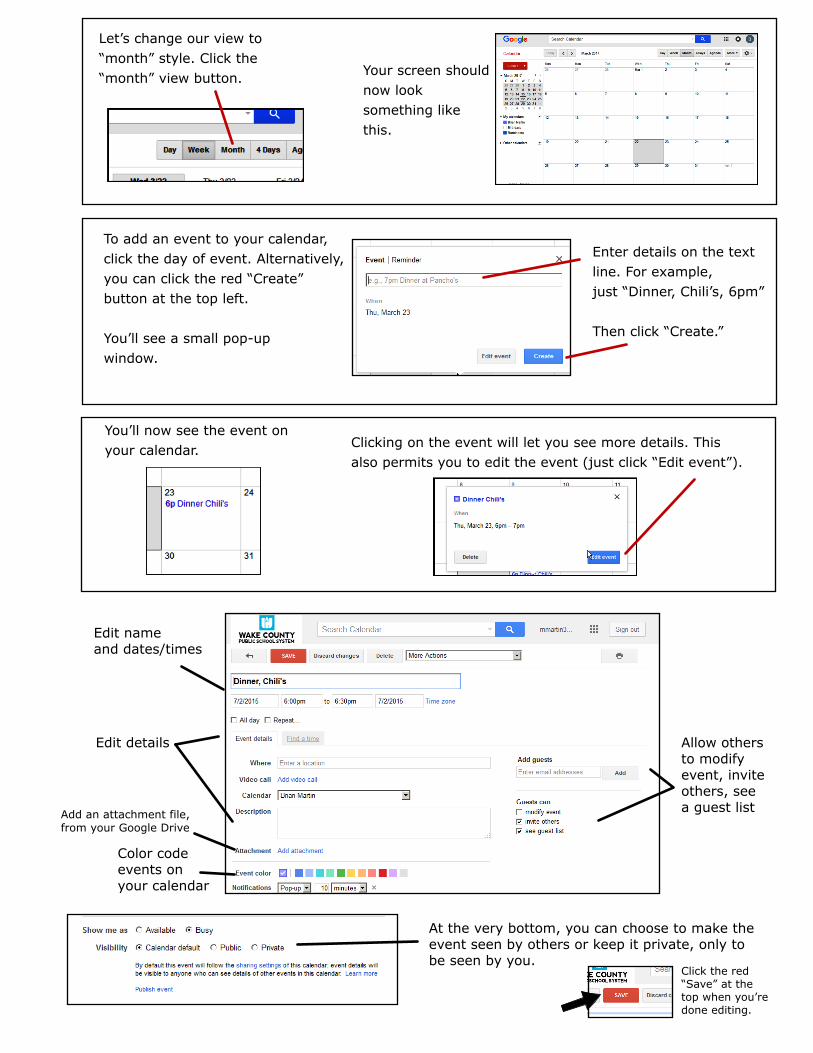
Edit nameand dates/times
Edit details
Color codeevents onyour calendar
Allow othersto modifyevent, inviteothers, seea guest list
At the very bottom, you can choose to make theevent seen by others or keep it private, only tobe seen by you.
Add an attachment file,from your Google Drive
Click the red“Save” at thetop when you’redone editing.
Let’s change our view to“month” style. Click the“month” view button. Your screen should
now looksomething likethis.
To add an event to your calendar,click the day of event. Alternatively,you can click the red “Create”button at the top left.
You’ll see a small pop-upwindow.
Enter details on the textline. For example,just “Dinner, Chili’s, 6pm”
Then click “Create.”
You’ll now see the event onyour calendar. Clicking on the event will let you see more details. This
also permits you to edit the event (just click “Edit event”).

Back on the main calendar page, look to the leftand find “My Calendars.” You can have as manyas you wish - for example, one for yourusage; one for 1st period, one for 2nd period,and so on.
Click the arrow beside“My calendars” to create a newone.
Once you have multiple calendars created, you can choose to view one specific calendar, or all of them together in the same display. Click the arrow beside the calendar name and you can select“Display only this Calendar.”
Now, let’s focus on how we can share this calendar so others can see it.
Click the arrow beside one of yourcalendars. Choose “Share this Calendar”from the options.
Here you can choose to make this calendaravailable to others or not, or share withspecific people.
Let’s find the code that we can useto embed this calendar on anotherwebsite (such as a Edmodo,Blackboard, or other teacherwebsite).
Click “Calendar Details.”
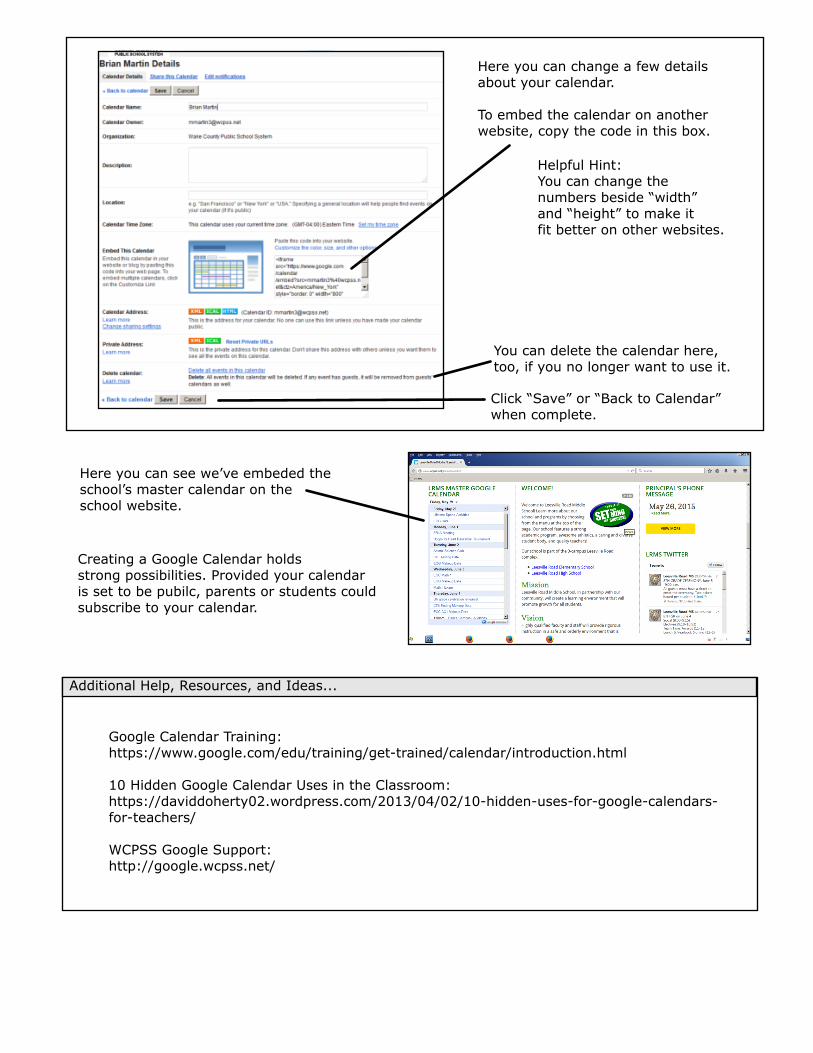
Here you can change a few detailsabout your calendar.
To embed the calendar on anotherwebsite, copy the code in this box.
Helpful Hint:You can change thenumbers beside “width”and “height” to make itfit better on other websites.
You can delete the calendar here,too, if you no longer want to use it.
Click “Save” or “Back to Calendar”when complete.
Here you can see we’ve embeded theschool’s master calendar on theschool website.
Creating a Google Calendar holdsstrong possibilities. Provided your calendaris set to be pubilc, parents or students couldsubscribe to your calendar.
Additional Help, Resources, and Ideas...
Google Calendar Training:https://www.google.com/edu/training/get-trained/calendar/introduction.html
10 Hidden Google Calendar Uses in the Classroom:https://daviddoherty02.wordpress.com/2013/04/02/10-hidden-uses-for-google-calendars-for-teachers/
WCPSS Google Support:http://google.wcpss.net/