wb scenario and custom game
TRANSCRIPT
CopyRight © 2011 - All Rights Reserved
World Builder Scenario
and
Custom Game Tutorial
Version: 1.0
Status: Draft
Date: 14 July 2011
Author: William Howard
CopyRight © 2011 - All Rights Reserved
Contents Introduction ............................................................................................................................................ 5
Assumptions ........................................................................................................................................ 5
Compatibility ....................................................................................................................................... 5
Creating a World Builder Scenario Map ................................................................................................. 6
Create a Map ....................................................................................................................................... 6
Start World Builder ............................................................................................................................. 6
Add Civilizations .................................................................................................................................. 7
Set Starting Techs and Policies ........................................................................................................... 9
Add City States .................................................................................................................................. 10
Place Civilization Starting Cities ........................................................................................................ 10
Place Civilization Starting Units......................................................................................................... 12
Add Palaces to Capital Cities ............................................................................................................. 14
Place City States ................................................................................................................................ 15
Set Scenario Properties ..................................................................................................................... 16
Save World Builder Scenario Map .................................................................................................... 16
Playing a World Builder Scenario Map.................................................................................................. 16
Start Civilization ................................................................................................................................ 16
Navigate to Advanced Setup Menu .................................................................................................. 17
Select the WB Scenario Map ............................................................................................................. 18
Select the Civilization to Play ............................................................................................................ 19
Start the Scenario.............................................................................................................................. 20
Play the Scenario ............................................................................................................................... 20
Changing a WB Scenario Map into a WB Scenario Mod ....................................................................... 21
Create a New Mod ............................................................................................................................ 21
Add the WB Scenario Map ................................................................................................................ 22
Set the Mod Properties ..................................................................................................................... 24
Delete the Saved WB Scenario Map ................................................................................................. 25
Build the WB Scenario Mod .............................................................................................................. 25
Playing a World Builder Scenario Mod ................................................................................................. 26
Start Civilization ................................................................................................................................ 26
Navigate to Mods Menu ................................................................................................................... 26
Enable the WB Scenario Mod ........................................................................................................... 27
Select the WB Scenario Map ............................................................................................................. 27

CopyRight © 2011 - All Rights Reserved
Start the Scenario.............................................................................................................................. 29
Uploading a World Builder Scenario Mod ............................................................................................ 30
Upload with ModBuddy .................................................................................................................... 30
Components of a Custom Game ........................................................................................................... 30
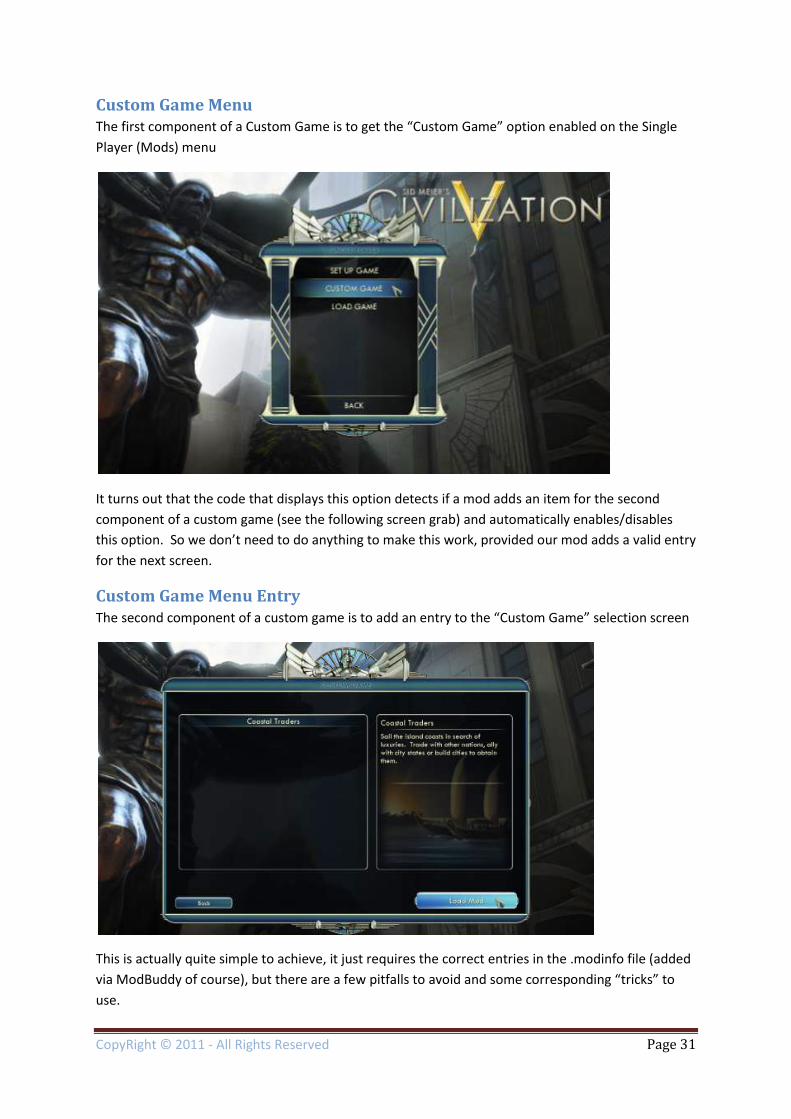
Custom Game Menu ......................................................................................................................... 31
Custom Game Menu Entry ................................................................................................................ 31
Configuration Screen ........................................................................................................................ 32
Victory Progress Panel ...................................................................................................................... 32
Changing a WB Scenario Mod into a WB Custom Game ...................................................................... 33
Download, Install and Enable the “Traders Scenario” ...................................................................... 33
Confirm Operation of the “Traders Scenario” .................................................................................. 33
Open WB Scenario Mod .................................................................................................................... 36
Import Files from Traders Scenario .................................................................................................. 37
Set VFS Imports ................................................................................................................................. 39
Add Required Properties ................................................................................................................... 39
Set Required Option .......................................................................................................................... 40
Add Required Actions ....................................................................................................................... 40
Add Required Content ...................................................................................................................... 40
Edit Scenario Text ............................................................................................................................. 41
Edit Scenario Parameters .................................................................................................................. 41
Edit Scenario Background Graphic .................................................................................................... 43
Edit Scenario Initialisation................................................................................................................. 43
Edit Scenario Victory Progress .......................................................................................................... 44
Files Not To Edit ................................................................................................................................ 45
Build & Test WB Custom Game Mod ................................................................................................ 45
Playing a WB Custom Game .................................................................................................................. 47
Start Civilization ................................................................................................................................ 47
Enable the WB Custom Game Mod .................................................................................................. 47
Select the Custom Game ................................................................................................................... 48
Start the Custom Game..................................................................................................................... 50
Check the Victory Progress Display ................................................................................................... 50
Extending the Game – Difficulty Selection ........................................................................................... 51
Start ModBuddy ................................................................................................................................ 51
Add Difficulty Options ....................................................................................................................... 51

CopyRight © 2011 - All Rights Reserved
View Changes .................................................................................................................................... 51
Extending the Game – Adding a Map Script ......................................................................................... 52
Start ModBuddy ................................................................................................................................ 52
Add a Map Script ............................................................................................................................... 52
Add Additional Scenario Parameters ................................................................................................ 53
Add Additional Scenario Initialisation ............................................................................................... 53
Add Initial Civilization Technologies ................................................................................................. 53
View Changes .................................................................................................................................... 54
Extending the Game – AI Only Civilizations .......................................................................................... 55
Start ModBuddy ................................................................................................................................ 55
Define the Playable Civilization(s) ..................................................................................................... 56
Define the AI Civilization(s) ............................................................................................................... 56
View Changes .................................................................................................................................... 56
Conclusion ............................................................................................................................................. 57

CopyRight © 2011 - All Rights Reserved Page 5
Introduction The goal of this tutorial is to enable you to be able to create Custom Games from World Builder
maps and/or map scripts such that they can be played from the Custom Game menu.
The tutorial starts by showing you how to create (and play) a World Builder Map Scenario, with
simple to follow, step-by-step instructions.
The tutorial then proceeds to show you how to convert the scenario into a mod, such that it can be
shared with other players by means of the ModHub. Instructions on how to play the scenario as a
mod are also given.
The tutorial then shows you how to convert the scenario mod into a custom game mod (using pre-
built components) and instructions on how to start the custom game are also given.
Finally, the tutorial shows you how to use the pre-built components to enable and/or disable key
features of configuring a custom game – civilization, map and difficulty selection.
By the end of the tutorial you will have a fully working, configurable, custom game based on both a
World Builder created map and a standard map script.
Assumptions This tutorial assumes that you:
Understand the basics of XML, SQL and Lua
Know how to download, install and enable a mod from the in-game ModHub
Have the Civilization V SDK installed
Know how to use ModBuddy to create and deploy a simple mod
Have the debug logs enabled, know where they are and know how to look for errors in them
(specifically database.log, lua.log and xml.log)
Know how to use LiveTuner (FireTuner) to test and debug a mod
Know how to use World Builder to create a map
Know how to upload a mod to the ModHub
(Optional) Know how to create .dds format images
Compatibility This tutorial was written with Civilization V 1.0.1.332 and also tested with 1.0.1.348

CopyRight © 2011 - All Rights Reserved Page 6
Creating a World Builder Scenario Map In this section we will create a simple World Builder Scenario called “Island Raiders”. The aim of the
scenario is to conquer the other civilisations on the map.
Create a Map The first step is to create the map. This can either be done by saving a map from the main
Civilization game or by creating one in World Builder - either by running one of the standard scripts
or by hand-crafting all the land-masses and adding features and resources. The map should be
created at standard size (80x52) and feature lots of islands.
Start World Builder Start World Builder and either open your saved map or create the new map.
From the Description tab, change the map name to Island Raiders (Civ5Map)

CopyRight © 2011 - All Rights Reserved Page 7
and save the map as IslandRaiders.Civ5Map
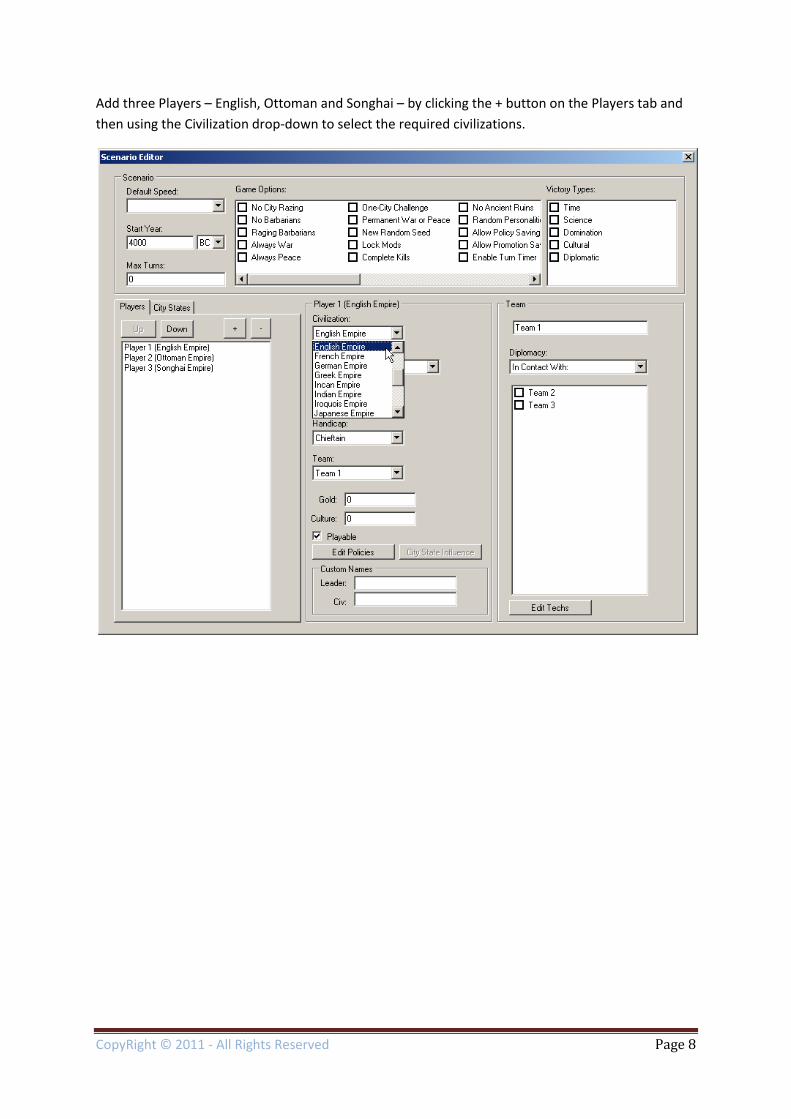
Add Civilizations We now need to add some civilizations to select from to play as. Open the Scenario Editor from the
Scenario Editor tab.
CopyRight © 2011 - All Rights Reserved Page 8
Add three Players – English, Ottoman and Songhai – by clicking the + button on the Players tab and
then using the Civilization drop-down to select the required civilizations.

CopyRight © 2011 - All Rights Reserved Page 9
Set Starting Techs and Policies As this is an island based scenario, we are going to give each Civilization the Sailing technology to
start with. However, as this technology requires Pottery, we must also give each civilization this as
well.
Select the first player and click the Edit Techs button in the bottom right hand corner. In the pop-up
tech editor select Agriculture, Pottery and Sailing, then close the pop-up window. Repeat this for
the other two players.
To “jump-start” the game we are also going to give each player one starting Policy, a different one
for each player. Select the first player and click the Edit Policies button at the bottom centre of the
scenario editor dialog. Assign this player the Tradition policy, then close the pop-up window.
Give the second player the Liberty policy and the third the Honor policy.
CopyRight © 2011 - All Rights Reserved Page 10
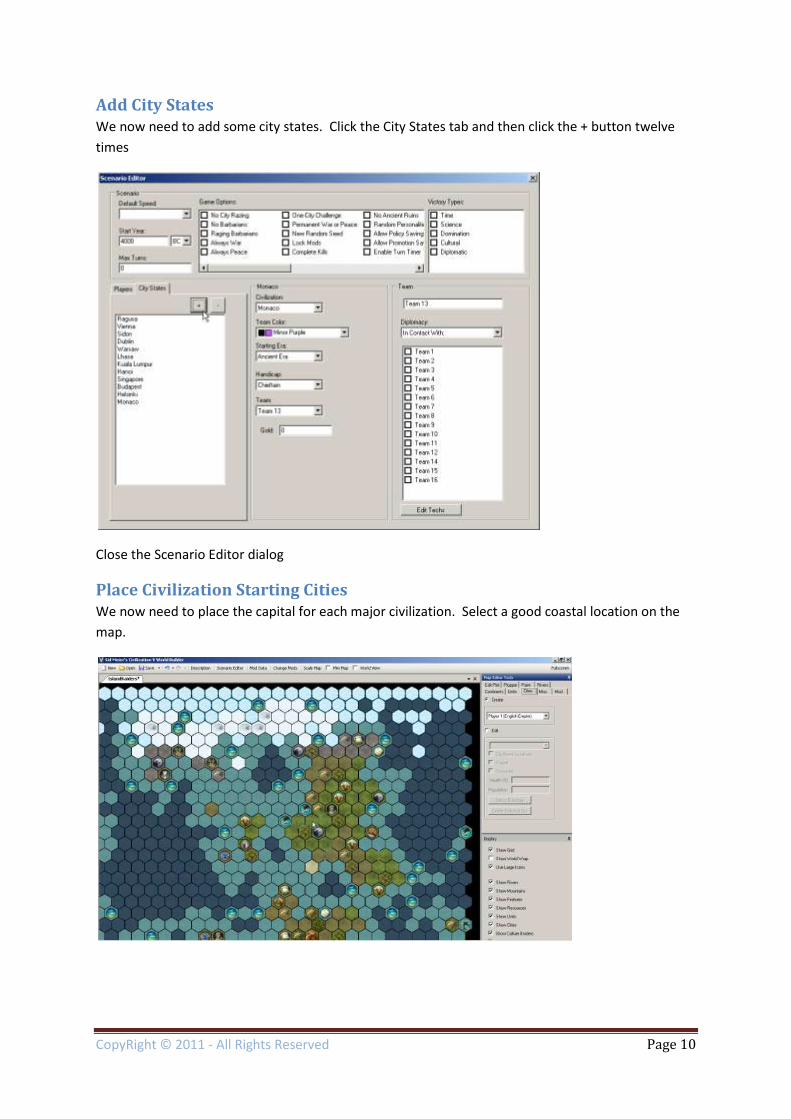
Add City States We now need to add some city states. Click the City States tab and then click the + button twelve
times
Close the Scenario Editor dialog
Place Civilization Starting Cities We now need to place the capital for each major civilization. Select a good coastal location on the
map.

CopyRight © 2011 - All Rights Reserved Page 11
Click the Cities tab in the Map Editor Tools panel, ensure Create is selected and that Player 1 is
showing in the drop-down menu, then click the tile on the map where the capital is to be placed.
On a different island, locate another starting coastal plot, change the drop-down to Player 2 and
click on the tile
CopyRight © 2011 - All Rights Reserved Page 12
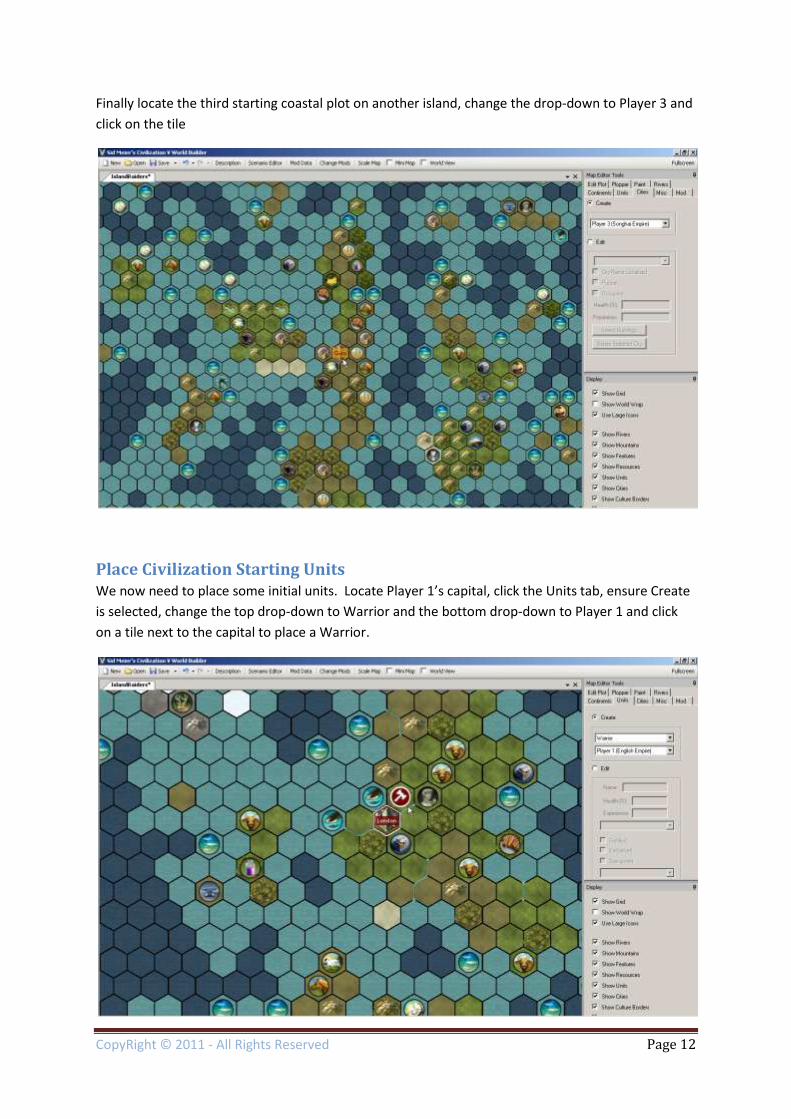
Finally locate the third starting coastal plot on another island, change the drop-down to Player 3 and
click on the tile
Place Civilization Starting Units We now need to place some initial units. Locate Player 1’s capital, click the Units tab, ensure Create
is selected, change the top drop-down to Warrior and the bottom drop-down to Player 1 and click
on a tile next to the capital to place a Warrior.

CopyRight © 2011 - All Rights Reserved Page 13
Change the top drop-down to Trireme and click on a coastal tile next to the capital to place a starting
ship.
Place a warrior and trireme for each of the other two players

CopyRight © 2011 - All Rights Reserved Page 14
Add Palaces to Capital Cities In a random map game, the first city founded is automatically created as the capital as the Palace is
added to it. We need to do the same for the capital cities we have just added. Click the Cities tab,
ensure that the Edit option is selected and then click on London. Click the Select Buildings button,
scroll the list of buildings down and select Palace.
Close the pop-up window and repeat for the other two capital cities.

CopyRight © 2011 - All Rights Reserved Page 15
Place City States We now need to place all the city states. Check the World View to see the full map, and click the
Cities tab. Ensure that Create is selected and change the drop-down to the first city state.
Locate a starting position on the map and click the tile to place the city state. Repeat for all twelve
city states, aiming for coastal locations well distributed across the map and available land-masses.

CopyRight © 2011 - All Rights Reserved Page 16
Set Scenario Properties We now need to set the scenario properties. Open the Scenario Editor again, set the Default Speed
to Standard, the start year to 4000BC, MaxTurns to 200, and check the Domination Victory Type.
Close the scenario editor dialog
Save World Builder Scenario Map Save the map and close World Builder.
Playing a World Builder Scenario Map This section gives step-by-step instructions on how to play the WB Scenario Map created in the
previous section.
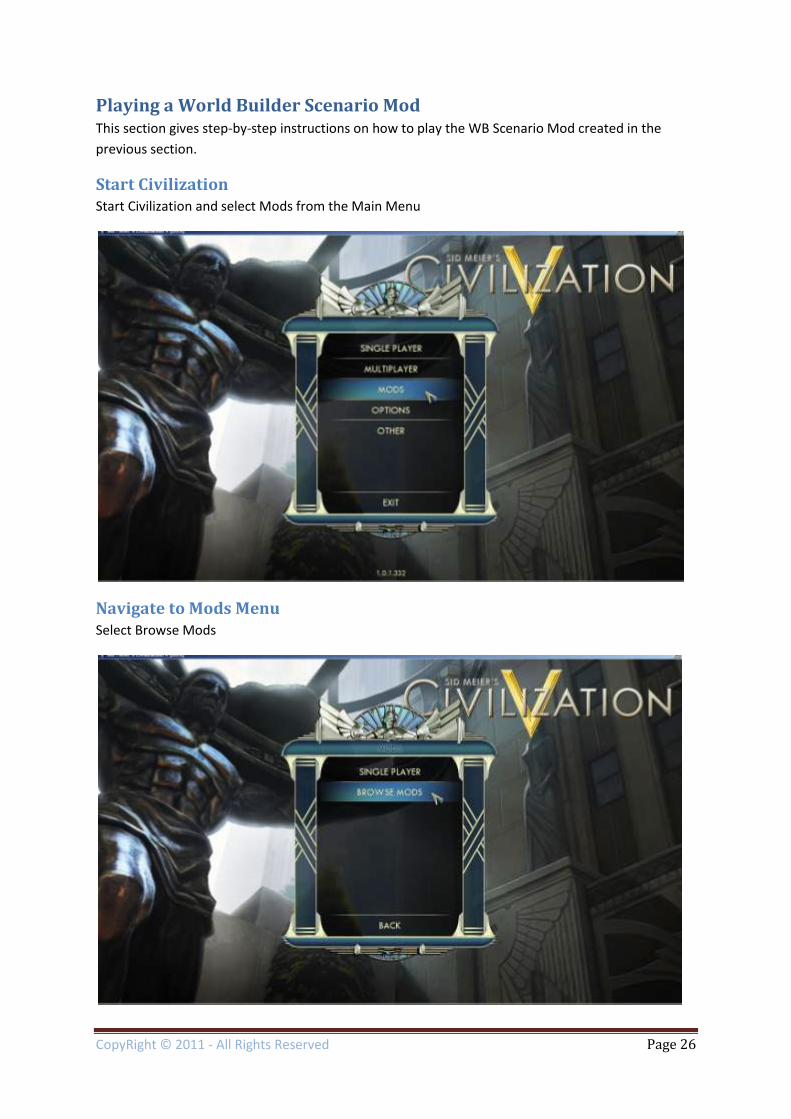
Start Civilization Start Civilization and select Mods from the Main Menu

CopyRight © 2011 - All Rights Reserved Page 17
Navigate to Advanced Setup Menu Select Single Player
Then Setup Game and Advanced Setup

CopyRight © 2011 - All Rights Reserved Page 18
Select the WB Scenario Map From the Map Type drop-down menu select the Island Raiders (Civ5Map) entry
Ignore all other items and click the Back button (do NOT click the Start Game button!)

CopyRight © 2011 - All Rights Reserved Page 19
On the Setup Screen, check the Load Scenario button
Select the Civilization to Play Select a Civilization to play

CopyRight © 2011 - All Rights Reserved Page 20
Start the Scenario Select a difficulty and then click the Start Scenario button
Play the Scenario Finally play your scenario. You will need to “know” what the premise and victory conditions are.
(Note that the Sailing technology has already been completed.)

CopyRight © 2011 - All Rights Reserved Page 21
Changing a WB Scenario Map into a WB Scenario Mod Now you have a working WB Scenario Map - but it’s only available on your computer. So how do
you “publish” it? To do this you need to convert it to a Mod and upload it to the ModHub for other
players to download from there.
Create a New Mod Start ModBuddy and select “New Mod …”
Enter the name of the mod – in this case “IslandRaidersScenario” – and click the OK button.

CopyRight © 2011 - All Rights Reserved Page 22
Complete the required General Information and click the Finish button.
Add the WB Scenario Map From the Solution Explorer window at the top of the right-hand frame, right-click the scenario name
CopyRight © 2011 - All Rights Reserved Page 23
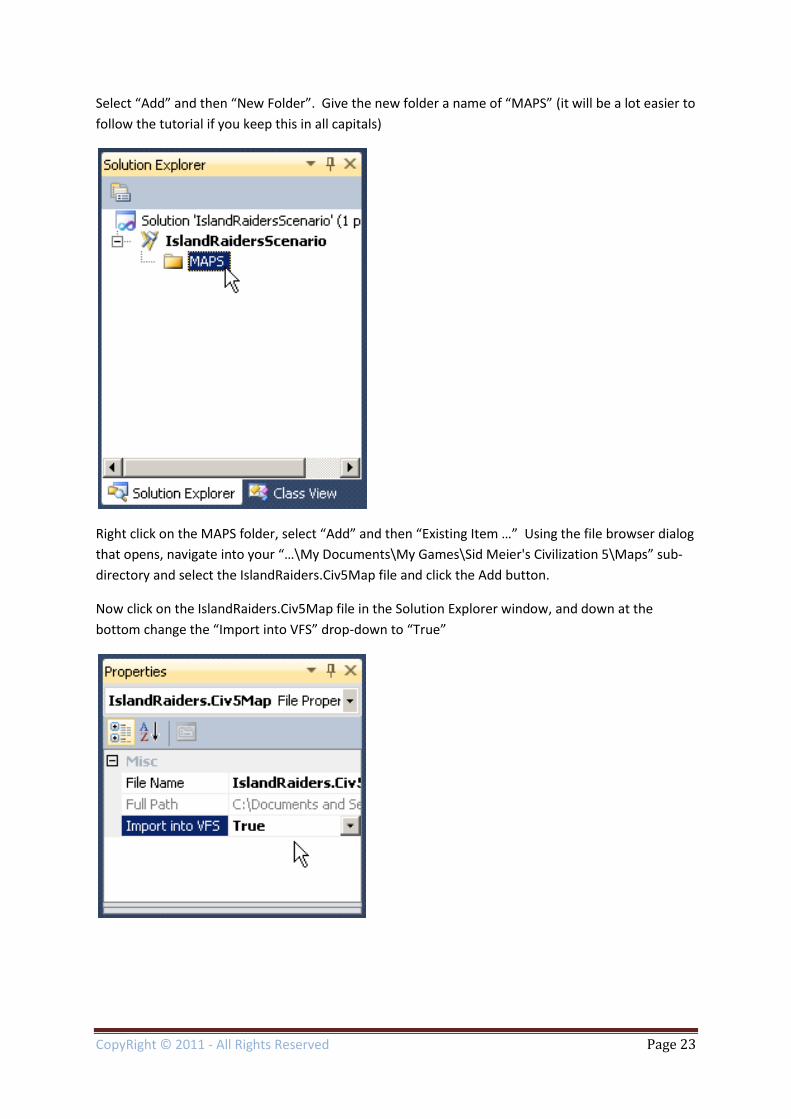
Select “Add” and then “New Folder”. Give the new folder a name of “MAPS” (it will be a lot easier to
follow the tutorial if you keep this in all capitals)
Right click on the MAPS folder, select “Add” and then “Existing Item …” Using the file browser dialog
that opens, navigate into your “…\My Documents\My Games\Sid Meier's Civilization 5\Maps” sub-
directory and select the IslandRaiders.Civ5Map file and click the Add button.
Now click on the IslandRaiders.Civ5Map file in the Solution Explorer window, and down at the
bottom change the “Import into VFS” drop-down to “True”

CopyRight © 2011 - All Rights Reserved Page 24
Set the Mod Properties We now need to add some properties to the mod, so right-click on the IslandRaidersScenario entry
in the Solution Explorer window and select “Properties” to open the mod’s properties screen.
Scroll to the bottom and uncheck the “Affects Saved Games” option.
Click on the Content tab (bottom of the left-hand tabs). Create a new row with a Type of “Map”, a
Name of “Island Raiders”, a description of “Island Raiders Scenario” and a FileName of
“MAPS/IslandRaiders.Civ5Map”.
Important!
1. Both Type and FileName are case sensitive – so “Map” not “map” or “MAP” and
“MAPS/IslandRaiders.Civ5Map” not “maps/islandraiders.civ5map” etc.
2. The type of the slash in the file name is critical – so “MAPS/IslandRaiders.Civ5Map” not
“MAPS\IslandRaiders.Civ5Map”

CopyRight © 2011 - All Rights Reserved Page 25
Delete the Saved WB Scenario Map With the map file loaded into the mod we need to delete it from the “…\My Documents\My
Games\Sid Meier's Civilization 5\Maps” sub-directory.
If we don’t delete the map file from here, Civilization will detect it both from the enabled mod and
from this location so there will be two entries on our map selection list (which will be confusing).
Build the WB Scenario Mod The final task is to build and deploy the mod. Make sure all files are saved, and then from the main
“Build” menu select “Build IslandRaidersScenario”. Confirm that the “Output” window (bottom
frame) reports success and that there are no errors on given in the “Error List” tab.
The build process also deployed the mod to your copy of Civilization.
CopyRight © 2011 - All Rights Reserved Page 26
Playing a World Builder Scenario Mod This section gives step-by-step instructions on how to play the WB Scenario Mod created in the
previous section.
Start Civilization Start Civilization and select Mods from the Main Menu
Navigate to Mods Menu Select Browse Mods

CopyRight © 2011 - All Rights Reserved Page 27
Enable the WB Scenario Mod Locate the Island Raiders Scenario mod and enable it (check box will be highlighted in green), then
click the Back button
Select the WB Scenario Map Select Single Player

CopyRight © 2011 - All Rights Reserved Page 28
Then Setup Game and Advanced Setup
From the Map Type drop-down menu select the Island Raiders entry
Note 1: If you have an “Island Raiders (Civ5Map)” entry, you need to delete the map from your Maps
sub-directory (see above).
Note 2: If you have no “Island Raiders” entry you either forgot to set VFS to true, or have made a
mistake with the capitalisation of the file name and/or used the wrong slash in the path
Ignore all other items and click the Back button (do NOT click the Start Game button!)

CopyRight © 2011 - All Rights Reserved Page 29
Start the Scenario On the Setup Screen, check the Load Scenario button, select a civilization and a difficulty, and then
click the Start Scenario button
Finally play your scenario. You will need to "know" what the premise and victory conditions are.

CopyRight © 2011 - All Rights Reserved Page 30
Uploading a World Builder Scenario Mod With your World Builder Scenario map now converted into a mod, you can upload it to the ModHub
to share with other players.
Upload with ModBuddy Mods are uploaded with ModBuddy. The procedure is not covered in this tutorial as there are many
on-line forum posts giving details on how to do this.
For a step-by-step pictorial guide see
http://www.flickr.com/photos/whoward69/sets/72157626685088090/
Components of a Custom Game We have now seen how to create a World Builder Scenario as a Mod such that it can be uploaded to
the ModHub for other players to download and enjoy. While the mod contains information about
the premise and goals of the scenario, this information is not available to the user during setup or
while playing the scenario. Also, the standard setup process (select the map, click back, check the
load scenario button, etc) is not intuitive.
Compare that to the scenario that comes as part of the free Mongol down-loadable content (DLC).
Once the DLC is enabled, a Custom Game option is available on the Single Player menu. From there
you can see information about the scenario, easily choose set-up options and commence the
scenario.
Once in the scenario, your victory progress is displayed at the top of the screen and you can get the
scenario description back up at the click of the Briefing button.
The next section will show you how to add all these features to the Island Raiders Scenario, but first
we will take a look at the four key components of a Custom Game in detail.
CopyRight © 2011 - All Rights Reserved Page 31
Custom Game Menu The first component of a Custom Game is to get the “Custom Game” option enabled on the Single
Player (Mods) menu
It turns out that the code that displays this option detects if a mod adds an item for the second
component of a custom game (see the following screen grab) and automatically enables/disables
this option. So we don’t need to do anything to make this work, provided our mod adds a valid entry
for the next screen.
Custom Game Menu Entry The second component of a custom game is to add an entry to the “Custom Game” selection screen
This is actually quite simple to achieve, it just requires the correct entries in the .modinfo file (added
via ModBuddy of course), but there are a few pitfalls to avoid and some corresponding “tricks” to
use.
CopyRight © 2011 - All Rights Reserved Page 32
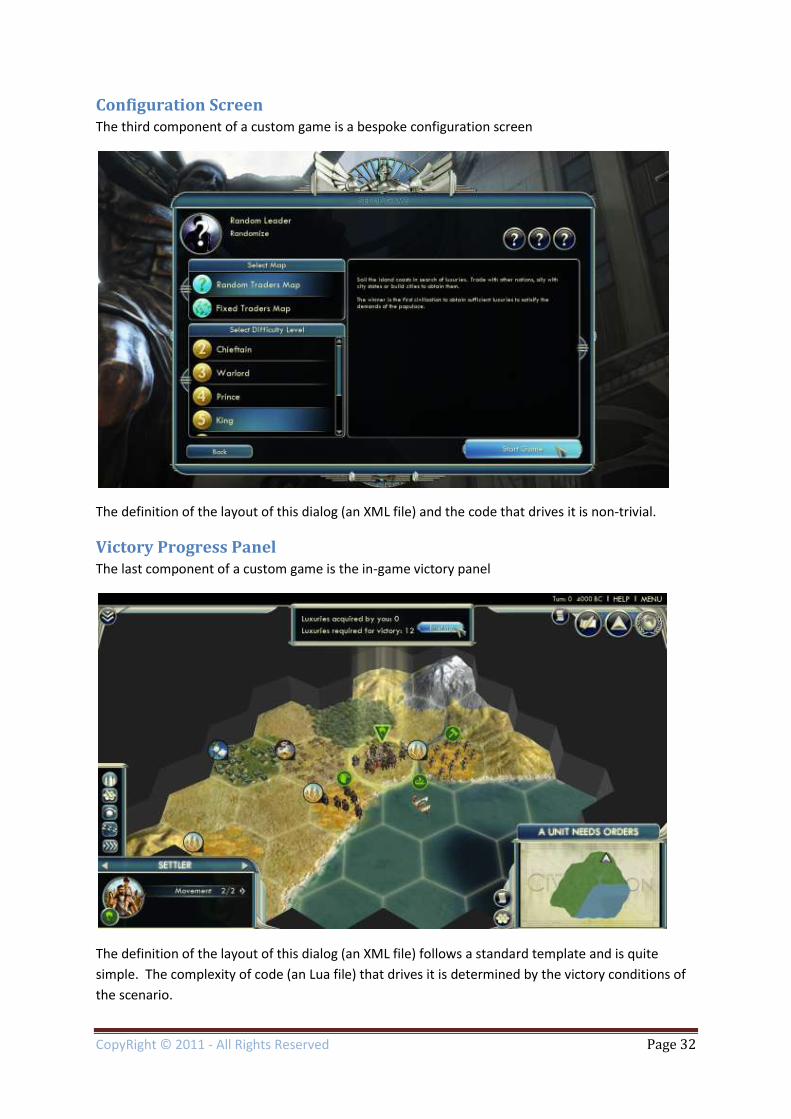
Configuration Screen The third component of a custom game is a bespoke configuration screen
The definition of the layout of this dialog (an XML file) and the code that drives it is non-trivial.
Victory Progress Panel The last component of a custom game is the in-game victory panel
The definition of the layout of this dialog (an XML file) follows a standard template and is quite
simple. The complexity of code (an Lua file) that drives it is determined by the victory conditions of
the scenario.

CopyRight © 2011 - All Rights Reserved Page 33
Changing a WB Scenario Mod into a WB Custom Game This section will show you how to convert the Island Raiders World Builder Scenario Mod into a
Custom Game Mod.
We could do this by writing all the necessary XML, SQL and Lua files from scratch but that would be
error prone and not very re-usable. Fortunately, in good “Blue Peter” fashion, we can use one I have
prepared earlier just for this purpose!
Download, Install and Enable the “Traders Scenario” I have created a “Traders Scenario” custom game mod which can be used as a template for other
custom games. It is both modular and auto-adaptive, meaning that aspects of the set-up screen are
shown or hidden depending on what options are set.
Using the ModHub, locate, download and install the TradersScenario mod.
Confirm Operation of the “Traders Scenario” Before proceeding it is advisable to confirm that the vanilla Traders Scenario is working (because if it
isn’t there is no chance anything that follows in this tutorial will work!)
Start Civilisation, navigate into the Mods menu, select Browse Mods, enable the TradersScenario
mod and then click Back to return to the Mods menu. Select the Single Player option. If all is
installed correctly, you will now have a Custom Game option.
Select Custom Game

CopyRight © 2011 - All Rights Reserved Page 34
Select the Coastal Traders item (note how the description of the scenario – along with the
background image - changes in the right hand frame) and then click “Load Mod”
Select a leader, map type and difficulty and then click “Start Game”
CopyRight © 2011 - All Rights Reserved Page 35
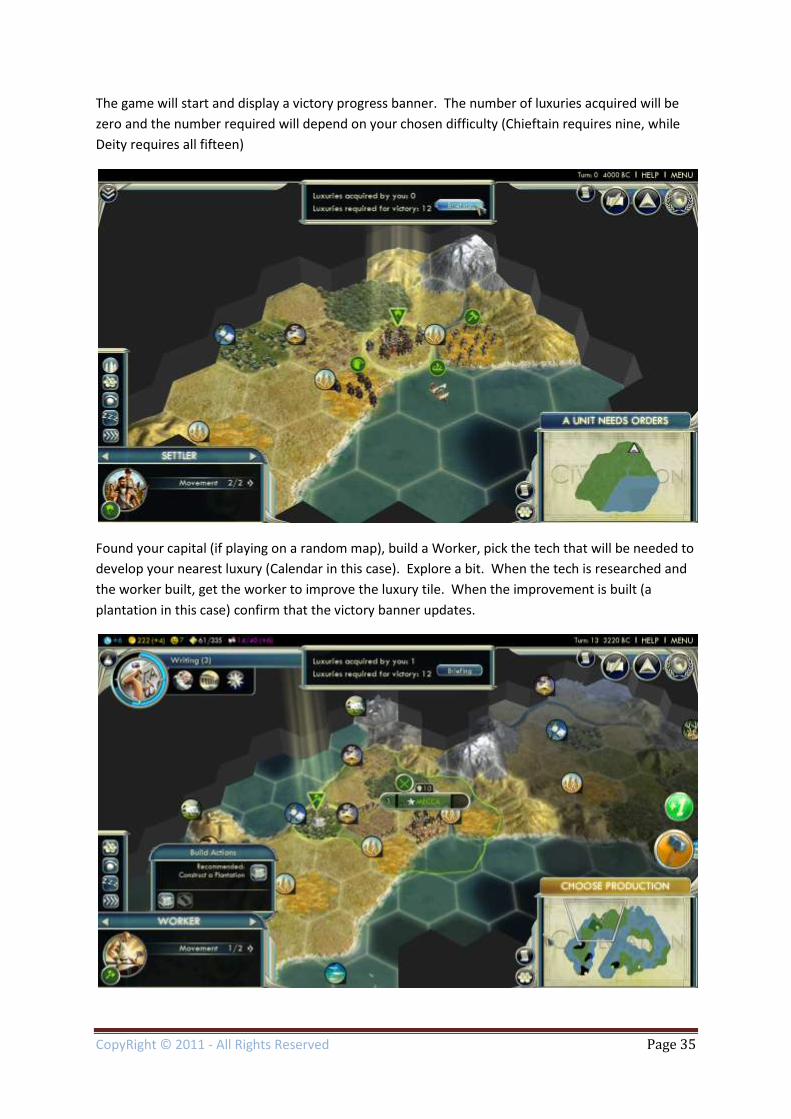
The game will start and display a victory progress banner. The number of luxuries acquired will be
zero and the number required will depend on your chosen difficulty (Chieftain requires nine, while
Deity requires all fifteen)
Found your capital (if playing on a random map), build a Worker, pick the tech that will be needed to
develop your nearest luxury (Calendar in this case). Explore a bit. When the tech is researched and
the worker built, get the worker to improve the luxury tile. When the improvement is built (a
plantation in this case) confirm that the victory banner updates.

CopyRight © 2011 - All Rights Reserved Page 36
We could play the game to its conclusion, but that’s sufficient to show that the vanilla game is
working!
We now want to modify our Island Raiders scenario mod to include the custom game components.
Open WB Scenario Mod Start ModBuddy and open the Island Raiders Scenario mod
As we no longer want the World Builder map to be playable from the Advanced Setup menu, change
the VFS Import for the Islandraiders.Civ5Map file to false
and delete the Map entry on the Content tab

CopyRight © 2011 - All Rights Reserved Page 37
Import Files from Traders Scenario We now need to copy all the files from the Traders Scenario that we need - this isn’t all of them so
pay close attention!
Add an ART folder to the IslandRaidersScenario project and import the Scenario_Background.dds file
from the “…\My Documents\My Games\Sid Meier's Civilization 5\MODS\TradersScenario (v 1)\ART”
sub-directory. (This file is the image that is displayed behind the scenario briefing on the choose
Custom Game screen.)
Add an LUA folder to the IslandRaidersScenario project and import the three files
ScenarioUtilities.lua, ScenarioInitialisation.lua and ScenarioParameters.lua (the Add Existing Item file
selection dialog supports multiple select, so these can all be selected and added at the same time)
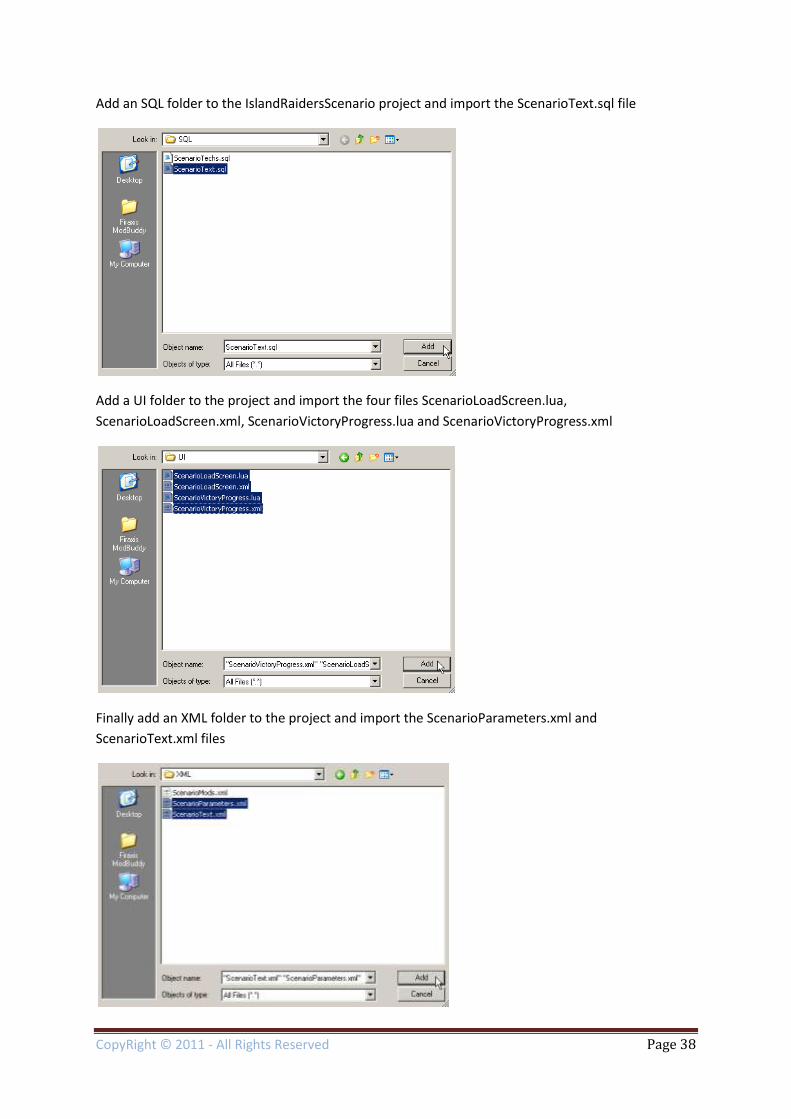
CopyRight © 2011 - All Rights Reserved Page 38
Add an SQL folder to the IslandRaidersScenario project and import the ScenarioText.sql file
Add a UI folder to the project and import the four files ScenarioLoadScreen.lua,
ScenarioLoadScreen.xml, ScenarioVictoryProgress.lua and ScenarioVictoryProgress.xml
Finally add an XML folder to the project and import the ScenarioParameters.xml and
ScenarioText.xml files

CopyRight © 2011 - All Rights Reserved Page 39
The final list of files should look like
Set VFS Imports We now need to set the “Import into VFS” option to true for required files. For the following files
(and only those files) set VFS to true, all others should remain at the default of false
ART/Scenario_Background.dds
LUA/ScenarioInitialisation.lua
LUA/ScenarioParameters.lua
LUA/ScenarioUtilities.lua
Add Required Properties We now need to set a custom property for the mod. Click the Custom Properties tab and enter
“Custom_Background_TXT_KEY_SCENARIO_TITLE” as the name and
“ART/Scenario_Background.dds” as the value (without the enclosing double quotes). Case and type
of slashes is significant!

CopyRight © 2011 - All Rights Reserved Page 40
Set Required Option Click the Mod Info tab, scroll to the bottom, and check the “Hide ‘Setup Game’” option.
Add Required Actions We now need to add actions to execute the sql and xml to update the database. The order of these
files is important, so add them in the following order. Again, case and type of slashes is significant!
XML/ScenarioText.xml
SQL/ScenarioText.sql
XML/ScenarioParameters.xml
Add Required Content We now need to add content to be loaded. The order of these files is not important, but once again
case and type of slashes is significant!
Custom UI/ScenarioLoadScreen.xml
InGameUIAddin LUA/ScenarioInitialisation.lua
InGameUIAddin UI/ScenarioVictoryProgress.xml
Important Note: The Name and Description fields for the Custom entry must be
“TXT_KEY_SCENARIO_TITLE” and “TXT_KEY_SCENARIO_DESC” respectively.
Why the TXT_KEY_ entries? The Name field of the Custom entry is prefixed by
“Custom_Background_” and used as the tag name to locate the background image. XML tags may
only contain a limited sub-set of characters and excludes most of the punctuation and also space.
This means a Name of “William’s Island Raiders Scenario” is not valid. However, by using a
TXT_KEY_ value for the name, we can conform to the requirements of XML while being able to use
any characters in the displayed name as the TXT_KEY_ entry is automatically translated via the game
database.
Note: If you don’t want the victory progress banner, simply omit the InGameUIAddin entry for it.

CopyRight © 2011 - All Rights Reserved Page 41
Edit Scenario Text While on the subject of the scenario name, open the “XML/ ScenarioText.xml” file and change the TXT_KEY_SCENARIO_TITLE, TXT_KEY_SCENARIO_DESC, TXT_KEY_SCENARIO_RANDOM_MAP, TXT_KEY_SCENARIO_FIXED_MAP and TXT_KEY_SCENARIO_BRIEFING_TEXT entries to match the goals of the scenario. (Do not change the name of the tags, just the text!)
Delete the Row entry with tag TXT_KEY_SCENARIO_VICTORY_PROGRESS as it is not needed by the Island Raiders custom game. Save the changes and close the file.
Edit Scenario Parameters Open the “LUA/ScenarioParameters.lua” file. This is the “brains” of the auto-adaptive template.
Adding or removing values in this file, determines which parts of the Custom Game setup dialog are
visible.
The most important piece of information required is the ModId. This value is different for every
mod, so the value you see in your ModBuddy will not be the value shown in these screen grabs! The
ModId is displayed at the top of the ModInfo tab and can be copied from here.
Copy the ModId and paste it into the ScenarioParameters.lua file

CopyRight © 2011 - All Rights Reserved Page 42
The next four entries relate to the maps used in the scenario, but only the first is relevant for a
World Builder Civ5Map file. Change the ScenarioFixedMap entry to refer to the
IslandRaiders.Civ5Map file and “comment out” (by prefixing the lines with --) the next three entries
(we will need these again later in the tutorial). As usual, case and the type of slashes is very
important.
The next block of lines refer to the civilizations we either defined in our World Builder Scenario Map
or wish to play on a random map. As we defined three civilizations when we created the World
Builder Scenario Map (all those pages ago), we need to delete the last entry and change the others
to reflect our chosen civilizations. (The correct values to use in this table can be found in the
CIV5Civilizations.xml core game file.)
If you wish, specify a default civilisation to play, otherwise leave the ScenarioDefaultCivilization set to nil to pick a random civilization to start with (this can be changed by the player from the Custom Game setup screen). The next block of lines refer to the difficulties the player can choose from. To illustrate the auto-adaptive dialog we are going to comment these out for the time being and force the difficulty to be King. We will later return and add these back in to see the effect of them on the Custom Game dialog. So, for the moment, comment these lines out.

CopyRight © 2011 - All Rights Reserved Page 43
The next block of lines refers to the possible victory types. As our scenario will be turn limited, we could just ignore these, but by picking appropriate ones here the AI stands a better chance of playing to win! For our scenario, we only need domination, so set that to true and all the others to false.
The next line relates to the game speed, pick an appropriate one. For the Island Raiders scenario either “GAMESPEED_QUICK” or “GAMESPEED_STANDARD” is suitable. The last line relates to the number of turns the scenario will run for. If there is no turn limit, leave this at zero, but for our Island Raiders scenario we need to change this to 200. (This should be the same as that set in the World Builder Scenario Dialog.)
Save the changes and close the file.
Edit Scenario Background Graphic The ART/Scenario_Background.dds file is displayed as the background to the scenario briefing in the
Custom Game selection menu. Either edit the ART/Scenario_Background.dds file or create a new
one and add it to the mod project. If you change the name, you will need to change the custom
property value added above. If you have the Viking/Denmark DLC you can use the background that
comes with that scenario.
Edit Scenario Initialisation Open the file LUA/ScenarioInitialisation.lua. This file controls what happens as the scenario starts
(initialises). For a World Builder Scenario Map based game, no initialisation is required (as all cities,
units, techs, policies, etc are allocated via the World Builder Scenario Editor.
We could delete everything in this file, but the framework is useful to keep, so we’ll just remove the
code we don’t need.

CopyRight © 2011 - All Rights Reserved Page 44
Locate the InitPlayer(pPlayer) function and delete the block of four lines in the middle (we’ll keep
the allocation of 50 gold to each player)
Save the changes and close the file.
Edit Scenario Victory Progress Almost there! Just need to change the Victory Progress banner to match our winning conditions.
Open the file UI/ScenarioVictoryProgress.lua. This file controls what is displayed in the Victory
Progress banner and has the logic to decide if we have won or lost.
In the Island Raiders scenario we win if we are the last man standing and we lose if we run out of
turns. As “last man standing” is a common victory condition it is already handled. As “out of turns”
is a common lose condition it is also already handled. So all we need to do is remove the “luxury
based victory” code and change the displayed message.
Delete the block of code starting at the “-- Loop through all the Majors checking for a luxury based
victory” comment, delete the line immediately after the “-- Update the victory progress banner”
comment and uncomment the second line (the one that references
“TXT_KEY_SCENARIO_TURNS_AND_OPPONENTS_REMAINING”

CopyRight © 2011 - All Rights Reserved Page 45
Save the changes and close the file.
Files Not To Edit The following files should not need editing under normal circumstances
UI/ScenarioLoadScreen.lua
UI/ScenarioLoadScreen.xml
UI/ScenarioVictoryProgress.xml
SQL/ScenarioText.sql
LUA/ScenarioUtilities.lua
XML/ ScenarioParameters.xml
Build & Test WB Custom Game Mod Make sure all files are saved and then from the main “Build” menu select “Build Solution” – this will
build and deploy the mod. Check for any errors listed on the Error List tab.
Check that the “…\My Documents\My Games\Sid Meier's Civilization 5\MODS\IslandRaidersScenario
(v 1)” folder has been created. Check that it contains the following files
IslandRaidersScenario (v 1).modinfo
ART\Scenario_Background.dds
LUA\ScenarioInitialisation.lua
LUA\ScenarioParameters.lua
LUA\ScenarioUtilities.lua
MAPS\IslandRaiders.Civ5Map
SQL\ScenarioText.sql
UI\ScenarioLoadScreen.lua
UI\ScenarioLoadScreen.xml
UI\ScenarioVictoryProgress.lua
UI\ScenarioVictoryProgress.xml
XML\ ScenarioParameters.xml
XML\ScenarioText.xml

CopyRight © 2011 - All Rights Reserved Page 46
Check that the .modinfo file looks like the following
<Mod id="…" version="1">
<Properties>
<Name>…</Name>
<Teaser>…</Teaser>
<Description>…</Description>
<HideSetupGame>0</HideSetupGame>
<AffectsSavedGames>0</AffectsSavedGames>
<SupportsSinglePlayer>1</SupportsSinglePlayer>
<SupportsMultiplayer>1</SupportsMultiplayer>
<SupportsMac>1</SupportsMac>
<ReloadLandmarkSystem>0</ReloadLandmarkSystem>
<ReloadStrategicViewSystem>0</ReloadStrategicViewSystem>
<ReloadUnitSystem>0</ReloadUnitSystem>
<Custom_Background_TXT_KEY_SCENARIO_TITLE>
ART/Scenario_Background.dds</Custom_Background_TXT_KEY_SCENARIO_TITLE>
</Properties>
<Files>
<File md5="…" import="1">ART/Scenario_Background.dds</File>
<File md5="…" import="1">LUA/ScenarioInitialisation.lua</File>
<File md5="…" import="1">LUA/ScenarioParameters.lua</File>
<File md5="…" import="1">LUA/ScenarioUtilities.lua</File>
<File md5="…" import="0">MAPS/IslandRaiders.Civ5Map</File>
<File md5="…" import="0">SQL/ScenarioText.sql</File>
<File md5="…" import="0">UI/ScenarioLoadScreen.lua</File>
<File md5="…" import="0">UI/ScenarioLoadScreen.xml</File>
<File md5="…" import="0">UI/ScenarioVictoryProgress.lua</File>
<File md5="…" import="0">UI/ScenarioVictoryProgress.xml</File>
<File md5="…" import="0">XML/ScenarioParameters.xml</File>
<File md5="…" import="0">XML/ScenarioText.xml</File>
</Files>
<Actions>
<OnModActivated>
<UpdateDatabase>XML/ScenarioText.xml</UpdateDatabase>
<UpdateDatabase>SQL/ScenarioText.sql</UpdateDatabase>
<UpdateDatabase>XML/ScenarioParameters.xml</UpdateDatabase>
</OnModActivated>
</Actions>
<EntryPoints>
<EntryPoint type="Custom" file="UI/ScenarioLoadScreen.xml">
<Name>TXT_KEY_SCENARIO_TITLE</Name>
<Description>TXT_KEY_SCENARIO_DESC</Description>
</EntryPoint>
<EntryPoint type="InGameUIAddin" file="LUA/ScenarioInitialisation.lua">
<Name>Scenario Initialisation</Name>
<Description>Scenario Initialisation</Description>
</EntryPoint>
<EntryPoint type="InGameUIAddin" file="UI/ScenarioVictoryProgress.xml">
<Name>Victory Progress</Name>
<Description>Victory Progress Display</Description>
</EntryPoint>
</EntryPoints>
</Mod>
GUIDs and MD5s have been replaced by … as they will differ, as have non-critical text strings. Some
standard tags have been removed from the listing for brevity. Pay particular attention to case of
filenames and use of the correct slash types, also the import attributes in the File tags and the values
in the Actions and EntryPoints sections.

CopyRight © 2011 - All Rights Reserved Page 47
Playing a WB Custom Game This section gives step-by-step instructions on how to play the WB Custom Game created in the
previous section.
Start Civilization Start Civilization and select Mods from the Main Menu
Enable the WB Custom Game Mod If the Traders Scenario is enabled, disable it. Locate the Island Raiders Scenario and enable it, then
click the Back button

CopyRight © 2011 - All Rights Reserved Page 48
Select the Custom Game The Single Player menu will now have a Custom Game option, select it.
Note: If you can still see the “Set Up Game” option, you forget to check the “Hide ‘Setup Game’”
option on the Mod Info tab in ModBuddy.
Select the Island Raiders custom game, note how the scenario premise and victory conditions are
displayed. Click the Load Mod button.
If you have two identical entries in the custom game list, you forgot to disable the Traders scenario.
(The duplication is intentional, and serves as a warning that there are two conflicting mods enabled.)

CopyRight © 2011 - All Rights Reserved Page 49
Click on the Random Leader area to choose a civilisation
Select a civilization to play
CopyRight © 2011 - All Rights Reserved Page 50
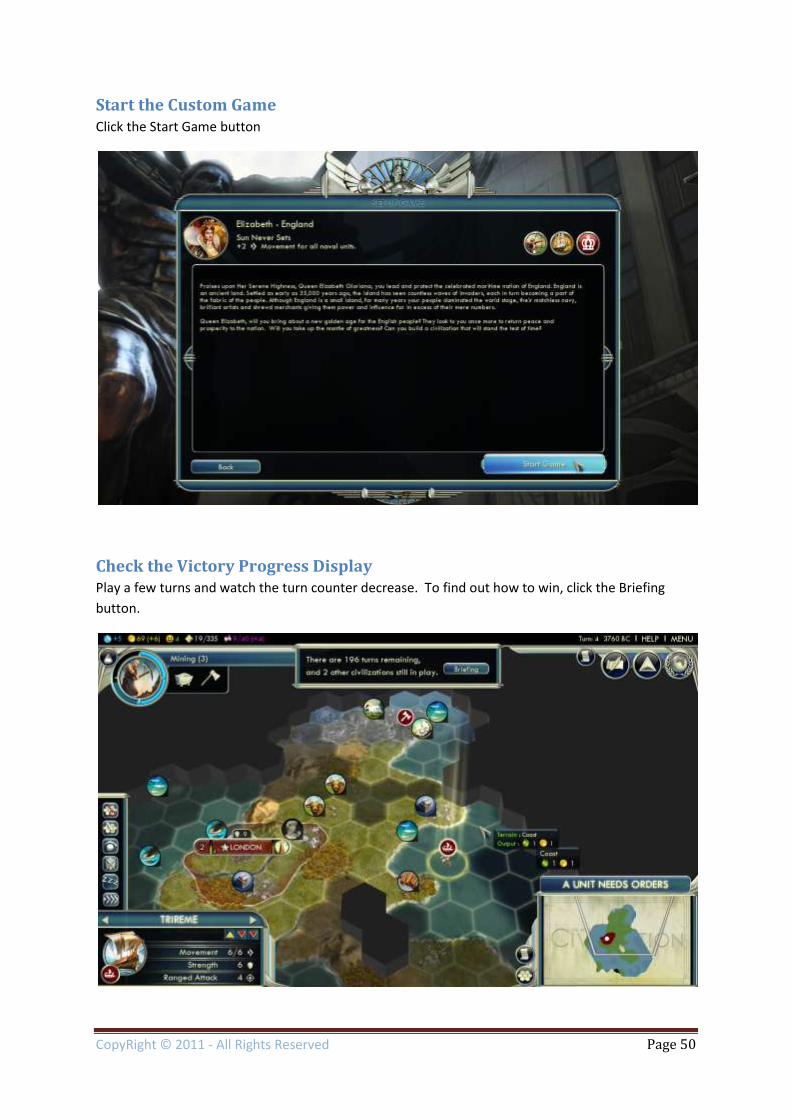
Start the Custom Game Click the Start Game button
Check the Victory Progress Display Play a few turns and watch the turn counter decrease. To find out how to win, click the Briefing
button.

CopyRight © 2011 - All Rights Reserved Page 51
Extending the Game – Difficulty Selection This section will show you how to add a difficulty menu to the custom game configuration screen.
Start ModBuddy Start ModBuddy, open the Island Raiders Scenario project and open the ScenarioParameters.lua file
(in the LUA folder)
Add Difficulty Options Reinstate the commented out list of difficulties
Because the code that displays the custom game configuration screen is auto-adaptive that’s all we
need to do!
Save the changes, close the file and rebuild the mod.
View Changes Start Civilisation, navigate to the Mods menu and re-enable the IslandRaidersScenario mod. (This is
necessary as the rebuild process changes the date-time stamp on the .modinfo file and Civilization
therefore detects that the mod has changed and automatically disables the mod.)
Select Custom Game and the Island Raiders scenario and check that the scenario setup screen now
contains a difficulty selection menu and that King is the default selection.

CopyRight © 2011 - All Rights Reserved Page 52
Extending the Game – Adding a Map Script Assuming your mod ends up as more than just a simple World Builder based scenario (ie with
additional XML/SQL database changes and/or Lua based logic) you may want to use a map script to
generate a random map rather than using the same fixed one for every game.
This section will show you how to add a map script to the mod and enable it to be selected instead
of the fixed World Builder map from the custom game configuration screen. (To concentrate on the
process of enabling a map script in the custom game configuration screen we will add the standard
Tiny Islands script, rather than develop one of our own.)
Start ModBuddy Start ModBuddy and open the Island Raiders Scenario project
Add a Map Script Right-click on the MAPS folder, select “Add” and then “Existing Item …” Browse into the
“C:\Program Files\Steam\SteamApps\common\sid meier's civilization v\assets\Maps” sub-directory
and select the TinyIslands.lua file and click “Add”
Rename the TinyIslands.lua file to be “IslandRaidersScript.lua”
CopyRight © 2011 - All Rights Reserved Page 53
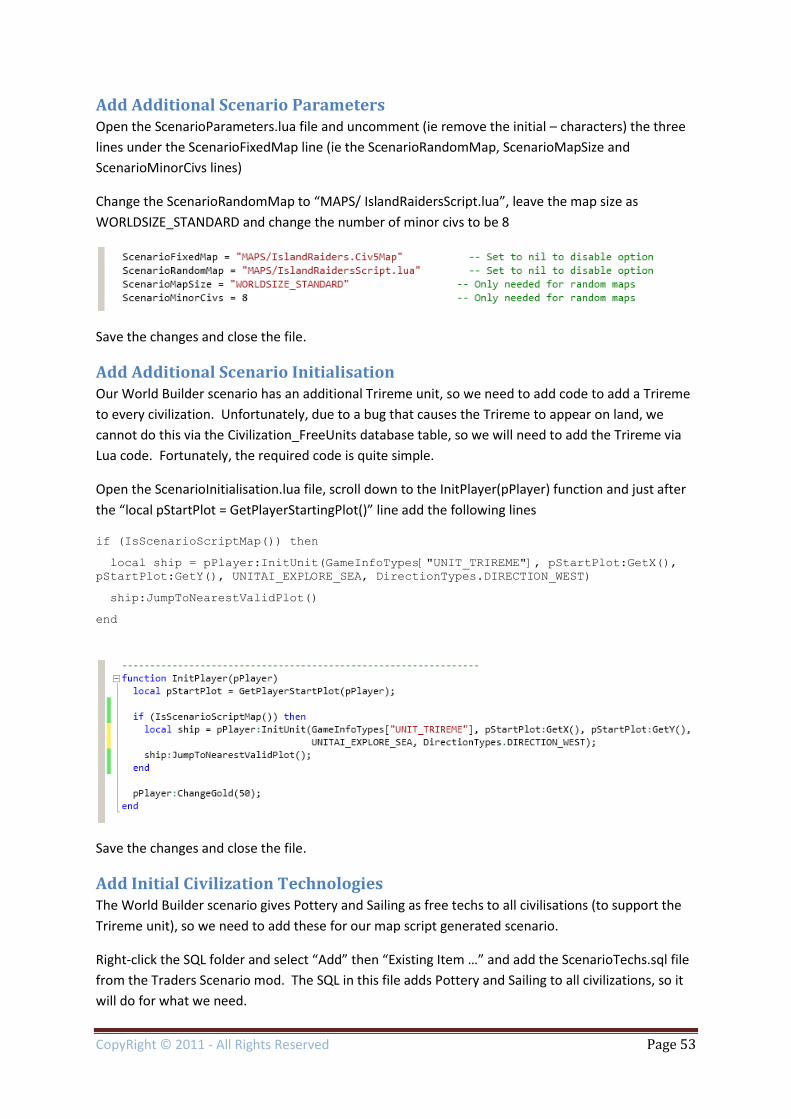
Add Additional Scenario Parameters Open the ScenarioParameters.lua file and uncomment (ie remove the initial – characters) the three
lines under the ScenarioFixedMap line (ie the ScenarioRandomMap, ScenarioMapSize and
ScenarioMinorCivs lines)
Change the ScenarioRandomMap to “MAPS/ IslandRaidersScript.lua”, leave the map size as
WORLDSIZE_STANDARD and change the number of minor civs to be 8
Save the changes and close the file.
Add Additional Scenario Initialisation Our World Builder scenario has an additional Trireme unit, so we need to add code to add a Trireme
to every civilization. Unfortunately, due to a bug that causes the Trireme to appear on land, we
cannot do this via the Civilization_FreeUnits database table, so we will need to add the Trireme via
Lua code. Fortunately, the required code is quite simple.
Open the ScenarioInitialisation.lua file, scroll down to the InitPlayer(pPlayer) function and just after
the “local pStartPlot = GetPlayerStartingPlot()” line add the following lines
if (IsScenarioScriptMap()) then
local ship = pPlayer:InitUnit(GameInfoTypes["UNIT_TRIREME"], pStartPlot:GetX(),
pStartPlot:GetY(), UNITAI_EXPLORE_SEA, DirectionTypes.DIRECTION_WEST)
ship:JumpToNearestValidPlot()
end
Save the changes and close the file.
Add Initial Civilization Technologies The World Builder scenario gives Pottery and Sailing as free techs to all civilisations (to support the
Trireme unit), so we need to add these for our map script generated scenario.
Right-click the SQL folder and select “Add” then “Existing Item …” and add the ScenarioTechs.sql file
from the Traders Scenario mod. The SQL in this file adds Pottery and Sailing to all civilizations, so it
will do for what we need.

CopyRight © 2011 - All Rights Reserved Page 54
On the Actions tab, add an entry to execute this file during mod activation.
Our World Builder scenario also granted an initial policy, but we won’t replicate that for the script
based scenario as it requires non-trivial Lua code to implement.
Save the changes and rebuild the mod.
View Changes Start Civilisation, navigate to the Mods menu and re-enable the IslandRaidersScenario mod. (This is
necessary as the rebuild process changes the date-time stamp on the .modinfo file and Civilization
therefore detects that the mod has changed and automatically disables the mod.)
Select Custom Game and the Island Raiders scenario and check that the scenario setup screen now
contains a map selection menu.

CopyRight © 2011 - All Rights Reserved Page 55
Start the game with the random map and check that the Trireme unit is placed and that you start
with Pottery and Sailing.
Extending the Game – AI Only Civilizations In some circumstances we may only want the human player to be able to select from a limited range
of civilisations, while placing more on the map for them to oppose. For example, a New World
conquest scenario may limit the player to England, France or Spain, but need the AI to play as the
Incans, Aztecs and Iroquois.
In this section we will change the Island Raiders scenario such that the human player is always
England while the AI controls the other civilizations
Start ModBuddy Start ModBuddy, open the Island Raiders Scenario project and open the ScenarioParameters.lua file
CopyRight © 2011 - All Rights Reserved Page 56
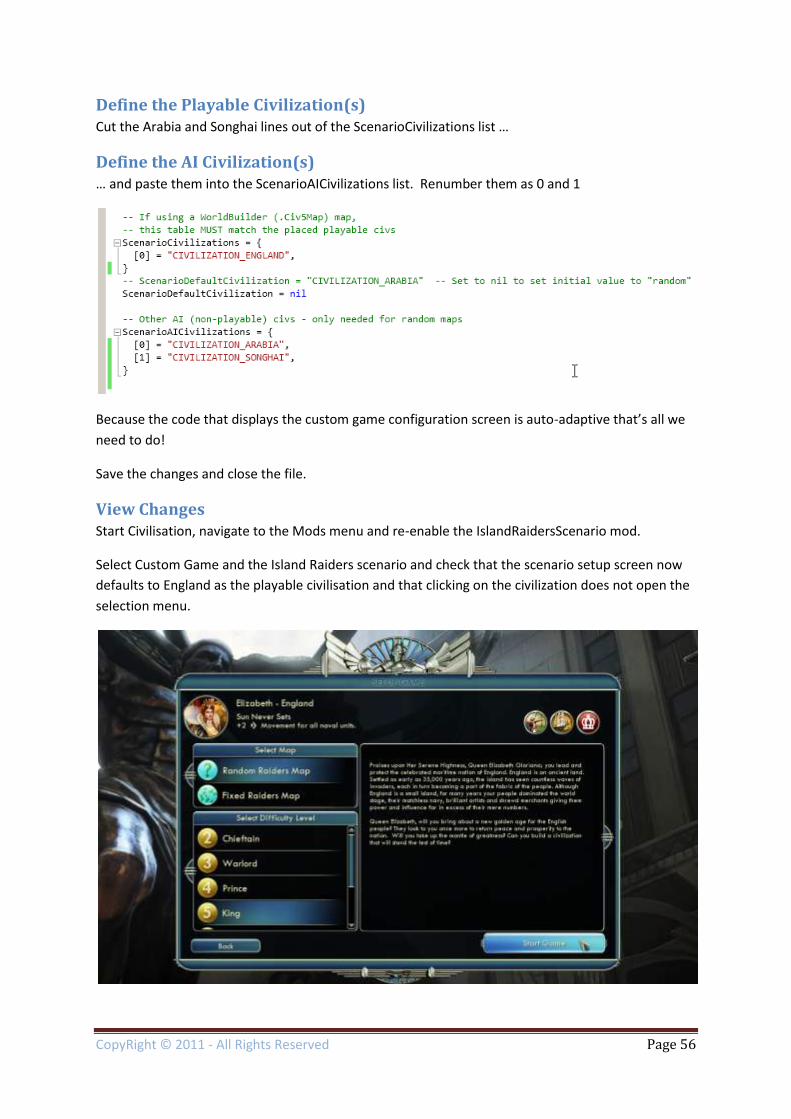
Define the Playable Civilization(s) Cut the Arabia and Songhai lines out of the ScenarioCivilizations list …
Define the AI Civilization(s) … and paste them into the ScenarioAICivilizations list. Renumber them as 0 and 1
Because the code that displays the custom game configuration screen is auto-adaptive that’s all we
need to do!
Save the changes and close the file.
View Changes Start Civilisation, navigate to the Mods menu and re-enable the IslandRaidersScenario mod.
Select Custom Game and the Island Raiders scenario and check that the scenario setup screen now
defaults to England as the playable civilisation and that clicking on the civilization does not open the
selection menu.

CopyRight © 2011 - All Rights Reserved Page 57
Using LiveTuner, reveal the full map and check that the other Civilizations have been placed.
Conclusion The Custom Game configuration screen is fully programmable so there are an infinite number of
possibilities for custom game mods to take advantage of. However, defining the dialog layout in
XML and coding the responses to button clicks and menu selections in Lua is non-trivial, so may be
beyond the skill set of most modders who would like to convert their World Builder based scenarios
into custom games. Hopefully the TradersScenario sample mod and this Tutorial will enable more
modders to take advantage of the custom game screens.