wavelink avalanche server - cisco.com · procedure step 1 turnonthephone. step 2...
TRANSCRIPT

Wavelink Avalanche Server
• Wavelink Avalanche Server Overview, page 1
• Before You Begin, page 1
• Best Practices, page 2
• Wavelink Server IP Address Setup, page 2
• Set Up and Use CU, page 3
• Install CU File, page 5
• Update Configuration Files, page 5
• Update Phone, page 12
Wavelink Avalanche Server OverviewThis chapter describes theWavelink AvalancheManagement Console and how to use it to configure the CiscoUnified Wireless IP Phone 7925G, 7925G-EX, and 7926G. The Configuration Utility (CU) for WavelinkAvalanche can be installed on the Wavelink Avalanche Management Console and used to configure a singlephone or multiple phones with common settings.
Not all features can be configured using Wavelink. Some features can only be configured from CiscoUnified Communications Manager Administration.
Note
Before You BeginBefore you can use the Wavelink Avalanche Management Console to configure phones, ensure that you havethe necessary components and follow the best practices during your setup.
The following components are required for configuring the phone using the Wavelink Avalanche server:
•Wavelink Avalanche software:
◦Avalanche Manager Agent
Cisco Unified Wireless IP Phone 7925G, 7925G-EX, and 7926G Administration Guide 1

◦Avalanche Management Console
• Cisco Unified Wireless IP Phone 7925G, 7925G-EX, and 7926G Firmware Release 1.3(1) or later
• Configuration Utility (CU) for Wavelink Avalanche
• DHCP server
• Cisco Unified Communications Manager
Best PracticesThis section describes the best practices recommended for setting up and using the CU on the WavelinkAvalanche server.
• Ensure that the phone is registered to Cisco Unified Communications Manager.
• Try out this process with one or two phones before deploying to many phones.
• Set up a VLAN that has access only to the Wavelink server.
• Configure DHCP Option 149 with the Wavelink server IP address. If you do not configure this option,see Set Up Wavelink Server Address from Phone, on page 2.
• Configure a Cisco Access Point to use a default SSID of “cisco” with open authentication and noencryption.
Wavelink Server IP Address SetupIf you did not configure DHCP Option 149 with the Wavelink server IP address, you must manually assignit.
Do not perform this task if you previously configured the Wavelink server address using DHCP Option149.
Note
The following sections describe the methods to assign the Wavelink server on the phone.
Set Up Wavelink Server Address from PhoneTo assign the Wavelink server from the phone, follow these steps.
Cisco Unified Wireless IP Phone 7925G, 7925G-EX, and 7926G Administration Guide2
Wavelink Avalanche ServerBest Practices

Procedure
Step 1 Turn on the phone.Step 2 Verify that the phone is installed with the required firmware version and is registered to Cisco Unified
Communications Manager.Step 3 Choose SETTINGS > System Configuration >Wavelink.Step 4 To unlock the phone, press **#.Step 5 In the Alternate Wavelink Server option, choose Yes.Step 6 Enter the IP address of the Wavelink server, and press Save.
Set Up Wavelink Server Address from Phone Web PageTo assign the Wavelink server using the phone web page, follow these steps.
Procedure
Step 1 From the phone web page, chooseWavelink Settings from the left pane.Under Wavelink Settings, make sure that the server is enabled.
Step 2 Click Use the following Server and enter the IP address of the server.Step 3 Click Save.
Set Up and Use CUThis section describes the tasks for configuring and using the CU from the Wavelink Management Console.
The CU is labeled as 7921G but the CU works for all 792X phones.Note
To set up and use the CU from the Wavelink Management Console, perform the following tasks.
Procedure
Step 1 Assign attributes for the phone. For more information, see Phone Attributes Setup, on page 4.Step 2 Install the CU on Wavelink. For more information, see Install CU File, on page 5.Step 3 Update the configuration files. For more information, see Update Configuration Files, on page 5.Step 4 Update the phones. For more information, see Phone Attributes Setup, on page 4.
Cisco Unified Wireless IP Phone 7925G, 7925G-EX, and 7926G Administration Guide 3
Wavelink Avalanche ServerSet Up Wavelink Server Address from Phone Web Page

Phone Attributes SetupYou can assign attributes on the Cisco Unified Wireless IP Phone that can be used to distinguish it from othermobile devices connected to the Wavelink server. These attributes can be used as search criteria for locatingphones on theWavelink server. For example, the predefinedModelName field of CP7925G is used to identifya device as the Cisco Unified Wireless IP Phone 7925G, 7925G-EX, and 7926G.
To assign attributes, use the Wavelink Management Console, the phone UI, or the phone web page:
• If you use theWavelinkManagement Console, choose the Add Properties option from the Client Settingsoption (for a single phone) or the Edit Device Properties option (for a mobile device group). For moreinformation, see the Wavelink Avalanche server documentation.
• If you assign attributes from the phone or phone web page, use the following sections to define valuesfor the CustomName and CustomValue fields.
Define CustomName and CustomValue on PhoneTo define the CustomName and CustomValue fields from the phone, follow these steps:
Procedure
Step 1 On the main phone screen, choose SETTINGS > System Configuration >Wavelink.Step 2 Unlock the phone by pressing **#.Step 3 Scroll to a CustomName, enter an attribute name (for example, “User”), and click Save.
Only alphanumeric characters are allowed in the CustomNamefield.
Note
Step 4 Scroll to CustomValue and enter a value for the corresponding CustomName (for example, “Admin”), andclick Save.You can define up to four pairs of custom parameters.
Define Custom Parameters from Phone Web PageTo define customer parameters from the phone web page, follow these steps:
Procedure
Step 1 From the phone web page, chooseWavelink Settings.Step 2 In the Wavelink Custom Parameters section, enter values in the Name and Value fields. You can define up
to four pairs of custom parameters.Do not use spaces in the Namefield.
Note
Cisco Unified Wireless IP Phone 7925G, 7925G-EX, and 7926G Administration Guide4
Wavelink Avalanche ServerPhone Attributes Setup

Install CU FileThe CU file is provided by Cisco in the .ava file format.
Install the CU on the Wavelink Avalanche Management Console.Note
For more information, see the Wavelink Avalanche Management Console documentation.
To install the phone CU, follow these steps.
Procedure
Step 1 Launch the Wavelink Avalanche Management Console and connect to the agent.Step 2 Choose Software Management > Install Software Package.Step 3 Browse to the location of the .ava file containing the CU and select it.Step 4 Click New and enter the software collection name under which the phone configuration files will be added.Step 5 Follow the instructions on the wizard to complete the installation.Step 6 When the installation completes, expand the software collection name on the left pane. The phone CU file
name 7925CU appears with a red “x” (disabled) next to it.Step 7 Right-click 7925CU and choose Enable Package.
The installation is complete. The following additional steps are optional. They configure the selectioncriteria so you can easily apply changes to a device group.
Note
Step 8 Right-click the software collection (containing the phone CU) and choose Settings.Step 9 Click the button at right of the Selection Criteria box to launch the Selection Criteria wizard.Step 10 Select an item from the Source Properties list on the left, and enter a value in the Selection Expression text
box.Step 11 Repeat the previous step for each property and value you wish to include. When finished, clickCompile, and
then click Test Expression.Step 12 Review the list displayed under Matching Clients to ensure the selection criteria have been met.Step 13 Click Apply, then click OK.
Update Configuration FilesYou can update a phone configuration file using the CU installed on a Wavelink Avalanche ManagementConsole.
The following table lists the configuration file settings.
Cisco Unified Wireless IP Phone 7925G, 7925G-EX, and 7926G Administration Guide 5
Wavelink Avalanche ServerInstall CU File

Table 1: Configuration File Settings
For more information, see...Setting
Profile Settings Fields, on page 6Profile Settings
WLAN Settings
Network Settings
USB Settings Field, on page 11USB Settings
Trace Settings Fields, on page 11Trace Settings
Wavelink Settings Fields, on page 12Wavelink Settings
To update settings in the phone configuration file, follow these steps:
Procedure
Step 1 Right click 7925CU (in a folder under Software Collections) to launch the CU.Step 2 From the left pane, choose the settings you wish to configure:
• Profile Settings
• USB Settings
• Trace Settings
•Wavelink Settings
Step 3 From the settings page, select or enter information for those settings.Step 4 Click Apply.
Profile Settings FieldsThe following table lists the fields in the Profile Settings screen.
Table 2: Profile Settings
For more information, see …DescriptionItem
Provides a name for the profile to make it easy toidentify; up to 63 alphanumeric characters.
Profile Name
Choose Yes or No.Profile Enabled
Cisco Unified Wireless IP Phone 7925G, 7925G-EX, and 7926G Administration Guide6
Wavelink Avalanche ServerProfile Settings Fields

For more information, see …DescriptionItem
WLAN Settings
Assigns the Service Set Identifier (SSID) to thisprofile. You must assign the same SSID to thephone that is also assigned to access points in thewireless network.
SSID
802.11 Standards for WLANCommunications
Determines the signal mode or priority forselecting signal modes available in the WLAN.Options are:
• 802.11 b/g: Use only 2.4 GHz band
• 802.11a: Use only 5 GHz band
• Auto, 802.11b/g preferred over 802.11a(dual-band)
• Auto, 802.11a preferred over 802.11b/g(dual-band)
The preferred band, if available, is usedat power-on, but the phone may switchto the less-preferred 2.4 GHz band, ifavailable, and the preferred band is lost.After the phone has connected to theless-preferred band, it does not scan forthe preferred band if the current band isacceptable, and will remain connectedto the less-preferred band.
Note
• Auto, signal strength (RSSI): Use strongestsignal in dual-band environment
WLAN Mode
802.11 Standards for WLANCommunications
Set for the type of power saving mode used in theWLAN. Options are:
• U-APSD/PS-Poll
• None
Call Power SaveMode
WLAN Security
Cisco Unified Wireless IP Phone 7925G, 7925G-EX, and 7926G Administration Guide 7
Wavelink Avalanche ServerProfile Settings Fields

For more information, see …DescriptionItem
Sets the authentication and encryption methodsfor this profile:
Open
Open access to APs
Open+WEP
Open access with WEP encryption(requires an encryption key)
Shared+WEP
Shared key authentication with WEP(requires an encryption key)
LEAP
Cisco proprietary authentication andencryption using a RADIUS server(requires a username and password)
EAP-FAST
Authentication and encryption using TLSand RADIUS server (requires a usernameand password)
Auto (AKM)
Automatic authenticated key managementusing:
•WPA, WPA2 (requires a usernameand password)
•WPA-Pre-shared key,WPA2-Pre-shared key (requires apassphrase/pre-shared key)
• CCKM (requires a username andpassword)
AuthenticationMode
Required for LEAP, EAP-FAST, and Auto (AKM) authentication methodsWireless SecurityCredentials
Assigns the network authentication username forthis profile
Username
Assigns the network authentication password forthis profile
Password
Cisco Unified Wireless IP Phone 7925G, 7925G-EX, and 7926G Administration Guide8
Wavelink Avalanche ServerProfile Settings Fields
For more information, see …DescriptionItem
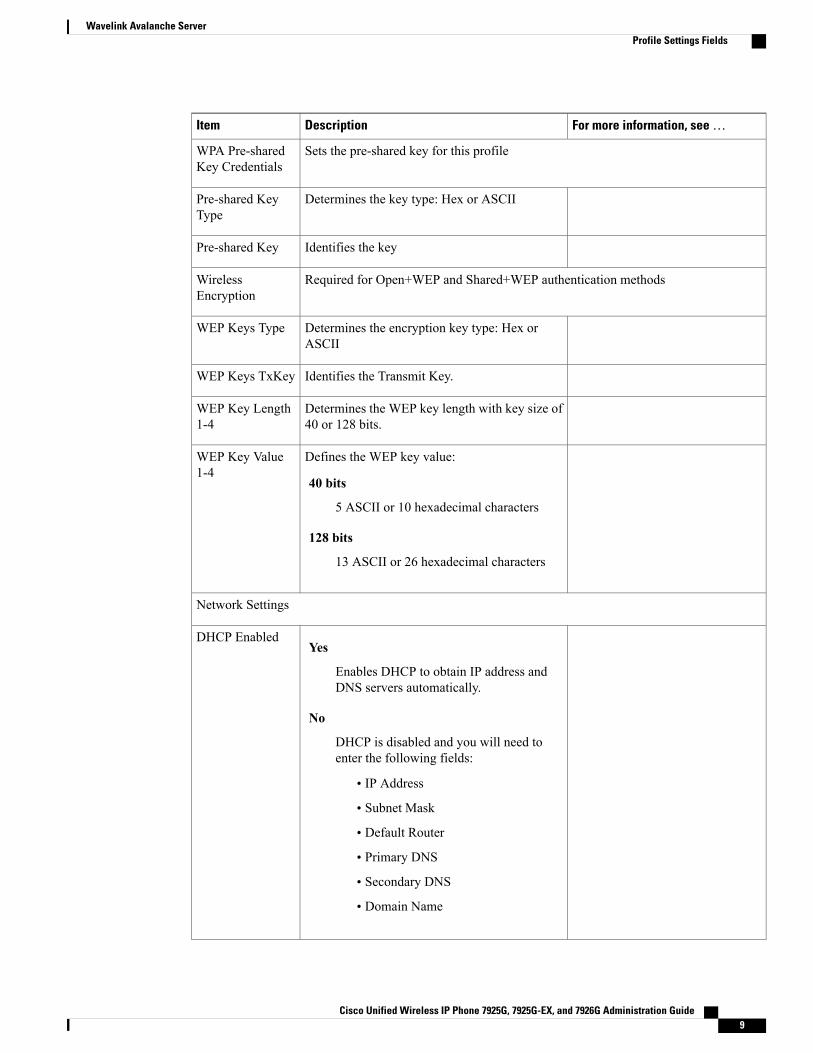
Sets the pre-shared key for this profileWPA Pre-sharedKey Credentials
Determines the key type: Hex or ASCIIPre-shared KeyType
Identifies the keyPre-shared Key
Required for Open+WEP and Shared+WEP authentication methodsWirelessEncryption
Determines the encryption key type: Hex orASCII
WEP Keys Type
Identifies the Transmit Key.WEP Keys TxKey
Determines the WEP key length with key size of40 or 128 bits.
WEP Key Length1-4
Defines the WEP key value:
40 bits
5 ASCII or 10 hexadecimal characters
128 bits
13 ASCII or 26 hexadecimal characters
WEP Key Value1-4
Network Settings
Yes
Enables DHCP to obtain IP address andDNS servers automatically.
No
DHCP is disabled and you will need toenter the following fields:
• IP Address
• Subnet Mask
• Default Router
• Primary DNS
• Secondary DNS
• Domain Name
DHCP Enabled
Cisco Unified Wireless IP Phone 7925G, 7925G-EX, and 7926G Administration Guide 9
Wavelink Avalanche ServerProfile Settings Fields

For more information, see …DescriptionItem
TFTP
Determines whether DHCP assigns the TFTPserver.
If yes, enter static IP addresses for:
• TFTP Server 1
• TFTP Server 2
Alternate TFTP
Advanced WLAN Settings
TSPEC Settings
Minimum data rate that outbound traffic usesMinimum PHYRate
Excess bandwidth beyond applicationrequirements
Surplus Bandwidth
Antenna Settings
• Vertical
• Horizontal
• Diversity
Antenna Selectionfor 802.11A
• Vertical
• Horizontal
• Diversity
Antenna Selectionfor 802.11B
Enabled: Identifies enabled channels in WLANto improve scanning for the phone.
Max Tx Power: Sets themaximum transmit powerfor the phone.
802.11G PowerSettings
Enabled: Identifies enabled channels in WLANto improve scanning for the phone
Max Tx Power: Sets themaximum transmit powerfor the phone
802.11A PowerSettings
Cisco Unified Wireless IP Phone 7925G, 7925G-EX, and 7926G Administration Guide10
Wavelink Avalanche ServerProfile Settings Fields

If you uncheck all channels in the 802.11 G Power Settings or 802.11 A Power Settings, the phone willnot be able to access the WLAN.
Note
Related Topics
Network Profile Settings
USB Settings FieldYou can change the IP address of the USB port on your phone by choosing one of the following options inthe DHCP Enabled field:
Yes
Obtains an IP address automatically.
No
You can specify the IP address and subnet mask on this page.
Related Topics
Set Up USB Settings on PC
Trace Settings FieldsYou can configure trace settings to determine how the phone creates and saves trace files. The following tabledescribes the trace settings.
Table 3: Trace Settings
DescriptionItem
Choose the number of trace files that the phone saves, from 2 to 10 files.Number of Files
Set up a remote server to store trace logs. If enabled, enter remote address andremote port.
Enable Remote Syslog
Enter remote IP address if Enable Remote Syslog is enabled.Remote IP Address
Enter a port number if Enable Remote Syslog is enabled. Valid values are: 514and 1024 to 65535.
Remote Port
Operating System data.Kernel Level
Phone configuration data.Configuration Level
Cisco Unified Communications Manager data.Call Control Level
Cisco Unified Wireless IP Phone 7925G, 7925G-EX, and 7926G Administration Guide 11
Wavelink Avalanche ServerUSB Settings Field

DescriptionItem
DHCP, TFTP, CDP data.Network Services Level
Application level security data.Security Level
Key strokes, softkeys, MMI data.User Interface Level
Channel scanning, authentication data.Wireless Level
RTP, SRTP, RTCP, DSP data.Audio Level
Firmware, upgrade data.System Level
Wavelink Settings FieldsYou can configureWavelink settings from the phone CU. The following table describes theWavelink settings.
Table 4: Wavelink settings
DescriptionSetting
Enables the Wavelink server.Enable
Enables the use of alternate Wavelink server.Use Alternate Server
If the User Alternate Server is enabled, enter an IP address for the alternateserver.
Alternate Server
Assign up to four attribute names to the phone to be used as selectioncriteria.
Custom Name 1-4
Define the values for each Custom Name to be used as selection criteria.Custom Value 1-4
Update PhoneWhen you have completed the phone configuration changes, you must export the configuration file from thephone CU to Wavelink, and then update the phone.
The CU does not perform a complete validation of the phone configuration. If the configuration filecontains an invalid setting, the phonemay reject the configuration and send an error message to the syslog.
Note
To update the phone with the updated configuration file, perform the following steps.
Cisco Unified Wireless IP Phone 7925G, 7925G-EX, and 7926G Administration Guide12
Wavelink Avalanche ServerWavelink Settings Fields

Procedure
Step 1 From the CU, select the configuration file, and then choose Export to Wavelink.Step 2 At the Success window, click OK. A message indicating the file transfer is complete appears at the bottom
of the window.Step 3 To update a mobile device group, select it from the left pane, and choose Update Now (Disallow User
Override).Step 4 To update a single device, expand a mobile device group or software collection from the left pane, right-click
on the device listed in the right pane, and do one of the following actions:
• Choose Update Now.
• Choose Client Settings. In the Avalanche Client Controls window, check the Force package syncduring Update Now check box, and click Update Now.
Cisco Unified Wireless IP Phone 7925G, 7925G-EX, and 7926G Administration Guide 13
Wavelink Avalanche ServerUpdate Phone

Cisco Unified Wireless IP Phone 7925G, 7925G-EX, and 7926G Administration Guide14
Wavelink Avalanche ServerUpdate Phone