wave maker intro tutorial
TRANSCRIPT

wmdoc_6.4 - Access a Database
Page 1 - last modified by Derek Henninger on 03/10/2011 at 15:03
Tutorial: Access a Database
• What You Will Learn• Related Information• Create a Project• Import a Database• Create a Master-Detail Form Using Database Widgets• Customize a Grid• Customize a Form• Run the Application
Update history: last updated August 2011 for WaveMaker Version 6.4.
What You Will Learn
In this tutorial, you build an application called EmployeeApp. The tutorial walks you through the steps for creatinga database-driven web application in WaveMaker. It uses WaveMaker's built-in database, so you do not needany additional software.
You use WaveMaker's visual drag and drop tools to:
1. Create a new WaveMaker project.2. Import a database, hrdb, that contains department, employee, and vacation information.3. Build a master-detail form that displays a list of employees and allows the user to edit a selected employee
in a web form.4. Run the application.
All without writing any code!
The tutorial takes about 15 minutes to complete.
Related Information
The Inspect Application tutorial reviews the application components and services that you work with in thistutorial.
For a PDF version of this tutorial, click here . If desired, download a Wavemaker project export for EmployeeApp.
Create a Project
To build a WaveMaker web application, start by creating a project.
Note: If you already have WaveMaker Studio open and running, select File>New Project, and proceed to step 3.
1. Run WaveMaker by starting the launcher and waiting for WaveMaker Studio to load in your defaultbrowser.WaveMaker Studio displays the Welcome screen. The Welcome screen provides links to WaveMakerresources including: screencasts; demo and sample projects; community forums; tutorials and otherdocumentation.
2. Click the Create a New Project option.

wmdoc_6.4 - Access a Database
Page 2 - last modified by Derek Henninger on 03/10/2011 at 15:03
3. In the New Project pop-up dialog, enter a project name. For this tutorial enter: EmployeeApp.4. Use the default Theme, wm_default.5. Select the Tabs Template as shown.

wmdoc_6.4 - Access a Database
Page 3 - last modified by Derek Henninger on 03/10/2011 at 15:03
6. Click OK.WaveMaker displays the default application, using the Tabs template. The browser header displaysEmployeeApp - Main (Home). This indicates that you are editing a web page named "Main"and that thispage is the "Home" page, meaning that this page is the first to be displayed when the application runs.
7. Click on the label widget that contains the text, "[Application Name]".8. In the property panel, change the caption property for the widget to Employee App
After pressing return (or selecting another property) the canvas displays the new caption.

wmdoc_6.4 - Access a Database
Page 4 - last modified by Derek Henninger on 03/10/2011 at 15:03
Import a Database
Here are some things to know about databases.
• WaveMaker supports all major databases. WaveMaker supports MySQL, PostgreSQL, Oracle, SQLServer, DB2, and HSQLDB. Access other databases using the Advanced Options .
• WaveMaker can import existing data models or create your database schema using your choice ofdatabase design tools, then use WaveMaker to import the schema. You may also use WaveMaker's DataModel Editor to create a new data model.
• Databases consist of tables and columns. When WaveMaker imports a database, it automaticallyconfigures the project to be able to read and write information from each table in the database.
• Imported database tables are referred to as live tables. In WaveMaker studio, you can see live datafrom the tables while building your application.
When you import a database schema, WaveMaker Studio automatically creates a Data Model and DatabaseWidgets for you.
• Data Model: the WaveMaker data model defines all database tables that are accessible to yourapplication.
• Database Widgets: for each table in the data model, WaveMaker creates a custom widget for creating,reading, updating and deleting information from that database table. For example, if there is an employeetable in the database, WaveMaker will create an Employee database widget when the database isimported.
WaveMaker is installed with a built-in database and sample data. To import the built-in database, follow thesesteps:
1. From the Services menu select Import Database
The New Data Model dialog is displayed.2. Complete the dialog as follows:
a. For the Database System field, select HSQLDB.Note: The connect properties differ between databases. When you select HSQLDB the other fields inthe dialog will change. To connect to HSQLDB, three fields are required: Username, Password, andFile.
b. In the Username field enter:sa("sa" is the default)
c. Leave the Password field blank.d. In the File field enter:
hrdbWhen you have entered this information the New Data Model dialog will look like this:

wmdoc_6.4 - Access a Database
Page 5 - last modified by Derek Henninger on 03/10/2011 at 15:03
3. Click the Test Connection button at the bottom of the Data Model dialog.4. When the "Connection Successful" alert appears, click OK to dismiss the dialog.
5. Click the Import button to import the data model. WaveMaker displays the message Importing Databasefor several seconds.
6. To see the details for the hrdb data service, select the Services tab and expand hrdb.The hrdb database has 4 tables: Department, Employee, User and Vacation.
7.
Save the project.
Now that you have imported the database, you can quickly build a Web application that accesses the database.
Create a Master-Detail Form Using Database Widgets
Database widgets make it easy to build forms that access and update database information. Here are somethings to know about database widgets:
• You create database widgets by importing a database schema. When WaveMaker imports a database,it creates a database widget for each table in the database. Database widgets are also created when youdefine a new database within WaveMaker.
• A Master Detail form consists of a grid and a form linked together. A Master Detail form has twosections: a table of database objects (grid) and a form for editing the database objects. The form alsocontains buttons to create, update, and delete the database objects.
Follow these steps to create a master-detail form:
1. If not already visible, Click the Palette tab to view the widgets that can be added to the page2. In the Palette tree scroll to the Database Widgets section and click the plus sign to expand that section

wmdoc_6.4 - Access a Database
Page 6 - last modified by Derek Henninger on 03/10/2011 at 15:03
3. Drag the Employee database widget from the Palette into Tab 1 in the Canvas.

wmdoc_6.4 - Access a Database
Page 7 - last modified by Derek Henninger on 03/10/2011 at 15:03
Note: In the screenshot above the drag tooltip shows "Employee (hrdb) -> layer1". "Employee (hrdb)"identifies the Employee database widget from the "hrdb" data model. The "->" symbol means the widgetwill be placed in the container widget. The container widget is "layer1", which is the name of the widget thathas the label "Tab 1". A tab is a type of layer widget.
4. Select the Traditional LiveForm.

wmdoc_6.4 - Access a Database
Page 8 - last modified by Derek Henninger on 03/10/2011 at 15:03
5. Click OK.WaveMaker retrieves employee data and displays it in the grid. It automatically creates the following:
• View: The database query that retrieves the Employee data. To see the View definition select theServices tab then select app.employeeLiveView1 from the Service tree.
• Variable: Holds the data returned by the view query. To see the Variable properties select theServices tab then select empoloyeeLiveVariable1 from the Service tree.
• Grid: Displays the data provided by the variable.• Form: Allows a user to see detailed data on an employee. The form is connected to the grid,
displaying the details of the currently selected employee of the grid. The form also has three buttons:"new" creates a new employee, "update" updates the currently selected employee, and "delete"deletes the currently selected employee
6. Select an employee in the grid to see detailed information in the form.
wmdoc_6.4 - Access a Database
Page 9 - last modified by Derek Henninger on 03/10/2011 at 15:03
By default the form shows the same content as the grid. The form provides editing functionality (insert,update, delete).
7. Note the labels, such as employeeDojoGrid, for each widget in the form. Make sure you can see theselabels by clicking the toggle button, the last in a row of buttons at the top of the Canvas.
8.
Save the application.
Customize a Grid
The grid is a widget for showing tabular data such as a list of employees. Here are some things to know aboutthe grid widget.
• A grid shows tabular data. Grids can show data from database queries, web services or Java services.• Order the grid columns using drag and drop. Just click and drag a column to change where it displays.• Change grid column appearance by right-clicking on the grid. Right-clicking the grid brings up the grid
column editor to set which columns to display and how to format those columns.• The Grid dataSet property defines what data the grid should display. The Employee database widget
automatically sets the dataSet to the results of an employee table query.
Follow these steps to customize the grid.
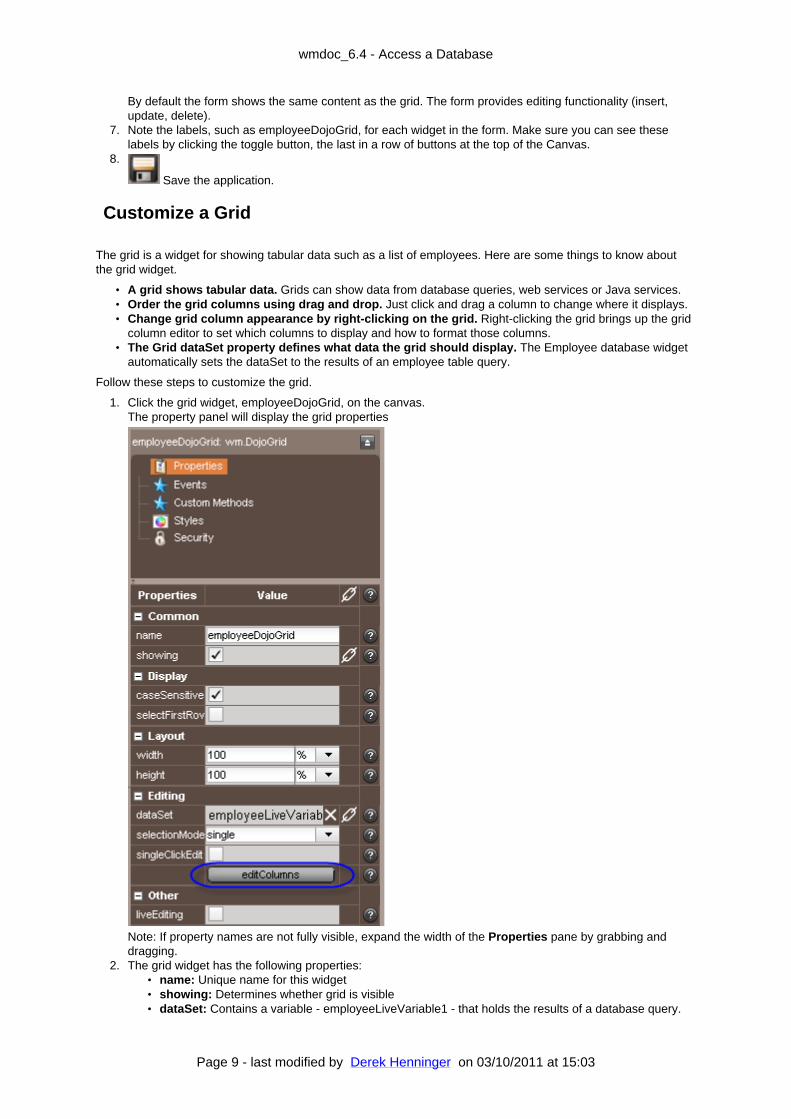
1. Click the grid widget, employeeDojoGrid, on the canvas.The property panel will display the grid properties
Note: If property names are not fully visible, expand the width of the Properties pane by grabbing anddragging.
2. The grid widget has the following properties:• name: Unique name for this widget• showing: Determines whether grid is visible• dataSet: Contains a variable - employeeLiveVariable1 - that holds the results of a database query.

wmdoc_6.4 - Access a Database
Page 10 - last modified by Derek Henninger on 03/10/2011 at 15:03
• selectionMode: Defines whether the user can select multiple rows of the grid.• singleClickEdit: If true, allows the grid to be edited with a single click.• editColumns: Brings up the grid column editor.
3. Click the editColumns button.Note that you can also right click the grid widget itself to bring up the grid column editor.
4. The column editor has a row for each column that can be displayed in the grid. Editing values in these rowschanges the appearance of the associated grid column. Values include:
• Showing check box: Shows or hides the column.• Field: Unique identifier for the column and cannot be edited• Title: Column heading that is displayed in the grid• Width: Can be specified in pixels or in percentage. By default, numeric values are 80px width and
text columns are 100% width.• Alignment: Specifies whether content is left-, right- or center-aligned.• Format: Alows the developer to specify currency, date, number or image formatting. You may also
create custom formatters.5. Uncheck the showing check boxes so that only the following fields are showing: firstname, lastname, city,
birthdate, and picurl.
6. Set the Width property for the firstname, lastname and city columns to 100 px.

wmdoc_6.4 - Access a Database
Page 11 - last modified by Derek Henninger on 03/10/2011 at 15:03
7. Set the Format property for the picurl column to image. Note that the picurl field contains a url for a picture,so this tells the grid to retrieve the picture from that url and display it.
8. Close the column editor by selecting the x in the upper left corner.9. The formatted grid should look like this.
Customize a Form
The form widget is used to display and edit data using a set of editor widgets. Here are some things to knowabout the form widget.
• The form widget contains editor widgets as well as an edit panel.

wmdoc_6.4 - Access a Database
Page 12 - last modified by Derek Henninger on 03/10/2011 at 15:03
• Order the editor widgets using drag and drop. Just click and drag an editor widget inside the formwidget to change where it displays. Note that you may not drag editor widgets outside of it's form widget.
• The Form dataSet property defines what data the form should display. The Employee databasewidget automatically set the form to show the currently selected employee in the grid.
• Forms can show and edit data from related tables. A form can show data from a one-to-manyrelationship (for example, an employee can take many vacations) as well as from a one-to-one relationship(for example, an employee can have a manager).
Follow these steps to customize the form.
1. To access the form widget, first select one of the editor widgets in the form, for example, firstNameEditor1.Press Esc.The selection changes from the editor widget to the widget that contains it, employeeLiveForm1.Note: the Model tree, discussed in the next tutorial, provides another way to change the selected widget.

wmdoc_6.4 - Access a Database
Page 13 - last modified by Derek Henninger on 03/10/2011 at 15:03
Note the following form properties for the form widget:• name: Unique name for this form widget.• showing: Shows or hides the form.• dataSet: Contains a variable - employeeDojoGrid.selectedItem - that holds the currently selected row
from the employee grid. To see details click .2. Select the first editor, eidEditor1.3. Note the following form properties for the editor:
• name: Unique name for this editor widget• showing: Show or hide the editor.• formField: Contains the database field - eid - that will be displayed and changed by this editor.• Caption: Text to display for the editor caption; i.e. the field name.• captionPosition: Controls where the caption will display: to the left, bottom or right of the editor.• captionAlign: Controls how the caption will display - left justified, centered or right justified.
4. Uncheck the showing property for this editor.
Note that the editor will no longer appear on the canvas. To select a widget that is not showing on thecanvas, click on the Model view tab (next to the Palette tab), select the widget in the model tree, and clickshowing.
5. Select the Tenantid editor and uncheck the showing property for this editor as well.
The finished form should look like this.

wmdoc_6.4 - Access a Database
Page 14 - last modified by Derek Henninger on 03/10/2011 at 15:03
Run the Application
Follow these steps to run the master-detail application:
1.
Click the button.2. The application will start running in a new browser tab or window (make sure your browser popup blocker is
off).
wmdoc_6.4 - Access a Database
Page 15 - last modified by Derek Henninger on 03/10/2011 at 15:03
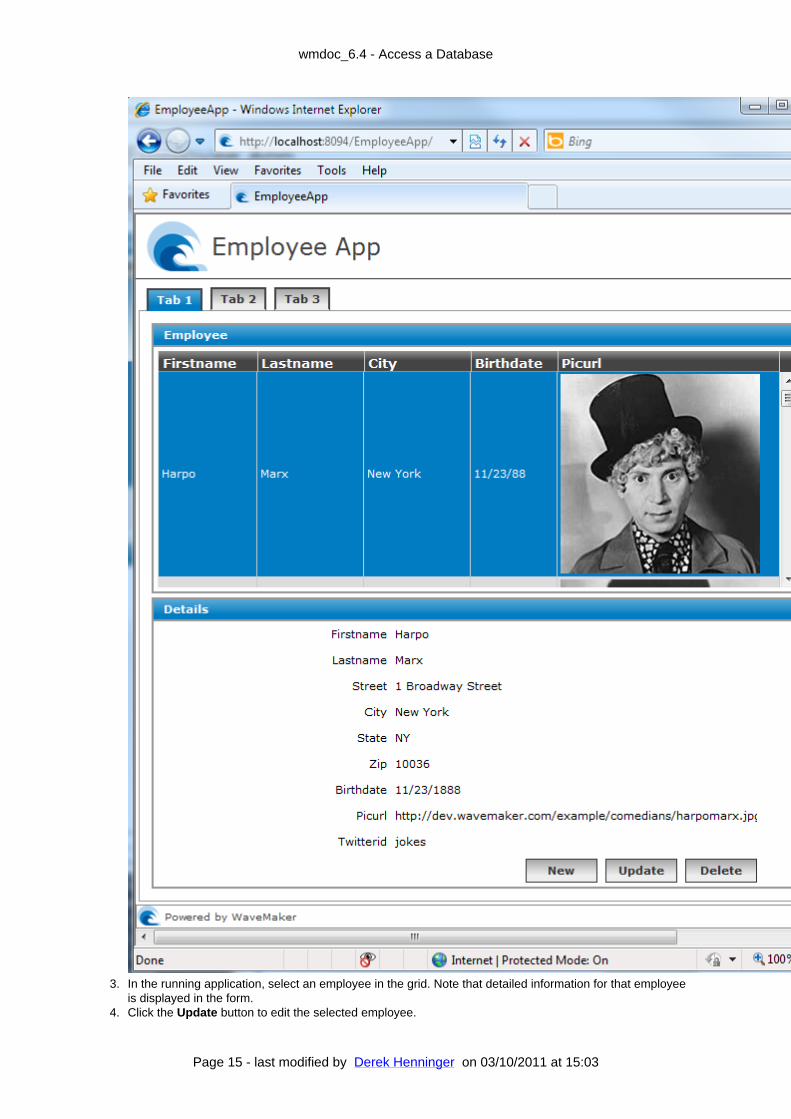
3. In the running application, select an employee in the grid. Note that detailed information for that employeeis displayed in the form.
4. Click the Update button to edit the selected employee.

wmdoc_6.4 - Access a Database
Page 16 - last modified by Derek Henninger on 03/10/2011 at 15:03
5. Change the employee name and click the Save button.6. Note that the employee name is now updated in the grid.7. Try the New button and the Delete button
Congratulations!You have completed the tutorial, learning how to access a database and create a master-detail form.
Continue on to the next Tutorial: Inspect an Application .