waterlevelfunction1:overflowfunction(default...
TRANSCRIPT

Water Level DCA DC Pump User’s Manual
DCA-1200 DCA-2000 DCA-3000
Introduction:The DC pumps are carefully inspected and tested to ensure both safety andoperating performance. However, failure to follow the instructions and warningsin this manual may result in pump’s damage and/or serious injury. Be sure toread and save this manual for future reference.
Attention:Sensor is a replacement Kits, Not Include Warranty. Suggestion for 8 to 12months to Change. Please Keep the sensor Clean and keep water levelconsistency.
Ⅰ.Pump Features High performance with innovational motor,and energy saving up to
50%,super quiet. Suitable for both marine and fresh water,Rust free. With anti-resistant ceramic shaft,last longer. Auto Overflow Protection. 10 / 30 / 50mins for feeding or change of water in aquarium use. Water Lever Sensor - Overflow / water shortage.
Sensor Function Default is Overflow Function.If you want to set for theBelow Water Alarm (No water) Function, please check this photo:
Water Level Function 1: Overflow Function(Default)
Overflow FunctionWhen the waterline is on below, it isan overflow alarm.
Water Level Function 2: Out of Water Function
Out of Water FunctionWhen the waterline is on top, it is an
Water shortage alarm.
Function 2 out of water installation method :
Step1.Take out the sensor in the middle and
Invert the sensor to install.
Step2.Please note the position of thesensors waterline. And install the
partsNotice: It's either Function 1 Or Function 2 active only, cannot doing Alarm onthe same time for overflow or lack of water.
Ⅱ.Controller Features With 8 mode, adjustable the flow rate and head max. Feed Mode - When First Press will LED indicator will Red for 10 min Off the
pump. Feed Mode - When First Press will LED indicator will Green for 30 min Off
the pump. Feed Mode - When First Press will LED indicator will Blue for 50 min Off
the pump.
Feed Mode - Manual Hold 3 second Switch Off Sensor Function. Feed Mode - When system Press Feed mode and back to Normal, it will
auto drop 2 speed down on it, and after 1 hours will become the firstflow.(Example, if Default is 8 Speed, when press the feed mode it will dropto 6 Speed, after 1 hours will resume to 8 speed to protection overflow / notstable of the aquarium).
0-12V Input for DIY. Memory function, ensure that the pump rework upon keeping the same
parameter.
Ⅲ.The LED flashing status instruction
Ⅳ.Performance Parameters Table
Ⅴ.CAUTIONAlways disconnect the pump from the power supply before cleaning,maintenance and handling. Do not let the pump work dry. Do not lift the pump by holding the power cord only Do not use the pump in the heating liquid. The pump fits for fresh water and sea water only The Pump house must be filled with water. The pump can not run in the swimming pool. Automatic shut off if no water for 2 minutes. Pull the plug out, and re-insert for resuming work
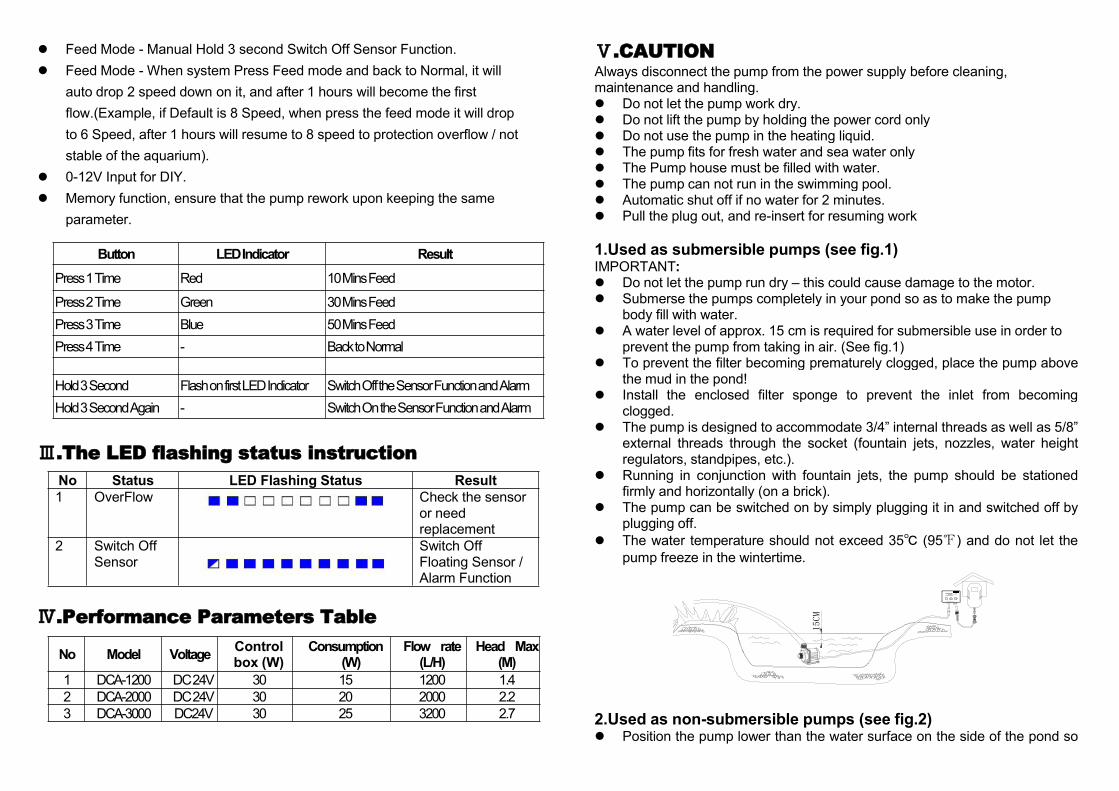
1.Used as submersible pumps (see fig.1)IMPORTANT: Do not let the pump run dry – this could cause damage to the motor. Submerse the pumps completely in your pond so as to make the pump
body fill with water. A water level of approx. 15 cm is required for submersible use in order to
prevent the pump from taking in air. (See fig.1) To prevent the filter becoming prematurely clogged, place the pump above
the mud in the pond! Install the enclosed filter sponge to prevent the inlet from becoming
clogged. The pump is designed to accommodate 3/4” internal threads as well as 5/8”
external threads through the socket (fountain jets, nozzles, water heightregulators, standpipes, etc.).
Running in conjunction with fountain jets, the pump should be stationedfirmly and horizontally (on a brick).
The pump can be switched on by simply plugging it in and switched off byplugging off.
The water temperature should not exceed 35℃ (95℉) and do not let thepump freeze in the wintertime.
15CM
10min
DC Pump Controller
FEED
2.Used as non-submersible pumps (see fig.2) Position the pump lower than the water surface on the side of the pond so
Button LEDIndicator ResultPress1Time Red 10MinsFeed
Press2Time Green 30MinsFeedPress3Time Blue 50MinsFeedPress4Time - BacktoNormal
Hold3Second FlashonfirstLEDIndicator SwitchOfftheSensorFunctionandAlarmHold3SecondAgain - SwitchOntheSensorFunctionandAlarm
No Status LED Flashing Status Result1 OverFlow Check the sensor
or needreplacement
2 Switch OffSensor
Switch OffFloating Sensor /Alarm Function
No Model Voltage Controlbox (W)
Consumption(W)
Flow rate(L/H)
Head Max(M)
1 DCA-1200 DC24V 30 15 1200 1.42 DCA-2000 DC24V 30 20 2000 2.23 DCA-3000 DC24V 30 25 3200 2.7
that the water can be drained to the pump because it is not self-priming. Remove the filter cover and connect suction hose (A) and pressure hose (B)
from the pump. The connection should be waterproof. Fill the suction hose and pump with water before turning it on. To prevent the pump from becoming clogged, provide the suction hose
with an adequate suction filter. Never let the pump run dry.
A
B
10min
DC Pump Controller
FEED
Ⅵ.OperationA clogged or dirty intake screen will reduce the performance.If the pump is used on a dirty surface, raise it slightly to reduce the amount ofdebris contacting the intake. If the flow is low, please adjust the regulator on thesealing cover.Do not let the pump run in dry. The pump will be broken easily. Normally, putthe pump into water, plug on. At the beginning, it probably can’t pump water,because there is air in the pump and the connector fitting. Don’t worry.If used as Submersible pump,Please plug on and off for several times. If used as non-submersible pump,please connected power supply then plug and loose the pipe several times. itwill work normally.
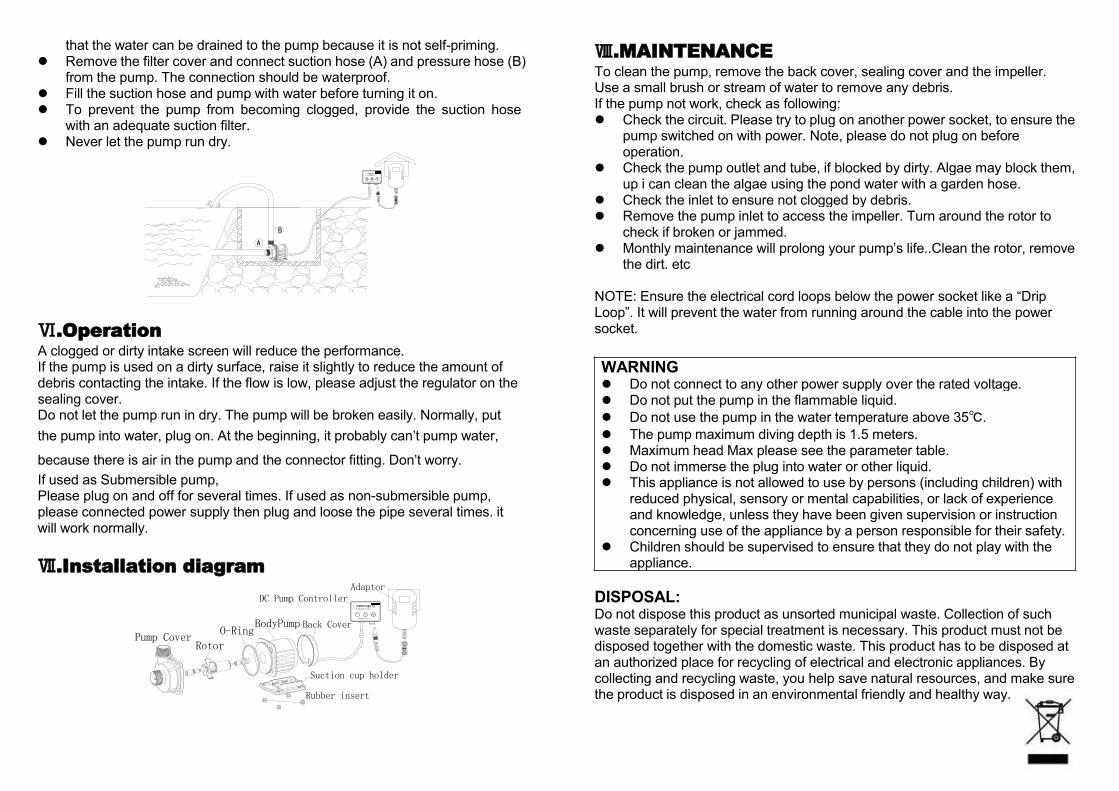
Ⅶ.Installation diagram
Pump CoverRotor
O-RingBodyPump Back Cover
DC Pump Controller10min
DC Pump Controller
FEED
Adaptor
Suction cup holder
Rubber insert
Ⅷ.MAINTENANCETo clean the pump, remove the back cover, sealing cover and the impeller.Use a small brush or stream of water to remove any debris.If the pump not work, check as following: Check the circuit. Please try to plug on another power socket, to ensure the
pump switched on with power. Note, please do not plug on beforeoperation.
Check the pump outlet and tube, if blocked by dirty. Algae may block them,up i can clean the algae using the pond water with a garden hose.
Check the inlet to ensure not clogged by debris. Remove the pump inlet to access the impeller. Turn around the rotor to
check if broken or jammed. Monthly maintenance will prolong your pump’s life..Clean the rotor, remove
the dirt. etc
NOTE: Ensure the electrical cord loops below the power socket like a “DripLoop”. It will prevent the water from running around the cable into the powersocket.
DISPOSAL:Do not dispose this product as unsorted municipal waste. Collection of suchwaste separately for special treatment is necessary. This product must not bedisposed together with the domestic waste. This product has to be disposed atan authorized place for recycling of electrical and electronic appliances. Bycollecting and recycling waste, you help save natural resources, and make surethe product is disposed in an environmental friendly and healthy way.
WARNING Do not connect to any other power supply over the rated voltage. Do not put the pump in the flammable liquid. Do not use the pump in the water temperature above 35℃. The pump maximum diving depth is 1.5 meters. Maximum head Max please see the parameter table. Do not immerse the plug into water or other liquid. This appliance is not allowed to use by persons (including children) with
reduced physical, sensory or mental capabilities, or lack of experienceand knowledge, unless they have been given supervision or instructionconcerning use of the appliance by a person responsible for their safety.
Children should be supervised to ensure that they do not play with theappliance.