water heater users guide - transvend · ommend the use of either a midi / mega bolt-down fuse and...
TRANSCRIPT

1
Version 2.0
Water Heater Users Guide
Serial No:
2 .......... Fitting Water Heaters 3 ........... Connecting to Power4 ........... Power Connector & Fuse Info5 ........... Water Heater Operation
6 ........... Health & Safety7 ........... Dimensions & Electrical Specs8 .......... Accessories10 ......... Water Heater Family
Contents
FS 619979ISO 9001:2015
E11 10R-058054
APPROVED PRODUCT
2
1. Fitting the Water Heater
Mounting templates can be downloaded from the Transvend website: www.transvend.com.Ensure that all water heaters are fitted level and mounted in accordance with the instructions so that the tap cannot be accidentally operated or knocked. Mount the heater unit in such a way to :
• Prevent splashing onto the vehicles occupants.• Prevent any interference with the driver.• Prevent exposure to hosed water/jet wash devices.• Eliminate any possibility of accidental operation/opening of any emergency door• Allow easy access to any grab/safety handles.• Protect it against airborne contaminants and accidental damage, a tap cover may need to be
fitted depending on fitting location.
Water Heater Mounting
Mount the heater to a secure vertical surface. Only use the bolts provided to screw into the heater, if longer bolts are used they may damage electrical components within the heater.
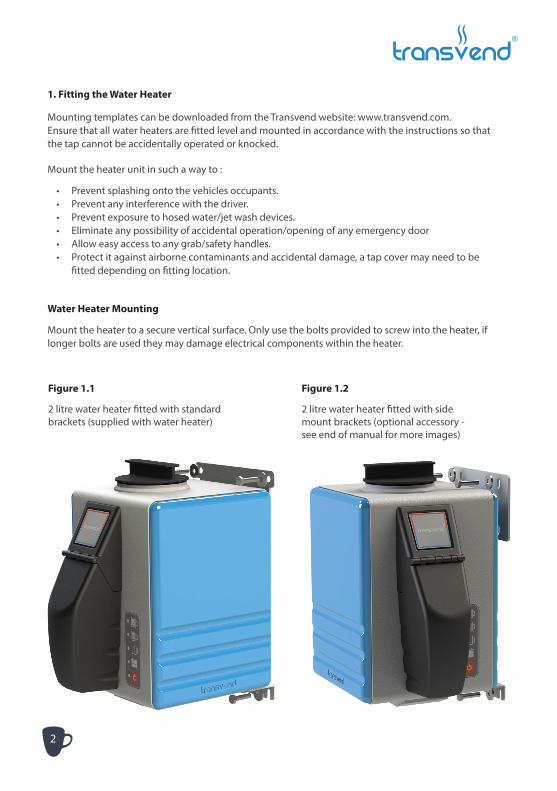
Figure 1.1
2 litre water heater fitted with standard brackets (supplied with water heater)
Figure 1.2
2 litre water heater fitted with side mount brackets (optional accessory - see end of manual for more images)

3
THE MACHINE IS AN ELECTRICAL PRODUCT AND IS NOT DESIGNED TO GET WET. MAKE SURE IT’S NOT FITTED WHERE IT’S EXPOSED TO HOSED OR FLOWING WATER AROUND OR THROUGH THE CASE.
Electrical Specifications
Voltage Current Power
12vdc 30A 350W
12vdc 60A 700W
24vdc 30A 700W
110vac 6.4A 700W
230vac 3.0A 700W
2. Connecting to Power
• IMPORTANT! Check your +ve and -ve negative supply cables are correctly labelled. DO NOT REVERSE THE POLARITY.
• Check the serial label underneath the water heater for the current and wattage rating.• Cable thickness – The supply cable should be a minimum 10mm2.• The water heater is supplied with a heavy duty socket to enable quick connection of the heater
(12vdc & 24vdc only).• Contact pins to fit to the supply cable are included, these should be terminated either by crimping,
with a heavy duty crimper, or soldering.• Position the front of the contact pin so that it slips under the barrier and snaps over the end of the
retaining spring, listen for the ‘SNAP’.• The supply cable should be fused with a 50A fuse for a 30A heater.• The supply cable should be fused with a 80A fuse for a 60A heater.• We recommend the use of screw type connections that cannot work loose.• The cables should be fitted to a suitable fuse block.• Check the vehicle manual or refer to the dealer before fitting to ensure that the heater will not
overload the electrical system.• If the incorrect size of supply cable is used, loss of performance may result and the supply cables
may become hot and may become hazardous.• If in doubt seek professional advice.• Earth connection cable should be a minimum of 10mm2.• Use a nut and bolt with large flat washers to make the connections to the earth point. The earthing
point should be free from corrosion and paint to ensure a metal to metal connection. Suitable battery termination grease can be applied to the earthing point after connection.
4
3. Power Connector & Fuse Information
Fuse Information
When installing Transvend equipment it is important to fuse the water heater correctly. Transvend rec-ommend the use of either a MIDI / MEGA bolt-down fuse and the associated housing or an automotive MAXI fuse. Make sure that the fuse is rated in accordance with the water heater specification.
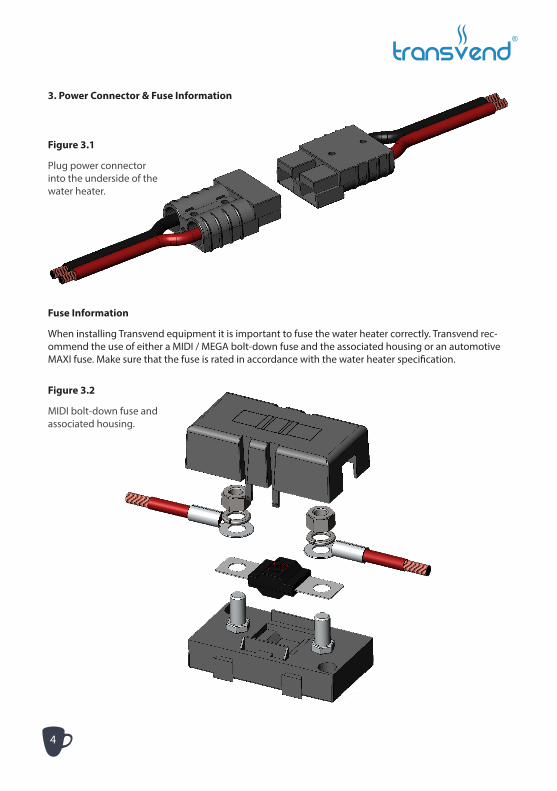
Figure 3.1
Plug power connector into the underside of the water heater.
Figure 3.2
MIDI bolt-down fuse and associated housing.

5
To view any activated operational features please see our website – www.transvend.com.
• Turn the machine on using the On/Off Button on the front of the heater.• The Power On LED and the Low Water LED will illuminate.• Fill the heater with fresh clean drinking water to the MAX mark DO NOT OVER FILL.• The Low Water LED will go out and the Heating LED will illuminate.• Check to ensure water flows from the tap.• The temperature has been factory set to 920C, when this temperature is reached the Heating LED
will go out and the Ready LED will illuminate.• When the Ready LED is illuminated the water has reached the correct temperature.
Features only available on 12vdc and 24vdc water heaters.
If ‘Frost Protection’ is activated:• If the water heater has ‘Frost Protection’ activated then the water heater will keep the temperature
of the water above 30C. This stops any risk of damage from expanding freezing water.
If ‘Voltage Sensing’ is activated:• If the water heater has ‘Voltage Sensing’ activated then it has a factory defined or user defined
voltage threshold set. This feature is recommended if you’re wiring the water heater to any supplementary or leisure batteries in the vehicle and don’t already have some form of battery protection in use. It will stop your supplementary or leisure batteries from going flat if the water heater is in operation.
If Alternator Sensing’ is activated:• If the water heater has ‘Alternator Sensing’ activated then it will sense when your engine is running.
This feature is recommended if you’re wiring the water heater to the vehicles main battery. It will stop your main crank battery from going flat if your water heater is in operation.
If ‘Press To Heat’ function is activated:• If the water heater has ‘Press to Heat’ activated then it will be set to ’once only’ heating cycles. The
water temperature will reach 920C, when it cools and reaches 870C the water heater will turn itself off. The user will have to press the On/Off Button to start another heating cycle.
Figure 4.1
Transvend Membrane Switch Label.
4. Operation Ready
Heating
Low Water
Battery Voltage Warning
Power on
6
5. Health & Safety
• IMPORTANT do not allow the heater to freeze.• Do ensure that only fresh clean water is used in this heater.• Ensure the system is drained down daily.• Do clean up any spillages and splashes as soon as they occur.• Always wash your hands before handling cups and serving drinks.• Only allow suitably trained persons to use and maintain the water heater.• Remember the health and safety of you, your staff/customers and passengers is paramount.• If the heater is mounted any other way than recommended, then the water level float switch will
not operate correctly and could result in serious damage or prevent the water heater from heating.• It’s important that there is sufficient room around the heater for routine servicing.• Do not use the water heater when the vehicle is in motion.
Fresh Water Storage
• Always ensure that only fresh clean water is used to fill the container, do not fill the heater or storage container from a hose pipe and make sure that the water is emptied and refilled with fresh water on a daily basis.
• If a water storage container is used then regular internal cleaning will be required.• Transvend recommends the use of ‘Milton Sterilising Fluid’ which is a chlorine based agent for the
inside of the water container. Always follow the manufactures instructions carefully.
Servicing & Maintenance
• See website for error codes.• The most likely problem to be encountered is the build-up of lime scale within the heater and tap.
This can be removed using a proprietary kettle descaler. • Descale regularly, to keep your water heater in good working order.• Follow the instructions on the descaler, rinse several times, then fill, heat until ready and discard the
water, to ensure no residues are left.• Transvend recommend the use of ‘Scalekleen’ for the removal of scale within the heater unit, always
follow the manufacturer’s instructions carefully. This product dissolves scale without toxic fumes, will not corrode plastic and silicone rubbers, it is biodegradable and safe to handle.

7
6. Specifications
2 Litre Water Heaters (H 295mm x W 179mm x D 254mm)
Model Voltage Power Current
105/10/A 12vdc 350W 30A
105/10/B 12vdc 700W 60A
106/10/C 24vdc 700W 30A
107/10 110vac 700W 6.4A
108/10 230vac 700W 3.0A
3 Litre Water Heaters (H 293mm x W 231.5mm x D 254mm)
Model Voltage Power Current
105/15/A 12vdc 350W 30A
105/15/B 12vdc 700W 60A
106/15/C 24vdc 700W 30A
107/15 110vac 700W 6.4A
108/15 230vac 700W 3.0A
4 Litre Water Heaters (H 293mm x W 284mm x D 254mm)
Model Voltage Power Current
105/20/A 12vdc 350W 30A
105/20/B 12vdc 700W 60A
106/20/C 24vdc 700W 30A
107/20 110vac 700W 6.4A
108/20 230vac 700W 3.0A

8
7. Accessories
Transvend manufacture a range of different accessories for the 2 litre, 3 litre and 4 litre water heaters. The carry handle kit (see figure 7.1), replaces the fitting brackets and allows you to remove the water heater from the vehicle. The locking pullout cradle (see figures 7.2 & 7.3) also replaces the fitting brackets and is usually used when the water heater is located in a locker or a confined area. The cradle can be extended in a locked position and retracted in a locked position. Once extended you have easy access to fill up the water heater and make drinks.
• Dimensional information for accessories can be found on www.transvend.com.
Figure 7.1
2 litre water heater fitted with carry handle kit.

9
Figure 7.2
2 litre water heater fitted on to locking pullout cradle (retracted).
Figure 7.3
2 litre water heater fitted on to locking pullout cradle (extended).

10
Figure 8.1
2 litre water heater
Figure 8.2
3 litre water heater
Figure 8.3
4 litre water heater
8. Water Heater Family
• Dimensional information for accessories can be found on www.transvend.com.

11
Figure 8.4
2 litre water heater fitted with optional side mount brackets on the left
Figure 8.5
2 litre water heater fitted with optional side mount brackets on the right
Figure 8.6
2 litre water heater fitted with and without tap cover

12
Transvend LtdUnit 2B, Grange Farm Industrial Estate
Tadlow Road, WrestlingworthSG19 2HE, United Kingdom
www.transvend.com
+44 (0)1767 631726 +44 (0)1767 [email protected]
T.F.E.