water and wood - georgia oak floor
TRANSCRIPT

by the owner — leave the impression that wood floorsare more problematic than other flooring choices.
For wood flooring professionals, it’s important toinform end users about the normal behavior of woodin relation to moisture. Most solid wood flooring willcontract during periods of low humidity (usually dur-ing the heating season), sometimes leaving noticeablecracks between boards, or else expand during periodsof high humidity. To help minimize these effects,users can stabilize the environment of the buildingthrough temperature and humidity control.
This publication provides an overview of howwater and wood don’t mix — and what to do if theydo. Spotting any potential moisture problems, andtaking the proper steps to avoid them, is the path tothe most-serviceable floor. Fortunately, many of theinstances that involve moisture can be mitigatedbefore, during or soon after installation.
A well-performing woodfloor is often the result ofan installer taking theproper time and carenecessary for a success-ful installation. Itinvolves a knowledge of:• the expected moisturecontent of wood flooringin a particular area afteracclimation;• the moisture content offlooring at the time ofinstallation;• and the expected “inuse” changes.Moisture is a large partof the reason for howwood behaves, both dur-ing the machiningprocess and after instal-lation. Installers woulddo well to understandmoisture’s effect onwood in some detail.
N A T I O N A L W O O D F L O O R I N G A S S O C I A T I O N T E C H N I C A L P U B L I C A T I O N N o . A 1 0 0
Introduction: When Waterand Wood Combine
When the phone rings for the flooringinstaller, it’s often a prospective customerwho got the name of the business from a
friend. Give an estimate for a new floor? Sure. Gettingthose kinds of phone calls are good for the business.
But sometimes the caller is a previous customerwith a complaint. Perhaps the floor that fit so wellwhen it was first installed now shows cracks, cup-ping or buckling.
Those are the most common changes that moisturecan inflict on a floor. They do no favors for the cus-tomer, nor for the hardwood flooring industry. Tales ofhow floors were damaged by water, for whatever rea-son — improper installation or careless maintenance
© 1996 NATIONAL WOOD FLOORING ASSOCIATION 3
WATER ANDWOOD
HOW MOISTURE AFFECTS WOOD FLOORING
Excessive moisture in the interior environment or from beneath the floor can causewood flooring to take on moisture. The result can be a “cupped” floor. For more on cupping, see page 19.

4 © 1996 NATIONAL WOOD FLOORING ASSOCIATION
N A T I O N A L W O O D F L O O R I N G A S S O C I A T I O N T E C H N I C A L P U B L I C A T I O N N o . A 1 0 0
Water and Wood Basics
T he easy explanation that students learn ingrade school — trees grow with roots in theground and leaves in the air — still serves as
the basis for understanding the never-ending rela-tionship between water and wood. The roots collectmoisture and nutrients from the soil and ship themthrough vessels or fibers up the trunk and branchesto the leaves. These vessels are similar to the“strings” in a stalk of celery. They are similar, too, toa group of soda straws gathered together, runningup and down the tree.
That’s the simple version of how a still-standingtree is made up of vertically-aligned fibers. Cut thetree down, and the fibers are horizontal. Saw it andmanufacture strip flooring, nail the floor down andmost of the fibers are still horizontal, running thelength of the boards.
In the live tree, the fibers are loaded with mois-ture, as sap. After being cut, the tree begins to dryout, just like a rose will wilt after it’s picked. As thetree’s fibers dry, they shrink in thickness or diame-
ter, but almost none lengthwise. This shrinkage,characteristic of all woods, is critical in understand-ing the effect of moisture on wood flooring.
Moisture content in solid wood is defined as theweight of water in wood expressed as a percentage ofthe weight of oven-dry wood. Weight, shrinkage,strength and other properties depend on the moisturecontent of wood. In trees, moisture content may be asmuch as 200 percent of the weight of wood substance.After harvesting and milling, the wood will be dried tothe proper moisture content for its end use.
Wood fibers are dimensionally stable when themoisture content is above the fiber saturation point(usually about 30 percent moisture content). Belowthat, wood changes dimension when it gains or losesmoisture. Here are some quick points about shrink-ing and swelling:
• Shrinkage usually begins at 25 to 30 percentmoisture content, the fiber saturation point.Shrinkage continues to zero percent moisturecontent, an oven-dry state.
• Swelling occurs as wood gains moisture, when itmoves from zero to 25 to 30 percent moisturecontent, the fiber saturation point. Differentwoods exhibit different moisture stability factors,but they always shrink and swell the most in thedirection of the annual growth rings (tangentially),about half as much across the rings (radially) andonly in miniscule amounts along the grain (longi-tudinally).This means that plainsawn flooring willtend to shrink and swell more in width thanquartersawn flooring, and that most flooring willnot shrink or swell measurably in length.
• Generally, flooring is expected to shrink in dryenvironments and expand in wetter environments.
• Between the fiber saturation point and the oven-dry state, wood will only change by about .1 per-cent of its dimension along the grain (lengthwisein a flatsawn board). It will change by 2 to 8 per-cent across the grain and across the annularrings (top to bottom), if quartersawn; and 5 to15 percent across the grain and parallel to theannular rings (side to side), if plainsawn.
• Wider boards tend to move more than narrower-boards. Movement in a 5-inch-wide plank ismore dramatic than in a 21⁄4-inch strip.
The ideal moisture content for flooring installationcan vary from an extreme of 4 to 18 percent, depend-ing on the wood species, the geographic location of theend product and time of year. Most oak flooring, forexample, is milled at 6 to 9 percent. Before installa-tion, solid wood flooring should be acclimated to thearea in which it is to be used, then tested with a mois-ture meter to ensure the proper moisture content.
(Note: Laminated wood flooring tends to be moredimensionally stable than solid flooring, and may notrequire as much acclimation as solid flooring prior toinstallation.)
A wood’s weight andmoisture content
Wood is hygroscopic — meaning, when exposed toair, wood will lose or gain moisture until it is in equi-librium with the humidity and temperature of the air.
Moisture content (MC) from 5 to 25 percent maybe determined using various moisture meters devel-oped for this purpose. The most accurate method inall cases, and for any moisture content, is to followthe laboratory procedure of weighing the piece withmoisture, removing the moisture by fully drying it inan oven (105 degrees C) and reweighing. The equa-tion for determining moisture content is
weight of wood with water - oven-dry weightMC% = x 100oven-dry weight
Moisturein ground

© 1996 NATIONAL WOOD FLOORING ASSOCIATION 5
N A T I O N A L W O O D F L O O R I N G A S S O C I A T I O N T E C H N I C A L P U B L I C A T I O N N o . A 1 0 0
Equilibrium moisture contentThe moisture content of wood below the fiber sat-
uration point is a function of both relative humidityand temperature in the surrounding air. When woodis neither gaining nor losing moisture, an equilib-rium moisture content (EMC) has been reached.
Wood technologists have graphs that precisely tieEMC and relative humidity together, but as a rule ofthumb, a relative humidity of 25 percent gives anEMC of 5 percent, and a relative humidity of 75 per-cent gives an EMC of 14 percent.
A 50 percent swing in relative humidity producesan EMC change of 10 percent. How that affects woodflooring depends on which species is being used. How-ever, let’s say the width variation is just 1⁄16 inch for a21⁄4-inch board. That’s a full inch over 16 boards in afloor. Over the width of a 10-foot wide floor, thatamounts to more than three inches of total expansionor contraction.
Protective coatings cannot prevent wood fromgaining or losing moisture; they merely slow theprocess.
The seasoning of lumberFreshly sawn lumber begins to lose moisture
immediately. Its color will darken and small splits orchecks may occur. Movement of moisture continuesat a rate determined by many factors, including tem-perature, humidity and air flow, until a point of equi-librium is reached with the surrounding air. Theshrinking and swelling of wood are dimensionalchanges caused by loss or gain of water.
In practical terms, the process works this way:
1.) A standing oak tree is felled and sawed into aboard 1-inch thick, 10 inches wide and 8-feet long.Placed on a scale, the board weighs, say, 36 pounds.
2.) The board is placed in a stack of boards sepa-rated from the next by stacking strips of uniform sizeto keep the board straight. The stack is aimed at theprevailing breezes to accelerate drying. After two orthree months of air drying, the board now weighs 25pounds. It is also 31⁄ 32-inch thick, 93⁄ 4 inches wide and8 feet long, with 25 percent moisture content.
3.) This 25-pound board is trucked to the flooringmill and loaded into a dry kiln, a building largeenough to hold three or four railcar-loads of lumber.After six or seven days, this same board is now 15⁄16-inch thick, 9.2 inches wide, 8 feet long. It weighs21.6 pounds with an 8 percent moisture content. Ifall the moisture were removed, the board wouldweigh 20 pounds.
The milling of lumberMost hardwood lumber is dried to an average of 6
to 9 percent moisture content before milling isbegun. Mill inspections conducted by the NationalOak Flooring Manufacturers Association, allow 5percent of the wood outside this range, to a maxi-mum moisture content of 12 percent. The 6 to 9 per-cent range is likely to be the average of all types ofwood products used in a normal household environ-ment, assuming usual heating and cooling equip-ment is used to ensure human comfort.
WOOD FLOORING HAS A COMFORT LEVEL, TOOWood flooring will perform best when the interior environment is controlled to stay within a relative humidity range of30 to 50 percent and a temperature range 60 to 80 degrees Fahrenheit. Fortunately, that’s about the same comfortrange most humans enjoy. The chart below indicates the moisture content wood will likely have at any given combi-nation of temperature and humidity. Note that equilibrium moisture contents in the recommendedtemperature/humidity range (shaded area) coincide with the 6 to 9 percent range within which most hardwood floor-ing is manufactured. Although some movement can be expected even between 6 and 9 percent, wood can expandand shrink dramatically outside that range. See page 6.
MOISTURE CONTENT OF WOOD AT VARIOUS TEMPERATURES AND RELATIVE HUMIDITY READINGS
Temperature (°Fahrenheit)
30 1.4 2.6 3.7 4.6 5.5 6.3 7.1 7.9 8.7 9.5 10.4 11.3 12.4 13.5 14.9 16.5 18.5 21.0 24.3 26.940 1.4 2.6 3.7 4.6 5.5 6.3 7.1 7.9 8.7 9.5 10.4 11.3 12.4 13.5 14.9 16.5 18.5 21.0 24.3 26.950 1.4 2.6 3.7 4.6 5.5 6.3 7.1 7.9 8.7 9.5 10.4 11.3 12.4 13.5 14.9 16.5 18.5 21.0 24.3 26.960 1.3 2.5 3.6 4.6 5.4 6.2 7.0 7.8 8.6 9.4 10.2 11.1 12.1 13.3 14.6 16.2 18.2 20.7 24.1 26.870 1.3 2.5 3.5 4.5 5.4 6.2 6.9 7.7 8.5 9.2 10.1 11.0 12.0 13.1 14.4 16.0 17.9 20.5 23.9 26.680 1.3 2.4 3.5 4.4 5.3 6.1 6.8 7.6 8.3 9.1 9.9 10.8 11.7 12.9 14.2 15.7 17.7 20.2 23.6 26.390 1.2 2.3 3.4 4.3 5.1 5.9 6.7 7.4 8.1 8.9 9.7 10.5 11.5 12.6 13.9 15.4 17.3 19.8 23.3 26.0100 1.2 2.3 3.3 4.2 5.0 5.8 6.5 7.2 7.9 8.7 9.5 10.3 11.2 12.3 13.6 15.1 17.0 19.5 22.9 25.6
5 10 15 20 25 30 35 40 45 50 55 60 65 70 75 80 85 90 95 98Relative Humidity (percent)
Chart taken from Wood Handbook: Wood as an Engineering Material, (Agriculture Handbook 72), Forest Products Laboratory, U.S. Department of Agriculture.

American Beech.00431
True Hickory.00411
Jarrah.00396
Red Oak.00369
White Oak.00365
Hard Maple.00353
Yellow Birch.00338
Pecan.00315
Brazillian Cherry.00300
White Ash.00274
Black Walnut.00274
Douglas Fir.00267
Southern Yellow Pine.00265
Heart Pine.00263
Black Cherry.00248
Purpleheart.00212
Wenge.00201
Teak.00186
Padauk.00180
Australian Cypress.00162
Merbau.00158
.00129 Mesquite
Santos Mahogany.00238
6 © 1996 NATIONAL WOOD FLOORING ASSOCIATION
N A T I O N A L W O O D F L O O R I N G A S S O C I A T I O N T E C H N I C A L P U B L I C A T I O N N o . A 1 0 0
All the way to the floorFlooring is usually dried to the national average
moisture content expected in use so that shrinkageand swelling are minimized and buckling or largegaps between boards does not occur. However, thecareful drying and manufacturing of wood flooringcannot entirely prevent an unsuccessful installation.
Manufacturers who have controlled storage maycontrol the moisture content of the wood up untilthe point it is placed on the truck for delivery. Vari-ous parts of the country have EMCs that range fromthe dry, desert areas of the Southwest (under 5 per-cent EMC) to the moist areas along the Gulf of Mex-ico (over 10 percent EMC). Additionally, a widerange of relative humidities can be experiencedbetween individual job sites in the same locale, suchas an ocean-front or lakeside home versus onethat’s a few miles inland.
Many manufacturers record moisture-meter read-ings before the flooring leaves the facilities, and suchreadings are attached to invoice and packing lists.The use of moisture meters, from manufacturing todistribution to installation, is discussed on page 15.
Dimensional stabilityWhen flooring manufacturers and distributors
talk about relative stability of various wood flooringspecies, they are referring to how a floor “moves”once it is put down.
The numbers in the accompanying chart weredeveloped by the Forest Products Laboratory of theU.S. Department of Agriculture. They reflect thedimensional change coefficient for the variousspecies, measured as tangential shrinkage orswelling within normal moisture content limits of 6-14 percent. Quartersawn wood will usually be moredimensionally stable than plainsawn.
The dimensional change coefficient can be used tocalculate expected shrinkage or swelling. Simply mul-tiply the change in moisture content by the changecoefficient, then multiply by the width of the board.
Example: A red oak (change coefficient = .00369)board 5 inches wide experiences a moisture contentchange from 6 to 9 percent — a change of 3 percent-age points.
Calculation:3 x .00369 = .01107 x 5 = .055 inches.
In actual practice, however, change would bediminished in a complete floor, as the boards’ prox-imity to each other tends to restrain movement.
For a more complete discussion of dimen-sional stability, see NWFA Technical PublicationNo. A200: Wood Species Used in Wood Flooring.Write to NWFA at 233 Old Meramec Station Rd.,Manchester, MO 63021.
GROWING BOARDSHow much can temperature and humidity affectthe dimensions of a hardwood floor? Take a lookat one 5-inch red oak plank board:
1) Within “normal living conditions” (say, aninterior temperature of 70 degrees and a relativehumidity of 40 percent), the board has a mois-ture content of 7.7 percent and is 5 inches wide.
2) If the relative humidity falls to 20 percent, themoisture content of the board will be 4.5 per-cent, and the same 5-inch board will shrink by.059 inches. Across 10 feet of flooring. that couldtranslate to as much as 1.4 inches of shrinkage.
3) If the humidity rises to 65 percent, the board’smoisture content would be 12 percent and thesame 5-inch board would expand by .079 inches.Across 10 feet of flooring, this could translate to1.9 inches of expansion.
DIMENSIONAL CHANGE COEFFICIENT FOR 23 COMMON WOOD SPECIES
Source: Wood Species Used in Wood Flooring
© 1996 NATIONAL WOOD FLOORING ASSOCIATION 7
N A T I O N A L W O O D F L O O R I N G A S S O C I A T I O N T E C H N I C A L P U B L I C A T I O N N o . A 1 0 0
Sources of Moisture
With the introduction of laminated flooring,hardwood floors can be used in virtuallyevery room in the house, even in base-
ments. Water on or near the building site is still aconsideration, however. It cannot be ignored orneglected.
Installing below-gradeand on-grade
Moisture comes from a variety of sources — fromthe earth itself, from surface water (i.e., rain waterrunoff), as well as from the interior atmosphere. Let’sconsider the various ways that moisture problemsoriginate, and how they can be controlled and pre-vented.
A room that is exposed to excessive moisturewould be prone to trouble if solid wood flooring wereinstalled in it. Basement floors are particularly trickyinstallations. But some products, such as laminatedflooring, may be suitable in many of these circum-stances because of their dimensional stability.
The use of these alternative materials is necessarywhen the installation is below-grade. “Below grade”is defined as any part of the slab having four inchesor more of earth above it. Additionally, walk-outbasements are considered a below-grade application,even if a portion of the basement is above ground.
Use of laminated flooringLaminated flooring — also called engineered floor-
ing — uses multiple layers of wood glued together,with the grain of each running at 90-degree angles tothe layers adjacent. As the wood fibers absorb mois-ture and want to expand, each layer is restrained bythe other and improved dimensional stability results.
Because it displays far less expansion and con-traction with moisture changes, laminated flooringcan be successfully installed in areas with widehumidity variations. It usually does not require full
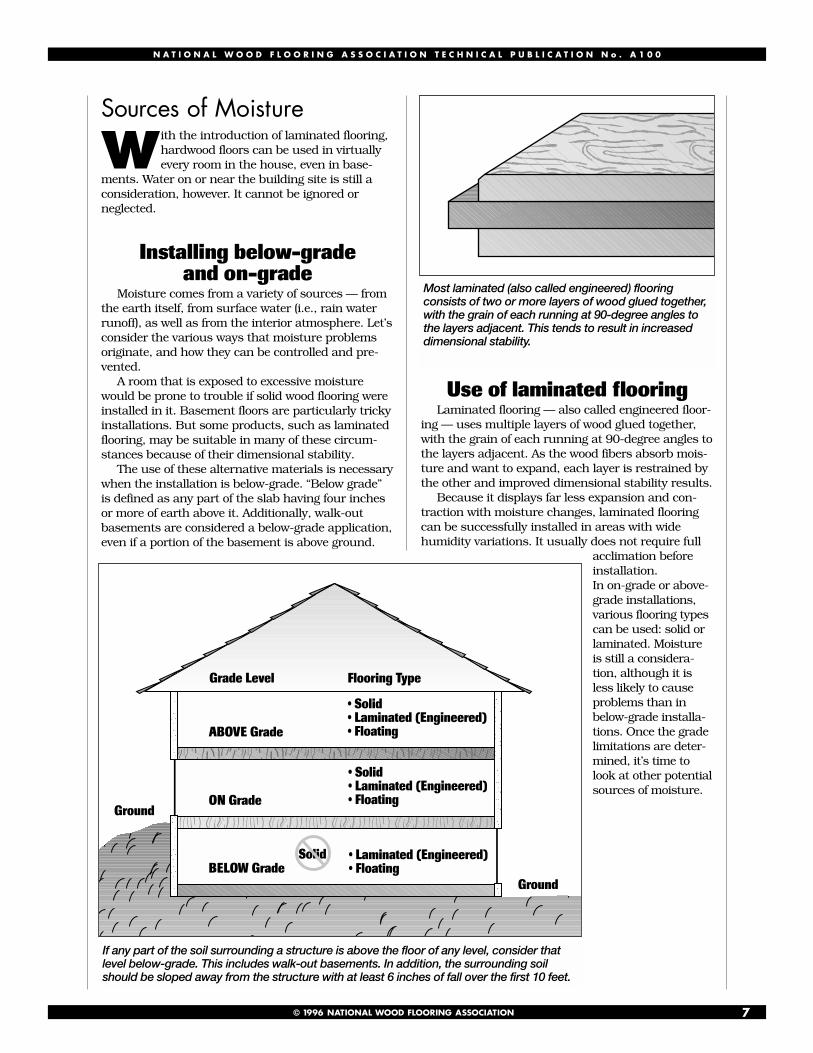
acclimation beforeinstallation. In on-grade or above-grade installations,various flooring typescan be used: solid orlaminated. Moistureis still a considera-tion, although it isless likely to causeproblems than inbelow-grade installa-tions. Once the gradelimitations are deter-mined, it’s time tolook at other potentialsources of moisture. aaaaaaaaaaaaaa Grade Level Flooring Type
ABOVE Grade
ON Grade
BELOW Grade
• Solid• Laminated (Engineered)• Floating
• Laminated (Engineered)• Floating
Ground
• Solid• Laminated (Engineered)• Floating
Solid
GroundaaaaaaIf any part of the soil surrounding a structure is above the floor of any level, consider thatlevel below-grade. This includes walk-out basements. In addition, the surrounding soilshould be sloped away from the structure with at least 6 inches of fall over the first 10 feet.
Most laminated (also called engineered) flooring consists of two or more layers of wood glued together,with the grain of each running at 90-degree angles tothe layers adjacent. This tends to result in increaseddimensional stability.

8 © 1996 NATIONAL WOOD FLOORING ASSOCIATION
N A T I O N A L W O O D F L O O R I N G A S S O C I A T I O N T E C H N I C A L P U B L I C A T I O N N o . A 1 0 0
open space that is deepenough to allow a person togain access to the under-floor area by crawling. Theminimum depth of thecrawl space should be 24inches under the floor joistsor 18 inches under thegirder. An 18-inch clear-ance beneath any ductworkis also desirable.Moisture problems withina house that show up ascondensation and/or froston windows in the livingarea, can result fromdampness in the crawlspace, or from inade-quately vented livingspace. Moisture problemsin crawl spaces may bedue to the construction ofa crawl space in an area ofhigh water table, impropergrading of the lot fordrainage or the omission
of moisture control devices such as vapor barriers,ground cover and ventilation openings.
Obvious symptoms of excessive moisture passingupward through the floors may include any of thefollowing: a musty odor; mold on the walls near thefloor, in corners and in closets; moisture condensa-tion on insulated windows or storm windows; andmoisture condensation in the walls with resultingpaint peeling. Some of the more common ways mois-ture gets into crawl spaces are:
• ground water moving through the foundationwalls or up through the earth floor;
• surface water moving through the foundationwalls or flowing in through ventilators;
• capillary rise of ground moisture;• “green” slabs, or concrete foundations that
weren’t fully cured when the rest of the housewas built above it;
Building codes in most areas requires cross-venti-lation in a crawl space equal to at least 1.5 percent ofthe square foot area within the crawl space.
In addition, a ground cover of 6-mil polyethylenesheets (preferably black) should be placed over theentire area of the crawl space soil, lapped at least 6inches and held in place by bricks or other weights.(Black polyethylene works better than clear, becausethe black plastic slows the growth of plants, whichcan occur even in a relatively dark crawl space. Inaddition, some wood flooring manufacturers are nowrecommending 8-mil poly in lieu of 6-mil.)
In cases where concrete is poured to create a floorin the crawl space, the 6- or 8-mil polyethylene coveris still required.
6- or 8-mil black poly
Fill Dirt
Open Vents
Suspended Subfloor
Open Vents
In crawl space construction, 6- or 8-mil plastic (preferably black) should cover the entire ground area.
Potential sources of moistureNEW CONSTRUCTION: During the building of a newhome, moisture can enter the house in a number ofways. When the frame is going up, the 2-by-4s andsubfloor materials often get rained on. Becausebuilders usually work on tight, demanding sched-ules, homes are sometimes built trapping moisturethat needs time to evaporate. The amount of mois-ture introduced by framing lumber and the wettrades can be significant.
GROUND WATER: Sometimes the level of the water inthe ground (the water table) is raised above the bot-tom surface of the foundation due to:
• heavy or prolonged rains;• a spring that appears only during wet seasons
and is not discovered when the house was built;• water flowing along an impervious layer within
the soil.Any of these may cause water to penetrate the
foundation walls or rise through the ground surfaceinto the foundation or crawl space.
SURFACE WATER: Rain water falling on the ground orfrom the roof can pass through or under the founda-tion walls. In some areas, heavy soils may retain sur-face drainage and cause water pressure against thefoundation walls or slab.
Surface drainage problems may also occurbecause the crawl space is below the finish gradeoutside the house.
CRAWL SPACE: Many houses are built over a crawlspace — that is, the floor of the house is built over an

© 1996 NATIONAL WOOD FLOORING ASSOCIATION 9
N A T I O N A L W O O D F L O O R I N G A S S O C I A T I O N T E C H N I C A L P U B L I C A T I O N N o . A 1 0 0
CAPILLARY RISE OF GROUND MOISTURE: Moisturetravels upward by capillary action — as much as 14to 18 gallons per day have been noted under a 1,000-square-foot house — and evaporates within the crawlspace. Capillary rise occurs in nearly all areas wherethe soil is clay or silt.
Capillary action is the effect of surface tension thatcauses water to rise up a narrow tube, against theeffect of gravity. In building construction, capillaryaction can occur between two surfaces placed together,or within porous materials. This relates to the installa-tion of wood flooring in that moisture can be drawnthrough both the subfloor and the concrete below it.
It is best not to build below the highest expectedwater table, for to do so is to have water under pres-sure trying to enter through any crack or weaknessin the construction. Porous granular filling materialaround and under the building, and connected todrainage lines, can be used to divert drainage wateraway from the structure.
Making these adaptations is the responsibility ofthe general contractor. However, the flooring installerwho has been hired by the general contractor to dothe floors in a new home or building should beaware of these details.
MOISTURE FROM THE HOUSE: There are many sourcesof moisture from within the house. Mopping the floorin a 150-square-foot kitchen can release the equivalentof 41⁄2 pints of water into the air; a shower or bath about1⁄2 pint; washing the dinner dishes about 1⁄2 pint. Also, afamily of four gives off about 1⁄2 pint of water per hourjust breathing (this is why bedrooms are unexpectedmoisture sources). As moisture is released in a house,it moves to all rooms by natural air movement or byforced air movement from furnace or air conditioning.
MOISTURE FROM MECHANICAL SYSTEMS: Moistureis sometimes introduced into the crawl space fromthe mechanical systems within the house. To avoidthis, make sure the clothes dryer is vented to the
Concrete Slab
6- or 8-mil poly
Vapor RetarderGravel
20
'
Water Table
Water
outside. Also, condensate water from cooling sys-tems and water from automatic ice makers shouldbe discharged away from the building.
RELATIVE HUMIDITY: When humidity increases, theeffect on the wood floor can be damaging. Thisoccurs most frequently in homes in which occupantsare there for a short period of time, such as a week-end home or vacation cabin, or in rooms that areclosed off (not heated) to save energy.
If air conditioning or heating is not used or is shutoff, ventilation is a must even when the home is notoccupied. Otherwise, the floor will expand in the highhumidity, and cupping and buckling will occur. This“greenhouse effect” will be exaggerated even morewhen a plank floor has been installed, because widerboards react to moisture with more movement.
Minimizing moisturefrom wood subfloors
A heavy moisture invasion can seep up through awood subfloor. It may occur slowly, but its effects aredamaging. Proper installation of flooring calls forchecking subfloors for moisture.
To protect against moisture rising through sub-floors, the installer needs to make sure there is aproper moisture-vapor retarder.
In any case, the moisture content of solid strip floor-ing should be within 4 percentage points of the sub-floor. (That is, if the subfloor is measured at 10 percentmoisture content, the strip flooring should have no lessthan 6 percent moisture content and no more than 14percent.) For solid plank flooring, the difference shouldbe no more than 2 percentage points. Solid strip orplank flooring requires a felt paper moisture retarderbetween the floor and subfloor. If a wood subfloor islaid over an existing slab, the moisture retarder canbe cemented to smooth, clean-swept concrete.
15-poundasphalt felt paper
Capillary action causes moisture to travel upward intothe slab. Gravel beneath the slab can slow the move-ment of moisture, but 6-mil plastic below the slab willprovide a more effective vapor retarder.
In joist construction, a vapor retarder of 15-pound satu-rated felt paper should be laid between the wood floor-ing and the wood subfloor. If the wood subfloor is laidover a concrete slab, the felt paper moisture retardercan be cemented to smooth, clean-swept concrete.Other vapor barriers or retarders may also be appropri-ate over concrete slabs. See page 10.

10 © 1996 NATIONAL WOOD FLOORING ASSOCIATION
N A T I O N A L W O O D F L O O R I N G A S S O C I A T I O N T E C H N I C A L P U B L I C A T I O N N o . A 1 0 0
Minimizing moisturefrom concrete
Traditional construction of homes tend to haveregional variations. While many of the older homesin New England, the Mid-Atlantic and Midwestregions have basements, most Southern home-building is done on concrete slabs. The slab rests ona carefully prepared base and is usually surroundedby a footing that runs below the frostline, providingthe actual foundation for the house.
The no-basement design eliminates many of themoisture problems associated with basements andbelow-grade features, obviously. But the installationof flooring over concrete is not without its own intri-cacies. Concrete appears to the untrained eye to be asolid, impermeable foundation, yet it’s actually asource in itself for moisture. Concrete expands whenit absorbs moisture in humid weather or by exposureto rain, and it contracts again when the moistureevaporates.
All concrete surfaces regardless of age or gradelevel will emit or conduct some degree of moisture,usually in the form of a vapor. This is a very naturaland necessary function of healthy concrete — it’s likecontinual “breathing.” However, too much moistureemission without a proper moisture barrier hasresulted in flooring failures. Many times the blame forthis is placed on a faulty product, improper specifica-tion or faulty workmanship, when the real reason lieswith slab vapor emission conditions.
Moisture conditions are not the flooring contrac-tor’s responsibility. Yet, the contractor should takethe initiative to determine potential problems andadvise the customer of available remedies before thestart of installation.
Concrete is composed of crushed rock, gravel,sand, cement and water. The introduction of waterinto a cement batch will begin a series of perpetualchemical interactions. The basic recipe for buildingconcrete is completely dependent on water beingpresent in the slab.
Water in concrete is necessary to continue theprocess of cement curing well past the first few criti-cal weeks. Therefore, all slabs should be tested formoisture before the floor’s installation.
Both on-grade or below-grade slabs need time toboth cure and dry out enough to handle flooring.General guidelines suggest that 60 days is sufficientfor the curing to occur, and floors can be installedafter this. These figures, however, are influenced by anumber of variables, and should not be used as thesole criterion as to whether or not it is safe to installa floor. Above-grade slabs poured in metal pans takesignificantly longer to dry and have been known torequire several months to well over a year to be safeto install upon. Since drying times are influenced bymany factors, it is necessary to conduct proper mois-ture tests regardless of the slab age or grade level.(See “Testing concrete,” page 16.)
Because moisture can rise through concrete bycapillary action, moisture-vapor barriers and mois-ture retarders need to be part of the installationprocess. Laid between the base of gravel or crushedstone and the slab, this barrier is usually in the formof heavy plastic, uninterrupted film. This film pre-vents the penetration of moisture through the slab tothe interior surface, where it can ultimately damagehardwood floors.
Additionally, another moisture barrier or retardershould be placed on top of the slab before installa-tion. A few choices for the barrier are:
1.) Low end PVC vinyl applied over the slab inmultipurpose adhesive with seams sealed andthe surface prepared before spreading thewood adhesive. The use of this methodrequires dependence upon the water-soluble,multipurpose bond in the presence of moistureand wood adhesives that are accepted overvinyl. This may also require a vinyl blocker.
2.) Polyfilm — 6-millimeter polyethelene film in36-inch or 48-inch wide rolls — applied over a“skim” coat of asphalt mastic. The masticshould be troweled with a straight-edge trowelto skim coat the slab, with coverage of about80-100 square feet per gallon. After about 30minutes, during which the solvents flash orevaporate, the polyfilm can be rolled over themastic by walking over the film, embedding itin the mastic. Air bubbles that form under thefilm can be forced out toward the seams with apush broom.
3.) 15-pound roofing felt in asphalt mastic appliedwith a notched trowel at the rate of 50 squarefeet per gallon. A second similar coating ofmastic and asphalt felt should be added, withoverlaps staggered to achieve a more eventhickness.
There are several other moisture barrier systemsavailable, including two-part epoxy, rubberized elas-tomeric membrane, and other sealing liquids.
In all cases, installers must verify acceptability ofa particular system with the flooring manufacturer,and also verify adhesive compatibility when planningto glue down over any moisture barrier. If you arenot familiar with the system, check with the adhe-sive manufacturer, the flooring manufacturer andthe manufacturer of the moisture barrier systembefore attempting an installation.

© 1996 NATIONAL WOOD FLOORING ASSOCIATION 11
N A T I O N A L W O O D F L O O R I N G A S S O C I A T I O N T E C H N I C A L P U B L I C A T I O N N o . A 1 0 0
The point of acclimating wood flooring beforeinstalling it is to allow the moisture content ofthe wood to adjust to “normal living condi-
tions” at the site — that is, the temperature andhumidity conditions that will typically be experiencedonce the structure is occupied.
Thus, it does no good at all — in fact, it is likelyharmful — to store wood flooring at the jobsite underconditions that don’t reflect those normal environ-mental conditions.
The wood flooring industry has done a good job inrecent years communicating the message that woodflooring is a dynamic material subject to changes indimension as a result of changes in humidity in thesurrounding environment. That has led to increasingawareness of the need to acclimate wood flooringbefore installation. Unfortunately, some installershave heard the message as, “Leaving wood flooring atthe jobsite for two weeks will properly acclimate thewood, no matter what the conditions are.”
In truth, some wood flooring may already be at theproper moisture content when it’s delivered. To allow it tosit at the jobsite under excessively humid conditions willonly cause the flooring to absorb unwanted moisture.
So, the key message is not that acclimation isgood, and that’s all you need to know. Rather,installers need to understand the dynamics of waterand wood and make educated judgments aboutwhen and how much acclimation is required. To doso requires knowing what the moisture content of theflooring is at the time of delivery and what itsexpected moisture content will be “in use.”
Wood at the warehouseOnce milled, the flooring should be stored in dry,
well-ventilated warehouses before shipment to job-sites. These are some recommended guidelines forhandling and storing hardwood flooring:
• Unloading: Flooring should be unloaded in good,dry weather, never in the rain.
• Warehousing: Flooring should be stored in anenclosed, well-ventilated building and located inareas where similar fine millwork is stored. Thestorage area within the building should be cleanand dry. The stacks of flooring should have goodair circulation and no water drainage nearby.
• Preventing condensation: When air in a building ismore humid than outside air, moisture mayform on the underside of the non-insulated roofand affect flooring. Insulation in the roof or wallscan prevent condensation.
A covered area can also provide protection,although this is not a guarantee in a damp season or
environment. If this is not possible, all top palletsshould be covered with polyethylene film or otherwater-proof covering.
The storage building should ideally have con-trolled humidity. Continual dry heat may dry flooringbelow its desirable moisture content, which couldresult in buckled floors if flooring is installed withoutproper acclimation. Conversely, storage in a damparea can introduce unwanted moisture and expan-sion in the flooring, which could result in unaccept-able cracks between boards if flooring is installedwithout proper acclimation.
Wood at the jobsiteBefore wood is delivered, the jobsite must be
checked to determine if it is ready. Wood should not bedelivered if jobsite moisture conditions are excessive.Otherwise, one will absorb moisture from the other.
The structure should be fully enclosed, with doorsand windows in place, and interior climate controlsshould be operating for at least 48 hours to stabilizethe moisture conditions of the interior. Once at thejobsite, the wood should be set indoors and spreadover the subfloor. About four days should passbefore an installation is started. Moisture contents ofboth the flooring and the subfloor must be checkedand recorded before any work begins.
If flooring is delivered on a damp day or duringrain, the boards will absorb moisture. If installed inthis condition, the flooring will shrink a few monthslater and show cracks.
Wood flooring should not be delivered to the jobsiteuntil plastering and painting are completed and dried.Moisture evaporates from damp walls into the air withinthe house, and some of it will be absorbed by the flooring.
Another condition that causes flooring to pick upmoisture during construction is less obvious, butmore common: If the heating or air conditioning isnot operating from the time the floor is installed untilthe house occupied, the humidity may be higherthan it would be if the house were occupied.
Only after getting satisfactory moisture measure-ments from the concrete slab and the subfloor, andonly after wood has acclimatized to the jobsite, is theinstaller ready to install. When installation is com-pleted, good practice calls for a delay of one or moreweeks for further acclimation before beginning thesanding and finishing part of the job.
On page 14 is a “Builder’s Checklist” that canassist as a pre-installation evaluation of the jobsite.Problems identified while completing the checklistshould be brought to the attention of the generalcontractor or owner before installation is begun.
Wood’s Acclimation

Regional variations of moisture contentThe numbers on the accompanying map provideexamples of how average moisture contents forinterior use of wood products vary from one regionto another, and from one season to another withina region. Actual moisture content conditions inany location may differ significantly from thesenumbers. In each pair of figures, the first numberis the average moisture content during Januaryand the second is the average moisture contentduring July. These numbers cannot be reliablyused as a basis for installation. The most reliablemoisture-content numbers can be obtained bybuilding your own historical records. Take moisture-content readings at various jobsites at differenttimes of the year, and record those readings. Astime goes on, you will be able to refer to your ownrecords for guidance in establishing safe moisture-content levels for wood flooring before you install.
12 © 1996 NATIONAL WOOD FLOORING ASSOCIATION
N A T I O N A L W O O D F L O O R I N G A S S O C I A T I O N T E C H N I C A L P U B L I C A T I O N N o . A 1 0 0
MOISTURE MAP OF
Source: The US Department of Agriculture Forest Products Laboratory
6-9
5-75-7
6-7
6-7
8-13
5-9
4-8
4-7
8-13
9-13
4-7 5-66-7
5-8
4-10
5-9
6-8

© 1996 NATIONAL WOOD FLOORING ASSOCIATION 13
N A T I O N A L W O O D F L O O R I N G A S S O C I A T I O N T E C H N I C A L P U B L I C A T I O N N o . A 1 0 0
THE UNITED STATES
5-9
6-9
5-10
6-106-11
7-86-9
7-9
8-97-87-9
8-9
6-7
8-10
11-13
8-9
10-11
11-13
7-11
7-10
8-10
7-108-11
8-12
8-10
9-11
11-1311-13
12-13
11-12
9-119-12
9-11
9-138-11
8-11
7-10
7-10
6-116-12
6-12
7-13
11-13
7-12

14 © 1996 NATIONAL WOOD FLOORING ASSOCIATION
N A T I O N A L W O O D F L O O R I N G A S S O C I A T I O N T E C H N I C A L P U B L I C A T I O N N o . A 1 0 0
BUILDER’S CHECKLISTPRE-INSTALLATION EVALUATION OF THE JOBSITE
Job name ___________________________________________________________________________________________
Job address _________________________________________________________________________________________
City ____________________________________________________________ State _________ Zip ________________
Job telephone _______________________________________________________________________________________
Jobsite superintendent ______________________________________________________________________________
I verify the jobsite is ready for wood flooring installation _______________________________________________(signature of jobsite superintendent)
Date _____________________________________
EXTERIOR CONDITIONS
Gutters and downspouts are properly placed to drainwater away from the structure.
Yes_____
Soil surrounding the structure is graded properly todrain water away from the site.
Yes_____
INTERIOR CONDITIONS
All wet trades (drywall, plaster, paint, ceramic tile,etc.) have completed their work.
Yes_____
Air conditioning, heating and ventilation are completeand operating.
Yes_____
The building is enclosed and weather-tight, includingall doors and windows in place.
Yes_____
The temperature and relative humidity within thestructure are at “normal living conditions” — that is,temperature is between 60 and 80 degrees Fahrenheitand between 30 and 50 percent relative humidity.
Yes_____
Six-mil polyethylene (preferably black) has beeninstalled and covers the entire ground area in thecrawl space.
Yes_____
CONCRETE SLAB CONDITIONS
Concrete has been installed for at least 30 days.
Yes_____
If wood flooring is to be installed over a slab, the con-crete is flat per specifications.
Yes_____
A vapor barrier has been installed under the slab.Yes_____
Verified by _________________________________________
DELIVERY AND WORKING CONDITIONS
Proper electrical power is available.120V ________ 220V ___
Driveway and sidewalks are paved.Yes__________
MOISTURE CONDITIONS
Moisture content of the wood subfloor is no more than4 percentage points above or below the finish flooringand is within regional moisture content guidelines.
Yes_____
Moisture testing of concrete slab began no soonerthan 30 days after the slab was poured. Test resultsindicate that it is safe for wood flooring installation tobegin.
Yes_____
What type of test was used?_________________________
What were the test results?__________________________
UNTIL THE FOLLOWING GUIDELINES HAVE BEEN MET, THE JOBSITE IS NOT READY FOR A WOOD FLOORING INSTALLATION.

© 1996 NATIONAL WOOD FLOORING ASSOCIATION 15
N A T I O N A L W O O D F L O O R I N G A S S O C I A T I O N T E C H N I C A L P U B L I C A T I O N N o . A 1 0 0
Testing for Moisture
The determination of moisture content is anessential part of quality control within the floor-ing installation process. Flooring installers
must know the dryness of not only the wood flooring,but its subfloor and the concrete slab beneath it, ifone exists. Hand-held electrical tools, called mois-ture meters, should be part of the toolbox of everyflooring contractor, for measuring moisture in sub-floors and floors.
Working with moisture metersMoisture meters have become one of the most crit-
ical tools of the trade, yet they are often neglected bythose who need them most — flooring contractors.The installer who continues to work without one issimply jeopardizing his jobs. A single moisture-prob-lem installation should be enough to convince him orher to invest in a meter and make use of one of themost cost-effective tools in the business.
Moisture meters have many purposes. They candetermine if floor boards are dry enough for an instal-lation to proceed. They can check subfloors and con-crete for high moisture levels; they can decide when asecond coat of finish can be applied; they can assess
water damage.There are two main types of meters — probe and
pinless.The probe type, which is the older method, mea-
sures electrical resistance across opposed sets ofpins, which are pushed into the wood. The higherthe moisture content, the lower the resistance.
Probe-type meters are fast and easy to use. Theycome with different measurement indicators. Thelower-cost units have L.E.D. display lights indicatingdifferent moisture levels; the better-quality unitshave analog or digital displays and provision for dif-ferent species and wood temperatures.
The pinless, dielectric types, which are alsoreferred to as “non-destructive” because they don’tleave any small holes in the wood, are quite different.
Signal penetration for pinless meters is up to 1inch for both hardwood and softwood. The meter canbe moved across the surface to identify pockets ofmoisture in a wood block or plank. It is relativelyunaffected by temperature. Rough surfaces havevery little effect on the reading. Measurements canalso be taken through coating, varnish or paint with-out damage to the surface.
One advantage of probe type meters is that thosewith insulated pins can measure moisture content atvarying depths — you can tell whether the moisturecontent near the bottom of a board is higher thannear the top, for example.
Deciding which kind of moisture meter to buy is amatter of sorting through the features you think you willneed, and how often you may use it, and then under-standing the various features and benefits. It is impor-tant that the meter you choose offers the following:
• A wide moisture content range from at least 6percent to 30 percent. (The accuracy of readingsoutside of these limits are generally consideredquestionable.)
• A clear analog or digital dial.• The necessary adjustment tables for various
species;• For a probe meter, the ability to take external
probes, and a selection of pin sizes.
A pinless moisture meter
A probe-type moisture meter

16 © 1996 NATIONAL WOOD FLOORING ASSOCIATION
N A T I O N A L W O O D F L O O R I N G A S S O C I A T I O N T E C H N I C A L P U B L I C A T I O N N o . A 1 0 0
Testing subfloorsWood subfloors are actually easy to check for
moisture content. Just test for moisture at severallocations in the room and average the results. Inmost regions, a “dry” subfloor that is ready to workon has a moisture content of 12 percent or less. Ifexcessively high readings are obtained, installationshould not proceed until the origin of the moisture isidentified and moisture problems are remedied. Dur-ing the winter, an overly moist subfloor can be driedout by running the heat for a few weeks. Air condi-tioning during the summer will do the same thing.
Before flooring can be installed, the moisturecontent of the subfloor should be within 4 percent-age points of the flooring that will be laid on it.If the moisture content between the flooring and sub-flooring varies more than 4 percentage points, thenthe flooring should not be installed.
Testing concreteAs concrete moves through its initial drying
period, regular checking of moisture content canstart after 30 days. In most cases it will take 60 daysor more before the slab is dry enough for wood floor-ing installation to proceed. Excess moisture in theconcrete will cause problems such as condensationor failure of the adhesive under the flooring.
Moisture conditions in concrete slabs that ulti-mately create moisture problems in flooring arenot the flooring contractor’s responsibility, but it isthe contractor’s responsibility to ensure thatpotential moisture problems are resolved beforeinstallation begins. Unless the flooring contractortakes the initiative to determine the potential prob-lems, through testing for moisture content, he isthe one who will get called by the unhappy home-owner — because the buckling wood is the onlyresult the homeowner sees.
A flooring contractor can begin his determinationwith some subjective and logical questions: What isthe history of other homes in the area, as well as thehistory of the building, the quality of the building andthe quality of the slab?
Also, what is the age of the concrete? (An installershould not accept a slab as “ready” on age alone.)What is the concrete’s visual appearance? (The colorof good, healthy concrete should be almost sugar-white. Any concrete that is gray, brown, tan or othersuch off-white colors should be suspected of havingcontaminants, admixtures or other problems unsuit-able for flooring. It is virtually impossible, however, tojudge a concrete slab’s moisture condition on thebasis on color alone.)
Concrete slabs must meet a moisture specificationwhen tested in accordance with the prescribed proce-dures, at the time of installation of the flooring, andalso at any future date. The moisture specification
shall be that the emission of moisture vapor fromthe floor shall not exceed 3 pounds per 1,000square feet per 24 hours.
Concrete should normally be a minimum of 60days old before wood flooring is installed on top,unless moisture testing indicates acceptable mois-ture content before that time. Anything short of that,and the general contractor is making demands of theflooring installer that could result in moisture prob-lems down the line.
Rely on flooring manufacturers’ recommendationsfor your definition of what qualifies as “acceptablemoisture content,” as well as for which type of mois-ture testing each manufacturer prefers.
Testing for moisture in concrete can be accom-plished using specially designed and calibratedmoisture meters, and there are also several types ofphysical tests that can be used. The most commontypes of tests are discussed on page 17.
Electrical testing of concreteSome meters are designed for concrete use. Regu-
lar checking of moisture content of the concrete slabduring the drying out period is required to ensure ithas reached sufficient dryness to accept the floorcovering.
Electrical testing works on the principle of resis-tance to electricity passing through the moisture inthe slab.
When testing concrete slabs, particularly if theyare on-grade or below-grade, the moisture conditionshould be tested not only on the surface, but also inthe body of the slab. The reason for testing both thesurface and the mid-section is to ascertain if there iscontinuous moisture movement toward the surface.If the flooring is installed while the slab is in thiscondition, upward movement of moisture will con-tinue and the moisture will move into the floor. Theresults are costly and damaging.
As always, tests in multiple locations throughoutthe slab.
Contact NWFA for sourcesThere are numerous sources for wood and con-
crete moisture meters, as well as for the materialsneeded to perform the calcium chloride test, which isdiscussed on page 17. Those sources are not listedhere, because they are always subject to change. Forthe latest information on these sources, contact:
The National Wood Flooring Association233 Old Meramec Station RoadManchester, MO 63021Phone: 800/422-4556 (U.S.)
800/848-8824 (Canada)314/391-5161 (local and international)Fax: 314/391-6137

© 1996 NATIONAL WOOD FLOORING ASSOCIATION 17
N A T I O N A L W O O D F L O O R I N G A S S O C I A T I O N T E C H N I C A L P U B L I C A T I O N N o . A 1 0 0
Various physical testsof concrete
Here are some other tests that installers employto check the moisture content of the concrete beforestarting the installation. All tests should be done atseveral different locations in a room — typicallyalong exterior walls and walls with plumbing enclo-sures, as well as over mechanical chases.
THE CALCIUM CHLORIDE TEST: The calcium chloridetest is becoming one of the most widely used con-crete moisture tests. It’s intended to determine theamount of moisture (in pounds) coming through theslab over a 1,000 square foot area in 24 hours.Developed in the 1950s by the Rubber Manufactur-ers Association as a measure of concrete dryness,it’s also known as the RMA test, as well as the“dome” test. The calcium chloride test has beenused most often by sheet vinyl installers, but agrowing number of wood flooring installers nowemploy the test as well. Costs can run about $50 or$60 per test. As always, refer to flooring manufac-turer recommendations, since some believe othertests are more accurate.
The calcium chloride test works by measuringchanges in weight of anhydrous calcium chloridecrystals.
A small plastic dish of crystals is sealed with aplastic tape. The entire dish is weighed on a gramscale prior to exposure and the weight, date andtime the test was started must be recorded. The lidis then opened, and the dish of crystals is carefullyset down on the concrete for 60 to 72 hours. Thedish is enclosed within a 7-by-10-inch cover, whichis sealed to the concrete. During this time, the onlysource of moisture being absorbed by the crystalsis what can evaporate out of the covered concretesurface area.
At the end of the test, the dome is removed andthe lid is placed back on the dish and sealed. Againthe dish is weighed on the gram scale and the dateand time are marked. The change in weight is multi-plied by a constant and divided by hours to providean estimated rate of evaporation, in pounds.
Pounds is the equivalent weight of the water thatevaporates out of a 1,000-square foot surface areaduring 24 hours. Water weighs 8.3 pounds per gal-lon. If the test reports 8.3 pounds emission, thenone-gallon of water is leaving a 1,000 square footsurface area in 24 hours.
A conservative but generally recommended allow-able amount of moisture emission as expressed bythe calcium chloride test is 3.0 pounds per 1,000square feet per 24 hours at the time of the installa-tion of the flooring.
THE POLYFILM TEST: Pieces of 24-inch squares ofpolyfilm are placed at several points on the subfloor,sealed to the subfloor on all four sides with silver
duct tape. After 24 hours, the patches are removedand inspected for signs of condensation. If beads ofwater are found on the subfloor or the concreteappears darker, further testing is necessary. If thereis no indication of moisture under the polyfilm, theinstallation may proceed. The reading is valid at 24hours, but it’s even better if the test can stay in placeuntil 72 hours have passed.
The polyflilm test can also be “accelerated” byusing a heat source (such as a 40 to 60 watt light-bulb) 18 inches above the plastic.
For more information on using the polyfilm test,refer to ASTM test method D4263.
THE HUMIDITY TEST: A relative humidity meter isplaced on the surface of the concrete next to interiorwalls and pillars. The meter is covered with an 18-inch-square polyethylene sheet, sealed at the edgeswith tape. The test should run 24 hours on a slabfour inches thick, up to 72 hours on a thicker slab. Ifthe meter reading stays at 65 percent or above, theslab is too wet.
THE PHENOLPHTHALEIN TEST: This uses a 3 percentphenolphthalein solution in water-free ethyl alcohol.Dime-sized holes, 1⁄4-inch deep, are drilled in variousareas of the slab, particularly around walls. Thentwo drops of the solution are applied into each of thedrilled areas. If there’s no color change in the solu-tion, there should not be enough moisture to affectthe installation. But if the phenolphthalein turnspink or dark red within five minutes, further testingmust be done with a more precise method.
The calcium chloride test: A sealed dish of crystals isweighed, then the lid is removed and the dish is placedunder a plastic cover, where the crystals are exposedto whatever moisture remains in the concrete slab.After 60 to 72 hours, the dish is resealed and weighedagain. The change in weight, through a mathematicalformula, provides a measure of how much water isevaporating from the slab.
18 © 1996 NATIONAL WOOD FLOORING ASSOCIATION
N A T I O N A L W O O D F L O O R I N G A S S O C I A T I O N T E C H N I C A L P U B L I C A T I O N N o . A 1 0 0
For the Flooring Contractoror Retailer: TroubleshootingMoisture-related Situations
Assessing the responsibility for hardwood floorsaffected by moisture is sometimes difficultbecause of the complexity of contributing
causes, and because the source of the moisture isseldom obvious.
It is often convenient for all parties to point thefinger of responsibility at the flooring contractor, thedistributor or the manufacturer of the flooring. Insome cases, of course, the flooring itself is responsible,but most of the shrinkage and expansion problemswith wood floors involve jobsite moisture conditions.These conditions cannot be controlled by flooringmanufacturers, nor in many instances by sub-con-tractors responsible for installing the wood floor,unless interior humidities are maintained at properlevels.
By using responsible practices for the installation,and by checking on the various moisture contents atthe site, the flooring contractor is taking the neces-sary steps toward a successful installation.
Yet, the fast pace of new-home constructionaccounts for some practices that are detrimental tohardwood floors and many other building products.When builders’ schedules demand that wood floorsbe put down before all doors and windows are inplace, or before concrete and masonry are dry, thehomeowner ultimately pays with the inconvenienceof putting up with a faulty hardwood floor.
It is the business of each of the parties to knowand control those areas of responsibility in his or herdomain, within reason. But some good insuranceagainst getting a callback a few months after theinstallation is customer education.
Customer education about proper maintenanceprocedures and normal expectations for their woodflooring is part of the installation. The owner shouldbe aware of the installer’s limits of liability. Theowner should also know how wood reacts to chang-ing temperature and humidity conditions and whatconstitutes acceptable cracks between boards thatwill disappear over time.
Pages 19-20 of this manual provide a two-pagebrief that the contractor can leave with the customeras part of his or her education. But if complaintsoccur down the road, here are some common-senseguidelines on how to handle them like a professional.
How to handle an angry customer• Listen! Except for the few “professional complain-
ers” who use complaints to avoid contractualobligations, most homeowners just need to venttheir frustration — and you need to know theproblem. So listen all the way through the home-owner’s remarks, even if they become offensive.The owner may feel that to get some attention hemust shout at somebody. Let that happen. Whenit is off his chest, he will probably be much easierto deal with.
• Be sympathetic. Never take a complaint person-ally — not even a tirade. You can express yourconcern without taking sides, even if you mustlater dispute much of the owner’s view of theproblem. You can’t really blame the owner forwanting the problem fixed.
• Be objective. Do not allow emotions or priorknowledge to get in the way of handling facts asfacts. There is no percentage in arguing. Just col-lect all the facts. By the same token, keep in mindthat a few boards do not always make a legiti-mate complaint.
• Log all information, from the first contact througha full inspection. Initially, get all pertinent datasuch as owner’s name, address and phone, plusthe same information on the builder, retailer orcontractor; what the product is, brand, whenpurchased, quantity, when installed and whenfinished. And get a full description of the problemat the outset.
• Report the complaint to your supplier if you feel theresponsibility may lie there, or if you need somespecial assistance. Report progress to the home-owner or builder — in writing with a copy foryourself — particularly if progress toward resolu-tion is delayed.
• Inspect the floor as soon as possible. Delays cancreate a second complaint, and do little for yourcredibility. Do not make a snap judgment of theproblem, and above all, do not report your find-ings on the spot to the homeowner or builder, orany other interested party.
Complete the full inspection procedure, thenassemble your facts for full analysis before deciding thereason for the complaint. Then report your findings inwriting. What you say in conversation can be misinter-preted, and is almost always remembered wrong. Whatis written doesn’t change, and doesn’t invite argumentbefore you are finished having your say.
Note: The National Wood Flooring Associationhas a Complaint/Checklist form that can be usedfor jobsite inspections and complaint resolution.It is available to NWFA members only. ContactNWFA at the address or phone numbers listed onthe back cover for more information.

© 1996 NATIONAL WOOD FLOORING ASSOCIATION 19
N A T I O N A L W O O D F L O O R I N G A S S O C I A T I O N T E C H N I C A L P U B L I C A T I O N N o . A 1 0 0
For the Customer:How to Spot and AvoidTrouble in Hardwood Floors
In a comfortable home with slight humidity varia-tions through the seasons, wood flooringresponds by expanding and contracting. These
changes may be noticeable. During warm, humidweather, wood expands. During dry weather, woodcontracts. This seasonal movement is a normalcharacteristic of wood flooring, and it never stops,regardless of the age of the wood. One of the bestways to ensure that wood flooring will give the per-formance homeowners expect is to install humiditycontrols and ensure that they are functioning beforethe flooring is installed.
Working withhumidity controls
A homeowner who chooses hardwood flooring ismaking an investment in a floor that will last 40 yearsor more, and he or she should protect that investmentby installing humidity controls — a tool that helps thefloor maintain a beautiful, trouble-free appearance.
Cracks and separationsbetween boards
Nearly every floor endures some separation betweenboards. In winter, when homes are heated and the airis dry, wood flooring gives up some of its moisture andtherefore shrinks. When that happens, thin cracksappear between. This is normal, and homeownersshould be forewarned of this. It is acceptable, and cus-tomers should not be calling the installers at the firstsign of cracks. Once the indoor heat goes off in thespring, and the indoor environment regains moisture,most of these cracks will close up.
Cracks in winter — in the drier months — mayeasily develop to the thickness of a dime (1⁄32 inch) forsolid 21⁄4 -inch wide strip oak floors. Floors with light-stained woods and naturally light woods like mapletend to show cracks more than darker, wood-tonefinished floors.
The cure for cracks? Homeowners should addmoisture to the air during dry periods. It’s theirchoice — live with the cracks and wait until spring,or else add humidity by opening the dishwasherafter a rinse cycle, switching off the bathroom fan orhanging laundry to dry in the basement near the fur-nace. Better yet, install a humidifier in the furnace,or an exterior air vent for the furnace burner.
If cracks are a concern, laminated flooring movesless and shows fewer gaps.
Cupping and crowning “Cupping and crowning” are common complaints
that develop with high humidity. Both problemsoccur across the width of the flooring material.
Cupping is when the edges of a board are highand its center is lower. It can occur after water spillsonto the floor and is absorbed by the wood, but highhumidity is more often the cause. If the woodexpands significantly, compression set can result asthe boards are crushed together, deforming theboards at the edges.
Cupping is caused by a moisture imbalancethrough the thickness of the wood: The wood is wet-ter on the bottom of the board than on the top. Themoisture imbalance can be proven by taking mois-ture meter readings at different pin depths.
The first step in repairing a cupped floor is toidentify and eliminate the moisture source. In the
2
3
4
1
Cupping and Crowning
Water spilled on the surface of the woodflooring or rising through the subfloor endsup trapped between the wood flooring andthe subfloor.
Cupping occurs when the bottom of thewood flooring remains wetter than the topsurface, which dries faster than the bottom.
If the floor is sanded before the boards havehad a chance to thoroughly dry and flattenout on their own, the top surface will initiallybe flat, while the bottoms of the boardsremain cupped.
Crowning occurs when the bottoms of theboards eventually dry and flatten out, leavingthe tops of the boards with a convex profile.

20 © 1996 NATIONAL WOOD FLOORING ASSOCIATION
N A T I O N A L W O O D F L O O R I N G A S S O C I A T I O N T E C H N I C A L P U B L I C A T I O N N o . A 1 0 0
kitchen, it may be a leak from the dishwasher or ice-maker. From outdoors, it might be the terrain of thelot, with rain and runoff not moving away from thehouse and foundation. Indoors, the humidity mayneed to be controlled, or a plumbing leak may becausing excess moisture in the basement, whichmigrates up into the subfloor and from there into thewood flooring.
Once the source of the moisture is controlled, cup-ping can usually be cured. The floor may improve onits own as it dries out over time. Other times, fansmay be needed to speed the drying process. Once themoisture content has stabilized, the floor can bereassessed. Choices may be to do nothing at all, torecoat the floor or to sand and refinish the floor. How-ever, it should not be sanded until moisture-meterreadings indicate the floor is thoroughly dried.
Crowning is the opposite of cupping: The center ofa board is higher than the edges. Moisture imbalanceis sometimes the cause of crowning if excessive mois-ture is introduced on the top of the floor, perhapsfrom water used in maintenance or plumbing leaksfrom an overhead sprinkler system. However, a com-mon cause is that the floor was previously cupped,but was sanded at the wrong time — before the mois-ture content returned to normal and the board flat-tened on its own. (See illustration on page 19.)
It should be noted that some slight cupping andcrowning may occur naturally, and should be toler-ated: The bark side of lumber shrinks and swellsmore than the side closest to the center of the tree.Largely seasonal in occurrence, it’s common inwider planks. Its appearance can be minimized byusing a beveled-edge flooring product with a satinfinish, rather than square-edge flooring with a highgloss finish.
Buckled floorsThe “buckling” of hardwood floors — when the
flooring literally pulls away from the subfloor, risingup to several inches in one or more places — is oneof the most extreme reactions to moisture that canoccur. Fortunately, it is not a common occurrence.
Buckling happens most often after a floor isflooded for a time, but there are numerous othercauses. On nailed floors, insufficient nailing, incor-rect nails or incorrect subfloor construction are pos-sibilities. On glue-down floors, the causes range fromthe use of incorrect or insufficient mastics to aninadequate mastic transfer, a subfloor separation ora subfloor contamination.
In flooded hardwood strip flooring, the swellingstress is theoretically high enough to push out walls.However, before that can happen the nails or theglue holding the flooring to the subfloor will usuallygive way, so that the floor bulges upward.
If buckling floors are caught early, spot repair andreplacement may be possible. Once the standingwater is removed, several boards may be taken upfrom the floor so that air can be circulated acrossand below the floor more effectively. Once the floorhas dried to a more stable moisture level, repairs canusually be made.
Some tips on maintenanceThe enjoyment of wood flooring depends on some
routine but minimal maintenance details. Theseinclude:
• Sweep your floors or use a dust mop daily, butdo not use a household dust treatment, as thismay cause your floors to become slick or dullthe finish.
• Vacuum your floor regularly, as often as youwould vacuum carpets.
• Clean your floor’s coated surface with a lightlydampened cloth using a recommended cleaningproduct, and according to the manufacturer'sdirections for use.
• Never damp mop a wood floor. In all cases, useminimum water, because water causes deterio-ration of the wood itself, as well as the finish.
• Buy a “floor care kit” that your installer or floor-ing retailer recommends instead of counting ona home-made remedy of vinegar and water toclean your floors. Different finishes have differ-ent maintenance requirements, and it’s best tofollow professional advice in this area.
• Clean light stains by rubbing with a damp cloth.• Avoid using mops or cloths that leave excessive
water on the floor. Never let a spill of water dryon the floor.
• Control humidity levels by use of a dehumidifieror humidifier. You may need to add portableunits in some rooms.
• Have your floors recoated periodically as the fin-ish shows wear.
• Do not clean your wood floors with water orwater-based products on a regular schedule.Clean only when necessary and clean only thesoiled areas.

© 1996 NATIONAL WOOD FLOORING ASSOCIATION 21
N A T I O N A L W O O D F L O O R I N G A S S O C I A T I O N T E C H N I C A L P U B L I C A T I O N N o . A 1 0 0
Wood Flooring OverRadiant Heating
Radiant heating is a growing source of heatingin North America, both in residential and com-mercial installations. Consequently, it’s impor-
tant for installers to understand how radiant heatingworks with hardwood flooring installations.
Radiant heating does not heat air directly as domore conventional forms of heating, such as base-board convectors or forced air circulation. Radiantheat is “omni-directional.” Unlike warm air, whichtends to rise, radiant energy tends to travel in alldirections. A large area of mild surface temperatures,such as a warm floor, is capable of transferring asmuch heat as a small surface area, such as a steamradiator, at high surface temperatures.
Radiant heat beneath wood flooring involves tub-ing in concrete, or tubing under plywood subfloors.
The most important factor in a successful woodflooring installation over radiant heat is a dry slaband a dry subfloor. The only sure way to dry a slaband subfloor system is to turn on the radiantheating system before installing the wood floor-ing. If this isn’t done, moisture left in the slab willenter the wood flooring as soon as the heat is turnedon. The result is floors that will expand, contract,shrink, crack, cup and bow excessively. If the heatcan’t be turned on, then everyone involved — downto the homeowner — should understand and acceptthe compromises that will appear down the road.
Opinions on the amount of time required varywidely. Some say the heating system should beturned on at least 72 hours before installation, witha preferred time of five to six days. That assumesthat the slab has been in place for at least 60 days.(See “Testing concrete” on page 16.) If the slab is rel-atively new, the recommendation is to have the heat-ing system turned on for 30 to 60 days beforeinstalling wood floors. As always, follow the recom-mendations of your wood flooring manufacturer.
Wood dries rapidly when the heat is first turnedon. It dries to a lower moisture content toward theend of the heating season. When the radiant heat isturned off, moisture once again starts to seep intothe wood subfloor and radiant slab. Abruptly turningon the radiant heat in the fall will subject wood floor-ing to rapid and easily noticed movement: Evidenceof this movement will be cupping or crowning of theboards. Finally, shrinkage cracks will appearbetween individual floor boards. Alternatively, gradu-ally turning the heat on before the first really coolday will begin the seasonal movement more gradu-ally. Thus, the movement of the floor will be muchless noticeable. As always, humidity controls canhelp offset flooring expansion and contraction.
Not all species of wood are good candidates for aninstallation over radiant heating. It’s best to follow themanufacturer’s recommendation for a species’ suit-ability over radiant heat. When possible, choose a
species that is known for its stability. Quartersawn orrift-sawn flooring is preferable to plainsawn in thesearch for stability. Strip flooring is also a betterchoice than plank flooring, because narrow boardsexpand and contract less than wide boards do. Usingnarrow boards also means there are more seams in afloor to take up movement. Because of its dimensionalstability, laminated flooring is another good choice.
Radiant heating systems are currently designedto run cooler than they did years ago, althoughwater supplied to the systems generally range from90 degrees to 140 degrees. In years past, when watertemperatures exceeded 140 degrees, wood fiberswere repeatedly traumatized, causing stress frac-tures, gaps and twisting. Repeated heating and cool-ing also broke down the adhesive that bonded thehardwood to the slab.
But today, a set of thermostat controls can helpavoid those problems. It is recommended to havethree thermostats — one to control the tubing watersupply temperature; one to control the room temper-ature with different zone controls; and one for outsidethe house. This three-thermostat system is kindestto wood flooring, because it moderates the floor tem-perature. People tend to crank up the heat whenthey’re cold, but with three thermostats, the systemadapts itself to conditions both inside and out. Theoutside thermostat gears up the system for thearrival of colder weather, and a thermostat adjustingthe control water temperature on the tubing will keepthe temperature at the homeowner’s comfort level.
Four Types of Radiant Heat Installation

22 © 1996 NATIONAL WOOD FLOORING ASSOCIATION
N A T I O N A L W O O D F L O O R I N G A S S O C I A T I O N T E C H N I C A L P U B L I C A T I O N N o . A 1 0 0
Acclimation of wood . . . . . . . . . . . . . . . . . . . . . . . . 4, 11at the jobsite . . . . . . . . . . . . . . . . . . . . . . . . . . . . . . . . . . 11at the warehouse. . . . . . . . . . . . . . . . . . . . . . . . . . . . . . 11Builder’s checklist . . . . . . . . . . . . . . . . . . . . . . . . . . . . . 14
Basements. . . . . . . . . . . . . . . . . . . . . . . . . . . . . . . . . . . . . . . 7
Builder’s checklist . . . . . . . . . . . . . . . . . . . . . . . . . . . . . 14
Calcium chloride test . . . . . . . . . . . . . . . . . . . . . . . . . 17
Capillary rise . . . . . . . . . . . . . . . . . . . . . . . . . . . . . . . . . . . 8
Concrete . . . . . . . . . . . . . . . . . . . . . . . . . . 8, 10, 16, 17, 21calcium chloride test . . . . . . . . . . . . . . . . . . . . . . . . . . 17electrical testing of . . . . . . . . . . . . . . . . . . . . . . . . . . . . 16humidity test. . . . . . . . . . . . . . . . . . . . . . . . . . . . . . . . . . 17moisture from. . . . . . . . . . . . . . . . . . . . . . . . . . . . . . 8, 10 phenolphthalein test . . . . . . . . . . . . . . . . . . . . . . . . . . 17polyfilm test . . . . . . . . . . . . . . . . . . . . . . . . . . . . . . . . . . . 17radiant heating. . . . . . . . . . . . . . . . . . . . . . . . . . . . . . . . 21subfloors over. . . . . . . . . . . . . . . . . . . . . . . . . . . . . . . . . . 9testing for moisture . . . . . . . . . . . . . . . . . . . . . . . . . . . 16
Cracks and separations. . . . . . . . . . . . . . . . . . . . . . . 19
Crawl spaces . . . . . . . . . . . . . . . . . . . . . . . . . . . . . . . . . . . . 8
Cupping and crowning. . . . . . . . . . . . . . . . . . . . . . . . 19
Dimensional stability . . . . . . . . . . . . . . . . . . . . . . . . 4, 6dimensional change coefficient . . . . . . . . . . . . . . . . . 6
Equilibrium moisture content . . . . . . . . . . . . . . . . . 5
Flooringlaminated flooring . . . . . . . . . . . . . . . . . . . . . . . . . . . 4, 7maintenance . . . . . . . . . . . . . . . . . . . . . . . . . . . . . . . . . . 20over radiant heating . . . . . . . . . . . . . . . . . . . . . . . . . . . 21seasonal movement . . . . . . . . . . . . . . . . . . . . . . . . . . . 19
Homes: Exteriorbelow-grade, on-grade, above-grade. . . . . . . . . . . . . 7construction of . . . . . . . . . . . . . . . . . . . . . . . . . . . . . . . . . 7water table . . . . . . . . . . . . . . . . . . . . . . . . . . . . . . . . . . . . . 8
Homes: Interioreveryday sources of moisture . . . . . . . . . . . . . . . . . . . 9flooring in basements. . . . . . . . . . . . . . . . . . . . . . . . . . . 7flooring maintenance tips. . . . . . . . . . . . . . . . . . . . . . 20humidity and temperature chart. . . . . . . . . . . . . . . . 5humidity controls . . . . . . . . . . . . . . . . . . . . . . . . . . . . . 19“normal living conditions” . . . . . . . . . . . . . . . . . . . . . 11
Humidity and temperature chart . . . . . . . . . . . 5
Humidity test . . . . . . . . . . . . . . . . . . . . . . . . . . . . . . . . 17
Laminated flooring . . . . . . . . . . . . . . . . . . . . . . . . . 4,7
Lumber seasoning . . . . . . . . . . . . . . . . . . . . . . . . . . . . 5
Maintenance . . . . . . . . . . . . . . . . . . . . . . . . . . . . . . . . . 20
Moisture content . . . . . . . . . . . . . . . . . . . . . . . . . . 4, 5, 6changes in EMC . . . . . . . . . . . . . . . . . . . . . . . . . . . . . . . . 5definition . . . . . . . . . . . . . . . . . . . . . . . . . . . . . . . . . . . . . . . 4equilibrium moisture content . . . . . . . . . . . . . . . . . . . 5regional variations . . . . . . . . . . . . . . . . . . . . . . . . . . . . . . 6
map of . . . . . . . . . . . . . . . . . . . . . . . . . . . . . . . . . 12-13
Moisture meters. . . . . . . . . . . . . . . . . . . . . . . . . . . . . . . 15pinless moisture meters . . . . . . . . . . . . . . . . . . . . . . . 15probe moisture meters . . . . . . . . . . . . . . . . . . . . . . . . 15readings on packaging. . . . . . . . . . . . . . . . . . . . . . . . . . 6
Moisture retarders. . . . . . . . . . . . . . . . . . . . . . . 8, 9, 10felt paper . . . . . . . . . . . . . . . . . . . . . . . . . . . . . . . . . . . 9, 10over subfloors . . . . . . . . . . . . . . . . . . . . . . . . . . . . . . . . . . 9polyethylene sheets . . . . . . . . . . . . . . . . . . . . . . 8, 9, 10
Phenolphthalein test . . . . . . . . . . . . . . . . . . . . . . . . . 17
Polyfilm test . . . . . . . . . . . . . . . . . . . . . . . . . . . . . . . . . 17
Radiant heating . . . . . . . . . . . . . . . . . . . . . . . . . . . . . 21
Relative humidity . . . . . . . . . . . . . . . . . . . . . . . . . . 5, 9
Sources of moisture. . . . . . . . . . . . . . . . . . . . . . 8, 9, 10capillary rise. . . . . . . . . . . . . . . . . . . . . . . . . . . . . . . . . . . . 9concrete. . . . . . . . . . . . . . . . . . . . . . . . . . . . . . . . . . . . . . . 10crawl spaces. . . . . . . . . . . . . . . . . . . . . . . . . . . . . . . . . . . . 8ground water . . . . . . . . . . . . . . . . . . . . . . . . . . . . . . . . . . . 8house . . . . . . . . . . . . . . . . . . . . . . . . . . . . . . . . . . . . . . . . . . 9mechanical systems . . . . . . . . . . . . . . . . . . . . . . . . . . . . 9new construction . . . . . . . . . . . . . . . . . . . . . . . . . . . . . . . 8relative humidity . . . . . . . . . . . . . . . . . . . . . . . . . . . . . . . 9subfloors . . . . . . . . . . . . . . . . . . . . . . . . . . . . . . . . . . . . . . . 9surface water . . . . . . . . . . . . . . . . . . . . . . . . . . . . . . . . . . . 8
Subfloors . . . . . . . . . . . . . . . . . . . . . . . . . . . . . . . . . . . . 9, 16moisture from . . . . . . . . . . . . . . . . . . . . . . . . . . . . . . . . . . 9 testing for moisture . . . . . . . . . . . . . . . . . . . . . . . . . . . 16
Testing for moisture problems . . . . . . . . . . 15, 16moisture meters. . . . . . . . . . . . . . . . . . . . . . . . . . . . . . . 15testing concrete . . . . . . . . . . . . . . . . . . . . . . . . . . . . . . . 16testing subfloors. . . . . . . . . . . . . . . . . . . . . . . . . . . . . . . 16
Trees . . . . . . . . . . . . . . . . . . . . . . . . . . . . . . . . . . . . . . . . . . . 3, 4fibers . . . . . . . . . . . . . . . . . . . . . . . . . . . . . . . . . . . . . . . . 3, 4live. . . . . . . . . . . . . . . . . . . . . . . . . . . . . . . . . . . . . . . . . . . 3, 4
Troubleshooting . . . . . . . . . . . . . . . . . . . . . . . . . . . . . . . 18buckled floors . . . . . . . . . . . . . . . . . . . . . . . . . . . . . . . . . 20cracks and separations. . . . . . . . . . . . . . . . . . . . . . . . 19cupping and crowning. . . . . . . . . . . . . . . . . . . . . . . . . 19dealing with customers. . . . . . . . . . . . . . . . . . . . . . . . 18
Vapor barriers . . . . . . . . . . . . . . . . . . . . . . . . . . . 8, 9,10
Walk-out basements . . . . . . . . . . . . . . . . . . . . . . . . . 7
Wooddimensional stability . . . . . . . . . . . . . . . . . . . . . . . . . 4, 6fibers . . . . . . . . . . . . . . . . . . . . . . . . . . . . . . . . . . . . . . . . . . . 4fiber saturation point. . . . . . . . . . . . . . . . . . . . . . . . . 4, 5hygroscopic qualities . . . . . . . . . . . . . . . . . . . . . . . . . . . 4movement in boards. . . . . . . . . . . . . . . . . . . . . . . . . . . . 4oven-dry weight. . . . . . . . . . . . . . . . . . . . . . . . . . . . . . . . . 4quartersawn vs. plainsawn . . . . . . . . . . . . . . . . . . . . . 6shrinkage and swelling . . . . . . . . . . . . . . . . . . . . . . . . . 4
INDEX

© 1996 NATIONAL WOOD FLOORING ASSOCIATION 23
N A T I O N A L W O O D F L O O R I N G A S S O C I A T I O N T E C H N I C A L P U B L I C A T I O N N o . A 2 0 0
NWFA TECHNICAL AND EDUCATION COMMITTEE
• John Hoopes, 3M Company, committee chair
• Coley Armstrong, Basic Coatings
• Joe Audino, Rode Brothers Floors
• Don Bollinger, Wood Floor Products
• Jeff Buysse, Minuteman International
• Bill Carnel, 3M Company
• Don Conner, Harris-Tarkett Inc.
• Tom Conser, The Roane Company
• Tom Derleth, Indiana Hardwood Specialists
• Galen Fitzel, 3M Company
• Kevin Hacke, Maple Flooring Manufacturers’ Association
• John Mayers, Dura Seal
• Tim McCool, Dri-Tac Adhesives Group
• Mickey Moore, National Oak Flooring Manufacturers’ Association
• Neil Moss, Hartco Flooring
• Bob Vanderlinden, Bruce Hardwood Floors
• Dick Walters, Erickson’s Flooring & Supply
THE FOLLOWING SOURCES WERE CONSULTEDIN COMPILING THIS PUBLICATION:
• Wood Handbook: Wood as an Engineering Material(Agriculture Handbook 72), Forest Products Labora-tory, Forest Service, U.S. Department of Agricul-ture, revised 1987.
• Hardwood Floors: Laying, Sanding and Finishing,Don Bollinger, Taunton Press, 1990.
• Residential and Light Building Construction,Stephens W. Nunnally and Joan A. Nunnally, Prentice-Hall Inc., 1990.
• Wood as Building and Hobby Material, Hans Kubler, John Wiley & Sons, 1980.
• Construction Principles, Materials and Methods,Harold B. Olin, The Institute of Financial Educa-tion, 1975.
• Water in Wood, Christen Skaar, Syracuse Wood Science Series, Syracuse University Press, 1972.
• An Introduction to the Seasoning of Timber, W.H. Brown, The MacMillan Company, 1965.
THE FOLLOWING INDIVIDUALS,ORGANIZATIONSAND COMPANIES CONTRIBUTED INFORMATION,SERVED AS REVIEWERS, OR BOTH:
• Bast Hardwood Floors, John Bast
• Beckett Brothers Floor Company, Steve Beckett
• Boone Flooring, Daniel Boone
• Brickman Wood Floors, Howard Brickman
• Buffalo Hardwood Floor Center, Jim Caroll
• C.A. Newell Company, Monte Asken,
• Clarke Industries
• Design Flooring Distributors Inc., Wayne Cotton
• Design Hardwood Products, John Goss
• Diamond “W” Floor Covering Inc., Dennis Parks
• Dynamic Laser Applications, Jim Garth
• Franklin International, Derick Cooper
• Golden State Flooring Company, Chris Coates
• Great American Hardwood Floors, Larry Bailey
• Hartco Flooring, Gene Failor
• Junckers Hardwood, John Safarik
• McSwain Hardwood Floor Company, Ralph McSwain
• Mesquite Products of Texas, Jim Tomerlin
• National Oak Flooring Manufacturers’ Association
• Plaza Hardwood Inc., Paul Fuge
• University of Massachusetts, Dr. Bruce Hoadley
• University of Wisconsin, Dr. Gene Wengert
• U.S. Forest Products Laboratory
• Wagner Hand-Held Electronic Products, Cynthia Biondi
• Woodpecker Hardwood Floors, Terry Noble
SOURCES AND CREDITS