waste as art – precious resources · web viewstudents investigate the things they use each day by...
TRANSCRIPT

Waste as art – precious resourcesThis document references Creative Arts K-6 Syllabus © NSW Education Standards Authority (NESA) for and on behalf of the Crown in right of the State of New South Wales, 2006. The illustrations used in this document are copyright © Cara MacLeod, 2011.
The precious resources resource kit, funded by the NSW Environmental Trust, is a generic version of resources developed by Woollahra Council for their Environmental Schools Sculpture Prize (2010). This resource should be used in conjunction with a guide to implementing waste as art and environmental art projects in schools.
The NSW Environmental Trust welcomes the use of these resources within the restraints imposed by the Copyright Act 1968 (Commonwealth). Provided acknowledgement is made of the source, Australian school staff, community groups and council staff are permitted to copy this material freely for the purpose of teaching students in schools or communicating with parents and others in the community.
Table of contentsLesson 1 – things we make and use............................................................................................2
Lesson 2 – what’s the problem?...................................................................................................5
Lesson 3 – living sculptures..........................................................................................................7
Lesson 4 – extraordinary objects................................................................................................10
Lesson 5 – weaving local places................................................................................................12
Lesson 6 – what does it mean to you?.......................................................................................15
© NSW Department of Education, 2018. This project has been assisted by the New South Wales Government through its Environmental Trust.

Lesson 1 – things we make and use
Lesson overview
Students investigate the things they use each day by viewing examples of Lucas Ihlein’s environmental audit of art. Students will be encouraged to think about what their own artworks and ways to be more environmentally sustainable. Students will complete an environmental audit of an art lesson they have recently completed at school.
Lesson outcomes
VAES1.3, VAS1.3, VAS2.3, VAS3.3
Cross curriculum links
English, Science and Technology (Values and attitudes, Knowledge and understanding), HSIE (Geography )
You will need
internet access to show The Story of Stuff video; digital copy of The Ins and Outs of an Artwork (2010) by Lucas Ihlein; pencils and markers; butchers paper and (optional) paints, paper and coloured pencils if extension activity is to be undertaken.
Activities
Introduction
What are some things we use each day? Ask students to share something they have used since they arrived at school. What is needed to make these things? Brainstorm ideas on the board
© NSW Department of Education, 2018. This project has been assisted by the New South Wales Government through its Environmental Trust.

(energy, water, resources, petrol, packaging).By viewing all or part of The Story of Stuff or by using the facts presented bellow help students understand that everyday around the world we use thousands of precious resources that often get thrown away and can’t be used again.
Artist Case Study
Lucas Ihlein is an artist who lives and works in Sydney. One of the ways he investigated the things we make and use, specifically in art, was by carrying out an environmental audit of ‘In the Balance: Art for a Changing World’, an exhibition of art with environmental themes at the Museum of Contemporary Art. An environmental audit is when you investigate the resources that go into creating something to find out what kind of impact the creation has on the environment.
Display the diagram, The Ins and Outs of an Artwork (2010, offset lithographic print on paper) by Lucas Ihlein. It represents the environmental audit he carried out. This environmental audit shows everything that went into making and exhibiting the artworks, as well as showing the results that came out of the exhibition. Ihlein included all the energy and resources used to make and exhibit the various artworks including materials, transport, work done by people and money. These items are labelled as Ins. The outs include the many good and bad outcomes including pleasure, behaviour change, waste materials and ideas. He even counted the energy and resources it took to make cups of coffee for meetings and flush the toilets! Consider using the following questions in a class discussion.
What are some of the energy and resources that went into the exhibition? What are some of the good and bad things that came out of the exhibition? Do you think it was worthwhile to use these resources to create the exhibition? Why or why
not? Have you ever thought about how many resources go into making all the things we use
each day?
Environmental audit
Choose a recent art project your class has completed to conduct an environmental audit on. In small groups, students should take a piece of butcher’s paper and develop their own environmental audit mind map (for earlier stages, this could be investigated and developed as a class). To do this brainstorm all the resources used to make the art project (paper, scissors, glue, paints). Students could attempt to sketch these items instead of writing them down. Also consider the energy or water that might have gone into the project (lights in the classroom, kiln, fans, water to wash brushes).
Display the mind maps on the wall and, as a class, discuss the following points. Do you think the art project was good for the environment? Why or why not? What were
some of the good things that came out of it? What were some of the bad things? What extra resources might have gone into making the actual art equipment used?
(chemicals, plastic, metal) Would energy and water have been needed to make them too? What are some ways the class could make their future art projects better for the
environment? Are paper and plastics recycled and reused? Are brushes soaked in a bucket rather than washed under a running tap? Can old items be reused such as yoghurt and
© NSW Department of Education, 2018. This project has been assisted by the New South Wales Government through its Environmental Trust.
butter tubs rather than buying new plastic palettes and tubs? Brainstorm some ideas the class can put into practice.
How could students conduct an environmental audit in their home? Some examples include auditing their dinner or breakfast one day, a toy they have in their room, or their computer or iPad. Help students to understand they can save resources at home as well as school.
Extension
Students choose important sustainability messages that have come out of their environmental audit and create posters to remind the class about sustainability in the classroom. For example, saving water, saving energy, recycling and reusing paper and materials.
© NSW Department of Education, 2018. This project has been assisted by the New South Wales Government through its Environmental Trust.
Lesson 2 – what’s the problem?
Lesson overview
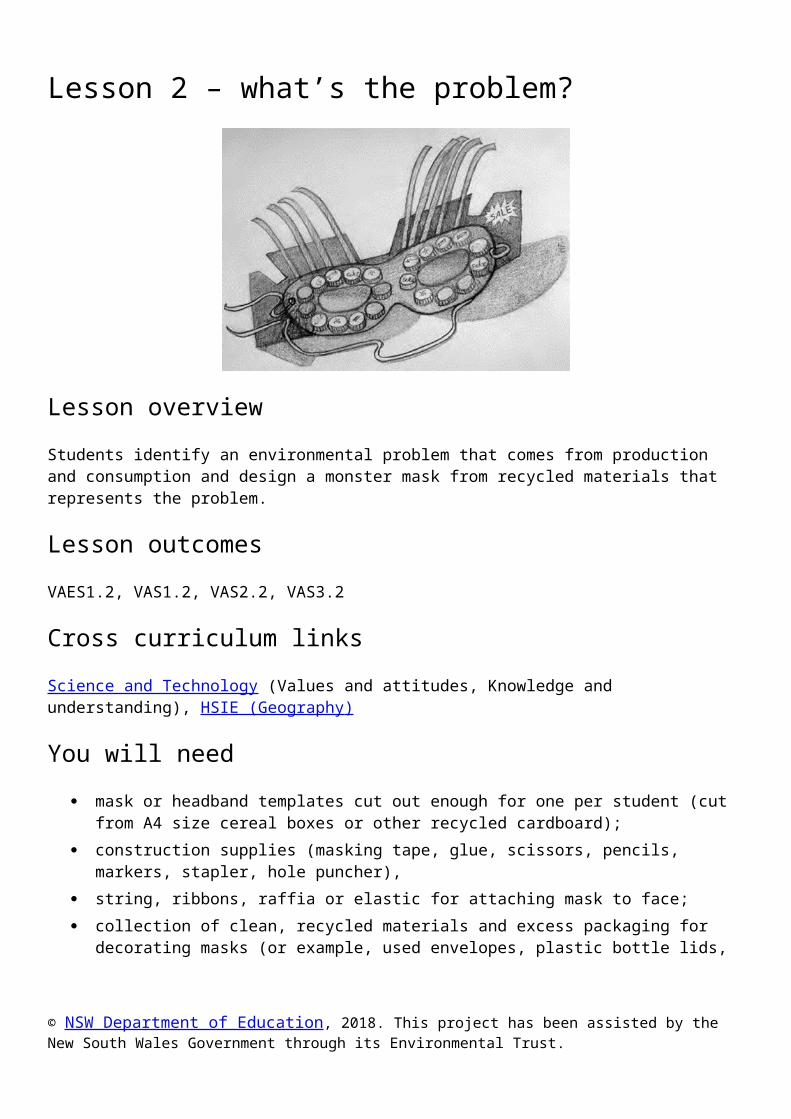
Students identify an environmental problem that comes from production and consumption and design a monster mask from recycled materials that represents the problem.
Lesson outcomes
VAES1.2, VAS1.2, VAS2.2, VAS3.2
Cross curriculum links
Science and Technology (Values and attitudes, Knowledge and understanding), HSIE (Geography )
You will need
mask or headband templates cut out enough for one per student (cut from A4 size cereal boxes or other recycled cardboard);
construction supplies (masking tape, glue, scissors, pencils, markers, stapler, hole puncher),
string, ribbons, raffia or elastic for attaching mask to face; collection of clean, recycled materials and excess packaging for decorating masks (or
example, used envelopes, plastic bottle lids, small containers, colourful paper, boxes and egg cartons, plastic wrappers, bubble wrap, soft foam sheets) and
a camera to document the extension activity.
© NSW Department of Education, 2018. This project has been assisted by the New South Wales Government through its Environmental Trust.
Activities
Introduction
Display the collection of found objects and recycled materials in front of the students. Ask students how some of these objects could be reused or repurposed? For example, an empty container could become a plant pot, old bottle lids could become eyes, pieces of plastic or glass could become beads.
Mask making
As a class choose an environmental problem that occurs because of wasteful production and consumption for example, excess packaging.
Each student then takes a pre-cut mask or headband template and creates a collage of materials on the surface to represent the chosen environmental problem on their monster mask. For older students, they may wish to cut out their own mask template from recycled cardboard. Or, they may be at a stage where total autonomy of their waste art piece is appropriate.
Students use glue or tape to attach paper and foil, and may also tie things like string and ribbons, or staple things such as foam, plastic or waste packaging to create their monster mask face. Demonstrate some basic techniques needed to join different materials together.
As students work, discuss the different qualities of the collected materials including where they came from, whether they are disposable or recyclable, and artistic qualities such as colour and texture.
Once masks are complete and dry, hole punch and attach, or staple, ribbon, string or elastic to the mask to fit to each student’s face.
Extension
Students perform a walk, action or performance to share their message about conserving and reusing resources. Encourage students to think of a performance that reflects the environmental problem that is represented by the mask they have made.
© NSW Department of Education, 2018. This project has been assisted by the New South Wales Government through its Environmental Trust.

Lesson 3 – living sculptures
Lesson overview
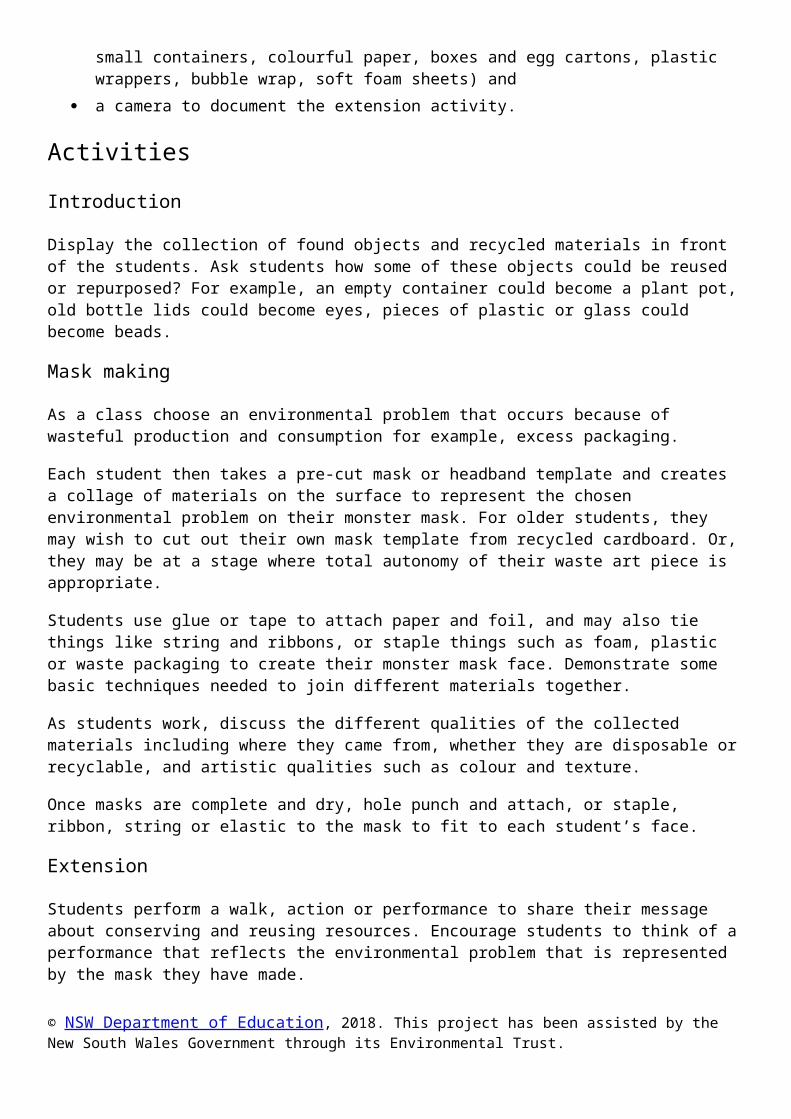
Students look at artworks made from recycled materials and living plants and learn about living art as an alternative to using new resources. They then use similar techniques to create their own living sculptures and arrange these in a collaborative installation in the classroom.
Lesson outcomes
VAES1.2, VAS1.2, VAS2.2, VAS3.2
Cross curriculum links
Science and Technology (Values and attitudes, Knowledge and understanding), HSIE (Geography )
You will need
images of Manna (2009) by Lauren Berkowitz and 7000 Oaks (1980) by Joseph Beuys; wheatgrass seeds, students will only need a thin scattering of seeds on their cotton wool for
best results; Cotton wool, a bag of the ripples kind rather than balls; water to wet the cotton wool and clear, recycled, plastic containers or cut water bottle bases 5-10cm deep (at least one per
student).
© NSW Department of Education, 2018. This project has been assisted by the New South Wales Government through its Environmental Trust.
Activities
Introduction
Not all art requires the use of lots of resources, or generates a lot of waste. Many artists have made art about caring for the environment and using things from the environment in their artworks. They send us environmental messages through their actions and use of materials in their sculpture installations.
Show images of 7000 Oaks by Joseph Beuys. Beuys believed that artists could be part of their own artwork. He helped to create a new form of art known as performance art. In his 7000 Oaks project from the 1980’s, Beuys made the act of planting trees into a work of art. His performance involved inviting many volunteers to be artists by helping him to plant 7000 trees all over the city of Kassel in Germany. The project took about five years to complete and the oaks still stand in the city today, reminding people to care more about nature.
Show images of ‘Manna’ (2009) by Lauren Berkowitz. This ‘artwork’ consists of 250 edible and medicinal plants, including Australian natives, European vegetables and herbs. The broader community and local primary students helped collect recycled plastic bottles and to grow the plants and seedlings. These plants were given back to schools and members of the community at the end of the exhibition. Ask your students;
This artwork has been described as a visual banquet of colours and textures. What colours, textures and shapes can you see in the artwork?
Is there anything interesting or beautiful about the artwork? What does it remind you of? Have you seen an artwork like this before? Do you grow any of your own fruits or vegetables at home?
Making Living Sculptures
Set up art stations around the classroom with enough materials for 3-5 students to share (a large handful cotton wool, several centimetres of water in the bottom of an ice cream container, a spare, small bottle of water, a container full of wheat grass seeds and one clear, plastic container that can hold water for each student)
Students carefully dunk their cotton wool into water or tip a little bit into their containers. Next students place the damp cotton wool, a few centimetres deep, into the bottom of their containers. Scatter a thin layer of wheat grass seeds across the surface. Students should then place their containers somewhere sunny and keep the cotton wool damp over the coming days. Depending on water and sunlight, the wheat grass should take 6-8 days to grow.
Alternatively, as in Lauren Berkowitz’s artworks, the class could create a plant nursery with seedling punnets put inside the plastic containers of water or place cuttings of different kinds of mint or succulents directly in containers of water, watching them grow roots in the water over time and later planting them in a garden at home or at school.
Once each container has sprouted, consider how the class could display their group of living sculptures to create an interesting composition. Students could experiment with arranging their containers in a row, a geometric grid, a circle or a pyramid. Encourage students to design an
© NSW Department of Education, 2018. This project has been assisted by the New South Wales Government through its Environmental Trust.
interesting arrangement for their own group installation. Remind them that placement is important for practical reasons too - they must consider the environmental factors of light and water needed for their living sculptures to grow. Students could place their containers on top of other containers or boxes to create different heights and levels.
Extension
Students and teachers could document the process of installation in sketches or photographs as their plants grow. Once the project is complete, students could take their plant home to juice, eat or plant in the garden. Parts could also be separated for waste, compost and recycling.
© NSW Department of Education, 2018. This project has been assisted by the New South Wales Government through its Environmental Trust.

Lesson 4 – extraordinary objects
Lesson overview
By looking at a range of surrealist artworks, students learn about how found objects can be reused and transformed into art. The theme of transforming everyday objects is then explored in drawing and 3D forms. Students experiment with ideas and sculpture techniques to create an original sculpture using recycled materials.
Lesson outcomes
VAES1.2, VAS1.2, VAS2.2, VAS3.2, VASES1.4, VAS1.4, VAS2.4, VAS3.4
Cross curriculum links
Science and Technology (Values and attitudes, Knowledge and understanding)
You will need
found everyday objects to be made into art (old shoes, clothes, hats, kitchen utensils) and assorted recycled materials collected from home, a charity shop (for example, foam off-cuts,
aluminium foil, used wrapping paper and cardboard, paddle pop sticks, coloured string, wire, cotton wool, plastic lids, straws, small boxes, natural materials, fibres, tissue paper).
Activities
Introduction
Familiar objects can be transformed into extraordinary art, becoming humorous or strange. When we collect and reuse things to make artworks they are called found objects. This is a great way to reuse our precious resources - by giving them a second life! About 90 years ago, artists tried to create art differently by taking everyday objects and transforming them into imaginative and bizarre artworks. Artists that took everyday objects and transformed them into something strange and new
© NSW Department of Education, 2018. This project has been assisted by the New South Wales Government through its Environmental Trust.

were called surrealist artists. This means they used real and recognisable objects in their artworks, but transformed them into something that wouldn’t normally fit together.
Show Bicycle Wheel (1913) by Marcel Duchamp. This artist had been trying to show that things were moving in his paintings but couldn’t quite get it right, so instead he used an actual spinning bicycle wheel in his sculpture. Show Object (Luncheon in Fur) (1936) by Meret Oppenheim. This artist covered a teacup, saucer and spoon in fur. It is meant to make us curious, but also a little bit disgusted. Show Gift (1921) by Man Ray. He combined a flat iron and nails, so the iron lost its original purpose - if you tried to use it, you would tear the clothes you were trying to iron.
Questions for the class: What are the effects of these transformed objects? How do they make you feel? Surprised, confused, amused? What are some other combinations you could use in art to transform a real object into
something new and strange? What message might it have for the environment?
Sketching
Each student should sketch a familiar found object (a clock, a shoe, a brick, a shell, a hairbrush, a book). They then sketch different ideas for adding unusual materials or objects that create new meanings and strange or humorous effects. Encourage students to use their imaginations to create extraordinary, unexpected combinations, particularly those which might have an environmental story or message behind it. When they have drawn their transformed object, students can give their drawing a title.
Transforming objects
Arrange art materials so they are accessible to the whole class and encourage students to experiment by combining different materials to create their surreal sculpture. For example, a shell is a natural found object, so what might it mean to mutate it with pieces of man-made plastic that often end up in the ocean?
Once students have gathered their materials, demonstrate to the class some simple sculpture techniques such as gluing, folding, taping or bending. Students then transform their object by mixing media, changing the colour or texture of their object, or changing its function. Encourage students to use 3D forms imaginatively and give their transformed object a title when they have joined everything securely. As they work, help students to consider what environmental story about saving resources their surreal sculpture might tell.
Evaluation
Ask students to self-assess their work. Ask open ended questions to encourage thoughtful, personal responses. For example; what object did you use? Why? How have you transformed it? How is your artwork extraordinary? What environmental story does your sculpture tell? What do you like about your work? How could you improve it? Evaluations could be used to produce descriptive text to accompany art pieces.
© NSW Department of Education, 2018. This project has been assisted by the New South Wales Government through its Environmental Trust.
Extension
Students could also develop a small clay sculpture by adding new textures and unusual parts to a model of their everyday object.
Lesson 5 – weaving local places
Lesson overview
Students look at artwork by Evonne Koolmatrie and how she represents her country and culture by weaving with natural fibres. In their own work, students represent their local environment using colours and textures in a recycled or fibre-based weaving.
Lesson outcomes
VAES1.1, VAS1.1, VAS2.1, VAS3.1
Cross curriculum links
Science and Technology (Knowledge and understanding), HSIE (History, Geography )
You will need
image of Eel Trap (1997) by Evonne Koolmatrie; recycled fibres of various colours and textures for weaving (raffia, string, wool, natural fibres
(reeds, paper bark) or textiles/plastic bags cut or torn into 30cm long thin strips); paddle pop sticks, bamboo skewers or flat bamboo (available in a bundle/ roll) and masking tape.
© NSW Department of Education, 2018. This project has been assisted by the New South Wales Government through its Environmental Trust.

Activities
Induction
Display the collected weaving materials in an accessible way to be seen and touched by the whole class – either several containers in the centre of group tables or a separate resource table.
Discuss the colours and textures of these materials and how they could be used to represent qualities of a place. Students describe colours, textures and materials that represent qualities of places. Soft blue material might suggest a clear blue sky and rough brown twine might look and feel like rough bark of a tree. If you choose to use organic materials, weaving with palm fronds could literally represent palm trees. Students then brainstorm special places in the local environment for example, the school grounds, a local park, waterway or beach. These places will form the subject matter of the student’s weavings and are all places that are affected by the misuse of our precious resources.
Artist case study
Show students a picture of Eel Trap (1997) by contemporary Aboriginal artist Evonne Koolmatrie. She uses natural weaving materials such as plant fibres from her traditional Ngarrindjeri country in South Australia.
This woven sculpture is based on the eel traps that were used along the Murray River by Indigenous Australians. The eels would swim into the large end of the trap and their heads would become trapped in the small end. Koolmatrie has a special place on the banks of the Murray River where she collects her weaving materials and creates her artworks in the beautiful natural environment she calls her ‘garden’. Create a class discussion about Koolmatrie’s work by posing the following questions;
The artist is careful to only pick enough grass for her weaving and leave plenty behind to continue growing. Why is this important?
Does this weaving tell us anything about the special place that this artist loves? What kind of environment do you think it is? A busy city? A forest? A quiet river?
These traps show how Indigenous Australians would catch their own food instead of buying it from the supermarket. How could this help save precious resources? Could you grow some of your own fruit and vegetables at home or at school?
Weaving
Students create a weaving that expresses some of the qualities they have noticed about a special place in their local environment. Follow these seven steps to create a woven art work (younger stages may need steps 1 – 3 completed for them).
1. Each student takes two paddle pop sticks or two bamboo skewers and forms a cross with them.
2. Students select strips of weaving materials in colours and textures that remind them of their special place;
© NSW Department of Education, 2018. This project has been assisted by the New South Wales Government through its Environmental Trust.

3. Students tie their first piece of weaving material tightly around the centre of the cross. Students could work in pairs, with someone holding the material and sticks down with a finger while the other ties the knot.
4. To begin their weaving, students wrap weaving material around one stick, then thread it under the next stick and wrap it around, then thread it over the third stick and wrap it around, then thread it under the last stick and wrap it around. Finally, thread it back over the first stick and wrap it around once again. The two sticks should now be joined securely. Check that students understand the process of wrapping around each stick and weaving under and over. Students continue the same process until they reach the end of their first piece of weaving material.
5. Students then choose another strip of weaving material, tie it onto the first piece and continue weaving. The materials should be woven tightly together so there are no gaps. Encourage your students to pay attention to detail, keeping loose ends hanging out the back and selecting materials carefully with an interesting mixture of colours and textures to represent their local place.
6. When students have finished their weaving, they will need to tie off the end. Then trim and tie off any other loose ends, preferably on the back, so they are not visible on the front.
7. Finally, display all works grouped as individual pieces in a formal or informal grid. It can be beneficial for the students to have their say in the placement of their own work in relation to the others. This is also a good opportunity for them to explain their place and what their weaving represents to the rest of the class.
© NSW Department of Education, 2018. This project has been assisted by the New South Wales Government through its Environmental Trust.
Lesson 6 – what does it mean to you?
Lesson overview
Students recall and discuss the precious resources we use and sometimes waste, and consider what sustainability means to them. As a class, students choose an environmental issue related to production and consumption and design a group sculpture, made of individual clay or recycled material pieces, to represent it.
Lesson outcomes
VAES1.2, VAS1.2, VAS2.2, VAS3.2
Cross curriculum links
Science and Technology (Knowledge and understanding), HSIE (Geography ) .
You will need
photographs from the internet or magazines of an area where precious resources are often wasted (for example: energy, e-waste, private transport, clothing or food);
pencils and A4 paper and a camera for photographing students work.
If making ceramics 5-10 kg block of terracotta, air-drying or paper clay; wire cutter or fishing line; wooden clay modelling tools, skewers, forks, paddle pop sticks; plastic containers and clean, plastic bags for storage and plywood boards or newspaper for drying.
If using recycled materials
© NSW Department of Education, 2018. This project has been assisted by the New South Wales Government through its Environmental Trust.
assorted recycled waste materials including foam off-cuts, aluminium foil, used wrapping paper and cardboard, paddle pop sticks, coloured string, wire, cotton wool, plastic lids, small boxes or tubes, natural materials, fibres, string, wire, tissue paper and
scissors, glue, masking tape, staplers.
Activities
Discussion
There are many areas where precious resources are often wasted in our society - in the old computers and mobile phones we throw away (this is called e-waste), in the clothes we no longer wear, food we don’t finish, cars we drive when we could walk or catch public transport. These things represent precious resources that are wasted when we consume too much, or are careless when we throw them away. Discuss your chosen area in detail. Can you find some statistics on how many resources are consumed or wasted each year? Is there information on a sustainable way to manage these resources? Can you find out anything about the resources? Could they be partially or fully saved, reused or used better?
Artist Case Study
Fiona Hall is a contemporary Australian artist, many of her art works and installations focus on the wast produced by mass consumerism and western society. Some of her works including Give a dog a bone (1996) could be explored with the class.
Designing a group sculpture
Students create objects in 3D which will represent their chosen environmental problem or sustainable solution. Students use sculpture techniques in recycled mixed media or ceramics to produce similar objects to contribute to a group display. Everyone must clearly label their work, particularly when creating similar objects so as not to get lost amidst the group display.
For example, if using recycled materials with the chosen topic of energy, students might each make something to contribute to a garden of solar panels and wind generators made from recycled wire, foil, cardboard boxes and tubes, cut sheets of aluminium cans or plastic bottles. If using ceramics with the chosen topic of e-waste, students may each make a clay slab model of a mobile phone. When sculptures are finished and bisque fired if possible, the teacher can assemble a display by piling them up, partially burying them or displaying them on a photographic background image to suggest the idea of landfill.
Extension
Older students may wish to complete this task individually. Students select an area of waste that means something to them and decide individually how to represent it.
Allow students time to find images online or in library books so they have images to sketch in 2D, and then develop into a 3D object. Their personal response might be representational or abstract, using images which have a personal or special meaning. Encourage students to express a
© NSW Department of Education, 2018. This project has been assisted by the New South Wales Government through its Environmental Trust.

message about sustainable use of resources or the impact of our wasteful consumer society on resources.
© NSW Department of Education, 2018. This project has been assisted by the New South Wales Government through its Environmental Trust.