washing machine manual a5 les - camec - camec … · to reduce the risk of electric shock, do not...
TRANSCRIPT
INDEX
1
Parts Identification and Accessories . . . . . . . . . . . . . . . . . . . . . . . . . . . . . . . . . . . . 2
Safety Information . . . . . . . . . . . . . . . . . . . . . . . . . . . . . . . . . . . . . . . . . . . . . . . . . 3
Installation . . . . . . . . . . . . . . . . . . . . . . . . . . . . . . . . . . . . . . . . . . . . . . . . . . . . . . . 4
Control Panel Layout . . . . . . . . . . . . . . . . . . . . . . . . . . . . . . . . . . . . . . . . . . . . . . . 7
Fully Automatic Washing . . . . . . . . . . . . . . . . . . . . . . . . . . . . . . . . . . . . . . . . . . . . 8
Operation . . . . . . . . . . . . . . . . . . . . . . . . . . . . . . . . . . . . . . . . . . . . . . . . . . . . . . . . 9
Cleaning and Maintenance . . . . . . . . . . . . . . . . . . . . . . . . . . . . . . . . . . . . . . . . . . 10
Troubleshooting and Specifications . . . . . . . . . . . . . . . . . . . . . . . . . . . . . . . . . . . 11
Error Codes. . . . . . . . . . . . . . . . . . . . . . . . . . . . . . . . . . . . . . . . . . . . . . . . . . . . . . 12
Warranty . . . . . . . . . . . . . . . . . . . . . . . . . . . . . . . . . . . . . . . . . . . . . . . . . . . . . . . . 13
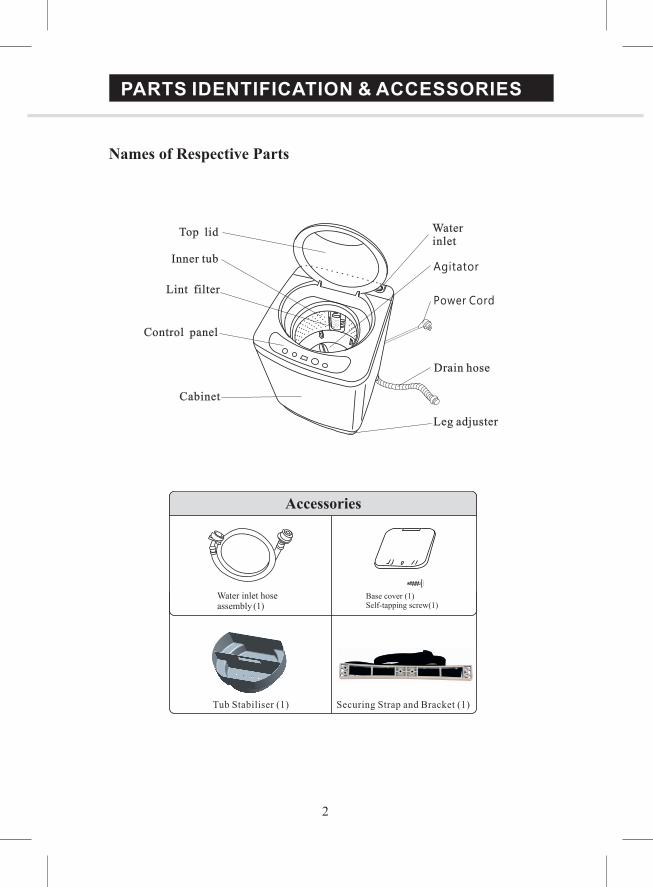
PARTS IDENTIFICATION & ACCESSORIES
Power Cord
Agitator
Tub Stabiliser (1) Securing Strap and Bracket (1)
Names of Respective Parts
2
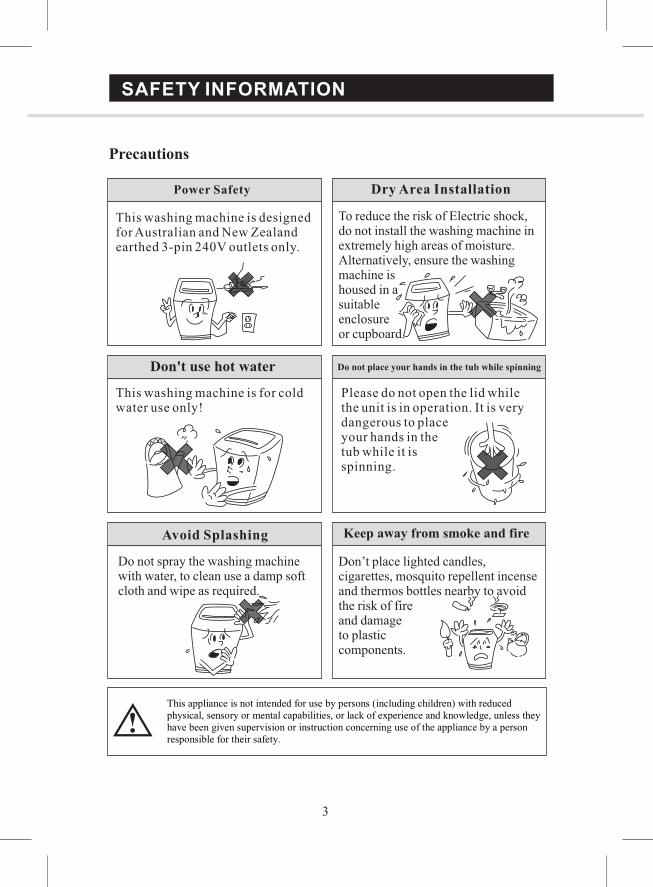
To reduce the risk of Electric shock, do not install the washing machine in extremely high areas of moisture. Alternatively, ensure the washing machine is housed in a suitable enclosure or cupboard.
SAFETY INFORMATION
Power Safety
This washing machine is designed for Australian and New Zealand earthed 3-pin 240V outlets only.
This washing machine is for cold water use only!
Please do not open the lid while the unit is in operation. It is very dangerous to place your hands in the tub while it is spinning.
Avoid Splashing
Don’t place lighted candles, cigarettes, mosquito repellent incense and thermos bottles nearby to avoid the risk of fire and damage to plastic components.
Precautions
3
Do not spray the washing machine with water, to clean use a damp soft cloth and wipe as required.
Dry Area Installation
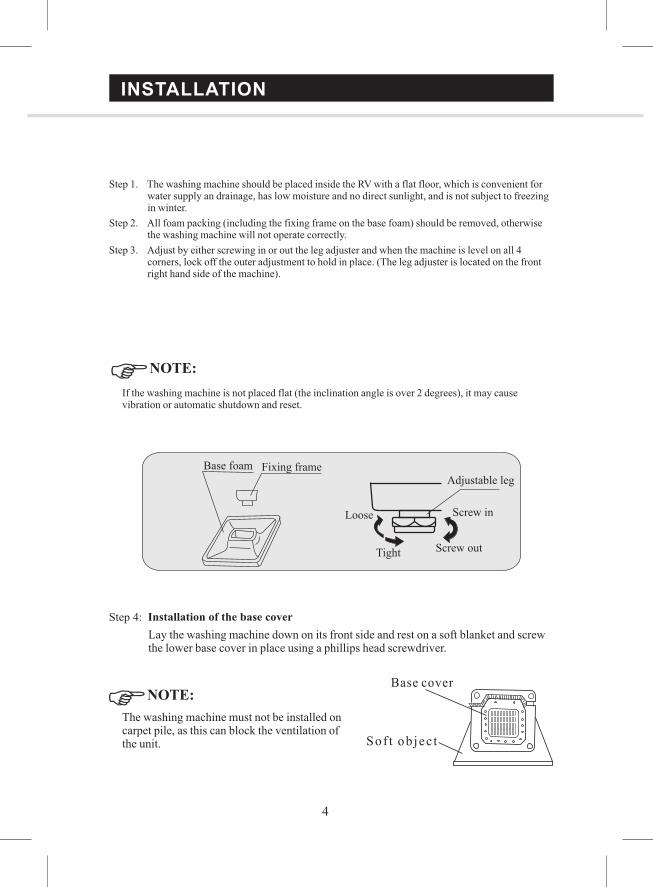
INSTALLATION
Step 1. The washing machine should be placed inside the RV with a flat floor, which is convenient for water supply an drainage, has low moisture and no direct sunlight, and is not subject to freezing in winter.
Step 2. All foam packing (including the fixing frame on the base foam) should be removed, otherwise the washing machine will not operate correctly.
Step 3. Adjust by either screwing in or out the leg adjuster and when the machine is level on all 4 corners, lock off the outer adjustment to hold in place. (The leg adjuster is located on the front right hand side of the machine).
If the washing machine is not placed flat (the inclination angle is over 2 degrees), it may cause vibration or automatic shutdown and reset.
The washing machine must not be installed on carpet pile, as this can block the ventilation of the unit.
4
Lay the washing machine down on its front side and rest on a soft blanket and screw the lower base cover in place using a phillips head screwdriver.
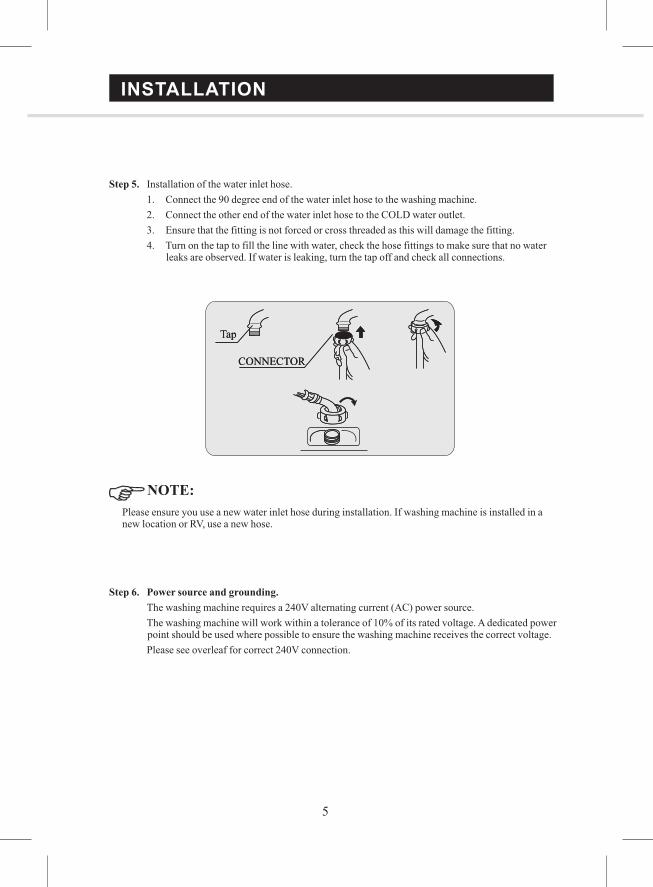
Step 5. Installation of the water inlet hose.
1. Connect the 90 degree end of the water inlet hose to the washing machine.
2. Connect the other end of the water inlet hose to the COLD water outlet.
3. Ensure that the fitting is not forced or cross threaded as this will damage the fitting.
4. Turn on the tap to fill the line with water, check the hose fittings to make sure that no water leaks are observed. If water is leaking, turn the tap off and check all connections.
Please ensure you use a new water inlet hose during installation. If washing machine is installed in a new location or RV, use a new hose.
Step 6. Power source and grounding.
The washing machine requires a 240V alternating current (AC) power source.
The washing machine will work within a tolerance of 10% of its rated voltage. A dedicated power point should be used where possible to ensure the washing machine receives the correct voltage.
Please see overleaf for correct 240V connection.
INSTALLATION
5
INSTALLATION
6
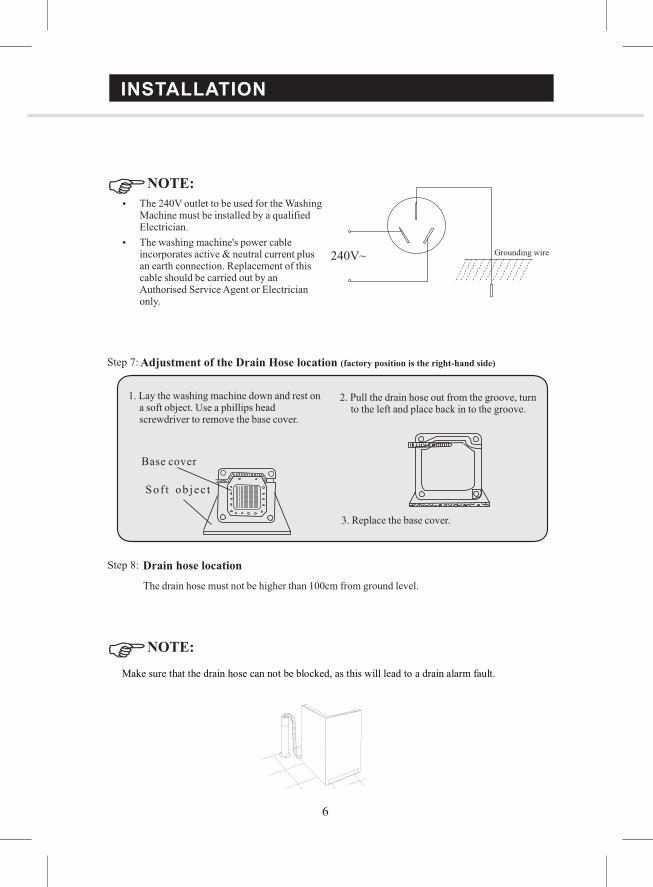
The 240V outlet to be used for the Washing Machine must be installed by a qualified Electrician.
The washing machine's power cable incorporates active & neutral current plus an earth connection. Replacement of this cable should be carried out by an Authorised Service Agent or Electrician only.
Adjustment of the Drain Hose location (factory position is the right-hand side)
1. Lay the washing machine down and rest on a soft object. Use a phillips head screwdriver to remove the base cover.
2. Pull the drain hose out from the groove, turn to the left and place back in to the groove.
3. Replace the base cover.
Drain hose location
The drain hose must not be higher than 100cm from ground level.

CONTROL PANEL LAYOUT
Wash Mode
WASH RINSE
SPIN QUICKWASH
WATER LEVEL WASH MODE
LOW HIGHCOMPACT RV
WASHING MACHINE
POWER ON/OFF
STARTPAUSE
2.5KG
Quick Wash
7
Wash Indicator
Machine is running. Indicates Quick Wash Program is selected.
Power on & off.
Press this button to select between LOW and HIGH water levels
Press this button to select any combination of WASH/RINSE/SPIN, or QUICK WASH
Status Display
To maximise washing machine life, please wait more than 30 seconds when switching the power on and off.
Press to start.
Press again to pause.
Displays wash time remaining (min)
In the event of a fault an error code will be displayed.
FULLY AUTOMATIC WASHING
Preparations before Washing
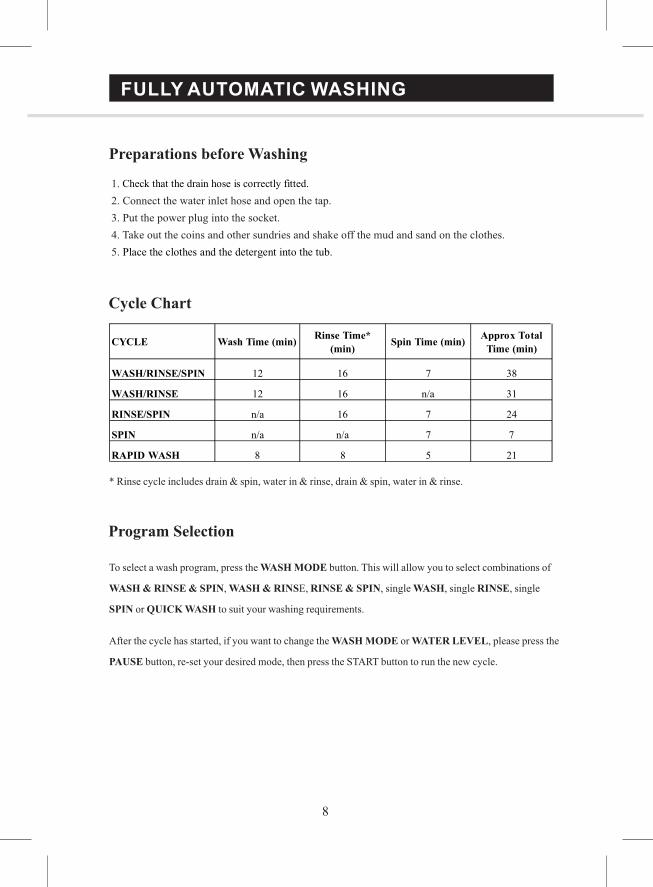
Cycle Chart
Program Selection
8
To select a wash program, press the WASH MODE button. This will allow you to select combinations of
WASH & RINSE & SPIN, WASH & RINSE, RINSE & SPIN, single WASH, single RINSE, single
SPIN or QUICK WASH to suit your washing requirements.
After the cycle has started, if you want to change the WASH MODE or WATER LEVEL, please press the
PAUSE button, re-set your desired mode, then press the START button to run the new cycle.
CYCLE Wash Time (min)Rinse Time*
(min)Spin Time (min)
Approx Total
Time (min)
WASH/RINSE/SPIN 12 16 7 38
WASH/RINSE 12 16 n/a 31
RINSE/SPIN n/a 16 7 24
SPIN n/a n/a 7 7
RAPID WASH 8 8 5 21
* Rinse cycle includes drain & spin, water in & rinse, drain & spin, water in & rinse.
Suggested Water Settings & Usage
OPERATION
9
1. Select the proper water level according to the quantity of clothes.
2. Select the Wash Mode.
3. Close the lid and press the START/PAUSE button.
Pre-washing of dirty clothesFor seriously stained or dirty clothes, run the RINSE/SPIN cycle to perform pre-washing, then add washing powder and select the full WASH/RINSE/SPIN cycle to complete washing.
1.0~2.5kg
CLEANING & MAINTENANCE
Prior to any maintenance or service, please ensure that the power and water have been disconnected from the machine.
When the cycle is complete
At the end of a cycle, the machine will beep to alert you that the cycle is complete. Remove the clothes from the washing machine and insert the Tub Stabiliser in preparation for transit.
To reduce the risk of electric shock and water leakage, disconnect the water & power supply when not in use.
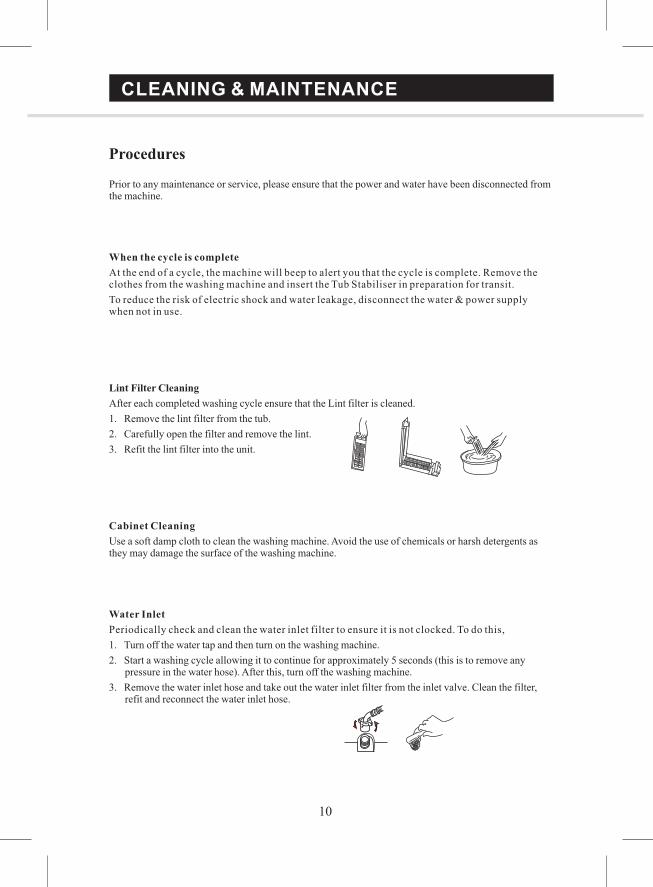
Lint Filter Cleaning
After each completed washing cycle ensure that the Lint filter is cleaned.
1. Remove the lint filter from the tub.
2. Carefully open the filter and remove the lint.
3. Refit the lint filter into the unit.
Cabinet Cleaning
Use a soft damp cloth to clean the washing machine. Avoid the use of chemicals or harsh detergents as they may damage the surface of the washing machine.
Water Inlet
Periodically check and clean the water inlet filter to ensure it is not clocked. To do this,
1. Turn off the water tap and then turn on the washing machine.
2. Start a washing cycle allowing it to continue for approximately 5 seconds (this is to remove any pressure in the water hose). After this, turn off the washing machine.
3. Remove the water inlet hose and take out the water inlet filter from the inlet valve. Clean the filter, refit and reconnect the water inlet hose.
Procedures
10
Note: Ensure that a pressure limiting valve is used if the pressure is outside the above specifications.
TROUBLESHOOTING & SPECIFICATIONS
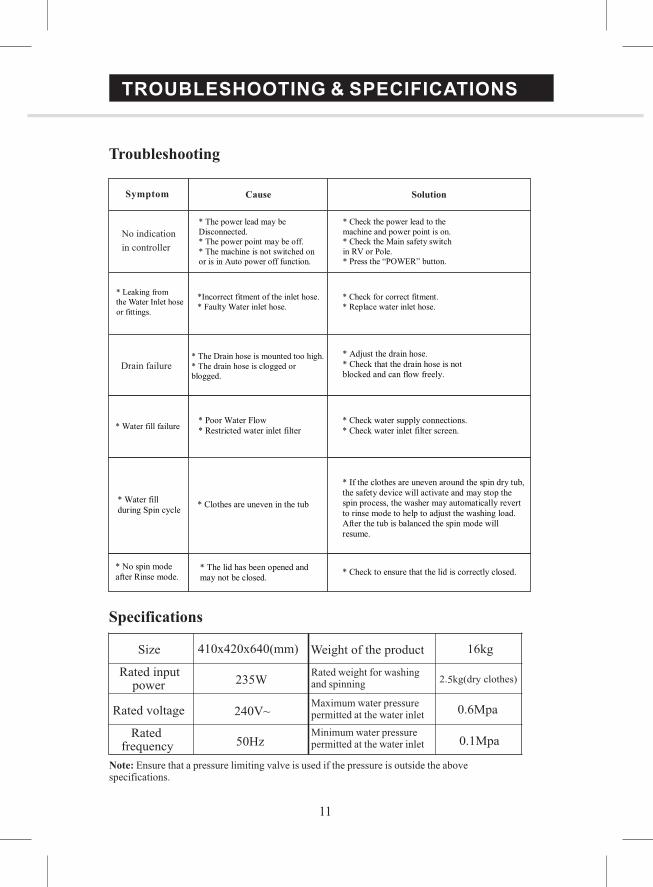
Troubleshooting
Specifications
11
5
Minimum water pressurepermitted at the water inlet
Maximum water pressurepermitted at the water inlet
Rated weight for washingand spinning
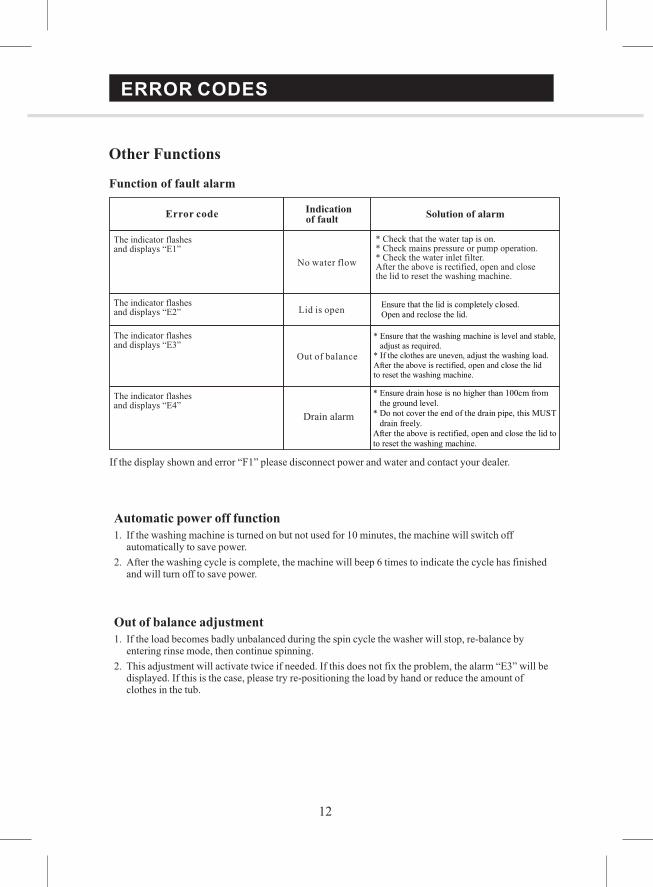
If the display shown and error “F1” please disconnect power and water and contact your dealer.
ERROR CODES
Other Functions
12
The indicator flashesand displays “E1”
* Check that the water tap is on.* Check mains pressure or pump operation.* Check the water inlet filter.After the above is rectified, open and closethe lid to reset the washing machine.
The indicator flashesand displays “E2”
The indicator flashesand displays “E3”
The indicator flashesand displays “E4”
Automatic power off function1. If the washing machine is turned on but not used for 10 minutes, the machine will switch off
automatically to save power.
2. After the washing cycle is complete, the machine will beep 6 times to indicate the cycle has finished and will turn off to save power.
Out of balance adjustment1. If the load becomes badly unbalanced during the spin cycle the washer will stop, re-balance by
entering rinse mode, then continue spinning.
2. This adjustment will activate twice if needed. If this does not fix the problem, the alarm “E3” will be displayed. If this is the case, please try re-positioning the load by hand or reduce the amount of clothes in the tub.
WARRANTY
1.0 Definitions The terms listed below shall have the following meanings: "Camec" means Camec Pty Ltd (ACN 004 846 584) of 47-63 Remington Drive, Dandenong South, Victoria 3175. "Purchaser" means the persons, firm or company being supplied with Products and / or services. "Product" means the equipment purchased by the Purchaser to which this Warranty applies. "Manufacturer" means the original company who created the Product.
2.0 Terms of Warranty 2.1 Camec warrants that, subject to the exclusions and limitations below, the Product will be free from defects in materials
and workmanship under normal use and maintenance for a period of 12 months from the date of supply to the original Purchaser ("Warranty Period"), unless otherwise specified.
2.2 The date of supply to the Purchaser must be evidenced by the original invoice. 2.3 If a defect appears in the Product before the end of the Warranty Period and Camec finds the Product to be defective in
materials or workmanship, Camec will, in its sole discretion, either: a) replace or repair the Product or the defective part of the Product free of charge; b) cause the Product or the defective part of the Product to be repaired or replaced by a qualified repairer free of
charge; or c) provide payment of the cost of having the Product replaced (or acquiring an equivalent Product) or repaired, or
services re-supplied. 2.4 Camec reserves the right to replace defective parts of the Product with parts and components of similar quality, grade or
composition where an identical part or component is not available. 2.5 Products presented for repair may be replaced by refurbished goods of the same type rather than being repaired.
Refurbished parts may be used to repair the Products. 2.6 This Warranty is in addition to any warranties imposed by Australian State and Federal legislation that cannot be
excluded. 2.7 Our goods come with guarantees that cannot be excluded under the Australian Consumer Law ("ACL"). You are
entitled to a replacement or refund for a major failure and for compensation for any other reasonably foreseeable loss or damage. You are entitled to have the goods repaired or replaced if the goods fail to be of acceptable quality and the failure does not amount to a major failure.
3.0 Exclusions 3.1 The Warranty will not apply where: a) the Product has been on-sold or assigned by the Purchaser; b) the Product has been re-installed; c) the Product has been modified or repaired by someone other than Camec or an authorised Camec agent; d) the Product's defect has arisen due to the Purchaser's failure to properly install, fit, maintain, service or use the
Product in accordance with the specifications and instructions provided by the Manufacturer, including a failure to comply with the relevant maintenance schedule (where applicable);
e) Camec cannot establish any fault in the Product after testing; f) The Product has been used other than for the purpose for which it was designed; g) The Product has been subject to abnormal conditions, including but not limited to temperature, pressure, stress,
load or similar; h) The Purchaser or installer has used or fitted non-genuine or non-approved parts and accessories to the Product or
has failed to use recommended parts and accessories; i) The Product's defect has arisen due to abuse, misuse, neglect or accident; or j) The Product has not been installed in accordance with the relevant instructions. 3.2 The Warranty will not extend to: a) fair wear and tear of the Product; or b) expendable parts.
4.0 Limitations 4.1 Camec makes no express warranties or representations other than those set out in this Warranty. 4.2 If a Product was received damaged, it must be returned to Camec within 7 days for warranty purposes. 4.3 Camec is not responsible for the installation of the Product. Any fault or defect due to installation should be referred to
the installer. The Product must be installed in accordance with the Manufacturer's instructions and any relevant legislation or code.
4.4 The repair or replacement of the Product or part of the Product or the cost of re-supplying the services or repairing or replacing the Product is the absolute limit of Camec's liability under this express warranty.
PRODUCT WARRANTY: IMPORTANT INFORMATION PLEASE READ CAREFULLY:
1300 654 936
If your product is faulty or you are experiencing difficulties using this product and require assistance please call our warranty hotline as listed below:
Warranty Hotline:
Camec Pty Ltd47-63 Remington Drive, Dandenong South VIC 3175
13
14
5.0 Warranty Claims 5.1 If a fault covered by the Warranty occurs, the Purchaser must first contact Camec. 5.2 Contact with Camec may be made in any of the following ways: a) Phone 1300 654 936 b) Fax 03 9799 4476 c) Email 5.3 Any Warranty claim from the Purchaser must be accompanied by: a) Proof of purchase; b) Installation details (if applicable); c) Return of Product (unless otherwise advised); d) Full details of the alleged defect; and e) If applicable, evidence of maintenance performed in accordance with the relevant maintenance schedules. 5.4 The cost of delivery and insurance of the Product to and from Camec and the cost of testing the Product are the
responsibility of the Purchaser. 5.5 Where it is deemed that the Product does not have a fault, the Purchaser will be charged a testing fee of $55.00 (GST
exclusive), this is subject to change without notice.
6.0 Returns 6.1 Subject to clause 6.2, Camec may, at its absolute discretion, accept returns of non-defective Products purchased within
30 days of invoice date. If accepted by Camec, returns for Products will incur a re-stocking fee of 25% of the invoiced price, payable on return of the Products.
6.2 If the Purchaser is a consumer under the ACL, nothing in clause 6.1 limits any remedy available for a failure of the guarantees in sections 56 and 57 of the ACL.
WARRANTY