walkthrough_sap_system_offline_copy_sample.docx · web viewwalkthrough - sap central system...
TRANSCRIPT

Walkthrough - SAP Central System “offline copy”
Attachment to blog “Microsoft and SAP NetWeaver – step by stepup to the cloud – Part IV : simple offline copy of a central system”
Author : Hermann Daeubler, Program Manager, Microsoft
Date : Aug 2012
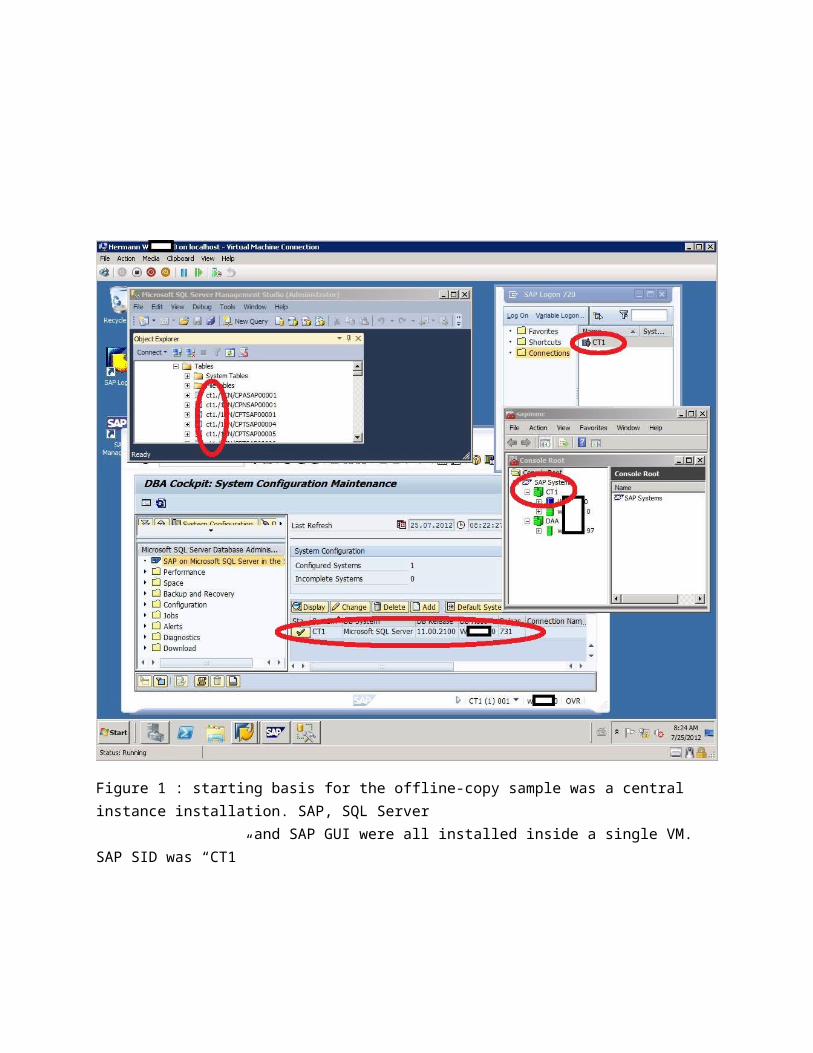
Figure 1 : starting basis for the offline-copy sample was a central instance installation. SAP, SQL Server and SAP GUI were all installed inside a single VM. SAP SID was “CT1”

Figure 2 : the offline-copy sample uses the VMM “clone” feature. It’s therefore a good idea to first check manually in VMM that everything works as expected by going through the VMM clone wizard for the source VM which should be copied

Figure 3 : at the end of the VMM clone wizard one can look at the Powershell script which implements the clone. To narrow down any issues it makes sense to copy these commands one by one and run them. That’s how I figured out a problem related to the VM name ( NOT the VM hostname but the name under which one can see the VM e.g. in Hyper-V manager ). Looking at the error message of one of these commands it became clear pretty quickly that using a hyphen or brackets in a VM name is not a good idea …

Figure 4 : this is a picture of an Orchestrator runbook which prepares the source VM for the copy process. All individual steps will be explained below. The VMM integration pack for Orchestrator was used to provide all the necessary VM-related activities. The basic idea is like this : - create a snapshot on the source VM - then copy a Powershell script to the VM which will be used later on to join a domain - also copy a XML file to run sysprep in unattended mode - change the hostname in the sysprep file - run sysprep and shutdown the source VM - then run another Orchestrator runbook to continue with the copy process
Figure 5 : some global variables were used in Orchestrator to define the target host and storage where the VM copy should be placed as well as the new hostname of the copied VM and the source VM hostname as well as logical name of the source VM

Figure 6 : there is a “get VM” activity which returns all kinds of data for a given VM. It was used to retrieve the VM ID which is needed as a parameter for other activities
Figure 7 : a VM snapshot was taken on the source VM. Running sysprep after taking the snapshot allows to change the hostname for the VM copy. At the end the snapshot will be deleted to return the source VM to its original state and hostname
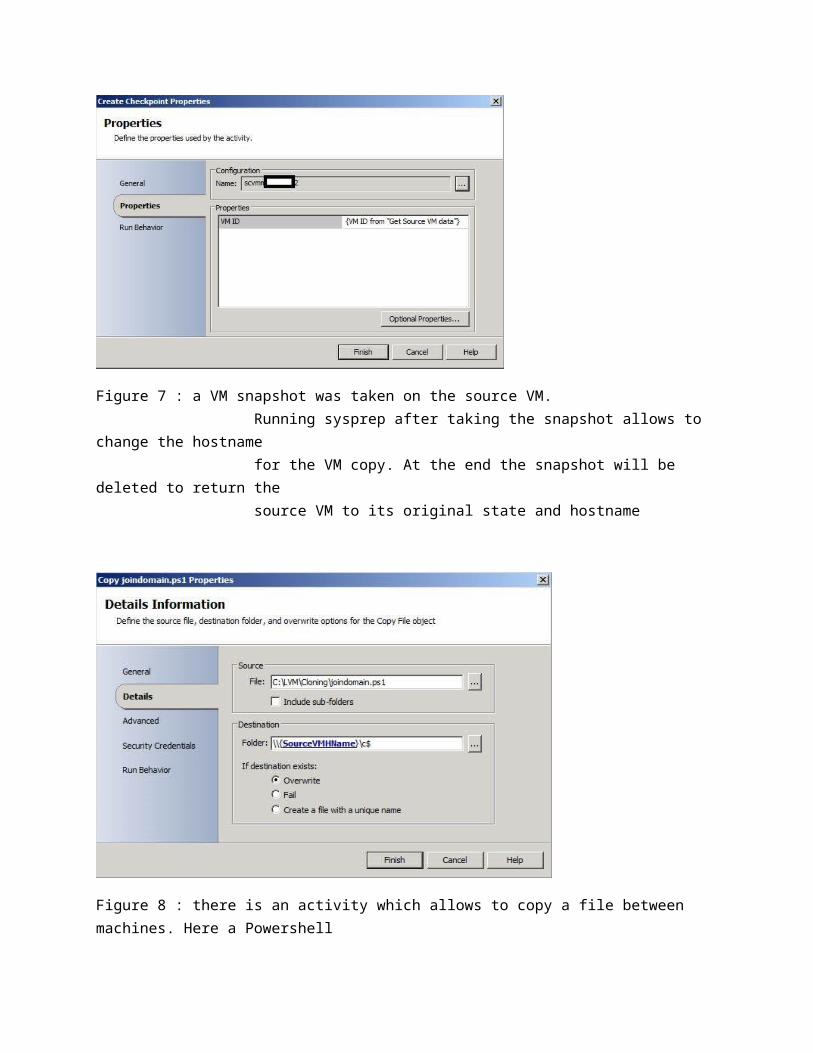
Figure 8 : there is an activity which allows to copy a file between machines. Here a Powershell script was copied from the local Orchestrator server to the source VM. The script was used later on to join the copied VM to a domain :
param ($domain, $user, $dpwd )
$duser = $domain + "\" + $user$localmachine = get-wmiobject Win32_Computersystem
$rc = $localmachine.JoinDomainOrWorkgroup($domain, $dpwd, $duser, $null, 3 )

Figure 9 : afterwards an xml file was copied from the local Orchestrator server to the source VM in order to run an unattended sysprep. The placeholder “%NAME% was replaced by the new hostname which the VM copy should get :
<?xml version="1.0" encoding="utf-8"?><unattend xmlns="urn:schemas-microsoft-com:unattend"> <settings pass="generalize"> <component name="Microsoft-Windows-PnpSysprep" processorArchitecture="amd64" publicKeyToken="31bf3856ad364e35" language="neutral" versionScope="nonSxS" xmlns:wcm="http://schemas.microsoft.com/WMIConfig/2002/State" xmlns:xsi="http://www.w3.org/2001/XMLSchema-instance">
<DoNotCleanUpNonPresentDevices>true</DoNotCleanUpNonPresentDevices> <PersistAllDeviceInstalls>true</PersistAllDeviceInstalls> </component> </settings>
<settings pass="specialize"> <component name="Microsoft-Windows-Shell-Setup" processorArchitecture="amd64" publicKeyToken="31bf3856ad364e35" language="neutral" versionScope="nonSxS" xmlns:wcm="http://schemas.microsoft.com/WMIConfig/2002/State" xmlns:xsi="http://www.w3.org/2001/XMLSchema-instance"> <ComputerName>%NAME%</ComputerName> <TimeZone>UTC</TimeZone> <DisableAutoDaylightTimeSet>true</DisableAutoDaylightTimeSet> </component> <component name="Microsoft-Windows-TerminalServices-LocalSessionManager" processorArchitecture="amd64" publicKeyToken="31bf3856ad364e35" language="neutral" versionScope="nonSxS" xmlns:wcm="http://schemas.microsoft.com/WMIConfig/2002/State" xmlns:xsi="http://www.w3.org/2001/XMLSchema-instance"> <fDenyTSConnections>false</fDenyTSConnections> </component> </settings> <settings pass="oobeSystem"> <component name="Microsoft-Windows-Shell-Setup" processorArchitecture="amd64"

publicKeyToken="31bf3856ad364e35" language="neutral" versionScope="nonSxS" xmlns:wcm="http://schemas.microsoft.com/WMIConfig/2002/State" xmlns:xsi="http://www.w3.org/2001/XMLSchema-instance"> <TimeZone>UTC</TimeZone> <DisableAutoDaylightTimeSet>true</DisableAutoDaylightTimeSet> <OOBE> <ProtectYourPC>3</ProtectYourPC> <SkipMachineOOBE>true</SkipMachineOOBE> <SkipUserOOBE>true</SkipUserOOBE> </OOBE> <UserAccounts> <AdministratorPassword> <Value>………………………………………………………………………………………………………</Value> <PlainText>false</PlainText> </AdministratorPassword></UserAccounts></component></settings></unattend>
Figure 10 : and here is the next activity in the runbook which simply replaced the placeholder in the unattended sysprep xml file with the new hostname

Figure 11 : details of the file path. As one can see parameters from the former copy activity were used
Figure 12 : then sysprep was called on the source VM :
cmd.exe /c %WINDIR%\system32\sysprep\sysprep.exe /generalize /oobe /shutdown /unattend:c:\unattend.xml
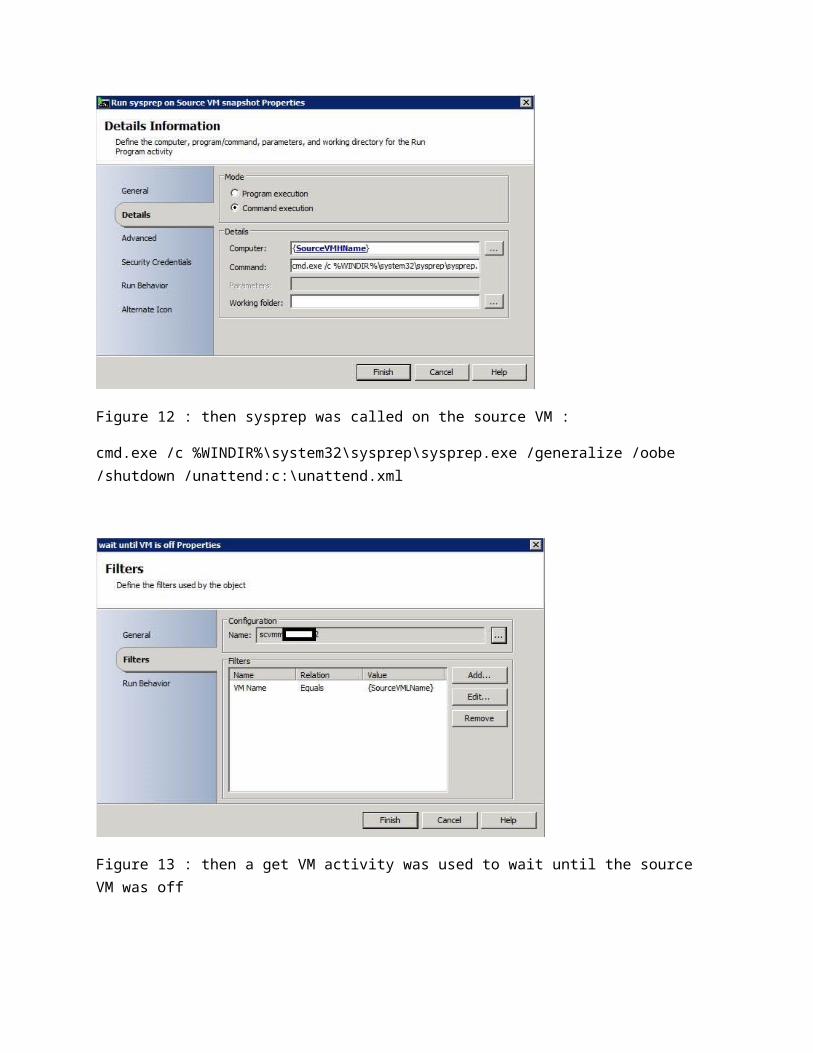
Figure 13 : then a get VM activity was used to wait until the source VM was off
Figure 14 : it turned out during the tests that there might be still a timing issue even if the activity before is in a loop until the state says “off”. A simple ping on the local Orchestrator server was used to add a 90sec break before moving on

Figure 15 : after the preparation another Orchestrator workbook was called using the snapshot ID as a parameter. This was used for further activities in the second runbook
Figure 16 : this was the second Orchestrator runbook. The basic idea was like this : - create a copy from the source VM - start the new copy and join a domain - get rid of the snapshot of the source VM and reset to its original state
The following screenshots will explain the individual steps

Figure 17 : the “initialize data” activity was used to get the snapshot ID from the calling runbook
Figure 18 : then the get VM activity was used again to retrieve the VM ID
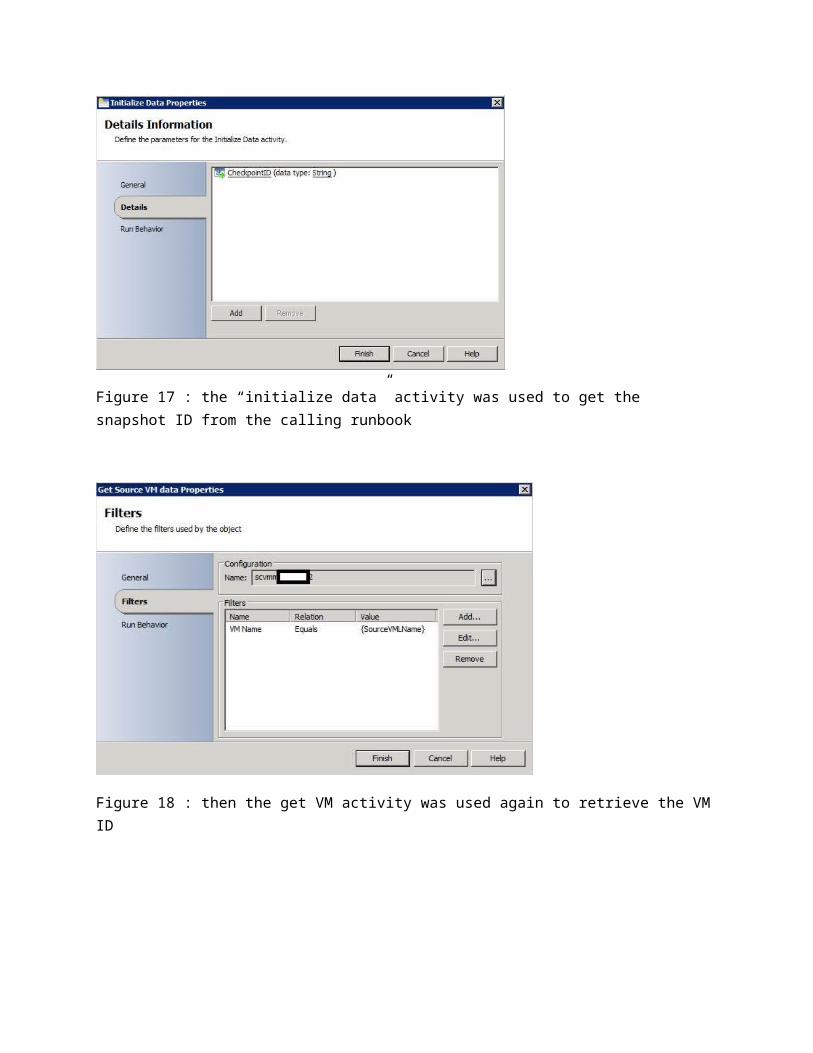
Figure 19 : the “create VM from VM” activity created the copy of the source VM
Figure 20 : in VMM the creation of the new VM copy showed up in the VMM job list

Figure 21 : the first branch after creating the new copy reset the source VM to its original state
Figure 22 : the “restore checkpoint” activity restored the snapshot of the source VM and therefore an undo of the sysprep was done. By deleting the snapshot the source VM also got back its original hostname

Figure 23 : after restoring the snapshot was simply deleted
Figure 24 : then it was possible to start the original source VM again

Figure 25 : the second branch of activities after creating the new VM copy took care of the domain join
Figure 26 : first step was to start the new VM

Figure 27 : the get VM activity was used to wait until the VM was running
Figure 28 : via the looping properties of the activity one can define when the loop should be finished

Figure 29 : there was again a timing issue due to some post-processing after sysprep. The next activity which needed to access Powershell on the new VM failed to start. A simple workaround was to add a break. It’s possible to solve this in a more efficient way by checking if all the sysprep post-processing is finished
Figure 30 : to call the Powershell script on the new VM to join a domain first required the policy setting as it’s not allowed by default. There are items which one could put already in the sysprep unattended XML file or do it later by calling e.g. a script. There are pros and cons. For the domain join the decision was made to just call a Powershell script. Here is the command which was used to set the PS policy :
cmd.exe /c | C:\Windows\SysWOW64\WindowsPowerShell\v1.0\powershell.exe set-executionpolicy unrestricted –force

Figure 31 : after setting the policy the script was called to join a domain :
cmd.exe /c | C:\Windows\SysWOW64\WindowsPowerShell\v1.0\powershell.exe -c c:\joindomain.ps1 domain_xyz user_xyz password_xyz

Here is an example how the domain join could be done via the sysprep unattended XML file.The component would be part of the <settings pass="specialize"> section :
<component name="Microsoft-Windows-UnattendedJoin" processorArchitecture="amd64" publicKeyToken="31bf3856ad364e35" language="neutral" versionScope="nonSxS" xmlns:wcm="http://schemas.microsoft.com/WMIConfig/2002/State" xmlns:xsi="http://www.w3.org/2001/XMLSchema-instance"> <Identification> <Credentials> <Domain>domain_xyz</Domain> <Password>password_xyz</Password> <Username>user_xyz</Username> </Credentials> <JoinDomain>domain_xyz</JoinDomain> </Identification> </component>
Figure 32 : the new VM was shut down after the domain join

Figure 33 : and then the new VM was started
Figure 34 : all single steps of the runbook should be “green” in the log

Figure 35 : same thing for the log of the first runbook – all steps should be “green”

Walkthrough - SAP System Rename 1.0
Attachment to blog “Microsoft and SAP NetWeaver – step by stepup to the cloud – Part IV : simple offline copy of a central system”
Author : Hermann Daeubler, Program Manager, Microsoft Corporation
Date : Aug 2012

Figure 1 : after copying the source VM the SAP system didn’t come up due to the change of the hostname. Only the DAA instance came up using the new hostname correctly. But e.g. SQL Server as well as SAP profile files still included the old hostname

Figure 2 : there is a standalone tool available on the SAP Service Marketplace which helps to make all the necessary changes related to the new hostname to make sure that the SAP system will start. There is still some post-processing required which will be mentioned further down
Figure 3 : the tool can be found on the support portal under “Software Downloads”. On the left side select “Search for Support Packages and Patches” and then type “System Rename”

Figure 4 : the search result should then include a link to the System Rename tool
Figure 5 : especially to support SQL Server 2012 but also in general only the latest version should be downloaded
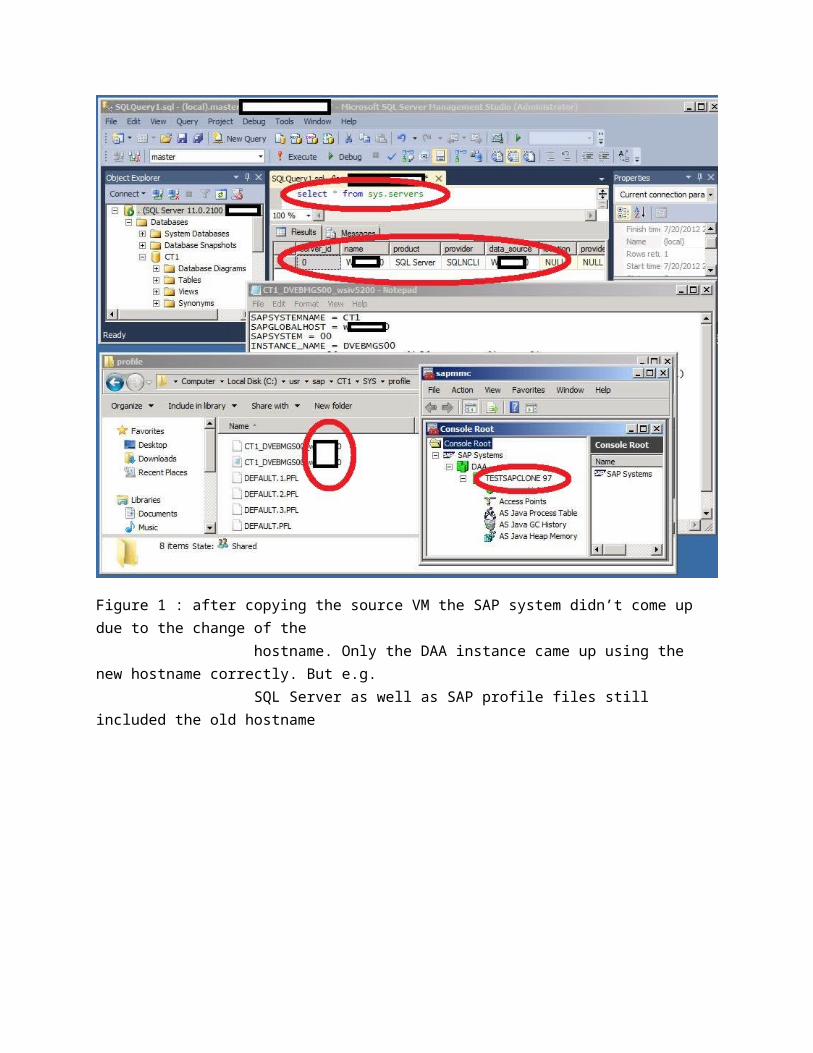
Figure 6 : the tool was built using the sapinst framework. The look&feel is the same as if one would install a new SAP system. For the use case described in the blog the first option of the tool was used. The description doesn’t include a hint about the hostname. But the following screenshots will show that a hostname change is covered by this option too

Figure 7 : for the blog sample the SID was also changed from CT1 to CT2. The value for “SAP Global Host” reflects the change of the hostname during the VM copy process

Figure 8 : for the sample the SAP instance number wasn’t changed
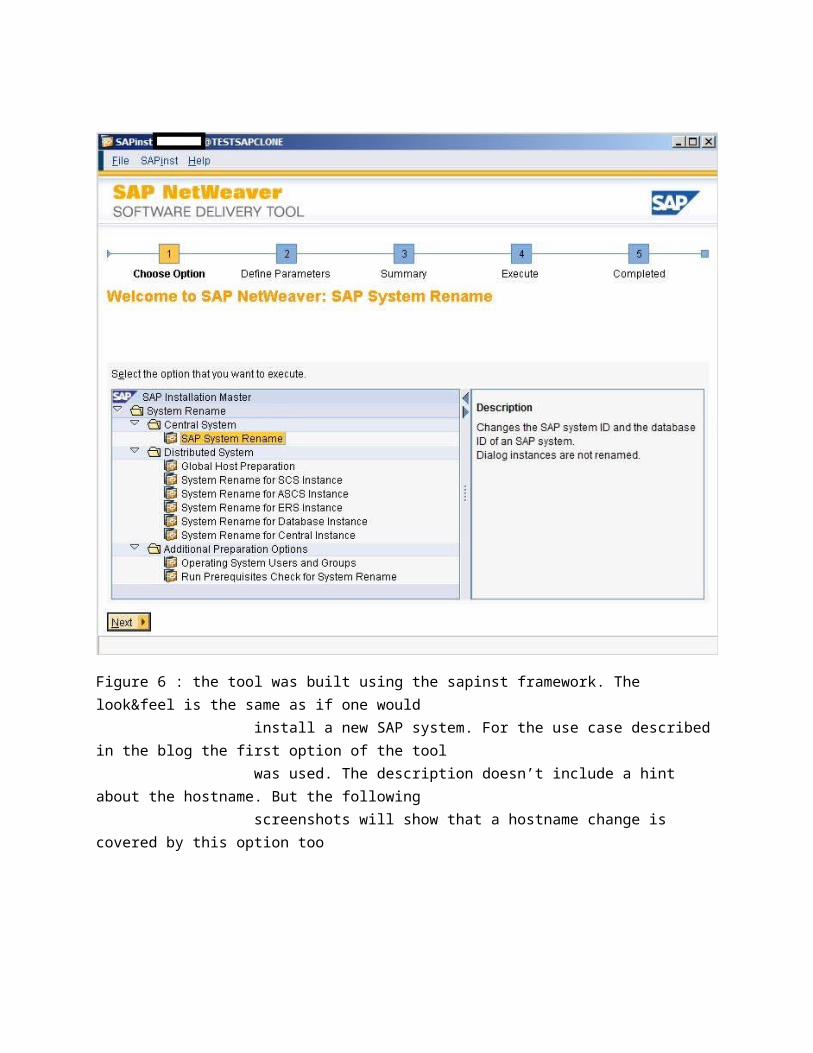
Figure 9 : the database connection had to be adapted to the new hostname
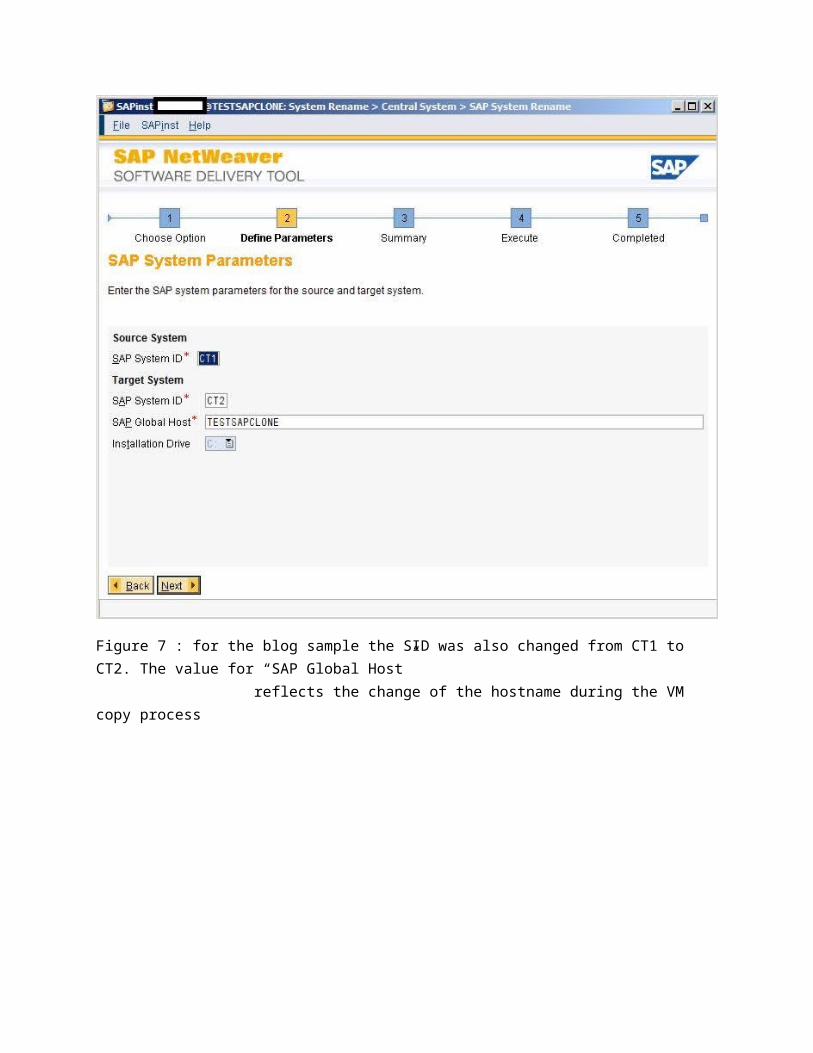
Figure 10 : the database name was adapted to reflect the new SID

Figure 11 : a domain was selected for the SAP system accounts

Figure 12 : passwords ….

Figure 13 : more passwords

Figure 14 : domain information for the SAP system was entered

Figure 15 : no license installation was done. The tool will still continue in this case and install a temp license. There is some additional info related to the SAP license at the end of the walkthrough

Figure 16 : like with a standard sapinst installation there was a summary screen at the end

Figure 17 : at the time when the summary screen shows up there is an inifile available. This could be used to do the whole thing in unattended mode as described for the regular sapinst in SAP note 950619 ( Installation of SAP Systems with Unattended Mode ). An example will be shown in a future blog
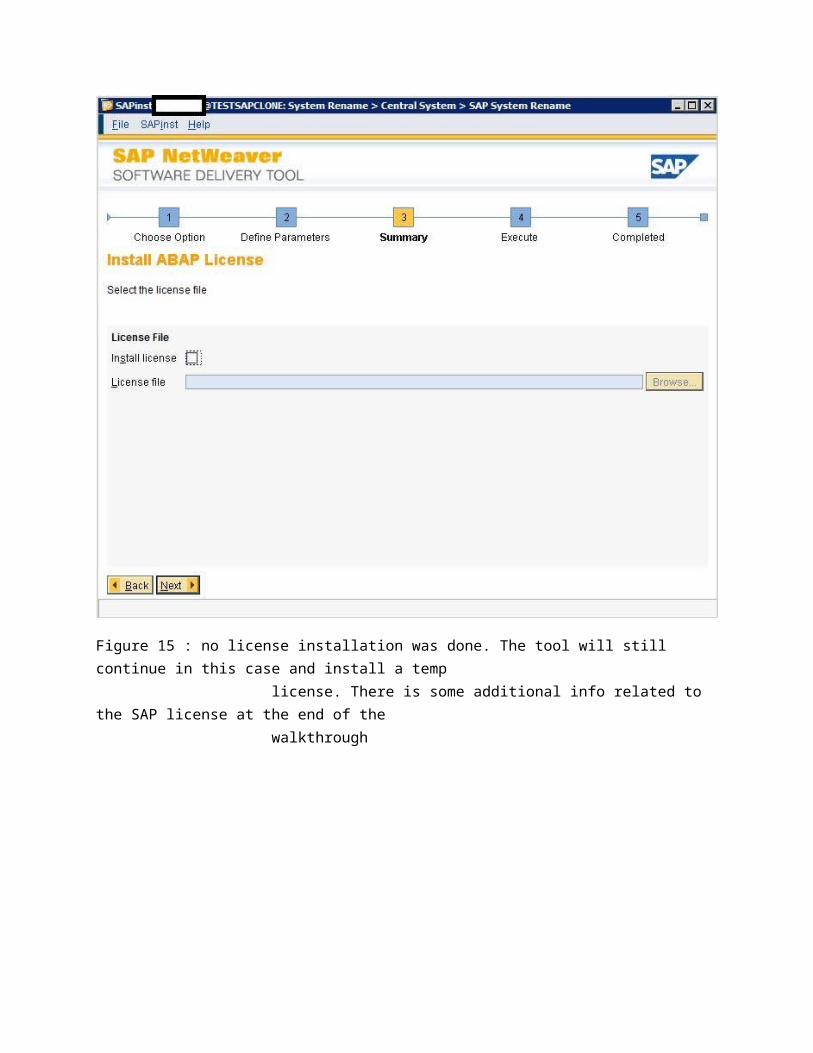
Figure 18 : finally the tool started to make all the changes. Again the look&feel is the same as for a normal SAP installation via sapinst

Figure 19 : Bingo ! After the tool finished - the SAP system came up correctly. The database schema was changed to ct2 and the SAP profiles were renamed using the new hostname

Figure 20 : the topic “post-processing” was mentioned before. The System Rename tool will only cover the basics to make sure the SAP system comes up. Depending on the system there will be a small or a huge list of items left which have to be adapted. One example is SAP Logon. The new CT2 entry was made manually
Figure 21 : as one can see at the bottom of the screenshot – the transport system is another item which was not touched by the System Rename tool
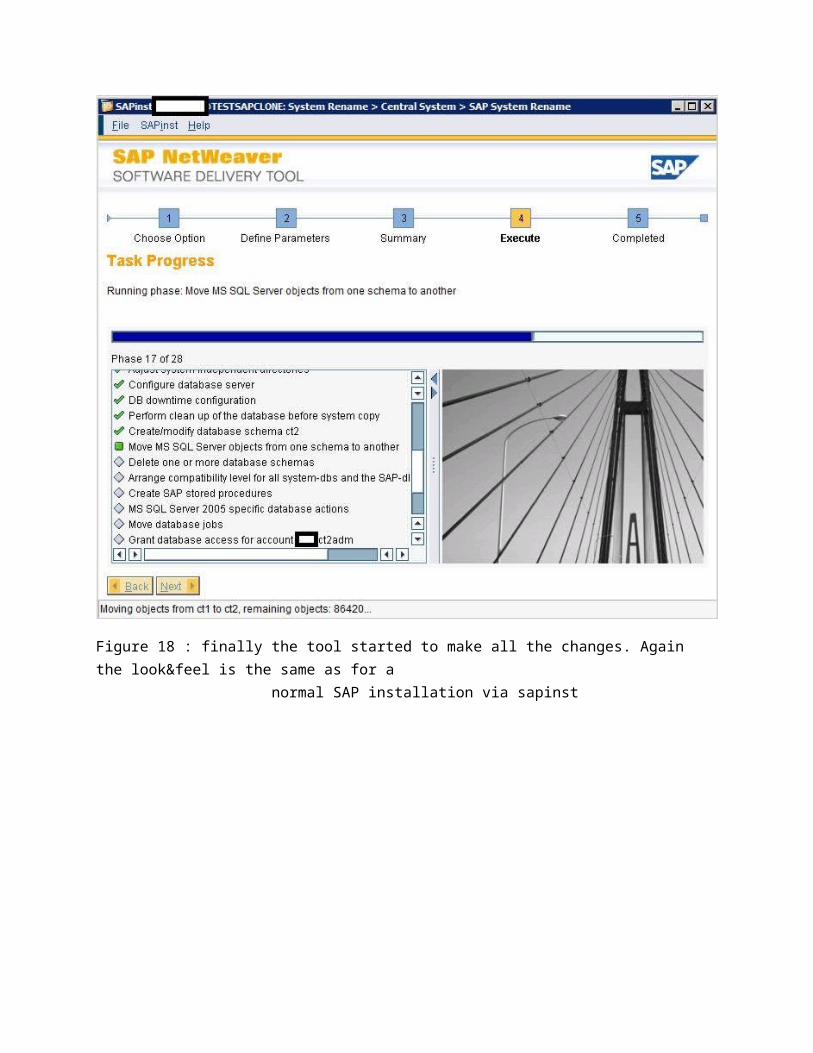
Figure 22 : last but not least there is the SAP license question. The picture shows that a temp license was installed by the rename tool

Figure 23 : the important point is that the hardware key changed. It’s different between the source VM and the new VM