walking with cytron servo motor - robotshop
TRANSCRIPT

Created by Cytron Technologies Sdn. Bhd. – All Rights Reserved 1
OVERVIEW
This document describes the development of Cytron Technologies DIY (Do It Yourself) Project No.18 (PR18). This project will use PIC16F876A to communicate with Cytron SC16A servo controller to control the biped that built up with Cytron servo motors and servo brackets. It provides a LCD to display the information. Circuit schematic diagram and sample PIC source code are provided. Source code provides a simple biped walking program and servo position calibrating function.
PR18 FEATURES
Basic Circuit - PIC16F876A microcontroller - Onboard 5V high current supply for SC16A - Protection against overload (3A fuse) - LCD screen display SC16A Servo Controller - Provides up to 16 control channels - Simple communication protocol with UART Biped - 6 Cytron C40R servo motors - 8 Cytron HD-SB-SH servo holders - 6 Cytron U-Joints for servo motor
Walking with Cytron Servo Motor
Version 1.0
August 2008
Cytron Technologies Sdn. Bhd.
Information contained in this publication regarding device applications and the like is intended through suggestion only and may be superseded by updates. It is your responsibility to ensure that your application meets with your specifications. No representation or warranty is given and no liability is assumed by Cytron Technologies Incorporated with respect to the accuracy or use of such information or infringement of patents or other intellectual property rights arising from such use or otherwise. Use of Cytron Technologies’s products as critical components in life support systems is not authorized except with express written approval by Cytron Technologies. No licenses are conveyed, implicitly or otherwise, under any intellectual property rights.

ROBOT . HEAD to TOE
PR18 – Walking With Cytron Servo Motor
Created by Cytron Technologies Sdn. Bhd. – All Rights Reserved 1
SYSTEM OVERVIEW
GENERAL DESCRIPTION
This project uses SC16A servo controller to control a servo biped. SC16A provides up to 16 control channels. PIC MCU communicates with the SC16A to transfer required data. The control of each servo motor will be stored in PIC MCU and displayed on LCD. PIC16F876A
This powerful (200 nanosecond instruction execution) yet easy-to-program (only 35 single word instructions) CMOS FLASH-based 8-bit microcontroller packs Microchip's powerful PIC® architecture into an 28-pin package and is upwards compatible with the PIC16C5X, PIC12CXXX and PIC16C7X devices. Feature of the device:
• 256 bytes of EEPROM data memory • Self programming • ICD (In Circuit Debugging function) • 2 Comparators • 5 channels of 10-bit Analog-to-Digital (A/D)
converter • 2 capture/compare/PWM functions • the synchronous serial port can be configured
as either 3-wire Serial Peripheral Interface (SPI™) or the 2-wire Inter-Integrated Circuit (I²C™) bus
• Universal Asynchronous Receiver Transmitter (USART)
Figure 1
Figure 1 shows the pin diagram of the PIC16F876A. For more detail, please download the datasheet from microchip web site at: http://www.microchip.com
SC16A
Figure 2
The SC16A servo controller offers up to 16 control channels. It can be daisy chained with another SC16A to provide total of 32 control channels. It uses UART interface to communicate with host microcontroller. It also provides communication with computer through USB port. Software is provided for computer to communicate with SC16A. The power sources for the servo motors and circuit are separated to provide more stable operation. For further information about SC16A, please refer to SC16A user manual from Cytron Technologies which can be downloaded from the link below: http://www.cytron.com.my/datasheet/SC16A_User%27s_Manual_v1.pdf HARDWARE
This project will require following hardware:
a. 1 x PIC16F876A b. 1 x PR18 Printed Circuit Board (PCB) c. 1 x SC16A Servo Controller d. 1 x 2X16 LCD e. 6 x C40R Servo Motors f. 8 x HD-SB-SH Servo Motor Holder g. 6 x U-Joint for Servo Motor h. Related hardware components i. Related electronic components
Please refer to the schematic diagram of PR18. The schematic is provided free therefore Cytron Technologies will not be responsible for any further modification or improvement.
Push Buttons
PIC16F876A
LCD
SC16A
Biped (Servo Motors + Servo Brackets)
ROBOT . HEAD to TOE
PR18 – Walking With Cytron Servo Motor
Created by Cytron Technologies Sdn. Bhd. – All Rights Reserved 2
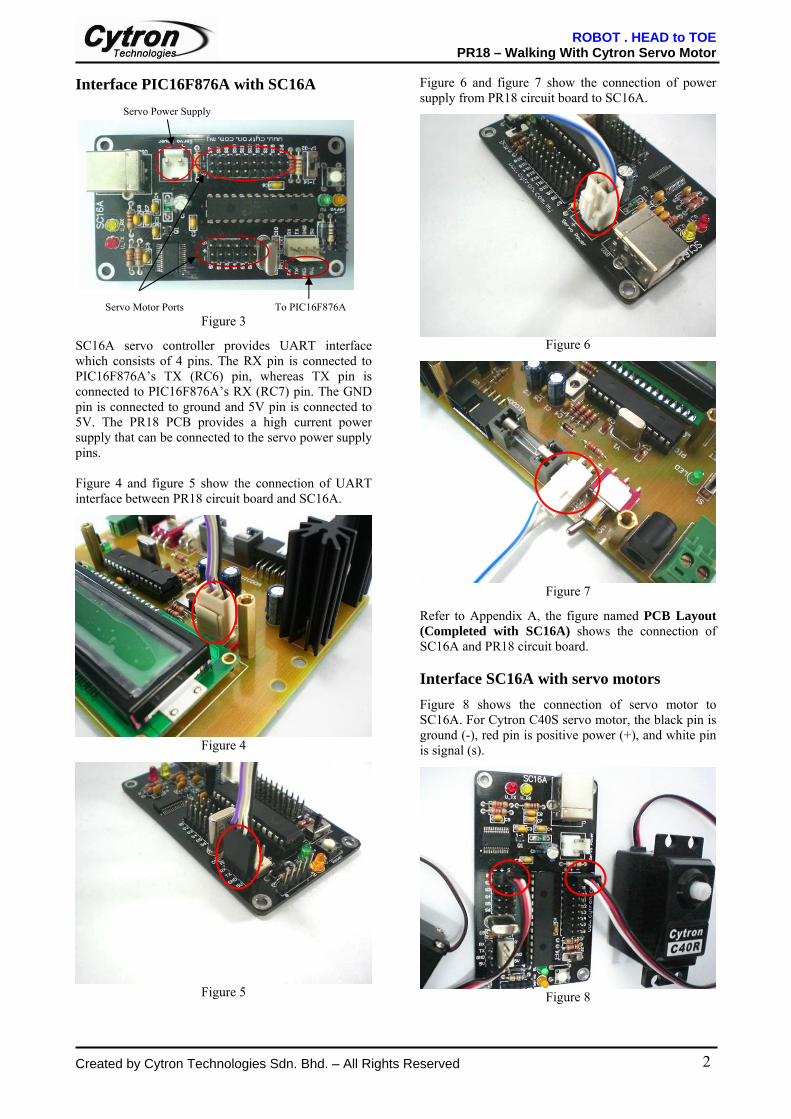
Interface PIC16F876A with SC16A Servo Power Supply
Servo Motor Ports To PIC16F876A
Figure 3
SC16A servo controller provides UART interface which consists of 4 pins. The RX pin is connected to PIC16F876A’s TX (RC6) pin, whereas TX pin is connected to PIC16F876A’s RX (RC7) pin. The GND pin is connected to ground and 5V pin is connected to 5V. The PR18 PCB provides a high current power supply that can be connected to the servo power supply pins. Figure 4 and figure 5 show the connection of UART interface between PR18 circuit board and SC16A.
Figure 4
Figure 5
Figure 6 and figure 7 show the connection of power supply from PR18 circuit board to SC16A.
Figure 6
Figure 7
Refer to Appendix A, the figure named PCB Layout (Completed with SC16A) shows the connection of SC16A and PR18 circuit board. Interface SC16A with servo motors
Figure 8 shows the connection of servo motor to SC16A. For Cytron C40S servo motor, the black pin is ground (-), red pin is positive power (+), and white pin is signal (s).
Figure 8
ROBOT . HEAD to TOE
PR18 – Walking With Cytron Servo Motor
Created by Cytron Technologies Sdn. Bhd. – All Rights Reserved 3
Vss
1
Vcc
2
Vee
3
RS
4
R/W
5
E6
DB
07
DB
18
DB
29
DB
310
DB
411
DB
512
DB
613
DB
714
LE
D+
15
LE
D-
16
LCD
DISPLAY
LCD
RB
4R
B3
RB
2R
B1
RB
0R
C5
RB
5
RC
3R
C4
VCC
RB
6R
B7
1K
R8Res1
1K
R7Res1
RC
2
RC
1
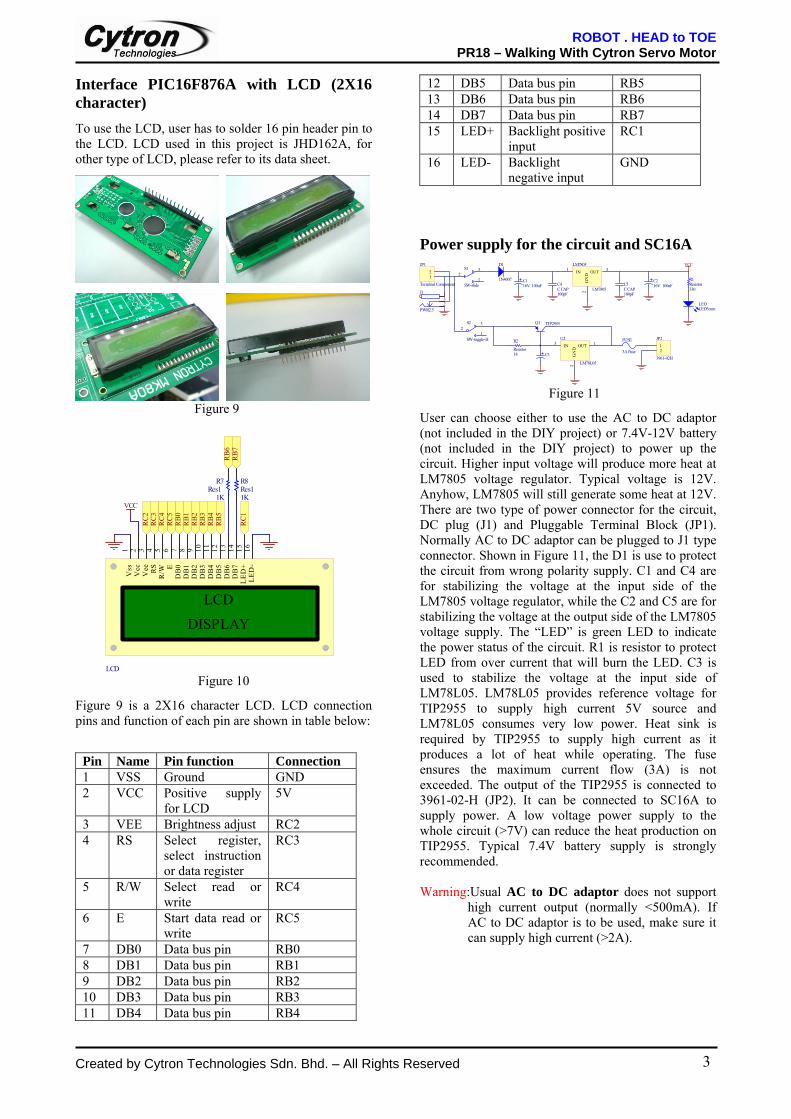
Interface PIC16F876A with LCD (2X16 character)
To use the LCD, user has to solder 16 pin header pin to the LCD. LCD used in this project is JHD162A, for other type of LCD, please refer to its data sheet.
Figure 9
Figure 10
Figure 9 is a 2X16 character LCD. LCD connection pins and function of each pin are shown in table below:
Pin Name Pin function Connection 1 VSS Ground GND 2 VCC Positive supply
for LCD 5V
3 VEE Brightness adjust RC2 4 RS Select register,
select instruction or data register
RC3
5 R/W Select read or write
RC4
6 E Start data read or write
RC5
7 DB0 Data bus pin RB0 8 DB1 Data bus pin RB1 9 DB2 Data bus pin RB2 10 DB3 Data bus pin RB3 11 DB4 Data bus pin RB4
12 DB5 Data bus pin RB5 13 DB6 Data bus pin RB6 14 DB7 Data bus pin RB7 15 LED+ Backlight positive
input RC1
16 LED- Backlight negative input
GND
Power supply for the circuit and SC16A
1
23
J1
PWR2.5
23
1
S1
SW-slideC116V 100uF
100pF
C4C CAP
100pF
C5C CAP
IN1
GN
D2
OUT 3LM7805
LM7805
C216V 100uF
LEDLED3mm
330
R1Resistor
VCCD1
1N4007
23
1
S2
SW-toggle-H
18
R2
ResistorC3
FUSE
3A FuseIN3
GN
D2
OUT 1U2
LM78L05
Q1 TIP2955
12
JP2
3961-02H
12
JP1
Terminal Component
Figure 11
User can choose either to use the AC to DC adaptor (not included in the DIY project) or 7.4V-12V battery (not included in the DIY project) to power up the circuit. Higher input voltage will produce more heat at LM7805 voltage regulator. Typical voltage is 12V. Anyhow, LM7805 will still generate some heat at 12V. There are two type of power connector for the circuit, DC plug (J1) and Pluggable Terminal Block (JP1). Normally AC to DC adaptor can be plugged to J1 type connector. Shown in Figure 11, the D1 is use to protect the circuit from wrong polarity supply. C1 and C4 are for stabilizing the voltage at the input side of the LM7805 voltage regulator, while the C2 and C5 are for stabilizing the voltage at the output side of the LM7805 voltage supply. The “LED” is green LED to indicate the power status of the circuit. R1 is resistor to protect LED from over current that will burn the LED. C3 is used to stabilize the voltage at the input side of LM78L05. LM78L05 provides reference voltage for TIP2955 to supply high current 5V source and LM78L05 consumes very low power. Heat sink is required by TIP2955 to supply high current as it produces a lot of heat while operating. The fuse ensures the maximum current flow (3A) is not exceeded. The output of the TIP2955 is connected to 3961-02-H (JP2). It can be connected to SC16A to supply power. A low voltage power supply to the whole circuit (>7V) can reduce the heat production on TIP2955. Typical 7.4V battery supply is strongly recommended. Warning:Usual AC to DC adaptor does not support
high current output (normally <500mA). If AC to DC adaptor is to be used, make sure it can supply high current (>2A).

ROBOT . HEAD to TOE
PR18 – Walking With Cytron Servo Motor
Created by Cytron Technologies Sdn. Bhd. – All Rights Reserved 4
Push Button as input for PIC microcontroller
RA0
SW1
10K
R4Resistor
VCC
Figure 12
One I/O pin is needed for one push button as input of PIC microcontroller. The connection of the push button to the I/O pin is shown in Figure 12. The I/O pin should be pull up to 5V using a resistor (with value range 1K-10K) and this configuration will result an active-low input. When the button is being pressed, reading of I/O pin will be in logic 0, while when the button is not pressed, reading of that I/O pin will be logic 1. ICSP for programming PIC microcontroller
ICSP stands for In Circuit Serial Programming and describes the serial programming interface for PIC microcontroller. ICSP gives you a convenient way of programming PIC Microcontroller without removing the chip from the development or production board. All you need is a programmer that provides the ICSP connector.
MCLRRB6RB7
1 23 45 67 89 10
UIC00A
Header 5X2 -H Figure 13
MCLR, RB6 and RB7 need to be connected to the USB In Circuit Programmer (UIC00A) to program the PIC microcontroller. The programmer (UIC00A) is not included in DIY project set since it can be used several time for different project set. User can also choose other type of PIC programmer to load the program. For the instruction of using PIC programmer, please refer to the particular PIC programmer user’s manual.
PCB circuit board
Figure 14
Component:
1. RESET button. 2. SW1 button. 3. SW2 button. 4. SW3 button. 5. S1 Slides switch (Circuit Power ON/OFF). 6. Power connector (7-12V). 7. DC plug socket (To 7-12V AC to DC adaptor). 8. Box header (To ICSP programmer). 9. S2 Toggle switch (Motor Power ON/OFF).
Please refer to Appendix A for the PCB layout of PR18. The PCB layout is provided free therefore Cytron Technologies will not be responsible for any further modification or improvement.
1
2
3
4
5
6 7
8 9

ROBOT . HEAD to TOE
PR18 – Walking With Cytron Servo Motor
Created by Cytron Technologies Sdn. Bhd. – All Rights Reserved 5
SOFTWARE Flowchart:
Program
Please download the sample program from Cytron website (same directory as this DIY project) Figure 15 shows the configuration of each servo motors in the program. L1 refers to the servo motor that located at the top of biped’s left leg. L2 refers to the middle left servo motor and L3 refers to the bottom left servo motor. The value of L1, L2 and L3 (in hexadecimal format) refers to which channel the servo motor is connected to SC16A. (For more information. please refer to figure 88 under GETITNG START). For the mid_LX (X = 1, 2, or 3), it is the middle position (about 90 degree) of the servo motor’s shaft. The same is applied to R1, R2 and R3. It needs to be calibrated for the exact middle position. Each servo
motor has different value. The calibration procedures will be discussed in later topic. (Refer to Calibrate the Servo Motor’s Position under GETTING START).
Figure 15
For more information about the software for this system, please refer to the source code provided. The explanation of each instruction is provided in the source code as the comment of each line. The source code is provided free and Cytron Technologies will not be responsible for any further modification or improvement. GETTING START
The PR18 Circuit
User can obtain the hardware set for this project (PR18) either by online purchasing (www.cytron.com.my) or purchase it in Cytron Technologies Shop.
1. Once user has the hardware set, soldering process can be started. Please solder the electronic components one by one according the symbols or overlays on the Printed Circuit Board (PCB). Ensure the component value and polarity is correctly soldered. Please refer to PCB Layout in Appendix A.
Caution: Make sure all the connectors (2510, 3961) are
soldered in proper side. Those electronic components have polarity such as capacitor, diode, PIC, LM7805, LM78L05, TIP2955 and LED should be soldered in right polarity or it may cause the circuit board fail to work.
Warning:Before the battery (Power) is plugged in,
make sure the polarity is correct to prevent the explosion. Wrong polarity of capacitor also may cause explosion.
2. Create the connection cable for the SC16A
servo controller.
Start
Display Startup Message
SW1 pressed?
Biped Walking
No
LCD
SW2 pressed?
SW3 pressed?
NO
Mode ‐1
Mode +1
YES
YES
NO
Mode = 1?
NO
Calibration
YES
Mode = 2

ROBOT . HEAD to TOE
PR18 – Walking With Cytron Servo Motor
Created by Cytron Technologies Sdn. Bhd. – All Rights Reserved 6
Guide to build the connector cable:
2510-04:
Figure 16
2561-04:
Figure 17
Create the connector cable according to the order shown in figure 18 below:
The first 2 nodes are crossed
Figure 18
The first 2 nodes which are crossed are RX and TX pins. For UART communication between 2 MCUs, the RX pin of one MCU is connected to TX pin of another MCU. 3961-02:
Figure 19
1
21
5 6
87
43
7
6 5
3 4
1 2
8
1 2
3
6
7
5
4
8
ROBOT . HEAD to TOE
PR18 – Walking With Cytron Servo Motor
Created by Cytron Technologies Sdn. Bhd. – All Rights Reserved 7
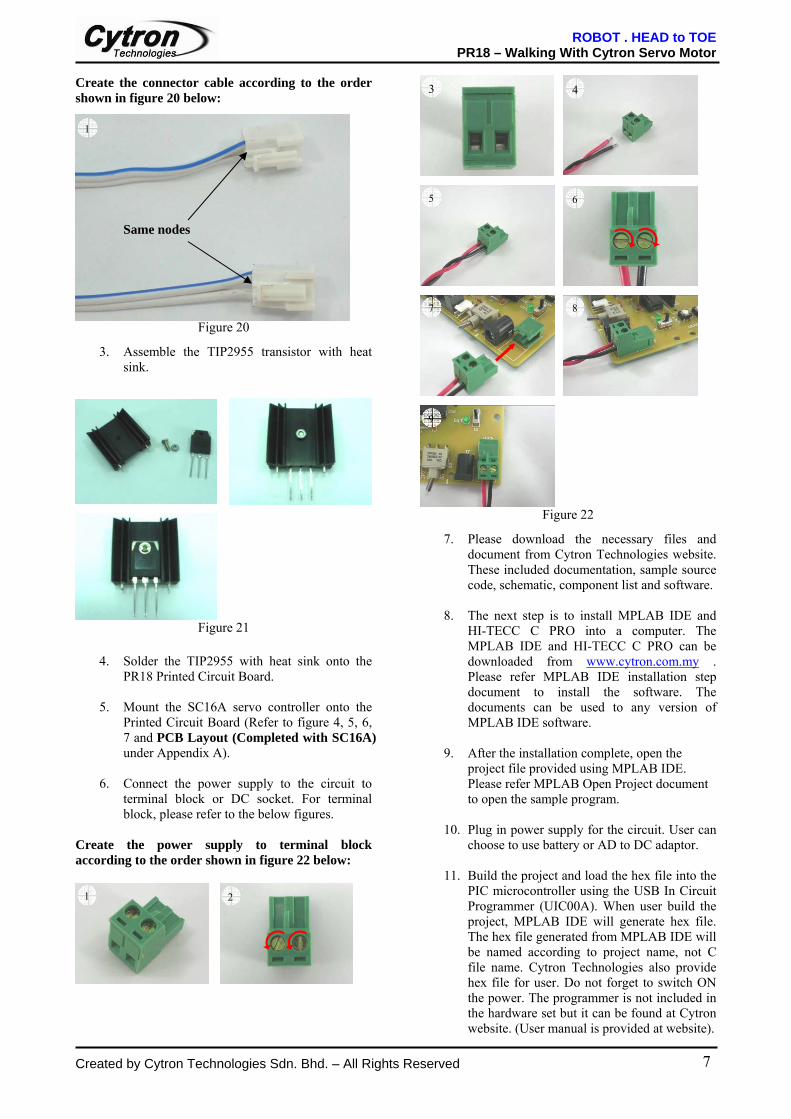
Create the connector cable according to the order shown in figure 20 below:
Same nodes
Figure 20
3. Assemble the TIP2955 transistor with heat sink.
Figure 21
4. Solder the TIP2955 with heat sink onto the PR18 Printed Circuit Board.
5. Mount the SC16A servo controller onto the
Printed Circuit Board (Refer to figure 4, 5, 6, 7 and PCB Layout (Completed with SC16A) under Appendix A).
6. Connect the power supply to the circuit to
terminal block or DC socket. For terminal block, please refer to the below figures.
Create the power supply to terminal block according to the order shown in figure 22 below:
Figure 22
7. Please download the necessary files and document from Cytron Technologies website. These included documentation, sample source code, schematic, component list and software.
8. The next step is to install MPLAB IDE and
HI-TECC C PRO into a computer. The MPLAB IDE and HI-TECC C PRO can be downloaded from www.cytron.com.my . Please refer MPLAB IDE installation step document to install the software. The documents can be used to any version of MPLAB IDE software.
9. After the installation complete, open the
project file provided using MPLAB IDE. Please refer MPLAB Open Project document to open the sample program.
10. Plug in power supply for the circuit. User can
choose to use battery or AD to DC adaptor.
11. Build the project and load the hex file into the PIC microcontroller using the USB In Circuit Programmer (UIC00A). When user build the project, MPLAB IDE will generate hex file. The hex file generated from MPLAB IDE will be named according to project name, not C file name. Cytron Technologies also provide hex file for user. Do not forget to switch ON the power. The programmer is not included in the hardware set but it can be found at Cytron website. (User manual is provided at website).
1
1 2
9
3
7
5
4
6
8
ROBOT . HEAD to TOE
PR18 – Walking With Cytron Servo Motor
Created by Cytron Technologies Sdn. Bhd. – All Rights Reserved 8
12. PIC is now completely programmed.
13. Proceed to “Set up Biped”. Set up Biped
The following steps refer to figure 23 below. This figure shows the bolts, nuts and screws that are available in the package of PR18.
Figure 23
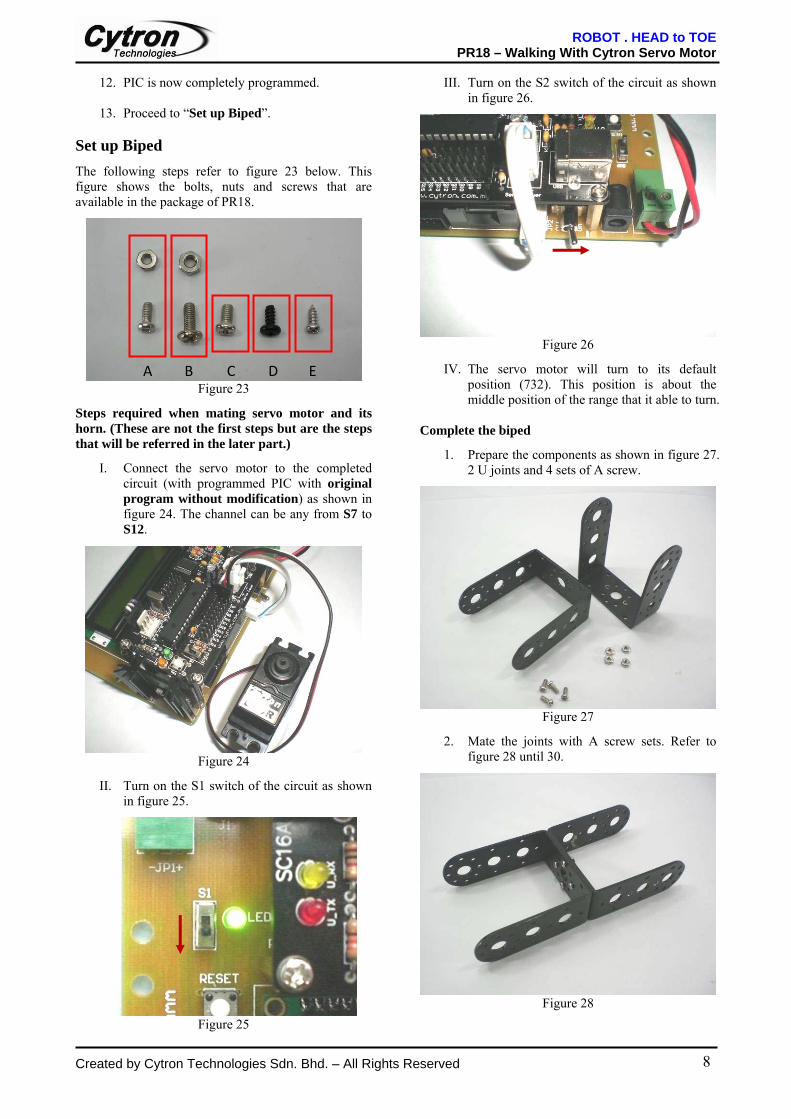
Steps required when mating servo motor and its horn. (These are not the first steps but are the steps that will be referred in the later part.)
I. Connect the servo motor to the completed circuit (with programmed PIC with original program without modification) as shown in figure 24. The channel can be any from S7 to S12.
Figure 24
II. Turn on the S1 switch of the circuit as shown in figure 25.
Figure 25
III. Turn on the S2 switch of the circuit as shown in figure 26.
Figure 26
IV. The servo motor will turn to its default position (732). This position is about the middle position of the range that it able to turn.
Complete the biped
1. Prepare the components as shown in figure 27. 2 U joints and 4 sets of A screw.
Figure 27
2. Mate the joints with A screw sets. Refer to figure 28 until 30.
Figure 28
A B C D E

ROBOT . HEAD to TOE
PR18 – Walking With Cytron Servo Motor
Created by Cytron Technologies Sdn. Bhd. – All Rights Reserved 9
Figure 29
Figure 30
3. Prepare the components as shown in figure 31. 2 servo horns and 8 sets of E screw.
Figure 31
4. Mate the servo horns and U joints with E screw sets as shown in figure 32 until 34.
Figure 32
Figure 33
Figure 34
5. Prepare the components as shown in figure 35. 2 servo motors and 2 sets of D screw.
ROBOT . HEAD to TOE
PR18 – Walking With Cytron Servo Motor
Created by Cytron Technologies Sdn. Bhd. – All Rights Reserved 10
Figure 35
6. Refer to steps I - IV, mate the servo motors and its horns with D screw sets as shown in figure 36 until 38. The steps are required to ensure the servo motors are mated at the middle position of their moveable range. As shown in figure 36, a successful mating is defined by the servo motors are nearly parallel to the servo holder while the circuit and motors are turned on. The circuit can be turned off and the servo motors can be disconnected after mating. The topic “Calibrate the Servo Motor’s Position” discusses how to tune the motor to its exact middle position.
Figure 36
Figure 37
Figure 38
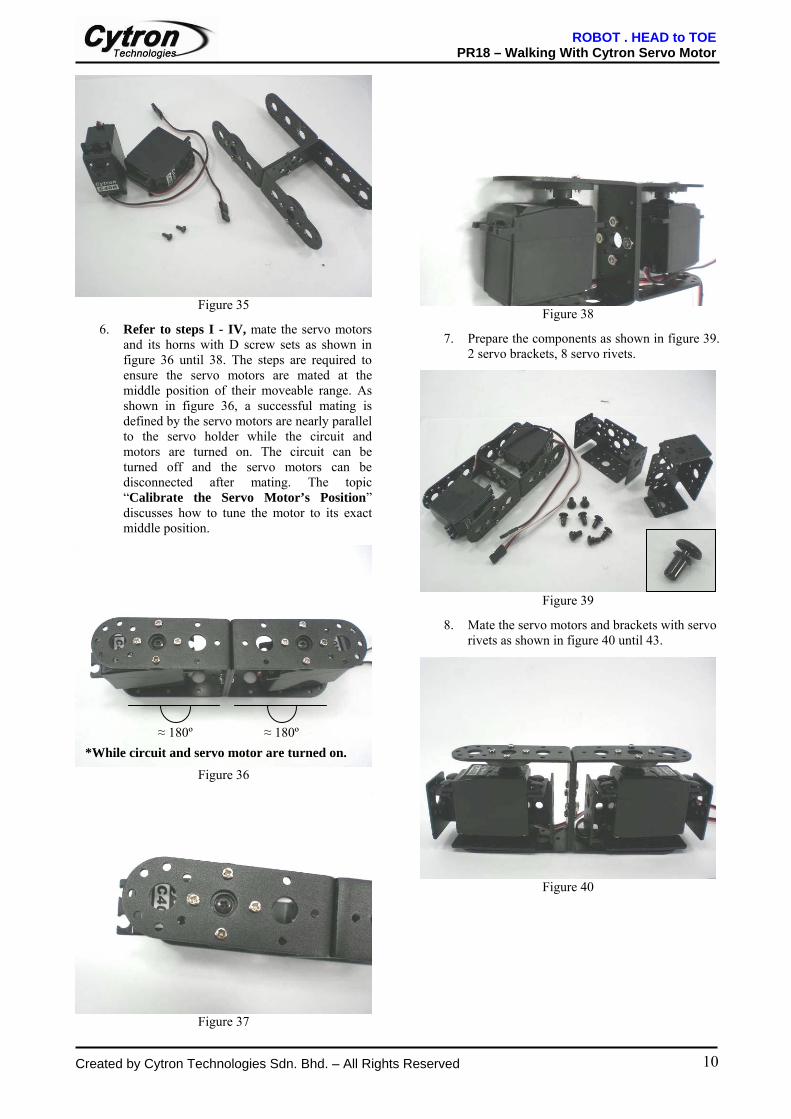
7. Prepare the components as shown in figure 39. 2 servo brackets, 8 servo rivets.
Figure 39
8. Mate the servo motors and brackets with servo rivets as shown in figure 40 until 43.
Figure 40
*While circuit and servo motor are turned on. ≈ 180º ≈ 180º

ROBOT . HEAD to TOE
PR18 – Walking With Cytron Servo Motor
Created by Cytron Technologies Sdn. Bhd. – All Rights Reserved 11
Figure 41
Figure 42
Figure 43
9. Prepare the components as shown in figure 44. Two bearings and 2 sets of B screw.
Figure 44
10. Assemble the bearings and B sets on the U-joints as shown in figure 45 until 48.
Figure 45
Figure 46

ROBOT . HEAD to TOE
PR18 – Walking With Cytron Servo Motor
Created by Cytron Technologies Sdn. Bhd. – All Rights Reserved 12
Figure 47
Figure 48
11. Prepare the components as shown in figure 49. 1 servo bracket and 4 sets of A screw.
Figure 49
12. Mate the servo brackets with A screw sets as shown in figure 50 until 52.
Figure 50
Figure 51
Figure 52
13. Prepare the components as shown in figure 53. 1 acrylic foot and 4 rubber pads.

ROBOT . HEAD to TOE
PR18 – Walking With Cytron Servo Motor
Created by Cytron Technologies Sdn. Bhd. – All Rights Reserved 13
Figure 53
14. Mate the rubber pads onto the acrylic foot as shown in figure 54 until 55.
Figure 54
Figure 55
15. Prepare the components as shown in figure 56. 1 U joint, 1 servo horn, 4 sets of A screw and 4 sets of E screw.
Figure 56
16. Mate the U joint, acrylic foot and servo horn with A screw sets and E screw sets as shown in figure 57 until 61.
Figure 57
Figure 58

ROBOT . HEAD to TOE
PR18 – Walking With Cytron Servo Motor
Created by Cytron Technologies Sdn. Bhd. – All Rights Reserved 14
Figure 59
Figure 60
Figure 61
17. Prepare the components as shown in figure 62. 1 servo motor and 1 set of D screw.
Figure 62
18. Refers to steps I – IV, mate the servo motor and its horn with D set as shown in figure 63 until 66. As in step 6, the steps are required to ensure the servo motor is mated at the middle position of its moveable range. As shown in figure 66, a successful mating is defined by the servo motor is nearly perpendicular to the servo holder while the circuit and motor are turned on. The circuit can be turned off and the servo motor can be disconnected after mating. The topic “Calibrate the Servo Motor’s Position” discusses how to tune the motor to its exact middle position.
Figure 63
Figure 64

ROBOT . HEAD to TOE
PR18 – Walking With Cytron Servo Motor
Created by Cytron Technologies Sdn. Bhd. – All Rights Reserved 15
Figure 65
Figure 66
19. Prepare the components as shown in figure 67. The partial completed leg, base, 4 servo rivets, 1 set of B screw and bearing.
Figure 67
20. Mate the leg and base with B set screw, rivets and bearing as shown in figure 68 until 72.
Figure 68
Figure 69
Figure 70
≈ 90º
*While circuit and servo motor are turned on.

ROBOT . HEAD to TOE
PR18 – Walking With Cytron Servo Motor
Created by Cytron Technologies Sdn. Bhd. – All Rights Reserved 16
Figure 71
Figure 72
21. Prepare the components as shown in figure 73. 1 servo bracket, 2 PCB stands (30mm) and 2 sets of C screw.
Figure 73
22. Mate the screws and PCB stands onto the servo bracket with C screw set as shown in figure 74 until 75.
Figure 74
Figure 75
23. Prepare the components as shown in figure 76. Uncompleted leg, the servo bracket (step 22) and 4 sets of A screw.
Figure 76
24. Mate the leg and servo bracket with A set screw as shown in figure 77 until 80.

ROBOT . HEAD to TOE
PR18 – Walking With Cytron Servo Motor
Created by Cytron Technologies Sdn. Bhd. – All Rights Reserved 17
Figure 77
Figure 78
Figure 79
Figure 80
25. Follow the steps from 1 to 24, build up another leg which is mirrored to the current leg. Refer to figure 81.
Figure 81
26. Prepare the components as shown in figure 82. 3 sets of A screw.
Figure 82

ROBOT . HEAD to TOE
PR18 – Walking With Cytron Servo Motor
Created by Cytron Technologies Sdn. Bhd. – All Rights Reserved 18
27. Mate the servo brackets of the legs with A sets screw to build the partially completed biped as shown in figure 83 until 85.
Figure 83
Figure 84
Figure 85
28. Prepare the components as shown in figure 86. The partially completed biped, completed circuit and 4 sets of C screw.
Figure 86
29. Mount the completed circuit onto the biped with C screw sets as shown in figure 87 until 88.
Figure 87
Figure 88
L1
L2
R1
L3
R2
R3

ROBOT . HEAD to TOE
PR18 – Walking With Cytron Servo Motor
Created by Cytron Technologies Sdn. Bhd. – All Rights Reserved 19
30. Connect the servo motors to the SC16A servo controller according to their respective channel. (L1 to channel S10, L2 to channel S11, L3 to channel S12, R1 to channel S7, R2 to channel S8, R3 to channel S9, refer to figure 15, figure 87 and figure 89). For L2, L3, R2 and R3, extension cables are needed to connect the motors to SC16A.
Figure 89
31. The completed biped is shown in figure 90.
Figure 90
Calibrate the Servo Motor’s Position
The default values for every servo motors in the program are 732. As shown in figure, the default value does not represent the exact middle position. User has to tune it and modify the values in the program.
1. Turn on the circuit power and motor power, the servo motor is no exactly in the middle position as shown in figure 91.
Figure 91
2. Press the SW2 button of PR18 circuit board to increase the mode to “Calibration?” as shown in figure 92.
Figure 92
3. Press the SW3 button (OK) as shown in figure 93.
Figure 93

ROBOT . HEAD to TOE
PR18 – Walking With Cytron Servo Motor
Created by Cytron Technologies Sdn. Bhd. – All Rights Reserved 20
4. The number of channel will be display on the LCD as shown in figure. Press SW1/SW2 to decrease/increase the number of channel.
Figure 94
5. For this example, the servo L2 (S11) is being
calibrated. Change the channel number to 11 and press SW3 button (OK) to proceed. The default value (732) of the current channel (S11) will be shown. Refer to figure 95 and figure 96.
Figure 95
Figure 96
6. Press SW1/SW2 to decrease/increase the value. For this example, the value (693) of the channel (L2, i.e. S11) brings the servo motor to its middle position. Refer figure 97 and figure 98.
Figure 97
Figure 98
7. The steps are same for the base of the biped. As shown in figure 99, the positions of the base servo motor (L3, i.e. S12) before and after calibration.
Before After
Figure 99
ROBOT . HEAD to TOE
PR18 – Walking With Cytron Servo Motor
Created by Cytron Technologies Sdn. Bhd. – All Rights Reserved 21
8. Modify the corresponding value of mid_Lx and mid_Rx (x = 1, 2 or 3) for the servo motors. This new value should be placed in the C source code file. Refer to figure 15 under SOFTWARE. Compile it and reload it to the PR18 board.
AC to DC adaptor:
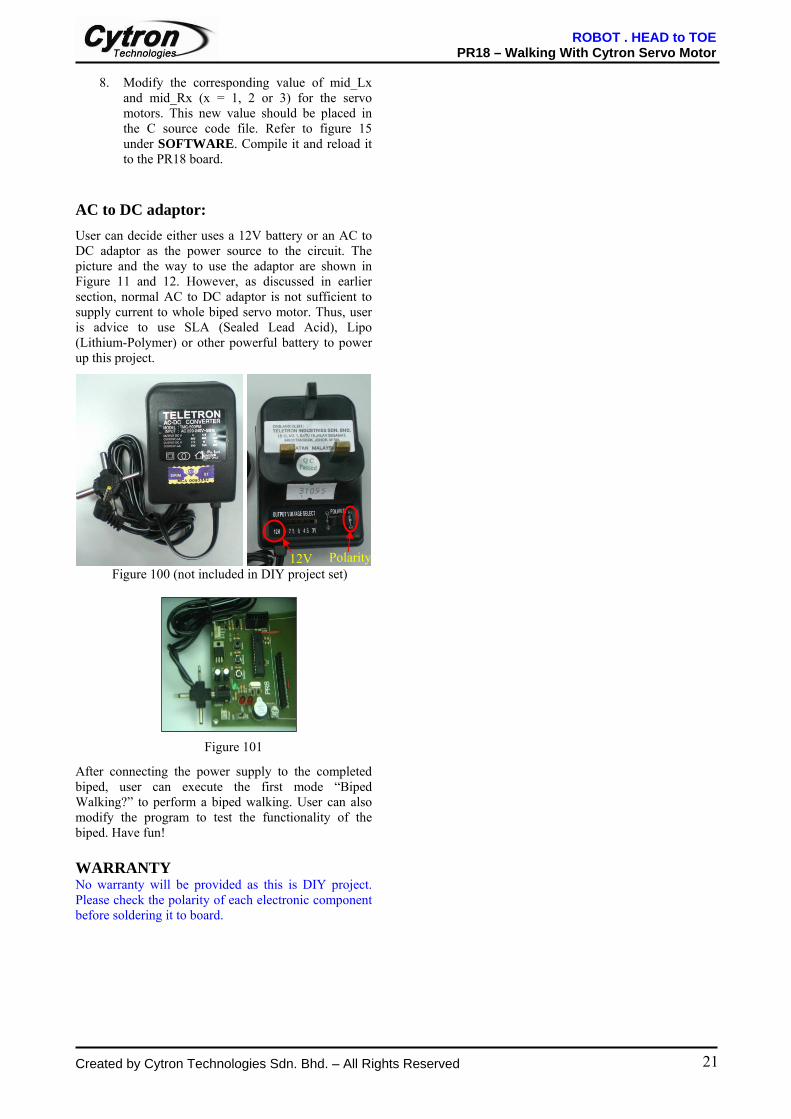
User can decide either uses a 12V battery or an AC to DC adaptor as the power source to the circuit. The picture and the way to use the adaptor are shown in Figure 11 and 12. However, as discussed in earlier section, normal AC to DC adaptor is not sufficient to supply current to whole biped servo motor. Thus, user is advice to use SLA (Sealed Lead Acid), Lipo (Lithium-Polymer) or other powerful battery to power up this project.
Figure 100 (not included in DIY project set)
Figure 101
After connecting the power supply to the completed biped, user can execute the first mode “Biped Walking?” to perform a biped walking. User can also modify the program to test the functionality of the biped. Have fun! WARRANTY No warranty will be provided as this is DIY project. Please check the polarity of each electronic component before soldering it to board.
12V Polarity

ROBOT . HEAD to TOE
PR18 – Walking With Cytron Servo Motor
Created by Cytron Technologies Sdn. Bhd. – All Rights Reserved 22
Appendix A PCB Layout (without LCD and TIP2955) PCB Layout (with LCD and TIP2955)
Terminal Block
DIP-40 Socket
20MHz Crystal
C-Cap 30pF
C-Cap 30pF
Fuse Holder
Box Header
Toggle Switch-H
3961
-02-
H
Con
nect
or
Adaptor Socket
18R
10K 1N4007 Diode LM7805
LM78L05
C-Cap 104
C-Cap 104
1K
+
-
330R 1N4148
E-Cap 100uF
2510-04 Connector
Jumper
Jumper
Slide Switch Small
3A Fuse
PIC16F876A
TIP2955 with Heat Sink
2x16 LCD
LED 3mm

ROBOT . HEAD to TOE
PR18 – Walking With Cytron Servo Motor
Created by Cytron Technologies Sdn. Bhd. – All Rights Reserved 1
PCB Layout (Completed with SC16A) * Cytron Technologies reserved the right to replace the component in the list with component of the same functionality without prior notice.
Prepared by Cytron Technologies Sdn. Bhd.
19, Jalan Kebudayaan 1A, Taman Universiti,
81300 Skudai, Johor, Malaysia.
Tel: +607-521 3178 Fax: +607-521 1861
URL: www.cytron.com.my
Email: [email protected] [email protected]
SC16A