w hat is a reborn? - bountiful babypictures.bountifulbaby.com/downloadoptimizedmanual.pdf · w hat...
TRANSCRIPT


What is a Reborn?A Reborn begins life as a common child's doll, and then goes through a transformation processto make it ultra-realistic. After being transformed, it is no longer just a child's doll, but is nowan ultra-realistic baby doll! It is easy to reborn a doll to make it more realistic, and we show youhow!
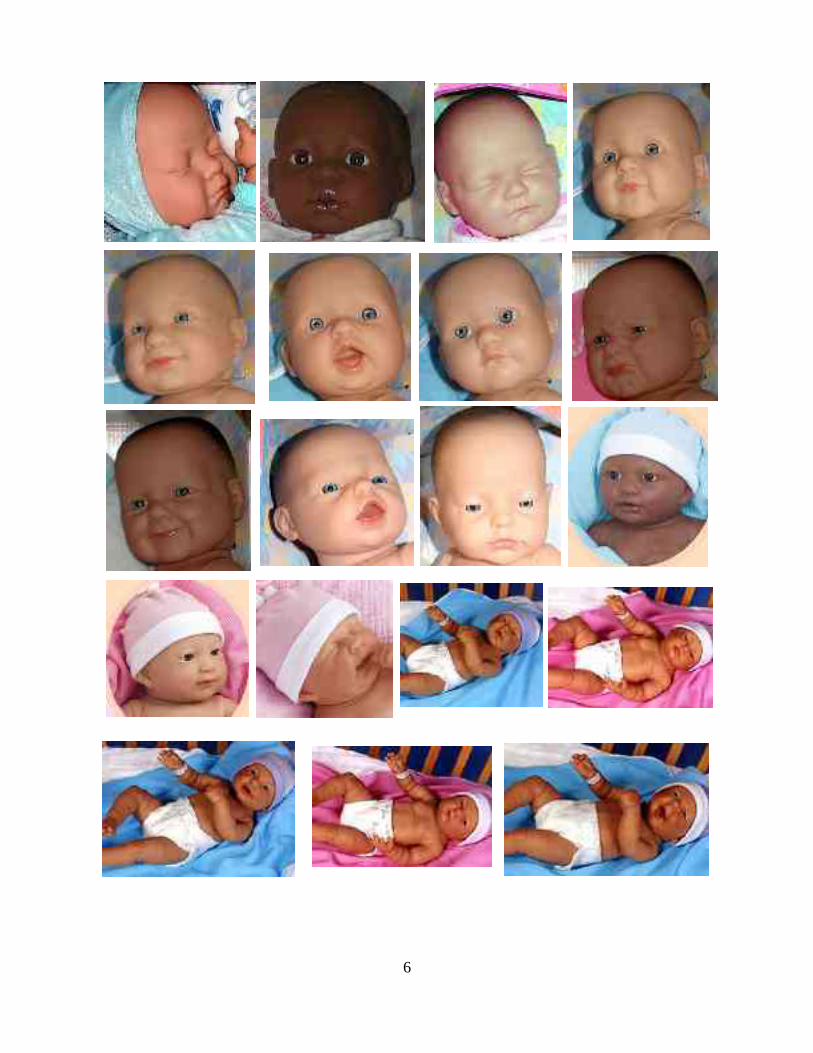
Below are some examples of Reborn Baby dolls (all from our “Past Work” page on our website):http://www.bountifulbaby.com/seaside/index/pastwork
2

3

The Twelve Steps to a Reborn!1. Pick the child's doll you wish to start with......... page 52. Take the doll apart.............................................. page 73. Optional factory hair paint removal................... page 94. Trim the vinyl..................................................... page 115. Permanent Eyebrows and Veins......................... page 146. Color wash and blushing................................... pages 22, 297. Nose drilling...................................................... page 398. Changing Baby's Eyes....................................... page 429. Nail painting...................................................... page 4410.Hair rooting or wig placement.......................... pages 49, 5911.Attaching eyelashes........................................... page 6412. Assembling the body........................................ page 72
Optional – Body Plates & Umbilicals............... pages 74, 77
All Content Copyright 2005 DP Creations, LLCAll Rights Reserved
4

Step #1: Pick the Child's Doll to Start WithAlthough most realistically-sized dolls can be “reborned”, the most popular child's doll to startwith is a doll from the Berenguer line. All of the Reborn Baby Dolls you saw in the previoussection are Berenguers. We keep in stock over 100 different Berenguer choices-- nobody offersmore Berenguer choices than Bountiful Baby! You can find them in the “Vinyl Dolls & VinylParts” category on our website:
http://www.bountifulbaby.com/seaside/index/birthingsupplies
Here are some example Berenguers, all of which (and more) are available from our website:
5
6

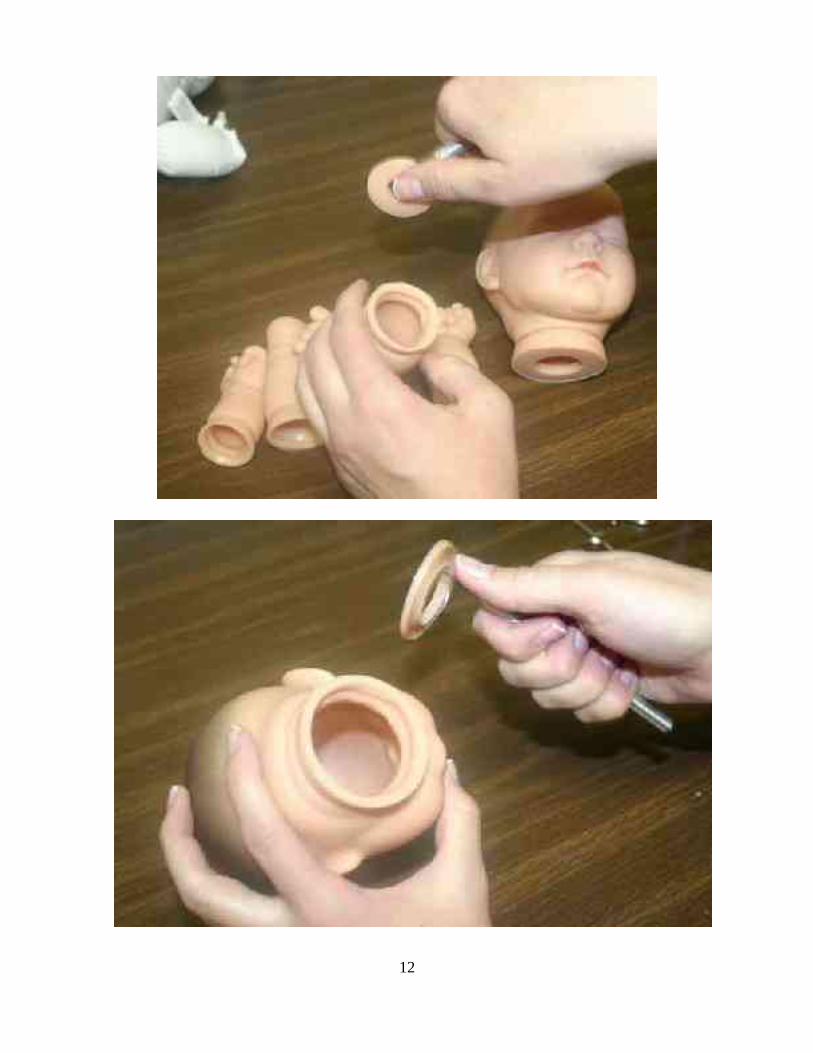
Step #2: Take The Doll Apart Cuticle nippers (our item #301) works well for this.
7

8

Step #3: Optional Factory Paint Removal
Blonde hair, brown, black, carrot, or brunette? And which shade?
If you pick a dark hair color for your reborn baby doll, you can probably get awaywith leaving the factory hair paint on. But if you pick a light hair color, you willprobably want to remove the factory hair paint.
But how do you remove it?
We've tried a lot of products over the years, including Goof Off, Once RemovedNail Polish Remover, Acetone Based Fingernail Polish Remover, and straightindustrial acetone. The problem with these products is that they are all flammable.Consequently, we currently have no plans to stock anything like them.
Consequently, as you might have noticed, some kind of "remover" product is oneproduct that is conspicuously absent from our website.
But which product do we use at Bountiful Baby?
We use industrial acetone, which you can get at any hardware store (we've evenpurchased it at Walmart).
You can also use fingernail polish remover whose active ingredient is acetone, andit works rather well. But, nothing "removes" better than straight acetone.
However, before anybody here at Bountiful Baby uses acetone, they "suit up",with safety glasses and latex rubber gloves (both of which we sell, look in the"Tools" category on our site). We also always only use the acetone in a well-ventilated area, with the airstream flowing away from the person using theacetone, and exhausted straight to the outside.
Also, don't leave it on the vinyl for long. Keep a stainless-steel bowl of warmwater nearby, and immediately wash the vinyl after each you are finished, but if ittakes you more than a few minutes to take the paint off, you will want to wash thehead before you are finished and again when the job is completed.
9

Anything that is strong enough to get the factory paint off of the Berenguers issome serious stuff. Don't mess with it unless you take the appropriate precautions. Take proper precautions with any chemicals you are using, including fingernailpolish remover. And if anything, be over cautious.
10

Step #4: Trim the Vinyl Using a Utility Knife (like our items #252, #281, or #429)
11
12

13

Step #5: Permanent Brows and Veins
If you would like to add brows and/or veins to your baby, do it after you removethe factory hair paint, but before you color wash and blush. The step of addingbrows and veins needs to be done fairly quickly because if the ink sets too long,you will not be able to remove enough ink for the desirable “barely there” look ofthe newborn brow.
Using an ultra fine tip brown Sharpie marker (our item #404), draw wispy browsfollowing the natural brow line of the face sculpt. If you make a mistake, quicklyremove the brow with a cotton pad dipped in non-acetone fingernail polishremover.
Apply the marker, then...
14

Take most of it back off with non-acetone fingernail polish remover, for a "barely-there" look.
15

Remember, you want a "barely-there" finished look, because babies have "barely-there" eyebrows. Keep in mind that the brows usually look better after some of theink is removed. Don’t stress too much if they don’t look perfect.
When you are satisfied with the brows, wipe the excess ink off with a pad dippedin Acetone nail polish remover. Use a clean pad for each wipe to avoid rubbingexcess ink onto other areas of the vinyl, again it is important to work quickly onthis step, not allowing any smeared ink a chance to dry.
You can also draw a few subtle lower lashes on the lower eyelid if you wish. Drawabout 4 or 5 lashes on the outsides of the lower lid just to give the suggestion ofsubtle baby lashes. For open-eyed babies, do this step with the eyes removed,because it is very easy to damage acrylic eyes with nail polish remover.
Use one of the pointed cotton swabs to remove excess ink from the lower lashes,turning it to a clean spot as you go and getting a new swab when needed to avoidsmearing ink.
16

17
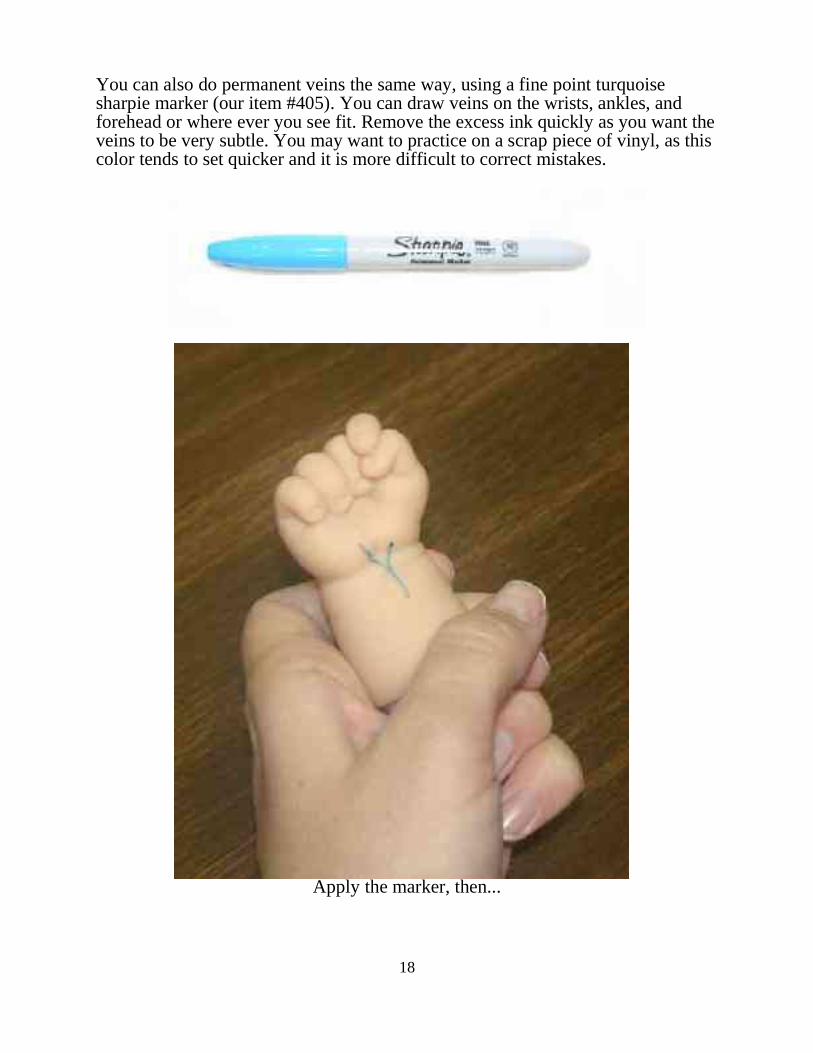
You can also do permanent veins the same way, using a fine point turquoisesharpie marker (our item #405). You can draw veins on the wrists, ankles, andforehead or where ever you see fit. Remove the excess ink quickly as you want theveins to be very subtle. You may want to practice on a scrap piece of vinyl, as thiscolor tends to set quicker and it is more difficult to correct mistakes.
Apply the marker, then...
18

...wipe off, for a "barely-there" look!
19

Put on, then...
...wipe off, for a "barely-there" look!
20

Put on, then...
...wipe off, for a "barely-there" look!
21

Step #6a: Color Washing Your Baby
Color washing outside of head, limbs, or body platesMix about 8 parts water with 1 part lavender paint (our item #254).Add water to paint a small amount at a time to avoid any lumps ofpaint. Working with one vinyl piece at a time, dip one of thecosmetic pads (our item #264) into the paint/water mixture and ruball over outside of the vinyl part. Immediately wipe off excess paintwith a dry cloth. Use one of the pointed cotton swabs (our item#263) to wipe off any paint that is left in the creases. If you see anystreaks or bruising your paint either is too thick and needs morewater, has clumps of unmixed paint in it or you allowed paint to dryafter being applied too heavily in that area. Repeat this process untilyou see a noticeable difference in color between the color washedvinyl and the vinyl that has not been color washed yet. The limbshould look slightly pinker and not so orange. I usually go over eachpart about four times.
After you have completed this process for all of the vinyl parts and you see no streaks or obviouspurple spots then the outer wash is complete. If you see purple spots, try removing them with awet cotton pad. If this does not work, put a little nail polish remover on a cotton pad and lightlyrub to remove excess paint. Do not get polish remover on the doll's eyes as this will damageacrylic doll eyes. If you are keeping the original lip and cheek color on the baby, avoid gettingpolish remover in these areas as well. If the paint looks blotchy, you may need to remove all ofthe color wash and start over.
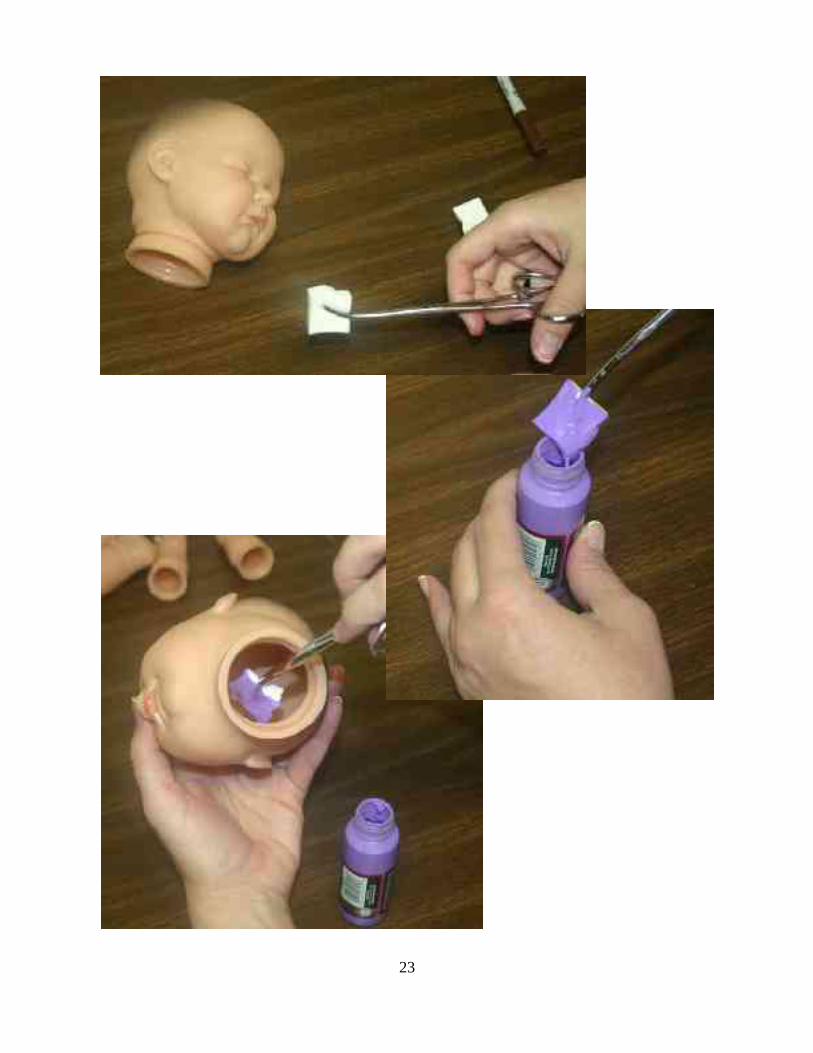
Inner Color WashPaint inside the head and limbs by taking a cosmetic wedge (our item #271 or #1282) andcutting or breaking it into 2 or three pieces. Clip one of the pieces into the end of the hemostats(our item #276) and dip into full strength lavender paint. Do not over load the wedge with paint.It is best to start with less paint and add more if needed. Rub the paint lightly all over inside thehead and limbs. Look at the limbs and head from the outside if you see an excess of purpleshowing through the vinyl. Wipe out with a dry or slightly damp small piece of a cottoncosmetic pad clipped onto the end of the hemostats.
Allow the paint to dry for a few hours. When to paint is completely dry, inspect your baby again.You may see excess purple showing through that wasn't as obvious when the paint was wet. Youcan remove this paint by breaking off a small piece of a cotton cosmetic pad and clipping it ontothe hemostats. Next dip the cotton into nail polish remover and wipe away the paint in thepurplish areas.
22
23

24

25

26

Above: Left foot has no color washRight foot has inner wash, but no outer wash
Below: Left hand has inner and outer color washRight hand has inner wash only
27

28

Step #6b: Blushing Your Baby
Above: our 32-count cosmetic wedges (ouritem #271)
To the right: our 100-count cosmeticwedges (the same wedges as our 32-count,but in a larger bag-- it is our item #1282)
Pointed Cotton Swabs (our item #263)
29

Old Rose Refill (item #346)
Old Rose Ink – Size: Small (item #278)
Old Rose – Size: Medium (item #345)
Old Rose – Size: Large (item #279)
30

Blush your baby after the color wash is complete. For the lips, some people like touse the paint from our nail kits, but we use lip stick to stain the existing gloss onthe lips.
The following instructions are for using Old Rose ink for blushing your baby. Wehave also had good success with Oil-Based Stencil Cremes instead of Old Roseink, so the instructions for the Stencil Cremes follows the instructions for the OldRose.
It is not necessary to remove the existing blush from your Berenguer Baby. Youcan blush right over your Berenguer Baby's existing blush since the Old Rose ink(our items #278, #279, or #345) blends well with the factory blush.
Using a cosmetic wedge (our item #271) dipped into the Old Rose ink pad, blushbaby's cheeks, chin, nose, bottom of feet, palms of hands, knees, elbows, andanywhere else you would like. Wipe excess blush off and blend with a drycosmetic wedge.
31

To make your baby's creases and rolls more noticeable, use a pointed cotton swab(our item #263) dipped into Old Rose ink (running the swab along the edge of theink pad or even under a loose edge of the ink pad usually works best to get moreink onto the swab). Paint ink into all of the baby's creases and rolls.
32

33

34

Next, take a dry cosmetic wedge and blend in and remove excess ink. You can usea pointed cotton swab to blend in any excess ink that the wedge cannot reach.
Your baby's blushing may look justright now, but as the ink dries and soaksin, the blushing fades. You will usuallywant to re-blush certain areas after youhave allowed the ink to set a day or two.If you accidentally over-blushed yourbaby the first time, you may besurprised at how well the baby looks ina few days when the ink settles in.
35

Blushing Your BabyUsing Stencil Creme Paint
Delta Stencil Magic Paint Creme is a concentrated, permanent, oil-based color.We offer the Stencil Creme Paints in 8 colors: (1) Berry Berry, (2) Mauve, (3)Barn Red, (4) Mulberry, (5) Black Cherry, (6) Coral, (7) Pink Carnation, and (8)Raspberry Pink.
Berry Berry and Mauve are great for Caucasian babies. You can use themseparately or mixed together. Our favorite is a mix of the two.
Barn Red and Mulberry work well for Ethnic babies. We prefer the Mulberry forMedium skin tones and the Barn Red for dark skin tones, but you can experimenton your own to come up with your personal favorites.
When you first open a container of Delta Stencil Magic Paint Creme, you willdiscover that a thin protective film formed on the surface of the paint. This isnormal. Remove it with a paper towel.
Using a cosmetic wedge, or your finger dipped into the Stencil Creme Paint, blushbabies cheeks, chin, nose, bottom of feet palms of hands, knees elbows andanywhere else you would like. Wipe excess blush off and blend with a drycosmetic wedge.
To make baby’s crease and rolls more noticeable, use a pointed cotton swabdipped into the Stencil Creme. Paint ink into all of the baby’s creases and rolls.Next take a dry cosmetic wedge and blend in and remove excess ink. You can usea dry pointed cotton swab to blend in any excess ink that the wedge cannot reach.
After letting the stencil Creme Paint set and soak in for a few days, you may wishto add more color.
36

Barn Red – Our item #527
Black Cherry – Our item #680
Berry Berry – Our item #526
Mulberry – Our item #528
37
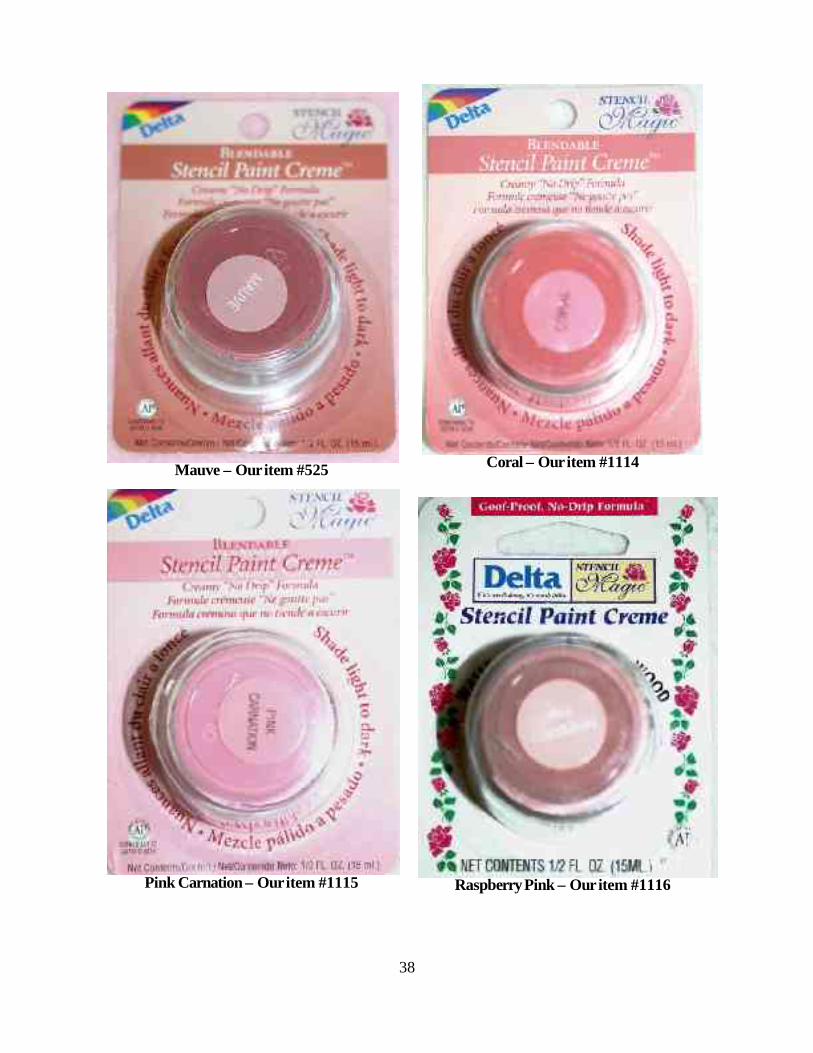
Mauve – Our item #525
Pink Carnation – Our item #1115
Coral – Our item #1114
Raspberry Pink – Our item #1116
38

Step #7: Nose Drilling
Using a rotary drill, or else just adrill bit, drill out the nostrils. Ouritem #186 includes all needed drillbit sizes for all aspects ofreborning. Our multipurposerooting and drilling tool (item#277) is useful for drilling. Astandard dremel tool is also a verygood tool to use for drilling.
Here is what it looks like with onenostril drilled, and the other onenot drilled.Be careful not to make the nostrilholes too large. If you need to,use a small file (from our item#344 or #498) to clean anyremaining vinyl "buggers" out.
39
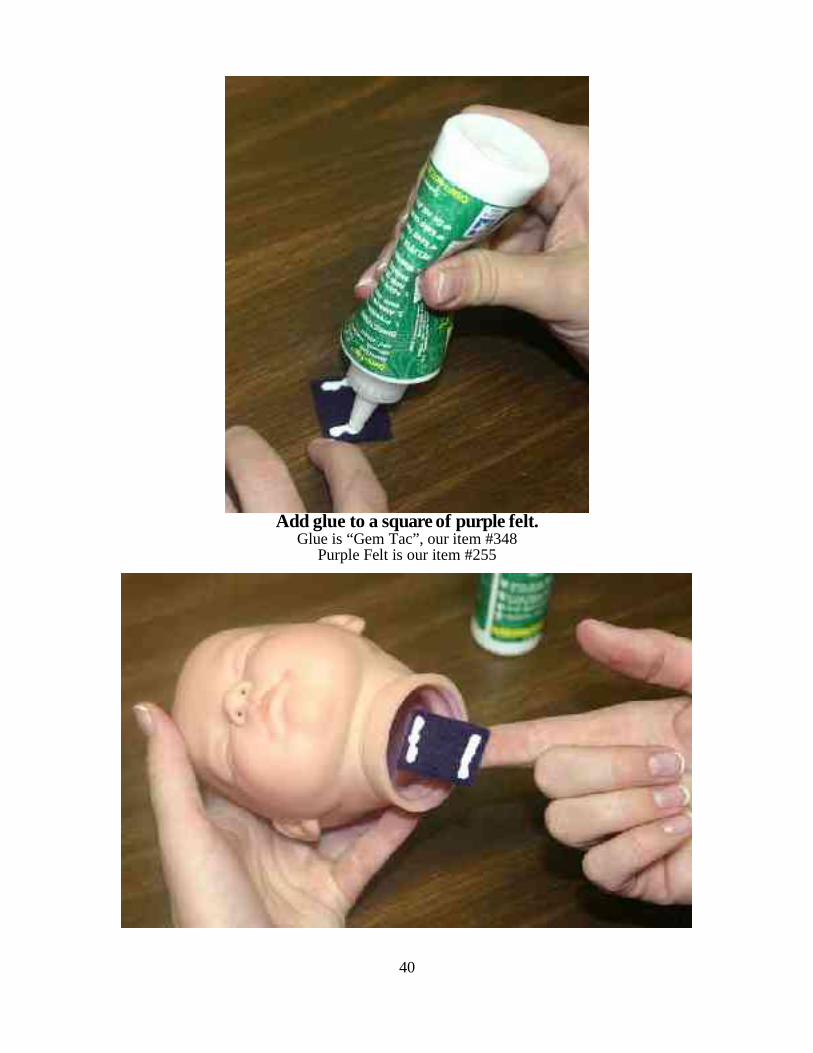
Add glue to a square of purple felt.Glue is “Gem Tac”, our item #348
Purple Felt is our item #255
40

And glue the purple felt over the drilled out nostrils.The purple felt (our item #255) will help create an illusion of depth.
41

Step #8: Changing Baby's EyesThis step obviously is not needed for sleeping babies. For changing eyes of awake babies, youwill need a utility knife (our items #252 or #281), a new pair of eyes, and suitable glue such asE6000 (our item #248), or for a non-toxic option, try Gem-Tac (our item #348).
It is recommended that you change your baby's eyes. For example the eyes that come with mostof the Berenguer baby dolls are not highly detailed and leaving them in will lessen the realisticlook of your baby.
Dark colored eyes will give the best newborn look to your baby. If you are going for an olderbaby look any natural looking eye color will do.
If you are doing an inside color wash (highly recommended), be sure to do this first beforechanging the eyes.
To remove the original eyes, cut away any excess vinyl on the neck to give a larger opening forchanging eyes. With your utility knife, cut through the vinyl around the bottom edge of the eyefrom the inside of the head. Push on the eyes from the front until they pop out. If you cannot getthe eyes out, you will need to cut a larger opening from the inside.
Once you have removed the eyes, place a ring of glue on the new eye and place them into thesocket. Adjust the eyes so that they are focused and looking in the same direction. Place headface down and allow the glue time to dry, checking occasionally to be sure the eyes have notmoved out of position. You will want to add more glue to the back of the socket once the eyesare set to provide extra strength.
The following babies take 18mm eyes:
14" Lots to Love 15" Carry Me 16" La Baby 17" La Newborn 17" La Newborn Moments 20" La Baby AA 20" La Baby, open eye closed mouth, shy baby (like Luke, shown below). 20" La Baby, new face (like Alexis, shown below), however some prefer a 20mm eye on this doll for a sweeter look.
The following babies take 22mm eyes:
20" open eye, open mouth baby (like Skyler, shown below) 17" Lots to Love Babies
42

Alexis
Luke
Skyler
43

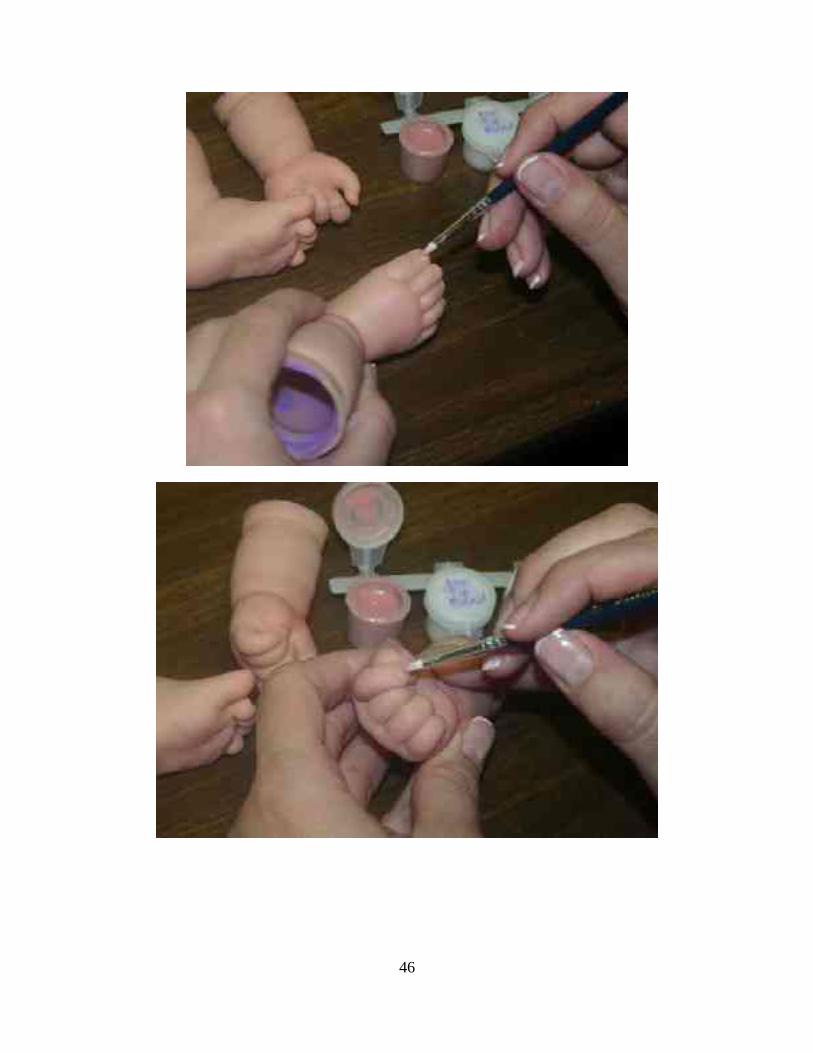
Step #9: Nail Painting
For life-like fingernails!
What is needed:
Bountiful Baby Translucent Nail Painting Kit (our item #318)
Use our kit (shown above), or create your own kit. Our kit consists of: (1) custom mixed water-
44

based paints, (2) paintbrush, (3) toothpicks, and (4) instructions.
If you create your own kit, the instructions you are reading here are evenbetter than the instructions that come with the kit. And, you should be able tofind paintbrushes and toothpicks (if you need, we sell them separately, as item#496 for the brush, and item #425 for a box of toothpicks). Thus, the onlything lacking to create your own kit is information on the custom mixedpaints.
We use Plaid paints for the custom mix. These plaid paints are also great forlips. We use Nuetral Wall Glaze (our item #1214), Vernis Barniz LinenWhite (our item #1215), Geranium Red (our item #1216), Cerulean Blue (ouritem #1217), Russet Brown (our item #1218), and Bark Brown (our item#1219).
For nail tips: mix about 8 parts Plaid Neutral Wall Glaze (item #1214) with 1 part Plaid VernisBarniz Linen White (item #1215).
For nail bed color: mix one 2 oz. bottle of Neutral with about 2 pea size dots of Plaid GeraniumRed (item #1216), 2 pea size dots of Plaid Cerulean Blue (item #1217), and a touch of PlaidRusset Brown (item #1218).
For lips: mix the same as for the nail bed color, but add more color to the Neutral base if desired.You may also want to use the Plaid Bark Brown (item #1219), in place of the Plaid RussetBrown for deeper colors.
To seal the lips and nails we recommend our item #249 Delta Varnish.
For umbilical cords: use a touch of Cerulean Blue at the base of the cord. Use Russet Brownmixed with Geramium Red to paint the tip of the cord. We also like to paint the entire cord witha watered down mix of these three colors.
Left: Realistic magnetic(detachable) umbilical cords!
Translucent Reborn Nail Painting
Start with clean nails free from any other gloss or paint. Using the provided paint brush lightlyand evenly brush each nail with the mauve “Nail Color.” Allow the paint to dry for about 20-30minutes.
45
46

When nails are dry, dip a toothpick into the “Nail Tip Blend” lightly rub the toothpick back andforth across the nail tip painting a thin line of off-white paint. If after several strokes, no paintgets on the nail, dip the toothpick in the paint again. If the toothpick is overloaded with paint,you will get too wide of a nail tip. If this happens simply wipe the paint off and try again. (I usemy fingertip to wipe of the nails to avoid getting any lint on the nails) It may take a littlepractice learning to get the right amount of paint on the tip of the toothpick.
47
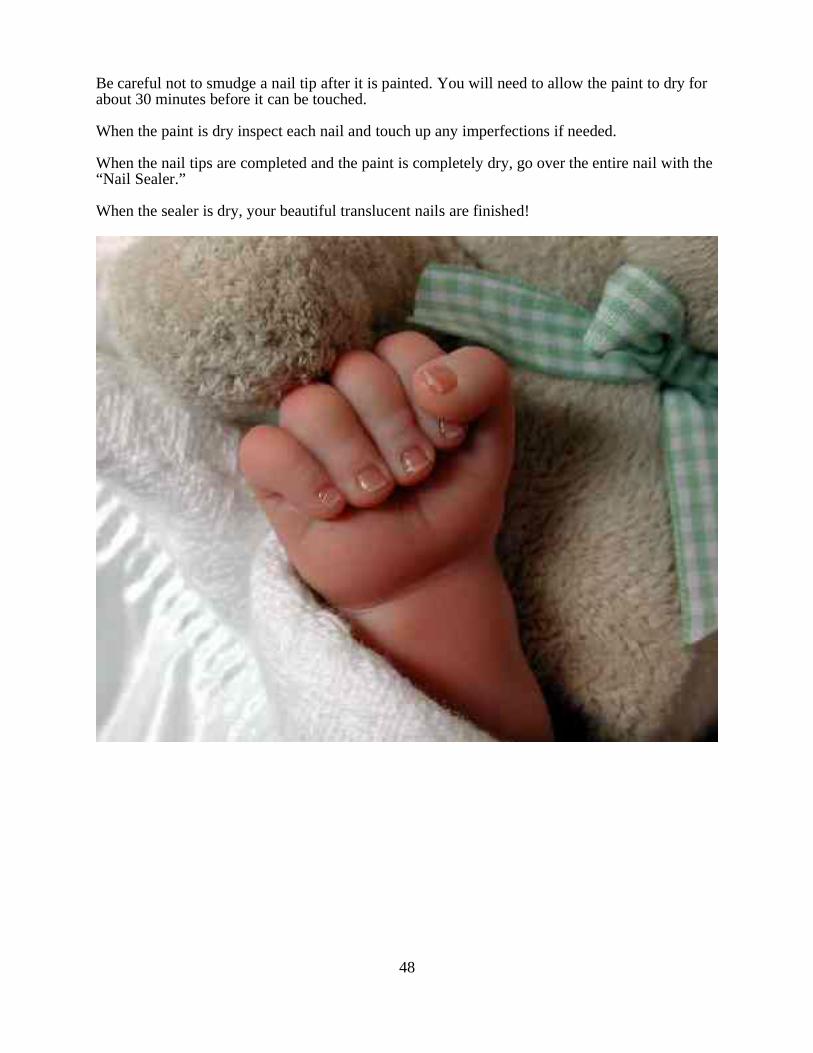
Be careful not to smudge a nail tip after it is painted. You will need to allow the paint to dry forabout 30 minutes before it can be touched.
When the paint is dry inspect each nail and touch up any imperfections if needed.
When the nail tips are completed and the paint is completely dry, go over the entire nail with the“Nail Sealer.”
When the sealer is dry, your beautiful translucent nails are finished!
48

Step #10a: Hair Rooting
Hair Rooting Instructions by Denise Kunz-Pratt
For hair rooting you will need mohair or human hair, a rooting tool, felting needles and Gem-Tac glue. I only use 38 gauge felting needles, but some folks prefer the larger 36 gauge needlesbecause they don't break as easily (I typically break between five to ten needles per rooted headwhen using regular needles, and one or two needles per rooted head for our ULTRA needles).
I also always use natural hair on my babies; such has mohair or human hair. I feel that naturalhair adds to the realism of the baby. For mohair I prefer the premium mohair sold on ourwebsite. It is the closest thing to newborn baby hair that I have ever seen. If you are a beginner,you may want to practice with our regular mohair to save on cost.
Human hair can also be used. Human hair is more difficult to root, so it is not recommended foryour first experience with rooting. Human hair is a slicker texture than mohair and doesn’t grabon to the needle as well, but with practice can be successfully rooted using the same method thatis described here for rooting mohair. I use hair from my own children for wonderful keepsakedolls made to look like them.
When rooting into polymer clay (for your sculpted dolls rather than your reborn baby dolls), thehair is rooted into unbaked clay. You will need about 1/3 of an inch of clay to root into. If theclay is too thin, the hair won't stick into the clay. I draw a hair line with a detailer tool (our item#440) and cut Saran Wrap to cover the crown of the head so that only about a one inch ring ofclay is exposed (this helps keep hair from sticking where I don't want it). I root starting at thehair line, and work my way toward the crown. I cut the circle over the crown smaller as I go. Ilike to work with mohair that is cut 3 to 4 inches long. I take a lock of hair and root over thecenter of it. I root about a one inch square area and then pull away the excess hair. I then smooththe needle holes closed with my fingers.
For rooting into vinyl, or silicone/vinyl mix, you will need to remove the head from the dollbefore rooting. I recommend color washing the inside of the head, opening the nose and mouthand blushing the doll before you root the hair. Since I do a very light coating of paint on theinside of the head, I have not had problems with purple paint showing through the scalp in thetiny needle holes. The reason I do these steps first is that if a mistake is made, I usually choose toput a wig on the baby rather than going through the effort of rooting a doll that did not turn out“perfect.”
Heating the vinyl head with a blow dryer, working in direct sunlight, or placing the head under asun lamp will heat and soften the vinyl making the head easier to root on most dolls.
With the rooting tool, place the collet with the smallest opening into the tool by completelyunscrewing the metal vise and pushing the collet into the hole. Screw the vise part way back onthe tool and then place a needle into the collet, pushing it in until almost all of the thicker part ofthe needle is inside the tool. Tighten the vise and you are ready to root. If you have difficultygetting the needle in at first a pair a needle nose pliers will help.
Hold the tool like a pencil, or else hold it by placing the wooden handle in the palm of your handwhile pinching on the metal vise part of the tool. In either case, make sure your fingers areplaced on and "pinching" the metal vise part of the tool, like you were holding a pencil, becausesupporting the tool down lower like this will help reduce needle breakage.
49
Cut hair into approximately 4” lengths. The first step is to create the border or hairline. Followthe pattern of the molded hair on the head. Lay a lock of hair on the vinyl and push the needle ofthe rooting tool through the vinyl with the handle on a slight downward angle and the needlealways pointing towards the crown. This angle will help the hair to lie more naturally. Workyour way across the width of the hair in one or more staggered rows. Pull away excess hair andmove the remaining lock of hair over and repeat. When your lock of hair gets too small to workwell, add more hair to your lock. Some of the hairs will break in the process. Occasionally pullaway and discard sections of broken hairs.
Continue working your way around the head until you have formed a complete hairline. Next fillin the rest of the scalp working your way towards the crown. Hair should be rooted on adownward angle and laying outwards from the crown in all directions. Root the crown of thehead last.
When hair is completely rooted, secure hair from inside by squeezing Gem-Tack glue around onthe hair from the inside of the head. Next clip a piece of a cosmetic wedge onto hemostats andsmooth the glue, covering all the hairs on the inside of the head. If you do not have cosmeticwedges or hemostats, you can use a paint brush.
When the glue has dried, you can brush and style the babies hair. Mohair gets very messy duringthe rooting process and may need to be carefully combed or picked to remove the snarls. SinceGem-Tac is waterproof when dry, you can even wash the babies hair without “rewetting” theglue inside the babies head.
Styling Baby's Hair
Using a styling razor (such as our item #461), shape the baby's hairline. For a newborn look,leave the babies hair longer in the front and shorter on the side front of the head. Cut awayexcess hair on the back and sides of the head.
Layer the hair a little making the hairs shorter on the top of the head to allow the hair to befluffed up.
Remember to take this step slowly and carefully, you can always cut away more hair, but it isnot as easy to add hair if you remove too much.
After styling the baby's hair, you may want to wet the hair using a wet baby soft brush and put anylon sock over the baby’s head being careful not to cover the lashes, then allow hair to dry andremove the sock. The cut off foot of a pair of nylons works great for this. This will take away thefrizzy look that mohair tends to get after rooting. With premium wavy or curly mohair, you canwet the hair and add a little styling mouse, then pick and shape the hair and let dry to bring outthe curls.
Caring for Mohair
Brush baby’s hair as needed, with a baby soft brush. Your baby’s mohair may require a littleextra grooming, but the beauty and soft feel of this hair makes it worth a little effort.
Mohair is a natural fiber and it is natural for there to be some shedding. Brush baby's hair as youwould a real newborn's hair to keep the hair smooth and separate.
50
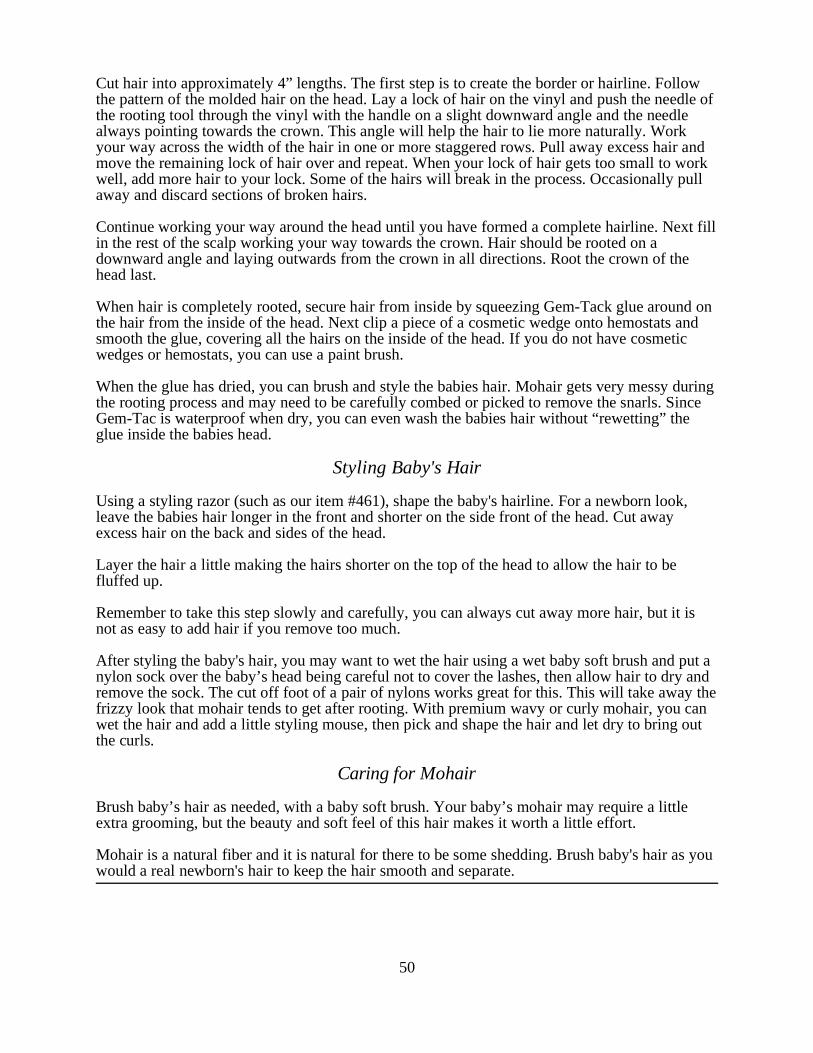
Examples of Reborns with Rooted Mohair
Rooting Human Hair
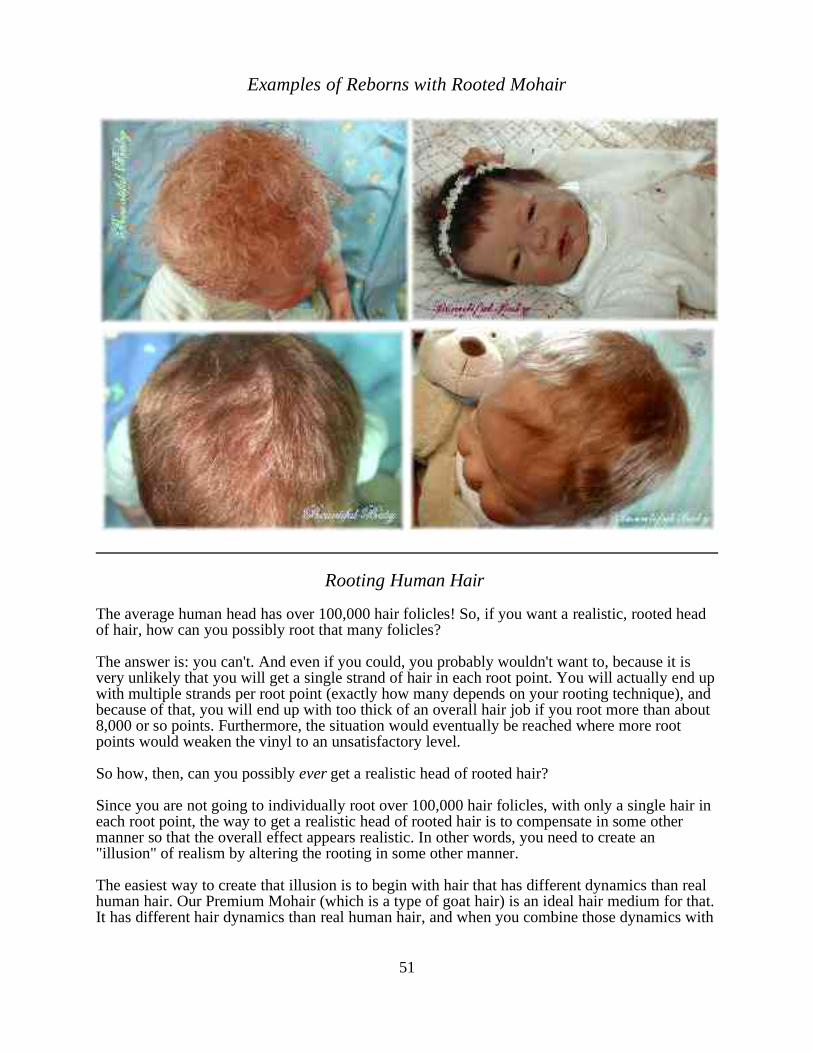
The average human head has over 100,000 hair folicles! So, if you want a realistic, rooted headof hair, how can you possibly root that many folicles?
The answer is: you can't. And even if you could, you probably wouldn't want to, because it isvery unlikely that you will get a single strand of hair in each root point. You will actually end upwith multiple strands per root point (exactly how many depends on your rooting technique), andbecause of that, you will end up with too thick of an overall hair job if you root more than about8,000 or so points. Furthermore, the situation would eventually be reached where more rootpoints would weaken the vinyl to an unsatisfactory level.
So how, then, can you possibly ever get a realistic head of rooted hair?
Since you are not going to individually root over 100,000 hair folicles, with only a single hair ineach root point, the way to get a realistic head of rooted hair is to compensate in some othermanner so that the overall effect appears realistic. In other words, you need to create an"illusion" of realism by altering the rooting in some other manner.
The easiest way to create that illusion is to begin with hair that has different dynamics than realhuman hair. Our Premium Mohair (which is a type of goat hair) is an ideal hair medium for that.It has different hair dynamics than real human hair, and when you combine those dynamics with
51
the naturally sparser rooting (of, say, maybe about 8,000 root points) that you are going to do,the overall effect appears very natural.
However, what if you want, say, an heirloom or keepsake baby, created with your real baby'shair, to be passed down through your family each generation? You'd be hard-pressed to find aparent anywhere who wouldn't cherish such a doll!
Or what if you want real human hair for some other reason?
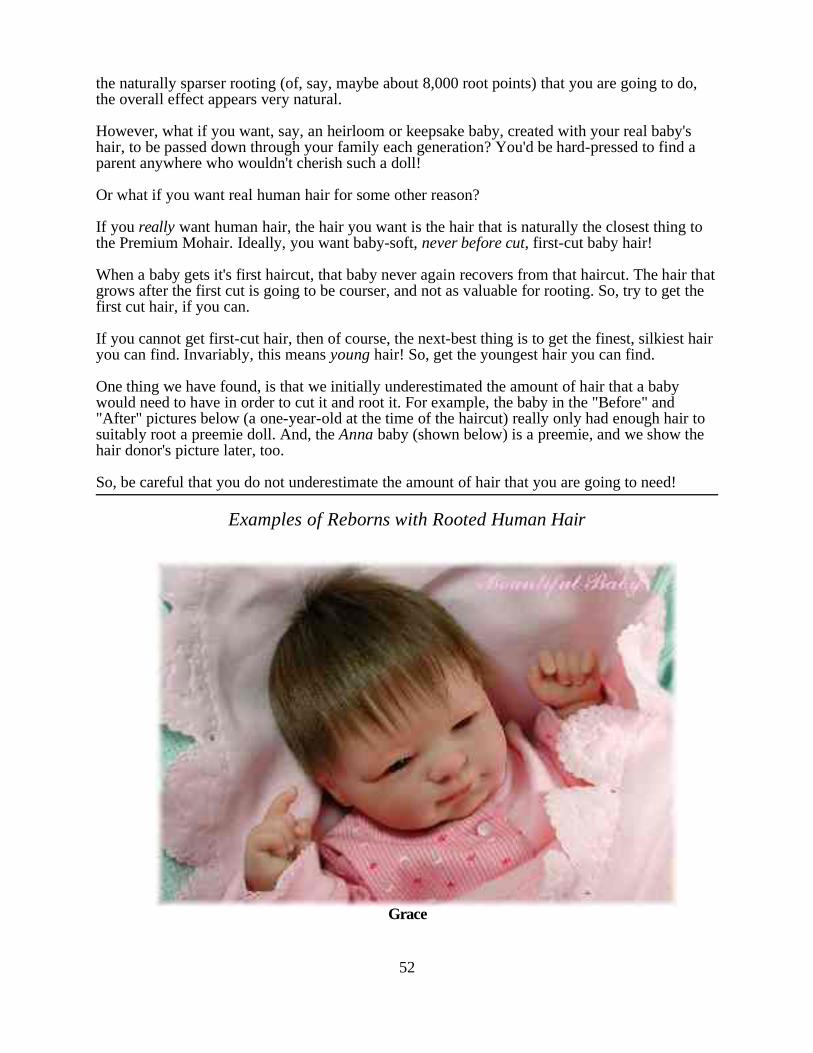
If you really want human hair, the hair you want is the hair that is naturally the closest thing tothe Premium Mohair. Ideally, you want baby-soft, never before cut, first-cut baby hair!
When a baby gets it's first haircut, that baby never again recovers from that haircut. The hair thatgrows after the first cut is going to be courser, and not as valuable for rooting. So, try to get thefirst cut hair, if you can.
If you cannot get first-cut hair, then of course, the next-best thing is to get the finest, silkiest hairyou can find. Invariably, this means young hair! So, get the youngest hair you can find.
One thing we have found, is that we initially underestimated the amount of hair that a babywould need to have in order to cut it and root it. For example, the baby in the "Before" and"After" pictures below (a one-year-old at the time of the haircut) really only had enough hair tosuitably root a preemie doll. And, the Anna baby (shown below) is a preemie, and we show thehair donor's picture later, too.
So, be careful that you do not underestimate the amount of hair that you are going to need!
Examples of Reborns with Rooted Human Hair
Grace
52
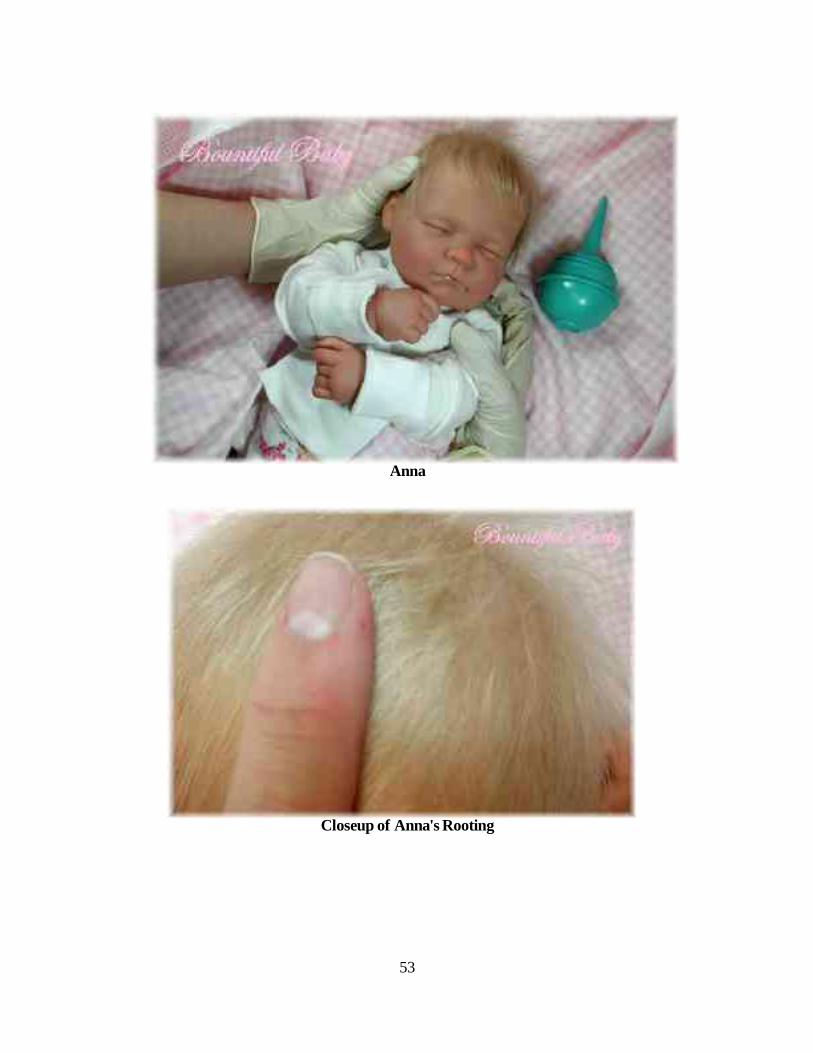
Anna
Closeup of Anna's Rooting
53

How long will human hair last? Take a look at baby Miranda, one of Denise's reborn babies,who now lives with her new mommy in Alpine, UT. Miranda's hair was taken 80 years ago froma 3 year old Edwardian boy! It is still beautiful and has not lost it's shine.
54

Real Human Hair From Real Babies!
Before
After
55

The 8 month old baby boy shown above provided the real human hair for theAnna reborn baby doll show below! It was his first haircut, and he was given acrewcut.
Anna is a preemie sized baby doll, and she took every bit of the little boy's hair,and it was still just barely enough hair. So, if you are wanting your baby's firsthaircut for an Heirloom Reborn, make sure you first let it grow longer than youeven think you'll need-- you'll be glad you waited!
56

Our Needles
We stock two types of needles: (1) Regular, and (2) ULTRA (our rooting tool comes with 38gauge ULTRA). In Regular, we stock 36, 38, 40, and 42 gauge. In ULTRA, we stock 36 and 38gauge (the bigger the number, the smaller the needle).
All the needles are triangular, therefore they have three edges. The ULTRA needles have onesingle small barb per edge (three barbs total), with the barb approximately 1/8" from the tip ofthe needle. The Regular needles have two barbs per edge (six barbs total), and they are atstaggered depths from the tip.
For hair rooting, the "fine-ness" of the rooting depends on three factors: (1) the size of therooting hole, (2) the number of hairs pulled into each rooting folicle, and (3) the elasticity of themedium being rooted into. The elasticity effects the degree that the rooting medium closes backin on the rooting hole-- the greater the elasticity, then the greater the rooting medium will"squeeze", or close back in, on the rooting folicle. For example, rooting into vinyl or silicone willappear finer than identical rooting into polymer clay (before the clay is baked), because bothsilicone and vinyl are more elastic than unbaked polymer clay. So, the best needle also dependsupon the rooting medium.
For rooting into vinyl (or a silicone/vinyl mix), a 38 gauge ULTRA needle roots about as finelyas a 42 gauge regular needle (remember, the bigger the gauge number, the smaller the needle).This is because our ULTRA needles pull fewer hairs per folicle. That is what they are designedto do.
So, even though our ULTRA needles (like are shipped with our rooting tool) root more sparselythan any other needle, they still work well, and are our most popular needle (by about 3 to 1).However, some people do not like them, because they root too sparsely for their tastes. For thosepeople, they may be happier with 36 gauge regular needles.
Our Rooting Tool (item #225)
57

To the right is an extreme closeup of our 38-guage Regular needles. You can see the
individual barbs, and you can see that it hasmore barbs than the Ultra needles have.
To the left is an extreme closeup of the tip ofour rooting tool (item #225), and the 38-guage
Ultra needles that the tool ships with.
58

Step #10b: Wig Placement
Kemper Cassidy Mohair Wigs
We think these are the best mohair wigs available for reborning. They are nice and baby-like,and easily styled. These pie-shaped partial cap wigs, with baby soft mohair, fit easily onto avariety of head shapes. They can be styled to your liking, although in many cases no styling isneeded. Nothing makes a more beautiful head of hair for a baby doll than natural mohair!
Cassidy mohair wigs are available in med/dark brown, light brown, honey blonde, pale blonde,carrot, and strawberry. Two of our Bountiful Babies, "Luke" and "Vanessa", can be seen below,each with a Kemper Cassidy Mohair wig (Luke has a honey blonde wig, and Vanessa has a paleblonde wig).
We recommend cutting the fabric tag off the back side of the wig. Place the wig on the dollshead and to determine the placing. Attach by placing a thin line of E6000 (our item #248) orGem-Tac (our item #348) on the binding edge of the cap only. E6000 has better holding power,but Gem-Tac is non-toxic and still has very good holding power. If you want a quick tack glueyou can use Fabric-Tac glue (our item #347), but it doesn't have the holding power of eitherGem-Tac or E6000.
59

Place wig evenly on head with thesmaller side of the wig in the frontand the wider side at the back.
60

Put a nylon stockingover the baby's headand allow the glue todry. Let Gem-Tac (ouritem #348) dry overnight before stylinghair. E6000 (our item#248) and Fabri-Tac(our item #347) dryfaster.
You want to avoid theneed to adjust the wigonce you have placedglue on the bindingedge. If you are notcomfortable withgluing the whole wigon at once, you can trygluing the a smallsection in the front,then a small section inthe back and work yourway around the sides.
Allow each section of glue to dry before adding glue to the next. This will help avoid placementproblems and the need to adjust the wig after gluing.
Size 12-13 wigs fit 12-13" heads such as the 17" Berenguer La NewBorn Moments and 16"Berenguer La Babies. Size 14-15 fits 14-15" heads such as the 20" and 22" Berenguer LaBabies, and the Berenguer Special Edition babies.
Styling The Wig
It may not be necessary to style your wig. But, depending on the exact size of the dolls head andthe desired look, you may wish to give your baby a trim.
Using a styling razor shape the babys hairline. For a newborn look, leave the babys hair longer inthe front and shorter on the side front of the head. Cut away excess hair on the back and sides ofthe head. Layer the hair a little, making the hairs shorter on the top of the head to allow the hairto be fluffed up.
Remember to take this step slowly and carefully, you can always cut away excess hair, but youcannot put the hair back on.
61

Examples of Reborns with Kemper Cassidy Wigs
62

Kemper Cassidy Mohair Wigs
We stock all of these Cassidy wig colors, in size 12-13 as well as size 14-15.
Strawberry Auburn Black
Blonde Carrot Light Brown
Medium/Dark Brown Pale Blonde Pale Pale Blonde
We also stock Cassie wigs (in size 14-15), which are very similar to the Cassidy wigs, but haveclear caps. And finally, we also stock Mikayla mohair wigs, which are curlier than either Cassie
or Cassidy, available in sizes 12-13, 14-15 and 16-17.
63

Step #11: Attaching Eyelashes
Adding eyelashes to your baby really makesthe eyes stand out. You want a soft wispylash like the ones included in our kits.
If you have a sleeping baby you will need tocut a slit right along the line that indicatesthe opening of the eye. Cut all the waythrough the vinyl so that glue can be addedfrom the inside. Be sure to hold the blade ata downward angle to insure the lashes willbe properly tilted downward as they are on asleeping baby. A very common mistake is toput the lashes straight out or tilted upwardlike they are on open eyes. I you look atsomeone with their eyes closed, you will seethat the lashes lay down towards the cheek.
64

Remove the lash from the plastic backing by pressing down on the gummed edge of the lashwhile sliding the lash upward. This will aid in removing the sticky glue that holds the lash to thebacking. You want to remove as much of this glue as possible especially if you are doing anopen eye baby.
65
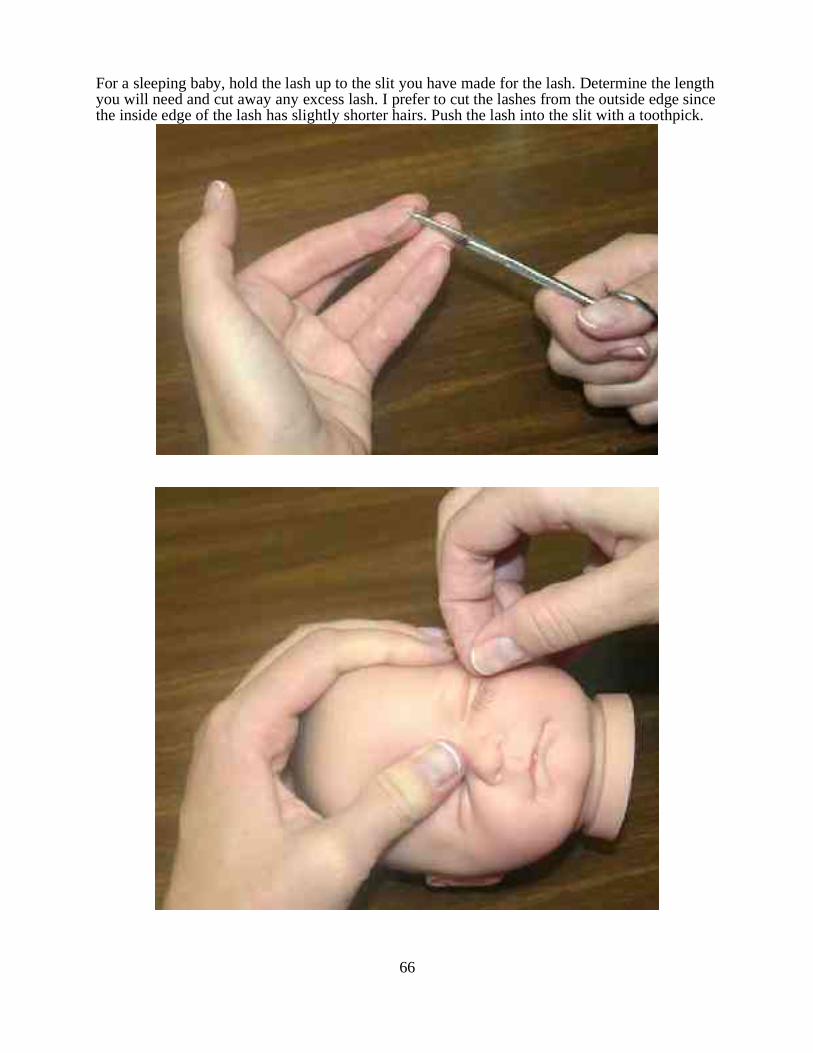
For a sleeping baby, hold the lash up to the slit you have made for the lash. Determine the lengthyou will need and cut away any excess lash. I prefer to cut the lashes from the outside edge sincethe inside edge of the lash has slightly shorter hairs. Push the lash into the slit with a toothpick.
66

67

68

69

Secure the lash by placing a line of Gem-Tacglue (item #348) on the slit from the inside. Usea piece of a cosmetic wedge (item #1282 or#271) attached to the hemostats (item #276 or#436) to lightly push the glue into the slit. If youcan barely see glue from the outside, this isgood. This glue dries clear. However, if youhave very much glue at all visible from theoutside you will want to clean it up carefullywith a moist cotton swab. Make sure you wipeup all glue residue that may be smeared aroundthe eyes. Once this glue is dry it isn’t necessarilyeasy to remove.
70

For an awake baby, you will want toplace the lash right where the vinylmeets the eyelid. A common mistakeis to place the lash in the crease of theeyelid. If you look at your own eye,your lash is on the very edge of youreye lid, so the best placement for thelash on a dolls eye is where the lidmeets the eye.
We prefer to not tuck the lash underthe eyelid at all. If you tuck the lashunder the lid, the lashes will lay overthe eye rather than curling up as theyshould.
Determine the length of lash neededby placing the lash along the upperedge of the eye. Cut away any excesslash for the outside edge of the lash.Place the lash back onto the top of theeye using a tooth pick. You may havedifficulty getting the whole lash inplace, if so don’t worry, just line upthe lash on one side and begin to gluethe lash in place using a toothpickdipped into Gem Tack glue. Ifnecessary allow one side of the lashto dry enough to hold the lash inplace before gluing the rest of thelash. Continue to add small amountsof glue all along the edge of the lash.
You don’t want to get glue all over the eye, but this glue dries clear and tiny amounts of glue atthe top of the eye are not a problem. Allow the glue to dry before handling your doll to avoidknocking the lashes out of place.
71
Step #12: Assembling the Body
Preparing The Head For Placing On The Body
If you are giving your baby an optional magnetic pacifier, use a glue such as our E6000 (item#248) to glue a rare earth magnet behind the baby’s mouth. Making sure you glue the right sideof the magnet to the mouth so that the pacifier with magnet will attract rather than push awayfrom the magnet inside of the head. If you have opened the nose and/or mouth, you will need toplace dark purple (our item #255) felt behind them to prevent weighting material or stuffingfrom showing through. Cut a square of felt and place it just above and behind the nose. If themouth is open too cut the piece large enough to cover the mouth opening as well and glue piecelightly with Gem-Tac, just above the nose openings on the inside of the head. You want to besure not to let any glue get in the nose or mouth openings.
If you have a bag of plastic pellets from your dolls original body, then place this bag in the dollshead for weighting. If you do not have this bag of pellets, place a nylon stocking (our item #265or #266) that is either seamed or tied on one end inside the dolls head and fill with Poly-Pellets(our item #218). Tie the end of the bag off. If there is excess space inside the head fill with Poly-fill stuffing (our item #217).
Stuffing The Limbs
Fill the arms and legs most of the way full of Poly-Pellets (#218). Top off with Poly-Fil (#217),filling the limbs tightly so the pellets won’t be able to move around and make noise.
If you want the feel of heavier limbs, place a nylon stocking in each limb and fill the hands andfeet with steel pellets (our item #556). The steel pellets are more expensive, but they often makethe limbs more posable, because the limbs will have more of a tendency to stay where you placethem if they are feeled with steel pellets.
Special Instructions for Berenguer “La Baby” Dolls: Fill the arms and legs about ¼ the way fullof Poly-fill (#217). Fill two tied off lengths of nylon stocking with 2 ½ ounces of Poly-Pellets(#218) in each stocking and tie. Place these pellet bags into the arms and fill with a little morePoly-Fil in the ends of the arms until you achieve the desired feel.
Fill two nylon stockings with 3 ½ ounces of pellets each. Place the pellets bags into the legs andfill with a little more Poly-Fill in the ends of the legs until you achieve the desired feel.
Stuffing The Torso
Place a small amount of stuffing in the bottom of the torso and then add a 1 ½ pound bag ofpellets (for Berenguer “La Newborn” dolls, a 1 pound bag of pellets will do fine). Fill the rest ofthe torso with Poly-fill. If you want a little more weight and want the neck to be more floppy adda 5 ounce bag of pellets to the very top of the torso.
72

Instructions for Berenguer “La Newborn” Dolls: Place a small amount of stuffing in the bottomof the torso and then add a 1 pound bag of pellets. Fill the rest of the torso with Poly-fill. If youwant a little more weight and want the neck to be more floppy add a 5 ounce bag of pellets to thevery top of the torso.
Attaching The Head And Limbs To The Body
Instructions for Berenguer “La Baby” dolls:
If you are using one of our body kits or one of our Bountiful Baby cloth bodies, cable ties arealready inserted for you. If not, you will need a 14”cable tie for the neck and 4 cable ties 8” longor in some cases longer for the arms and legs.
Thread the cable ties through the casings on the neck and limbs. Thread the ends of the cable tietogether and pull slightly. Place the arms on the body. Pull the ties as you adjust the fabric to begathered evenly around your tie. Pull the tie tightly using your hemostats (our item #276) or apair of needle nose pliers (such as our item #250 or #282). Place the legs on your doll in thesame manner.
Place the head on top of the body and pull the cable tie tighter slowly. Adjust the fabric as yougo. You will want to get the tie on the neck tight enough that it will not fall off, but lose enoughthat the head can still be turned for posing.
Cut the ends of the cable ties off smoothly with your cuticle nippers. Yes, normal cutters willalso cut cable ties (like our items #251 or #283), but cuticle nippers create a cut that feels almostpolished! Also, these precision nippers have a cutting head with an angled design to help youmore clearly see where and what you are cutting.
Instructions for Berenguer “La Newborn” and “Special Edition” dolls:
Place the top side of the neck base (our item #421 for the La Newborn dolls, and item #420 forthe Special Edition dolls) into the head. You may need to cut away the inner ring of vinyl or thinout thick areas of excess vinyl with your utility knife. It may be hard for you to get the neck baseinto the head, but this is necessary for a securely attached head. Try turning the base as you pushdown or using a screwdriver to push the base into the head. The neck base should turn freelyinside the head.
Place the head on top of the body and pull the cable tie tight.
Cut the ends of the cable ties off smoothly with your cuticle nippers.
73
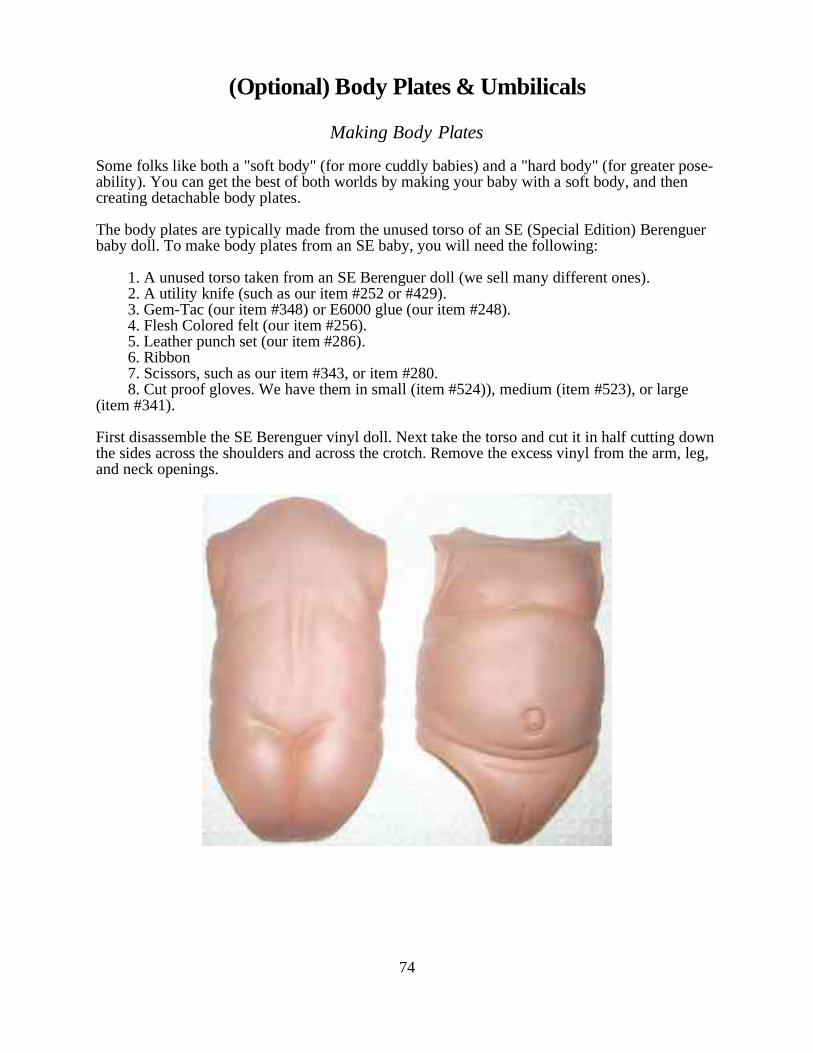
(Optional) Body Plates & Umbilicals
Making Body Plates
Some folks like both a "soft body" (for more cuddly babies) and a "hard body" (for greater pose-ability). You can get the best of both worlds by making your baby with a soft body, and thencreating detachable body plates.
The body plates are typically made from the unused torso of an SE (Special Edition) Berenguerbaby doll. To make body plates from an SE baby, you will need the following:
1. A unused torso taken from an SE Berenguer doll (we sell many different ones). 2. A utility knife (such as our item #252 or #429). 3. Gem-Tac (our item #348) or E6000 glue (our item #248). 4. Flesh Colored felt (our item #256). 5. Leather punch set (our item #286). 6. Ribbon 7. Scissors, such as our item #343, or item #280. 8. Cut proof gloves. We have them in small (item #524)), medium (item #523), or large(item #341).
First disassemble the SE Berenguer vinyl doll. Next take the torso and cut it in half cutting downthe sides across the shoulders and across the crotch. Remove the excess vinyl from the arm, leg,and neck openings.
74

Next round off the edges at the shoulders, upper and lower sides and crotch with your utilityknife. Use caution and take your time when cutting the plates as it is very easy to slip and cutyourself. Cut proof gloves will decrease the chance of cuts, but the tip of the blade can still pokethrough the fibers.
If you are color washing your doll, color wash and blush the plates to match. If you are adding amagnetic umbilical cord to your baby, glue a magnet to the back side of the naval. You maywish to cover the back side of the plates with felt. This will improve the looks of the plates andalso aid in holding the plates in place on your doll. Place glue on the back side of the platesmaking sure to get a good line of glue around the edges. Place a sheet of felt over the plate.Allow the glue to dry thoroughly and then cut away excess felt.
75
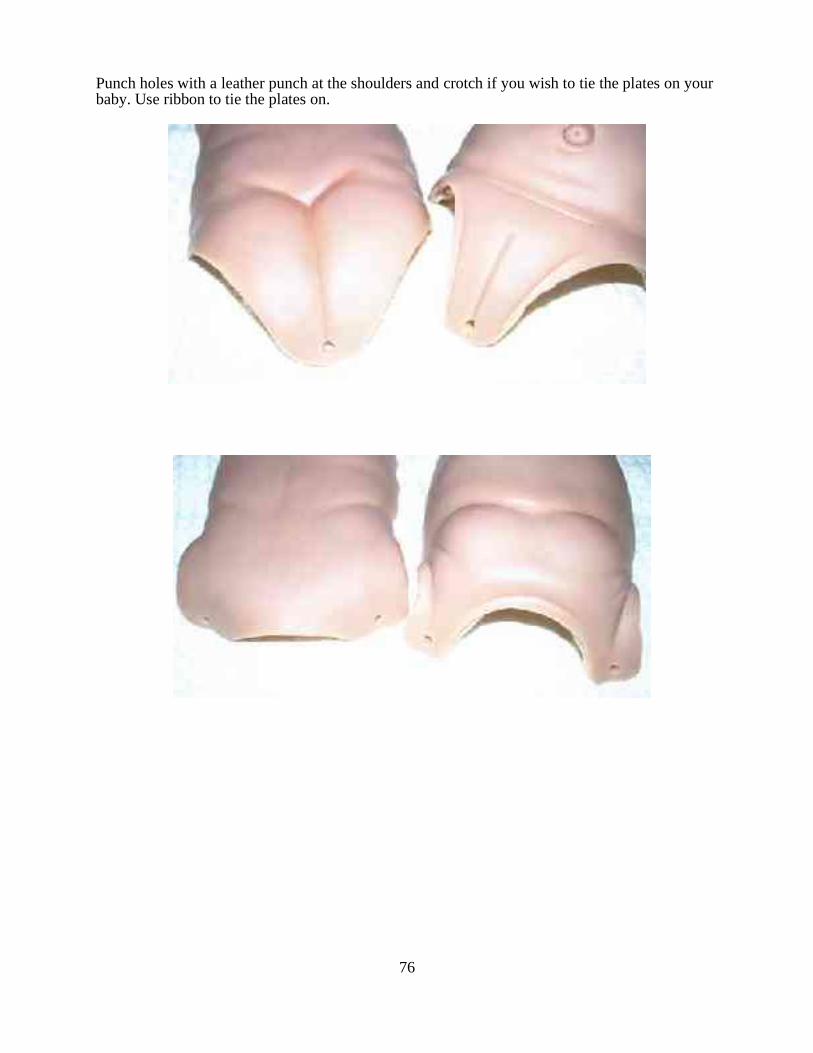
Punch holes with a leather punch at the shoulders and crotch if you wish to tie the plates on yourbaby. Use ribbon to tie the plates on.
76

Making Umbilical Cords
Making a detachable umbilical cord is an optional, and advanced technique. Most people don'tmake them, but if you would like to, here are the instructions.
You sculpt an umbilical cording using our white translucent Cernit polymer clay (our item #262,as shown below):
Step #1: The first step is to clean your hands! Then, after cleaning your hands, you can use apiece of old clay, rolled around in a ball, to clean the lint off of your hands. Roll the ball of oldclay around the palms of your hands:
77
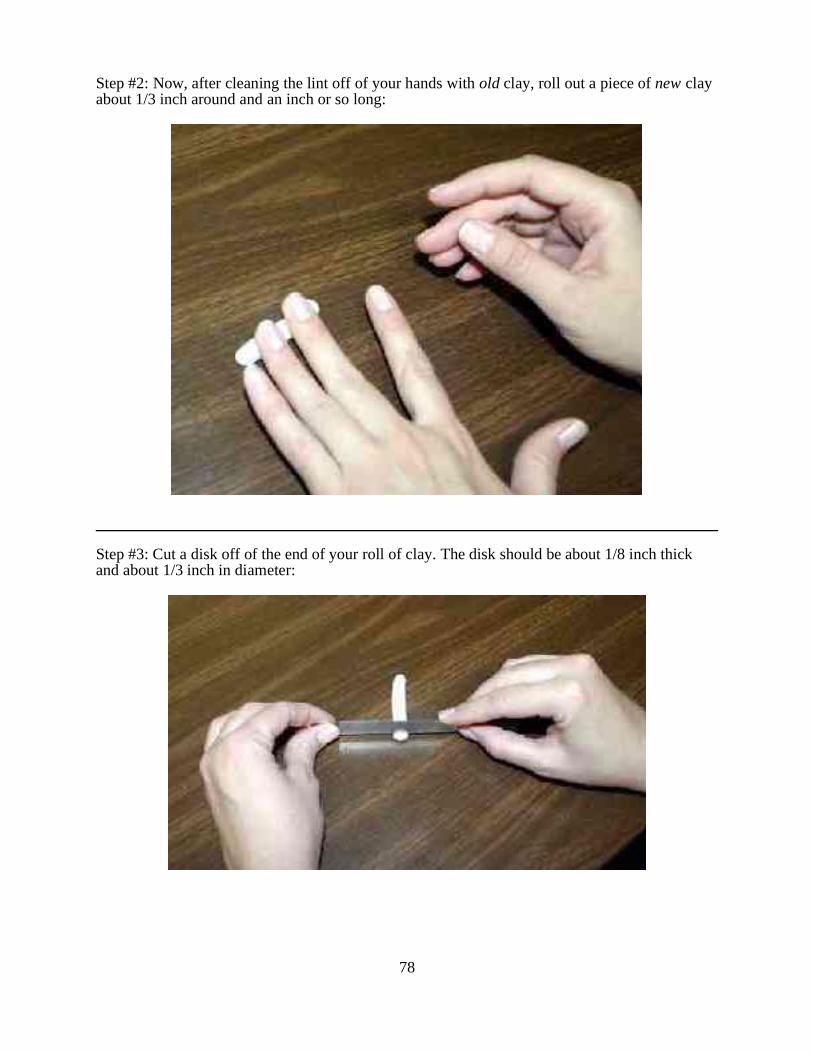
Step #2: Now, after cleaning the lint off of your hands with old clay, roll out a piece of new clayabout 1/3 inch around and an inch or so long:
Step #3: Cut a disk off of the end of your roll of clay. The disk should be about 1/8 inch thickand about 1/3 inch in diameter:
78

Step #4: Bake the disk. It should be about 1/8 inch thick and 1/3 of an inch around. Bake it atabout 270 degrees for about 10 minutes. This disk will be used later to keep the umbilical cordclamp from cutting the clay in half. The little disk in the top right corner of this photo is thebaked disk.
79

Step #5: Now roll out a piece of clay about 1/2 inch around and an inch or so long:
Step #6: Place the baked disk in the middle of the clay:
80

Step #7: Put a magnet (our item #168) in one end and smooth everything out. After you smoothit out, the clay should be formed like a small, thin cylinder, with a magnet on one end, and thebaked disk in the center:
Step #8: Next, twist the cord a little:
81

Step #9: Put the clamp (our item #169) on over the now covered baked disk:
82
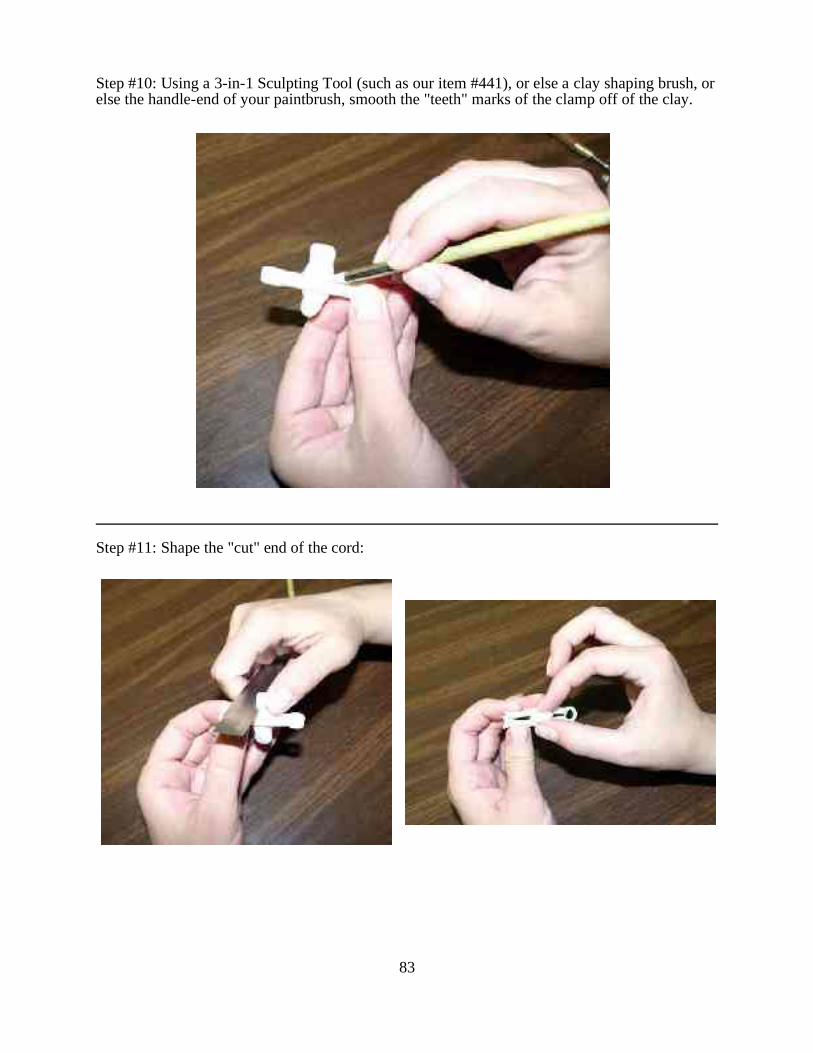
Step #10: Using a 3-in-1 Sculpting Tool (such as our item #441), or else a clay shaping brush, orelse the handle-end of your paintbrush, smooth the "teeth" marks of the clamp off of the clay.
Step #11: Shape the "cut" end of the cord:
83

Step #12: Now press the magnet end of the cord onto the belly plate that you will be using it onto shape the end to fit, making sure that there is only a very thin layer of clay on the end of themagnet. This is the step that determines if your umbilical is going to be an "innie" or an "outie",because it depends on which belly plate you press the magnet end of the cord against to shape it:
Step #13: Bake the cord with the clamp on at 235 degrees for about 45 minutes. After it is baked,if the clamp gets a little brown, you can cut it off and put a new clamp on. Add a little red paintmixed with brown to the tip and a light touch of blue to the base and seal it with the Deltavarnish (our item #249). Glue a second magnet to the inside of the belly plate using E6000 glue(our item #248) making sure that the magnet is placed on in the right direction so the cordattaches rather than repels away from the belly plate.
84