vxag installation guide for amazon web services (aws) · pdf fileinstallation guide feb-2016...
TRANSCRIPT

Installation Guide
Feb-2016 rev. a
vxAG Installation Guide
for Amazon Web Services (AWS)

Table of Contents
1 Introduction ............................................................................................................... 1
1.1 How Array vxAG Works on AWS ..................................................................................... 1
1.2 Recommended Instance Types ....................................................................................... 2
1.3 Usage Limitations and Guidelines.................................................................................... 2
2 Deploying vxAG on AWS .......................................................................................... 4
2.1 Creating the Amazon VPC and Needed Subnets ............................................................. 4
2.2 Launching the vxAG EC2 Instance .................................................................................. 4
2.3 Adding Other Interfaces to the vxAG Instance ................................................................. 8
2.4 Adding Secondary Private IP Addresses to the External Interface ................................... 9
2.5 Adding Elastic IPs to the Network Interfaces ..................................................................10
2.6 Accessing the vxAG Instance and Setting the "array" Password.....................................12
2.6.1 Accessing the vxAG Instance via SSH .....................................................................12
2.6.2 Accessing the vxAG Instance via WebUI .................................................................13
2.7 Adding IPs to Other Interfaces ........................................................................................13
2.8 Loading the vxAG License ..............................................................................................14
About Array Networks ................................................................................................ 15

1
1 Introduction
The Array vxAG appliance is an SSL-based VPN platform that offers fast, secure, and scalable
remote access to Web and non-Web applications. Amazon Web Services (AWS) is a leading
cloud-computing platform that helps enterprises move their business from the physical network
infrastructure to the cloud.
vxAG for AWS is a virtual appliance integrated with the AWS cloud environment, providing
almost all of the features of physical AG Series appliances. The vxAG appliance offers fast,
secure, and scalable remote access to Web and non-Web applications. The vxAG appliance
establishes security with AAA and user policies, provides access methods for Web, mail, file
and native application servers, and assures scalability with the virtual site and HA technology.
By integrating these features into a single virtual appliance, the vxAG appliance delivers secure
remote and mobile access to trusted employees, customers, and partners anywhere, anytime
while protecting the AWS-hosted network resources.
Array vxAG is available as an Amazon Machine Image (AMI) in the AWS marketplace and can
be deployed as an Amazon Elastic Cloud Compute (EC2) instance. With this support, AWS
customers can leverage Array vxAG SSL VPN and other valuable features to better meet their
business needs.
Note: The vxAG appliance is also an SSL-based secure application platform that can also support the DesktopDirect solution.
1.1 How Array vxAG Works on AWS
AWS provides different types of Web services, such as Amazon Virtual Private Cloud (VPC)
and EC2. Amazon VPC provisions a private, isolated section of the Amazon Web Services
(AWS) cloud where you can launch Amazon AWS resources in a virtual network that you define.
With Amazon VPC, you can define a virtual network topology that closely resembles a
traditional network that you might operate in your own data center. Amazon EC2 is a Web
service that provides resizable compute capacity in the cloud. Amazon EC2 provides a wide
selection of instance types optimized to fit different use cases. Instance types comprise varying
combinations of CPU, memory, storage, and networking capacity and give you the flexibility to
choose the appropriate mix of resources for your applications.
In deployment, Array vxAG and application servers are launched as EC2 instances within an
Amazon VPC, as shown in the following figure.

2
Figure 1-1 Typical Deployment Scenario of vxAG for AWS
For more information, please refer to http://aws.amazon.com/documentation.
1.2 Recommended Instance Types
The vxAG computation and network performance is based upon the resources of the underlying
AWS instance type. Following are the EC2 Instance Types that are recommended for vxAG.
Instance Type vCPU Memory Network
Performance
Max Virtual Site
Max Session
t2.small 1 2 Low 20 600
t2.medium 2 4 Medium 256 10000
m4.large 2 8 High 256 25000
m4.xlarge 4 16 High 256 128000
Table 1-1 Recommended Instance Types
When an EC2 instance is launched, the specified instance type determines the resources
allowed for the vxAG, such as number of vCPUs, memory size, network performance, number
of ENIs and the number of private IP addresses per ENI. For details on compute, memory, and
storage capabilities of each instance type, please refer to
http://docs.aws.amazon.com/AWSEC2/latest/UserGuide/instance-types.html.
1.3 Usage Limitations and Guidelines
In the AWS cloud service architecture, if the vxAG is deployed with multiple network
interfaces, the AWS VPC needs to be used. You should configure the VPC route table
correctly to make sure that the management and external subnets are publicly
accessible.

3
vxAG uses a BYOL (Bring Your Own License) model, and requires that a license be
purchased from Array Networks. The BYOL license specifies the maximum sessions,
maximum virtual portals, and so on. When purchasing the vxAG BYOL license from
Array, please specify the AWS instance type that you will use for the optimal usage.
The vxAG license has the following software features included as standard:
- Host checking
- Cache cleaner
- SSL encryption for data in transit
- Per-user policy engine
- Multiple access methods (Web, Layer 3, client-server, thin client)
- 64-bit architecture
- Non-disruptive upgrades up to 600 concurrent users and 500Mbps throughput
vxAG for AWS supports only the BYOL (Bring Your Own License) model at present.
Please refer to the section 2.8 Loading the vxAG License to learn how to load the vxAG
BYOL license.
vxAG AMIs with pre-license for subscription will be available soon. Please check AWS
Marketplace.

4
2 Deploying vxAG on AWS
This section describes the process of deploying the vxAG EC2 instance within the Amazon VPC.
2.1 Creating the Amazon VPC and Needed Subnets
Before deploying the vxAG, you first need to create a VPC. For each VPC, AWS creates two
subnets (Management and External). If additional subnets are needed, you can add them later.
Please configure AWS routing tables to ensure that the management subnet and external
subnet are accessible from the Internet.
For more information about creating and configuring the VPC, please refer to
http://aws.amazon.com/cn/documentation/vpc/.
2.2 Launching the vxAG EC2 Instance
To launch the vxAG EC2 instance on AWS, please perform the following steps:
1. Log into AWS (http://aws.amazon.com) with a valid credential and switch to the
AWS EC2 management console, as shown in the following figure.
Figure 2-1 EC2 Management Console
2. In the Create Instance area of the EC2 Dashboard page, click the Launch
Instance button, as shown in the preceding figure.
3. In Step 1: Choose an Amazon Machine Image (AMI) page, click the AWS
Marketplace tab, enter “vxAG” in the search box and click the Select button, as
shown in the following figure.

5
Figure 2-2 Selecting the vxAG AMI
4. In Step 2: Choose an Instance Type page, select one of the instance types
supported by the vxAG AMI, such as “m4.large”, and click the Next: Configure
Instance Details button, as shown in the following figure.
Figure 2-3 Selecting the Instance Type
5. In Step 3: Configure Instance Details page, set the Network parameter to an
existing VPC and set the Subnet parameter to the management subnet of the
VPC. In the Network Interfaces area, click the Add Device button to add
another interface to the instance and assign the internal subnet to this new

6
interface. Then click the Review and Launch button, as shown in the following
figure.
Figure 2-4 Configuring Instance Details
6. Click the 6. Configure Security Group tab, add security group rules to allow
access via SSH and WebUI and then click the Review and Launch button, as
shown in the following figure.
Figure 2-5 Configuring Security Group Rules

7
Note: To allow administrators to access the vxAG instance via SSH and
WebUI from the Internet, please add security group rules for port 22 of SSH,
for port 8888 of the WebUI.
7. Review the instance information and click the Launch button, as shown in the
following figure.
Figure 2-6 Reviewing and Launching the Instance
8. In the prompted dialog box, select Create a new key pair from the drop-down list
box, specify the Key pair name parameter, and click the Download Key Pair
button to download the key file and then click the Launch Instances, as shown
in the following figure.
Figure 2-7 Creating the New Key Pair

8
The newly created vxAG instance will be launched successfully as shown the following figure.
Figure 2-8 vxAG Instance Launched Successfully
2.3 Adding Other Interfaces to the vxAG Instance
To use three or more interfaces, you will need to add other interfaces to the vxAG instance after it is launched. When you add other interfaces to the vxAG instance, please make sure that the vxAG appliance is stopped. Note that the EC2 instance of the m4.large size supports two network interfaces at maximum.
To add a network interface to the vxAG instance:
1. Access the AWS EC2 management console, click the Network Interfaces link in the navigation pane, and then click the Create Network Interface button, as shown in the following figure.
Figure 2-9 Creating a Network Interface
2. In the Create New Interface dialog box, specify the parameters and click the
Yes, Create button, as shown in the following figure.

9
Figure 2-10 Setting the Parameters of the Network Interface
3. Select the entry of the newly created network interface and click the Attach
button. In the Attach Network Interface dialog box, specify the Instance ID
parameter and click the Attach button, as shown in the following figure.
Figure 2-11 Attaching the Network Interface to the Instance
To configure the IP address for the newly added network interface, please refer to 2.7 for details.
2.4 Adding Secondary Private IP Addresses to the External Interface
To create multiple virtual sites, secondary private IP addresses (vxAG virtual site IPs) need to
be added to the external interface of the vxAG instance.
To add a secondary AWS private IP address to the external interface:
1. Access the AWS EC2 management console, and click the Network Interfaces link in the navigation pane. Select the entry of the external interface and click the Actions button to select Manage Private IP Addresses, as shown in the following figure.

10
Figure 2-12 Managing Private IP Addresses
2. In the Manage Private IP Addresses dialog box, click the Assign new IP link to add a new secondary IP address, and then click the Yes, Update button, as shown in the following figure.
Figure 2-13 Adding a New IP Address
To make the secondary private IP address publicly accessible, you need to add an elastic IP
and associate it with the secondary private IP address. The next section describes this process.
2.5 Adding Elastic IPs to the Network Interfaces
To make the management interface and the external interface of the vxAG instance publicly
accessible, you need to add elastic IPs and associate them with the private IP addresses of the
network interfaces.
To add the elastic IP to a network interface:
1. Access the AWS EC2 management console, click the Elastic IPs link in the
navigation pane, and then click the Allocate New Address button. In the
Allocate New Address dialog box, click the Yes, Allocate button, as shown in
the following figure.

11
Figure 2-12 Allocating the New Address
2. Select the entry of the newly created elastic IP, click the Actions button and
select the Associate Address item, as shown in the following figure.
Figure 2-13 Associating the New Address
3. In the Associate Address screen, specify the parameters for Network Interface
and Private IP Address and click the Associate button, as shown in the
following figure.
Figure 2-14 Associating the Elastic IP
12
2.6 Accessing the vxAG Instance and Setting the "array" Password
2.6.1 Accessing the vxAG Instance via SSH
You can connect to the newly created vxAG instance via SSH after the newly created
vxAG instance becomes “Running”.
To access the vxAG instance via SSH, use the public DNS Name or IP address and the
SSH port 22 as the SSH access point.
The downloaded private key file (.pem) is required to be used by SSH for logging into
the newly created vxAG instance.
The vxAG AMI default administration account is "array"
ssh –i <private-key.pem> array@<vxAG IP or DNS name>
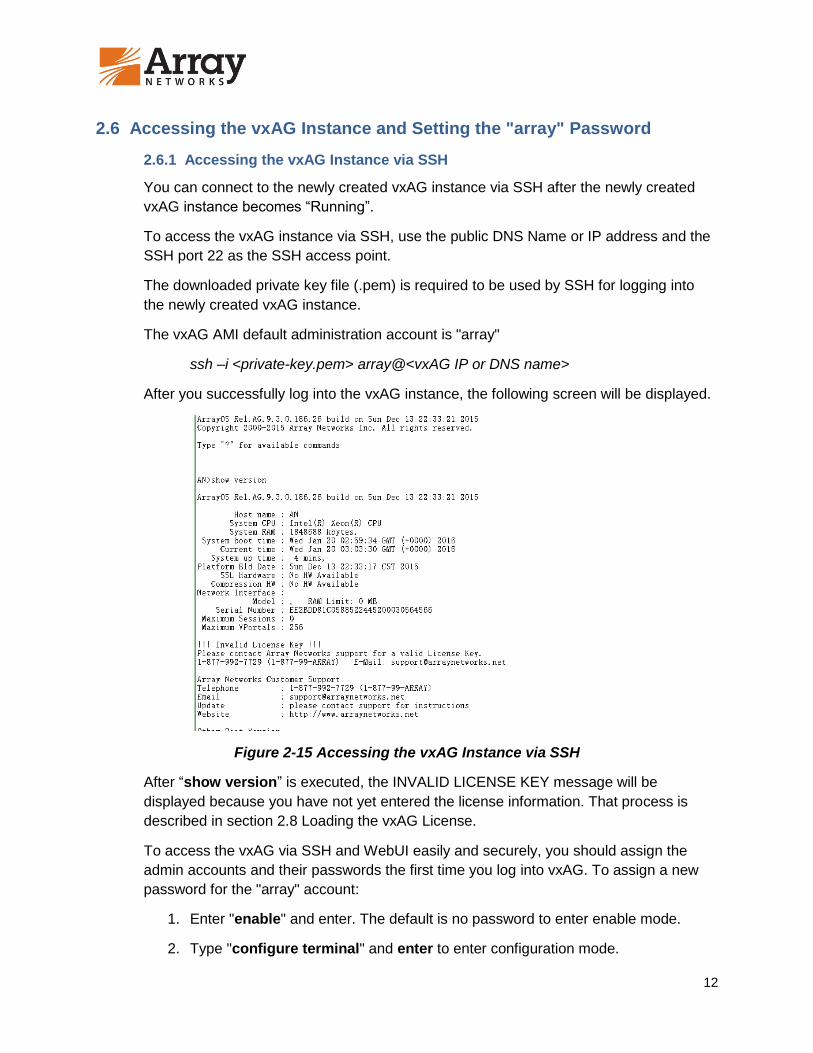
After you successfully log into the vxAG instance, the following screen will be displayed.
Figure 2-15 Accessing the vxAG Instance via SSH
After “show version” is executed, the INVALID LICENSE KEY message will be
displayed because you have not yet entered the license information. That process is
described in section 2.8 Loading the vxAG License.
To access the vxAG via SSH and WebUI easily and securely, you should assign the
admin accounts and their passwords the first time you log into vxAG. To assign a new
password for the "array" account:
1. Enter "enable" and enter. The default is no password to enter enable mode.
2. Type "configure terminal" and enter to enter configuration mode.
13
3. Type “ssh auth password on array” to enable password authentication for
WebUI and SSH.
4. Change the password of the default account (array) using the “admin password
array new_password” command.
5. Type "write memory all" and enter to have vxAG retain the change after reboot.
2.6.2 Accessing the vxAG Instance via WebUI
To enable vxAG WebUI access, you will first need to access the vxAG instance via SSH
to perform the following configurations in the Config mode:
1. Enable the WebUI using the “webui on” command.
2. (Optional) Configure the WebUI port using the “webui port” command.
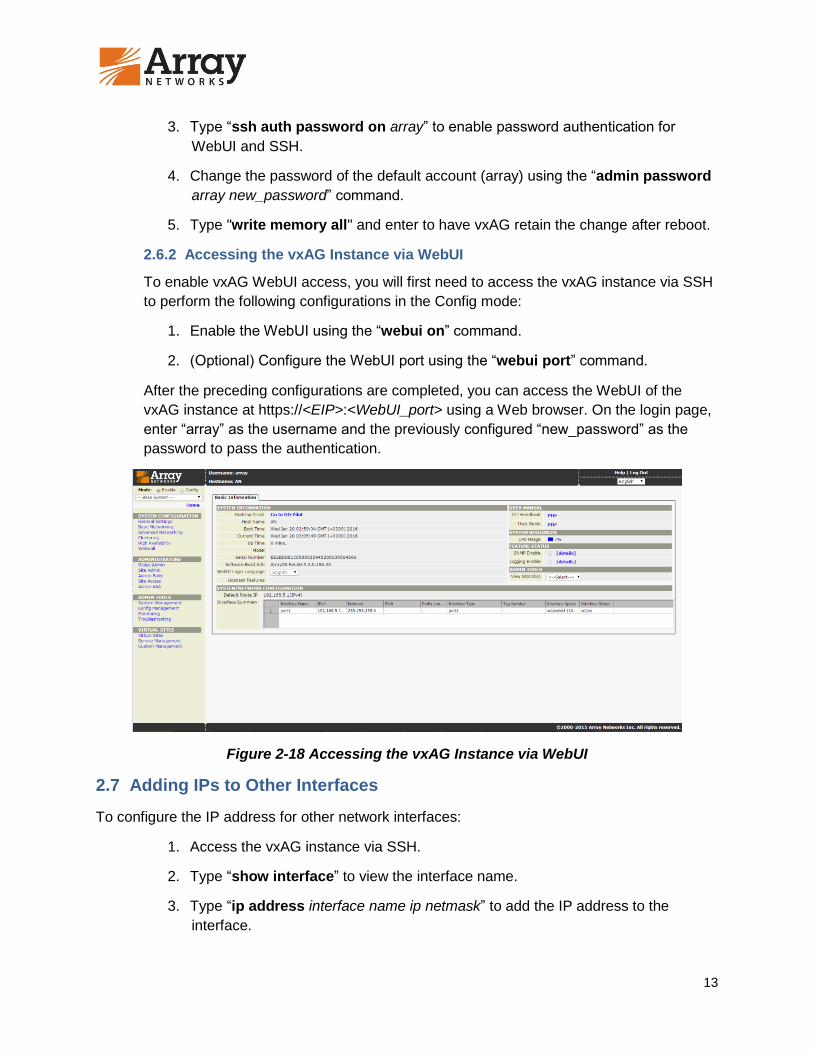
After the preceding configurations are completed, you can access the WebUI of the
vxAG instance at https://<EIP>:<WebUI_port> using a Web browser. On the login page,
enter “array” as the username and the previously configured “new_password” as the
password to pass the authentication.
Figure 2-18 Accessing the vxAG Instance via WebUI
2.7 Adding IPs to Other Interfaces
To configure the IP address for other network interfaces:
1. Access the vxAG instance via SSH.
2. Type “show interface” to view the interface name.
3. Type “ip address interface name ip netmask” to add the IP address to the
interface.

14
2.8 Loading the vxAG License
For a BYOL vxAG, you will need a license from Array Networks and will need to load the license
to the vxAG. To grant a license, Array Networks will need the vxAG system information and
options information. Following are the steps to acquire a license key:
1. Access the vxAG instance via SSH.
2. Capture the output for the software version, model and serial number of the vxAG
by executing the “show version” command.
3. Contact Array Networks Customer Support by email with the vxAG information
and your license options (such as maximum sessions, maximum virtual portals,
time duration/trial) to obtain a valid license key.
4. Typically, the license key will be emailed to you.Once received, execute the
“system license” command in the Config mode, paste the license key and press
“Enter”. The license will be successfully loaded.
Alternatively, you can load the license via WebUI. To load the license, select Admin Tools>
System Management > License.

15
About Array Networks
Array Networks is a global leader in application delivery networking with over 5000 worldwide
customer deployments. Powered by award-winning SpeedCore® software, Array application
delivery, WAN optimization and secure access solutions are recognized by leading enterprise,
service provider and public sector organizations for unmatched performance and total value of
ownership. Array is headquartered in Silicon Valley, is backed by over 400 employees
worldwide and is a profitable company with strong investors, management and revenue growth.
Poised to capitalize on explosive growth in the areas of mobile and cloud computing, analysts
and thought leaders including Deloitte, IDC and Frost & Sullivan have recognized Array
Networks for its technical innovation, operational excellence and market opportunity.
© 2016 Array Networks, Inc. All rights reserved. Array Networks and the Array Networks logo are trademarks of Array Networks, Inc. in the United States and other countries. All other trademarks, service marks, registered marks, or registered service marks are the property of their respective owners. Array Networks assumes no responsibility for any inaccuracies in this document. Array Networks reserves the right to change, modify, transfer, or otherwise revise this publication without notice.
To purchase
Array Networks
Solutions, please
contact your
Array Networks
representative at
1-866-MY-ARRAY
(692-7729) or
authorized reseller
Feb-2016rev. a
Corporate Headquarters [email protected] 408-240-8700 1 866 MY-ARRAY www.arraynetworks.com EMEA [email protected] +32 2 6336382
China [email protected] +010-84446688 France and North Africa [email protected] +33 6 07 511 868
India [email protected] +91-080-41329296 Japan sales-japan@ arraynetworks.com +81-81-44-589-8315