vx8575 cover 1.0 - lg usa
TRANSCRIPT

MM
BB
0357601(1.0) H
This booklet is made from 60% post-consumer recycled paper.
VX8575_cover_1.0.qxd 9/18/09 10:38 AM Page 1

Copyright©2009 LG Electronics, Inc. All rights reserved.LG and the LG logo are registered trademarks of LG Group andits related entities. Chocolate® is a trademark of LG. All othertrademarks are the property of their respective owners.
VX8575_cover_1.0.qxd 9/18/09 10:38 AM Page 2

Read these simple guidelines. Breaking the rules may be dangerous or illegal.Further detailed information is given in this user guide.
Violation of the instructions may cause serious injury or death.
l Never use an unapproved battery since this could damage thephone and/or battery and could cause the battery toexplode.
l Never place your phone in a microwave oven as it will causethe battery to explode.
l Never store your phone in temperatures less than -4°F or greater than 122°F.
l Do not dispose of your battery near fire or with hazardous orflammable materials.
l When riding in a car, do not leave your phone or set up thehands-free kit near the air bag. If wireless equipment isimproperly installed and the air bag is deployed, you may beseriously injured.
l Do not use a hand-held phone while driving.
l Do not use the phone in areas where its use is prohibited.(For example: aircraft)
Important Safety Precautions
1
Important Safety Precautions
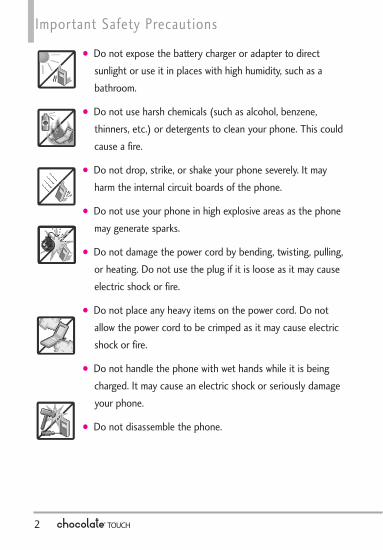
l Do not expose the battery charger or adapter to directsunlight or use it in places with high humidity, such as abathroom.
l Do not use harsh chemicals (such as alcohol, benzene,thinners, etc.) or detergents to clean your phone. This couldcause a fire.
l Do not drop, strike, or shake your phone severely. It mayharm the internal circuit boards of the phone.
l Do not use your phone in high explosive areas as the phonemay generate sparks.
l Do not damage the power cord by bending, twisting, pulling,or heating. Do not use the plug if it is loose as it may causeelectric shock or fire.
l Do not place any heavy items on the power cord. Do notallow the power cord to be crimped as it may cause electricshock or fire.
l Do not handle the phone with wet hands while it is beingcharged. It may cause an electric shock or seriously damageyour phone.
l Do not disassemble the phone.
2

l Do not place or answer calls while charging the phone as itmay short-circuit the phone and/or cause electric shock orfire.
l Do not hold or let the antenna come in contact with yourbody during a call.
l Make sure that no sharp-edged items, such as animal’s teethor nails, come into contact with the battery. This could causea fire.
l Store the battery out of reach of children.
l Be careful that children do not swallow any parts (such asearphone, connection parts of the phone, etc.) This couldcause asphyxiation or suffocation resulting in serious injury ordeath.
l Unplug the power cord and charger during lightning stormsto avoid electric shock or fire.
l Only use the batteries and chargers provided by LG. Thewarranty will not be applied to products provided by othersuppliers.
l Only authorized personnel should service the phone and itsaccessories. Faulty installation or service may result inaccidents and consequently invalidate the warranty.
l Your service provider programs one or more emergencyphone numbers, such as 911, that you can call under anycircumstances, even when your phone is locked. Your phone’spreprogrammed emergency number(s) may not work in alllocations, and sometimes an emergency call cannot be placeddue to network, environmental, or interference issues.
3

Important Safety Precautions . . .1Welcome . . . . . . . . . . . . . . . . .8Technical Details . . . . . . . . . . .9
Important Information . . . . . . . . . . . . . . . . .9
Phone Overview . . . . . . . . . . .12Quick Glance of the TouchScreen and How to Use It . .14
Touch Sensitive Soft Keys . . . . . . . . . . . . .14
Shortcut Menu . . . . . . . . . . .16Touch Screen Shortcut Menu . . . . . . . . . .16
Entering and EditingInformation . . . . . . . . . . . . . . .18
Text Input . . . . . . . . . . . . . . . . . . . . . . . . . . .18
Menu Tree . . . . . . . . . . . . . . .21Getting Started with YourPhone . . . . . . . . . . . . . . . . . . .24
The Battery . . . . . . . . . . . . . . . . . . . . . . . . . .24Installing the Battery . . . . . . . . . . . . . . . . .24Removing the Battery . . . . . . . . . . . . . . . .24
Charging the Battery . . . . . . . . . . . . . . . . .24Charging with USB . . . . . . . . . . . . . . . . . . .25How to Install a microSD™ Card . . . . . .25How to Remove a microSD™ Card . . . .25Battery Temperature Protection . . . . . . .26Battery Charge Level . . . . . . . . . . . . . . . . . .26Turning the Phone On and Off . . . . . . . .26Turning the Phone On . . . . . . . . . . . . . . .26Turning the Phone Off . . . . . . . . . . . . . . .26
Signal Strength . . . . . . . . . . . . . . . . . . . . . .26Screen Icons . . . . . . . . . . . . . . . . . . . . . . . . .27
Making Calls . . . . . . . . . . . . . . . . . . . . . . . . .27Correcting Dialing Mistakes . . . . . . . . . .27
Redialing Calls . . . . . . . . . . . . . . . . . . . . . . .27Receiving Calls . . . . . . . . . . . . . . . . . . . . . . .27
Menu Tree on the TouchScreen . . . . . . . . . . . . . . . . . . .28
Menu Access . . . . . . . . . . . . . . .28
Shortcut Menu on the TouchScreen . . . . . . . . . . . . . . . . . . .29
Touch Screen Shortcut Menu . . . . . . . . . .29
Quick Access to ConvenientFeatures . . . . . . . . . . . . . . . . .30
Lock Mode . . . . . . . . . . . . . . . . . . . . . . . . . .30Quick Volume Adjustment . . . . . . . . . . . . .30Vibrate Mode . . . . . . . . . . . . . . . . . . . . . . . .30Call Waiting . . . . . . . . . . . . . . . . . . . . . . . . .30Voice Commands . . . . . . . . . . . . . . . . . . . . .31
Contacts in Your Phone’sMemory . . . . . . . . . . . . . . . . .32
Storing Basics . . . . . . . . . . . . . . . . . . . . . . . .32Changing Contact Entries . . . . . . . . . . . . .32Speed Dial . . . . . . . . . . . . . . . . . . . . . . . . . .33Storing a Number with Pauses . . . . . . . . .33Deleting . . . . . . . . . . . . . . . . . . . . . . . . . . . . .34
Camera Features . . . . . . . . . .353D (Three-axis-accelerometer) Rotation . 35Camera Features . . . . . . . . . . . . . . . . . . . . .36Video Camera . . . . . . . . . . . . . . . . . . . . . . .38After recording video . . . . . . . . . . . . . . . . .39Picture Editing . . . . . . . . . . . . . . . . . . . . . . .39Video Editing . . . . . . . . . . . . . . . . . . . . . . . .40
Table of Contents
4

My Verizon . . . . . . . . . . . . . . .41
MESSAGING . . . . . . . . . . . . .42
1. New Message . . . . . . . . . . . . .421.1 TXT Message . . . . . . . . . . . . . . . . . . . .421.2 Picture Message . . . . . . . . . . . . . . . . . .441.3 Video Message . . . . . . . . . . . . . . . . . . .451.4 Voice Message . . . . . . . . . . . . . . . . . . .46
2. Messages . . . . . . . . . . . . . . . .463. Drafts . . . . . . . . . . . . . . . . . . .484. Voicemail . . . . . . . . . . . . . . .485. Visual Voice Mail . . . . . . . . . .496. Mobile IM . . . . . . . . . . . . . . .497. Email . . . . . . . . . . . . . . . . . . . .498. Chat . . . . . . . . . . . . . . . . . . . .509. Social Network Message . . . .5010. Settings . . . . . . . . . . . . . . . .5111. Erase Options . . . . . . . . . . . .53
CONTACTS . . . . . . . . . . . . . .54
1. New Contact . . . . . . . . . . . . .542. Contact List . . . . . . . . . . . . . .543. Backup Assistant . . . . . . . . . .554. Favorites . . . . . . . . . . . . . . . . . .555. Groups . . . . . . . . . . . . . . . . . . .566. Speed Dials . . . . . . . . . . . . . . .567. In Case of Emergency(ICE) . .578. My Name Card . . . . . . . . . . . .57
RECENT CALLS . . . . . . . . . . . . .58
1. Missed . . . . . . . . . . . . . . . . . .582. Received . . . . . . . . . . . . . . . . .583. Dialed . . . . . . . . . . . . . . . . . . . .594. All . . . . . . . . . . . . . . . . . . . . . . .59
5. View Timers . . . . . . . . . . . . . . .60
MEDIA CENTER . . . . . . . . . . . .61
1. Music & Tones . . . . . . . . . . . .611.1 V CAST Music . . . . . . . . . . . . . . . . . . .611.2 Get New Ringtones . . . . . . . . . . . . . . .621.3 My Ringtones . . . . . . . . . . . . . . . . . . . .621.4 My Music . . . . . . . . . . . . . . . . . . . . . . .63Playing Your Music . . . . . . . . . . . . . . . . . .63Music Player Controls . . . . . . . . . . . . . . .64Exit From the Music Player . . . . . . . . . . .66
1.5 My FM Radio . . . . . . . . . . . . . . . . . . . .661.6 My Sounds . . . . . . . . . . . . . . . . . . . . . .691.7 Sync Music . . . . . . . . . . . . . . . . . . . . . .692. Picture & Video . . . . . . . . .712.1 V CAST Videos . . . . . . . . . . . . . . . . . . .712.2 Get New Pictures . . . . . . . . . . . . . . . . .722.3 My Pictures . . . . . . . . . . . . . . . . . . . . . .722.4 My Videos . . . . . . . . . . . . . . . . . . . . . . .732.5 Take Picture . . . . . . . . . . . . . . . . . . . . . .752.6 Record Video . . . . . . . . . . . . . . . . . . . .762.7 Online Album . . . . . . . . . . . . . . . . . . . .76
3. Games . . . . . . . . . . . . . . . . . .774. Browse & Download . . . . . . .775. Extras . . . . . . . . . . . . . . . . . . . .816. Info . . . . . . . . . . . . . . . . . . . . . .81
My Music . . . . . . . . . . . . . . . . . .81
Browser . . . . . . . . . . . . . . . . . . .82Ending a Browser Session . . . . . . . . . . . . .82Browser Navigating . . . . . . . . . . . . . . . . . . .82
Search . . . . . . . . . . . . . . . . . . . . .87
5

Table of Contents
Email . . . . . . . . . . . . . . . . . . . . . .88
VZ Navigator . . . . . . . . . . . . . . .88
Tools . . . . . . . . . . . . . . . . . . . . . .891. Voice Commands . . . . . . . . .89
1.1.1 Call <Name or Number> . . . . . . . .891.1.2 Send Msg to <Name or Number or
Group> . . . . . . . . . . . . . . . . . . . . . .901.1.3 Go to <Menu> . . . . . . . . . . . . . . . . .901.1.4 Check <Item> . . . . . . . . . . . . . . . . .901.1.5 Contacts <Name> . . . . . . . . . . . . .901.1.6 Search . . . . . . . . . . . . . . . . . . . . . . .901.1.7 Redial . . . . . . . . . . . . . . . . . . . . . . . .901.1.8 Play . . . . . . . . . . . . . . . . . . . . . . . . . .901.1.9 My Verizon . . . . . . . . . . . . . . . . . . .901.1.0 Help . . . . . . . . . . . . . . . . . . . . . . . . .91
2. Calculator . . . . . . . . . . . . . .913. Ez Tip Calculator . . . . . . . . .914. Calendar . . . . . . . . . . . . . . . .915. Alarm Clock . . . . . . . . . . . . .926. Stopwatch . . . . . . . . . . . . . .927. World Clock . . . . . . . . . . . . .938. Notepad . . . . . . . . . . . . . . . .939. Drawing Pad . . . . . . . . . . . . .9410. USB Mass Storage . . . . . . .94
Settings . . . . . . . . . . . . . . . . . . .951. My Verizon . . . . . . . . . . . . . . .952. Bluetooth Menu . . . . . . . . . .952.1 Add New Device . . . . . . . . . . . . . . . . .95
My Device Info . . . . . . . . . . . . . . . . . . .972.2 Discovery Mode . . . . . . . . . . . . . . . . . .972.3 Supported Profiles . . . . . . . . . . . . . . . .97
3. Sounds Settings . . . . . . . . . .98
3.1 Easy Set-Up . . . . . . . . . . . . . . . . . . . . .983.2 Master Volume . . . . . . . . . . . . . . . . . . .983.3 Call Sounds . . . . . . . . . . . . . . . . . . . . . .983.4 Alert Sounds . . . . . . . . . . . . . . . . . . . . .993.5 Button Sounds . . . . . . . . . . . . . . . . . .1003.6 Digit Dial Readout . . . . . . . . . . . . . .1003.7 Service Alerts . . . . . . . . . . . . . . . . . . .1003.8 Power On/Off . . . . . . . . . . . . . . . . . . .101
4. Display Settings . . . . . . . . . .1014.1 Easy Set-Up . . . . . . . . . . . . . . . . . . . . .1014.2 Banner . . . . . . . . . . . . . . . . . . . . . . . . .1024.3 Backlight . . . . . . . . . . . . . . . . . . . . . . .1024.4 Wallpaper . . . . . . . . . . . . . . . . . . . . . .1034.5 Charging Screen . . . . . . . . . . . . . . . .1034.6 Display Themes . . . . . . . . . . . . . . . . .1034.7 Fonts . . . . . . . . . . . . . . . . . . . . . . . . . .1044.8 Dial Fonts . . . . . . . . . . . . . . . . . . . . . .1044.9 Clock Format . . . . . . . . . . . . . . . . . . .1044.10 Shortcut Bin . . . . . . . . . . . . . . . . . . .1054.11 Music Handle . . . . . . . . . . . . . . . . . .105
5. Touch Settings . . . . . . . . . .1056. Phone Settings . . . . . . . . . .1066.1 Airplane Mode . . . . . . . . . . . . . . . . .1066.2 Voice Commands . . . . . . . . . . . . . . . .1066.3 Language . . . . . . . . . . . . . . . . . . . . . . .1076.4 Location . . . . . . . . . . . . . . . . . . . . . . .1076.5 Current Country . . . . . . . . . . . . . . .1086.6 Security . . . . . . . . . . . . . . . . . . . . . . . .1086.6.1 Edit Codes . . . . . . . . . . . . . . . . . .1086.6.2 Restrictions . . . . . . . . . . . . . . . . . .1096.6.3 Phone Lock . . . . . . . . . . . . . . . . . .1096.6.4 Lock Phone Now . . . . . . . . . . . . . .1106.6.5 Reset Default . . . . . . . . . . . . . . . . .1106.6.6 Restore Phone . . . . . . . . . . . . . . . .111
6

6.7 System Select . . . . . . . . . . . . . . . . . . .1116.8 NAM Select . . . . . . . . . . . . . . . . . . . . .112
7. Call Settings . . . . . . . . . . . . .1127.1 Answer Options . . . . . . . . . . . . . . . . . .1127.2 Show Dialpad . . . . . . . . . . . . . . . . . . . .1127.3 Auto Retry . . . . . . . . . . . . . . . . . . . . . .1137.4 TTY Mode . . . . . . . . . . . . . . . . . . . . . .1137.5 One Touch Dial . . . . . . . . . . . . . . . . . .1157.6 Voice Privacy . . . . . . . . . . . . . . . . . . . .1157.7 DTMF Tones . . . . . . . . . . . . . . . . . . . . .1157.8 Assisted Dialing . . . . . . . . . . . . . . . . . .115
8. USB Auto Detection . . . . . .1169. Memory . . . . . . . . . . . . . . . .1179.1 Save Options . . . . . . . . . . . . . . . . . . . .1179.2 Phone Memory . . . . . . . . . . . . . . . . . .1179.3 Card Memory . . . . . . . . . . . . . . . . . . .118
10. Phone Info . . . . . . . . . . . . .11810.1 My Number . . . . . . . . . . . . . . . . . . . .11910.2 SW/HW Version . . . . . . . . . . . . . . . .11910.3 Icon Glossary . . . . . . . . . . . . . . . . . .11910.4 Software Update . . . . . . . . . . . . . . . .119
11. Set-Up Wizard . . . . . . . . . .120
Safety . . . . . . . . . . . . . . . . . .121TIA Safety Information . . . . . .121
Exposure to Radio Frequency Signal . . . . . . . . . . . . . . . . . . . . . . . . .121Antenna Care . . . . . . . . . . . . . . . . . .121Phone Operation . . . . . . . . . . . . . . .121Tips on Efficient Operation . . . . . .122Driving . . . . . . . . . . . . . . . . . . . . . . . .122Electronic Devices . . . . . . . . . . . . . .122Pacemakers . . . . . . . . . . . . . . . . . . . .122Hearing Aids . . . . . . . . . . . . . . . . . . .123
Other Medical Devices and Health Care Facilities . . . . . . . . . . .123Vehicles . . . . . . . . . . . . . . . . . . . . . . .123Aircraft . . . . . . . . . . . . . . . . . . . . . . . .123Blasting Areas . . . . . . . . . . . . . . . . .123Potentially Explosive Atmosphere .123For Vehicles Equipped with an Air Bag . . . . . . . . . . . . . . . . . . . . . . .124
Safety Information . . . . . . . . . .124Charger and Adapter Safety . . . . .125Battery Information and Care . . . .125Explosion, Shock, and Fire Hazards . . . . . . . . . . . . . . . . . . . . . . .128General Notice . . . . . . . . . . . . . . . .128Caution: Avoid potential hearing loss. . . . . . . . . . . . . .129
FDA Consumer Update . . . . . .13110 Driver Safety Tips . . . . . . . .139Consumer Information on SAR . . . . . . . . . . . . . . . . . . . . . .141FCC Hearing-Aid Compatibility(HAC) Regulations for Wireless Devices . . . . . . . . . . . .144
Accessories . . . . . . . . . . . . .147LIMITED WARRANTYSTATEMENT . . . . . . . . . . . .148Glossary . . . . . . . . . . . . . . . .151Terminology . . . . . . . . . . . . . . .151Acronyms and Abbreviations . .151
Index . . . . . . . . . . . . . . . . . . .153
7

Thank you for choosing theChocolate® TOUCH cellular phonedesigned to operate with the latestdigital mobile communicationtechnology, Code Division MultipleAccess (CDMA). Along with themany advanced features of theCDMA system, such as greatlyenhanced voice clarity, thiscompact phone offers:
l V CAST Music with Rhapsodyl V CAST Videol V CAST Song IDl Mobile IMl Bing Searchl VZ Navigatorl VZW Tones Deluxel Mobile Web Emaill Visual Voice Maill Corporate Emaill BackUp Assistantl City IDl Touch Screen and auto Touch
Screen lock.l Display themes and Wallpapers
for customization.l Built-in 3.2 Megapixel digital
camera (with video mode).
l Large, easy-to-read, backlit LCDwith status icons.
l Messaging Voicemail, and callerID.
l HTML Browser.l Media Centerl Dolby® Mobilel FM Radiol Long battery standby and talk
time.l Easy operation; use Touch
Screen to choose menus andanswer prompts.
l Any Key answer, Auto-answerwith Handsfree, auto retry, OneTouch and Speed Dialing (with999 memory locations).
l Bilingual (English and Spanish)capability.
l Bluetooth® wireless technology.l 1GB of internal memory for
music
NOTE The Bluetooth® word mark andlogos are owned by theBluetooth SIG, Inc. and any useof such marks by LG Electronicsis under license. Othertrademarks and trade names arethose of their respective owners.
8
Welcome

Important InformationThis user’s guide provides importantinformation on the use and operationof your phone. Please read this guidecarefully prior to using the phone tobe able to use your phone to itsgreatest advantage and to preventany accidental damage or misuse. Anyunapproved changes or modificationswill void your warranty.
Technical DetailsThe Chocolate® TOUCH is an alldigital phone that operates onboth Code Division MultipleAccess (CDMA) frequencies:cellular services at 800 MHz andPersonal Communication Services(PCS) at 1.9 GHz.CDMA technology uses a featurecalled DSSS (Direct SequenceSpread Spectrum) that enables thephone to keep communicationfrom being crossed and to use onefrequency channel by multipleusers in the same specific area.This results in a 10-fold capacityincrease when compared withanalog mode. In addition, featuressuch as soft/ softer handoff, hardhandoff, and dynamic RF powercontrol technologies combine toreduce call interruptions.The Cellular and PCS CDMAnetworks consist of MSO (MobileSwitching Office), BSC (BaseStation Controller), BTS (BaseStation Transmission System), and
MS (Mobile Station). 1xRTT system receives twice asmany subscribers in the wirelesssection as IS-95. Its battery life istwice as long as IS-95. High-speeddata transmission is also possible.EV-DO system is optimized fordata service and is much fasterthan 1xRTT system in applicablearea.The table on the following pagelists some major CDMA standards.FCC RF Exposure InformationWARNING! Read this informationbefore operating the phone.In August 1996, the FederalCommunications Commission (FCC)of the United States, with its actionin Report and Order FCC 96-326,adopted an updated safety standardfor human exposure to RadioFrequency (RF) electromagneticenergy emitted by FCC regulatedtransmitters. Those guidelines areconsistent with the safety standardpreviously set by both U.S. andinternational standards bodies. Thedesign of this phone complies withthe FCC guidelines and theseinternational standards.Bodily Contact During OperationThis device was tested for typicaluse with the back of the phonekept 0.79 inches (2.0 cm) fromthe body. To comply with FCC RFexposure requirements, a minimumseparation distance of 0.79 inches
Technical Details
9
Technical Details
10
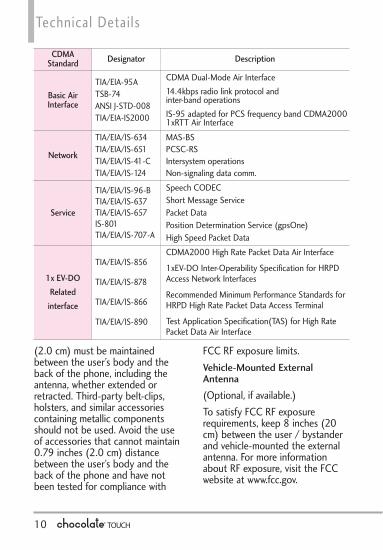
CDMAStandard Designator Description
Basic AirInterface
TIA/EIA-95ATSB-74ANSI J-STD-008TIA/EIA-IS2000
CDMA Dual-Mode Air Interface14.4kbps radio link protocol and inter-band operationsIS-95 adapted for PCS frequency band CDMA20001xRTT Air Interface
Network
TIA/EIA/IS-634TIA/EIA/IS-651TIA/EIA/IS-41-CTIA/EIA/IS-124
MAS-BSPCSC-RSIntersystem operationsNon-signaling data comm.
Service
TIA/EIA/IS-96-BTIA/EIA/IS-637TIA/EIA/IS-657IS-801TIA/EIA/IS-707-A
Speech CODECShort Message ServicePacket DataPosition Determination Service (gpsOne)High Speed Packet Data
1x EV-DO
Related
interface
TIA/EIA/IS-856
TIA/EIA/IS-878
TIA/EIA/IS-866
TIA/EIA/IS-890
CDMA2000 High Rate Packet Data Air Interface
1xEV-DO Inter-Operability Specification for HRPDAccess Network Interfaces
Recommended Minimum Performance Standards forHRPD High Rate Packet Data Access Terminal
Test Application Specification(TAS) for High RatePacket Data Air Interface
(2.0 cm) must be maintainedbetween the user’s body and theback of the phone, including theantenna, whether extended orretracted. Third-party belt-clips,holsters, and similar accessoriescontaining metallic componentsshould not be used. Avoid the useof accessories that cannot maintain0.79 inches (2.0 cm) distancebetween the user’s body and theback of the phone and have notbeen tested for compliance with
FCC RF exposure limits.Vehicle-Mounted ExternalAntenna (Optional, if available.)To satisfy FCC RF exposurerequirements, keep 8 inches (20cm) between the user / bystanderand vehicle-mounted the externalantenna. For more informationabout RF exposure, visit the FCCwebsite at www.fcc.gov.

FCC Notice and CautionsThis device and its accessoriescomply with part 15 of FCC rules.Operation is subject to the followingtwo conditions: (1) This device andits accessories may not causeharmful interference, and (2) thisdevice and its accessories mustaccept any interference received,including interference that causesundesired operation. Any changes ormodifications not expressly approvedin this user guide could void yourwarranty for this equipment. Useonly the supplied antenna. Use ofunauthorized antennas (ormodifications to the antenna) couldimpair call quality, damage thephone, void your warranty and/orviolate FCC regulations. Don't usethe phone with a damaged antenna.A damaged antenna could cause aminor skin burn. Contact your localdealer for a replacement antenna.Part 15.21 statement Changes or modifications that arenot expressly approved by themanufacturer could void the user'sauthority to operate the equipment.Part 15.19 statement This device and its accessoriescomply with part15 of FCC rules. Operation is subject to the followingtwo conditions: (1) This device & its accessories
may not cause harmfulinterference.
(2) This device & its accessories
must accept any interferencereceived, including interferencethat may cause undesiredoperation.
Part 15.105 statement This equipment has been testedand found to comply with thelimits for a class B digital device,pursuant to Part 15 of the FCCRules. These limits are designed toprovide reasonable protectionagainst harmful interference in aresidential installation. Thisequipment generates uses and canradiate radio frequency energy and,if not installed and used inaccordance with the instructions,may cause harmful interference toradio communications. However,there is no guarantee thatinterference will not occur in aparticular installation. If thisequipment does cause harmfulinterference to television reception,which can be determined byturning the equipment off and on,the user is encouraged to try tocorrect the interference by one ormore of the following measures: - Reorient or relocate the receiving
antenna. - Increase the separation between
the equipment and receiver. - Connect the equipment into an
outlet on a circuit different fromthat to which the receiver isconnected.
- Consult the dealer or anexperienced radio/TV technicianfor help.
11

12
Phone Overview
1. Earpiece Lets you hear the caller.
2. Touch Soft Keys Touch Keys on this Touchpadprovide easy access to Messages, the phoneDialpad, the Main Menu, the Contact List, andFavorites which easily activate with the touch ofyour fingertip.
3. SEND Key Use to answer incoming calls and toplace calls from the Dialpad. From Standbymode, pressing this key will open the All Callslist.
4. Clear Key / Voice Command Key Deletessingle spaces or characters. Also backs out ofmenus, one level at a time. While in Standbymode, use for quick access to Voice Commandor press and hold to access Voice Recorder.
5. 3.5mm Headset Jack Allows you to plug in an
optional wired headset for convenient, hands-free conversations. The 3.5mm jack also allows youto connect headphones normally used with othermp3 players.
6. Proximity Sensor This sensor locks the Touchscreen during a call if an object (like your head)comes within close proximity, to preventaccidental keypresses. Please note that somephone cases may engage the sensor. The sensoris disabled when using the Speakerphone, aBluetooth headset or the headset jack.
7. Light Sensor Detects the amount of light, adjustsbrightness of the LCD. This conserves power andextends battery life.
8. Touch Screen Displays incoming calls,messages and indicator icons as well as a widevariety of content you select to view.
5. 3.5mm Headset Jack
1. Earpiece
3. SEND Key
4. Clear Key / Voice Command Key
9. Shortcut Menu Touch Key
10. My Music Touch Key
8. Touch Screen
11. PWR/END Key
2. Touch Soft Keys
7. Light Sensor
6. Proximity Sensor
NOTESEND Key, CLR / Voice Commands Key, and PWR / END Key are not illuminated when the displayis off. Press the Unlock Key, or any other exterior key, to illuminate the display and keys. To unlock the screenand keys, lightly press and slide the icon upwards to reveal the Standby mode Touch Screen and TouchSoft Keys.
13
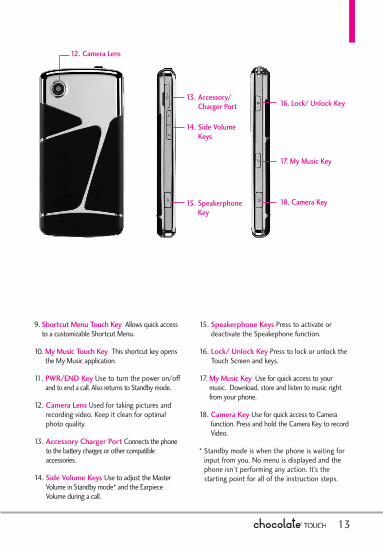
9. Shortcut Menu Touch Key Allows quick accessto a customizable Shortcut Menu.
10. My Music Touch Key This shortcut key opensthe My Music application.
11. PWR/END Key Use to turn the power on/offand to end a call. Also returns to Standby mode.
12. Camera Lens Used for taking pictures andrecording video. Keep it clean for optimalphoto quality.
13. Accessory Charger Port Connects the phoneto the battery charger, or other compatibleaccessories.
14. Side Volume Keys Use to adjust the MasterVolume in Standby mode* and the EarpieceVolume during a call.
15. Speakerphone Keys Press to activate ordeactivate the Speakephone function.
16. Lock/ Unlock Key Press to lock or unlock theTouch Screen and keys.
17. My Music Key Use for quick access to yourmusic. Download, store and listen to music rightfrom your phone.
18. Camera Key Use for quick access to Camerafunction. Press and hold the Camera Key to recordVideo.
* Standby mode is when the phone is waiting forinput from you. No menu is displayed and thephone isn’t performing any action. It’s thestarting point for all of the instruction steps.
12. Camera Lens
13. Accessory/Charger Port 16. Lock/ Unlock Key
17. My Music Key
18. Camera Key
14. Side VolumeKeys
15. SpeakerphoneKey

14
Quick Glance of the Touch Screen and How to Use It
Touch Sensitive Soft Keys( , , , , )
1. Make sure your hands are cleanand dry. Remove moisture fromthe surface of your hands. Don'tuse the touch keys in a humidenvironment.
2. Touch screen is sensitive to yourlight touch. You don't need topress it forcefully to use it.Protect your phone from severeimpact because touch screensensors may become damagedfrom harsh use.
3. Use the tip of your finger totouch the center of a touch key.If you touch off-center it mayactivate the nearby functioninstead.
4. The touch feedback level can beadjusted to your preference.
5. When both the LCD screen andbacklight are off, all keys aredeactivated. Press the UnlockKey ( ) twice to turn on andunlock the Touch Screen.
6. The Proximity Sensor protectsagainst accidental key pressesduring phone calls by locking thescreen.
7. Keep metal and other conductivematerial away from the surface oftouch screen because contactmay cause electronic interference.
How to Unlock
Touch the icon and slide upto unlock thescreen.
Press theUnlock Key onthe side ofyour phone.Press twice ifthe backlight isoff.
OR

Calibrating the Touch Screen
15
Calibration allows the phone torecognize the accuracy of yourtouch.
1. Unlock the Touch Screen bysliding the Slide icon up orpress the Unlock Key ( ) onthe right side of your phone.Then, touch the Menu TouchSoft Key .
2. Touch the Settings icon .
3. Touch Touch Settings.
4. Place your finger on the TouchScreen and apply gentle upwardpressure to scroll the list up, thentouch Calibration.
5. Touch the target each time itappears.
6. After setting calibration, touchCheck calibration or Savewithout check.
l If you touch Check calibration,touch each target as it appearsagain. The screen will display apurple dot to indicate thelocation of your touch. If you aresatisfied with your accuracy,touch Yes to save, or touch Noto try again.
l Touch Save without check tosave without viewing your touchaccuracy.

Touch Screen Shortcut MenuThe Touch Screen Shortcut Menu allows instant access to menus and phonefeatures with the quick touch of your fingertip. To use the Shortcut Menu:
1. Unlock the Touch Screen by sliding the Slide icon up or press theUnlock Key ( ) on the right side of your phone.
2. Touch the Shortcut Menu icon . 3. Touch the My Media tab to access, and/or manage, shortcuts to your
favorite Media files (including pictures, videos, and music).4. To close the Shortcut Menu, press the Clear or PWR/END Key.
Touch Soft KeysMenu: Displays the Main Menu.Messages: Displays
the Messages menu.
Contacts:Displays yourContact List.
Phone: Displays the Dialpad TouchKeys so you can make a call. Dialmanually using the numeric keys oreasily from your Recent Calls,Contacts, or Voice Dial.
Favorites: Displaysyour favoritecontacts.
Shortcut Menu
16

17
Touch and hold thisTouch Key to call your
voice mail box.
Touch this Touch Key to viewthe recent call history.
Touch this Touch Key to display yourContact List to view or call a Contact.
Touch this Touch Keyto delete digitsentered one by one.Hold down to deletethe entire entry.
Touch this Touch Key todial using Voice
Command.
When you touch the Phone Touch Soft Key the following Dialpad isdisplayed:
Touch and hold thisTouch Key to toggleyour phone betweenVibrate Mode andNormal Mode.

Text InputYou can enter information using theTouch Screen keypad. There arespecial key functions to help youwith text entry.
Text Input While Composing aTXT Message
1. Unlock the Touch Screen bysliding the Slide icon up orpress the Unlock Key ( ) onthe right side of your phone.
2. Touch the Message Touch Soft Key.
3. Touch .
4. Select TXT Message.
5. Touch the Text Field to beginentering text. A touch keypad willpopup.
6. To access Text Input options, pressthe Text Options Touch Key .The options are:
Insert Quick Text/ Save AsDraft/ Add/ Format Text/Priority Level/ Callback#/ SaveQuick Text/ Cancel Message
Entering and Editing Information
18
Touch to change text input modes.Handwriting/Keypad Toggle Key.
Text Entry Options.Insert Quick Text/ Save As Draft/Add/ Format Text/ Priority Level/Callback#/ Save Quick Text/Cancel MessageTouch to exit text input mode.

19
When entering text, besides"typing" the text with Touch Keys,you also have the option to writewith your fingertip. The TouchScreen interprets your movementsinto characters.
1. Touch a text field, then touch themanual writing icon on theright side of the display.
2. Use your fingertip to write eachcharacter you want. You must writein the box that appears in the lowerhalf of the screen. If the TouchScreen does not display thecharacter you intended, press theClear/Voice Commands Key to delete characters, and try again.
For instructions on how to betteruse the handwriting function, seethe next page.
NOTE The handwriting option may notbe available for all text entryfields.
Changing Input Method
To change from "writing" to"typing":In the hand-writing screen, touchthe Keypad icon on the right-hand side.
TIPWhen you "write" on the Touch Screen,the interpreted movements will bedisplayed. Gaps in lines may indicate thatyou need to press slightly harder for moreconstant contact with the Touch Screen.
After creating amessage, touch SENDto send the message.
HandwritingRecognition Field

Entering and Editing Information
20
The following tables may help in understanding how the Touch Screeninterprets movements into characters.
Writing in Upper-Case
Note that you must touch the All Caps TouchKey to write in upper-case letters.Writing in Lower-Case
Note that you must touch the NumbersTouch Key to write in numbers.
Note that you must touch the SymbolsTouch Key to write in symbols.

21
Menu Tree
My VMy Verizonerizon
MeMessaging ssaging
1. New Message1. TXT Message2. Picture Message3. Video Message4. Voice Message
2. Messages*3. Drafts4. Voicemail5. Visual Voice Mail6. Mobile IM7. Email8. Chat9. Social Network
Message10. Settings
1. Messages View2. Entry Mode3. Text Entry Settings4. Auto Save Sent5. Auto Erase Inbox6. Message Font Size7. TXT Auto View
8. TXT Auto Scroll9. Multimedia Auto
Receive10. Quick Text11. Voicemail#12. Callback#13. Signature14. Delivery Receipt
11. Erase Options
CContontactactss1. New Contact2. Contact List3. Backup Assistant4. Favorites5. Groups6. Speed Dials7. In Case of Emergency8. My Name Card
RRecent Callsecent Calls
1. Missed2. Received3. Dialed4. All
5. View Timers
Media CMedia Cententerer1. Music & Tones
1. V CAST Music |Rhapsody
2. Get NewRingtones
3. My Ringtones4. My Music5. My FM Radio6. My Sounds7. Sync Music
2. Picture & Video1. V CAST Videos2. Get New Pictures3. My Pictures4. My Videos5. Take Picture6. Record Video7. Online Album
3. Games1. Get New
Applications2. Rock Band3. The Sims 3
4. Browser5. Browse & Download
* The submenu options Messages vary and depend on the Message View settings.
Menu Tree
22
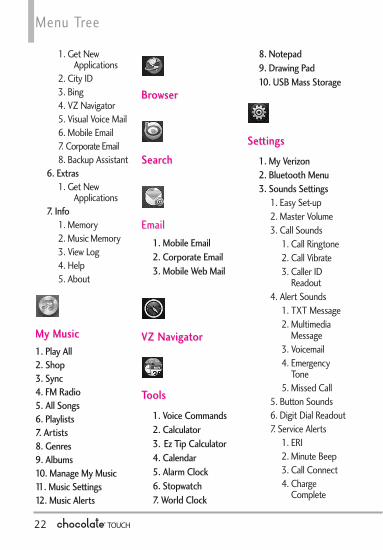
1. Get NewApplications
2. City ID3. Bing4. VZ Navigator5. Visual Voice Mail6. Mobile Email7. Corporate Email8. Backup Assistant
6. Extras1. Get New
Applications7. Info
1. Memory2. Music Memory3. View Log4. Help5. About
My MusicMy Music1. Play All2. Shop3. Sync4. FM Radio5. All Songs6. Playlists7. Artists8. Genres9. Albums10. Manage My Music11. Music Settings12. Music Alerts
BrBroowwserser
SearSearchch
EmailEmail1. Mobile Email2. Corporate Email3. Mobile Web Mail
VZ NaVZ Navigavigattoror
TToolsools
1. Voice Commands2. Calculator3. Ez Tip Calculator4. Calendar5. Alarm Clock6. Stopwatch7. World Clock
8. Notepad9. Drawing Pad10. USB Mass Storage
SeSetttingstings
1. My Verizon2. Bluetooth Menu3. Sounds Settings
1. Easy Set-up2. Master Volume3. Call Sounds
1. Call Ringtone2. Call Vibrate3. Caller ID
Readout4. Alert Sounds
1. TXT Message2. Multimedia
Message3. Voicemail 4. Emergency
Tone5. Missed Call
5. Button Sounds6. Digit Dial Readout7. Service Alerts
1. ERI2. Minute Beep3. Call Connect4. Charge
Complete

23
8. Power On/Off 1. Power On
Sound2. Power On
Vibrate3. Power Off
Sound4. Power Off
Vibrate4. Display Settings
1. Easy Set-up2. Banner
1. PersonalBanner
2. ERI Banner3. Backlight4. Wallpaper
1. My Pictures2. My Videos3. Fun Animations
5. Charging Screen6. Display Themes7. Fonts 8. Dial Fonts9. Clock Format
10. Shortcut Bin11. Music Handle
5. Touch Settings1. Auto Lock2. Vibrate Type3. Vibrate Level4. Vibrate Effect5. Sound6. Calibration
6. Phone Settings1. Airplane Mode2. Voice Commands
1. ConfirmChoices
2. Sensitivity3. Adapt Voice4. Prompt Mode5. Audio Playback6. Prompt
Timeout7. CLR Key
Activation8. Info
3. Language4. Location5. Current Country6. Security
1. Edit Codes2. Restrictions3. Phone Lock4. Lock Phone
Now5. Reset Default6. Restore Phone
7. System Select8. NAM Select
7. Call Settings1. Answer Options2. Show Dialpad3. Auto Retry4. TTY Mode5. One Touch Dial6. Voice Privacy
7. DTMF Tones8. Assisted Dialing
8. USB Auto Detection9. Memory
1. Save Options2. Phone Memory3. Card Memory
10. Phone Info1. My Number2. SW/HW Version3. Icon Glossary 4. Software Update
11. Set-up Wizard
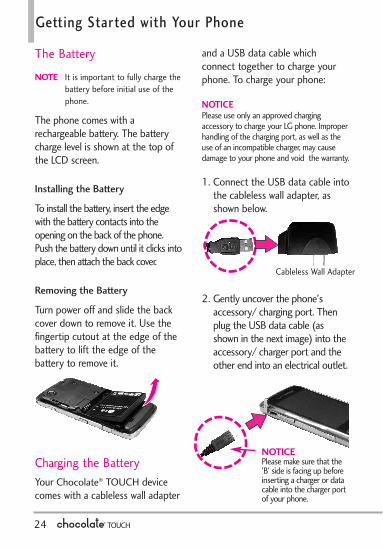
The Battery
NOTE It is important to fully charge thebattery before initial use of thephone.
The phone comes with arechargeable battery. The batterycharge level is shown at the top ofthe LCD screen.
Installing the Battery
To install the battery, insert the edgewith the battery contacts into theopening on the back of the phone.Push the battery down until it clicks intoplace, then attach the back cover.
Removing the Battery
Turn power off and slide the backcover down to remove it. Use thefingertip cutout at the edge of thebattery to lift the edge of thebattery to remove it.
Charging the BatteryYour Chocolate® TOUCH devicecomes with a cableless wall adapter
and a USB data cable whichconnect together to charge yourphone. To charge your phone:
NOTICEPlease use only an approved chargingaccessory to charge your LG phone. Improperhandling of the charging port, as well as theuse of an incompatible charger, may causedamage to your phone and void the warranty.
1. Connect the USB data cable intothe cableless wall adapter, asshown below.
2. Gently uncover the phone'saccessory/ charging port. Thenplug the USB data cable (asshown in the next image) into theaccessory/ charger port and theother end into an electrical outlet.
NOTICEPlease make sure that the'B' side is facing up beforeinserting a charger or datacable into the charger portof your phone.
Getting Started with Your Phone
24
Cableless Wall Adapter

3. The charge time variesdepending upon the batterylevel.
Charging with USBYou can use your computer tocharge your phone. To be able tocharge with the USB cable, youmay need to have the necessaryUSB Driver installed on your PCfirst. Connect one end of the USBcable to the charging accessoryport on your phone and the otherend to a bus-powered USB port onyour PC.
NOTE Low-powered USB ports are notsupported, such as the USB porton your keyboard or bus-powered USB hub.
How to Install a microSDTM Card
1. Remove the back cover andlocate the microSDTM slot onthe left side.
2. Insert the microSDTM card(purchased separately) withthe logos facing up. Push inuntil it clicks into the slot.Please note that if you insertthe card in the wrongdirection, it may damage yourphone or your card.
How to Remove a microSDTM
Card1. Gently push the card in, this will
release the exposed edge of themicroSDTM card to eject it.
2. Remove the microSDTM card fromthe slot and replace the cover.
NOTE
• Do not attempt to remove themicroSDTM card while reading or writingto the card.
• Users wishing to transfer or download musiconto a MicroSDTM card inserted into thisphone (through either MTP Sync or Over theAir) should format the MicroSDTM card on thishandset before using it through (Menu ->Settings -> Memory -> Card Memory ->
25
microSDTM slot
Getting Started with Your Phone
26
Format). Warning: Formatting the MicroSDTM
card will erase all contents on the card. In theevent the MicroSDTM card is used on thisphone without first formatting it, the phonewill display “License acquisition failed” duringOTA downloading or MTP Sync. Song filesdownloaded or otherwise purchased fromthird party providers and stored on aMicroSDTM card inserted into this device maybe protected or encrypted by such providerand cannot be played on this device.
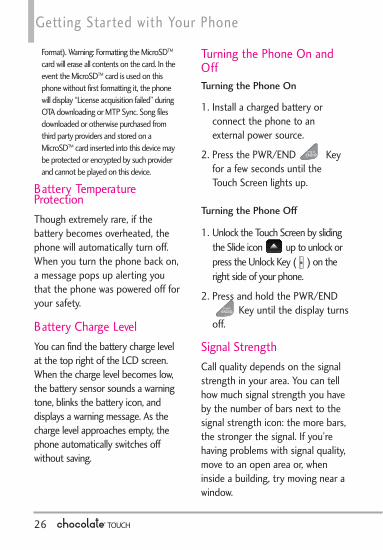
Battery TemperatureProtectionThough extremely rare, if thebattery becomes overheated, thephone will automatically turn off.When you turn the phone back on,a message pops up alerting youthat the phone was powered off foryour safety.
Battery Charge LevelYou can find the battery charge levelat the top right of the LCD screen.When the charge level becomes low,the battery sensor sounds a warningtone, blinks the battery icon, anddisplays a warning message. As thecharge level approaches empty, thephone automatically switches offwithout saving.
Turning the Phone On andOffTurning the Phone On
1. Install a charged battery orconnect the phone to anexternal power source.
2. Press the PWR/END Keyfor a few seconds until theTouch Screen lights up.
Turning the Phone Off
1. Unlock the Touch Screen by slidingthe Slide icon up to unlock orpress the Unlock Key ( ) on theright side of your phone.
2. Press and hold the PWR/ENDKey until the display turns
off.
Signal StrengthCall quality depends on the signalstrength in your area. You can tellhow much signal strength you haveby the number of bars next to thesignal strength icon: the more bars,the stronger the signal. If you’rehaving problems with signal quality,move to an open area or, wheninside a building, try moving near awindow.

27
Screen IconsWhen the phone is on, the top lineof the LCD screen displays phonestatus icons. To view what they mean:
1. Unlock the Touch Screen by slidingthe Slide icon up to unlock orpress the Unlock Key ( ) on theright side of your phone and touchthe Menu Touch Soft Key .
2. Touch the Settings icon .3. Scroll the list up, then touch
Phone Info.4. Touch Icon Glossary.
Making Calls
1. Unlock the Touch Screen by slidingthe Slide icon up to unlock orpress the Unlock Key ( ) on theright side of your phone.
2. Touch the Phone Touch Soft Key, to display the dialpad you
can use to dial. Enter the phonenumber you want to call.
NOTE You can search your Contact List( ) or Recent Calls( ) and select a number tocall instead of manually dialing.
3. Press the SEND Key ortouch the Call touch key to place the call.
4. Press the PWR/END Key
or touch the End touch keyto end the call.
Correcting Dialing Mistakes
If you make a mistake while dialinga number, touch the Clear touchkey once to erase the lastdigit entered, or hold the Cleartouch key down for at least 2seconds to delete all digits.
Redialing CallsWith the Touch Screen unlocked,press the SEND Key once toview a list of all of your recent calls.The last 270 calls (90 Received, 90missed and 90 Dialed) are stored inthe call history list. Touch the Dialtouch key next to any of theentries to place a call to that number.You can also press the SEND Key twice to redial the last numberyou dialed, received or missed inthe call history.
Receiving Calls
1. When the phone rings and/orvibrates, unlock the TouchScreen by sliding the Slide icon
up, then touch the Answertouch key , or pressthe SEND Key.
2. Press the PWR/END Keyto end the call.
Answer
CLR
END
CALL
RECENT
CONTACTS
Menu Tree on the Touch Screen
28
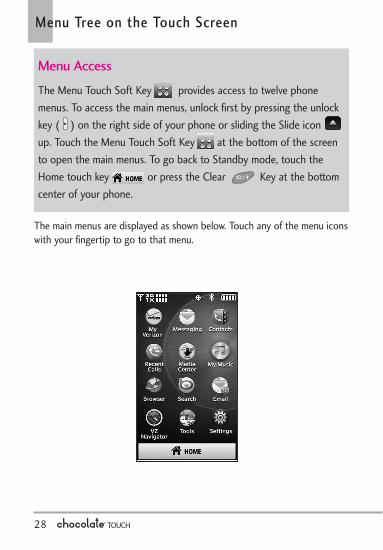
Menu Access
The Menu Touch Soft Key provides access to twelve phonemenus. To access the main menus, unlock first by pressing the unlockkey ( ) on the right side of your phone or sliding the Slide icon up. Touch the Menu Touch Soft Key at the bottom of the screento open the main menus. To go back to Standby mode, touch theHome touch key or press the Clear Key at the bottomcenter of your phone.
The main menus are displayed as shown below. Touch any of the menu iconswith your fingertip to go to that menu.

29
Soc.Net MSG
V CAST Video
Visual Voice Mail
Bluetooth
Alarm Clock
Search
Mobile IM
My Pictures
FM Radio
ADD
Managing ShortcutsYou can add, delete, and rearrange shortcut icons. To add, touch the Add touch key , scroll to the featureyou want, then touch it. To remove from the Shortcuts menu, drag and drop the icon on the Trashcan touch key
(When you hold down a Shortcut item, the Add touch key turns into the Trash can touch key ). Tomove an icon, drag and drop it on another icon, they will exchange places.
Use the MyMedia submenus to addshortcuts toyour selectedmedia files.
Touch the MyMedia tab andtouch the Addtouch key to add files tothis shortcutmenu.
Touch Screen Shortcut MenuThe Shortcut Menu allows quick, direct access to several frequently useddevice features from the Touch Screen. Up to 11 shortcuts can be set. Toaccess the Shortcut Menu, unlock the Touch Screen, then touch theShortcut Menu icon . By default, the shortcuts below are provided, butyou can customize them to your preferences.NOTE Touch the My Media tab to set up to 11 media files (picture, video, or music) with shortcut access.
Shortcut Menu on the Touch Screen

30
Lock ModeSets your phone to require a 4digit password in order to use thephone.
To set lock mode on, touchMenu -> Settings -> Phone
Settings -> Security -> Enter PhoneLock Code -> Touch Lock PhoneNow.
Quick Volume AdjustmentQuickly adjust ringer and earpiecevolumes by pressing the upperside volume key to increase andlower side key to decrease.
NOTE The earpiece volume can only beadjusted by the side volume keysduring a call.
NOTE To turn sounds off, unlock thephone, press and hold the lowerside volume key for 3 seconds,then press and hold the upperside volume key to return tonormal sounds mode.
Vibrate ModeSets the phone to vibrate insteadof ring ( is displayed on theNotifications bar). To set VibrateMode, touch the Phone TouchSoft Key to display the keypadtouch keys then touch and holdthe Pound touch key .
To return to Normal Mode, touchand hold the Pound touch key
.
Call WaitingDuring a call, one beep indicatesthat you have another incomingcall.
Ignoring a Call Waiting
If you don't want to answer theincoming call, touch onthe Touch Screen. The CallWaiting beep stops and the callgoes to your voicemail, if available.
Answering a Call Waiting
1. Press the SEND Key, toautomatically put the first callon hold and answer the new call.
2. Press the SEND Key again,to put the second call on holdand return to the first caller.
Ignore
Quick Access to Convenient Features

Voice CommandsVoice Commands allow you to dothings by verbal command (e.g.,make calls, check Voicemail, etc.).For more information, see page 89.
1. With the Touch Screen unlocked,press the Clear / VoiceCommands Key once (anextended press activates theVoice Recorder feature instead).
2. Follow the prompts to use yourvoice command(s).
NOTE Voice Commands can also bestarted with the designated keyon your Bluetooth® device. Pleasecheck the manual of theBluetooth® device for furtherinstructions.
31

Storing Basics
1. Unlock the Touch Screen by slidingthe Slide icon up to unlock orpress the Unlock Key ( ) on theright side of your phone.
2. Touch the Contact Touch Soft Key.
3. Touch the New touch key.
4. Touch a field, use the pop-uptouch keys to enter information,then touch the Done touch key
. Do this for each field youwant to enter.
5. When all fields are complete,touch the Save touch key
.
OR
1. Unlock the Touch Screen bysliding the Slide icon up tounlock or press the Unlock Key( ) on the right side of yourphone.
2. Touch the Phone Touch SoftKey for the phone dialingkeypad.
3. Use the Dialpad that pops upto enter the phone number and
touch the Save touch key.
4. Touch Add New Contact/Update Existing.
5. Touch Mobile 1/ Home/ Work/Mobile 2/ Fax.
6. Enter information into theremaining fields, as necessary,and touch the Save touch key
to save.
Changing Contact Entries
1. Unlock the Touch Screen by slidingthe Slide icon up to unlock orpress the Unlock Key ( ) on theright side of your phone.
2. Touch the Contact List TouchSoft Key .
3. Touch the Contact you want tocustomize.
4. Touch the Edit touch key, touch and edit the
fields you want to change thentouch the Done touch key
.
5. Touch the Save touch keywhen edits are
complete.SAVE
DONE
EDIT
SAVE
SAVE
SAVE
DONE
New
32
Contacts in Your Phone’s Memory

Speed DialAllows you to set up your SpeedDials.
1. Unlock the Touch Screen bysliding the Slide icon up tounlock or press the Unlock Key( ) on the right side of yourphone.
2. Touch the Contacts Touch SoftKey .
3. Touch the Contact you want toset with a Speed Dial, thentouch the Options icon .
4. Touch Set Speed Dial, thentouch the phone number to setwith a Speed Dial.
5. Touch an unassigned Speed Dialnumber.
6. You will be prompted "AssignSpeed Dial to Contact?” TouchYes.
Storing a Number withPausesPauses allow you to enteradditional series of numbers toaccess automated systems such asVoicemail or credit billing numbers.Pause types are: Wait (W) Thephone stops dialing until you pressthe Release touch key on the Touch Screen, to advance tothe next number. 2-Sec Pause (P)The phone waits two secondsbefore sending the next string ofdigits automatically.
1. Unlock the Touch Screen bysliding the Slide icon up tounlock or press the Unlock Key( ) on the right side of yourphone.
2. Touch the Phone Touch Soft Key.
3. Enter the number, then touchthe Options icon .
4. Touch Add 2-Sec Pause/ AddWait, then enter additionalnumbers.
5. Touch the Save touch key, then complete the
Contact entry as necessary. SAVE
RELEASE
33

34
Contacts in Your Phone’s Memory
DeletingDeleting a Contact Entry
1. Unlock the Touch Screen by slidingthe Slide icon up to unlock orpress the Unlock Key ( ) on theright side of your phone.
2. Touch the Contacts Touch SoftKey .
3. Touch the Contact you want(search using # or alphabetletters at the bottom of thescreen, if necessary).
4. Touch the Erase touch key.
5. Touch Yes.
ERASE

Camera Features
3D (Three-axis-accelerometer) Rotation 3D Rotation is a feature that allows you to have flexibility in how you viewcontent on your screen. Simply turn your Chocolate® TOUCH device fromvertical to horizontal (or horizontal to vertical ) and get a whole newperspective. Chocolate® TOUCH senses the change in orientation and canautomatically adjusts to fit the screen. View an image in wide screenorientation. This feature is helpful when you're looking at your pictures,browsing your music by album artwork, viewing Browser websites, or evenentering text.
Rotate Chocolate® TOUCH sideways.
Drag or flick left or right.
35

Camera Features
36
Camera FeaturesThe built-in 3.2 MP camera feature is complete with optics for superiorphoto capabilities with various options, effects, and controls.
Camera Settings The images below show how to access the camera settings.
Back
Birghtness Settings
White Balance SettingsShot Type
CameraSettings
Touch to change tovideo feature
Touch to take a picture
Touch to go to MyPictures
Zoom(not available at the highest resolution)
Touch the screen to access menusettings and rotate Chocolate®
TOUCH sideways.
37
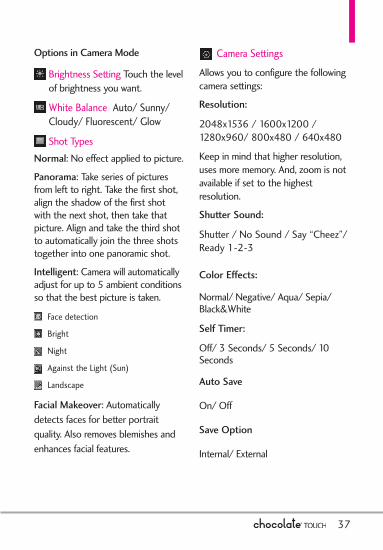
Options in Camera Mode
Brightness Setting Touch the levelof brightness you want.
White Balance Auto/ Sunny/Cloudy/ Fluorescent/ Glow
Shot Types Normal: No effect applied to picture.
Panorama: Take series of picturesfrom left to right. Take the first shot,align the shadow of the first shotwith the next shot, then take thatpicture. Align and take the third shotto automatically join the three shotstogether into one panoramic shot.
Intelligent: Camera will automaticallyadjust for up to 5 ambient conditionsso that the best picture is taken.
Face detection
Bright
Night
Against the Light (Sun)
Landscape
Facial Makeover: Automaticallydetects faces for better portraitquality. Also removes blemishes andenhances facial features.
Camera Settings
Allows you to configure the followingcamera settings:
Resolution:
2048x1536 / 1600x1200 /1280x960/ 800x480 / 640x480
Keep in mind that higher resolution,uses more memory. And, zoom is notavailable if set to the highestresolution.
Shutter Sound:
Shutter / No Sound / Say “Cheez”/Ready 1-2-3
Color Effects:
Normal/ Negative/ Aqua/ Sepia/Black&White
Self Timer:
Off/ 3 Seconds/ 5 Seconds/ 10Seconds
Auto Save
On/ Off
Save Option
Internal/ External

Video CameraThe built-in video camera feature comes with options similar to the Camera feature.
Options in Video ModeSettingsRecording Time: For Send/ For SaveFor Send: Limits the recording time so the video clip can be sent in a video message.Please note that the video clip may still need to be shortened for Sending.For Save: Allows the video to be saved as a high quality video clip to the phone(regardless of resolution setting). Video clips recorded in the For Save setting canbe sent in a video message only if the recorded output is less than 500KB.Resolution: 320X240 / 176X144Color Effects: Normal / Negative / Aqua / Sepia / Black&WhiteAuto Save: On / OffSave Option: Internal/ External
Camera Features
38
Video Camera SettingsThe images below show how to access the video settings.
Back
Brightness
White Balance
Record Settings
Touch to change toCamera mode
Zoom Setting Touch and slide right to zoom in or left to zoom out
Touch the screen for video options
Touch to beginrecording/end recording
Touch to go toMy Videos

After Recording Video
After recording, use the Touch screen to select what to do with the videoclip. Depending on the size, the options are:
Play / Erase / Send / Save or Play / Erase / Save
39
Picture EditingWith the Chocolate® TOUCH's many picture editing features, you haveendless possibilites in creating fun pictures. To edit while viewing a picture,touch the Options icon , then touch Edit.
Editing Touch Keys
Drawing
1. Touch the Drawing touch key .Options available are:- Pen: Allows you to draw on
the image using your finger (ora stylus).
- Eraser: Allows you to erasethe Pen drawings with yourfinger (or a stylus).
- Settings: Allows you toconfigure the color and widthfor the Pen. Also allows you toset the Eraser width.
2. Press Save to save and exit.
Composition
1. You can change the photo'scomposition. Touch theComposition touch key .Options available are:- Zoom: Allows you to zoom
in/out.- Rotate: Allows you to rotate
the image 90 degrees at a time.- Crop: Allows you to crop the
image. Once you select an area tocrop, touch the Compositiontouch key to finalize cropping.
Back
Drawing
Composition
Adjustments
Stamp
Undo
Save
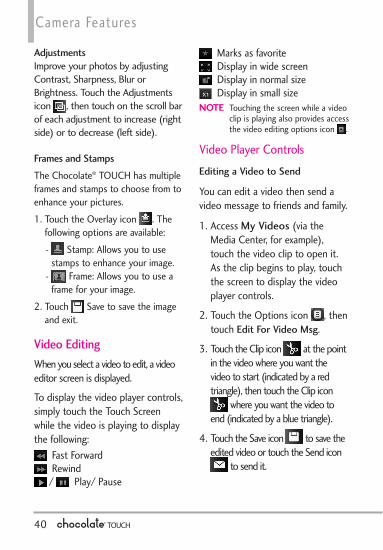
Camera Features
40
Adjustments Improve your photos by adjustingContrast, Sharpness, Blur orBrightness. Touch the Adjustmentsicon , then touch on the scroll barof each adjustment to increase (rightside) or to decrease (left side).
Frames and Stamps
The Chocolate® TOUCH has multipleframes and stamps to choose from toenhance your pictures. 1. Touch the Overlay icon . The
following options are available: - Stamp: Allows you to use
stamps to enhance your image.- Frame: Allows you to use a
frame for your image.2. Touch Save to save the image
and exit.
Video EditingWhen you select a video to edit, a videoeditor screen is displayed.
To display the video player controls,simply touch the Touch Screenwhile the video is playing to displaythe following:
Fast ForwardRewind
/ Play/ Pause
Marks as favoriteDisplay in wide screenDisplay in normal sizeDisplay in small size
NOTE Touching the screen while a videoclip is playing also provides accessthe video editing options icon .
Video Player Controls
Editing a Video to Send
You can edit a video then send avideo message to friends and family.
1. Access My Videos (via theMedia Center, for example),touch the video clip to open it.As the clip begins to play, touchthe screen to display the videoplayer controls.
2. Touch the Options icon , thentouch Edit For Video Msg.
3. Touch the Clip icon at the pointin the video where you want thevideo to start (indicated by a redtriangle), then touch the Clip icon
where you want the video toend (indicated by a blue triangle).
4. Touch the Save icon to save theedited video or touch the Send icon
to send it.

Editing Using Video Effects
Access My Videos, touch the videoclip to open it. Touch the screen asit begins to play, then touch theOptions icon .l Multi Trim
Use the Clip icon to createa new video with up to 3 clipsfrom the current video. You canadd a fade effect between theclipped video pieces by touchingthe Save icon and thenSave with Fade Effect.
l Multi Capture
You can capture still images fromvideo footage and save in yourdevice's picture gallery. You cansave up to 5 still shots. Touchthe Snapshot icon tocapture. The Player will pause atthat position, so touch the Playicon to resume playing theclip. After clip capture(s), touchthe Save icon to save.
My VerizonCheck your subscriptioninformation ranging from yourpayment plan to your softwareupgrade or other available services.
1. Unlock the Touch Screen by slidingthe Slide icon up to unlock orpress the Unlock Key ( ) on theright side of your phone and touchthe Menu Touch Soft Key .
2. Touch My Verizon .
My Verizon
41

MESSAGINGThe phone can store up to 540(depending on message sizes, lessmay be available) messages. Theinformation stored in the messageis determined by phone mode andservice capability. Other limits toavailable characters per messagemay exist. Please check with yourservice provider for systemfeatures and capabilities.SHORTCUTSimply touch the Messages Touch Soft Key
while in Standby mode.
New Message Alert
Your phone will alert you whenyou have new messages.
1. The phone displays a messageon the screen.
2. The message icon ( ) isdisplayed on the Notificationbar. In the case of a high prioritymessage, ( ) is displayed.
1. New MessageAllows you to send messages (Text,Picture, Video and Voice). Eachmessage can have multipledestination addresses and cancontain various items of
information. These are dependentupon the type of message youwant to send.
1.1 TXT MessageSending a Basic Message
1. Unlock the Touch Screen by slidingthe Slide icon up to unlock orpress the Unlock Key ( ) on theright side of your phone and touchthe Menu Touch Soft Key .
2. Touch the Messaging icon .3. Touch New Message.4. Touch TXT Message.5. Touch to enter the
recipient's phone number oremail address using the touchkeys, then touch the Donetouch key .
6. Touch the Text area to enteryour message. Use the keypadthat pops up, or touch the Pentouch key to write in yourmessage. Please note that youcan rotate your phone 90degrees counter-clockwise touse the on-screen QWERTY.When finished entering text,touch the Done touch key
.7. Touch the Send touch key
.A sending screen is displayed.
SEND
DONE
PEN
DONE
New #
MESSAGING
42

43
Other Message OptionsEntering saved addresses in theTo: field
1. Touch the Favorite touch key, touch the Contact
touch key , or touchthe Social Network touch key
.l Your list of Favorite
Contacts is displayed. Selectthe one(s) to receive yourmessage.
l Your Contact List isdisplayed. Select the ones youwant to receive your message.
l Select Facebook,MySpace, or Twitter. Your textmessage will update your status.
NOTE To copy a destination addressfrom Recent Calls or Groups,touch , touch the Optionsicon , then touch From RecentCalls or Groups and touch yourselection.
The Text Field Options1. Touch the text entry area, then
touch the Options icon .2. Select from the following options.
NOTE Options are dependent on themessage type and current field.
Insert Quick Text Allows you toinsert a quick text. See page 52for more information.Save As Draft Saves themessage into the Drafts folder. Add Allows you to add aGraphic, Animation, Sound,Name Card, or ContactNumber/Email.Copy Text Allows you to copytext you highlight to paste itinto a text field. Paste Will paste the copied text. Format Text Allows you tochange the look of the text. Alignment/ Font Size/ FontStyle/ Text Color/ BackgroundPriority Level Allows you to setthe priority level for themessage. High/ NormalCallback # Inserts a pre-programmed callback numberwith your message.On/ Off/ EditSave Quick Text Allows you toadd the text entered as a QuickText.Cancel Message Cancelsmessage editing and goes toMessage menu.
New #
Soc.Net
Contact
Favorite
Soc.Net
ContactFavorite

MESSAGING
44
3. Complete and then send themessage by pressing ortouching the Send touch key
.
1.2 Picture Message
1. Unlock the Touch Screen bysliding the Slide icon up tounlock or press the Unlock Key( ) on the right side of yourphone and touch the MenuTouch Soft Key .
2. Touch the Messaging icon .3. Touch New Message.4. Touch Picture Message.
5. Enter the destinationaddress(es) by touching theFavorite touch keyto copy the address from aFavorites entry, the Contacttouch key to copythe address from your ContactList, the New # touch key
to manually enter theaddress, or the Social Networktouch key to selectbetween VZW Online Album,Facebook, and My Space.
6. Touch the Done touch keyafter entering the
recipient(s) (up to 10).
7. Touch the Text field, then type
your message with the touchkeypad.
8. Touch the Picture field. Thepictures in your phone willdisplay. To select a picture,simply touch it, then touch theSelect touch key .
9. Touch the Send touch key. A confirmation message
is displayed.
Other Picture MessageOptionsUsing the To: Field Options
1. Touch the New # touch key, then Touch the
Options icon .
2. Select from the followingoptions:
From Contacts/From RecentCalls/Favorites/Groups/To VZWOnline Album/To SNS
Using the Text or Subject FieldOptions
1. Touch the Options icon .2. Select from the following options:
Preview Displays the Picturemessage as it would be seen bythe recipient.Save As Draft Saves the
New #
SEND
SELECT
DONE
Soc.Net
New #
Contact
Favorite
SEND

45
message into the Drafts folder.
Copy Text Allows you to copytext you highlight to paste itinto a text field. Paste Will paste the copied text. Insert Quick Text Allows you toinsert quick text customized onthe phone.Add Slide Insert multiplepictures and sound into apicture message. Priority Level Gives priority tothe message. High/ NormalCancel Message
Adding Slides to Your PictureMessage
When you want to send multiplepictures and sound, use the AddSlide option. This allows you tocreate one picture message withmultiple pictures and soundattached to it. 1. Create a new picture message.2. Add a picture or sound to your
message.3. Touch the Next Slide touch key
.4. Add another picture or sound
file to the new Slide. 5. Repeat adding slides, text and
pictures as necessary. Touch thePrevious Slide / Next Slidetouch keys / to scrollthrough the slides attached toyour picture message.
6. Complete the message thensend the message.
1.3 Video Message
1. Unlock the Touch Screen bysliding the Slide icon up tounlock or press the Unlock Key( ) on the right side of yourphone and touch the MenuTouch Soft Key .
2. Touch the Messaging icon .
3. Touch New Message.
4. Touch Video Message.
5. Enter the destinationaddress(es) by touching theFavorite touch key to copy the address from aFavorites entry, the Contacttouch key to copythe address from your ContactList, the New # touch key
to manually enter theaddress, or the Social Networktouch key to selectbetween VZW Online Album,Facebook, and MySpace.
Soc.Net
New #
Contact
Favorite

MESSAGING
6. Touch after entering therecipient(s) (up to 10).
7. Touch the text field, then typeyour message with the touchkeypad.
8. Touch the video field, touch toselect the video to send, thentouch Select.
9. Touch the Send touch keyto send.
1.4 Voice Message
The Basics of Sending a Message
1. Unlock the Touch Screen bysliding the Slide icon up tounlock or press the Unlock Key( ) on the right side of yourphone and touch the MenuTouch Soft Key .
2. Touch the Messaging icon .
3. Touch New Message.
4. Touch Voice Message.
5. Touch the Record touch keyto start recording
your message.
6. Touch the Stop touch keyto end recording.
7. Enter the destinationaddress(es) by touching the
Favorite touch key to copy the address from aFavorites entry, the Contacttouch key to copythe address from your ContactList, the New # touch key
to manually enter theaddress, or the Social Networktouch key to selectfrom VZW Online Album,Facebook, and My Space.
8. Touch the Done touch keyafter entering
recipient(s) (up to 10).9. Touch Text, Name Card, and/or
Subject to add to your message. 10. Touch the Send touch key
to send.
2. MessagesWhen your phone receives amessage, you are alerted by:l A notification message on the
screen.l An alert tone and/or vibration,
depending on your volumesettings.
If you don’t respond to thenotification within a few minutes,the notification message disappearsand the New Message icon is
SEND
DONE
Soc.Net
New #
Contact
Favorite
SEND
DONE
46

47
displayed on the Notification barinstead ( indicates a highpriority message). You can chooseto view your messages by the timereceived (sorted into Inbox andSent folders) or by Contact (allmessages in one folder sorted byaddress).To change the message view:
1. Unlock the Touch Screen bysliding the Slide icon up tounlock or press the Unlock Key( ) on the right side of yourphone and touch the MenuTouch Soft Key .
2. Touch the Messaging icon .
3. Touch Settings.4. Touch Messages View, then
touch a setting.Time / Contact
5. Touch the Save touch key.
Viewing Your Messages
1. Unlock the Touch Screen bysliding the Slide icon up tounlock or press the Unlock Key( ) on the right side of yourphone and touch the MenuTouch Soft Key .
2. Touch the Messaging icon .
3. Touch Messages (or Inbox,depending on your MessagesView configuration).
4. Touch a message entry.
5. Options available for a receivedmessage:
l , to reply to themessage.
l , to erase the message.l , to forward the
message.l The Options key , for the
following options:
Reply with Copy/ Save QuickText/ Lock/Unlock/ Add ToContacts/ Extract Address/Message Info
Message Icon Reference
New/Unread TXTMessages
Opened/Read TXTMessages
New/UnreadPicture/Video Messages
Open/Read Picture/VideoMessages
FORWARD
ERASE
REPLY
SAVE

MESSAGING
Text/Picture/VideoMessages sent
Message delivered
Text/Picture/VideoMessages failed
Message pending
Multiple Messages sent
Multiple Messagesdelivered
Multiple Messages failed
Multiple Messagesincomplete
Priority High
Locked
3. DraftsYour phone allows you to saveDrafts of messages. When Draftsare saved, they are saved in theDrafts folder.
1. Unlock the Touch Screen bysliding the Slide icon up tounlock or press the Unlock Key( ) on the right side of yourphone and touch the Menu
Touch Soft Key .2. Touch the Messaging icon .
3. Touch Drafts.
4. Touch a message entry.
5. Options from here:l Touch the Send touch key
to send the message.l Touch the Options icon .Preview / Save As Draft /Priority Level / Callback #
Message Icon Reference
Draft Text Message
Draft Picture/Video Message
4. VoicemailAllows you to view the number ofnew voice messages recorded in theVoicemail box. Once you exceedthe storage limit, old messages maybe overwritten. When you receive anew voice message, your phone willalert you.
Checking Your Voicemail Box
1. Unlock the Touch Screen bysliding the Slide icon up tounlock or press the Unlock Key( ) on the right side of yourphone and touch the Menu
SEND
48

49
Touch Soft Key .2. Touch the Messaging icon .
3. Touch Voicemail.
4. Options from here:l Touch the Clear touch key
to clear the Voicemailcounter.
l Press the SEND Key ortouch the Call touch key
to listen to themessage(s).
l Touch the touch key to use the VisualVoice Mail function.
5. Visual Voice MailVisual Voice Mail allows themanagement of voice mail directlyfrom the device rather thanaccessing voice mail via traditionalmethod(s). Visual Voice Maildisplays a list of messages andallows the user to choose whichmessage to listen to or delete,without having to dial into theirmailbox, listen to voice instructions,or prior messages.
1. Unlock the Touch Screen bysliding the Slide icon up tounlock or press the Unlock Key
( ) on the right side of yourphone and touch the MenuTouch Soft Key .
2. Touch the Messaging icon .3. Touch Visual Voice Mail.Please note that you may need todownload and set up Visual VoiceMail before using it for the first time.
6. Mobile IMAllows you to send and receive anInstant Message at any time.
1. Unlock the Touch Screen by slidingthe Slide icon up to unlock orpress the Unlock Key ( ) on theright side of your phone and touchthe Menu Touch Soft Key .
2. Touch the Messaging icon .
3. Touch Mobile IM.
Please note that you may need todownload and set up the Emailprograms before using them for thefirst time.
7. EmailAllows you to send and receive emaileasily from your phone. Email containsseveral applications downloadablefrom the Messaging Menu. Don't missan important email. Thanks to mobile
VISUAL VMAIL
CALL
CLEAR

Email, you can get your emails on yourphone, while you're on the go. MobileEmail works with many providers,including Yahoo!, AOL, Verizon.net andmore. Aside from Mobile Email,Corporate Email and Mobile WebEmail are also available. Depending onthe application, you can receive alertsfrom your Chocolate® TOUCH whennew email has arrived.
1. Unlock the Touch Screen bysliding the Slide icon up tounlock or press the Unlock Key( ) on the right side of yourphone and touch the MenuTouch Soft Key .
2. Touch the Messaging icon .3. Place your finger on the Touch
Screen and apply gentle upwardpressure to scroll the list up,then touch Email.
4. Touch an email service.Mobile Email/ CorporateEmail/ Mobile Web Mail
Please note that you may need todownload and set up the Emailprograms before using them for thefirst time.
8. ChatAllows you to connect to variousmessaging services.1. Unlock the Touch Screen by sliding
the Slide icon up to unlock orpress the Unlock Key ( ) on theright side of your phone and touchthe Menu Touch Soft Key .
2. Touch the Messaging icon .3. Place your finger on the Touch
Screen and apply gentle upwardpressure to scroll the list up,then touch Chat.
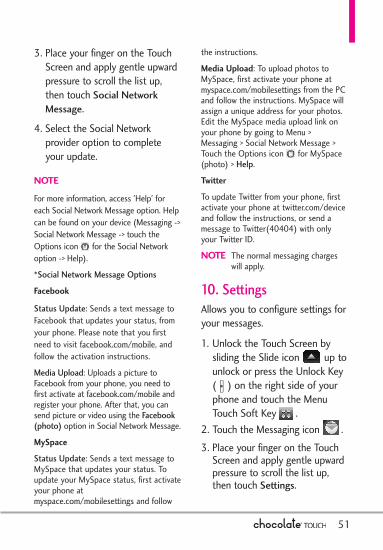
9. Social Network MessageSocial Network Message allows youto easily update your SocialNetwork accounts, providing accessto VZW Online Album, Facebook,MySpace, Twitter, and more*. Checkwith your Service Provider fordetails.
1. Unlock the Touch Screen bysliding the Slide icon up tounlock or press the Unlock Key( ) on the right side of yourphone and touch the MenuTouch Soft Key .
2. Touch the Messaging icon .
MESSAGING
50
51
3. Place your finger on the TouchScreen and apply gentle upwardpressure to scroll the list up,then touch Social NetworkMessage.
4. Select the Social Networkprovider option to completeyour update.
NOTE
For more information, access 'Help' foreach Social Network Message option. Helpcan be found on your device (Messaging ->Social Network Message -> touch theOptions icon for the Social Networkoption -> Help).
*Social Network Message Options
Status Update: Sends a text message toFacebook that updates your status, fromyour phone. Please note that you firstneed to visit facebook.com/mobile, andfollow the activation instructions.
Media Upload: Uploads a picture toFacebook from your phone, you need tofirst activate at facebook.com/mobile andregister your phone. After that, you cansend picture or video using the Facebook(photo) option in Social Network Message.
MySpace
Status Update: Sends a text message toMySpace that updates your status. Toupdate your MySpace status, first activateyour phone atmyspace.com/mobilesettings and follow
the instructions.
Media Upload: To upload photos toMySpace, first activate your phone atmyspace.com/mobilesettings from the PCand follow the instructions. MySpace willassign a unique address for your photos.Edit the MySpace media upload link onyour phone by going to Menu >Messaging > Social Network Message >Touch the Options icon for MySpace(photo) > Help.
To update Twitter from your phone, firstactivate your phone at twitter.com/deviceand follow the instructions, or send amessage to Twitter(40404) with onlyyour Twitter ID.
NOTE The normal messaging chargeswill apply.
10. SettingsAllows you to configure settings foryour messages.
1. Unlock the Touch Screen bysliding the Slide icon up tounlock or press the Unlock Key( ) on the right side of yourphone and touch the MenuTouch Soft Key .
2. Touch the Messaging icon .3. Place your finger on the Touch
Screen and apply gentle upwardpressure to scroll the list up,then touch Settings.

MESSAGING
52
Message Settings Sub-MenuDescriptions
1. Messages View
Select Time to display messageschronologically in Inbox and Sentfolders. Select Contact to sort allmessages chronologically byContact in one message folder.
2. Entry Mode
Select T9 Word , Abc , ABC or 123to be your default input method.
3. Text Entry Settings
Allows you to activate/deactivatethe text entry settings ShowCandidate, Word Correction, orWord Prediction.
4. Auto Save Sent
Select On to automatically saveyour Sent messages.
Select Off if you don't want tosave them.
Select Prompt to be askedwhenever a new message is sent.
5. Auto Erase Inbox
Select On to automatically deleteread messages when you exceed
the storage limit.
6. Message Font Size
Select to display the receivedmessages in Small or Large font.
7. TXT Auto View
Select On to automatically displaymessage content on the screen.Select On+Readout toautomatically display content andread it aloud.
Select Off for more security andprivacy by requiring the messageto be opened to view it.
8. TXT Auto Scroll
Select On to automatically scrolltext down while viewing messages.Or, select Off.
9. Multimedia Auto Receive
Select On to automaticallydownload attachments toMultimedia messages. Or, selectOff.
10. Quick Text
Displays your list of Quick Textphrases to help you to reducemanual input into messages. Usethis submenu to edit and add text.

11. Voicemail #
Allows you to manually enter theaccess number for VoicemailService. This number should beonly used when a VMS (VoicemailService) access number is notprovided by the network.
12. Callback #
Select On to automatically send adesignated callback number withyour messages. Or, select Off.
13. Signature
Select Custom to create/edit asignature to automatically sendwith your messages. Select Nonefor no signature.
14. Delivery Receipt
When set to On, the phone willindicate Sent messages as havingbeen successfully delivered. Pleasesee page 48 for the icon indicatinga "Message Delivered".
11. Erase Options
Allows you to erase all messagesstored in your Inbox, Sent, orDrafts folders. Or, to erase allmessages at once.
1. Unlock the Touch Screen bysliding the Slide icon up tounlock or press the Unlock Key( ) on the right side of yourphone and touch the MenuTouch Soft Key .
2. Touch the Messaging icon .
3. Place your finger on the TouchScreen and apply gentle upwardpressure to scroll the list up,then touch Erase Options. Theoptions available are: Erase Received Messages/Erase Sent Messages/ EraseDrafts/ Erase All
NOTE
Message View setting (Time or Contact),affects the Erase Message submenu names,but nonetheless they function the same.
53

CONTACTSThe Contacts Menu allows you tostore names, phone numbers andother information in your phone’smemory.
1. New ContactAllows you to add a new numberto your Contact List.
1. Unlock the Touch Screen by slidingthe Slide icon up to unlock orpress the Unlock Key ( ) on theright side of your phone and touchthe Menu Touch Soft Key .
2. Touch the Contacts icon .
3. Touch New Contact.
4. Enter the name and othercontact information for eachfield.
l Touch a field, enter information,then touch the Done touch key
.
5. Touch the Save touch keyto save the information.
2. Contact List
Allows you to view your ContactList.
1. Unlock the Touch Screen by slidingthe Slide icon up to unlock orpress the Unlock Key ( ) on theright side of your phone and touchthe Menu Touch Soft Key .
2. Touch the Contacts icon .
3. Touch Contact List.
NOTE From this Contact List, touch theOptions icon . Then touchErase. With this menu you canerase multiple contacts at thesame time. Select (mark) theContacts you want to deletethen touch Erase.
4. Touch a Contact entry.
5. Options from here:l Touch the Erase touch key
to erase the Contact.l Touch the Edit touch key
ERASE
SAVE
DONE
CONTACTS
54
Add a new contact.
In Case ofEmergency: touch toview and/or call youremergency contacts.
ABC / 123/SYM Mode Toggle KeyDirect search touch keys. For example,touch the Pound touch key to displayentries that begin with #, touching a letterwill display entries that begin with thatletter, etc.

55
to edit the Contact.l Touch the Message touch
key to send theContact a message.
l Touch the Options icon to select one of thefollowing:Send Name Card/ Set AsFavorite/ Set As ICE Contact/Set Speed Dial/ RemoveSpeed Dial
l Press the SEND Key tocall.
3. Backup AssistantBackup Assistant safeguards yourmobile phone's address book byautomatically saving a copy of thenames, phone numbers, and emailaddresses stored in your phone.You can also view, print, add,delete, and edit your contactsonline. If you lose, damage, orupgrade your phone, BackupAssistant will restore your ContactList to a new or replacementphone. Additional fees may apply.See brochure for details.
NOTE To use the Backup Assistantservice, you are required to activatethe service from your phone.
1. Unlock the Touch Screen by sliding
the Slide icon up to unlock orpress the Unlock Key ( ) on theright side of your phone and touchthe Menu Touch Soft Key .
2. Touch the Contacts icon .3. Touch Backup Assistant.4. Follow the instructions to
download the application.
4. FavoritesAllows you to add Contact entriesor Contact groups to your list ofFavorites to easily view, call, orsend messages.
SHORTCUTFrom the home screen, touch theFavorites icon .
1. Unlock the Touch Screen by slidingthe Slide icon up to unlock orpress the Unlock Key ( ) on theright side of your phone and touchthe Menu Touch Soft Key .
2. Touch the Contacts icon .3. Touch Favorites.4. Touch the Add touch key .5. Touch CONTACT or GROUP.6. Mark the contact entry or
group to add and touch theDone touch key .DONE
MESSAGE
EDIT

CONTACTS
56
NOTE To remove a contact or group, goto the Favorites screen and drag aFavorite into the trash can image( changes to when youbegin to drag an item).
5. GroupsAllows you to view your groupedContacts, add a new group,change the name of a group,delete a group, or send a messageto everyone in the selected group.
1. Unlock the Touch Screen by slidingthe Slide icon up to unlock orpress the Unlock Key ( ) on theright side of your phone and touchthe Menu Touch Soft Key .
2. Touch the Contacts icon .
3. Touch Groups.
4. Options from here:l Touch the Options icon .
Touch Manage Groups to edit,erase or send the groupcontacts as name cards(feature may not be supportedby/compatible with all carriers).
l Touch the New Group touchkey to add anew group to the list.
l Touch a group with at leastone member in it then Touch
the Options icon toselect Mark All / Unmark All/ Remove All.Once one or more contacts ismarked, touch the Optionsicon to select an option:Remove/ New TXT Message/New Picture Message/ NewVideo Message/ New VoiceMessage/ Mark All/ UnmarkAll/ Remove All
6. Speed DialsAllows you to view your list ofSpeed Dials or designate SpeedDials for numbers entered in yourContacts.
1. Unlock the Touch Screen by slidingthe Slide icon up to unlock orpress the Unlock Key ( ) on theright side of your phone and touchthe Menu Touch Soft Key .
2. Touch the Contacts icon .3. Touch Speed Dials.4. Touch the Speed Dial position.5. Touch the Contact you wish to
assign a Speed Dial.6. Touch the Contact number you
want to assign (if applicable),then touch Yes.
NEW GROUP
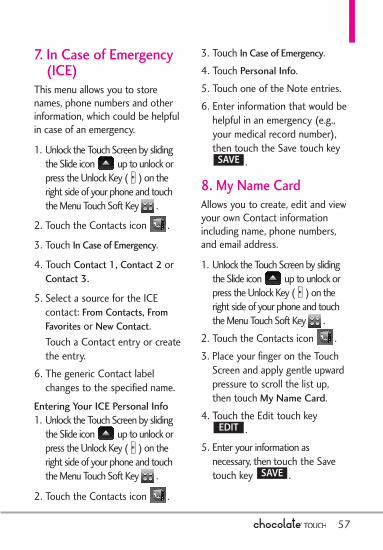
57
7. In Case of Emergency(ICE)
This menu allows you to storenames, phone numbers and otherinformation, which could be helpfulin case of an emergency.
1. Unlock the Touch Screen by slidingthe Slide icon up to unlock orpress the Unlock Key ( ) on theright side of your phone and touchthe Menu Touch Soft Key .
2. Touch the Contacts icon .
3. Touch In Case of Emergency.
4. Touch Contact 1, Contact 2 orContact 3.
5. Select a source for the ICEcontact: From Contacts, FromFavorites or New Contact.Touch a Contact entry or createthe entry.
6. The generic Contact labelchanges to the specified name.
Entering Your ICE Personal Info1. Unlock the Touch Screen by sliding
the Slide icon up to unlock orpress the Unlock Key ( ) on theright side of your phone and touchthe Menu Touch Soft Key .
2. Touch the Contacts icon .
3. Touch In Case of Emergency.4. Touch Personal Info.5. Touch one of the Note entries.6. Enter information that would be
helpful in an emergency (e.g.,your medical record number),then touch the Save touch key
.
8. My Name CardAllows you to create, edit and viewyour own Contact informationincluding name, phone numbers,and email address.
1. Unlock the Touch Screen by slidingthe Slide icon up to unlock orpress the Unlock Key ( ) on theright side of your phone and touchthe Menu Touch Soft Key .
2. Touch the Contacts icon .3. Place your finger on the Touch
Screen and apply gentle upwardpressure to scroll the list up,then touch My Name Card.
4. Touch the Edit touch key.
5. Enter your information asnecessary, then touch the Savetouch key .SAVE
EDIT
SAVE

58
RECENT CALLS
RECENT CALLSThe Recent Calls Menu is a list ofthe last phone numbers or Contactentries for calls you placed,accepted, or missed. It's continuallyupdated as new numbers are addedto the beginning of the list and theoldest entries are removed from thebottom of the list.
1. MissedAllows you to view the list ofmissed calls; up to 90 entries.
1. Unlock the Touch Screen bysliding the Slide icon up tounlock or press the Unlock Key( ) on the right side of yourphone and touch the MenuTouch Soft Key .
2. Touch the Recent Calls icon .
3. Touch Missed.
4. Touch a Missed Call entry to viewthe entry. Options from here:
l Touch the Call touch key to place a call to the number.
l Touch the Message touch keyto send a message.
l Touch the Contact Information
touch key toview the caller's contact entry.
OR
Touch the Save touch keyto save the contact
information into your ContactList.
l Touch the Options icon .
Save To Contacts (Contact info) /Erase/ Lock(Unlock)/ View Timers
2. ReceivedAllows you to view the list ofincoming calls; up to 90 entries.
1. Unlock the Touch Screen bysliding the Slide icon up tounlock or press the Unlock Key( ) on the right side of yourphone and touch the MenuTouch Soft Key .
2. Touch the Recent Calls icon .
3. Touch Received.
4. Touch a Received Call entry toview the entry. Options fromhere:
l Touch the Call touch key to place a call to the number.
l Touch the Message touch key
CALL
SAVE
CONTACT INFO
MESSAGE
CALL

59
RECENT CALLS
to send amessage.
l Touch the Contact Informationtouch key toview the caller's contact entry.
OR
Touch the Save touch keyto save the call
information into your ContactList.
l Touch the Options icon forthe following options:
Save to Contacts (Contactinfo) / Erase/ Lock(Unlock)/View Timers
3. DialedAllows you to view the list ofoutgoing calls; up to 90 entries.
1. Unlock the Touch Screen bysliding the Slide icon up tounlock or press the Unlock Key( ) on the right side of yourphone and touch the MenuTouch Soft Key .
2. Touch the Recent Calls icon .
3. Touch Dialed.
4. Touch a Dialed Call entry to viewthe entry. Options from here:
l Touch the Call touch key to place a call to the number.
l Touch the Message touch keyto send a message.
l Touch the Contact Informationtouch key toview the caller's contact entry.
OR
touch the Save touch keyto save the call
information into your ContactList.
l Touch the Options icon forthe following options:Save to Contacts (Contactinfo) / Erase/ Lock(Unlock)/View Timers
4. AllAllows you to view the list of allcalls; up to 270 entries.
1. Unlock the Touch Screen bysliding the Slide icon up tounlock or press the Unlock Key( ) on the right side of yourphone and touch the MenuTouch Soft Key .
2. Touch the Recent Calls icon .
3. Touch All.
SAVE
CONTACT INFO
MESSAGE
CALL
SAVE
CONTACT INFO
MESSAGE

60
4. Touch a Call entry to view theentry. Options from here:
l Touch the Call touch key to place a call to the number.
l Touch the Message touch keyto send a message.
l Touch the Contact Informationtouch key toview the caller's contact entry.
OR
Touch the Save touch keyto save the call
information into your ContactList.
l Touch the Options icon forthe following options:
Save to Contacts (Contactinfo) / Erase/ Lock(Unlock)/View Timers
SHORTCUTTo quickly view a list of all your recentcalls, press the SEND Key fromStandby mode.
5. View TimersAllows you to view the duration ofthe different call types. Also allowsyou to view Data counters.
1. Unlock the Touch Screen bysliding the Slide icon up tounlock or press the Unlock Key( ) on the right side of yourphone and touch the MenuTouch Soft Key .
2. Touch the Recent Calls icon .
3. Touch View Timers.
4. Touch the Reset touch keynext to a call list to reset
it. Timers and Counters availableare:
Last Call/ All Calls/ ReceivedCalls/ Dialed Calls/ RoamingCalls/ Transmit Data/ ReceivedData/ Total Data/ Last Reset/Lifetime Calls/ Lifetime DataCounter
5. To reset all the recorded timersat once, touch the Reset Alltouch key .
NOTE Not all Timers can be reset.
SAVE
CONTACT INFO
MESSAGE
CALL
RECENT CALLS

Media Center
Media CenterMedia Center gives youcustomizable service right on yourwireless device that lets you getringtones, play games, surf theweb, get up-to-the-minuteinformation and more. Visitverizonwireless.com/getitnow toview all of the applicationsavailable for your wireless device.
NOTE The Touch Screen automaticallyaccomodates incoming calls while youare playing music, browsing the net,watching video, or using VZ Navigator.The Touch Screen unlocks for you toanswer the call, and if you answer thecall, it pauses the player/feature untilyou end the call.
Anything Unclear?
From the Media Center menu, touchthe Information touch key tosee the Memory, Music Memory,View Log, Help and About sections.Use the Help option to viewinformation from buying newapplications to expired applications.
1. Music & TonesListen to your music, access VCastMusic with Rhapsody andpersonalize your phone withringtones. A wide variety of choices
are available to you, such as currenthits, pop, hip-hop, and more.Access and Options1. Unlock the Touch Screen by
sliding the Slide icon up tounlock or press the Unlock Key( ) on the right side of yourphone and touch the MenuTouch Soft Key .
2. Touch the Media Center icon .
3. Touch Music & Tones.About Music Only Mode
Music Only mode allows you tolisten exclusively to your music (asyou do with MP3 players). SetMusic Only mode to On if youdon't want your listening enjoymentto be interrupted by calls. 1. Access Music & Tones (by
following the steps in theprevious instructions).
2. Touch My Music.3. Scroll the list up and touch
Music Settings.4. Touch Music Only, then touch
On.
1.1 V CAST MusicTransform your wireless device intoa portable music player. Downloadnew songs from the Media Center
Info
61

Media Center
62
music catalog right onto yourwireless device or a PC. Then youcan sync your music between yourPC and phone.
1. Unlock the Touch Screen bysliding the Slide icon up tounlock or press the Unlock Key( ) on the right side of yourphone and touch the MenuTouch Soft Key .
2. Touch the Media Center icon .
3. Touch Music & Tones.
4. Touch V CAST Music |Rhapsody.
NOTE Additional charges for music mayapply. V CAST Music | Rhapsodyservice is not available in all areas.Check the Verizon Wireless musicwebsite (www.verizonwireless.com/music) for details.
1.2 Get New RingtonesAllows you to connect to MediaCenter and download variousringtones.
1. Unlock the Touch Screen bysliding the Slide icon up tounlock or press the Unlock Key( ) on the right side of yourphone and touch the MenuTouch Soft Key .
2. Touch the Media Center icon .
3. Touch Music & Tones.
4. Touch Get New Ringtones.
5. Touch a ringtone downloadapplication.
l Get New Applications Allowsyou to download other RingtoneDownloading Applications.
l V CAST Song ID Allows you toidentify a new song anddownload its Ringtone and more.
l VZW Tones Deluxe Allows you todownload Ringtones and more.
1.3 My RingtonesAllows you to set a ringtone ordownload a new one.
1. Unlock the Touch Screen bysliding the Slide icon up tounlock or press the Unlock Key( ) on the right side of yourphone and touch the MenuTouch Soft Key .
2. Touch the Media Center icon .3. Touch Music & Tones.4. Touch My Ringtones.5. Touch a ringtone to select it.NOTE Touch the Play touch key to
play the ringtone.

6. Set the selected tone as:Ringtone/ Contact ID/ AlertSounds
l Ringtone: Set as a Ringtone forincoming calls.
l Contact ID: Allows you to setthe Ringtone to notify you whena specific Contact is calling you.
l Alert Sounds: Allows you to setthe ringtone to notify youwhenever a new TXT Message,Multimedia Message and/orVoicemail is received.
1.4 My Music The Chocolate® TOUCH allowsyou to store and to listen to musicright from your phone. Connect toV CAST Music with Rhapsody todownload a variety of music,transfer music between your phoneand your PC, manage and organizeyour music files, and more.
NOTE Storage availability depends onthe size of each file as well asmemory allocation of otherapplications.
SHORTCUT- Press side Music Key when in Standby
mode to easily access My Music. Or
- Press the Menu Touch Soft Key andthen press the My Music icon .
1. Unlock the Touch Screen bysliding the Slide icon up tounlock or press the Unlock Key( ) on the right side of yourphone and touch the MenuTouch Soft Key .
2. Touch the Media Center icon .3. Touch Music & Tones.4. Touch My Music.5. Touch a submenu to access your
music.
Playing Your Music
It’s easy to find and play the musicyou’ve stored in your phone andmemory card.
Access My Music1. Unlock the Touch Screen by
sliding the Slide icon up tounlock or press the Unlock Key( ) on the right side of yourphone and touch the MenuTouch Soft Key .
2. Touch the Media Center icon .
3. Touch Music & Tones.4. Touch My Music.5. Touch one of the following submenus.
63

Media Center
All Songs /Playlists / Artists/Genres/ Albums/Manage MyMusic/ Music Settings/ MusicAlerts
6. Touch the name of the song youwant to hear to start the musicplayer.
64
Music Player Controls
Play All Allows you to play all songs.All Songs Allows you to view all of your songs alphabetically.
Touch a song to play it.Playlists Allows you to view and play your songs by playlist.
Playlists can be created on either your phone or PCthen transferred between them, but Playlists can onlybe managed (add and delete songs) from where theywere created. If you create a playlist on your PC,make sure to generate it through V CAST Music withRhapsody so that you can transfer it to your phone.
Artists Allows you to view and play your songs grouped byartist.
Genres Allows you to view and play songs by genre.Albums Allows you to view and play songs by album.Manage My Music Allows you to manage your music files. (Erase/ Move
to Card/ Move to Phone/ Lock/ Unlock)Music Settingsl Repeat : Allows you to set one of the following modes:
Repeat All : Repeats the playlist once the last song is played.Repeat One : Plays the selected song repeatedly.Repeat Off : Plays all songs in the list once, then stops and exits
the Music Player.l Shuffle:
Shuffle On : Shuffles music files in the songs list and plays themin random order.
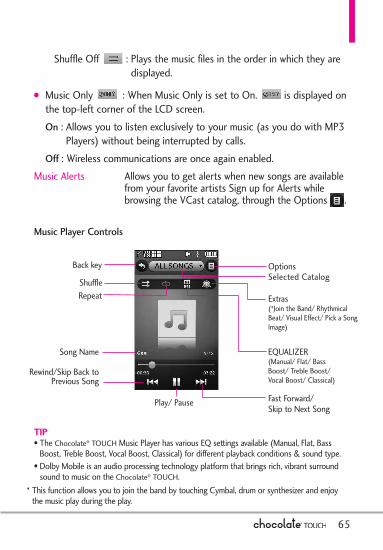
65
Music Player Controls
Shuffle
Back key OptionsSelected Catalog
Play/ Pause Fast Forward/ Skip to Next Song
EQUALIZER(Manual/ Flat/ BassBoost/ Treble Boost/Vocal Boost/ Classical)
Rewind/Skip Back toPrevious Song
Song Name
Repeat Extras(*Join the Band/ RhythmicalBeat/ Visual Effect/ Pick a SongImage)
TIP• The Chocolate® TOUCH Music Player has various EQ settings available (Manual, Flat, Bass
Boost, Treble Boost, Vocal Boost, Classical) for different playback conditions & sound type. • Dolby Mobile is an audio processing technology platform that brings rich, vibrant surround
sound to music on the Chocolate® TOUCH.* This function allows you to join the band by touching Cymbal, drum or synthesizer and enjoy
the music play during the play.
Shuffle Off : Plays the music files in the order in which they aredisplayed.
l Music Only : When Music Only is set to On. is displayed onthe top-left corner of the LCD screen. On : Allows you to listen exclusively to your music (as you do with MP3
Players) without being interrupted by calls. Off : Wireless communications are once again enabled.
Music Alerts Allows you to get alerts when new songs are availablefrom your favorite artists Sign up for Alerts whilebrowsing the VCast catalog, through the Options .

Media Center
66
Controlling the Music PlayerWhile listening to your music, usethe following to control the MusicPlayer:
l Options touch key : Allowsyou to choose:Exit Player/ Get V CAST Music/Music Only Mode/ Add ToPlaylist/ Song Info / Home Screen
l Side Volume Keys : Adjust thevolume.
Landscape mode
While music is playing, rotate theChocolate® TOUCH device to enterLandscape mode.
Background Music Mode
While music is playing, press thePWR/ END Key (or touch theOptions icon > Home Screen)to move the Music Player to thebackground of the Standby modescreen.
Exit From the Music Player
Press the PWR/ END Keytwice to exit the Music Player.
1.5 My FM Radio
Listen to FM broadcasts and musicfrom your phone. Wiredheadphones, or a headset, arerequired to use this feature.
Access FM Radio
1. Unlock the Touch Screen by slidingthe Slide icon up to unlock orpress the Unlock Key ( ) on theright side of your phone and touchthe Menu Touch Soft Key .
2. Touch the Media Center icon .
3. Touch Music & Tones.
4. Plug a wired headset into theheadset jack located at the topleft of the phone.
5. Touch My FM Radio.

Current StationFrequency
Manual Tuner WheelScan Backward
Sets Favorite Channels
Back Options
Sound Source (Headset or Speaker)Current Frequency LocationDisplays Song Info (if available)Scan Forward
Opens VCast Song ID App*
Displays Preset FavoritesChannels 7-12
Preset FavoritesChannels
*V CAST Song ID will listen to virtually any recorded music and give you back the title,artist and album.
67
SHORTCUTWith the Touch Screen unlocked and a wiredheadset plugged in, press the Music Key (locatedon the right side of the phone), then touch the FMRadio icon .
FM Frequency Range: 87.5MHz -107.9 MHz.
Automatic Scan Station Tuning
Available broadcast stations aredependent on the transmissionsignal strength in your currentlocation. Touch the Scan Backward/Scan Forward touch keys / toscan through the available FMradiotransmissions in your area.
Manual Tuner Wheel
Touch and drag your finger acrossthe tuner wheel icon to manally tune to a radio stationfrequency.
Setting Favorite Channels/Stations
Quickly access your favorite stations.Set up to 12 stations with simpletouch access.
1. Access My FM Radio.2. Tune to a station, then touch
.3. Touch a Preset Favorites Channel
touch key at the bottom of theTouch Screen.
Mute

Media Center
68
Using Saved Favorite Channels/Stationsl From My FM Radio, touch any
preset station to automaticallytune to it.
l From Standby mode with FMRadio playing in the background
Touch the Preset Station Listtouch key to display yourpreset favorite stations. Use yourfingertip to scroll the list up ordown. Touch the preset stationyou want to listen to.
FM Radio Options
While using the My FM Radio,touch the Options icon toselect from the following options:
l Exit FM Radio Exits to Standbymode.
l Auto scan Automatically scansfor available radio frequencies.lErase channel Erases the currentpreset channel.
l Reset all channels Resets allpreset FM Radio channels.
l RBDS info On/ Off TogglesRadio Broadcast Data Systemdisplay info on or off.
l Listen Via Allows you to switchbetween listening from theheadset or phone’s speaker.
l Go to My Music Returns to MyMusic.
l Home Screen Exits to Standbymode with FM Radio playing inthe background.
FM Radio Icon Reference
Icons at the top of the LCD screenindicate the FM Radio status.
FM Radio playing.
FM Radio paused.
Returns toFM Radio
PresetStation List

69
1.6 My SoundsAllows you to select saved soundsor to record a new sound.
1. Unlock the Touch Screen by slidingthe Slide icon up to unlock orpress the Unlock Key ( ) on theright side of your phone and touchthe Menu Touch Soft Key .
2. Touch the Media Center icon .
3. Touch Music & Tones.
4. Touch My Sounds.
5. Touch the Record New touch key. Or touch a sound
using your fingertip.
Options for preloaded sounds: Set As/ Send/ To Online Album/Erase All/ File Info
Options for user-recordedsounds: Set As/ Erase/ Send/ To OnlineAlbum/ Rename/ Move/ Lock/Erase All/ File Info
1.7 Sync MusicAllows you to synchronize yourmusic between your PC and yourphone. Transfer music files fromyour PC into your phone's memoryor microSDTM memory card (sold
separately) and vice versa. Transfermusic you purchased from theonline V CAST Music | RhapsodyMusic Store to your PC.
NOTE A compatible USB cable isrequired for syncing.
Download music to your PC
1. Open V CAST Music withRhapsody. Don’t have V CASTMusic with Rhapsody? Dowloadit for free atverizonwireless.com/music
2. Log in.3. Once logged in you can
perform any one of thefollowing actions:
l Download a PC copy of a trackpurchased over the air
l Purchase songs or albumsl Add subscription music to your
library
Downloading PC Copy
NOTE For each V CAST Music withRhapsody track you’ve downloadedto your phone, you can download acopy to your computer at noadditional charge.
a. Song tracks available fordownload will pop-up upon log

Media Center
70
in completion.b. Check the boxes of songs you
wish to download.c. Select “Download Tracks”.To purchase music:a. Browse the catalog and select
the track or album you wish topurchase.
b. Re-enter your password.c. Confirm the purchase and the
download will begin shortly.
Adding Subscription Music
NOTE V CAST Music with Rhapsodymonthly subscription required.
a. Add music to your collection bysimply dragging and dropping itto My Library or, if connected,your V CAST Music withRhapsody subscription capabledevice (both found underSources). This can also be doneeasily by clicking on the Addbutton next to each song.
4. To play the song or album, find itand select it in the My Library tab.
Sync your music from your PC toyour wireless device
This option allows you to transfermusic files from your PC. In order to
use this option, you must install VCAST Music with Rhapsody on yourPC.1. Open V CAST Music with
Rhapsody. Don’t have V CASTMUSIC with Rhapsody?Download it for free atverizonwireless.com/music
2. Plug in the USB cable to yourphone and connect it to a USBport on your PC.
3. From the main screen on yourphone, the SYNC MUSIC VCAST MOBILE PHONE displayappears. Your phone shoulddisplay the message:Connected.
4. Drag and drop the song(s) youwant to sync from My Library, toyour V CAST mobile phone,listed under the Sources tab.
Once synchronization is complete,press the PWR/END Key anddisconnect the USB cable.
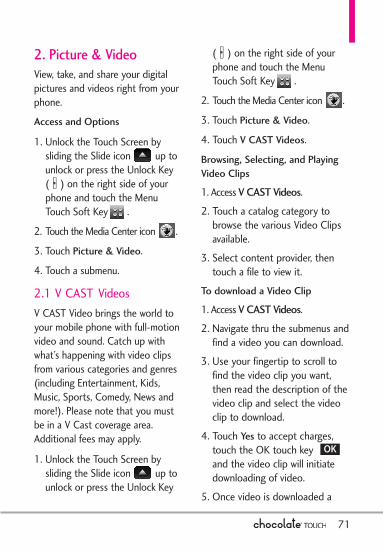
71
2. Picture & VideoView, take, and share your digitalpictures and videos right from yourphone.
Access and Options
1. Unlock the Touch Screen bysliding the Slide icon up tounlock or press the Unlock Key( ) on the right side of yourphone and touch the MenuTouch Soft Key .
2. Touch the Media Center icon .
3. Touch Picture & Video.
4. Touch a submenu.
2.1 V CAST VideosV CAST Video brings the world toyour mobile phone with full-motionvideo and sound. Catch up withwhat’s happening with video clipsfrom various categories and genres(including Entertainment, Kids,Music, Sports, Comedy, News andmore!). Please note that you mustbe in a V Cast coverage area.Additional fees may apply.
1. Unlock the Touch Screen bysliding the Slide icon up tounlock or press the Unlock Key
( ) on the right side of yourphone and touch the MenuTouch Soft Key .
2. Touch the Media Center icon .
3. Touch Picture & Video.
4. Touch V CAST Videos.
Browsing, Selecting, and PlayingVideo Clips
1. Access V CAST Videos.
2. Touch a catalog category tobrowse the various Video Clipsavailable.
3. Select content provider, thentouch a file to view it.
To download a Video Clip
1. Access V CAST Videos.
2. Navigate thru the submenus andfind a video you can download.
3. Use your fingertip to scroll tofind the video clip you want,then read the description of thevideo clip and select the videoclip to download.
4. Touch Yes to accept charges,touch the OK touch key and the video clip will initiatedownloading of video.
5. Once video is downloaded a
OK

message will appear on yourphone. Touch Yes, the video willplay automatically.
Saved video clips areautomatically saved in MyVideos.
NOTE Not all videos are downloadable.Only videos that have the optionto save can be downloaded.Additional charges for each videoclip viewed may apply.
Deleting Video Clips
1. Access V CAST Videos.
2. Touch My Videos.
3. Touch Video to delete.
4. Touch the Options icon andtouch Erase.
5. Touch Yes to erase Video.
Configure Alerts for New Video
1. Access V CAST Videos.
2. Touch the Options key on the bottom right of the screen.
3. Touch Alerts.
4. Touch Configure Alerts.
5. Touch the Content Provider youwant to receive Alerts from.
6. Select Save to confirm yourselection.
2.2 Get New PicturesAllows you to connect to MediaCenter and download a variety ofimages for My Pictures.
1. Unlock the Touch Screen bysliding the Slide icon up tounlock or press the Unlock Key( ) on the right side of yourphone and touch the MenuTouch Soft Key .
2. Touch the Media Center icon .
3. Touch Picture & Video.
4. Touch Get New Pictures.
5. Touch Get New Applications forthe available Picture downloadingapplications.
2.3 My PicturesAllows you to view photos stored inthe phone.
SHORTCUTUnlock the Touch Screen by sliding theimage up or press the Unlock Key( ) on the right side of your phone,touch the Shortcut icon to access theShortcut menu, then touch the MyPictures icon .
1. Unlock the Touch Screen bysliding the Slide icon up tounlock or press the Unlock Key
Media Center
72
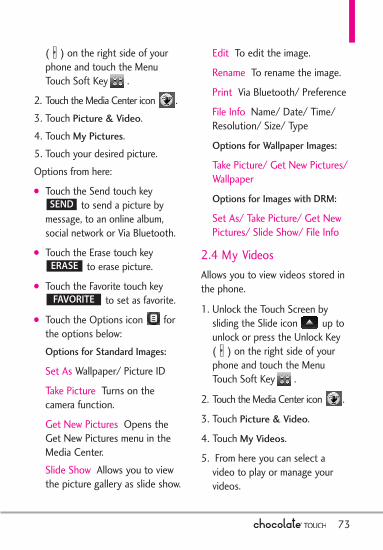
( ) on the right side of yourphone and touch the MenuTouch Soft Key .
2. Touch the Media Center icon .3. Touch Picture & Video.4. Touch My Pictures.5. Touch your desired picture.Options from here:l Touch the Send touch key
to send a picture bymessage, to an online album,social network or Via Bluetooth.
l Touch the Erase touch keyto erase picture.
l Touch the Favorite touch keyto set as favorite.
l Touch the Options icon forthe options below:Options for Standard Images:
Set As Wallpaper/ Picture ID
Take Picture Turns on thecamera function.
Get New Pictures Opens theGet New Pictures menu in theMedia Center.Slide Show Allows you to viewthe picture gallery as slide show.
Edit To edit the image.
Rename To rename the image.
Print Via Bluetooth/ Preference
File Info Name/ Date/ Time/Resolution/ Size/ Type
Options for Wallpaper Images:
Take Picture/ Get New Pictures/Wallpaper
Options for Images with DRM:
Set As/ Take Picture/ Get NewPictures/ Slide Show/ File Info
2.4 My VideosAllows you to view videos stored inthe phone.
1. Unlock the Touch Screen bysliding the Slide icon up tounlock or press the Unlock Key( ) on the right side of yourphone and touch the MenuTouch Soft Key .
2. Touch the Media Center icon .
3. Touch Picture & Video.
4. Touch My Videos.
5. From here you can select avideo to play or manage yourvideos.
FAVORITE
ERASE
SEND
73
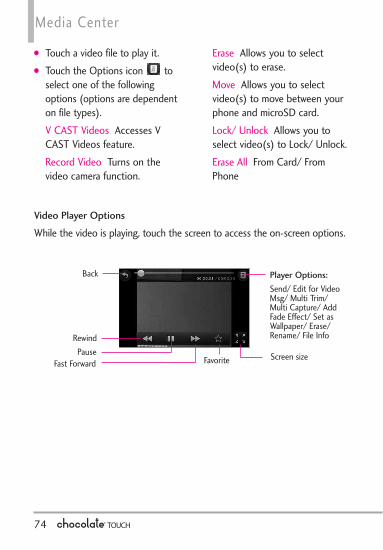
Media Center
74
l Touch a video file to play it.l Touch the Options icon to
select one of the followingoptions (options are dependenton file types). V CAST Videos Accesses VCAST Videos feature.Record Video Turns on thevideo camera function.
Erase Allows you to selectvideo(s) to erase.Move Allows you to selectvideo(s) to move between yourphone and microSD card.Lock/ Unlock Allows you toselect video(s) to Lock/ Unlock.Erase All From Card/ FromPhone
Player Options: Send/ Edit for VideoMsg/ Multi Trim/Multi Capture/ AddFade Effect/ Set asWallpaper/ Erase/Rename/ File InfoRewind
Back
PauseFast Forward
Screen sizeFavorite
Video Player OptionsWhile the video is playing, touch the screen to access the on-screen options.

75
2.5 Take PictureTake pictures straight from your phone.
TIPSl To take a clear picture, set the proper
brightness level and zoom before taking thepicture. Zoom is not available at the highestpicture resolution.
l Avoid jolting the camera. l Wipe the camera lens with a soft cloth.
SHORTCUTSThe Side Camera Key ( ) is a shortcut key toTake Picture in Standby mode. Press and holdthe Camera Key to record Video.
1. Unlock the Touch Screen by slidingthe Slide icon up to unlock orpress the Unlock Key ( ) on theright side of your phone and touchthe Menu Touch Soft Key .
2. Touch the Media Center icon .
3. Touch Picture & Video.
4. Touch Take Picture.
5. Touch the screen to set cameraoptions. For more information on
how to use the camera, see theCamera section on page 36.
l Select the option(s) tocustomize.
Brightness
White Balance Auto/ Sunny/Cloudy/ Fluorescent/ Glow
Shot Types Normal/ Panorama/Intelligent/ Facial Makeover
Resolution 2048X1536/1600X1200/ 1280X960/800X480/ 640X480
Shutter Sound Shutter/ NoSound/ Say "Cheez"/ Ready!123
Color Effects Normal/ Negative/Aqua/ Sepia/ Black&White
Self Timer Off/ 3 Seconds/ 5Seconds/ 10 Seconds
Auto Save On/ Off
Save Option Internal/ External
Video Switches to the Recordfunction
6. Touch the Take Picture touch keyto take the picture.
7. Touch the Save Picture touch key. The picture is stored in
My Pictures.Save
Take
Camera KeyCamera Lens

Media Center
76
2.6 Record Video Lets you record a video messagewith sound.
1. Unlock the Touch Screen bysliding the Slide icon up tounlock or press the Unlock Key( ) on the right side of yourphone and touch the MenuTouch Soft Key .
2. Touch the Media Center icon .
3. Touch Picture & Video.
4. Touch Record Video.
5. Touch the screen to set Videooptions. For more information onhow to use Video recording, seepage 38.
l Select the option(s) tocustomize.
Brightness
White Balance Auto/ Sunny/Cloudy/ Fluorescent/ Glow
Recording Time For Send/ For Save
Resolution 320X240/176X144
Color Effects Normal/Negative/ Aqua/ Sepia/Black&White
Auto Save On/ Off
Save Option Internal/ External
Camera Switches to the Camerafunction
6. Record a video by touching theRecord touch key ,then touch the Stop touch key
to end recording.
NOTE You can also press the sideCamera Key to start and stoprecording.
7. Touch the Save touch key. The video clip is stored
in My Videos.
2.7 Online AlbumLets you save your pictures andvideos to Online Albums that makeit easy to save, organize and shareall your pictures and videos.
1. Unlock the Touch Screen bysliding the Slide icon up tounlock or press the Unlock Key( ) on the right side of yourphone and touch the MenuTouch Soft Key .
2. Touch the Media Center icon .
3. Touch Picture & Video.
Save
Stop
Record

77
4. Touch Online Album.
5. Login to access your OnlineAlbum.
3. GamesAllows you to play games as well asdownload new games and applicationsfrom the Media Center server.
1. Unlock the Touch Screen bysliding the Slide icon up tounlock or press the Unlock Key( ) on the right side of yourphone and touch the MenuTouch Soft Key .
2. Touch the Media Center icon .
3. Touch Games.
4. Touch a game to play or touchGet New Applications.
4. Browse & DownloadEverything you need to know whileyou’re on the go.
1. Unlock the Touch Screen bysliding the Slide icon up tounlock or press the Unlock Key( ) on the right side of yourphone and touch the MenuTouch Soft Key .
2. Touch the Media Center icon .
3. Touch Browse & Download.
4. Touch an application or touchGet New Applications.
City ID
City ID is an enhanced Caller IDfeature on select Verizon Wirelesshandsets that automaticallydisplays the city and state of everywireless call received. City ID readsthe area code and local exchange ofan incoming call and displays thelocation associated with thatnumber. City ID includes over20,000 cities, towns andneighborhoods in North Americaand over 200 country codes fromaround the world - providingmobile subscribers with aremarkably accurate tool to helpidentify incoming callers.
City ID enabled handsets also featureoutgoing and call log identificationwhich displays the city and state ofoutgoing calls as well as calls withinthe handset’s call history.
City ID is a feature with a free trialthat works automatically –displaying the city and state withthe very first incoming phone call.

Media Center
After the free trial period,subscribers will receive a messageto purchase the application.
Subscribers are then presented withthe available purchase options.If after purchasing City ID asubscriber decides to cancel theapplication, the subscriber canfollow the standard Media Centerprocess to cancel a subscription.
3. To purchase City ID if you said“no” during the trial?
1. Touch the Menu icon
2. Touch the Media Center icon
3. Touch Browse & Download
4. Touch City ID
5. Touch Subcription Status,then touch Subscribe Nowto purchase the application.
6. Application Downloads. Afterthe application is successfullyinstalled, touch “yes” to runCity ID or “no” to return toGet It Now.
7. Touch End to return to MainMenu.
More Available Applications...
VZ NavigatorSM
VZ NavigatorSM is an applicationdownloadable from the Browse &Download menu. Now you can findthe address of a great restaurant orthe nearest ATM. Check movietimes. Discover the latest hot spots.And know exactly how to get towhere you’re going. VZ NavigatorSM
puts all the advanced features ofthe latest GPS devices and systemson your wireless device — at afraction of the price.
NOTES• To use VZ NavigatorSM, you must turn
Location On (see page 107).
• Download and subscription required foruse only in National Enhanced ServiceCoverage Area: accuracy andcompleteness of information is notguaranteed; information about locationof device will be used to deliver service.Additional fees may apply. See brochurefor details or visitwww.verizonwireless.com.
Visual Voice MailVisual Voice Mail allows themanagement of voice mail directlyfrom the device rather thanaccessing voice mail via traditionalmethod(s). Visual Voice Mail
78

displays a list of messages andallows the user to choose whichmessage to listen to or delete,without having to dial into theirmailbox, listen to voice instructions,or prior messages.
How to set up Visual Voice Mail1. If you are an existing Verizon
Wireless subscriber, skip to step 2.If you are a new Verizon Wirelesssubscriber, first dial *86 to set upyour voice mail service.
2. Unlock the Touch Screen andtouch the Menu Touch Soft Key
, then touch the Message icon.
3. Touch Visual Voice Mail.
4. Upon opening the link to VisualVoice Mail, a message will beplayed promoting the benefits ofVisual Voice Mail.
5. Follow the prompts to downloadthe application.
6. When prompted, enter your basicvoice mail password that waspreviously established.*
7. Continue to follow the promptsand instructions to complete the
download and activation of VisualVoice Mail.
8. Once the activation steps arecompleted, exit the applicationand return after 5 minutes tobegin using Visual Voice Mail.
* Please note that storing a voice mailpassword is required to use Visual VoiceMail. This application may store voice mailmessages in electronic format on thisdevice.
Anyone in possession of this devicecan access the voice mail. To limitunauthorized access to your voicemail, consider locking the phonewhen not in use. Cancellation ofVisual Voice Mail cannot becompleted via the device. Pleasecontact Customer Service or go toMy Verizon at verizonwireless.comif you need to cancel your VisualVoice mail service. Visual Voice Mailand traditional Voice Mail may notalways be synchronized and if youcancel Visual Voice Mail you maylose all stored voice mails andinformation. To avoid losing allstored voice mails and information,save your voice mail in an audioformat onto a phone’s internalmemory, removable memory or sendthe audio file as a message using
79

Media Center
picture messaging or email. Onceyou have registered for My Verizon,you will have the ability to reset yourvoice mail password online or viayour Web capable wireless device.
NOTE Voice Mail may not be available insome areas. Voice Mailboxes notset up within 45 days will becancelled. Your Verizon WirelessVoice Mailbox is not passwordprotected until you create apassword by following the setuptutorial. Airtime and othercharges will be incurred whenusing Voice Mail from yourwireless phone. IN Callingminutes do not apply to VoiceMail retrievals; you will becharged to maintain yourconnection to Voice Mail. VerizonWireless is not liable for missedmessages, or messages deletedfrom your Voice Mailbox, even ifyou have saved them.
Mobile Email
Mobile Email is an applicationdownloadable from the Browse &Download Menu. Don't miss animportant email. Thanks to MobileEmail, you can get your emails onyour phone, while you're on the go.Mobile Email works with manyproviders, including Yahoo!, AOL,Verizon.net and others. Get alertsfrom your Chocolate® TOUCHwhen new email has arrived. Additional fees may apply.
See brochure for details or visitwww.verizonwireless.com.
Corporate Email
The Corporate Email service is apre-paid service provided byRemoSync, offering convenienceand flexibility to customers whofrequently deal in bulk mail.Additional fees may apply. Seebrochure for details or visitwww.verizonwireless.com.
Backup Assistant
Backup Assistant safeguards yourmobile phone's address book andautomatically saves a copy of thenames, phone numbers, and emailaddresses stored in your phone.You can also view, print, add,delete, and edit your contactsonline. If you lose, damage, orupgrade your phone, BackupAssistant will restore your contactlist to a new or replacement phone.Additional fees may apply. Seebrochure for details.
NOTE To use the Backup Assistantservice, you are required toactivate the service from yourphone.
80
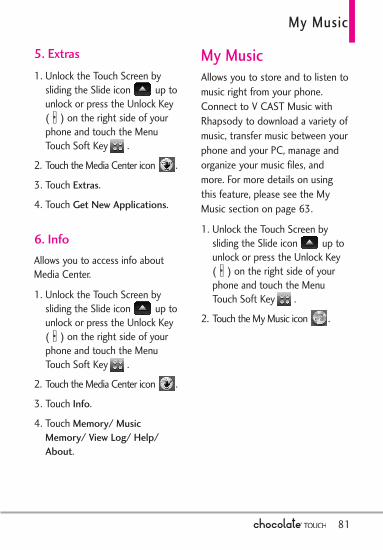
5. Extras
1. Unlock the Touch Screen bysliding the Slide icon up tounlock or press the Unlock Key( ) on the right side of yourphone and touch the MenuTouch Soft Key .
2. Touch the Media Center icon .
3. Touch Extras.
4. Touch Get New Applications.
6. Info
Allows you to access info aboutMedia Center.
1. Unlock the Touch Screen bysliding the Slide icon up tounlock or press the Unlock Key( ) on the right side of yourphone and touch the MenuTouch Soft Key .
2. Touch the Media Center icon .
3. Touch Info.
4. Touch Memory/ MusicMemory/ View Log/ Help/About.
My MusicAllows you to store and to listen tomusic right from your phone.Connect to V CAST Music withRhapsody to download a variety ofmusic, transfer music between yourphone and your PC, manage andorganize your music files, andmore. For more details on usingthis feature, please see the MyMusic section on page 63.
1. Unlock the Touch Screen bysliding the Slide icon up tounlock or press the Unlock Key( ) on the right side of yourphone and touch the MenuTouch Soft Key .
2. Touch the My Music icon .
My Music
81

82
Browser
BrowserThe Browser feature allows you toaccess the internet from yourVerizon Wireless device. Access andselections within this feature aredependent upon your serviceprovider. For specific information onBrowser access through yourphone, contact your serviceprovider.
Launching the Browser1. Unlock the Touch Screen by sliding
the Slide icon up to unlock orpress the Unlock Key ( ) on theright side of your phone and touchthe Menu Touch Soft Key .
2. Touch the Browser icon .
Ending a Browser SessionEnd a Browser session by pressingthe PWR/END Key.
Browser NavigatingAccessing embedded links andcontent
Select items or links by touching iton the screen.
HINT: If you’re having troubletouching the exact link on thescreen, use the zoom function to
zoom in so that there is a largerarea to touch to activate yourselection on the Touch Screen.Zoom in or out using the SideVolume Keys.
Scrolling / Fast Scrolling
Use your fingertip to move thescreen contents in the directionyou move your finger.
How quickly you move your fingerdetermines the quickness of thescroll.
CAUTION Do not use a sharp item foryour pen-like stylus because it could scratchyour screen.
Returning to Home Page
Touch the Command bar icon ,then touch the Home icon .
Browser Menu Options
Touch the Command bar icon ,then touch the Options icon .l Full Screen View Use the whole
screen, including the annuciatorand command bar area, to viewpages.
l WWW Takes you to the VZW GoTo Site where you can enter the

83
Web address you wish to visit.l Add Favorite Allows you to add
the current page as a Favorite/Bookmark.
l Find on Page Allows you tosearch for text you want to findin the web page.
l Search Allows you to go to theSearch page on the VZWMobile Web portal.
l History Displays list of visitedweb pages.
l Optimized View Takes you to thepage where you can select tohave Webpages optimized for yourphone.
l Display Mode Changes how thephone displays loaded pages.The options are:
Standard Displays a standardBrowser screen with vertical andhorizontal page navigation.
Page Overview Will zoom out todisplay the entire web page inone screen.
Fixed Width Displays webcontents to fit the size of thescreen. Allows verticalnavigation only.
Text Only Displays only text andexcludes images used in theWeb page.
l Send URL Allows you to sendthe link of the current page viaa text message.
l Settings Allows you to configureto your preferred Browsersettings. The options are:
Homepage Allows you to selectyour Home Page.
JavaScript ON / OFF
Feed settings 25 items/ 50items/ 75 items
RSS Update mode Automatic/Manual
Security Cookies/ Send Referrer/Authentication Caching/ SSL3.0/TLS 1.0/ Root Certificates/Current Certificate
Manage Memory Allows you toerase different types of itemsstored by your browser.
Restore Defaults Allows you torestore to the default HomePage, Display Mode, Security,and Feed settings; or, to RestoreAll.

84
Browser
l Information Shows Web PageInformation or Browser Information.
Entering/Deleting Text, Numbersor Symbols
When a text entry field is touchedor tapped, a Touch Keypad will popup for you to enter letters,
numbers, and/or symbols. Simplytouch the characters you want andtouch the Clear touch key to delete.TIP When entering text in an entry field,
turn the device 90 degrees (counter-clockwise) to be able to type inlandscape mode.
Command bar icons on the Touch Screen
WWW Shows you the currentURL address.
Menu Displays theBrowser MenuOptions
News Feeds Allows you to add newsfeeds. This icon is grayed out if a newsfeed is not available.
Back/ Forward
Home Returns toHome Page
ZoomFavorites Allows you to view or
add to favorites
Refresh/ Stop
Allows you to reloadthe current Webpage.
*While the page isloading, isdisplayed. Touchthis to stop loadingthe page.

85
ZOOM Options
1. Access the Browser.
2. Touch the Zoom icon to display the zoom button.
l Touch the Plus Zoom icon to zoom in and touch the Minus Zoomicon to zoom out.
l A double tap automatically zooms out as much as possible. A seconddouble tap will Zoom in to the previous Zoom level.
Zoom buttons
Zoom With the Touch Screen

UUssiinngg RRSSSS rreeaaddeerr
RSS (Really Simple Syndication) is a family of web feed formats used topublish frequently updated content such as blog entries, news headlines orpodcasts. An RSS document, which is called a feed, web feed, or channelcontains either a summary of content from an associated web site or the fulltext. RSS makes it possible for people to keep up with their favorite websites in an automated manner that is easier than checking them manually.
1) Add New Feed
When a web page finishes loading, the RSSFeed Indicator will appear if an RSS feed isavailable. Touch the RSS Feed indicator icon
and select the feed you want to save.
2) Update Feeds
Touch the Command bar icon >touch the RSS Feeds icon > Touchthe Feed Update icon .
86
Browser
RSS Feed Indicator
Feed Update Button
Search
87
SearchThe Search (bing) applicationprovides Verizon Wirelesssubscribers with a superior,comprehensive mobile search(bing) experience that includeshighly relevant search results fromtop quality content sources andresults from VZW contentdownloadable catalogs, Web / Wapand Local POI.Mobile Search (bing) develops auser experience that:l Provides search results from Web
& WAP, Local POI and VZWDownloadable Content catalogs.
l Provides the most relevant set ofresults from top-quality contentsources for the broadest set ofmobile queries (increase numberof users who click through to topresults on a query).
l Provides a high probabilityaction result set.
Access and Options1. Unlock the Touch Screen by sliding
the Slide icon up to unlock orpress the Unlock Key ( ) on theright side of your phone and touchthe Menu Touch Soft Key .
2. Touch the Search icon .
NOTE Standard mobile rates apply.Check with your service providerfor details.

88
Email/ VZ Navigator
EmailThe Email applications allow you tosend and receive email so you don'tmiss an important email. Get youremails on your phone, while you'reon the go using applicationsdownloaded from the followingproviders: l Mobile Emaill Corporate Emaill Mobile Web MailAccess and Options1. Unlock the Touch Screen by sliding
the Slide icon up to unlock orpress the Unlock Key ( ) on theright side of your phone and touchthe Menu Touch Soft Key .
2. Touch the Email icon .
VZ NavigatorThe VZ Navigator Menu allows youto get directions to locations whenyou're out and about with: l Voice-prompted turn-by-turn
directions with auto-rerouting ifyou miss a turn
l The option to view detailedcolor maps that can be pannedand zoomed
l The ability to find points ofinterest
Access and Options1. Unlock the Touch Screen by sliding
the Slide icon up to unlock orpress the Unlock Key ( ) on theright side of your phone and touchthe Menu Touch Soft Key .
2. Touch the VZ Navigator icon.
ToolsYour phone tools include VoiceCommands, Calculator, Ez TipCalculator, Calendar, Alarm Clock,Stopwatch, World Clock, Notepad,Drawing Pad, and USB Mass Storage.
1. Voice CommandsThis feature provides you with thefollowing options equipped withAVR (Advanced VoiceRecognition) technology. Eachoption has its detailed informationon the phone. To view the optiondetails, touch the Options icon
, touch INFO and then touchthe Voice Command option formore information.
Access Voice Commands1. Unlock the Touch Screen by sliding
the Slide icon up to unlock orpress the Unlock Key ( ) on theright side of your phone and touchthe Menu Touch Soft Key .
2. Touch the Tools icon .
3. Touch Voice Commands.
Voice Commands SettingsTo customize your voice commands,touch the Options icon , thenSETTINGS.
Confirm Choices Automatic/Always Confirm/Never ConfirmSensitivity More Sensitive/Automatic/ Less SensitiveAdapt Voice Train Digits/ TrainWordsPrompt Mode Prompts/ Readout +Alerts/ Readout/ Tones OnlyAudio Playback Speakerphone/EarpiecePrompt Timeout 5 seconds/ 10secondsCLR Key Activation ON/ OFFInfo Provides Settings Info.Using Voice Commands
To access the Voice Commandoptions (below):
1. From Standby Mode, press theClear/Voice Command Key
.
2. When prompted, say the nameof the function (below) you wishto use:
1.1.1 Call <Name or Number>
Say "Call" and then call someonesimply by saying the phonenumber or name. Please speak
Tools
89

90
Tools
clearly and exactly as in yourContact list. When you have morethan one contact number, you canstate the name and number typeof the contact (for example, 'CallJohn Work').
1.1.2 Send Msg to <Name orNumber or Group>
Say "Send Message" and the voicecommand will prompt you for thetype of message. After choosingthe message type, system will askyou for the contact name, numberor group. It will automatically starta message. If you say a full-sentence command, such as "SendMessage to Bob", it will automaticallystart a text message without askingfor the message type. When using"Send Message" command, speakclearly and say the number, groupname, or name exactly as it isentered in your Contact List.
1.1.3 Go to <Menu>
The "Go to" command allows youto access a menu within the phone(for example, "Go to Calendar"). If no menu option is stated, a listof options will be provided.
1.1.4 Check <Item>
The "Check" command allows youto check out a wide range of items,such as: the battery level, signalstrength, phone status, volume,missed calls, voicemail, messages,to time and date.
1.1.5 Contacts <Name>
You can look up names in yourContacts (for example, say"Lookup John"). Once a contact'sinfo is read out, you will beprompted for the followingoptions:
Call/ Modify/ Erase/ Create New
1.1.6 Search
The “Search” command activatesbing, an application that allows youto search for information over theinternet. You may need to downloadand install bing first, before usingthis Voice Command function.
1.1.7 Redial
Allows you to automatically redialthe last number called.
1.1.8 Play
Allows you to play songs saved inthe phone.
1.1.9 My Verizon

91
The "My Verizon" commandprovides you with direct access toyour Verizon Wireless accountinformation.
1.1.0 Help
Provides a general guideline tousing Voice Commands.
2. CalculatorAllows you to perform simplemathematical calculations. You canenter numbers up to eight digits.
1. Unlock the Touch Screen bysliding the Slide icon up tounlock or press the Unlock Key( ) on the right side of yourphone and touch the MenuTouch Soft Key .
2. Touch the Tools icon .
3. Touch Calculator.
4. Enter the numbers and operatorsto get the calculation you want.
5. Touch the Equals icon to viewthe result.
NOTE Touch these icons to add parentheses, power,
or plus or minus functions to thecalculation.
3. Ez Tip CalculatorAllows you to quickly and easilycalculate bill amounts using the billtotal, tip % and number of peopleas variables.
1. Unlock the Touch Screen bysliding the Slide icon up tounlock or press the Unlock Key( ) on the right side of yourphone and touch the MenuTouch Soft Key .
2. Touch the Tools icon .
3. Touch Ez Tip Calculator.
4. Enter the variable fields (TotalBill, Tip %, Split).
l Touch any of the fields, a keypadwill appear so that you can enteramounts.
5. Touch the Reset touch keyfor another
calculation.
4. CalendarAllows you to keep your agendaconvenient and easy to access.Simply store your appointmentsand your phone can alert you witha reminder you set.
RESET

92
Tools
1. Unlock the Touch Screen bysliding the Slide icon up tounlock or press the Unlock Key( ) on the right side of yourphone and touch the MenuTouch Soft Key .
2. Touch the Tools icon .
3. Touch Calendar.
TIPTouch the Options icon to select fromthe following options: Weekly/ Go ToDate/ Go To Today/ Search/ Erase Old/Erase All/ Send
4. Touch to select a day.5. Touch the Add touch key
.6. Touch Subject field to enter text.7. Scroll and touch the other
Calendar setting fields. For eachCalendar event you can set:l Start Time l End Timel Repeat l Untill Alerts l Tonesl Vibrate
8. Touch the Save touch keywhen Calendar
information is complete.
5. Alarm ClockAllows you to set one of ten alarms.
At the alarm time, a notification willbe displayed on the LCD screenand the alarm will sound.SHORTCUTUnlock the Touch Screen and touch theShortcut icon to access the Shortcutmenu, then touch the Alarm Clock Icon .
1. Unlock the Touch Screen bysliding the Slide icon up tounlock or press the Unlock Key( ) on the right side of yourphone and touch the MenuTouch Soft Key .
2. Touch the Tools icon .
3. Touch Alarm Clock.
4. Touch the Add touch key. (Up to 10 can be
added).
5. Touch the fields to edit thealarm information, including:l Set Time l Repeatl Ringtone
6. Touch the Save touch keyafter setting all of the
Alarm fields as necessary.
6. StopwatchAllows you to use your phone as astopwatch.
1. Unlock the Touch Screen by sliding
SAVE
ADD
SAVE
ADD

93
the Slide icon up to unlock orpress the Unlock Key ( ) on theright side of your phone and touchthe Menu Touch Soft Key .
2. Touch the Tools icon .
3. Touch Stopwatch.
4. Touch the Start touch key, the other options are:
l . l . l . l .
7. World ClockAllows you to determine the currenttime in another time zone or country.
1. Unlock the Touch Screen by slidingthe Slide icon up to unlock orpress the Unlock Key ( ) on theright side of your phone and touchthe Menu Touch Soft Key .
2. Touch the Tools icon .
3. Touch World Clock.
4. Touch the Cities touch keyto choose from a list
of available cities.
NOTE Touch the Go To touch keyto search for the city
by typing into the search field.
5. Touch a city in the list.
The display shows the positionof the city on a global map.
6. Touch the OK touch key to zoom in on the city and viewits date and time infomation.
NOTE Touch the Set Daylight SavingTime touch key set todaylight saving time.
8. NotepadAllows you to add, read, edit, anderase notes.
1. Unlock the Touch Screen by slidingthe Slide icon up to unlock orpress the Unlock Key ( ) on theright side of your phone and touchthe Menu Touch Soft Key .
2. Touch the Tools icon .
3. Place your finger on the TouchScreen and apply gentle upwardpressure to scroll the list up,then touch Notepad.
4. Touch the Add touch keyto write a new note.
NOTE Touch the Text Entry touch key
to change the entry
mode.
5. After filling in the note, touchthe Done touch key .DONE
Abc
ADD
SET DST
OK
GO TO
CITIES
RESUMERESETSTOPLAP
START

94
Tools
9. Drawing PadThis function allows you to drawfreely so that you can simply savethe image, send it in a message orset it as a Wallpaper.
1. Unlock the Touch Screen by slidingthe Slide icon up to unlock orpress the Unlock Key ( ) on theright side of your phone and touchthe Menu Touch Soft Key .
2. Touch the Tools icon .
3. Place your finger on the TouchScreen and apply gentle upwardpressure to scroll the list up,then touch Drawing Pad.
4. Touch the Add touch key.
5. Touch the Color Palette touch keyto choose color, touch Pen
Size touch key to choosethe pen size, touch Eraser touchkey to choose the eraser size,touch the Undo touch key toundo, and touch the Save touchkey to save.
6. Once the drawing is saved,touch the drawing to view it.Once opened, you can touchthe Options icon toRename or to set as a Wallpaper.
10. USB Mass Storage
This menu allows you to transfercontent from your phone to yourWindows® XP or Windows Vista™
PC (or vice versa) when yourphone is connected to yourWindows® XP or Windows Vista™
PC with a compatible USB cable.Mac OS operating system is notsupported.
NOTE Do not insert or remove themicroSDTM card while the PC isplaying, deleting or downloadingfiles.
1. Connect the Phone with a PC usingan LG USB adapter.
2. Unlock the screen, if necessary.
3. The Sync Music screen will show onyour phone. Touch the Drop touchkey to exit this screen.
4. Touch the Menu Touch Soft Key .
5. Touch the Tools icon .
6. Place your finger on the TouchScreen and apply gentle upwardpressure to scroll the list up,then touch USB Mass Storage.
7. Touch the Exit touch key to close the connection.
Exit
DROP
ADD

Settings
95
Settings
1. My VerizonCheck your subscriptioninformation ranging from yourpayment plan to your softwareupgrade or other available services.1. Unlock the Touch Screen by sliding
the Slide icon up to unlock orpress the Unlock Key ( ) on theright side of your phone and touchthe Menu Touch Soft Key .
2. Touch the Settings icon .
3. Touch My Verizon.
2. Bluetooth MenuThe Chocolate® TOUCH iscompatible with devices thatsupport the Bluetooth® Headset,Handsfree, Dial Up Networking,Stereo, Phonebook Access, BasicPrinting, Object Push* File Transfer,Basic Imaging and Human Interfaceprofiles**. You may create andstore 20 pairings within theChocolate® TOUCH and connectto one device at a time. Theapproximate communication rangefor Bluetooth® wireless technologyis up to 30 feet (10 meters).
Bluetooth QD ID B015677
SHORTCUTUnlock the Touch Screen and touch theShortcut icon to access the Shortcutmenu, then touch the Bluetooth® Icon .
NOTE Read the user guide of eachBluetooth® accessory that youare trying to pair with yourphone because the instructionsmay be different.
NOTE Your phone is based on theBluetooth® specification, but it is notguaranteed to work with all devicesenabled with Bluetooth® wirelesstechnology. Phone does not supportALL Bluetooth® OBEX Profiles.*Contact Name Cards, Calendarevents and other non-protecteddata. ** For vehicle/accessory
compatibility go towww.verizonwireless.com/bluetoothchart.
2.1 Add New DevicePairing is the process that allowsthe handset to locate, establish,and register 1-to-1 connectionwith the target device.
For pairing with a new Bluetooth®
device
1. Follow the Bluetooth® accessoryinstructions to set the device topairing mode.
2. Unlock the Touch Screen by slidingthe image up to unlock or
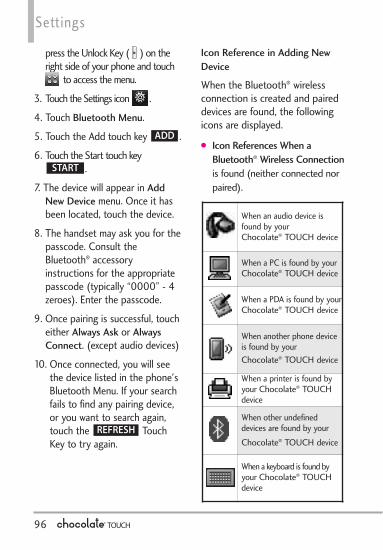
96
Settings
press the Unlock Key ( ) on theright side of your phone and touch
to access the menu.
3. Touch the Settings icon .
4. Touch Bluetooth Menu.
5. Touch the Add touch key .
6. Touch the Start touch key.
7. The device will appear in AddNew Device menu. Once it hasbeen located, touch the device.
8. The handset may ask you for thepasscode. Consult theBluetooth® accessoryinstructions for the appropriatepasscode (typically “0000” - 4zeroes). Enter the passcode.
9. Once pairing is successful, toucheither Always Ask or AlwaysConnect. (except audio devices)
10. Once connected, you will seethe device listed in the phone'sBluetooth Menu. If your searchfails to find any pairing device,or you want to search again,touch the TouchKey to try again.
Icon Reference in Adding NewDevice
When the Bluetooth® wirelessconnection is created and paireddevices are found, the followingicons are displayed.
l Icon References When aBluetooth® Wireless Connectionis found (neither connected norpaired).
When an audio device isfound by your Chocolate® TOUCH device
When a PC is found by yourChocolate® TOUCH device
When a PDA is found by yourChocolate® TOUCH device
When another phone deviceis found by your Chocolate® TOUCH device
When a printer is found byyour Chocolate® TOUCHdevice
When other undefineddevices are found by your Chocolate® TOUCH device
When a keyboard is found byyour Chocolate® TOUCHdevice
REFRESH
START
ADD

97
My Device InfoAllows you to view your device'sBluetooth® information and to editthe name of the Bluetooth® device.
1. Unlock the Touch Screen bysliding the Slide icon up tounlock or press the Unlock Key( ) on the right side of yourphone and touch the MenuTouch Soft Key .
2. Touch the Settings icon .
3. Touch Bluetooth Menu.
4. Touch the Options icon .
5. Touch My Device Info.
6. Touch the Rename Devicetouch key .
7. Use the pop-up keypad to editthe phone's Bluetooth® name andtouch the Done touch key
.
2.2 Discovery ModeAllows you to set whether yourdevice is able to be searched byother Bluetooth® devices in thearea.
1. Unlock the Touch Screen bysliding the Slide icon up tounlock or press the Unlock Key
( ) on the right side of yourphone and touch the MenuTouch Soft Key .
2. Touch the Settings icon .3. Touch Bluetooth Menu.
TIPSimply touch the Show touch key
to enter Discovery Mode.
4. Touch the Options icon .5. Touch Discovery Mode.6. Touch a setting.
On/ Off
2.3 Supported ProfilesAllows you to see profiles thatyour Chocolate® TOUCH phonecan support.
1. Unlock the Touch Screen bysliding the Slide icon up tounlock or press the Unlock Key( ) on the right side of yourphone and touch the MenuTouch Soft Key .
2. Touch the Settings icon .3. Touch Bluetooth Menu.4. Touch the Options icon .5. Touch Supported Profiles.6. Touch a Profile for more
information about it.
SHOW
DONE
RENAME DEVICE

98
Settings
NOTES• If you want to view your options for a
device already in your paired list, touchand hold the name of the device in thelist to connect. For a list of pairingoptions to choose from, just touch theSettings icon .
3. Sounds SettingsProvides options to customize thephone’s sounds.
3.1 Easy Set-UpAllows you to easily set theSounds settings all from onesubmenu.
1. Unlock the Touch Screen bysliding the Slide icon up tounlock or press the Unlock Key( ) on the right side of yourphone and touch the MenuTouch Soft Key .
2. Touch the Settings icon .
3. Touch Sounds Settings.
4. Touch Easy Set-Up.
5. Follow the prompts to set theSounds settings for your phone.
3.2 Master VolumeAllows you to set Master Volumesettings.
1. Unlock the Touch Screen bysliding the Slide icon up tounlock or press the Unlock Key( ) on the right side of yourphone and touch the MenuTouch Soft Key .
2. Touch the Settings icon .
3. Touch Sounds Settings.
4. Touch Master Volume.
5. Adjust the volume by touchingmore or fewer volume bars andtouch to save thesetting.
3.3 Call SoundsAllows you to set Call Sounds andVibration for incoming calls.
1. Unlock the Touch Screen bysliding the Slide icon up tounlock or press the Unlock Key( ) on the right side of yourphone and touch the MenuTouch Soft Key .
2. Touch the Settings icon .
3. Touch Sounds Settings.
4. Touch Call Sounds.
5. Touch a Call Sounds submenu.
Call Ringtone / Call Vibrate /Caller ID Announcement
SET
99
3.3.1 Call Ringtone
1. Unlock the Touch Screen bysliding the Slide icon up tounlock or press the Unlock Key( ) on the right side of yourphone and touch the MenuTouch Soft Key .
2. Touch the Settings icon .
3. Touch Sounds Settings.
4. Touch Call Sounds.
5. Touch Call Ringtone.
6. Touch a ringtone to set and save.
3.3.2 Call Vibrate
1. Unlock the Touch Screen bysliding the Slide icon up tounlock or press the Unlock Key( ) on the right side of yourphone and touch the MenuTouch Soft Key .
2. Touch the Settings icon .
3. Touch Sounds Settings.
4. Touch Call Sounds.
5. Touch Call Vibrate to toggle thesetting.
On/ Off
3.3.3 Call ID Readout
1. Unlock the Touch Screen bysliding the Slide icon up tounlock or press the Unlock Key( ) on the right side of yourphone and touch the MenuTouch Soft Key .
2. Touch the Settings icon .3. Touch Sounds Settings.4. Touch Call Sounds.5. Touch Call ID Readout.6. Touch a setting.
Ring Only/ Caller ID + Ring/Name Repeat
3.4 Alert SoundsAllows you to select the alert typefor new messages and othernotifications.
1. Unlock the Touch Screen bysliding the Slide icon up tounlock or press the Unlock Key( ) on the right side of yourphone and touch the MenuTouch Soft Key .
2. Touch the Settings icon .
3. Touch Sounds Settings.

100
Settings
4. Touch Alert Sounds.
5. Touch TXT Message/Multimedia Message/Voicemail/ Emergency Tone/Missed Call.
l Each Alert Sounds menu has thefollowing options.
Tone/ Vibrate/ Reminder
l The Emergency Tone has thefollowing options:
Alert/ Vibrate/ Off
3.5 Button SoundsAllows you to set the volume levelfor the touch keys (buttons).
1. Unlock the Touch Screen bysliding the Slide icon up tounlock or press the Unlock Key( ) on the right side of yourphone and touch the MenuTouch Soft Key .
2. Touch the Settings icon .
3. Touch Sounds Settings.
4. Touch Button Sounds.
5. Adjust the volume by touchingmore or fewer volume bars andtouch the Set touch key to save the setting.
3.6 Digit Dial ReadoutAllows you to set the phone toreadout the digits you dial.
1. Unlock the Touch Screen bysliding the Slide icon up tounlock or press the Unlock Key( ) on the right side of yourphone and touch the MenuTouch Soft Key .
2. Touch the Settings icon .
3. Touch Sounds Settings.
4. Touch Digit Dial Readout totoggle the setting.
On/ Off
3.7 Service AlertsAllows you to set any of the fourAlert options to either On or Off.
1. Unlock the Touch Screen bysliding the Slide icon up tounlock or press the Unlock Key( ) on the right side of yourphone and touch the MenuTouch Soft Key .
2. Touch the Settings icon .
3. Touch Sounds Settings.
4. Place your finger on the TouchScreen and apply gentle upward
SET

101
pressure to scroll the list up,then touch Service Alerts.
5. Touch an alert option to togglethe setting On or Off.
ERI Alerts you to the networkstatus of your current cellularservice. Minute Beep Alerts you 10seconds before the end of everyminute during a call.
Call Connect Alerts you when thecall is connected.
Charge Complete Alerts youwhen the battery is completelycharged.
3.8 Power On/OffAllows you to set the phone tosound a tone and/or vibrate whenthe phone is powered on/off.
1. Unlock the Touch Screen bysliding the Slide icon up tounlock or press the Unlock Key( ) on the right side of yourphone and touch the MenuTouch Soft Key .
2. Touch the Settings icon .
3. Touch Sounds Settings.
4. Place your finger on the Touch
Screen and apply gentle upwardpressure to scroll the list up,then touch Power On/Off.
5. Touch Power On Sound / PowerOn Vibrate / Power Off Sound/ Power Off Vibrate to togglethe setting.
On/ Off
4. Display SettingsProvides options to customize thephone’s display screen.
4.1 Easy Set-UpAllows you to easily set the Displaysettings all from one submenu.
1. Unlock the Touch Screen bysliding the Slide icon up tounlock or press the Unlock Key( ) on the right side of yourphone and touch the MenuTouch Soft Key .
2. Touch the Settings icon .
3. Touch Display Settings.
4. Touch Easy Set-Up.
5. Follow the prompts to set theDisplay settings for your phone.

102
Settings
4.2 BannerAllows you to enter text to display onthe LCD. You can enter up to 23characters.
4.2.1 Personal Banner
1. Unlock the Touch Screen bysliding the Slide icon up tounlock or press the Unlock Key( ) on the right side of yourphone and touch the MenuTouch Soft Key .
2. Touch the Settings icon .
3. Touch Display Settings.
4. Touch Banner.
5. Touch Personal Banner.
6. Enter the banner text and touchthe Done touch key .
NOTE To change the font color, touchthe Options icon , touch FontColor, touch the color you want,then touch the OK touch key .
4.2.2 ERI Banner
If you use ERI Service, ERI Text isshown on the sub banner.
1. Unlock the Touch Screen bysliding the Slide icon up to
unlock or press the Unlock Key( ) on the right side of yourphone and touch the MenuTouch Soft Key .
2. Touch the Settings icon .3. Touch Display Settings.4. Touch Banner.5. Touch ERI Banner to toggle the
setting.On/ Off
4.3 BacklightAllows you to set the duration forthe backlight to stay on.
1. Unlock the Touch Screen bysliding the Slide icon up tounlock or press the Unlock Key( ) on the right side of yourphone and touch the MenuTouch Soft Key .
2. Touch the Settings icon .
3. Touch Display Settings.
4. Touch Backlight.
5. Touch a Backlight setting.7 Seconds/ 15 Seconds/ 30Seconds/ 1 Minute
OK
DONE

103
4.4 WallpaperAllows you to choose the kind ofbackground to be displayed on thephone. The possibilities areendless, but Fun Animations, inparticular, provide you withanimated screens for yourbackground wallpaper.
1. Unlock the Touch Screen bysliding the Slide icon up tounlock or press the Unlock Key( ) on the right side of yourphone and touch the MenuTouch Soft Key .
2. Touch the Settings icon .
3. Touch Display Settings.
4. Touch Wallpaper.
5. Touch a submenu.My Pictures/ My Videos/ FunAnimations
6. Touch your choice, then touchSelect, Set or the FunAnimation to select it.
NOTE When selecting a picture, touchthe Adjust touch key toadjust placement and/ or zoom.
4.5 Charging ScreenAllows you to set a screensaver forthe LCD to prevent others fromseeing your personal phoneinformation while it's charging.
1. Unlock the Touch Screen bysliding the Slide icon up tounlock or press the Unlock Key( ) on the right side of yourphone and touch the MenuTouch Soft Key .
2. Touch the Settings icon .
3. Touch Display Settings.
4. Touch Charging Screen.
5. Touch a setting.No Image/ Desk Clock/Calendar
4.6 Display ThemesAllows you to choose betweendifferent themes for the phone'smenus.
1. Unlock the Touch Screen bysliding the Slide icon up tounlock or press the Unlock Key( ) on the right side of yourphone and touch the MenuTouch Soft Key .
2. Touch the Settings icon .
ADJUST

104
Settings
3. Touch Display Settings.
4. Touch Display Themes.
5. Touch a setting.Hi-Fi/ Shooting Star
4.7 FontsAllows you to set menu fonts.
1. Unlock the Touch Screen bysliding the Slide icon up tounlock or press the Unlock Key( ) on the right side of yourphone and touch the MenuTouch Soft Key .
2. Touch the Settings icon .3. Touch Display Settings.4. Place your finger on the Touch
Screen and apply gentle upwardpressure to scroll the list up,then touch Fonts.
5. Touch a setting.VZW Font/ LG Serif/ LG Joy
4.8 Dial FontsAllows you to set the dial font size.This setting is helpful for thosewho need the text to display a littlebit larger.
1. Unlock the Touch Screen bysliding the Slide icon up to
unlock or press the Unlock Key( ) on the right side of yourphone and touch the MenuTouch Soft Key .
2. Touch the Settings icon .
3. Touch Display Settings.
4. Place your finger on the TouchScreen and apply gentle upwardpressure to scroll the list up,then touch Dial Fonts.
5. Touch a setting.Normal/ Large
4.9 Clock Format1. Unlock the Touch Screen by
sliding the Slide icon up tounlock or press the Unlock Key( ) on the right side of yourphone and touch the MenuTouch Soft Key .
2. Touch the Settings icon .
3. Touch Display Settings.
4. Place your finger on the TouchScreen and apply gentle upwardpressure to scroll the list up,then touch Clock Format.
5. Touch a setting.
Normal/ Analog/ Digital 12/

105
Large Digital 12/ Digital 24/Large Digital 24/ Dual/ Off
NOTE On the Standby screen, you cantouch and drag the clock to adifferent location on the TouchScreen.
4.10 Shortcut Bin
Displays or hides the Shortcut icon ( ) on the Standby Screen.
1. Unlock the Touch Screen bysliding the Slide icon up tounlock or press the Unlock Key( ) on the right side of yourphone and touch the MenuTouch Soft Key .
2. Touch the Settings icon .
3. Touch Display Settings.
4. Place your finger on the TouchScreen and apply gentle upwardpressure to scroll the list up,then touch Shortcut Bin totoggle the setting.
On/ Off
NOTE On the Standby screen, you canchange the vertical placement ofthe Shortcut Bin Touch Key bytouching and dragging it.
4.11 Music Handle
Displays or hides the Music shortcuticon ( ) on the Standby Screen.1. Unlock the Touch Screen by
sliding the Slide icon up tounlock or press the Unlock Key( ) on the right side of yourphone and touch the MenuTouch Soft Key .
2. Touch the Settings icon .
3. Touch Display Settings.
4. Place your finger on the TouchScreen and apply gentle upwardpressure to scroll the list up,then touch Music Handle totoggle the setting.
On/ Off
NOTE On the Standby screen, you canchange the vertical placement ofthe Music Handle Touch Key bytouching and dragging it.
5. Touch SettingsAllows you to customize the settingsfor your phone's Touch Screen.
1. Unlock the Touch Screen bysliding the Slide icon up tounlock or press the Unlock Key

106
Settings
( ) on the right side of yourphone and touch the MenuTouch Soft Key .
2. Touch the Settings icon .
3. Touch Touch Settings.
4. The following options areavailable to customize the TouchSettings:
Auto Lock On / Off
Vibrate Type Short / Double /Long
Vibrate Level Off / Low /Medium / High
Vibrate Effect On/ Off
Sound Wood Block/Percussion/ Clean/ Echo/ Off
Calibration
6. Phone SettingsThe Phone Settings Menu allowsyou to designate specific settings tocustomize how you use your phone.
6.1 Airplane Mode Turns off all wireless communications.This feature allows you to use thephone when radio transmission isrestricted. When in Airplane Mode,services using the Location On
functionality (such as Chaperone)will not function completely.
1. Unlock the Touch Screen bysliding the Slide icon up tounlock or press the Unlock Key( ) on the right side of yourphone and touch the MenuTouch Soft Key .
2. Touch the Settings icon .
3. Touch Phone Settings.
4. Touch Airplane Mode.
5. Touch a setting.On/ Off
6.2 Voice Commands
Allows you to set Voice Commandsettings.
1. Unlock the Touch Screen bysliding the Slide icon up tounlock or press the Unlock Key( ) on the right side of yourphone and touch the MenuTouch Soft Key .
2. Touch the Settings icon .
3. Touch Phone Settings.
4. Touch Voice Commands and usethe following options toconfigure Voice Command:

107
Confirm Choices Automatic/Always Confirm/ Never ConfirmSensitivity More Sensitive/Automatic/ Less SensitiveAdapt Voice Train Digits/ TrainWordsPrompt Mode Prompts/Readout + Alerts/ Readout/Tones OnlyAudio Playback Speakerphone/EarpiecePrompt Timeout 5 seconds/ 10secondsCLR Key Activation On/ OffInfo
6.3 LanguageAllows you to use the bilingual(English or Spanish) featureaccording to your preference.
1. Unlock the Touch Screen bysliding the Slide icon up tounlock or press the Unlock Key( ) on the right side of yourphone and touch the MenuTouch Soft Key .
2. Touch the Settings icon .
3. Touch Phone Settings.
4. Touch Language.
5. Touch a setting.
English/ Español
6.4 LocationAllows you to turn On or Off theLocation function on your phone.If set to On, location-basedservices are able to access yourGPS (Global Positioning System)satellite-assisted locationinformation.
1. Unlock the Touch Screen bysliding the Slide icon up tounlock or press the Unlock Key( ) on the right side of yourphone and touch the MenuTouch Soft Key .
2. Touch the Settings icon .
3. Touch Phone Settings.
4. Touch Location.
5. Touch a setting.Location On/ E911 Only
NOTES• GPS satellite signals are not always
received by the phone under badatmospheric and environmentalconditions, indoors, etc.
• When the Location Lock setting isactivated in the Security Menu, the lockcode is required to enter the Locationmenu. The lock code is the same 4 digits
108
Settings
you use as your device lock code; bydefault it is the last 4 digits of yourphone number.
• When in Airplane Mode, servicessupporting Location On functionality(such as Chaperone) will not functioncompletely.
6.5 Current CountryThe Current Country menu allowsyou to change the phone settingsto reflect the Country where youare currently located.
1. Unlock the Touch Screen bysliding the Slide icon up tounlock or press the Unlock Key( ) on the right side of yourphone and touch the MenuTouch Soft Key .
2. Touch the Settings icon .
3. Touch Phone Settings.
4. Touch Current Country.
5. Touch a desired country.
6.6 SecurityThe Security menu allows you tosecure the phone electronically.
1. Unlock the Touch Screen bysliding the Slide icon up tounlock or press the Unlock Key( ) on the right side of your
phone and touch the MenuTouch Soft Key .
2. Touch the Settings icon .3. Touch Phone Settings.4. Place your finger on the Touch
Screen and apply gentle upwardpressure to scroll the list up,then touch Security.
5. Enter the four-digit lock code.By default, the lock code is thelast 4 digits of your mobilephone number if it is set. Thelock code is the last 4 digits ofyour MEID if your mobile phonenumber is not set.
6.6.1 Edit Codes
Allows you to enter a new four-digit lock code.
1. Unlock the Touch Screen bysliding the Slide icon up tounlock or press the Unlock Key( ) on the right side of yourphone and touch the MenuTouch Soft Key .
2. Touch the Settings icon .
3. Touch Phone Settings.
4. Place your finger on the TouchScreen and apply gentle upward

109
pressure to scroll the list up,then touch Security.
5. Enter the four-digit lock code.
6. Touch Edit Codes.
7. Touch Phone Only or Calls &Services, then enter your newlock code. Enter it again toconfirm it.
6.6.2 Restrictions
Allows you to set separate restrictionsfor Location Setting, Calls, Messages,and Dial Up Modem.
1. Unlock the Touch Screen bysliding the Slide icon up tounlock or press the Unlock Key( ) on the right side of yourphone and touch the MenuTouch Soft Key .
2. Touch the Settings icon .
3. Touch Phone Settings.4. Place your finger on the Touch
Screen and apply gentle upwardpressure to scroll the list up,then touch Security.
5. Enter the four-digit lock code.6. Touch Restrictions.7. Enter the four-digit PIN code.
8. Touch a Restrictions submenu,then the setting.Location Setting Lock Setting/Unlock SettingIncoming Calls Allow All/Contacts Only/ Block AllOutgoing Calls Allow All/Contacts Only/ Block AllIncoming Messages Allow All/Block AllOutgoing Messages Allow All/Block AllDial-up Modem Allow All/ BlockAll
6.6.3 Phone Lock
Keeps your phone fromunauthorized use. Once the phoneis locked, it's in restricted modeuntil the lock code is entered. Youcan receive phone calls and stillmake emergency calls. You canmodify the Phone Only lock codeusing the Edit Codes submenuwithin the Security menu.
1. Unlock the Touch Screen bysliding the Slide icon up tounlock or press the Unlock Key( ) on the right side of yourphone and touch the MenuTouch Soft Key .

110
Settings
2. Touch the Settings icon .
3. Touch Phone Settings.
4. Place your finger on the TouchScreen and apply gentle upwardpressure to scroll the list up,then touch Security.
5. Enter the four-digit lock code.
6. Touch Phone Lock.
7. Touch a setting.
Unlocked The phone is notlocked (Lock mode can beused). On Power Up The phone islocked when it is turned on.
6.6.4 Lock Phone Now
Allows you to quickly lock thephone.
1. Unlock the Touch Screen bysliding the Slide icon up tounlock or press the Unlock Key( ) on the right side of yourphone and touch the MenuTouch Soft Key .
2. Touch the Settings icon .
3. Touch Phone Settings.
4. Place your finger on the Touch
Screen and apply gentle upwardpressure to scroll the list up,then touch Security.
5. Enter the four-digit lock code.
6. Touch Lock Phone Now.
6.6.5 Reset Default
Allows you to reset your phone tothe factory default settings.
1. Unlock the Touch Screen bysliding the Slide icon up tounlock or press the Unlock Key( ) on the right side of yourphone and touch the MenuTouch Soft Key .
2. Touch the Settings icon .
3. Touch Phone Settings.
4. Place your finger on the TouchScreen and apply gentle upwardpressure to scroll the list up,then touch Security.
5. Enter the four-digit lock code.
6. Touch Reset Default.
7. After reading the warningmessage, touch the OK touchkey .
8. Touch Revert.
OK
111
A confirmation message isdisplayed briefly before thephone resets itself.
6.6.6 Restore Phone
Allows you to erase all user dataand Contact information you'veentered in the phone's memory soit's as if it just left the factory.
1. Unlock the Touch Screen bysliding the Slide icon up tounlock or press the Unlock Key( ) on the right side of yourphone and touch the MenuTouch Soft Key .
2. Touch the Settings icon .
3. Touch Phone Settings.
4. Place your finger on the TouchScreen and apply gentle upwardpressure to scroll the list up,then touch Security.
5. Enter the four-digit lock code.
6. Touch Restore Phone.
7. After reading the warningmessage, touch the OK touchkey .
8. Enter the four-digit lock code.
6.7 System SelectAllows you to set up the phonemanagement environment. Leavethis setting as the default unlessyou want to alter system selectionas instructed by your serviceprovider.
1. Unlock the Touch Screen bysliding the Slide icon up tounlock or press the Unlock Key( ) on the right side of yourphone and touch the MenuTouch Soft Key .
2. Touch the Settings icon .
3. Touch Phone Settings.
4. Place your finger on the TouchScreen and apply gentle upwardpressure to scroll the list up,then touch System Select.
5. Touch a setting.
Home Only : You canmake/receive calls in your homenetwork only.
Automatic A/ Automatic B: Youcan make/receive calls in eitheryour home or roam network.Roaming rates may apply whennot in the home service area.
OK

112
Settings
6.8 NAM SelectAllows you to select the phone’sNAM (Number AssignmentModule) if the phone is registeredwith multiple service providers.
1. Unlock the Touch Screen bysliding the Slide icon up tounlock or press the Unlock Key( ) on the right side of yourphone and touch the MenuTouch Soft Key .
2. Touch the Settings icon .
3. Touch Phone Settings.
4. Place your finger on the TouchScreen and apply gentle upwardpressure to scroll the list up,then touch NAM Select.
5. Touch a setting.
NAM1/ NAM2
7. Call SettingsThe Call Settings Menu allows youto designate how the phonehandles both incoming andoutgoing calls.
7.1 Answer OptionsAllows you to determine how thephone will answer an incoming call.
1. Unlock the Touch Screen bysliding the Slide icon up tounlock or press the Unlock Key( ) on the right side of yourphone and touch the MenuTouch Soft Key .
2. Touch the Settings icon .
3. Touch Call Settings.
4. Touch Answer Options.
5. Touch the setting(s) you want.
Any Key/ Auto with Handsfree
6. Touch the Done touch key.
7.2 Show DialpadThis options allows you to choosewhen a dialpad should be displayedwhen a call is placed.
1. Unlock the Touch Screen bysliding the Slide icon up tounlock or press the Unlock Key( ) on the right side of yourphone and touch the MenuTouch Soft Key .
2. Touch the Settings icon .
3. Touch Call Settings.
4. Touch Show Dialpad.
5. Touch the setting(s) you want.
DONE

113
Voicemail/Toll-free/ All Calls/Customized Number
6. Touch the Done touch key.
7.3 Auto RetryAllows you to set the length oftime the phone waits beforeautomatically redialing a numberwhen the attempted call fails.
1. Unlock the Touch Screen bysliding the Slide icon up tounlock or press the Unlock Key( ) on the right side of yourphone and touch the MenuTouch Soft Key .
2. Touch the Settings icon .3. Touch Call Settings.4. Touch Auto Retry.5. Touch a setting.
Off/ Every 10 Seconds/ Every30 Seconds/ Every 60Seconds
7.4 TTY ModeAllows you to attach a TTY deviceenabling you to communicate withparties also using a TTY device. Aphone with TTY support is able totranslate typed characters to voice.Voice can also be translated intocharacters and then displayed onthe TTY.
DONE
Menu User Feature Transmission/Receiving Mode
When makingcommunications with a
normal terminal
TTY FullFor hearing-/
verbally-impaired
text message transmission,text message receiving
Operator required
TTY +Talk
For hearing-impaired
able totalk
voice transmission, textmessage receiving
Operator required
TTY +Hear
For verbally-impaired
audible text message transmission,voice receiving
Operator required
TTY Off voice transmission, voicereceiving
TTY Mode (Tele Type writer)

114
Settings
1. Unlock the Touch Screen bysliding the Slide icon up tounlock or press the Unlock Key( ) on the right side of yourphone and touch the MenuTouch Soft Key .
2. Touch the Settings icon .
3. Touch Call Settings.
4. Touch TTY Mode.
5. Touch a setting.
TTY Full/ TTY + Talk/ TTY +Hear/ TTY Off
TTY Full:
- Users who cannot talk andhear can send and receive atext message through TTYequipment.
TTY + Talk:
- Users who can talk but cannothear receive a text message andsend voice through TTYequipment.
TTY + Hear:
- Users who can hear but cannottalk send a text message andreceive voice through TTYequipment.
TTY Off:
- Users communicate withoutTTY equipment.
Connecting TTY Equipment and aTerminal
1. Connect the TTY terminal tothe phone using a TTY cable.(Use the headset jack toconnect to the phone.)
2. Enter the phone's Call SettingsMenu menu and set the desiredTTY mode.
3. After setting a TTY mode, checkthe phone's LCD screen for theTTY icon.
4. Connect the TTY equipment tothe power source and turn it on.
5. Make a phone connection tothe desired number.
6. When connection is made, usethe TTY equipment to type inand send a text message orsend voice.
7. The voice or text message fromthe receiver end displays on theTTY equipment display.

115
7.5 One Touch DialAllows you to initiate a speed dialcall by touching and holding thespeed dial digit on the dialpad. Ifset to Off, designated Speed Dialnumbers will not function.
1. Unlock the Touch Screen bysliding the Slide icon up tounlock or press the Unlock Key( ) on the right side of yourphone and touch the MenuTouch Soft Key .
2. Touch the Settings icon .
3. Touch Call Settings.
4. Touch One Touch Dial totoggle the setting.
On/ Off
7.6 Voice PrivacyAllows you to set the voice privacyfeature for CDMA calls. CDMAtechnology already offers inherentvoice privacy. Check with yourservice provider for availability.
1. Unlock the Touch Screen bysliding the Slide icon up tounlock or press the Unlock Key( ) on the right side of yourphone and touch the Menu
Touch Soft Key .
2. Touch the Settings icon .
3. Touch Call Settings.
4. Touch Voice Privacy to togglethe setting.
On/ Off
7.7 DTMF TonesAllows you to set the DTMF tonelength.
1. Unlock the Touch Screen bysliding the Slide icon up tounlock or press the Unlock Key( ) on the right side of yourphone and touch the MenuTouch Soft Key .
2. Touch the Settings icon .
3. Touch Call Settings.
4. Place your finger on the TouchScreen and apply gentle upwardpressure to scroll the list up,then touch DTMF Tones.
5. Touch a setting.Normal/ Long
7.8 Assisted DialingAllows easy dialing of internationalcalls while roaming in another

116
Settings
country. If set to On, Assisted Dialingis displayed in calling screen.
1. Unlock the Touch Screen bysliding the Slide icon up tounlock or press the Unlock Key( ) on the right side of yourphone and touch the MenuTouch Soft Key .
2. Touch the Settings icon .
3. Touch Call Settings.
4. Place your finger on the TouchScreen and apply gentle upwardpressure to scroll the list up,then touch Assisted Dialing.
5. Touch Assisted Dialing to togglethe setting. On/ Off
6. Touch Reference Country thenscroll through the list to find thecountry you want.
7. Touch the Set icon next to theselected country to edit and savethe Country code, IDD Prefix(International Direct Dial), NDDPrefix, Area/City Code andLength(Length of Phone Number),then touch the Save touch key
to set.
NOTE For example: A device in China is tryingto reach a U.S. number, 201-555-5555(Reference Country is U.S.A.) replace"+" code with IDD prefix for China.User Enters: +1-201-555-5555,Assisted Dialing: 00-1-201-555-5555
8. USB Auto DetectionAllows you to set up how yourphone behaves when a USBconnection is made. The optionsfor your phone are Media SyncMode, Modem Mode or Ask OnPlug. If the option is set to Ask OnPlug, you are asked to confirmwhenever the connection is made. 1. Unlock the Touch Screen by
sliding the Slide icon up tounlock or press the Unlock Key( ) on the right side of yourphone and touch the MenuTouch Soft Key .
2. Touch the Settings icon .3. Place your finger on the Touch
Screen and apply gentle upwardpressure to scroll the list up,then touch USB AutoDetection.
4. Touch a setting.Media Sync Mode/ ModemMode/ Ask On Plug
SAVE

117
9. MemoryAllows you to set your phone's SaveOptions. Also allows you to checkyour Chocolate® TOUCH internalphone memory as well as themicroSDTM external memory.
The Chocolate® TOUCH can accessthe following file types stored onthe removable microSDTM card.
My Pictures: png, jpg, bmp, gifMy Videos: 3gp, 3g2, wmv (fileswith DRM protection may not play)My Ringtones: mid, midi, qcp, pmd,mp4, aac, mp3, wav, amr My Music: wma, mp3, m4aMy Sounds: mid, qcp, midi, aac,mp3, wav, amrMy Contacts: vcf
9.1 Save OptionsAllows you to select which memory(phone or memory card) to use tosave your files.1. Unlock the Touch Screen by
sliding the Slide icon up tounlock or press the Unlock Key( ) on the right side of yourphone and touch the MenuTouch Soft Key .
2. Touch the Settings icon .
3. Place your finger on the TouchScreen and apply gentle upwardpressure to scroll the list up,then touch Memory.
4. Touch Save Options.5. Touch Pictures/ Videos/
Sounds/ Ringtones.6. Touch Phone Memory/ Card
Memory.
9.2 Phone MemoryShows the memory usageinformation for the phone and liststhe files, by type.1. Unlock the Touch Screen by
sliding the Slide icon up tounlock or press the Unlock Key( ) on the right side of yourphone and touch the MenuTouch Soft Key .
2. Touch the Settings icon .3. Place your finger on the Touch
Screen and apply gentle upwardpressure to scroll the list up,then touch Memory.
4. Touch Phone Memory.5. Touch Memory Usage/ My
Pictures/ My Videos/ MyRingtones/ My Music/ MySounds/ My Contacts/ MoveAll To Card.
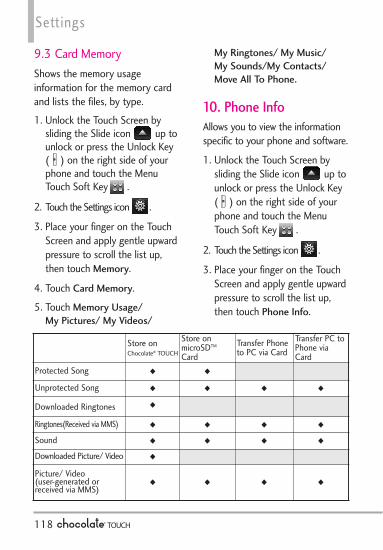
118
Settings
9.3 Card MemoryShows the memory usageinformation for the memory cardand lists the files, by type.1. Unlock the Touch Screen by
sliding the Slide icon up tounlock or press the Unlock Key( ) on the right side of yourphone and touch the MenuTouch Soft Key .
2. Touch the Settings icon .
3. Place your finger on the TouchScreen and apply gentle upwardpressure to scroll the list up,then touch Memory.
4. Touch Card Memory.
5. Touch Memory Usage/My Pictures/ My Videos/
My Ringtones/ My Music/My Sounds/My Contacts/Move All To Phone.
10. Phone InfoAllows you to view the informationspecific to your phone and software.
1. Unlock the Touch Screen bysliding the Slide icon up tounlock or press the Unlock Key( ) on the right side of yourphone and touch the MenuTouch Soft Key .
2. Touch the Settings icon .
3. Place your finger on the TouchScreen and apply gentle upwardpressure to scroll the list up,then touch Phone Info.
Store on Chocolate® TOUCH
Store onmicroSDTM
CardTransfer Phoneto PC via Card
Transfer PC toPhone viaCard
Protected Song W W
Unprotected Song W W W W
Downloaded Ringtones W
Ringtones(Received via MMS) W W W W
Sound W W W W
Downloaded Picture/ Video W
Picture/ Video (user-generated orreceived via MMS)
W W W W

119
10.1 My NumberAllows you to view your phonenumber.
1. Unlock the Touch Screen bysliding the Slide icon up tounlock or press the Unlock Key( ) on the right side of yourphone and touch the MenuTouch Soft Key .
2. Touch the Settings icon .
3. Place your finger on the TouchScreen and apply gentle upwardpressure to scroll the list up,then touch Phone Info.
4. Touch My Number.
10.2 SW/HW VersionAllows you to view the versions ofvarious applications such as SW,PRL, ERI, Browser, Media Center,AVR, MMS, Bluetooth, MSUI, HW,MEID Version, OTADM Version,and Warranty Date Code.
1. Unlock the Touch Screen bysliding the Slide icon up tounlock or press the Unlock Key( ) on the right side of yourphone and touch the MenuTouch Soft Key .
2. Touch the Settings icon .
3. Place your finger on the TouchScreen and apply gentle upwardpressure to scroll the list up,then touch Phone Info.
4. Touch SW/HW Version.
10.3 Icon Glossary
Allows you to view all the icons andtheir meanings.1. Unlock the Touch Screen by
sliding the Slide icon up tounlock or press the Unlock Key( ) on the right side of yourphone and touch the MenuTouch Soft Key .
2. Touch the Settings icon .
3. Place your finger on the TouchScreen and apply gentle upwardpressure to scroll the list up,then touch Phone Info.
4. Touch Icon Glossary.
10.4 Software UpdateThis feature gives your device theability to upgrade to the latestsoftware and keeps it operatingwith the latest features, all withouthaving to visit a Verizon WirelessCommunications Store for theupgrade.

Settings
1. Unlock the Touch Screen bysliding the Slide icon up tounlock or press the Unlock Key( ) on the right side of yourphone and touch the MenuTouch Soft Key .
2. Touch the Settings icon .
3. Place your finger on the TouchScreen and apply gentle upwardpressure to scroll the list up,then touch Phone Info.
4. Touch Software Update.
5. Touch Status.
Touch Status to see the status of adownload or update and seeinformation on the last successfulupdate. If updates have not yetbeen performed, status informationwill be unavailable.
11. Set-Up Wizard
This Set-Up Wizard menu will guideyou through the most commonlyused personalization options. Thisway you can set your phone upquickly and easily.
1. Unlock the Touch Screen bysliding the Slide icon up tounlock or press the Unlock Key( ) on the right side of yourphone and touch the MenuTouch Soft Key .
2. Touch the Settings icon .
3. Place your finger on the TouchScreen and apply gentle upwardpressure to scroll the list up,then touch Set-Up Wizard.
4. Follow the screen prompts to setyour phone settings.
120

TIA Safety InformationThe following is the complete TIASafety Information for wirelesshandheld phones.
Exposure to Radio FrequencySignal
Your wireless handheld portablephone is a low power radiotransmitter and receiver. When ON,it receives and sends out RadioFrequency (RF) signals.
In August, 1996, the FederalCommunications Commissions(FCC) adopted RF exposureguidelines with safety levels forhandheld wireless phones. Thoseguidelines are consistent with thesafety standards previously set byboth U.S. and internationalstandards bodies:
ANSI C95.1 (1992) *
NCRP Report 86 (1986)
ICNIRP (1996)* American National StandardsInstitute; National Council onRadiation Protection andMeasurements; InternationalCommission on Non-Ionizing
Radiation Protection
Those standards were based oncomprehensive and periodicevaluations of the relevant scientificliterature. For example, over 120scientists, engineers, and physiciansfrom universities, governmenthealth agencies, and industryreviewed the available body ofresearch to develop the ANSIStandard (C95.1).The design of your phonecomplies with the FCCguidelines (and thosestandards).
Antenna Care
Use only the supplied or anapproved replacement antenna.Unauthorized antennas,modifications, or attachments coulddamage the phone and may violateFCC regulations.
Phone Operation
NORMAL POSITION: Hold thephone as you would any othertelephone with the antenna pointedup and over your shoulder.
Safety
121

122
Tips on Efficient Operation
For your phone to operate mostefficiently:
Don’t touch the antennaunnecessarily when the phone is inuse. Contact with the antennaaffects call quality and may causethe phone to operate at a higherpower level than otherwise needed.
Driving
Check the laws and regulations onthe use of wireless phones in theareas where you drive and alwaysobey them. Also, if using yourphone while driving, please observethe following:
l Give full attention to driving --driving safely is your firstresponsibility;
l Use hands-free operation, ifavailable;
l Pull off the road and park beforemaking or answering a call ifdriving conditions or the lawrequire it.
Electronic Devices
Most modern electronic equipmentis shielded from RF signals.
However, certain electronicequipment may not be shieldedagainst the RF signals from yourwireless phone.
Pacemakers
The Health Industry ManufacturersAssociation recommends that aminimum separation of six (6)inches be maintained between ahandheld wireless phone and apacemaker to avoid potentialinterference with the pacemaker.These recommendations areconsistent with the independentresearch by and recommendationsof Wireless Technology Research.Persons with pacemakers:l Should ALWAYS keep the phone
more than six (6) inches fromtheir pacemaker when thephone is turned ON;
l Should not carry the phone in abreast pocket;
l Should use the ear opposite thepacemaker to minimize thepotential for interference;
l Should turn the phone OFFimmediately if there is anyreason to suspect thatinterference is taking place.
Safety
123
Hearing Aids
Some digital wireless phones mayinterfere with some hearing aids. Inthe event of such interference, youmay want to consult your serviceprovider (or call the customerservice line to discuss alternatives).
Other Medical Devices andHealth Care Facilities
If you use any other personalmedical device, consult themanufacturer of your device todetermine if it is adequatelyshielded from the external RFenergy. Your physician may be ableto assist you in obtaining thisinformation.
Turn your phone OFF in healthcare facilities when any regulationsposted in these areas instruct youto do so. Hospitals or health carefacilities may use equipment thatcould be sensitive to the externalRF energy.
Vehicles
RF signals may affect improperlyinstalled or inadequately shieldedelectronic systems in motor
vehicles. Check with themanufacturer or its representativeregarding your vehicle. You shouldalso consult the manufacturer ofany equipment that has beenadded to your vehicle.
Aircraft
FCC regulations prohibit usingyour phone while in the air. SwitchOFF your phone before boardingan aircraft.
Blasting Areas
To avoid interfering with blastingoperations, turn your phone OFFwhen in a “blasting area” or inareas posted: “Turn off two-wayradio”. Obey all signs andinstructions.
Potentially Explosive Atmosphere
Turn your phone OFF when in anyarea with a potentially explosiveatmosphere and obey all signs andinstructions. Sparks in such areascould cause an explosion or fireresulting in bodily injury or evendeath.
Areas with a potentially explosive

124
Safety
atmosphere are often, but notalways marked clearly. Potentialareas may include: fueling areas(such as gasoline stations); belowdeck on boats; fuel or chemicaltransfer or storage facilities;vehicles using liquefied petroleumgas (such as propane or butane);areas where the air containschemicals or particles (such asgrain, dust, or metal powders); andany other area where you wouldnormally be advised to turn offyour vehicle engine.
For Vehicles Equipped with an AirBag
An air bag inflates with great force.DO NOT place objects, includingeither installed or portable wirelessequipment, in the area over the airbag or in the air bag deploymentarea. If in-vehicle wirelessequipment is improperly installedand the air bag inflates, seriousinjury could result.
Safety InformationPlease read and observe thefollowing information for safe andproper use of your phone and to
prevent damage. Also, keep theuser guide in an accessible place atall times after reading it.
Violation of theinstructions may
cause minor or serious damageto the product.
l Do not disassemble or opencrush, bend or deform, punctureor shred.
l Do not modify orremanufacture, attempt to insertforeign objects into the battery,immerse or expose to water orother liquids, expose to fire,explosion or other hazard.
l Only use the battery for thesystem for which it is specified.
l Only use the battery with acharging system that has beenqualified with the system perthis standard. Use of anunqualified battery or chargermay present a risk of fire,explosion, leakage, or otherhazard.
l Do not short circuit a battery orallow metallic conductive objectsto contact battery terminals.
l Replace the battery only with
Caution

125
another battery that has beenqualified with the system perthis standard, IEEE-Std-1725-200x. Use of an unqualifiedbattery may present a risk offire, explosion, leakage or otherhazard.
l Promptly dispose of usedbatteries in accordance withlocal regulations.
l Battery usage by children shouldbe supervised.
l Avoid dropping the phone orbattery. If the phone or batteryis dropped, especially on a hardsurface, and the user suspectsdamage, take it to a servicecenter for inspection.
l Improper battery use may resultin a fire, explosion or otherhazard.
l For those host devices thatutilize a USB port as a chargingsource, the host device's usermanual shall include a statementthat the phone shall only beconnected to products that bearthe USB-IF logo or havecompleted the USB-IFcompliance program.
Charger and Adapter Safetyl The charger and adapter are
intended for indoor use only.l Insert the battery pack charger
vertically into the wall powersocket.
l Only use the approved batterycharger. Otherwise, you maycause serious damage to yourphone.
l Use the correct adapter for yourphone when using the batterypack charger abroad.
Battery Information and Care
l Please read the manual forproper installation and removalof the battery.
l Please read the manual forspecified charger and chargingmethod.
l Do not damage the power cordby bending, twisting, or heating.Do not use the plug if it is looseas it may cause electric shock orfire.Do not place any heavy itemson the power cord. Do not allowthe power cord to be crimped asit may cause electric shock or fire.
126
Safety
l Unplug the power cord prior tocleaning your phone, and cleanthe power plug pin when it’sdirty. When using the powerplug, ensure that it’s firmlyconnected. If not, it may causeexcessive heat or fire. If you putyour phone in a pocket or bagwithout covering the receptacleof the phone (power plug pin),metallic articles (such as a coin,paperclip or pen) may short-circuit the phone. Always coverthe receptacle when not in use.
l Recharge the battery after longperiods of non-use to maximizebattery life. Battery life will varydue to usage pattern andenvironmental conditions.
l Please use only an approvedcharging accessory to chargeyour LG phone. Improperhandling of the charging port, aswell as the use of anincompatible charger, may causedamage to your phone and voidthe warranty.
l Never store your phone intemperatures less than -4°F orgreater than 122°F.
l Charging temperature range is
32°F and 113°F. Do not chargethe battery outside this range.Doing so may generate excessiveheat causing serious damage tothe battery deteriorating batterylife and/or other batterycharacteristics.
l Do not use or leave the batteryin direct sunlight or inside a hotcar. The battery may generateheat, smoke or flame, as well asdeteriorating battery life and/orother battery characteristics.
l The battery pack has aprotection circuit. Do not usenear places that can generatemore than 100V staticelectricity which could damagethe protection circuit. Damagedprotection circuits may rupture,smoke, or ignite.
l When using the battery for thefirst time, if it emits a bad smell,you see rust on it, or anythingelse abnormal, do not use theequipment. Return it to theplace where it was bought.
l If children are allowed to use thedevice battery, an adult isresponsible for teaching aboutthe safe handling and use of

127
batteries, as well as supervisingtheir proper use and care.
l Keep the battery away fromyoung children. Safeguard sothat small children do notremove the battery from thecharger or device.
l If liquid from the battery rubsagainst skin or clothing, rinsewith clean water. The batteryliquid could cause skin irritation.
l Do not handle the phone withwet hands while it is beingcharged. It may cause an electricshock or seriously damage yourphone.
l Do not place or answer callswhile charging the phone as itmay short-circuit the phoneand/or cause electric shock orfire.
l The charger and adapter areintended for indoor use only.
l Insert the battery pack chargervertically into the wall powersocket.
l Do not use harsh chemicals(such as alcohol, benzene,thinners, etc.) or detergents toclean your phone. This could
cause a fire. Do not place oranswer calls while charging thephone as it may short-circuit thephone and/or cause electricshock or fire. Don’t short-circuitthe battery. Metallic articlessuch as a coin, paperclip or penin your pocket or bag mayshort-circuit the + and –terminals of the battery (metalstrips on the battery) uponmoving. Short-circuit of theterminal may damage thebattery and cause an explosion.
l Never use and unapprovedbattery since this could damagethe phone and/or battery andcould cause the battery toexplode. Only use the batteriesand chargers provided by LG.The warranty will not be appliedto products provided by othersuppliers. Only authorizedpersonnel should service thephone and its accessories. Faultyinstallation or service may resultin accidents and consequentlyinvalidate the warranty.

128
Safety
Explosion, Shock, and FireHazards
l Do not put your phone in aplace subject to excessive dustand keep the minimum requireddistance between the powercord and heat sources.
l Unplug the power cord prior tocleaning your phone, and cleanthe power plug pin when it’s dirty.
l When using the power plug,ensure that it’s firmly connected.If not, it may cause excessiveheat or fire.
l If you put your phone in apocket or bag without coveringthe receptacle of the phone(power plug pin), metallicarticles (such as a coin,paperclip or pen) may short-circuit the phone. Always coverthe receptacle when not in use.
l Don’t short-circuit the battery.Metallic articles such as a coin,paperclip or pen in your pocketor bag may short-circuit the +and – terminals of the battery(metal strips on the battery)upon moving. Short-circuit ofthe terminal may damage thebattery and cause an explosion.
General Notice
l Using a damaged battery orplacing a battery in your mouthmay cause serious injury.
l Do not place items containingmagnetic components such as acredit card, phone card, bankbook, or subway ticket nearyour phone. The magnetism ofthe phone may damage the datastored in the magnetic strip.
l Talking on your phone for a longperiod of time may reduce callquality due to heat generatedduring use.
l When the phone is not used fora long period time, store it in asafe place with the power cordunplugged.
l Using the phone in proximity toreceiving equipment (i.e., TV orradio) may cause interference tothe phone.
l Do not use the phone if theantenna is damaged. If adamaged antenna contacts skin,it may cause a slight burn.Please contact an LG AuthorizedService Center to replace thedamaged antenna.

129
l Do not immerse your phone inwater. If this happens, turn it offimmediately and remove thebattery. If the phone does notwork, take it to an LGAuthorized Service Center.
l Do not paint your phone.l The data saved in your phone
might be deleted due to carelessuse, repair of the phone, orupgrade of the software. Pleasebackup your important phonenumbers. (Ringtones, textmessages, voice messages,pictures, and videos could alsobe deleted.) The manufacturer isnot liable for damage due to theloss of data.
l When you use the phone inpublic places, set the ringtoneto vibration so you don't disturbothers.
l Do not turn your phone on oroff when putting it to your ear.
l Use accessories, such asearphones and headsets, withcaution. Ensure that cables aretucked away safely and do nottouch the antenna unnecessarily.
Caution: Avoid potential hearingloss.Prolonged exposure to loud sounds(including music) is the mostcommon cause of preventablehearing loss. Some scientificresearch suggests that usingportable audio devices, such asportable music players and cellulartelephones, at high volume settingsfor long durations may lead topermanent noise induced hearingloss. This includes the use ofheadphones (including headsets,earbuds and Bluetooth® or otherwireless devices). Exposure to veryloud sound has also beenassociated in some studies withtinnitus (a ringing in the ear),hypersensitivity to sound anddistorted hearing. Individualsusceptibility to noise-inducedhearing loss and other potentialhearing problems varies.
The amount of sound produced bya portable audio device variesdepending on the nature of thesound, the device, the devicesettings and the headphones. Youshould follow some commonsense

130
Safety
recommendations when using anyportable audio device:
l Set the volume in a quietenvironment and select thelowest volume at which you canhear adequately.
l When using headphones, turnthe volume down if you cannothear the people speaking nearyou or if the person sitting nextto you can hear what you arelistening to.
l Do not turn the volume up toblock out noisy surroundings. Ifyou choose to listen to yourportable device in a noisyenvironment, use noise-cancellingheadphones to block outbackground environmental noise.
l Limit the amount of time youlisten. As the volume increases,less time is required before yourhearing could be affected.
l Avoid using headphones afterexposure to extremely loudnoises, such as rock concerts,that might cause temporaryhearing loss. Temporary hearingloss might cause unsafe volumesto sound normal.
l Do not listen at any volume thatcauses you discomfort. If youexperience ringing in your ears,hear muffled speech orexperience any temporaryhearing difficulty after listeningto your portable audio device,discontinue use and consultyour doctor.
You can obtain additionalinformation on this subject fromthe following sources:American Academy of Audiology
11730 Plaza American Drive, Suite300Reston, VA 20190Voice: (800) 222-2336Email: [email protected]: www.audiology.orgNational Institute on Deafness and
Other Communication Disorders
National Institutes of Health31 Center Drive, MSC 2320Bethesda, MD USA 20892-2320Voice: (301) 496-7243Email: [email protected]:http://www.nidcd.nih.gov/health/hearing

131
National Institute forOccupational Safety and Health
Hubert H. Humphrey Bldg.200 Independence Ave., SWWashington, DC 20201Voice: 1-800-35-NIOSH (1-800-356-4674)Internet:http://www.cdc.gov/niosh/topics/noise/default.html
FDA Consumer UpdateThe U.S. Food andDrug Administration’sCenter for Devices and
Radiological Health ConsumerUpdate on Mobile Phones:
1. Do wireless phones pose ahealth hazard?
The available scientific evidencedoes not show that any healthproblems are associated with usingwireless phones. There is no proof,however, that wireless phones areabsolutely safe. Wireless phonesemit low levels of Radio Frequency(RF) energy in the microwave rangewhile being used. They also emitvery low levels of RF when instandby mode. Whereas high levels
of RF can produce health effects(by heating tissue), exposure tolow level RF that does not produceheating effects causes no knownadverse health effects. Manystudies of low level RF exposureshave not found any biologicaleffects. Some studies havesuggested that some biologicaleffects may occur, but suchfindings have not been confirmedby additional research. In somecases, other researchers have haddifficulty in reproducing thosestudies, or in determining thereasons for inconsistent results.
2. What is the FDA's roleconcerning the safety of wirelessphones?
Under the law, the FDA does notreview the safety of radiation-emitting consumer products suchas wireless phones before they canbe sold, as it does with new drugsor medical devices. However, theagency has authority to take actionif wireless phones are shown toemit Radio Frequency (RF) energyat a level that is hazardous to theuser. In such a case, the FDA couldrequire the manufacturers of

132
Safety
wireless phones to notify users ofthe health hazard and to repair,replace, or recall the phones sothat the hazard no longer exists.
Although the existing scientificdata does not justify FDAregulatory actions, the FDA hasurged the wireless phone industryto take a number of steps,including the following:
l Support needed research intopossible biological effects of RFof the type emitted by wirelessphones;
l Design wireless phones in a waythat minimizes any RF exposureto the user that is not necessaryfor device function; and
l Cooperate in providing users ofwireless phones with the bestpossible information on possibleeffects of wireless phone use onhuman health.
The FDA belongs to an interagencyworking group of the federalagencies that have responsibilityfor different aspects of RF safety toensure coordinated efforts at thefederal level. The followingagencies belong to this workinggroup:
l National Institute forOccupational Safety and Health
l Environmental ProtectionAgency
l Occupational Safety and HealthAdministration
l National Telecommunicationsand Information Administration
The National Institutes of Healthparticipates in some interagencyworking group activities, as well.
The FDA shares regulatoryresponsibilities for wireless phoneswith the Federal CommunicationsCommission (FCC). All phones thatare sold in the United States mustcomply with FCC safety guidelinesthat limit RF exposure. The FCCrelies on the FDA and other healthagencies for safety questionsabout wireless phones.
The FCC also regulates the basestations that the wireless phonenetworks rely upon. While thesebase stations operate at higherpower than do the wireless phonesthemselves, the RF exposures thatpeople get from these basestations are typically thousands oftimes lower than those they can

133
get from wireless phones. Basestations are thus not the subject ofthe safety questions discussed inthis document.
3. What kinds of phones are thesubject of this update?
The term “wireless phone” refershere to handheld wireless phoneswith built-in antennas, often called“cell”, “mobile”, or “PCS” phones.These types of wireless phones canexpose the user to measurableRadio Frequency (RF) energybecause of the short distancebetween the phone and the user’shead.
These RF exposures are limited byFCC safety guidelines that weredeveloped with the advice of theFDA and other federal health andsafety agencies. When the phone islocated at greater distances fromthe user, the exposure to RF isdrastically lower because aperson's RF exposure decreasesrapidly with increasing distancefrom the source. The so-called“cordless phones,” which have abase unit connected to thetelephone wiring in a house,typically operate at far lower power
levels, and thus produce RFexposures far below the FCC safetylimits.
4. What are the results of theresearch done already?
The research done thus far hasproduced conflicting results, andmany studies have suffered fromflaws in their research methods.Animal experiments investigatingthe effects of Radio Frequency(RF) energy exposurescharacteristic of wireless phoneshave yielded conflicting results thatoften cannot be repeated in otherlaboratories. A few animal studies,however, have suggested that lowlevels of RF could accelerate thedevelopment of cancer inlaboratory animals. However, manyof the studies that showedincreased tumor development usedanimals that had been geneticallyengineered or treated with cancer-causing chemicals so as to be pre-disposed to develop cancer in theabsence of RF exposure. Otherstudies exposed the animals to RFfor up to 22 hours per day. Theseconditions are not similar to theconditions under which people use

134
Safety
wireless phones, so we do notknow with certainty what theresults of such studies mean forhuman health. Three largeepidemiology studies have beenpublished since December 2000.Between them, the studiesinvestigated any possibleassociation between the use ofwireless phones and primary braincancer, glioma, meningioma, oracoustic neuroma, tumors of thebrain or salivary gland, leukemia, orother cancers. None of the studiesdemonstrated the existence of anyharmful health effects from wirelessphone RF exposures. However,none of the studies can answerquestions about long-termexposures, since the average periodof phone use in these studies wasaround three years.
5. What research is needed todecide whether RF exposure fromwireless phones poses a healthrisk?
A combination of laboratorystudies and epidemiological studiesof people actually using wirelessphones would provide some of thedata that are needed. Lifetime
animal exposure studies could becompleted in a few years. However,very large numbers of animalswould be needed to providereliable proof of a cancerpromoting effect, if one exists.Epidemiological studies canprovide data that is directlyapplicable to human populations,but ten or more years follow-upmay be needed to provide answersabout some health effects, such ascancer. This is because the intervalbetween the time of exposure to acancer-causing agent and the timetumors develop — if they do —may be many, many years. Theinterpretation of epidemiologicalstudies is hampered by difficultiesin measuring actual RF exposureduring day-to-day use of wirelessphones. Many factors affect thismeasurement, such as the angle atwhich the phone is held, or whichmodel of phone is used.
6. What is the FDA doing to findout more about the possiblehealth effects of wireless phoneRF?
The FDA is working with the U.S.National Toxicology Program and

135
with groups of investigators aroundthe world to ensure that highpriority animal studies areconducted to address importantquestions about the effects ofexposure to Radio Frequency (RF)energy.
The FDA has been a leadingparticipant in the World HealthOrganization International ElectroMagnetic Fields (EMF) Projectsince its inception in 1996. Aninfluential result of this work hasbeen the development of adetailed agenda of research needsthat has driven the establishmentof new research programs aroundthe world. The project has alsohelped develop a series of publicinformation documents on EMFissues.
The FDA and the CellularTelecommunications & InternetAssociation (CTIA) have a formalCooperative Research AndDevelopment Agreement (CRADA)to do research on wireless phonesafety. The FDA provides thescientific oversight, obtaining inputfrom experts in government,industry, and academic
organizations. CTIA-fundedresearch is conducted throughcontracts with independentinvestigators. The initial researchwill include both laboratory studiesand studies of wireless phoneusers. The CRADA will also includea broad assessment of additionalresearch needs in the context ofthe latest research developmentsaround the world.
7. How can I find out how muchRadio Frequency energy exposure Ican get by using my wirelessphone?
All phones sold in the UnitedStates must comply with FederalCommunications Commission(FCC) guidelines that limit RadioFrequency (RF) energy exposures.The FCC established theseguidelines in consultation with theFDA and the other federal healthand safety agencies. The FCC limitfor RF exposure from wirelessphones is set at a SpecificAbsorption Rate (SAR) of 1.6watts per kilogram (1.6 W/kg). TheFCC limit is consistent with thesafety standards developed by theInstitute of Electrical and
136
Safety
Electronic Engineering (IEEE) andthe National Council on RadiationProtection and Measurement. Theexposure limit takes intoconsideration the body’s ability toremove heat from the tissues thatabsorb energy from the wirelessphone and is set well below levelsknown to have effects.Manufacturers of wireless phonesmust report the RF exposure levelfor each model of phone to theFCC. The FCC website(http://www.fcc.gov/oet/rfsafety)gives directions for locating theFCC identification number on yourphone so you can find yourphone’s RF exposure level in theonline listing.
8. What has the FDA done tomeasure the Radio Frequencyenergy coming from wirelessphones?
The Institute of Electrical andElectronic Engineers (IEEE) isdeveloping a technical standard formeasuring the Radio Frequency(RF) energy exposure from wirelessphones and other wirelesshandsets with the participationand leadership of FDA scientists
and engineers. The standard,“Recommended Practice forDetermining the Spatial-PeakSpecific Absorption Rate (SAR) inthe Human Body Due to WirelessCommunications Devices:Experimental Techniques”, setsforth the first consistent testmethodology for measuring therate at which RF is deposited in theheads of wireless phone users. Thetest method uses a tissue-simulating model of the humanhead. Standardized SAR testmethodology is expected to greatlyimprove the consistency ofmeasurements made at differentlaboratories on the same phone.SAR is the measurement of theamount of energy absorbed intissue, either by the whole body ora small part of the body. It ismeasured in watts/kg (ormilliwatts/g) of matter. Thismeasurement is used to determinewhether a wireless phone complieswith safety guidelines.
9. What steps can I take to reducemy exposure to Radio Frequencyenergy from my wireless phone?
If there is a risk from these

137
products — and at this point wedo not know that there is — it isprobably very small. But if you areconcerned about avoiding evenpotential risks, you can take a fewsimple steps to minimize yourexposure to Radio Frequency (RF)energy. Since time is a key factor inhow much exposure a personreceives, reducing the amount oftime spent using a wireless phonewill reduce RF exposure. If youmust conduct extendedconversations by wireless phoneevery day, you could place moredistance between your body andthe source of the RF, since theexposure level drops offdramatically with distance. Forexample, you could use a headsetand carry the wireless phone awayfrom your body or use a wirelessphone connected to a remoteantenna. Again, the scientific datadoes not demonstrate that wirelessphones are harmful. But if you areconcerned about the RF exposurefrom these products, you can usemeasures like those describedabove to reduce your RF exposurefrom wireless phone use.
10. What about children usingwireless phones?
The scientific evidence does notshow a danger to users of wirelessphones, including children andteenagers. If you want to take stepsto lower exposure to RadioFrequency (RF) energy, themeasures described above wouldapply to children and teenagersusing wireless phones. Reducingthe time of wireless phone use andincreasing the distance betweenthe user and the RF source willreduce RF exposure.
Some groups sponsored by othernational governments have advisedthat children be discouraged fromusing wireless phones at all. Forexample, the government in theUnited Kingdom distributedleaflets containing such arecommendation in December2000. They noted that noevidence exists that using awireless phone causes brain tumorsor other ill effects. Theirrecommendation to limit wirelessphone use by children was strictlyprecautionary; it was not based onscientific evidence that any healthhazard exists.

138
Safety
11. What about wireless phoneinterference with medicalequipment?
Radio Frequency (RF) energy fromwireless phones can interact withsome electronic devices. For thisreason, the FDA helped develop adetailed test method to measureElectro Magnetic Interference(EMI) of implanted cardiacpacemakers and defibrillators fromwireless telephones. This testmethod is now part of a standardsponsored by the Association forthe Advancement of MedicalInstrumentation (AAMI). The finaldraft, a joint effort by the FDA,medical device manufacturers, andmany other groups, was completedin late 2000. This standard willallow manufacturers to ensure thatcardiac pacemakers anddefibrillators are safe from wirelessphone EMI.
The FDA has tested hearing aidsfor interference from handheldwireless phones and helpeddevelop a voluntary standardsponsored by the Institute ofElectrical and Electronic Engineers(IEEE). This standard specifies test
methods and performancerequirements for hearing aids andwireless phones so that nointerference occurs when a personuses a “compatible” phone and a“compatible” hearing aid at thesame time. This standard wasapproved by the IEEE in 2000.
The FDA continues to monitor theuse of wireless phones for possibleinteractions with other medicaldevices. Should harmfulinterference be found to occur, theFDA will conduct testing to assessthe interference and work toresolve the problem.
12. Where can I find additionalinformation?
For additional information, pleaserefer to the following resources:
FDA web page on wireless phones(http://www.fda.gov/Radiation-EmittingProducts/RadiationEmittingProductsandProcedures/HomeBusinessandEntertainment/CellPhones/default.htm)
Federal CommunicationsCommission (FCC) RF SafetyProgram(http://www.fcc.gov/oet/rfsafety)

139
International Commission on Non-lonizing Radiation Protection(http://www.icnirp.de)
World Health Organization (WHO)International EMF Project(http://www.who.int/emf)
Health Protection Agency(http://www.hpa.org.uk/)
10 Driver Safety TipsYour wireless phone gives you thepowerful ability to communicate byvoice almost anywhere, anytime. Animportant responsibilityaccompanies the benefits ofwireless phones, one that everyuser must uphold.
When operating a car, driving isyour first responsibility. Whenusing your wireless phone behindthe wheel of a car, practice goodcommon sense and remember thefollowing tips:
1. Get to know your wirelessphone and its features such asspeed dial and redial. Carefullyread your instruction manualand learn to take advantage ofvaluable features most phonesoffer, including automatic redial
and memory. Also, work tomemorize the phone keypad soyou can use the speed dialfunction without taking yourattention off the road.
2. When available, use a hands-freedevice. A number of hands-freewireless phone accessories arereadily available today. Whetheryou choose an installedmounted device for yourwireless phone or a speakerphone accessory, takeadvantage of these devices ifavailable to you.
3. Make sure you place yourwireless phone within easy reachand where you can reach itwithout removing your eyesfrom the road. If you get anincoming call at an inconvenienttime, if possible, let yourVoicemail answer it for you.
4. Suspend conversations duringhazardous driving conditions orsituations. Let the person youare speaking with know you aredriving; if necessary, suspendthe call in heavy traffic orhazardous weather conditions.Rain, sleet, snow, and ice can be

140
Safety
hazardous, but so is heavytraffic. As a driver, your firstresponsibility is to pay attentionto the road.
5. Don’t take notes or look upphone numbers while driving. Ifyou are reading an address bookor business card, or writing a“to-do” list while driving a car,you are not watching where youare going. It is common sense.Do not get caught in adangerous situation becauseyou are reading or writing andnot paying attention to the roador nearby vehicles.
6. Dial sensibly and assess thetraffic; if possible, place callswhen you are not moving orbefore pulling into traffic. Try toplan your calls before you beginyour trip or attempt to coincideyour calls with times you may bestopped at a stop sign, red light,or otherwise stationary. But ifyou need to dial while driving,follow this simple tip -- dial onlya few numbers, check the roadand your mirrors, then continue.
7. Do not engage in stressful oremotional conversations that
may be distracting. Stressful oremotional conversations anddriving do not mix; they aredistracting and even dangerouswhen you are behind the wheelof a car. Make people you aretalking with aware you aredriving and if necessary, suspendconversations which have thepotential to divert yourattention from the road.
8. Use your wireless phone to callfor help. Your wireless phone isone of the greatest tools youcan own to protect yourself andyour family in dangeroussituations -- with your phone atyour side, help is only threenumbers away. Dial 911 or otherlocal emergency number in thecase of fire, traffic accident, roadhazard, or medical emergency.Remember, it’s a free call onyour wireless phone!
9. Use your wireless phone to helpothers in emergencies. Yourwireless phone provides you aperfect opportunity to be a“Good Samaritan” in yourcommunity. If you see an autoaccident, crime in progress or
141
other serious emergency wherelives are in danger, call 911 orother local emergency number,as you would want others to dofor you.
10. Call roadside assistance or aspecial wireless non-emergencyassistance number whennecessary. Certain situationsyou encounter while driving mayrequire attention, but are noturgent enough to merit a call foremergency services. But you canstill use your wireless phone tolend a hand. If you see abroken-down vehicle posing noserious hazard, a broken trafficsignal, a minor traffic accidentwhere no one appears injured ora vehicle you know to be stolen,call roadside assistance or otherspecial non-emergency wirelessnumber.
The above tips are meant asgeneral guidelines. Beforedeciding to use your mobiledevice while operating a vehicle,it is recommended that youconsult your applicablejurisdiction’s local laws or otherregulations regarding such use.
Such laws or other regulationsmay prohibit or otherwiserestrict the manner in which adriver may use his or her phonewhile operating a vehicle.
Consumer Information onSAR(Specific Absorption Rate)
This Model Phone Meets theGovernment’s Requirements forExposure to Radio Waves. Yourwireless phone is a radiotransmitter and receiver. It isdesigned and manufactured not toexceed the emission limits forexposure to radiofrequency (RF)energy set by the FederalCommunications Commission(FCC) of the U.S. Government.These FCC exposure limits arederived from the recommendationsof two expert organizations, theNational Counsel on RadiationProtection and Measurement(NCRP) and the Institute ofElectrical and Electronics Engineers(IEEE). In both cases, therecommendations were developedby scientific and engineeringexperts drawn from industry,

142
Safety
government, and academia afterextensive reviews of the scientificliterature related to the biologicaleffects of RF energy.
The exposure Limit for wirelessmobile phones employs a unit ofmeasurement known as the SpecificAbsorption Rate, or SAR. The SARis a measure of the rate ofabsorption of RF energy by thehuman body expressed in units ofwatts per kilogram (W/kg). TheFCC requires wireless phones tocomply with a safety limit of 1.6watts per kilogram (1.6 W/kg). TheFCC exposure limit incorporates asubstantial margin of safety to giveadditional protection to the publicand to account for any variationsin measurements.
Tests for SAR are conducted usingstandard operating positionsspecified by the FCC with thephone transmitting at its highestcertified power level in all testedfrequency bands. Although SAR isdetermined at the highest certifiedpower level, the actual SAR level ofthe phone while operating can bewell below the maximum value.Because the phone is designed to
operate at multiple power levels touse only the power required toreach the network, in general, thecloser you are to a wireless basestation antenna, the lower thepower output.
Before a phone model is availablefor sale to the public, it must betested and certified to the FCCthat it does not exceed the limitestablished by the government-adopted requirement for safeexposure. The tests are performedin positions and locations (e.g., atthe ear and worn on the body) asrequired by the FCC for eachmodel.
This device was tested for typicalbody-worn operations with theback of the phone kept 0.79inches (2.0 cm) between the user’sbody and the back of the phone.To comply with FCC RF exposurerequirements, a minimumseparation distance of 0.79 inches(2.0 cm) must be maintainedbetween the user s body and theback of the phone. Third-partybelt-clips, holsters, and similaraccessories containing metalliccomponents should not be used.
143
Body-worn accessories that cannotmaintain 0.79 inches (2.0 cm)separation distance between theuser's body and the back of thephone, and have not been testedfor typical body-worn operationsmay not comply with FCC RFexposure limits and should beavoided.
The FCC has granted anEquipment Authorization for thismodel phone with all reported SARlevels evaluated as in compliancewith the FCC RF emissionguidelines.
The highest SAR value for thismodel phone when tested for useat the ear is 1.46 W/kg and whenworn on the body, as described inthis user’s manual, is 0.790 W/kg.While there may be differencesbetween SAR levels of variousphones and at various positions,they all meet the governmentrequirement for safe exposure.
SAR information on this modelphone is on file with the FCC andcan be found under the DisplayGrant section ofhttp://www.fcc.gov/oet/ea/fccid/after searching on FCC ID.
To find information that pertains toa particular model phone, this siteuses the phone FCC ID numberwhich is usually printed somewhereon the case of the phone.Sometimes it may be necessary toremove the battery pack to find thenumber. Once you have the FCC IDnumber for a particular phone,follow the instructions on thewebsite and it should providevalues for typical or maximum SARfor a particular phone.
Additional information on SpecificAbsorption Rates (SAR) can befound on the CellularTelecommunications IndustryAssociation (CTIA) website athttp://www.ctia.org/
*In the United States and Canada,the SAR limit for mobile phonesused by the public is 1.6 watts/kg(W/kg) averaged over one gram oftissue. The standard incorporates asubstantial margin of safety to giveadditional protection for the publicand to account for any variationsin measurements.

144
Safety
FCC Hearing-AidCompatibility (HAC)Regulations for WirelessDevicesOn July 10, 2003, the U.S. FederalCommunications Commission(FCC) Report and Order in WTDocket 01-309 modified theexception of wireless phones underthe Hearing Aid Compatibility Actof 1988 (HAC Act) to requiredigital wireless phones becompatible with hearing-aids. Theintent of the HAC Act is to ensurereasonable access totelecommunications services forpersons with hearing disabilities.
While some wireless phones areused near some hearing devices(hearing aids and cochlearimplants), users may detect abuzzing, humming, or whiningnoise. Some hearing devices aremore immune than others to thisinterference noise, and phones alsovary in the amount of interferencethey generate.
The wireless telephone industryhas developed a rating system forwireless phones, to assist hearing
device users to find phones thatmay be compatible with theirhearing devices. Not all phoneshave been rated. Phones that arerated have the rating on their boxor a label located on the box.
The ratings are not guarantees.Results will vary depending on theuser's hearing device and hearingloss. If your hearing devicehappens to be vulnerable tointerference, you may not be ableto use a rated phone successfully.Trying out the phone with yourhearing device is the best way toevaluate it for your personal needs.
M-Ratings: Phones rated M3 orM4 meet FCC requirements andare likely to generate lessinterference to hearing devicesthan phones that are not labeled.M4 is the better/higher of the tworatings.T-Ratings: Phones rated T3 or T4meet FCC requirements and arelikely to generate less interferenceto hearing devices than phonesthat are not labeled. T4 is thebetter/higher of the two ratings.
Hearing devices may also be rated.Your hearing device manufacturer

145
or hearing health professional mayhelp you find this rating. Higherratings mean that the hearingdevice is relatively immune tointerference noise. The hearing aidand wireless phone rating values arethen added together. A sum of 5 isconsidered acceptable for normaluse. A sum of 6 is considered forbest use.
In the above example, if a hearingaid meets the M2 level rating andthe wireless phone meets the M3level rating, the sum of the twovalues equal M5. This should
provide the hearing aid user with“normal usage” while using theirhearing aid with the particularwireless phone. “Normal usage” inthis context is defined as a signalquality that’s acceptable for normaloperation.
The M mark is intended to besynonymous with the U mark. The Tmark is intended to be synonymouswith the UT mark. The M and Tmarks are recommended by theAlliance for TelecommunicationsIndustries Solutions (ATIS). The Uand UT marks are referenced inSection 20.19 of the FCC Rules.The HAC rating and measurementprocedure are described in theAmerican National StandardsInstitute (ANSI) C63.19 standard.
To enter that the Hearing AidCompatibility rating for your phoneis maintained, secondarytransmitters such as Bluetooth andWLAN(this phone does not haveWLAN) components must bedisabled during a call. See Page 95for instructions to disable thesecomponents.
M3 + M2 = 5
T3 + T2 = 5

Safety
146
For information about hearing aidsand digital wireless phones
Wireless Phones and Hearing AidAccessibilityhttp://www.accesswireless.org/hearingaid/
FCC Hearing Aid Compatibilityand Volume Controlhttp://www.fcc.gov/cgb/consumerfacts/hac_wireless.html

147
Accessories
There are a variety of accessories available for your phone and three easyways to purchase them: shop online anytime at www.verizonwireless.com, callus at 1866 VZ GOT IT (894 6848) or visit one of our Verizon WirelessCommunication Stores.
Vehicle Power
Charger
Wall/USBCharger
Batteries
Bluetooth StereoSpeaker
USB Cable
BluetoothHeadset
148
LIMITED WARRANTY STATEMENT
1. WHAT THIS WARRANTYCOVERS:
LG offers you a limited warrantythat the enclosed subscriber unitand its enclosed accessories will befree from defects in material andworkmanship, according to thefollowing terms and conditions:
(1) The limited warranty for theproduct extends for TWELVE(12) MONTHS beginning onthe date of purchase of theproduct with valid proof ofpurchase, or absent valid proofof purchase, FIFTEEN (15)MONTHS from date ofmanufacture as determined bythe unit's manufacture datecode.
(2) The limited warranty extendsonly to the original purchaser ofthe product and is notassignable or transferable to anysubsequent purchaser/end user.
(3) This warranty is good only tothe original purchaser of theproduct during the warrantyperiod as long as it is in theU.S., including Alaska, Hawaii,U.S. Territories and Canada.
(4) The external housing andcosmetic parts shall be free ofdefects at the time ofshipment and, therefore, shallnot be covered under theselimited warranty terms.
(5) Upon request from LG, theconsumer must provideinformation to reasonablyprove the date of purchase.
(6) The customer shall bear thecost of shipping the productto the Customer ServiceDepartment of LG. LG shallbear the cost of shipping theproduct back to the consumerafter the completion of serviceunder this limited warranty.
2. WHAT THIS WARRANTYDOES NOT COVER:
(1) Defects or damages resultingfrom use of the product inother than its normal andcustomary manner.
(2) Defects or damages fromabnormal use, abnormalconditions, improper storage,exposure to moisture ordampness, unauthorized

149
modifications, unauthorizedconnections, unauthorizedrepair, misuse, neglect, abuse,accident, alteration, improperinstallation, or other acts whichare not the fault of LG,including damage caused byshipping, blown fuses, spills offood or liquid.
(3) Breakage or damage toantennas unless caused directlyby defects in material orworkmanship.
(4) That the Customer ServiceDepartment at LG was notnotified by consumer of thealleged defect or malfunctionof the product during theapplicable limited warrantyperiod.
(5) Products which have had theserial number removed ormade illegible.
(6) This limited warranty is in lieuof all other warranties, expressor implied either in fact or byoperations of law, statutory orotherwise, including, but notlimited to any implied warrantyof marketability or fitness for aparticular use.
(7) Damage resulting from use ofnon LG approved accessories.
(8) All plastic surfaces and allother externally exposed partsthat are scratched or damageddue to normal customer use.
(9) Products operated outsidepublished maximum ratings.
(10) Products used or obtained ina rental program.
(11) Consumables (such as fuses).
3. WHAT LG WILL DO:
LG will, at its sole option, eitherrepair, replace or refund thepurchase price of any unit thatdoes not conform to this limitedwarranty. LG may choose at itsoption to use functionallyequivalent re-conditioned,refurbished or new units or partsor any units. In addition, LG willnot re-install or back-up any data,applications or software that youhave added to your phone. It istherefore recommended that youback-up any such data orinformation prior to sending theunit to LG to avoid the permanentloss of such information.

LIMITED WARRANTY STATEMENT
150
4. STATE LAW RIGHTS:
No other express warranty isapplicable to this product. THEDURATION OF ANY IMPLIEDWARRANTIES, INCLUDING THEIMPLIED WARRANTY OFMARKETABILITY, IS LIMITED TOTHE DURATION OF THE EXPRESSWARRANTY HEREIN. LG SHALLNOT BE LIABLE FOR THE LOSS OFTHE USE OF THE PRODUCT,INCONVENIENCE, LOSS OR ANYOTHER DAMAGES, DIRECT ORCONSEQUENTIAL, ARISING OUTOF THE USE OF, OR INABILITY TOUSE, THIS PRODUCT OR FORANY BREACH OF ANY EXPRESSOR IMPLIED WARRANTY,INCLUDING THE IMPLIEDWARRANTY OF MARKETABILITYAPPLICABLE TO THIS PRODUCT.
Some states do not allow theexclusive limitation of incidental orconsequential damages orlimitations on how long an impliedwarranty lasts; so these limitationsor exclusions may not apply to you.This warranty gives you specificlegal rights and you may also haveother rights which vary from stateto state.
5. HOW TO GET WARRANTYSERVICE:
To obtain warranty service, pleasecall or fax to the followingtelephone numbers from anywherein the continental United States:
Tel. 1-800-793-8896 or Fax. 1-800-448-4026
Or visit http://us.lgservice.com.Correspondence may also bemailed to:
LG Electronics Service- MobileHandsets, P.O. Box 240007,Huntsville, AL 35824
DO NOT RETURN YOURPRODUCT TO THE ABOVEADDRESS. Please call or write forthe location of the LG authorizedservice center nearest you and forthe procedures for obtainingwarranty claims.

151
Terminology
EZ Tip Calc
Feature for easy bill calculation using thetotal cost, tip, and number of people asvariables.
Advanced Voice Recognition
Feature that allows you to perform a widerange of verbal commands by training thephone to recognize your individualspeech patterns.
Bluetooth® wireless technology
Technology used to allow mobile phones,computers, and other personal devices tobe easily coordinated and interconnectedusing a short-range wireless connection.
Media Center
Feature that accesses the Internet toprovide the ability to access and evendownload a wide variety of software,information, music, video, and more righton your LG Verizon wireless phone.
microSDTM
Additional external memory for yourmobile phone.
V CASTSM
Feature that is the next generation inwireless technology which transformsyour wireless phone into a portable musicplayer and delivers an amazing streamingmobile video experience. V CAST uses technology that significantlyincreases download capabilities to deliverbetter graphics, sound and depth anduses the power of broadband so that youcan download the hottest entertainment,sports highlights, news and breakingweather to your Verizon Wireless V CASTphone. The new V CAST phones providebetter imaging capabilities, mega pixelcameras and video cameras, improvedaudio and expandable memory storage.
Acronyms andAbbreviations
DTMF
Dual-Tone Multi Frequency (or “touch-tone”) is a method used to communicatekeys pressed on the phone. Pressing a keygenerates two simultaneous tones, onefor the row and one for the column todetermine which key was pressed.
Glossary
Glossary
152
ERI
Enhanced Roaming Indicator is a featureto indicate whether a mobile phone is onits home system, a partner network, or aroaming network. Many phones indicatehome vs. roaming as an icon, but ERIcapable phones can clearly indicate third“partner network” status.
EVDO
Evolution Data Only or Evolution DataOptimized (abbreviated as EVDO, EV-DO,EvDO, 1xEV-DO or 1xEvDO) providesfast wireless broadband access (3G)anywhere, without needing a WiFihotspot.
GPS
Global Positioning System is a system ofsatellites, computers, and receivers able todetermine the latitude and longitude of aspecific receiver on Earth. Position iscalculated using time and distance.
IS 2000
Type of digital signaling. It's the secondgeneration of CDMA digital cellular, anextension of IS-95. Differences betweensignaling types have to do with pilotsignal and links to provide more trafficchannels, and control protocols.
NAM
Number Assignment Module is how thephone stores the phone number and itselectronic serial number.
SSL
Secure Sockets Layer Protocol used toencrypt data sent over the air.
TTY
Teletypewriter. An electromechanicaltypewriter that either transmits orreceives messages coded in electricalsignals. A phone with TTY support is ableto translate typed characters to voice ortranslate voice into characters to displayon the TTY.
110 Driver Safety Tips 139
3D (Three-axis-
accelerometer) Rotation
35
AAccessories 147
Acronyms and Abbreviations
151
Add New Device 95
Airplane Mode 106
Alarm Clock 92
Alert Sounds 99
All 59
Answer Options 112
Assisted Dialing 115
Auto Retry 113
BBacklight 102
Backup Assistant 55
Banner 102
Battery Charge Level 26
Battery Temperature
Protection 26
Bluetooth Menu 95
Browse & Download 77
Browser 82
Browser Navigating 82
Button Sounds 100
CCalculator 91
Calendar 91
Calibrating the Touch Screen
15
Call Settings 112
Call Sounds 98
Call Waiting 30
Camera Features 35, 36
Card Memory 118
Caution: Avoid potential
hearing loss. 129
Changing Contact Entries 32
Charging Screen 103
Charging the Battery 24
Charging with USB 25
Chat 50
Clock Format 104
Consumer Information on
SAR 141
Contact List 54
CONTACTS 54
Contacts in Your Phone’s
Memory 32
Current Country 108
DDeleting 34
Dial Fonts 104
Dialed 59
Digit Dial Readout 100
Discovery Mode 97
Display Settings 101
Display Themes 103
Drafts 48
Drawing Pad 94
DTMF Tones 115
EEasy Set-Up 98, 101
Edit Codes 108
Email 49, 88
Ending a Browser Session
82
Entering and Editing
Information 18
Erase Options 53
ERI Banner 102
Extras 81
Ez Tip Calculator 91
FFavorites 55
FCC Hearing-Aid
Compatibility (HAC)
Regulations for Wireless
Devices 144
FDA Consumer Update 131
GGames 77
Get New Pictures 72
Get New Ringtones 62
Getting Started with Your
Phone 24
Glossary 151
Groups 56
153
Index
HHow to Install a microSD™
Card 25
How to Remove a
microSD™ Card 25
IIcon Glossary 119
Important Information 9
Important Safety Precautions
1
In Case of Emergency (ICE)
57
Index 153
Info 81
LLanguage 107
LIMITED WARRANTY
STATEMENT 148
Location 107
Lock Mode 30
Lock Phone Now 110
MMaking Calls 27
Master Volume 98
Media Center 61
Memory 117
Menu Access 28
Menu Fonts 104
Menu Tree on the Touch
Screen 28
Menu Tree 21
Messages 46
MESSAGING 42
Missed 58
Mobile IM 49
More Available
Applications... 78
Music & Tones 61
Music Handle 105
My Device Info 97
My FM Radio 66
My Music 63, 81
My Name Card 57
My Number 119
My Pictures 72
My Ringtones 62
My Sounds 69
My Verizon 41, 95
My Videos 73
NNAM Select 112
New Contact 54
New Message 42
Notepad 93
OOne Touch Dial 115
Online Album 76
Other Message Options 43
PPersonal Banner 102
Phone Info 118
Phone Lock 109
Phone Memory 117
Phone Overview 12
Phone Settings 106
Picture & Video 71
Picture Editing 39
Picture Message 44
Power On/Off 101
QQuick Access to Convenient
Features 30
Quick Glance of Touch
Screen and How to Use
It 14
Quick Volume Adjustment
30
RReceived 58
Receiving Calls 27
RECENT CALLS 58
Record Video 76
Redialing Calls 27
Reset Default 110
Restore Phone 111
Restrictions 109
SSafety Information 124
Save Options 117
Index
154

Screen Icons 27
Search 87
Security 108
Service Alerts 100
Set-Up Wizard 120
Settings 51, 95
Shortcut Bin 105
Shortcut Menu 16
Shortcut Menu on the Touch
Screen 29
Show Dialpad 112
Signal Strength 26
Social Network Message 50
Software Update 119
Sounds Settings 98
Speed Dial 33
Speed Dials 56
Stopwatch 92
Storing a Number with
Pauses 33
Storing Basics 32
Supported Profiles 97
SW/HW Version 119
Sync Music 69
System Select 111
TTable of Contents 4
Take Picture 75
Technical Details 9
Terminology 151
Text Input 18
The Battery 24
TIA Safety Information 121
Tools 89
Touch Sensitive Soft Keys 14
Touch Settings 105
TTY Mode 113
Turning the Phone On and
Off 26
TXT Message 42
UUSB Auto Detection 116
USB Mass Storage 94
VV CAST Music 61
V CAST Videos 71
Vibrate Mode 30
Video Camera 38
Video Editing 40
Video Message 45
Video Player Controls 40
View Timers 60
Visual Voice Mail 49
Voice Commands 31, 89,
106
Voice Message 46
Voice Privacy 115
Voicemail 48
VZ Navigator 88
WWallpaper 103
World Clock 93
155

MEMO

MEMO

MEMO