vw new beetle convertible top hydraulics … · use as a guideline only – apply common sense, be...
TRANSCRIPT

Use as a guideline only – apply common sense, be careful, and wear protective gear! Top Hydraulics, Inc. is not responsible or liable for personal injury or material damage.
VW New Beetle Hydraulic Cylinder Removal Guide, page 1 of 24
© Top Hydraulics, Inc. Rev. 1.0 12/2016
VW New Beetle Convertible
Top Hydraulics Removal Instructions
Provided by Michael L. (a happy customer)
Version 1.0 – Comments and corrections are welcome and appreciated.

Use as a guideline only – apply common sense, be careful, and wear protective gear! Top Hydraulics, Inc. is not responsible or liable for personal injury or material damage.
VW New Beetle Hydraulic Cylinder Removal Guide, page 2 of 24
© Top Hydraulics, Inc. Rev. 1.0 12/2016
2010 New Beetle Convertible
Removal of Passenger Side Rear Trim Panel
– Similar procedure may be used for Driver’s side with appropriate adjustments.
1. Remove Rear Seat bottom.
a. Pull up on front, seat will pivot toward you.
b. Lift rear of seat to vertical position.
c. Disconnect Seat Bottom Rod from interface on car body (See Photo 1).
i. Remove by pulling both Rods toward the middle. You may have to do them one
at a time.
2. Remove both Rear Headrests.
a. Pull up on each Headrest, they just come off.
3. Remove the (2) Rear Seat Belt Latches by removing the fasteners.
4. Remove Rear Seat Back.
a. Remove the Center Armrest by pulling down, then out.
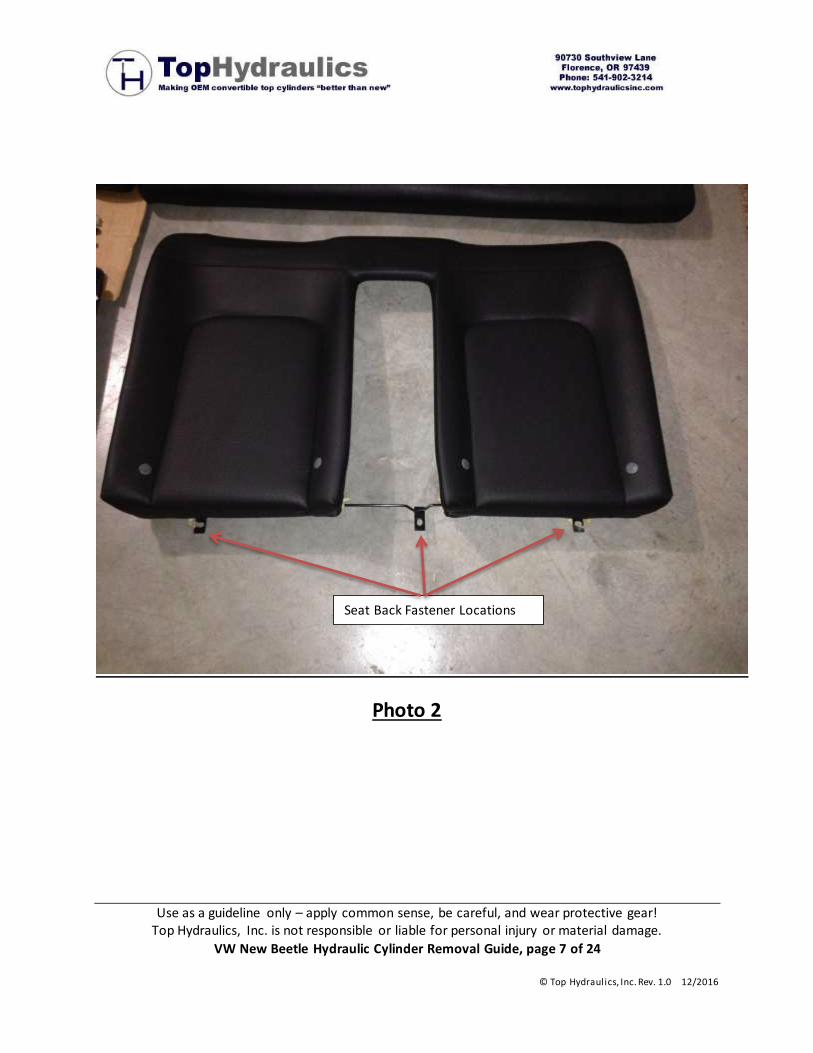
b. Remove (3) screws that secure the Sea Back at bottom of seat (See Photo 2).
c. Pull up on Seat Back. May need to move from side to side as the Seat Back is lifted up.
5. Disconnect Rear Seatbelt connection at the side of the Trim Panel being removed (See Photo 3).
6. Disconnect Front Seat Belt from lower connection, Rod at the Sill Plate area.
a. Remove (1) Fastener (See Photo 4).
b. Pull up on Rod to allow removal of the Front Seat Belt lower connection.
7. Remove Passenger Side Trim Panel.
a. Remove Fastener at upper right corner of Trim Panel (See Photos 5 & 6).
b. Pull back along right side of Trim Panel – (2) snaps (See Photos 6 & 7).
c. Pull up and back along the front portion of the Trim Panel (along Door Jam) – USE CARE
TO PREVENT DAMAGE TO TRIM PANEL.
i. Separate from Sill Plate first.
ii. Using plastic trim removal tool, pull the front edge of the trim panel away from
the Door Jam area and detach from body.
d. Pull up on Trim Panel BUT DO NOT REMOVE – MUST DISCONNECT VARIOUS ITEMS.
e. Disconnect Speaker (if so equipped).
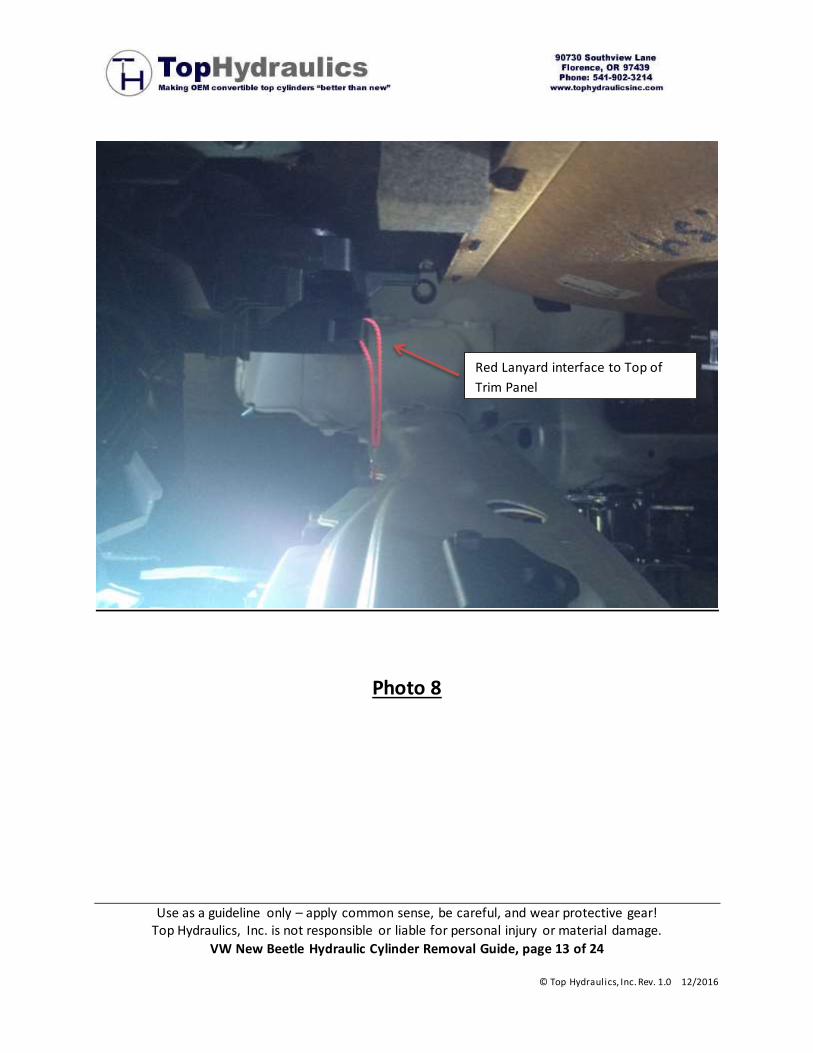
f. Disconnect Red Lanyard from hook at top of Trim Panel (See Photo 8).
g. Disconnect the Trim Panel Sliding Door Cable from Rod End using a screwdriver to pull
off Rod End (See Photo 9) – 2010 BEETLE DOES NOT HAVE FOLDING DOORS. EARLIER
MODELS ARE SLIGHTLY DIFFERENT, ACTUATION RODS WILL NEED TO BE
DISCONNECTED.

Use as a guideline only – apply common sense, be careful, and wear protective gear! Top Hydraulics, Inc. is not responsible or liable for personal injury or material damage.
VW New Beetle Hydraulic Cylinder Removal Guide, page 3 of 24
© Top Hydraulics, Inc. Rev. 1.0 12/2016
h. Disconnect the Sliding Door Cable from mount – NOTE LOCATION ON THREADED
PORTION OF CABLE FOR REINSTALLTION.
i. Feed the Front Seat Belt through the Trim Panel to allow it to be removed.
j. Feed the Rear Seat Belt through the rear portion of the Trim Panel to allow it to be
removed.
k. Remove Trim Panel from car.
2010 New Beetle Convertible
Removal of Convertible Top Hydraulic Cylinder from Passenger Side
– Similar procedure may be used for Driver’s side with appropriate adjustments
(No Microswitch).
1. Verify Trim Panel has been removed.
2. Verify Top is in the up position.
a. Shaft of Hydraulic Cylinder will be retracted. This will prevent possible damage to the
surface finish which is critical to the shaft’s ability to seal. Be VERY careful not to scratch
or mar the shaft!
3. Disconnect the Microswitch from the connector (See Photo 3).
a. Connector is at the lower right area under the Top Latching Mechanism.
4. Disconnect the (2) other restraining points for the Microswitch Wire.
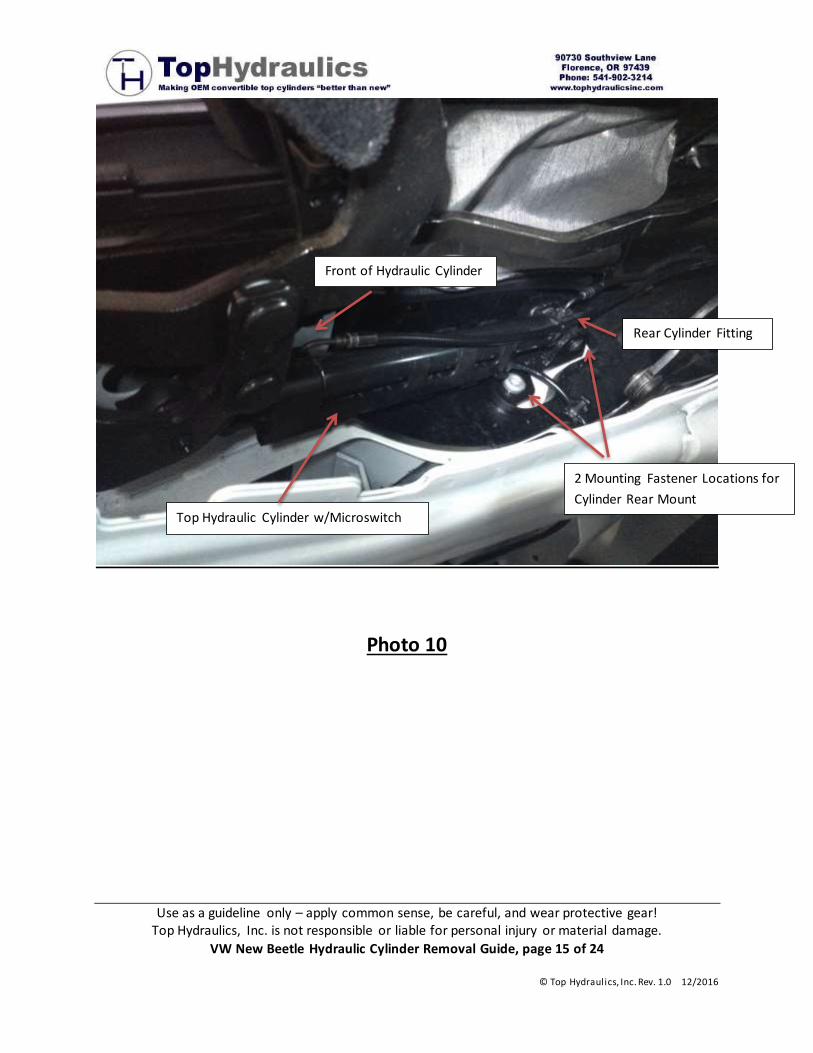
5. Disconnect the Hydraulic Lines from the Cylinder (See Photos 10, 11 & 12).
a. Place a towel or section of plastic under Cylinder area to catch any potential clips that
could fall inadvertently.
b. Carefully cut the Zip Tie that secures the Hydraulic Hose to the rear portion of the
Cylinder (See Photo 12).
c. Remove each Hose Retainer Clip using small pliers and pull away from the connection in
a sliding manner – NOTE THESE MAY NEED TO BE MOVED BACK AND FORTH TO ENABLE
REMOVAL. BE PATIENT. USE CARE NOT TO DAMAGE HYDRAULIC LINE, CONNECTION
FITTING OR TOP OF CYLINDER PORT.
Use as a guideline only – apply common sense, be careful, and wear protective gear! Top Hydraulics, Inc. is not responsible or liable for personal injury or material damage.
VW New Beetle Hydraulic Cylinder Removal Guide, page 4 of 24
© Top Hydraulics, Inc. Rev. 1.0 12/2016
d. Cover the ends of the Hose Fittings using a section of plastic bag and Zip-Tie. Provide
additional covering as appropriate.
i. Remove the front portion of Microswitch that is clipped over Hydraulic Cylinder
Rod End (See Photos 14 – 18).
ii. Remove Zip Tie – If present.
iii. Open the Rod End interface by opening the latching mechanism.
iv. Spread open the Switch rod end interface to allow access to Rod End.
6. Separate the Rod End from mount on vehicle (See Photos 15 & 19).
a. Remove the metal C-Clip on the Rod End using a screwdriver of appropriate size – USE
TAPE OR OTHER METHOD TO KEEP CLIP CAPTIVE IN CASE DURING REMOVAL IT EJECTS
FROM THE ROD END.
b. Separate the Rod end from mount on vehicle.
7. Disconnect Rear Mounting Bracket from vehicle (See Photo 10).
a. Remove (2) Fasteners on rear mount.
8. Remove the Hydraulic Cylinder from vehicle.
a. Cover each Fitting Port using appropriate methods for protection.
9. Remove Hydraulic Cylinder from Rear Mount (See Photo 13).
a. Remove “C” Clip from Shaft.
b. Remove Shaft.
c. Pull Cylinder from Rear Mount.
d. Reinstall Shaft to Rear Mount and secure with “C” Clip.

Use as a guideline only – apply common sense, be careful, and wear protective gear! Top Hydraulics, Inc. is not responsible or liable for personal injury or material damage.
VW New Beetle Hydraulic Cylinder Removal Guide, page 5 of 24
© Top Hydraulics, Inc. Rev. 1.0 12/2016
Removal of Convertible Top Hydraulic Cylinder
Microswitch (Passenger Side Only)
Verify Trim Panel has been removed
1. Verify Top is in the up position.
a. Shaft of Hydraulic Cylinder will be retracted. This will prevent possible damage to the
surface finish which is critical to the shaft’s ability to seal. Be VERY careful not to scratch
or mar the shaft!
2. Disconnect the Microswitch from the connector (See Photo 3).
a. Connector is at the lower right area under the Top Latching Mechanism.
3. Disconnect the (2) other restraining points for the Microswitch Wire.
4. Remove the front portion of Microswitch that is clipped over the Hydraulic Cylinder Rod End
(See Photos 14 – 18).
i. Remove Zip Tie – If present.
ii. Open the Rod End interface by opening the latching mechanism.
iii. Spread open the Switch rod end interface to allow access to Rod End.
5. Carefully slide the Microswitch toward the front of the vehicle – BE CAREFUL AND PATIENT TO
PREVENT ANY DAMAGE TO FRONT HYDRAULIC LINE AND FITTING.
6. Pull Microswitch away from the Hydraulic Cylinder and remove from vehicle.

Use as a guideline only – apply common sense, be careful, and wear protective gear! Top Hydraulics, Inc. is not responsible or liable for personal injury or material damage.
VW New Beetle Hydraulic Cylinder Removal Guide, page 6 of 24
© Top Hydraulics, Inc. Rev. 1.0 12/2016
Photos
Photo 1
Rear Seat Bottom Mounting Points
Use as a guideline only – apply common sense, be careful, and wear protective gear! Top Hydraulics, Inc. is not responsible or liable for personal injury or material damage.
VW New Beetle Hydraulic Cylinder Removal Guide, page 7 of 24
© Top Hydraulics, Inc. Rev. 1.0 12/2016
Photo 2
Seat Back Fastener Locations

Use as a guideline only – apply common sense, be careful, and wear protective gear! Top Hydraulics, Inc. is not responsible or liable for personal injury or material damage.
VW New Beetle Hydraulic Cylinder Removal Guide, page 8 of 24
© Top Hydraulics, Inc. Rev. 1.0 12/2016
Photo 3
Rear Seat Belt Fastener
Microswitch Connector

Use as a guideline only – apply common sense, be careful, and wear protective gear! Top Hydraulics, Inc. is not responsible or liable for personal injury or material damage.
VW New Beetle Hydraulic Cylinder Removal Guide, page 9 of 24
© Top Hydraulics, Inc. Rev. 1.0 12/2016
Photo 4
Front Seat Belt Fastener

Use as a guideline only – apply common sense, be careful, and wear protective gear! Top Hydraulics, Inc. is not responsible or liable for personal injury or material damage.
VW New Beetle Hydraulic Cylinder Removal Guide, page 10 of 24
© Top Hydraulics, Inc. Rev. 1.0 12/2016
Photo 5
Trim Panel Upper Right Fastener
Location

Use as a guideline only – apply common sense, be careful, and wear protective gear! Top Hydraulics, Inc. is not responsible or liable for personal injury or material damage.
VW New Beetle Hydraulic Cylinder Removal Guide, page 11 of 24
© Top Hydraulics, Inc. Rev. 1.0 12/2016
Photo 6
Trim Panel Clip Locations
from the Front View
Fastener Location

Use as a guideline only – apply common sense, be careful, and wear protective gear! Top Hydraulics, Inc. is not responsible or liable for personal injury or material damage.
VW New Beetle Hydraulic Cylinder Removal Guide, page 12 of 24
© Top Hydraulics, Inc. Rev. 1.0 12/2016
Photo 7
Trim Panel Clip Locations
Trim Panel Clip Locations
Use as a guideline only – apply common sense, be careful, and wear protective gear! Top Hydraulics, Inc. is not responsible or liable for personal injury or material damage.
VW New Beetle Hydraulic Cylinder Removal Guide, page 13 of 24
© Top Hydraulics, Inc. Rev. 1.0 12/2016
Photo 8
Red Lanyard interface to Top of
Trim Panel

Use as a guideline only – apply common sense, be careful, and wear protective gear! Top Hydraulics, Inc. is not responsible or liable for personal injury or material damage.
VW New Beetle Hydraulic Cylinder Removal Guide, page 14 of 24
© Top Hydraulics, Inc. Rev. 1.0 12/2016
Photo 9
Trim Panel Sliding Door Cable
Use as a guideline only – apply common sense, be careful, and wear protective gear! Top Hydraulics, Inc. is not responsible or liable for personal injury or material damage.
VW New Beetle Hydraulic Cylinder Removal Guide, page 15 of 24
© Top Hydraulics, Inc. Rev. 1.0 12/2016
Photo 10
Front of Hydraulic Cylinder
Rear Cylinder Fitting
2 Mounting Fastener Locations for
Cylinder Rear Mount
Top Hydraulic Cylinder w/Microswitch

Use as a guideline only – apply common sense, be careful, and wear protective gear! Top Hydraulics, Inc. is not responsible or liable for personal injury or material damage.
VW New Beetle Hydraulic Cylinder Removal Guide, page 16 of 24
© Top Hydraulics, Inc. Rev. 1.0 12/2016
Photo 11
Hose Retainer Clip – Same for
Front and Rear
Removal Direction

Use as a guideline only – apply common sense, be careful, and wear protective gear! Top Hydraulics, Inc. is not responsible or liable for personal injury or material damage.
VW New Beetle Hydraulic Cylinder Removal Guide, page 17 of 24
© Top Hydraulics, Inc. Rev. 1.0 12/2016
Photo 12
Rear Cylinder Fitting Zip Tie for Hose

Use as a guideline only – apply common sense, be careful, and wear protective gear! Top Hydraulics, Inc. is not responsible or liable for personal injury or material damage.
VW New Beetle Hydraulic Cylinder Removal Guide, page 18 of 24
© Top Hydraulics, Inc. Rev. 1.0 12/2016
Photo 13
Rear Cylinder Mount –
Fastener Locations
Hose Fitting Retaining Clip – Removed
Same Design Clip Used for Front and
Rear
Rear Mount Shaft and “C”
Clip

Use as a guideline only – apply common sense, be careful, and wear protective gear! Top Hydraulics, Inc. is not responsible or liable for personal injury or material damage.
VW New Beetle Hydraulic Cylinder Removal Guide, page 19 of 24
© Top Hydraulics, Inc. Rev. 1.0 12/2016
Photo 14
MicroSwitch Connection at Rod End – Closed Position
Use as a guideline only – apply common sense, be careful, and wear protective gear! Top Hydraulics, Inc. is not responsible or liable for personal injury or material damage.
VW New Beetle Hydraulic Cylinder Removal Guide, page 20 of 24
© Top Hydraulics, Inc. Rev. 1.0 12/2016
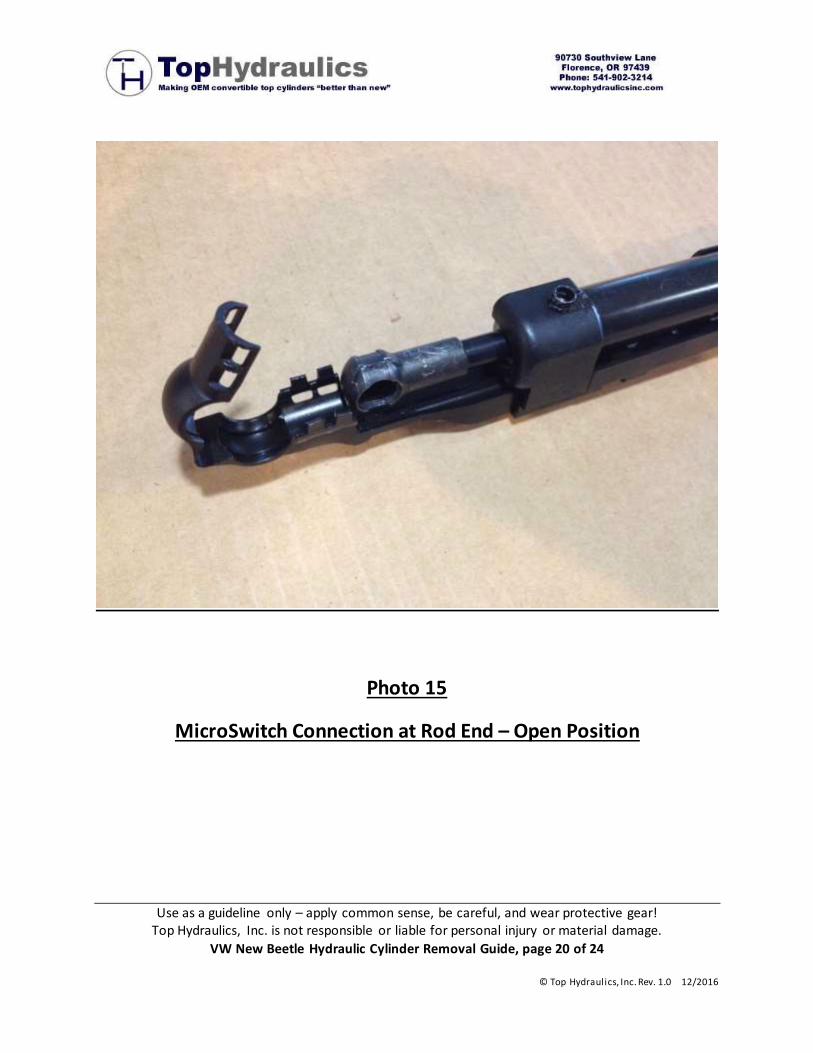
Photo 15
MicroSwitch Connection at Rod End – Open Position

Use as a guideline only – apply common sense, be careful, and wear protective gear! Top Hydraulics, Inc. is not responsible or liable for personal injury or material damage.
VW New Beetle Hydraulic Cylinder Removal Guide, page 21 of 24
© Top Hydraulics, Inc. Rev. 1.0 12/2016
Photo 16
Microswitch Side View

Use as a guideline only – apply common sense, be careful, and wear protective gear! Top Hydraulics, Inc. is not responsible or liable for personal injury or material damage.
VW New Beetle Hydraulic Cylinder Removal Guide, page 22 of 24
© Top Hydraulics, Inc. Rev. 1.0 12/2016
Photo 17
Microswitch Partially Removed – Rod End Connection Open

Use as a guideline only – apply common sense, be careful, and wear protective gear! Top Hydraulics, Inc. is not responsible or liable for personal injury or material damage.
VW New Beetle Hydraulic Cylinder Removal Guide, page 23 of 24
© Top Hydraulics, Inc. Rev. 1.0 12/2016
Photo 18
Hydraulic Top Cylinder and Microswitch - Separated

Use as a guideline only – apply common sense, be careful, and wear protective gear! Top Hydraulics, Inc. is not responsible or liable for personal injury or material damage.
VW New Beetle Hydraulic Cylinder Removal Guide, page 24 of 24
© Top Hydraulics, Inc. Rev. 1.0 12/2016
Photo 19
Clip on Rod End of Hydraulic Cylinder