vulcano user guide - monsoon multimediamonsoonmultimedia.com/flowguide.pdf · user guide 2...
TRANSCRIPT

© 2011 Monsoon Multimedia, Inc. All Rights Reserved.
MONSOON MULTIMEDIA
User Guide

User Guide
1
Contents INTRODUCTION .......................................................................................................................................... 2
WHAT’S IN THE BOX .................................................................................................................................... 2
VULKANO UNIT ........................................................................................................................................... 2
VULKANO SETUP FOR WINDOWS 7 AND VISTA ................................................................................................ 3
VULKANO SETUP FOR WINDOWS XP ........................................................................................................... 10
VULKANO SETUP FOR MAC ........................................................................................................................ 18
DOWNLOAD THE CLIENTS ............................................................................................................................ 27
Troubleshooting .................................................................................................................................... 27
FREQUENTLY ASKED QUESTIONS ................................................................................................................. 28

User Guide
2
INTRODUCTION Vulkano is a sleek and stylish consumer device that connects to your television STB (Set Top
Box), and enables a complete television and Internet media experience on your Smartphone,
iPhone, iPad, PC, Mac and big screen television. Vulkano allows you to enjoy live and recorded
television, videos, photos and music on multiple devices.
WHAT’S IN THE BOX
VULKANO UNIT

User Guide
3
VULKANO SETUP FOR WINDOWS 7 AND VISTA Congratulations on buying Vulkano. We will take you through a few simple steps to get you up and
running.
These steps are for setting up your Vulkano from a Windows 7 PC or Windows Vista PC. If you are
using a Windows XP PC or a Mac, please look in the Table of Contents of this User Guide to find the
appropriate section.
CONNECT VULKANO TO YOUR SET-TOP BOX (STB) Your STB has output connectors on the back for Component, Composite, or both. If you have both, use
Component for better video quality. (You will need a Set-Top Box to use Vulkano)
Connect audio and video cables from the STB “Output” connectors to Vulkano’s video and audio
“Input” connectors as shown. For Component, you will use two cables. For Composite, you
will only use one
Component
Composite
Write down your STB brand and model number. You will need it later in the Setup.
CONNECT VULKANO TO YOUR TV This step assumes that your STB was previously connected to your TV. You will re-use your existing
cables. It is not mandatory to connect Vulkano Flow’s output to a TV.
Your TV has audio and video “Input” connectors on the back or side for Component, Composite, or both.
Make sure you use the same cable types, either Component or Composite, for this connection as used in
Step 1.

User Guide
4
Connect audio and video cables from the Vulkano “Output” connectors to your TV’s video and
audio “Input” connectors as shown. For Component, you will use two cables. For Composite,
you will only use one.
Component
Composite
CONNECT THE POWER ADAPTER Plug the power adapter into Vulkano and a wall plug or power strip as shown
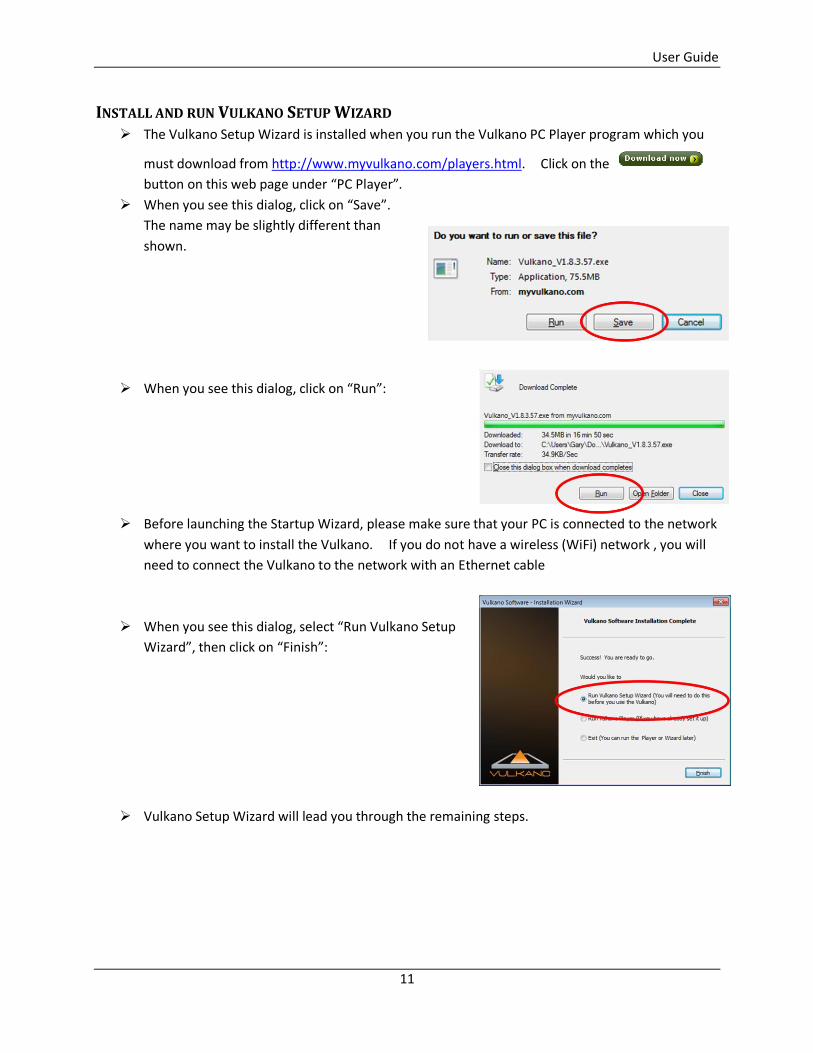
INSTALL AND RUN VULKANO SETUP WIZARD The Vulkano Setup Wizard is installed when you run the Vulkano PC Player program which you
must download from http://www.myvulkano.com/players.html. Click on the
button on this web page under “PC Player”.
When you see this dialog, click on “Save”.
The name may be slightly different than
shown.
When you see this dialog, click on “Run”:

User Guide
5
Before launching the Startup Wizard, please make sure that your PC is connected to the network
where you want to install the Vulkano. If you do not have a wireless (WiFi) network , you will
need to connect the Vulkano to the network with
an Ethernet cable
When you see this dialog, select “Run Vulkano
Setup Wizard”, then click on “Finish”:
Vulkano Setup Wizard will lead you through the remaining steps.
CHOOSE PASSWORD In the Choose password window:
Enter a password in the Password and
Confirm password fields
CONFIGURE WIRELESS SETTINGS In the Configure Wireless Settings:
Enter the name of your wireless network in
the Enter desired SSID field
Select your Security Type:
None
WEP
WPA
Enter the appropriate Network key or
passphrase
Click Next
The specified wireless settings will be applied to your Vulkano.

User Guide
6
VIDEO INPUT CONFIGURATION In the Video Input Configuration window:
Select the appropriate video input configuration
that corresponds to how you connected Vulkano
to your STB:
o Composite – if you used Red/White/
Yellow cables
o Component – if you used Red/Green/
Blue & Red/White cables
Click Next
When you have selected the correct video input
configuration, the video will be displayed in the Video Input Configuration window.
CONFIGURE EPG (ELECTRONIC PROGRAM GUIDE) In the Configure EPG window:
Enter your ZIP Code
Select your Service Type:
o Satellite
o Cable
Click Next
Note: The EPG is supported in the United States. If
you are located in another country, click Skip.
In the Configure EPG window:
Select your Service Provider from the
drop-down list
Click Next
CONFIGURE SET TOP BOX CONTROL

User Guide
7
In the Configure Set Top Box Control window:
Select your STB Category
Select your STB Brand
Select your STB Model
Select one of the following options:
I found my model number (or a similar
one) in the list – let me test it.
I couldn’t find my model number.
Show me a different way to find the right control.
I couldn’t find a control that works. I want Vulkano to learn my remote control
codes.
Click Next
I found my model number (or a similar one) in the list – let me test it.
For this option:
Select a Set Top Box command
Click Test
If the Set Top Box does not work properly, click Back
and choose a different model.
Click Next
I found my model number. Show me a different way
to find the right control.
For this option:
Select a Set Top Box command
Click Test
Note: If the Set Top Box does not work properly, click Test Next Code and click Test, or select a
Code from the drop-down list and click Test
Click Next

User Guide
8
I couldn’t find a control that works. I want Vulkano to learn my remote control
codes.
For this option:
Select your Set Top Box type
Select a command from the list box
Click Learn
Follow the screen prompts
CHANNEL TUNING TEST – SINGLE DIGITS In the Channel Tuning Test – single digits window:
Select the appropriate single digit channel
option
Select the check box option if you need to
press the Enter button on your TV remote
after entering a channel number
Click the Channel option and select a
single-digit channel
Click Test
If the channel tuning test works correctly:
Click Next
CHANNEL TUNING TEST – MULTIPLE DIGITS In the Channel Tuning Test – multiple digits:
Click the Channel option and select a two or
three digit channel
Click Test
If the channel selection drops digits, adjust the slider
accordingly.
If the channel option works
Click Next

User Guide
9
CONFIGURE WAKEUP SETTINGS Some Set Top Boxes enter into a standby mode after
several hours. In this window, you can choose the
remote control command that will wake up your STB
prior to making a recording. You can:
Specify a Command
Specify the time Delay
Specify the Keep Alive interval
Click Next
ASSIGN VULKANO NAME In the Assign Vulkano Name window:
Enter a name for your Vulkano in the Give
your Vulkano a name field
Click Restore
Click Next
VULKANO CONFIGURED SUCCESSFULLY Congratulations! You have successfully set up your
Vulkano!
Click Finish

User Guide
10
VULKANO SETUP FOR WINDOWS XP Congratulations on buying Vulkano. We will take you through a few simple steps to get you up and
running.
These steps are for setting up your Vulkano from a Windows XP PC. If you are using a Windows 7 PC,
Windows Vista PC or a Mac, please look in the Table of Contents of this User Guide to find the
appropriate section.
CONNECT VULKANO TO NETWORK AND POWER Plug the power adapter into Vulkano and a wall plug or power strip.
You can use either a wired or Wi-Fi connection to attach Vulkano to your home network.
Wired connection: If your router is close to your Set Top Box, connect it to Vulkano using the
supplied Ethernet cable. Otherwise, follow the steps in “Wi-Fi connection” below to connect
Vulkano to your Wi-Fi network.
You can connect Vulkano to your router, your PC or an open Ethernet connection on
your network.
If you do not have an open port, you should purchase a 4-port Ethernet switch or hub.
Wi-Fi connection: Use the supplied Ethernet cable to temporarily connect your Mac or PC’s
Ethernet port to your Vulkano’s Ethernet port. In step 2, you will be shown how to connect
Vulkano to your Wi-Fi network. Once Vulkano is connected to your Wi-Fi network, you will
disconnect the Ethernet cable.
CONNECT THE POWER ADAPTER Plug the power adapter into Vulkano and a wall plug or power strip as shown
Before launching the
Startup Wizard, please
make sure that your PC is
connected to the network
where you want to install
the Vulkano (Wired or
wireless), and that the
Vulkano is connected to
the PC or the network
with an Ethernet cable
User Guide
11
INSTALL AND RUN VULKANO SETUP WIZARD The Vulkano Setup Wizard is installed when you run the Vulkano PC Player program which you
must download from http://www.myvulkano.com/players.html. Click on the
button on this web page under “PC Player”.
When you see this dialog, click on “Save”.
The name may be slightly different than
shown.
When you see this dialog, click on “Run”:
Before launching the Startup Wizard, please make sure that your PC is connected to the network
where you want to install the Vulkano. If you do not have a wireless (WiFi) network , you will
need to connect the Vulkano to the network with an Ethernet cable
When you see this dialog, select “Run Vulkano Setup
Wizard”, then click on “Finish”:
Vulkano Setup Wizard will lead you through the remaining steps.

User Guide
12
When you see this dialog, your Vulkano has been
connected to your wireless network, it will no longer
be necessary to have your Vulkano connected
directly to your router, complete the cable
connections as described in Steps 3 and 4.
Disconnect the Ethernet cable from your Vulkano
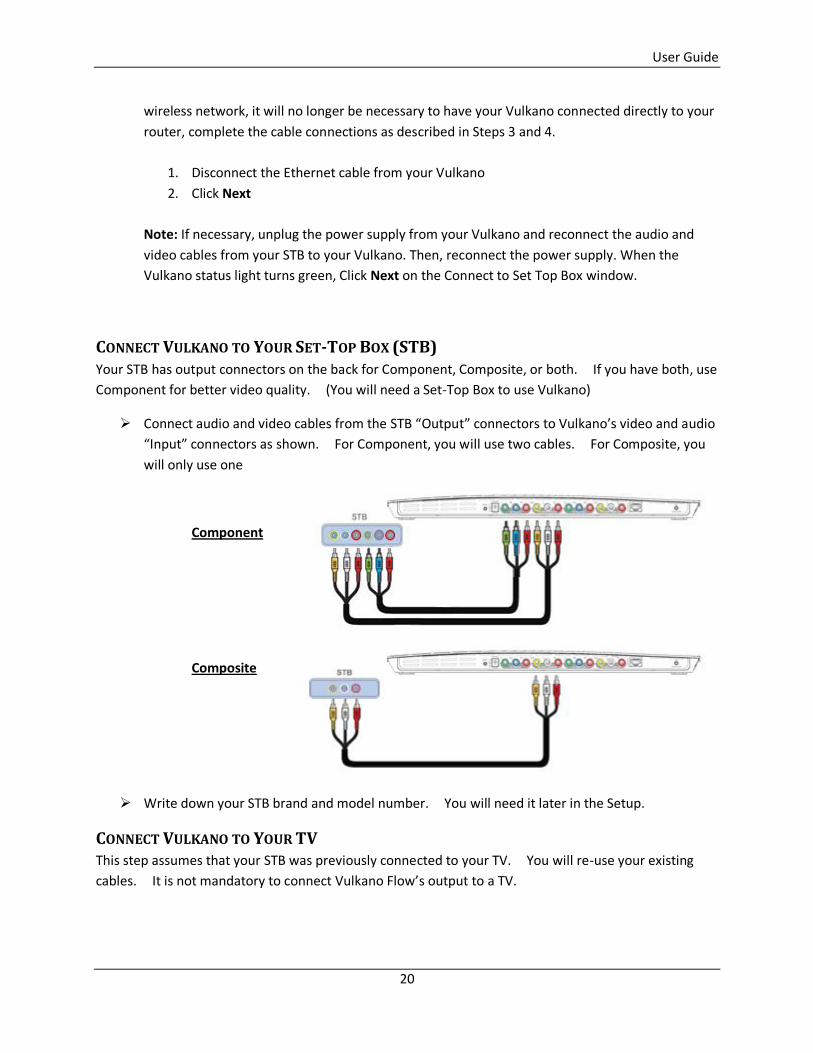
CONNECT VULKANO TO YOUR SET-TOP BOX (STB) Your STB has output connectors on the back for Component, Composite, or both. If you have both, use
Component for better video quality. (You will need a Set-Top Box to use Vulkano)
Connect audio and video cables from the STB “Output” connectors to Vulkano’s video and audio
“Input” connectors as shown. For Component, you will use two cables. For Composite, you
will only use one
Component
Composite
Write down your STB brand and model number. You will need it later in the Setup.
CONNECT VULKANO TO YOUR TV This step assumes that your STB was previously connected to your TV. You will re-use your existing
cables. It is not mandatory to connect Vulkano Flow’s output to a TV.
Your TV has audio and video “Input” connectors on the back or side for Component, Composite, or both.
Make sure you use the same cable types, either Component or Composite, for this connection as used in
Step 1.

User Guide
13
Connect audio and video cables from the Vulkano “Output” connectors to your TV’s video and
audio “Input” connectors as shown. For Component, you will use two cables. For Composite,
you will only use one.
Component
Composite
CONNECT THE POWER ADAPTER Plug the power adapter into Vulkano and a wall plug or power strip as shown
Vulkano Setup Wizard will lead you through the remaining steps.
CHOOSE PASSWORD Click Next
Follow the remaining steps in Vulkano Setup Wizard
to complete the process.
In the Choose password window:
Enter a password in the Password and
Confirm password fields
CONFIGURE WIRELESS SETTINGS In the Configure Wireless Settings:
1. Enter the name of your wireless network in
the Enter desired SSID field
2. Select your Security Type:
None
WEP
User Guide
14
WPA
3. Enter the appropriate Network key or
passphrase
4. Click Next
The specified wireless settings will be applied to your
Vulkano.
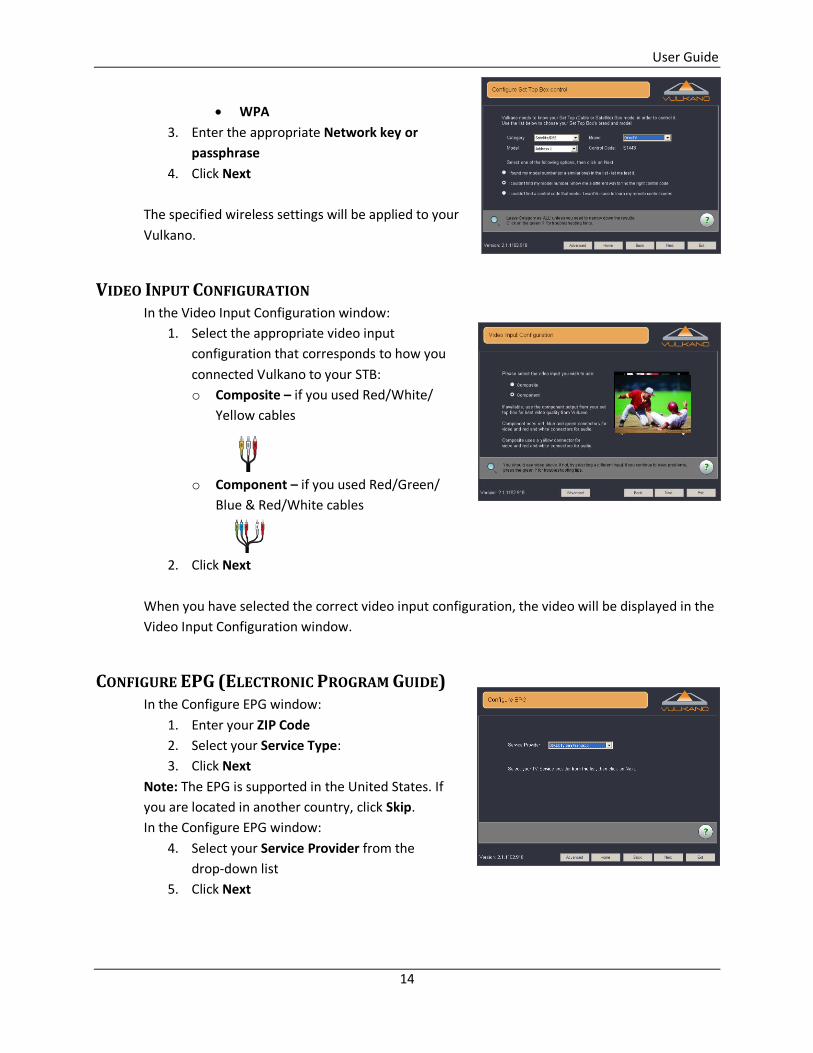
VIDEO INPUT CONFIGURATION In the Video Input Configuration window:
1. Select the appropriate video input
configuration that corresponds to how you
connected Vulkano to your STB:
o Composite – if you used Red/White/
Yellow cables
o Component – if you used Red/Green/
Blue & Red/White cables
2. Click Next
When you have selected the correct video input configuration, the video will be displayed in the
Video Input Configuration window.
CONFIGURE EPG (ELECTRONIC PROGRAM GUIDE) In the Configure EPG window:
1. Enter your ZIP Code
2. Select your Service Type:
3. Click Next
Note: The EPG is supported in the United States. If
you are located in another country, click Skip.
In the Configure EPG window:
4. Select your Service Provider from the
drop-down list
5. Click Next
User Guide
15
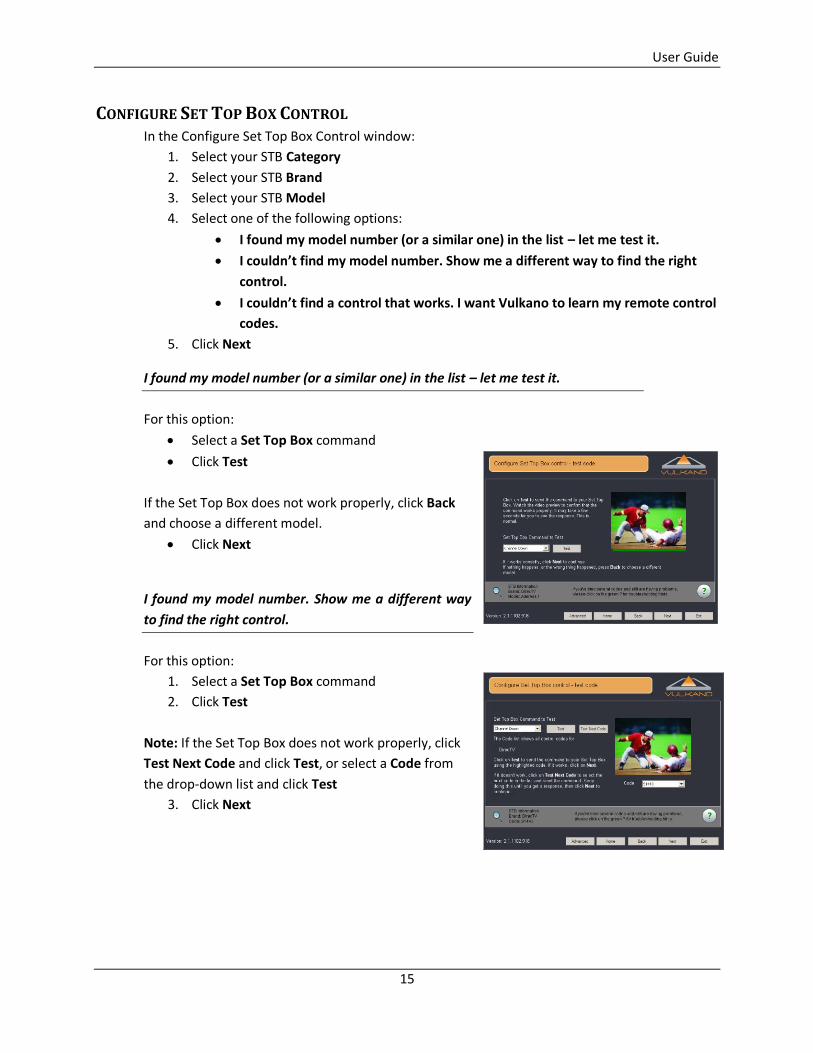
CONFIGURE SET TOP BOX CONTROL In the Configure Set Top Box Control window:
1. Select your STB Category
2. Select your STB Brand
3. Select your STB Model
4. Select one of the following options:
I found my model number (or a similar one) in the list – let me test it.
I couldn’t find my model number. Show me a different way to find the right
control.
I couldn’t find a control that works. I want Vulkano to learn my remote control
codes.
5. Click Next
I found my model number (or a similar one) in the list – let me test it.
For this option:
Select a Set Top Box command
Click Test
If the Set Top Box does not work properly, click Back
and choose a different model.
Click Next
I found my model number. Show me a different way
to find the right control.
For this option:
1. Select a Set Top Box command
2. Click Test
Note: If the Set Top Box does not work properly, click
Test Next Code and click Test, or select a Code from
the drop-down list and click Test
3. Click Next

User Guide
16
I couldn’t find a control that works. I want Vulkano to learn my remote control
codes.
For this option:
1. Select your Set Top Box type
2. Select a command from the list box
3. Click Learn
4. Follow the screen prompts
CHANNEL TUNING TEST – SINGLE DIGITS In the Channel Tuning Test – single digits window:
1. Select the appropriate single digit channel
option
2. Select the check box option if you need to
press the Enter button on your TV remote
after entering a channel number
3. Click the Channel option and select a
single-digit channel
4. Click Test
If the channel tuning test works correctly:
Click Next
CHANNEL TUNING TEST – MULTIPLE DIGITS In the Channel Tuning Test – multiple digits:
Click the Channel option and select a two or
three digit channel
Click Test
If the channel selection drops digits, adjust the slider
accordingly.
If the channel option works
Click Next

User Guide
17
CONFIGURE WAKEUP SETTINGS Some Set Top Boxes enter into a standby mode after
several hours. In this window, you can choose the
remote control command that will wake up your STB
prior to making a recording. You can:
1. Specify a Command
2. Specify the time Delay
3. Specify the Keep Alive interval
4. Click Next
ASSIGN VULKANO NAME In the Assign Vulkano Name window:
1. Enter a name for your Vulkano in the Give
your Vulkano a name field
2. Click Restore
3. Click Next
VULKANO CONFIGURED SUCCESSFULLY Congratulations! You have successfully set up your
Vulkano!
Click Finish

User Guide
18
VULKANO SETUP FOR MAC Congratulations on buying Vulkano. We will take you through a few simple steps to get you up
and running.
These steps are for setting up your Vulkano from. If you are using a Windows 7 PC,
Windows Vista PC or aa Windows XP PC, please look in the Table of Contents of this User
Guide to find the appropriate section.
CONNECT VULKANO TO POWER Plug the power adapter into
Vulkano and a wall plug or
power strip.
CONNECT VULKANO TO NETWORK You can use either a wired or
Wi-Fi connection to attach
Vulkano to your home network.
Wired connection: If your router is close to your Set Top Box, connect it to Vulkano using the
supplied Ethernet cable. Otherwise, follow the steps in “Wi-Fi connection” below to connect
Vulkano to your Wi-Fi network.
You can connect Vulkano to your router, your PC or an open Ethernet connection on
your network.
If you do not have an open port, you should purchase a 4-port Ethernet switch or hub.
Wi-Fi connection: Use the supplied Ethernet cable to temporarily connect your Mac or PC’s
Ethernet port to your Vulkano’s Ethernet port. In step 2, you will be shown how to connect
Vulkano to your Wi-Fi network. Once Vulkano is connected to your Wi-Fi network, you will
disconnect the Ethernet cable.
disconnect the Ethernet cable.
DOWNLOAD VULKANO MAC PLAYER Download Vulkano Mac Player from http://www.myvulkano.com/players.html
After download is complete, install Vulkano Mac Player. (It takes a few minutes to download,
and then a few more minutes to install).
When Vulkano Mac Player starts for the first time, the Setup program will run automatically.
Important! If you see this on the screen: ,you should press the
“Update” button shown here:
User Guide
19
Vulkano will download the latest firmware and reboot itself. Setup may report that it has lost
the connection – this is normal. If so, click on the “Retry” button to continue.
Vulkano Setup will guide you through the rest of the setup process.
When instructed, complete the cable connections as described in Steps 3 and 4.
Follow the remaining steps in Vulkano Setup to complete the process.
RUN VULKANO MAC PLAYER SETUP Congratulations on buying Vulkano. We will take you through a few simple steps to get you up
and running.
These steps are for setting up your Vulkano from a Mac. If you are using a Windows 7 PC,
Windows Vista PC or a Windows XP PC, please look in the Table of Contents of this User Guide
to find the appropriate section.
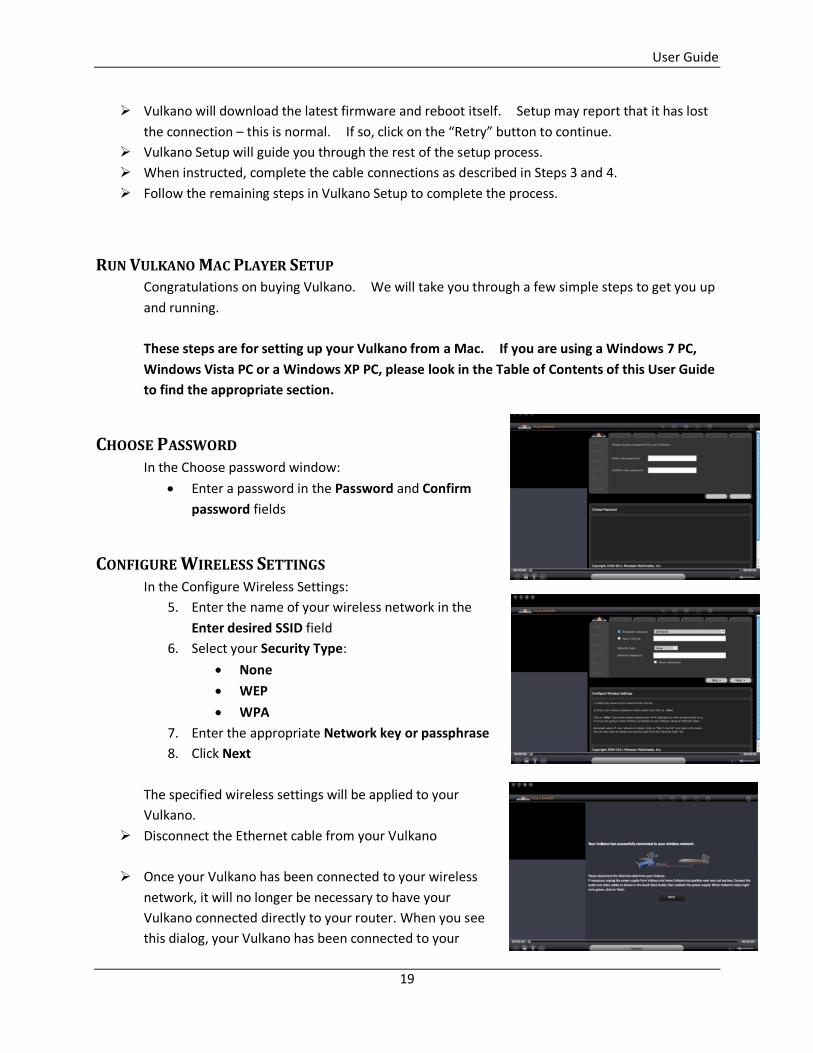
CHOOSE PASSWORD In the Choose password window:
Enter a password in the Password and Confirm
password fields
CONFIGURE WIRELESS SETTINGS In the Configure Wireless Settings:
5. Enter the name of your wireless network in the
Enter desired SSID field
6. Select your Security Type:
None
WEP
WPA
7. Enter the appropriate Network key or passphrase
8. Click Next
The specified wireless settings will be applied to your
Vulkano.
Disconnect the Ethernet cable from your Vulkano
Once your Vulkano has been connected to your wireless
network, it will no longer be necessary to have your
Vulkano connected directly to your router. When you see
this dialog, your Vulkano has been connected to your
User Guide
20
wireless network, it will no longer be necessary to have your Vulkano connected directly to your
router, complete the cable connections as described in Steps 3 and 4.
1. Disconnect the Ethernet cable from your Vulkano
2. Click Next
Note: If necessary, unplug the power supply from your Vulkano and reconnect the audio and
video cables from your STB to your Vulkano. Then, reconnect the power supply. When the
Vulkano status light turns green, Click Next on the Connect to Set Top Box window.
CONNECT VULKANO TO YOUR SET-TOP BOX (STB) Your STB has output connectors on the back for Component, Composite, or both. If you have both, use
Component for better video quality. (You will need a Set-Top Box to use Vulkano)
Connect audio and video cables from the STB “Output” connectors to Vulkano’s video and audio
“Input” connectors as shown. For Component, you will use two cables. For Composite, you
will only use one
Component
Composite
Write down your STB brand and model number. You will need it later in the Setup.
CONNECT VULKANO TO YOUR TV This step assumes that your STB was previously connected to your TV. You will re-use your existing
cables. It is not mandatory to connect Vulkano Flow’s output to a TV.

User Guide
21
Your TV has audio and video “Input” connectors on the back or side for Component, Composite, or both.
Make sure you use the same cable types, either Component or Composite, for this connection as used in
Step 1.
Connect audio and video cables from the Vulkano “Output” connectors to your TV’s video and
audio “Input” connectors as shown. For Component, you will use two cables. For Composite,
you will only use one.
Component
Composite
CONNECT THE POWER ADAPTER Plug the power adapter into Vulkano and a wall plug or power strip as shown
Vulkano Setup Wizard will lead you through the remaining steps.
VIDEO INPUT CONFIGURATION In the Video Input Configuration window:
3. Select the appropriate video input configuration
that corresponds to how you connected Vulkano
to your STB:
o Composite – if you used Red/White/
Yellow cables
o Component – if you used Red/Green/
Blue & Red/White cables
4. Click Next

User Guide
22
When you have selected the correct video input configuration, the video will be displayed in the
Video Input Configuration window.
CONFIGURE EPG (ELECTRONIC PROGRAM GUIDE) In the Configure EPG window:
6. Enter your ZIP Code
7. Select your Service Type:
Satellite
Cable
8. Click Next
Note: The EPG is supported in the United States. If you
are located in another country, click Skip.
In the Configure EPG window:
9. Select your Service Provider from the
drop-down list
10. Click Next
CONFIGURE SET TOP BOX CONTROL In the Configure Set Top Box Control window:
6. Select your STB Category
7. Select your STB Brand
8. Select your STB Model
9. Select one of the following options:
I found my model number (or a similar
one) in the list – let me test it.
I couldn’t find my model number. Show
me a different way to find the right control.
I couldn’t find a control that works. I want Vulkano to learn my remote control
codes.
10. Click Next
I found my model number (or a similar one) in the list – let me test it.
For this option:
Select a Set Top Box command

User Guide
23
Click Test
If the Set Top Box does not work properly, click Back and choose a different model.
Click Next
I found my model number. Show me a different way to find the right control.
For this option:
4. Select a Set Top Box command
5. Click Test
Note: If the Set Top Box does not work properly, click Test Next Code and click Test, or select a
Code from the drop-down list and click Test
6. Click Next
I couldn’t find a control that works. I want Vulkano to learn my remote control
codes.
For this option:
5. Select your Set Top Box type
6. Select a command from the list box
7. Click Learn
8. Follow the screen prompts
CHANNEL TUNING TEST – SINGLE DIGITS In the Channel Tuning Test – single digits window:
5. Select the appropriate single digit channel
option
6. Select the check box option if you need to
press the Enter button on your TV remote
after entering a channel number
7. Click the Channel option and select a
single-digit channel
8. Click Test
If the channel tuning test works correctly:
Click Next
User Guide
24
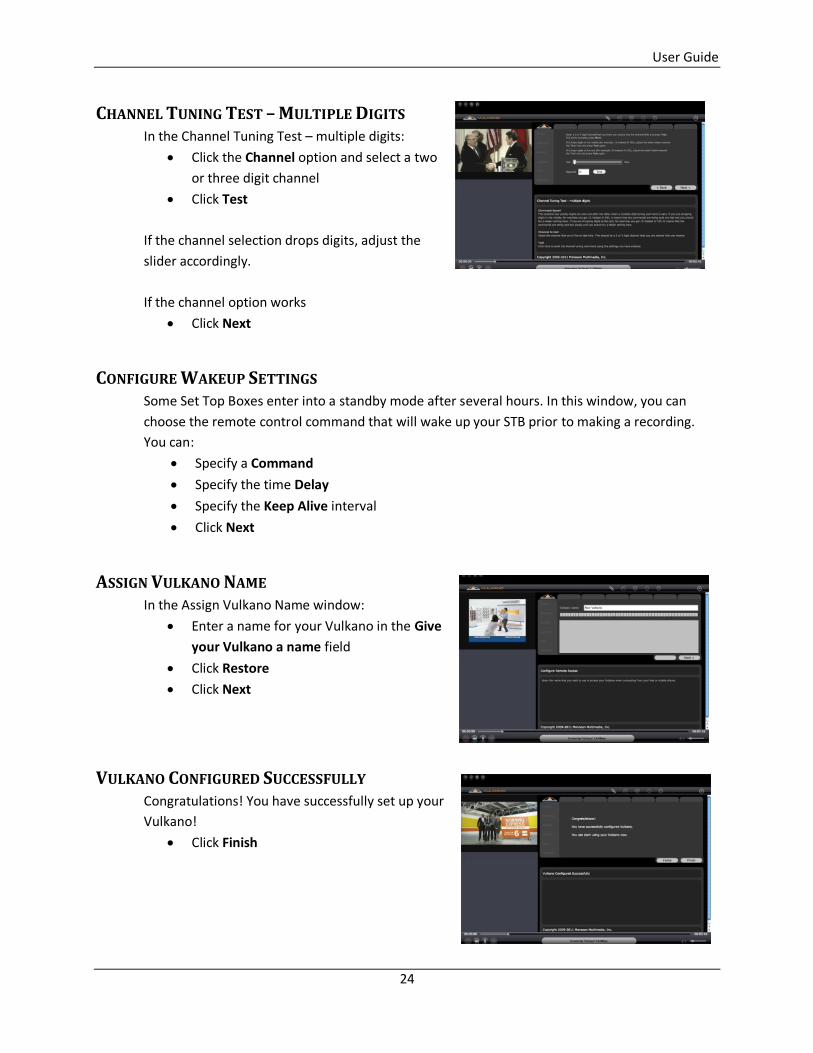
CHANNEL TUNING TEST – MULTIPLE DIGITS In the Channel Tuning Test – multiple digits:
Click the Channel option and select a two
or three digit channel
Click Test
If the channel selection drops digits, adjust the
slider accordingly.
If the channel option works
Click Next
CONFIGURE WAKEUP SETTINGS Some Set Top Boxes enter into a standby mode after several hours. In this window, you can
choose the remote control command that will wake up your STB prior to making a recording.
You can:
Specify a Command
Specify the time Delay
Specify the Keep Alive interval
Click Next
ASSIGN VULKANO NAME In the Assign Vulkano Name window:
Enter a name for your Vulkano in the Give
your Vulkano a name field
Click Restore
Click Next
VULKANO CONFIGURED SUCCESSFULLY Congratulations! You have successfully set up your
Vulkano!
Click Finish
User Guide
25
DOWNLOAD AND INSTALL PLAYERS
PC
Download Vulkano PC Player to your PC from www.myvulkano.com/players.html
Install and run Vulkano Player
Select Run Vulkano Player if you already set up Vulkano
Go to Player > Add or Select Vulkano > Add and enter the name and password of your
Vulkano
Select Watch TV to get started
MAC
Download Vulkano Mac Player to your Mac from www.myvulkano.com/players.html
Install and run Vulkano Player
Go to Player > Add/Select Vulkano > Add to enter the name and password of Vulkano
Go back to the Home screen and push Watch TV to get started
•
Mobile Players
Vulkano Mobile Players for are available from the Apple App Store, the Android App
Market and Blackberry App World
Note: Please be sure to select the correct version of Vulkano Player. For Vulkano Flow,
and Vulkano Blast models, use “Vulkano Player for Flow and Blast”. For other Vulkano
models, use “Vulkano Player”
IPHONE/IPAD
Download Vulkano Player to your iPhone or iPad from the iTunes App Store
Go to Settings>Select to enter the name and password of Vulkano
Go back to the Home screen and push Live TV to get started
ANDROID
Download Vulkano Player to your phone from Android Market
Install and run Vulkano Player
Go to Settings > Selected Vulkano > Add Vulkano
Enter the name and password of Vulkano
Go back to the Home screen and push Live TV to get started

User Guide
26
BLACKBERRY
Download Vulkano Player to your phone from Blackberry Apps World
Install and run Vulkano Player
Go to Settings > Selected Vulkano > Add Vulkano
Enter the name and password of Vulkano
Go back to the Home screen and push Live TV to get started

User Guide
27
DOWNLOAD THE CLIENTS
TROUBLESHOOTING
For additional information or technical assistance for your Vulkano product, go to Monsoon’s
Technical Support Website at: http://www.myvulkano.com/support.html.

User Guide
28
FREQUENTLY ASKED QUESTIONS
Q: WOULD VULKANO SUPPORT WINDOWS MCE?
A: Vulkano has its own EPG Support for Scheduled recordings, therefore there would be no need
to use Windows MCE with Vulkano. In another words Windows MCE is not supported by
Vulkano.
Q: I HAVE FORGOT MY VULKANO PASSWORD. IS THERE ANYWAY TO RETRIEVE IT?
A: You can retrieve the User Name and Password of your Vulkano from PlayerSettings.xml File of
your Old Laptop.
You may follow these Steps:
For Windows XP
Go to C:\Documents and Settings\User Account\Local Settings\Application Data\Monsoon
Multimedia\Vulkano\PlayerSettings.xml
For Vista & Win7
Go to C:\Users\<Your Account>\AppData\Local\Monsoon
Multimedia\Vulkano\PlayerSettings.xml
Kindly Note: Local Settings and AppData are Hidden Folders. Kindly Unhide them to get to the
PlayerSettings.xml file.
Follow these Steps to unhide Folders in XP
http://www.howtogeek.com/howto/windows/display-hidden-folders-in-xp/
Follow these Steps to Unhide Folders in Vista & Win7
http://www.howtogeek.com/howto/windows-vista/show-hidden-files-and-folders-in-windows-
vista/
Q: I WANT TO ADD SECOND VULKANO IN MY NETWORK, HOW CAN I DO IT?
A: In order to set up Second Vulkano Unit in a Single Network, you have to configure One
Vulkano Unit at one Point of time. Your first Vulkano Unit should not be plugged to the power
source during the basic Configuration. Once you configure your Second Vulkano Unit, you can
Plug in the first Vulkano unit as well.
User Guide
29
However, only one Vulkano can be seen as Local Vulkano unit. It depends on the IP Address
assigned to your Vulkano devices by your Network Router. For example if the IP Address
Assigned to one of your Vulkano is 192.168.1.15 and the IP Address assigned to your other
Vulkano is 192.168.1.16, in this case the Vulkano with .15 IP address will be seen as the Local
Vulkano as per the IP Stack.
Now to make your preferred Vulkano as your First Vulkano, you need to disconnect the other
Vulkano for a While, Reboot your Router then the Vulkano which is connected to it, it will
rearrange the IP address. You can then Turn on other Vulkano as well.
Q: WHAT ARE THE DIFFERENT TYPES OF INPUT & OUTPUT PORTS ON VULKANO?
A: Audio/Video Inputs and output Ports on Vulkano are as follows:
RCA Composite Video (In and Out)
RCA Left and Right Audio (In and Out)
Component Y-Pb-Pr (In and Out)
HDMI Out
Q: HOW CAN I SET UP MY VULKANO PLAYER ON PC AT A REMOTE LOCATION, I AM UNABLE TO
COMPLETE THE WIZARD?
A: You do not need to Run Wizard to configure Vulkano at your office computer.
For remote viewing you just have to Open PC Player > Then Click on "Player" in the Tool Bar on
Top of the PC Player > Then Click on "Add/Select Vulkano"> Enter your Vulkano Name and
Password under Remote Vulkano by Clicking on Add.
Once you are done, you can simply click on "Connect" to watch your Favorite Programs from the
remote location.
Q: CAN I SET MY VULKANO UP USING A PC?
A: Vulkano can be configured using PC and MAC Setup Wizard. In addition to this you can use
the Vulkano Remote Control for TV Setup Wizard to configure it on your TV.
Q: HOW DO I PORT FORWARD MY ROUTER?
A: You may go to http://www.portforward.com. Select Make and Model of your Router, (Skip
the Advertisement) Search for Monsoon Vulkano and Click on it.
Follow the instructions as how to forward the ports for Vulkano. You may call Monsoon
Technical Support for any assistance, if needed.

User Guide
30
Q: WILL MY 802.11 G ROUTER WORK WITH A VULKANO?
A: Yes, it will work with 802.11g router. Vulkano supports 802.11a, g & n Wireless Standards.
Q: CAN I UPGRADE MY VULKANO’S STORAGE?
A: Connecting any Peripheral to VULKANO is not as cut and dried as it would be with PC - on
Windows, you can go to any PC store and buy any Device and get proper drivers with it. On
VULKANO, we have to carefully select Devices and drivers to match the Linux operating system
used on the unit. As of now Only a few storage devices has been tested with VULKANO and that
is what will work with VULKANO. You may go upto 1TB of Storage on Vulkano which can be
purchased from http://shop.monsoonmultimedia.com/shop/products.aspx?c=3
Q: IS STATIC IP SETUP FOR VULKANO REQUIRED?
A: Since Vulkano renegotiates UPnP port forwarding rules whenever it gets an IP address, it
should not need to have a static IP set if your router supports UPnP (and UPnP is enabled).
However, there is no harm in having the IP set for static either – just the standard warnings
about making sure that the static IP chosen is not in the DHCP allocation range set by the router
or used by another device using static IP on the same LAN.
If Vulkano is being used on a router that does NOT support UPnP, and as a result port
forwarding had to be set manually using the router’s web interface, then static IP assignment for
Vulkano is recommended. Some routers feature a way to assign the same IP address to a device
repeatedly, which can be used instead of setting static IP on the Vulkano.
This can be called (depending on the router):
DHCP reservation
Static DHCP
Reserved IP address
And requires you to enter both the IP address you wish to use and the MAC address of the
device in question (Vulkano). See your router’s documentation for more information on this
feature.