vp-w80u/w80/w87/w87d ideo camcorder -...
TRANSCRIPT
Videocámara8mm
VP-W80U/W80/W87/W87D
Manual de instrucciones del usuario
Antes de utilizar la videocámara,lea completamente el presentemanual de instrucciones, yconsérvelo para futuras consultas.
AD68-00606K
Video Camcorder8mm
VP-W80U/W80/W87/W87D
Owner’s Instruction BookBefore operating the unit,please read this instructionbook thoroughly, and retain it for future reference.
ELECTRONICS
START/STOP
SELFTIMER
ZERORETURN
STILL
COUNTERRESETWIDE
TELE
DISPLAY
This product meets the intent of Directive 89/336 CEE, 73/23 CEE, 93/68 CEE.
Este producto cumple los requisitos de la Directiva 89/336 CEE, 73/23 CEE, 93/68 CEE.
VP-W80U VP-W80U
VP-W80/W87/W87DHi VP-W80/W87/
W87DHi
ENGLISH ESPAÑOL
00606K VP-W80 UK+ESP(1-19) 3/20/03 8:34 AM Page 101

ENGLISH ESPAÑOL
2
Features................................................................................8Descriptions
■ Front View/Side View/Rear View ....................9, 10, 11■ OSD (On Screen Display)..........................................12
Accessories Supplied with Camcorder ..............................14Remote Control (VP-W87/W87D only) ..............................15
■ Self Recording with the Remote Control ..................15
Adjusting the Hand Strap and Shoulder Strap ..................16 Lithium Battery Installation ................................................17Connecting a Power Source ..............................................18
■ To use the AC Power Adapter ..................................18■ To use the Battery Pack ............................................19
Using the Battery Pack ......................................................20■ Table of approximate continuous recording time ......20■ Battery Level display..................................................21
Inserting and Ejecting a Cassette ......................................22
Making the First recording ..............................................23Tips for Stable Image Shooting ......................................25
■ Recording with the Viewfinder ................................25Adjusting the Focus of the VIEWFINDER ......................25Reviewing a recording ....................................................26
■ Viewing a Still Picture ............................................27■ Picture Search ........................................................27
Zooming In and Out ........................................................28Digital Zoom ....................................................................29EASY mode (for beginners) ............................................31CUSTOM-Creating your own customized recording settings ............................................................................32
Table of Contents
Precautions and Safety Instructions
Getting to Know Your Camcorder
Preparing
Basic Shooting
Advanced Shooting
Tabla de Contenido
Avisos e instrucciones de seguridad
Conozca su videocámaraCaracterísticas ..................................................................8Descripciones
■ Vista Frontal/Vista lateral/Vista trasera ........9, 10, 11■ OSD (Visualizador en pantalla) ..............................12
Accesorios suministrados con la videocámara ..............14Mando a distáncia (sólo en VP-W87/W87D) ..................15
■ Filmación automática utilizando el mando a distancia 15
Ajuste de la correa de mano y de hombro ......................16 Instalación de la batería de litio ......................................17Conexión a la fuente de energía ....................................18
■ Uso del Adaptador de corriente AC ........................18■ Para el uso de la batería ........................................19
Uso de la batería ............................................................20■ Tabla de tiempo de grabación contínuo..................20■ Visualizador del nivel de batería ............................21
Introducir y extraer un videocasete ................................22
Filmando por primera vez ....................................................23Consejos para la filmación con imágenes estables ............25
■ Filmar utilizando el visor ..............................................25Ajustar el enfoque y la luminosidad del VISOR ..................25Reproducción de la cinta en videocámara ..........................26
■ Ver una imagen fija......................................................27■ Búsqueda de imágenes ..............................................27
Lejos y Cerca........................................................................28Zoom Digital..........................................................................29modo EASY shot (para principiantes)..................................31CUSTOM-Creacion de sus ajustes de grabaciónpersonalizados......................................................................32
Configuración de la videocámara
Filmación básica
Filmación avanzada
00606K VP-W80 UK+ESP(1-19) 3/20/03 8:34 AM Page 2

3
ENGLISH ESPAÑOL
Table of Contents (continued)
DIS (Digital Image Stabilizer, VP-W87/W87D only) ........33MF/AF (Manual Focus/Auto Focus) ................................34BLC..................................................................................35Program AE (Automatic Exposure) ................................36DSE (Digital Special Effects) in CAMERA mode ............38Setting and Recording the DATE/TIME ..........................40Selecting and Recording a Title ......................................42Fade In and Out ..............................................................44PIP (VP-W87/W87D only) ..............................................45Snap Shot (VP-W87/W87D only) ....................................46White Balance ................................................................47Demonstration ................................................................48Setting the Date/Title Colour ..........................................49Lighting Techniques ........................................................50
To watch on a TV monitor ..............................................51Various Functions in PLAYER mode ..............................53DSE in PLAYER mode ....................................................54
Cleaning and Taking care of the Camcorder ..................54■ Cleaning the Viewfinder ..........................................54■ Cleaning the Video Heads ......................................55■ Storing the Camcorder............................................55
Self Diagnosis Display ....................................................57Checking..........................................................................58Moisture Condensation....................................................60
Playing back the Tape
Maintenance
Troubleshooting Check
Specifications ............................................61
Index ........................................................62
Using Your Camcorder Abroad ................56
Tabla de Contenido (continuación)
DIS (Estabilizador digital de imagen, sólo en VP-W87/W87D) 33Enfoque Manual/automático ..........................................34BLC ................................................................................35PROGRAMA AE (Exposición automática) ....................36DSE (Efecto Digital Especial) en modo CAMERA ........38Configurar y grabar una FECHA/HORA ........................40Selección y grabación de un título ................................42Entrada y salida gradual ................................................44PIP (sólo en VP-W87/W87D) ........................................45Filmación Instantánea (sólo en VP-W87/W87D)............46Balance de blanco..........................................................47Demostración ................................................................48Ajustando el colour de Date/Title. ..................................49Técnicas de iluminación ................................................50
Para ver con el monitor de TV ......................................51Funciones varias en el modo PLAYER ..........................53DSE en modo PLAYER..................................................54
Limpieza y cuidados de la videocámara ........................54■ Limpieza del Visor ................................................54■ Limpieza de los cabezales del vídeo ....................55■ Guardar la videocámara ........................................55
Pantalla de autodiagnóstico ..........................................57Resolución de problemas ..............................................58Condensación de la humedad ......................................60
Reproducir una cinta
Mantenimiento
Especificaciones ........................................61
Índice. ......................................................62
Utilizar la videocámara en el extranjero ..56
Resolución de problemas
00606K VP-W80 UK+ESP(1-19) 3/20/03 8:34 AM Page 3
ENGLISH ESPAÑOL
4
Precautions and Safety Instructions
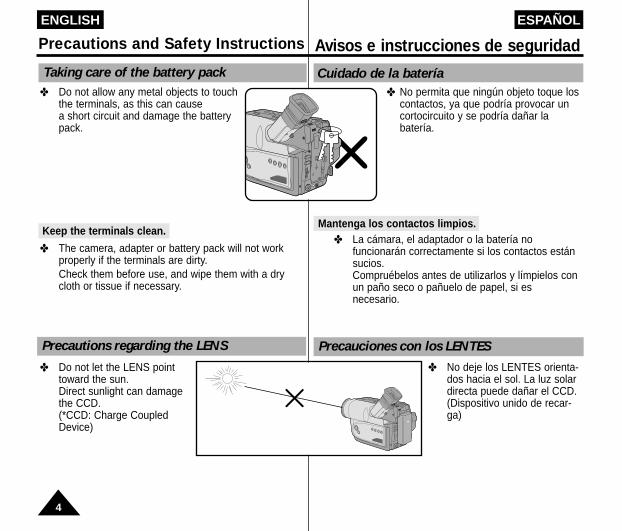
Taking care of the battery pack✤ Do not allow any metal objects to touch
the terminals, as this can cause a short circuit and damage the batterypack.
Keep the terminals clean.
✤ The camera, adapter or battery pack will not workproperly if the terminals are dirty. Check them before use, and wipe them with a dry cloth or tissue if necessary.
✤ Do not let the LENS pointtoward the sun. Direct sunlight can damagethe CCD.(*CCD: Charge CoupledDevice)
Avisos e instrucciones de seguridad
Cuidado de la batería
✤ No deje los LENTES orienta-dos hacia el sol. La luz solardirecta puede dañar el CCD.(Dispositivo unido de recar-ga)
Precauciones con los LENTES
✤ No permita que ningún objeto toque loscontactos, ya que podría provocar uncortocircuito y se podría dañar labatería.
Mantenga los contactos limpios.✤ La cámara, el adaptador o la batería no
funcionarán correctamente si los contactos estánsucios.Compruébelos antes de utilizarlos y límpielos conun paño seco o pañuelo de papel, si esnecesario.
Precautions regarding the LENS
00606K VP-W80 UK+ESP(1-19) 3/20/03 8:34 AM Page 4
ENGLISH ESPAÑOL
5
Precautions and Safety Instructions
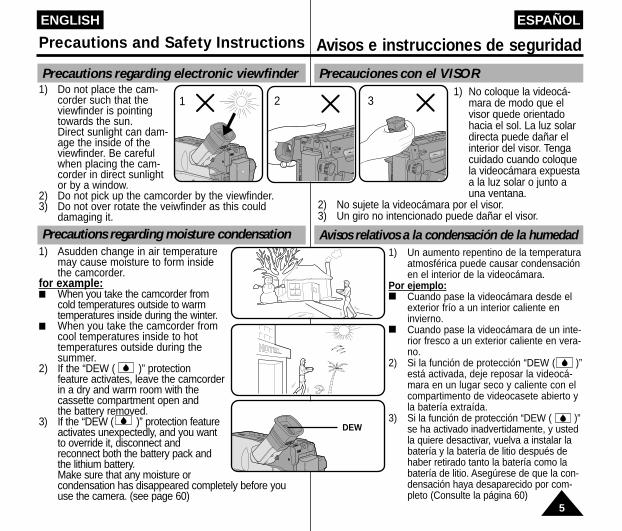
Precautions regarding electronic viewfinder1) Do not place the cam-
corder such that theviewfinder is pointingtowards the sun.Direct sunlight can dam-age the inside of theviewfinder. Be carefulwhen placing the cam-corder in direct sunlightor by a window.
2) Do not pick up the camcorder by the viewfinder.3) Do not over rotate the veiwfinder as this could
damaging it.
Precautions regarding moisture condensation
1 2 3
DEW
Avisos e instrucciones de seguridad
Precauciones con el VISOR1) No coloque la videocá-
mara de modo que el visor quede orientado hacia el sol. La luz solar directa puede dañar el interior del visor. Tenga cuidado cuando coloque la videocámara expuestaa la luz solar o junto a una ventana.
2) No sujete la videocámara por el visor.3) Un giro no intencionado puede dañar el visor.
1) Un aumento repentino de la temperaturaatmosférica puede causar condensaciónen el interior de la videocámara.
Por ejemplo:■ Cuando pase la videocámara desde el
exterior frío a un interior caliente eninvierno.
■ Cuando pase la videocámara de un inte-rior fresco a un exterior caliente en vera-no.
2) Si la función de protección “DEW ( )”está activada, deje reposar la videocá-mara en un lugar seco y caliente con elcompartimento de videocasete abierto yla batería extraída.
3) Si la función de protección “DEW ( )”se ha activado inadvertidamente, y ustedla quiere desactivar, vuelva a instalar labatería y la batería de litio después dehaber retirado tanto la batería como labatería de litio. Asegúrese de que la con-densación haya desaparecido por com-pleto (Consulte la página 60)
Avisos relativos a la condensación de la humedad1) Asudden change in air temperature
may cause moisture to form inside the camcorder.
for example:■ When you take the camcorder from
cold temperatures outside to warm temperatures inside during the winter.
■ When you take the camcorder from cool temperatures inside to hot temperatures outside during the summer.
2) If the “DEW ( )” protection feature activates, leave the camcorder in a dry and warm room with the cassette compartment open andthe battery removed.
3) If the “DEW ( )” protection featureactivates unexpectedly, and you want to override it, disconnect and reconnect both the battery pack and the lithium battery.Make sure that any moisture orcondensation has disappeared completely before youuse the camera. (see page 60)
00606K VP-W80 UK+ESP(1-19) 3/20/03 8:34 AM Page 5

ENGLISH ESPAÑOL
6
Precautions and Safety Instructions
Precautions regarding the battery pack✤ Make sure that the battery pack is charged before
shooting outdoors.✤ To preserve battery power, keep your camcorder
turned off when you are not operating it.✤ When your camcorder is in CAMERA mode, if it is left
in STANDBY for more than 5 minutes without opera-tion, it will automatically turn off to protect againstunnecessary battery discharge.
✤ Make sure that the battery pack is locked in placebefore carrying.Dropping the battery pack might damage it.
✤ When the battery reaches the end of its life pleasecontact your local dealer. The batteries have to bedealt with as chemical waste.
Warning: Keep the LITHIUM BATTERY out of thereach of children. Should the battery beswal-lowed, consult a doctor immediately.
✤ The lithium battery maintains the clock function,TITLE, CUSTOM function and preset contents memo-ry; even if the battery pack or AC power adapter isremoved.
✤ The lithium battery for the camcorder lasts about 8~10months under normal operation from time of installation.
✤ When the lithium battery becomes weak or dead, thedate/time indicator flashes about 5 secondswhen you set the power switch to CAMERA. In thiscase, replace the lithium battery with type CR2025. (see page 17)
Precautions regarding the Lithium battery
*When the lithium batterybecomes weak or deadplease contact your localdealer. The batteries haveto be desposed of aschemical waste.
WARNING:
LITHIUM BATTERYMUST BE RECYCLEDOR DISPOSED OFPROPERLY.
* Cuando la batería de litio sedebilite o se agote, póngaseen contacto con sudistribuidor local. Las bateríasdeben tratarse como si fueranresiduos químicos.
PRECAUCIÓN :
LA BATERÍA DE LITIOSE DEBE RECICLAR O ELIMINARADECUADAMENTE.
Avisos e instrucciones de seguridad
Avisos relativos a la batería✤ Asegúrese de que la batería está cargada antes de fil-
mar en el exterior.✤ Para conservar la energía de la batería, mantenga su
videocámara apagada cuando no la utilice.✤ Cuando su videocámara esté en modo CAMERA, se
apagará automáticamente si se deja en STANDBYmás de 5 minutos sin funcionar, para evitar unadescarga inesperada de la batería.
✤ Asegúrese de que la batería está firmemente colocadaen su lugar. La batería se puede dañar al caer al suelo.
✤ Cuando la batería llegue al final de su vida útil, pón-gase en contacto con su distribuidor local. Las bateríasdeben tratarse como si fueran residuos químicos.
Precaución : Mantenga la BATERÍA DE LITIO fuera delalcance de los niños. En el caso de quefuera tragada, consulte un médico deinmediato.
✤ La bateria de litio mantiene las funciones CLOCK,TITLE, CUSTOM y los ajustes de memoria; incluso sinla bateria o el alimentador AC desconectado.
✤ La batería de litio para la videocámara dura de 8 a 10meses bajo funcionamiento normal desde su instalación.
✤ Cuando la batería de litio se debilita o se agota, elindicador de fecha/hora centellea aproximádamente 5segundos cuando el interruptor pasa a CAMERA. Eneste caso, cambie la batería de litio con una de tipoCR2025. (Consulte la página 17)
Avisos relativos a la batería de litio
00606K VP-W80 UK+ESP(1-19) 3/20/03 8:34 AM Page 6

ENGLISH ESPAÑOL
7
Precautions and Safety Instructions Avisos e instrucciones de seguridad
Precautions regarding the hand strap✤ It is very important to adjust the hand
strap correctly to ensure the cameracan be held steady. (see page 16)
✤ Do not insert your hand in the handstrap forcibly, as it may result in dam-age to the buckle.
✤ To ensure normal recording and clear pictures, ensurethat the heads are kept clean.When playing back the pictures, if they are noisy orhardly visible, the video heads may be dirty. If this happens, clean the video heads with a dry typecassette cleaner.
✤ Do not use a wet type cassette cleaner.It may damage the video heads. (see page 55)
✤ To protect against tape and head-drum wear, yourcamcorder will automatically turn off if it is left inSTANDBY mode without operation for more than 5 minutes.
Precautions when cleaning the video heads
Avisos relativos a la correa para mano✤ Es muy importante ajustar la correa
para mano para filmar mejor. (Consulte la página 16)
✤ No inserte la mano en la correaforzándola, podría dañar la hebilla.
✤ Para asegurar filmaciones normales e imágenesclaras, limpie los cabezales del vídeo. Si las imágenesreproducidas tienen ruido o se ven con dificultad,puede que los cabezales del vídeo estén sucios. En este caso, limpie los cabezales del vídeo con unvideocasete de limpieza de tipo seco.
✤ No utilice un videocasete de limpieza de tipo húmedo.Podría dañar los cabezales del vídeo. (Consulte lapágina 55)
✤ Con el fin de evitar un mayor desgaste de la cinta ydel cabezal, su videocámara se apagará automática-mente si se deja en modo STANDBY (ESPERA) sinfuncionar más de 5 minutos.
Apagado automático del modo STANDBY (ESPERA)
Avisos relativos a la limpieza del cabezal del vídeo
Auto-off function in STANDBY mode
00606K VP-W80 UK+ESP(1-19) 3/20/03 8:34 AM Page 7

ENGLISH ESPAÑOL
8
Getting to Know Your Camcorder Conozca su videocámara
FeaturesYour camcorder has many features available when recordingor during playback.Snap Shot (VP-W87/W87D only)
The Snap Shot function allows you to record an object at astandstill for a limited time in CAMERA mode. (see page 46)PIP (VP-W87/W87D only)
The PIP function shows where the centre of the image iswhile zoomed in on a subject. (see page 45)BLC
When you shoot a subject with the light source behind thesubject or a subject with a light background, the BLC functionshould be switched on. (see page 35)DSE (Digital Special Effects)The DSE allows a creative look to your films by adding vari-ous special effects. (see page 38)Program AE (Auto Exposure)
The Program AE allows the shutter speed and aperture to beadjusted to the type of subject being filmed. (see page 36)
DIS (VP-W87/W87D only)The DIS compensates for unstable images caused by handshake, particularly at high magnification. (see page 33)
22x High ratio zoom lens Zooming is a recording technique that lets you change thesize of the subject in the picture.For more professional recordings, use the zoom function. (see page 28)
Digital Zoom Zooms more than 22x are performed digitally. (see page 29)
MacroThe macro function allows you to shoot your subject at closerange. You have to adjust the zoom fully wide for macroshooting. (see page 28)
CaracterísticasSu videocámara incluye una gran variedad de característicaspara la grabación y la reproducción.Filmación instantánea (sólo VP-W87/W87D)
La función de filmación instantánea le permite filmar un objetoen un imagen fija durante un tiempo limitado en el modoCámara. (Consulte la página 46)PIP (sólo VP-W87/W87D)
La función PIP muestra dónde se encuentra el centro de la ima-gen mientras se filma en Zoom Digital del modo Cámara.(Consulte la página 45)BLC
Cuando filme con la fuente de luz detrás del motivo o un motivocon luz de fondo, utilice la función BLC. (Consulte la página 35)DSE (Efectos especiales digitales)
La función DSE permite añadir efectos especiales a sus graba-ciones consiguiendo así una apariencia más creativa.(Consulte la página 38)Program AE (Exposición automática)
El Programa AE permite adaptar la velocidad y abertura del obtu-rador al tipo de escena que se va a filmar. (Consulte la página 36)DIS (sólo VP-W87/W87D)
Esta función permite compensar la inestabilidad de las imágenes ocasionada por el movimiento de la mano, especialmente encaso de gran aumento. (Consulte la página 33)Lente de Zoom de alta proporción 22x
El zoom es una técnica de filmación que permite cambiar eltamaño del motivo en la escena. Para grabaciones de tipo másprofesional utilice la función zoom. (Consulte la página 28)Zoom digital
El zoom mayor de 22x se consigue digitalmente.(Consulte la página 29)Macro
La función macro permite filmar un objeto a corta distancia. Es necesario utilizar el zoom de amplitud máxima para podergrabar con macro. (Consulte la página 28)
00606K VP-W80 UK+ESP(1-19) 3/20/03 8:34 AM Page 8

ENGLISH ESPAÑOL
9
Getting to Know Your Camcorder Conozca su videocámara
Front View Vista Frontal
1. Lente (Consulte la página 61)
2. REC SEARCH (REW) REC SEARCH funcionaen el módo STANDBY(Consulte la página 24)REW funciona en el modoPLAYER (Consulte la pági-na 53)
3. PLAY/STILL (LIGHT)PLAY/STILL funciona en el modo PLAYER. (Consulte la página 52)LIGHT funciona en el modoCAMERA. (sólo VP-W87/ W87D)
4. REC SEARCH (FF) REC SEARCH funcionaen el modo STANDBY.(Consulte la página 24) FFfunciona en el modo PLAY-ER. (Consulte la página 53)
5. DATE/TIME(STOP) DATE/TIME funciona en elmodo CAMERA. (Consultela página 40)
STOP funciona en el modoPLAYER (Consulte la pági-na 52)
6. TAPE EJECT(Consulte la página 22)Utilice esta función paraextraer la cinta.
7. EVF(Visor Electrónico)8. MIC
MIC funciona en el modo CAMERA.
9. Sensor de mando a distan-cia (sólo VP-W87/ W87D, Consulte la página 15)
10. EASYEASY funciona en el modoCAMERA.
11. CUSTOMCUSTOM funciona en elmodo CAMERA.
12. VIDEO Light(sólo VP-W87/W87D)
1. Lens (see page 61)2. REC SEARCH (REW)
REC SEARCH works inSTANDBY mode. (see page 24)REW works in PLAYER mode. (see page 53)
3. PLAY/STILL (LIGHT) PLAY/STILL works in PLAYER mode. (see page 52)LIGHT works in CAMERAmode. (VP-W87/W87D)
4. REC SEARCH (FF) REC SEARCH works inSTANDBY mode. (see page 24)FF works in PLAYER mode. (see page 53)
5. DATE/TIME (STOP) DATE/TIME works in CAMERA mode. (see page 40)
STOP works in PLAYER mode. (see page 52)
6. TAPE EJECT (see page 22)Used to eject the tape.
7. EVF (Electronic Viewfinder)
8. MICMIC works in CAMERAmode.
9. Remote sensor (VP-W87/W87D only, see page 15)
10. EASYEASY works in CAMERAmode.
11. CUSTOMCUSTOM works in CAMERA mode.
12. VIDEO LIGHT (VP-W87/W87D only)
3. PLAY/STILL (LIGHT)
4. REC SEARCH (FF)
5. DATE/TIME (STOP)
7. EVF
11. CUSTOM
2. REC SEARCH (REW)
6. TAPE EJECT
1. LENS12. VIDEO LIGHT
9. Remote Sensor
8. MIC
10. EASY
00606K VP-W80 UK+ESP(1-19) 3/20/03 8:34 AM Page 9

ENGLISH ESPAÑOL
10
Getting to Know Your Camcorder Conozca su videocámara
Side View
13. BATTERY EJECT14. MENU ON/OFF
(Consulte la página 30) MENU ON/OFF funcionasólo en los modos CAM-ERA y PLAYER.
15. ENTER (MF) (Consulte la página 30)ENTER funciona en elmodo MENU. MF funciona en el modo CAMERA.
16. UP/DOWN Disco selector(Consulte la página 30)El disco selectorUP/DOWN funciona en elmodo MENU.
17. PROGRAMA AE (Consulte la página 36)PROGRAMAAE(Exposición Automática) fun-ciona en el modo CAMERA.
18. DSE (Consulte la página 38)DSE funciona en el modo CAMERA y PLAYER.
19. BLC(Consulte la página 35)BLC funciona en el modo CAMERA.
20. FADE (Consulte la página 44)FADE funciona en el modoCAMERA.
21. Salida de DC (Consulte la página 18)
22. Indicador de la carga(Consulte la página 19)
23. Salida a S-VÍDEO (sólo VP-W80/W87/W87D)
24. Batería de litio(Consulte la página 17)
Vista lateral
13. BATTERY EJECT14. MENU ON/OFF
(see page 30)MENU ON/OFF works inCAMERA and PLAYERmode.
15. ENTER (MF) (see page 30)ENTER works in MENUmode. MF works in CAMERAmode.
16. UP/DOWN dial(see page 30)UP/DOWN dial works inMENU mode.
17. PROGRAM AE(see page 36) PROGRAM AE (AutoExposure) works in CAMERA mode.
18. DSE (see page 38)DSE works in CAMERAand PLAYER mode.
19. BLC (see page 35) BLC works in CAMERAmode.
20. FADE (see page 44)FADE works in CAMERAmode.
21. DC Jack (see page 18)22. Recharging Indicator
(see page 19)23. S-VIDEO out (VP-W80/
W87/W87D only) 24. Lithium Battery
(see page 17)
24. Lithium Battery
14. MENU ON/OFF
13. BATTERY EJECT
15. ENTER (MF)16. UP/DOWN Dial
21. DC Jack22. Recharging Indicator
23. S-VIDEO out(VP-W80/W87/W87D only)
17. P.AE
19. BLC
20. FADE
18. DSE
00606K VP-W80 UK+ESP(1-19) 3/20/03 8:34 AM Page 10

11
ENGLISH ESPAÑOL
Getting to Know Your Camcorder Conozca su videocámara
Rear View
25. ZOOM (Consulte la página 28)
26. Soporte del videocasete27. Gancho para la correa del
hombro (Consulte lapágina 17)
28. Salida de AUDIO/VÍDEO (Consulte la página 51)
29. Tapa de LENS30. Correa para mano
(Consulte la página 16)31. Interruptor POWER
(Consulte la página 18)- CAMERA: Seleccionar
para filmar.- OFF: Seleccionar para
apagar la videocá-marma.
- PLAYER: Seleccionarpara reproducir.
32. START/STOP(Consulte la página 23)START/STOP funciona enel modo CAMERA.
33. Compartimiento de labatería (Consulte lapágina 19)
34. SNAP SHOT/D.ZOOMSNAP SHOT funciona enel modo CAMERA. (sólo VP-W87/W87D,Consulte la página 46)D.ZOOM funciona en elmodo CAMERA. (sólo VP-W80U/W80,Consulte la página 30)
35. MIC externo(sólo VP-W87/W87D, Consulte la página 61)
Vista trasera
25. ZOOM (see page 28)26. Cassette Compartment27. Hooks for Shoulder
Strap (see page 17)28. AUDIO/VIDEO out
(see page 51)29. LENS cap30. Hand Strap
(see page 16)31. POWER Switch
(see page 18)- CAMERA : Select to
record.- OFF : Select to turn off
the camcorder.- PLAYER : Select to
playback.
32. START/STOP(see page 23)START/STOP works inCAMERA mode.
33. Battery pack compart-ment (see page 19)
34. D.ZOOM (SNAP SHOT) D.ZOOM works in CAM-ERA mode. (VP-W80U/W80 only, see page 30)SNAP SHOT works inCAMERA mode. (VP-W87/W87D only, see page 46)
35. External MIC (VP-W87/W87D only, see page 61)
25. ZOOM
26. CassetteCompartment
28. AUDIO/VIDEO out
29. LENS cap
30. Hand Strap
34. D.ZOOM (SNAP SHOT)
27. Hooks for Shoulder Strap
32. START/STOP
33. Battery pack compartment
31. POWER Switch
35. External MIC (VP-W87/W87D only)
MIC
00606K VP-W80 UK+ESP(1-19) 3/20/03 8:34 AM Page 11
ENGLISH ESPAÑOL
12
Getting to Know Your Camcorder Conozca su videocámara
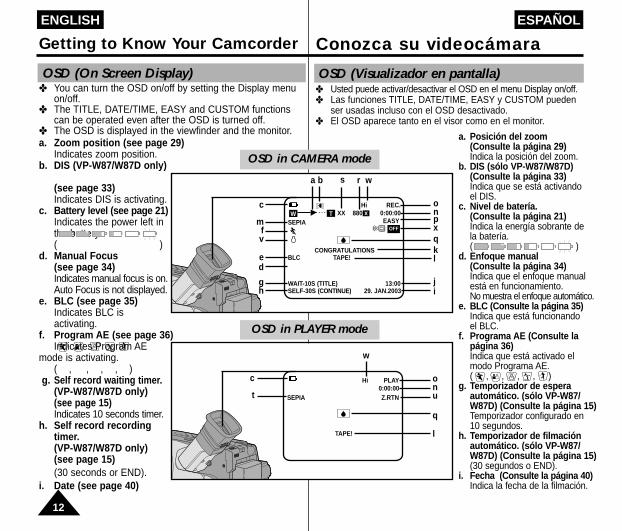
OSD (On Screen Display)✤ You can turn the OSD on/off by setting the Display menu
on/off.✤ The TITLE, DATE/TIME, EASY and CUSTOM functions
can be operated even after the OSD is turned off.✤ The OSD is displayed in the viewfinder and the monitor.
OSD in CAMERA modea. Zoom position (see page 29)
Indicates zoom position.b. DIS (VP-W87/W87D only)
(see page 33)Indicates DIS is activating.
c. Battery level (see page 21)Indicates the power left in the battery.( )
d. Manual Focus (see page 34)Indicates manual focus is on.Auto Focus is not displayed.
e. BLC (see page 35)Indicates BLC is activating.
f. Program AE (see page 36)Indicates Program AE
mode is activating. ( , , , , )
g. Self record waiting timer.(VP-W87/W87D only)(see page 15)Indicates 10 seconds timer.
h. Self record recording timer.(VP-W87/W87D only) (see page 15)(30 seconds or END).
i. Date (see page 40)
a. Posición del zoom (Consulte la página 29)Indica la posición del zoom.
b. DIS (sólo VP-W87/W87D) (Consulte la página 33)Indica que se está activando el DIS.
c. Nivel de batería. (Consulte la página 21)Indica la energía sobrante de la batería.( )
d. Enfoque manual (Consulte la página 34)Indica que el enfoque manual está en funcionamiento. No muestra el enfoque automático.
e. BLC (Consulte la página 35)Indica que está funcionando el BLC.
f. Programa AE (Consulte la página 36)Indica que está activado el modo Programa AE.( , , , , )
g. Temporizador de espera automático. (sólo VP-W87/ W87D) (Consulte la página 15)Temporizador configurado en 10 segundos.
h. Temporizador de filmación automático. (sólo VP-W87/ W87D) (Consulte la página 15)(30 segundos o END).
i. Fecha (Consulte la página 40)Indica la fecha de la filmación.
OSD (Visualizador en pantalla)✤ Usted puede activar/desactivar el OSD en el menu Display on/off.✤ Las funciones TITLE, DATE/TIME, EASY y CUSTOM pueden
ser usadas incluso con el OSD desactivado.✤ El OSD aparece tanto en el visor como en el monitor.
OSD in PLAYER mode
onpxqkl
ji
r ws a b
Hi 8 REC.XX 880 0:00:00
SEPIA
CONGRATULATIONSBLC TAPE!
WAIT-10S (TITLE) 13:00SELF-30S (CONTINUE) 29. JAN.2003
W TEASY
xc
mfv
ed
gh
c
t
on u
q
l
w
Hi 8 PLAY0:00:00
SEPIA Z.RTN
TAPE!
OFF
00606K VP-W80 UK+ESP(1-19) 3/20/03 8:34 AM Page 12
ENGLISH ESPAÑOL
13
Getting to Know Your Camcorder Conozca su videocámara
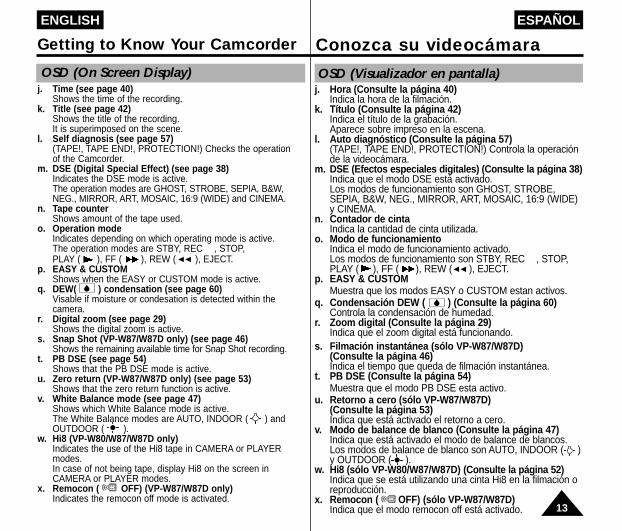
OSD (On Screen Display)j. Time (see page 40)
Shows the time of the recording.k. Title (see page 42)
Shows the title of the recording.It is superimposed on the scene.
l. Self diagnosis (see page 57)(TAPE!, TAPE END!, PROTECTION!) Checks the operation of the Camcorder.
m. DSE (Digital Special Effect) (see page 38)Indicates the DSE mode is active.The operation modes are GHOST, STROBE, SEPIA, B&W, NEG., MIRROR, ART, MOSAIC, 16:9 (WIDE) and CINEMA.
n. Tape counter Shows amount of the tape used.
o. Operation mode Indicates depending on which operating mode is active.The operation modes are STBY, REC , STOP, PLAY ( ), FF ( ), REW ( ), EJECT.
p. EASY & CUSTOMShows when the EASY or CUSTOM mode is active.
q. DEW( ) condensation (see page 60)Visable if moisture or condesation is detected within the camera.
r. Digital zoom (see page 29)Shows the digital zoom is active.
s. Snap Shot (VP-W87/W87D only) (see page 46)Shows the remaining available time for Snap Shot recording.
t. PB DSE (see page 54)Shows that the PB DSE mode is active.
u. Zero return (VP-W87/W87D only) (see page 53)Shows that the zero return function is active.
v. White Balance mode (see page 47)Shows which White Balance mode is active.The White Balance modes are AUTO, INDOOR ( ) and OUTDOOR ( ).
w. Hi8 (VP-W80/W87/W87D only)Indicates the use of the Hi8 tape in CAMERA or PLAYER modes.In case of not being tape, display Hi8 on the screen in CAMERA or PLAYER modes.
x. Remocon ( OFF) (VP-W87/W87D only)Indicates the remocon off mode is activated.
OSD (Visualizador en pantalla)j. Hora (Consulte la página 40)
Indica la hora de la filmación.k. Título (Consulte la página 42)
Indica el título de la grabación. Aparece sobre impreso en la escena.
l. Auto diagnóstico (Consulte la página 57)(TAPE!, TAPE END!, PROTECTION!) Controla la operación de la videocámara.
m. DSE (Efectos especiales digitales) (Consulte la página 38)Indica que el modo DSE está activado.Los modos de funcionamiento son GHOST, STROBE, SEPIA, B&W, NEG., MIRROR, ART, MOSAIC, 16:9 (WIDE)y CINEMA.
n. Contador de cinta Indica la cantidad de cinta utilizada.
o. Modo de funcionamiento Indica el modo de funcionamiento activado.Los modos de funcionamiento son STBY, REC , STOP, PLAY ( ), FF ( ), REW ( ), EJECT.
p. EASY & CUSTOMMuestra que los modos EASY o CUSTOM estan activos.
q. Condensación DEW ( ) (Consulte la página 60)Controla la condensación de humedad.
r. Zoom digital (Consulte la página 29)Indica que el zoom digital está funcionando.
s. Filmación instantánea (sólo VP-W87/W87D) (Consulte la página 46)Indica el tiempo que queda de filmación instantánea.
t. PB DSE (Consulte la página 54)Muestra que el modo PB DSE esta activo.
u. Retorno a cero (sólo VP-W87/W87D) (Consulte la página 53)Indica que está activado el retorno a cero.
v. Modo de balance de blanco (Consulte la página 47)Indica que está activado el modo de balance de blancos.Los modos de balance de blanco son AUTO, INDOOR ( ) y OUTDOOR ( ).
w. Hi8 (sólo VP-W80/W87/W87D) (Consulte la página 52)Indica que se está utilizando una cinta Hi8 en la filmación o reproducción.
x. Remocon ( OFF) (sólo VP-W87/W87D)Indica que el modo remocon off está activado.
00606K VP-W80 UK+ESP(1-19) 3/20/03 8:34 AM Page 13

ENGLISH ESPAÑOL
14
Getting to Know Your Camcorder Conozca su videocámara
Accesorios suministrados con la videocámaraAccessories Supplied with CamcorderAsegúrese de que recibe con su videocámara los sigu-ientes accesorios.
Nota: Los accesorios opcionales pueden ir incluídoscon la videocámara dependiendo del país dondese compre.
Accesorios básicos1. Adaptador de corriente AC.
(Consulte la página 18)2. Cable DC.
(Consulte la página 18)3. Batería. (Consulte la página 19)4. Cable Audio/Vídeo.
(Consulte la página 51)5. Correa de hombro.
(Consulte la página 17)6. Manual de instrucciones.7. Mando a distancia.
(sólo VP-W87/W87D, Consulte la página 15)
8. Bateria Lithium para el Control Remoto. (sólo VP-W87/W87D, Consulte la página 15)Batería de litio para el reloj.(TYPE: CR2025, Consulte la página 17)
9. Adaptador Scart.(Consulte la página 51)
Accesorios opcionales10. Cable S-VÍDEO.
(sólo VP-W80/W87/W87D,Consulte la página 52)
Make sure that the following basic accessories are supplied with your camcorder.
Basic Accessory
1. AC Power Adapter. (see page 18)
2. AC cord. (see page 18)3. Battery Pack. (see page 19)4. Audio/Video Cable.
(see page 51)5. Shoulder strap. (see page 17)6. Instruction Book.7. Remote Control.
(VP-W87/W87D only, see page 15)
8. Lithium Battery for Remote Control.(VP-W87/W87D only, see page 15)Lithium Battery for Clock.(TYPE: CR2025, see page 17)
9. Scart adapter. (see page 51)
Optional Accessory
10. S-VIDEO cable (VP-W80/W87/W87D only,see page 52)
Note: Optional accessories may be included with thecamcorder, depending on the country in whichit is purchased.
1. AC Power Adapter 2. AC cord 3. Battery Pack
5. Shoulder Strap4. AUDIO/VIDEO Cable
START/STOP
SELFTIMER
ZERORETURN
STILL
COUNTERRESET
WIDE
TELE
DISPLAY
6. Instruction Book
7. Remote Control
Video Camcorder8mm
8. Lithium Batteries
10. S-VIDEO Cable
9. Scart adapter
00606K VP-W80 UK+ESP(1-19) 3/20/03 8:34 AM Page 14

ENGLISH ESPAÑOL
15
START/STOP
SELFTIMER
ZERORETURNSTILL
COUNTERRESET WIDE
TELE
DISPLAY
6
12897
11
4512
10
3
Getting to Know Your Camcorder Conozca su videocámara
Remote Control (VP-W87/W87D only)Description of Parts
1. Start/Stop (see page 23)2. Self Timer3. Still (see page 53)4. WIDE (see page 28)5. TELE (see page 28)6. Display (see page 12)7. (Play) (see page 52)8. (FF) (see page 53)9. (REW) (see page 53) 10. (Stop) (see page 52)11. Counter Reset (see page 53)12. Zero Return (see page 53)
Battery Installation to the Remote Control✤ You must insert or replace this battery when:
- You purchase the camcorder. - The remote control doesn’t work.
✤ Insert Lithium Battery, following the + and - markings.
✤ Be careful not to reverse the polarity of the battery.
Self Recording with the Remote Control✤ The Self Timer function on the
remote control allows you to start and stop recording automatically.
Example: recording yourself✤ Two options are available
- WAIT-10S/SELF-30S: wait 10 seconds, followed by 30 seconds of recording.
- WAIT-10S/SELF-END: wait 10 seconds, followedby recording until you press the START/STOPbutton again.
Mando a distancia (VP-W87/W87D)
Instalación de las baterías para el mando a distancia✤ Deberá introducir o cambiar estas
baterías cuando:- Compre su videocámara. - El mando a distancia no funcione.
✤ Insertar la batería de Litio segun las marcas + y -.
✤ Tenga cuidado de no confundir la polari-dad de la batería.
Filmación automática utilizando el mando a distancia
✤ La función Temporizador automático con el mando a distancia le permite comenzar y terminar la grabación automáticamente.
Ejemplo : Escena con todos los miembros de su familia ✤ Existen dos opciones
- WAIT-10S/SELF-30S: esperar 10 segundos y después filmar durante 30 segundos.
- WAIT-10S/SELF-END: esperar 10 segundos y después grabar hasta que vuelva a pulsar el botón START/STOP.
Descripción de partas1. Iniciar/Parar (Consulte la página 23)2. Temporizador Automático3. Imagen Fija (Consulte la página 53)4. ÁNGULO GRANDE (Consulte la página 28)5. TELE (Consulte la página 28)6. Visualizador (Consulte la página 12)7. (Reproducir) (Consulte la página 52)8. FF (Avance rápido)
(Consulte la página 53)9. REW (Rebobinado)
(Consulte la página 53) 10. (Parar) (Consulte la página 52)11. Counter Reset (Consulte la página 53)12. Zero Return (Consulte la página 53)
00606K VP-W80 UK+ESP(1-19) 3/20/03 8:34 AM Page 15

16
ENGLISH ESPAÑOL
Preparing Configuración de la videocámara1. Ponga el interruptor de encen-
dido en modo CAMERA.2. Pulse el botón del Temporizador
Automático hasta que el indicador aparezca en la pantalla visor:■ WAIT-10S/SELF-30S■ WAIT-10S/SELF-END
3. Pulse el botón START/STOPpara que se ponga en funcionamiento el temporizador.: Tras 10 segundos de espera,
comienza la filmación: Si ha seleccionado SELF-30S,
la filmación se detendrá automáticamente después de 30 segundos.
: Si ha seleccionado SELF-END, pulse de nuevo el botón START/ STOP cuando desée terminar la filmación.
Nota: Cuando filme utilizando el temporizador, puede pulsar elbotón START/STOP una segunda vez para cancelar lafunción.
Correa de mano✤ Es muy importante ajustar correctamente esta cor-
rea para obtener buenos resultados de filmación.✤ La correa de sujeción de
mano le permite:- Sujetar la cámara en una
postura cómoda y estable.- Pulsar el Zoom y el botón
de Grabación sin cambiar la posición de la mano.
1. Tire de la cubierta de la correa para abrirla y despegue la correa. Ajuste la longitud y vuelva a pegarla en la cubierta.
2. Cierre de nuevo la cubierta de la correa.
1. Set power switch to CAMERA.2. Press Self Timer button until
the appropriate indicator is displayed on the Viewfinder:■ WAIT-10S/SELF-30S■ WAIT-10S/SELF-END
3. Press START/STOP button tostart the timer.:After approximately 10 sec-onds, recording starts.: If you have selected SELF-30S, recording stops automat-ically after 30 seconds.
: If you have selected SELF-END, press the START/ STOPagain when you wish to stoprecording.
Note: When using the timer, pressing the START/STOPbutton again, cancels the function.
Hand Strap✤ It is very important to adjust the hand strap correctly
to ensure the camera can be held securely.✤ The hand strap enables you to:
- Hold the camcorder in a stable, comfortable position.
- Press the Zoom and the red Record button without having to change the position of your hand.
1. Pull open the Hand Strap cover and release the Hand Strap, adjust its length andstick it back onto the Hand Strap cover.
2. Close the Hand Strap cover when finished.
Ajuste de la correa de mano y de hombro
Adjusting the Hand Strap and Shoulder Strap
1
START/STOP
SELFTIMER
ZERORETURNSTILL
COUNTERRESET WIDE
TELE
DISPLAY3
START/STOP
SELFTIMER
ZERORETURNSTILL
COUNTERRESET WIDE
TELE
DISPLAY2
WAIT-10S SELF-30S
CAMERA
00606K VP-W80 UK+ESP(1-19) 3/20/03 8:34 AM Page 16

ENGLISH ESPAÑOL
17
Configuración de la videocámaraPreparingCorrea de hombro
✤ La correa de hombro lepermite llevar la cámaracon total seguridad.
1. Introduzca los extremos enlos enganches para correasituados en la videocámara.
✤ La batería del litio mantiene la función del reloj y la memoria de contenidos de título y preconfiguración; incluso si se retiran la batería o el adaptador de corriente AC.
✤ La batería de litio tiene una duración de 8 a 10 meses a partir del momento de su instalación con un fun-cionamiento normal.
✤ Cuando la batería de litio se debilita o se descarga por completo, el indicador fecha/hora parpadea durante unos 5 segundos al colocar el interruptor de encendido en la posición CAMERA.
En ese caso, reemplace la batería de litiopor otra del tipo CR2025.1. Sacar el soporte del compartimiento
de la batería de litio.2. Insertar el lado de la batería de
litio hacia el fondo del soporte.3. Reinsertar el soporte en el compar
timiento de la batería de litio.
Nota: Si el soporte se coloca en unaposición incorrecta, no se ajustarácorrectamente.
Precaución: Mantenga la BATERÍA DE LITIO fuera delalcance de los niños. Si alguien traga labatería, consulte inmediatamente a un médico.
Instalación de la batería de litio
Shoulder Strap✤ The Shoulder Strap
allows you to carry your camcorder with complete safety.
1. Insert each end of the strap into the hooks on the camcorder.
2. Put the end of each strap through the buckle, adjust the length of the strap, then pull it tight in the buckle.
✤ The lithium battery maintains the clock function, titleand preset contents of the memory; even if the batterypack or AC power adapter is removed.
✤ The lithium battery for the camcorder lasts about 8~10months from the time of installation under normaloperation.
✤ When the lithium battery becomes weak or dead, thedate/time indicator flashes about 5 seconds when youset the power switch to CAMERA.In this case, replace the lithium battery with typeCR2025 Lithium button cell.
1. Remove the Lithium battery holder fromthe base of the camera.
2. Insert the side of the lithium battery toward the bottom of the holder.
3. Reinsert the lithium battery holder intothe slot on the base of the camera.
Note: The battery holder will only fit one way to avoid possible incorrect insertion.
Warning: Keep LITHIUM BATTERIES out of the reachof the children. Should any battery be swal-lowed, consult a doctor immediately.
Lithium Battery Installation
2. Pase los extremos por las hebillas, ajuste la longitud dela correa y tire para asegurarla en la hebilla.
00606K VP-W80 UK+ESP(1-19) 3/20/03 8:34 AM Page 17

ENGLISH ESPAÑOL
18
Conexión a la fuente de energía✤ Existen dos formas diferentes de conectar la
videocámara a la fuente de energía.- Utilizando el Adaptador de corriente AC :
para filmación en interiores.- Utilizando la Batería: para filmación en exteriores.
Uso del Adaptador de corriente AC
1. Conecte el adaptador de corriente AC al cableAC.
2. Enchufe el cable AC a la red eléctrica.Nota:El enchufe y la red eléctrica pueden ser diferentes dependiendo de la zona donde se encuentre.
3. Conecte el otro extremo del Cable DC o la salida de DC a la videocámara.
4. Para ajustar la videocámara en el modo CAMERA.a. Mantenga pulsada la pestaña del interruptor y
empuje el interruptor a la posición CAMERA .b. Asegúrese de que la tapa del lente está abierta.c. Asegúrese de que la imagen aparece en el monitor.
Nota: Si el adaptador se utiliza junto a un televisor o auna videocámara, puede provocar que estosaparatos emitan un ruido. Aleje el adaptador del televisor, la videocámara oel cable de la antena.
Connecting a Power Source✤ There are two types of power source available.
- Using the AC Power Adapter : used for indoor recording.
- Using the Battery Pack: used for mobile recording.
To use the AC Power Adapter1. Connect the AC Power
Adapter to a AC cord.
2. Connect the AC cord to a wall socket.Note: The plug and wall
socket type canbe differentaccording to theregional condi-tions.
3. Connect the other end of the DC cable to DC jack of the camcorder.
4. To set the camcorder to CAMERA mode.a. Hold down the tab of the power switch and push
the switch to CAMERA mode.b. Make sure that the Lens Cap is opened.c. Make sure that the image appears in the
Viewfinder.
Note: If the adapter is used next to the TV or the camcorder, it may cause the TV or camcorder to emit noise. Move the adapter away from the TV, camcorderor the antenna cable.
Preparing Configuración de la videocámara
2
13
CAMERA
00606K VP-W80 UK+ESP(1-19) 3/20/03 8:34 AM Page 18

ENGLISH ESPAÑOL
19
Configuración de la videocámaraPreparing
Para el uso de la batería¿Qué duración tendrá la batería para filmar?
✤ La frecuencia con que se usan las lentes de zoom. Prepare tantas baterías como sea posible
Recarga de la batería1. Conecte la batería a la
videocámara.2. Conecte el adaptador de
corriente AC a un cable AC y conecte el cable a una toma de pared.
3. Conecte el cable DC a un jackDC de la videocámara.
4. Apague la videocámara y elindicador de recarga comen-zará a parpadear y comenzarála carga.- Parpadeo una vez por
segundo: Indica que se hacargado menos del 50%.
- Parpadeo dos veces por segundo: Indica que se ha cargado el 50% ~ 75%.
- Parpadeo tres veces por segundo: Indica que se ha cargado el 75% ~ 100%.
- Se detiene el parpadeo y la luz es contínua: Se ha completado la recarga.
- Encendido y apagado cada segundo: Indica algún error. Vuelva a colocar la batería y el cable DC.
5. Si se ha completado la recarga, separe la videocámara, el adaptador de corriente y la batería.- Incluso si se ha apagado la cámara, se descargará la
batería.
Nota: La batería puede estar parcialmente cargadaen el momento de la compra.
To use the Battery Pack
How long will the battery last for recording?✤ Depends on how often you are likely to use the zoom
feature during recording.
Recharging the Battery Pack1. Attach the battery pack to the
camcorder.2. Connect the AC Power
Adapter to a AC cord and plug the AC cord into a wall socket.
3. Connect the DC cable to the camcorder.
4. Turn the power off on thecamcorder, and the rechargingindicator will start flashing, indicating the battery is charging.- Flashing once a second :
the battery is lessthan 50% charged.
- Flashing twice a second : the battery is between50% ~ 75% charged.
- Flashing three times a second : the battery is between 75% ~ 100% charged.
- Constantly stays on : Charging is complet.- On for a second and off for a second : there is an
error and the charger needs to be reset.5. If recharging is completed, separate the camcorder,
AC power adapter, and battery pack.■ Even if the power is turned off, the battery will still
discharged over time if left connected to the camera.Note: Battery pack may be charged a little at the time of
purchase.
1
4
2 3
OFF
00606K VP-W80 UK+ESP(1-19) 3/20/03 8:34 AM Page 19

ENGLISH ESPAÑOL
20
Preparing Configuración de la videocámara
Using the Battery Pack
✤ The continuous recording times given in the table areapproximate. Actual recording time may differ depen-dent on camera settings and usage.
Notes:✤ The battery pack should be recharged in a room tem-
perature that is between 0°C and 40°C.It should never be charged in a room temperature thatis below 0°C.
✤ The life and capacity of the battery pack will bereduced if it is used in temperatures below 0°C,even when it is fully recharged.
✤ The life and capacity of the battery pack will bereduced if the battery pack is left in temperaturesabove 40°C for a long period, even when it is fully recharged.
✤ Do not put the battery pack near any heat source (fireor flames, for example), or left in direct sunlight.
Table of approximate continuous recordingtime based on model and battery type
Uso de la batería
Tabla de tiempo de grabación contínuo basadaen el modelo y tipo de batería.
✤ Los tiempos de grabación contínuo incluídos en latabla son aproximados. El tiempo real de grabacióndepende del uso.
Notas:✤ La batería debe recargarse a temperatura ambiente
entre 0°C y 40°C. Nunca la recargue a temperaturaspor debajo de 0°C.
✤ Incluso si se ha recargado completamente, si labatería se usa con temperaturas inferiores a de 0°C,se reducirá su vida útil.
✤ La vida útil y capacidad de la batería se reducirán si labatería se deja a temperaturas por encima de 40°Cdurante un período prolongado de tiempo, incluso sise ha recargado completamente.
✤ No ponga la batería cerca de una fuente de calor (por ejemplo, fuego o llamas).
VP-W80U/W80 VP-W87/W87D
Approximately Approximately150 minutes 125 minutes
Approximately Approximately220 minutes 180 minutes
Approximately Approximately430 minutes 370 minutes
SB-L110A
SB-L160
SB-L320
Battery Type
ModelVP-W80U/W80 VP-W87/W87D
Aproximada mente Aproximada mente150 minutos 125 minutos
Aproximada mente Aproximada mente220 minutos 180 minutos
Aproximada mente Aproximada mente430 minutos 370 minutos
SB-L110A
SB-L160
SB-L320
Tipo de batería
Modelo
00606K VP-W80 UK+ESP(20-43) 3/20/03 8:35 AM Page 20

21
Visualizador del nivel de batería✤ El visualizador del nivel de batería muestra la
cantidad de energía que aún queda en la batería.
1. Totalmente cargada2. Consumido el 10%~45% 3. Consumido el 45%~70%4. Consumido el 70%~90%
(prepare una batería cargada)5. Consumido el 90%~95%
(cambie la batería)6. Consumido el 100%
(la videocámara se apagará enpoco tiempo, cambie la bateríatan pronto como sea posible)
✤ El tiempo de filmación con una batería totalmente car-gada puede consultarse en la tabla de la página 20.
✤ El tiempo de filmación puede verse afectado porlas condiciones de temperatura. En un ambientefrío, el tiempo de filmación se reduce. El tiempode filmación contínuo que aparece en el manualde instrucciones ha sido medido en unas condi-ciones de 77°F(25°C). y utilizando una bateríatotalmente cargada. Debido a que las condicionesde temperatura no son iguales cada vez que seutiliza la videocámara, el tiempo de bateríadisponible no es el mismo que aparece en lasinstrucciones.
Consejos para la identificación de labateríaLa marca de carga suministrada con labatería le ayuda a saber si ha sido car-gada o no.Existen dos colores(rojo y negro) y ustedelige cuál indica que la batería está cargada o descargada.
Battery Level display✤ The battery level display indicates the amount of
power remaining in the battery pack.
1. Fully charged2. 10~45% consumed3. 45~70% consumed4. 70~90% consumed
(prepare a charged one)5. 90~95% consumed
(change the battery)6. 100% consumed
(camcorder will turn off soon, changethe battery as soon as possible)
✤ Please refer to the table on page 20 for approximate continuous recording times.
✤ The recording time is affected by environmental temperature and conditions. The recording time becomes very short in a cold environment. The continuous recording time in the operating instruc-tions is measured using a fully charged battery pack in 77°F(25°C). As environmental temperaturesand conditions may be different when you actually use the camcorder, the remaining battery time may not be the same as the approximate continuous recording times given in these instructions.
Tips for Battery Identification.Acharge mark is provided on the battery pack to help you remember whether it has been charged or not.Two colours are provided (red and black)-you may choose which one indicates charged and which indicates discharged.
1
2
3
4
5
6
Preparing Configuración de la videocámara
ENGLISH ESPAÑOL
00606K VP-W80 UK+ESP(20-43) 3/20/03 8:35 AM Page 21
ENGLISH ESPAÑOL
22
Introducir y extraer un videocasete✤ Existen diferentes tipos de videocasetes dependiendo
de:- Sistema de color utilizado - Tiempo de filmación y reproducción.- Hi8/8mm (VP-W80/W87/W87D: Hi8)
Introducir y extraer un videocasete✤ Asegúrese de que la batería está
correctamente instalada.
1. Pulse el botón EJECT.- El compartimento se abrirá
automáticamente.- Introduzca el videocasete con
la ventana transparente situada hacia el exterior y la pestaña de protección hacia arriba.
2. Empuje la marca PUSH hasta que encaje en su sitio.Nota: Una vez que haya terminado de
filmar un videocasete que deseeguardar, puede protegerlo paraevitar un borrado accidental.
a. Imposibilidad de filmar (Protección): Pulse la pestaña roja del video-casete para que cubra la abertura.
b. Posibilidad de filmar:Si no desea guardar la filmación delvideocasete, pulse la pestaña rojapara que no cubra la abertura.
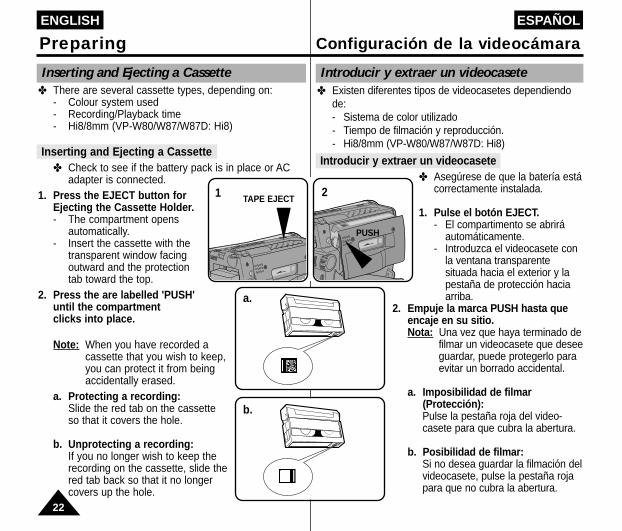
Inserting and Ejecting a Cassette✤ There are several cassette types, depending on:
- Colour system used - Recording/Playback time- Hi8/8mm (VP-W80/W87/W87D: Hi8)
Inserting and Ejecting a Cassette✤ Check to see if the battery pack is in place or AC
adapter is connected.1. Press the EJECT button for
Ejecting the Cassette Holder.- The compartment opens
automatically.- Insert the cassette with the
transparent window facing outward and the protection tab toward the top.
2. Press the are labelled 'PUSH' until the compartment clicks into place.
Note: When you have recorded a cassette that you wish to keep, you can protect it from beingaccidentally erased.
a. Protecting a recording:Slide the red tab on the cassette so that it covers the hole.
b. Unprotecting a recording:If you no longer wish to keep therecording on the cassette, slide thered tab back so that it no longercovers up the hole.
a.
1 2TAPE EJECT
PUSH
b.
Preparing Configuración de la videocámara
00606K VP-W80 UK+ESP(20-43) 3/20/03 8:35 AM Page 22

23
Basic Shooting Filmación básica
Filmando por primera vezAsegúrese de que ha preparadoadecuadamente la videocámara.■ Ha conectado la fuente de
energía? (Batería o adaptador de energiaAC)
■ Ha colocado el interruptor deencendido en la posición CAM-ERA?
■ Ha introducido un videocasete?(Consulte la página 22)
■ Asegúrese de que el indicador STANDBY aparece enel OSD. (Si la pestaña roja del videocasete está abier-ta, no se mostrará el indicador STANDBY)
■ Ha abierto la tapa del Lente?■ Asegúrese de que la imagen que desea filmar
aparece en el visor.■ Asegúrese de que el nivel de batería es suficiente
para la filmación. (Consulte la página 21)■ Recomendamos a los principiantes, que usen el modo
EASY.
a. Para comenzar a filmar, pulseel botón rojo START/STOP. La filmación comenzará y elindicador REC aparecerá en elvisor.
Making the First RecordingPlease check the following beforerecording.■ Have you connected a power
source?(Battery Pack or AC PowerAdapter)
■ Have you set the power switch to the CAMERA position?
■ Have you inserted a cassette? (see page 22)■ Make sure that STANDBY is displayed in the OSD
(if the red tab of the cassette is covering the hole, STANDBY will not be displayed)
■ Have you removed the LENS CAP?■ Make sure that the image you want to record is vis-
able in the Viewfinder.■ Make sure that there is enough remaining power for
the expected recording time. (see page 21)■ We recommend that beginners, who are using the
camcorder for the first time, switch the EASY modeon.
a. To start recording, press the redSTART/STOP button. Recording starts and REC is displayed in the Viewfinder.
CAMERA
BATTERY
RECX:XX:XX
ENGLISH ESPAÑOL
00606K VP-W80 UK+ESP(20-43) 3/20/03 8:35 AM Page 23

ENGLISH ESPAÑOL
24
Basic Shooting Filmación básica b. Para detener la filmación, pulse
de nuevo el botón START/STOP. La filmación se detendrá y el indicador STANDBY aparecerá en el visor.
Si introduce un videocasete y la videocámara permaneceen el modo STANDBY durante más de 5 minutos, seapagará automáticamente. Para volver a utilizarla, pulseel botón rojo START/STOP o coloque el interruptor deencendido en la posición OFF y después en CAMERA.Esta característica de apagado automático ha sido dis-eñada para ahorrar batería y para proteger el tambor delcabezal y la cinta.
Editar búsqueda ✤ Podrá ver una escena filmada con
la función REC SEARCH , en el modo STANDBY. REC SEARCH le permite rebobinar y REC SEARCH avanzar rápidamente, mientras mantenga el botón pulsado.
✤ Si pulsa durante un instante el botón REC SEARCH en el modo STANDBY, la videocámarareproducirá hacia atrás durante3 segundos y después volverá automáticamente a la posición original.
b. To stop recording, press the red START/STOP button again. When recording stops, STANDBY will be displayed on the Viewfinder.
When a cassette is loaded and the camcorder is left inSTANDBY mode for over 5 minutes without being used,it will turn off automatically. To use it again, push the redSTART/STOP button or set power switch to OFF andthen back to CAMERA. This Auto Power Off feature isdesigned to save battery power and to protect the TapeHead and tapes.
REC SEARCH ✤ You can view a recorded picture
with REC SEARCH , func-tion in STANDBY mode. RECSEARCH allows you toreverse and REC SEARCHallows you to forward, for aslong as you keep the buttonpressed.
✤ If you press REC SEARCHbutton briefly in STANDBY mode,your camcorder will playback inreverse for 3 seconds and return to the original positionautomatically.
STBYY:YY:YY
REC SEARCH ,
REC SEARCH (Press briefly)
00606K VP-W80 UK+ESP(20-43) 3/20/03 8:35 AM Page 24

25
Basic Shooting Filmación básica
Consejos para la filmación con imágenes estables■ Mientras filma, es muy importante
sujetar la videocámara correctamente.■ Para la filmación estable, asegure la
tapa del lente con firmeza enganchándola en la correa desujeción para la mano. (Vea la figura)
Filmar utilizando el visor1. Sujete la videocámara con firmeza
utilizando la correa de sujeción para la mano. (Consulte la página 16)
2. Apoye el codo derecho en su costado.3. Coloque la mano izquierda debajo o
junto al monitor LCD para poder sostenerlo y ajustarlo.No toque el micrófono incorporado.
4. Elija una posición estable y cómoda. Puede apoyarse en una pared o en una mesa para conseguir mayor estabilidad. No olvide respirar con suavidad.
5. Sitúe el ojo con firmeza en el borde del ocular del visor.
6. Utilice el marco del visor como guía para determinar el plano horizontal.
7. Siempre que sea posible, utilice un trípode.
Enfoque:
Usar el botón de ajuste de focus del VISOR para enfocar el imagen.
Ajustar el enfoque y la luminosidad del VISOR
Tips for Stable Image Shooting■ While recording, it is very important
to hold the camcorder correctly.■ To avoid the risk of the lens cap
appearing in your shot, always clip it onto the hand strap. (refer to figure)
Recording with the Viewfinder1. Hold the camcorder firmly with the
hand strap. (see page 16)2. Place your right elbow against your
side.3. Place your left hand under the
camcorder to support it.Be sure to not touch the built-in microphone.
4. Choose a comfortable, stable position for the shots.You can lean against a wall or on a table for greater stability.Do not forget to breathe gently.
5. Put your eye firmly against the eyepiece.
6. Use the viewfinder frame as a guide to determine the horizontal plane.
7. Whenever possible, use a tripod.
Focus: Slide the focus adjustment knob on thebottom of the VIEWFINDER to focusthe image.
Adjusting the Focus of the VIEWFINDER
ENGLISH ESPAÑOL
00606K VP-W80 UK+ESP(20-43) 3/20/03 8:35 AM Page 25

ENGLISH ESPAÑOL
26
Basic Shooting Filmación básica
Reproducción de la cinta en videocámaraReviewing a recording✤ You can review your recording on the Viewfinder.
1. Hold down the tab of the power switch and select PLAYER mode.
2. Insert the tape you wish to view.
3. Make sure that STOP is displayed in the OSD.
4. Press the (REW) button torewind the tape to the beginning.■ To stop REWIND, press the
(STOP) button.■ Camcorder stops automatically
after rewinding.
5. Press the (PLAY/STILL) buttonto start playback.■ You can see the video you
shot in the Viewfinder.■ To stop the PLAY operation, press
the (STOP) button.
Note: You can also watch it on a TV screen, once connecting the camcorder to a TV or VCR. (see page 51)
✤ Puede reproducir las imágenes filmadas en el visor.✤ Asegúrese de que la batería está instalada correcta-
mente.
1. Mantenga pulsada la pestaña delinterruptor y empuje el interruptora la posición PLAYER.
2. Introduzca una cinta que haya fil-mado.
3. Asegúrese de que el indicadorSTOP aparece en el OSD.
4. Pulse le botón (REW) pararebobinar la cinta hasta el principio.■ Para detener el REWIND,
pulse el botón (STOP).■ La videocámara pasa
automáticamente al modoSTOP cuando la cinta ha lle-gado al principio después derebobinar.
5. Pulse el botón (PLAY/STILL)para comenzar la reproducción.■ Podrá ver en la pantalla LCD
las imágenes filmadas.■ Para detener la reproducción,
pulse el botón (STOP).
Nota: También puede ver las imágenes en una pantallade televisión después de conectar la videocámaraa un televisor o a un reproductor.(Consulte la página 51)
1
2
3
4
5
PLAYER
REW STOP
PLAY/STILL STOP
PUSH
STOP
00606K VP-W80 UK+ESP(20-43) 3/20/03 8:35 AM Page 26

27
Basic Shooting Filmación básica Viewing a Still Picture
■ Press (PLAY/STILL) but-ton during playback.
■ To resume playback, pressthe (PLAY/STILL) button again.
Picture Search■ Press and hold (FF) or
(REW) button during play-back.
■ To resume normal playback,release the button.
Ver una imagen fija■ Pulse el botón
(PLAY/STILL) durante lareproducción.
■ Para reiniciar la reproduc-ción, pulse de nuevo elbotón (PLAY/STILL).
Búsqueda de imágenes■ Mantenga pulsado el
botón de avance rápido(FF) o el botón de
rebobinado (REW)durante la reproducción.
■ Para volver a reproducirnormalmente, suelte elbotón.
PLAY/STILL
REW FF
ENGLISH ESPAÑOL
00606K VP-W80 UK+ESP(20-43) 3/20/03 8:35 AM Page 27

ENGLISH ESPAÑOL
28
Advanced Shooting Filmación avanzada
Zooming In and Out✤ Zoom works in CAMERA mode only.✤ Zooming is a technique that allows you to increase or
decrease the size of the subject in the picture.For a more professional looking recording, don't usethe zoom function too often.
✤ You can also choose from two zoom speeds to suitdifferent needs:■ Gradual zoom (9~12 seconds from WIDE/TELE to
WIDE/TELE)■ High-Speed zoom (3~6 seconds from TELE/WIDE
to WIDE/TELE)✤ Use these features for different shots; Please note
that over use of the zoom feature can lead to a reduc-tion of battery pack usage time.
1. Move the zoom lever a little for a gradual zoom, move it furtherfor a high-speed zoom.Your zooming is monitored on the OSD.
2. T (Telephoto) side: Subject appears closer.
3. W (Wide angle) side:Subject appears fur-ther away.
Note: MACROIf you cannot get asharp focus in tele-photo zoom, movethe lever to the “W”side until the focus is sharp.You can shoot a subject that is at least 1 mm awayfrom the lens surface in the wide angle position.
Lejos y Cerca✤ El zoom sólo funciona en modo CAMERA.✤ El “Zooming” es una técnica de grabación que le permite
cambiar el tamaño del motivo de la escena. Para graba-ciones con un aspecto más profesional, utilice con mod-eración la función “Zoom”.
✤ También puede seleccionar una de las dos velocidades dezoom según sus necesidades:■ El zoom gradual (9~12 segundos de TELE/WIDE a
WIDE/TELE)■ Zoom de gran velocidad (3~6 segundos de TELE/
WIDE a WIDE/ TELE)✤ Utilice estas características para variar sus tomas; tenga
en cuenta, sin embargo, que demasiado “zooming” de ale-jamiento y acercamiento tiende a ofrecer un aspecto pocoprofesional durante la reproducción y reduce el tiempo útilde la batería.
1. Mueva la palanca de zoom unpoco para conseguir un zoomgradual, muévala más para el degran velocidad. Su “zooming” se controla en elOSD.
2. Hacia T (Teleobjetivo): El motivo aparece máscerca.
3. Hacia W (Gran angu-lar):El motivo aparece másalejado.
Nota: MACRO
Si no puede conseguir un enfoque nítido en zoom deteleobjetivo, mueva la palanca hacia “W” hasta que elenfoque sea nítido. Puede realizar una toma de un motivo que esté comomínimo a 1 mm de la superficie de la lente en la posi-
TW
00606K VP-W80 UK+ESP(20-43) 3/20/03 8:35 AM Page 28
29
Advanced Shooting Filmación avanzada
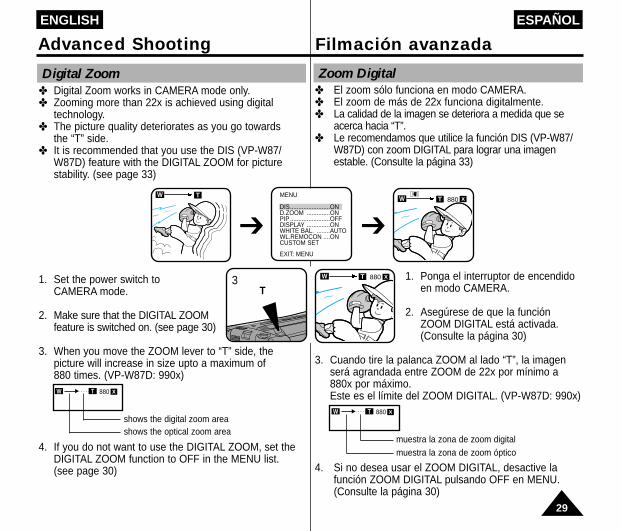
Digital Zoom✤ Digital Zoom works in CAMERA mode only.✤ Zooming more than 22x is achieved using digital
technology.✤ The picture quality deteriorates as you go towards
the “T” side.✤ It is recommended that you use the DIS (VP-W87/
W87D) feature with the DIGITAL ZOOM for picturestability. (see page 33)
1. Set the power switch to CAMERA mode.
2. Make sure that the DIGITAL ZOOM feature is switched on. (see page 30)
3. When you move the ZOOM lever to “T” side, the picture will increase in size upto a maximum of 880 times. (VP-W87D: 990x)
4. If you do not want to use the DIGITAL ZOOM, set the DIGITAL ZOOM function to OFF in the MENU list. (see page 30)
shows the digital zoom areashows the optical zoom area
880
▲
xW T
Zoom Digital✤ El zoom sólo funciona en modo CAMERA.✤ El zoom de más de 22x funciona digitalmente.✤ La calidad de la imagen se deteriora a medida que se
acerca hacia “T”.✤ Le recomendamos que utilice la función DIS (VP-W87/
W87D) con zoom DIGITAL para lograr una imagenestable. (Consulte la página 33)
1. Ponga el interruptor de encendido en modo CAMERA.
2. Asegúrese de que la función ZOOM DIGITAL está activada. (Consulte la página 30)
3. Cuando tire la palanca ZOOM al lado “T”, la imagen será agrandada entre ZOOM de 22x por mínimo a 880x por máximo.Este es el límite del ZOOM DIGITAL. (VP-W87D: 990x)
4. Si no desea usar el ZOOM DIGITAL, desactive lafunción ZOOM DIGITAL pulsando OFF en MENU.(Consulte la página 30)
muestra la zona de zoom digitalmuestra la zona de zoom óptico
880
▲
xW T
3T
880 xW T
ENGLISH ESPAÑOL
880 xW TW T
➔ ➔
MENU
DIS........................OND.ZOOM ..............ONPIP........................OFF DISPLAY ..............ONWHITE BAL. ........AUTOWL.REMOCON ....ONCUSTOM SET
EXIT: MENU
00606K VP-W80 UK+ESP(20-43) 3/20/03 8:35 AM Page 29

30
ENGLISH ESPAÑOL
Advanced Shooting Filmación avanzadaSetting the DIGITAL ZOOM ON/OFF (VP-W87/W87D)
✤ The DIGITAL ZOOM feature is explained on page 29.
1. Set power switch to CAMERA mode.
2. Press the MENU ON/OFF button.■ The MENU list will appear.
3. Turn the UP/DOWN dial to D. ZOOM.
4. Press ENTER.■ The DIGITAL ZOOM setting will
change.
5. Press the MENU ON/OFF button toend setting.
In case of VP-W80U/W801. Set the power switch to CAMERA
mode.2. Press the D. ZOOM ON/OFF button.
■ The DIGITAL ZOOM will be displayed on the screen, and the DIGITAL ZOOM function will operate.
3. To deactivate DIGITAL ZOOM function, press the D.ZOOM button again.■ The DIGITAL ZOOM indicators disappear from the
screen.Note: The D. ZOOM ON/OFF function will not operate
in EASY mode.
Configuración del ZOOM ON/OFF DIGITAL (VP-W87/W87D)✤ La funcion de ZOOM DIGITAL se explica en la
pagina 29.
1. Ponga el interruptor de encendido en modo CAMERA.
2. Pulse el botón MENU ON/OFF.■ Se mostrara la lista MENU.
3. Gire el disco selector UP/DOWN aD. ZOOM.
4. Pulse ENTER.■ Cambiara la configuración del
DIGITAL ZOOM.
5. Pulse el botón MENU ON/OFF parafinalizar la configuración.
En el caso de VP-W80U/W801. Ponga el interruptor de encendido
en modo CAMERA.
2. Pulse el botón D. ZOOM ON/OFF .■ Se mostrará el ZOOM DIGITAL
en la pantalla, y la función de ZOOM DIGITAL estará en funcionamiento.
3. Para desactivar la función deZOOM DIGITAL, pulse el botónD.ZOOM de nuevo.■ El ZOOM DIGITAL desaparecerá
de la pantalla.
Nota: La funcion D.ZOOM ON/OFF no funcionara en losmodos EASY.
D.ZOOM880 xW T
MENU
DIS........................OFFD.ZOOM ..............OFFPIP........................OFF DISPLAY ..............ONWHITE BAL. ........AUTOWL.REMOCON ....ONCUSTOM SET
EXIT: MENU
MENU
DIS........................OFFD.ZOOM ..............OFFPIP........................OFF DISPLAY ..............ONWHITE BAL. ........AUTOWL.REMOCON ....ONCUSTOM SET
EXIT: MENU
MENU
DIS........................OFFD.ZOOM ..............ONPIP........................OFF DISPLAY ..............ONWHITE BAL. ........AUTOWL.REMOCON ....ONCUSTOM SET
EXIT: MENU
00606K VP-W80 UK+ESP(20-43) 3/20/03 8:35 AM Page 30

ENGLISH ESPAÑOL
31
Advanced Shooting Filmación avanzada
EASY Mode (for Beginners)✤ Even a beginner can easily make a recording using
the EASY mode.■ The EASY mode only operates in CAMERA mode.
1. Set the power switch to CAMERAmode.
2. By pressing the EASY button, all the functions of the camera will be set to off and the recording settings will be set to the following basic mode.■ Battery level, recording mode,
counter, date/time, DIS ( ) will be displayed as the camcorder starts to run.
■ The word “EASY” will appear in the Viewfinder at the same time.However, the Date/Time will only be seen if it has been previously set.(DIS ( ) will be displayed on VP-W87/W87D only)
3. Press the START/STOP button to start recording.■ Recording will begin using the basic automatic
environment settings.
4. Pressing the EASY button again turns the EASY mode off.■ The camera will return to the settings that
were set prior to the EASY mode beingswitched on.
Notes:■ In the EASY mode, the MENU, MF, DSE, P.AE
and BLC functions are not available.■ If you want to use these functions, you must first
switch the EASY mode off.■ The EASY settings will be stored in the camera
(providing a good lithium battery has been installed).
Modo EASY (para principiantes)✤ Incluso los principiantes pueden filmar facilmente usan-
do el modo EASY.■ El modo EASY solo funciona en modo CAMERA.
1. Ponga el switch power en modo CAMERA.
2. Apretando el boton EASY, todas las funciones de camara se desactivaran y los ajustes de grabacion seran los del modo basic.
■ El nivel de Bateria, modo de grabacion, contador, date/time, DIS ( ) se mostraran cuando la camara empiece a funcionar.
■ “EASY” aparecera en el Visor al mismo tiempo. Sin embargo, Date/Time apareceran solo si han sidoseleccionados previamente.(DIS ( ) aparecera solo en las VP-W87/W87D)
3. Pulse el boton START/STOP para empezar la filmacion.■ La filmacion se efectuara con los ajustes basicos
automáticamente.
4. Al apretar EASY otra vez el modo EASY sedesactiva.■ La camara volvera a los ajustes previos
al modo EASY.
Notas:■ En el modo EASY, las funciones de cortinilla no
estan disponibles, asi como MENU, MF, DSE, P.AE,BLC.
■ Si quiere usar estas funciones, debera primerodesactivar los modos EASY.
■ Los ajustes del modo EASY se guardan en la cama-ra (si hemos instalado la bateria de litio).
STBYX:XX:XX
EASY
31. JAN. 2003
00606K VP-W80 UK+ESP(20-43) 3/20/03 8:35 AM Page 31

ENGLISH ESPAÑOL
32
CUSTOM-Creating your own customized recording settings✤ You can customize the settings and save them for future use.
■ The CUSTOM function only operates in CAMERA mode.1. Set the power switch to CAMERA mode. 2. Press the MENU ON/OFF button,
to bring up the MENU list.3. Turn the UP/DOWN dial until
CUSTOM SET is highlighted.4. Press the ENTER button, the
CUSTOM menu will appear.■ Set the status of each item to
what you want.5. To exit the menu, press the MENU
ON/OFF button twice.6. By pressing the CUSTOM button,
the CUSTOM settings will come up.■ Date/Time and Title will only appear
if these have been set in advance.■ The word “CUSTOM” will be
displayed on the Viewfinder atthe same time.
Example: When the CUSTOM SET is set as follows;
7. Press the START/STOP button to start recording.■ Recording will begin
using the new CUSTOM settings.
8. To switch Custom off, pressthe CUSTOM button once.■ The camera will revert to
the settings that were set prior to the CUSTOM mode being switched on.
Note: The CUSTOM settings will be stored in the camera (providing a good lithium battery has been installed).
CUSTOM-Crear sus ajustes de grabación personalizados✤ Usted puede crear sus ajustes de grabacion personalizados y
guardarlos.■ La función CUSTOM solo funciona en modo camara.
1. Ponga el power switch en modo CAMERA.
2. Pulsar el MENU ON/OFF, para activar la lista MENU.
3. Gire el dial UP/DOWN hasta que CUSTOM SET se subraya.
4. Pulse el boton ENTER, el CUSTOM menu aparecera.■ Haga los ajustes segun sus
preferencias.5. Para salir del menu, apriete el MENU
ON/OFF dos veces.6. Apretando el boton CUSTOM , todos
los ajustes anteriores seran sobreescritos.■ Date/Time y Title solo apareceran si
han sido ajustados previamente.■ La palabra “CUSTOM” se mostrara
en el Visor al mismo tiempo.
Ejemplo: Cuando CUSTOM SET seajusta así;
7. Pulse el boton START/ STOPpara empezar a filmar.■ La grabación se hara
segun los nuevos ajustes CUSTOM.
8. Para desactivar Custom , pulse CUSTOM una vez.■ La videocámara volverá
a los ajustes que esta banestablecidos antes de activar el modo CUSTOM.
Notas: Los ajustes CUSTOM se guardan en la camara, siempre y cuando instalemos la bateria de litio.
Pressing the CUSTOM button,
displays
Advanced Shooting Filmación avanzada
MENU
DIS........................OFFD.ZOOM ..............OFFPIP........................OFF DISPLAY ..............ONWHITE BAL. ........AUTOWL.REMOCON ....ONCUSTOM SET
EXIT: MENU
MENU
DIS........................OFFD.ZOOM ..............OFFPIP........................OFF DISPLAY ..............ONWHITE BAL. ........AUTOWL.REMOCON ....ONCUSTOM SET
EXIT: MENU
CUSTOM SETTINGDIS ......................ON PIP ......................OFFD.ZOOM ..............OFFWHITE BAL. ........AUTODATE/TIME ..........OFFPROGRAM AE ....AUTODSE SELECT ......OFF
EXIT: MENU
CUSTOM SETTINGDIS ......................ON PIP ......................OND.ZOOM ..............ONWHITE BAL. ........INDOORDATE/TIME ..........DATE/TIMEPROGRAM AE ....DSE SELECT ......B&W
EXIT: MENU
Hi 8 STBY880x 0:00:02B&W CUSTOM
CONGRATURATIONTITLE 0:00CONTINUE 1.JAN.2003
00606K VP-W80 UK+ESP(20-43) 3/20/03 8:35 AM Page 32

33
ENGLISH ESPAÑOL
Advanced Shooting
DIS (Digital Image Stabilizer, VP-W87/W87D only)✤ The DIS function works in CAMERA mode only.✤ DIS (Digital Image Stabilizer) is a handshake compen-
sation function that compensates for any shaking or moving of the hand holding the camcorder (within reasonable limits).
✤ It provides more stable pictures when:■ Recording with the Zoom.■ Recording a small object
close-up■ Recording and walking
at the same time■ Recording through the
window of a vehicle
1. Set the power switch to CAMERAmode.
2. Press the MENU ON/OFF button.■ The MENU list will appear.
3. Turn the UP/DOWN dial until DISis highlighted.
4. Press ENTER.■ The DIS setting will change.
5. Press MENU ON/OFF button to end the setting.■ When the DIS is set, the DIS
mark ( ) will displayed on the OSD.
Notes: 1. It is recommended to deactivate the DIS function when using a ripod.
2. The DIS function will not operate in DSE mode.3. The MENU ON/OFF function will not operate
in EASY mode.
Filmación avanzada
DIS (Estabilizador digital de imagen, sólo en VP-W87/W87D)✤ La función DIS sólo funciona en modo CAMERA.✤ La función de compensación de temblor de la mano, denomi-
nada DIS (Estabilizador digital de la imagen) compensacualquier ligero temblor o movimiento de la mano que sopor-ta la videocámara (dentro de unos límites razonables).
✤ Proporciona imágenes másestables cuando:■ Se graba en modo Zoom
In (lejos)■ Se graba un primer plano
de un objeto pequeño■ Grabar y caminar al
mismo tiempo■ Grabar a través de la
ventana de un vehículo
1. Ponga el interruptor de encendido en modo CAMERA.
2. Pulse el botón MENU ON/OFF.■ Se mostrará la lista MENU.
3. Gire el disco selector UP/DOWNa DIS.
4. Pulse ENTER.■ Cambiará la configuración DIS.
5. Pulse el botón MENU ON/OFF para finalizar la configuración.■ Cuando haya configurado el DIS,
se mostrará la marca DIS ( )en el OSD.
Notas:1. Se recomienda desactivar la función de compensación de
temblor de la mano al utilizar un trípode.2. La función DIS no se activará en el modo DSE.3. El MENU ON/OFF no funcionara en los modos
EASY.
➔➔
MENU
DIS........................OFFD.ZOOM ..............OFFPIP........................OFF DISPLAY ..............ONWHITE BAL. ........AUTOWL.REMOCON ....ON
EXIT: MENU
MENU
DIS........................OFFD.ZOOM ..............OFFPIP........................OFF DISPLAY ..............ONWHITE BAL. ........AUTOWL.REMOCON ....ON
EXIT: MENU
MENU
DIS........................OND.ZOOM ..............OFFPIP........................OFF DISPLAY ..............ONWHITE BAL. ........AUTOWL.REMOCON ....ON
EXIT: MENU
00606K VP-W80 UK+ESP(20-43) 3/20/03 8:35 AM Page 33

ENGLISH ESPAÑOL
34
Enfoque Manual/Automático✤ La función Enfoque manual/automático funciona sólo
en el modo CAMERA.✤ En la mayoría de situaciones, es mejor utilizar el
Enfoque automático, pues permite concentrarse en laparte creativa de la filmación.
✤ El enfoque manual es necesario en aquellas condicionesen las que el enfoque automático no es adecuado.
Enfoque Automático✤ El modo AF (de Enfoque automático) se activa
automáticamente al encender la videocámara.✤ Si no tiene experiencia con videocámaras, es
recomendable el uso del modo de Enfoqueautomático.
Enfoque Manual✤ En los siguientes casos debería
obtener mejores resultados utilizando el enfoque manual.
a. Una imagen con varios objetos,unos cercanos a la videocámara yotros lejanos.
b. Una persona rodeada de niebla ode nieve.
c. Superficies muy brillantes o esmal-tadas, como un coche.
d. Personas u objetos que se muevenconstantemente o con rapidez,como un deportista o una multitud.
1. Ponga el interruptor de encendidoen modo CAMERA.
2. Pulse el botón MF.
3. Acerque la imagen con el zoom,empujando la pestaña ZOOM haciala “T”.
MF/AF (Manual Focus/Auto Focus)✤ The MF/AF function works in CAMERA mode only.✤ In most situations, it is better to use the Automatic
Focus feature, as it enables you to concentrate on thecreative side of your shooting.
✤ Manual focusing may be necessary under certain con-ditions that make automatic focusing inadequate.
Auto Focusing✤ The AF (Auto Focus) mode is set automatically
when you switch on the Power switch.✤ If you are inexperienced with camcorders, we rec-
ommend that you use the Auto Focus mode.
Manual Focusing✤ In the following situations, you
should obtain better results by adjusting the focus manually.
a. A picture containing severalobjects, some close to the cam-corder, others further away.
b. A person enveloped in fog or sur-rounded by snow.
c. Very shiny or glossy surfaces like a car.
d. People or objects moving constant-ly or quickly like an athlete orcrowd.
1. Set the power switch to CAMERAmode.
2. Press the MF button.The MF symbol will appear in the viewfinder.
3. Zoom in on the subject to be shot by pushing the ZOOM tab to the“T” side.
2
3
Advanced Shooting Filmación avanzada
00606K VP-W80 UK+ESP(20-43) 3/20/03 8:35 AM Page 34

ENGLISH ESPAÑOL
35
Advanced Shooting Filmación avanzada
BLC BLC funciona en modo CAMERA.Cuando el motivo está más oscuro que el fondo, entonceshay contraluz:
- El motivo está colocado frente a una ventana.
- La persona que se desea filmar lleva ropa blanca o brillante y está colocada frente a un fondo claro; la cara de la persona está demasiado oscura para distinguir sus facciones.
- El motivo está en el exterior y el fondo es un cielo cubierto.
- Las fuentes lumínicas son demasiado brillantes.
- El motivo está contra un fondo nevado.
1. Ponga el interruptor de encendido en modo CAMERA.
2. Pulse el botón BLC.■ Normal - BLC - Normal■ BLC sólo destaca el motivo.
Nota: La funcion BLC no funcionara en P.AE o EASY.
4. Girar el disco selector hacia arriba y abajo hasta que el objeto sea enfocado.
5. Puede obtener una imagen nítida después de alejarla con el zoom.
6. Para volver al modo de enfoque automático (AF), pulse de nuevo el botón Enfoque manual.
Nota: La funcion MF no funcionaraen los modos EASY.
BLC BLC works in CAMERA mode.Back lighting exists when the subject is darker than thebackground, such as when:
- The subject is placed in front of a window.
- The person to be shot is wearing white or shinyclothes and is placed against a bright background;the person’s face is too darkto distinguish their features.
- The subject is outdoors and the background is overcast.
- The light source is too bright.- The subject is against a snowy
background.
1. Set the power switch to CAMERAmode and press the BLC button.■ Normal - BLC - Normal (BLC
enhances only the subject).
Note: BLC function will not operate in P.AE or EASY mode.
4. Turn the UP/DOWN dial up ordown until the object is focused.
5. If the picture won't focus, zoom outuntil it becomes clear.
6. To return to AF(Auto Focus), pressthe MF button again.The MF symbol will disappear fromthe viewfinder.
Note: The MF function will not operate in EASY mode.
* BLC on* BLC off
00606K VP-W80 UK+ESP(20-43) 3/20/03 8:35 AM Page 35

ENGLISH ESPAÑOL
36
Advanced Shooting Filmación avanzada
PROGRAM AE (Automatic Exposure)✤ The PROGRAM AE function works in CAMERA mode only.✤ The PROGRAM AE modes allow you to adjust shutter
speeds and apertures to suit different recording conditions.✤ There are 6 automatic exposure modes.1. AUTO mode
■ Auto balance between the subject and the background.■ Used in normal conditions.■ The shutter speed automatically varies from 1/50 to
1/250 second, depending on the picture.2. SPORTS mode ( )
■ For shooting people or objects moving quickly; youshould able to play back the picture in slow motion on an 8 mm VCR or stop on a given image with very little blur.
3. PORTRAIT mode ( ) ■ For focusing on the subject and not the background.
The PORTRAIT mode is most effective when usedoutdoors.
■ The shutter speed automatically varies from 1/50 to1/1000 second, depending on the picture.
4. SPOTLIGHT mode ( ) ■ To shoot correctly when there is only light on the
subject and not the rest of the picture.■ The shutter speed is 1/50 second.
5. SAND/SNOW mode ( ) ■ For shooting when the people or objects are darker
than the background because of reflected light fromsand or snow.
■ The shutter speed automatically varies from 1/50 to 1/250 second, depending on the picture.
6. HSS (High Speed Shutter) mode ( ) ■ For shooting fast-moving subjects such as the
players in golf or tennis games.■ You may need to light the shooting area.
PROGRAMA AE (Exposición Automática)✤ La función PROGRAMA AE sólo funciona en modo CAMERA.✤ El modo PROGRAMA AE le permite adaptar la velocidad y
abertura del obturador a las diferentes condiciones que se va afilmar. Estos elementos le permiten controlar creativamente la profundidad de campo.
✤ Hay 6 modos automáticos de exposición.1. Modo AUTO
■ Equilibrado automático entre el motivo y el fondo.■ Se utiliza en condiciones normales.■ La velocidad del obturador varía automáticamente de
1/50 a 1/250 de segundo, según la escena.2. Modo SPORTS ( )
■ Si filma personas u objetos que se mueven con rapidez; podrá reproducir dichas imágenes a cámara lenta en un reproductor VCR de 8 mm o parar una imagen concreta con bastante nitidez.
3. Modo PORTRAIT ( ) ■ Para enfocar el motivo principal y frontal, quedando el
fondo desenfocado. El modo PORTRAIT es más efectivo cuando se utiliza en el exterior.
■ La velocidad del obturador varía automáticamente de 1/50 a 1/1000 de segundo, según la escena.
4. Modo SPOTLIGHT ( ) ■ Para filmar correctamente cuando hay una sola luz que
ilumine el motivo y el resto de la escena esté sin luz.■ La velocidad del obturador es de 1/50 de segundo.
5. Modo SAND/SNOW ( ) ■ Para filmar cuando las personas o los objetos están más
oscuros que el fondo debido a la luz reflejada de la arenao la nieve.
■ La velocidad del obturador varía automáticamente de 1/50 a 1/250 de segundo, según la escena.
6. Modo HSS (Obturador de gran velocidad) ( ) ■ Para filmar motivos que se mueven con rapidez como
jugadores de golf o partidos de tenis.■ Quizás necesite iluminar la zona de filmación.
00606K VP-W80 UK+ESP(20-43) 3/20/03 8:35 AM Page 36
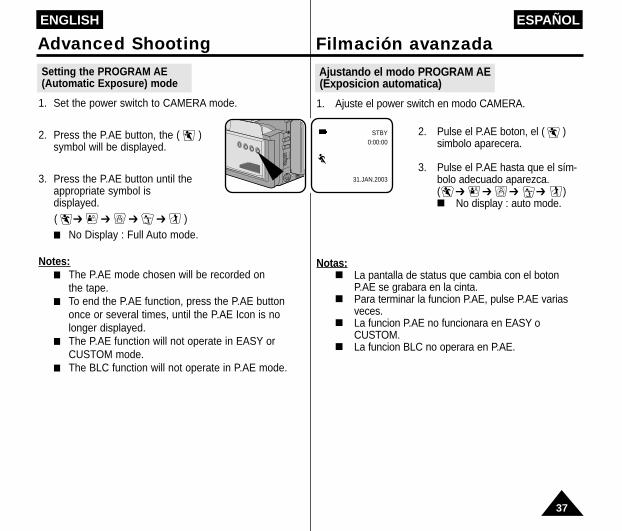
ENGLISH ESPAÑOL
37
Advanced Shooting Filmación avanzada
Setting the PROGRAM AE (Automatic Exposure) mode
1. Set the power switch to CAMERA mode.
2. Press the P.AE button, the ( ) symbol will be displayed.
3. Press the P.AE button until the appropriate symbol is displayed.( ➔ ➔ ➔ ➔ )■ No Display : Full Auto mode.
Notes:■ The P.AE mode chosen will be recorded on
the tape.■ To end the P.AE function, press the P.AE button
once or several times, until the P.AE Icon is nolonger displayed.
■ The P.AE function will not operate in EASY or CUSTOM mode.
■ The BLC function will not operate in P.AE mode.
Ajustando el modo PROGRAM AE (Exposicion automatica)
1. Ajuste el power switch en modo CAMERA.
2. Pulse el P.AE boton, el ( ) simbolo aparecera.
3. Pulse el P.AE hasta que el sím-bolo adecuado aparezca.( ➔ ➔ ➔ ➔ )■ No display : auto mode.
Notas:■ La pantalla de status que cambia con el boton
P.AE se grabara en la cinta.■ Para terminar la funcion P.AE, pulse P.AE varias
veces.■ La funcion P.AE no funcionara en EASY o
CUSTOM.■ La funcion BLC no operara en P.AE.
STBY0:00:00
31.JAN.2003
00606K VP-W80 UK+ESP(20-43) 3/20/03 8:35 AM Page 37

ENGLISH ESPAÑOL
38
Advanced Shooting Filmación avanzada
DSE (Efecto Digital Especial) en modo CAMERA✤ Los efectos digitales le permiten dar un aspecto creativo
a su grabación añadiendo varios efectos especiales.✤ Seleccione el efecto digital apropiado para el tipo de
imagen que desea captar y el efecto que desea obtener.✤ Hay varios modos DSE.
(VP-W80U/W80: 8 modos, VP-W87/W87D: 10 modos)
1. Imagen normal.2. GHOST: Este modo da el efecto de
arrastre a la imagen. (sólo VP-W87/W87D)
3. STROBE: Este modo filma insertandoun efecto de corte en la imagen. Como referencia, hay 50 campos en laimagen normal. (sólo VP-W87/W87D)
4. SEPIA: Este modo da a la imagen unefecto SEPIA.
5. B&W(Blanco y negro): Este modo per-mite visualizar la imagen en blanco ynegro.
6. NEG.(Negativo): Este modo permitetomar las fotografías reflejando el colorde la imagen.
7. MIRROR: Este modo corta la imagenpor la mitad, usando el efecto de espejo.
8. ART: Añaden un efecto de pintura, llamado solarizacion, a la imagen.
9. MOSAIC: Este modo permite captar lasimágenes usando un diseño en formade fichas.
10. 16:9 (WIDE): Este modo le permite16:9 (WIDE) pantalla de televisión.
11. CINEMA: Este modo cubre la partesuperior/inferior de la pantalla paracrear un efecto similar a una película.
Nota : La funcion DSE no funciona en EASY.
DSE (Digital Special Effects) in CAMERA mode✤ The digital effects enable you to give a creative look to
your recording by adding various special effects.✤ Select the appropriate digital effect for the type of picture
that you wish to shoot and the effect that you wish to give.✤ There are several DSE modes. (VP-W80U/W80: 8 modes,
VP-W87/W87D: 10 modes)
1. Normal picture: This mode uses a normal image without DSE effect .
2. GHOST: This mode gives the image a dragging effect.(VP-W87/W87D only)
3. STROBE: This mode works byinserting cutting effect on the image. As a reference, there are 50 fields inthe normal picture. (VP-W87/W87D only)
4. SEPIA: This mode gives the image a reddish brown pigment.
5. B&W(Black & White): This mode makes the image black and white.
6. NEG.(Negative): This mode reverses the colour of the imagecreating a negative picture affect.
7. MIRROR: This mode cuts the imagein half, using a mirror effect.
8. ART: Adds a paint-like effect, called solarization, to the image.
9. MOSAIC: This mode gives theimage a checkered design.
10. 16:9(WIDE): This mode provides 16:9(WIDE) television display.
11. CINEMA: This mode covers upper/lower portion of the screen to give a movie-like effect.
Note: DSE function will not operate inEASY mode.
1 2
3
7
6
8
10
5
9
4
11
00606K VP-W80 UK+ESP(20-43) 3/20/03 8:35 AM Page 38
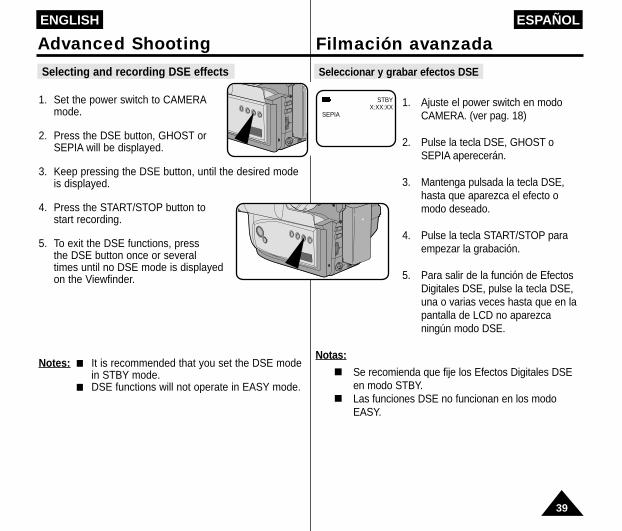
ENGLISH ESPAÑOL
39
Advanced Shooting Filmación avanzada
Selecting and recording DSE effects
1. Set the power switch to CAMERAmode.
2. Press the DSE button, GHOST or SEPIA will be displayed.
3. Keep pressing the DSE button, until the desired mode is displayed.
4. Press the START/STOP button to start recording.
5. To exit the DSE functions, press the DSE button once or severaltimes until no DSE mode is displayed on the Viewfinder.
Notes: ■ It is recommended that you set the DSE modein STBY mode.
■ DSE functions will not operate in EASY mode.
Seleccionar y grabar efectos DSE
1. Ajuste el power switch en modoCAMERA. (ver pag. 18)
2. Pulse la tecla DSE, GHOST oSEPIA aperecerán.
3. Mantenga pulsada la tecla DSE,hasta que aparezca el efecto omodo deseado.
4. Pulse la tecla START/STOP paraempezar la grabación.
5. Para salir de la función de EfectosDigitales DSE, pulse la tecla DSE,una o varias veces hasta que en lapantalla de LCD no aparezcaningún modo DSE.
Notas:■ Se recomienda que fije los Efectos Digitales DSE
en modo STBY.■ Las funciones DSE no funcionan en los modo
EASY.
STBYX:XX:XX
SEPIA
00606K VP-W80 UK+ESP(20-43) 3/20/03 8:35 AM Page 39
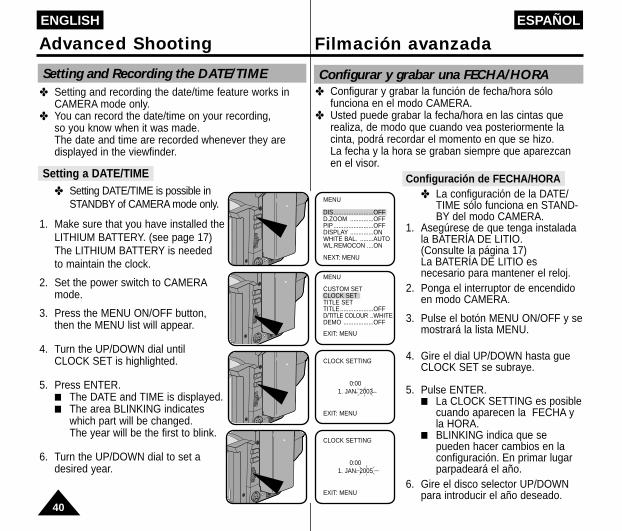
ENGLISH ESPAÑOL
40
Advanced Shooting Filmación avanzada
Configurar y grabar una FECHA/HORA✤ Configurar y grabar la función de fecha/hora sólo
funciona en el modo CAMERA.✤ Usted puede grabar la fecha/hora en las cintas que
realiza, de modo que cuando vea posteriormente la cinta, podrá recordar el momento en que se hizo. La fecha y la hora se graban siempre que aparezcan en el visor.
Configuración de FECHA/HORA✤ La configuración de la DATE/
TIME sólo funciona en STAND-BY del modo CAMERA.
1. Asegúrese de que tenga instaladala BATERÍA DE LITIO. (Consulte la página 17) La BATERÍA DE LITIO es necesario para mantener el reloj.
2. Ponga el interruptor de encendidoen modo CAMERA.
3. Pulse el botón MENU ON/OFF y semostrará la lista MENU.
4. Gire el dial UP/DOWN hasta gueCLOCK SET se subraye.
5. Pulse ENTER.■ La CLOCK SETTING es posible
cuando aparecen la FECHA yla HORA.
■ BLINKING indica que sepueden hacer cambios en laconfiguración. En primar lugarparpadeará el año.
6. Gire el disco selector UP/DOWNpara introducir el año deseado.
Setting and Recording the DATE/TIME✤ Setting and recording the date/time feature works in
CAMERA mode only.✤ You can record the date/time on your recording,
so you know when it was made.The date and time are recorded whenever they are displayed in the viewfinder.
Setting a DATE/TIME✤ Setting DATE/TIME is possible in
STANDBY of CAMERA mode only.
1. Make sure that you have installed theLITHIUM BATTERY. (see page 17)The LITHIUM BATTERY is neededto maintain the clock.
2. Set the power switch to CAMERAmode.
3. Press the MENU ON/OFF button,then the MENU list will appear.
4. Turn the UP/DOWN dial until CLOCK SET is highlighted.
5. Press ENTER.■ The DATE and TIME is displayed.■ The area BLINKING indicates
which part will be changed.The year will be the first to blink.
6. Turn the UP/DOWN dial to set a desired year.
MENU
DIS........................OFFD.ZOOM ..............OFFPIP........................OFF DISPLAY ..............ONWHITE BAL. ........AUTOWL.REMOCON ....ON
NEXT: MENU
MENU
CUSTOM SETCLOCK SETTITLE SETTITLE....................OFF D/TITLE COLOUR ..WHITEDEMO ..................OFF
EXIT: MENU
CLOCK SETTING
0:001. JAN. 2003
EXIT: MENU
CLOCK SETTING
0:001. JAN. 2005
EXIT: MENU
00606K VP-W80 UK+ESP(20-43) 3/20/03 8:35 AM Page 40
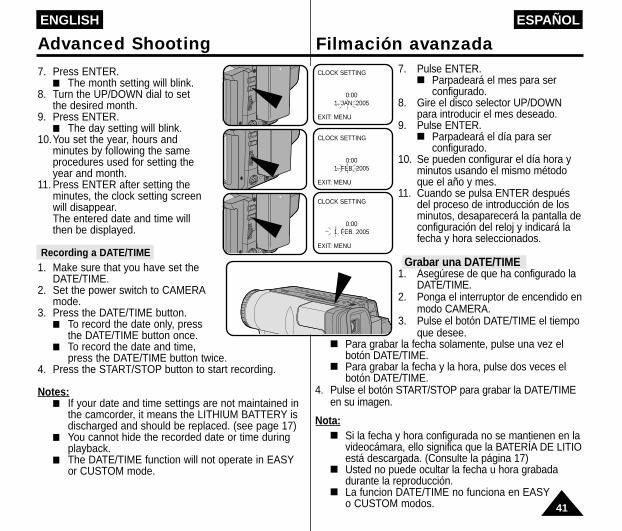
41
ENGLISH ESPAÑOL
Advanced Shooting Filmación avanzada7. Pulse ENTER.
■ Parpadeará el mes para ser configurado.
8. Gire el disco selector UP/DOWN para introducir el mes deseado.
9. Pulse ENTER.■ Parpadeará el día para ser
configurado. 10. Se pueden configurar el día hora y
minutos usando el mismo método que el año y mes.
11. Cuando se pulsa ENTER después del proceso de introducción de los minutos, desaparecerá la pantalla de configuración del reloj y indicará la fecha y hora seleccionados.
Grabar una DATE/TIME1. Asegúrese de que ha configurado la
DATE/TIME.2. Ponga el interruptor de encendido en
modo CAMERA.3. Pulse el botón DATE/TIME el tiempo
que desee.■ Para grabar la fecha solamente, pulse una vez el
botón DATE/TIME.■ Para grabar la fecha y la hora, pulse dos veces el
botón DATE/TIME.4. Pulse el botón START/STOP para grabar la DATE/TIME
en su imagen.
Nota:■ Si la fecha y hora configurada no se mantienen en la
videocámara, ello significa que la BATERÍA DE LITIOestá descargada. (Consulte la página 17)
■ Usted no puede ocultar la fecha u hora grabada durante la reproducción.
■ La funcion DATE/TIME no funciona en EASYo CUSTOM modos.
7. Press ENTER.■ The month setting will blink.
8. Turn the UP/DOWN dial to set the desired month.
9. Press ENTER.■ The day setting will blink.
10.You set the year, hours and minutes by following the sameprocedures used for setting the year and month.
11. Press ENTER after setting the minutes, the clock setting screen will disappear.The entered date and time will then be displayed.
Recording a DATE/TIME1. Make sure that you have set the
DATE/TIME.2. Set the power switch to CAMERA
mode.3. Press the DATE/TIME button.
■ To record the date only, press the DATE/TIME button once.
■ To record the date and time, press the DATE/TIME button twice.
4. Press the START/STOP button to start recording.
Notes:■ If your date and time settings are not maintained in
the camcorder, it means the LITHIUM BATTERY is discharged and should be replaced. (see page 17)
■ You cannot hide the recorded date or time during playback.
■ The DATE/TIME function will not operate in EASYor CUSTOM mode.
CLOCK SETTING
0:001. JAN. 2005
EXIT: MENU
CLOCK SETTING
0:001. FEB. 2005
EXIT: MENU
CLOCK SETTING
0:001. FEB. 2005
EXIT: MENU
00606K VP-W80 UK+ESP(20-43) 3/20/03 8:35 AM Page 41

42
ENGLISH ESPAÑOL
Advanced Shooting Filmación avanzada
Selección y grabación de un título✤ La selección y grabación de un TITLE funciona sólo
en el modo CAMERA.✤ La función TITLE le permite seleccionar un título
almacenado en la memoria de la cámara.✤ Tambien puede seleccionar el idioma de los títulos.
Seleccionar un idioma y titular✤ La selección de un idioma funciona sólo en
STANDBY en el modo CAMERA.✤ El idioma de fábrica por defecto es el ENGLISH.
Se puede cambiar el idioma.
1. Asegúrese de haber instalado la BATERÍA DE LITIO.
2. Ponga el interruptor de encendido en modo CAMERA.
3. Pulse el botón MENU ON/OFF. Se mostrará la lista MENU.
4. Gire el dial UP/DOWN hasta gueTITLE SET se subraye.
5. Pulse ENTER.■ Aparecerá la lista de idiomas
disponibles.
Selecting and Recording a Title✤ Selecting and recording a TITLE is possible in the
CAMERA mode only.✤ The TITLE feature allows you to select a preset title
stored in the camcorder’s memory.✤ You can also select the language of the titles.
Selecting a Language and Setting a Title✤ Selecting a language is possible in both STAND-
BY in CAMERA modes.✤ The factory default language is ENGLISH but you
can change the language.
1. Make sure that you have installed the LITHIUM BAT-TERY or have the adapter attached.
2. Set the power switch to CAMERAmode.
3. Press the MENU ON/OFF button. The MENU list will be displayed.
4. Turn the UP/DOWN dial until TITLE SET is highlighted.
5. Press ENTER.■ Alist of available languages
will appear.
MENU
DIS........................OFFD.ZOOM ..............OFFPIP........................OFF DISPLAY ..............ONWHITE BAL. ........AUTOWL.REMOCON ....ONNEXT: MENU
MENUCUSTOM SETCLOCK SETTITLE SETTITLE....................OFFD/TITLE COLOUR ..WHITEC.RESET ..............0:00:00DEMO ..................OFF
EXIT: MENU
LANGUAGE SELECTENGLISH [HAVING FUN]FRENCHGERMAN ITALIANSPANISHRUSSIANEXIT: MENU
00606K VP-W80 UK+ESP(20-43) 3/20/03 8:35 AM Page 42

ENGLISH ESPAÑOL
43
Advanced Shooting Filmación avanzada6. Turn the UP/DOWN dial to
select the appropriate language.■ You may select from
ENGLISH/FRENCH/GERMAN/ITALIAN/SPANISH/RUSSIAN.
7. Press ENTER.■ Then, the title list in the
launguage you chose will appear.
8. Turn the UP/DOWN dial to highlight the TITLE you desire.
9. Press ENTER.■ The selected title will appear on the screen for
2 ~ 3 seconds and will then disappear. At the same time the camcorder will return to the menu mode.
Recording a TitleNote: ■ Make sure that you have selected a TITLE.
1. Set the power switch to CAMERA mode.
2. Press MENU.3. Turn the UP/DOWN dial until
TITLE........OFF is highlighted.4. Press ENTER to choose
between OFF, AUTO-10S and CONTINUE.
5. Press the START/STOP button to record the title withyour recording.■ If you want to change the title recording time,
select title recording time.Select from: (OFF, AUTO-10S, CONTINUE) on MENU.
Notes: ■ The title moves horizontally from the right sideto the left side 10 seconds after you turn on the title.
■ The MENU ON/OFF function will not operate in EASY or REC mode.
6. Gire el UP/DOWN dial hasta laposición del lenguaje apropiada.■ Puede seleccionar ENG-
LISH/FRENCH/GERMAN/ITALIAN/SPANISH/RUSSIAN.
7. Pulse ENTER.■ El titulo del pais seleccionado
aparecera.
8. Gire el UP/DOWN dial hasta elTITLE que desee.
9. Pulse ENTER.■ el title aparecera en la pantalla por 2 ~ 3 segundos.
Al mismo tiempo la camara volvera al modo menu.
Grabar un tituloNota: ■ Asegurese de haber seleccionado TITLE.
1. Ponga el power switch en modoCAMERA.
2. Pulse MENU.
3. Gire el dial UP/DOWN hasta gueTITLE...........OFF se subraye.
4. Pulse ENTER para elegir entreOFF, AUTO-10S y CONTINUE.
5. Pulse START/STOP para grabar el titulo con su grabacion.■ Si quiere cambiar el tiempo de grabacion, selec-
cionelo (OFF, AUTO-10S, CONTINUE) en MENU.
Notas:■ El título se mueve horizontalmente de derecha a
izquierda 10 segundos tras activarlo.■ La funcion MENU ON/OFF no funcionara en
modos EASY o REC.
ENGLISH [HAVING FUN]FRENCHGERMANITALIANSPANISHRUSSIAN
ANNIVERSARYCONGRATULATIONSGRADUATIONHAPPY BIRTHDAYHAPPY NEW YEARHAVING FUN
MENU
CUSTOM SETCLOCK SETTITLE SETTITLE...................CONTINUED/TITLE COLOUR ..WHITEDEMO ..................OFF
EXIT: MENU
00606K VP-W80 UK+ESP(20-43) 3/20/03 8:35 AM Page 43

ENGLISH ESPAÑOL
44
✤ La función FADE sólo funciona en modo CAMERA .✤ Para dar una apariencia profesional a sus películas,
puede utilizar algunos efectos especiales, como laentrada gradual al principio o la salida gradual al finalde la secuencia.
Empezar a grabar1. Antes de realizar cualquier
toma, mantenga pulsado el botón FADE.La imagen y el sonido desa-parecerán gradualmente(atenuación).
2. Pulse el botón START/STOP y al mismo tiempo suelte el botónFADE. En este momento se inicia la filmación y la imagen y el sonido aparecen gradual-mente (aparición gradual).
Al parar de filmar (utilice FADE IN/FADE OUT)
3. Cuando desee dejar de filmar, mantenga pulsado el botón FADE. La imagen y el sonido desaparecerán gradualmente (atenuación).
4. Cuando la ima-gen haya desa-parecido, pulse el botón START/ STOP para pararla grabación.
a. FADE OUT(Aprox. 4 segundos)
b. FADE IN(Aprox. 4 segundos)
Entrada y Salida gradual✤ The FADE function works in CAMERA mode only.✤ You can give your films a professional look by using
special effects such as fading in and out at the beginning or end of a sequence.
To Start Recording1. Before recording, hold down
the FADE button.The picture and sound gradually disappear (fade out).
2. Press the START/STOP button and at the same time release the FADE button.Recording starts and the picture and sound graduallyappear (fade in).
To Stop Recording (using FADE IN / FADE OUT)
3. When you wish to stop record-ing, hold down the FADE button.The picture and sound gradually disappear (fade out).
4. When the picture has disappeared, press the START/STOP button to stop recording.
a. FADE OUT(Approx. 4 seconds)
b. FADE IN(Approx. 4 seconds)
Advanced Shooting
Fade In and Out
Gradual appearance b. FADE IN Release the FADE button
Press the FADE button a. FADE OUT Gradual disappearance
➔➔
➔➔
STBY0:00:00
REC0:00:15
REC0:00:15
STBY0:00:20
➔➔
➔➔
Filmación avanzada
00606K VP-W80 UK+ESP(44-64) 3/20/03 8:36 AM Page 44
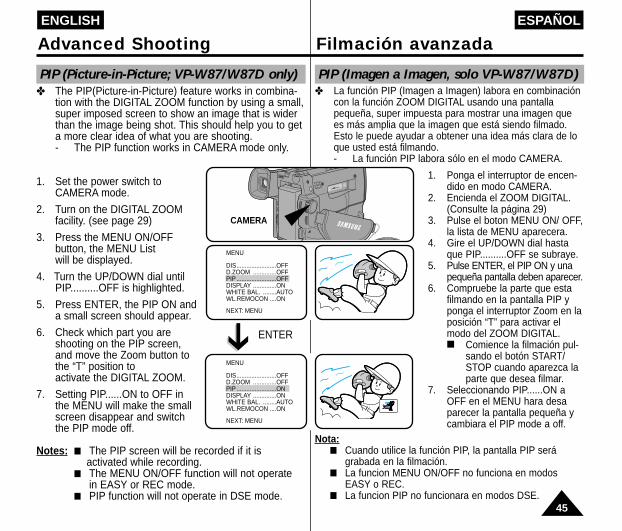
45
ENGLISH ESPAÑOL
CAMERA
PIP (Picture-in-Picture; VP-W87/W87D only)
Advanced Shooting
✤ The PIP(Picture-in-Picture) feature works in combina-tion with the DIGITAL ZOOM function by using a small,super imposed screen to show an image that is widerthan the image being shot. This should help you to geta more clear idea of what you are shooting.- The PIP function works in CAMERA mode only.
1. Set the power switch to CAMERA mode.
2. Turn on the DIGITAL ZOOM facility. (see page 29)
3. Press the MENU ON/OFF button, the MENU Listwill be displayed.
4. Turn the UP/DOWN dial untilPIP..........OFF is highlighted.
5. Press ENTER, the PIP ON and a small screen should appear.
6. Check which part you are shooting on the PIP screen,and move the Zoom button to the “T” position toactivate the DIGITAL ZOOM.
7. Setting PIP......ON to OFF in the MENU will make the small screen disappear and switch the PIP mode off.
Notes: ■ The PIP screen will be recorded if it is activated while recording.
■ The MENU ON/OFF function will not operatein EASY or REC mode.
■ PIP function will not operate in DSE mode.
PIP (Imagen a Imagen, solo VP-W87/W87D)
Filmación avanzada
✤ La función PIP (Imagen a Imagen) labora en combinacióncon la función ZOOM DIGITAL usando una pantallapequeña, super impuesta para mostrar una imagen quees más amplia que la imagen que está siendo filmado.Esto le puede ayudar a obtener una idea más clara de loque usted está filmando.- La función PIP labora sólo en el modo CAMERA.
1. Ponga el interruptor de encen-dido en modo CAMERA.
2. Encienda el ZOOM DIGITAL. (Consulte la página 29)
3. Pulse el boton MENU ON/ OFF,la lista de MENU aparecera.
4. Gire el UP/DOWN dial hastaque PIP..........OFF se subraye.
5. Pulse ENTER, el PIP ON y unapequeña pantalla deben aparecer.
6. Compruebe la parte que estafilmando en la pantalla PIP yponga el interruptor Zoom en laposición “T” para activar elmodo del ZOOM DIGITAL.■ Comience la filmación pul-
sando el botón START/STOP cuando aparezca laparte que desea filmar.
7. Seleccionando PIP......ON a OFF en el MENU hara desaparecer la pantalla pequeña y cambiara el PIP mode a off.
Nota:■ Cuando utilice la función PIP, la pantalla PIP será
grabada en la filmación.■ La funcion MENU ON/OFF no funciona en modos
EASY o REC.■ La funcion PIP no funcionara en modos DSE.
MENU
DIS........................OFFD.ZOOM ..............OFFPIP........................ON DISPLAY ..............ONWHITE BAL. ........AUTOWL.REMOCON ....ON
NEXT: MENU
MENU
DIS........................OFFD.ZOOM ..............OFFPIP........................OFF DISPLAY ..............ONWHITE BAL. ........AUTOWL.REMOCON ....ON
NEXT: MENU➔ ➔
ENTER
00606K VP-W80 UK+ESP(44-64) 3/20/03 8:36 AM Page 45

ENGLISH ESPAÑOL
46
Snap Shot (VP-W87/W87D only)✤ With the SNAP SHOT feature, your camcorder can
function like a normal film camera, allowing you to take single still pictures.- The SNAP SHOT function only operates in the
CAMERA mode.
1. Set the power switch to CAMERAmode.
2. Press the SNAP SHOT button when you have the pictureyou wish to capture.■ At this time, be careful not to
shake your camcorder because the image will be indistinctly recorded.
3. Once the SNAP SHOT button hasbeen pressed, your camcorder will automatically return to STANDBYmode after approximately 6 seconds.■ You can check the remaining
available SNAP SHOT space by looking at the time displayed on the screen.
■ To stop SNAP SHOT shooting, press the SNAP SHOT button again.
Notes:■ If the camcorder is knocked or shaken while taking
a SNAP SHOT, the image may be blurred.■ The SNAP SHOT is activated in recording.■ When the SNAP SHOT button is pressed in
CAMERA mode with no tape installed, a still image will be displayed in the viewfinder.
Advanced Shooting
Filmación Instantánea (sólo VP-W87/W87D)✤ Con la función de SNAP SHOT, se puede filmar un
objeto fijo con una duración como la de una cámara defilmación normal.
- La funcion SNAP SHOT opera en el modo CAMERA.
1. Ponga el interruptor de encendido en modo CAMERA.
2. Pulse el botón SNAP SHOT en la dirección de parada en la que desea filmar.■ En este momento, tenga cuidado
de no agitar la cámara de vídeo porque la imagen se filmará indistintamente.
3. Cuando se pulsa el botón SNAPSHOT, la cámara de vídeo se pondrá automáticamente en el modo STAND-BY tras la filmación de las imágenes fijas durante 6 segundos.■ Puede comprobar el tiempo
restante de SNAP SHOT mirando al tiempo mostrado en la pantalla.
■ Para detener la SNAP SHOT, pulse de nuevo el botón SNAPSHOT.
Notas:■ Si la camara se mueve bruscamente las instanta-
neas se pueden ver "movidas".■ El SNAP SHOT es activado en filmación.■ Cual el botón SNAP SHOT es pulsado en el modo
CAMERA sin ningún videocasete, la pantalla para-da desaparecerá.
Filmación avanzada
CAMERA
00606K VP-W80 UK+ESP(44-64) 3/20/03 8:36 AM Page 46

47
ENGLISH ESPAÑOL
Balance de blancos✤ WHITE BALANCE es una función de filmación que
conserva el color único del objeto en cualquier estado de filmación.
✤ Puede seleccionar el modo de WHITE BALANCE para obtener color de buena calidad de la imagen.- AUTO: Este modo se usa generalmente para
controlar el WHITE BALANCE automáticamente.- INDOOR ( ): Controla el WHITE BALANCE de
acuerdo con el ambiente interior.- OUTDOOR ( ): Controla el WHITE BALANCE de
acuerdo con el ambiente exterior.Configuración de un modo de White Balance
1. Ponga el interruptor de encendido en modo CAMERA.
2. Pulse el botón MENU ON/ OFF y aparecerá la lista MENU.
3. Gire el disco selector UP/ DOWN de modo que el WHITE BAL. ........AUTO esiluminado.
4. Pulse ENTER.■ Puede seleccionar
INDOOR o OUTDOOR pulsando el boton ENTER.
5. Pulse el botón MENU ON/ OFF para finalizar la configuración de WHITE BALANCE.
Nota: La funcion MENU ON/OFF no funcionara enmodos EASY o REC.
White Balance✤ WHITE BALANCE is a recording function that
preserves the unique colour of the object in any shooting condition.
✤ You may select the appropriate WHITE BALANCE mode to obtain good quality colour of the image.- AUTO: This mode is generally used to control the
WHITE BALANCE automatically.- INDOOR ( ): It controls WHITE BALANCE
according to the indoor ambience.- OUTDOOR ( ): It controls WHITE BALANCE
according to the outdoor ambience.
Setting a White Balance Mode1. Set the power switch to
CAMERA mode.
2. Press the MENU ON/OFF button, then the MENU list will be displayed.
3. Turn the UP/DOWN dial until WHITE BAL. ........AUTO is highlighted.
4. Press ENTER.■ You can set it to INDOOR
or OUTDOOR by pressing the ENTER button.
5. Press MENU ON/OFF button to exit the WHITE BALANCE setting screen.
Note: The MENU ON/OFF function will not operate in EASY or REC mode.
Advanced Shooting Filmación avanzada
Hi 8 STBY0:00:00
MENU
DIS........................OFFD.ZOOM ..............OFFPIP........................OFF DISPLAY ..............ONWHITE BAL. ........AUTOWL.REMOCON ....ON
EXIT: MENU
MENU
DIS........................OFFD.ZOOM ..............OFFPIP........................OFF DISPLAY ..............ONWHITE BAL. ........OUTDOORWL.REMOCON ....ON
EXIT: MENU
00606K VP-W80 UK+ESP(44-64) 3/20/03 8:36 AM Page 47
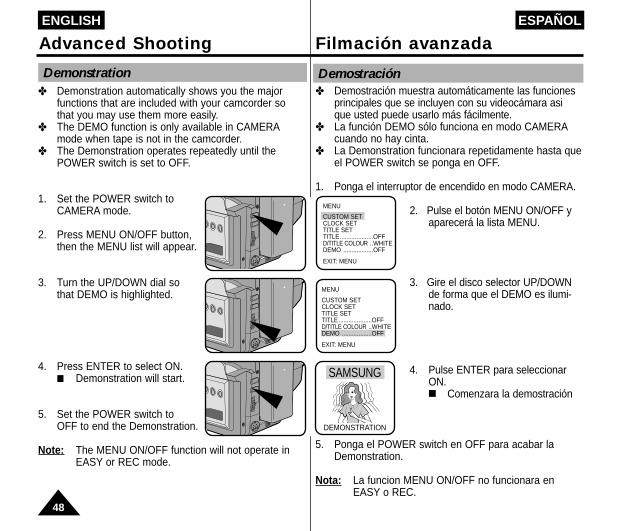
48
ENGLISH ESPAÑOL
Advanced Shooting Filmación avanzada
Demostración✤ Demostración muestra automáticamente las funciones
principales que se incluyen con su videocámara asique usted puede usarlo más fácilmente.
✤ La función DEMO sólo funciona en modo CAMERAcuando no hay cinta.
✤ La Demonstration funcionara repetidamente hasta queel POWER switch se ponga en OFF.
1. Ponga el interruptor de encendido en modo CAMERA.
2. Pulse el botón MENU ON/OFF yaparecerá la lista MENU.
3. Gire el disco selector UP/DOWNde forma que el DEMO es ilumi-nado.
4. Pulse ENTER para seleccionarON.■ Comenzara la demostración
5. Ponga el POWER switch en OFF para acabar la Demonstration.
Nota: La funcion MENU ON/OFF no funcionara en EASY o REC.
✤ Demonstration automatically shows you the majorfunctions that are included with your camcorder sothat you may use them more easily.
✤ The DEMO function is only available in CAMERAmode when tape is not in the camcorder.
✤ The Demonstration operates repeatedly until thePOWER switch is set to OFF.
1. Set the POWER switch to CAMERA mode.
2. Press MENU ON/OFF button,then the MENU list will appear.
3. Turn the UP/DOWN dial so that DEMO is highlighted.
4. Press ENTER to select ON.■ Demonstration will start.
5. Set the POWER switch to OFF to end the Demonstration.
Note: The MENU ON/OFF function will not operate in EASY or REC mode.
Demonstration
MENU
CUSTOM SETCLOCK SETTITLE SETTITLE....................OFF D/TITLE COLOUR ..WHITEDEMO ..................OFF
EXIT: MENU
MENU
CUSTOM SETCLOCK SETTITLE SETTITLE....................OFF D/TITLE COLOUR ..WHITEDEMO ..................OFF
EXIT: MENU
SAMSUNG
DEMONSTRATION
00606K VP-W80 UK+ESP(44-64) 3/20/03 8:36 AM Page 48

49
ENGLISH ESPAÑOL
Advanced Shooting Filmación avanzada
1. Set the power switch to CAMERA mode. (see page 22)
2. Press the MENU ON/OFF button.■ The MENU list will appear.
3. Turn the UP/DOWN dial to D/TITLE COLOUR.......WHITE.
4. Press ENTER.■ A list of available colour
will appear.
5. Turn the UP/DOWN dial toselect the appropriate colour.
6. Press ENTER.
7. Press the MENU ON/OFF button to end setting.■ The title and Date/Time will appear in the colour
you chose.
Setting the Date/Title Colour1. Ponga el power switch en modo CAMERA.
(ver pag. 22)
2. Pulse MENU ON/OFF.■ La lista MENU aparecerá.
3. Gire el dial UP/DOWN hasta D/TITLE COLOUR.......WHITE.
4. Pulse ENTER.■ Aparecera una lista de colores.
5. Gire el dial UP/DOWN paraseleccionar colour.
6. Pulse ENTER.
7. Pulse MENU ON/OFF para finalizar el ajuste.■ Entonces, aparecerá el colour seleccionado.
Ajustando el colour de Date/Title.
MENU
CUSTOM SETCLOCK SETTITLE SETTITLE....................OFF D/TITLE COLOUR ..WHITEC.RESET ..............0:00:00DEMO ..................OFF
EXIT: MENU
MENU
CUSTOM SETCLOCK SETTITLE SETTITLE....................OFF D/TITLE COLOUR ..WHITEC.RESET ..............0:00:00DEMO ..................OFF
EXIT: MENU
DATE/TITLE COLOUR SELECT[WHITE]
WHITEYELLOWCYANMAGENTAREDGREENBLUE
EXIT: MENU
DATE/TITLE COLOUR SELECT[YELLOW]
WHITEYELLOWCYANMAGENTAREDGREENBLUE
EXIT: MENU
00606K VP-W80 UK+ESP(44-64) 3/20/03 8:36 AM Page 49

ENGLISH ESPAÑOL
50
Técnicas de iluminación✤ Al utilizar la videocámara, pueden darse dos situa-
ciones posibles de filmación.- Filmar en exteriores (Grabación normal o utilizan-
do un filtro ND (Densidad neutra)).- Filmar en interiores (Se necesita o recomienda el
uso de la iluminación de vídeo).✤ El aspecto que más puede influir en la calidad de una
imagen es la luminosidad, medida en unidades lux.✤ La siguiente tabla muestra una lista de algunas situa-
ciones comunes, su correspondiente nivel de luminosi-dad y las recomendaciones asociados.
1. Extraiga la cinta que haya filmado. (Consulte la página 22)
2. Si desea proteger la cinta de un borrado accidental, empuje la pestaña roja del videocasete.
3. Ponga el interruptor de encendido en OFF.4. Cierre la tapa de LENS.5. Retire la BATTERY PACK de la videocámara.
Después de filmar
Situations Brightness Recommenda-(lux) tions
◆ Snow-covered mountains or fields. 100,000 ND filter ◆ Sandy beach on a hot 100,000 recommended.
summer’s day.◆ On a sunny day in the middle 35,000
of the afternoon.◆ On a gloomy day, an hour 2,000
after the sunrise. Normal ◆ Office with fluorescent lighting 1,000 recording.
near to a window.◆ On a sunny day, an hour 1,000
before the sunset. ◆ Department store counter. 500 to 700◆ Room lit by two 30W 300 Video light
fluorescent lights. recommended.
◆ Arcade at night. 150 to 200 Video light ◆ Candle light. 10 to 15 required.
Lighting Techniques✤ When you use your camcorder, there are normally
only two main recording environments.- You will be shooting outdoors (Normal recording or
through an ND (Neutral Density) filter).- You will be shooting indoors (Video light
recommended or required).✤ The single greatest influence on picture quality is the
level of brightness, measured in lux.✤ The following table lists a few common situations, the
corresponding level of brightness and any associated recommendations.
1. Eject the tape that you have shot. (see page 22)2. If you want to protect the tape against accidental erasing,
move the red tab on the cassette to cover the hole.3. Set the POWER switch to OFF.4. Close the LENS cover.5. Remove the BATTERY PACK from the camcorder.
After Shooting
Situaciones Luminosidad Recomend-(lux) aciones
◆ Montañas o campos 100,000 Filtro ND cubiertos de nieve. recomendado.
◆ Playa de arena en un día 100,000de verano caluroso
◆ Día soleado alrededor 35,000de mediodia.
◆ Día nublado, una hora 2,000después de la puesta del sol.
◆ Oficina con iluminación 1,000 Grabación normal fluorescente cerca a la ventana.
◆ Día soleado una hora antes 1,000de la puesta de sol.
◆ Caja del centro comercial. 500 a 700◆ Habitación iluminada por dos 300 Iluminación de
tubos fluorescentes de 30W. vídeo recomendado.◆ Arcadia de noche. 150 a 200 Iluminación de ◆ Luz de velas. 10 a 15 vídeo necesario.
Advanced Shooting Filmación avanzada
00606K VP-W80 UK+ESP(44-64) 3/20/03 8:36 AM Page 50

ENGLISH ESPAÑOL
51
Playing back the Tape Reproducir una cinta✤ Para ver una cinta que haya filmado.✤ La función Reproducir funciona sólo en el modo PLAYER.
■ En el monitor de TV: recomendada para uso en interiores.
✤ Es muy práctico ver una cinta en el televisor si se estáen interiores.
✤ Para reproducir una cinta, el televisor debe tener un sis-tema de color compatible. (Consulte la página 56)
Conectar a un televisor que tenga conexión de entrada de audio y vídeo
✤ Utilice el cable Audio/Vídeoque se suministra con lavideocámara.■ Amarillo: Vídeo■ Blanco: Audio(L)
✤ Puede utilizar el adaptadorSCART suministrado comoaccesorio opcional.
✤ Puede conectar su videocámara al televisor a travésdel reproductor de vídeo.
■ Amarillo: Vídeo■ Blanco: Audio(L)■ Puede utilizar el adaptador
SCART su-ministrado como accesorio opcional.
Nota: Para ver el videocasete en la pantalla del televisor,elegir el canal reservado por su reproductor devídeo en el televisor. (Referir al manual de instruc-ciones del reproductor de vídeo o televisor)
Para ver con el monitor de TV
Conectar a un televisor sin conexión de entrada de audio y vídeo
✤ To view a tape that you have recorded.✤ Playback function works in PLAYER mode only.
■ Watch on a TV monitor: recommended for indoor use.
✤ It is better to use a TV monitor to view tapes indoors.✤ To play a tape back, the TV must feature a compatible
colour system. (see page 56)Connecting to a TV which has an Audio and Video input jack
✤ Use the Audio/Video cable supplied with your camcorder.■ The yellow one: Video■ The white one: Audio(L)
✤ You can use a SCART adapter, supplied optionally.
✤ A provided SCART adapter will be one of the following two types.■ Stereo type■ Mono type
✤ You can connect your camcorder to a TV through a VCR.■ Set the input selector on the
VCR to LINE.■ The yellow one: Video■ The white one: Audio(L)■ You can use a SCART
adapter (supplied optionally).✤ To view the cassette on the
television screen, select the channel reserved for yourVCR on the television.(Refer to your VCR or television instruction book.)
To watch on a TV monitor
Connecting to a TV which has no Audio and Video input jack
00606K VP-W80 UK+ESP(44-64) 3/20/03 8:36 AM Page 51

ENGLISH ESPAÑOL
52
Playing back the Tape Reproducir una cintaNotas:
■ VP-W80U/W80/W87/W87D disponen de un sis-tema de audio monaural. Si su televisor o repro-ductor de vídeo disponen de un sistema de audioestéreo, conecte el cable audio a la entrada “L”del televisor o del reproductor de vídeo.
■ Puede utilizar el cable S-VÍDEO para obtenerimágenes de mejor calidad en caso de disponerde un conector S-VÍDEO en el televisor.
Reproducción1. Utilice el botón TV/VÍDEO para
seleccionar VÍDEO en su televisor.
2. Conecte la fuente de energía a la videocámara (batería o Adaptador AC).Coloque el interruptor de encendi-do en el modo PLAYER.
3. Introduzca el videocasete quequiera ver.■ Asegúrese de que aparece el
indicador STOP.
4. Pulse el botón (PLAY/STILL).■ La imagen filmada aparece en el televisor transcur-
rridos 2 ó 3 segundos. ■ Pulse ■ (STOP) para detener la reproducción.■ Si la cinta se acaba durante la reproducción, se
rebobinará automáticamente.Notas:
■ El sistema (Hi8, 8mm) se seleccionan automática-mente dependiendo del formato de la cinta.
■ Los modelos VP-W80/W87/W87D pueden reproducir en los dos sistemas, Hi8 y 8mm.
■ Esta camara no soporta los modos LP.
Note:■ VP-W80U/W80/W87/W87D feature a monaural
audio system. If your TV or VCR are stereo, connect the audio cable to the input marked “L” of the TV or VCR.
■ You can use the S-VIDEO cable to obtain better quality pictures if you have the S-VIDEO connectoron your TV.
Playback1. Use the TV/VIDEO button to select VIDEO on your TV.2. Connect a power source (battery or AC Power
Adapter) to the camcorder.Set the power switch to PLAYER mode.
3. Insert the tape you want to watch.■ Make sure that STOP is
displayed.4. Press the (PLAY/STILL)
button.■ The recorded pictures should
appear on the TV after 2 to 3 seconds.
■ Press ■ (STOP) to stop playing. ■ If the tape reaches its end during
playback, the tape will rewind automatically.
Notes:■ This camcorder does not support LP recording
and playback.■ The playback system (Hi8/8mm) is selected
automatically, depending on the tape format.■ VP-W80/W87/W87D can playback both Hi8
and 8mm.
PLAYER
PLAY/STILL
00606K VP-W80 UK+ESP(44-64) 3/20/03 8:36 AM Page 52

53
ENGLISH ESPAÑOL
Playing back the Tape Reproducir una cinta
Funciones varias en el modo PLAYERVer una imagen STILL (Pausa en la reproducción)
- Pulse el botón (PLAY/STILL) durantela reproducción.
- Para reiniciar la reproducción, pulse de nuevo el botón (PLAY/ STILL).
Nota: La videocámara se parará automáti-camente si permanece en el modoSTILL por más de 5 minutos sinningún tipo de funcionamiento paraprevenir el desgaste de la cinta y deltambor de cabezal.
Localizar una escena (búsqueda de imágenes)
- Pulse los botones de avance rápido (FF) o rebobinado (REW)
durante la reproducción. Para reiniciar la reproducción normal, suelte los botones.
Retorno a cero (VP-W87/W87D)✤ La función ZERO RETURN funciona en STOP del
modo PLAYER.✤ Puede avanzar o rebobinar
automáticamente al 0:00:001. Coloque el interruptor de encendido
en el modo PLAYER.■ Asegúrese de que aparece el indi-
cador STOP.2. Pulse el botón ZERO RETURN.
■ Aparecerá el indicador Z.RETURN.■ El avance rápido (FF) o el rebobinado (REW)
comenzará a funcionar automáticamente.Notas:■ El botón ZERO RETURN no funciona cuando el TAPE
COUNTER muestra 0:00:00.■ Ponga el COUNTER RESET en “C.RESET 0:00:00” en
modo MENU al principio de la cinta o la secuencia deseadaCuando desee buscar este punto de nuevo en la cinta, pulse el botón Z.RETURN cuando se haya parado de reproducir.
Various Functions in PLAYER modeTo view a STILL picture (Playback pause)
- Press (PLAY/STILL) button during playback.
- To resume playback, press (PLAY/STILL) button again.
Note: Your camcorder will automatically stop if it is left for more than 5 minutes in STILL mode without operation in order to prevent tape and head wear.
To locate a scene (picture search)- Press (FF) or (REW)
buttons during playback. To resume normal playback, release the buttons.
Zero RETURN (VP-W87/W87D only)✤ The ZERO RETURN function works in STOP of
PLAYER mode.✤ You can Fast Forward or Rewind to 0:00:00
automatically.1. Set power switch to PLAYER mode.
■ Make sure that STOP is displayed.
2. Press ZERO RETURN button.■ Z.RETURN should displayed.■ FF or REW works automatically.
Note: The ZERO RETURN button doesnot work when the TAPE COUNTER reads 0:00:00.
Notes: ■ Set the COUNTER RESET to “C.RESET0:00:00” in MENU mode at the start of thecassette or the required sequence.
■ When you wish to find this point on the tape again, press Z.RTN button when playback is stopped.
START/STOP
SELFTIMER
ZERORETURNSTILL
COUNTERRESET WIDE
TELE
DISPLAY
REW
PLAY/STILL
FF
00606K VP-W80 UK+ESP(44-64) 3/20/03 8:36 AM Page 53

ENGLISH ESPAÑOL
54
Playing back the Tape Reproducir una cinta
DSE in PLAYER mode✤ The procedure for using DSE in PLAYER mode is the
same as the procedure for using DSE in CAMERAmode, except that the power switch must be set toPLAYER instead of CAMERA. Please refer to pages 38 and 39.
Note: The GHOST, STROBE, NEG., MIRROR, MOSA-IC, CINEMA and 16:9(WIDE) effects will not oper-ate when your camcorder is in PLAYER mode.
✤ Pressing the DSE button will scroll through the avail-able settings. Stop at the one you require.
DSE en modo PLAYER✤ El proceso de uso de DSE en el modo PLAYER es
idéntico al proceso de uso de DSE en el modo CAM-ERA, excepto que el interruptor de encendido debeestar fijado a PLAYER en vez de CAMERA. Por favor,consulte a las páginas 38 y 39.
Nota: En el modo GHOST, STROBE, NEG., MIRROR,MOSAIC, CINEMA en 16:9 (WIDE) no funcionaráncuando la videocámara, esta en modo PLAYER.
✤ Pulsando el boton DSE hara" scroll" de los ajustesposibles. Pare en el deseado.
Cleaning the Viewfinder◆ Releasing the Eyepiece
1. Pull the viewfinder up and then turn the screw counter-clock-wise.
2. Pull the EYEPIECE away from the viewfinder.
3. Clean the EYEPIECE and theVIEWFINDER screen with a soft cloth and cotton swab or a blower.◆ Reattaching the Eyepiece
4. Reposition the EYEPIECE backon the VIEWFINDER.
5. Insert and tighten the screw.
Maintenance MantenimientoCleaning and Taking care of the Camcorder Limpieza y cuidados de la Videocámara
Limpieza del Visor
◆ Como desmontar el Ocular1. Tire del VISOR hacia arriba y
gire el tornillo en sentido anti-horario.
2. Saque el Ocular.3. Limpie el Ocular y la pantalla
del VISOR con un paño suave,copo de algodón o unsoplador.
◆ Colocación del Ocular4. Ponga el Ocular en el VISOR. 5. Apriete el tornillo.
1 2
43
00606K VP-W80 UK+ESP(44-64) 3/20/03 8:36 AM Page 54

ENGLISH ESPAÑOL
55
Maintenance MantenimientoCleaning the Video Heads
✤ To ensure normal recording and clear pictures, clean the video heads.
✤ When the playback pictures are noisy or hardly visible, the video heads may be dirty.
a. Normal Pictureb, c. Noisy Picture
If this happens, clean thevideo heads with a drytype cassette cleaner.
1. Set the power switch to PLAYER mode.
2. Insert the cleaning tape.3. Press the (PLAY/STILL) button.4. Press the ■ (STOP) button after about 30 seconds.
Check the quality of the picture using a known good video cassette. If it is still bad, repeat the operation.
If the problem continues, contact your local authorized ser-vice centre.
Storing the Camcorder1. You must detach the
BATTERY PACK from the camcorder when not in use.
2. Keep the camcorder in a ventilated, dry/warm place.
3. Store the camcorder were temperature changes will be minimal. (avoid places such as a garage, loft spaceor car.)
4. Store the camcorder on a stable surface.
Limpieza de los cabezales del vídeo✤ Para asegurar filmaciones normales e imágenes
claras, limpie los cabezales de vídeo.✤ Si las imágenes reproducidas tienen ruido o no se
ven fácilmente puede que los cabezales del vídeoestén sucios.
a. Imagen normalb, c. Imagen con ruido
Si esto sucede, limpielos cabezales del vídeocon una cinta delimpieza de tipo seco.
1. Ponga el interruptor de encendido en el modo PLAYER. 2. Introduzca una cinta de limpieza de tipo seco.3. Pulse el botón (PLAY/STILL).4. Pulse el botón ■ (STOP) transcurridos 30 segundos.
Compruebe la calidad de la imagen utilizando unacinta de vídeo. Si la imagen todavía no es buena, repi-ta la operación. Si el problema continúa, póngase encontacto con su servicio técnico autorizado.
Guardar la videocámara1. Debe retirar la BATTERY
PACK de la videocámaraantes de guardarla.
2. Guarde la videocámaraen un lugar ventilado,seco y con una temper-atura suave.
3. No guarde la videocá-mara en un lugar dondehaya cambios bruscos detemperatura, como en uncoche.
4. Guarde la videocámaraen un lugar estable.
21
43
a b c
00606K VP-W80 UK+ESP(44-64) 3/20/03 8:36 AM Page 55

ENGLISH ESPAÑOL
56
Using Your Camcorder Abroad Utilizar la videocámara en el extranjero
Using Your Camcorder Abroad✤ Each country or area has its own electric and TV
colour system.✤ Before using your camcorder abroad, check the following:
Power sources■ You can use your camcorder in any country or area
that uses 100V to 240V, 50/60 Hz.■ Were necessary, use a commercially available AC plug
adapter, depending on the style of plug used.
Colour system■ You can always view your recordings on the Viewfinder.
However, to view a recording on a television or to make a copy to a video cassette recorder, the televi-sion or VCR must be PAL: VP-W80U/W80/W87/W87D-compatible and have the appropriate audio/video jacks.
✜ PAL-compatible areaAustralia, Austria, Belgium, Bulgaria, China, CIS, Czech Republic, Denmark, Egypt, Finland, France,Germany, Greece, Great Britain, Holland, Hong Kong,Hungary, India, Iran, Iraq, Kuwait, Libya, Malaysia,Mauritius, Rumania, Saudi Arabia, Singapore, Slovak Republic, Spain, Sweden, Switzerland, Syria,Thailand, Tunisia, etc.
✜ NTSC-compatible areaBahamas, Canada, Central America, Japan, Mexico, Philippines, Korea, Taiwan, United States, etc.
Note: You can make recordings with your camcorderanywhere in the world.
Utilizar la videocámara en el extranjero✤ Cada país o zona tiene su propio sistema eléctrico o
de color de televisión.✤ Antes de utilizar su videocámara en el extranjero,
revise los si-guientes aspectos:
Fuentes de energía■ Puede utilizar su videocámara en cualquier país o
zona con electricidad 100V a 240V, 50/60 Hz.■ Utilice un adaptador de enchufe AC disponible, en
caso de que sea necesario, dependiendo del diseñodel enchufe de pared local.
Sistema de color■ Puede ver sus grabaciones en el visor.
Sin embargo, para verlas en un televisor o copiarlasen una cinta de vídeo, el televisor o el reproductor devídeo deben ser compatibles con PAL: VP-W80U/W80/W87/W87D- y disponer de entradas de audio/ vídeoadecuadas.
✜ Zonas compatibles con PALAlemania, Arabia Saudita, Australia, Austria, Bélgica,Bulgaria, CEI, China, Dinamarca, Egipto, España,Finlandia, Francia, Gran Bretaña, Grecia, Holanda,Hong Kong, Hungría, Irak, India, Irán, Kuwait, Libia,Malasia, Mauricio, República Checa, RepúblicaEslovaca, Rumanía, Siria, Singapur, Suecia, Suiza,Tailandia, Túnez, etc.
✜ Zona compatible con NTSCAmérica Central, Bahamas, Canadá, Corea, EstadosUnidos, Filipinas, Japón, México, Taiwán, etc.
Nota: Puede realizar filmaciones con su videocámara encualquier lugar del mundo.
00606K VP-W80 UK+ESP(44-64) 3/20/03 8:36 AM Page 56
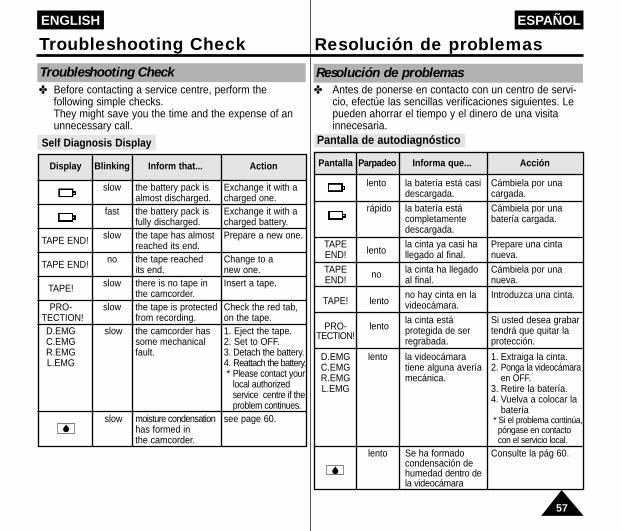
57
ENGLISH ESPAÑOL
Troubleshooting Check Resolución de problemas
Resolución de problemas✤ Antes de ponerse en contacto con un centro de servi-
cio, efectúe las sencillas verificaciones siguientes. Lepueden ahorrar el tiempo y el dinero de una visitainnecesaria.
Pantalla de autodiagnóstico
Pantalla Parpadeo Informa que... Acción
lento la batería está casi Cámbiela por una descargada. cargada.
rápido la batería está Cámbiela por una completamente batería cargada.descargada.
TAPElento
la cinta ya casi ha Prepare una cintaEND! llegado al final. nueva.
TAPE no la cinta ha llegado Cámbiela por una END! al final. nueva.
TAPE! lento no hay cinta en la Introduzca una cinta.videocámara.
PRO- lentola cinta está Si usted desea grabar
TECTION! protegida de ser tendrá que quitar la regrabada. protección.
D.EMG lento la videocámara 1. Extraiga la cinta.C.EMG tiene alguna avería 2. Ponga la videocámara R.EMG mecánica. en OFF.L.EMG 3. Retire la batería.
4. Vuelva a colocar la batería
* Si el problema continúa,póngase en contacto con el servicio local.
lento Se ha formado Consulte la pág 60.condensación de humedad dentro de la videocámara
Troubleshooting Check✤ Before contacting a service centre, perform the
following simple checks. They might save you the time and the expense of an unnecessary call.
Self Diagnosis Display
Display Blinking Inform that... Action
slow the battery pack is Exchange it with aalmost discharged. charged one.
fast the battery pack is Exchange it with a fully discharged. charged battery.
TAPE END! slow the tape has almost Prepare a new one.reached its end.
TAPE END! no the tape reached Change to a its end. new one.
TAPE! slow there is no tape in Insert a tape. the camcorder.
PRO- slow the tape is protected Check the red tab, TECTION! from recording. on the tape.D.EMG slow the camcorder has 1. Eject the tape. C.EMG some mechanical 2. Set to OFF.R.EMG fault. 3. Detach the battery.L.EMG 4. Reattach the battery.
* Please contact your local authorized service centre if the problem continues.
slow moisture condensation see page 60.has formed in the camcorder.
00606K VP-W80 UK+ESP(44-64) 3/20/03 8:36 AM Page 57
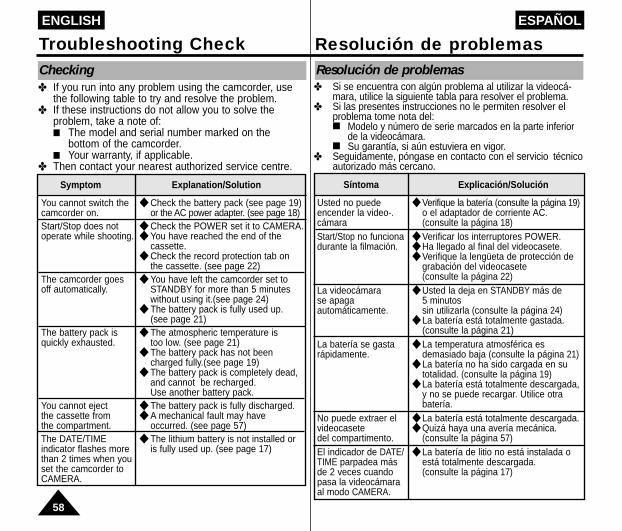
ENGLISH ESPAÑOL
58
Troubleshooting Check Resolución de problemasResolución de problemas✤ Si se encuentra con algún problema al utilizar la videocá-
mara, utilice la siguiente tabla para resolver el problema.✤ Si las presentes instrucciones no le permiten resolver el
problema tome nota del:■ Modelo y número de serie marcados en la parte inferior
de la videocámara.■ Su garantía, si aún estuviera en vigor.
✤ Seguidamente, póngase en contacto con el servicio técnicoautorizado más cercano.
Síntoma Explicación/Solución
Usted no puede ◆ Verifique la batería (consulte la página 19)encender la video-. o el adaptador de corriente AC. cámara (consulte la página 18)Start/Stop no funciona ◆ Verificar los interruptores POWER.durante la filmación. ◆ Ha llegado al final del videocasete.
◆ Verifique la lengüeta de protección de grabación del videocasete(consulte la página 22)
La videocámara ◆ Usted la deja en STANDBY más de se apaga 5 minutosautomáticamente. sin utilizarla (consulte la página 24)
◆ La batería está totalmente gastada. (consulte la página 21)
La batería se gasta ◆ La temperatura atmosférica es rápidamente. demasiado baja (consulte la página 21)
◆ La batería no ha sido cargada en su totalidad. (consulte la página 19)
◆ La batería está totalmente descargada, y no se puede recargar. Utilice otrabatería.
No puede extraer el ◆ La batería está totalmente descargada.videocasete ◆ Quizá haya una avería mecánica. del compartimento. (consulte la página 57)El indicador de DATE/ ◆ La batería de litio no está instalada o TIME parpadea más está totalmente descargada.de 2 veces cuando (consulte la página 17)pasa la videocámara al modo CAMERA.
Checking✤ If you run into any problem using the camcorder, use
the following table to try and resolve the problem.✤ If these instructions do not allow you to solve the
problem, take a note of:■ The model and serial number marked on the
bottom of the camcorder.■ Your warranty, if applicable.
✤ Then contact your nearest authorized service centre.
Symptom Explanation/Solution
You cannot switch the ◆ Check the battery pack (see page 19)camcorder on. or the AC power adapter. (see page 18)Start/Stop does not ◆ Check the POWER set it to CAMERA.operate while shooting. ◆ You have reached the end of the
cassette.◆ Check the record protection tab on
the cassette. (see page 22)The camcorder goes ◆ You have left the camcorder set to off automatically. STANDBY for more than 5 minutes
without using it.(see page 24)◆ The battery pack is fully used up.
(see page 21)The battery pack is ◆ The atmospheric temperature is quickly exhausted. too low. (see page 21)
◆ The battery pack has not been charged fully.(see page 19)
◆ The battery pack is completely dead, and cannot be recharged. Use another battery pack.
You cannot eject ◆ The battery pack is fully discharged.the cassette from ◆ A mechanical fault may have the compartment. occurred. (see page 57)The DATE/TIME ◆ The lithium battery is not installed or indicator flashes more is fully used up. (see page 17) than 2 times when you set the camcorder to CAMERA.
00606K VP-W80 UK+ESP(44-64) 3/20/03 8:36 AM Page 58

ENGLISH ESPAÑOL
59
Troubleshooting Check Resolución de problemas
Symptom
The playback picture is inpoor quality.
You can do nothing withthe camcorder.
A vertical strip appearswhen you shoot a brightsubject against a darkbackground. (candleflame, for example)
The image in theviewfinder is blurred.
The tape does not movewhen you press the play,Fast Forward or Rewindbuttons.
The Date Time or Titledisappeared even thoughyou had it set.
Explanation/Solution
◆ The video heads might be dirty. (see page 55)
◆ A mechanical fault may have occurred. (see page 57)
◆ The contrast between the subject and the background is too great for the camcorder to operate normally. Make the background bright to reduce the contrast or use the BLC function while you are shooting. (see page 35)
◆ The view finder lens has not been adjusted.Turn the viewfinder focus ring until the screen comes into sharp focus. (see page 25)
◆ Set the POWER switch to PLAYER.◆ You have reached the beginning
or end of the cassette.
◆ The lithium battery is not installed or is fully used up. (see page 17)
Síntoma
La imagen de la repro- duc-ción tiene poca calidad.
No puede hacer nada conla videocámara.
Aparece una línea verticalcuando filma un motivoclaro contra un fondooscuro (llama de vela, porejemplo)
La imagen en el visor seve borrosa.
La cinta no se muevecuando usted pulsa losbotones de reproducciónde avance rápido y deretroceso.La Fecha, hora y el título desaparecen aunque usted los haya programado.
Explicación/Solución
◆ Los cabezales del vídeo pueden estar sucios. (consulte la página 55)
◆ Probablemente haya ocurrido una avería mecánica.(consulte la página 57)
◆ El contraste entre el motivo y el fondo es demasiado grande para que la videocámara pueda funcionar de forma normal. Claree el fondo para reducir el contraste o utilice la función BLC cuando esté filmando. (consulte la página 35)
◆ Las lentes del visor no han sido ajustadas. Gire el aro de enfoque del visor hasta que la pantalla del visor se vea nítidamente. (consulte la página 25)
◆ Ajuste el interruptor POWER a la posición de PLAYER.
◆ Ha llegado al inicio o al final del videocasete.
◆ La batería de litio no está instalada o está totalmente gastada. (consulte la página 17)
00606K VP-W80 UK+ESP(44-64) 3/20/03 8:36 AM Page 59

ENGLISH ESPAÑOL
60
Troubleshooting Check Resolución de problemas
Condensación de la humedad✤ Si se pasa la vídeocámara directamente de un lugar
frío a otro con una temperatura más elevado, puedecondensarse la humedad en el interior de la videocá-mara, en la superficie de la cinta o en las lentes. Eneste caso, la cinta puede adherirse al tambor delcabezal y dañarse, o hacer que el funcionamiento nosea correcto.
Para evitar posibles daños bajo estas circunstancias, la videocá-mara tiene integrado un sensor de humedad.
✤ Si hay humedad en el interior de la videocámara, se mostrará “DEW( )”.En este caso, no se activaráninguna de las funciones con laexcepción de la expulsión. Abra el compartimento del video-casete y saque la batería y man-téngala al menos dos horas enuna habitación templada y seca.
✤ Si se activa de forma inesperada la protección DEW, y desea cancelarla, haga lo siguiente: (Asegúrese de que ha desapareci-do completamente la condensación.)
1. Extraiga la batería.
2. Saque la batería de litio.
3. Vuelva a colocar la batería de litio.
4. Vuelva a colocar la batería.
Moisture Condensation✤ If the camcorder is brought directly from a cold place to
a warm place, moisture may form inside the camcorder, on the surface of the tape, or on the lens. In this condi-tion, the tape may stick to the head drum and be dam-aged or the unit may not operate correctly.To prevent possible damage under these circumstances, the camcorder has the built-in moisture sensor.
✤ If there is moisture inside the cam-corder, “DEW( )” is displayed.If this happens, none of the functionsexcept cassette ejection will work. Open the cassette compartment andremove the battery for at least two hours in a warm dry room.
✤ If the DEW protection feature unexpectedly activated and you want to override it: (Please make sure that the condensation has disappeared completely.)
1. Take the battery pack out.
2. Take the lithium battery out.
3. Put the lithium battery back.
4. Put the battery pack back.
1
2
3
4
DEW
00606K VP-W80 UK+ESP(44-64) 3/20/03 8:36 AM Page 60

ENGLISH ESPAÑOL
61
Specifications Especificaciones✤ Estas especificaciones técnicas y diseños pueden ser
cambiados sin notficación.
System VP-W80U/W80/W87/W87D
Sistema de grabación Vídeo: 2 cabezas rotatorias FM scanning HelicalAudio: Sistema monoural FM
Señal de vídeo Color PAL, CCIR estándarVideocasete utilizable VP-W80U: 8 mm
VP-W80/W87/W78D: Hi8 o 8 mmVelocidad de la cinta SP: 20,051 mm/seg.Modo de la velocidad Grabación: Sólo SP Reproducción: SPTiempo de grabación P5-120: 120 min.Tiempo de FF o REW P5-120: aprox. 8 min.Dispositivo de imagen CCD (Dispositivo acoplado de carga) Coeficiente de 22xzoom ópticoLongitvd focal: f 3,6~79,2 mmF 1,6Diámetro de filtro 46 mmSistema de enfoque InternoMacro Macro amplio automáticoIluminación minima 0,3 lux (visible)ConectoresSalida de vídeo Mini jack, 1 Vp-p, 75 ohms,DesequilibradoSalida de audio Mini jack, 7.7 dBs, imp.: inferior a 820 ohmsMicrófono ext. Monaural ø3,5 (sólo VP-W87/W87D)GeneralidadesFuente de corriente DC 8,4V (1,5A)Consumo de energia VP-W80U/W80: 3,3W,
VP-W87/W87D: 3,8WMicrofono incorporado Mic. condensado, omni-direccionalTemperatura de 0°C ta 40°C (32°F ta 104°F) funcionamientoDimensión (W ✕ H ✕ D) 101 ✕ 104 ✕ 174 mmPeso 690 g
✤ These technical specifications and design may bechanged without notice.
System VP-W80U/W80/W87/W87D
Recording system Video: 2 rotary heads Helical scanning FMAudio: FM monaural system
Video signal PAL colour, CCIR standardUsable cassette VP-W80U: 8 mm
VP-W80/W87/W87D: Hi8 or 8 mmTape speed SP: 20.051 mm/secSpeed mode Record: SP only Playback: SP only Recording time P5-120: 120 min.FF or REW time P5-120: approx. 8 min.Image device CCD (Charge Coupled Device) Optical zoom ratio 22xFocal length: f 3.6 ~ 79.2 mmF 1.6Filter diameter 46 mmFocus system InnerMacro Auto wide macroMin. Illumination 0.3 lux (visible)ConnectorsVideo out Mini jack, 1 Vp-p, 75 ohms,
UnbalancedAudio out Mini jack, 7.7 dBs,
imp.: less than 820 ohmsExternal mic Monaural ø3.5 (VP-W87/W87D)GeneralPower requirement DC 8.4 V (1.5 A)Power consumption VP-W80U/W80: 3.3 W,
VP-W87/W87D: 3.8 WBuilt-in mic Condenser mic, omni-directionalOperating temperature 0°C to 40°C (32°F to 104°F) Dimension (W*H*D) 101*104*174 (mm)Weight 690g
00606K VP-W80 UK+ESP(44-64) 3/20/03 8:36 AM Page 61

ENGLISH ESPAÑOL
62
Index Índice- A -
ABROAD ......................56AC POWER ADAPTER18AF ................................34AUDIO ..........................51AUTO FOCUSING........34 AUTO MODE................36AUTO POWER OFF ....24
- B -
BATTERY ....................19BATTERY LEVEL ........21BATTERY PACK ..........19BLC ..............................35
- C -
CAMERA ......................18CASSETTE ..................22CASSETTE HOLDER ..11CLEANING ..................55CONTENTS....................2CUSTOM ......................32
- D -
DATE ............................40DATE/TIME ..................40DC CABLE ..................18DEMO ..........................48DEW ............................60DIGITAL ZOOM ............29DIMENSION ................61DIS................................33DISPLAY ......................12DSE ..............................38
- E -
EASY............................31EJECT ..........................22
- F -
FADE IN ......................44FADE OUT ..................44FF (FAST FORWARD) 53FILTER DIAMETER......61FOCAL LENGTH ..........61
- G -
GHOST ........................38
- H -
HAND STRAP ..............16Hi8 ................................52
- L -
LENS ..............................9LITHIUM BATTERY......17
- M -
MIRROR ......................38MOISTURE ..................60MONAURAL AUDIO ....51MOSAIC ......................38
- N -
ND FILTER ..................50NEG..............................38NTSC............................56
- A -
ADAPTADOR DECORRIENTE AC..........18APAGADO AUTOMÁTICO 24AUDIO ........................51AUDIO MONAURAL....52AUTO DIAGNÓSTICO 57
- B -
BALANCE DE BLANCOS 47BATERÍA......................19BATERÍA DE LITIO......17BLC..............................35
- C -
CABEZAL DE VÍDEO ..55CABLE DC ..................18CONSUMO DE
ENERGÍA ..............61CONTADOR DE CINTA13CONTENIDO ................2CORREA DE HOMBRO 17CORREA DE MANO....16CUSTOM ....................32
- D -
DEMO ........................48DEW ............................60DIÁMETRO DE FILTRO 61DIMENSIÓN ................61DIS ..............................33DSE ............................38
- E -
EASY ..........................31EJECT ........................22ENFOQUEAUTOMÁTICO ............34ENTRADA GRADUAL 44ESPECIFICACIONES..61
- F -
FECHA/HORA ............40FF (AVANCE RÁPIDO)53FILMACIÓN ................23FILMACIÓNAUTOMÁTICA ............15FILTRO ND..................49FUENTE DECORRIENTE................61
- G -
GHOST........................38
- H -
Hi8 ..............................52HORA ..........................40HUMEDAD ..................60
- I -
INTERRUPTOR ..........18
- L -
LENTE ..........................9LIMPIEZA ....................54
00606K VP-W80 UK+ESP(44-64) 3/20/03 8:36 AM Page 62
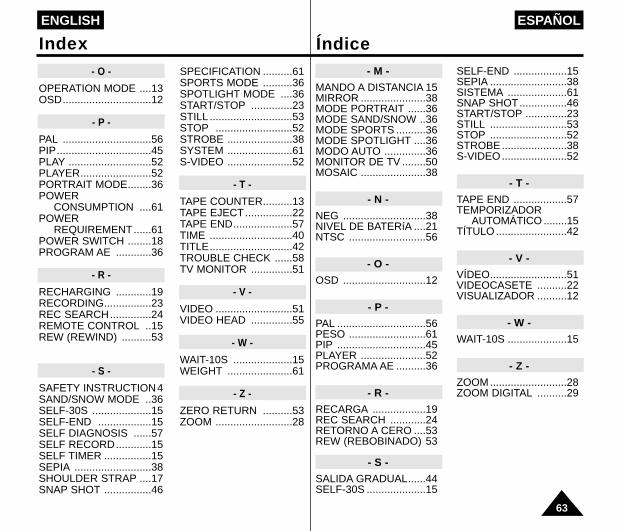
ENGLISH ESPAÑOL
63
- O -
OPERATION MODE ....13OSD..............................12
- P -
PAL ..............................56PIP................................45PLAY ............................52PLAYER........................52PORTRAIT MODE........36POWER
CONSUMPTION ....61POWER
REQUIREMENT......61POWER SWITCH ........18PROGRAM AE ............36
- R -
RECHARGING ............19RECORDING................23REC SEARCH..............24REMOTE CONTROL ..15REW (REWIND) ..........53
- S -
SAFETY INSTRUCTION4SAND/SNOW MODE ..36SELF-30S ....................15SELF-END ..................15SELF DIAGNOSIS ......57SELF RECORD............15SELF TIMER ................15SEPIA ..........................38SHOULDER STRAP ....17SNAP SHOT ................46
SPECIFICATION ..........61SPORTS MODE ..........36SPOTLIGHT MODE ....36START/STOP ..............23STILL ............................53STOP ..........................52STROBE ......................38SYSTEM ......................61S-VIDEO ......................52
- T -
TAPE COUNTER..........13TAPE EJECT................22TAPE END....................57TIME ............................40TITLE............................42TROUBLE CHECK ......58TV MONITOR ..............51
- V -
VIDEO ..........................51VIDEO HEAD ..............55
- W -
WAIT-10S ....................15WEIGHT ......................61
- Z -
ZERO RETURN ..........53ZOOM ..........................28
- M -
MANDO A DISTANCIA 15MIRROR ......................38MODE PORTRAIT ......36MODE SAND/SNOW ..36MODE SPORTS ..........36MODE SPOTLIGHT ....36MODO AUTO ..............36MONITOR DE TV ........50MOSAIC ......................38
- N -
NEG ............................38NIVEL DE BATERíA ....21NTSC ..........................56
- O -
OSD ............................12
- P -
PAL ..............................56PESO ..........................61PIP ..............................45PLAYER ......................52PROGRAMA AE ..........36
- R -
RECARGA ..................19REC SEARCH ............24RETORNO A CERO ....53REW (REBOBINADO) 53
- S -
SALIDA GRADUAL......44SELF-30S ....................15
SELF-END ..................15SEPIA ..........................38SISTEMA ....................61SNAP SHOT................46START/STOP ..............23STILL ..........................53STOP ..........................52STROBE......................38S-VIDEO......................52
- T -
TAPE END ..................57TEMPORIZADOR
AUTOMÁTICO ........15TÍTULO........................42
- V -
VÍDEO..........................51VIDEOCASETE ..........22VISUALIZADOR ..........12
- W -
WAIT-10S ....................15
- Z -
ZOOM..........................28ZOOM DIGITAL ..........29
Index Índice
00606K VP-W80 UK+ESP(44-64) 3/20/03 8:36 AM Page 63

ELECTRONICS ELECTRONICS
THIS CAMCORDER IS MANUFACTUREDBY:
*Samsung Electronics’ Internet Home PageUnited Kingdom http://www.samsungelectronics.co.ukFrance http://www.samsung.frAustralia http://www.samsung.com.auGermany http://www.samsung.deSweden http://www.samsung.sePoland http://www.samsung.com.plSpain http://www.samsung.es
ESTA VIDEOCÁMARA HA SIDO FABRICADAPOR:
*Samsung Electronics’ Internet Home PageUnited Kingdom http://www.samsungelectronics.co.ukFrance http://www.samsung.frAustralia http://www.samsung.com.auGermany http://www.samsung.deSweden http://www.samsung.sePoland http://www.samsung.com.plSpain http://www.samsung.es
ENGLISH ESPAÑOL
00606K VP-W80 UK+ESP(1-19) 3/20/03 8:34 AM Page 100