vontu installation guide - convert write services...
TRANSCRIPT

Vontu Installation Guide
Version 7.1 for Windows
Document Number: 1-0100-0710-2007-07-31
© 2007 Vontu, Inc.
All rights reserved. This product and related documentation are protected by copyright and distributed under licensing restricting their use, copying, distribution, and decompilation. No part of this product or related documentation may be reproduced in any form or by any means without prior written authorization of Vontu. While every precaution has been taken in the preparation of this book, Vontu assumes no responsibility for errors or omissions. This publication and features described herein are subject to change without notice.
TRADEMARKS:
© 2007 Vontu, Inc.
All rights reserved. Vontu Inc

Vontu 7.1 Installation Guide for Windows 3
ContentsPreface ....................................................................................................................6
Audience ...........................................................................................................6Documentation Map .........................................................................................6
Chapter 1 Introduction to Vontu ........................................................................................... 8The Vontu Suite Overview ...............................................................................9
Vontu Enforce ....................................................................................................... 9Vontu Discover .................................................................................................... 10Vontu Protect ....................................................................................................... 11Vontu Network Monitor ...................................................................................... 11Vontu Network Prevent ....................................................................................... 12Vontu Endpoint Monitor ..................................................................................... 12
Choosing a Deployment Size ..........................................................................13Vontu Installation Tiers ..................................................................................14
Three-Tier Installation ......................................................................................... 14Two-Tier Installation ........................................................................................... 14Single-Tier Installation ........................................................................................ 14
Vontu System Requirements ..........................................................................15Downloading the Vontu Software ..................................................................18
Chapter 2 Installing Vontu 7.1 ............................................................................................. 19Installing a Three-Tier Vontu Installation ......................................................20Installing a Two-Tier Vontu Installation ........................................................21Installing a Single-Tier Vontu Installation .....................................................22Pre-Installation Steps ......................................................................................23
Gather Required Materials .................................................................................. 23Verifying the Microsoft Windows Server Installation ........................................ 25
Post-Installation Steps .....................................................................................28Vontu Security Configuration ............................................................................. 28Windows Security Lockdown Guidelines ........................................................... 34Anti-virus Scans and Hot FileSystem Backups ................................................... 42Microsoft Asian Language Packs ........................................................................ 43
Chapter 3 Installing Oracle 10g........................................................................................... 44Downloading the Oracle 10g Software ...........................................................45Installing Oracle 10g .......................................................................................46
Installing Oracle 10g Release 10.2.0.1 ................................................................ 46Installing Oracle Patchset 10.2.0.3 ...................................................................... 47Installing the Oracle Security Patch Update ........................................................ 48
Creating and Configuring the TNS Listener ...................................................50Creating the TNS Listener ................................................................................... 50Configuring the TNS Listener ............................................................................. 50
Creating the Oracle Database for Vontu .........................................................52

Vontu 7.1 Installation Guide for Windows 4
Creating the Vontu database ................................................................................ 52Creating an Oracle User Called “Protect” ........................................................... 55Locking the Oracle “dbsnmp” User Account ...................................................... 55Verifying the Vontu Database ............................................................................. 56Adding Additional Data Files .............................................................................. 57
Backing Up the Vontu Oracle 10g Database ..................................................58Auditing Unsuccessful Login Attempts ..........................................................60
Chapter 4 Installing Vontu Enforce Server ........................................................................ 62Downloading the Vontu Software ..................................................................63Installing the Vontu Enforce Server ...............................................................64
Chapter 5 Importing a Vontu Solution Pack ...................................................................... 73Downloading the Vontu Solution Packs .........................................................74Vontu Solution Packs ......................................................................................75
Importing a Vontu Solution Pack ........................................................................ 75
Chapter 6 Installing a Detection Server.............................................................................. 77Downloading the Vontu Software ..................................................................78Installing a Vontu Detection Server ................................................................79
Chapter 7 Installing a Single-Tier Vontu Server................................................................ 87Downloading the Vontu Software ..................................................................88Installing the Vontu Single-Tier Server ..........................................................89
Chapter 8 Installing Vontu Endpoint Agent....................................................................... 98Obtaining the Vontu Software ........................................................................99System Requirements ...................................................................................100
Hardware ........................................................................................................... 100Software ............................................................................................................. 100
Installing Endpoint Agents ...........................................................................101What Gets Installed ........................................................................................... 101Other Security Applications and the Endpoint Agent ....................................... 101Installation with System Management Software ............................................... 101Manual Installation ............................................................................................ 103
Uninstalling Endpoint Agents .......................................................................105Uninstallation with System Management Software .......................................... 105Manual Uninstallation ....................................................................................... 105
Chapter 9 Adding and Configuring the Vontu Detection Servers.................................. 106Logging In To the Enforce Server ................................................................107Adding and Configuring a Detection Server ................................................108
Configuring a Network Monitor Server ............................................................ 109Configuring a Discover Server or a Protect Server ........................................... 110Configuring an Email Prevent Server ............................................................... 111Configuring a Web Prevent Server ................................................................... 112Configuring an Endpoint Server ........................................................................ 114

Vontu 7.1 Installation Guide for Windows 5
Configuring Your Firewall ...........................................................................116Configuring a Discover Server for Lotus Notes Targets ..............................117Adding Vontu Protect Functionality .............................................................120
Chapter 10 Getting Started .................................................................................................. 121Vontu Enforce Server Administration Console ............................................122
Logging In to the Enforce Server Administration Console ............................... 122Logging Out of the Enforce Server ................................................................... 122Changing Your Password .................................................................................. 123Using Online Help ............................................................................................. 123
Initial Vontu Setup ........................................................................................124Initial Setup Check List ..................................................................................... 124Initial Setup Detailed List .................................................................................. 124
Chapter 11 Uninstalling Vontu ............................................................................................ 126Uninstalling Vontu ........................................................................................127
Appendix A Syslog Logging................................................................................................... 130

Vontu 7.1 Installation Guide for Windows 6
PrefaceThis book, the Vontu 7.1 Installation Guide for Windows, describes the process to perform a new install of the Vontu 7 suite and any required third party software. It is important that you perform the Vontu installation in the order outlined in this guide.
This guide provides an overview of the Vontu suite components and describes the different types of installations and their system requirements. It then walks you through the various installation and configuration steps. The guide concludes with a chapter describing the various tasks you should perform to start using the Vontu suite.
You should familiarize yourself with the other documentation that is available for the Vontu suite. For example, if you wish to upgrade to Vontu 7 instead of performing a new installation, then use the Vontu 7.1 Upgrade Guide for Windows.
AudienceThis guide is intended for network or system administrators responsible for installing and configuring the Vontu suite.
Documentation MapThis section provides an overview of the other Vontu product documentation. You can download the Vontu documentation from the support.vontu.com FTP site at /pub/Vontu_7_Windows/Vontu_7.1/Documentation. You will need a Vontu customer support user name and password.
If you have problems accessing the FTP site or downloading the documentation, contact your Vontu representative.
The other Vontu product documentation includes:
Vontu 7.1 Upgrade Guide for Windows—provides the specific upgrade paths that you should follow to successfully upgrade to Vontu 7 from a previous Vontu release. It also includes instructions on how to upgrade from an Oracle 9i database to the Oracle 10g database, which is required for this version of Vontu.
Vontu 7.1 Utility Guide—provides instructions on how to install and use the Remote EDM Indexer, how to use the Universal Data Store API, how to use the SQL Pre-indexer, as well as how to use the various other Vontu utilities, such as, the

Documentation Map
Vontu 7.1 Installation Guide for Windows 7
Environment Check Utility (ECU), the SSL Key Tool, the SQLAdapter, and the Database Password Changer.
Vontu 7.1 Online Help—provides context-sensitive information for all the Vontu functionality that can be accessed through the Vontu Enforce Server administration console. You can get to the online help from the Vontu Enforce Server administration console’s help link.
Vontu 7.1 Email Prevent MTA Integration Guide—provides instructions on how to integrate and configure the Vontu Email Prevent Server into your organization’s messaging architecture.
Vontu 7.1 Lookup Plug-In Developer’s Guide—provides instructions on how to use the custom attribute Lookup Plug-in feature. This feature allows you to link with external systems, such as a corporate directory, and extract data pertinent to incidents in the Vontu Enforce Server. It also provides instructions on how to use the Vontu Lookup Tester feature. This feature helps you test lookup plug-ins before you deploy them.
Various Vontu 7.1 Solution Pack Guides—provide detailed descriptions for the configuration settings included in each Vontu Solution Pack. For example, they outline the configured policies, available response rules, policies and recommended automated response rules, configured roles and reports, configured users, attributes enabled, and additional protocols enabled.

Vontu 7.1 Installation Guide for Windows 8
Chapter 1Introduction to Vontu
This chapter provides an introduction to the Vontu suite. It presents an overview of the different Vontu components, discusses how to choose a deployment size and type, as well as the system requirements for each type of deployment.
The following topics are covered:
“The Vontu Suite Overview”, see page 9.
“Choosing a Deployment Size”, see page 13.
“Vontu Installation Tiers”, see page 14.
“Vontu System Requirements”, see page 15.
Introduction to Vontu The Vontu Suite Overview
Vontu 7.1 Installation Guide for Windows 9
The Vontu Suite OverviewVontu enables you to discover confidential information on file servers, Web servers, and desktops; monitor all network traffic and prevent transmission of confidential data; monitor the use of sensitive data on endpoint computers; and automatically enforce data security and encryption policies.
Vontu includes the Vontu Enforce central management platform and five product modules:
Vontu Discover
Vontu Protect
Vontu Network Monitor
Vontu Network Prevent
Vontu Endpoint Monitor
You can deploy Vontu Discover, Vontu Protect, Vontu Network Monitor, Vontu Network Prevent, and Vontu Endpoint Monitor as stand-alone products or in combination, but they are always managed by the Vontu Enforce Server for central management of the complete solution. (Vontu Protect requires Vontu Discover.) The Vontu Discover, Vontu Protect, Vontu Network Monitor, Vontu Network Prevent, and Vontu Endpoint Monitor products are referred to as detection servers in this guide.
The distributed architecture of Vontu enables organizations to:
Perform centralized management and reporting—The two-tier architecture enables you to efficiently deploy and manage the Vontu solution at a low Total Cost of Ownership (TCO), while aggregating data across the enterprise to yield a comprehensive view of data loss risk.
Centrally manage policies—Define data security policies once and deploy immediately across Vontu Discover, Vontu Protect, Vontu Network Monitor, Vontu Network Prevent, and Vontu Endpoint Monitor.
Deploy data loss prevention at enterprise scale—Vontu is proven at Fortune 500 companies to monitor millions of messages per day, hundreds of thousands of users, gigabit network speeds, and billions of data records.
Vontu EnforceVontu Enforce is the central management platform that allows organizations to define, deploy, and enforce consistent data loss prevention policies across Vontu Discover, Vontu Protect, Vontu Network Monitor, Vontu Network Prevent, and Vontu Endpoint Monitor. This centralized approach to management dramatically reduces TCO compared to solutions that require each component to be managed separately.

Introduction to Vontu Vontu Discover
Vontu 7.1 Installation Guide for Windows 10
Vontu Enforce enables organizations to:
Build and deploy accurate data loss prevention policies—Organizations can combine detection technologies (including detection for Asian languages), define rules, and specify actions to include in data loss prevention policies. Using pre-built regulatory and best practice policies, organizations can meet regulatory compliance, data protection and acceptable use requirements, and address specific threats.
Automatically enforce data loss prevention policies—Organizations can automate policy enforcement options for notification, remediation workflow, blocking, quarantine, and encryption.
Measure risk reduction and demonstrate compliance—The reporting features of Vontu Enforce allow executives and response teams to create actionable reports identifying risk reduction trends over time.
Empower rapid remediation—Organizations can automate the entire remediation process using detailed incident reporting and workflow automation, based on incident severity. Role-based access controls empower individual business units and departments to review and remediate just those incidents that are relevant to their business or employees.
Safeguard employee privacy—Vontu Enforce allows analysts to review incidents without revealing sender identity or message content, so multi-national companies can meet legal requirements on monitoring European Union employees and transferring personal data across national boundaries.
Vontu DiscoverVontu Discover scans networked file shares, web content servers, and desktops at high speeds to detect exposed data and documents. Vontu Discover allows companies to understand exactly where confidential data is exposed and helps significantly reduce the risk of data loss.
Vontu Discover enables organizations to:
Pinpoint unprotected confidential data—Vontu Discover helps organizations accurately locate at-risk data stored on their networks, so they can inform shared file server owners to protect the data.
Reduce proliferation of confidential data—Vontu Discover helps organizations to detect the spread of sensitive information throughout the company and reduce the risk of data loss.
Automate investigations and audits—Vontu Discover streamlines data security investigations and compliance audits by enabling users to scan for confidential data automatically, as well as review access control and encryption policies.

Introduction to Vontu Vontu Protect
Vontu 7.1 Installation Guide for Windows 11
Vontu ProtectVontu Protect reduces your risk by removing exposed confidential data, intellectual property, and classified information from your organization's open file shares on network servers or desktop computers. (There is no separate Vontu Protect server; Vontu Protect adds protection functionality to the Discover Server.)
Vontu Protect enables organizations to:
Quarantine exposed files—Vontu Protect can automatically move files that violate policies to a quarantine area that re-creates the source file structure for easy location. Optionally Vontu can place a marker text file in the original location of the offending file to explain why and where it was quarantined.
Quarantine file restoration—Vontu Protect can easily restore quarantined files to their original or a new location.
Copy exposed or suspicious files—Vontu Protect can automatically copy files that violate policies to a quarantine area that re-creates source file structure for easy location, leaving the original file in place.
Enforce access control and encryption policies—Vontu Protect proactively ensures workforce compliance with existing access control and encryption policies.
Vontu Network MonitorVontu Network Monitor accurately detects confidential information across all network protocols and content types—before it leaves the network—with no impact on network performance. Real-time monitoring and reporting delivers constant visibility on data security.
Vontu Network Monitor enables organizations to:
Monitor all network communications for confidential data—Vontu Network Monitor provides real-time monitoring across all network communications, including email, instant messaging, web mail and web postings, file transfers, network news, peer-to-peer, Telnet, and all other TCP sessions through any port.
Accurately detect policy violations—Vontu Network Monitor detects all confidential information, including customer data and intellectual property, and identifies policy violations with unmatched accuracy.
Qualify and quantify the risk of data loss—Vontu Network Monitor lets you quantify your organization's risk from potential confidential data loss incidents. Vontu Network Monitor automatically classifies each data loss incident by severity, allowing response teams to quickly prioritize high risk situations and focus resources.
Introduction to Vontu Vontu Network Prevent
Vontu 7.1 Installation Guide for Windows 12
Vontu Network PreventVontu Network Prevent proactively stops data loss through email and Web communications. Vontu Network Prevent integrates with existing email message chain and web infrastructure technologies to capture network communications and block transmissions that contain confidential data.
Vontu Network Prevent enables organizations to:
Stop confidential data loss—Vontu Network Prevent blocks email, web (HTTP/HTTPS), and FTP communications that contain confidential data.
Implement encryption policies—Vontu Network Prevent analyzes email messages and selectively routes messages containing confidential content to an encryption gateway for secure delivery, enabling enforcement of enterprise-wide encryption and archiving policies.
Enforce workforce compliance—Through automatic blocking and encryption, Vontu Network Prevent effectively enforces workforce compliance with government regulations and company policies.
Vontu Endpoint MonitorVontu Endpoint Monitor detects the use of sensitive data on your endpoint computers. It consists of at least one Endpoint Server and all the endpoint Vontu Agents that are connected to it. Vontu Agents detect activity in the endpoint file system, collect data on that activity, and send the data to the associated Endpoint Server for analysis. Vontu can detect when an endpoint user downloads a sensitive file to his or her hard drive, or copies it to a USB device such as an external disk drive.

Introduction to Vontu Choosing a Deployment Size
Vontu 7.1 Installation Guide for Windows 13
Choosing a Deployment SizeBefore you install Vontu, you need to choose the deployment size that best suits your organization’s needs and environment. The key considerations involved in making this decision are as follows:
Number of employees to be monitored
Amount of traffic
Size of Exact Data Matches (EDM)/Indexed Data Matches (IDM).
Vontu outlines three sample deployments based on enterprise size, described in Table 1-1 on page 13. Review these sample deployments to understand which is most optimal for your organization’s environment, then see the referenced system requirements.
Table 1-1: Types of enterprise deployments
Small/Medium Enterprise
Large Enterprise Very Large Enterprise
Number of employees
< 10,000 > 10,000 and < 30,000 > 30,000
Traffic volume
30-40 Mbps 40-70 Mbps > 70 Mbps
EDM/IDM size
EDM < 1 million cells or IDM < 1,000 pages
EDM > 1 million cells or IDM > 1,000 pages
EDM > 1 million cells or IDM > 1,000 pages
Hardware requirements
See Table 1-2 See Table 1-3 See Table 1-4

Introduction to Vontu Vontu Installation Tiers
Vontu 7.1 Installation Guide for Windows 14
Vontu Installation TiersVontu supports three different installations: three-tier, two-tier, and single-tier. Vontu recommends the three-tier installation, when it is feasible; however, your organization might need to implement a two-tier or single-tier depending on available resources and organization size.
Three-Tier Installation To implement the Vontu three-tier installation, you install the Vontu database, the Vontu Enforce Server, and a Vontu detection server on three separate machines. Vontu recommends implementing the three-tier installation architecture as it enables your database administration team to control the Vontu database. In this way you can utilize all of your corporate standard tools for database backup, recovery, monitoring, performance and maintenance. If you implement the Vontu three-tier installation, you need to install the Oracle Client (SQL*Plus and Database Utilities) on the Vontu Enforce Server to enable database communications between the Oracle server and the Vontu Enforce Server.
Two-Tier InstallationTo implement the Vontu two-tier installation, you install the Vontu database and the Vontu Enforce Server on the same machine, then you install a Vontu detection server on a separate machine. Typically, this installation is implemented when an organization, or the group responsible for data loss prevention, does not have a database administration team.
If you choose this installation, the Vontu administrator needs to be able to perform database maintenance tasks, for example, database backups.
Single-Tier InstallationTo implement the Vontu single-tier installation, you install the Vontu database, the Vontu Enforce Server, and a Vontu detection server all on the same machine. Choose this installation only if you are performing a risk assessment, testing, or your organization’s size fits well within the Small/Medium Enterprise deployment definition, see Table 1-1, “Types of enterprise deployments,” on page 13.
If you choose this installation, the Vontu administrator needs to be able to perform database maintenance tasks, for example, database backups. Also, the Vontu administrator should monitor the Vontu host server’s memory usage.

Introduction to Vontu Vontu System Requirements
Vontu 7.1 Installation Guide for Windows 15
Vontu System RequirementsThe system requirements for Vontu depend on the type of information you want to protect and the size of your organization, and also, on which Vontu servers you choose to install and where they are installed.
A Vontu deployment that includes the Network Monitor Server has different system requirements than a Vontu deployment that includes the Discover Server. Also, if you install the Network Monitor Server and the Enforce Server on separate machines (a two-tier installation), then the system requirements are different than if you installed the Enforce Server and Network Monitor Server installation on the same machine (a single-tier installation).
While a small or medium-sized organization can install a single-tier Vontu deployment, Vontu recommends a three-tier Vontu deployment.
Table 1-2, “Small/Medium Enterprise System Requirements,” on page 15.
Table 1-3, “Large Enterprise System Requirements,” on page 16.
Table 1-4, “Very Large Enterprise System Requirements,” on page 16.
Small/Medium Enterprise System RequirementsTable 1-2: Small/Medium Enterprise System Requirements
Enforce* Network Monitor Discover/Prevent/Endpoint
NICs To communicate with detection servers:
1 Copper 1 Gb/100 MB Ethernet
To communicate with Enforce server:
1 Copper 1 Gb/100 MB EthernetFor Network Traffic Monitoring (pick one):
1 Copper 1 Gb/100 MB Ethernet,
1 Endace model 4.3 GE for Fiber (opt), or
1 Endace model 4.5 GE for Copper (opt)
To communicate with Enforce server:
1 Copper 1 Gb/100 MB Ethernet
Disk Space
500 GB, RAID 0+1 Configuration, 4 main drivers, 1 redundant
140 GB Ultra-fast SCSI
OS Microsoft Windows 2003 Enterprise Edition (32-bit)
Microsoft Internet Explorer 6.0 or 7.0, or Mozilla Firefox 2.0
MS Language Packs (See “MS Asian Language Packs” on page 17.)
Processor 2 x 3.0 GHz CPU

Introduction to Vontu Vontu System Requirements
Vontu 7.1 Installation Guide for Windows 16
Large Enterprise System Requirements
Very Large Enterprise System Requirements
Memory 6 - 8 GB RAM (EDM/IDM size could increase memory requirements)
*Minimum is 8 GB RAM if Vontu single-tier
Table 1-2: Small/Medium Enterprise System Requirements
Enforce* Network Monitor Discover/Prevent/Endpoint
Table 1-3: Large Enterprise System Requirements
Enforce Network Monitor Discover/Prevent/Endpoint
NICs To communicate with detection servers:
1 Copper 1 Gb/100 MB Ethernet
To communicate with Enforce:
1 Copper 1 Gb/100 MB EthernetFor Network Traffic Monitoring (pick one):
1 Endace model 4.3 GE for Fiber (opt), or
1 Endace model 4.5 GE for Copper (opt)
To communicate with Enforce:
1 Copper 1 Gb/100 MB Ethernet
Disk Space 500 GB, RAID 0+1 Configuration, 4 main drives, 1 redundant
140 GB Ultra-fast SCSI
OS Microsoft Windows 2003 Enterprise Edition (32-bit)
Microsoft Internet Explorer 6.0 or 7.0, or Mozilla Firefox 2.0
MS Language Packs (See “MS Asian Language Packs” on page 17.)
Processor 2 x 3.0 GHz Dual Core CPU
Memory 6 - 8 GB RAM (EDM/IDM size could increase memory requirements)
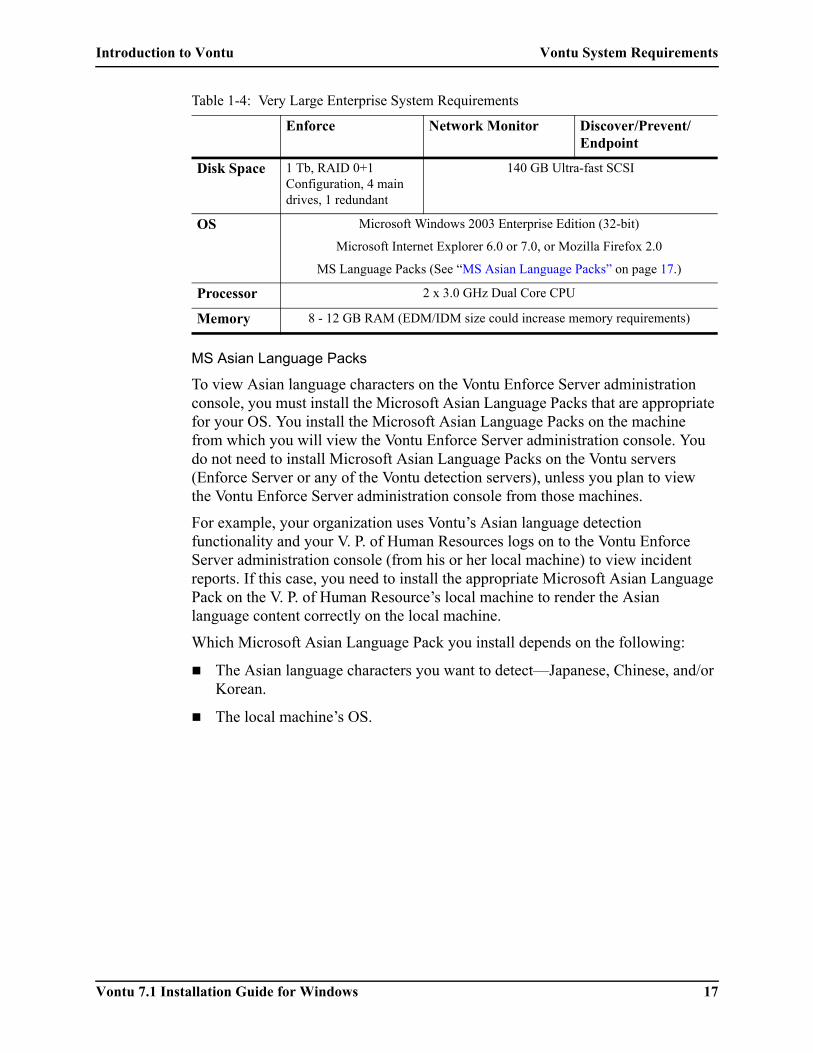
Table 1-4: Very Large Enterprise System Requirements
Enforce Network Monitor Discover/Prevent/Endpoint
NICs To communicate with detection servers:
1 Copper 1 Gb/100 MB Ethernet
To communicate with Enforce:
1 Copper 1 Gb/100 MB EthernetFor Network Traffic Monitoring (pick one):
1 Endace model 4.3 GE for Fiber (opt), or
1 Endace model 4.5 GE for Copper (opt)
To communicate with Enforce:
1 Copper 1 Gb/100 MB Ethernet
Introduction to Vontu Vontu System Requirements
Vontu 7.1 Installation Guide for Windows 17
MS Asian Language Packs
To view Asian language characters on the Vontu Enforce Server administration console, you must install the Microsoft Asian Language Packs that are appropriate for your OS. You install the Microsoft Asian Language Packs on the machine from which you will view the Vontu Enforce Server administration console. You do not need to install Microsoft Asian Language Packs on the Vontu servers (Enforce Server or any of the Vontu detection servers), unless you plan to view the Vontu Enforce Server administration console from those machines.
For example, your organization uses Vontu’s Asian language detection functionality and your V. P. of Human Resources logs on to the Vontu Enforce Server administration console (from his or her local machine) to view incident reports. If this case, you need to install the appropriate Microsoft Asian Language Pack on the V. P. of Human Resource’s local machine to render the Asian language content correctly on the local machine.
Which Microsoft Asian Language Pack you install depends on the following:
The Asian language characters you want to detect—Japanese, Chinese, and/or Korean.
The local machine’s OS.
Disk Space 1 Tb, RAID 0+1 Configuration, 4 main drives, 1 redundant
140 GB Ultra-fast SCSI
OS Microsoft Windows 2003 Enterprise Edition (32-bit)
Microsoft Internet Explorer 6.0 or 7.0, or Mozilla Firefox 2.0
MS Language Packs (See “MS Asian Language Packs” on page 17.)
Processor 2 x 3.0 GHz Dual Core CPU
Memory 8 - 12 GB RAM (EDM/IDM size could increase memory requirements)
Table 1-4: Very Large Enterprise System Requirements
Enforce Network Monitor Discover/Prevent/Endpoint
Introduction to Vontu Downloading the Vontu Software
Vontu 7.1 Installation Guide for Windows 18
Downloading the Vontu SoftwareThis section outlines all of the Vontu 7 software components and third party software that you need to download and install. You can download all the software, just the basic set of software files, or download software as you need it. (At the beginning of each chapter of this guide, there is a list of the software that you need to download and install to accomplish the tasks in that chapter.)
Download the Vontu software from the support.vontu.com FTP site. You will need a Vontu customer support user name and password.
If you have problems accessing the FTP site or downloading the software, contact your Vontu representative.
Basic set of Vontu 7.1 software files—/pub/Vontu_7_Windows/FullInstall-Windows-7.1-10g
All Vontu 7.1 software files—/pub/Vontu_7_Windows/Vontu_7.1
Vontu 7.1 documentation—/pub/Vontu_7_Windows/Vontu_7.1/Documentation
Oracle 10g software—/pub/Vontu_7_Windows/Vontu_7.1/Oracle
Oracle 10g security patches—/pub/Vontu_7_Windows/Vontu_7.1/Oracle/SecurityPatch-2007-04-17
Vontu 7.1 solution packs—/pub/Vontu_7_Windows/Vontu_7.1/Solution_Packs
Third party software—/pub/Vontu_7_Windows/Vontu_7.1/Third_Party
Vontu 7.1 software for new installations—/pub/Vontu_7_Windows/Vontu_7.1/NewInstalls
Vontu 7.1 upgrader software (from 6.x to 7.1)—/pub/Vontu_7_Windows/Vontu_7.1/Upgrade_6.x_to_7.1
Vontu 7.1 updater software (from 7.x to 7.1)—/pub/Vontu_7_Windows/Vontu_7.1/Update_7.x_to_7.1

Vontu 7.1 Installation Guide for Windows 19
Chapter 2Installing Vontu 7.1
This chapter describes how to perform a new Vontu installation. You can choose to install a three-tier, two-tier, or single-tier Vontu installation. For more information about which type of Vontu installation to perform, see “Introduction to Vontu” on page 8.
To learn how to install and use the Vontu EDM Remote Indexer, see the Vontu 7.1 Utility Guide.
The following topics are covered:
“Installing a Three-Tier Vontu Installation”, see page 20.
“Installing a Two-Tier Vontu Installation”, see page 21.
“Installing a Single-Tier Vontu Installation”, see page 22.
“Pre-Installation Steps”, see page 23.
“Vontu Security Configuration”, see page 28.
“Post-Installation Steps”, see page 28.

Installing Vontu 7.1 Installing a Three-Tier Vontu Installation
Vontu 7.1 Installation Guide for Windows 20
Installing a Three-Tier Vontu InstallationVontu does not support installing a Vontu server on a machine with other applications, unless those applications are required to run Vontu. This guide, the Vontu 7.1 Installation Guide, outlines the required applications.
To install a three-tier Vontu installation:
1. Perform the pre-installation steps. See “Pre-Installation Steps” on page 23.
2. Install Oracle 10g and create Vontu database.
In a three-tier Vontu installation your organization’s database administration team installs, creates, and maintains the Vontu database. Contact your Vontu representative for information about how to setup the Vontu Oracle 10g database in a three-tier environment. If you implement the Vontu three-tier installation, you need to install the Oracle Client (SQL*Plus and Database Utilities) on the Vontu Enforce Server to enable database communications between the Oracle server and the Vontu Enforce Server. The Vontu installer needs SQL*PLUS to create tables and views on the Enforce Server, therefore the Windows user account used to installed Vontu needs access to SQL*Plus.
3. Install the Vontu Enforce Server. .See “Installing Vontu Enforce Server” on page 53
4. Import a Vontu solution pack. See “Importing a Vontu Solution Pack” on page 73.
5. Install a Vontu detection server. See “Installing a Detection Server” on page 77.
6. Add and configure a Vontu detection server. See “Adding and Configuring the Vontu Detection Servers” on page 106.
7. Optionally, change the Vontu default security configuration. See “Vontu Security Configuration” on page 28.
8. Perform the post-installation steps. See “Post-Installation Steps” on page 28.
9. Start using Vontu to perform initial setup tasks, for example, change the Administrator password, and create user accounts and roles. See “Getting Started” on page 121.
Installing Vontu 7.1 Installing a Two-Tier Vontu Installation
Vontu 7.1 Installation Guide for Windows 21
Installing a Two-Tier Vontu InstallationVontu does not support installing a Vontu server on a machine with other applications, unless those applications are required to run Vontu. This guide, the Vontu 7.1 Installation Guide, outlines the required applications.
To install a two-tier Vontu installation:
1. Perform the pre-installation steps. See “Pre-Installation Steps” on page 23.
2. Install Oracle 10g. See “Installing Oracle 10g” on page 44.
3. Install the Vontu Enforce Server. See “Installing Vontu Enforce Server” on page 62.
4. Import a Vontu solution pack. See “Importing a Vontu Solution Pack” on page 73.
5. Install a Vontu detection server. See “Installing a Detection Server” on page 77.
6. Add and configure a Vontu detection server. See “Adding and Configuring the Vontu Detection Servers” on page 106.
7. Optionally, change the Vontu default security configuration. See “Vontu Security Configuration” on page 28.
8. Perform the post-installation steps. See “Post-Installation Steps” on page 28.
9. Start using Vontu to perform initial setup tasks, for example, change the Administrator password, and create user accounts and roles. See “Getting Started” on page 121.
Installing Vontu 7.1 Installing a Single-Tier Vontu Installation
Vontu 7.1 Installation Guide for Windows 22
Installing a Single-Tier Vontu InstallationVontu does not support installing a Vontu server on a machine with other applications, unless those applications are required to run Vontu. This guide, the Vontu 7.1 Installation Guide, outlines the required applications.
To install a single-tier Vontu installation:
1. Perform the pre-installation steps. See “Pre-Installation Steps” on page 23.
2. Install Oracle 10g. See “Installing Oracle 10g” on page 44.
3. Install the Vontu Enforce Server and a Vontu detection server on the same machine. See “Installing a Single-Tier Vontu Server” on page 87.
4. Import a Vontu solution pack. See “Importing a Vontu Solution Pack” on page 73.
5. Add and configure a Vontu detection server. See “Adding and Configuring the Vontu Detection Servers” on page 106.
6. Optionally, change the Vontu default security configuration. See “Vontu Security Configuration” on page 28.
7. Perform the post-installation steps. See “Post-Installation Steps” on page 28.
8. Start using Vontu to perform initial setup tasks, for example, change the Administrator password, and create user accounts and roles. See “Getting Started” on page 121.

Installing Vontu 7.1 Pre-Installation Steps
Vontu 7.1 Installation Guide for Windows 23
Pre-Installation StepsThis section describes the pre-installation steps you need to perform before installing the Oracle 10g database or the Vontu servers.
Once you have performed these pre-installation steps return to the appropriate installation instructions for your Vontu implementation.
The pre-installation steps are as follows:
“Gather Required Materials”, see page 23.
“Verifying the Microsoft Windows Server Installation”, see page 25.
Gather Required MaterialsDownload software from the support.vontu.com FTP site. You will need a Vontu customer support user name and password.
Table 2-1: Materials Required for Installing Vontu
Required Materials
Vontu software:
Vontu installer—ProtectInstaller_7.1.exe
Vontu Lookup SDK installer—LookupSdkInstaller.exe (if you want to lookup custom attributes from a corporate directory.)
Vontu Agent installer—VontuWindowsAgentInstaller_7.1.zip (if you purchased Vontu Endpoint Monitor)
Oracle software:
Oracle 10g software—10201_database_win32.zip
Oracle 10g patch set—p5337014_10203_WINNT.zip
Oracle 10g critical patch update—p6116131_10203_WINNT.zip
Vontu Oracle 10g database template—10g_Installation_Tools.zip

Installing Vontu 7.1 Gather Required Materials
Vontu 7.1 Installation Guide for Windows 24
Third-party software:
Required for Pre-Installation:
WinPcap 3.0 (the only Vontu-supported version of WinPcap).
Ethereal for Windows (most current version).
Caution: Do not allow Ethereal to install a later version of WinPcap. Vontu does not support versions of WinPcap beyond 3.0.
Required for Installation:
Remote access.
Oracle database (Oracle 10g only). Read ”Installing Oracle 10g” on page 46 before you attempt to install the Oracle software.
SFU 3.5—SFU allows UNIX services to be accessed from Windows. Download from the Microsoft Download Center (http://www.microsoft.com/downloads/details.aspx?familyid=896C9688-601B-44F1-81A4-02878FF11778&displaylang=en) and install on Discover servers that will run scans on UNIX machines.
Additional Tools:
Putty (or similar SSH client to access Unix servers for Vontu Prevent deployment).
Adobe Acrobat Reader (for reading Vontu documentation).
Vontu documentation:
Vontu 7.1 Installation Guide for Windows
Vontu 7.1 Email Prevent MTA Integration Guide (if Vontu Email Prevent Server was purchased).
Vontu 7.1 Utility Guide
Vontu license key
Vontu solution pack
Table 2-1: Materials Required for Installing Vontu
Required Materials

Installing Vontu 7.1 Verifying the Microsoft Windows Server Installation
Vontu 7.1 Installation Guide for Windows 25
Verifying the Microsoft Windows Server InstallationThis section outlines the steps to verify your Microsoft Windows Server installation is ready for a Vontu server installation.
Vontu servers:
Microsoft Windows 2003 Enterprise Server (32-bit) with Service Pack 2 operating system is installed on all Vontu servers, as well as the required patches and updates. (Vontu recommends you turn off Microsoft’s Auto Update feature and that you contact your Vontu representative before installing any new patches. Vontu verifies new Microsoft patches and will send you a communication when it is safe to apply these new patches.)
See “Vontu System Requirements” on page 15 to review the server requirements.
Administrator log-in user name and password for each Vontu server.
Static IP Address(es) for each Vontu server.
Access to each Vontu server via Terminal Services, which should be installed and running on each Vontu server (for troubleshooting or remote accessing).
Configure the corporate firewall to use a single port number on which the detection server should accept connections from the Enforce Server. The port number can be any single port number greater than but not equal to 1024. Vontu recommends you use the same port number for all detection servers. You must use this port number when you install a detection server and when you register it with the Enforce Server. (You register a detection server on the Enforce Server’s Add Server > Configure Server page.)
Communication and access:
Physical address and contact person for Data Center(s).
Desktop/workstation with access to Internet, FTP, and email.
EDM and IDM documents:
Digital documents or access to where they are stored. To create remote EDM index, see the Vontu 7.1 Utility Guide.
SMTP Alerting:
If you plan to use Vontu’s Alerting capabilities, you need the following.
Access to a local SMTP server.
Mail server configuration for sending SMTP email, including an account and password, if the mail server requires authentication.
Table 2-1: Materials Required for Installing Vontu
Required Materials
Table 2-2: Verifying the Microsoft Windows Server Installation
Steps to verify the Microsoft Windows Server Installation
Verify all Vontu servers are racked and set-up in the data center.

Installing Vontu 7.1 Verifying the Microsoft Windows Server Installation
Vontu 7.1 Installation Guide for Windows 26
Verify the network cables are plugged into the appropriate ports.
Enforce Server:
NIC Port 1—Standard network access for Administration.
If the Enforce Server has multiple NICs, disable the unused NIC if possible. If the unused NIC cannot be disabled, make the following changes to the properties file to allow the detection servers to talk to the Enforce Server. (<IP> is the IP address that you want to bind on.)
On the Enforce Server:
\Vontu\Protect\config\model.properties
model.notification.host= <IP>
model.notification.serverobject.host= <IP>
On the Monitor Server:
\Vontu\Protect\config\model.properties
model.notification.host= <IP>
\Vontu\Protect\bin\NotificationTrafficMonitor.lax
lax.command.line.args=<IP>:37328
Detection Server:
NIC Port 1—Standard network access for Administration.
NIC Port 2—SPAN PORT or TAP should be plugged into this port for detecting.
Does not need an IP address.
Caution: If you are using an Endace card, then do not set this port up for span or tap.
Log in as the Administrator user.
Assign static IP address, subnet mask, and gateway for the Administration NIC. Do not assign an IP address to the detection server NIC.
Make sure that the management NIC has the following items enabled:
Internet protocol TCP/IP
File and Printer Sharing for MS networks
Client for MS Networks
Disabling any of these can cause communication problems between the Enforce Server and the detection servers.
From a command line, use ipconfig (using ipconfig /all) to verify assigned IP addresses.
Unless DNS is being used to resolve the Vontu server, check that the c:\windows\system32\drivers\etc\hosts file contains server name and accurate IP addresses for the Vontu server. If you reset these, reboot the server afterwards.
Ping the Vontu server (using both IP and hostname) from each server or remote server to verify they are accessible on the network and resolve properly.
Table 2-2: Verifying the Microsoft Windows Server Installation
Steps to verify the Microsoft Windows Server Installation

Installing Vontu 7.1 Verifying the Microsoft Windows Server Installation
Vontu 7.1 Installation Guide for Windows 27
Verify that ports 443 (SSL) and 3389 (RDP) are open and accessible from the Vontu servers to the desktop location where you will be accessing the server.
Turn on remote desktop connections for each Vontu server. In Windows, right-click My Computer, click Properties, then select Remote>Allow users to connect remotely to this computer. Verify that you can use Remote Desktop to log into the Vontu server from the local workstation assigned to you.
Verify that Port 25 is not being blocked. The Vontu server uses Port 25 (SMTP) for the email alerting functionality.
Verify that the detection server NIC is receiving the correct traffic from the SPAN PORT or TAP. Install Ethereal and use it to verify traffic on the server for non-Endace cards. Use dagsnap –o out.pcap from a command line for Endace cards. The output from dagsnap can then be reviewed in Ethereal.
Create users with local administrator privileges on each of the Windows machines. These users need not be domain users. They will be used for installation, and the Vontu services will run under these user accounts after installation. The passwords for all of the users (on the Vontu detection server and Enforce Server) and the services password should be the same (recommended).
Place all servers in the same time zone, independent of their physical location and ensure that all servers are synchronized with the same time (to the minute). Ensure the servers are updated with DST 2007 patches.
For an Email Prevent Server:
Make sure you can access the MTA from the local hardware via Putty or a similar SSH client.
Make sure the Linux firewall is configured correctly so that you can Telnet from the Vontu Email Prevent Server to the MTA on port 25, and that you can Telnet from the MTA to the Vontu Email Prevent Server on port 10026.
For a Web Prevent Server:
Follow your proxy server’s integration guide (for example, BlueCoat, or Cisco) to configure the proxy server.
Table 2-2: Verifying the Microsoft Windows Server Installation
Steps to verify the Microsoft Windows Server Installation

Installing Vontu 7.1 Post-Installation Steps
Vontu 7.1 Installation Guide for Windows 28
Post-Installation StepsThis section describes the post-installation steps you need to perform after installing the Vontu suite.
The post-installation steps are as follows:
“Vontu Security Configuration”, see page 28.
“Windows Security Lockdown Guidelines”, see page 34.
“Anti-virus Scans and Hot FileSystem Backups”, see page 42.
“Microsoft Asian Language Packs”, see page 43.
Vontu Security ConfigurationVontu secures data communications between all of the Vontu servers by encrypting the data being transmitted and requiring servers to authenticate with each other. Vontu also secures data communications and authenticates between the Endpoint Server and Endpoint Agents. While your Vontu installation is secure, Vontu highly recommends you change the default Vontu security settings to ensure your Vontu installation uses unique certificates or keys. The following sections describe the Vontu security configuration and how to change the default security configuration.
Vontu SSL Client/Server CertificatesTo ensure confidentiality, Vontu secures all data flowing between the Enforce Server and the Vontu detection servers using the Secure Socket Layer/Transport Layer Security (SSL/TLS) protocol. The SSL/TLS protocol not only encrypts the data being transmitted, Vontu also uses it for mutual authentication between the Vontu servers. Authentication is implemented via the mandatory use of client and server side certificates or keys. By default, connections between the Vontu servers use a single self-signed certificate that is embedded securely inside the Vontu software. Every Vontu installation uses this same certificate.
While the default security configuration in Vontu is secure, Vontu highly recommends you generate unique client and server side certificates or keys for your organization’s Vontu installation. These new certificates replace the default certificates that come with the Vontu application.
Vontu provides the sslkeytool utility to generate your own unique pair of certificates; you store the first certificate on the Enforce Server, while you store the second certificate on each detection server. While the sslkeytool utility is installed on all Vontu servers, you should run it on only one of the Vontu servers (Vontu recommends the Enforce Server) to simplify certificate management.
To learn how to generate a unique pair of certificates, see the Vontu 7.1 Utility Guide.

Installing Vontu 7.1 Vontu Security Configuration
Vontu 7.1 Installation Guide for Windows 29
Vontu Enforce Server and Browser SecurityThe Vontu Enforce Server provides a Web interface (administration console) for reporting and administration purposes. This interface is accessed via a Web browser. The Enforce Server and browser communicate through a SSL connection.
To ensure confidentiality, all communication between the Enforce Server and the browser is encrypted using a symmetric key. During connection initiation, the Enforce Server and the browser negotiate the encryption algorithm (algorithm, keysize, and encoding) that will be used, as well at the encryption key itself.
By default, connections between the Enforce Server and the browser use a single self-signed certificate that is embedded securely inside the Vontu software. Every Vontu installation uses this same certificate. While the default security configuration in Vontu is secure, Vontu highly recommends you generate a unique certificate or key for your organization’s Vontu installation. This new certificate replaces the default certificate that comes with the Vontu application.
To generate a unique Enforce Server certificate:
1. Collect the following information to generate a certificate request:
Common Name: The fully qualified DNS name of the Enforce Server machine (must be the actual name of the server accessible by all the clients, for example https://<servername>/policymananger)
Organization Name: For example, Vontu, Inc.
Organizational Unit: (optional)
City: For example, San Francisco
State: For example, CA
Country: For example, US
Expiration: Desired expiration time in days (90).
2. Use the keytool.exe to create the “self-signed” certificate (keystore file), which you need to generate the .CSR. Keytool is a key and certificate management utility that enables users to administer their own public/private key pairs and associated certificates for use in self-authentication (where the user authenticates to other users/services) or data integrity and authentication services, using digital signatures. It also allows users to cache the public keys (in the form of certificates) of their communicating

Installing Vontu 7.1 Vontu Security Configuration
Vontu 7.1 Installation Guide for Windows 30
peers. To create this file, first go to the root directory where the Vontu application resides.
a. Change directory to <drive>\vontu\jre\bin, where <drive> is the drive on which you installed the Vontu Enforce Server. The keytool.exe is located in this directory.
b. Run the following command with the information collected in step 1:
keytool -genkey -alias tomcat -keyalg RSA -keysize 1024 -keystore .keystore -validity <Expiration> -storepass protect -dname "cn=<Common Name>,o=<Organization Name>,ou=<Organization Unit>,l=<City>,s=<State>,c=US"
The -storepass protect command sets the password to “protect”. Enter this if you are prompted for a password after running this command. This will create the “self-signed” certificate (.keystore) in the <drive>vontu\jre\bin directory.
3. Generate the certificate signing request (CSR) file. This is the request that you submit to the Signature Authority to obtain a signed certificate.
From the <drive>\vontu\jre\bin directory and run the following command:
keytool -certreq -alias tomcat -keyalg RSA -keystore .keystore -storepass protect -file "VontuEnforce.csr"
If you are prompted for a password, press Enter. This will create a file called “VontuEnforce.csr”. You submit this file to the Signature Authority.
4. To generate a certificate you send the .CSR file to a Certified Signature Authority (your own or a third party, for example, VeriSign).
Internal Signature Authorities: To obtain a Signed Certificate from your internal Signature Authority, contact your system administrator for instructions.
VeriSign Signature Authority:
Current Customers: If you are a current VeriSign customer, go the following page, http://www.VeriSign.com/products-services/security-services/ssl/current-ssl-customers/index.html, and buy an additional certificate. You will need your Common Name, Order Number, or Serial Number to begin the transaction, as well as the CSR.
New Customers: If you are not a current customer and wish to purchase the signed certificate from VeriSign, go to the following page, http://www.VeriSign.com/products-services/security-

Installing Vontu 7.1 Vontu Security Configuration
Vontu 7.1 Installation Guide for Windows 31
services/ssl/buy-ssl-certificates/index.html. To purchase the signed certificate, you will need the following, in addition to the CSR:
The length of time for the certificate (1 or 2 years).
The number of servers hosting a single domain (up to 5 servers, only 1 required for Vontu).
The server platform.
The organization, organizational unit, country, state or locality (all spelled without abbreviations).
Payment information and a billing contact.
The common name. This is the host + domain name such as “www.company.com” or “company.com”.
An email where VeriSign can reach you to validate the information.
Documentation to demonstrate that your organization is legitimate.
Other Signature Authorities: To obtain signed certificates from other Signature Authorities, go to their web sites and follow the instructions to enroll and obtain a signed certificate. The process will be similar to the VeriSign process, however check with the organization to identify any additional environment information that may be needed for the certificate.
5. The certified Signature Authority sends you the signed certificate (this might take 3-5 days). Internal Signature Authorities must return the root certificate along with the signed certificate.
6. Place the signed certificate into the directory (<drive>\vontu\jre\bin) with the .keystore file. If the signed certificate is provided in the body of an email, paste it into a text document exactly as it appears on the screen, including the top and bottom lines (-----Begin Certificate----- and -----End Certificate-----). Make sure that no extra lines, spaces, trailing carriage returns, or characters have been inadvertently added, or the file will not work. Save this file in the same directory where the .keystore file is

Installing Vontu 7.1 Vontu Security Configuration
Vontu 7.1 Installation Guide for Windows 32
located. If the signed certificate is provided as an attachment to an email, copy this file into the same directory where the .keystore file is located.
7. Keep a copy of both the .keystore file and the signed certificate file in a separate, secure location.
8. Confirm the signed certificate is correct. Open a command prompt and run the following command to view the certificate's fingerprint(s).
keytool -printcert -file <<Signed Certificate filename>>
The following is an example output:
Owner: CN=ll, OU=ll, O=ll, L=ll, S=ll, C=ll
Issuer: CN=ll, OU=ll, O=ll, L=ll, S=ll, C=ll
Serial Number: 59092b34
Valid from: Thu Sep 25 18:01:13 PDT 1997 until: Wed Dec 24 17:01:13
PST 1997
Certificate Fingerprints:
MD5: 11:81:AD:92:C8:E5:0E:A2:01:2E:D4:7A:D7:5F:07:6F
SHA1: 20:B6:17:FA:EF:E5:55:8A:D0:71:1F:E8:D6:9D:C0:37
37:13:0E:5E:FE
9. Call or email the person who sent the certificate and compare the fingerprint(s) you see with the fingerprint(s) they sent you. If the fingerprint(s) are not exactly equivalent, the certificate may have been replaced in transit by an attacker's certificate.
If you used an Internal Signing Authority, also view the fingerprint(s) of the root certificate using the same -printcert command.
keytool -printcert -file <<name of Root Certificate provided by Internal Signature Authority>>
Compare the displayed fingerprint with the well-known fingerprint (obtained from a newspaper or the root CA's webpage). Contact the certificate's issuer if you have questions.
When you execute the command, the -import command will print out the certificate information and prompt you to verify it.

Installing Vontu 7.1 Vontu Security Configuration
Vontu 7.1 Installation Guide for Windows 33
10. Return to the <drive>Vontu\jre\bin directory and update the local .keystore file with the signed certificate.
Internal signature authority
Use the following command to update the .keystore file with the root certificate:
keytool -import -file <root certificate filename>
Use the following command to update the .keystore file with the signed certificate:
keytool -import -alias tomcat -keystore .keystore -trustcacerts -file <signed certificate filename>
Versign or third-party signature authority
Use the following command to update the local .keystore file with the signed certificate:
keytool -import -alias tomcat -keystore .keystore -trustcacerts -file <signed certificate filename>
11. Copy the updated .keystore file into the <drive>Vontu\Protect\tomcat\conf directory.
12. Restart the Vontu Manager services.
Vontu Endpoint Server and Endpoint Agent SecurityVontu secures all communications between the Endpoint Server and the Endpoint Agents, as well as the Endpoint Agent shadow cache, using the Advanced Encryption Standard (AES) technology. AES is a symmetric key encryption technology that supports key sizes of 128, 192, and 256 bits. Vontu uses three different sets of AES keys: one to secure the shadow cache, one to authenticate the Endpoint Server to the Endpoint Agent, and one to encrypt traffic between the Endpoint Server and Endpoint Agent. While the shadow cache key is only used at the Endpoint Agent, the authentication and traffic encryption keys must be shared between the Endpoint Server and Endpoint Agent.
By default, Vontu uses predefined shadow cache and authentication 128-bit keys. The traffic encryption key is a randomly generated session key that is negotiated every time the Endpoint Agent connects to the Endpoint Server.
While the existing security in Vontu is secure, Vontu recommends you change the default keys. You can change the shadow cache and authentication keys, and you can change the AES key size (128, 192, 256).
You should change these default settings (change to use unique keys or change the key size) before you deploy the Endpoint Agents.

Installing Vontu 7.1 Windows Security Lockdown Guidelines
Vontu 7.1 Installation Guide for Windows 34
To learn more about Endpoint Server/Endpoint Agent security and how to generate unique Endpoint Server/Endpoint Agent keys or change the key size, see the Vontu 7.1 Utility Guide.
Windows Security Lockdown GuidelinesThis section provides a set of basic hardening procedures that you should complete after you install a Vontu server. You should adapt these guidelines to suit your organizations standards for secure communications and hardening procedures.
Table 2-1 and Table 2-2 list a standard set of Windows Services that should be running on a Vontu server post-installation. Table 2-1 lists required services; while Table 2-2 lists services that you should disable.
In addition, tables Table 2-3 through Table 2-7 list Windows system administrative security settings that you can adjusted for additional security hardening.
Required Windows ServicesYou should confirm the Windows services listed in Table 2-1 on page 34 are running.
Table 2-1: Microsoft Windows Required Services
Required To Run—Service Name
Alerter
COM+ Event System
DCOM Server Process Launcher
Defwatch—for Symantec
DNS Client
Event Log
Interix Subsystem Startup—for UNIX Services for Windows (for RA's)
IPSEC Services
Logical Disk Manager
Network Connections
OracleOraDb10g_home1TNSListener—OracleOraDb10g_Home1 is the default name. Your name might vary if the Oracle home name is not the default one.
OracleServicePROTECT—Vontu Enforce Server only.
Plug and Play
Protected Storage
Remote Procedure Call (RPC)

Installing Vontu 7.1 Windows Security Lockdown Guidelines
Vontu 7.1 Installation Guide for Windows 35
Windows Services To Be DisabledYou should disable the Windows services listed in Table 2-2 on page 35.
Removable Storage
Security Accounts Manager
Server—Required only for Enforce if EDMs will be used. Otherwise, not required.
Symantec AntiVirus
System Event Notification
Task Scheduler
TCP/IP NetBIOS Helper Service
Terminal Services
User Name Mapping—For UNIX Services for Windows (for RAs)
Vontu Incident Persister—For Vontu Enforce Server only
Vontu Enforce—For Vontu Enforce Server only
Vontu Monitor—For Vontu detection servers only
Vontu Notifier—For Vontu Enforce Server only
Vontu Update
Windows Management—Instrumentation
Windows Management—Instrumentation Driver Extensions Workstation
Windows Time—Required if no alternative Enforce/detection server system clock synchronization is implemented
Workstation—Required for Alerter Service
Table 2-2: Microsoft Windows Services To Disable
Disable—Service Name
DHCP Client
Dist. File System
Dist. Link Tracking Client
Dist. Link Tracking Server
Dist. Transaction Coordinator
Error Reporting Service—New addition
Help and Support
Messenger
Print Spooler
Table 2-1: Microsoft Windows Required Services
Required To Run—Service Name

Installing Vontu 7.1 Windows Security Lockdown Guidelines
Vontu 7.1 Installation Guide for Windows 36
Administrative Security SettingsThe following tables provide additional administrative settings available on a Microsoft Windows system that can be adjusted for additional security hardening.
Security Settings
Password Policy
Local Audit
Remote Registry—New addition
Wireless Config
Table 2-3: Security Settings
Policy Security Setting
Account Lockout Policy
Account lockout duration 0
Account lockout threshold 3 invalid logon attempts
Reset account lockout counter after 15 minutes
Table 2-4: Password Policy
Password Policy Security Setting
Enforce password history 24 passwords remembered
Maximum password age 60 days
Minimum password age 2 days
Minimum password length 10 characters
Password must meet complexity requirements Enabled
Store passwords using reversible encryption Disabled
Table 2-5: Local Audit
Local Audit Security Setting
Audit account logon events Success, Failure
Audit account management Success, Failure
Audit directory service access Success, Failure
Audit logon events Success, Failure
Audit object access Success, Failure
Table 2-2: Microsoft Windows Services To Disable
Disable—Service Name

Installing Vontu 7.1 Windows Security Lockdown Guidelines
Vontu 7.1 Installation Guide for Windows 37
User Rights Assignment
Audit policy change Success, Failure
Audit privilege use Success, Failure
Audit process tracking No auditing
Audit system events Success, Failure
Restore files and directories Administrators, Backup Operators
Shut down the system Administrators, Power Users, Backup Operators
Synchronize directory service data
Take ownership of files or other objects Administrators
Table 2-6: User Rights Assignment
User Rights Assignment Security Setting
Access this computer from the network Everyone, Administrators, Users, Power Users, Backup Operators
Act as part of the operating system
Add workstations to domain
Adjust memory quotas for a process LOCAL SERVICE, NETWORK SERVICE, Administrators
Allow log on locally Administrators, Users, Power Users, Backup Operators
Allow log on through Terminal Services Administrators, Remote Desktop Users
Back up files and directories Administrators, Backup Operators
Bypass traverse checking Everyone, Administrators, Users, Power Users, Backup Operators
Change the system time Administrators, Power Users
Create a pagefile Administrators
Create a token object
Create global objects Administrators, SERVICE
Create permanent shared objects
Debug programs Administrators
Deny access to this computer from the network
Deny log on as a batch job
Table 2-5: Local Audit
Local Audit Security Setting

Installing Vontu 7.1 Windows Security Lockdown Guidelines
Vontu 7.1 Installation Guide for Windows 38
Deny log on as a service
Deny log on locally
Deny log on through Terminal Services
Enable computer and user accounts to be trusted for delegation
Force shutdown from a remote system Administrators
Generate security audits LOCAL SERVICE, NETWORK SERVICE
Impersonate a client after authentication Administrators, SERVICE
Increase scheduling priority Administrators
Load and unload device drivers Administrators
Lock pages in memory
Log on as a batch job LOCAL SERVICE
Log on as a service NETWORK SERVICE
Manage auditing and security log Administrators
Create a pagefile Administrators
Create a token object
Create global objects Administrators, SERVICE
Create permanent shared objects
Debug programs Administrators
Deny access to this computer from the network
Deny log on as a batch job
Deny log on locally
Deny log on through Terminal Services
Enable computer and user accounts to be trusted for delegation
Force shutdown from a remote system Administrators
Generate security audits LOCAL SERVICE, NETWORK SERVICE
Impersonate a client after authentication Administrators, SERVICE
Increase scheduling priority Administrators
Load and unload device drivers Administrators
Lock pages in memory
Log on as a batch job LOCAL SERVICE
Deny log on locally
Table 2-6: User Rights Assignment
User Rights Assignment Security Setting

Installing Vontu 7.1 Windows Security Lockdown Guidelines
Vontu 7.1 Installation Guide for Windows 39
Security Options
Deny log on through Terminal Services
Log on as a service NETWORK SERVICE
Manage auditing and security log Administrators
Modify firmware environment values Administrators
Perform volume maintenance tasks Administrators
Profile single process Administrators, Power Users
Profile system performance Administrators
Remove computer from docking station Administrators, Power Users
Replace a process level token LOCAL SERVICE, NETWORK SERVICE
Restore files and directories Administrators, Backup Operators
Shut down the system Administrators, Power Users, Backup Operators
Synchronize directory service data
Take ownership of files or other objects Administrators
Table 2-7: Security Options
Security Options Security Settings
Accounts: Administrator account status Enabled
Accounts: Guest account status Disabled
Accounts: Limit local account use of blank passwords to console logon only
Enabled
Accounts: Rename administrator account protectdemo
Accounts: Rename guest account Guest
Audit: Audit the access of global system objects Disabled
Audit: Audit the use of Backup and Restore privilege
Disabled
Audit: Shut down system immediately if unable to log security audits
Disabled
Devices: Allow undock without having to log on Enabled
Devices: Allowed to format and eject removable media
Administrators
Devices: Prevent users from installing printer drivers
Enabled
Table 2-6: User Rights Assignment
User Rights Assignment Security Setting

Installing Vontu 7.1 Windows Security Lockdown Guidelines
Vontu 7.1 Installation Guide for Windows 40
Devices: Restrict CD-ROM access to locally logged-on user only
Enabled
Devices: Restrict floppy access to locally logged-on user only
Enabled
Devices: Unsigned driver installation behavior Do not allow installation
Domain controller: Allow server operators to schedule tasks
Enabled
Domain controller: LDAP server signing requirements
Not Defined
Domain controller: Refuse server account password changes
Not Defined
Domain member: Digitally encrypt or sign secure channel data (always)
Enabled
Domain member: Digitally encrypt secure channel data (when possible)
Enabled
Domain member: Digitally sign secure channel data (when possible)
Enabled
Accounts: Administrator account status Enabled
Accounts: Guest account status Disabled
Accounts: Limit local account use of blank passwords to console logon only
Enabled
Accounts: Rename administrator account protectdemo
Accounts: Rename guest account Guest
Domain member: Disable server account password changes
Disabled
Domain member: Maximum server account password age
30 days
Domain member: Require strong (Windows 2000 or later) session key
Enabled
Interactive logon: Do not display last user name Enabled
Interactive logon: Do not require CTRL+ALT+DEL Disabled
Interactive logon: Message text for users attempting to log on
Interactive logon: Message title for users attempting to log on
Not Defined
Interactive logon: Number of previous logons to cache (in case domain controller is not available)
10 logons
Interactive logon: Prompt user to change password before expiration
14 days
Table 2-7: Security Options
Security Options Security Settings

Installing Vontu 7.1 Windows Security Lockdown Guidelines
Vontu 7.1 Installation Guide for Windows 41
Interactive logon: Require Domain Controller authentication to unlock workstation
Disabled
Interactive logon: Require smart card Disabled
Interactive logon: Smart card removal behavior Force Logoff
Microsoft network client: Digitally sign communications (always)
Enabled
Microsoft network client: Digitally sign communications (if server agrees)
Enabled
Microsoft network client: Send unencrypted password to third-party SMB servers
Disabled
Microsoft network server: Amount of idle time required before suspending session
15 minutes
Microsoft network server: Digitally sign communications (always)
Enabled
Microsoft network server: Digitally sign communications (if client agrees)
Enabled
Microsoft network server: Disconnect clients when logon hours expire
Enabled
Network access: Allow anonymous SID/Name translation
Disabled
Network access: Do not allow anonymous enumeration of SAM accounts
Enabled
Network access: Do not allow anonymous enumeration of SAM accounts and shares
Disabled
Network access: Do not allow storage of credentials or .NET Passports for network authentication
Disabled
Network access: Let Everyone permissions apply to anonymous users
Disabled
Network access: Named Pipes that can be accessed anonymously
COMNAP, COMNODE, SQL\QUERY, SPOOLSS, EPMAPPER, LOCATOR, TrkWks, TrkSvr
Network access: Remotely accessible registry paths System\CurrentControlSet\Control\ProductOptions, System\CurrentControlSet\Control\Server Applications, Software\Microsoft\Windows NT\CurrentVersion
Table 2-7: Security Options
Security Options Security Settings

Installing Vontu 7.1 Anti-virus Scans and Hot FileSystem Backups
Vontu 7.1 Installation Guide for Windows 42
Anti-virus Scans and Hot FileSystem BackupsBecause the Vontu application can exhibit virus-like behavior when accessing files and directories, certain Vontu and Oracle directories need to be omitted from anti-virus scans on Vontu servers. This section presumes you have already installed an anti-virus software application.
Excluding Vontu Directories and Files From Anti-virus scansUsing the pre-installed anti-virus software, omit the following Enforce Server directories from anti-virus scanning:
\Vontu\Protect\incidents
\Vontu\Protect\index
\Vontu\Protect\logs
\Vontu\Protect\temp
\Vontu\Protect\tomcat\temp
\Vontu\Protect\tomcat\webapps\webdav\index
\Vontu\Protect\tomcat\webapps\webdav\logs
\Vontu\Protect\tomcat\work
Using the pre-installed anti-virus software, omit the following Network Monitor Server directories from anti-virus scanning:
\drop
\drop_pcap
\icap_spool
\packet_spool
\Vontu\Protect\incidents
\Vontu\Protect\index
Network access: Remotely accessible registry paths and sub-paths
System\CurrentControlSet\Control\Print\Printers, System\CurrentControlSet\Services\Eventlog,
Network access: Do not allow anonymous enumeration of SAM accounts
Enabled
Network access: Do not allow anonymous enumeration of SAM accounts and shares
Disabled
Network access: Do not allow storage of credentials or .NET Passports for network authentication
Disabled
Table 2-7: Security Options
Security Options Security Settings

Installing Vontu 7.1 Microsoft Asian Language Packs
Vontu 7.1 Installation Guide for Windows 43
\Vontu\Protect\logs (with subdirectories)
\Vontu\Protect\temp (with subdirectories)
Excluding Oracle Directories and Files From Anti-virus scansUsing the pre-installed anti-virus software, omit the following Oracle directories from anti-virus scanning:
\oracle\oradata\Protect
\oracle\product\10.2.0\db_1
Most Oracle data files to be excluded are located in these two directories; however there might be additional Oracle data files or temporary files. Use the Oracle Enterprise Manager to view the location and names of database datafiles (*.DBF files). The only specific file names are: .CTL, .DBF and REDO.LOG.
Microsoft Asian Language PacksYou must install the Microsoft Asian Language Packs on the machine from which you will view the Vontu Enforce Server administration console. For more information, See “MS Asian Language Packs” on page 17.

Vontu 7.1 Installation Guide for Windows 44
Chapter 3Installing Oracle 10g
This chapter describes the steps to perform a new Oracle 10g installation and to create a Vontu database. It also discusses backing up the Vontu database and auditing unsuccessful login attempts.
This chapter is intended for the two-tier and single-tier Vontu installations. If your organization already uses Oracle 10g software and you have a database administration team, you should consider using your organization’s existing Oracle 10g environment. For more information about how to create and configure a Vontu database using your organization’s Oracle 10g environment, contact your Vontu representative.
After you create the Vontu database and complete the Vontu installation, you can change the database password using the Vontu DBPasswordChanger utility. For more information about the Vontu DBPasswordChanger utility, see the Vontu 7.1 Utility Guide.
The following topics covered are:
“Downloading the Oracle 10g Software”, see page 45.
“Installing Oracle 10g”, see page 46.
“Creating and Configuring the TNS Listener”, see page 50.
“Creating the Oracle Database for Vontu”, see page 52.
“Backing Up the Vontu Oracle 10g Database”, see page 58.
“Auditing Unsuccessful Login Attempts”, see page 60.
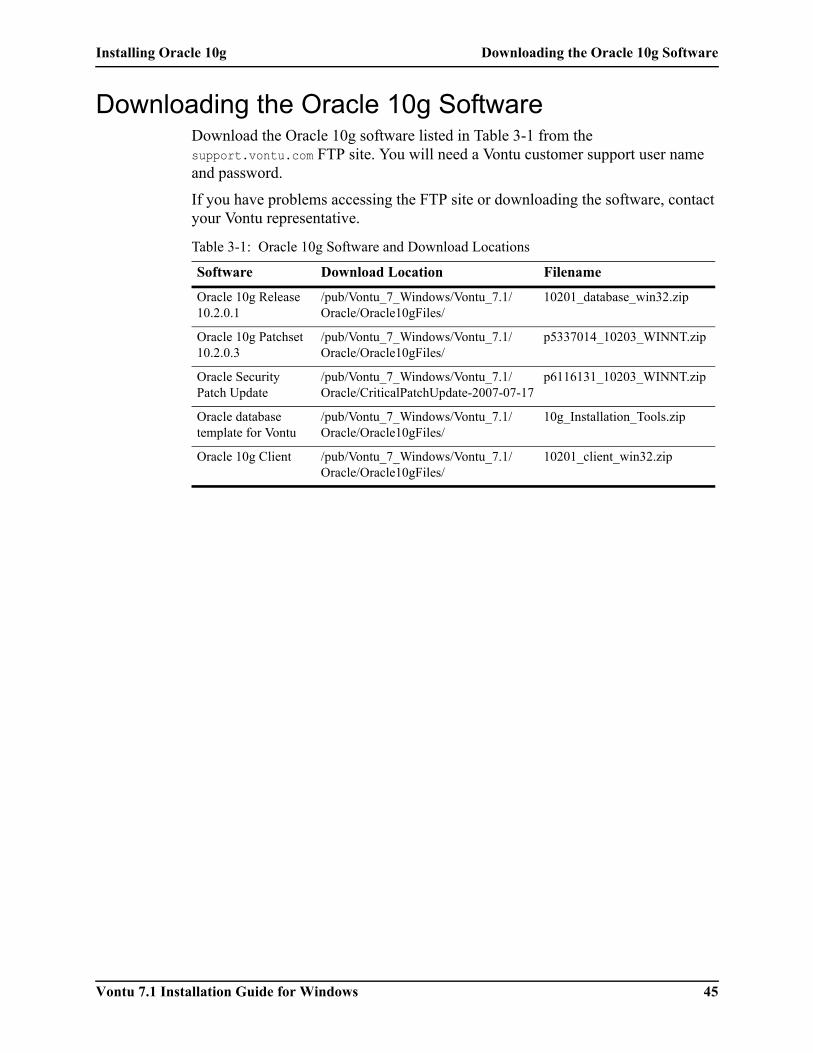
Installing Oracle 10g Downloading the Oracle 10g Software
Vontu 7.1 Installation Guide for Windows 45
Downloading the Oracle 10g SoftwareDownload the Oracle 10g software listed in Table 3-1 from the support.vontu.com FTP site. You will need a Vontu customer support user name and password.
If you have problems accessing the FTP site or downloading the software, contact your Vontu representative.
Table 3-1: Oracle 10g Software and Download Locations
Software Download Location Filename
Oracle 10g Release 10.2.0.1
/pub/Vontu_7_Windows/Vontu_7.1/Oracle/Oracle10gFiles/
10201_database_win32.zip
Oracle 10g Patchset 10.2.0.3
/pub/Vontu_7_Windows/Vontu_7.1/Oracle/Oracle10gFiles/
p5337014_10203_WINNT.zip
Oracle Security Patch Update
/pub/Vontu_7_Windows/Vontu_7.1/Oracle/CriticalPatchUpdate-2007-07-17
p6116131_10203_WINNT.zip
Oracle database template for Vontu
/pub/Vontu_7_Windows/Vontu_7.1/Oracle/Oracle10gFiles/
10g_Installation_Tools.zip
Oracle 10g Client /pub/Vontu_7_Windows/Vontu_7.1/Oracle/Oracle10gFiles/
10201_client_win32.zip

Installing Oracle 10g Installing Oracle 10g
Vontu 7.1 Installation Guide for Windows 46
Installing Oracle 10gTo install Oracle 10g and create the Vontu database, you must perform the following steps, in order, on the Enforce Server machine:
1. Download the Oracle software. See “Downloading the Oracle 10g Software” on page 45.
2. Install the Oracle 10g Release 10.2.0.1 software. See “Installing Oracle 10g Release 10.2.0.1” on page 46.
3. Install the Oracle Patchset 10.2.0.3 software. See “Installing Oracle Patchset 10.2.0.3” on page 47.
4. Install the Oracle Security Patch Update software. See “Installing the Oracle Security Patch Update” on page 48.
5. Create and configure the TNS Listener. See “Creating and Configuring the TNS Listener” on page 50.
6. Create the Vontu database. See “Creating the Oracle Database for Vontu” on page 52.
Installing Oracle 10g Release 10.2.0.1This section describes how to install the Oracle 10g base software. You must install the base software before installing the Oracle Patchset and Oracle Security Patch Update software.
To install Oracle 10g Release 10.2.0.1
1. Shut down the following services if they are running in Windows Services:
All Oracle services
Distributed Transaction Coordinator service
Oracle releases Security Patch Updates approximately once every three months. Vontu tests these Oracle Security Patch Updates to ensure they do not negatively impact the operation of the Vontu suite, then Vontu releases the Oracle Security Patch Update to customers. You should contact your Vontu representative before installing a new Oracle Security Patch Update that has not been tested and released by Vontu.
The Enforce Server uses the Oracle thin driver and the Oracle client. Vontu has packaged the .jar files for the Oracle thin driver with the Vontu software; however, you must also install the Oracle client. The Vontu installer needs SQL*PLUS to create tables and views on the Enforce Server, therefore the Windows user account used to installed Vontu needs access to SQL*Plus.

Installing Oracle 10g Installing Oracle Patchset 10.2.0.3
Vontu 7.1 Installation Guide for Windows 47
2. Unzip the 10201_database_win32.zip file and navigate to the database directory.
The directory to which you extract the zip file must not contain spaces.
3. To install the Oracle software, double-click on the Oracle Universal Installer file, setup.exe.
4. At the Installation Method screen, do the following:
a. Select Basic Installation.
b. Verify the Oracle Home Location is <drive>\oracle\product\10.2.0\db_1
c. Select the Standard Edition (1.1GB) installation type.
d. Uncheck Create Starter Database and click Next.
5. At the Product-Specific Prerequisite Checks screen, click Next.
6. At the Summary screen, click Install.
The Oracle software installs.
7. At the End of Installation screen, click Exit then Yes.
Installing Oracle Patchset 10.2.0.3Before installing the Oracle Patchset 10.2.0.3, you must install the Oracle 10g Release 10.2.0.1 software (see “Installing Oracle 10g Release 10.2.0.1” on page 46).
To install the Oracle Patchset 10.2.0.3
1. Shut down the following services if they are running in Windows Services:
All Oracle services
Distributed Transaction Coordinator service
2. Unzip the p5337014_10203_WINNT.zip file and navigate to the Disk1 directory.
The directory to which you extract the zip file must not contain spaces.
Oracle Standard Edition is not the default setting; you must select Oracle Standard Edition.
Installing Oracle 10g Installing the Oracle Security Patch Update
Vontu 7.1 Installation Guide for Windows 48
3. To install the Oracle Patchset software, double-click on the Oracle Universal Installer file, setup.exe.
4. Click Next.
5. At the Specify Home Details screen, verify the Name and Path values are as follows, the click Next:
a. Name: OraDb10g_home1
b. Path: <drive>\oracle\product\10.2.0\db_1
6. At the Summary screen, click Install.
7. At the End of Installation screen, click Exit then Yes.
Installing the Oracle Security Patch UpdateBefore installing the Oracle Security Patch Update, you must install the Oracle 10g Release 10.2.0.1 software (see “Installing Oracle 10g Release 10.2.0.1” on page 46) and the Oracle Patchset 10.2.0.3 software (see “Installing Oracle Patchset 10.2.0.3” on page 47).
To install the Oracle Security Patch Update
1. Open a command prompt and set the %ORACLE_HOME% variable to the Oracle Home Location, for example, c:\oracle\product\10.2.0\db_1.
> set ORACLE_HOME=<drive>\oracle\product\10.2.0\db_1
2. Verify the version of the command line OPatch utility, which you will use to install the Oracle Security Patch Update.
> %ORACLE_HOME%\OPatch\opatch version
It should be version 10.2.0.3.0.
The Path value must be the same as the Oracle Home Location. See “Installing Oracle 10g Release 10.2.0.1” on page 46, step 4.b.
You will use Oracle’s OPatch utility to apply the Oracle Security Patch Update. For more information about this utility, see the OPatch documentation located in the Oracle home directory, (for example, c:\oracle\product\10.2.0\db_1\OPatch\docs\ Users_Guide.txt).

Installing Oracle 10g Installing the Oracle Security Patch Update
Vontu 7.1 Installation Guide for Windows 49
3. Unzip the p6116131_10203_WINNT.zip file. By default, the file unzips to the a folder called 6116131.
If you choose to unzip the file to another location, then the directory to which you extract the file must not contain spaces. You will need to know this directory path for step 5.a.
4. Shut down the following services if they are running in Windows Services:
All Oracle services
Distributed Transaction Coordinator service
5. Install the Oracle Security Patch Update using the OPatch utility.
a. Change directory to the directory where you extracted the Oracle Security Patch Update software. If you followed step 3, then you extracted the p6116131_10203_WINNT.zip file to c:\Oracle10gSoftware\ p6116131_10203_WINNT\6116131.
> cd <drive>:\Oracle10gSoftware\p6116131_10203_WINNT\6116131
b. Run OPatch to apply the Oracle Security Patch Update.
> %ORACLE_HOME%\OPatch\opatch apply
Follow the on screen command prompts.
For more information about this Oracle Security Patch Update, see the release documentation located in the directory where you extracted the Oracle Security Patch Update software, (for example, c:\Oracle10gSoftware\p6116131_10203_WINNT\ 6116131\README.html).
If Microsoft Windows Services for UNIX (SFU) is installed, remove it from the Windows PATH environment variable, because it is known to cause problems with the OPatch utility.

Installing Oracle 10g Creating and Configuring the TNS Listener
Vontu 7.1 Installation Guide for Windows 50
Creating and Configuring the TNS ListenerYou must create and configure an Oracle Net Listener to make remote connections to your Oracle database possible.
Creating the TNS Listener
To create a TNS Listener:
1. Start the Oracle Net Configuration Assistant.
Choose Start>All Programs> Oracle - OraDb10g_home1> Configuration and Migration Tools>Net Configuration Assistant.
2. Select Listener configuration and click Next.
3. Select Add and click Next.
4. Enter a listener name and click Next.
5. Select the TCP protocol and click Next.
6. Select Use the standard port number of 1521 and click Next.
7. When prompted to configure another listener, select No and click Next.
8. When prompted that the listener configuration is complete, click Next.
9. Click Finish to exit the Oracle Net Configuration Assistant.
Configuring the TNS Listener
To configure a TNS Listener:
1. Open the listener.ora file located in the %ORACLE_HOME%\NETWORK\ADMIN folder (for example, C:\oracle\product\10.2.0\db_1\NETWORK\ADMIN), using a text editor.
2. Delete the following lines:
SID_LIST_LISTENER =
(SID_LIST =
(SID_DESC =
(SID_NAME = PLSExtProc)
(ORACLE_HOME = C:\oracle\product\10.2.0\db_1)
(PROGRAM = extproc)
)
)
Installing Oracle 10g Configuring the TNS Listener
Vontu 7.1 Installation Guide for Windows 51
3. Add the following line anywhere in the file:
4. Save the listener.ora file.
5. In Windows Services, start the TNS Listener service, if it is not already running. (For example, start OracleOraDb10g_home1TNSListener. The <OraDb10g_home1> portion of the TNS Listener name reflects the Oracle name variable.)
6. From the command prompt, set the password for the TNS Listener.
a. Type LSNRCTL and press Enter.> LSNRCTL
b. Type set password <password> and press Enter.
LSNRCTL> set password <password>
Store the TNS Listener password in a secure location for future use.
c. Type exit and press Enter.LSNRCTL> exit
ADMIN_RESTRICTIONS_listener=on
Installing Oracle 10g Creating the Oracle Database for Vontu
Vontu 7.1 Installation Guide for Windows 52
Creating the Oracle Database for VontuAfter you install the Oracle 10g Release 10.2.0.1 software, the Oracle Patchset 10.2.0.3 software, the Oracle Security Patch Update software, and create and configure the TNS Listener, you need to create the Vontu database. Vontu supplies a database template for this purpose. The Vontu database template contains all the default configurations of the Vontu database, including default data files.
Perform the following steps in order to create and setup the Vontu database:
1. Create the Vontu database. See “Creating the Vontu database” on page 52.
2. Create a new Oracle user. See “Creating an Oracle User Called “Protect”” on page 55.
3. Lock the Oracle “dbsnmp” user account. See “Locking the Oracle “dbsnmp” User Account” on page 55.
4. Verify the Vontu database. See “Verifying the Vontu Database” on page 56.
5. Backup the Vontu database. See “Backing Up the Vontu Oracle 10g Database” on page 58.
6. Log all unsuccessful Oracle login attempts. See “Auditing Unsuccessful Login Attempts” on page 60.
Creating the Vontu database
To create the Vontu database:
1. If you logged in as a domain user, you need to set the sqlnet.ora file’s SQLNET.AUTHENTICATION_SERVICES=() value to none; otherwise, go to step 2.
a. Open the sqlnet.ora file located in the %Oracle_Home%\network\admin folder (for example, c:\oracle\product\10.2.0\db_1\NETWORK\ADMIN), using a text editor.
b. Change the SQLNET.AUTHENTICATION_SERVICES=(NTS)value to none.SQLNET.AUTHENTICATION_SERVICES=(none)
c. Save and close the sqlnet.ora file.
2. Extract the database template file, Oracle_10g_Database_for_Vontu.dbt from the 10g_Installation_Tools.zip file to the

Installing Oracle 10g Creating the Vontu database
Vontu 7.1 Installation Guide for Windows 53
%ORACLE_HOME%\assistants\dbca\templates folder, (for example, c:\oracle\product\10.2.0\db_1\assistants\dbca\templates).
3. Start the Oracle Database Configuration Assistant to create the Vontu database.
Choose Start>All Programs>Oracle - OraDb10g_Home1> Configuration and Migration Tools>Database Configuration Assistant.
4. In the Welcome screen, click Next.
5. Select Create a Database and click Next.
6. Select Oracle 10g Database for Vontu from the list of templates and click Next.
7. Enter a database name (Global Database Name) and a database instance name (Oracle System Identifier or SID).
a. Enter protect for the Global Database Name.
b. Enter protect for the SID and click Next.
Note the database and database instance names as you will need them later when you install the Vontu software.
8. Check Configure the Database with Enterprise Manager and select Use Database Control for Database Management, then click Next.
9. Create an Oracle database user account password, specify and confirm the password, then click Next.
You can use the same password for all user accounts or use different passwords for each user account. The various user accounts are SYS, SYSTEM, DBSNMP, and SYSMAN.
Follow these guidelines for an acceptable Oracle user account password:
Passwords cannot contain quotation marks.
Passwords are not case sensitive.
A password must begin with an alphabetic character.
Passwords can contain only alphanumeric characters and the underscore (_), dollar sign ($), and pound sign (#). However, Oracle strongly discourages you from using $ and #.
You must use the default Global Database Name (protect) and SID (protect) values. The Vontu application requires these two values to be protect for Vontu to work.
Installing Oracle 10g Creating the Vontu database
Vontu 7.1 Installation Guide for Windows 54
A password cannot be an Oracle reserved word such as SELECT.
10. Select File System and click Next.
11. Select Use Database File Locations from Template and click Next.
12. The Recovery Configuration step is optional. Click Next.
Enabling archiving allows online database backup and recovery. It also guarantees complete data recoverability; however, it does require more disk space and management.
You should discuss your backup and recovery strategy with a Vontu representative to determine if this option is appropriate for your environment.
13. Check Enterprise Manager Repository and click Next.
14. Select Custom and accept the default template values, then click Next.
15. Click Next to skip the Database Storage step.
16. Check Create Database and click Finish.
17. When the confirmation screen appears, click OK.
When the database creation process is approximately 58% complete an error message appears.
Vontu recommends that you resize the Oracle window so that when the ORA-22973 error message appears it is not blocked from view; otherwise, you might think the create database process is progressing when it is not.
When the “ORA-22973: size of object identifier exceeds maximum size allowed” error message appears, click Ignore.
When the “ORA-04043: objectXDB_DATASTORE_PROC does not exist” error message appears, click Ignore.
The database is created, which can take up to 20 minutes to complete.
If the database creation process fails or hangs, check the Oracle Database Configuration Assistant logs for errors. The logs are located in the <%ORACLE_HOME%>\cfgtoollogs\dbca\<SID> folder (for example, c:\oracle\product\10.2.0\db_1\cfgtoollogs\dbca\protect).
18. When the database creation process is complete, another Database Configuration Assistant window opens and displays the database details.
Note the Database Control URL to access the Enterprise Manager later, (for example, http://<server hostname>.<domain>:1158/em, where <server hostname> is your database server name).
Installing Oracle 10g Creating an Oracle User Called “Protect”
Vontu 7.1 Installation Guide for Windows 55
19. Click Exit.
Creating an Oracle User Called “Protect”
To create a new Oracle user called “protect”:
1. Extract the SQL script file, oracle_create_user.sql, from the 10g_Installation_Tools.zip file to a local directory.
2. Open a command prompt and change directory to the directory where you extracted the oracle_create_user.sql file.
3. Start SQL*Plus.> sqlplus /nolog
4. Run oracle_create_user.sql.SQL> @oracle_create_user.sql
5. Enter the SYS user account password, which you created in step 9 of the “To create the Vontu database:” section on page 52.
SQL> <sys_password>
6. Create a password for the new “protect” database user account and note the password for future use.
SQL> <protect_password>
Choose a password according to the guidelines set out in step 9 of the “To create the Vontu database:” section on page 52. After you complete the Vontu installation, you can change the database password, see the Vontu 7.1 Utility Guide.
Locking the Oracle “dbsnmp” User Account
To lock the Oracle “dbsnmp” user account:
1. Open a command prompt and start SQL*Plus.
> sqlplus /nolog
2. Log in as the SYS user, which you created in step 9 of the “To create the Vontu database:” section on page 52.
SQL> connect sys/<sys_password> as sysdba
3. Lock the “DBSNMP” user account.SQL> ALTER USER dbsnmp ACCOUNT LOCK;

Installing Oracle 10g Verifying the Vontu Database
Vontu 7.1 Installation Guide for Windows 56
Verifying the Vontu Database
To verify the Vontu database was created correctly:
1. Open a command prompt and start SQL*Plus.> sqlplus
2. Log in as the SYS user, which you created in step 9 of the “To create the Vontu database:” section on page 52.
SQL> connect sys/<sys_password> as sysdba
3. Verify the screen displays the following information:Oracle10g Release 10.2.0.3.0 - Production
4. Run the following query:SQL> SELECT * FROM v$version;
5. Verify the output contains the following information:
6. Run the following query:SQL> desc dba_tablespaces;
7. Verify the output contains the following information:
8. Exit from SQL*Plus.SQL> exit
9. Log in as the “protect” database user.
>sqlplus protect/<protect_password>@protect
10. Exit from SQL*Plus.SQL> exit
BANNER
---------------------------------------------------
Oracle Database 10g Release 10.2.0.3.0 - Production
PL/SQL Release 10.2.0.3.0 - Production
CORE 10.2.0.3.0 Production
TNS for Windows: Version 10.2.0.3.0 - Production
NLSRTL Version 10.2.0.3.0 - Production
RETENTION VARCHAR2(11 CHAR)
BIGFILE VARCHAR2(3 CHAR)

Installing Oracle 10g Adding Additional Data Files
Vontu 7.1 Installation Guide for Windows 57
Adding Additional Data FilesAfter building the Vontu database, you can add more space to the database by creating additional data files.
To add additional data files to the Vontu database:
1. Start the Oracle Enterprise Manager. Open a browser and enter the Oracle Enterprise URL, which you noted in step 18 of the “To create the Vontu database:” section on page 52.
2. Log in to the Oracle Enterprise Manager.
a. In the User Name field, enter the SYS user account name.
b. In the Password field, enter your SYS password.
c. For Connect As, select SYSDBA, then click Login.
d. In the license information screen, click I agree.
3. Click on the Administration tab, and then click on Datafiles in the Database Administration Storage section.
4. On the Datafiles screen, select the following options, then click Go:
a. Select the ..\USER01.DBF data file name.
b. Select Create Like from the Actions dropdown list box.
5. On the Create Datafile screen, select the following options, then click OK:
a. In the File Name field, enter a data file name.
b. In the File Directory field, select a file directory for the new data file.
c. In the File Size field, enter the file size.
d. Deselect the Reuse existing file checkbox.
e. In the Storage section, check Automatically extend data file when full and check Unlimited for Maximum File Size.
Each of these files has a maximum size of 32 GB.
6. Create as many data files as needed up to 80% of the drive size.
7. Click Logout to exit the Oracle Enterprise Manager.

Installing Oracle 10g Backing Up the Vontu Oracle 10g Database
Vontu 7.1 Installation Guide for Windows 58
Backing Up the Vontu Oracle 10g DatabaseThis section outlines how to perform a Vontu Oracle 10g database backup. You should back up the Vontu database before performing any actions that could corrupt the database, for example, performing an upgrade.
To back up the Vontu database:
1. You need to backup all the files that are located in the <drive>\oracle\product\10.2.0\ORADATA\PROTECT folder. These include the *.DBF, *.LOG, and *.CTL files).
2. Shutdown any Vontu services running on the machine.
3. Shutdown all Oracle TNS Listeners. (There might be more than one listener configured. A listener should look like OracleOraDb10g_home1TNS Listener).
4. This step is optional. Run the following SQL query as the SYS database user to determine the size of the database that needs to be backed up, it will return the database size in bytes. Make sure the disk has enough space for backup files.
SELECT ROUND(SUM(bytes)/1024/1024/1024, 4) GB
FROM (
SELECT SUM(bytes) bytes
FROM dba_data_files
UNION ALL
SELECT SUM(bytes) bytes
FROM dba_temp_files
UNION ALL
SELECT SUM(bytes) bytes
FROM v$log
);
5. Shut down all Oracle services.
6. Copy <drive>\oracle\product\10.2.0\ORADATA\PROTECT directories into a backup location. There might be additional data files or temporary files created. Make sure that all files in this directory are copied to the backup location.
If a recover from this backup is required, you need to copy these files back to their original locations. Make sure you note where these files were copied from so that you can replace them in the original location when needed.

Installing Oracle 10g Backing Up the Vontu Oracle 10g Database
Vontu 7.1 Installation Guide for Windows 59
7. Copy the password file <drive>:\oracle\product\10.2.0\db_1\ database\PWDPROTECT.ora into the backup location.
8. Restart the Oracle services.
Installing Oracle 10g Auditing Unsuccessful Login Attempts
Vontu 7.1 Installation Guide for Windows 60
Auditing Unsuccessful Login AttemptsThis section outlines how to turn on or off the auditing of unsuccessful login attempts. You can write the audit trail to a database or to the operating system.
To write the audit trail to the database:
1. From the command line, enter the following:
sqlplus /nolog
SQL> connect sys/<password>@protect as sysdba
SQL> ALTER SYSTEM SET audit_trail = DB SCOPE = spfile;
SQL> audit connect whenever NOT successful;
SQL> exit
2. Restart the Oracle server.
The audit trail is stored in dba_audit_trail system view and can be viewed using the following SQL while logged into SQL*Plus as SYS user.
SELECT os_username, username, timestamp, audit_option, action_name
FROM dba_audit_trail;
3. Auditing on unsuccessful login attempts can be turned off using the following SQL command:
noaudit connect;
4. The audit trail takes space and should be purged periodically using the following SQL command:
TRUNCATE TABLE sys.aud$;
To write the audit trail to the operating system:
1. You can set audit_file_dest to any directory in the system. To maintain accountability, it is recommended that the audit_file_dest parameter

Installing Oracle 10g Auditing Unsuccessful Login Attempts
Vontu 7.1 Installation Guide for Windows 61
should be set to a location where the database administrator does not have rights, but the OS administrator does have access.
From the command line, enter the following:
sqlplus /nolog
SQL> connect sys/<password>@protect as sysdba
SQL> ALTER SYSTEM SET audit_trail = OS SCOPE = spfile;
SQL> ALTER SYSTEM SET audit_file_dest = '<drive>:\ORACLE\ADMIN\PROTECT\ADUMP' scope = spfile;
SQL> audit connect whenever NOT successful;
SQL> exit
2. Restart the Oracle server.
3. Auditing on unsuccessful login attempts can be turned off using the following SQL command:
noaudit connect;
Vontu 7.1 Installation Guide for Windows 62
Chapter 4Installing Vontu Enforce Serv-er
This chapter describes the steps to install the Vontu Enforce Server. You must install the Oracle 10g software before installing the Enforce Server. See “Installing Oracle 10g” on page 44.
The following topics are covered:
“Downloading the Vontu Software”, see page 63.
“Installing the Vontu Enforce Server”, see page 64.
Installing Vontu Enforce Server Downloading the Vontu Software
Vontu 7.1 Installation Guide for Windows 63
Downloading the Vontu SoftwareDownload the Vontu software listed in Table 4-1 from the support.vontu.com FTP site. You will need a Vontu customer support user name and password.
If you have problems accessing the FTP site or downloading the software, contact your Vontu representative.
Table 4-1: Vontu Software and Download Locations
Software Download Location Filename
Vontu software /pub/Vontu_7_Windows/Vontu_7.1/NewInstalls/
ProtectInstaller_7.1.exe

Installing Vontu Enforce Server Installing the Vontu Enforce Server
Vontu 7.1 Installation Guide for Windows 64
Installing the Vontu Enforce ServerThis section describes how to install the Vontu Enforce Server. You must install the Oracle 10g software before installing the Enforce Server. See “Installing Oracle 10g” on page 44.
To install the Vontu Enforce Server:
1. Log in (or remote log in) as Administrator to the machine where you will install the Vontu Enforce Server. Copy the Vontu installer (ProtectInstaller_7.1.exe) to a local directory.
2. Choose Start>Run and browse to the folder where you copied the ProtectInstaller_7.1.exe file.
3. Double-click on ProtectInstaller_7.1.exe to select the file, and then click OK.
The Vontu Introduction screen displays.
4. Throughout the Vontu installation process, the right side of the screen displays information and installation options. Use the following buttons to navigate through the installation process:
Click Next to display the next installation screen.
Click Previous to return to the previous installation screen.
Vontu strongly recommends that you disable any antivirus, pop-up blocker, and registry protection software before you begin the Vontu installation process.
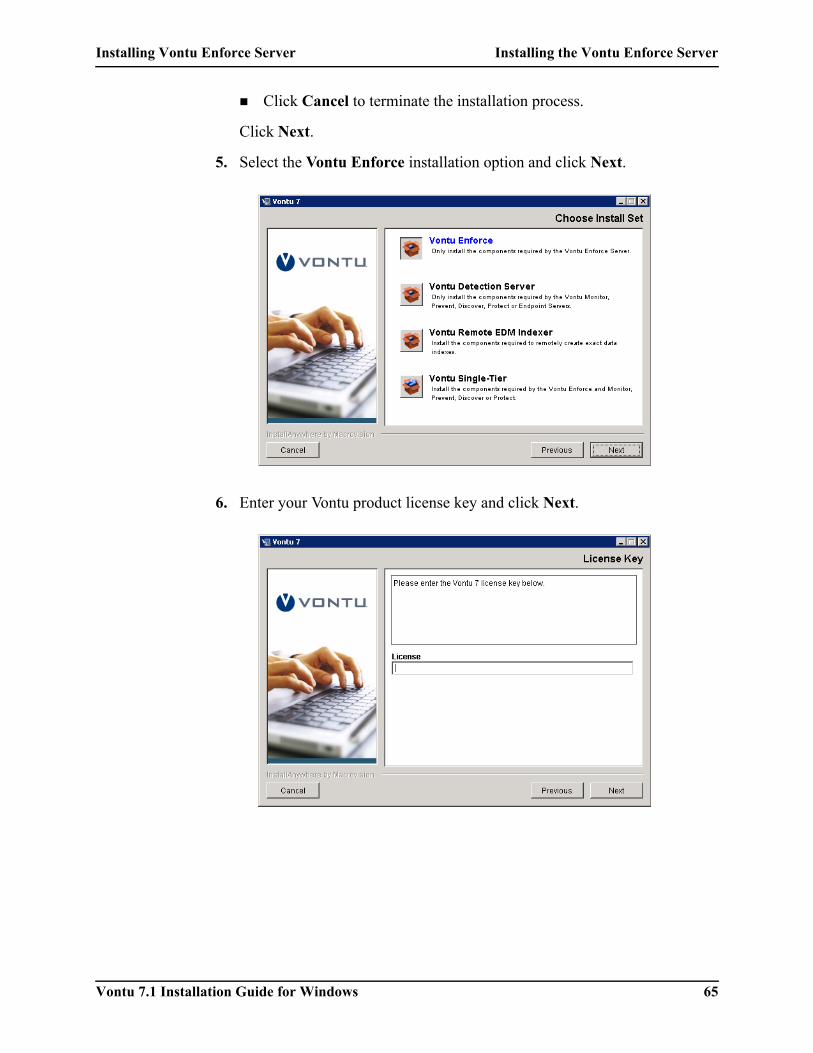
Installing Vontu Enforce Server Installing the Vontu Enforce Server
Vontu 7.1 Installation Guide for Windows 65
Click Cancel to terminate the installation process.
Click Next.
5. Select the Vontu Enforce installation option and click Next.
6. Enter your Vontu product license key and click Next.

Installing Vontu Enforce Server Installing the Vontu Enforce Server
Vontu 7.1 Installation Guide for Windows 66
7. Accept the Vontu default installation location (at the server root level, for example, C:\Vontu), and click Next.
Vontu recommends you use the default installation location; however, you can click Choose to navigate to a different installation location instead. Do not install Vontu in a folder or path that includes spaces (for example, C:\my documents\Vontu is not a valid installation location).
8. Select a radio button to choose where to create product icons. Optionally, select Create Icons for All Users to make the product icons available in the same location for all users of the Enforce Server. Click Next.
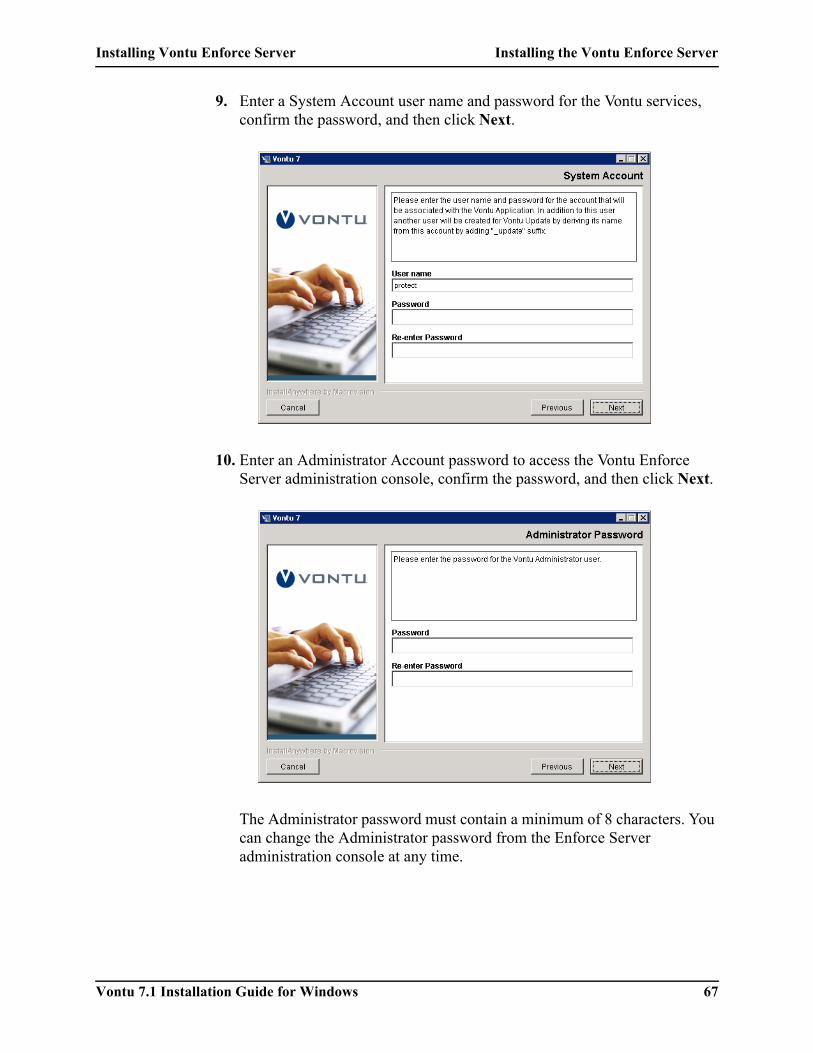
Installing Vontu Enforce Server Installing the Vontu Enforce Server
Vontu 7.1 Installation Guide for Windows 67
9. Enter a System Account user name and password for the Vontu services, confirm the password, and then click Next.
10. Enter an Administrator Account password to access the Vontu Enforce Server administration console, confirm the password, and then click Next.
The Administrator password must contain a minimum of 8 characters. You can change the Administrator password from the Enforce Server administration console at any time.

Installing Vontu Enforce Server Installing the Vontu Enforce Server
Vontu 7.1 Installation Guide for Windows 68
11. Enter the Oracle Database Server host name or IP address and the Oracle Database Server (TNS) Listener Port, then click Next.
For a two-tier Vontu installation (the Oracle database and the Enforce Server are on the same machine), specify the 127.0.0.1 in Oracle Database Server field.
For a three-tier Vontu installation (the Oracle database is located on a separate machine from the Enforce Server), specify the Oracle server host name or IP address in Oracle Database Server field.
12. Enter the Vontu Enforce Server database user name and password, confirm the password, enter the database SID, and then click Next.

Installing Vontu Enforce Server Installing the Vontu Enforce Server
Vontu 7.1 Installation Guide for Windows 69
You created the Vontu Enforce Server database user name, and password in step 6 of the “To create a new Oracle user called “protect”:” section on page 55. You created the Vontu Enforce Server database SID in step 9 of the “To create the Vontu database:” section on page 52.
13. If you want Vontu to configure time synchronization between the Vontu Enforce Server and all other Vontu servers, select Configure NTP and click Next.
Vontu recommends that the system clocks for the Enforce Server and all other Vontu servers are synchronized. Vontu recommends using the Network Time Protocol (NTP) service; however, you can choose an alternative method to synchronize the Vontu servers’ system clocks.
If you select the Configure NTP checkbox, the Vontu installer designates the Enforce Server as the NTP server and all other Vontu servers as its clients. You must choose the same synchronization method when installing all Vontu servers.
14. You have completed entering the Vontu Enforce Server installation settings. Review the Pre-installation Summary screen to confirm your installation configuration.
To change settings, use the Previous button to return to the appropriate screen to make a change.
To confirm the settings and start the installation, click Install.

Installing Vontu Enforce Server Installing the Vontu Enforce Server
Vontu 7.1 Installation Guide for Windows 70
15. The Installing Vontu screen appears and displays an installation progress bar.
16. The Installation Complete screen appears.
Select Yes, restart my system and click Done to shutdown all applications and restart the Enforce Server.
Select No, I will restart my system myself and click Done to end the Vontu installation process and return to the desktop. You must restart the Enforce Server machine before you use the Enforce Server.
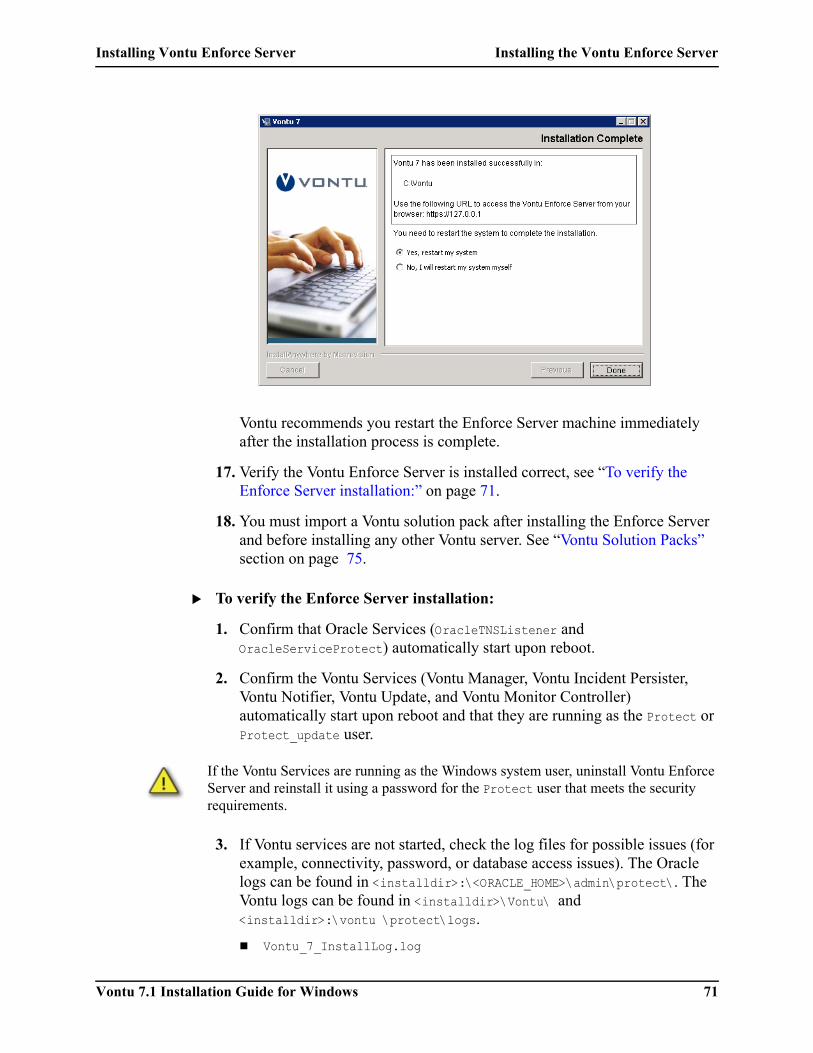
Installing Vontu Enforce Server Installing the Vontu Enforce Server
Vontu 7.1 Installation Guide for Windows 71
Vontu recommends you restart the Enforce Server machine immediately after the installation process is complete.
17. Verify the Vontu Enforce Server is installed correct, see “To verify the Enforce Server installation:” on page 71.
18. You must import a Vontu solution pack after installing the Enforce Server and before installing any other Vontu server. See “Vontu Solution Packs” section on page 75.
To verify the Enforce Server installation:
1. Confirm that Oracle Services (OracleTNSListener and OracleServiceProtect) automatically start upon reboot.
2. Confirm the Vontu Services (Vontu Manager, Vontu Incident Persister, Vontu Notifier, Vontu Update, and Vontu Monitor Controller) automatically start upon reboot and that they are running as the Protect or Protect_update user.
3. If Vontu services are not started, check the log files for possible issues (for example, connectivity, password, or database access issues). The Oracle logs can be found in <installdir>:\<ORACLE_HOME>\admin\protect\. The Vontu logs can be found in <installdir>\Vontu\ and <installdir>:\vontu \protect\logs.
Vontu_7_InstallLog.log
If the Vontu Services are running as the Windows system user, uninstall Vontu Enforce Server and reinstall it using a password for the Protect user that meets the security requirements.

Installing Vontu Enforce Server Installing the Vontu Enforce Server
Vontu 7.1 Installation Guide for Windows 72
VontuIncidentPersister.log
VontuManager.log
VontuMonitorController.log
VontuNotifier.log
VontuUpdate.log

Vontu 7.1 Installation Guide for Windows 73
Chapter 5Importing a Vontu Solution Pack
This chapter describes how to import a Vontu solution pack. You should import a solution pack only immediately after installing the Enforce Server and before installing a Vontu detection server. If you are performing a single-tier installation, then you should import a solution pack immediately after the single-tier installation is complete.
The following topics are covered:
“Downloading the Vontu Solution Packs”, see page 74.
“Vontu Solution Packs”, see page 75.
Importing a Vontu Solution Pack Downloading the Vontu Solution Packs
Vontu 7.1 Installation Guide for Windows 74
Downloading the Vontu Solution PacksDownload the Vontu solution packs listed in Table 5-1 from the support.vontu.com FTP site. You will need a Vontu customer support user name and password.
If you have problems accessing the FTP site or downloading the solution packs, contact your Vontu representative.
Table 5-1: Vontu Software and Download Locations
Software Download Location Filename
Vontu Solution Packs
/pub/Vontu_7_Windows/Vontu_7.1/Solution_Packs/
Energy_v7.1.vsp
EU_UK_v7.1.vsp
Federal_v7.1.vsp
Financial_v7.1.vsp
Health_Care_v7.1.vsp
High_Tech_v7.1.vsp
Insurance_v7.1.vsp
Manufacturing_v7.1.vsp
Media_Entertainment_v7.1.vsp
Pharmaceutical_v7.1.vsp
Retail_v7.1.vsp
Telecom_v7.1.vsp
Vontu_Classic_v7.1.vsp

Importing a Vontu Solution Pack Vontu Solution Packs
Vontu 7.1 Installation Guide for Windows 75
Vontu Solution PacksVontu provides various solution packs that, when imported, further your Enforce Server configuration. Each solution pack is designed to include configuration settings, such as policies, roles, reports, protocols, and incident statuses, that support the data loss prevention needs of a particular industry or organization.
It is important that you adhere to the following rules when importing a solution pack:
Import a solution pack only immediately after installing the Enforce Server and before installing any other Vontu server. (If you are performing a single-tier installation, then you should import a solution pack immediately after the installation is complete.)
Import a solution pack that was created specifically for the Vontu Enforce Server version you installed. Do not import a solution pack that was released with a previous version of Vontu.
Do not attempt to import a solution pack on an Enforce Server that you have modified after the initial installation, as the solution pack import will fail.
Do not attempt to import more than one solution pack on the same Enforce Server, as the solution pack import will fail.
Importing a Vontu Solution PackYou import a Vontu solution pack on the Enforce Server machine.
To import a Vontu solution pack:
1. Log in (or remote log in) as Administrator to the Vontu Enforce Server.
2. Copy a Vontu solution pack (for example, Vontu_Classic_v7.1.vsp) to a local directory.
3. In Windows Services, stop all Vontu services except for the Vontu Notifier service. The Vontu Notifier service must remain running.
Stop the Vontu services in the following order:
Vontu Update
Vontu Incident Persister
Vontu Manager
Vontu Monitor (if a single-tier installation)
Vontu Monitor Controller

Importing a Vontu Solution Pack Importing a Vontu Solution Pack
Vontu 7.1 Installation Guide for Windows 76
4. From the command line prompt, change directory to where the SolutionPackInstaller.exe file is located, <%Vontu system folder%>\protect\bin folder. (For example, C:\Vontu\Protect\bin).> cd c:\Vontu\Protect\bin
5. Import a solution pack by running SolutionPackInstaller.exe and specifying the solution pack directory path, <%Solutionpack_path%>, and file name, <%Solutionpack_filename%>, (for example, c:\vontudownloads\ Vontu_Classic_v7.1.vspVontu_Classic_v7.1.vsp). The solution pack directory path must not contain any spaces.
> SolutionPackInstaller.exe import <drive>:\<%Solutionpack_path%>\ <%Solutionpack_filename.vsp%>
6. Restart the Vontu services you stopped in step 3 and make sure the Vontu Notifier service is also running. If the Vontu Notifier service is not running, start Vontu Notifier first, then the other Vontu services.
Start the Vontu services in the following order:
Vontu Manager
Vontu Monitor (if a single-tier installation)
Vontu Incident Persister
Vontu Update
Vontu Monitor Controller
7. Once you have completed importing a solution pack, do one of the following depending on the type of installation you are performing:
Three-tier Vontu installation—install a detection server, see “Installing a Detection Server” on page 77.
Two-tier Vontu installation—install a detection server, see “Installing a Detection Server” on page 77.
Single-tier installation—add and configure the detection server, see “Adding and Configuring the Vontu Detection Servers” on page 106.

Vontu 7.1 Installation Guide for Windows 77
Chapter 6Installing a Detection Server
This chapter describes how to install a Vontu detection server. You must install Oracle 10g, create a Vontu database, install the Vontu Enforce Server, and import a Vontu solution pack on the Enforce Server machine before you install a Vontu detection server on a separate machine.
The following topics are covered:
“Downloading the Vontu Software”, see page 78.
“Installing a Vontu Detection Server”, see page 79.

Installing a Detection Server Downloading the Vontu Software
Vontu 7.1 Installation Guide for Windows 78
Downloading the Vontu SoftwareDownload the Vontu software listed in Table 6-1 from the support.vontu.com FTP site. You will need a Vontu customer support user name and password.
If you have problems accessing the FTP site or downloading the software, contact your Vontu representative.
Table 6-1: Vontu Software and Download Locations
Software Download Location Filename
Vontu software /pub/Vontu_7_Windows/Vontu_7.1/NewInstalls/
ProtectInstaller_7.1.exe
Ethereal software /pub/Vontu_7_Windows/Vontu_7.1/Third_Party/
ethereal-setup-0.10.10.exe
WinPCap version 3.0 /pub/Vontu_7_Windows/Vontu_7.1/Third_Party/
WinPcap_3_0.exe
Windows Services for UNIX Version 3.5—required for a Discover Server that will run a scan on a UNIX machine.
Microsoft Download Center (http://www.microsoft.com/downloads/details.aspx?familyid=896C9688-601B-44F1-81A4-02878FF11778&displaylang=en)
SFU35SEL_EN.exe
The WinPCap software is only required for the Network Monitor Server; however, Vontu recommends you install WinPCap no matter which type of detection server you plan to install and configure.
Installing a Detection Server Installing a Vontu Detection Server
Vontu 7.1 Installation Guide for Windows 79
Installing a Vontu Detection ServerThe Vontu suite includes five different types of detection servers, which are described in Table 6-2 on page 79. These detection servers are managed by the Enforce Server.
You must first install the Enforce Server and import a solution pack before installing any of the detection servers. You install all the Vontu servers, including the Enforce Server, using the same installer executable, ProtectInstaller_7.1.exe.
After you install a detection server, you must use the Vontu Enforce Server administration console to add the server to the list of servers managed by the Enforce Server. It is during the add server process (see “Adding and Configuring the Vontu Detection Servers” on page 106) that you configure which type of detection server the new server will be.
To install a Vontu detection server:
1. Log in (or remote log in) as Administrator to the machine where you will install the Vontu detection server.
Table 6-2: Vontu Detection Servers
Server Name Description
Network Monitor Server Inspects network communications for confidential data, accurately detects policy violations, and precisely qualifies and quantifies the risk of data loss, such as intellectual property or customer data.
Email Prevent Server Prevents data security violations for data in motion by blocking email communications that contain confidential data. It can also conditionally route traffic with confidential data to an encryption gateway for secure delivery and encryption policy enforcement.
Web Prevent Server Stops data security violations for data in motion over web communications and file transfer protocols.
Discover Server Identifies unsecured confidential data exposed on open file shares, Web servers, and individual desktops and laptops.
In addition, the Protect product functionality secures confidential data at rest with the ability to automatically quarantine or copy sensitive files.
Endpoint Server Monitors the use of sensitive data at the endpoint and accurately detects policy violations.
Vontu strongly recommends that you disable any antivirus, pop-up blocker, and registry protection software before you begin the Vontu installation process.
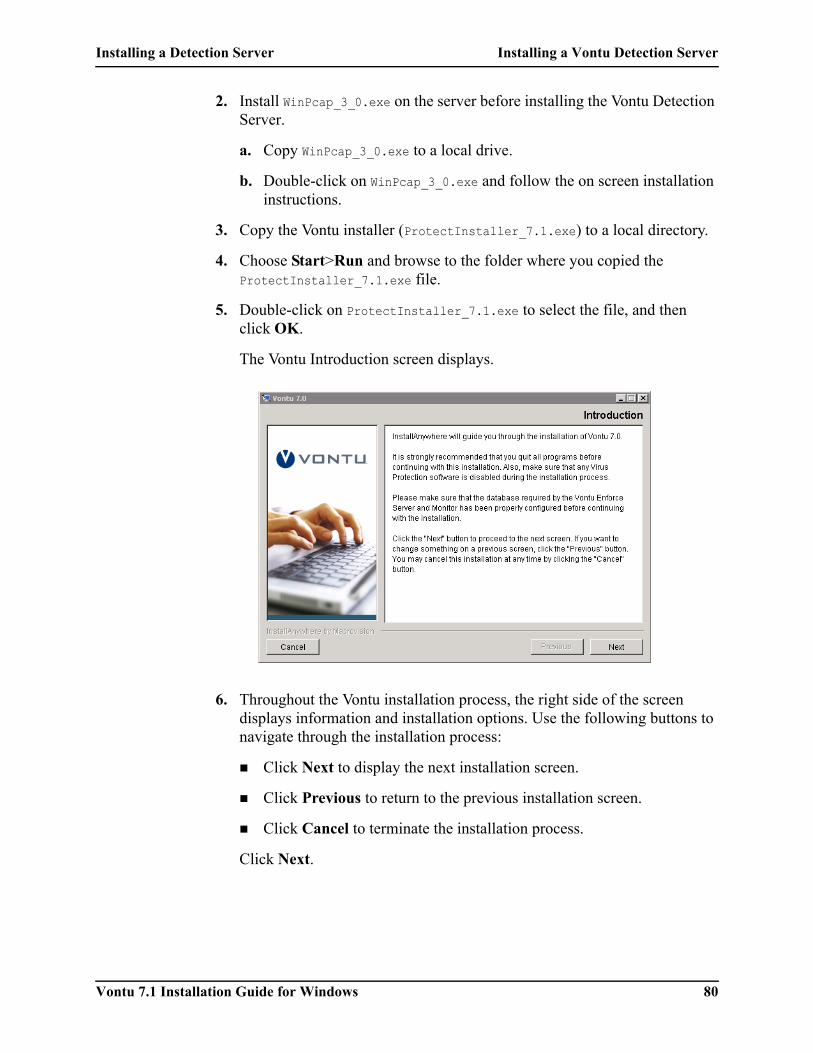
Installing a Detection Server Installing a Vontu Detection Server
Vontu 7.1 Installation Guide for Windows 80
2. Install WinPcap_3_0.exe on the server before installing the Vontu Detection Server.
a. Copy WinPcap_3_0.exe to a local drive.
b. Double-click on WinPcap_3_0.exe and follow the on screen installation instructions.
3. Copy the Vontu installer (ProtectInstaller_7.1.exe) to a local directory.
4. Choose Start>Run and browse to the folder where you copied the ProtectInstaller_7.1.exe file.
5. Double-click on ProtectInstaller_7.1.exe to select the file, and then click OK.
The Vontu Introduction screen displays.
6. Throughout the Vontu installation process, the right side of the screen displays information and installation options. Use the following buttons to navigate through the installation process:
Click Next to display the next installation screen.
Click Previous to return to the previous installation screen.
Click Cancel to terminate the installation process.
Click Next.
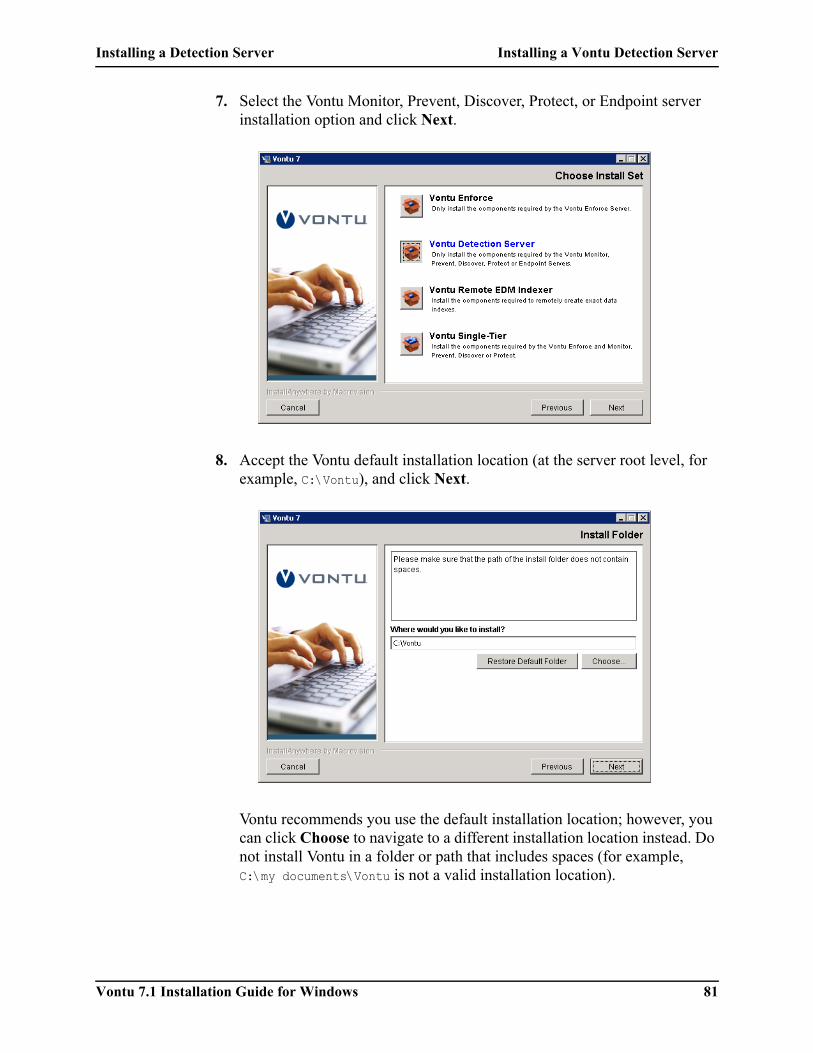
Installing a Detection Server Installing a Vontu Detection Server
Vontu 7.1 Installation Guide for Windows 81
7. Select the Vontu Monitor, Prevent, Discover, Protect, or Endpoint server installation option and click Next.
8. Accept the Vontu default installation location (at the server root level, for example, C:\Vontu), and click Next.
Vontu recommends you use the default installation location; however, you can click Choose to navigate to a different installation location instead. Do not install Vontu in a folder or path that includes spaces (for example, C:\my documents\Vontu is not a valid installation location).

Installing a Detection Server Installing a Vontu Detection Server
Vontu 7.1 Installation Guide for Windows 82
9. Enter the System Account user name and password for the Vontu services, confirm the password, and then click Next.
10. Enter the Transport Configuration settings and click Next.
a. In Port, accept the default port number on which the detection server should accept connections from the Enforce Server. You can change this default to any port higher that port 1024.
b. In Network Interface (Bind Address), enter which detection server network interface to use to communicate with the Enforce Server. If there is only one network interface, leave this field blank.

Installing a Detection Server Installing a Vontu Detection Server
Vontu 7.1 Installation Guide for Windows 83
11. When installing a detection server, you must choose the same system clock synchronization method that you chose when you installed your Enforce Server.
If you previously chose Vontu to configure time synchronization between the Vontu Enforce Server and all other Vontu servers, select Configure NTP and click Next.
If you previously chose to use a different synchronization method (external to Vontu), leave the Configure NTP unselected and click Next.
12. You have completed entering the Vontu detection server installation settings. Review the Pre-installation Summary screen to confirm your installation configuration.
To change settings, use the Previous button to return to the appropriate screen to make a change.
To confirm the settings and start the installation, click Install.

Installing a Detection Server Installing a Vontu Detection Server
Vontu 7.1 Installation Guide for Windows 84
13. The Installing Vontu screen appears and displays an installation progress bar.
14. The Installation Complete screen appears.
Select Yes, restart my system and click Done to shutdown all applications and restart the Detection Server.
Select No, I will restart my system myself and click Done to end the Vontu installation process and return to the desktop. You must restart the Detection Server machine before you add it to your Enforce Server.

Installing a Detection Server Installing a Vontu Detection Server
Vontu 7.1 Installation Guide for Windows 85
Vontu recommends you restart the detection server machine immediately after the installation process is complete.
15. Verify the detection server installation, see “To verify the detection server installation:” on page 85.
16. You must add and configure the detection server using your Enforce Server administration console. See “Adding and Configuring the Vontu Detection Servers” section on page 106.
To verify the detection server installation:
1. Confirm the Vontu Services (VontuMonitor.exe and VontuUpdate.exe), PacketCapture.exe, and at least two Java .exe processes are running.
2. If the Vontu services do not start, check log files for possible issues (for example, connectivity, password, or database access issues). The Oracle logs can be found in <installdir>:\<ORACLE_HOME>\admin\protect\. The Vontu logs can be found in <installdir>\Vontu\ and <installdir>:\vontu \protect\logs.
Vontu_7_InstallLog.log
VontuIncidentPersister.log
VontuManager.log
VontuMonitorController.log
The Vontu installation process creates a log file, Vontu_7_InstallLog.log, which is stored in the Vontu installation folder (for example, c:\Vontu\). You can use this log file to view the status of installed Vontu components.

Installing a Detection Server Installing a Vontu Detection Server
Vontu 7.1 Installation Guide for Windows 86
VontuNotifier.log
VontuUpdate.log

Vontu 7.1 Installation Guide for Windows 87
Chapter 7Installing a Single-Tier Vontu Server
This chapter describes how to install at single-tier Vontu installation. For a description of the Vontu single-tier installation, see “Single-Tier Installation” on page 14.
The following topics are covered:
“Downloading the Vontu Software”, see page 88.
“Installing the Vontu Single-Tier Server”, see page 89.
Installing a Single-Tier Vontu Server Downloading the Vontu Software
Vontu 7.1 Installation Guide for Windows 88
Downloading the Vontu SoftwareDownload the Vontu software listed in Table 7-1 from the support.vontu.com FTP site. You will need a Vontu customer support user name and password.
If you have problems accessing the FTP site or downloading the software, contact your Vontu representative.
Table 7-1: Vontu Software and Download Locations
Software Download Location Filename
WinPCap version 3.0 /pub/Vontu_7_Windows/Vontu_7.1/Third_Party/
WinPcap_3_0.exe
Vontu software /pub/Vontu_7_Windows/Vontu_7.1/NewInstalls/
ProtectInstaller_7.1.exe
The WinPCap software is only required for the Network Monitor Server; however, Vontu recommends you install WinPCap no matter which type of detection server you plan to install and configure.

Installing a Single-Tier Vontu Server Installing the Vontu Single-Tier Server
Vontu 7.1 Installation Guide for Windows 89
Installing the Vontu Single-Tier Server
To install the Vontu single-tier server:
1. Log in (or remote log in) as Administrator to the machine where you will install the Vontu single-tier installation.
2. Install WinPcap_3_0.exe on the server before installing the Vontu single-tier server.
a. Copy WinPcap_3_0.exe to a local drive.
b. Double-click on WinPcap_3_0.exe and follow the on screen installation instructions.
3. Copy the Vontu installer (ProtectInstaller_7.1.exe) to a local directory.
4. Choose Start>Run and browse to the folder where you copied the ProtectInstaller_7.1.exe file.
5. Double-click on ProtectInstaller_7.1.exe to select the file, and then click OK.
The Vontu Introduction screen displays.
Vontu strongly recommends that you disable any antivirus, pop-up blocker, and registry protection software before you begin the Vontu installation process.

Installing a Single-Tier Vontu Server Installing the Vontu Single-Tier Server
Vontu 7.1 Installation Guide for Windows 90
6. Throughout the Vontu installation process, the right side of the screen displays information and installation options. Use the following buttons to navigate through the installation process:
Click Next to display the next installation screen.
Click Previous to return to the previous installation screen.
Click Cancel to terminate the installation process.
Click Next.
7. Select the Vontu Single-Tier installation option and click Next.
8. Enter your Vontu product license key and click Next.

Installing a Single-Tier Vontu Server Installing the Vontu Single-Tier Server
Vontu 7.1 Installation Guide for Windows 91
9. Accept the Vontu default installation location, (at the server root level, for example, C:\Vontu), and click Next.
Vontu recommends you use the default installation location; however, you can click Choose to navigate to a different installation location instead. Do not install Vontu in a folder or path that includes spaces (for example, C:\my documents\Vontu is not a valid installation location).
10. Select a radio button to choose where to create product icons. Optionally, select Create Icons for All Users to make the product icons available in the same location for all users of the Enforce Server. Click Next.

Installing a Single-Tier Vontu Server Installing the Vontu Single-Tier Server
Vontu 7.1 Installation Guide for Windows 92
11. Enter a System Account user name and password for the Vontu services, confirm the password, and then click Next.
12. Enter an Administrator Account password to access the Vontu Enforce Server administration console, confirm the password, and then click Next.
The Administrator password must contain a minimum of 8 characters. You can change the Administrator password from the Enforce Server administration console at any time.
13. Enter the Transport Configuration settings. In Port, accept the default port number on which the detection server should accept connections from the

Installing a Single-Tier Vontu Server Installing the Vontu Single-Tier Server
Vontu 7.1 Installation Guide for Windows 93
Enforce Server and click Next. You can change the default port to any port higher than 1024.
14. Enter the Oracle Database Server host name or IP address and the Oracle Database Server Listener Port, then click Next.

Installing a Single-Tier Vontu Server Installing the Vontu Single-Tier Server
Vontu 7.1 Installation Guide for Windows 94
15. Enter the Vontu Enforce Server database user name and password, confirm the password, enter the database SID, and then click Next.
You created the Vontu Enforce Server database SID, user name, and password in steps 7 and 9 of the “To create the Vontu database:” section on page 52.
16. If you want Vontu to configure time synchronization between the Vontu Enforce Server and all other Vontu servers, select Configure NTP and click Next.
Vontu recommends the system clocks for the Enforce Server and all other Vontu servers to be synchronized. Vontu recommends using the Network

Installing a Single-Tier Vontu Server Installing the Vontu Single-Tier Server
Vontu 7.1 Installation Guide for Windows 95
Time Protocol (NTP) service; however, you can choose an alternative method to synchronize the Vontu server’s system clocks.
If you select the Configure NTP checkbox, the Vontu installer designates the Enforce Server as the NTP server and all other Vontu servers as its clients. You must choose the same synchronization method when installing all Vontu servers.
17. You have completed entering the Vontu single-tier installation settings. Review the Pre-installation Summary screen to confirm your installation configuration.
To change settings, use the Previous button to return to the appropriate screen to make a change.
To confirm the settings and start the installation, click Install.

Installing a Single-Tier Vontu Server Installing the Vontu Single-Tier Server
Vontu 7.1 Installation Guide for Windows 96
18. The Installing Vontu screen appears and displays an installation progress bar.
19. The Installation Complete screen appears.
Select Yes, restart my system and click Done to shutdown all applications and restart the Enforce Server.
Select No, I will restart my system myself and click Done to end the Vontu installation process and return to the desktop. You must restart the Enforce Server machine before you use the Enforce Server.
Vontu recommends you restart the Enforce Server machine immediately after the installation process is complete.

Installing a Single-Tier Vontu Server Installing the Vontu Single-Tier Server
Vontu 7.1 Installation Guide for Windows 97
20. Verify the Vontu single-tier installation, see “To verify the Vontu single-tier installation:” on page 97.
21. You must import a Vontu solution pack immediately after installing the Vontu single-tier server, and before changing any Vontu single-tier server configurations. See “Importing a Vontu Solution Pack” section on page 73.
To verify the Vontu single-tier installation:
1. Confirm that Oracle Services (OracleTNSListener and OracleServiceProtect) automatically start upon reboot.
2. Confirm the Vontu Services (Vontu Manager, Vontu Incident Persister, Vontu Notifier, Vontu Update, Vontu Monitor Controller, and Vontu Monitor) automatically start upon reboot and that they are running as the Protect or Protect_update user.
3. If Vontu services are not started, check the log files for possible issues (for example, connectivity, password, or database access issues). The Oracle logs can be found in <installdir>:\<ORACLE_HOME>\admin\protect\. The Vontu logs can be found in <installdir>\Vontu\ and <installdir>:\vontu\protect\logs.
Vontu_7_InstallLog.log
VontuIncidentPersister.log
VontuManager.log
VontuMonitorController.log
VontuNotifier.log
VontuUpdate.log
The Vontu installation process creates a log file, Vontu_7_InstallLog.log, which is stored in the Vontu installation folder (for example, c:\Vontu\). You can use this log file to view the status of installed Vontu components.
If the Vontu Services are running as the Windows system user, uninstall Vontu Enforce Server and reinstall it using a password for the Protect user that meets the security requirements.

Vontu 7.1 Installation Guide for Windows 98
Chapter 8Installing Vontu Endpoint Agent
To use Vontu to protect data at the endpoint, you must install and configure at least one Endpoint Server, create policies and apply them to the server, and then deploy Endpoint Agents to the desired endpoints. (You can update or create new policies after you install the Endpoint Agents.) For details on installing an Endpoint Server, see “Installing a Detection Server” on page 77. For details on adding and configuring an Endpoint Server, see “Adding and Configuring the Vontu Detection Servers” on page 106. For details on creating policies and policy groups, see the Vontu online help.
This chapter describes how to deploy Endpoint Agents to your endpoints. After you install the Agents, you can monitor them on the Enforce Server administration console.
The following topics are covered:
“Obtaining the Vontu Software”, see page 99.
“System Requirements”, see page 100.
“Installing Endpoint Agents”, see page 101.
“Uninstalling Endpoint Agents”, see page 105.
If you want to change the default Vontu security configuration for the Endpoint Server and Endpoint Agents (create unique keys or change the key size), you must make these security configuration settings before deploying Endpoint Agents. See “Vontu Endpoint Server and Endpoint Agent Security” on page 33.

Installing Vontu Endpoint Agent Obtaining the Vontu Software
Vontu 7.1 Installation Guide for Windows 99
Obtaining the Vontu SoftwareTo obtain the Vontu Agent software, you need to contact your Vontu representative. You will be given the zip file, VontuWindowsAgentInstaller_7.1.zip, which contains the following files:
setup.exe—the Endpoint Agent executable file.
VontuAgentInstaller.msi—the Endpoint Agent MSI file.
install_agent.bat—a sample batch file to install the Endpoint Agent using the VontuAgentInstaller.msi file.
uninstall_agent.bat—a sample batch file to uninstall the Endpoint Agent using the VontuAgentInstaller.msi file.

Installing Vontu Endpoint Agent System Requirements
Vontu 7.1 Installation Guide for Windows 100
System RequirementsThis section describes system requirements for machines running Endpoint Agents.
HardwareEndpoint Agents hardware requirements:
300-megahertz (MHz) processor (Intel Pentium/Celeron or AMD K6/Athlon/Duron)
256 megabytes (MB) of RAM
1.5 gigabytes (GB) of available space on the hard disk
SoftwareEndpoint Agents software requirements:
Windows XP Pro, SP2

Installing Vontu Endpoint Agent Installing Endpoint Agents
Vontu 7.1 Installation Guide for Windows 101
Installing Endpoint AgentsThis section describes how to install Endpoint Agents. You can install Endpoint Agents manually or using system management software.
Before you begin, make sure you have installed and configured an Endpoint Server. For details on installing an Endpoint Server see “Installing a Detection Server” on page 77. For details on adding and configuring an Endpoint Server see “Adding and Configuring the Vontu Detection Servers” on page 106.
What Gets InstalledVontu installs the following components on each endpoint:
A driver (vfsmfd.sys) that detects activity in the endpoint file system and relays the information to the Vontu Agent service. This driver is installed at <WindowsDir>\System32\drivers. For example, C:\windows\System32\drivers.
The Vontu Agent service that receives information from the driver and relays it to the Endpoint Server. When creating the installation command (as described in “Installation with System Management Software” on page 101), you must use the SERVICENAME parameter to designate the name under which this service appears in the endpoint computer’s task manager and service list.
Vontu creates the following files when you start the Vontu Agent service:
A shadow cache (ShadowCache.cf), created in the installation directory, which stores copies of files the end user copies or downloads to the endpoint hard drive or to USB devices.
A log file (<SERVICENAME>.log), created in the installation directory. For example, if you set the SERVICENAME parameter to VontuAgent, then the log file name would be VontuAgent.log.
Other Security Applications and the Endpoint AgentBefore installing Vontu Endpoint Agent, identify all security applications currently running on your endpoint computers and configure those applications to allow Vontu Endpoint Agent to function fully. Some applications, such as Norton Internet Security and Trend Micro PC-cillin Internet Security, generate alerts when they detect the installation or initial launch of Vontu Endpoint Agent. Such alerts reveal the presence of Vontu Endpoint Agent and they sometimes let users block the Vontu Endpoint Agent entirely.
Installation with System Management SoftwareYou can use your system management software (SMS) to deploy Endpoint Agents to endpoint computers. This section describes the information you need for

Installing Vontu Endpoint Agent Installation with System Management Software
Vontu 7.1 Installation Guide for Windows 102
configuring your SMS to deploy Endpoint Agents. For details on entering this information into your particular SMS, see your SMS documentation.
When configuring your SMS, specify the following information:
VontuAgentInstaller.msi—name of the Endpoint Agent MSI package. (This package is included in the VontuWindowsAgentInstaller_7.1.zip file, available at ftp://support.vontu.com.)
Installation parameters:
TARGETDIR—(required) the installation directory. (Default is <INSTALLDIR>\Vontu\Endpoint Agent. For example, C:\Program Files\Vontu\Endpoint Agent.)
ENDPOINTSERVER—(required) the hostname or IP address of the Endpoint Server. For example, type server.company.com. This value must be consistent with the Agent Listener>Bind Address (Host/IP) value you set for the Endpoint Server on the Vontu Enforce Server Configure Server page.
PORT— (required) the number of the port over which the Endpoint Server communicates with Endpoint Agents. Use the port you specified in the Vontu Enforce Server administration console when you configured the Endpoint Server. See “Configuring an Endpoint Server” step 2.b on page 114. For example, type 8000.
SERVICENAME—(required) the name you assign to the Vontu Agent service. This is the name under which the service will appear in the endpoint computer’s task manager and service list.
KEY—(optional) the authentication key that the Vontu Agent and Endpoint Server use to establish a secure connection. Vontu Agents include a default authentication key, but you can also create your own key using the endpointkeytool utility (as described in the Vontu 7.1 Utility Guide). To use your own key, specify it with the KEY parameter during deployment and installation. If you decide to specify the key after after installing Vontu Agents, you must reinstall the Agents to specify the key.
ARPSYSTEMCOMPONENT—(optional) the parameter that prevents Vontu Agent from appearing in the endpoint computer’s Add or Remove Programs list. Set this parameter to “1” to prevent Vontu Agent from appearing in the list. If you leave this parameter out (or if you leave the value blank), Vontu Agent will appear in the Add or Remove Programs list.
When you deploy Endpoint Agents, your SMS issues a command similar to the following on the specified endpoints:msiexec /i VontuAgentInstaller.msi /q TARGETDIR="C:\Program Files\Vontu\Endpoint Agent\" ENDPOINTSERVER="server.company.com" PORT="8000" SERVICENAME="endpoint" ARPSYSTEMCOMPONENT="1"

Installing Vontu Endpoint Agent Manual Installation
Vontu 7.1 Installation Guide for Windows 103
—where msiexec is the Windows command for executing MSI packages; /i takes the name of the package; /q specifies a silent install; TARGETDIR, ENDPOINTSERVER, PORT, and SERVICENAME are the Vontu-required parameters; and ARPSYSTEMCOMPONENT is the optional parameter preventing Vontu Agent from appearing in the endpoint computer’s Add or Remove Programs list. (Note that Vontu ships with an example installation command in <vontu_install_dir>\Endpoint\install_agent.bat.)
Manual InstallationThis section describes how to install Endpoint Agents manually on your endpoints.
To install Endpoint Agents manually:
1. Log in to the endpoint computer as administrator.
2. Copy the Endpoint Agent setup.exe file to endpoint computer and double-click on setup.exe.
The Endpoint Agent installation wizard starts up, displaying the Endpoint Agent Setup screen.
3. Click Next to accept the copyright agreement.
4. Click Next to accept the license agreement.
If your computer is not already running Windows Installer 3.1, the Endpoint Agent installer initiates the installation of that program. In this case, you are prompted to restart the computer after the Windows Installer installation. Upon restart, the Endpoint Agent installer resumes.
5. Type the appropriate values in the following fields:
Endpoint Server— (required) the hostname or IP address of the Endpoint Server. For example, type server.company.com. This value must be consistent with the Agent Listener>Bind Address (Host/IP) value you set for the Endpoint Server on the Vontu Enforce Server Configure Server page.
Port—(required) the number of the port over which the Endpoint Server communicates with Endpoint Agents. Use the port you
After installing Endpoint Agents, the Vontu Endpoint Agent service automatically starts on each endpoint computer. After you start this service on all endpoints, log in to the Enforce Server and go to Administration>Agent Management>Overview. Verify that the newly-installed Agents are registered (in other words, that they appear in the list on this screen).

Installing Vontu Endpoint Agent Manual Installation
Vontu 7.1 Installation Guide for Windows 104
specified in the administration console when configuring the Endpoint Server. For example, type 8000 (the default value in the administration console).
Service Name—(required) the name you assign to the Vontu Agent service. This is the name under which the service will appear in the endpoint computer’s task manager and service list.
Key—(optional) the authentication key that the Vontu Agent and Endpoint Server use to establish a secure connection. Vontu Agents include a default authentication key, but you can also create your own key using the endpointkeytool utility (as described in the Vontu 7.1 Utility Guide). To use your own key, specify it with the KEY parameter during deployment and installation. If you decide to specify the key after installing Vontu Agents, you must reinstall the Agents to specify the key.
Click Next.
6. Accept the default installation directory or enter a new one, and then click Next. (Default is C:\Program Files\Manufacturer\Endpoint Agent.)
7. On the Confirm Installation screen that appears, click Next.
The installation takes a couple moments. When it finishes, the Installation Complete screen appears.
8. Click Close.
9. Go to Start>Control Panel, double-click Administrative Tools, and then double-click Services. Find the Vontu Agent service (listed under the name you typed in the Service Name field during installation) and make sure it is running.
Endpoint Agent is now monitoring the endpoint.
10. Log in to the Enforce Server and go to Administration>Agent Management>Overview. Verify that the Agent is registered (in other words, that it appears in the list).

Installing Vontu Endpoint Agent Uninstalling Endpoint Agents
Vontu 7.1 Installation Guide for Windows 105
Uninstalling Endpoint AgentsThis section describes how to uninstall Endpoint Agents. You can uninstall Agents manually or using system management software.
Uninstallation with System Management SoftwareYou can use your system management software (SMS) to uninstall Endpoint Agents from endpoint computers. This section describes the information you need for configuring your SMS to uninstall Endpoint Agents. For details on entering this information into your particular SMS, see your SMS documentation.
When you uninstall Endpoint Agents, your SMS issues a command similar to the following on the specified endpoints:msiexec /uninstall VontuAgentInstaller.msi /q
—where msiexec is the Windows command for executing MSI packages; /uninstall takes the name of the package; and /q specifies a silent uninstall.
Manual UninstallationThis section describes how to uninstall Endpoint Agents manually. Manual uninstallation is only possible if during deployment you configured the Endpoint Agent to appear in the endpoint computer’s Add or Remove Programs list. (For details on this configuration option and others, see “Installing Endpoint Agents” on page 101.)
To uninstall Endpoint Agent manually:
1. Go to Start>Control Panel and double-click Add or Remove Programs.
2. Select Endpoint Agent and click Remove.
Vontu 7.1 Installation Guide for Windows 106
Chapter 9Adding and Configuring the Vontu Detection Servers
This chapter describes how to add and configure a Vontu detection server. Before adding and configuring a detection server, you must install the detection server. See “Installing a Detection Server” on page 77.
The following topics are covered:
“Logging In To the Enforce Server”, see page 107.
“Adding and Configuring a Detection Server”, see page 108.
“Configuring Your Firewall”, see page 116.
“Adding Vontu Protect Functionality”, see page 120.
Adding and Configuring the Vontu Detection Servers Logging In To the Enforce Server
Vontu 7.1 Installation Guide for Windows 107
Logging In To the Enforce ServerYou add a Detection Server using the Vontu Enforce Server administration console. To access the administration console you must first log in to the Enforce Server.
To log in to the Vontu Enforce Server administration console:
1. Log in (or remote log in) as Administrator to the Vontu Enforce Server machine.
2. Select Start>All Programs>Vontu 7>Vontu Enforce.
3. On the Vontu login screen, enter the Administrator username and password.
a. In Username, enter Administrator.
b. In Password, enter the Administrator password.
If you installed a two-tier Vontu installation, you created the Administrator password in step 10 of the “To install the Vontu Enforce Server:” section on page 64.
If you installed a single-tier Vontu installation, you created the Administrator password in step 12 of the “To install the Vontu single-tier server:” section on page 89.
4. Click Login.
The Vontu Enforce Server administration console appears and displays an Executive Summary report.
Adding and Configuring the Vontu Detection Servers Adding and Configuring a Detection Server
Vontu 7.1 Installation Guide for Windows 108
Adding and Configuring a Detection ServerBefore adding and configuring a detection server, you must install the detection server. See “Installing a Detection Server” on page 77. Once the Detection Server is installed, you use the Vontu Enforce Server administration console to add the detection server, then configure it to be the Detection Server of your choice. For a list of the different Vontu detection servers, see Table 6-2, “Vontu Detection Servers,” on page 79.
To add a Vontu detection server:
1. On the left navigation panel under Administration>System, click Overview.
The System Overview page appears.
2. Click Add Server.
3. Select the type of detection server to add and click Next. The detection server options are:
Vontu Network Monitor
Vontu Discover or Vontu Protect
Vontu Email Prevent
Vontu Web Prevent
Vontu Endpoint
(For more information about the types of detection servers, see Table 6-2, “Vontu Detection Servers,” on page 79.)
The Configure Server page appears. The information displayed on the Configure Server page depends on which type of server you selected.
To configure a Network Monitor Server, see “Configuring a Network Monitor Server” section on page 109.
To configure a Discover Server or Protect Server, see “Configuring a Discover Server or a Protect Server” section on page 110.
To configure a Email Prevent Server, see “Configuring an Email Prevent Server” section on page 111.
To configure a Web Prevent Server, see “Configuring a Web Prevent Server” section on page 112.
If you want to install Vontu Protect, select the Discover Server option. Vontu Protect provides additional protection features to the Discover Server.

Adding and Configuring the Vontu Detection Servers Configuring a Network Monitor Server
Vontu 7.1 Installation Guide for Windows 109
To configure a Endpoint Server, see “Configuring an Endpoint Server” section on page 114.
4. Configure your corporate firewall to allow communication between the Enforce Server and any detection servers you have installed in your DMZ. See “Configuring Your Firewall” on page 116.
5. The Detection Server configuration is now complete; however, for some detection servers you must also perform additional steps.
Discover Server (if scanning Lotus Notes)—see “Configuring a Discover Server for Lotus Notes Targets” on page 117.
Email Prevent Server—see the Vontu 7.1 Email Prevent MTA Integration Guide.
Web Prevent Server—see your Web proxy server’s configuration guide or contact your Vontu representative for more information.
Endpoint Server—see “Vontu Security Configuration” on page 28 and see “Installing Vontu Endpoint Agent” on page 98.
Configuring a Network Monitor Server
To configure a Network Monitor Server:
1. Enter the Network Monitor Server’s General information. This information defines how the server will communicate with the Enforce Server.
a. In Name, enter a unique name for the detection server.
Vontu recommends you include the server type in the name to help you recognize its type on the System Overview page. (For example, “Network Monitor Server-HR.”)
b. In Host, enter the detection server’s host name or IP address. (If this is a single-tier installation, then click the Same as Enforce checkbox to autofill the host information.)
c. In Port, enter the port number the detection server will use to communicate with the Enforce Server. If you chose the default port when you installed the detection server, then enter 8100. However, if you changed the default port, then enter the same port number here (it can be any port higher than 1024).
2. On the Packet Capture tab, you can add settings for the Source Folder, Archive Folder, and Network Interfaces.
a. In Source Folder Override, do not enter a value. This field exists for backward compatibility with earlier versions of Vontu.

Adding and Configuring the Vontu Detection Servers Configuring a Discover Server or a Protect
Vontu 7.1 Installation Guide for Windows 110
b. In Archive Folder, do not enter a value at this time.
c. In Network Interfaces, do not enter a value at this time. Network Interfaces section will be empty until a detection server is fully configured and started for the first time. Return to this page later to configure the Network Interfaces.
d. In the Protocol section, click the check box next to one or more protocols to select those protocols for monitoring by this server.
You can click on the edit icon to customize the protocol and click Save.
3. On the SMTP Copy Rule tab, you can add the Source Folder Override setting.
a. In Source Folder Override, do not enter a value. This field exists for backward compatibility with earlier versions of Vontu.
4. Click Save.
The Server Detail page appears.
5. Review the Server Detail page to confirm the Network Monitor Server configuration, then click Done.
The System Overview page appears and displays the newly added Network Monitor Server. The server Status should display as Starting or Running.
Configuring a Discover Server or a Protect Server
To configure a Discover Server or a Protect Server:
1. Enter the Discover Server or Protect Server’s General information. This information defines how the server will communicate with the Enforce Server.
a. In Name, enter a unique name for the detection server.
Vontu recommends you include the detection server type in the name to help you recognize its type on the System Overview page. For example, “Discover Server-HR.”)
b. In Host, enter the detection server’s host name or IP address. (If this is a single-tier installation, then click the Same as Enforce checkbox to autofill the host information.)
c. In Port, enter the port number the server will use to communicate with the Enforce Server. If you chose the default port when you installed

Adding and Configuring the Vontu Detection Servers Configuring an Email Prevent Server
Vontu 7.1 Installation Guide for Windows 111
the detection server, then enter 8100. However, if you changed the default port, then enter the same port number here (it can be any port higher than 1024).
2. Click Save.
The Server Detail page appears.
3. Review the Server Detail page to confirm the Discover Server or Protect Server configuration, then click Done.
The System Overview page appears and displays the newly added Discover Server. The server Status should display as Starting or Running.
Configuring an Email Prevent Server
To configure an Email Prevent Server:
1. Enter the Email Prevent Server’s General information. This information defines how the server will communicate with the Enforce Server.
a. In Name, enter a unique name for the detection server.
Vontu recommends you include the server type in the name to help you recognize its type on the System Overview page. (For example, “Email Prevent Server-HR.”)
b. In Host, enter the detection server’s host name or IP address. (If this is a single-tier installation, then click the Same as Enforce checkbox to autofill the host information.)
c. In Port, enter the port number the detection server will use to communicate with the Enforce Server. If you chose the default port when you installed the detection server, then enter 8100. However, if you changed the default port, then enter the same port number here (it can be any port higher than 1024).
2. Click Save.
The Server Detail page appears.
3. Review the Server Detail page to confirm the Email Prevent Server configuration, then click Done.
The System Overview page appears and displays the newly added Email Prevent Server. The server Status should display as Starting or Running.

Adding and Configuring the Vontu Detection Servers Configuring a Web Prevent Server
Vontu 7.1 Installation Guide for Windows 112
4. You must integrate the Email Prevent Server into your organization’s email message stream. For information on how to do this, see the Vontu 7.1 Email Prevent MTA Integration Guide.
Configuring a Web Prevent Server
To configure a Web Prevent Server:
1. Enter the Web Prevent Server’s General information. This information defines how the server will communicate with the Enforce Server.
a. In Name, enter a unique name for the detection server.
Vontu recommends you include the server type in the name to help you recognize its type on the System Overview page. (For example, “Web Prevent Server-HR.”)
b. In Host, enter the detection server’s host name or IP address. (If this is a single-tier installation, then click the Same as Enforce checkbox to autofill the host information.)
c. In Port, enter the port number the detection server will use to communicate with the Enforce Server. If you chose the default port when you installed the detection server, then enter 8100. However, if you changed the default port, then enter the same port number here (it can be any port higher than 1024).
2. On the ICAP tab, you can add settings for Trial Mode, Request Filtering, Response Filtering, and Connection.
a. Select Trial Mode to test the prevention capability without actually blocking requests. When this check box is selected, the incidents are generated and appear as blocked in the incident reports, but no transmissions are actually blocked.
b. In the Request Filtering section, you can add settings for filtering requests.
In Ignore Requests Smaller Than, enter the minimum size of the body of HTTP requests you want the server to inspect. The maximum value is 4096 bytes.
Select Ignore Requests without Attachments to inspect only HTTP requests containing attachments.
In Ignore Requests to Hosts or Domains, enter the host names or domains to which you want to ignore requests.

Adding and Configuring the Vontu Detection Servers Configuring a Web Prevent Server
Vontu 7.1 Installation Guide for Windows 113
In Ignore Requests from User Agents, enter the names of user agents from which you want to ignore requests.
c. In the Response Filtering section, you can add settings for filtering responses.
In Ignore Responses Smaller Than, enter the minimum size of the body of HTTP responses you want the server to inspect.
In Inspect Content Type, add additional content types that you want the server to the inspect.
In Ignore Responses from Hosts or Domains, enter the names of user agents from which you want to ignore responses.
In Ignore Responses to User Agents, enter the names of user agents from which you want to ignore responses.
d. In the Connection section, you can add connection settings.
In TCP Port, accept the default TCP port number or enter a different port number on which you want this detection server to listen to ICAP requests. The same value must be configured on the HTTP proxy sending ICAP requests to this server. The recommended (default) value is 1344.
In Maximum Number of Connections, accept the default maximum number value (25), or enter a different maximum number value, of simultaneous ICAP connections from the HTTP proxy you want to allow.
In Connection Backlog, accept the default maximum number value (2), or enter a different maximum number value, of waiting connections you want to allow. Each waiting connection means that a user is waiting at his or her browser. The minimum value is 1.
3. Click Save.
The Server Detail page appears.
4. Review the Server Detail page to confirm the Web Prevent Server configuration, then click Done.
The System Overview page appears and displays the newly added Web Prevent Server. The server Status should display as Starting or Running.

Adding and Configuring the Vontu Detection Servers Configuring an Endpoint Server
Vontu 7.1 Installation Guide for Windows 114
Configuring an Endpoint Server
To configure an Endpoint Server:
1. Enter the Endpoint Server’s General information. This information defines how the Endpoint Server will communicate with the Enforce Server.
a. In Name, enter a unique name for the detection server.
Vontu recommends you include the server type in the name to help you recognize its type on the System Overview page. (For example, “Endpoint Server-HR.”)
b. In Host, enter the host name or IP address the Endpoint Server will use to communicate with the Enforce Server. (If this is a single-tier installation, then click the Same as Enforce checkbox to autofill the host information.)
c. In Port, enter the port number the Endpoint Server will use to communicate with the Enforce Server. If you chose the default port when you installed the detection server, then enter 8100. However, if you changed the default port, then enter the same port number here (it can be any port higher than 1024).
2. On the Endpoint Server tab, you can add the Endpoint Server host and port setting. This information defines how the Endpoint Server will communicate with Endpoint Agents.
a. In Host, enter the host name or IP address the Endpoint Server will use to communicate with Endpoint Agents.
b. In Port, accept the default port number (8000) or enter a different port number the Endpoint Server will communicate with Endpoint Agents. You must use the same port number when you configure an Endpoint Agent.
3. On the Agent tab, you can add settings for removable media, built-in storage, and Endpoint Agent/Endpoint Server communication.
a. In the Removable Media Performance Filters section, enter settings for ignore files smaller than, ignore files larger than, and enter settings for ignore and include file types.

Adding and Configuring the Vontu Detection Servers Configuring an Endpoint Server
Vontu 7.1 Installation Guide for Windows 115
b. In the Built-in Storage Performance Filters section, select Monitor local Filesystem for sensitive download to inspect data on built-in storage devices.
c. In the Built-in Storage Performance Filters section, enter settings to ignore file sizes smaller or larger than, ignore and include files in path settings, and ignore and include file types.
d. In the Communication: Agent - Endpoint Server section, enter bandwidth throttle and shadow cache settings.
In Bandwidth Throttle, accept the default value (5) or enter a different bandwidth value in mbps.
For Shadow Cache Size, choose shadow cache size by % of total (accept the 5% default value or enter a different value) or shadow cache size by bytes (enter the number of bytes).
4. Click Save.
The Server Detail page appears.
5. Review the Server Detail page to confirm the Endpoint Server configuration, then click Done.
The System Overview page appears and displays the newly added Endpoint Server. The server Status should display as Starting or Running.

Adding and Configuring the Vontu Detection Servers Configuring Your Firewall
Vontu 7.1 Installation Guide for Windows 116
Configuring Your FirewallThis section describes firewall requirements for Vontu 7. The instructions in this section assume your Enforce Server is installed inside your corporate LAN behind a firewall and that your detection servers (for example, your Network Monitor Servers) are installed in the DMZ. If this is the case, update your corporate firewall settings as follows:
Allow connections from the Enforce Server on the corporate network to the detection servers in the DMZ. Configure your firewall to accept connections on the port you entered when installing the detection servers. By default, the Enforce Server and the detection servers communicate over port 8100, but you can configure Vontu to use any port higher than 1024. You should use the same port number for all your detection servers.
Allow Windows Remote Desktop Client connections (TCP port 3389). This can be useful for setup purposes.
Review your firewall settings and close any ports no longer required for communication between the Enforce Server and the detection servers. In previous versions of Vontu, port assignment was random; therefore, all ports over 1024 had to be open to enable communication between the Enforce Server and the detection servers. In Vontu 7, the servers communicate over a single port number. (By default, this is port 8100, though you can configure Vontu to use any port higher than 1024.) Since Vontu no longer requires all ports over 1024 to be open, you should adjust your firewall settings accordingly.
Adding and Configuring the Vontu Detection Servers Configuring a Discover Server for Lotus
Vontu 7.1 Installation Guide for Windows 117
Configuring a Discover Server for Lotus Notes Targets
To use the Discover Server to scan a Lotus Notes target, you need to perform additional configuration steps. The Discover Server can either access Domino servers directly (non-native mode) using Domino Internet Inter-Orb Protocol (DIIOP) or go through a Lotus Notes client (native mode). Each mode has its own configuration procedure.
Scanning Lotus Notes using the non-native modeThe Discover Server accesses Domino servers directly using DIIOP and HTTP. Before the Discover Server can successfully scan Domino servers and databases using DIIOP, the Lotus Notes administrator must perform the following tasks.
To directly scan Domino servers (non-native):
1. Add two Lotus Notes .jar files (Notes.jar and NSCO.jar) to the Discover Server’s <drive>:\Program Files\Vontu\Protect\plugins directory.
a. On a machine where the Lotus Notes 6.5 client is installed, go to the Lotus Notes installation directory usually located at <drive>:\Program Files\Lotus\Notes.
b. Locate the Notes.jar and NSCO.jar files, then copy and paste these files into the <drive>:\Program Files\Vontu\Protect\plugins directory on the Discover Server.
2. Start the HTTP service on the Domino server being scanned.
3. Configure the “Allow HTTP connections to browse databases” setting to ‘true’.
4. Start the DIIOP service on the Domino server being scanned.
5. Create an Internet password so the scan user account can access the Domino server.
Scanning Lotus Notes using the native mode Vontu can go through the Lotus Notes client to access the Domino servers and databases owned by that Lotus Notes client. Using this native mode does not require any configuration on the Domino server; however, the following modifications must be made to the Discover Server to work through the client.
To scan Domino servers through the Lotus Notes client (native):
1. Add two Lotus Notes .jar files (Notes.jar and NSCO.jar) to the Discover Server.

Adding and Configuring the Vontu Detection Servers Configuring a Discover Server for Lotus
Vontu 7.1 Installation Guide for Windows 118
a. On a machine where the Lotus Notes 6.5 client is installed, go to the Lotus Notes installation directory usually located at <drive>:\Program Files\Lotus\Notes.
b. Locate the Notes.jar and NSCO.jar files, then copy and paste these files into the <drive>:\Program Files\Vontu\Protect\plugins directory on the Discover Server.
2. Change lotusnotescrawler.use.diiop scanning configuration property setting on the Discover Server.
a. On the Discover Server, go to <drive>:\Program Files\Vontu\Protect|config\Crawler.properties.
b. Open the Crawler.properties file in a text editor.
c. Locate the lotusnotescrawler.use.diiop parameter and change the value from ‘true’ to ‘false’.
d. Save and close the file.
3. Use IBM’s installation procedure to install the Lotus Notes client on the Discover Server.
4. Give the “protect” user write permission to the notes.ini file.
a. Locate the notes.ini file at <drive>:\Program Files\Lotus\Notes.
b. Right-click on the notes.ini file and select the Properties option.
c. Select the Security tab.
d. In the Group or user names section, select the ‘protect’ user.
e. In the Permissions section, select the Write check box in the Allow column, and click OK
5. Add the Notes home directory to the PATH system variable.
a. From the Start menu, select Control Panel.

Adding and Configuring the Vontu Detection Servers Configuring a Discover Server for Lotus
Vontu 7.1 Installation Guide for Windows 119
b. Double-click on System to display the System Properties dialog box.
c. Click Environment Variables.
d. In the System variables section, scroll down the list of variables to the Path variable.
e. Double-click the Path variable to display the Edit System Variable dialog box.
f. In the Variable value field, at the end of the text string, type a semi-colon and the path to the Notes directory.
For example, ;C;\Program Files\Lotus\Notes.
g. Click OK and close all of the dialog boxes.
6. Copy the user.id file supplied by the Lotus Notes administrator to the Notes directory on the Discover Server (<drive>:\Program Files\Lotus\Notes).
Access to the Domino server and the success of scanning operations is determined by the permissions granted to this user.id file. The Lotus Notes administrator must ensure that the user.id has the proper permissions to access all files that need to be scanned.
7. Restart the Discover Server so that the changes to the server’s configuration can take effect.

Adding and Configuring the Vontu Detection Servers Adding Vontu Protect Functionality
Vontu 7.1 Installation Guide for Windows 120
Adding Vontu Protect FunctionalityVontu Protect adds protection functionality to Vontu Discover. If you purchase Vontu Protect to add to Vontu Discover, you will receive a new Vontu license key that turns on the Vontu Protect functionality. You must copy and paste this new license into the System Settings page’s Key field, see “To change the Vontu license key:” on page 120.
After adding Vontu Protect, the Discover Targets>Add File System Target page displays an extra tab called Protect. When you create a new file-system target, use this Protect tab to configure what Vontu Protect will do with files that violate your policies.
You can configure Vontu Protect to perform the following actions when incidents are found in the target file system:
Copy—Copies the target to another location. A copy of the file is made and placed wherever specified but the file is left in its original location.
Quarantine—Moves the target to the quarantine area you specify. The file is actually removed from its original location where it was found.
To copy or quarantine files, you must create response rules telling Vontu to copy or quarantine files, and then add those rules to active policies. For more information about creating response rules, see the Vontu online help’s Setting Up Response Rules topic.
Vontu Protect adds a remediation icon (copied or quarantined) to the Vontu incident list, if any response rule applied.
For more information about Vontu Protect functionality, see the Protect section of the Vontu online help’s Adding or Editing a Target topic.
To change the Vontu license key:
1. Select Settings>System Settings and click Configure.
2. On the Edit System Settings page, copy and paste the new Vontu license key into the Key field
3. Click Save.
4. Log out of the Vontu Enforce administration console and log in again.
5. Select Settings>System Settings and verify the new license description.

Vontu 7.1 Installation Guide for Windows 121
Chapter 10Getting Started
This chapter describes how to start using Vontu once you have installed the Enforce Server and at least one detection server.
The following topics are covered:
“Vontu Enforce Server Administration Console”, see page 122.
“Initial Vontu Setup”, see page 124.
Getting Started Vontu Enforce Server Administration Console
Vontu 7.1 Installation Guide for Windows 122
Vontu Enforce Server Administration ConsoleThis section describes how to log in to the Enforce Server administration console, use the online help, and outlines high-level steps for setting Vontu up to protect your data.
Logging In to the Enforce Server Administration ConsoleThis section describes how to log in to the Enforce Server administration console.
To log in to the Enforce Server administration console:
1. Log in (or remote log in) as Administrator to the Vontu Enforce Server machine.
2. Select Start>All Programs>Vontu 7>Vontu Enforce.
3. On the Vontu login screen, enter the Administrator username and password.
a. In Username, enter Administrator.
b. In Password, enter the Administrator password you created in step 10 of the “To install the Vontu Enforce Server:” section on page 64.
4. Click Login.
The Vontu Enforce Server administration console appears and displays an Executive Summary report.
Logging Out of the Enforce ServerThis section describes how to log out of the Enforce Server administration console. Before logging out, make sure you have saved any edits.
To log out:
1. Click logout at top right of the screen.
Vontu prompts you to confirm the logout.
2. Click OK.
Vontu displays a message confirming the logout was successful.

Getting Started Changing Your Password
Vontu 7.1 Installation Guide for Windows 123
Changing Your PasswordPasswords must be at least eight characters long and they are case-sensitive. If your system administrator has configured Vontu to require a strong password, you must specify a password that meets that requirement. Check with your system administrator for instructions.
When your password expires, Vontu displays the Password Renewal window the next time you try to log in. When this happens, type your old password, then type your new password once and then a second time to confirm it.
To change your password:
1. Click profile in the upper right corner of the administration console.
2. On the Edit Profile screen that appears, type your current password, then type your new password once and then a second time to confirm.
3. Click Save.
Using Online HelpTo access online help, click help in the upper right corner of any screen in the administration console. Vontu displays the help in a separate window, showing the table of contents in the left pane and context-sensitive help in the right pane.
In the Help window, you can:
Navigate through the table of contents to see any topic in the help. Click to open a help chapter, then click to close it. Click any topic to view its content in the right pane. Click or to browse through the topics in each chapter.
Click Index to look up information alphabetically.
Click Search, enter a word or phrase, and click Go to find specific words or phrases in the help.
Click Glossary to select unfamiliar terms and view their definitions.
Click Back to return to the last topic viewed.

Getting Started Initial Vontu Setup
Vontu 7.1 Installation Guide for Windows 124
Initial Vontu SetupThis section provides a high-level outline of the initial steps you need to perform to set up Vontu. It assumes that you have completed all tasks described in the previous chapters of this guide. Check off tasks as you perform each one. Each high-level step included here contains one or more cross-references to more detailed instructions.
Initial Setup Check List
Initial Setup Detailed List1. Change the Administrator's password to a unique password known only to you.
For details about changing passwords, see “Changing Your Password” on page 123.
2. Add an email address for the Administrator user account so you can be notified of system events. For details on adding an email address, open the Vontu online help and go to Administration>Users> Users> Editing the Administrator Account.
3. Add user accounts for all users who are authorized to use the system, and provide them with their login information. For details on user accounts, open the Vontu online help and look at the topics under Administration>Users.
4. Review the policy templates provided with the system to familiarize yourself with their content and data requirements. Note that, for compliance-monitoring policies based on industry standards and regulations, columns in any data profiles you use must correspond to the data requirements in the template. For details on policy management, open the Vontu online help and go to Policy Management>Policies. You can find descriptions of policy
Table 10-1: Initial setup steps
Steps to set up Vontu for the first time
Change the Administrator's password to a unique password.
Set up mail server information and add an email address for the Administrator user account so you can be notified of system events.
Review roles, users, and policy groups, and add user accounts for all users who are authorized to use the system, and provide them with their login information.
Review policies and content set up by the Solution Pack.
If you installed Vontu Discover, set up Discover targets.

Getting Started Initial Setup Detailed List
Vontu 7.1 Installation Guide for Windows 125
templates under Policy Management>Policies >Working with Policies>Policy Templates.
5. Optionally, add the data profiles that you plan to associate with policies. Note that this step is necessary only if you are licensed for data profiles and if you intend to use them in policies. For details on data profiles, open the Vontu online help and go to Policy Management>Protected Content >Exact Data.
6. If you are responsible for adding policies, add one or more policies.
If not, notify the policy administrator(s) that data profiles have been added and they can proceed with policy addition. Be sure that you have added user accounts with policy access for each policy administrator in your organization and provided them with their login information.
7. Determine your organization's incident management workflow and add incident attributes. For details, open the online help and go to Administration>Settings>Attributes.
After the initial system configuration is complete, you can continue to add data profiles, policies, and reports, and modify your settings, if desired, to suit your organization's needs.

Vontu 7.1 Installation Guide for Windows 126
Chapter 11Uninstalling Vontu
This chapter describes how to uninstall a Vontu server or a specific Vontu component.
“Uninstalling Vontu”, see page 127.
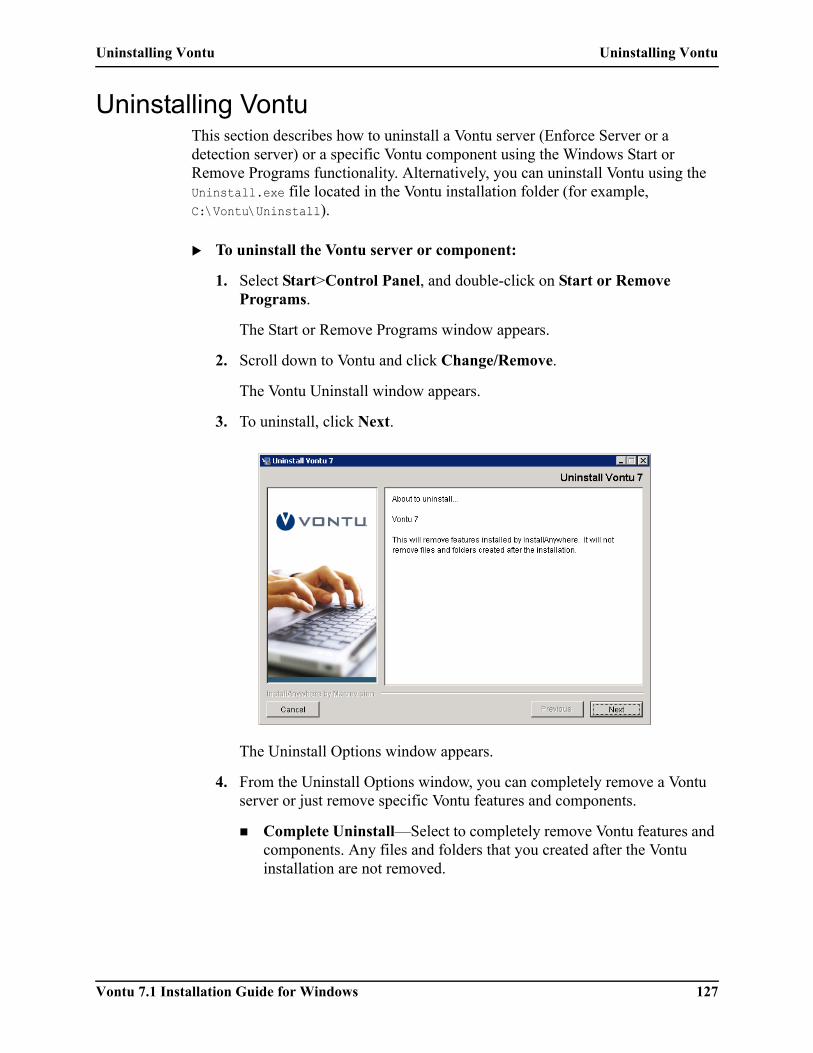
Uninstalling Vontu Uninstalling Vontu
Vontu 7.1 Installation Guide for Windows 127
Uninstalling VontuThis section describes how to uninstall a Vontu server (Enforce Server or a detection server) or a specific Vontu component using the Windows Start or Remove Programs functionality. Alternatively, you can uninstall Vontu using the Uninstall.exe file located in the Vontu installation folder (for example, C:\Vontu\Uninstall).
To uninstall the Vontu server or component:
1. Select Start>Control Panel, and double-click on Start or Remove Programs.
The Start or Remove Programs window appears.
2. Scroll down to Vontu and click Change/Remove.
The Vontu Uninstall window appears.
3. To uninstall, click Next.
The Uninstall Options window appears.
4. From the Uninstall Options window, you can completely remove a Vontu server or just remove specific Vontu features and components.
Complete Uninstall—Select to completely remove Vontu features and components. Any files and folders that you created after the Vontu installation are not removed.

Uninstalling Vontu Uninstalling Vontu
Vontu 7.1 Installation Guide for Windows 128
Uninstall Specific Features—Select to remove selected Vontu features or components.
Select an uninstall option and click Next.
5. If you selected Uninstall Specific Features, the Choose Product Features window appears. The features and components you can uninstall depends on the type of Vontu server you are uninstalling.
Uncheck the features or components you wish to uninstall and click Uninstall.
When the uninstall process is finished the Uninstall Complete window appears, see step 7 on page 129.
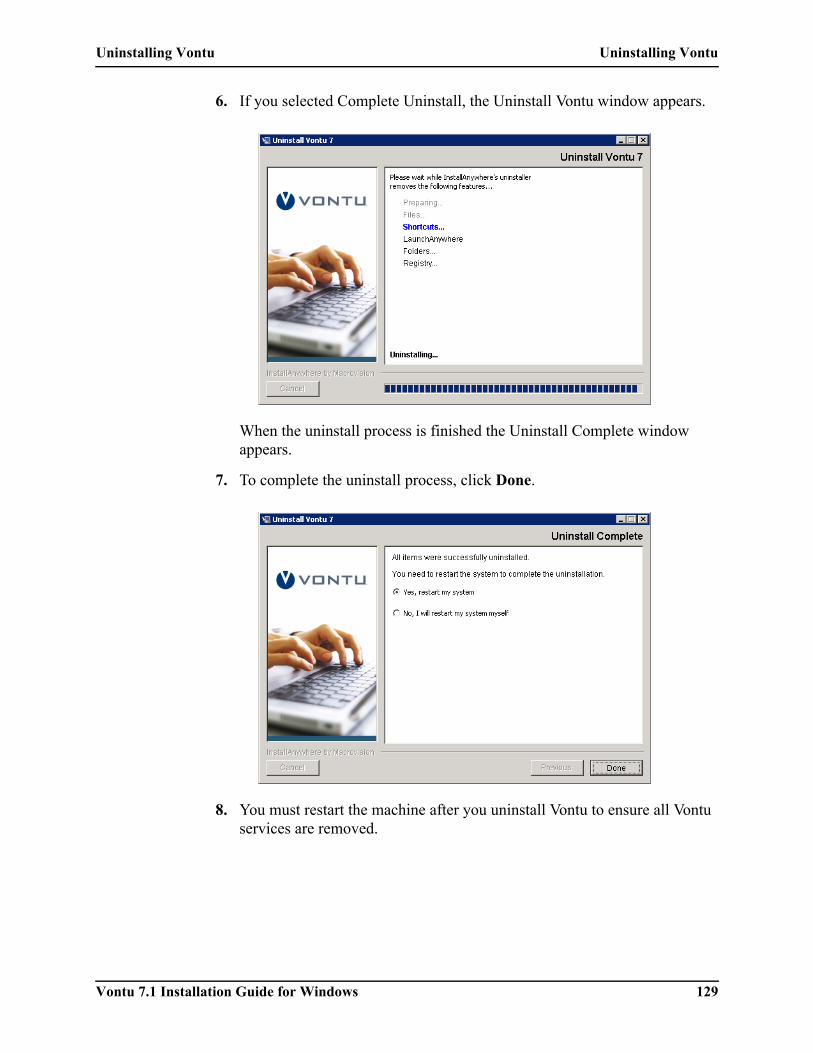
Uninstalling Vontu Uninstalling Vontu
Vontu 7.1 Installation Guide for Windows 129
6. If you selected Complete Uninstall, the Uninstall Vontu window appears.
When the uninstall process is finished the Uninstall Complete window appears.
7. To complete the uninstall process, click Done.
8. You must restart the machine after you uninstall Vontu to ensure all Vontu services are removed.

Vontu 7.1 Installation Guide for Windows 130
Appendix ASyslog Logging
You have the option to send severe Vontu system events to a syslog server. To do this you must modify the config\Manager.properties file.
To enable syslog logging:
1. Locate and open the config\Manager.properties file.
2. Uncomment the following lines:
#systemevent.syslog.host= #systemevent.syslog.port= #systemevent.syslog.format= [{0}] {1} - {2}
3. Type values for each of these parameters, as follows:
host—syslog server host or IP address
port—syslog server port number (default is 514)
format—log file message format. Specify one or more of the following indicators:
{0}—includes the name of the server on which the event occurred
{1}—includes a brief summary of the event
You can also configure Vontu to send email notifications of severe system events. For details, open the Vontu online help and go to Administration>System>Alerts>Alerts Overview.
Vontu 7.1 Installation Guide for Windows 131
{2}—includes a detailed description of the event
For example:
systemevent.syslog.host=galapagos systemevent.syslog.port=600 systemevent.syslog.format= [{0}] {1} - {2}
In this example, event records will consist of the server name in brackets, followed by a brief summary, a hyphen, and then a detailed description.