volkswagen mk4 1.8t billet engine oil dipstick &...
TRANSCRIPT

Volkswagen MK4 1.8TBillet Engine Oil Dipstick & FunnelInstallation Instructions
Proper service and repair procedures are vital to the safe, reliable operation of all motor vehicles as well as the personal safety of those performing the repairs. Standard safety procedures and precautions (including use of safety goggles and proper tools and equipment) should be followed at all times to eliminate the possibility of personal injury or improper service which could damage the vehicle or compromise its safety.

ECS TUNING 1000 SEVILLE RD. WADSWORTH, OH 44281 1.800.924.5172 WWW.ECSTUNING.COM 2
VW MK4 1.8T BILLET DIPSTICK & FUNNEL INSTALLATION ES#2975661®
Table of Contents
ES#2975662ES#2975659
ES#2966484 ES#2966488ES#2966487
BASIC SKILLS REQUIRED
SOME EXPERIENCE RECOMMENDED
INTRODUCTION
The Project:Today we’re going to install one of our billet aluminum engine oil dipstick and funnel combinations on our MK4 Volkswagen GTI 1.8T. We’re showing it on a GTI, but it’ll fit just the same on any MK4 Golf 1.8T or Jetta 1.8T, any New Beetle 1.8T, and also a MK1 Audi TT with a 1.8T. This is an easy project that only requires a few standard tools, and these easy to read instructions will take you through it step by step and make the installation a breeze.
ADVANCED SKILLS &EXPERIENCE REQUIRED
SOME EXPERIENCE RECOMMENDED
PROFESSIONAL SKILLS & SPECIALTY TOOLS REQUIRED
ADVANCED SKILLS &EXPERIENCE REQUIRED
BASIC SKILLS REQUIRED
PROFESSIONAL SKILLS & SPECIALTY TOOLS REQUIRED
The quality and precision of these dipsticks and funnels is second to none, and you’ll enjoy both the function and the feel of them. The dipstick handles are available in three finishes: Black Anodized, Silver Anodized, and Polished. These are the perfect touch under your hood!
Black AnodizedVW - ES#2966487Audi - ES#2975661
PolishedVW - ES#2966484Audi - ES#2975659
Silver AnodizedVW - ES#2966488Audi - ES#2975662
Thank you for looking to ECS Tuning for all of your performance and repair needs. We appreciate your business!
ECS TUNING 1000 SEVILLE RD. WADSWORTH, OH 44281 1.800.924.5172 WWW.ECSTUNING.COM 3
VW MK4 1.8T BILLET DIPSTICK & FUNNEL INSTALLATION ES#2975661®
Table of Contents
ES#2975662ES#2975659
ES#2966484 ES#2966488ES#2966487
TABLE OF CONTENTSKit Contents .....................................................................................................................pg.4
Required Tools and Equipment ................................................................................pg.5
Shop Supplies and Materials .....................................................................................pg.6
Installation and Safety Information ........................................................................pg.7
Dipstick and Funnel Installation ..............................................................................pg.8
Schwaben Tools .............................................................................................................pg.20

ECS TUNING 1000 SEVILLE RD. WADSWORTH, OH 44281 1.800.924.5172 WWW.ECSTUNING.COM 4
VW MK4 1.8T BILLET DIPSTICK & FUNNEL INSTALLATION ES#2975661®
Table of Contents
ES#2975662ES#2975659
ES#2966484 ES#2966488ES#2966487
KIT CONTENTS
Billet Aluminum Dipstick Funnel w/O-Ring and Mounting Bracket Dipstick w/Billet Aluminum Handle

ECS TUNING 1000 SEVILLE RD. WADSWORTH, OH 44281 1.800.924.5172 WWW.ECSTUNING.COM 5
VW MK4 1.8T BILLET DIPSTICK & FUNNEL INSTALLATION ES#2975661®
Table of Contents
ES#2975662ES#2975659
ES#2966484 ES#2966488ES#2966487
REQUIRED TOOLS
• Protecta-Sockets (for lug nuts) ........................................................ES#2221243• 3/8” Drive Ratchet ....................................................................... ES#2765902• 3/8” Drive Torque Wrench......................................................... ES#2221245• 3/8” Drive Deep and Shallow Sockets ................................... ES#2763772• 3/8” Drive Extensions ................................................................. ES#2804822• Hydraulic Floor Jack ................................................................... ES#240941• Torx Drivers .............................................................................................ES#11417• 1/2” Drive Deep and Shallow Sockets ................................... ES#2839106• 1/2” Drive Ratchet• 1/2” Drive Extensions• 1/2” Drive Torque Wrench ........................................................ ES#2221244• 1/2” Drive Breaker Bar ................................................................ ES#2776653• Crows Foot Wrenches• Hook and Pick Tool Set .............................................................. ES#2778980
• 1/4” Drive Ratchet ................................................................................ES#2823235• 1/4” Drive Deep and Shallow Sockets .................................... ES#2823235• 1/4” Drive Extensions ................................................................. ES#2823235• Plier and Cutter Set ..................................................................... ES#2804496• Flat and Phillips Screwdrivers ..........................................................ES#2225921• Jack Stands .............................................................................................ES#2763355• Ball Pein Hammers• Pry Bar Set ...............................................................................................ES#1899378• Bench Mounted Vise• Punch and Chisel Set• Hex Bit (Allen) Wrenches and Sockets ..........................................ES#11420• Thread Repair Tools .............................................................................ES#1306824• Open/Boxed End Wrench Set ..........................................................ES#2765907
Tool Recommendations: The following list of tools are part of a standard automotive tool set, and are used in various combinations for most automotive repairs. The tools required for this installation are highlighted in red, but we recommend you have this complete standard selection to overcome any issues that may arise such as rust, corrosion, or broken and stripped fasteners. The specific tools required for each step will be listed by the step number throughout these instructions, and any tools listed below with a hyperlink are available on our website.
ECS TUNING 1000 SEVILLE RD. WADSWORTH, OH 44281 1.800.924.5172 WWW.ECSTUNING.COM 6
VW MK4 1.8T BILLET DIPSTICK & FUNNEL INSTALLATION ES#2975661®
Table of Contents
ES#2975662ES#2975659
ES#2966484 ES#2966488ES#2966487
Standard Shop Supply Recommendations: We recommend that you have a standard inventory of automotive shop supplies before beginning this or any automotive repair procedure. The following list outlines the basic shop supplies that we like to keep on hand. Shop supplies with a hyperlink are available on our website.
SHOP SUPPLIES AND MATERIALS
• Hand Cleaner/Degreaser - Click Here• Pig Mats - for protecting your garage floor and work area from spills and stains - Click Here• Spray detailer - for rapid cleaning of anything that comes into contact with your paint such as brake fluid - Click Here• Micro Fiber Towels - for cleaning the paint on your car - Click Here• Latex Gloves - for the extra oily and dirty jobs - Click Here• Medium and High Strength Loctite Thread lock compound - to prevent bolts from backing out - Click Here• Anti-Seize Compound - to prevent seizing, galling, and corrosion of fasteners - Click Here• Aerosol Brake/Parts Cleaner - for cleaning and degreasing parts• Shop Rags - used for wiping hands, tools, and parts• Penetrating oil - for helping to free rusted or stuck bolts and nuts• Mechanics wire - for securing components out of the way• Silicone spray lube - for rubber components such as exhaust hangers• Paint Marker - for marking installation positions or bolts during a torquing sequence• Plastic Wire Ties/Zip Ties - for routing and securing wiring harnesses or vacuum hoses• Electrical tape - for wrapping wiring harnesses or temporary securing of small components

ECS TUNING 1000 SEVILLE RD. WADSWORTH, OH 44281 1.800.924.5172 WWW.ECSTUNING.COM 7
VW MK4 1.8T BILLET DIPSTICK & FUNNEL INSTALLATION ES#2975661®
Table of Contents
ES#2975662ES#2975659
ES#2966484 ES#2966488ES#2966487
INSTALLATION NOTES
GENERAL PREPARATION AND SAFETY INFORMATION
• RH refers to the passenger side of the vehicle.• LH refers to the driver side of the vehicle.• Always use the proper torque specifications.• If applicable to this installation, torque specifications will be listed throughout the document and at the end as well.• Please read all of these instructions and familiarize yourself with the complete process BEFORE you begin.
• Park your car in a safe, well lit, level area.• Shut the engine off and remove the key from the ignition switch.• Make sure any remote start devices are properly disabled.• ALWAYS wear safety glasses.• Make sure the parking brake is applied until the vehicle is safely lifted and supported.• If using an automotive lift, be sure and utilize the factory specified lift points. Lifting a vehicle in an incorrect location can cause damage to the suspension/running gear.• When lifting a vehicle using a jack, always utilize the factory specified lift points. Lifting a vehicle in an incorrect location can cause damage to the suspension/running gear. ALWAYS support the vehicle with jack stands.• Always read and follow all safety information and warnings for the equipment you are using.
!
ECS Tuning cares about your health and safety. Please read the following safety information. This information pertains to automotive service in general, and while it may not pertain to every job you do, please remember and share these important safety tips.
Never get underneath a vehicle that is supported only by a jack. Always make sure that the vehicle is securely supported on jack stands.

ECS TUNING 1000 SEVILLE RD. WADSWORTH, OH 44281 1.800.924.5172 WWW.ECSTUNING.COM 8
VW MK4 1.8T BILLET DIPSTICK & FUNNEL INSTALLATION ES#2975661®
Table of Contents
ES#2975662ES#2975659
ES#2966484 ES#2966488ES#2966487
DIPSTICK AND FUNNEL INSTALLATIONStep 1:
Step 2: Flat Blade Screwdriver
Remove the engine cover and pull out the original dipstick.
Loosen the three 1/4 turn fasteners (arrows) on the front engine trim piece, then lift the trim piece upward, pull it forward, and remove it.
NOTE
The original engine cover is not on our car but will need to be removed if you have one installed.
The 1/4 turn fasteners are loosened by simply turning them 1/4 turn counter-clockwise. When they are loose they will “pop” upwards, but they will remain in the trim piece.

ECS TUNING 1000 SEVILLE RD. WADSWORTH, OH 44281 1.800.924.5172 WWW.ECSTUNING.COM 9
VW MK4 1.8T BILLET DIPSTICK & FUNNEL INSTALLATION ES#2975661®
Table of Contents
ES#2975662ES#2975659
ES#2966484 ES#2966488ES#2966487
Step 3:
Step 4:
10mm Socket, Ratchet
5mm Hex Bit (Allen) Wrench
Remove the two nuts securing the secondary air pipe clamps to the control valve plate, then lift the clamps off of the studs and pull the secondary air pipe slightly forward.
Remove the two hex bit (allen) head screws that hold the control valve plate to the intake manifold. Note the tab on the plate that supports the top of the dipstick funnel.
DIPSTICK AND FUNNEL INSTALLATION
Support Tab

ECS TUNING 1000 SEVILLE RD. WADSWORTH, OH 44281 1.800.924.5172 WWW.ECSTUNING.COM 10
VW MK4 1.8T BILLET DIPSTICK & FUNNEL INSTALLATION ES#2975661®
Table of Contents
ES#2975662ES#2975659
ES#2966484 ES#2966488ES#2966487
Step 5:
Step 6:
Lift the control valve plate upwards to slide the tab out of the dipstick funnel, then pull it forward to access the electrical connector on the RH (passenger) side.
Disconnect the electrical connector by squeezing the two metal tabs and pulling the connector off. The photo on the right shows a disconnected view of the connector so you can see the tabs.
DIPSTICK AND FUNNEL INSTALLATION

ECS TUNING 1000 SEVILLE RD. WADSWORTH, OH 44281 1.800.924.5172 WWW.ECSTUNING.COM 11
VW MK4 1.8T BILLET DIPSTICK & FUNNEL INSTALLATION ES#2975661®
Table of Contents
ES#2975662ES#2975659
ES#2966484 ES#2966488ES#2966487
Step 7:
Step 8:
Grip the original dipstick funnel then pull it upwards and remove it. The dipstick funnel is “snapped” in place on the bottom, and you will have to pull up hard enough to release it. If necessary, grip the top of the funnel with a pair of pliers.
It is very common for the center portion of the original dipstick funnel to break off and remain in the lower dipstick tube that is installed in the engine block.
DIPSTICK AND FUNNEL INSTALLATION
Shine a light down into the lower dipstick tube and make sure it is clean and that no portion of the original dipstick funnel remains. Remove any pieces of the original funnel by pulling them out with a small pick tool.
Inspect and clean this area
Make sure no pieces of the original dipstick funnel remain

ECS TUNING 1000 SEVILLE RD. WADSWORTH, OH 44281 1.800.924.5172 WWW.ECSTUNING.COM 12
VW MK4 1.8T BILLET DIPSTICK & FUNNEL INSTALLATION ES#2975661®
Table of Contents
ES#2975662ES#2975659
ES#2966484 ES#2966488ES#2966487
Step 9:
Step 10:
First slide the mounting bracket off of the new billet dipstick funnel, then lubricate the o-ring with clean engine oil and insert it into the groove in the bottom.
Slide the new dipstick funnel down onto the dipstick tube. The funnel is angled. Make sure it is angled away from the intake manifold.
DIPSTICK AND FUNNEL INSTALLATION
NOTE
Your o-ring may be a different color. We used green here for good visibility. It is also not necessary to completely seat the o-ring, it will seat itself upon funnel installation.

ECS TUNING 1000 SEVILLE RD. WADSWORTH, OH 44281 1.800.924.5172 WWW.ECSTUNING.COM 13
VW MK4 1.8T BILLET DIPSTICK & FUNNEL INSTALLATION ES#2975661®
Table of Contents
ES#2975662ES#2975659
ES#2966484 ES#2966488ES#2966487
Step 11:
Step 12:
Now we need to seat the new funnel onto the dipstick tube, but let’s first look at how the two fit together. Inspect the drawings on the right.
When seating the two together, the guide sleeve will center the funnel as you slide it down onto the lower dipstick tube. The groove in the funnel will “pop” in place over the funnel retainer and the o-ring will seal between the funnel and the lower dipstick tube.
DIPSTICK AND FUNNEL INSTALLATION
Lower Dipstick Tube
O-ring
Lower Dipstick Tube
Billet Funnel
Billet Funnel
O-ringGuide Sleeve
Funnel Retainer
Groove
Groove
Guide Sleeve
Funnel Retainer
The lower dipstick tube has a funnel retainer around its circumference.
The new billet funnel has an inside groove in the bottom around the fingers. There is also a guide sleeve and the o-ring that you installed in step 9.
It takes a moderate amount of pressure to seat the two together, but there is a very easy way to do it. Continue with step 13 and we’ll show you how.

ECS TUNING 1000 SEVILLE RD. WADSWORTH, OH 44281 1.800.924.5172 WWW.ECSTUNING.COM 14
VW MK4 1.8T BILLET DIPSTICK & FUNNEL INSTALLATION ES#2975661®
Table of Contents
ES#2975662ES#2975659
ES#2966484 ES#2966488ES#2966487
Step 13:
Step 14:
Place a shop rag over the top of the new billet dipstick funnel.
Place a piece of wood (we’ve used an old 2 x 4) on top of the rag and funnel.
DIPSTICK AND FUNNEL INSTALLATION
Funnel top
Funnel top

ECS TUNING 1000 SEVILLE RD. WADSWORTH, OH 44281 1.800.924.5172 WWW.ECSTUNING.COM 15
VW MK4 1.8T BILLET DIPSTICK & FUNNEL INSTALLATION ES#2975661®
Table of Contents
ES#2975662ES#2975659
ES#2966484 ES#2966488ES#2966487
Step 15:
Step 16:
Ball Pein Hammer
Strike the top of the wood directly above the top of the funnel. There is no need to use excessive force here, one light hit and the funnel should
“pop” into place.
To make sure the funnel is properly seated, simply give it a tug upward, if it doesn’t move, you’ve seated it properly.
DIPSTICK AND FUNNEL INSTALLATION
Funnel top
Pull up on the new funnel to make sure it is seated

ECS TUNING 1000 SEVILLE RD. WADSWORTH, OH 44281 1.800.924.5172 WWW.ECSTUNING.COM 16
VW MK4 1.8T BILLET DIPSTICK & FUNNEL INSTALLATION ES#2975661®
Table of Contents
ES#2975662ES#2975659
ES#2966484 ES#2966488ES#2966487
Step 17:
Step 18:
Slide the mounting bracket over the top of the dipstick funnel as shown. The bracket has a “top” and “bottom” and must be correctly installed. When it is correctly installed, the head of the securing screw will be located on the LH (driver’s) side of the car as shown in this photo.
Hold the control valve plate in its mounting location and adjust the height of the dipstick funnel mounting bracket so it lines up with the tab on the control valve plate.
DIPSTICK AND FUNNEL INSTALLATION
Mounting Bracket Screw

ECS TUNING 1000 SEVILLE RD. WADSWORTH, OH 44281 1.800.924.5172 WWW.ECSTUNING.COM 17
VW MK4 1.8T BILLET DIPSTICK & FUNNEL INSTALLATION ES#2975661®
Table of Contents
ES#2975662ES#2975659
ES#2966484 ES#2966488ES#2966487
Step 19:
Step 20:
2.5mm Allen Wrench
Pull back the control valve plate and tighten the screw on the moutning bracket, just until it is snug on the dipstick funnel.
Line up the tab on the control valve plate with the elongated slot in the mounting bracket, then slide the tab through the bracket until the control valve plate is in its mounting location.
DIPSTICK AND FUNNEL INSTALLATION
NOTE
The electrical connector cannot be connected before the valve plate is installed. We will reconnect it in the next step.
ECS TUNING 1000 SEVILLE RD. WADSWORTH, OH 44281 1.800.924.5172 WWW.ECSTUNING.COM 18
VW MK4 1.8T BILLET DIPSTICK & FUNNEL INSTALLATION ES#2975661®
Table of Contents
ES#2975662ES#2975659
ES#2966484 ES#2966488ES#2966487
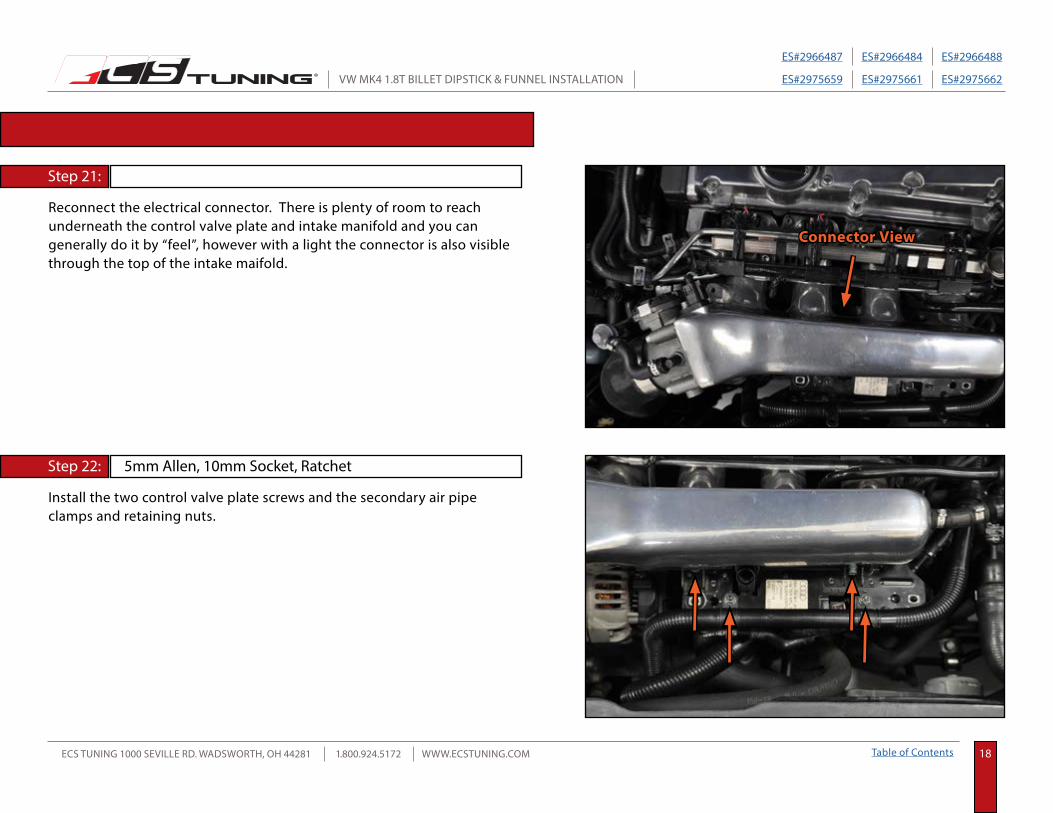
Step 21:
Step 22: 5mm Allen, 10mm Socket, Ratchet
Reconnect the electrical connector. There is plenty of room to reach underneath the control valve plate and intake manifold and you can generally do it by “feel”, however with a light the connector is also visible through the top of the intake maifold.
Install the two control valve plate screws and the secondary air pipe clamps and retaining nuts.
Connector View
DIPSTICK AND FUNNEL INSTALLATION

ECS TUNING 1000 SEVILLE RD. WADSWORTH, OH 44281 1.800.924.5172 WWW.ECSTUNING.COM 19
VW MK4 1.8T BILLET DIPSTICK & FUNNEL INSTALLATION ES#2975661®
Table of Contents
ES#2975662ES#2975659
ES#2966484 ES#2966488ES#2966487
Step 23:
Step 24:
Flat Blade Screwdriver
Install the front engine trim piece and front engine cover (if removed).
Apply a thin layer of clean engine oil onto the o-rings of your new ECS billet dipstick, then slide it into your new billet funnel and your installation is complete!
DIPSTICK AND FUNNEL INSTALLATION
Lubricate
C AUTION
Do not use your original dipstick with the ECS Tuning billet funnel. You will not obtain a proper oil reading.

ECS TUNING 1000 SEVILLE RD. WADSWORTH, OH 44281 1.800.924.5172 WWW.ECSTUNING.COM 20
VW MK4 1.8T BILLET DIPSTICK & FUNNEL INSTALLATION ES#2975661®
Table of Contents
ES#2975662ES#2975659
ES#2966484 ES#2966488ES#2966487
At ECS Tuning, we carry a line of high quality Schwaben Tools and Equipment to help you build your ultimate tool collection. Never before has affordability and quality been so closely related. Our entire Schwaben line is subjected to strict in house testing for strength and durability. See what we have to offer and equip your garage without breaking the bank.
SCHWABEN - BUILD THE ULTIMATE TOOL COLLECTION
Engine Bars
Pressure BleedersLighting
Breaker BarCreepers
Pry Bars
Gloves
Screwdrivers
Coil Spring CompressorsCamber GaugeHose Pinch PliersWheel Bolt Pattern GaugeBall Joint SeparatorVanos Solenoid Socket
Exhaust Hanger Pliers
Scraper, Hook, & Pick SetCamshaft ToolsFan Clutch WrenchesTie Rod ToolsBrake Fluid Catch BottleTubing CutterBooster CablesOil Filter ToolsService CartsBattery ChargerStethoscopeBattery Terminal BrushWheel Chocks
E-Drive SocketsSockets
Jack Stands
Ratchets
Torx Sockets
Circuit Tester
Torx DriversCar Ramps
Bubble Flaring ToolThread ChaserDrain PansWrenchesImpact SocketsTorque Wrenches

Your MK4 1.8T Billet Dipstick and Funnel Installation is complete!
These instructions are provided as a courtesy by ECS TuningProper service and repair procedures are vital to the safe, reliable operation of all motor vehicles as well as the personal safety of those performing the repairs. Standard safety procedures and precautions (including use of safety goggles and proper tools and equipment) should be followed at all times to eliminate the possibility of personal injury or improper service which could damage the vehicle or compromise its safety.
Although this material has been prepared with the intent to provide reliable information, no warranty (express or implied) is made as to its accuracy or completeness. Neither is any liability assumed for loss or damage resulting from reliance on this material. SPECIFICALLY, NO WARRANTY OF MERCHANTABILITY, FITNESS FOR A PARTICULAR PURPOSE OR ANY OTHER WARRANTY IS MADE OR TO BE IMPLIED WITH RESPECT TO THIS MATERIAL. In no event will ECS Tuning, Incorporated or its affiliates be liable for any damages, direct or indirect, consequential or compensatory, arising out of the use of this material.