voip configuration guide - extron · pdf fileclick apply after making any changes in order to...
TRANSCRIPT
DMP 128 Plus C V DMP 128 Plus C V AT Avaya Aura Configuration Guide
REVISION: 1.1 DATE: SEPTEMBER 1ST 2017
Revision Date: 09/01/17
Page 2 of 18
DMP 128 Plus C V / C V AT – Avaya Aura
Revision Log
Date Version Notes
August 6th 2017 1.0 First Release. Applies to Firmware 1.01.0004.002
Sep. 1st 2017 1.1 Corrected error in system import procedure. Applies to Firmware 1.01.0004.002
Revision Date: 09/01/17
Page 3 of 18
DMP 128 Plus C V / C V AT – Avaya Aura
Table of Contents
1.0 Introduction ......................................................................................................................... 4
2.0 Configuring Aura for DMP 128 Plus C V (AT) VoIP Registration .......................................... 5
2.1 Verifying System Capacity ................................................................................................ 5
2.2 Codec Set .......................................................................................................................... 6
2.3 Configuring SIP Users ....................................................................................................... 7
3.0 Configuring DMP 128 Plus C V (AT) VoIP Lines .................................................................... 9
3.1 Network Interface Configuration ..................................................................................... 9
3.2 Transport Configuration ................................................................................................. 10
3.3 Line Registration ............................................................................................................. 11
3.4 Codecs ............................................................................................................................ 12
3.5 Dialing ............................................................................................................................. 13
3.6 System Overview ............................................................................................................ 14
3.7 Troubleshooting ............................................................................................................. 14
Appendix A: RTP Port Range ..................................................................................................... 15
Appendix B: Invite Handling Mode ........................................................................................... 17
Revision Date: 09/01/17
Page 4 of 18
DMP 128 Plus C V / C V AT – Avaya Aura
1.0 Introduction
This document provides a reference for registering DMP 128 Plus C V (AT) VoIP lines to an Avaya Aura system (Session Manager 7.0). DMP 128 Plus C V / C V AT Firmware Version 1.01.0004-002.
Revision Date: 09/01/17
Page 5 of 18
DMP 128 Plus C V / C V AT – Avaya Aura
2.0 Configuring Aura for DMP 128 Plus C V (AT) VoIP Registration
• All Aura configuration within this document requires administrative access to both the Avaya Aura System Access Terminal (SAT) along with the Avaya Aura System Manager web interface.
• VoIP functionality within the DMP 128 Plus is built around the Session Initiation Protocol (SIP) signaling system, as defined in RFC 3261. The Aura platform must be licensed to allow the addition of third-party SIP endpoints before any line registration can take place (see Section 2.1).
• If multiple codec types are assigned to the DMP 128 Plus for Aura Extensions, the user may experience call drop-outs when re-establishing calls following On-Hold events. If this occurs, please refer to Appendix B for details on how to correct the problem.
2.1 Verifying System Capacity
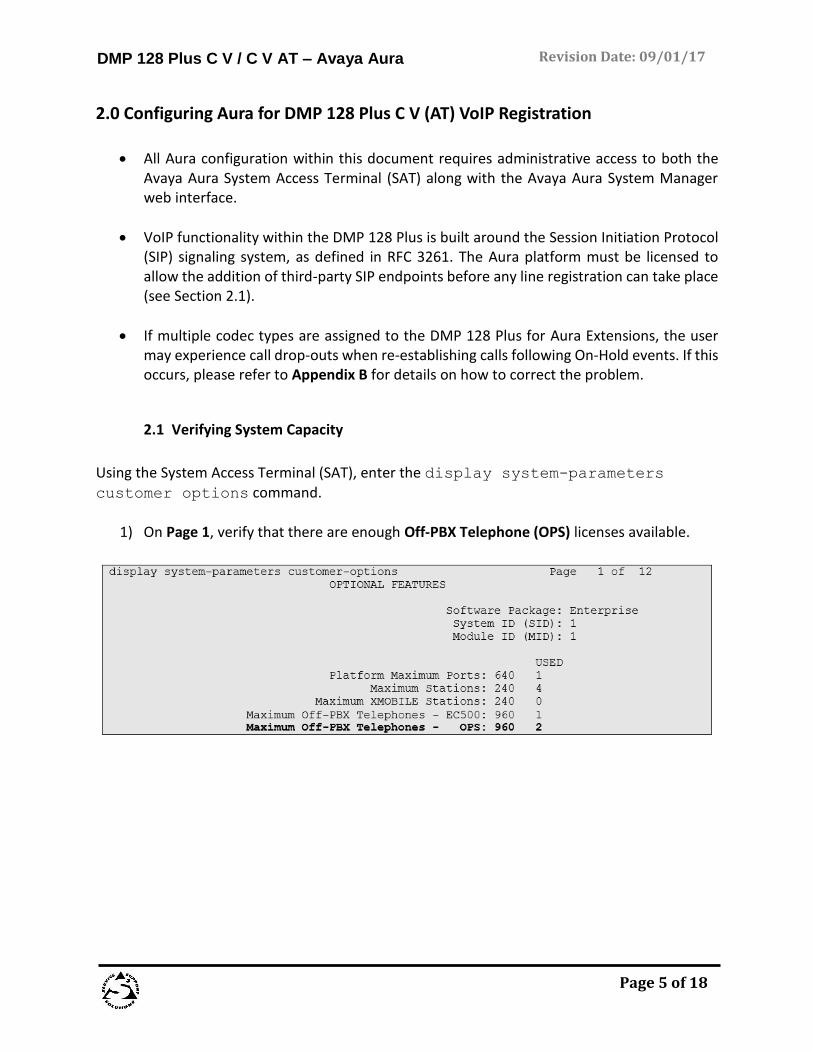
Using the System Access Terminal (SAT), enter the display system-parameters customer options command.
1) On Page 1, verify that there are enough Off-PBX Telephone (OPS) licenses available.
Revision Date: 09/01/17
Page 6 of 18
DMP 128 Plus C V / C V AT – Avaya Aura
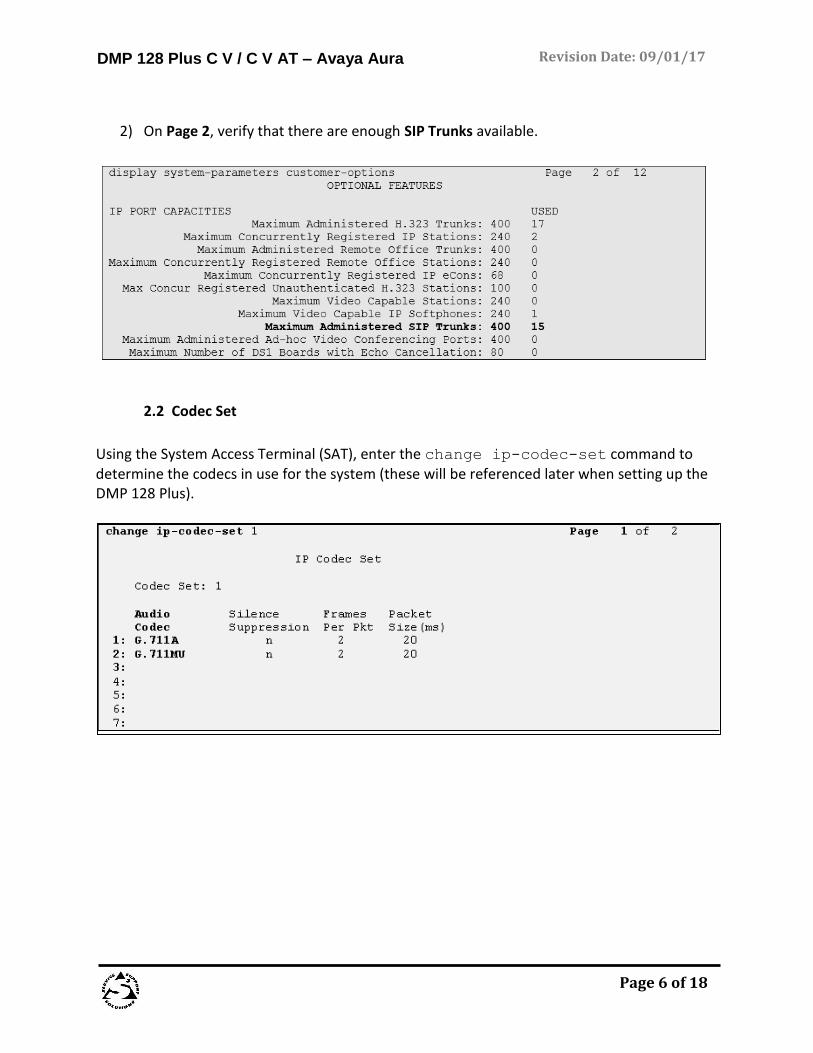
2) On Page 2, verify that there are enough SIP Trunks available.
2.2 Codec Set
Using the System Access Terminal (SAT), enter the change ip-codec-set command to determine the codecs in use for the system (these will be referenced later when setting up the DMP 128 Plus).
Revision Date: 09/01/17
Page 7 of 18
DMP 128 Plus C V / C V AT – Avaya Aura
2.3 Configuring SIP Users
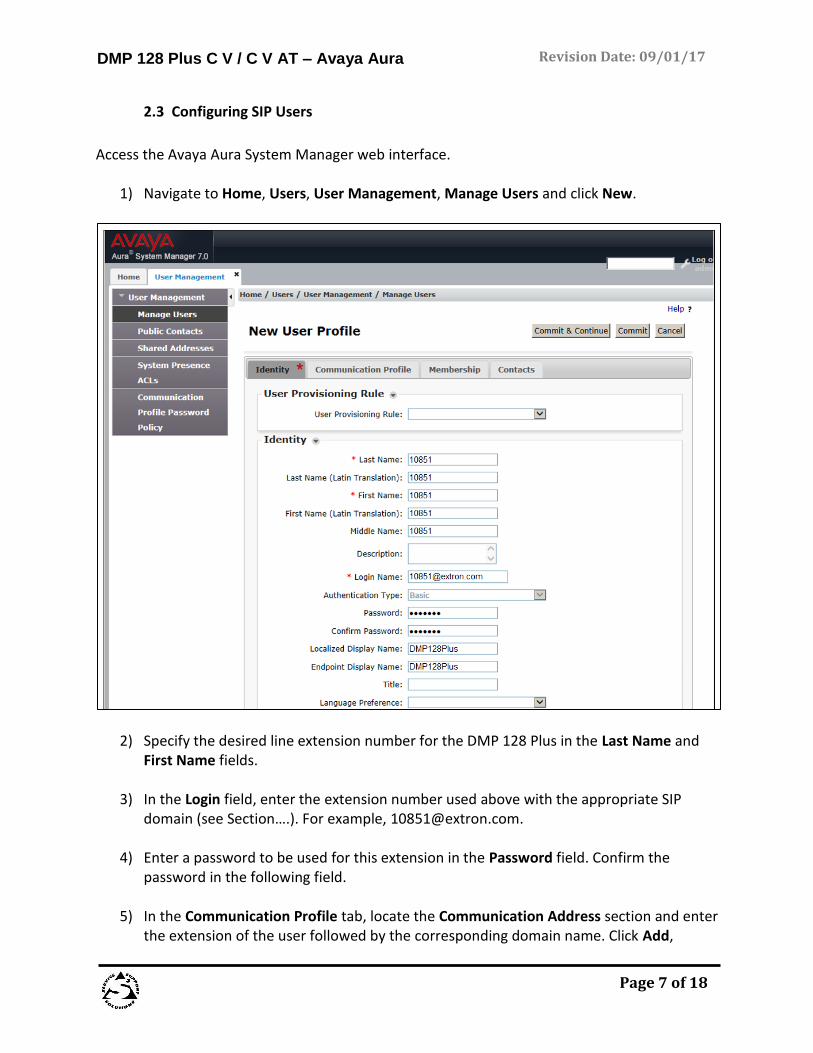
Access the Avaya Aura System Manager web interface.
1) Navigate to Home, Users, User Management, Manage Users and click New.
2) Specify the desired line extension number for the DMP 128 Plus in the Last Name and First Name fields.
3) In the Login field, enter the extension number used above with the appropriate SIP
domain (see Section….). For example, [email protected].
4) Enter a password to be used for this extension in the Password field. Confirm the password in the following field.
5) In the Communication Profile tab, locate the Communication Address section and enter the extension of the user followed by the corresponding domain name. Click Add,
Revision Date: 09/01/17
Page 8 of 18
DMP 128 Plus C V / C V AT – Avaya Aura
6) Ensure that the Session Manager Profile is checked and that the appropriate Primary
Session Manager is specified for SIP registration.
7) Complete steps 1 to 6 for every additional line required for use with the DMP 128 Plus.
Revision Date: 09/01/17
Page 9 of 18
DMP 128 Plus C V / C V AT – Avaya Aura
3.0 Configuring DMP 128 Plus C V (AT) VoIP Lines
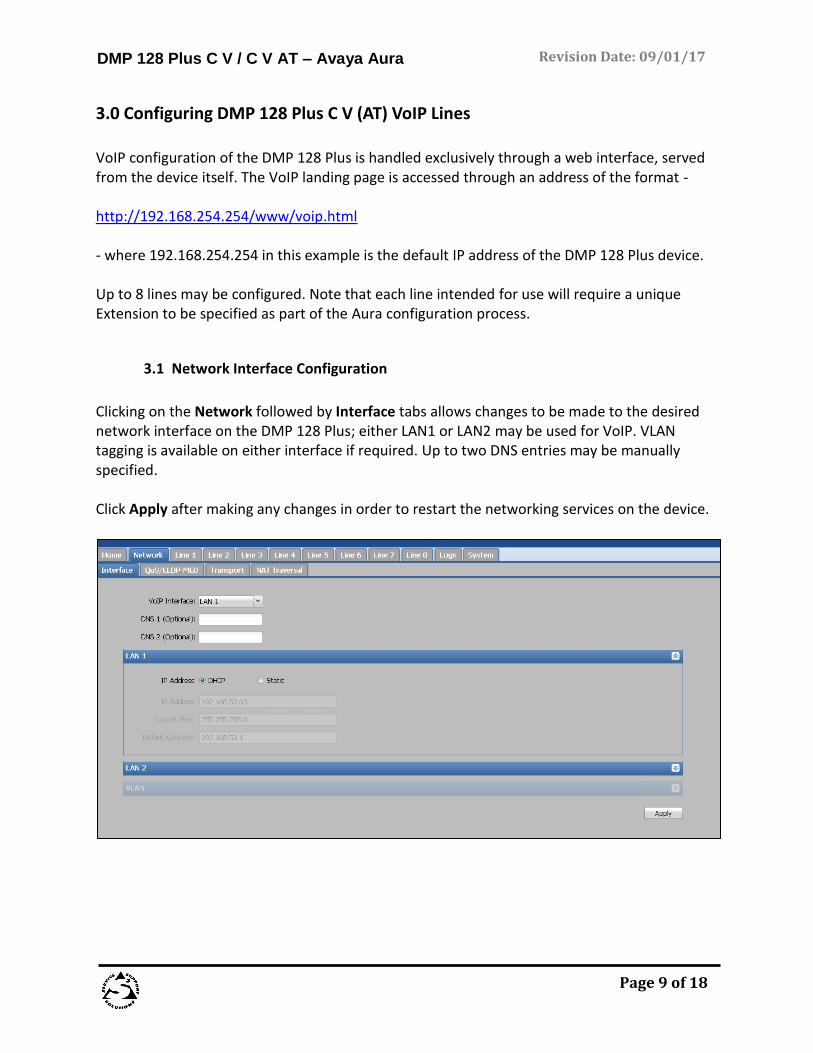
VoIP configuration of the DMP 128 Plus is handled exclusively through a web interface, served from the device itself. The VoIP landing page is accessed through an address of the format - http://192.168.254.254/www/voip.html - where 192.168.254.254 in this example is the default IP address of the DMP 128 Plus device. Up to 8 lines may be configured. Note that each line intended for use will require a unique Extension to be specified as part of the Aura configuration process.
3.1 Network Interface Configuration
Clicking on the Network followed by Interface tabs allows changes to be made to the desired network interface on the DMP 128 Plus; either LAN1 or LAN2 may be used for VoIP. VLAN tagging is available on either interface if required. Up to two DNS entries may be manually specified. Click Apply after making any changes in order to restart the networking services on the device.
Revision Date: 09/01/17
Page 10 of 18
DMP 128 Plus C V / C V AT – Avaya Aura
3.2 Transport Configuration
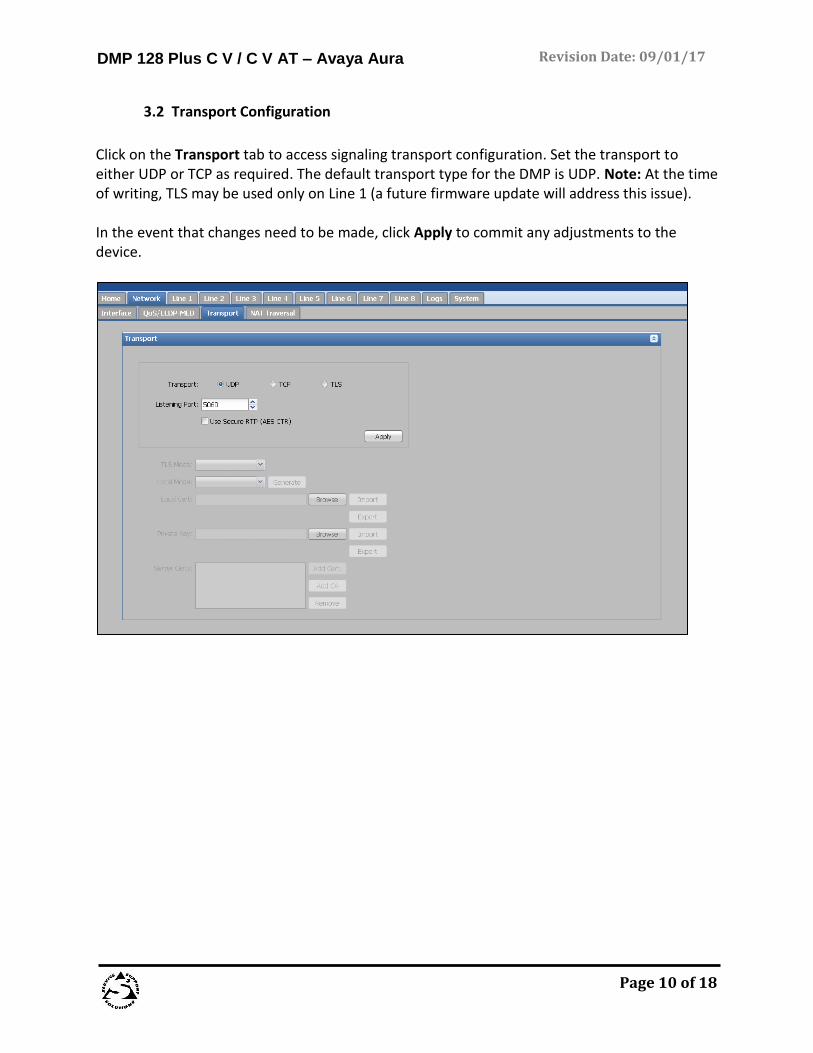
Click on the Transport tab to access signaling transport configuration. Set the transport to either UDP or TCP as required. The default transport type for the DMP is UDP. Note: At the time of writing, TLS may be used only on Line 1 (a future firmware update will address this issue). In the event that changes need to be made, click Apply to commit any adjustments to the device.
Revision Date: 09/01/17
Page 11 of 18
DMP 128 Plus C V / C V AT – Avaya Aura
3.3 Line Registration
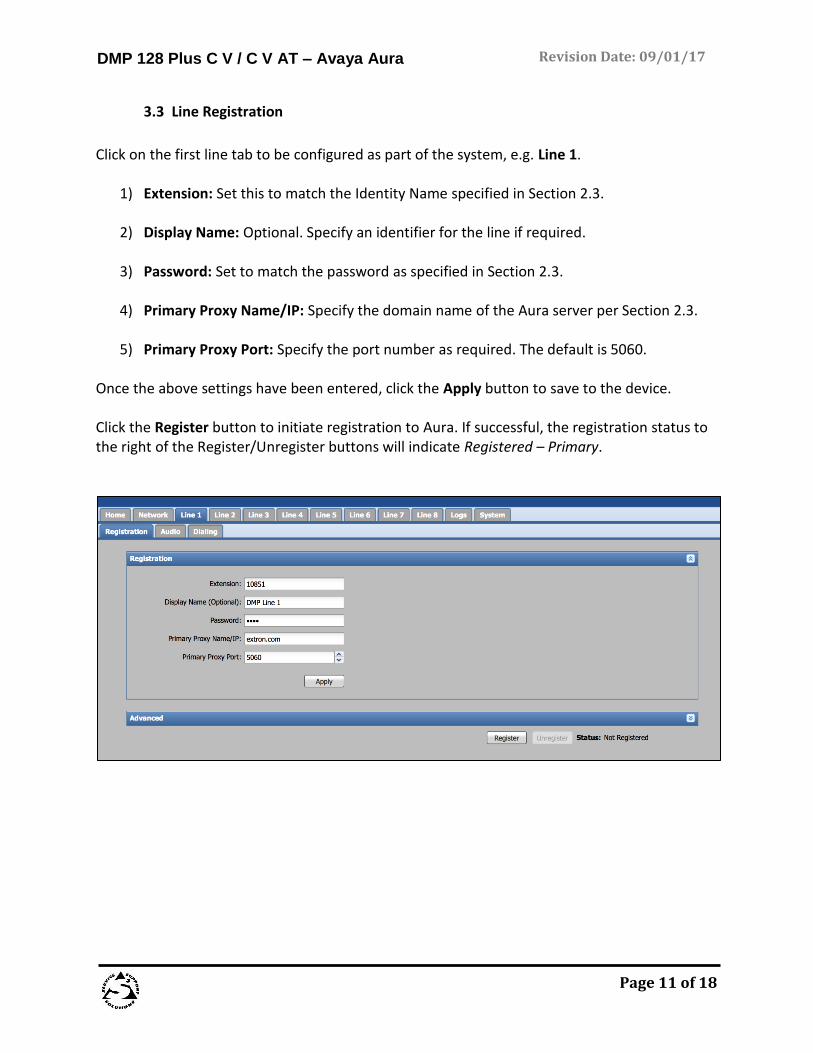
Click on the first line tab to be configured as part of the system, e.g. Line 1.
1) Extension: Set this to match the Identity Name specified in Section 2.3.
2) Display Name: Optional. Specify an identifier for the line if required.
3) Password: Set to match the password as specified in Section 2.3.
4) Primary Proxy Name/IP: Specify the domain name of the Aura server per Section 2.3.
5) Primary Proxy Port: Specify the port number as required. The default is 5060.
Once the above settings have been entered, click the Apply button to save to the device. Click the Register button to initiate registration to Aura. If successful, the registration status to the right of the Register/Unregister buttons will indicate Registered – Primary.

Revision Date: 09/01/17
Page 12 of 18
DMP 128 Plus C V / C V AT – Avaya Aura
3.4 Codecs
The availability and ordering of codecs may be changed from within the Audio tab. Codecs will only be available for use within phone calls if they are moved from the Available to the Assigned column. By default, G.711u and G.711a are assigned to the system. Click the Apply button to commit any changes to the device. Note: If call drop-outs following On/Off-Hold events are noted when multiple codecs are assigned to the DMP 128 Plus, refer to Appendix B.
Revision Date: 09/01/17
Page 13 of 18
DMP 128 Plus C V / C V AT – Avaya Aura
3.5 Dialing
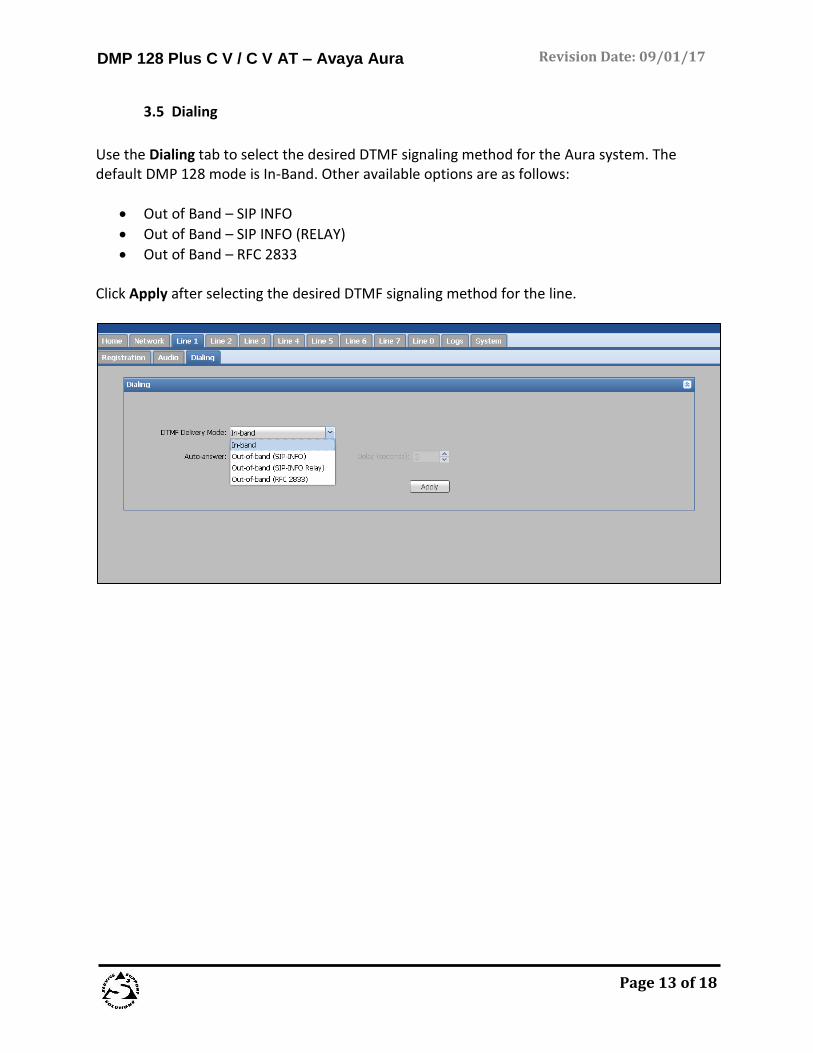
Use the Dialing tab to select the desired DTMF signaling method for the Aura system. The default DMP 128 mode is In-Band. Other available options are as follows:
• Out of Band – SIP INFO
• Out of Band – SIP INFO (RELAY)
• Out of Band – RFC 2833 Click Apply after selecting the desired DTMF signaling method for the line.
Revision Date: 09/01/17
Page 14 of 18
DMP 128 Plus C V / C V AT – Avaya Aura
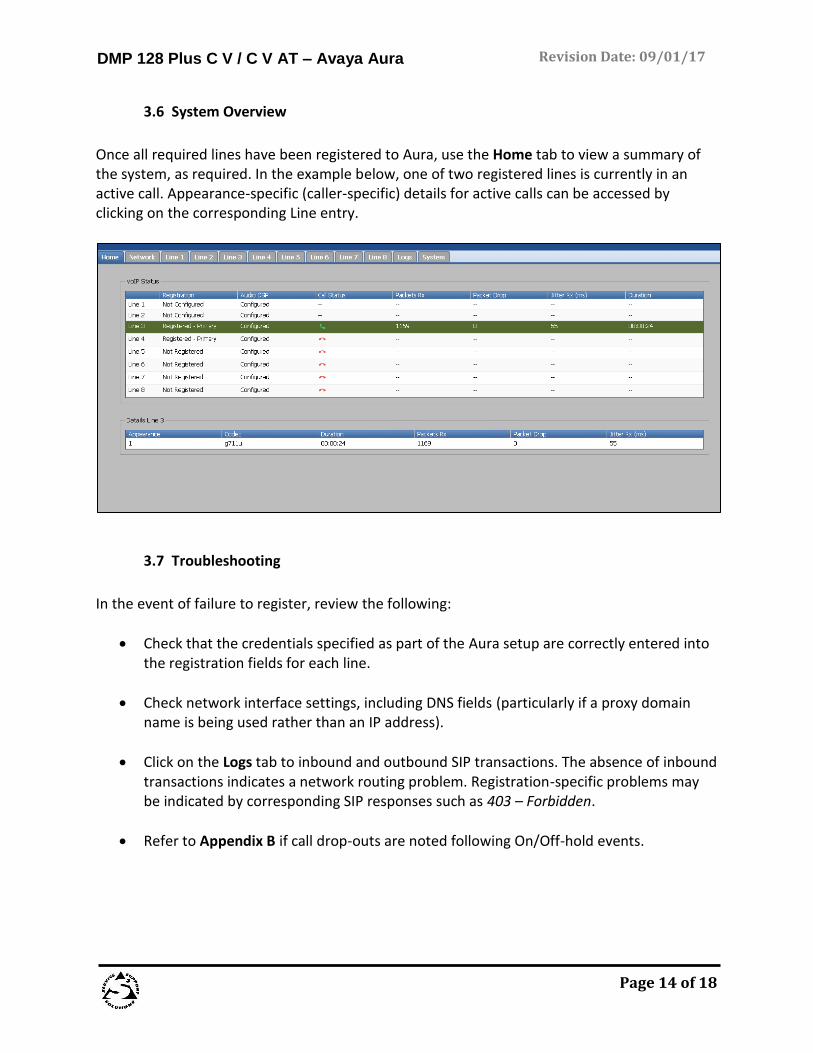
3.6 System Overview
Once all required lines have been registered to Aura, use the Home tab to view a summary of the system, as required. In the example below, one of two registered lines is currently in an active call. Appearance-specific (caller-specific) details for active calls can be accessed by clicking on the corresponding Line entry.
3.7 Troubleshooting
In the event of failure to register, review the following:
• Check that the credentials specified as part of the Aura setup are correctly entered into the registration fields for each line.
• Check network interface settings, including DNS fields (particularly if a proxy domain name is being used rather than an IP address).
• Click on the Logs tab to inbound and outbound SIP transactions. The absence of inbound transactions indicates a network routing problem. Registration-specific problems may be indicated by corresponding SIP responses such as 403 – Forbidden.
• Refer to Appendix B if call drop-outs are noted following On/Off-hold events.
Revision Date: 09/01/17
Page 15 of 18
DMP 128 Plus C V / C V AT – Avaya Aura
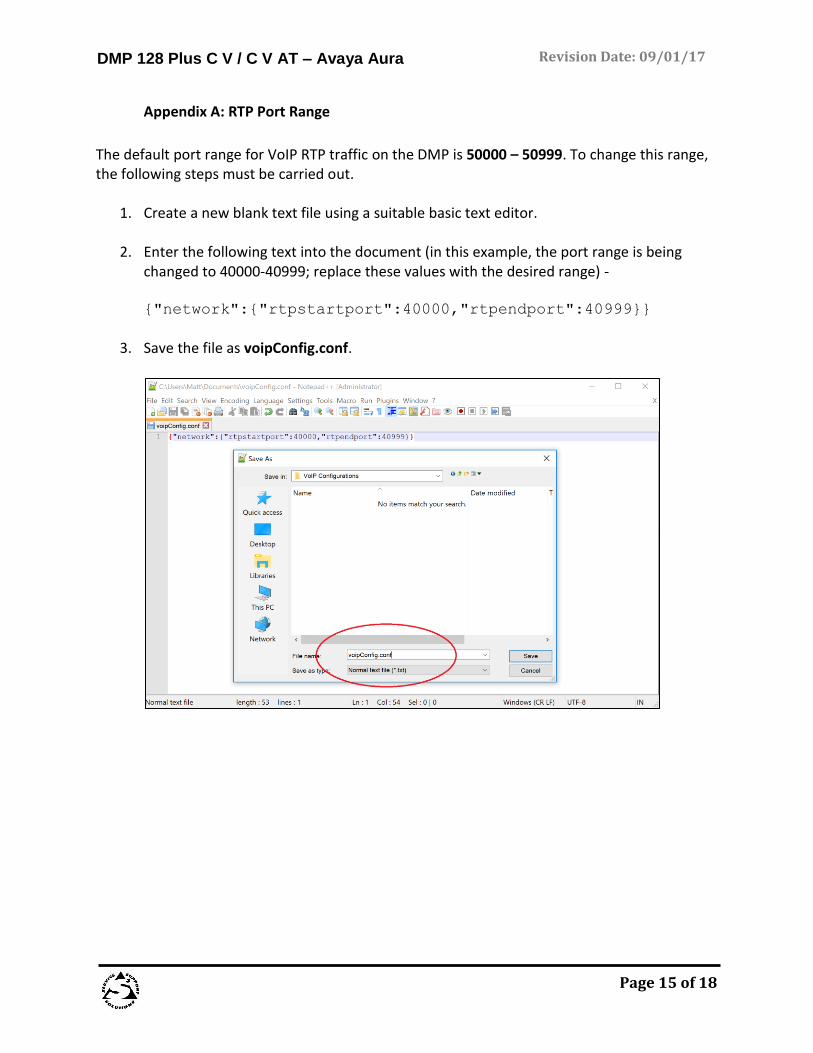
Appendix A: RTP Port Range
The default port range for VoIP RTP traffic on the DMP is 50000 – 50999. To change this range, the following steps must be carried out.
1. Create a new blank text file using a suitable basic text editor.
2. Enter the following text into the document (in this example, the port range is being changed to 40000-40999; replace these values with the desired range) - {"network":{"rtpstartport":40000,"rtpendport":40999}}
3. Save the file as voipConfig.conf.
Revision Date: 09/01/17
Page 16 of 18
DMP 128 Plus C V / C V AT – Avaya Aura
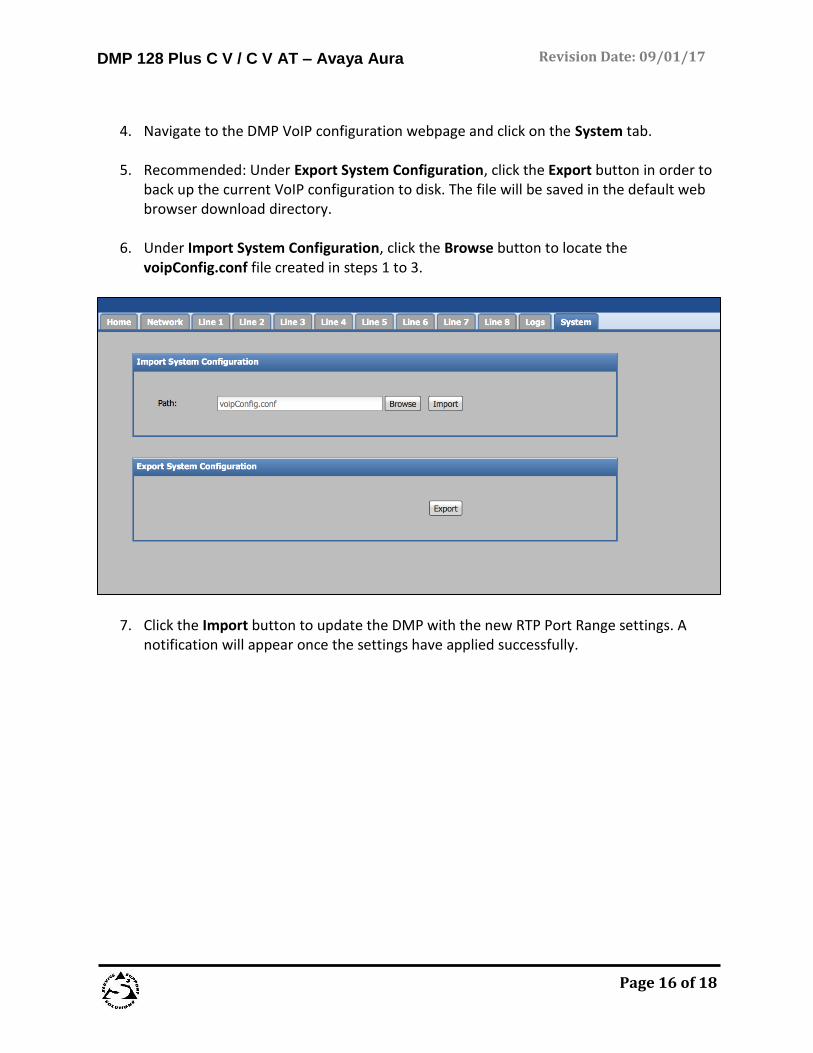
4. Navigate to the DMP VoIP configuration webpage and click on the System tab.
5. Recommended: Under Export System Configuration, click the Export button in order to
back up the current VoIP configuration to disk. The file will be saved in the default web browser download directory.
6. Under Import System Configuration, click the Browse button to locate the voipConfig.conf file created in steps 1 to 3.
7. Click the Import button to update the DMP with the new RTP Port Range settings. A notification will appear once the settings have applied successfully.
Revision Date: 09/01/17
Page 17 of 18
DMP 128 Plus C V / C V AT – Avaya Aura
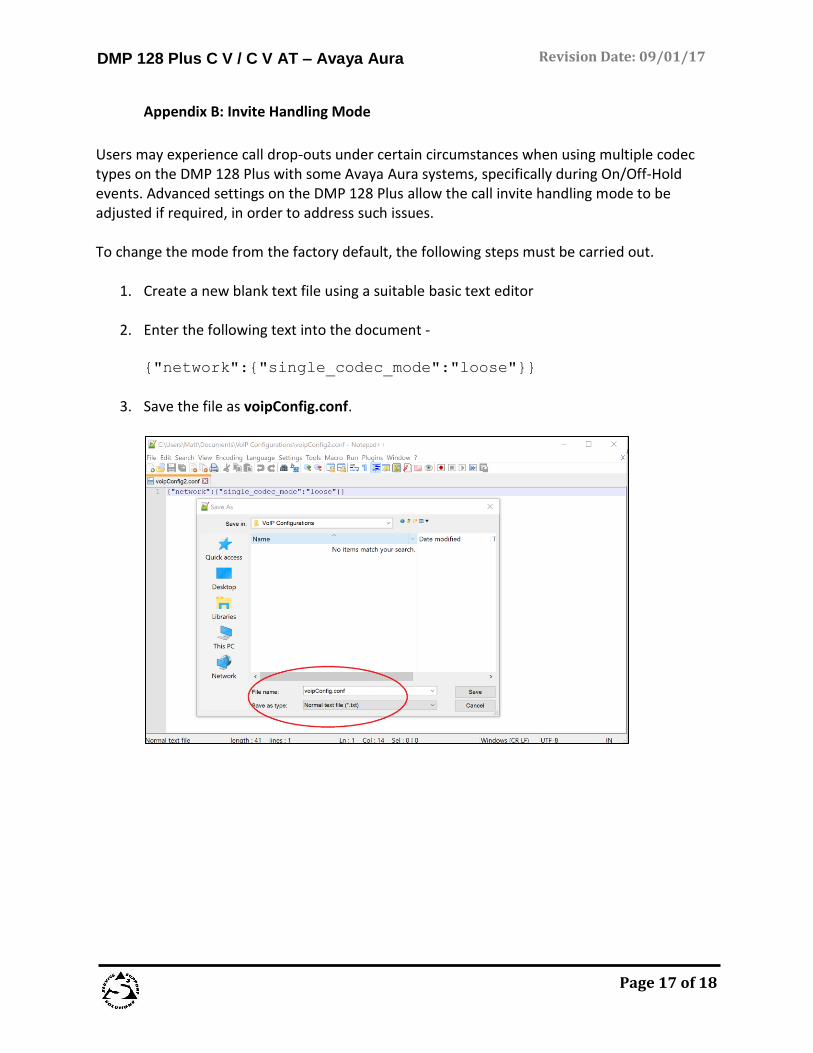
Appendix B: Invite Handling Mode
Users may experience call drop-outs under certain circumstances when using multiple codec types on the DMP 128 Plus with some Avaya Aura systems, specifically during On/Off-Hold events. Advanced settings on the DMP 128 Plus allow the call invite handling mode to be adjusted if required, in order to address such issues. To change the mode from the factory default, the following steps must be carried out.
1. Create a new blank text file using a suitable basic text editor
2. Enter the following text into the document - {"network":{"single_codec_mode":"loose"}}
3. Save the file as voipConfig.conf.
Revision Date: 09/01/17
Page 18 of 18
DMP 128 Plus C V / C V AT – Avaya Aura
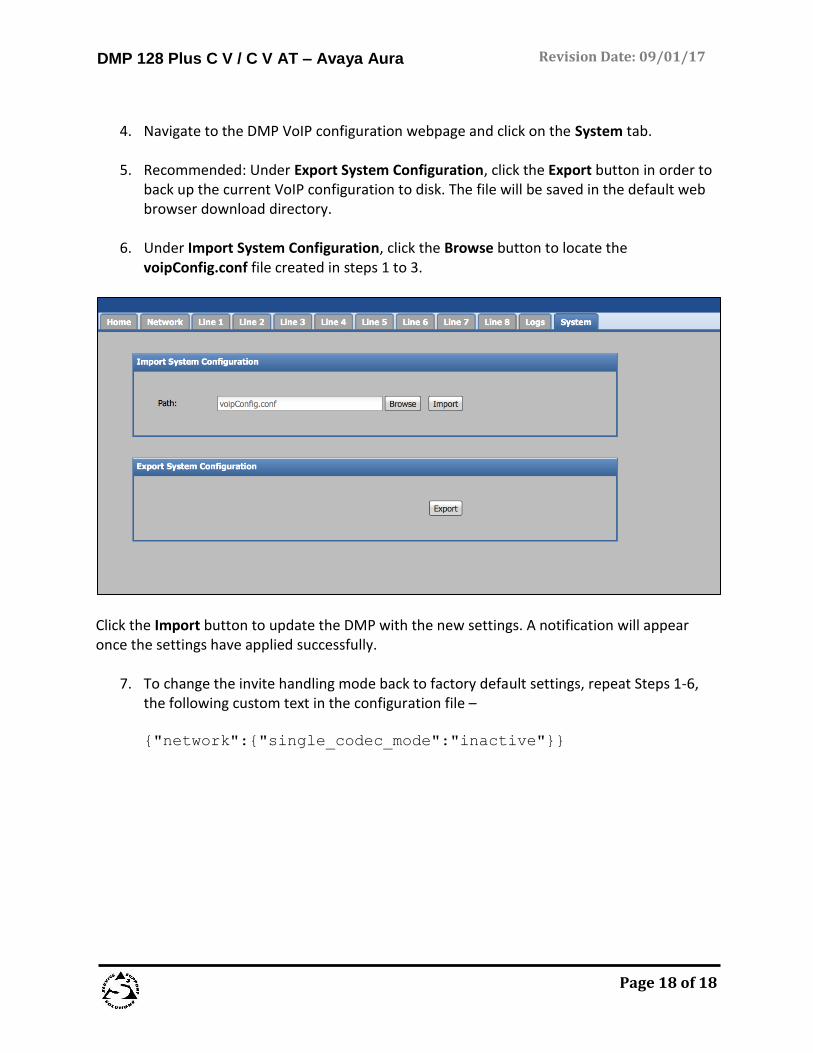
4. Navigate to the DMP VoIP configuration webpage and click on the System tab.
5. Recommended: Under Export System Configuration, click the Export button in order to
back up the current VoIP configuration to disk. The file will be saved in the default web browser download directory.
6. Under Import System Configuration, click the Browse button to locate the voipConfig.conf file created in steps 1 to 3.
Click the Import button to update the DMP with the new settings. A notification will appear once the settings have applied successfully.
7. To change the invite handling mode back to factory default settings, repeat Steps 1-6, the following custom text in the configuration file –
{"network":{"single_codec_mode":"inactive"}}