vmware vcenter administration
TRANSCRIPT

7/30/2019 Vmware Vcenter Administration
http://slidepdf.com/reader/full/vmware-vcenter-administration 1/183
Administration Guide
VMware vCenter™ Protect Essentials Plus
Configuration Management

7/30/2019 Vmware Vcenter Administration
http://slidepdf.com/reader/full/vmware-vcenter-administration 2/183
Copyright and Trademarks
ii vCenter™ Protect Essentials Plus - Configuration Management Administration Guide
_______________________________________________________________________________
Copyright
Copyright 2009 – 2011 VMware, Inc. All rights reserved. This product is protected by U.S. andinternational copyright and intellectual property laws. VMware products are covered by one ormore patents listed at http://www.vmware.com/go/patents.
No part of this document may be reproduced or retransmitted in any form or by any meanselectronic, mechanical, or otherwise, including photocopying and recording for any purpose otherthan the purchaser’s personal use without written permission of VMware, Inc.
Trademarks
vCenter, VMware, and the VMware logo are either registered trademarks or trademarks of
VMware, Inc. in the United States and/or other jurisdictions. All other marks and namesmentioned herein may be trademarks of their respective companies.
Document Information and Print History
Document number: N/A
Date Version Description
March 2009 4.0 Initial release of the NetChk Configure
Administration Guide.
August 2009 4.1 Add info about virtual machine capability and
two new custom checks (x64 and File DataOffset).
December 2009 4.2 Add support for Windows 7 and Windows Server 2008 Family R2 (excluding Server Core)
November 2011 4.3 Rebrand to VMware. Remove Security BestPractices and all references to ISO/SOX.

7/30/2019 Vmware Vcenter Administration
http://slidepdf.com/reader/full/vmware-vcenter-administration 3/183
Table of Contents
vCenter™ Protect Essentials Plus - Configuration Management Administration Guide iii
Table of Contents
Welcome to VMware vCenter™ Protect Essentials Plus - Configuration Management 4.3.............. 1 Why You Need VMware vCenter Protect - Configuration Management ..................................... 2 What's New? ....................................................................................................................... 3 General Computer Security Recommendations ....................................................................... 3
VMware Inc Can Help ....................................................................................................... 3 About VMware vCenter Protect - Configuration Management ..................................................... 4
Editions of the Program........................................................................................................ 4 System Requirements .......................................................................................................... 5
Console ........................................................................................................................... 5 Clients ............................................................................................................................. 6
Program Overview ............................................................................................................... 7 Major Components ............................................................................................................... 8 Scanning Engine Overview ................................................................................................... 8 Enumerating Machines ......................................................................................................... 8
Determining Security Status ................................................................................................. 9
Installation ........................................................................................................................... 10 Obtaining the Software ...................................................................................................... 10 Installing the Prerequisites ................................................................................................. 10
Automatic installation ..................................................................................................... 10 Manual installation ......................................................................................................... 10
Performing A New Installation ............................................................................................ 12 Getting Started ..................................................................................................................... 15
Starting VMware vCenter Protect - Configuration Management ............................................. 15 Activating VMware vCenter Protect - Configuration Management .......................................... 15 Version and License Information ......................................................................................... 17 How Licenses are Tracked .................................................................................................. 18 About the VMware vCenter Protect - Configuration Management Home Page ........................ 19 How to Use the Program .................................................................................................... 21 Menu Options .................................................................................................................... 22 Toolbar Options ................................................................................................................. 23 Online Help ....................................................................................................................... 23
Defining Machine Groups ....................................................................................................... 24 About Machine Groups ....................................................................................................... 24 Working With A Machine Group .......................................................................................... 25 Importing a New Machine Group ........................................................................................ 27 Creating Machine Groups ................................................................................................... 29
Configuring Machine Groups .................................................................................................. 30 Adding Machines to a Machine Group by Name ................................................................... 31 Adding Domains to a Machine Group .................................................................................. 33 Adding Organizational Units to a Machine Group .................................................................. 34 Adding Machines by IP Address to a Machine Group ............................................................ 35 Defining Nested Groups ..................................................................................................... 36
7/30/2019 Vmware Vcenter Administration
http://slidepdf.com/reader/full/vmware-vcenter-administration 4/183
Table of Contents
iv vCenter™ Protect Essentials Plus - Configuration Management Administration Guide
Filter Machines In A Group ................................................................................................. 38 Ignoring Certain Machines .................................................................................................. 38 Linking Files to Machine Groups .......................................................................................... 39
Adding Virtual Machines to a Machine Group .......................................................................... 41 Logging On To A Virtual Infrastructure Server ..................................................................... 42 Selecting Virtual Machines for Inclusion in a Machine Group ................................................. 44
Customizing the View ..................................................................................................... 44 Selecting Virtual Machines for Inclusion in a Machine Group .............................................. 44 Viewing Virtual Machines Within a Machine Group ............................................................ 45
Defining and Configuring Policies ........................................................................................... 46 About Policies .................................................................................................................... 46 Working With A Policy ........................................................................................................ 47 Creating a New Policy ........................................................................................................ 51 Configuring A Policy ........................................................................................................... 55
To add one or more policy checks to a policy ................................................................... 55 To remove one or more policy checks from a policy.......................................................... 55 To configure individual policy checks within a policy ......................................................... 56
Copying a Custom Policy .................................................................................................... 57 Duplicating a Predefined Policy ........................................................................................... 58 Cloning A Policy ................................................................................................................. 59 Providing A Comment Before Changing A Policy................................................................... 61 Exporting and Importing Policies ........................................................................................ 62
To export a policy .......................................................................................................... 62 To import a policy .......................................................................................................... 63
Policy Management ............................................................................................................... 65 Associating Policies with a Machine Group ........................................................................... 65 How to Associate Specific Policies with a Machine Group ...................................................... 65 How the Associated Policies are Affected ............................................................................. 66
Using Custom Checks ............................................................................................................ 68 Overview of Custom Checks ............................................................................................... 68 Loading Custom Checks From A Database ........................................................................... 70 Importing Custom Checks From A File ................................................................................. 71 Creating Custom Registry Value Checks .............................................................................. 73 Creating Custom Service Checks ......................................................................................... 79 Creating Custom User Rights Checks ................................................................................... 84 Creating Custom File ACL Checks ........................................................................................ 92 Creating Custom Directory ACL Checks ............................................................................... 98 Creating Custom Registry Multi-String Value Checks .......................................................... 103 Creating Custom Registry Value Exists Checks ................................................................... 107 Creating Custom Registry Value Checks for All Users.......................................................... 111 Creating Custom Registry Value x64 Checks ...................................................................... 116 Creating Custom File Date Offset Checks ........................................................................... 121 Using Regedit .................................................................................................................. 125
Viewing Custom Checks ................................................................................................... 127 Exporting Custom Checks ................................................................................................. 128

7/30/2019 Vmware Vcenter Administration
http://slidepdf.com/reader/full/vmware-vcenter-administration 5/183
Table of Contents
vCenter™ Protect Essentials Plus - Configuration Management Administration Guide v
Performing Scans ................................................................................................................ 131 Scanning Prerequisites ..................................................................................................... 131 How To Initiate A Scan From The Home Page ................................................................... 132 How To Initiate A Scan From A Machine Group .................................................................. 133 How To Initiate A Scan From A Policy ............................................................................... 134 Scheduling a Scan ........................................................................................................... 135 Scan Status Dialog ........................................................................................................... 137 Supplying Credentials ....................................................................................................... 137
Assigning Unique Credentials to a Machine Group .......................................................... 138 Assigning Unique Credentials to Individual Components .................................................. 138
Scan History .................................................................................................................... 139 Interpreting Scan Results .................................................................................................... 140
Viewing Scan Results ....................................................................................................... 140 Scan Results: Policy Check Summary ................................................................................ 142 Scan Results: Account Summary ....................................................................................... 144 Scan Results: Share Summary .......................................................................................... 146 Scan Results: Group Membership Summary ....................................................................... 148 Scan Results: Machine Summary ...................................................................................... 149 Detailed Policy Check Information ..................................................................................... 151
Enforcement ....................................................................................................................... 152 Enforcement Overview ..................................................................................................... 152 Enforcing One or More Policy Checks ................................................................................ 153 Providing A Comment Before Performing an Enforcement .................................................. 154 Enforcement History ........................................................................................................ 155
Change Management .......................................................................................................... 156 Requiring Policy Change and Enforcement Comments ........................................................ 156 Exporting Policy Changes ................................................................................................. 157
To export policy changes .............................................................................................. 157 How to View Checks That Are Out of Compliance .............................................................. 158 How to View Comments ................................................................................................... 160
Reports .............................................................................................................................. 161 Available Reports ............................................................................................................. 161 Report Gallery ................................................................................................................. 162 Exporting reports ............................................................................................................. 164
Viewing Account Information ............................................................................................... 165 How to View Account Information ..................................................................................... 165 Enabling and Disabling Account Scanning .......................................................................... 166
Understanding Shares ......................................................................................................... 167 What Exactly Is A Share? ................................................................................................. 167 Why Knowing About Shares Is Important .......................................................................... 167 How to View Share Information ........................................................................................ 168 Enabling and Disabling Shares Scanning ........................................................................... 168
7/30/2019 Vmware Vcenter Administration
http://slidepdf.com/reader/full/vmware-vcenter-administration 6/183
Table of Contents
vi vCenter™ Protect Essentials Plus - Configuration Management Administration Guide
Viewing Group Membership Information ............................................................................... 169 Why Knowing About Group Membership Is Important ........................................................ 169 How to View Group Membership Information .................................................................... 169 Enabling and Disabling Group Membership Scanning.......................................................... 170
Configuring a Connection to the VMware vCenter Protect Database ....................................... 171 Disconnected Mode ............................................................................................................. 173 Manually Obtaining XML Files ............................................................................................... 174
About the XML Files ...................................................................................................... 174 Obtaining support ............................................................................................................... 175 Index ................................................................................................................................. 176

7/30/2019 Vmware Vcenter Administration
http://slidepdf.com/reader/full/vmware-vcenter-administration 7/183
Welcome
vCenter™ Protect Essentials Plus - Configuration Management Administration Guide 1
Welcome to VMware vCenter™ Protect EssentialsPlus - Configuration Management 4.3
Welcome to VMware vCenter™ Protect Essentials Plus - Configuration Management, the nextgeneration of computer security configuration and compliance assessment for Microsoft-basedmachines. VMware vCenter Protect - Configuration Management enables you to understand,check, assess, audit, and enforce policy checks on the machines in your networks. It is also anexcellent tool for enabling you to understand and meet regulatory compliance requirements andother information security needs.
VMware vCenter Protect - Configuration Management is simultaneously an information center, an
implementation tool, and a vehicle for proving compliance with regulatory requirements.
• As an information center it places a detailed catalog of security procedures, scripts, and
other security configuration information at your fingertips. You can use this informationto gain an understanding about a number of different policy checks and why you may
want to implement those checks. It also provides predefined scripts that you can use onmachines in your network to implement the various policy checks.
• As an implementation tool it provides you with the ability to scan Microsoft-basedmachines in your network and assess the machines for their adherence to specific policysettings. How each scanned machine "grades out" is dependent upon how strict a policyyou use when evaluating the machines. You can use the tool to interpret the results of the scan and to update wayward machines, bringing them in line with your particularcorporate security policies.
• As a compliance tool, the reports that are automatically generated can be used toprovide auditors with evidence of your company's compliance with regulatoryrequirements. They can also be used to assess your readiness prior to an external audit.

7/30/2019 Vmware Vcenter Administration
http://slidepdf.com/reader/full/vmware-vcenter-administration 8/183
Welcome
2 vCenter™ Protect Essentials Plus - Configuration Management Administration Guide
Why You Need VMware vCenter Protect - ConfigurationManagement
IT executives are increasingly confronted with the dual task of managing risk to theirorganization and complying with internal and external security mandates. According to one study
(Gartner, 2003), more than two-thirds of vulnerabilities are a result of system configurationerrors.
VMware vCenter Protect - Configuration Management automates the management of criticalsystem and security configurations, enabling IT executives to keep up with emerging regulations,
to meet their compliance objectives, to lower their costs, and to reduce their risk of exposure.
The VMware vCenter Protect - Configuration Management solution automates the development
and management of a security baseline, focusing on the following key components:
• Security configuration management: Security configuration errors are one of the
main causes of system downtime and exposure. The ability to manage and mitigatethese types of issues is critical. Successful implementation of a security configuration
management program reduces demands on IT staff, ensures the highest level of systemintegrity, and proactively manages critical system and security configuration attributes inan automated, repeatable, and auditable manner.
VMware vCenter Protect - Configuration Management centralizes management tasks tostreamline efficiency and provide better overall accountability. It provides an auditablemethod of tracking system security configuration changes to enforce and support
compliance requirements. It also helps an enterprise to develop and maintain anauditable set of internal controls to ensure the accuracy, security, and availability of
corporate information assets.
• Proof of Compliance: Many government regulations and industry initiatives demandthat IT be able to provide evidence of the ”current state” of the systems on the network while maintaining auditable reporting to demonstrate compliance. These regulations have
caused a significant increase in the attention IT organizations place on understandingand managing the elements that make up their IT environment, as well as the tracking of change.
VMware vCenter Protect - Configuration Management addresses the growing challengesassociated with the IT system audit process by providing comprehensive automation tostreamline the auditing and reporting of system and security configurations. It allows theenterprise to conduct a complete assessment of the entire network rather than astatistical sampling of systems. This complete assessment results in a far more expansiveview of compliance with existing policies.
With VMware vCenter Protect - Configuration Management, your enterprise has a broadrange of audit-ready reports that offer detailed verification of your system and securityconfiguration compliance.
• IT Risk Management: IT executives need comprehensive visibility into the security
state of their entire network to properly assess potential risk to the organization and todemonstrate compliance with stated security policies, industry regulations, and IT bestpractices. Today, most vulnerabilities result from the lack of a consistent means of measuring the condition or state of systems (or multiple systems) on the network. As aresult, there is a widening gap between an organization’s documented security policiesand the existing state of individual systems on the network. This gap leaves

7/30/2019 Vmware Vcenter Administration
http://slidepdf.com/reader/full/vmware-vcenter-administration 9/183
Welcome
vCenter™ Protect Essentials Plus - Configuration Management Administration Guide 3
organizations exposed to multiple risks such as downtime from system failure,introduction of security vulnerabilities, and insider security threats.
Mitigation of potential risk associated with out-of-policy security configuration is acomplex task. VMware vCenter Protect - Configuration Management takes a simplifiedapproach that can quickly and easily identify systems that are out of compliance andreturn those systems to the desired state.
What's New?
For a complete list of the new features, enhancements, and bug fixes included in this version, goto: http://www.shavlik.com/support/updates-configure.aspx.
General Computer Security Recommendations
In order to keep each machine in your network operating at its best, VMware Inc offers thefollowing "best practice" recommendations:
• Configure each machine securely to avoid attacks
• Keep each machine up-to-date with the latest software patches
• Scan each machine regularly to remove spyware
• Keep each machine physically secure
• Use a password-protected screen saver with a short interval
• Use anti-virus protection software on each machine
• Use an account that does not contain administrative privileges for everyday tasks
• Use a specialized account when performing administrative functions
VMware Inc Can Help
According to one study (Gartner, 2003):
• 65% of all computer attacks exploit security configuration errors
• 35% of all computer attacks exploit missing patches
VMware Inc provides a number of security products that can help keep your network machines
free from harm. VMware vCenter Protect - Configuration Management enables experiencedadministrators to identify and fix security configuration errors that exist on machines in yournetwork. VMware vCenter Protect enables you to identify and deploy missing patches to yournetwork machines. In addition, it can scan for and remove threats from those same machines. Byusing VMware vCenter Protect - Configuration Management in concert with VMware vCenterProtect, you can effectively guard against a wide range of the attacks that may be launchedagainst machines in your network.

7/30/2019 Vmware Vcenter Administration
http://slidepdf.com/reader/full/vmware-vcenter-administration 10/183
About VMware vCenter Protect – Configuration Management
4 vCenter™ Protect Essentials Plus - Configuration Management Administration Guide
About VMware vCenter Protect - ConfigurationManagement
Editions of the Program
There are several editions of the program. The edition you have depends upon the type of program license you purchased. Each edition provides a different level of capabilities.
• VMware vCenter Protect Essentials Plus - Configuration Management, TrialEdition
VMware vCenter Protect Essentials Plus - Configuration Management is available on atrial basis. This enables you to test all the capabilities of VMware vCenter Protect -Configuration Management, but only for 45 days. When the trial license expires the
program will only allow you to scan and remediate the local machine.
• VMware vCenter Protect Essentials Plus - Configuration Management, AuditEdition
The Audit edition allows you to create machine groups, to create policy groups, to scanmachines, and to view the results of the scan.
• VMware vCenter Protect Essentials Plus - Configuration Management, Full
Edition
The Full edition allows you access to all the features in the Audit edition, plus it providespolicy enforcement capabilities. The Full edition does not provide the licensing needed to
use the SCAP Processor.
• VMware vCenter Protect Essentials Plus - Configuration Management, SCAP Audit Edition
The SCAP Audit edition allows you access to all the features in the Audit edition, plus it
allows you to use the SCAP Processor. The SCAP Processor is a separate utility programthat converts Security Content Automation Protocol (SCAP) profiles into policies that canbe imported into VMware vCenter Protect - Configuration Management . This edition isgenerally used for U.S. Government customers or Government-affiliated customers.
• VMware vCenter Protect Essentials Plus - Configuration Management, SCAPFull Edition
The SCAP edition allows you access to all the features in the Full edition, plus it allows
you to use the SCAP Processor. The SCAP Processor is a separate utility program thatconverts Security Content Automation Protocol (SCAP) profiles into policies that can beimported into VMware vCenter Protect - Configuration Management. This edition is
generally used for U.S. Government customers or Government-affiliated customers.
For more information, see Version and License Information.

7/30/2019 Vmware Vcenter Administration
http://slidepdf.com/reader/full/vmware-vcenter-administration 11/183
About VMware vCenter Protect – Configuration Management
vCenter™ Protect Essentials Plus - Configuration Management Administration Guide 5
System Requirements
Console
Processor:• Minimum: 500 MHz CPU
• Recommended: 2.0 GHz CPU (multi-processor machine if more than 1000 seatlicense)
Memory:• Minimum: 256 MB RAM• Recommended: 2 MB RAM (4 GB if more than 1000 seat license)
Video:• 1024 x 768 screen resolution or higher (1280 x 1024 recommended)
Disk Space:• 60 meg for application
Operating System (one of the following):Minimum:• Windows XP Professional, SP3 or later (SP2 or later if using 64-bit version)• Windows Vista, SP2 or later, Business, Enterprise, or Ultimate Edition• Windows 7, Professional, Enterprise, or Ultimate EditionRecommended:• Windows Server 2003 Family, SP2 or later• Windows Server 2008 Family, excluding Server Core• Windows Server 2008 Family R2, excluding Server Core
Note: VMware vCenter Protect - Configuration Management supports 32- and 64-bitversions of the listed operating systems for both console and target systems.
Database:• Use of SQL Server database (SQL Server 2005, SQL Server 2005 Express Edition,
SQL Server 2008, or SQL Server 2008 Express Edition) is required. If you do not have
a SQL Server database, the option to install SQL Server 2008 Express Edition will beprovided during the prerequisite software installation process.
• Size: 1.5 GB
Prerequisite Software:• Internet Explorer 6.0 or later• Windows Installer 4.5 (only required if installing SQL Express 2008 during the
installation)
• Use of Microsoft SQL Server 2005, SQL Server 2005 Express Edition, SQL Server2008, or SQL Server 2008 Express Edition
• SQL Server Management Objects (SMO)• SQL Native Client or SQL 2008 Native Client (if using SQL Server 2008)• Microsoft .NET Framework 3.5, SP1 or later
• IIS common files (for IIS-related checks)• VMware vCenter Protect 7.x or later (if you want to use patch policy checks)
System Configuration:• Workstation Service• Server Service• Remote Registry Service• Simple File Sharing disabled

7/30/2019 Vmware Vcenter Administration
http://slidepdf.com/reader/full/vmware-vcenter-administration 12/183
About VMware vCenter Protect – Configuration Management
6 vCenter™ Protect Essentials Plus - Configuration Management Administration Guide
• An administrative share is required (will be temporarily added if missing)• When scanning the console machine, Windows Management Instrumentation (WMI)
service must be running and the protocol allowed to the machine (in WindowsFirewall, on Windows XP/Windows 2003 machines this is called Remote
Administration, and on Windows Vista/Windows Server 2008 machines this is called
Windows Management Instrumentation (WMI)/Remote Administration)
Clients
Browser:• Internet Explorer 4.0 or later
Disk Space:• A minimal amount needed for log files
Operating System (any of the following):• Windows 2000 Professional• Windows 2000 Server• Windows 2000 Advanced Server• Windows 2000 Datacenter Server
• Windows 2000 Small Business Server• Windows XP Professional• Windows XP Tablet PC Edition• Windows Server 2003, Enterprise Edition• Windows Server 2003, Standard Edition• Windows Server 2003, Web Edition• Windows Server 2003 for Small Business Server• Windows Server 2003, Datacenter Edition• Windows Vista, Home Basic Edition
• Windows Vista, Home Premium Edition• Windows Vista, Business Edition• Windows Vista, Enterprise Edition
• Windows Vista, Ultimate Edition
• Windows 7, Professional Edition• Windows 7, Enterprise Edition
• Windows 7, Ultimate Edition• Windows Server 2008, Standard• Windows Server 2008, Enterprise• Windows Server 2008, Datacenter• Windows Server 2008, Standard - Core• Windows Server 2008, Enterprise - Core• Windows Server 2008, Datacenter - Core• Windows Server 2008 R2, Standard• Windows Server 2008 R2, Enterprise• Windows Server 2008 R2, Datacenter•
Windows Server 2008 R2, Standard - Core• Windows Server 2008 R2, Enterprise - Core• Windows Server 2008 R2, Datacenter - CoreNote: VMware vCenter Protect - Configuration Management supports 32- and 64-bitversions of the listed operating systems for both console and target systems.
7/30/2019 Vmware Vcenter Administration
http://slidepdf.com/reader/full/vmware-vcenter-administration 13/183
About VMware vCenter Protect – Configuration Management
vCenter™ Protect Essentials Plus - Configuration Management Administration Guide 7
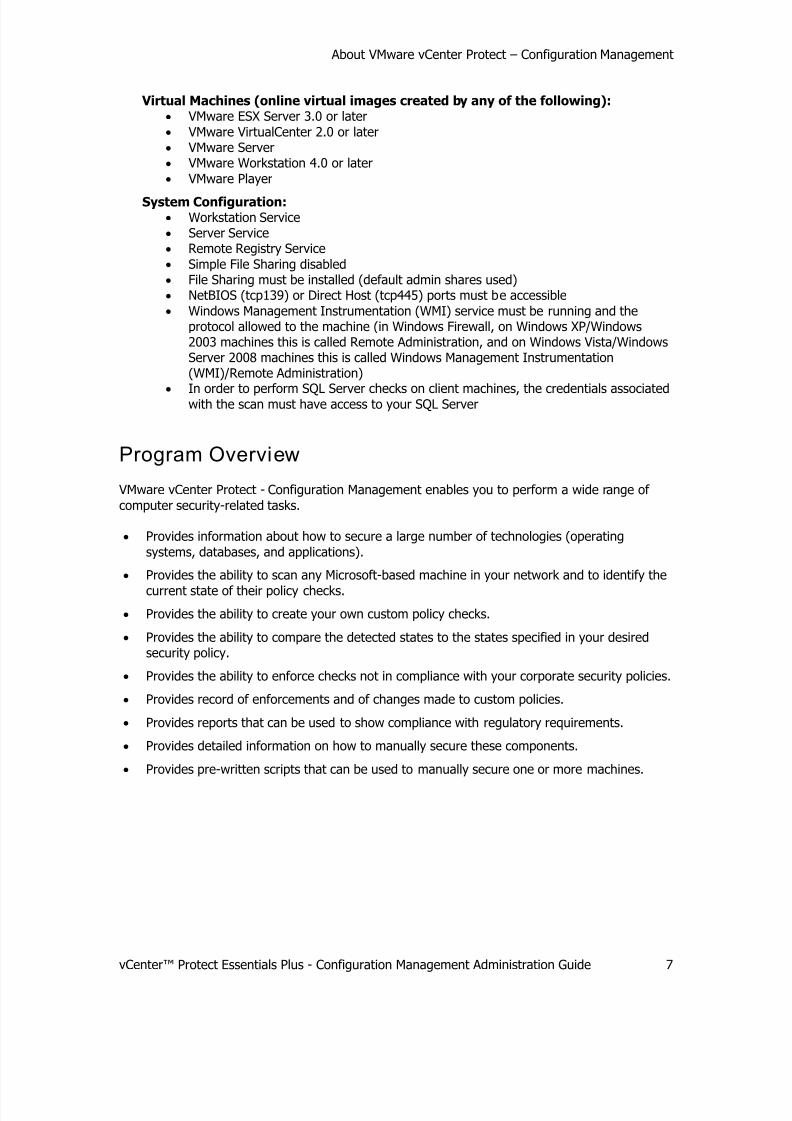
Virtual Machines (online virtual images created by any of the following):• VMware ESX Server 3.0 or later• VMware VirtualCenter 2.0 or later• VMware Server• VMware Workstation 4.0 or later• VMware Player
System Configuration:• Workstation Service• Server Service• Remote Registry Service• Simple File Sharing disabled• File Sharing must be installed (default admin shares used)• NetBIOS (tcp139) or Direct Host (tcp445) ports must be accessible• Windows Management Instrumentation (WMI) service must be running and the
protocol allowed to the machine (in Windows Firewall, on Windows XP/Windows2003 machines this is called Remote Administration, and on Windows Vista/WindowsServer 2008 machines this is called Windows Management Instrumentation(WMI)/Remote Administration)
• In order to perform SQL Server checks on client machines, the credentials associatedwith the scan must have access to your SQL Server
Program Overview
VMware vCenter Protect - Configuration Management enables you to perform a wide range of
computer security-related tasks.
• Provides information about how to secure a large number of technologies (operating
systems, databases, and applications).
• Provides the ability to scan any Microsoft-based machine in your network and to identify the
current state of their policy checks.
• Provides the ability to create your own custom policy checks.
• Provides the ability to compare the detected states to the states specified in your desiredsecurity policy.
• Provides the ability to enforce checks not in compliance with your corporate security policies.
• Provides record of enforcements and of changes made to custom policies.
• Provides reports that can be used to show compliance with regulatory requirements.
• Provides detailed information on how to manually secure these components.
• Provides pre-written scripts that can be used to manually secure one or more machines.

7/30/2019 Vmware Vcenter Administration
http://slidepdf.com/reader/full/vmware-vcenter-administration 14/183
About VMware vCenter Protect – Configuration Management
8 vCenter™ Protect Essentials Plus - Configuration Management Administration Guide
Major Components
VMware vCenter Protect - Configuration Management contains the following main components:
• Scanning Engine: Scans the desired machines in your network for adherence to the policychecks you specify.
• Enforcement Tool: Enables you to correct the configuration issues the scan engine detectson your network machines.
• Reports: Enable you to view the results of your scans. The reports also provide externalauditors with evidence of your company's compliance with regulatory requirements.
Scanning Engine Overview
VMware vCenter Protect - Configuration Management is an extension of the industry leadingHFNetChk scan engine developed for Microsoft by Shavlik Technologies (now a part of VMware
Inc). The VMware vCenter Protect - Configuration Management engine uses an ExtensibleMarkup Language (XML) compliance data file that contains information about which policy checksto scan for. The content of the XML data file is determined by the policy you elect to use— eitherthe Recommended Baseline provided by VMware Inc or a custom policy that you create.
VMware vCenter Protect - Configuration Management scans the selected machines to determinethe different products that are running. VMware vCenter Protect - Configuration Managementthen parses the XML file, identifies the associated policy checks defined within the XML file, anddetermines which checks (if any) are not in compliance with the stated policy. An overview of the
scan results are automatically displayed in the right pane, and detailed information about theresults may be found in the accompanying reports that are available.
Enumerating Machines
When scanning by domain name, VMware vCenter Protect - Configuration Management doesseveral things to enumerate the machines in the domain:
• If the scan is being run as an administrative user with appropriate permissions, VMwarevCenter Protect - Configuration Management attempts to contact the domain controllerand enumerate its list of machine accounts.
• Machines are also enumerated from the network browse list which is the same list of
machines seen on a per domain basis when viewing Network Neighborhood, or similar to'net view /domain:domainname'. No special permissions are required to enumerate
machine names this way as VMware vCenter Protect - Configuration Management isusing UDP port 137 (NetBIOS name service) to enumerate the browse list. If thescanning machine has just been connected to the network, it may take up to 15 minutes
until the machine synchronizes with the browse master and for this list to becomeavailable to the scanning machine. The list of machines that are returned representmachines that are currently online or have been within the last 15 minutes. Machines
7/30/2019 Vmware Vcenter Administration
http://slidepdf.com/reader/full/vmware-vcenter-administration 15/183
About VMware vCenter Protect – Configuration Management
vCenter™ Protect Essentials Plus - Configuration Management Administration Guide 9
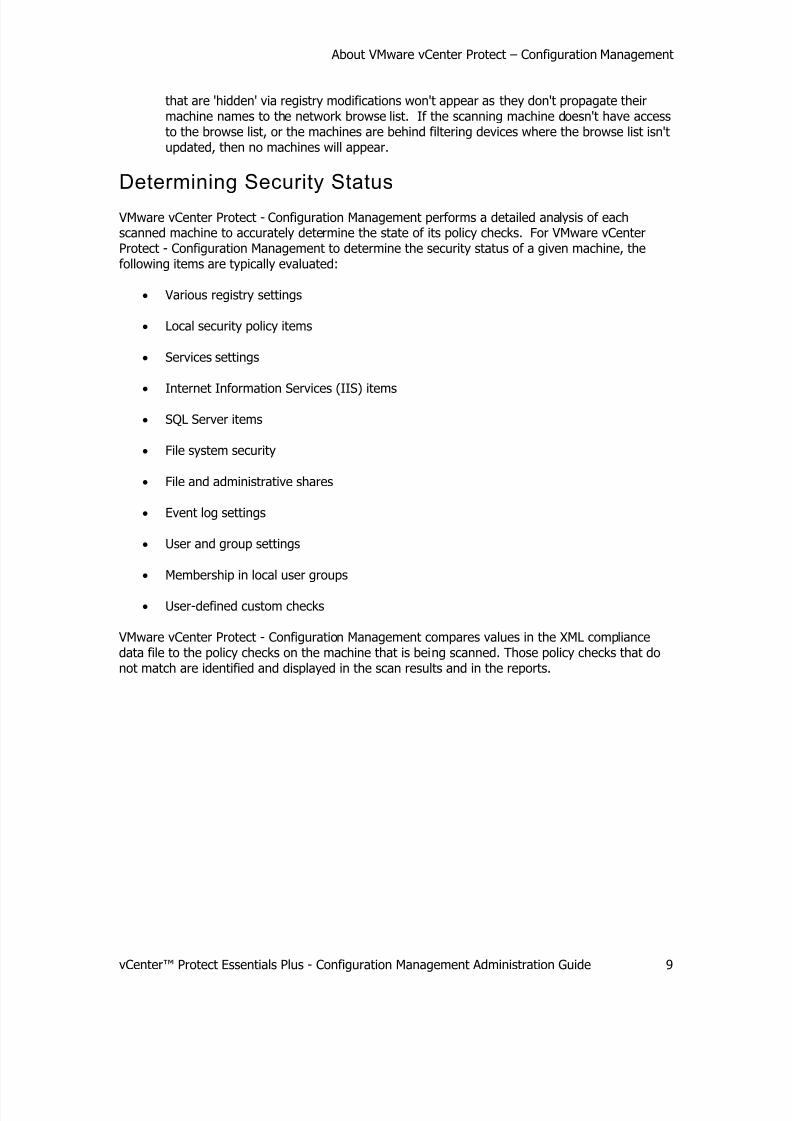
that are 'hidden' via registry modifications won't appear as they don't propagate theirmachine names to the network browse list. If the scanning machine doesn't have accessto the browse list, or the machines are behind filtering devices where the browse list isn'tupdated, then no machines will appear.
Determining Security Status
VMware vCenter Protect - Configuration Management performs a detailed analysis of eachscanned machine to accurately determine the state of its policy checks. For VMware vCenterProtect - Configuration Management to determine the security status of a given machine, thefollowing items are typically evaluated:
• Various registry settings
• Local security policy items
• Services settings
• Internet Information Services (IIS) items
• SQL Server items
• File system security
• File and administrative shares
• Event log settings
• User and group settings
• Membership in local user groups
• User-defined custom checks
VMware vCenter Protect - Configuration Management compares values in the XML compliancedata file to the policy checks on the machine that is being scanned. Those policy checks that donot match are identified and displayed in the scan results and in the reports.

7/30/2019 Vmware Vcenter Administration
http://slidepdf.com/reader/full/vmware-vcenter-administration 16/183
Installation
10 vCenter™ Protect Essentials Plus - Configuration Management Administration Guide
Installation
Obtaining the Software
VMware vCenter Protect - Configuration Management is available for download from our Web-
based download center. The download center always has the most recent version of VMwarevCenter Protect - Configuration Management that is available.
Installing the Prerequisites
Automatic instal lation
The prerequisites can be automatically installed during the VMware vCenter Protect -Configuration Management installation.
Manual installation
If you prefer to download and install the prerequisites yourself, you may do so using thefollowing URLs.
Windows Installer 4.5
http://www.microsoft.com/downloads/details.aspx?FamilyID=5a58b56f-60b6-4412-95b9-54d056d6f9f4
.NET Framework 3.5
http://download.microsoft.com/download/0/6/1/061f001c-8752-4600-a198-53214c69b51f/dotnetfx35setup.exe
SQL Server 2008 Express Edition (needed only if you don't already have a full editionof SQL Server)
http://www.microsoft.com/downloads/details.aspx?FamilyID=58ce885d-508b-45c8-9fd3-118edd8e6fff
Prerequisites for SQL Server Management Objects (2008)
Englishhttp://download.microsoft.com/download/0/E/6/0E67502A-22B4-4C47-92D3-0D223F117190/SQLSysClrTypes.msi (x86)http://download.microsoft.com/download/A/D/0/AD021EF1-9CBC-4D11-AB51-6A65019D4706/SQLSysClrTypes.msi (x64)
Frenchhttp://download.microsoft.com/download/2/1/2/212DDFE2-3F12-44A1-A96C-42AB89F951D2/SQLSysClrTypes.msi (x86)http://download.microsoft.com/download/6/8/B/68BD0291-CED3-4538-B6CB-
10978DC4ED9C/SQLSysClrTypes.msi (x64)German
http://download.microsoft.com/download/0/9/7/0971CDDD-AE32-44F1-9075-4547E24ED463/SQLSysClrTypes.msi (x86)http://download.microsoft.com/download/7/7/B/77B0D929-34B5-4020-83D7-4F28CD2336C3/SQLSysClrTypes.msi (x64)

7/30/2019 Vmware Vcenter Administration
http://slidepdf.com/reader/full/vmware-vcenter-administration 17/183
Installation
vCenter™ Protect Essentials Plus - Configuration Management Administration Guide 11
SQL Server Management Objects (2008)
English http://download.microsoft.com/download/0/E/6/0E67502A-22B4-4C47-92D3-0D223F117190/SharedManagementObjects.msi (x86)http://download.microsoft.com/download/A/D/0/AD021EF1-9CBC-4D11-AB51-
6A65019D4706/SharedManagementObjects.msi (x64)
Frenchhttp://download.microsoft.com/download/2/1/2/212DDFE2-3F12-44A1-A96C-42AB89F951D2/SharedManagementObjects.msi (x86)http://download.microsoft.com/download/6/8/B/68BD0291-CED3-4538-B6CB-
10978DC4ED9C/SharedManagementObjects.msi (x64)German
http://download.microsoft.com/download/0/9/7/0971CDDD-AE32-44F1-9075-
4547E24ED463/SharedManagementObjects.msi (x86)http://download.microsoft.com/download/7/7/B/77B0D929-34B5-4020-83D7-4F28CD2336C3/SharedManagementObjects.msi (x64)
SQL 2008 Native Client (if using SQL Server 2008)English
http://download.microsoft.com/download/0/E/6/0E67502A-22B4-4C47-92D3-0D223F117190/sqlncli.msi (x86)http://download.microsoft.com/download/A/D/0/AD021EF1-9CBC-4D11-AB51-6A65019D4706/sqlncli.msi (x64)
Frenchhttp://download.microsoft.com/download/2/1/2/212DDFE2-3F12-44A1-A96C-42AB89F951D2/sqlncli.msi (x86)http://download.microsoft.com/download/6/8/B/68BD0291-CED3-4538-B6CB-
10978DC4ED9C/sqlncli.msi (x64)German
http://download.microsoft.com/download/0/9/7/0971CDDD-AE32-44F1-9075-4547E24ED463/sqlncli.msi (x86)http://download.microsoft.com/download/7/7/B/77B0D929-34B5-4020-83D7-
4F28CD2336C3/sqlncli.msi (x64)
If your language is not listed the Microsoft SQL Server Native Client download is part of the
collection found at:http://www.microsoft.com/downloads/details.aspx?FamilyID=b33d2c78-1059-4ce2-b80d-2343c099bcb4&displaylang=en

7/30/2019 Vmware Vcenter Administration
http://slidepdf.com/reader/full/vmware-vcenter-administration 18/183
Installation
12 vCenter™ Protect Essentials Plus - Configuration Management Administration Guide
Performing A New Installation
To install the program:
1) Double-click the file named VMwareProtectConfigMgmtSetup_4.3.#.#.exe.
Any software prerequisites that are missing will be listed. Click Install to install the missingprerequisites (this may take several minutes and may require a reboot). When all prerequisitesare installed the Welcome to the VMware vCenter Protect - ConfigurationManagement Installation Wizard dialog is displayed.
2) Click Next.
The license agreement is displayed. You must agree to the terms of the license agreement inorder to install the program.
3) To continue with the installation, select I accept the terms in the license agreement andthen click Next.
The Destination Folder dialog appears.
4) If you want to change the default location of the program, click Change and choose a newlocation. When you are done, click Next.
The Ready to Install the Program dialog appears.
5) To begin the installation click Install.
Near the end of the installation process the Do you have an Existing Database? dialog isdisplayed.
6) If you have a previously installed VMware vCenter Protect - Configuration Managementdatabase that you wish to use, select Yes and then click Next. Otherwise, select No and thenclick Next.
• If you select Yes, specify whether your existing database is a SQL Server or Microsoft Access database. If it is a Microsoft Access database it will be converted to a SQL Server
database. Proceed to Step 8 to provide your SQL Server configuration information.
• If you select No, the Do you want to create a new Database? dialog is displayed.
7) To create a new SQL Server database, select Yes. If you select No the installation will not beable to complete.
A dialog similar to the following is displayed:

7/30/2019 Vmware Vcenter Administration
http://slidepdf.com/reader/full/vmware-vcenter-administration 19/183
Installation
vCenter™ Protect Essentials Plus - Configuration Management Administration Guide 13
Use the boxes provided to define the name, location, and credentials used to access the SQLServer database.
• Server name: You can specify a machine or you can specify a machine and the SQLServer instance running on that machine.
• Database name: Specify the database name you want to use. The default databasename is stcScans .
• Windows Authentication: This is the recommended and default option. VMwarevCenter Protect - Configuration Management will use the currently logged on usercredentials to connect to the SQL Server database. The User name and Password boxes
will be unavailable.
• SQL Authentication: Select this option to enter a specific user name and passwordcombination when logging on to the specified SQL Server.
Caution! If you supply SQL authentication credentials and have not implemented SSLencryption for SQL connections, the credentials will be passed over the network in clear
text.• Test Server Connection: To verify that the program can use the supplied credentials to
connect to the database, click this button.

7/30/2019 Vmware Vcenter Administration
http://slidepdf.com/reader/full/vmware-vcenter-administration 20/183
Installation
14 vCenter™ Protect Essentials Plus - Configuration Management Administration Guide
8) After providing all the required information, click Next.
The program either creates the new database or connects to the existing database. When thedatabase is complete the Database Installation Complete dialog is displayed.
9) Click Next.
When the installation is complete the Installation Complete dialog appears.
10) Click Finish.
The InstallShield Wizard Completed dialog appears.
11) If you want to start using the program immediately, enable the Launch VMware vCenterProtect - Configuration Management check box and then click Finish.
7/30/2019 Vmware Vcenter Administration
http://slidepdf.com/reader/full/vmware-vcenter-administration 21/183
Getting Started
vCenter™ Protect Essentials Plus - Configuration Management Administration Guide 15
Getting Started
Starting VMware vCenter Protect - ConfigurationManagement
You can start VMware vCenter Protect - Configuration Management two ways:
Select Start > All Programs > VMware > vCenter Protect ConfigurationManagement
Double-click the vCenter Protect Configuration Management icon on your desktop
After starting the program the home page is displayed. See About the Home Page for detailed
information about the home page.
Activat ing VMware vCenter Protect - ConfigurationManagement
Until you activate VMware vCenter Protect - Configuration Management you are very limited in
the actions you are allowed to perform. You activate the program by entering a valid activationkey. To activate VMware vCenter Protect - Configuration Management:
1. If you have an electronic copy of your license key copy it to your computer's clipboard.
Your license key is typically sent to you in an e-mail from VMware Inc when you purchase the
product.
2. From the VMware vCenter Protect - Configuration Management menu select Help > EnterLicense Key.
The Activation dialog appears.
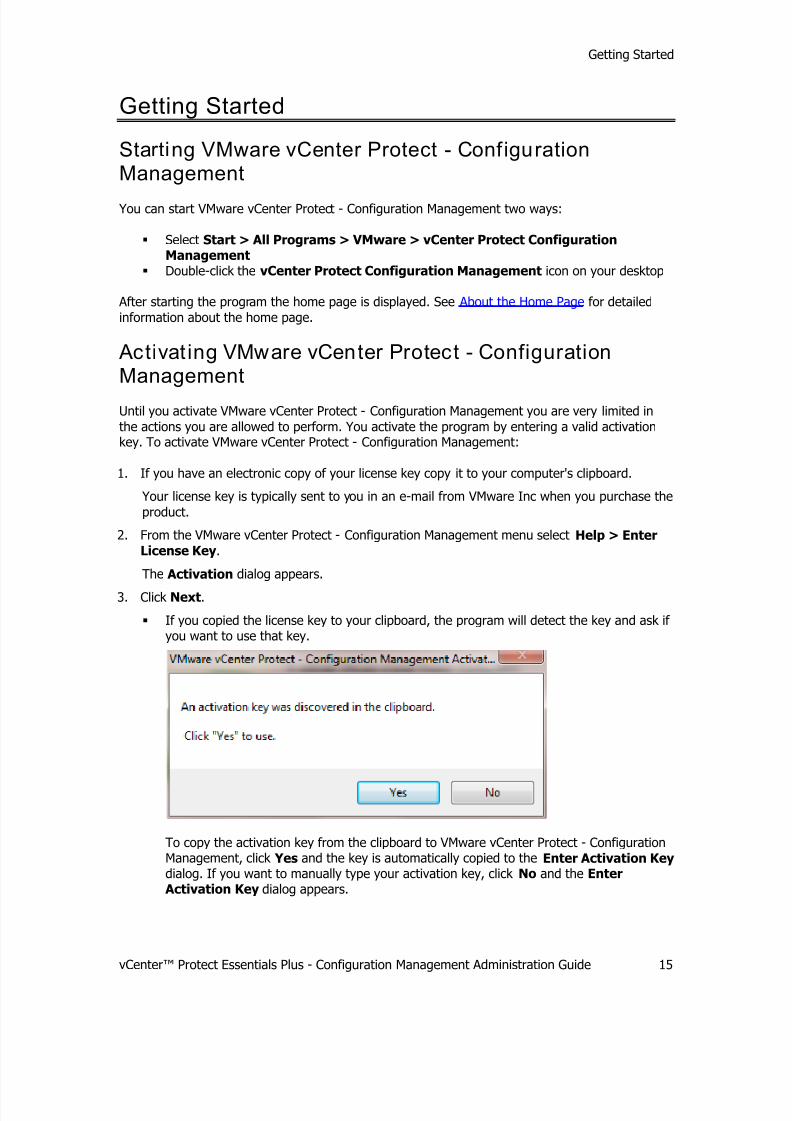
3. Click Next.
If you copied the license key to your clipboard, the program will detect the key and ask if you want to use that key.
To copy the activation key from the clipboard to VMware vCenter Protect - ConfigurationManagement, click Yes and the key is automatically copied to the Enter Activation Key dialog. If you want to manually type your activation key, click No and the Enter
Activation Key dialog appears.

7/30/2019 Vmware Vcenter Administration
http://slidepdf.com/reader/full/vmware-vcenter-administration 22/183
Getting Started
16 vCenter™ Protect Essentials Plus - Configuration Management Administration Guide
If you didn't copy your activation key to your clipboard, the Enter Activation Key dialog appears:
4. When the activation key has been entered on the dialog, click Next.
If you have an Internet connection
If you have an Internet connection and the activation is successful the Registration Complete
dialog is displayed. At this point the activation process is complete.
If you do not have an Internet connection
If you do not have an Internet connection the following dialog appears:
1. Select the This system does not have a connection to the Internet option and thenclick Finish.
A text file is generated and opened within the Notepad application.
2. Save the file and then move it to a computer that has an Internet connection.

7/30/2019 Vmware Vcenter Administration
http://slidepdf.com/reader/full/vmware-vcenter-administration 23/183
Getting Started
vCenter™ Protect Essentials Plus - Configuration Management Administration Guide 17
3. E-mail the file to [email protected].
VMware Inc will process the license information and e-mail you back the processed licensefile.
4. When you receive the processed license file, move the file to the computer you are installingthe program on and then double-click the file.
VMware vCenter Protect - Configuration Management will now be activated.
Version and License Information
Selecting Help > About will provide a variety of information about VMware vCenter Protect -
Configuration Management.
Version and Application Information
The center portion of the Help > About dialog is used to view both version and applicationinformation. To toggle between both views, click the Version Info or App Info button.
• Version Info: Displays version information about each of the program components beingused by the program.
• App Info: Displays both the version and the edition of the program being used as well asthe number of machines you are licensed to scan and the number of machines you arelicensed to remediate (enforce).
Version Log
To save the version information to a Notepad file, click Version Log.
Tech Support Information For technical assistance with VMware vCenter Protect - Configuration Management, please referto one of the following support options:
• Browse the Community Site at community.shavlik.com
• E-mail us at [email protected]
• Phone Technical Support at 866-407-5279

7/30/2019 Vmware Vcenter Administration
http://slidepdf.com/reader/full/vmware-vcenter-administration 24/183
Getting Started
18 vCenter™ Protect Essentials Plus - Configuration Management Administration Guide
How Licenses are Tracked
When a remediation (enforcement) is performed, VMware vCenter Protect - ConfigurationManagement records the machine name in the database if it does not already exist. From there,the number of remaining seats available for remediation is reduced by one for each remediationtarget.
You can easily find out how many licenses are available by choosing Help > About. The dialogbelow indicates that this license permits the scanning and remediation of up to 5000 machines.

7/30/2019 Vmware Vcenter Administration
http://slidepdf.com/reader/full/vmware-vcenter-administration 25/183
Getting Started
vCenter™ Protect Essentials Plus - Configuration Management Administration Guide 19
About the VMware vCenter Protect - Conf igurationManagement Home Page
The home page is your starting point for many of the actions you perform with VMware vCenterProtect - Configuration Management. The home page is designed to be simple yet powerful,
enabling you to perform any number of computer security-related activities quickly and easily. Anannotated home page is shown here. For information about each section of the home page, seethe table that follows.
1The Get Started area provides three easy steps for initiating a scan. You simply:
1. Select the machine group you want to scan.2. Select the policy you want to use when scanning the machines.3. Click Begin Scan.
The Select Machine Group areacontains a drop-down boxcontaining a list of all currently
available machine groups. It alsocontains a link that enables you to
define a new machine group, if needed. Finally, if you need areminder as to what machines arecontained within a specific group,click View.

7/30/2019 Vmware Vcenter Administration
http://slidepdf.com/reader/full/vmware-vcenter-administration 26/183
Getting Started
20 vCenter™ Protect Essentials Plus - Configuration Management Administration Guide
The Select Policy area contains a
drop-down box containing a list of all currently available policies. It
also contains a link that enablesyou to define a new policy. Finally,if you need a reminder as to what
products and checks are included ina specific policy, click View.
To initiate a scan using thespecified machine group and policy,click Begin Scan.
2This area provides information related to VMware vCenter Protect - ConfigurationManagement, including ways to get help and links to news.
3Machine groups define what will be scannedby VMware vCenter Protect - ConfigurationManagement . To view information about agroup simply click the group name.
• My Machine: Defines the localmachine.
• My Domain: Defines the local domain.
• My Test Machines: Enables you todefine a group of machinesrepresenting a smaller view of youractual network environment that youcan use for testing purposes.
• Entire Network : Defines all machinesvisible on the network.
• Import New Machine Group:Enables you to quickly create a new
machine group by importing an existinggroup.
• New Machine Group: Enables you tocreate a custom group of machines.

7/30/2019 Vmware Vcenter Administration
http://slidepdf.com/reader/full/vmware-vcenter-administration 27/183
Getting Started
vCenter™ Protect Essentials Plus - Configuration Management Administration Guide 21
4 A policy defines the products and the checks
that you want evaluated by VMware vCenterProtect - Configuration Management. Two
predefined baseline policies are provided foryour use, or you can define your own policygroup.
5The Scan Results list provides quick access
to all scans that have been performed.Clicking View Accounts enables you toview information about the local useraccounts identified on each machine that hasbeen scanned by the program. Clicking ViewResults enables you to select scans bydomain, machine group, or scan date.
Clicking an entry in the Recent Scans listwill take you directly to that particular scan.
How to Use the Program
VMware vCenter Protect - Configuration Management is designed to be powerful yet simple to
use. In general, you simply:
1. Select the machine group you want to scan.
2. Select the policy you want to use to evaluate the scanned machines.
3. Perform the scan.
4. Review the scan results and the accompanying reports.
5. If some policy checks are found to be noncompliant on certain machines, use the program toenforce (update) those settings.
6. Review the accompanying reports.

7/30/2019 Vmware Vcenter Administration
http://slidepdf.com/reader/full/vmware-vcenter-administration 28/183
Getting Started
22 vCenter™ Protect Essentials Plus - Configuration Management Administration Guide
Menu Options
The VMware vCenter Protect - Configuration Management menus enable you to do the following:
• File:
o New: Enables you to create a new machine group or a new custom policy
o Save: Save the item currently in use
o Print: Prints the information currently displayed in the right-hand pane
o Exit: Exits the program
• View:
o Home: Returns you to the home page
• Tools:
o Reports: Launches the Report Gallery, which is used to generate a variety of reports onany of the scans that have been performed
o
Manage Scan Results: Displays a list of all prior scans and enables you to delete thosescans that are no longer of any value
o Scheduling: Launches the Scheduled Jobs dialog, which enables you to view currentlyscheduled jobs and to schedule new jobs.
o Virtual Infrastructure Servers: Enables you to add virtual machines to a machine
group.
o Import Machine Group: Enables you to import a machine group that has beenexported from another machine group within VMware vCenter Protect - ConfigurationManagement or from another VMware Inc product (such as VMware vCenter Protect )
o Import Policy: Enables you to import a policy that has been exported from anotherinstance of VMware vCenter Protect - Configuration Management .
o Export Policy: Enables you to export an existing policy to an XML file.
o Export Policy Changes: Enables you to export to an XML file a list of changes thathave been made to a policy.
o Options: Launches the Options dialog, which enables you to configure different programoptions
• Help:
o Enter License Key: Enables you to activate the program
o Refresh License Key: Updates your program license, activating any new features orcapabilities that have recently been made available to you
o Check for Updates: Checks the proper Web site for updates to the program (if you arerunning in disconnected mode, a temporary Internet connection is attempted in order to
perform the check)o Contents: Display the online Help contents tab
o Index: Display the online Help index tab
o About: Display program version information

7/30/2019 Vmware Vcenter Administration
http://slidepdf.com/reader/full/vmware-vcenter-administration 29/183
Getting Started
vCenter™ Protect Essentials Plus - Configuration Management Administration Guide 23
Toolbar Options
The toolbar provides quick access to often used options and tasks. The following buttons areavailable on the toolbar:
• : Returns you to the previously viewed page
• : Forwards you to the next page you viewed in this session
• : Returns you to the home page
• : Saves the item currently in use
• : Launches the Report Gallery, which enables you to generate a variety of reports
• : Prints the information currently displayed in the right-hand pane
• : Enables you to add virtual machines to a new machine group
• : Launches the Help system
Online Help
A robust Help system is available for the program. To access the Help system, select Help >Contents or Help > Index.
Context-sensitive help is also available for many of the various program windows and dialogs.
Simply click , , or press F1 to view information specific to the window or dialog currentlydisplayed on the screen.

7/30/2019 Vmware Vcenter Administration
http://slidepdf.com/reader/full/vmware-vcenter-administration 30/183
Defining Machine Groups
24 vCenter™ Protect Essentials Plus - Configuration Management Administration Guide
Defining Machine Groups
About Machine Groups
VMware vCenter Protect - Configuration Management uses
machine groups to keep track of the machines that are includedin a particular scan. Even the local machine My Machine isconsidered a machine group. Among the predefined machinegroups are:
My Machine This group includes only the local machine.
My Domain Includes all of the machines that are a part of the domain to which thescanning computer is joined.
My Test
Machines
A group of machines that represent a 'smaller' view of your actual network environment. A machine of each type that is typically scanned should beadded to this group and used for testing purposes.
Entire
Network
Includes all machines currently viewable in Network Neighborhood.
Import NewMachine
Group
Import a list of machine names from a previously created XML file.
NewMachine
Group
Create a custom group of machines.
7/30/2019 Vmware Vcenter Administration
http://slidepdf.com/reader/full/vmware-vcenter-administration 31/183
Defining Machine Groups
vCenter™ Protect Essentials Plus - Configuration Management Administration Guide 25
Working With A Machine Group
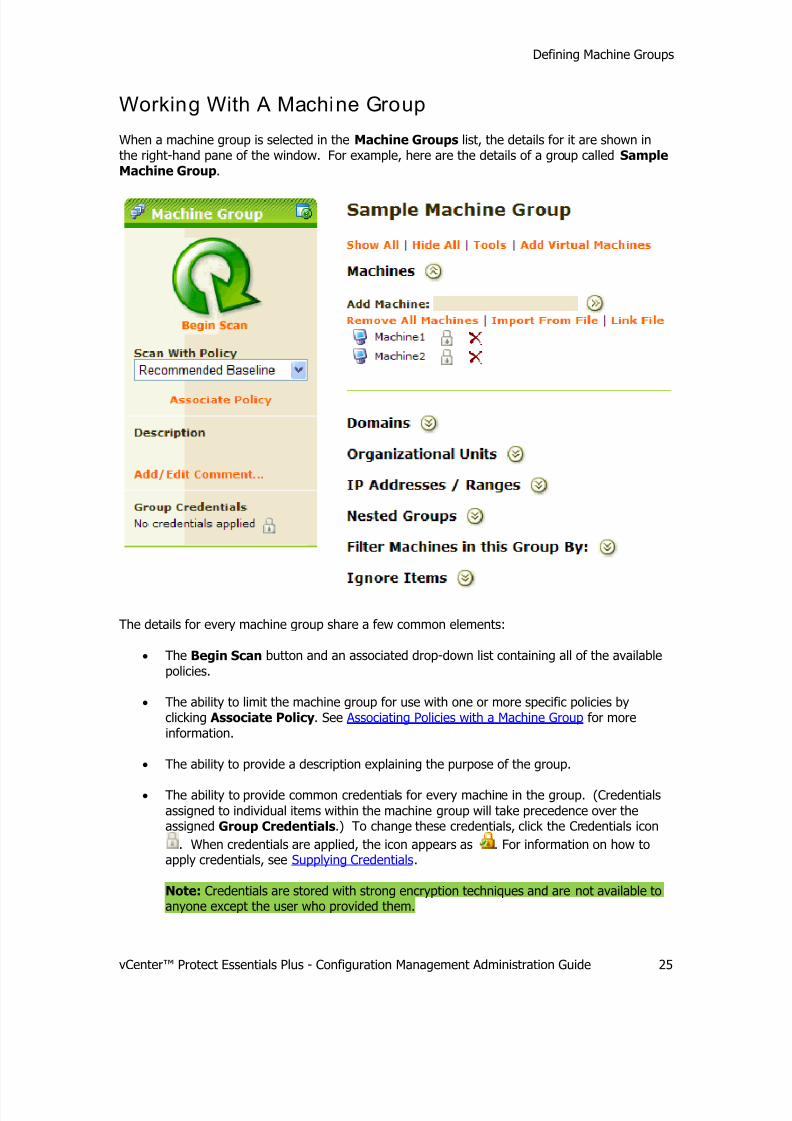
When a machine group is selected in the Machine Groups list, the details for it are shown inthe right-hand pane of the window. For example, here are the details of a group called SampleMachine Group.
The details for every machine group share a few common elements:
• The Begin Scan button and an associated drop-down list containing all of the available
policies.
• The ability to limit the machine group for use with one or more specific policies byclicking Associate Policy. See Associating Policies with a Machine Group for moreinformation.
• The ability to provide a description explaining the purpose of the group.
• The ability to provide common credentials for every machine in the group. (Credentials
assigned to individual items within the machine group will take precedence over theassigned Group Credentials.) To change these credentials, click the Credentials icon
. When credentials are applied, the icon appears as . For information on how toapply credentials, see Supplying Credentials.
Note: Credentials are stored with strong encryption techniques and are not available toanyone except the user who provided them.

7/30/2019 Vmware Vcenter Administration
http://slidepdf.com/reader/full/vmware-vcenter-administration 32/183
Defining Machine Groups
26 vCenter™ Protect Essentials Plus - Configuration Management Administration Guide
• Located beneath the name of the machine group are the following machine group menuitems.
Show All Shows all of the components (machines, domains, organizational units,IP addresses, etc.) used to define machines in this group. SeeConfiguring Machine Groups for information about each of these
components.
Note: Components for the predefined machine groups My Machine
and My Domain are never enumerated.
Hide All Hides all of the components used to define machines in this group. SeeConfiguring Machine Groups for information about each of thesecomponents.
Tools Click this menu item to access the following command options:
Delete: Deletes the current machine group.
Properties: Launches the Machine Group dialog, which enablesyou to rename the machine group and to update the description of the machine group.
Remove All Entities: Removes all machines in the machinegroup.
Import Group: Imports a group definition from an existing groupXML file. The file must be in the same format that is created by thegroup export feature.
Export Group: Exports the group definition to a group file or to atext file. If you choose to export to a text file, a separate file iscreated for the machines, domains, IP addresses, and IP ranges in
the group. If you choose to export to a group file, this creates anXML file that can be imported into another machine group.
Add Virtual
Machines
Enables you to add virtual machines to the machine group. Only thosevirtual machines that are online when a scan is performed will bescanned by VMware vCenter Protect - Configuration Management . SeeLogging On To A Server and Selecting Virtual Machines for details.

7/30/2019 Vmware Vcenter Administration
http://slidepdf.com/reader/full/vmware-vcenter-administration 33/183
Defining Machine Groups
vCenter™ Protect Essentials Plus - Configuration Management Administration Guide 27
Import ing a New Machine Group
One of the ways to quickly create a new machine group is to import an existing group thatclosely resembles the new group you want create; you can then add and delete machines asneeded. You can import a group that already exists within VMware vCenter Protect -Configuration Management, and you can also import existing groups from other products, suchas VMware vCenter Protect. Importing existing groups is much quicker than manually creatinggroups, particularly if the groups are large.
To import a new machine group:
Note: A new machine group is imported from an existing group XML file. Group XML files can becreated using the Tools > Export Group > Group File menu.
1. In the Machine Groups list click Import New Machine Group.
The Create A New Machine Group dialog box is displayed.
In this dialog, provide a descriptive name for the new machine group along with a commentthat describes the purpose of the group.
2. To save the group click Save; to abort the operation click Cancel.
If you click Save the Select a file to import dialog box is displayed.

7/30/2019 Vmware Vcenter Administration
http://slidepdf.com/reader/full/vmware-vcenter-administration 34/183
Defining Machine Groups
28 vCenter™ Protect Essentials Plus - Configuration Management Administration Guide
3. Navigate to the location of the machine group XML file you want to import and then click
Open.
The following dialog is displayed:
4. Click OK .
The new machine group is displayed. For information on configuring the new machine group,see Configuring Machine Groups.
7/30/2019 Vmware Vcenter Administration
http://slidepdf.com/reader/full/vmware-vcenter-administration 35/183
Defining Machine Groups
vCenter™ Protect Essentials Plus - Configuration Management Administration Guide 29
Creating Machine Groups
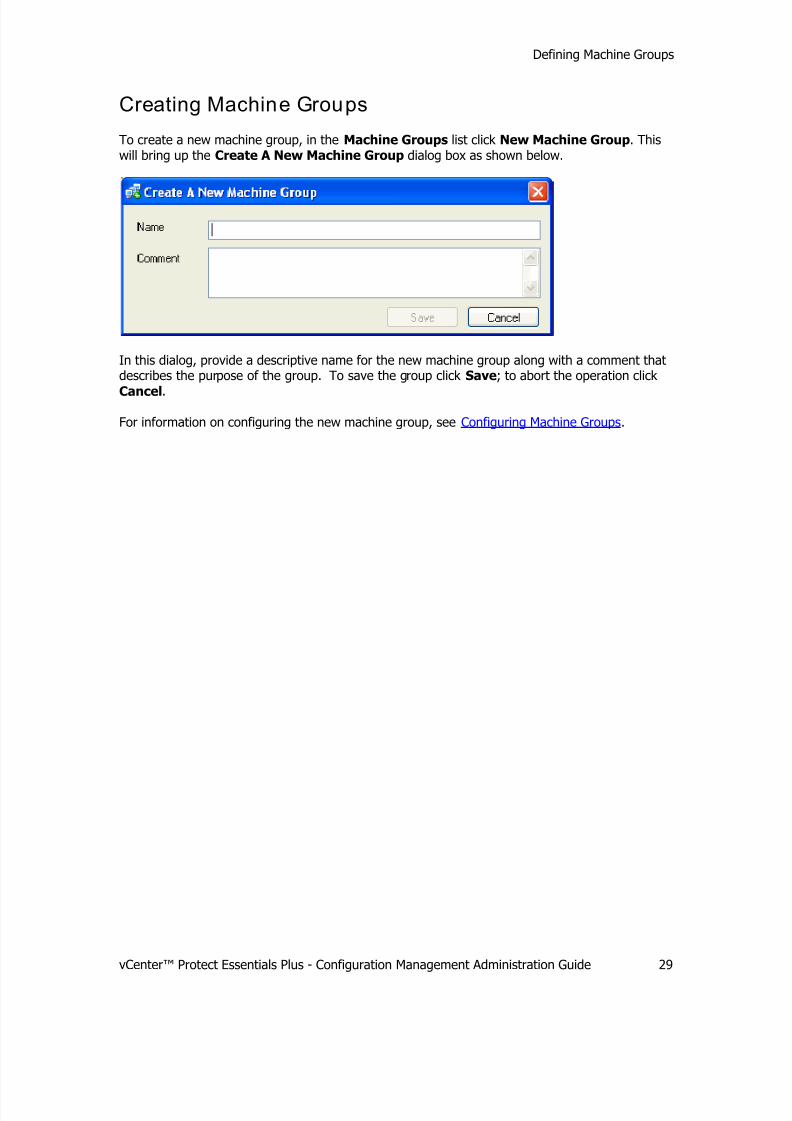
To create a new machine group, in the Machine Groups list click New Machine Group. Thiswill bring up the Create A New Machine Group dialog box as shown below.
In this dialog, provide a descriptive name for the new machine group along with a comment thatdescribes the purpose of the group. To save the group click Save; to abort the operation click
Cancel.
For information on configuring the new machine group, see Configuring Machine Groups.

7/30/2019 Vmware Vcenter Administration
http://slidepdf.com/reader/full/vmware-vcenter-administration 36/183
Configuring Machine Groups
30 vCenter™ Protect Essentials Plus - Configuration Management Administration Guide
Configuring Machine Groups
When you configure a machine group you specify exactly which machines you want to be part of that group. This provides significant flexibility in how you configure machine groups. Thefollowing components are available to help you uniquely define each machine group:
Machines: See Adding Machines by Name for details.
Domains: See Adding Domains for details.
Organizational Units: See Adding by Organizational Unit for details.
IP Addresses / Ranges: See Adding Machines by IP Address for details.
Nested Groups: See Defining Nested Groups for details.

7/30/2019 Vmware Vcenter Administration
http://slidepdf.com/reader/full/vmware-vcenter-administration 37/183
Configuring Machine Groups
vCenter™ Protect Essentials Plus - Configuration Management Administration Guide 31
Filter Machines in this Group By: See Filtering Machines for details.
Ignore Items: See Ignoring Certain Machines for details.
Virtual Machines: You can also add virtual machines to a machine group using the Tools
> Virtual Infrastructure Servers menu command. See Adding Virtual Machines fordetails.
Adding Machines to a Machine Group by Name
One of the ways that a machine can be added to a machine group is by machine name. Likemost other tasks in VMware vCenter Protect - Configuration Management, there is a multitude of
different ways that you can provide the machine name information to be used.
The easiest way to add a machine to a machine group is to type the name of the machine in the
Add Machine field and click . You can also add or remove machines using the followingmachine menu options.

7/30/2019 Vmware Vcenter Administration
http://slidepdf.com/reader/full/vmware-vcenter-administration 38/183
Configuring Machine Groups
32 vCenter™ Protect Essentials Plus - Configuration Management Administration Guide
Remove
AllMachines
Select this menu option to remove all of the machines from a group.
ImportFrom File
You can import a list of machine names from a previously created text file. Thetext file can be created manually or it can be created by exporting machines
names from another machine group using the Tools > Export Group > TextFiles menu. See Working With A Machine Group for more information about theTools menu.
Link File Machine names can also be dynamically linked to a text file rather than
imported. Linking a file to a machine group is different than importing itscontents. Importing contents is a one-time operation after which theinformation from the file becomes a part of the machine group. When you link
a file to a machine group, any changes that you make to the file areautomatically reflected in the next scan. See Linking Files to Machine Groups for more information.
When machines are added or imported by name, the new entries are displayed within the
Machines component as illustrated here:
Each machine that is listed is accompanied by the following icons:
: To change the credentials for a particular machine, click this icon. When credentials
have been applied to a particular machine, the icon shows as . For information on how toapply credentials, see Supplying Credentials.
Note: Credentials are stored with strong encryption techniques and are not available toanyone except the user who provided them.
: To delete a machine click this icon.

7/30/2019 Vmware Vcenter Administration
http://slidepdf.com/reader/full/vmware-vcenter-administration 39/183
Configuring Machine Groups
vCenter™ Protect Essentials Plus - Configuration Management Administration Guide 33
Adding Domains to a Machine Group
Another way that machines can be added to a machine group is by domain. Adding a domain toa machine group will result in all of the machines in the domain automatically being a part of thegroup by virtue of their domain membership.
The easiest way to add a domain to a machine group is to type the name of the domain in the
Add Domain field and click . You can also add or remove domains using the followingdomain menu options.
Remove All
Domains
Select this menu option to remove all of the domains from a group.
ImportFrom File
You can import a list of domain names from a previously created text file.The text file can be created manually or it can be created by exporting
names from another machine group using the Tools menu.
Link File Domain names can also be dynamically linked to a text file rather thanimported. Linking a file to a machine group is different than importing its
contents. Importing contents is a one-time operation after which theinformation from the file becomes a part of the machine group. When you
link a file to a machine group, any changes that you make to the file areautomatically reflected in the next scan. See Linking Files to Machine Groups
for more information.
When domains are added or imported, the new entries are displayed within the Domains component as illustrated here:
Each domain that is listed is accompanied by the following icons:
: To change the credentials for a particular domain, click this icon. When credentials have
been applied to a particular domain, the icon shows as . For information on how to applycredentials, see Supplying Credentials.
Note: Credentials are stored with strong encryption techniques and are not available toanyone except the user who provided them.
: To delete a domain click this icon.

7/30/2019 Vmware Vcenter Administration
http://slidepdf.com/reader/full/vmware-vcenter-administration 40/183
Configuring Machine Groups
34 vCenter™ Protect Essentials Plus - Configuration Management Administration Guide
Adding Organizational Units to a Machine Group
Companies often split up Active Directory entities by creating multiple Organizational Units. A machine group in VMware vCenter Protect - Configuration Management can be configured toinclude specific organization units from Active Directory. For example, you can create a machinegroup that includes all machines from the 'Sales' organizational unit if desired.
The easiest way to add an organizational unit to a machine group is to type its name in the Add
OU field and then click . An OU is added in full LDAP format. For example, to add the SalesOU from the domain example.com, the format is 'example/ou=sales,dc=example,dc=com'. If you specify a parent OU, all children OUs will be included in the scan.
You can also add or remove organizational units using the following organizational unit menu
options.
Remove AllOrganizational
Units
Select this menu option to remove all of the organizational units from agroup.
Import FromFile
You can import a list of OUs from a previously created text file. The text
file can be created manually or it can be created by exporting names fromanother machine group using the Tools menu.
When organizational units are added, the new entries are displayed within the OrganizationalUnits component as illustrated here:
Each organizational unit that is listed is accompanied by the following icons:
: To change the credentials for a particular organizational unit, click this icon. When
credentials have been applied to a particular organizational unit the icon shows as . Forinformation on how to apply credentials, see Supplying Credentials.
Note: Credentials are stored with strong encryption techniques and are not available toanyone except the user who provided them.
: To delete an organizational unit click this icon.
7/30/2019 Vmware Vcenter Administration
http://slidepdf.com/reader/full/vmware-vcenter-administration 41/183
Configuring Machine Groups
vCenter™ Protect Essentials Plus - Configuration Management Administration Guide 35
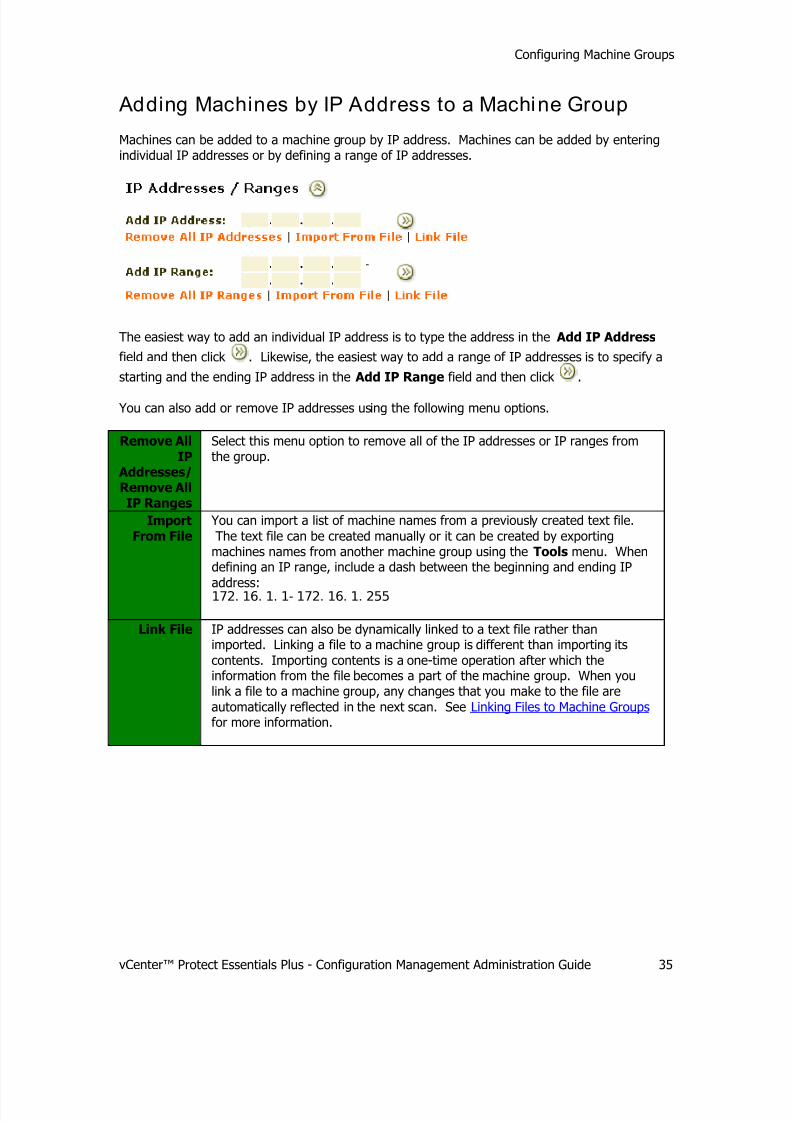
Adding Machines by IP Address to a Machine Group
Machines can be added to a machine group by IP address. Machines can be added by enteringindividual IP addresses or by defining a range of IP addresses.
The easiest way to add an individual IP address is to type the address in the Add IP Address
field and then click . Likewise, the easiest way to add a range of IP addresses is to specify a
starting and the ending IP address in the Add IP Range field and then click .
You can also add or remove IP addresses using the following menu options.
Remove All
IP Addresses/Remove AllIP Ranges
Select this menu option to remove all of the IP addresses or IP ranges fromthe group.
ImportFrom File
You can import a list of machine names from a previously created text file.
The text file can be created manually or it can be created by exportingmachines names from another machine group using the Tools menu. Whendefining an IP range, include a dash between the beginning and ending IP
address:172. 16. 1. 1- 172. 16. 1. 255
Link File IP addresses can also be dynamically linked to a text file rather thanimported. Linking a file to a machine group is different than importing its
contents. Importing contents is a one-time operation after which theinformation from the file becomes a part of the machine group. When youlink a file to a machine group, any changes that you make to the file are
automatically reflected in the next scan. See Linking Files to Machine Groups for more information.

7/30/2019 Vmware Vcenter Administration
http://slidepdf.com/reader/full/vmware-vcenter-administration 42/183
Configuring Machine Groups
36 vCenter™ Protect Essentials Plus - Configuration Management Administration Guide
When IP addresses are added or imported, the new entries are displayed within the IP
Addresses / Ranges component as illustrated here:
Each IP address or IP address range that is listed is accompanied by the following icons:
: To change the credentials for a particular IP address or address range, click this icon.
When credentials have been applied to a particular IP address or address range the iconshows as . For information on how to apply credentials, see Supplying Credentials.
Note: Credentials are stored with strong encryption techniques and are not available toanyone except the user who provided them.
: To delete an IP address or address range, click this icon.
Defining Nested Groups
You can use nested groups when configuring a machine group. A nested group is a group thatconsists of one or more other groups.
To add or remove nested groups, use the following nested group menu options.
Add
NestedGroup
This menu option opens a separate dialog that provides a list of availablemachine groups. All currently defined machine groups are listed except themachine group you are currently configuring. Select the machine groups youwould like to add to the custom group and then click OK .

7/30/2019 Vmware Vcenter Administration
http://slidepdf.com/reader/full/vmware-vcenter-administration 43/183
Configuring Machine Groups
vCenter™ Protect Essentials Plus - Configuration Management Administration Guide 37
Remove All
NestedGroups
Select this menu option to remove all of the nested groups from the group.
When a nested group is added, the new entry is displayed within the Nested Groups component as illustrated here:
Each nested group that is listed is accompanied by the following icons:
: To change the credentials for a nested group, click this icon. When credentials have
been applied to a nested group the icon shows as . For information on how to apply
credentials, see Supplying Credentials.
Note: Changing the credentials here changes the credentials everywhere the group is used.If credentials are not specified here, the credentials from the original machine group areused.
Also note: Credentials are stored with strong encryption techniques and are not available toanyone except the user who provided them.
: To delete a nested group, click this icon.

7/30/2019 Vmware Vcenter Administration
http://slidepdf.com/reader/full/vmware-vcenter-administration 44/183
Configuring Machine Groups
38 vCenter™ Protect Essentials Plus - Configuration Management Administration Guide
Filter Machines In A Group
Filters enable you to specify the types of machines you want included in a scan. For example, if you want to scan all the IIS servers within a domain, you would specify the desired domain in theDomains component and then in the Filter Machines in this Group By component you wouldselect IIS Servers. All other machine types are ignored.
To specify one or more machine types, simply enable the check box in front of the machinetype(s) you want included in the scan.
Ignoring Certain Machines
You can define a number of machines you want to ignore. This is especially useful for defining a
machine group that consists of all but a few machines from a large group of machines. Forexample, if you want to create a machine group that consists of all but two machines in adomain, you simply add the domain and then specify the two machines you want to ignore.
Machines can be added to the ignore list by name or by IP address. Simply specify the name or
IP address and then click . Or, you can click Choose and use the menu that appears to addor remove machines from the ignore list.

7/30/2019 Vmware Vcenter Administration
http://slidepdf.com/reader/full/vmware-vcenter-administration 45/183
Configuring Machine Groups
vCenter™ Protect Essentials Plus - Configuration Management Administration Guide 39
When machines are added to the list, the entries are displayed within the Ignore Items component as illustrated here:
To delete a machine from the ignore list, click .
Linking Files to Machine Groups
VMware vCenter Protect - Configuration Management also provides a dynamic mechanism forkeeping a machine group current. This is especially useful if your machine list changes from timeto time and you want an easy way to update it. Linking a file to a machine group is differentthan importing its contents. Importing contents is a one-time operation after which theinformation from the file becomes a part of the machine group.
When you link files to a machine group, any changes that you make to the files are reflectedupon the next scan. In other words, if you add machines to and delete machines from a linkedfile between scans, any new machines added to the file will be scanned while any machinesremoved will not.
When defining a machine group you can link to files containing machine names, domains, IP
addresses, and IP address ranges. The following table describes how to create each particularlink file.
Link Machine
File
Provide the name of a file containing machine names. One machine name perline with a carriage return at the end of each line.
Sample:machi ne1machi ne2dcmai ldbser ver
Link
DomainFile
Provide the name of a file containing domain names. One domain name perline with a carriage return at the end of each line.
Sample:exampl eyour companycorpr edmonddmz

7/30/2019 Vmware Vcenter Administration
http://slidepdf.com/reader/full/vmware-vcenter-administration 46/183
Configuring Machine Groups
40 vCenter™ Protect Essentials Plus - Configuration Management Administration Guide
Link IP Address
File
Provide the name of a file containing IP addresses. One IP address per linewith a carriage return at the end of each line.
Sample:192. 168. 29. 13210. 1. 1. 10
172. 16. 1. 5
Link IP
RangeFile
Provide the name of a file containing IP ranges. IP ranges in the format of x.x.x.x-y.y.y.y are acceptable. One per line with a carriage return at the end of each line.
Sample:192. 168. 29. 1- 192. 168. 29. 5172. 16. 2. 20- 172. 16. 2. 99
The following illustrates linked files that have been added to a machine group:
Each linked file that is listed is accompanied by the following icons:
: To change the credentials for a particular file, click this icon. When credentials have
been applied to a particular file, the icon shows as . For information on how to applycredentials, see Supplying Credentials.
Note: Credentials are stored with strong encryption techniques and are not available toanyone except the user who provided them.
: To delete a linked file click this icon.
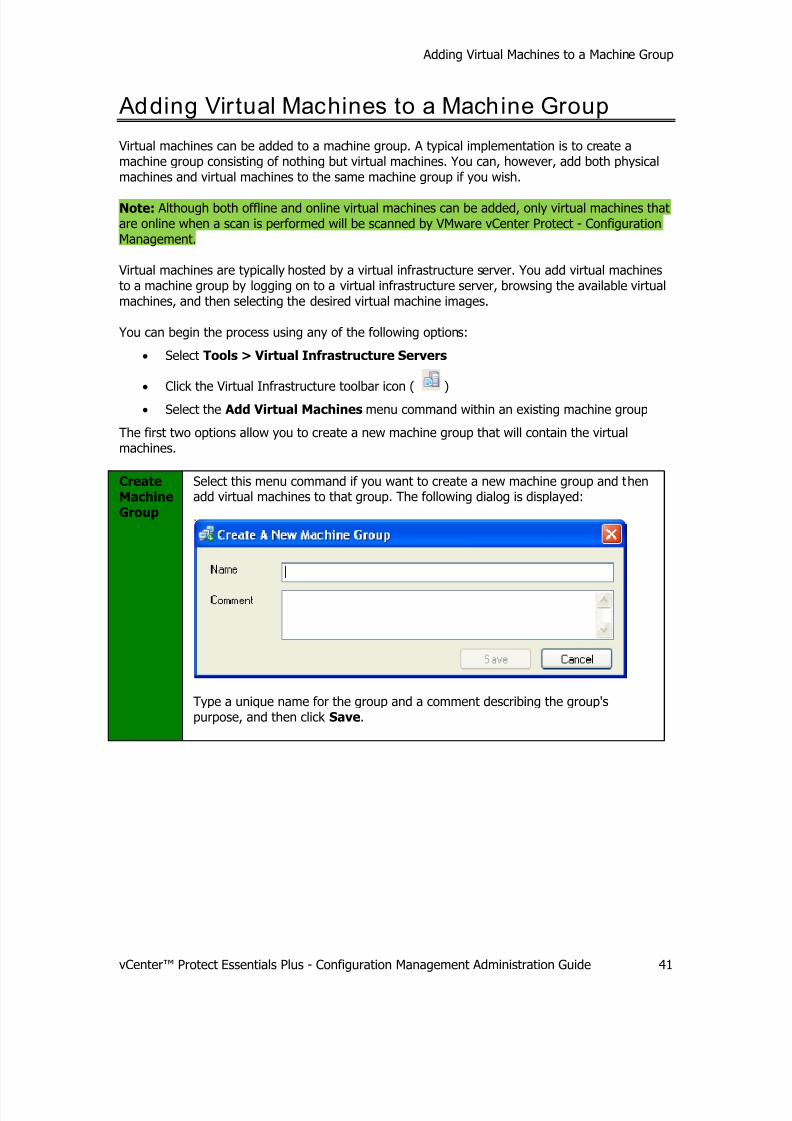
7/30/2019 Vmware Vcenter Administration
http://slidepdf.com/reader/full/vmware-vcenter-administration 47/183
Adding Virtual Machines to a Machine Group
vCenter™ Protect Essentials Plus - Configuration Management Administration Guide 41
Adding Virtual Machines to a Machine Group
Virtual machines can be added to a machine group. A typical implementation is to create amachine group consisting of nothing but virtual machines. You can, however, add both physicalmachines and virtual machines to the same machine group if you wish.
Note: Although both offline and online virtual machines can be added, only virtual machines thatare online when a scan is performed will be scanned by VMware vCenter Protect - ConfigurationManagement.
Virtual machines are typically hosted by a virtual infrastructure server. You add virtual machinesto a machine group by logging on to a virtual infrastructure server, browsing the available virtualmachines, and then selecting the desired virtual machine images.
You can begin the process using any of the following options:
• Select Tools > Virtual Infrastructure Servers
• Click the Virtual Infrastructure toolbar icon ( )
• Select the Add Virtual Machines menu command within an existing machine group
The first two options allow you to create a new machine group that will contain the virtualmachines.
CreateMachineGroup
Select this menu command if you want to create a new machine group and thenadd virtual machines to that group. The following dialog is displayed:
Type a unique name for the group and a comment describing the group'spurpose, and then click Save.

7/30/2019 Vmware Vcenter Administration
http://slidepdf.com/reader/full/vmware-vcenter-administration 48/183
Adding Virtual Machines to a Machine Group
42 vCenter™ Protect Essentials Plus - Configuration Management Administration Guide
The Tools > Virtual Infrastructure Servers option also enables you to add the virtualmachines to an existing machine group.
Add toMachineGroup
Select this menu command if you want to add virtual machines to an existingmachine group. A dialog similar to the following is displayed:
Select the desired machine group and then click OK . You cannot select multiplemachine groups.
After specifying what machine group will be used to store the virtual machines, the next step isto log on to the desired virtual infrastructure server(s). See Logging On To A Server for details.
Logging On To A Virtual Infrastructure Server
When you begin the process of adding one or more virtual machines to a machine group, a
dialog similar to the following is displayed:

7/30/2019 Vmware Vcenter Administration
http://slidepdf.com/reader/full/vmware-vcenter-administration 49/183
Adding Virtual Machines to a Machine Group
vCenter™ Protect Essentials Plus - Configuration Management Administration Guide 43
You must:
1. Log on to one or more VMware ESX or virtual infrastructure server by clicking Add
Server.
2. Select the virtual machines on those servers that you want to include in your machine
group.The dialog is initially empty. The dialog contains the following buttons and options:
Export Applies only after virtual machines are added to the table. It enables you toexport selected items to a text file.
AddServer
Enables you to add a new server definition. The following dialog is displayed:
• Server: Type the full name of the VMware ESX or virtual infrastructureserver that is hosting the virtual machines you want to add to the machine
group.
• Port: The port number used when making a connection to the server. The
default port value is 443.
• User: Type a user name that has access to the server.
• Password: Type the password for the user.
After adding the server, the list of virtual machines hosted by that server is
displayed. See Selecting Virtual Machines for information on selecting the desiredvirtual machines for inclusion in the machine group.
AddItemsBy
Specifies whether the virtual machines that you select will be added to the
machine group using their Machine Name or their IP Address. You cannotselect both options.
AddSelected
This button is not available until after you log on to a server and the table ispopulated with virtual machines. Use this button to add selected virtualmachines to your machine group.

7/30/2019 Vmware Vcenter Administration
http://slidepdf.com/reader/full/vmware-vcenter-administration 50/183
Adding Virtual Machines to a Machine Group
44 vCenter™ Protect Essentials Plus - Configuration Management Administration Guide
Selecting Virtual Machines for Inclusion in a MachineGroup
After logging on to a VMware ESX or virtual infrastructure server, the dialog is populated with allthe virtual machines hosted by that server. For example:
Customizing the View
You can easily customize the way information is displayed within the dialog.
• You can reorder the columns by clicking and dragging the column headers to newlocations. For example, if you want the Power State information to be displayed in thefirst column, simply click on the column header and drag it to the first column.
Tip: When reordering columns, the column header you are moving will always be placedin front of the column you drag it to.
• You can click within a column header to sort the table by that information. Click
repeatedly to toggle the sort between ascending order and descending order.
Selecting Virtual Machines for Inclusion in a Machine Group
Before you select the desired virtual machines, be sure to use the Add Items By areas to
specify how you want the virtual machines to be added to the machine group.
• Machine Name: The selected virtual machines will be added to the Machine component
of the machine group.• IP Address: The selected virtual machines will be added to the IP Addresses component
of the machine group.
To add virtual machines to a machine group:
1. Select the desired virtual machines.
You can select multiple virtual machines by pressing and holding the Shift or Ctrl key whileselecting the items.

7/30/2019 Vmware Vcenter Administration
http://slidepdf.com/reader/full/vmware-vcenter-administration 51/183
Adding Virtual Machines to a Machine Group
vCenter™ Protect Essentials Plus - Configuration Management Administration Guide 45
2. Click Add Selected.
Note: If a machine name or IP address is unavailable, that virtual machine cannot be added tothe machine group using the unavailable item.
Viewing Virtual Machines With in a Machine Group
When virtual machines are added, the new entries are displayed within either the Machines component or the IP Addresses / Ranges component. They are displayed no different thanphysical machines. For example:
Each virtual machine that is listed is accompanied by the following icons:
: To change the credentials for a particular virtual machine, click this icon. When
credentials have been applied to a particular machine the icon shows as . For informationon how to apply credentials, see Supplying Credentials.
Note: Credentials are stored with strong encryption techniques and are not available toanyone except the user who provided them.
: To delete a virtual machine, click this icon.

7/30/2019 Vmware Vcenter Administration
http://slidepdf.com/reader/full/vmware-vcenter-administration 52/183
Defining and Configuring Policies
46 vCenter™ Protect Essentials Plus - Configuration Management Administration Guide
Defining and Configuring Policies
About Policies
VMware vCenter Protect - Configuration Management uses policies to define the products and the
policy checks to evaluate during a particular scan. VMware vCenter Protect - ConfigurationManagement provides two predefined baseline policies:
• Recommended Baseline: This robust pre-cast policy includes the full set of security
configuration settings currently available within the program. This policy makes it veryeasy to quickly scan, manage, and enforce a "best practices" policy for your entirenetwork, while helping to support specific regulatory requirements.
• NIST/FISMA Baseline: This predefined policy is based on NIST 800-53 and industrybest practices. Use it for assisting with regulatory compliance with regulations such asFISMA.
In addition, there are also a number of predefined policy templates that can be downloaded from
the VMware Inc Web site and then imported into VMware vCenter Protect - ConfigurationManagement. See Exporting and Importing Policies for details.
None of the predefined baseline policies can be modified. If you wish to define your own policies,see Creating a New Policy.
Note: Your organization may use an Active Directory and Microsoft Group Policy infrastructure toapply corporate standards to your computers and workstations. If a policy defines one or morepolicy checks that are controlled by Active Directory, any changes to those policy checks will be
temporary if they conflict with Group Policy and the checks will be changed back to the valuesspecified by Active Directory. In this situation it is important that you define your policy to reflectthe requirements specified by your Active Directory settings. This will enable you to accurately
audit and report on the status of your policy checks. Enforcement by VMware vCenter Protect -
Configuration Management will then be in compliance with and maintain the required GroupPolicy settings.

7/30/2019 Vmware Vcenter Administration
http://slidepdf.com/reader/full/vmware-vcenter-administration 53/183
Defining and Configuring Policies
vCenter™ Protect Essentials Plus - Configuration Management Administration Guide 47
Working With A Policy
When an existing policy is selected in the Policy & Compliance list, its details are displayed inthe right-side of the window. For example, here are the details of a policy called SamplePolicy.
The details for every policy share the following common elements:
• The upper-left pane presents the available policy checks. The checks are broken into five
different groups (or frameworks):
o Categories: Contains all available policy checks. Each policy check maps to
exactly one control.
o NIST 800-53: Contains all available policy checks. Each policy check maps toone or more controls within the Federal Information Security Management Act(FISMA).
o PCI DSS 1.1: Contains all policy checks. Each policy check maps to one or more
controls within version 1.1 of the Payment Card Industry Data Security Standard(PCI DSS).

7/30/2019 Vmware Vcenter Administration
http://slidepdf.com/reader/full/vmware-vcenter-administration 54/183
Defining and Configuring Policies
48 vCenter™ Protect Essentials Plus - Configuration Management Administration Guide
o PCI DSS 1.2: Contains all policy checks. Each policy check maps to one or morecontrols within version 1.2 of the Payment Card Industry Data Security Standard(PCI DSS).
o PCI DSS 2.0: Contains all policy checks. Each policy check maps to one or morecontrols within version 2.0 of the Payment Card Industry Data Security Standard
(PCI DSS).
Tip: To view the policy checks currently included in the policy you are viewing, selectPolicy Checks. All checks currently in the policy are displayed in the upper-right pane.
To view all available checks regardless of whether they are contained in the policy, selectone of the groups/frameworks described above.
• The upper-right pane displays the policy checks available in the category or framework selected in the upper-left pane. Of the policy checks listed, the checks currently enabled
in the policy are identified by an icon with a green check mark ( ) in the In Policy column.
For details on modifying a policy definition, see Configuring A Policy.
• Located just above the upper-right pane is a drop-down box you can use to select theproduct-specific policy checks you want displayed in the upper-right pane.
• Located in upper left corner of the lower pane are the following items: a Begin Scan
button, three drop-down boxes that identify the machines you want to scan and thepatch and spyware groups you want to use when determining patch and spywarecompliance, and a link you can click to provide a description explaining the purpose of the policy.
The Begin Scan button is used to begin a scan of the
machine group specified in the Scan Machine Group box.
The Scan Machine Group box enables you to select
the machine group you want to scan.
Enables you to select the group of patches you wantthe program to use when evaluating the Patch
Management: Percent Patches Deployed policy
check. This check is available within the followingpolicy frameworks:
• Category: Best Practices: Malicious Code Protection
• NIST 800-53: CM-1 Configuration Management Policy and Procedures , CM-3 Configuration Change
Control , SI-2 Flaw Remediation , and SI-3 Malicious Code Protection

7/30/2019 Vmware Vcenter Administration
http://slidepdf.com/reader/full/vmware-vcenter-administration 55/183
Defining and Configuring Policies
vCenter™ Protect Essentials Plus - Configuration Management Administration Guide 49
• PCI DSS 1.1, 1.2, and 2.0: 2.2.3 Configure system security parameters to prevent misuse ,and 6.3.1 Testing of all security patches and system and software configuration changes before deployment .
If the Patch Management: Percent PatchesDeployed policy check is not used in the new policy,the Patch Groups option is simply ignored.
The selectable patch groups are defined within VMware vCenter Protect , a patch management
product. If the VMware vCenter Protect database isunavailable then no patch groups will be selectable.
See Configuring Access to the Protect database forinformation on defining the path to the VMwarevCenter Protect database.
The default value is (all). This means that all patchesare used when determining a value for the Patch
Management: Percent Patches Deployed policycheck (as opposed to requiring just the patchesspecified within a patch group).
Compliance information pertaining to the specifiedpatch group is displayed in the scan results.
Note: This option does not apply if you are using VMware vCenter Protect 7.0 or later.
Enables you to select the group of signatures youwant the program to use when evaluating theSpyware Management: Percent Signatures
Remediated policy check. This check is availablewithin the following policy frameworks:
• Category: Best Practices: Malicious Code Protection
• NIST 800-53: SI-3 Malicious Code Protection
• PCI DSS 1.1, 1.2, and 2.0: 2.2.3 Configure
system security parameters to prevent misuse
If the Spyware Management: Percent Signatures
Remediated policy check is not used in the newpolicy, the Signature Groups option is simplyignored.
The selectable signature groups are defined within VMware vCenter Protect, a spyware managementproduct. If the VMware vCenter Protect database isunavailable then no signature groups will beselectable. See Configuring Access to the Protectdatabase for information on defining the path to the
VMware vCenter Protect database.

7/30/2019 Vmware Vcenter Administration
http://slidepdf.com/reader/full/vmware-vcenter-administration 56/183
Defining and Configuring Policies
50 vCenter™ Protect Essentials Plus - Configuration Management Administration Guide
The default value is (all). This means that allsignatures are used when determining a value for the
Spyware Management: Percent SignaturesRemediated policy check (as opposed to requiring
just the signatures specified within a signature group).
Compliance information pertaining to the specifiedsignature group is displayed in the scan results.
The Add/Edit Comment link enabled you to providea description that explains the purpose of the policy.
• Located beneath the name of the machine group in the bottom pane are the following
policy menu items. (The following items are displayed only for custom policies, the threepredefined baseline policies cannot be modified.)
Tip: You can also right-click a policy check in the top right-hand pane to access thesemenu items.
Add SelectedChecks
Adds the selected policy checks to the policy. You can also double-click apolicy check to add it to the policy.
RemoveSelected
Checks
Removes the selected policy checks from the policy. You can also double-click a policy check to remove it from the policy.
Select All Selects all of the policy checks in the upper-right pane.
Unselect All Clears all of the policy checks in the upper-right pane.
Delete Policy Deletes the policy.
Export Policy Exports the policy to an XML file.Export Policy
ChangesExports to an XML file the changes that have been made to a policy. SeeExporting Policy Changes for more details.
Add CustomCheck
Launches the Custom Check Wizard, which enables you to create yourown custom policy checks. See Creating Custom Checks for more details.
Edit CustomCheck
Launches the Custom Check Wizard, which enables you to edit theselected custom policy check. See Creating Custom Checks for moredetails.
• Located on the Values tab of the bottom pane are fields you can use to configure thepolicy check currently selected in the upper-right pane. For details on using these fields,see Configuring A Policy.
• Located on the Information tab of the bottom pane is a description of the policy check currently selected in the upper-right pane. The description contains two sections: A
Rationale section that describes the purpose and reasoning behind the check, and aManual Implementation section that describes how to manually configure the check.

7/30/2019 Vmware Vcenter Administration
http://slidepdf.com/reader/full/vmware-vcenter-administration 57/183
Defining and Configuring Policies
vCenter™ Protect Essentials Plus - Configuration Management Administration Guide 51
Creating a New Policy
You can create a new policy that defines policy checks for one or more products. To create a newpolicy, in the Policy & Compliance list click New Custom Policy. The Create A New Policy dialog box is displayed.
The dialog contains the following options:
Name Type a descriptive name for the new policy.
Comment Type a comment that describes the purpose of the policy.
Patch Groups Enables you to select the group of patches you want the program to usewhen evaluating the Patch Management: Percent PatchesDeployed policy check. This check is available within the following policyframeworks:
• Category: Best Practices: Malicious Code Protection
• NIST 800-53: CM-1 Configuration Management Policy and Procedures , CM-3 Configuration Change Control , SI-2 Flaw Remediation , and SI-3 Malicious Code Protection
• PCI DSS 1.1, 1.2, and 2.0: 2.2.3 Configure system security parameters to prevent misuse , and 6.3.1 Testing of all security
patches and system and software configuration changes before deployment .
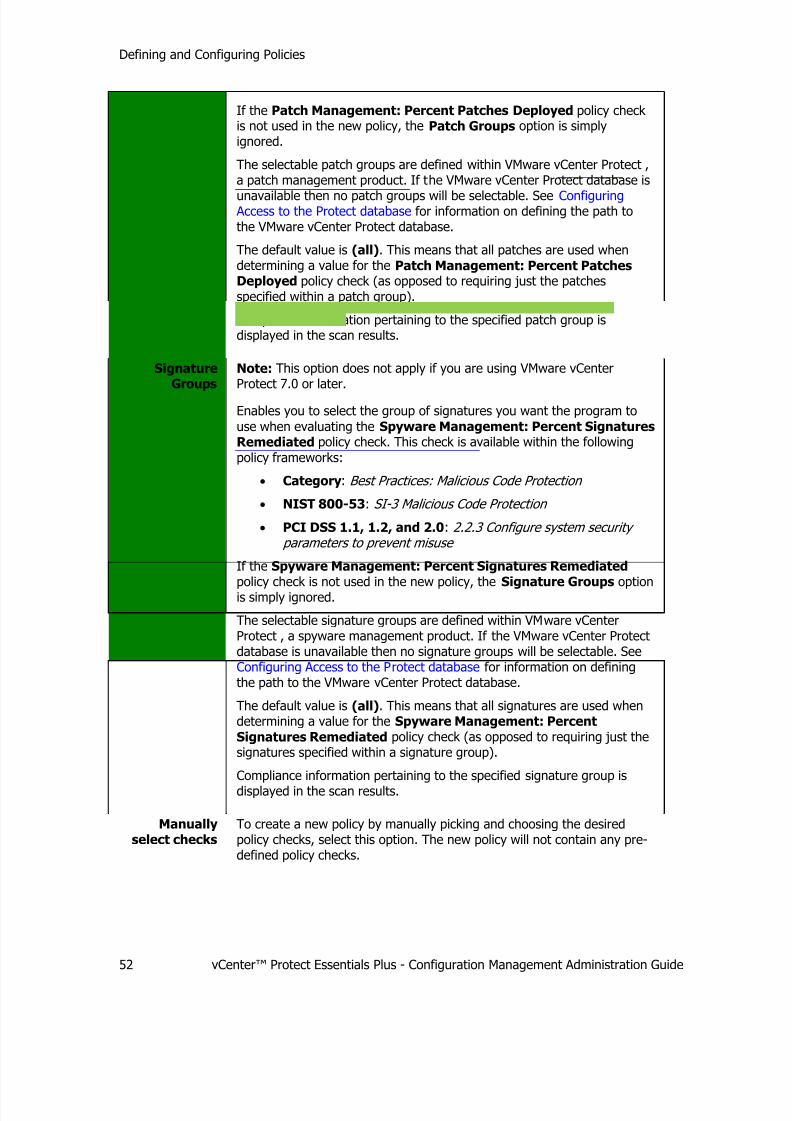
7/30/2019 Vmware Vcenter Administration
http://slidepdf.com/reader/full/vmware-vcenter-administration 58/183
Defining and Configuring Policies
52 vCenter™ Protect Essentials Plus - Configuration Management Administration Guide
If the Patch Management: Percent Patches Deployed policy check is not used in the new policy, the Patch Groups option is simplyignored.
The selectable patch groups are defined within VMware vCenter Protect ,a patch management product. If the VMware vCenter Protect database is
unavailable then no patch groups will be selectable. See Configuring Access to the Protect database for information on defining the path tothe VMware vCenter Protect database.
The default value is (all). This means that all patches are used whendetermining a value for the Patch Management: Percent PatchesDeployed policy check (as opposed to requiring just the patchesspecified within a patch group).
Compliance information pertaining to the specified patch group isdisplayed in the scan results.
SignatureGroups
Note: This option does not apply if you are using VMware vCenterProtect 7.0 or later.
Enables you to select the group of signatures you want the program to
use when evaluating the Spyware Management: Percent SignaturesRemediated policy check. This check is available within the following
policy frameworks:
• Category: Best Practices: Malicious Code Protection
• NIST 800-53: SI-3 Malicious Code Protection
• PCI DSS 1.1, 1.2, and 2.0: 2.2.3 Configure system security parameters to prevent misuse
If the Spyware Management: Percent Signatures Remediated policy check is not used in the new policy, the Signature Groups optionis simply ignored.
The selectable signature groups are defined within VMware vCenterProtect , a spyware management product. If the VMware vCenter Protectdatabase is unavailable then no signature groups will be selectable. SeeConfiguring Access to the Protect database for information on definingthe path to the VMware vCenter Protect database.
The default value is (all). This means that all signatures are used whendetermining a value for the Spyware Management: Percent
Signatures Remediated policy check (as opposed to requiring just thesignatures specified within a signature group).
Compliance information pertaining to the specified signature group is
displayed in the scan results.
Manuallyselect checks
To create a new policy by manually picking and choosing the desiredpolicy checks, select this option. The new policy will not contain any pre-defined policy checks.

7/30/2019 Vmware Vcenter Administration
http://slidepdf.com/reader/full/vmware-vcenter-administration 59/183
Defining and Configuring Policies
vCenter™ Protect Essentials Plus - Configuration Management Administration Guide 53
Create from
selected OS
To create a new policy that defines policy checks for a particularoperating system, select this option.
Note: Although the policy will initially contain only policy checks for thespecified operating system, you will be able to add policy checks for
other operating systems if you wish.
• Specific Service Pack: If you want to create a policy for a specific
operating system service pack, enable this check box beforeselecting the desired operating system.
• Operating System: Select the desired operating system. The newpolicy will be initially populated with all the available policy checksfor the operating system you select.
• Regulatory framework: If you want to create a policy thatcomplies with a particular regulatory framework, select the desiredframework. The new policy will be initially populated with all theavailable policy checks for the framework you select. The available
frameworks are:o Categories: Contains all available policy checks. Each policy
check maps to exactly one control.. This is the same as thedefault Recommended Baseline policy.
o NIST 800-53: Used for assisting with Federal InformationSecurity Management Act (FISMA) compliance. Contains allavailable policy checks. Each policy check maps to one or morecontrols within the Federal Information Security Management
Act (FISMA)
o PCI DSS 1.1: Used for assisting with Payment Card Industry
Data Security Standard (PCI DSS) compliance. Contains all policy
checks. Each policy check maps to one or more controls withinversion 1.1 of the Payment Card Industry Data SecurityStandard (PCI DSS).
o PCI DSS 1.2: Used for assisting with Payment Card IndustryData Security Standard (PCI DSS) compliance. Contains all policychecks. Each policy check maps to one or more controls withinversion 1.2 of the Payment Card Industry Data SecurityStandard (PCI DSS).
o PCI DSS 2.0: Used for assisting with Payment Card IndustryData Security Standard (PCI DSS) compliance. Contains all policychecks. Each policy check maps to one or more controls withinversion 2.0 of the Payment Card Industry Data Security
Standard (PCI DSS).
From anexistingmachine
To create a new policy using an existing machine group, select thisoption and then select a machine group whose current policies closely
resemble the policies you want to define in this new policy group. Thenew policy will be populated with the policy checks currently defined onthe machine in that group; you can then simply refine the policy to suit
your needs rather than manually configuring each check one at a time.

7/30/2019 Vmware Vcenter Administration
http://slidepdf.com/reader/full/vmware-vcenter-administration 60/183
Defining and Configuring Policies
54 vCenter™ Protect Essentials Plus - Configuration Management Administration Guide
This mechanism is very powerful for creating a policy from a machinewith a known security policy. The created policy can then be used tovery quickly assess compliance for a wide range of similarly functioningmachines in the network.
Restriction: Only machine groups containing one machine are eligible
for use with this method.
To save the policy click Save and the new policy is displayed. For example, a new custom policythat is defined manually would look similar to the following figure:
For information on configuring the new policy, see Configuring A Policy.

7/30/2019 Vmware Vcenter Administration
http://slidepdf.com/reader/full/vmware-vcenter-administration 61/183
Defining and Configuring Policies
vCenter™ Protect Essentials Plus - Configuration Management Administration Guide 55
Configuring A Policy
When you configure a policy you do two things:
• You specify exactly which policy checks you want in the policy by adding or removing checks
• You configure the parameters for each of the individual policy checks
To add one or more policy checks to a policy
1. In the upper-left pane, select the desired policy framework (Categories, NIST 800-53,
PCI DSS 1.1, PCI DSS 1.2, or PCI DSS 2.0).
2. Use the drop-down box locatedabove the upper-right pane to specify the product whose checks you want to make
available.
3. In the upper-right pane, enable the check box of each policy check you want to add to the
policy.
4. In the bottom pane click Add Selected Checks or, in the upper-right pane, right-click apolicy check and select Add Selected Checks.
The In Policy icon will be displayed for each new policy check, denoting that the check is now part of the policy.
Tip: You can also double-click an individual policy check to instantly add it to a policy.
5. To save the modified policy, select File > Save or click the Save icon .
To remove one or more policy checks from a policy
1.
Use the drop-down box locatedabove the upper-right pane to specify the product whose checks you want to remove.
2. In the upper-right pane, enable the check box of each policy check you want to removefrom the policy.
3. In the bottom pane click Remove Selected Checks or, in the upper-right pane, right-click a policy check and select Remove Selected Checks.
The In Policy icon will be removed for each disabled policy check. Checks not
displaying the icon are not enabled within the current policy.
Tip: You can also double-click an individual policy check to instantly remove it from a policy.
4. To save the modified policy, select File > Save or click the Save icon .

7/30/2019 Vmware Vcenter Administration
http://slidepdf.com/reader/full/vmware-vcenter-administration 62/183
Defining and Configuring Policies
56 vCenter™ Protect Essentials Plus - Configuration Management Administration Guide
To configure individual policy checks within a policy
1. In the upper-right pane, select the policy check you want to configure.
For example:
2. In the lower pane, select the Values tab.
For example:
3. Use the available parameters to configure the policy check.
Quite often you will have the option to configure the same policy check multiple times. This is
because the same policy check can be configured differently for different products and fordifferent versions of the same product. The products and product versions displayed here willbe the same products and product versions contained in the policy. For example, in thesample shown above, if Windows XP Professional SP2 was not part of the policy then the
Windows XP Professional SP2 parameters would not be shown.
Tip: If you want to configure the policy checks the same for all the listed products andproduct versions, configure the parameters for the first listed product and then click Make
all check values the same.

7/30/2019 Vmware Vcenter Administration
http://slidepdf.com/reader/full/vmware-vcenter-administration 63/183
Defining and Configuring Policies
vCenter™ Protect Essentials Plus - Configuration Management Administration Guide 57
Note: Some custom checks cannot be configured the same as other policy checks and willhave an Edit link rather than a Value box. For example:
To modify a custom check value click Edit, make the desired changes and then click Save.See Overview of Custom Checks for more information.
4. To save the modified policy, select File > Save or click the Save icon .
Copying a Custom Policy
You can make a copy of a custom policy using the export/import functionality (see Exporting andImporting Policies). This may be useful if you want to create a new policy that closely matches anexisting custom policy. Simply export the existing policy to an XML file, specify a new name forthe exported policy within the XML file, import the XML file, and then refine the imported policy
to suit your needs.
You must rename the exported policy because VMware vCenter Protect - ConfigurationManagement will not allow you to import a policy if another policy with the same name alreadyexists in the system. Simply providing a different name to the XML file during the export processdoesn't work— the name of the policy is stored within the XML file. To rename the exportedpolicy, open the XML file using an XML editor and change the policygroup_name parameter.
For example:
Note: You cannot export either of the two predefined policies (Recommended Baseline andNIST/FISMA Baseline). If you want to use one of the predefined policies as the starting point for
a new custom policy, see Duplicating A Predefined Policy.

7/30/2019 Vmware Vcenter Administration
http://slidepdf.com/reader/full/vmware-vcenter-administration 64/183
Defining and Configuring Policies
58 vCenter™ Protect Essentials Plus - Configuration Management Administration Guide
Duplicating a Predefined Policy
The two predefined policies (Recommended Baseline and NIST/FISMA Baseline) cannot bemodified or exported. If you want to use one of the predefined policies as the starting point for anew custom policy, you must create a duplicate of the desired predefined policy.
1. In the Policy & Compliance list click New Custom Policy.
The Create A New Policy dialog box is displayed.
2. Type a name and a comment.
3. Enable Manually select checks and then click Save.
An empty policy is displayed.
4. Select the framework that represents the predefined baseline you want to duplicate.
All the checks in that framework will be displayed in the upper-right pane. For example, if you select NIST 800-53 the following is displayed:

7/30/2019 Vmware Vcenter Administration
http://slidepdf.com/reader/full/vmware-vcenter-administration 65/183
Defining and Configuring Policies
vCenter™ Protect Essentials Plus - Configuration Management Administration Guide 59
5. In the bottom pane, click Select All.
The check boxes are enabled for every check in the upper-right pane.
6. Click Add Selected Checks.
All the checks are added to the new policy, effectively duplicating the predefined policy. Youcan now customize the policy as desired.
Cloning A Policy
VMware vCenter Protect - Configuration Management enables you to create a new policy bycloning the configuration of an established machine. This is a quick and powerful way to create apolicy that can immediately be used to scan similar machines in your organization for compliance.The idea is for you to configure one machine in your organization that represents yourorganization's "gold standard." You then clone a policy using the policy checks on that machine.This process can be very useful when working with vendors or government agencies that providemachines that are pre-configured according to a particular standard.
The actual process is very simple.
Note: To see a demonstration of the policy cloning process, go to:http://www.shavlik.com/prodtrain-configure-clone.aspx
1. Create a machine group that contains just the one machine you want to use as your gold
standard.
The machine group cannot contain multiple machines. For information on creating a machine
group and on adding a machine to it, see Creating a New Machine Group and ConfiguringMachine Groups, respectively.
2. In the Policy & Compliance list click New Custom Policy.
The Create A New Policy dialog box is displayed.
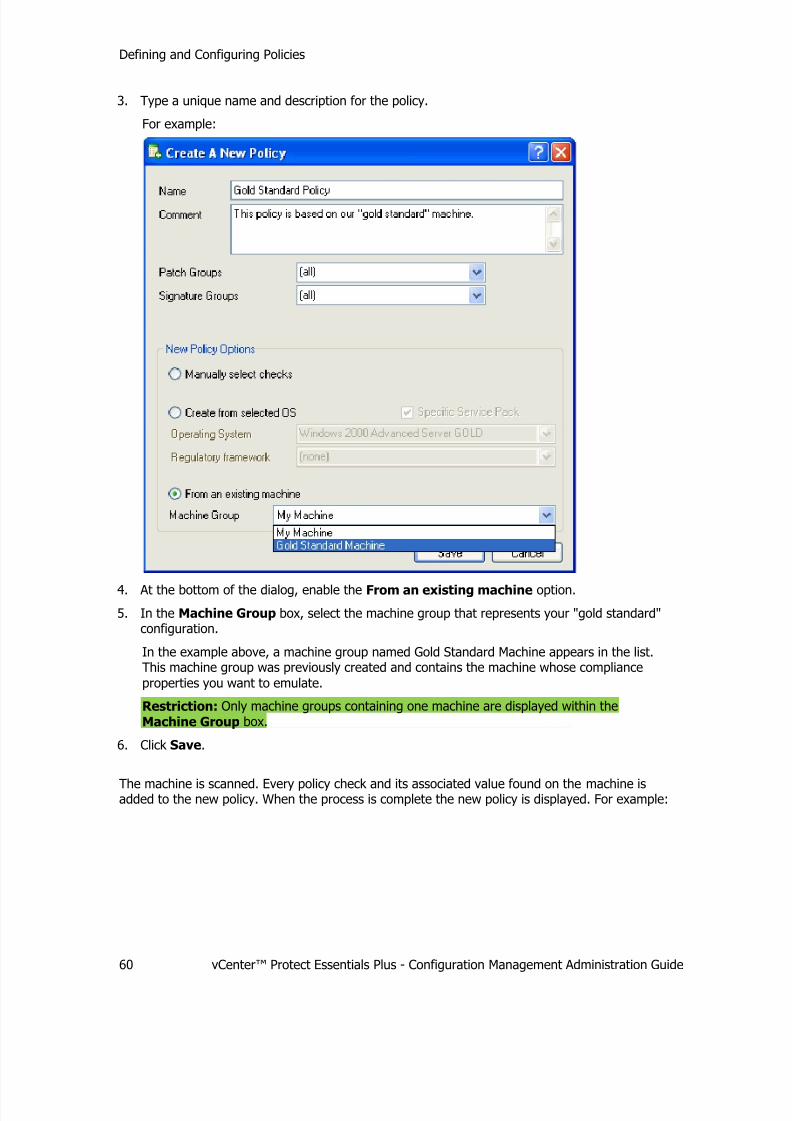
7/30/2019 Vmware Vcenter Administration
http://slidepdf.com/reader/full/vmware-vcenter-administration 66/183
Defining and Configuring Policies
60 vCenter™ Protect Essentials Plus - Configuration Management Administration Guide
3. Type a unique name and description for the policy.
For example:
4. At the bottom of the dialog, enable the From an existing machine option.
5. In the Machine Group box, select the machine group that represents your "gold standard"configuration.
In the example above, a machine group named Gold Standard Machine appears in the list.This machine group was previously created and contains the machine whose compliance
properties you want to emulate.
Restriction: Only machine groups containing one machine are displayed within the
Machine Group box.
6. Click Save.
The machine is scanned. Every policy check and its associated value found on the machine isadded to the new policy. When the process is complete the new policy is displayed. For example:

7/30/2019 Vmware Vcenter Administration
http://slidepdf.com/reader/full/vmware-vcenter-administration 67/183
Defining and Configuring Policies
vCenter™ Protect Essentials Plus - Configuration Management Administration Guide 61
Providing A Comment Before Changing A Policy
Depending on how VMware vCenter Protect - Configuration Management is configured, you maybe required to provide a comment before changing an existing policy. This serves a couple of purposes.
• The comment captures the rationale for making the change.
• The comment is a record that helps prove "due care" of your security requirements.
Note: For details on how to require comments and to view comments that have been made, see
Requiring Policy Change and Enforcement Comments.
If you are required to provide a comment, a dialog similar to the following will appear when youattempt to save your policy change.

7/30/2019 Vmware Vcenter Administration
http://slidepdf.com/reader/full/vmware-vcenter-administration 68/183
Defining and Configuring Policies
62 vCenter™ Protect Essentials Plus - Configuration Management Administration Guide
Simply type your comment and then click OK . Your policy change will not be saved if you do notprovide a comment.
If you want to re-configure VMware vCenter Protect - Configuration Management so thatcomments are not required, enable the Do not require comment check box and then click OK .This will apply to all future change attempts, not just this change. If you accidentally enable this
option, it can be reconfigured by selecting Tools > Options from the main menu and thenselecting the Change Control tab.
Export ing and Importing Policies
You can export a custom policy to an XML file. This makes the policy available to be imported byother installations of VMware vCenter Protect - Configuration Management. All checks within apolicy, including custom checks, will be exported and/or imported. Policies exported from earlierversions of VMware vCenter Protect - Configuration Management may be imported into laterversions of VMware vCenter Protect - Configuration Management.
You can also import a number of different policy templates that are available for download fromthe VMware Inc Web site.
Note: You cannot export any of the two predefined policies (Recommended Baseline andNIST/FISMA Baseline). If you want to use one of the predefined policies as the starting point fora new custom policy, see Duplicating A Predefined Policy.
To export a policy
1. Select Tools > Export Policy, or while viewing a custom policy, click Export Policy.
The Select A Policy dialog is displayed. For example:
Note: Only custom policies are displayed in the list. None of the predefined policies can beexported.
2. Enable the check box of the policy you want to export and then click OK .

7/30/2019 Vmware Vcenter Administration
http://slidepdf.com/reader/full/vmware-vcenter-administration 69/183
Defining and Configuring Policies
vCenter™ Protect Essentials Plus - Configuration Management Administration Guide 63
3. In the Export Policy to dialog, specify the desired directory and file name and then click
Save.
The following dialog is displayed:
4. If you want to sign the XML file with a digital signature click Yes; if not, click No.
By digitally signing the XML file you provide additional security. For example, whoeverimports the file will know exactly who created the file and be able to decide if the file comesfrom a trustworthy source. In addition, signing the file creates a checksum that is usedduring the import process to verify that the file has not been corrupted.
Note: In order to digitally sign the XML file you must have access to a digital certificate.
If you click Yes the Signing Certificate Selection dialog is displayed.5. (Optional) If you elect to digitally sign the XML file, on the Signing Certificate Selection
dialog select the certificate you want to use to sign the file and then click OK .
To import a policy
Note: If you are attempting to import a policy into the same instance of VMware vCenter Protect- Configuration Management from which the policy was originally exported, see Copying a
Custom Policy for information on changing the name of the policy.
1. Select Tools > Import Policy, or click Import Policy from within the Policy & Compliance list.
The Select a file to import dialog is displayed. For example:

7/30/2019 Vmware Vcenter Administration
http://slidepdf.com/reader/full/vmware-vcenter-administration 70/183
Defining and Configuring Policies
64 vCenter™ Protect Essentials Plus - Configuration Management Administration Guide
2. Select the XML file you want to import and then click Open.
• If the file is unsigned the following dialog is displayed:
An unsigned file is not as secure as a digitally signed file. If you feel you can trust thefile (for example, perhaps you or a colleague were the person who initially exported
the file), then click Yes. Otherwise click No.
• If the file is digitally signed a dialog similar to the following is displayed:
To import the file click Yes; to abort the operation click No.
The imported policy is given the policy group name that is stored within the XML file, whichmay or may not be the same name as the XML file.

7/30/2019 Vmware Vcenter Administration
http://slidepdf.com/reader/full/vmware-vcenter-administration 71/183
Policy Management
vCenter™ Protect Essentials Plus - Configuration Management Administration Guide 65
Policy Management
Associating Policies with a Machine Group
VMware vCenter Protect - Configuration Management enables you to specify exactly which of
your organization's policies can be used to manage a particular machine group. By restrictingwhich policies can be used by a machine group you effectively tighten control over yourmachines. For example, you can associate stricter policies with your most critical machine groupswhile allowing your less critical machine groups to be managed by less restrictive policies. This is
particularly useful for organizations that want to ensure that machines with similar functionalityare managed in a uniform, standardized way.
How to Associate Specific Polic ies with a MachineGroup
1. While viewing the machine group, click Associate Policy.
For example:
The Select a Policy dialog is displayed. For example:

7/30/2019 Vmware Vcenter Administration
http://slidepdf.com/reader/full/vmware-vcenter-administration 72/183
Policy Management
66 vCenter™ Protect Essentials Plus - Configuration Management Administration Guide
2. Select the policies you want to associate with this machine group.
You can select one, some, or all of the available policies.
• All: If this option is enabled you cannot select individual policies. All polices definedwithin the program will be available to the machine group.
• Selected: If this option is enabled, only those policies you select from the available
list will be available to the machine group.
Note: Selecting all the individual policies is not the same as enabling the All option. If additional policies are created in the future, those policies will not be automatically
available unless All is enabled. If Selected is enabled you would have to manuallydefine an association with the new policies to make them available to the machine group.
3. Click OK .
The policies you select here define the policies that will appear within the Scan With Policy
box. For example, if you select only the Recommended Baseline policy, then only that policy isavailable from within the machine group's policy selection box.
How the Associated Policies are Affected
Associating a policy with a machine group essentially forms a one-to-one association between the
policy and the machine group. For example, if you associate the Recommended Baseline policy with a machine group, that will be the only policy to appear within the machine group'sScan With Policy selection box.
Once an association is created between a machine group and a policy, it also changes the way
machine groups are made available from within the policy. Only the associated machine groupwill be available from within the policy. For example, if you associated a group named Sample
Group with the Recommended Baseline policy, only Sample Group would be available fromwithin the policy.

7/30/2019 Vmware Vcenter Administration
http://slidepdf.com/reader/full/vmware-vcenter-administration 73/183
Policy Management
vCenter™ Protect Essentials Plus - Configuration Management Administration Guide 67
If you want other machine groups to be available from within a policy, simply create additionalassociations between those machine groups and the policy.
The Getting Started section of the home page is similarly affected. For example, using thesame scenario as above, if Sample Group is selected as the machine group, the only policy that
will be available to scan that particular machine group will be Recommended Baseline.
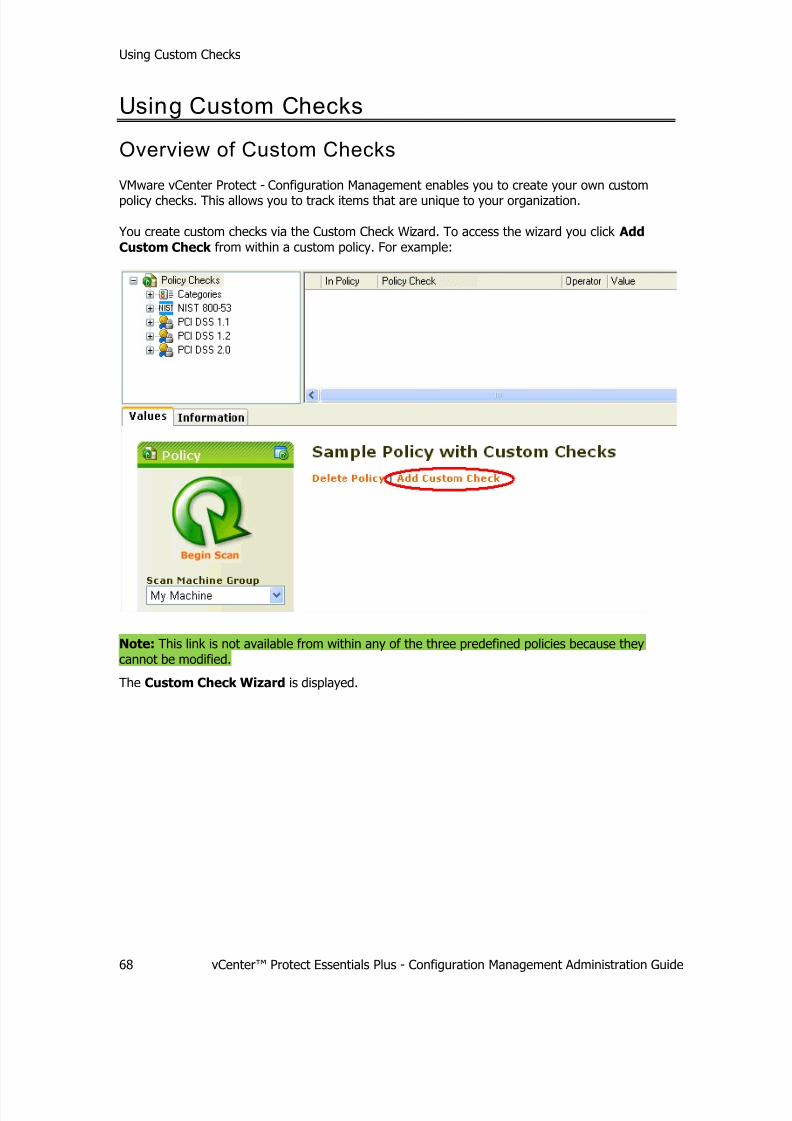
7/30/2019 Vmware Vcenter Administration
http://slidepdf.com/reader/full/vmware-vcenter-administration 74/183
Using Custom Checks
68 vCenter™ Protect Essentials Plus - Configuration Management Administration Guide
Using Custom Checks
Overview of Custom Checks
VMware vCenter Protect - Configuration Management enables you to create your own custom
policy checks. This allows you to track items that are unique to your organization.
You create custom checks via the Custom Check Wizard. To access the wizard you click Add
Custom Check from within a custom policy. For example:
Note: This link is not available from within any of the three predefined policies because theycannot be modified.
The Custom Check Wizard is displayed.

7/30/2019 Vmware Vcenter Administration
http://slidepdf.com/reader/full/vmware-vcenter-administration 75/183
Using Custom Checks
vCenter™ Protect Essentials Plus - Configuration Management Administration Guide 69
This wizard allows you to create custom checks three different ways:
• Loading Custom Checks From A Database
• Importing Custom Checks From A File
• Creating one or more new custom checks from scratch (see the following):
o Creating Custom Registry Value Checks o Creating Custom Service Checks
o Creating Custom User Rights Checks
o Creating Custom File ACL Checks
o Creating Custom Directory ACL Checks
o Creating Custom Registry Multi-String Checks
o Creating Custom Registry Value Exists Checks
o Creating Custom Registry Value Checks for All Users
o Creating Custom Registry Value x64 Checks
o Creating Custom File Date Offset Checks

7/30/2019 Vmware Vcenter Administration
http://slidepdf.com/reader/full/vmware-vcenter-administration 76/183
Using Custom Checks
70 vCenter™ Protect Essentials Plus - Configuration Management Administration Guide
Loading Custom Checks From A Database
One way to add custom checks to a custom policy is to import existing custom checks from otherpolicies. VMware vCenter Protect - Configuration Management maintains a database of all customchecks that have been created. You simply use the Custom Check Wizard to import the customchecks you want. You can import the custom checks as is or you can modify them as needed.
The Custom Check Wizard is launched from within a custom policy. Only those custom checksthat reside in d i f ferent custom policies are available to be imported. The program recognizescustom checks that are already contained in the current custom policy and will not display thosechecks.
1. From the Custom Check Wizard click Load from database.
A dialog similar to the following is displayed:
2. Select the custom check you want to add and then click Next.
The Custom Check Wizard Operating Systems dialog is displayed. At this point you caneither import the custom check as is by clicking Next on all the subsequent dialogs, or youcan use the subsequent dialogs to edit the check before importing it.
• If the check is a registry check, see Creating Custom Registry Checks for informationon the subsequent dialogs.
• If the check is a service check, see Creating Custom Service Checks for informationon the subsequent dialogs.
• If the check is a user rights check, see Creating Custom User Rights Checks forinformation on the subsequent dialogs.

7/30/2019 Vmware Vcenter Administration
http://slidepdf.com/reader/full/vmware-vcenter-administration 77/183
Using Custom Checks
vCenter™ Protect Essentials Plus - Configuration Management Administration Guide 71
• If the check is a file ACL check, see Creating Custom File ACL Checks for informationon the subsequent dialogs.
• If the check is a directory ACL check, see Creating Custom Directory ACL Checks forinformation on the subsequent dialogs.
• If the check is a registry multi-string check, see Creating Custom Registry Multi-
String Checks for information on the subsequent dialogs.• If the check is a registry exists check, see Creating Custom Registry Exists Checks for
information on the subsequent dialogs.
• If the check is a registry value check for all users, see Creating Custom Registry Value Checks for All Users for information on the subsequent dialogs.
• If the check is a 64-bit registry check, see Creating Custom Registry Value x64
Checks for information on the subsequent dialogs.
• If the check is a file date offset check, see Creating Custom File Date Offset Checks
for information on the subsequent dialogs.
Importing Custom Checks From A File You can create a custom check by importing an existing custom check that was previously
exported to an XML file. You can then modify that custom check if needed.
Note: For information on exporting a custom check, see Exporting Custom Checks.
1. From the Custom Check Wizard click Import from File.
A dialog similar to the following is displayed:

7/30/2019 Vmware Vcenter Administration
http://slidepdf.com/reader/full/vmware-vcenter-administration 78/183
Using Custom Checks
72 vCenter™ Protect Essentials Plus - Configuration Management Administration Guide
2. Select the XML file you want to import and then click Open.
• If the file is unsigned the following dialog is displayed:
An unsigned file is not as secure as a digitally signed file. If you feel you can trust thefile (for example, perhaps you or a colleague were the person who initially exported
the file), then click Yes. Otherwise click No.
• If the file is digitally signed a dialog similar to the following is displayed:
To import the file click Yes; to abort the operation click No.
If the import process is successful the following dialog is displayed:

7/30/2019 Vmware Vcenter Administration
http://slidepdf.com/reader/full/vmware-vcenter-administration 79/183
Using Custom Checks
vCenter™ Protect Essentials Plus - Configuration Management Administration Guide 73
3. At this point you can either import the custom check as is by clicking Next on all thesubsequent dialogs, or you can use the subsequent dialogs to edit the check before importingit.
• If the check is a registry check, see Creating Custom Registry Checks for information
on the subsequent dialogs.
• If the check is a service check, see Creating Custom Service Checks for informationon the subsequent dialogs.
• If the check is a user rights check, see Creating Custom User Rights Checks forinformation on the subsequent dialogs.
• If the check is a file ACL check, see Creating Custom File ACL Checks for informationon the subsequent dialogs.
• If the check is a directory ACL check, see Creating Custom Directory ACL Checks forinformation on the subsequent dialogs.
• If the check is a registry multi-string check, see Creating Custom Registry Multi-String Checks for information on the subsequent dialogs.
• If the check is a registry value exists check, see Creating Custom Registry ValueExists Checks for information on the subsequent dialogs.
• If the check is a registry value check, see Creating Custom Registry Value Checks forinformation on the subsequent dialogs.
• If the check is a 64-bit registry check, see Creating Custom Registry Value x64Checks for information on the subsequent dialogs.
• If the check is a file date offset check, see Creating Custom File Date Offset Checks
for information on the subsequent dialogs.
Creating Custom Registry Value Checks
Within VMware vCenter Protect - Configuration Management, you can define a custom check thatlooks for a specific registry value on all scanned machines. For example, you may wish to createa check that verifies that all of your machines contain a certain registry key for an in-houseapplication or for an organization-specific security requirement.
The custom check type discussed in this section is designed to be used with 32-bit operatingsystems. It will also work within the 32-bit (Wow6432Node) registry key locations on 64-bit
systems. To create a custom check for 64-bit operating systems, see Creating Custom Registry Value x64 Checks.
Note: To see a demonstration of the following process, go to:http://www.shavlik.com/prodtrain-configure.aspx
1. To create a new custom Registry Value check from scratch, from the Custom Check Wizardclick Create New Custom Check .
The following dialog is displayed:

7/30/2019 Vmware Vcenter Administration
http://slidepdf.com/reader/full/vmware-vcenter-administration 80/183
Using Custom Checks
74 vCenter™ Protect Essentials Plus - Configuration Management Administration Guide
2. Select the desired operating system levels and then click Next.
The General Properties dialog is displayed.
3. Type a unique name for the custom check and description.

7/30/2019 Vmware Vcenter Administration
http://slidepdf.com/reader/full/vmware-vcenter-administration 81/183
Using Custom Checks
vCenter™ Protect Essentials Plus - Configuration Management Administration Guide 75
4. In the Type box select Registry Value and then click Next.
Note: For registry values on 64-bit machines you should select Registry Value (x64), as itis designed to work specifically with 64-bit machines.
The Specific Properties dialog is displayed. For example:
5. Use the available boxes to define the exact registry value for which you want to create a
policy check. You must provide the root, path, name, and type information. For example:
Note: If a value name is not specified the (Default) value name will be used.

7/30/2019 Vmware Vcenter Administration
http://slidepdf.com/reader/full/vmware-vcenter-administration 82/183
Using Custom Checks
76 vCenter™ Protect Essentials Plus - Configuration Management Administration Guide
Hint: For tips on using the Windows Registry Editor program (regedit) to locate these valuesand easily populate the fields on this dialog, see Using Regedit.
6. After defining the specific properties of the check, click Test Check .
This test is performed on the console registry and has two purposes. It validates that thecheck is properly defined by using the information provided to locate the check, and itdisplays the current registry value. If the test comes back unable to locate the registry value,
it either means the check is not properly defined or it does not exist on the console (althoughit may on the target systems).
7. Click Next.
The Operator and Value dialog is displayed.

7/30/2019 Vmware Vcenter Administration
http://slidepdf.com/reader/full/vmware-vcenter-administration 83/183
Using Custom Checks
vCenter™ Protect Essentials Plus - Configuration Management Administration Guide 77
8. Select an operator, type an expected value, and then click Next.
The Operator can be any of the following:
• = : Equal to
• < : Less than
• > : Greater than
• != : Not equal to
• <= : Less than or equal to
• >= : Greater than or equal to
The Expected Value can be any alphanumeric value.
9. Click Next.
The following dialog is displayed.

7/30/2019 Vmware Vcenter Administration
http://slidepdf.com/reader/full/vmware-vcenter-administration 84/183
Using Custom Checks
78 vCenter™ Protect Essentials Plus - Configuration Management Administration Guide
10. (Optional) If you want to export this custom check to an XML file to use it as the startingpoint for other custom checks, click Export to File.
For more information, see Exporting Custom Checks.
11. Click Finish.
The custom check is displayed within the policy. For example:

7/30/2019 Vmware Vcenter Administration
http://slidepdf.com/reader/full/vmware-vcenter-administration 85/183
Using Custom Checks
vCenter™ Protect Essentials Plus - Configuration Management Administration Guide 79
Creating Custom Service Checks
Within VMware vCenter Protect - Configuration Management, you can define a custom check thatlooks on all scanned machines for the status of a specific service. For example, you may wish tocreate a custom check that verifies that all of your organization's machines are configured to
automatically start a specific anti-virus service. Custom checks can augment the built-in serviceschecks already provided with the data for VMware vCenter Protect - Configuration Management.The built-in checks cover most of the services provided by the Windows operating systemssupported by VMware vCenter Protect - Configuration Management.
Note: To see a demonstration of this process, go to: http://www.shavlik.com/training-on-
demand.aspx.
1. To create a new custom Service Status check from scratch, from the Custom Check Wizard
click Create New Custom Check .
The following dialog is displayed:
2.
Select the desired operating system levels and then click Next.Tip: To determine the operating system being used on a particular machine, on themachine's desktop right-click My Computer and then select Properties. The operatingsystem is listed on the General tab.
The General Properties dialog is displayed.

7/30/2019 Vmware Vcenter Administration
http://slidepdf.com/reader/full/vmware-vcenter-administration 86/183
Using Custom Checks
80 vCenter™ Protect Essentials Plus - Configuration Management Administration Guide
3. Type a unique name for the custom check and a description.
4. In the Type box select Service Status and then click Next.
The Specific Properties dialog is displayed. For example:

7/30/2019 Vmware Vcenter Administration
http://slidepdf.com/reader/full/vmware-vcenter-administration 87/183
Using Custom Checks
vCenter™ Protect Essentials Plus - Configuration Management Administration Guide 81
5. In the Service Name box, type the name of the service for which you want to create acustom check.
To locate the correct name to use:
a) From your Windows desktop select Start > Control Panel > Administrative Tools.
b) Double-click the Services icon.
c) From within the Services dialog, double-click the service for which you want to create acustom check.
d) On the resulting Properties dialog, on the General tab, locate the Service name. Forexample:
e) On the Custom Check Wizard dialog, type this name in the Service Name box.Tip: Another way to locate the correct service name is to launch the Microsoft Registry Editor(regedit) and navigate to theHKEY_LOCAL_MACHINE\SYSTEM\CurrentControlSet\Servicesdirectory. Keys under
this hive are commonly named with the service name required for use with the wizard.
6. Click Test Check .
This test is performed on the console registry and has two purposes. It validates that thecheck is properly defined by using the information provided to locate the check, and itdisplays the current value of the service. If the test comes back unable to locate the service,it either means the check is not properly defined or it does not exist on the console (althoughit may on the target systems).
7. Click Next.
The Operator and Value dialog is displayed.

7/30/2019 Vmware Vcenter Administration
http://slidepdf.com/reader/full/vmware-vcenter-administration 88/183
Using Custom Checks
82 vCenter™ Protect Essentials Plus - Configuration Management Administration Guide
8. Select an operator, type an expected value, and then click Next.
The Operator can be either of the following:
• = : Equal to
• != : Not equal to
The Service Status can be any of the following:
• Automatic: Specifies that the service starts automatically when the system starts.
• Manual: Specifies that a user or a dependent service can start the service. Services
with Manual startup do not start automatically when the system starts.
• Disabled: Prevents the service from being started by the system, a user, or a
dependent service.
• Automatic-Running: Specifies that the service starts automatically when the
system starts and is running at the time of the check.
• Automatic-Stopped: Specifies that the service starts automatically when thesystem starts and is stopped at the time of the check.
• Disabled-Stopped: Specifies that the service is disabled when the system startsand is stopped at the time of the check.
9. Click Next.
The following dialog is displayed.

7/30/2019 Vmware Vcenter Administration
http://slidepdf.com/reader/full/vmware-vcenter-administration 89/183
Using Custom Checks
vCenter™ Protect Essentials Plus - Configuration Management Administration Guide 83
10. (Optional) If you want to export this custom check to an XML file to use it as the startingpoint for other custom checks, click Export to File.
For more information, see Exporting Custom Checks.
11. Click Finish.
The custom check is displayed within the policy. For example:

7/30/2019 Vmware Vcenter Administration
http://slidepdf.com/reader/full/vmware-vcenter-administration 90/183
Using Custom Checks
84 vCenter™ Protect Essentials Plus - Configuration Management Administration Guide
Creating Custom User Rights Checks
A user right is a type of control that is placed upon a user. It determines who may performspecific tasks or operations. In a Microsoft Windows environment, a user right refers to a securitypolicy that applies to individual users or to groups of users. It is considered a best practice tomanage user rights using security principals and user groups so that they can apply across awide range of machines rather than a specific machine.
Within VMware vCenter Protect - Configuration Management , you can define a custom check that specifies who should be assigned a specific user right. During a machine scan all users,
groups, and security principals with the specified user right are identified. The custom check willbe in compliance only if there is an exact match with the users, groups, and security principalsspecified within the check.
Note: You must define a separate custom check for each user right you want to scan for.
1. To create a new custom User Rights Assignment check from scratch, from the Custom Check Wizard click Create New Custom Check .
The following dialog is displayed:
2. Select the desired operating system levels and then click Next.
Tip: To determine the operating system being used on a particular machine, on themachine's desktop right-click My Computer and then select Properties. The operating
system is listed on the General tab.
The General Properties dialog is displayed.

7/30/2019 Vmware Vcenter Administration
http://slidepdf.com/reader/full/vmware-vcenter-administration 91/183

7/30/2019 Vmware Vcenter Administration
http://slidepdf.com/reader/full/vmware-vcenter-administration 92/183
Using Custom Checks
86 vCenter™ Protect Essentials Plus - Configuration Management Administration Guide
5. In the User Right box, specify the type of user right for which you want to create a customcheck.
The rights available on this dialog are all well known, standard Windows rights. The rightsreside in an XML file that can be periodically updated by VMware Inc . For information aboutany of the listed rights, simply perform a Web search on the term listed in parentheses at theend of a selection.
Note: Not all user rights are available in all operating systems. If after performing a scanyou notice that a specific user right is not found, it means the user right is not associatedwith the operating system. Simply remove that check from the policy.
6. Click Test Check .
This will show the users on the local machine that are currently assigned the user right. Youcan use this as a starting point on the next dialog (where you specify the users you wantassigned this right).
7. Click Next.
The Operator and Value dialog is displayed.
8. Select an operator.
The only operator currently offered is = (equal to). This means that a scanned machine mustbe an exact match with all aspects of this check in order to be found in compliance with thischeck.
9. Click Specify Users and specify the users that will be affected by this check.

7/30/2019 Vmware Vcenter Administration
http://slidepdf.com/reader/full/vmware-vcenter-administration 93/183
Using Custom Checks
vCenter™ Protect Essentials Plus - Configuration Management Administration Guide 87
Selectthis
objecttype
Shows the object types currently available for assigning to a check. To change
this, click Object Types. The Object Types dialog is displayed.
There are three possible object types:
• Built-in security principals: Consists of well known accounts andservices that are built-in to Windows operating systems.
• Groups: Consists of all Windows groups matching the search criteria.
• Users: Consists of all Windows users matching the search criteria.From this
locationSpecifies where the objects that you want to assign to this check reside. Thedefault location is the local machine. In many case the objects will resideelsewhere, such as your network directory. To specify a different location, click
Locations. The Locations dialog is displayed. For example:

7/30/2019 Vmware Vcenter Administration
http://slidepdf.com/reader/full/vmware-vcenter-administration 94/183
Using Custom Checks
88 vCenter™ Protect Essentials Plus - Configuration Management Administration Guide
Navigate to the desired location and then click OK .
Enter theobject
names toselect
Type the name of the object that you want to assign to the user right. You canspecify multiple object names at once by separating the object names with asemicolon. When specifying object names you should use the following syntax:
• Display name: First name Last name• Object name: machine1• User name: user1• Object name@domain name: machine1@domain1• Domain name\Object name: domain1\machine1
User rights are typically associated with user groups or security principals. This
makes for easier and wider-ranging management of user rights, with thecommon user groups or security principals available for multiple machines. Thisapproach is recommended within VMware vCenter Protect - ConfigurationManagement .
Note: The use of machine-specific accounts is not recommended as it mayrequire scanning on a machine-by-machine basis in order to check forcompliance. If you do specify a machine-specific account such as a built-in useraccount or a user defined within a local group, you must include the machinename when typing the object name (example: MachineA\Administrator). To seethe built-in user accounts and the users defined within a local group on yourmachine, select Start > Control Panel > Admin Tools > ComputerManagement > Local Users & Groups.
To verify the accuracy of the names, click Check Names. The program has
built-in intelligence and will return all valid names with their properly formattedsyntax. When specifying security principal names, you can type just the firstfew characters of the name and then click Check Names. The program willpresent the full name of the nearest match (if any).
If any names cannot be found the Name Not Found dialog is displayed.
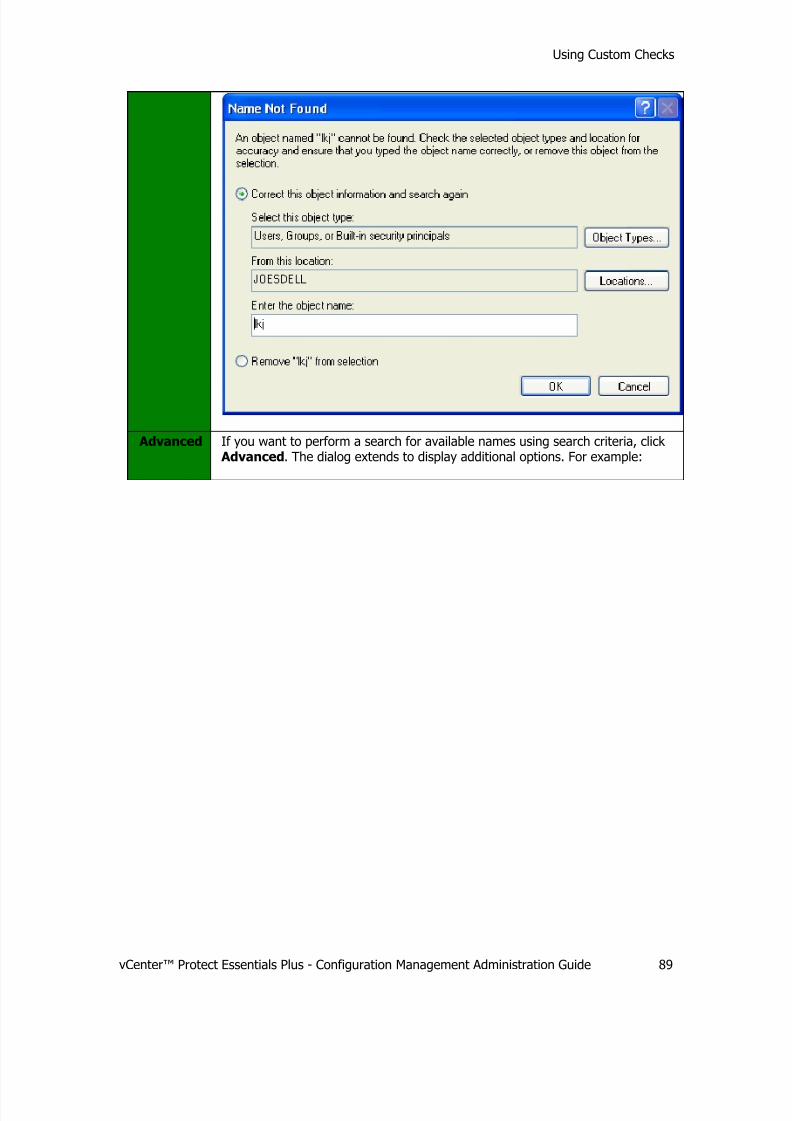
7/30/2019 Vmware Vcenter Administration
http://slidepdf.com/reader/full/vmware-vcenter-administration 95/183
Using Custom Checks
vCenter™ Protect Essentials Plus - Configuration Management Administration Guide 89
Advanced If you want to perform a search for available names using search criteria, click Advanced. The dialog extends to display additional options. For example:
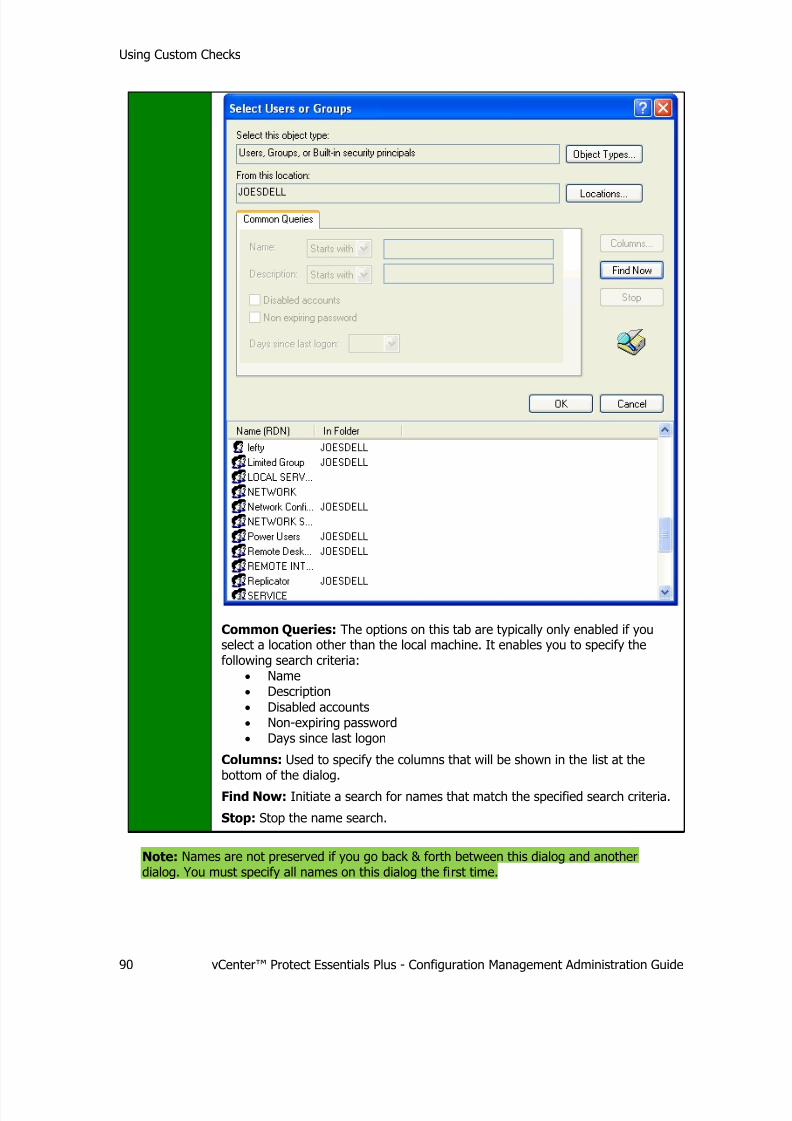
7/30/2019 Vmware Vcenter Administration
http://slidepdf.com/reader/full/vmware-vcenter-administration 96/183
Using Custom Checks
90 vCenter™ Protect Essentials Plus - Configuration Management Administration Guide
Common Queries: The options on this tab are typically only enabled if youselect a location other than the local machine. It enables you to specify thefollowing search criteria:
• Name• Description• Disabled accounts• Non-expiring password• Days since last logon
Columns: Used to specify the columns that will be shown in the list at thebottom of the dialog.
Find Now: Initiate a search for names that match the specified search criteria.
Stop: Stop the name search.
Note: Names are not preserved if you go back & forth between this dialog and anotherdialog. You must specify all names on this dialog the first time.

7/30/2019 Vmware Vcenter Administration
http://slidepdf.com/reader/full/vmware-vcenter-administration 97/183
Using Custom Checks
vCenter™ Protect Essentials Plus - Configuration Management Administration Guide 91
Important! If you select any special users specific to the local machine (for example, a SQLServer user such as SQLServer2005SQLBrowserUser$name), the check is likely to fail. This isbecause the security ID (SID) associated for the name on a remote machine is likely to bedifferent. An exception to this is the built-in user account Support_388945a0, which isused to control access to certain signed scripts on a machine. This user is always supported
regardless of the SID associated with the name on remote machines.
When you are finished specifying users, click OK .
9. On the Operator and Value dialog, click Next.
The following dialog is displayed.
10. (Optional) If you want to export this custom check to an XML file to use it as the startingpoint for other custom checks, click Export to File.
For more information, see Exporting Custom Checks.
11. Click Finish.
The custom check is displayed within the policy. For example:

7/30/2019 Vmware Vcenter Administration
http://slidepdf.com/reader/full/vmware-vcenter-administration 98/183
Using Custom Checks
92 vCenter™ Protect Essentials Plus - Configuration Management Administration Guide
Creating Custom File ACL Checks
A file Access Control List (ACL) is a type of access control that is placed upon an individual datafile. It determines what access operations can be performed on the file, and by whom. Within
VMware vCenter Protect - Configuration Management, you can define a custom File ACL check that specifies what file access permissions certain users should have for a specific file. In general,a custom check is designed to handle the more simple file ACLs. More advanced ACL settings arenot currently supported.
File ACLs are typically associated with user groups or security principals. This makes for easierand wider-ranging management of ACLs, with the common user groups or security principalsavailable for multiple machines. This approach is recommended within VMware vCenter Protect -
Configuration Management. Use of machine-specific accounts may require scanning on amachine-by-machine basis in order to check for compliance.
During a scan, VMware vCenter Protect - Configuration Management will compare the ACLsettings for the file on a scanned machine to the settings defined in the custom file ACL check.
The file settings must be an exact match in order for the file to be in compliance with the customcheck.
You must create a custom file ACL check for each data file you are interested in. You will typicallyonly create custom file ACL checks for those files you deem important for your network security(for example, regedit.exe).
Note: Custom File ACL checks are not currently enforceable. Enforcement may be available in afuture release of VMware vCenter Protect - Configuration Management. See Enforcement
Overview for more information on enforcement.

7/30/2019 Vmware Vcenter Administration
http://slidepdf.com/reader/full/vmware-vcenter-administration 99/183
Using Custom Checks
vCenter™ Protect Essentials Plus - Configuration Management Administration Guide 93
1. To create a new custom File ACL check from scratch, from the Custom Check Wizard click
Create New Custom Check .
The following dialog is displayed:
2. Select the desired operating system levels and then click Next.
Tip: To determine the operating system being used on a particular machine, on themachine's desktop right-click My Computer and then select Properties. The operatingsystem is listed on the General tab.
The General Properties dialog is displayed.

7/30/2019 Vmware Vcenter Administration
http://slidepdf.com/reader/full/vmware-vcenter-administration 100/183
Using Custom Checks
94 vCenter™ Protect Essentials Plus - Configuration Management Administration Guide
3. Type a unique name for the custom check and a description.
4. In the Type box select File ACL and then click Next.
The Specific Properties dialog is displayed. For example:
5. In the File Path box, specify the full path name to the file for which you want to create acustom check.
If you don't know the exact location of the file, click Select File to locate the file.
Tip: You can specify standard Windows environment variables within the path name (for
example: %windir%, %systemroot%, etc).
6. Click Test Check .
This will show the current file permissions for users on the local machine. You can use this asa starting point on the next dialog (where you specify what permissions certain users should
have for the file).
Note: The information displayed here is the same information you'll see if you right-click onthe file within Windows Explorer and then select Properties > Security.
7. Click Next.
The Operator and Value dialog is displayed.

7/30/2019 Vmware Vcenter Administration
http://slidepdf.com/reader/full/vmware-vcenter-administration 101/183
Using Custom Checks
vCenter™ Protect Essentials Plus - Configuration Management Administration Guide 95
8. Select an operator.
The only operator currently offered is = (equal to). This means that a scanned machine mustbe an exact match with all aspects of this check in order to be found in compliance with thischeck.
9. Click Select ACL.
The Permissions dialog is displayed. For example:
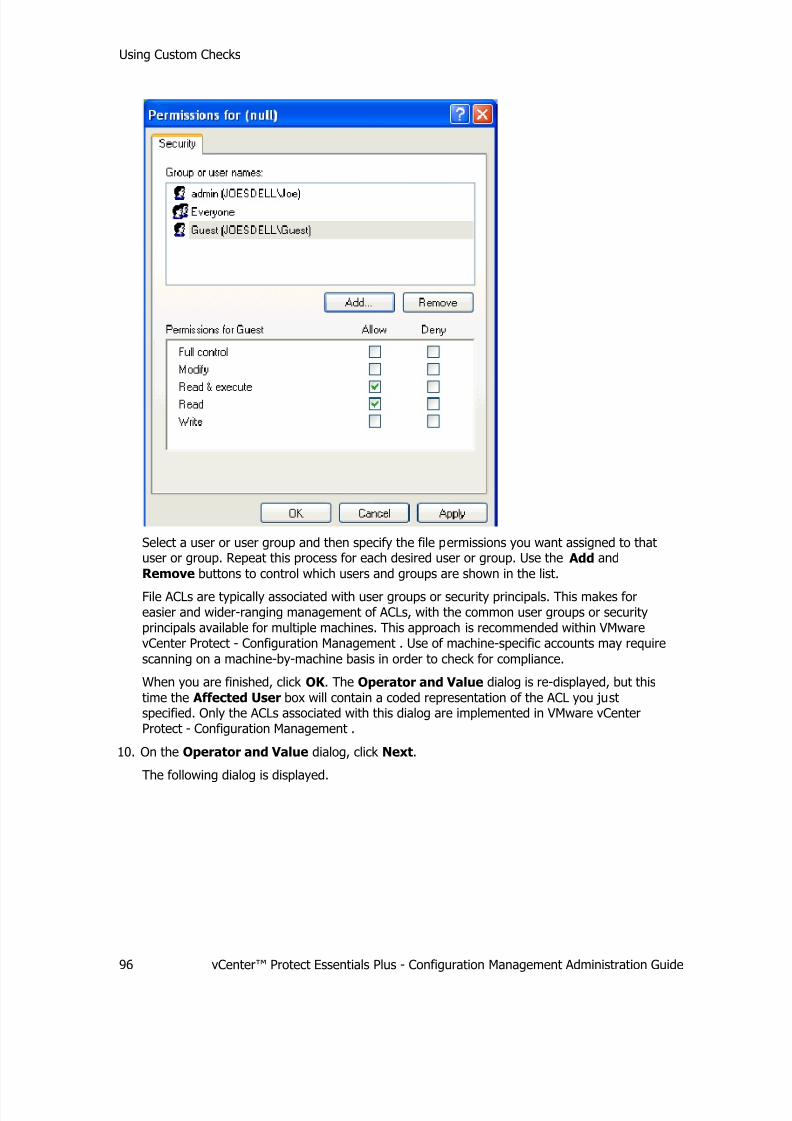
7/30/2019 Vmware Vcenter Administration
http://slidepdf.com/reader/full/vmware-vcenter-administration 102/183
Using Custom Checks
96 vCenter™ Protect Essentials Plus - Configuration Management Administration Guide
Select a user or user group and then specify the file permissions you want assigned to thatuser or group. Repeat this process for each desired user or group. Use the Add and
Remove buttons to control which users and groups are shown in the list.
File ACLs are typically associated with user groups or security principals. This makes foreasier and wider-ranging management of ACLs, with the common user groups or securityprincipals available for multiple machines. This approach is recommended within VMwarevCenter Protect - Configuration Management . Use of machine-specific accounts may require
scanning on a machine-by-machine basis in order to check for compliance.
When you are finished, click OK . The Operator and Value dialog is re-displayed, but this
time the Affected User box will contain a coded representation of the ACL you justspecified. Only the ACLs associated with this dialog are implemented in VMware vCenterProtect - Configuration Management .
10. On the Operator and Value dialog, click Next.
The following dialog is displayed.

7/30/2019 Vmware Vcenter Administration
http://slidepdf.com/reader/full/vmware-vcenter-administration 103/183
Using Custom Checks
vCenter™ Protect Essentials Plus - Configuration Management Administration Guide 97
11. (Optional) If you want to export this custom check to an XML file to use it as the startingpoint for other custom checks, click Export to File.
For more information, see Exporting Custom Checks.
12. Click Finish.
The custom check is displayed within the policy. For example:

7/30/2019 Vmware Vcenter Administration
http://slidepdf.com/reader/full/vmware-vcenter-administration 104/183
Using Custom Checks
98 vCenter™ Protect Essentials Plus - Configuration Management Administration Guide
Creating Custom Directory ACL Checks
A directory Access Control List (ACL) is a type of control that is placed upon a directory. Itdetermines what operations can be performed on the directory, and by whom. Within VMwarevCenter Protect - Configuration Management, you can define a custom directory ACL check thatspecifies what permissions certain users should have for a specific directory.
Directory ACLs are typically associated with user groups or security principals. This makes foreasier and wider-ranging management of ACLs, with the common user groups or securityprincipals available for multiple machines. This approach is recommended within VMware vCenter
Protect - Configuration Management. Use of machine-specific accounts may require scanning ona machine-by-machine basis in order to check for compliance.
During a scan, VMware vCenter Protect - Configuration Management will compare the ACLsettings for the directory on a scanned machine to the settings defined in the custom file ACL
check. The directory settings must be an exact match in order for the directory to be incompliance with the custom check.
You must create a custom directory ACL check for each directory you are interested in. You willtypically only create custom directory ACL checks for those directories you deem important foryour network security (for example, C:\Windows).
Note: Custom Directory ACL checks are not enforceable. See Enforcement Overview for moreinformation on enforcement.
1. To create a new custom Directory ACL check from scratch, from the Custom Check Wizardclick Create New Custom Check .
The following dialog is displayed:

7/30/2019 Vmware Vcenter Administration
http://slidepdf.com/reader/full/vmware-vcenter-administration 105/183
Using Custom Checks
vCenter™ Protect Essentials Plus - Configuration Management Administration Guide 99
2. Select the desired operating system levels and then click Next.
Tip: To determine the operating system being used on a particular machine, on themachine's desktop right-click My Computer and then select Properties. The operatingsystem is listed on the General tab.
The General Properties dialog is displayed.
3. Type a unique name for the custom check and a description.
4. In the Type box select Directory ACL and then click Next.
The Specific Properties dialog is displayed. For example:

7/30/2019 Vmware Vcenter Administration
http://slidepdf.com/reader/full/vmware-vcenter-administration 106/183
Using Custom Checks
100 vCenter™ Protect Essentials Plus - Configuration Management Administration Guide
5. In the Directory Path box, specify the full path name for the directory for which you wantto create a custom check.
If you don't know the exact location, click Open Directory to locate the directory path.
Tip: You can specify standard Windows environment variables within the path name (forexample: %windir%, %systemroot%, etc).
6. Click Test Check .
This will show the current directory permissions for users on the local machine. You can usethis as a starting point on the next dialog (where you specify what permissions certain users
should have for the directory).
Note: The information displayed here is the same information you'll see if you right-click on
the directory within Windows Explorer and then select Properties > Security.
7. Click Next.
The Operator and Value dialog is displayed.
8. Select an operator.
The only operator currently offered is = (equal to). This means that a scanned machine must
be an exact match with all aspects of this check in order to be found in compliance with thischeck.
9. Click Select ACL.
The Permissions dialog is displayed. For example:

7/30/2019 Vmware Vcenter Administration
http://slidepdf.com/reader/full/vmware-vcenter-administration 107/183
Using Custom Checks
vCenter™ Protect Essentials Plus - Configuration Management Administration Guide 101
Select a user or user group and then specify the directory permissions you want assigned tothat user or group. Repeat this process for each desired user or group. Use the Add and
Remove buttons to control which users and groups are shown in the list.
Directory ACLs are typically associated with user groups or security principals. This makes foreasier and wider-ranging management of ACLs, with the common user groups or securityprincipals available for multiple machines. This approach is recommended within VMwarevCenter Protect - Configuration Management . Use of machine-specific accounts may require
scanning on a machine-by-machine basis in order to check for compliance.
When you are finished, click OK . The Operator and Value dialog is re-displayed, but this
time the Affected User box will contain a coded representation of the ACL you justspecified. The directory ACL defined here will also be applicable to files within the directory(unless otherwise configured).
10. On the Operator and Value dialog, click Next.
The following dialog is displayed.

7/30/2019 Vmware Vcenter Administration
http://slidepdf.com/reader/full/vmware-vcenter-administration 108/183
Using Custom Checks
102 vCenter™ Protect Essentials Plus - Configuration Management Administration Guide
11. (Optional) If you want to export this custom check to an XML file to use it as the startingpoint for other custom checks, click Export to File.
For more information, see Exporting Custom Checks.
12. Click Finish.
The custom check is displayed within the policy. For example:

7/30/2019 Vmware Vcenter Administration
http://slidepdf.com/reader/full/vmware-vcenter-administration 109/183
Using Custom Checks
vCenter™ Protect Essentials Plus - Configuration Management Administration Guide 103
Creating Custom Registry Multi-String Value Checks
A multi-string value is an entry in a registry key that stores a list of strings. Within VMwarevCenter Protect - Configuration Management, you can define a custom check that looks to see if a specific multi-string value contains the expected text strings. The check will be in compliance
only if there is an exact match with the string values identified on a scanned machine. The orderof string values does not matter, just so all items are there. If a machine is missing one or morestring values, or if there are extra string values, the check will not be in compliance.
1. To create a new custom Registry Multi-String Value check from scratch, from the Custom
Check Wizard click Create New Custom Check .
The following dialog is displayed:
2. Select the desired operating system levels and then click Next.
The General Properties dialog is displayed.

7/30/2019 Vmware Vcenter Administration
http://slidepdf.com/reader/full/vmware-vcenter-administration 110/183
Using Custom Checks
104 vCenter™ Protect Essentials Plus - Configuration Management Administration Guide
3. Type a unique name for the custom check and description.
4. In the Type box select Registry Multi-String Value and then click Next.
The Specific Properties dialog is displayed.
5. Use the available boxes to define the exact registry key multi-string value for which you wantto create a policy check.
You must provide the root, path, and value name information. For example:

7/30/2019 Vmware Vcenter Administration
http://slidepdf.com/reader/full/vmware-vcenter-administration 111/183
Using Custom Checks
vCenter™ Protect Essentials Plus - Configuration Management Administration Guide 105
Hint: For tips on using the Windows Registry Editor program (regedit) to locate these valuesand easily populate the fields on this dialog, see Using Regedit. For example, here's what thevalues shown above look like within regedit:
6. After defining the specific properties of the check, click Test Check .
This will prove whether the registry key defined here currently exists on the local machineand will show the current string values defined for the entry.
7. Click Next.
The Operator and Value dialog is displayed.

7/30/2019 Vmware Vcenter Administration
http://slidepdf.com/reader/full/vmware-vcenter-administration 112/183
Using Custom Checks
106 vCenter™ Protect Essentials Plus - Configuration Management Administration Guide
8. Select an operator.
The only operator currently offered is = (equal to). This means that a scanned machine mustbe a match with all items specified for this check in order to be found in compliance with thischeck. The order the items are specified does not matter.
9. Specify the text string values that you expect to be defined for this entry and then click Next.
You can specify up to 4,000 different string values. Each string value should be separated bya semicolon.
10. Click Next.
The following dialog is displayed.
11. (Optional) If you want to export this custom check to an XML file to use it as the starting
point for other custom checks, click Export to File.
For more information, see Exporting Custom Checks.
12. Click Finish.
The custom check is displayed within the policy. For example:

7/30/2019 Vmware Vcenter Administration
http://slidepdf.com/reader/full/vmware-vcenter-administration 113/183
Using Custom Checks
vCenter™ Protect Essentials Plus - Configuration Management Administration Guide 107
Creating Custom Registry Value Exists Checks
Within VMware vCenter Protect - Configuration Management, you can define a custom check thatlooks to see if a specific registry value exists on a scanned machine. For example, this type of
check could be useful for determining if an application has placed an expected registry keyneeded for its configuration.
Note: Custom Registry Value Exists checks are not enforceable. Enforcement may be available ina future release of VMware vCenter Protect - Configuration Management. See Enforcement
Overview for more information on enforcement.
1. To create a new custom Registry Value Exists check from scratch, from the Custom Check
Wizard click Create New Custom Check .
The following dialog is displayed:

7/30/2019 Vmware Vcenter Administration
http://slidepdf.com/reader/full/vmware-vcenter-administration 114/183
Using Custom Checks
108 vCenter™ Protect Essentials Plus - Configuration Management Administration Guide
2. Select the desired operating system levels and then click Next.
The General Properties dialog is displayed.
3. Type a unique name for the custom check and description.
4. In the Type box select Registry Value Exists and then click Next.
The Specific Properties dialog is displayed.
5. Use the available boxes to define the exact registry key for which you want to create a policycheck.
You must provide the root and path information (the registry value data type and its data arenot relevant to this check). For example:

7/30/2019 Vmware Vcenter Administration
http://slidepdf.com/reader/full/vmware-vcenter-administration 115/183
Using Custom Checks
vCenter™ Protect Essentials Plus - Configuration Management Administration Guide 109
Hint: For tips on using the Windows Registry Editor program (regedit) to locate these valuesand easily populate the fields on this dialog, see Using Regedit.
6. After defining the specific properties of the check, click Test Check .
This will show whether the registry key value defined here currently exists on the local
machine.
7. Click Next.
The Operator and Value dialog is displayed.
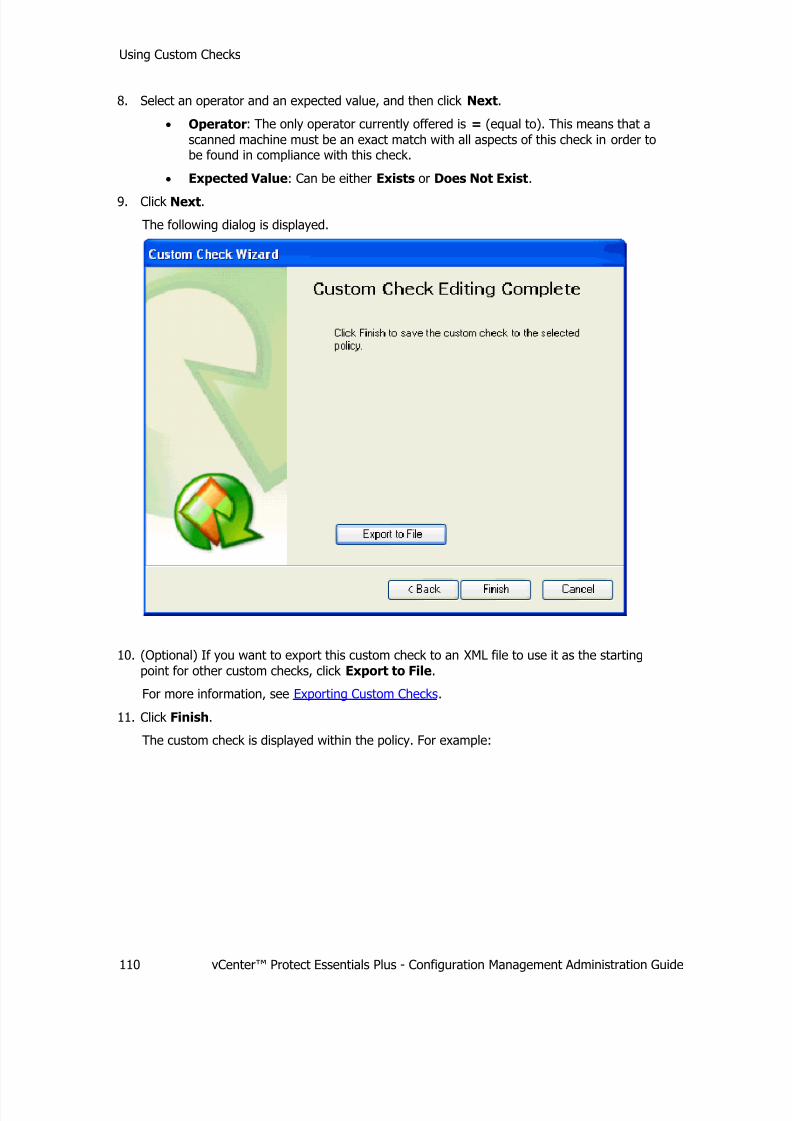
7/30/2019 Vmware Vcenter Administration
http://slidepdf.com/reader/full/vmware-vcenter-administration 116/183
Using Custom Checks
110 vCenter™ Protect Essentials Plus - Configuration Management Administration Guide
8. Select an operator and an expected value, and then click Next.
• Operator: The only operator currently offered is = (equal to). This means that a
scanned machine must be an exact match with all aspects of this check in order tobe found in compliance with this check.
• Expected Value: Can be either Exists or Does Not Exist.
9. Click Next.
The following dialog is displayed.
10. (Optional) If you want to export this custom check to an XML file to use it as the starting
point for other custom checks, click Export to File.
For more information, see Exporting Custom Checks.
11. Click Finish.
The custom check is displayed within the policy. For example:

7/30/2019 Vmware Vcenter Administration
http://slidepdf.com/reader/full/vmware-vcenter-administration 117/183
Using Custom Checks
vCenter™ Protect Essentials Plus - Configuration Management Administration Guide 111
Creating Custom Registry Value Checks for All Users
This custom check enables you to specify a registry value that should apply to all user accountson a machine. In order for a machine to be in compliance with the check, all users must have the
specified key value. It is considered a "best practice" for this type of check to look at the registryvalues associated with regular users who have logged onto the machine in the past. They have aprofile that contains registry keys that can be found when logged in under theHKEY_CURRENT_USER hive. This type of check looks for such registry keys, but the keys areassociated with each user, not just the current user.
Note: Custom Registry Value (HKCU - Via All Users) checks are not currently enforceable.Enforcement may be available in a future release of VMware vCenter Protect - Configuration
Management. See Enforcement Overview for more information on enforcement.
1. To create a new custom Registry Value (HKCU - Via All Users) check from scratch, from the
Custom Check Wizard click Create New Custom Check .
The following dialog is displayed:

7/30/2019 Vmware Vcenter Administration
http://slidepdf.com/reader/full/vmware-vcenter-administration 118/183
Using Custom Checks
112 vCenter™ Protect Essentials Plus - Configuration Management Administration Guide
2. Select the desired operating system levels and then click Next.
The General Properties dialog is displayed.
3. Type a unique name for the custom check and description.
4. In the Type box select Registry Value (HKCU - Via All Users) and then click Next.
The Specific Properties dialog is displayed. For example:

7/30/2019 Vmware Vcenter Administration
http://slidepdf.com/reader/full/vmware-vcenter-administration 119/183
Using Custom Checks
vCenter™ Protect Essentials Plus - Configuration Management Administration Guide 113
5. Use the available boxes to define the exact registry value for which you want to create apolicy check.
The Root box contains only one option: ALL_USERS. This represents all users within theHKEY_USERS hive. The path, name, and type values you specify in the other three boxesmust apply to all users defined within the HKEY_USERS hive.
For example, to represent the following registry item for all users ...
... you would specify the following values within the dialog:
Hint: For tips on using the Windows Registry Editor program (regedit) to locate these values
and easily populate the fields on this dialog, see Using Regedit.
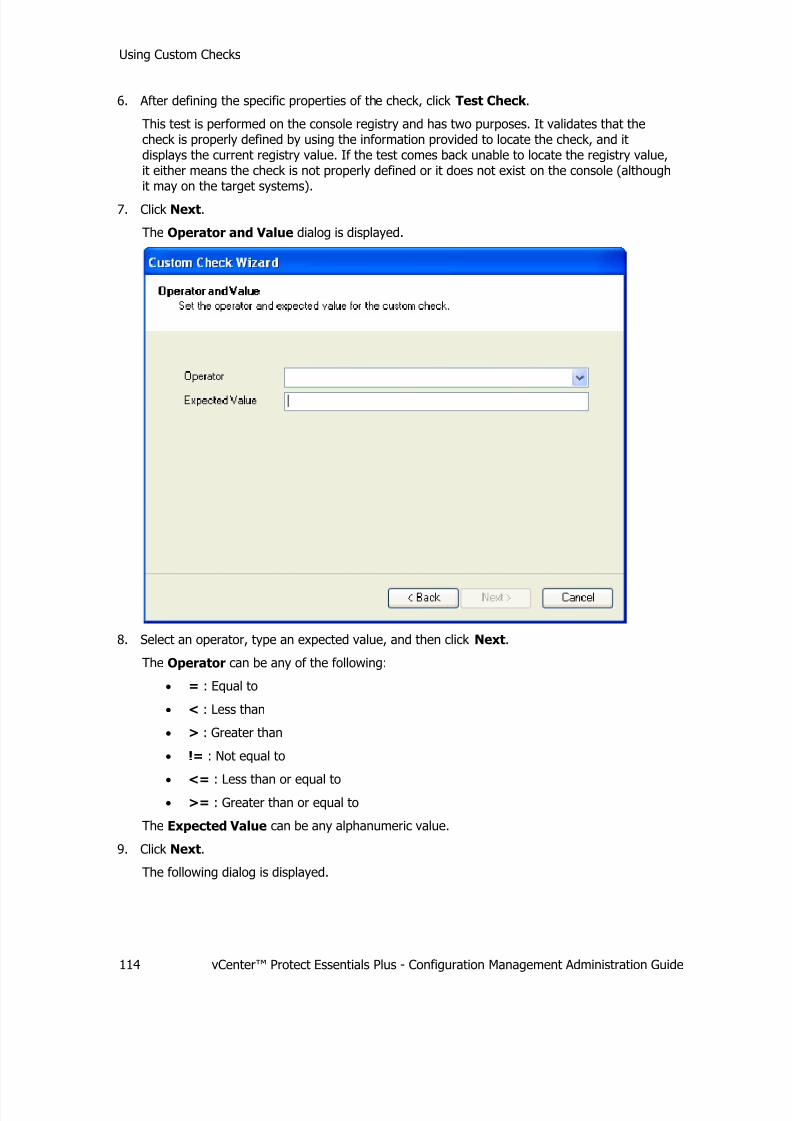
7/30/2019 Vmware Vcenter Administration
http://slidepdf.com/reader/full/vmware-vcenter-administration 120/183
Using Custom Checks
114 vCenter™ Protect Essentials Plus - Configuration Management Administration Guide
6. After defining the specific properties of the check, click Test Check .
This test is performed on the console registry and has two purposes. It validates that thecheck is properly defined by using the information provided to locate the check, and itdisplays the current registry value. If the test comes back unable to locate the registry value,it either means the check is not properly defined or it does not exist on the console (althoughit may on the target systems).
7. Click Next.
The Operator and Value dialog is displayed.
8. Select an operator, type an expected value, and then click Next.
The Operator can be any of the following:
• = : Equal to
• < : Less than
• > : Greater than
• != : Not equal to
• <= : Less than or equal to
• >= : Greater than or equal to
The Expected Value can be any alphanumeric value.
9. Click Next.
The following dialog is displayed.

7/30/2019 Vmware Vcenter Administration
http://slidepdf.com/reader/full/vmware-vcenter-administration 121/183
Using Custom Checks
vCenter™ Protect Essentials Plus - Configuration Management Administration Guide 115
10. (Optional) If you want to export this custom check to an XML file to use it as the startingpoint for other custom checks, click Export to File.
For more information, see Exporting Custom Checks.
11. Click Finish.
The custom check is displayed within the policy. For example:

7/30/2019 Vmware Vcenter Administration
http://slidepdf.com/reader/full/vmware-vcenter-administration 122/183
Using Custom Checks
116 vCenter™ Protect Essentials Plus - Configuration Management Administration Guide
Creating Custom Registry Value x64 Checks
Within VMware vCenter Protect - Configuration Management, you can define a custom check thatlooks to see if a specific 64-bit registry value exists on a scanned machine. For example, you maywish to create a check that verifies that all of your 64-bit machines contain a certain registry keyfor an in-house application or for an organization-specific security requirement.
Note: 64-bit machines support both 32- and 64-bit programs. In order to support thecoexistence of programs, Windows is designed to present 32-bit programs with a tree in theregistry that is different from the 64-bit tree. The custom check described in this section is
designed to work with the 64-bit portion of the registry. If you want to create a custom check forthe 32-bit portion of the registry, see Creating Custom Registry Value Checks.
1. To create a new custom Registry Value x64 check from scratch, from the Custom Check Wizard click Create New Custom Check .
The following dialog is displayed:
2. Select the desired 64-bit operating system levels and then click Next.
The General Properties dialog is displayed.

7/30/2019 Vmware Vcenter Administration
http://slidepdf.com/reader/full/vmware-vcenter-administration 123/183
Using Custom Checks
vCenter™ Protect Essentials Plus - Configuration Management Administration Guide 117
3. Type a unique name for the custom check and description.
4. In the Type box select Registry Value (x64) and then click Next.
The Specific Properties dialog is displayed. For example:

7/30/2019 Vmware Vcenter Administration
http://slidepdf.com/reader/full/vmware-vcenter-administration 124/183
Using Custom Checks
118 vCenter™ Protect Essentials Plus - Configuration Management Administration Guide
5. Use the available boxes to define the exact registry value for which you want to create apolicy check.
You must provide the root, path, value name, and value type information. For example:
Hint: For tips on using the Windows Registry Editor program (regedit) to locate these values
and easily populate the fields on this dialog, see Using Regedit. 6. After defining the specific properties of the check, click Test Check .
This test is performed on the console registry and has two purposes. It validates that thecheck is properly defined by using the information provided to locate the check, and it
displays the current registry value. If the test comes back unable to locate the registry value,it either means the check is not properly defined or it does not exist on the console (althoughit may on the target systems). If the check does not exist on the console it may be because
the console is not installed on a 64-bit operating system.
7. Click Next.
The Operator and Value dialog is displayed.

7/30/2019 Vmware Vcenter Administration
http://slidepdf.com/reader/full/vmware-vcenter-administration 125/183
Using Custom Checks
vCenter™ Protect Essentials Plus - Configuration Management Administration Guide 119
8. Select an operator, type an expected value, and then click Next.
The Operator can be any of the following:
• = : Equal to
• < : Less than
• > : Greater than
• != : Not equal to
• <= : Less than or equal to
• >= : Greater than or equal to
The Expected Value can be any alphanumeric value.
9. Click Next.
The following dialog is displayed.

7/30/2019 Vmware Vcenter Administration
http://slidepdf.com/reader/full/vmware-vcenter-administration 126/183
Using Custom Checks
120 vCenter™ Protect Essentials Plus - Configuration Management Administration Guide
10. (Optional) If you want to export this custom check to an XML file to use it as the startingpoint for other custom checks, click Export to File.
For more information, see Exporting Custom Checks.
11. Click Finish.
The custom check is displayed within the policy. For example:

7/30/2019 Vmware Vcenter Administration
http://slidepdf.com/reader/full/vmware-vcenter-administration 127/183
Using Custom Checks
vCenter™ Protect Essentials Plus - Configuration Management Administration Guide 121
Creating Custom File Date Offset Checks
This custom check enables you to determine if a specific file on your scanned machines isconsidered current or out-of-date. How old a file is in relation to the current date will oftenindicate the validity of the file's content. Examples of this are antivirus signature files, applicationdata files, or specific operating system files with known security flaws.
This custom check compares the file modification date to the current date. Based on criteria thatyou specify, machines with files found to be out-of-date will be flagged as out of compliance. Forexample, you may create a custom check that determines if an antivirus signature file is more
than three days old. Machines with signature files older than three days would be out of compliance and would require updated files.
Note: Custom File Date Offset checks are not currently enforceable. Enforcement may beavailable in a future release of VMware vCenter Protect - Configuration Management.
1. To create a new custom File Date Offset check from scratch, from the Custom Check Wizardclick Create New Custom Check .
The following dialog is displayed:
2. Select the desired operating system levels and then click Next.
Tip: To determine the operating system being used on a particular machine, on themachine's desktop right-click My Computer and then select Properties. The operating
system is listed on the General tab.
The General Properties dialog is displayed.

7/30/2019 Vmware Vcenter Administration
http://slidepdf.com/reader/full/vmware-vcenter-administration 128/183
Using Custom Checks
122 vCenter™ Protect Essentials Plus - Configuration Management Administration Guide
3. Type a unique name for the custom check and a description.
4. In the Type box select File Date Offset and then click Next.
The Specific Properties dialog is displayed. For example:

7/30/2019 Vmware Vcenter Administration
http://slidepdf.com/reader/full/vmware-vcenter-administration 129/183
Using Custom Checks
vCenter™ Protect Essentials Plus - Configuration Management Administration Guide 123
5. In the File Path box, specify the full path name to the file for which you want to create acustom check.
If you don't know the exact location of the file, click Select File to locate the file.
Tip: You can specify standard Windows environment variables within the path name (forexample: %windir%, %systemroot%, etc).
6. Click Test Check .
This test has two purposes. It validates that the file can be found in the designated locationand it displays the number of days since the file located on the console machine was last
modified. If the test comes back unable to locate the file it means the check is not properlydefined.
7. Click Next.
The Operator and Value dialog is displayed.
8. Select an operator, specify an expected value, and then click Next.
The Operator can be any of the following:
• = : Equal to
• < : Less than
• > : Greater than
• != : Not equal to
• <= : Less than or equal to
• >= : Greater than or equal to
The Expected Value is the number of days from the scan date. For example, if you aretesting to see that a file is not more than three days old, you would specify <= 3.
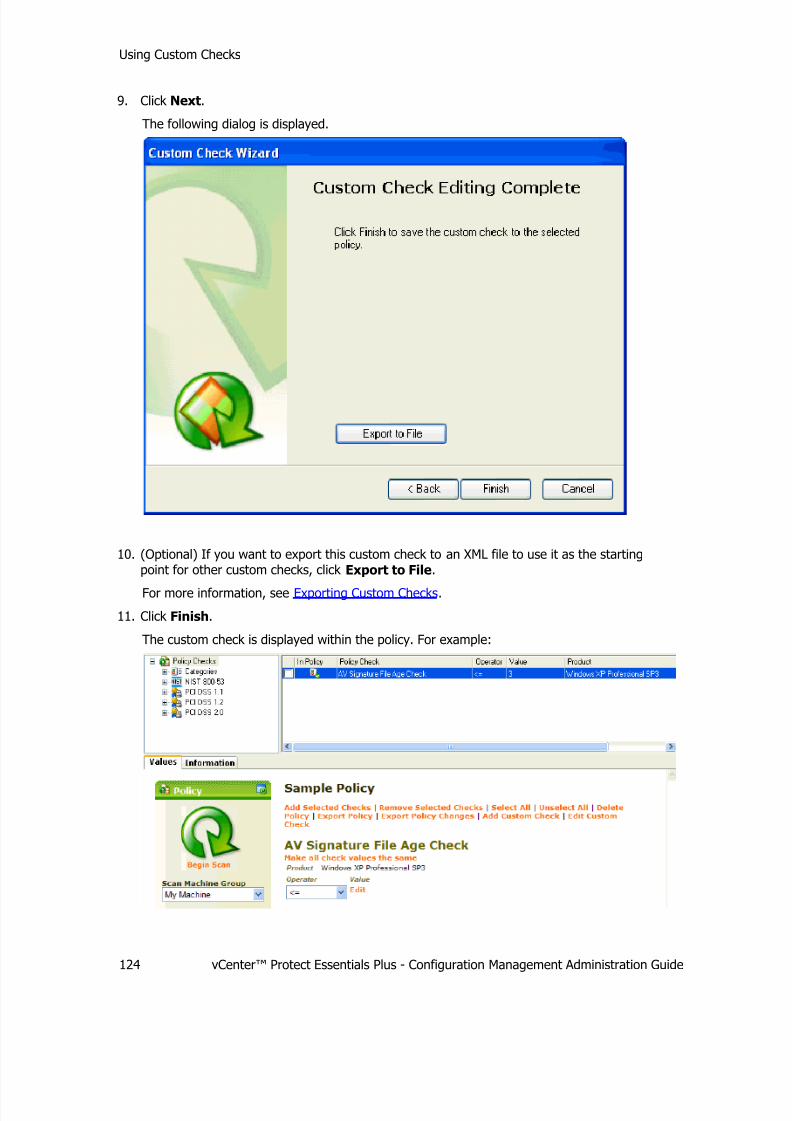
7/30/2019 Vmware Vcenter Administration
http://slidepdf.com/reader/full/vmware-vcenter-administration 130/183
Using Custom Checks
124 vCenter™ Protect Essentials Plus - Configuration Management Administration Guide
9. Click Next.
The following dialog is displayed.
10. (Optional) If you want to export this custom check to an XML file to use it as the startingpoint for other custom checks, click Export to File.
For more information, see Exporting Custom Checks.
11. Click Finish.
The custom check is displayed within the policy. For example:

7/30/2019 Vmware Vcenter Administration
http://slidepdf.com/reader/full/vmware-vcenter-administration 131/183
Using Custom Checks
vCenter™ Protect Essentials Plus - Configuration Management Administration Guide 125
Using Regedit
This section provides tips on using the Microsoft Registry Editor program (regedit) to locate thevalues needed when defining custom registry checks using the Custom Check Wizard.
1. On your Windows desktop select Start > Run.
2. In the Open box type regedit.
3. Click OK .
4. Expand the appropriate root folder and sub-folders to begin locating the desired registryvalue.
For example:
5. When you have located the desired registry value, do the following to populate the variousfields in the Custom Check Wizard.
• Root:
a) In the Registry Editor, identify the registry path root name (begins with HKEY_ )
b) Switch back to the Custom Check Wizard and select the matching root value.
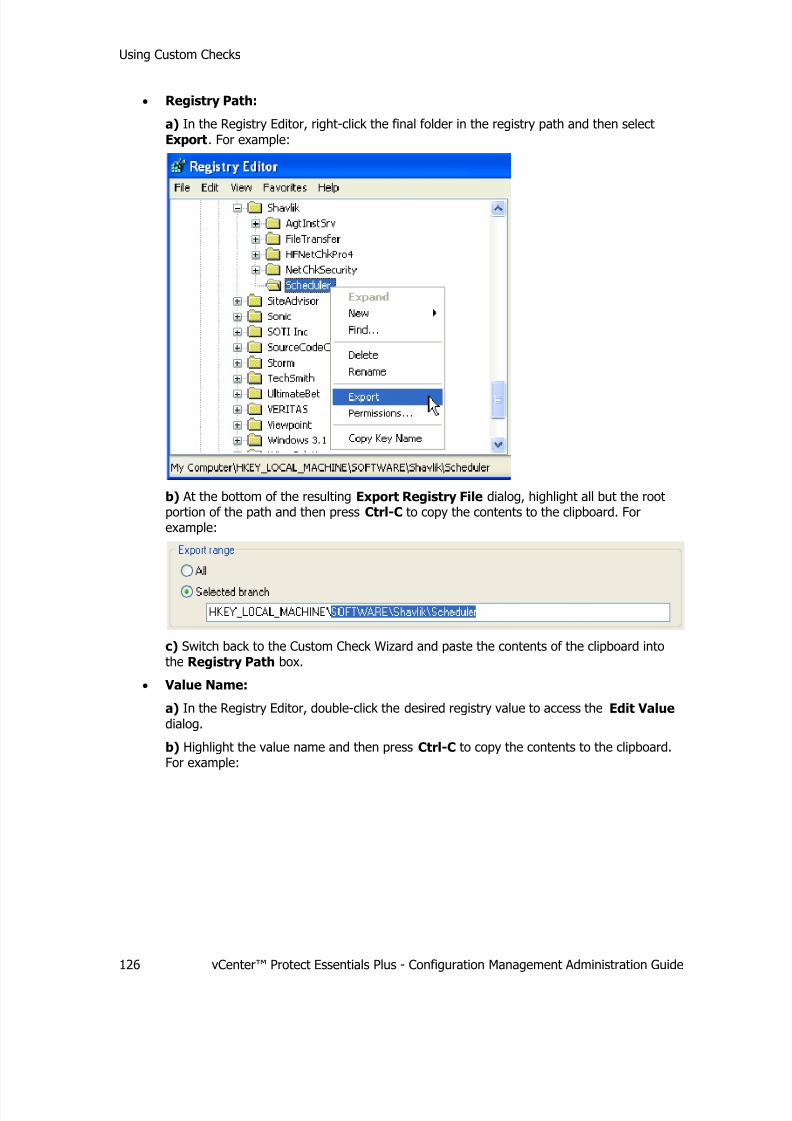
7/30/2019 Vmware Vcenter Administration
http://slidepdf.com/reader/full/vmware-vcenter-administration 132/183
Using Custom Checks
126 vCenter™ Protect Essentials Plus - Configuration Management Administration Guide
• Registry Path:
a) In the Registry Editor, right-click the final folder in the registry path and then select
Export. For example:
b) At the bottom of the resulting Export Registry File dialog, highlight all but the rootportion of the path and then press Ctrl-C to copy the contents to the clipboard. Forexample:
c) Switch back to the Custom Check Wizard and paste the contents of the clipboard intothe Registry Path box.
• Value Name:
a) In the Registry Editor, double-click the desired registry value to access the Edit Value
dialog.
b) Highlight the value name and then press Ctrl-C to copy the contents to the clipboard.For example:

7/30/2019 Vmware Vcenter Administration
http://slidepdf.com/reader/full/vmware-vcenter-administration 133/183
Using Custom Checks
vCenter™ Protect Essentials Plus - Configuration Management Administration Guide 127
c) Switch back to the Custom Check Wizard and paste the contents of the clipboard intothe Value Name box.
• Value Type:
a) In the Registry Editor, look in the Type column to locate the registry type.
b) Switch back to the Custom Check Wizard and select the matching value in the ValueType box.
Viewing Custom Checks
When one or more custom checks are created, they can be viewed within a sub-category named
Custom Check . This sub-category is shown within each of the available frameworks in theupper-left pane. Only those custom checks contained within the currently selected policy are
displayed. For example:

7/30/2019 Vmware Vcenter Administration
http://slidepdf.com/reader/full/vmware-vcenter-administration 134/183
Using Custom Checks
128 vCenter™ Protect Essentials Plus - Configuration Management Administration Guide
To view the custom checks that are not contained within the currently selected policy:
1. In the bottom pane of the selected policy, click Add Custom Check .
2. On the Custom Check Wizard dialog, click Load from database.
The resulting dialog will display all the custom checks that are contained within other policies.If desired they can be added to the currently selected policy.
Export ing Custom Checks
VMware vCenter Protect - Configuration Management provides the ability to export customchecks that you've created. Exporting a custom check enables it to be imported by you or acolleague into a different custom policy. Custom checks are exported to an XML file.
There are two ways to initiate the export of a custom check:
• When creating a new custom check : On the final Custom Check Wizard dialog, click
Export to File.
• When editing an existing custom check :
a. While viewing a custom policy, highlight the custom check you want to exportand then click Edit Custom Check .
For example:
The Custom Check Wizard is launched.
b. Repeatedly click Next on each dialog until the final dialog is displayed.

7/30/2019 Vmware Vcenter Administration
http://slidepdf.com/reader/full/vmware-vcenter-administration 135/183
Using Custom Checks
vCenter™ Protect Essentials Plus - Configuration Management Administration Guide 129
c. Click Export to File.
After clicking Export to File the Select file name to export custom check dialog isdisplayed. For example:

7/30/2019 Vmware Vcenter Administration
http://slidepdf.com/reader/full/vmware-vcenter-administration 136/183
Using Custom Checks
130 vCenter™ Protect Essentials Plus - Configuration Management Administration Guide
1. In the Save in box specify the directory where you want to save the exported custom check.
2. Type a unique file name and then click Save.
The following dialog is displayed:
3. If you want to sign the XML file with a digital signature click Yes; if not, click No.
By digitally signing the XML file you provide additional security. For example, whoeverimports the file will know exactly who created the file and be able to decide if the file comesfrom a trustworthy source. In addition, signing the file creates a checksum that is usedduring the import process to verify that the file has not been corrupted.
Note: In order to digitally sign the XML file you must have access to a digital certificate.
If you click Yes the Signing Certificate Selection dialog is displayed.
4. (Optional) If you elect to digitally sign the XML file, on the Signing Certificate Selection dialog select the certificate you want to use to sign the file and then click OK .

7/30/2019 Vmware Vcenter Administration
http://slidepdf.com/reader/full/vmware-vcenter-administration 137/183
Performing Scans
vCenter™ Protect Essentials Plus - Configuration Management Administration Guide 131
Performing Scans
Scanning Prerequisites
The following criteria must be met to ensure a successful scan:
When scanning your local machine
• You must be an administrator on your local machine.
• The machine must be capable of obtaining the required XML data files, either from alocation on the Internet (via http or https) or from a location on the local machine (seeEnabling Disconnected Mode for more details).
• The local machine’s Workstation service must be started.
Note: The Server service is not required to be started on the local machine.
• IIS-related policy checks require the IIS common files to be on the scanning machine.
IIS-related checks may not be scannable in some network environments.When scanning a remote machine you must meet all the requirements for the localscan above, plus
• You must have local administrative rights on the remote machine and be able to log onto this machine from the workstation performing the scan.
• File and Print Sharing must be enabled.
• The NetBIOS (tcp139) or Direct Host (tcp445) ports must be accessible on the remote
machine.
• The remote machine must be running the Server service.
Note: The Workstation service is not required to be started on the remote machine.
• The remote machine must be running the Remote Registry service.
• The %systemroot% share (usually C$ or similar) must be accessible on the remotemachine.
Special note regarding Windows XP and Simple File Sharing
When Simple File Sharing is enabled, remote administration and remote registry editing does notwork as expected from a remote computer and connections to administrative shares (such as C$)do not work because all remote users authenticate as Guest . Guest accounts do not have
administrative privileges.
If you are running Windows XP Professional, go to the following Microsoft Knowledge Base articleto learn more about this feature and how to disable Simple File Sharing:
http://support.microsoft.com/default.aspx?scid=kb;en-us;304040
If you are running Windows XP Home Edition, Simple File Sharing cannot be disabled (Microsoft
states that it is as designed) so remote scanning will not work on this operating system.

7/30/2019 Vmware Vcenter Administration
http://slidepdf.com/reader/full/vmware-vcenter-administration 138/183
Performing Scans
132 vCenter™ Protect Essentials Plus - Configuration Management Administration Guide
How To Init iate A Scan From The Home Page
A scan can be initiated from the home page in three simple steps:
1. Select the machine group to scan.
Use the Select Machine Group box to select the machine group you want to scan. If the
machines you want to scan are not already defined within an existing machine group, youcan define a new group by clicking Create New Machine Group. To view the contents of
the specified machine group click View. When using the program for the first time, considerusing the My Machine group for your first scan.
2. Select the policy checks to examine by specifying a policy.
Use the Select Policy box to select the policy that defines the policy checks you want theprogram to scan for and report on. If the policy checks you want to scan for are not already
defined, you can define a new policy by clicking Create New Custom Policy. To view thecontents of the specified policy click View. When using the program for the first time,consider using the Recommended Baseline for your first scan.
3. Initiate the scan by clicking Begin Scan.

7/30/2019 Vmware Vcenter Administration
http://slidepdf.com/reader/full/vmware-vcenter-administration 139/183
Performing Scans
vCenter™ Protect Essentials Plus - Configuration Management Administration Guide 133
How To Initiate A Scan From A Machine Group
1. Select the desired machine group in the Machine Groups list.
2. In the Scan With Policy box select the policy that defines the policy checks you want theprogram to scan for and report on.
3. Click Begin Scan.

7/30/2019 Vmware Vcenter Administration
http://slidepdf.com/reader/full/vmware-vcenter-administration 140/183
Performing Scans
134 vCenter™ Protect Essentials Plus - Configuration Management Administration Guide
How To Init iate A Scan From A Policy
1. Select the desired policy in the Policy & Compliance list.
2. In the Scan Machine Group box select the group of machines you want to scan.
3. If you use VMware vCenter Protect and you want to ascertain compliance with a certain
patch group and/or signature group, select the desired groups in the Select Patch Group box and the Select Signature Group box. See Working With A Policy for more
information.
4. Click Begin Scan.

7/30/2019 Vmware Vcenter Administration
http://slidepdf.com/reader/full/vmware-vcenter-administration 141/183
Performing Scans
vCenter™ Protect Essentials Plus - Configuration Management Administration Guide 135
Scheduling a Scan
You can use the Schedule feature to specify when and how often a scan should be run.
1. Select Tools > Scheduling.
The Scheduled Jobs dialog is displayed. Any currently scheduled jobs are shown within thedialog. For example:
2. To schedule a new scan, click Add.
The Add Job dialog is displayed:

7/30/2019 Vmware Vcenter Administration
http://slidepdf.com/reader/full/vmware-vcenter-administration 142/183
Performing Scans
136 vCenter™ Protect Essentials Plus - Configuration Management Administration Guide
The dialog contains the following options:
• Job Name: Specify a descriptive name for the job. (For example: Daily Local Scan, orWeekly Domain Scan.)
• Scan What: Specify which of the available machine groups you want to scan.
• Scan How: Specify which of the available policies you want to use when performing thescan.
• Scan When:
• Run once at indicates that the scan will be run at the day and time selected.
• Run recurring at allows you to regularly run scans at a specific time and using
a specified recurrence pattern. For example, using this option, a scan could berun every night at midnight, or every Saturday at 9 PM, or on the first day of every month at 11 PM, or at any other user selected time and interval.
• Auto Enforce: If enabled, will automatically enforce the policy by correcting anydiscrepancies found on the scanned machines. The enforcement is performed
immediately after the scan.
• User Name: Specify a user name with administrative rights on the console machine.
This user name will be used when scheduling the job on the console machine.
• Password: Type the password for the specified user name.
3. When the desired options are selected, click OK .
The new job will be displayed within the Scheduled Jobs dialog.
To view all scheduled tasks on a machine:
• On Windows XP machines, select Start > Control Panel > Performance andMaintenance > Scheduled Tasks
• On Windows 2000 machines, select Start > Settings > Control Panel > ScheduledTasks

7/30/2019 Vmware Vcenter Administration
http://slidepdf.com/reader/full/vmware-vcenter-administration 143/183
Performing Scans
vCenter™ Protect Essentials Plus - Configuration Management Administration Guide 137
Scan Status Dialog
When executing a scan, the Scan / Enforce Status dialog appears:
The dialog displays status information while the scan is in progress. To cancel a scan that is inprogress, click Cancel.
When a scan is complete, the results are displayed immediately on the right-side of the window.See Viewing Scan Results for details on interpreting the scan results.
Supplying CredentialsCredentials consist of a user name and password pair used to authenticate to the machines thatare scanned. By default, VMware vCenter Protect - Configuration Management uses yourcurrently logged on credentials to automatically log in and scan the target machine(s). If the
current logged in user credentials do not have administrative rights on all of the target machines,you need to enter alternate credentials. VMware vCenter Protect - Configuration Managementwill use these alternate credentials to automatically log on to the target machines.
Note: In all cases, credentials are stored with strong encryption techniques and are not availableto anyone except the user who provided them.
• If you enter Domain\User, VMware vCenter Protect - Configuration Management will use
the domain account rights.• If you enter <Target Machine>\User, VMware vCenter Protect - Configuration
Management will use the target's local account rights.
• If you do not enter a machine or domain name, the scanner tries to useconsolemachinename\user. If this is not successful, it will next attempt to use
remotemachinename\user.
• '.\username' will cause the scanner to prepend the remote machine's name to theusername (for example, remotemachinename\user).
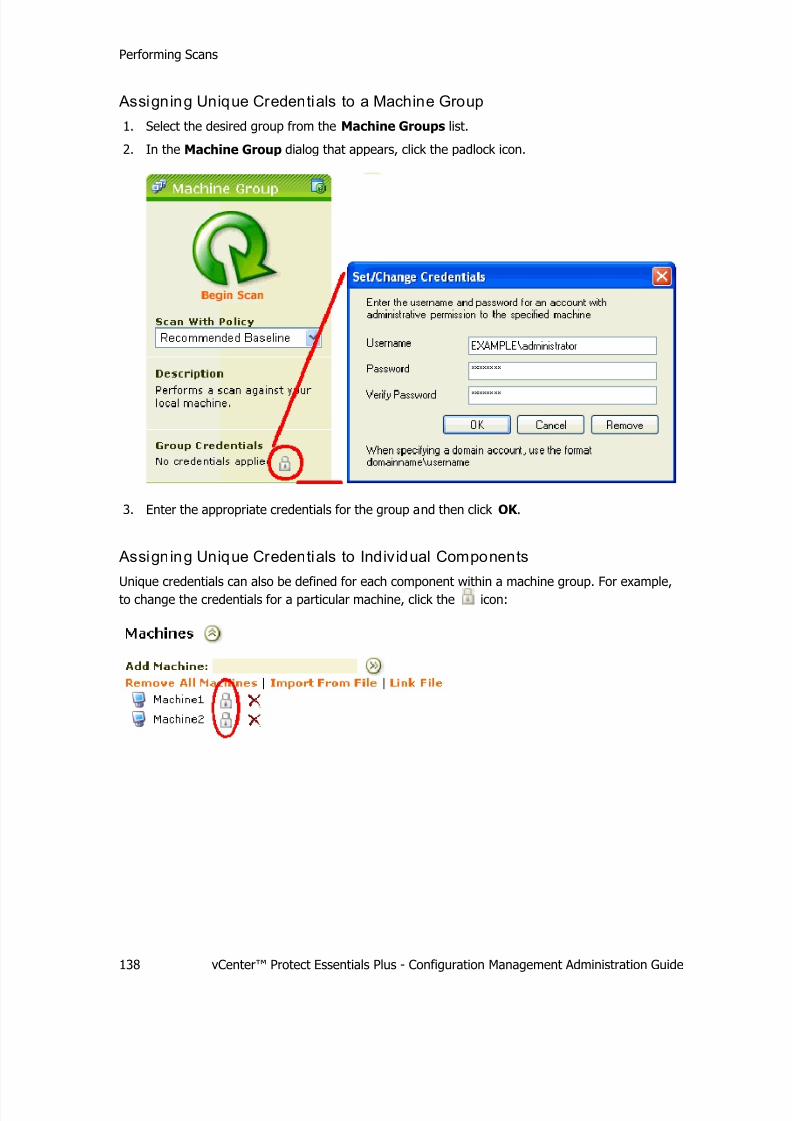
7/30/2019 Vmware Vcenter Administration
http://slidepdf.com/reader/full/vmware-vcenter-administration 144/183
Performing Scans
138 vCenter™ Protect Essentials Plus - Configuration Management Administration Guide
Assigning Unique Credentials to a Machine Group
1. Select the desired group from the Machine Groups list.
2. In the Machine Group dialog that appears, click the padlock icon.
3. Enter the appropriate credentials for the group and then click OK .
Assigning Unique Credentials to Individual Components
Unique credentials can also be defined for each component within a machine group. For example,
to change the credentials for a particular machine, click the icon:

7/30/2019 Vmware Vcenter Administration
http://slidepdf.com/reader/full/vmware-vcenter-administration 145/183
Performing Scans
vCenter™ Protect Essentials Plus - Configuration Management Administration Guide 139
Scan History
Even after a series of scans, all of the results of prior scans are just a click away. After a scan isperformed, an entry for the scan is placed in the Recent Scans list. You can view a scan byselecting it. To delete an entry from the list, right-click the entry and select Delete.
Additionally, you can get a more detailed list of all prior scans by selecting Tools > ManageScan Results.
If you want to delete certain scans from this list, select the items you would like to remove and
click Deleted Selected. If you would like to remove all scan history, choose Select All andthen Delete All. Be careful not to delete scans you may need in order to prove past compliancewith certain regulations.
Note: Removing an entry from the Recent Scans list also removes that entry from the
Manage Scan Results list, and vice versa. All data associated with the deleted item are alsoremoved from the database.

7/30/2019 Vmware Vcenter Administration
http://slidepdf.com/reader/full/vmware-vcenter-administration 146/183
Interpreting Scan Results
140 vCenter™ Protect Essentials Plus - Configuration Management Administration Guide
Interpreting Scan Results
Viewing Scan Results
Scan results are displayed immediately following a successful scan. They are also available when
you select a previous scan from the Recent Scans list.
When displaying scan results the program divides the right-side of the window into three smallerpanes. The upper-left pane lists the type of information that is available, the upper-right panedisplays machine and policy check information based on the item selected in the upper-left pane,
and the bottom pane displays detailed information about the item selected in the upper-rightpane. The following figure illustrates the scan results format:

7/30/2019 Vmware Vcenter Administration
http://slidepdf.com/reader/full/vmware-vcenter-administration 147/183
Interpreting Scan Results
vCenter™ Protect Essentials Plus - Configuration Management Administration Guide 141
1This pane provides a summary of all the scans currently contained in the RecentScans list. It organizes the scan information four ways— by account information, bydomains, by machines groups, and by individual scans
• Accounts: Provides detailed information about the local user accounts identifiedon each machine that has been scanned by the program. See Enabling and
Disabling Account Scanning for more information.
• Domains: Expanding this tree enables you to view the most recent scaninformation for the domains in your network.
• Machine Groups: Expanding this tree enables you to view the most recentscan information for your machine groups.
• Scans: Expanding this tree enables you to view information about individualscans.
Information within the Domains, Machine Groups, and Scans trees is brokendown into five categories:
• Policy Check Summary: Enables you to view information about every policy
check identified within a particular domain, machine group, or scan. See ScanResults: Policy Check Summary for details.
• Account Summary: Enables you to view information about every local user
account identified within a particular domain, machine group, or scan. See ScanResults: Account Summary for details.
• Share Summary: Enables you to view information about every share identifiedwithin a particular domain, machine group, or scan. See Scan Results: ShareSummary for details.
• Group Membership Summary: Enables you to view information about everygroup identified within a particular domain, machine group, or scan. See ScanResults: Group Membership Summary for details.
• Machine Summary: Enables you to view information about every machineidentified within a particular domain, machine group, or scan. See Scan Results:
Machine Summary for details.
2This is another summary pane. Depending on what is selected in the upper-leftpane, it will display summary information about either machines or policy checks.
Click on a column heading to sort the table by that information.
Located just above this pane are two drop-down boxes you can use to filter the
information presented within the pane.

7/30/2019 Vmware Vcenter Administration
http://slidepdf.com/reader/full/vmware-vcenter-administration 148/183
Interpreting Scan Results
142 vCenter™ Protect Essentials Plus - Configuration Management Administration Guide
3This pane displays detailed information about the machine selected in the upper-rightpane. A table at the bottom of this pane shows a history of the actions that havebeen performed on the machine.
In addition, this pane contains the following links:
• Add/Edit Comment: Enables you to provide a comment about the selectedmachine. The comment is saved and displayed for all future scans and
enforcements involving the machine.
• Summary Report: Displays the Scan Machine Policy Compliance report for
the machine currently selected in the upper-right pane.
• Export Changes: Exports to an XML file a list of changes that have been madeto this machine.
• Export Out of Policy Checks: Exports to an XML file the list of checks that arenot in compliance on this machine.
Scan Results: Policy Check SummaryTop right-hand pane
When Policy Check Summary is selected in the upper-left pane, the upper right-hand pane inthe scan summary displays a table containing detailed information about each policy check thatwas used during the scan. Click on a column heading to sort the table by that information.
Enforce Enables you to specify which checks not currently in compliance you would like
to enforce. If a check box is not provided it means all machines are incompliance with the check and there is nothing else to enforce.
Note: On a few checks, enforcement is not an option.
Policy
Check
Provides the name of individual policy checks.
Indicates how many machines are in compliance with this check.
Indicates how many machines are not in compliance with this check.
TotalScanned
Displays the number of machines scanned during the scan.

7/30/2019 Vmware Vcenter Administration
http://slidepdf.com/reader/full/vmware-vcenter-administration 149/183
Interpreting Scan Results
vCenter™ Protect Essentials Plus - Configuration Management Administration Guide 143
Bottom pane
The bottom pane contains summary information about the scan. You can view additionalinformation by clicking one of the following links:
• Summary Report: Displays the Scan Policy Compliance Summary by Item report.
This report shows the status of each policy check contained in the policy.
• Detail Report: Displays the Scan Policy Compliance Details report. This report showsthe details about each policy check, including the value specified for each check in the policyand the value actually found on the machine.
• Compliance Filter: Use this filter to specify which policy checks are included in the Detail
Report. The options are All, In Compliance, and Out of Compliance.
In addition, you can use this pane to enforce compliance for those checks not in compliance. Inthe Enforce column of the upper-right pane simply enable the check box next to the desiredchecks and then, in the bottom pane, click either Enforce Selected or Enforce/Rescan
Selected. You can also use Select All and Unselect All to enable or clear the check boxes.
Tip: You can also right-click a policy check to access the Enforce Selected, Enforce/RescanSelected, Select All, and Unselect All menu options.
See Enforcement Overview for more information about the enforcement process.

7/30/2019 Vmware Vcenter Administration
http://slidepdf.com/reader/full/vmware-vcenter-administration 150/183
Interpreting Scan Results
144 vCenter™ Protect Essentials Plus - Configuration Management Administration Guide
Scan Results: Account Summary
Note: Account scanning can be enabled and disabled. If account scanning is disabled then noaccount information will be collected for the scanned machines. See Enabling and Disabling
Account Scanning for more information.
Top right-hand pane
When the Account Summary is selected in the upper-left pane, the top right-hand pane in thescan summary displays a table containing detailed information about each local user account
identified on machines found during that particular scan. Click on a column heading to sort thetable by that information.
The overview shown above indicates that the machine named JOES_COMPUTER contains threedifferent accounts and the machine named JOESDELL contains six different accounts.
Bottom pane
The bottom pane of the Account Summary provides some general information about all theaccounts identified during the scan as well as detailed information about the account currentlyselected in the upper-right pane. The bottom pane also provides the ability to set new passwords
for any of the accounts and to disable, enable, unlock, and delete accounts.
Tip: You can also right-click an account in the top right-hand pane to access the Set Password,Disable Account, Enable Account, Unlock Account, and Delete Account menu options.

7/30/2019 Vmware Vcenter Administration
http://slidepdf.com/reader/full/vmware-vcenter-administration 151/183
Interpreting Scan Results
vCenter™ Protect Essentials Plus - Configuration Management Administration Guide 145
Caution! Only experienced system administrators should ever attempt to modify account valuesor account status. Modifying an account without detailed knowledge about how that account is
used can have serious repercussions on your network.
Set Password Click to set the password for the selected account. You must haveadministrative privileges on the machine containing the account in order
to set the password. The change takes affect immediately.
Disable Account
Click to disable the account so that it cannot be used. You must haveadministrative privileges on the machine containing the account in order
to disable the account. The change takes affect immediately. To verifythe account was disabled, simply rerun the scan and check the accountstatus.
Caution! If you use the Administrator account credentials for scanningwith VMware vCenter Protect - Configuration Management , do notdisable this account. Future scans will fail and your ability to re-enable
the account with VMware vCenter Protect - Configuration Managementwill also be unavailable.
Enable
Account
Click to enable the account so that it can be used. You must haveadministrative privileges on the machine containing the account in orderto enable the account. The change takes affect immediately. To verifythe account was enabled, simply rerun the scan and check the accountstatus.

7/30/2019 Vmware Vcenter Administration
http://slidepdf.com/reader/full/vmware-vcenter-administration 152/183
Interpreting Scan Results
146 vCenter™ Protect Essentials Plus - Configuration Management Administration Guide
Unlock Account
Click to unlock an account that has been locked due to a number of unsuccessful log on attempts. You must have administrative privileges onthe machine containing the account in order to unlock the account. Thechange takes affect immediately. To verify the account was unlocked,simply rerun the scan and check the account status.
Note: Further investigation is warranted whenever an account is foundto be locked. The locked account may be a result of an unauthorizedaccess attempt.
Delete Account Click to delete the account from the target machine. You must haveadministrative privileges on the machine containing the account in orderto delete the account. The change takes affect immediately. To verify the
account was deleted, simply rerun the scan and check that the accountno longer exists.
Caution! Always double-check yourself before deleting an account. Thepurpose of some accounts is not always readily apparent and you may
inadvertently disable a key function on the machine by deleting anaccount. This action is not reversible.
Finally, you can view additional information by clicking on the link named Summary Report.This will display the Local Account Summary report. This report provides information abouteach of the accounts detected on the scanned machines and shown in the upper-right pane.
Scan Results: Share Summary
Note: Shares scanning can be enabled and disabled. If shares scanning is disabled then noshares information will be collected for the scanned machines. See Enabling and Disabling Shares
Scanning for more information.
For more information about shares, see What Exactly Is A Share? and Why Knowing AboutShares Is Important.
Top right-hand pane
When Share Summary is selected in the upper-left pane, the top right-hand pane in the scansummary displays a table containing detailed information about each share identified onmachines found during that particular scan. Click on a column heading to sort the table by thatinformation.

7/30/2019 Vmware Vcenter Administration
http://slidepdf.com/reader/full/vmware-vcenter-administration 153/183
Interpreting Scan Results
vCenter™ Protect Essentials Plus - Configuration Management Administration Guide 147
The overview shown above indicates that the machine named JOEA5100 contains six differentshares.
Bottom pane
The bottom pane of the Share Summary provides some general information about all the
shares identified during the scan as well as detailed information about the share currentlyselected in the upper-right pane. The details shown include the ACLs provided when the sharewas defined as well as Windows NTFS ACLs used on the corresponding share folder location.Restrictions from the NTFS ACLs or permissions always override the permissions set on the share
if both are present.
You can view, export, and print the information by clicking on the link named SummaryReport. This will display the Local Shares Summary report. This report provides informationabout each of the shares detected on the scanned machines and shown in the upper-right pane.

7/30/2019 Vmware Vcenter Administration
http://slidepdf.com/reader/full/vmware-vcenter-administration 154/183
Interpreting Scan Results
148 vCenter™ Protect Essentials Plus - Configuration Management Administration Guide
Scan Results: Group Membership Summary
Note: Group membership scanning can be enabled and disabled. If group membership scanningis disabled then no group membership information will be collected for the scanned machines.See Enabling and Disabling Group Membership Scanning for more information.
Top right-hand pane
When the Group Membership Summary is selected in the upper-left pane, the top right-handpane in the scan summary displays a table containing detailed information about each group
identified on machines found during that particular scan. Click on a column heading to sort thetable by that information.
The overview shown above indicates that the machine named JOEA5100 contains 12 differentgroups.
Bottom pane
The bottom pane of the Group Membership Summary provides some general informationabout all the groups identified during the scan as well as detailed information about the groupcurrently selected in the upper-right pane. You can view additional information by clicking on thelink named Summary Report. This will display the Local Group Membership Summary report. This report provides information about each of the groups detected on the scannedmachines and shown in the upper-right pane.

7/30/2019 Vmware Vcenter Administration
http://slidepdf.com/reader/full/vmware-vcenter-administration 155/183
Interpreting Scan Results
vCenter™ Protect Essentials Plus - Configuration Management Administration Guide 149
Scan Results: Machine Summary
Top right-hand pane
When an individual machine is selected in the upper-left pane, the top right-hand pane in the
scan summary displays a table containing information about each policy check on that particularmachine. Click on a column heading to sort the table by that information.
Bottom pane
If a policy check is selected in the table in the top right-hand pane, the bottom pane changes todisplay detailed information about the check. In addition, you can use this summary to enforcecompliance for those checks not in compliance. In the Enforce column of the upper-right panesimply enable the check box next to the desired checks and then, in the bottom pane, click eitherEnforce Selected or Enforce/Rescan Selected. You can also use Select All and Unselect
All to enable or clear the check boxes.
Tip: You can also right-click a policy check to access the Enforce Selected, Enforce/RescanSelected, Select All, and Unselect All menu options.

7/30/2019 Vmware Vcenter Administration
http://slidepdf.com/reader/full/vmware-vcenter-administration 156/183
Interpreting Scan Results
150 vCenter™ Protect Essentials Plus - Configuration Management Administration Guide
See Enforcement Overview for more information about the enforcement process.
Finally, you can view additional information by clicking one of the following links:
• Summary Report: Displays the Scan Policy Compliance Summary by Item report.
This report shows the status of every policy check detected on the machine currentlyselected in the upper-left pane.
• Detail Report: Displays the Scan Policy Compliance Details report. This report showsdetailed information for the policy check currently selected in the upper-right pane.
See Detailed Policy Check Information for more information about the policy check.

7/30/2019 Vmware Vcenter Administration
http://slidepdf.com/reader/full/vmware-vcenter-administration 157/183
Interpreting Scan Results
vCenter™ Protect Essentials Plus - Configuration Management Administration Guide 151
Detailed Policy Check Information
VMware vCenter Protect - Configuration Management provides detailed information about everypolicy check in order to allow administrators to make informed decisions about the applicability of the check to their environment. To see the details of a policy check, while viewing a machinesummary, select the check in the upper-right pane and view the results in the bottom pane.
As illustrated in the following figure, the Policy Check Details section provides an abundance of information about the selected check. The Rationale section describes the basic purpose andreasoning behind the policy check and why it should be implemented. The Manual
Implementation section provides the steps for manually implementing the check, if you desire.

7/30/2019 Vmware Vcenter Administration
http://slidepdf.com/reader/full/vmware-vcenter-administration 158/183
Enforcement
152 vCenter™ Protect Essentials Plus - Configuration Management Administration Guide
Enforcement
Enforcement Overview
To enforce a policy check means to change its value to that specified by the governing policy.
VMware vCenter Protect - Configuration Management provides the means to enforce policychecks on local and remote machines via a few simple mouse clicks. See Enforcing One or MorePolicy Checks for detailed information about the actual process.
Caution! The values specified for the policy checks in the pre-defined policies provided within VMware vCenter Protect - Configuration Management may not be suitable for every environment.It is strongly recommended that you test enforcement of the policy checks on a small sample of machines in a non-production environment before you enforce the checks on a large scale. Thisis particularly important when enforcing checks defined within custom policy groups.
Before you enforce one or more policy checks, however, you should know the following:
• Your organization may use an Active Directory and Microsoft Group Policy infrastructureto apply corporate standards to your computers and workstations. If VMware vCenterProtect - Configuration Management changes a policy check controlled by ActiveDirectory, the change will be temporary and the check will be changed back to the valuespecified by Active Directory. In this situation it is important that you define your policyto reflect the requirements specified by your Active Directory settings. This will enableyou to accurately audit and report on the status of your policy checks. Enforcement by
VMware vCenter Protect - Configuration Management will then be in compliance with andmaintain the required Group Policy settings.
• Enforcement is performed while viewing the results of a compliance scan. Be sure to usea current scan when performing a enforcement.
• You can only enforce those checks that are not in compliance with the associated policy.
• Most policy checks that are changed during the enforcement process will take affect
immediately on the machine. Some changes, however, require a reboot of the machinebefore they take affect.
• The following custom check types are currently not enforceable:
o File ACL
o Directory ACL
o Registry Value Exists
o Registry Value (HKCU - Via All Users)
o File Date Offset

7/30/2019 Vmware Vcenter Administration
http://slidepdf.com/reader/full/vmware-vcenter-administration 159/183
Enforcement
vCenter™ Protect Essentials Plus - Configuration Management Administration Guide 153
Enforcing One or More Policy Checks
You can enforce policy checks while viewing either a Policy Check Summary or a machinesummary. While a Policy Check Summary is used here to illustrate the enforcement process, theprocess is identical from a machine summary. The one advantage of performing an enforcementfrom the Policy Check Summary is that you can enforce policy checks to multiple machines at thesame time.
Caution! The values specified for the policy checks in the pre-defined policies provided within VMware vCenter Protect - Configuration Management may not be suitable for every environment.
It is strongly recommended that you test enforcement of the policy checks on a small sample of machines in a non-production environment before you enforce the checks on a large scale. Thisis particularly important when enforcing checks defined by custom policies. Always remember
that policy check values in your custom policies can be configured differently from the defaults tomatch the needs of your network.
1. While viewing a Policy Check Summary or a machine summary, in the Enforce columnenable the check boxes for the compliance settings you would like to update.
You can manually enable the check boxes one at a time, or you can enable or clear all check boxes by clicking Select All or Unselect All.
Note: The checks that are already in compliance and do not need enforcing will not havecheck boxes. A limited number of checks are not currently enforceable and will not have
check boxes. A future version of the program will automate enforcement of these checks.
2. When the desired policy checks are selected, in the bottom pane click either EnforceSelected or Enforce/ Rescan Selected.
Tip: You can also right-click a policy check to access the Enforce Selected,Enforce/Rescan Selected, Select All, and Unselect All menu options.

7/30/2019 Vmware Vcenter Administration
http://slidepdf.com/reader/full/vmware-vcenter-administration 160/183
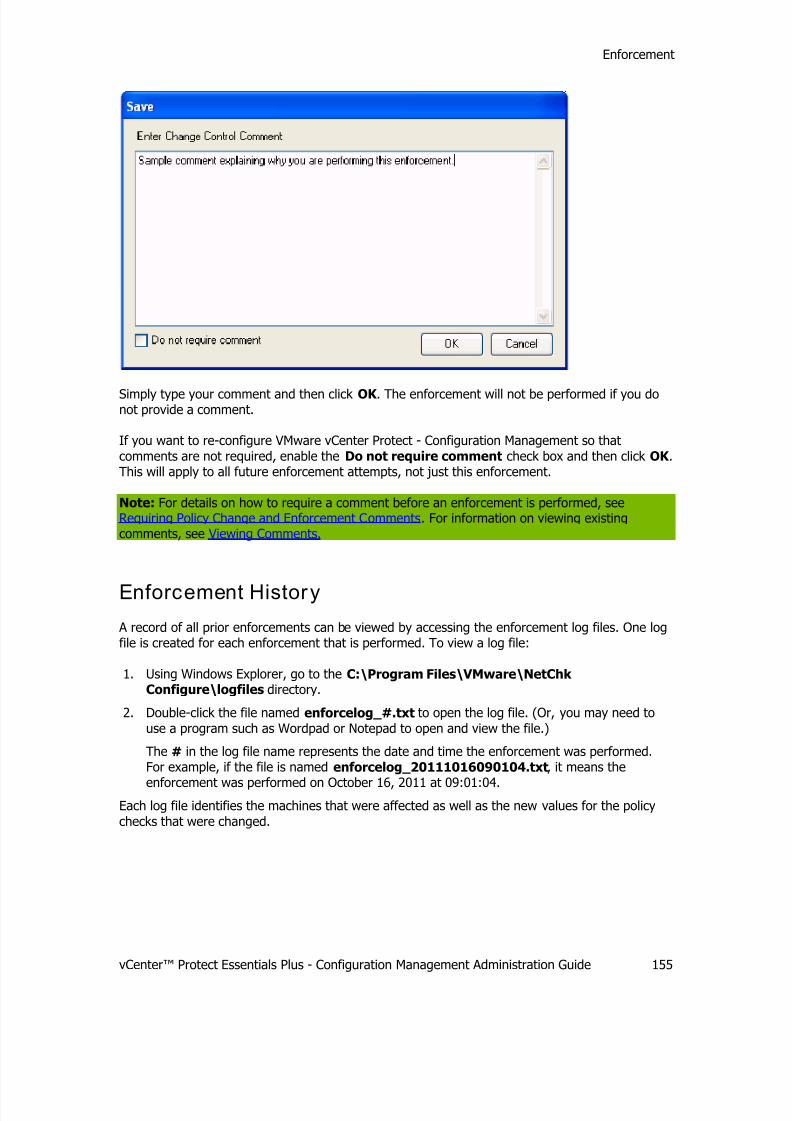
7/30/2019 Vmware Vcenter Administration
http://slidepdf.com/reader/full/vmware-vcenter-administration 161/183
Enforcement
vCenter™ Protect Essentials Plus - Configuration Management Administration Guide 155
Simply type your comment and then click OK . The enforcement will not be performed if you donot provide a comment.
If you want to re-configure VMware vCenter Protect - Configuration Management so that
comments are not required, enable the Do not require comment check box and then click OK .This will apply to all future enforcement attempts, not just this enforcement.
Note: For details on how to require a comment before an enforcement is performed, seeRequiring Policy Change and Enforcement Comments. For information on viewing existingcomments, see Viewing Comments.
Enforcement History
A record of all prior enforcements can be viewed by accessing the enforcement log files. One logfile is created for each enforcement that is performed. To view a log file:
1. Using Windows Explorer, go to the C:\Program Files\VMware\NetChk Configure\logfiles directory.
2. Double-click the file named enforcelog_#.txt to open the log file. (Or, you may need to
use a program such as Wordpad or Notepad to open and view the file.)
The # in the log file name represents the date and time the enforcement was performed.For example, if the file is named enforcelog_20111016090104.txt, it means the
enforcement was performed on October 16, 2011 at 09:01:04.Each log file identifies the machines that were affected as well as the new values for the policy
checks that were changed.

7/30/2019 Vmware Vcenter Administration
http://slidepdf.com/reader/full/vmware-vcenter-administration 162/183
Change Management
156 vCenter™ Protect Essentials Plus - Configuration Management Administration Guide
Change Management
Requiring Policy Change and Enforcement Comments
VMware vCenter Protect - Configuration Management provides the mechanisms needed to track
changes you make to your policies and policy enforcements you perform on the machines in yourorganization.
One way to do this is to require comments to be recorded each time you change a policy or each
time you perform an enforcement.
1. Select Tools > Options and then select the Change Control tab.
2. Enable the desired check boxes.
• Policy Change comment required: Anytime a policy is changed a dialog will be
displayed that is used to explain exactly why the change is being made. The policy willnot be saved unless a comment is made.
• Enforce Change comment required: Anytime an enforcement is performed a dialogwill be displayed that is used to explain exactly why the enforcement is being performed.The enforcement will not be performed unless a comment is made.
3. Click OK .

7/30/2019 Vmware Vcenter Administration
http://slidepdf.com/reader/full/vmware-vcenter-administration 163/183
Change Management
vCenter™ Protect Essentials Plus - Configuration Management Administration Guide 157
Export ing Policy Changes
VMware vCenter Protect - Configuration Management enables you to export to an XML file a listof all changes that have ever been made to your custom policies. This provides a number of benefits:
• It creates a written record that you can use during an audit• It provides a concise history of your policy changes
• It allows you to analyze the growth and direction of your organization's security policies
• The XML file created during the export process can be integrated into and used as inputto a ticketing or change management system
To export policy changes
1. Select Tools > Export Policy Changes.
The Select a Policy dialog is displayed. Only custom policies are displayed because the two
predefined baseline policies (Recommended Baseline and NIST/FISMA Baseline) cannot be
modified and will never have policy changes to report. For example:
2. Enable the check box of the policy whose changes you want to view.
You can only select one policy.
3. Click OK .
The Export Policy Changes To dialog is displayed.

7/30/2019 Vmware Vcenter Administration
http://slidepdf.com/reader/full/vmware-vcenter-administration 164/183
Change Management
158 vCenter™ Protect Essentials Plus - Configuration Management Administration Guide
4. Browse to the directory you want to save the file to, provide a unique file name, and thenclick Save.
You can view the file using any available XML editor.
How to View Checks That Are Out of Compliance
VMware vCenter Protect - Configuration Management enables you to quickly determine exactlywhich checks are out of compliance on a machine or group of machines. Doing so effectively
creates a "To-Do" list of checks that need correcting. This is accomplished by using the In/Outof Compliance report filter.
1. After performing one or more scans, open the Report Gallery by using the Tools > Reports
menu or by clicking the Report Gallery icon on the toolbar.
2. In the Pick Filter Options section, for the In/Out of Compliance filter select Out of Compliance.
This is illustrated in the following figure:

7/30/2019 Vmware Vcenter Administration
http://slidepdf.com/reader/full/vmware-vcenter-administration 165/183
Change Management
vCenter™ Protect Essentials Plus - Configuration Management Administration Guide 159
3. Generate your report.
Only those checks currently out of compliance are displayed. In the following example, only
those checks out of compliance are displayed for the machine named JOESDELL.
For more information on reports, see Overview of Reports and Report Gallery.
Another Opt ion
You can also create a list of checks that are out of compliance directly from the scan results.While viewing the Compliance Summary, in the bottom pane specify Out of Compliance in theCompliance filter and then click Detail Report. See Scan Results: Compliance Summary formore details.
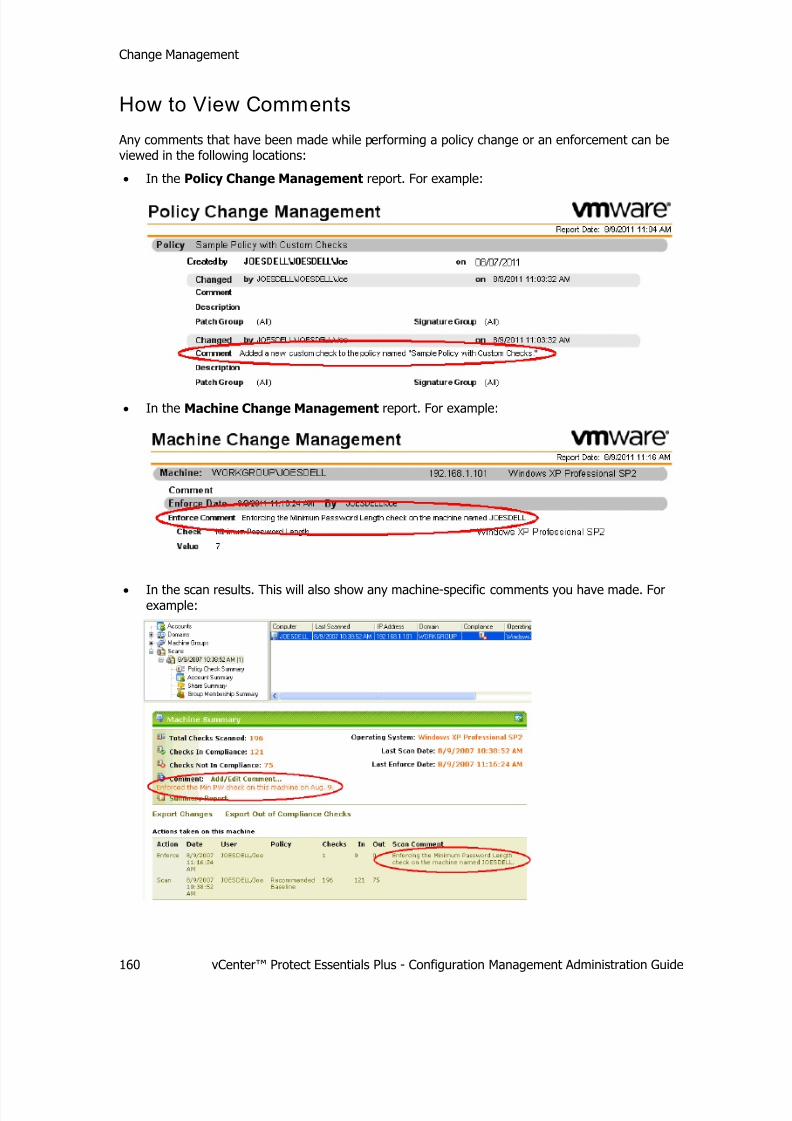
7/30/2019 Vmware Vcenter Administration
http://slidepdf.com/reader/full/vmware-vcenter-administration 166/183
Change Management
160 vCenter™ Protect Essentials Plus - Configuration Management Administration Guide
How to View Comments
Any comments that have been made while performing a policy change or an enforcement can beviewed in the following locations:
• In the Policy Change Management report. For example:
• In the Machine Change Management report. For example:
• In the scan results. This will also show any machine-specific comments you have made. Forexample:

7/30/2019 Vmware Vcenter Administration
http://slidepdf.com/reader/full/vmware-vcenter-administration 167/183
Reports
vCenter™ Protect Essentials Plus - Configuration Management Administration Guide 161
Reports
Available Reports
To choose a report, click on the Report Gallery icon on the toolbar and select a report fromthe drop-down list at the top of the Report Gallery dialog. The following reports are available in
VMware vCenter Protect - Configuration Management.
Report Description
Scan PolicyCompliance Details
This report provides a detailed list of the policy checks and
their status. It provides a summary for each machine withineach scan.
Scan Machine PolicyCompliance
This report lists the number of policy checks that are in and
out of compliance. It provides a summary for each machinewithin each scan.
Scan Detail ExecutiveSummary
This report lists the number of policy checks that are in and
out of compliance. It provides a summary for each scan.
Scan Policy
Compliance Summaryby Item
This report lists the number of machines that are in and out of compliance for each policy check. It provides a summary for
each scan.
Machine Policy
Compliance
This report provides detailed compliance information for eachmachine, using the most recent scan available for eachmachine.
Machine Scan History
Details
This report provides detailed compliance information for each
machine. It provides a summary for all available scans.
Machine Check Compliance
This report provides a summary of the state of all policychecks scanned for on machines, using the most recent scanof each machine.
Most Recent ScanPolicy ComplianceDetail
This report provides a detailed listing of the most recent scansbased on the filtering criteria selected.
Most Recent ScanMachine PolicyCompliance
This report provides a list of the policy checks that are in andout of compliance. It provides a summary for each machine
within the most recent scan.
Most Recent ScanPolicy ComplianceSummary By Item
This report provides a list of machines that are in or out of compliance for each policy check in the most recent scan.
Policy ComplianceTrend(3 months)
This report displays a graph showing the percentage of machines in compliance during the scans performed in the lastthree months. The graph shows whether the percentage of machines in compliance is trending up or down.

7/30/2019 Vmware Vcenter Administration
http://slidepdf.com/reader/full/vmware-vcenter-administration 168/183
Reports
162 vCenter™ Protect Essentials Plus - Configuration Management Administration Guide
Machine PolicyCompliance Trend(3 months)
This report displays a graph showing the percentage of
compliance settings in compliance during the scans performedin the last three months. The graph shows whether thepercentage of checks in compliance is trending up or down.
Scan Executive
Summary
This report displays pie charts that shows the number of
checks that are in and out of compliance for each scan.
Local AccountSummary
This report provides a detailed summary of each local account
identified by each scan.
Policy Change
Management
This report provides a list of changes that have been made toa policy.
Machine ChangeManagement
This report provides a list of changes that have been made toa machine.
Local Shares Summary This report provides a list of each local share detected on each
machine included in a scan.
Local Group
Membership Summary
This report provides a list of the groups (and the number of members in each group) on each machine included in a scan.
Report Gallery
The VMware vCenter Protect - Configuration Management Report Gallery is designed to provideyou with an assortment of different report filtering options. You can open the Report Gallery
using the Tools > Reports menu or by clicking the Report Gallery icon on the toolbar.The Report Gallery consists of a single dialog in which you make all of your selections.
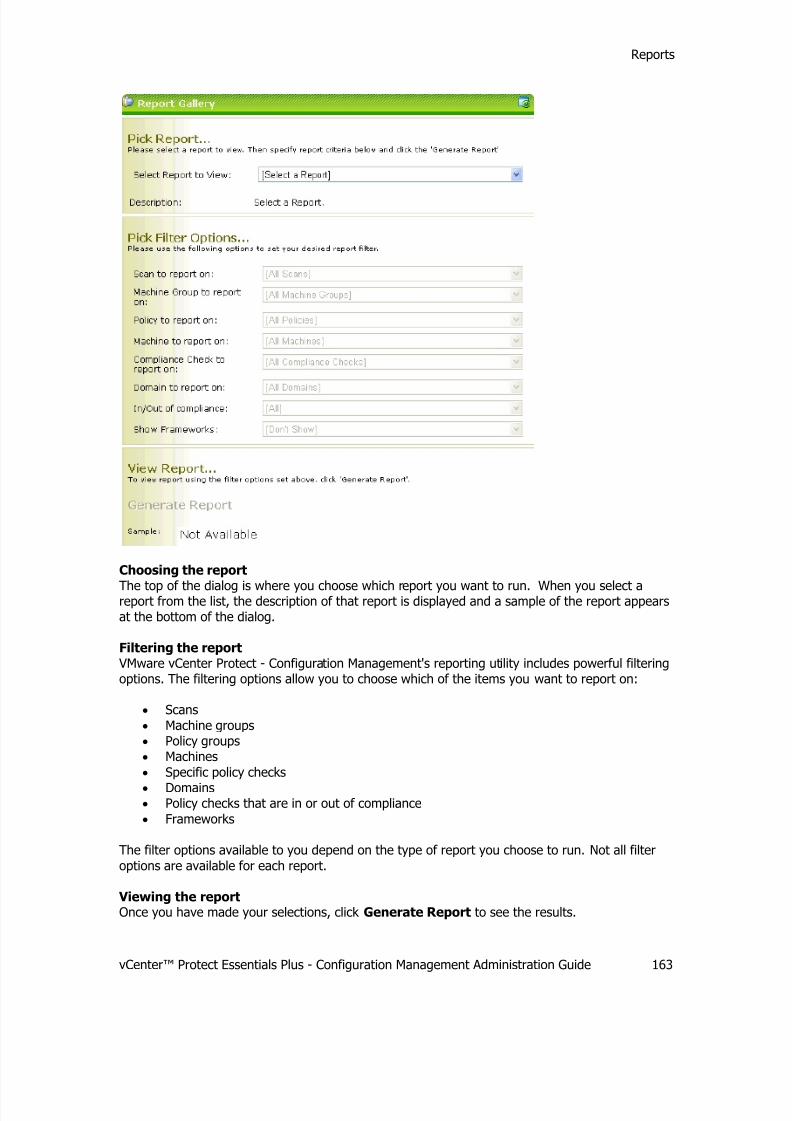
7/30/2019 Vmware Vcenter Administration
http://slidepdf.com/reader/full/vmware-vcenter-administration 169/183
Reports
vCenter™ Protect Essentials Plus - Configuration Management Administration Guide 163
Choosing the report
The top of the dialog is where you choose which report you want to run. When you select areport from the list, the description of that report is displayed and a sample of the report appearsat the bottom of the dialog.
Filtering the report VMware vCenter Protect - Configuration Management's reporting utility includes powerful filteringoptions. The filtering options allow you to choose which of the items you want to report on:
• Scans
• Machine groups• Policy groups• Machines
• Specific policy checks
• Domains• Policy checks that are in or out of compliance
• Frameworks
The filter options available to you depend on the type of report you choose to run. Not all filter
options are available for each report.
Viewing the reportOnce you have made your selections, click Generate Report to see the results.

7/30/2019 Vmware Vcenter Administration
http://slidepdf.com/reader/full/vmware-vcenter-administration 170/183
Reports
164 vCenter™ Protect Essentials Plus - Configuration Management Administration Guide
Exporting reports
After a report is generated, it can be exported to a different format from the report viewer.
1. Select File > Export or click Export on the toolbar.
The Export icon is illustrated in the following figure.
The ActiveReports Export dialog then appears, as illustrated here:
2. Select the export format and any available options and then click OK .
The Save As dialog appears.
3. Specify the name and location of the report file and then click Save.
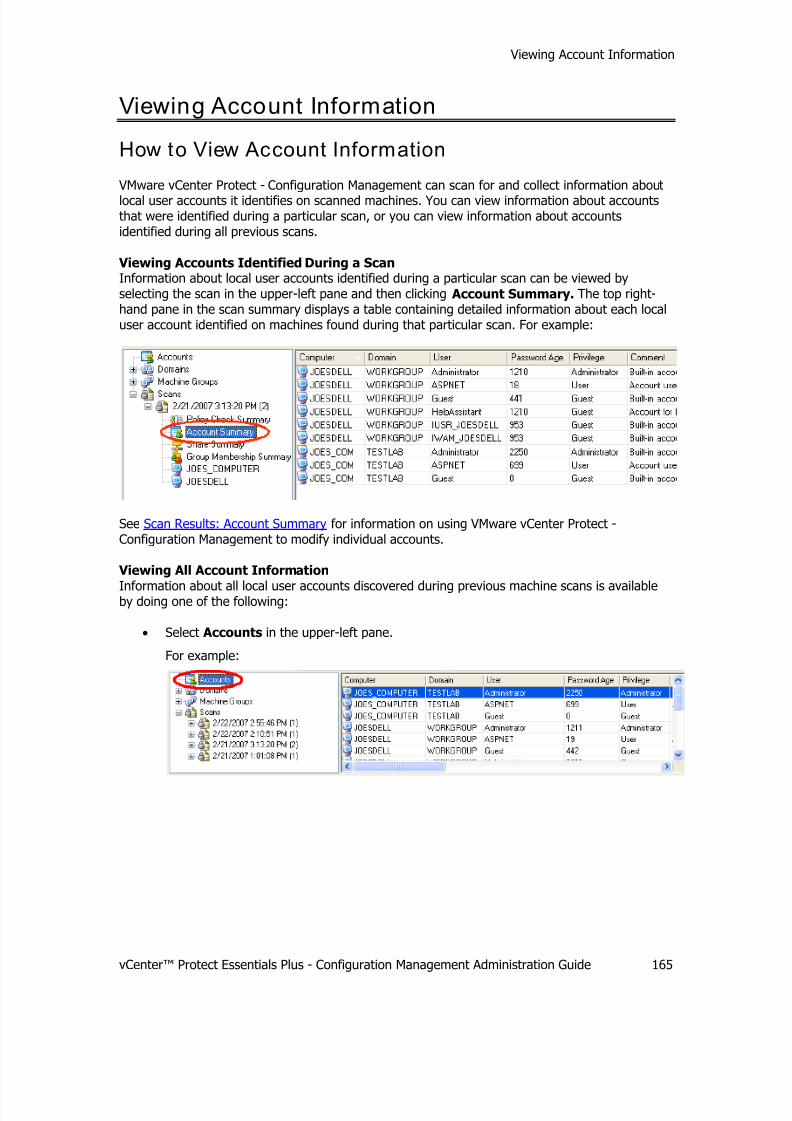
7/30/2019 Vmware Vcenter Administration
http://slidepdf.com/reader/full/vmware-vcenter-administration 171/183
Viewing Account Information
vCenter™ Protect Essentials Plus - Configuration Management Administration Guide 165
Viewing Account Information
How to View Account Information
VMware vCenter Protect - Configuration Management can scan for and collect information about
local user accounts it identifies on scanned machines. You can view information about accountsthat were identified during a particular scan, or you can view information about accountsidentified during all previous scans.
Viewing Accounts Identified During a ScanInformation about local user accounts identified during a particular scan can be viewed byselecting the scan in the upper-left pane and then clicking Account Summary. The top right-hand pane in the scan summary displays a table containing detailed information about each localuser account identified on machines found during that particular scan. For example:
See Scan Results: Account Summary for information on using VMware vCenter Protect -Configuration Management to modify individual accounts.
Viewing All Account Information
Information about all local user accounts discovered during previous machine scans is availableby doing one of the following:
• Select Accounts in the upper-left pane.
For example:

7/30/2019 Vmware Vcenter Administration
http://slidepdf.com/reader/full/vmware-vcenter-administration 172/183
Viewing Account Information
166 vCenter™ Protect Essentials Plus - Configuration Management Administration Guide
• Select View Accounts in the Scan Results list.
See Scan Results: Account Summary for information on using VMware vCenter Protect -Configuration Management to modify individual accounts.
Enabling and Disabling Account Scanning
Searching for and identifying accounts during a compliance scan can lengthen the time it takes tocomplete a scan. For example, scanning a domain controller (which contains a large number of accounts) may take a considerable amount of time. If you are not interested in account
information, or if you simply want to speed the scanning process, you can disable accountscanning.
1. Select Tools > Options.
2. On the General tab, enable the Turn off account scanning check box.
3. Click OK .
To re-enable account scanning, simply clear the Turn off account scanning check box andthen click OK .

7/30/2019 Vmware Vcenter Administration
http://slidepdf.com/reader/full/vmware-vcenter-administration 173/183
Understanding Shares
vCenter™ Protect Essentials Plus - Configuration Management Administration Guide 167
Understanding Shares
What Exactly Is A Share?
A share is any resource that can be accessed by other users or computers on a network. There
are two primary types of shared resources:
System share:
• IPC$, a special share reserved for interprocess communication
• ADMIN$, a special share used for remote administration of a server
• Default administrative shares such as C$, D$, and winnt$.
User share: A user-defined share. User shares can include:• Open share: Can be accessed using a blank user name and password and is therefore
vulnerable to a null session attack.
• Accessible share: Cannot be accessed using a null session. Can only be accessed usingspecific user name and password credentials.
• Protected share: Cannot be accessed using the credentials of the currently logged-inuser.
• Cracked share: Can be accessed using a user name and password discovered by a bruteforce attack.
• Printer share: A shared network printer or print queue.
Why Knowing About Shares Is Important
In today's hazardous computing environment it is critically important to understand how manyshared resources are in your network and where they reside. Shares by their very nature arevulnerable to attack and can be used as a platform from which to initiate attacks on yournetwork. Shares you know about are vulnerable but can be monitored; shares you don't knowabout are doubly vulnerable because you don't know they should be monitored.
You likely have more shares on your computer or in your network than you think. For example,many people do not realize that Windows operating systems are typically installed with default
system shares. These shares, while often left dormant, can be used by attackers as portals fromwhich to launch an attack.

7/30/2019 Vmware Vcenter Administration
http://slidepdf.com/reader/full/vmware-vcenter-administration 174/183
Understanding Shares
168 vCenter™ Protect Essentials Plus - Configuration Management Administration Guide
How to View Share Information
VMware vCenter Protect - Configuration Management can scan for and collect information aboutshares it identifies on scanned machines. You can view information about shares that wereidentified within a domain, within a machine group, or during a particular scan. For example:
Enabling and Disabling Shares Scanning
Searching for and identifying shares during a scan can lengthen the time it takes to complete thescan. If you are not interested in share information, or if you simply want to speed the scanningprocess, you can disable share scanning.
1. Select Tools > Options.
2. On the General tab, enable the Turn off shares scanning check box.
3. Click OK .
To re-enable shares scanning, simply clear the Turn off shares scanning check box and thenclick OK .

7/30/2019 Vmware Vcenter Administration
http://slidepdf.com/reader/full/vmware-vcenter-administration 175/183
Viewing Group Membership Information
vCenter™ Protect Essentials Plus - Configuration Management Administration Guide 169
Viewing Group Membership Information
Why Knowing About Group Membership Is Important
A group is typically granted certain privileges on a machine. By extension, the members of a
group are afforded the same privileges granted to the group. Understanding who is a member of a group can help you limit the number of people able to perform certain functionality. Forexample, it is considered a best security practice to limit the number of people assigned to theadministrator group. In fact, some guidelines recommend that certain groups contain no
members at all.
How to View Group Membership Information
VMware vCenter Protect - Configuration Management can scan for and collect information aboutgroups it identifies on scanned machines. You can view information about groups that were
identified within a domain, within a machine group, or during a particular scan. For example:
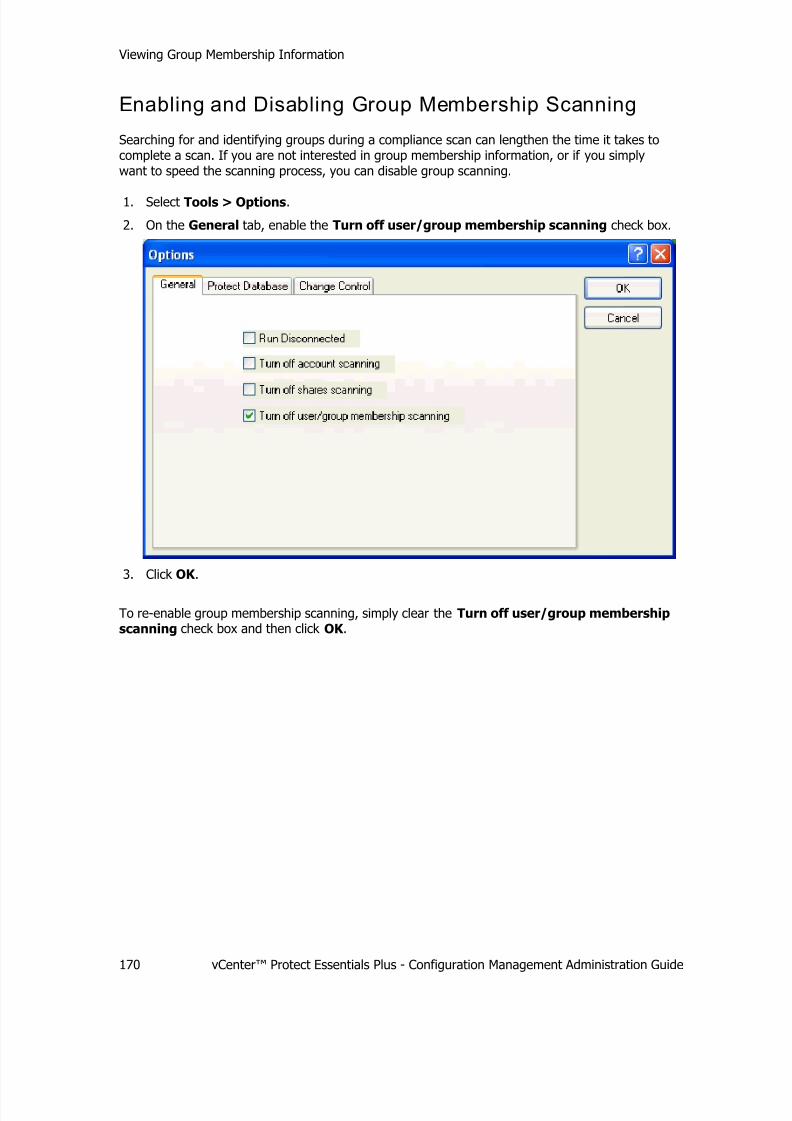
7/30/2019 Vmware Vcenter Administration
http://slidepdf.com/reader/full/vmware-vcenter-administration 176/183
Viewing Group Membership Information
170 vCenter™ Protect Essentials Plus - Configuration Management Administration Guide
Enabling and Disabling Group Membership Scanning
Searching for and identifying groups during a compliance scan can lengthen the time it takes tocomplete a scan. If you are not interested in group membership information, or if you simplywant to speed the scanning process, you can disable group scanning.
1. Select Tools > Options.
2. On the General tab, enable the Turn off user/group membership scanning check box.
3. Click OK .
To re-enable group membership scanning, simply clear the Turn off user/group membershipscanning check box and then click OK .

7/30/2019 Vmware Vcenter Administration
http://slidepdf.com/reader/full/vmware-vcenter-administration 177/183
Configuring a Connection to the VMware vCenter Protect Database
vCenter™ Protect Essentials Plus - Configuration Management Administration Guide 171
Configuring a Connection to the VMware vCenter Protect Database
If you want to be able to assign VMware vCenter Protect patch groups and signature groups toyour VMware vCenter Protect - Configuration Management policies, you must be able to connectto the VMware vCenter Protect database. If VMware vCenter Protect is available when VMwarevCenter Protect - Configuration Management is installed the program will automatically recognizethe type and location of the VMware vCenter Protect database being used. You can modify thispredefined information if needed.
1. Select Tools > Options.
2. Select the Protect Database tab.
The tab contains the following options:
Server/InstanceName
The full path to and name of SQL Server used by VMware vCenterProtect . For example: (local)\SQLEXPRESS .
Database Name The name of the VMware vCenter Protect database contained on
SQL Server. The default name is Protect .
Use SQL Authentication Specifies what type of authentication to use when connecting toSQL Server. If the check box is NOT enabled it means thecredentials of the currently logged on user will be used toauthenticate to the server (this is Windows authentication). If thecheck box IS enabled it means SQL authentication will be usedand you must provide the following information:
• Logon User: The user name used when logging on to
SQL Server.

7/30/2019 Vmware Vcenter Administration
http://slidepdf.com/reader/full/vmware-vcenter-administration 178/183
Configuring a Connection to the VMware vCenter Protect Database
172 vCenter™ Protect Essentials Plus - Configuration Management Administration Guide
• Password: The password used when logging on to SQLServer.
• Retype Password: Retype the same password to verify
it was typed correctly.
No Integration Clears all boxes on the dialog. No connection to the VMwarevCenter Protect database will be made.
Default Settings Sets all boxes to the default values.
Test Connection Verifies you can connect to the VMware vCenter Protect databaseusing the supplied information. If the test is successful thefollowing dialog is displayed:
3. When you are finished defining access to the VMware vCenter Protect database, click OK .

7/30/2019 Vmware Vcenter Administration
http://slidepdf.com/reader/full/vmware-vcenter-administration 179/183
Disconnected Mode
vCenter™ Protect Essentials Plus - Configuration Management Administration Guide 173
Disconnected Mode
By default, each time the program is started it checks to see if there are new XML data files todownload and use within the program. If the VMware vCenter Protect - ConfigurationManagement console is on a machine that is not connected to the Internet, or if you simply don't
want to automatically download new XML files, you must run in Disconnected Mode. WhenDisconnected Mode is enabled the program will not attempt to look for updated XML files but willinstead simply use the files already located on the machine.
To enable Disconnected Mode:
1. Select Tools > Options.
The following dialog is displayed:
2. On the General tab, enable the Run Disconnected check box and then click OK .
To disable Disconnected Mode:
1. Select Tools > Options.
2. On the General tab, clear the Run Disconnected check box and then click OK .
7/30/2019 Vmware Vcenter Administration
http://slidepdf.com/reader/full/vmware-vcenter-administration 180/183
Manually Obtaining XML Files
174 vCenter™ Protect Essentials Plus - Configuration Management Administration Guide
Manually Obtaining XML Files
If updates are required for the XML files and you are running in disconnected mode, you willneed to obtain the new XML files either by switching to connected mode or by downloading thefiles manually from the following Web site:
https://xml.shavlik.com/data/configure/v4.3.0/f i lename.cab
where:
• f i lenam e.cab is the .cab file associated with the XML files described below (forexample, ssc.cab is the .cab associated with the ssc.xml file).
Once the .cab file is downloaded, you can extract the XML file from the cab file much like youwould from a zip file. The newly-downloaded XML file should be placed into the XML directory
under the VMware vCenter Protect - Configuration Management installation location (forexample: C:\Program Files\VMware\NetChk Configure\XML ). The updated files will contain newerdate/time stamps than the files you are replacing. VMware vCenter Protect - Configuration
Management may need to be closed and restarted, or a scan may need to be performed, before
the new XML file will be used.
About the XML Files
VMware vCenter Protect - Configuration Management uses the following XML data files:
• News XML file (news.xml): Provides the product overview text, news, and otherinformation that is displayed on the home page.
• Baseline XML file (ssc.xml): Provides the policy checks and values used within the
Recommended Baseline policy.
• Policy Checks Conversion XML file (conversion.xml): Provides mappings used in
the SCAP editions of VMware vCenter Protect - Configuration Management .
• Custom Checks XML file (CheckWizard.xml): Provides mechanisms to createcustom checks used in user-defined custom policies.

7/30/2019 Vmware Vcenter Administration
http://slidepdf.com/reader/full/vmware-vcenter-administration 181/183
Obtaining Support
vCenter™ Protect Essentials Plus - Configuration Management Administration Guide 175
Obtaining support
For technical assistance with VMware vCenter Protect - Configuration Management, please referto one of the following support options:
• Browse the Community Site at community.shavlik.com
• E-mail us at [email protected]
• Phone Technical Support at 866-407-5279 or +1-651-407-5279

7/30/2019 Vmware Vcenter Administration
http://slidepdf.com/reader/full/vmware-vcenter-administration 182/183
Index
176 vCenter™ Protect Essentials Plus - Configuration Management Administration Guide
Index
A About ..................................................... 17 Accounts ............................... 144, 165, 166
Activation ............................................... 15 Active Directory .........................34, 46, 152 Associate policy ................................ 65, 66
Audit edition ............................................. 4 Automatic update .................................... 19
C Change control .............. 156, 157, 158, 160Change management ............................ 156
Cloning a policy ...................................... 59Comment ..................................... 156, 160Compliance Filter .................................. 142Context-sensitive Help ............................. 23
Copying a policy...................................... 57Creating ........................................... 29, 51Credentials ..................................... 25, 137Custom check types
Directory ACL check ............................ 98File ACL check .................................... 92File Date Offset check ....................... 121Registry Multi-String check ................ 103Registry Value check ........................... 73Registry Value Exists check ................ 107
Registry Value for All Users check ...... 111Registry Value x64 check ................... 116
Service check ...................................... 79User Rights check ............................... 84
Custom Check Wizard.............................. 68
D Database .............................................. 171Detail report ................................. 142, 149Digital signature .............................. 71, 128Directory ACL custom check .................... 98
Disconnected mode ............................... 173Domains ................................................. 33Duplicating a policy ................................. 58
E Editions .................................................... 4Enforce multiple machines ..................... 153Enforcement ................................. 152, 153Enforcement history .............................. 155
Enumerating ............................................. 8Export changes ............................. 140, 157Export custom check ............................. 128
Export out of compliance ....................... 140
Export virtual image ................................ 42Exporting a policy ................................... 62Exporting reports .................................. 164
F F1 .......................................................... 23
File ACL custom check ............................. 92File Date Offset check ........................... 121Filtering machines ................................... 38
Filtering reports .................................... 162FISMA .............................................. 47, 51Framework ....................................... 47, 51
From an existing machine ........................ 51
G Gold standard ......................................... 59
Group membership ................ 148, 169, 170
H Help ....................................................... 23Home page ............................................. 19
I Ignoring machines .................................. 38Import from file ..................... 27, 31, 33, 35Importing a policy ................................... 62Installation ....................................... 10, 12
IP address .............................................. 35
L License information ........................... 15, 18
Linking files ............................................ 39Log file ................................................. 155
M Machine group ....................... 24, 25, 29, 31Machines ...................................... 8, 31, 35Manage items ....................................... 139Microsoft Knowledge Base ......................... 8My Domain ............................................. 24My Machine ............................................ 24My Test Machines ................................... 24
N Navigation buttons .................................. 23Nested group .......................................... 36
NIST 800-53 ..................................... 47, 51NIST/FISMA Baseline ........................ 19, 46
7/30/2019 Vmware Vcenter Administration
http://slidepdf.com/reader/full/vmware-vcenter-administration 183/183
Index
O Operating system information ........ 140, 149Operations edition ..................................... 4Organizational Unit ................................. 34
P Password .............................................. 135Patch group ...............................47, 51, 171Patch Management
Percent Patches Deployed ................... 47PCI DSS ........................................... 47, 51Policies ....................................... 46, 51, 55Policy check ...................................... 46, 55Policy management ................................. 65Prerequisites ........................................... 10
R Recent scans ........................................ 139Recommended Baseline ..............19, 46, 173
Refresh files ........................................... 22Refresh license ....................................... 22
Regedit ................................................ 125Registering 15
Scanning prerequisites .......................... 131
SCAP ........................................................ 4Scheduling a scan ................................. 135
Service custom check .............................. 79Service pack information ............... 140, 149Services.................................................. 79
Set/Change credentials .......................... 137Shares .......................................... 146, 168Signed file ...................................... 71, 128Software ................................................ 10SQL Server ........................................... 171SQL Server checks .................................... 5stcScans.mdb ......................................... 12Summary Report ............ 140, 142, 144, 149Support ................................................ 175Support_388945a0 .................................. 84System requirements ................................ 5
T Test machine credentials ......................... 25Test machine existence ........................... 25
U