vmware site recovery manager 6
TRANSCRIPT


i
VEPSUN TECHNOLOGIES
Lab Guide for
VMware SRM 6

ii
About Vepsun Technologies:
Since 2010, Vepsun has grown to become the largest independent IT training institutes. we
offer most advanced technology than any other computer and business training company.
Businesses and individuals can choose from the course offerings, delivered by experts.
Whether your organization is a large multinational or a small business, we can bring the
appropriate skills, experience and contacts to bear. Our marketing communications
department can advise on appropriate ways to communicate your message, from a static
brochure website, all the way through to hundreds of pages on on-line information updated
minute by minute.
We believe that Vepsun offers excellence at every level, whether it be the delivery of technical
consultancy, training, project implementation, or applying our experience working and
research into successful internet marketing techniques.
Our technical department has skills the equal of those anywhere in the world. There is nobody
with more knowledge and experience of internetworking technology and its integration with
business computer systems. for large projects we can draw on extensive industry contacts to
involve specialist systems architect, project managers, analysts and programmers.
Before thinking about giving advice, we like to listen carefully to what our customers want
and from that understanding we work hard to provide the advice that we would wish to
receive if we were in the same situation.
We seek to form long term relationships with clients who take this medium seriously. With a
full understanding of your goals, our experience and effort can put the refinement and
achievement of those goals into practice. If you would like to find out more about us, we
would be delighted to hear from you. We think you will find our ability to listen and think
before proposing solutions makes a refreshing change!

iii
INDEX
S.No Description Page No.
1 Site Recovery Manager 6 1
2 SRM 6 Installation 5
3 Configuring SRM Site Pairing 21
4 Installing and configuring vSphere Replication 25
5 Configuring SRM Mapping 53
6 Running SRM Test Recovery 71
7 Cleaning SRM Test Recovery 77

1 | P a g e w w w . v e p s u n . i n
VMWARE
SITE RECOVERY MANAGER 6

2 | P a g e w w w . v e p s u n . i n
VMWARE SRM
VMware Site Recovery Manager (SRM) is a business continuity solution from
VMware. Site Recovery Manager is an automation software that integrates with an
underlying replication technology to provide policy- based management, non-
disruptive testing and automated orchestration of recovery plans. This provides
simple and reliable recovery and mobility of virtual machines between sites with
minimal or no downtime.
Site Recovery Manager is available in two editions to help you protect your environment
according to business needs. Both editions of Site Recovery Manager are licensed “per protected
virtual machine”.
SRM STANDARD SRM ENTERPRISE
Licensing Up to 75 protected
VMs per site
No licensing limitation on the number of
protected VMs
Features Exclusive features:
• VMware NSX integration
• Orchestrated cross-vCenter vMotion
• Stretched storage support
• Storage policy-based management
Protected site is nothing but your primary site where active production workloads are running
and recovery site is the datacenter location where you want to move your production workloads
in case of Disaster like natural calamities in your primary datacenter. Virtual machines are moved
to recover from a disaster or as a planned migration. vCenter Site Recovery Manager facilitates
the clean shutdown of virtual machines at the protected site for a planned migration.

3 | P a g e w w w . v e p s u n . i n
VMware SRM is used with array-based replication software. You can also use VMware’s native
replication, called VMware vSphere Replication. vSphere Replication copies virtual machines from
one host to another, using the power of the hosts involved rather than the storage system.
VMware Site Recovery Manager Components
You need to have same version of vCenter and SRM installed on both protected and recovery site.
SRM plug-in must be added to vSphere web client. Since SRM 5.8, SRM plugin integrated only
with Web Client and no plug-ins available for vSphere client.
Storage Replication Adapter (SRA) is the Code written by storage partners to allow SRM to
communicate with storage arrays. You need to install Storage replication adapter (SRA) from the
respective vendor in the SRM server to use array based replication. In case of using array-based
replication, the same replication technology must be available at both sites, and the arrays must
be paired. If you are using vSphere Replication, it’s required a vSphere Replication appliance on
both sites. The vSphere Replication appliances must be connected to each other and be the same
version.
VR Appliance (vSphere Replication Appliance) – this used to be called the “VRMS”, and provided
management capabilities for the VR framework. This function persists in the VR Appliance, and
“VRS” functionality has been integrated with the appliance.
VR Server (VRS) is vSphere Replication Server – an optional scaling component. This provides a
replication target. This functionality is included in the VR Appliance, but to scale to higher than
100 replications, additional VR Server instances can be deployed.
vSphere Replication Agent (VRA) Present on every host, it only becomes active when a protected
VM is writing data.
4 | P a g e w w w . v e p s u n . i n
Network file copy (NFC) protocol is used to commit network based disk writes by vSphere. The
VRS receives replicated blocks and distributes them via NFC to the vSphere hosts for writing to
storage.
Pre-requisites to install SRM
1. Install the same version of Platform Services Controller, vCenter Server and Site Recovery
Manager on both sites (Protected and Recovery site)
2. Site Recovery Manager can be installed on Dedicated server or on the same system as
vCenter server is installed. SRM requires supported version of Windows operating system.
In case vCenter Server appliance, you need to install SRM on dedicated windows server.
3. Make use of fully qualified domain names (FQDN) rather than IP addresses when you
install and configure Platform Services Controller, vCenter Server, vSphere Replication and
Site Recovery Manager.
4. You should have Platform Services Controller and vCenter Server ready before installing
SRM 6.0. Obtain the address of the Platform Services Controller instance for both sites.
The Platform Services Controller must be running and accessible during Site Recovery
Manager installation.
5. Obtain the vCenter Single Sign-On administrator user name and password for both of the
local and remote sites
6. Make use of centralized NTP servers to synchronize the clock settings of the systems on
which Platform Services Controller, vCenter Server, vSphere Replication and Site Recovery
Manager Server. Maintain the consistence time between all systems.
7. Obtain a Windows user account with the appropriate privileges to install and run SRM
service. You can configure the Site Recovery Manager service to run under a specified user
account. The account can be a local user or a domain user.
8. Site Recovery Manager requires a database. SRM can be installed either with embedded
Embedded vPostgres Database or an external database sources like Microsoft SQL or
Oracle. If you are using external database for SRM installation, Site Recovery Manager
requires a database source name (DSN) for 64-bit open database connectivity (ODBC). You
can create the ODBC system DSN before you run the Site Recovery Manager installer, or
you can create the DSN during the installation process
9. To use Site Recovery Manager with vSphere Replication, deploy the appropriate version
of vSphere Replication on both of the protected and recovery sites before you install Site
Recovery Manager Server.
10. Download the Site Recovery Manager 6.0 installation file to a folder on the machine on
which to install Site Recovery Manager on both primary site and recovery site.

5 | P a g e w w w . v e p s u n . i n
SITE RECOVERY MANAGER 6
INSTALLATION

6 | P a g e w w w . v e p s u n . i n
Open the Windows 2012 Server which is being dedicated for the SRM Server.
Install the SRM package. SRM comes with an exe file.

7 | P a g e w w w . v e p s u n . i n
Double click SRM installation file to initiate the installation.

8 | P a g e w w w . v e p s u n . i n
In the SRM installation wizard, Click on Next to start the installation and followed by standard
license agreement.

9 | P a g e w w w . v e p s u n . i n

10 | P a g e w w w . v e p s u n . i n
Select the destination folder for the Site Recovery Manager installation and click on Next.
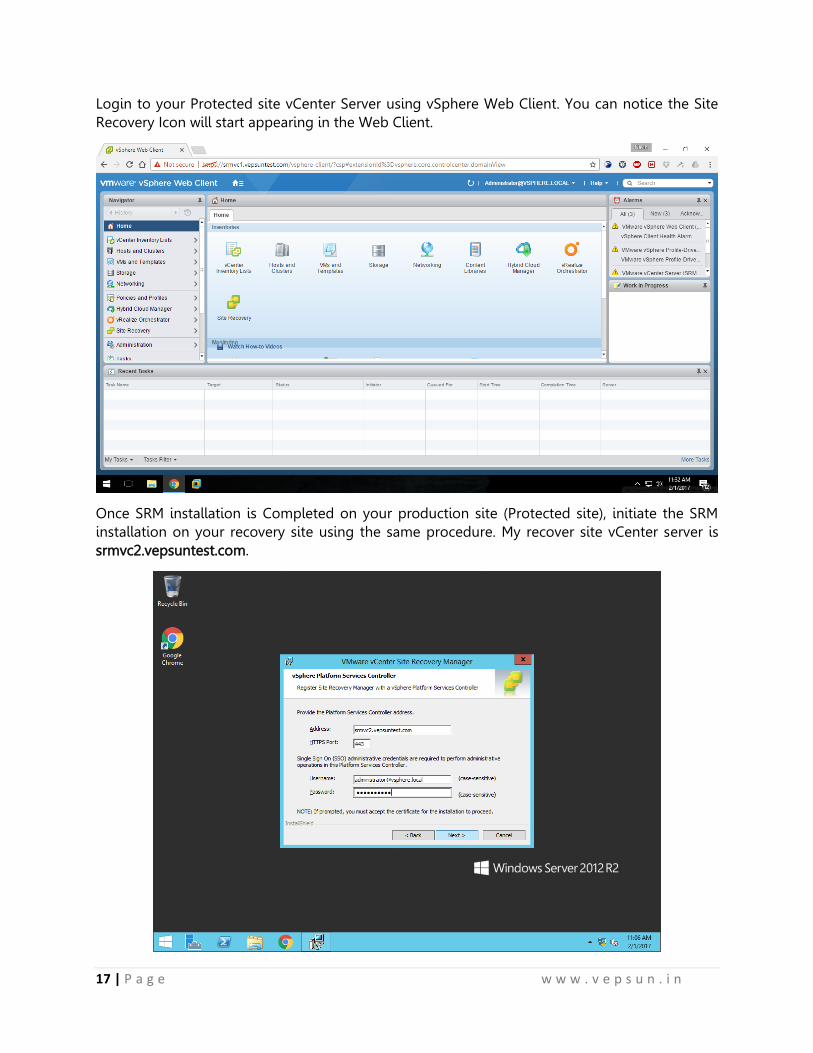
For SRM 6.0 installation, we need to specify the hostname or IP address of Platform Services
Controller address to register SRM with PSC.

11 | P a g e w w w . v e p s u n . i n
Note: As a best practice, it is recommended to use FQDN names throughout the installation of all components like vCenter, SRM, vSphere Replication etc. Specify the Single sign-on (SSO) administrative credentials to perform administrative actions on the Platform services controller.
Accept the certificate if prompted.
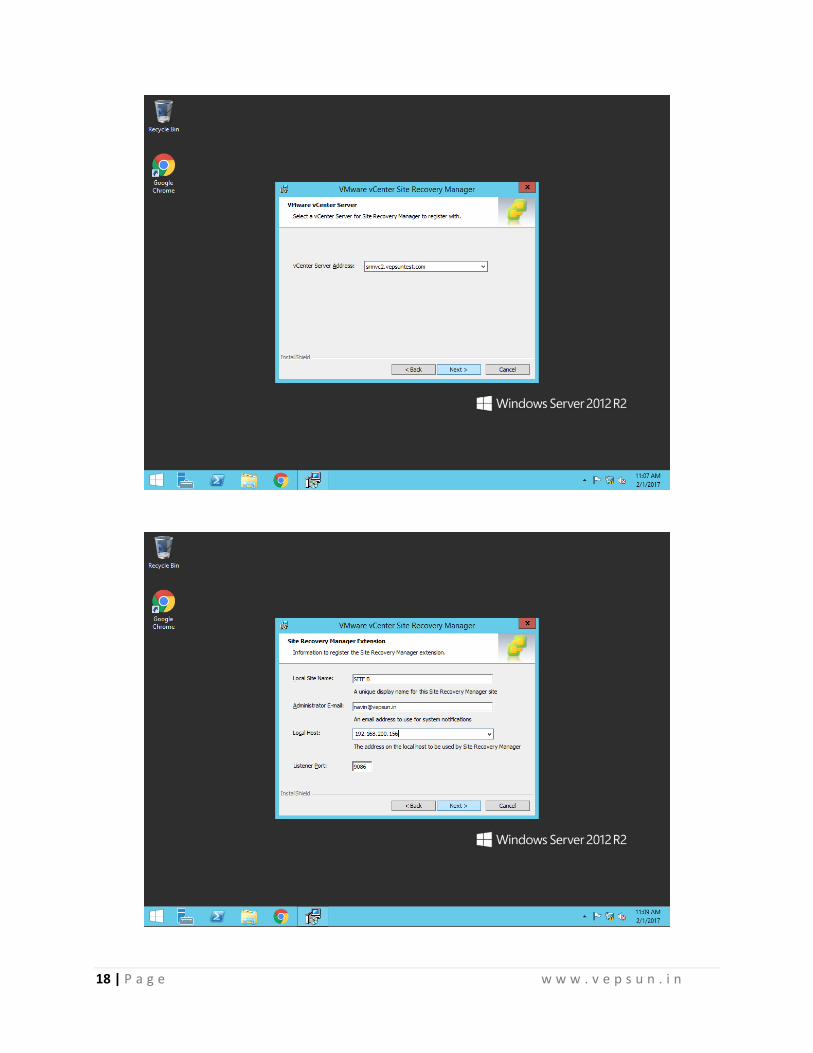
Select the vCenter Server instance from the drop-down to register Site Recovery Manager and
click Next.
Specify the Local Site name for the SRM site. This specified name will appear in SRM interface. By
default, vCenter Server address will be used, if you didn’t specify any name during the installation.
Enter administrator email address for this site and Select the IP address of the local host from the
drop-down to be used by SRM. If you have dual IP address in the server, Select the appropriate IP
address for the SRM installation.

12 | P a g e w w w . v e p s u n . i n
Select the Default Site Recovery Manager plug-in identifier (if you are installing SRM with standard
configuration with one protected site and one recovery site) or select create a Custom Site
Recovery Manager Plug-in identifier (when you install Site Recovery Manager in a shared recovery
site configuration, with multiple protected sites and one recovery site).

13 | P a g e w w w . v e p s u n . i n
You can either use the option to Automatically generate a certificate or Use Custom certificate
file, if you have any and click on Next.
Specify the Organization and Organization Unit. Click on Next.

14 | P a g e w w w . v e p s u n . i n
You can use either the embedded database (vPostgres database) or a custom external database
for the SRM installation. To use an external database, select an existing 64-bit DSN from the drop-
down menu or Click on DSN setup to create a new 64-bit DSN for SRM database.
Provide the data source name, DB username and password. Leave the remaining settings to
default and click on next.

15 | P a g e w w w . v e p s u n . i n
Select the user account under which to run the Site Recovery Manager Server service and click
Next. It can be a Local system account or an Active directory domain account. Click on Next.
Click on Install to start the SRM installation.

16 | P a g e w w w . v e p s u n . i n
It will take few minutes to complete the Site Recovery Manager installation.
Click on Finish to complete the Site recovery manager installation.
17 | P a g e w w w . v e p s u n . i n
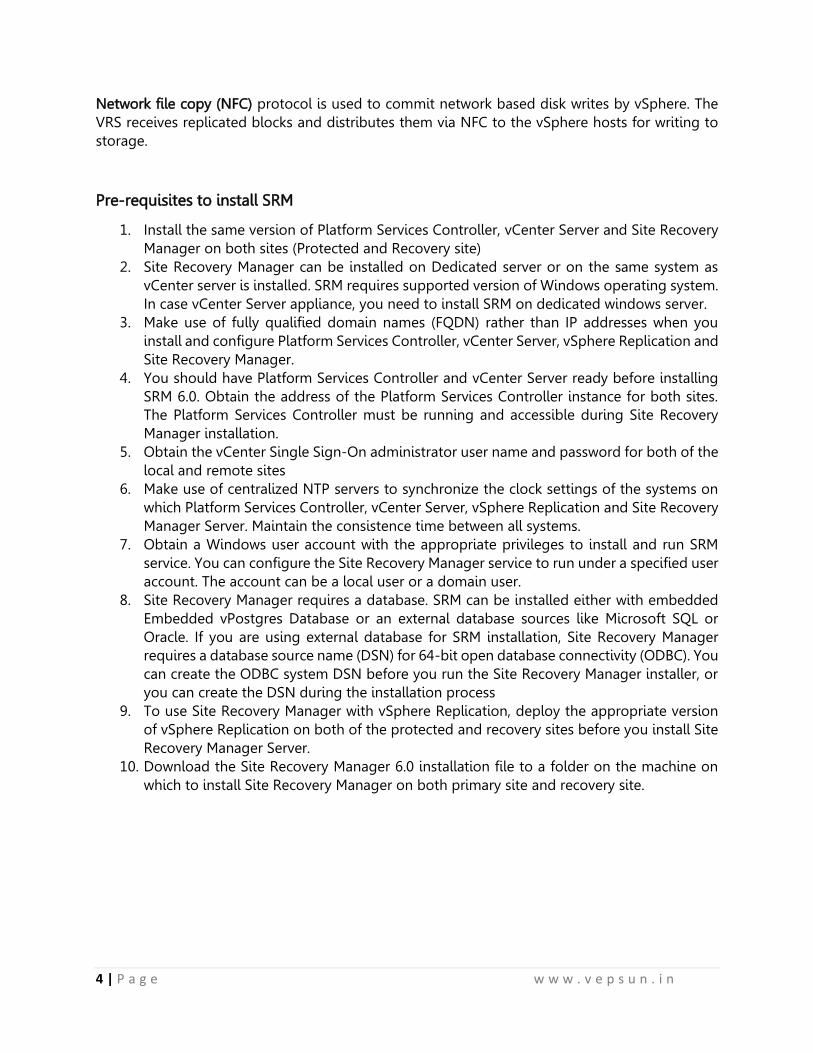
Login to your Protected site vCenter Server using vSphere Web Client. You can notice the Site
Recovery Icon will start appearing in the Web Client.
Once SRM installation is Completed on your production site (Protected site), initiate the SRM
installation on your recovery site using the same procedure. My recover site vCenter server is
srmvc2.vepsuntest.com.
18 | P a g e w w w . v e p s u n . i n

19 | P a g e w w w . v e p s u n . i n
Once SRM installation completed on the both protected and recovery site. Login to vSphere Web
Client of both vCenter server using web client. Click on “Site Recovery” plug-in. You will be able
to see your SRM site names which you specified during the installation under sites in each vCenter
server.

20 | P a g e w w w . v e p s u n . i n

21 | P a g e w w w . v e p s u n . i n
CONFIGURING SRM SITE PAIRING

22 | P a g e w w w . v e p s u n . i n
Login to your Protected Site vCenter server using vSphere web client and click on “Site Recovery”
Plug-in in the home page. Under Sites, you will be able to see the Protected Site name. Click on
Summary Tab and Click on “Pair Sites” under Guide to Configure SRM.
Provide the Platform service controller address of your SRM remote site (recovery site). The
address that you provide for the Platform Services Controller must be an exact match of the of
address that you provided when you installed Site Recovery Manager Server on the remote site.
Leave the Port number as default, if you don’t have any custom port for PSC. Click Next.

23 | P a g e w w w . v e p s u n . i n
This page displays the vCenter Server instance in which Site Recovery Manager Server is registered
on the remote site. Enter the vCenter server Single sign-on (SSO) credentials and click on Finish.
The connection process proceeds automatically after authentication with the correct privileges
established.
Accept the certificate if needed.

24 | P a g e w w w . v e p s u n . i n
Once site Pairing is established between protected and recovery site. You will be able to see the
remote site appears under Sites in the Site Recovery Manager interface. It displays the information
about the primary site and Paired site.

25 | P a g e w w w . v e p s u n . i n
INSTALLING AND CONFIGURING
VSPHERE REPLICATION

26 | P a g e w w w . v e p s u n . i n
VMware vSphere Replication (Hypervisor Based Replication HBR) is a solution included in the
Essentials Plus Kit and higher editions of vSphere.
vSphere Replication appliance comes in two formats (.iso and .zip). You can download any of
them.
Mount the ISO or unzip the package. You will find the .ovf file inside.

27 | P a g e w w w . v e p s u n . i n
Deploy the vSphere Replication as a standard OVF template.
Allow the Client Integration Plugin.

28 | P a g e w w w . v e p s u n . i n
Select the vSphere_Replication_OVF10.ovf file.
Click Next.
29 | P a g e w w w . v e p s u n . i n
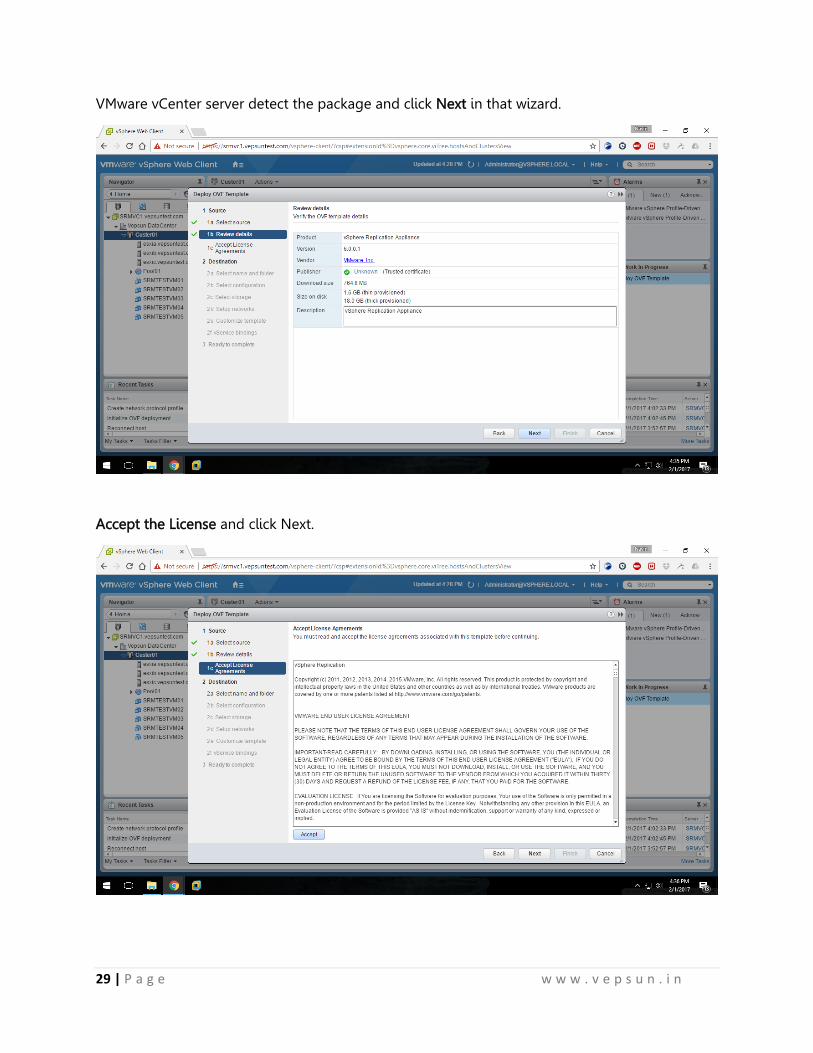
VMware vCenter server detect the package and click Next in that wizard.
Accept the License and click Next.

30 | P a g e w w w . v e p s u n . i n
Give a name to the appliance.
Select the configuration and click Next.

31 | P a g e w w w . v e p s u n . i n
Select the Datastore and click Next.
Give a VM Portgroup and mention the DNS, Gateway IP address.

32 | P a g e w w w . v e p s u n . i n
Give the Password for the root account and give the Management IP address.
Click Next.

33 | P a g e w w w . v e p s u n . i n
Review the settings and click Finish.
Wait for the deployment to complete and power on the Virtual Machine.

34 | P a g e w w w . v e p s u n . i n
Open the link https://IP_address_of_appliance:5480 in the browser and ignore the certificate
warning.
The default username is root and the password is what you provided.

35 | P a g e w w w . v e p s u n . i n
Click on the configuration tab and provide the vCenter password and click Save and Restart
Service.
Accept the certificate if prompted.

36 | P a g e w w w . v e p s u n . i n
Wait until the successfully save the configuration info appears and the VRM service is running.
Login to the vCenter server with Webclient.

37 | P a g e w w w . v e p s u n . i n
You can notice the vSphere Replication plugin which would have installed.
Click on icon shown above. You should see the vSphere Replication as "Enabled (OK)". Click
Manage.

38 | P a g e w w w . v e p s u n . i n
Click icon shown on below figure to deploy and configure the second VRA. You can deploy many
VRAs to balance VMs replication between them.
Specify vSphere_Replication_AddOn_OVF10.ovf and click Next.

39 | P a g e w w w . v e p s u n . i n

40 | P a g e w w w . v e p s u n . i n

41 | P a g e w w w . v e p s u n . i n

42 | P a g e w w w . v e p s u n . i n

43 | P a g e w w w . v e p s u n . i n
After deployment of the second VRA and powered it on, please click on icon shown on below
figure to register the second VRA.
Select the second VRA. Click OK.

44 | P a g e w w w . v e p s u n . i n
You should see the second VRA.
Repeat the above steps in the DR site also.
Click Target Sites and icon shown below to set up the connection with the second (remote) site.

45 | P a g e w w w . v e p s u n . i n
Provide credentials to connect to the Platform Services Controller.
Now sites should be connected and you are ready to configure protection of VMs.

46 | P a g e w w w . v e p s u n . i n
We have just installed and configured vSphere Replication Appliances (VRA) and connected sites.
Now we can configure a protection for VMs. I have a Windows 7 VM which we are going to do
the replication.
To do so, Right click on VM and Select All vSphere Replication Actions -> Configure Replication.

47 | P a g e w w w . v e p s u n . i n
Select Replicate to a vCenter Server. Click Next.
Select a remote vCenter and click Next.

48 | P a g e w w w . v e p s u n . i n
Select Auto-assign vSphere Replication server and click Next.
Select a Datastore where the replicated files will be stored.

49 | P a g e w w w . v e p s u n . i n
Select replication options for the virtual machine such Guest OS quiescing and Network
Compression.
Configure recovery settings for the virtual machine.

50 | P a g e w w w . v e p s u n . i n
Review settings and click Finish to start the replication process.
When you click on VM you should see the replication process/status.

51 | P a g e w w w . v e p s u n . i n
Now replication will be configured and the virtual machine will be replicated with an RPO of 15
minutes. To check on the progress of the replica, Click vCenter -> Manage -> vSphere Replication
-> Outgoing Replication
Wait for the process to complete.
You can see the same in the DR site as incoming replication.

52 | P a g e w w w . v e p s u n . i n

53 | P a g e w w w . v e p s u n . i n
CONFIGURING SRM MAPPING

54 | P a g e w w w . v e p s u n . i n
Basically inventory mappings involves in mapping the resources (clusters and resource pools),
folders, and networks of the Protected Site to the Recovery Site.
When your Recovery Plan is invoked for testing or for real DR, the SRM server at the Recovery Site
needs to know your preferences for bringing your replicated VMs online. Although the recovery
location has the virtual machine files by virtue of third-party replication software, the metadata
that comprises the vCenter inventory is not replicated. It is up to the SRM administrator to decide
how this “soft” vCenter data is handled. The SRM administrator needs to be able to indicate what
resource pools, networks, and folders the replicated VMs will use. This means that when VMs are
recovered they are brought online in the correct location and function correctly. Specifically, the
important issue is network mappings. If you don’t get this right, the VMs that are powered on at
the Recovery Site might not be accessible across the network. out of that we will going to discuss
about SRM resource mapping in this particular post.
Resource Mapping
Resource mappings define which compute resources are used at the recovery site, when virtual
machines are recovered. For Example, You have the Specific cluster or Resource pool in which
Exchange mailboxes are hosted in your protection site called “Exchange”. You need to define the
mapping to bring that particular Exchange Mailboxes in the Specific Cluster or Resource Pool
called “Exchange-DR” in recovery site during test recovery or in actual disaster recovery. For
achieve this, you need to configure the Resource mapping at SRM. To configure resource
mapping, Login to your Protected site vCenter using vSphere Web Client -> SRM plugin -> Select
the Protected site and Click on Create Resource Mapping

55 | P a g e w w w . v e p s u n . i n
This step involves in mapping the resources from your protected site to recovery site. This is just
an front end. We need to ensure that the replication LUN’s are mapped to the DR ESXi host to
bring the VM’s on the DR host.
To configure Mapping, Select the ESXi host in protected site and Select the mapping object in the
recovery site and click on Add Mapping.
After it is done, click Next.
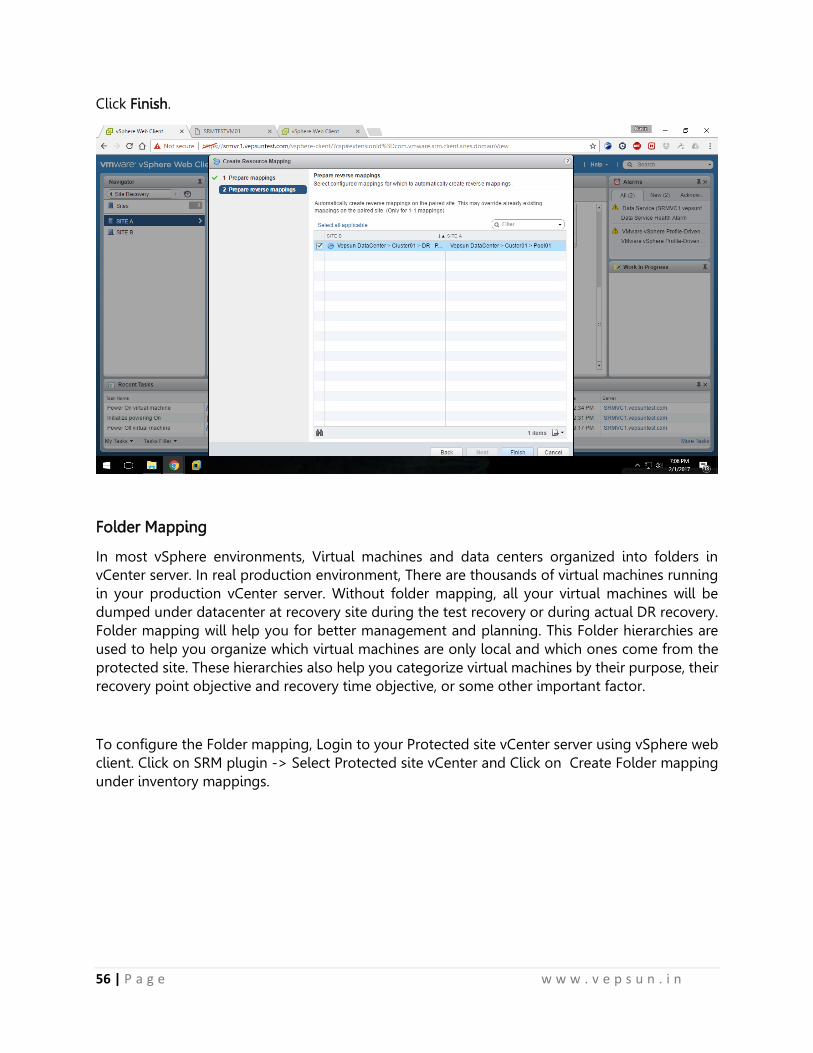
56 | P a g e w w w . v e p s u n . i n
Click Finish.
Folder Mapping
In most vSphere environments, Virtual machines and data centers organized into folders in
vCenter server. In real production environment, There are thousands of virtual machines running
in your production vCenter server. Without folder mapping, all your virtual machines will be
dumped under datacenter at recovery site during the test recovery or during actual DR recovery.
Folder mapping will help you for better management and planning. This Folder hierarchies are
used to help you organize which virtual machines are only local and which ones come from the
protected site. These hierarchies also help you categorize virtual machines by their purpose, their
recovery point objective and recovery time objective, or some other important factor.
To configure the Folder mapping, Login to your Protected site vCenter server using vSphere web
client. Click on SRM plugin -> Select Protected site vCenter and Click on Create Folder mapping
under inventory mappings.

57 | P a g e w w w . v e p s u n . i n
You have 2 options to configure the folder mapping either automatically prepare mappings for
folders with matching names or to prepare mappings manually. I am choosing the option to
prepare folder mappings manually and click on Next.

58 | P a g e w w w . v e p s u n . i n
Select the Datacenter or folder from the protected site and select appropriate mapping folder in
the right side from recovery site and click on Add Mappings to add the folder mappings.
I have selected the folder mapping between my protected site and DR site. click on Next.

59 | P a g e w w w . v e p s u n . i n
Select all applicable to configure the reverse mappings. Reverse mappings option will
automatically create reverse mappings on the paired site. Click on Finish.
That’s it. we are done with configuring the SRM folder mappings.
Network mapping
Network Mapping is one of the important step in SRM inventory mappings. If you don’t get this
configured correctly, the VMs that are powered on at the Recovery Site might not be accessible
across the network. Network mappings can only be related to Virtual machine port groups. You
cannot map management network or VMkernel port groups.
You need to more cautions with network mappings on recovery site because Site Recovery
manager does not validate whether the port group that you map is correct portgroup or not. I
would recommend you to create the similar Port groups names with some prefix or suffix like
Prod_ or DR_ in the virtual machines Port group in protected site and recovery site. It will help
you to easily configure the network mappings. To configure the network mapping, Login to your
Protected vCenter server using vSphere Web client and click on SRM in the home page, Select
Protected site vCenter in the list and Select Configure Network mapping under inventory
mapping.

60 | P a g e w w w . v e p s u n . i n
There are two options to configure the network mapping first one is automatically prepare
mappings for networks with matching names and second one is prepare mappings manually. I
want to configure the networks mapping manually between protected site and recovery site.

61 | P a g e w w w . v e p s u n . i n
As I recommended earlier, it would be best to name your port which can be easily identify from
the port group names. I have named production network with prefix Prod_ and recovery site
network with the prefix DR_. Select the network from the protected site in the left side and select
the appropriate network port group in the recovery site and Click on Add mappings.
Similarly configure the network mappings between protected site and recovery site networks and
click on next.

62 | P a g e w w w . v e p s u n . i n
Select all applicable to configure the reverse mapping for the paired site. Which creates the
network mapping between DR site and protected site. Click on Finish.
SRM Placeholder Datastores
A placeholder datastore is used to store the placeholder virtual machines at the recovery site. A
placeholder datastore reserves a place for protected virtual machines in the recovery site’s
inventory. Placeholder datastores does not need to be replicated and it must be visible to all esxi
hosts in the cluster. Placeholder datastore needs to established in both primary and secondary
sites to facilitate the reprotection. The placeholder datastore can be on local storage or shared
storage available to all ESXi hosts in the cluster.
A placeholder virtual machine is nothing but a subset of virtual machine files that is created ,when
a virtual machine is added to a recovery plan. It cannot be powered on. A placeholder virtual
machine provides a visual cue in the recovery site inventory that a virtual machine is protected.
Only function of placeholder virtual machine is to reserve a place in the inventory of the recovery
site. Placeholder virtual machines are composed only of very few files *.vmx, *.vmxf, and *.vmsd
files. The disk files (*.vmdk) are not present. The placeholder virtual machine files have a size of
approximately 1KB each.
When you add vm’s to the SRM protection group, SRM creates a placeholder virtual machine at
recovery site. It also derives its folder and compute assignments from the inventory mappings
which we have configured in our previous posts. You can easily identify the placeholder virtul
machines by their unique icon on the recovery site.

63 | P a g e w w w . v e p s u n . i n
To configure the Site Recovery Manager Placeholder Datastore, Click on Configure Placeholder
datastore option under guide to Configure SRM.
Select the datastore from the list to be used as Placeholder datastore for your production cluster.
Placeholder datastore can be local or remote. You should use the non-replicated lun. I would
recommend you to name the datastore to match up with the cluster name along with keyword
“Placeholder” to easily identify it. Once you have selected the datastore, click on ok.

64 | P a g e w w w . v e p s u n . i n
Creating SRM Protection Group
Site Recovery Manager Protection groups can be created to group virtual machines for protection.
SRM protection groups will be different for array-based replicated virtual machines and vSphere
replication replicated virtual machines. You cannot create protection groups by grouping both
types of replication. In simple terms, A protection group is a group of virtual machines that fail
over together at the recovery site during a test or a actual recovery using VMware vCenter Site
Recovery Manager. In actual Production environment, you can create protection group based on
Cluster or application type or array based replication groups based on the datastore groups. An
array-based protection group can contain one or more datastore groups.
To create a new protection group, Click on “Create Protection Group” under guide to configure
SRM in the SRM homepage of the vSphere Web Client.
Specify the name and location for the protection group.
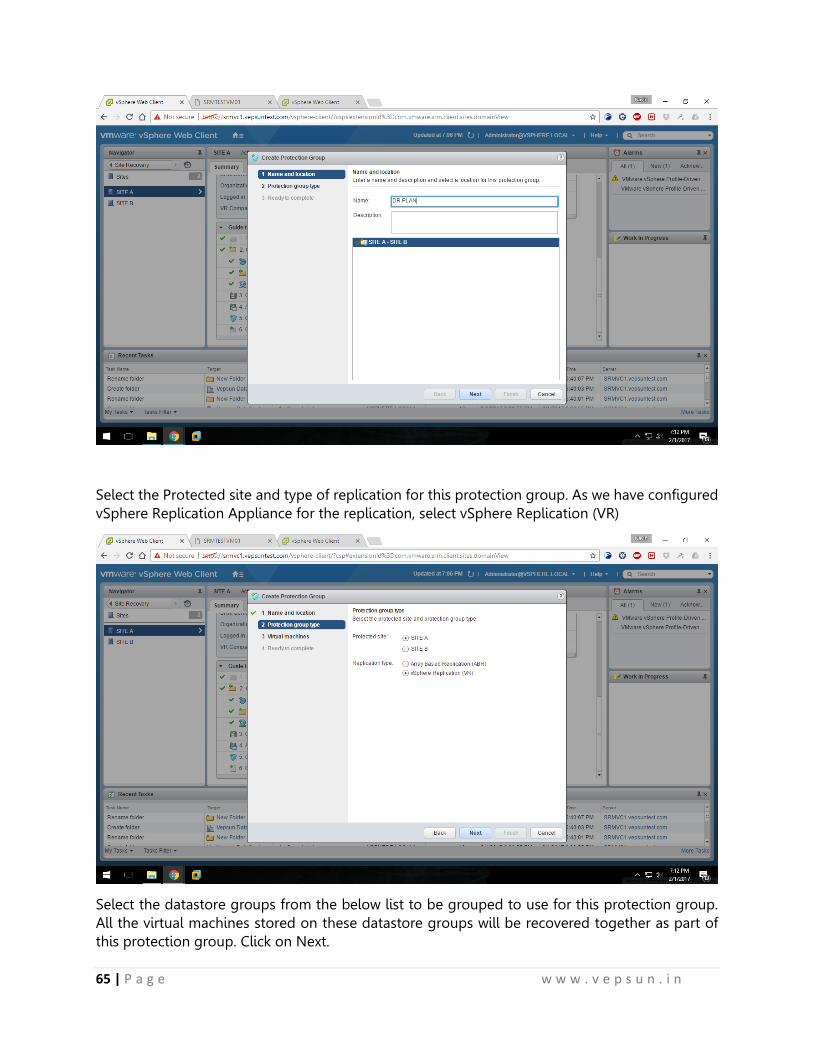
65 | P a g e w w w . v e p s u n . i n
Select the Protected site and type of replication for this protection group. As we have configured
vSphere Replication Appliance for the replication, select vSphere Replication (VR)
Select the datastore groups from the below list to be grouped to use for this protection group.
All the virtual machines stored on these datastore groups will be recovered together as part of
this protection group. Click on Next.

66 | P a g e w w w . v e p s u n . i n
Review all the information, which you have selected to create this SRM protection group and click
on Finish.

67 | P a g e w w w . v e p s u n . i n
Creating SRM Recovery Plans
vCenter Site recovery manager recovery plan is an automated plan for recovering
protected virtual machines to the recovery site. SRM recovery plan includes one or more
protection groups. You can include a protection group in more than one recovery plan. You create
one recovery plan to handle a planned migration or other can be created only to recovery specific
application or services by only including specific protection groups as part of the recovery plan.
Recovery plans can be used for Test recovery, planned migration to the recovery site or for disaster
recovery.
A vCenter Site Recovery Manager recovery plan includes the following information:
A list of virtual machines from protection groups
A startup and priority order for those virtual machines
Any custom steps added before or after virtual machine startup
You can configure the recovery plans to include custom actions during recovery like IP
customization for virtual machines, Custom scripts before vm start up and you can define the
priority of virtual machines, etc. Recovery plans can be configured to use an isolated internal
network for testing. Automatically generated virtual switches have no physical adapters. When
you are performing the test recovery, You can use the isolated network for the recovered virtual
machines to connect to avoid disturbance to the production virtual machines.
To create SRM recovery plan, Click on Create Recovery plan under recovery plans in the SRM
section of vSphere Web client.

68 | P a g e w w w . v e p s u n . i n
Enter the name and description for the recovery plan and select the location for this recovery plan.
Click on Next.
Select the recovery site in which the vm’s will be recovered as part of this recovery plan.
Select the list of protection groups which will be included as part of this recovery plan.

69 | P a g e w w w . v e p s u n . i n
You can the specify the test networks to use while running tests of this recovery plan. You can
manually select the test networks if you have created for the test purposes or you can leave the
default auto created test network called “isolated network”. Automatically generated virtual
switches have no physical adapters. When you are performing the test recovery, You can use the
isolated network for the recovered virtual machines to connect to avoid disturbance to the
production virtual machines. I am keeping the auto created isolated network as my test network.
Click on Next.

70 | P a g e w w w . v e p s u n . i n
Review all the settings selections specified during the recovery plan creation and click on finish
to create the recovery plans.
Once the recovery plan is created, you will be able to see the recovery plans created under the
recovery plans. You can edit the recovery plans to include the custom steps and vm priority ,etc.
71 | P a g e w w w . v e p s u n . i n
RUNNING SRM TEST RECOVERY

72 | P a g e w w w . v e p s u n . i n
Test recovery is nothing but a testing a recovery plan exercises with every aspect of
recovery plan. Site recovery manager ensures that test recovery will avoid disruption in ongoing
operations on the protected and recovery site. You can run test recovery at time like every hour,
every day, every month or quarter. Recovery plans that suspend local virtual machines do so for
tests and for actual recoveries. With this exception, running a test recovery does not disrupt
replication or ongoing activities at either site. It is always recommended to run recovery plan test
as often as needed to ensure that your actual DR plan is working as expected.
You can run the test recovery, once all the SRM configuration is done. You can verify in the
summary tab that all the configuration steps for SRM is displayed with Green tickmark.
To run a test recovery, Select the recovery Plans -> Monitor tab -> Recovery Steps -> Click
on Green Arrow (Play button) to run the test recovery. Please be cautious in selecting the Test
recovery option. if you have selected the actual recovery instead of test recovery, will start
recovery of your production virtual machines and it creates the impact to the production. You
can view the lists of recovery steps which will be executed as part of this recovery plan.

73 | P a g e w w w . v e p s u n . i n
Once you have clicked on the Green Arrow button to start the test recovery, recovery will
run in test mode and it will recover the virtual machines in a test environment on the recovery
site. You have storage option whether to replicate recent changes to the recovery site or not. This
process may take several minutes to complete the replication of recent changes to recovery site.
It is up to you run the test recovery with recent changes or not. I have selected the option to
replicate recent changes to recovery site. Click on Next.

74 | P a g e w w w . v e p s u n . i n
Review your settings selections before initiating the recovery test and click on Finish.
Once test recovery is executed, you will be able to see the series of recovery steps involved as
part of this recovery plans and its progress percentage.
After the process is done, you can see the VM getting powered on at the DR Site.

75 | P a g e w w w . v e p s u n . i n

76 | P a g e w w w . v e p s u n . i n

77 | P a g e w w w . v e p s u n . i n
CLEANING SRM TEST PAIRING

78 | P a g e w w w . v e p s u n . i n
Once your test recovery is completed and you have validated that your recovery plan is
working as expected. You can run a recovery plan cleanup. Recovery plan cleanup returns virtual
machines to their initial state before the recovery plan test was run. The recovery plan is reset to
a ready state. You can run a forced cleanup, if you experience errors during a recovery plan.
Recovery Plan Cleanup has series of steps and below are the cleanup steps:
Test virtual machines that were started during recovery plan testing are powered off.
Virtual machines that were suspended during the recovery plan test are resumed.
The recovery site storage is reset to the pre-test state.
Placeholder virtual machines are restored.
Replicated storage snapshots that were used by the virtual machines during the test are
discarded.
To Cleanup the test recovery, Click on the Brush symbol under Recovery plan -> Monitor ->
Recovery steps to clean up the recent test recovery.
Running a cleanup operation on this plan will remove the test environment and remove the test
environment and reset the plan to ready state. Click on Next after reading the Cleanup
Confirmation.

79 | P a g e w w w . v e p s u n . i n
Review the clean information and click on Finish to start the start the Recovery test cleanup.
Monitor the progress of the test recovery cleanup process.

