vms reporting instructions for vessel owner s/operators ... · vms reporting instructions for...
TRANSCRIPT
1
National Oceanic and Atmospheric Administration NOAA FISHERIES SERVICE
Office of Law Enforcement Northeast Division
55 Great Republic Drive Gloucester, MA 01930-2276
VMS Reporting Instructions for Vessel Owners/Operators
Network Innovations Version
Effective – April 19, 2018
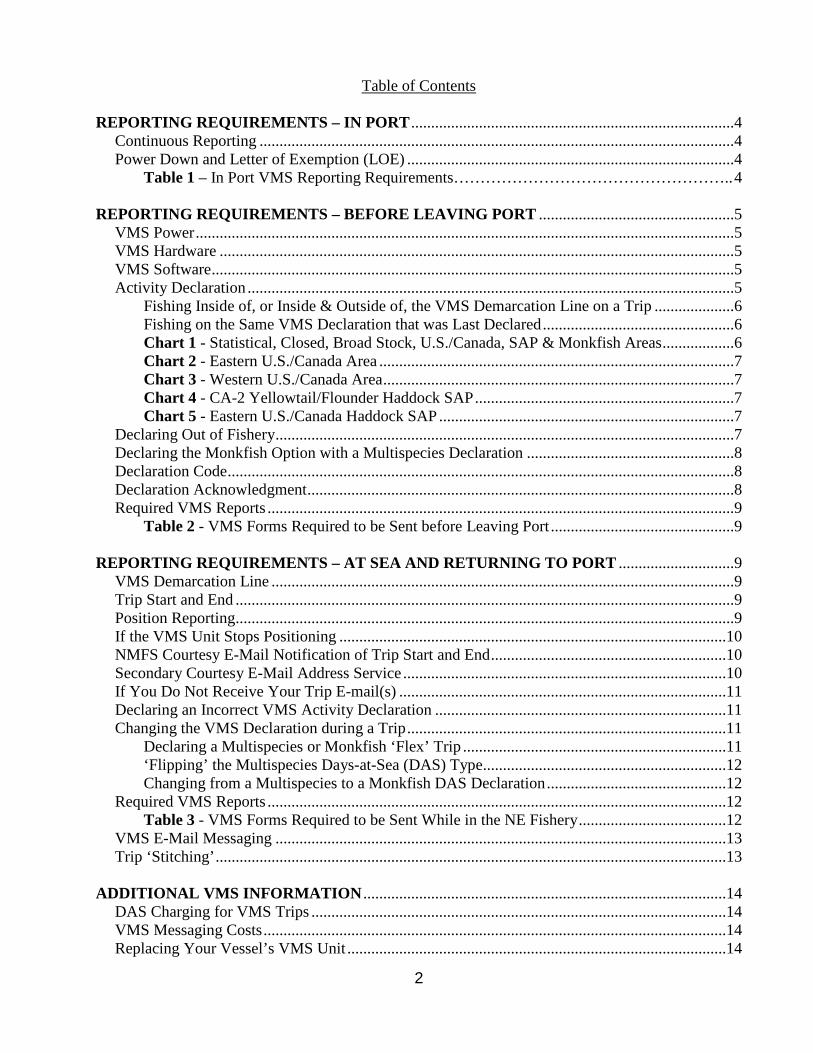
These instructions are developed for the use of vessel owners and operators who are required to maintain a VMS unit and send reports in accordance with the Greater Atlantic Fisheries Regulations at 50 CFR 648.9 and 648.10. These instructions supplement the regulations and do not replace them. Owners and operators are encouraged to review the regulations. These instructions are also available on the Greater Atlantic Region (GAR) VMS web page at http://www.greateratlantic.fisheries.noaa.gov/vms/index.html as shown below:
2
Table of Contents REPORTING REQUIREMENTS – IN PORT .................................................................................4
Continuous Reporting .......................................................................................................................4 Power Down and Letter of Exemption (LOE) ..................................................................................4
Table 1 – In Port VMS Reporting Requirements…………………………………………….. 4
REPORTING REQUIREMENTS – BEFORE LEAVING PORT .................................................5 VMS Power .......................................................................................................................................5 VMS Hardware .................................................................................................................................5 VMS Software ...................................................................................................................................5 Activity Declaration ..........................................................................................................................5
Fishing Inside of, or Inside & Outside of, the VMS Demarcation Line on a Trip ....................6 Fishing on the Same VMS Declaration that was Last Declared ................................................6 Chart 1 - Statistical, Closed, Broad Stock, U.S./Canada, SAP & Monkfish Areas ..................6 Chart 2 - Eastern U.S./Canada Area .........................................................................................7 Chart 3 - Western U.S./Canada Area ........................................................................................7 Chart 4 - CA-2 Yellowtail/Flounder Haddock SAP .................................................................7 Chart 5 - Eastern U.S./Canada Haddock SAP ..........................................................................7
Declaring Out of Fishery ...................................................................................................................7 Declaring the Monkfish Option with a Multispecies Declaration ....................................................8 Declaration Code ...............................................................................................................................8 Declaration Acknowledgment ...........................................................................................................8 Required VMS Reports .....................................................................................................................9
Table 2 - VMS Forms Required to be Sent before Leaving Port ..............................................9 REPORTING REQUIREMENTS – AT SEA AND RETURNING TO PORT .............................9
VMS Demarcation Line ....................................................................................................................9 Trip Start and End .............................................................................................................................9 Position Reporting .............................................................................................................................9 If the VMS Unit Stops Positioning .................................................................................................10 NMFS Courtesy E-Mail Notification of Trip Start and End ...........................................................10 Secondary Courtesy E-Mail Address Service .................................................................................10 If You Do Not Receive Your Trip E-mail(s) ..................................................................................11 Declaring an Incorrect VMS Activity Declaration .........................................................................11 Changing the VMS Declaration during a Trip ................................................................................11
Declaring a Multispecies or Monkfish ‘Flex’ Trip ..................................................................11 ‘Flipping’ the Multispecies Days-at-Sea (DAS) Type.............................................................12 Changing from a Multispecies to a Monkfish DAS Declaration .............................................12
Required VMS Reports ...................................................................................................................12 Table 3 - VMS Forms Required to be Sent While in the NE Fishery .....................................12
VMS E-Mail Messaging .................................................................................................................13 Trip ‘Stitching’ ................................................................................................................................13
ADDITIONAL VMS INFORMATION ...........................................................................................14 DAS Charging for VMS Trips ........................................................................................................14 VMS Messaging Costs ....................................................................................................................14 Replacing Your Vessel’s VMS Unit ...............................................................................................14
3
Removing Your Vessel’s VMS Unit ..............................................................................................14 Contacting the VMS Team .............................................................................................................14
Table 4 - VMS Team Contact List ..........................................................................................15 Alternate E-Mail Address to Contact the VMS Team ....................................................................15 Contacting the VMS Support Center ..............................................................................................15 VMS Reimbursement Program .......................................................................................................15 Contacting NMFS Enforcement ......................................................................................................16 Contacting your VMS Vendor ........................................................................................................16
CHANGE LOG ..................................................................................................................................17 ATTACHMENT 1 – Network Innovations Declarations & Forms – Software Version 15 ..............19 ATTACHMENT 2 - How to ‘Confirm the Use of a Previous VMS Code’ .......................................59 ATTACHMENT 3 - Groundfish Catch Reporting Requirements (Flow Diagram) ..........................61
4
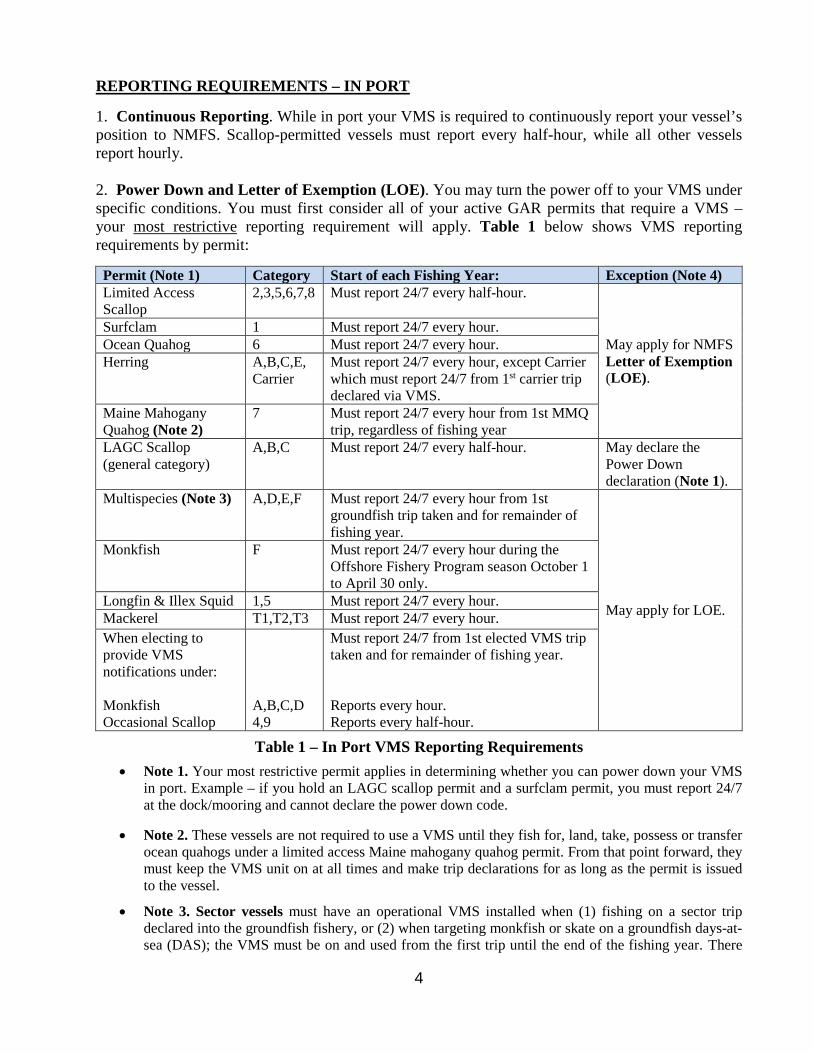
REPORTING REQUIREMENTS – IN PORT
1. Continuous Reporting. While in port your VMS is required to continuously report your vessel’s position to NMFS. Scallop-permitted vessels must report every half-hour, while all other vessels report hourly. 2. Power Down and Letter of Exemption (LOE). You may turn the power off to your VMS under specific conditions. You must first consider all of your active GAR permits that require a VMS – your most restrictive reporting requirement will apply. Table 1 below shows VMS reporting requirements by permit: Permit (Note 1) Category Start of each Fishing Year: Exception (Note 4) Limited Access Scallop
2,3,5,6,7,8 Must report 24/7 every half-hour.
May apply for NMFS Letter of Exemption (LOE).
Surfclam 1 Must report 24/7 every hour. Ocean Quahog 6 Must report 24/7 every hour. Herring A,B,C,E,
Carrier Must report 24/7 every hour, except Carrier which must report 24/7 from 1st carrier trip declared via VMS.
Maine Mahogany Quahog (Note 2)
7 Must report 24/7 every hour from 1st MMQ trip, regardless of fishing year
LAGC Scallop (general category)
A,B,C Must report 24/7 every half-hour. May declare the Power Down declaration (Note 1).
Multispecies (Note 3) A,D,E,F Must report 24/7 every hour from 1st groundfish trip taken and for remainder of fishing year.
May apply for LOE.
Monkfish F Must report 24/7 every hour during the Offshore Fishery Program season October 1 to April 30 only.
Longfin & Illex Squid 1,5 Must report 24/7 every hour. Mackerel T1,T2,T3 Must report 24/7 every hour. When electing to provide VMS notifications under: Monkfish Occasional Scallop
A,B,C,D 4,9
Must report 24/7 from 1st elected VMS trip taken and for remainder of fishing year. Reports every hour. Reports every half-hour.
Table 1 – In Port VMS Reporting Requirements
• Note 1. Your most restrictive permit applies in determining whether you can power down your VMS in port. Example – if you hold an LAGC scallop permit and a surfclam permit, you must report 24/7 at the dock/mooring and cannot declare the power down code.
• Note 2. These vessels are not required to use a VMS until they fish for, land, take, possess or transfer
ocean quahogs under a limited access Maine mahogany quahog permit. From that point forward, they must keep the VMS unit on at all times and make trip declarations for as long as the permit is issued to the vessel.
• Note 3. Sector vessels must have an operational VMS installed when (1) fishing on a sector trip declared into the groundfish fishery, or (2) when targeting monkfish or skate on a groundfish days-at-sea (DAS); the VMS must be on and used from the first trip until the end of the fishing year. There
5
may be annual NMFS exemptions that apply to certain sectors. Common pool vessels must have an operational VMS installed when (1) taking the first groundfish DAS trip, or (2) when Category C and HA-permitted vessels are fishing in more than one Broad Stock Area; they must also keep the VMS on and use VMS for all subsequent trips through the fishing year.
• Note 4. The regulations at 50 CFR 648.10(c)(2) allow a vessel to power off their VMS after (1)
obtaining a NMFS Letter of Exemption (LOE), or (2) sending the power down declaration. The vessel’s most restrictive permit will determine which situation applies. Circumstances that allow an owner to obtain an LOE include (1) the vessel is expected to be out of the water for > 72 consecutive hours, or (2) the vessel will be dockside or moored for a minimum of 30 consecutive days (the vessel may not engage in any fisheries or move from the dock/mooring until the VMS unit is turned back on). The request must be made in advance of the intended exemption period. The LOE application form is available on the VMS web page or by contacting the VMS Team (see Page 14). Fill it out and mail, e-mail or fax it to the VMS Team in advance of the date you intend to turn the VMS unit off. You may not turn your VMS unit off until you receive your LOE from NMFS. The LOE must reside on the vessel at all times.
REPORTING REQUIREMENTS - BEFORE LEAVING PORT 1. Mini-C Application. This application provides three (3) visual displays that help you determine if your Sailor Platinum VMS is operating normally. To confirm, check the status of the three (3) indicators to the right of the Mini-C icon (the icon is located at the bottom, center of the screen to the left of the UTC time display). All three indicators should be ‘green’. The bottom indicator provides whether a valid position is received. The middle indicator provides whether the control panel is logged into the satellite network. The top indicator provides whether the VMS is receives a satellite signal. Refer to the Network Innovations User Manual for a complete listing of status indicators. 2. VMS Power. If your VMS has been powered off, turn it on and confirm that the unit is reporting normally by checking for both a GPS and Iridium signal. You may call the VMS Team to ensure that OLE is receiving your vessel’s signal. 3. VMS Hardware. Be sure that your Model 6004 control panel (terminal) is logged in to the ‘West Atlantic Ocean’ network. The control panel is required in order to be VMS-compliant at sea as it allows NMFS to communicate with your vessel via e-mail. 4. VMS Software. Run the current version of NMFS-required Network Innovations software on your terminal. Failure to install the required software will compromise your ability to send proper declarations and forms, and may lead to enforcement action. Contact Network Innovations if your unit does not have the required software (see page 16).
Effective April 19, 2018– Network Innovations Software ‘NOAA NED’ Version 15 4. Activity Declaration. For every trip, go to the homepage and begin by clicking on the ‘NOAA VMS’ button on the control panel. Go to the ‘Declaration’ menu, complete the required steps (and any appropriate optional steps) and send an activity declaration for your intended trip (see two exceptions below). Your VMS software has built-in logic that helps you make and send a ‘valid’ declaration (‘valid’ means NMFS regulations allow your chosen combination of gear, DAS, area(s), broad stock area(s), etc.).

6
When selecting areas and broad stock areas to fish, Charts 1-5 on pages 6-7 may be useful. When your selections are valid, the ‘Declare’ button will appear at the top right corner of your control panel. The Attachment 1 provides you with screen views and guidance for each of the declarations and forms. Please familiarize yourself with the declaration screens before reading on. Paragraphs 5 and 6 below provide guidance on sending a declaration for ‘Declare Out of Fishery’ (DOF) trips and ‘Monkfish Option’ trips.
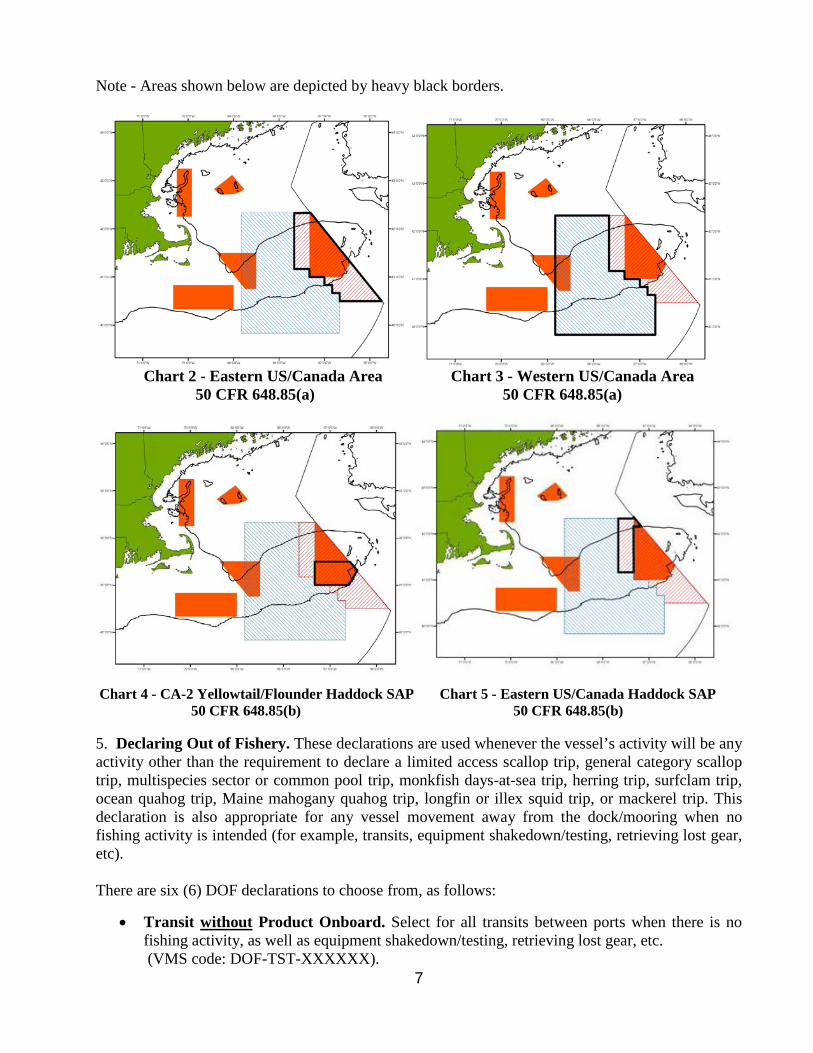
a. Exception 1 - Fishing Inside of, or Inside & Outside of, the VMS Demarcation Line on a Trip. VMS starts and ends trips as the vessel crosses the VMS demarcation line (see page 9 for an explanation) and is not able to accurately calculate trip length in these situations. If you intend to fish completely inside the VMS demarcation line, or fish both inside and outside the demarcation line on the same trip, you must (1) declare the trip through the Interactive Voice Response (IVR) Call-In system (1-888-284-4904) and (2) declare the DOF activity declaration on your VMS unit (Note – If you experience difficulty using the IVR system, call the Analysis and Program Support Division (APSD) for assistance at (978) 281-9234. APSD also maintains a back-up IVR message line at 888-487-9994). b. Exception 2 - Fishing on the Same VMS Declaration that was Last Declared. This alternative method allows owner/operators to call the IVR system and follow the prompts to ‘Confirm the Use of a Previous VMS Code’. It is not to be used in lieu of an inoperable VMS. This feature saves you the step of sending a declaration from your VMS unit and will provide you with a confirmation number; however, it may only be used if your declaration is identical to the last declaration received by NMFS. The IVR system will report to you the last 12-character VMS declaration ‘code’ received from your vessel so be prepared to know the declaration code you wish to use for your trip. See Attachment 2 for directions on how to use this feature. Charts 1-5 depict various areas for Multispecies and Monkfish declaration reporting. These charts are not to be used for the depiction of closed areas.
Chart 1 - Statistical, Closed, Broad Stock, US/Canada, SAP & Monkfish Areas
7
Note - Areas shown below are depicted by heavy black borders.
Chart 2 - Eastern US/Canada Area Chart 3 - Western US/Canada Area
50 CFR 648.85(a) 50 CFR 648.85(a)
Chart 4 - CA-2 Yellowtail/Flounder Haddock SAP Chart 5 - Eastern US/Canada Haddock SAP 50 CFR 648.85(b) 50 CFR 648.85(b) 5. Declaring Out of Fishery. These declarations are used whenever the vessel’s activity will be any activity other than the requirement to declare a limited access scallop trip, general category scallop trip, multispecies sector or common pool trip, monkfish days-at-sea trip, herring trip, surfclam trip, ocean quahog trip, Maine mahogany quahog trip, longfin or illex squid trip, or mackerel trip. This declaration is also appropriate for any vessel movement away from the dock/mooring when no fishing activity is intended (for example, transits, equipment shakedown/testing, retrieving lost gear, etc). There are six (6) DOF declarations to choose from, as follows:
• Transit without Product Onboard. Select for all transits between ports when there is no fishing activity, as well as equipment shakedown/testing, retrieving lost gear, etc.
(VMS code: DOF-TST-XXXXXX).
8
• Transit with Product Onboard. Select for all transits authorized by regulations in which the
vessel is declaring out of a VMS-required fishery and there is product onboard the vessel (VMS code: DOF-TSP-XXXXXX).
• Fishing - Commercial. Select for trips when fishing that does not require a declaration for the
species listed above (Para. 5) or for activities covered by Exception 1 on page 6. This declaration also requires you to choose your intended gear (VMS code: DOF-CML-XXX?XX, where ‘?’ represents the gear code chosen).
• Fishing - Recreational/Charter. Select for recreational and charter fishing trips (VMS code:
DOF-REC-XXXXXX).
• Scientific Research. Select for trips involving scientific research activity when not on an Experimental fishing permit (VMS code: DOF-SCI-XXXXXX).
• NAFO. Select only when permitted by NMFS to participate in the Northwest Atlantic
Fisheries Organization (NAFO) outside the U.S. EEZ (VMS code: DOF-NAF-XXXXXX). 6. Declaring the Monkfish Option with a Multispecies Declaration. If you anticipate exceeding the monkfish incidental catch limit while on a multispecies sector or DAS trip and want to retain the monkfish caught, declare the monkfish option. This action preserves your ability to change to a monkfish DAS trip later while at sea (you do not accrue Monkfish DAS unless you decide during the trip to redeclare your trip as a Monkfish trip). However, you must fish your multispecies trip entirely within the monkfish Northern Fishery Management Area (NFMA). Your VMS code will show an ‘M’ (for monkfish option) in the 2nd to last character. To declare the option, go to the appropriate multispecies sector or common pool declaration screen, and follow the instruction to ‘Check box if you want to add the monkfish option’. 7. Declaration Code. Your declaration is converted by your VMS software into a 12-character VMS code (format: XXX-XXX-XXXXXX) and transmitted to NMFS when you press the ‘Declare’ button. The VMS code is built at the top left corner of your screen as you make your declaration selections. Check the code and description to be sure they accurately reflect your intended activity. When you click ‘Declare’ and your declaration is being sent, you will see ‘Tx’ (transmitting) next to the Mini-C icon at the bottom of the screen. Once the declaration is transmitted, you will see a green check mark at the bottom right corner of your screen above the time display. You can press the ‘Submitted’ tab on the NOAA VMS screen to view a listing of all declarations sent and their status. A ‘right arrow’ indicates the message is being sent, a ‘checkmark’ indicates the message was sent, and an ‘X’ indicates the message failed to be sent. Clicking on the submitted declaration will bring up a window with a listing of your declaration selections. 8. Declaration Acknowledgment. Regulations require that you send an accurate declaration; therefore, you are encouraged to await an acknowledgment. When your declaration is received by the satellite provider’s gateway or LES (Land-Earth Station), the checkmark on your ‘Submitted’ screen is your acknowledgment; it is your confirmation that NMFS will receive the declaration that you sent. It is possible that your declaration may be delivered to NMFS before you receive an acknowledgment; you may always call the VMS Team during the workday to confirm receipt.

9
Note – If your declaration fails to be sent, you may go to the ‘Selections’ screen, press the failed declaration and then ‘retry’. 9. Required VMS Reports. Your VMS software also includes several required forms (reports). We have covered the sending of an activity declaration prior to leaving port. Now, we will discuss those forms that, if appropriate for your intended activity, must be sent before leaving port. A list of these forms is shown in Table 2 below. See Attachment 1 to view these forms. VMS Form Must be sent by: Purpose Multispecies Trip Start Hail
All Sector vessels declaring a groundfish trip only when intending to fish on a NMFS exemption/option.
To provide advance notification to enforcement personnel. RSA & EFP Trip Start Hail All vessels as required by their NMFS RSA
or EFP Letter of Authorization.
Table 2 – VMS Forms Required to be sent before Leaving Port REPORTING REQUIREMENTS – AT SEA AND RETURNING TO PORT
1. VMS Demarcation Line. The VMS demarcation line is defined by a series of lines connecting 51 coordinates as described in 50 CFR 648.10 and the VMS web page. The line generally follows the contour of the Eastern Seaboard from northern Maine to North Carolina. When your vessel crosses the VMS demarcation line, the NMFS monitoring system automatically records a trip start and trip end event for your trip. Your trip starts on the first VMS position seaward of the line and ends with the first VMS position shoreward of the line. 2. Trip Start and End. A VMS trip consists of the VMS-assigned Trip Identification Number, VMS Activity Declaration (Code), Trip Start Date/Time, Trip End Date/Time, and Trip Duration. A VMS trip automatically starts on the first position report sent by your VMS unit that is seaward of the demarcation line (defined as ‘in the Northeast Fishery’). A VMS trip automatically ends on the first position report shoreward of the demarcation line upon the return to port. The declaration that is initially associated with the trip and reported to you in the Trip Start e-mail (described below) is the last declaration successfully received from your vessel prior to leaving port. The declaration reported to you in the Trip End e-mail is the final declaration associated with the trip and recorded in the NE Region database.
Note - Do not declare out of the fishery on your return to port to end your trip or stop your days-at-sea clock – as previously stated, your trip automatically ends with the first VMS position shoreward of the demarcation line on the return to port. 3. Position Reporting. While away from the dock or mooring, your vessel’s VMS unit must be operational by sending automatic position reports and capable of sending and receiving messages. If you hold a VMS-required limited access or general category scallop permit, your VMS must send position reports on a half-hourly basis regardless of the vessel’s activity. For all other permits requiring the use of VMS, the unit must send automatic position reports on an hourly basis regardless of the vessel’s activity. For vessels that hold multiple permits, the most restrictive VMS reporting rate applies. If you replace your VMS unit, be sure the replacement unit is correctly set to your vessel’s proper reporting rate. Note - To determine if your VMS is positioning normally and sending required position

10
reports to NMFS, check to be sure that all three (3) Mini-C indicators at the bottom, center of your screen are displaying a green light. If you suspect the unit is not positioning, call Network Innovations for technical support (see page 16). 4. If the VMS Unit Stops Positioning. Please be sure that your VMS unit is well-maintained and sending the required position reports. Periodically check your unit to ensure that it’s positioning normally. If your VMS unit stops functioning (positioning and/or messaging) and you’re unable to restore normal operation, you are required to terminate your trip and return to port. Notify the VMS Team, and have the unit checked/repaired and returned to operational status before the next trip. 5. NMFS Courtesy E-Mail Notification of Trip Start and End. The VMS Team manages a script that automatically sends a courtesy trip start and trip end e-mail to your VMS unit for every trip. All costs associated with courtesy e-mails are paid for by NMFS; no cost is incurred by your vessel. The Trip Start e-mail is sent approximately 4 hours after a trip start is recorded by the NMFS monitoring system. The message will be in the following format (example shown): From: [email protected] To: (vessel’s VMS unit e-mail address) Subject: F/V (name) - Trip Start Trip Start: 2014-03-01 09:30 Trip ID: 1301010 VMS Code: NMS-SEC-OPXWXA. If code is incorrect, return to a port & redeclare. NE VMS Team: 978-281-9213. Note - The trip start email that your VMS unit receives from NMFS is not a confirmation of your trip declaration, but only provides the most-recent declaration received from your vessel. The Trip End e-mail is sent approximately 6-8 hours after a trip end is recorded. If your VMS is powered down while in port, delivery of the message to your VMS may time out before you receive it. You can also provide the VMS Team with a personal e-mail address to receive the trip start/end e-mails and other e-mails from NMFS (see Secondary Courtesy E-Mail Address Service below). The delays in delivery of trip start and end e-mails are a necessary feature of the NMFS VMS trip generation system to ensure accurate trip accounting. The message will be in the following format (example shown): From: [email protected] To: (vessel’s VMS unit e-mail address) Subject: F/V (name) - Trip End Trip End: 2014-03-01 21:30 VMS Code: NMS-SEC-OPXWXA Trip ID: 1301010 Trip Length: 0.5 days 6. Secondary Courtesy E-Mail Address Service. The VMS Team maintains an e-mail service that allows owners to receive trip e-mails and other NMFS VMS correspondence with the vessel via the

11
owner’s personal e-mail address. Go to ‘Contact Information’ on the VMS web page and see ‘VMS Courtesy Messaging’. There is no charge to the vessel owner for this service. 7. If You Do Not Receive Your Trip E-mail(s). The VMS Team stops the trip generation program temporarily any time that a delay in delivery of VMS data is detected from one or more VMS vendors. This is necessary to prevent problems with the proper generation of trips that could affect trip accounting. Once the trip generator is restarted, any backlog of trip e-mails should be sent to your vessel and, if appropriate, the secondary e-mail address. For questions, call the VMS Team. 8. Declaring an Incorrect VMS Activity Declaration. If your vessel leaves port on a trip and you declared the wrong activity, you should return the vessel to a port (or inside the VMS demarcation line for scallop-permitted vessels on scallop trips) and redeclare the proper activity through your VMS unit. You do not necessarily have to return to the port from which you departed. The vessel must be in a port, or as close to the port as safety dictates. A listing of ports and their OLE-defined geographic location is available on the VMS web page. 9. Changing the VMS Declaration during a Trip. When in the NE Fishery, your VMS unit does not allow you to change your trip declaration, except under three specific situations:
• Declaring a ‘flex’ on a groundfish or monkfish trip; • Flipping the groundfish DAS type from ‘B’ to ‘A’, when possession limits are exceeded; and • Changing from a multispecies trip to a monkfish DAS trip (only if the monkfish option was
declared in port). If eligible, a vessel may flex, flip or change to a monkfish declaration only once per trip. These actions do not necessarily have to occur simultaneously. These three situations are further described below.
Note – Except under specific circumstances when the use of ‘Declare out of Fishery with Product Onboard’ is authorized by NMFS, you may not send another activity declaration after crossing the demarcation line upon return to port while you have product onboard the vessel.
a. Declaring a Multispecies or Monkfish ‘FLEX’ Trip. A flex is declared at sea in the NE Fishery by adding fishing area(s) to the groundfish or monkfish declaration that you sent in port. When your VMS recognizes that your vessel is inside the NE Fishery and regulations allow a flex from your original declaration, the software will present you with the flex option upon selecting ‘Flex/Monkfish’ on the NOAA VMS screen. Only one flex per trip is allowed. Sector and common pool vessels have different flex options. To declare a flex from the NOAA VMS screen:
• Directly below your current declaration, the screen will display ‘NE Fishery Inside’ indicating that your vessel is currently inside the NE fishery zone. If you are allowed to do a FLEX from your initial declaration, the ‘Flex/Monkfish’ button will be illuminated.
• Press the ‘Flex/Monkfish’ button to bring up your original declaration. Select the appropriate ‘Plan’ and then press ‘Continue’ in the upper right. Your original selections will be displayed. The ‘Area’ selection will display a red ‘X’. Press on the ‘Area’ selection to bring up the menu, select your additional areas and then press ‘Apply’.
• Press ‘Declare’.
12
b. ‘Flipping’ the Multispecies Days-at-Sea (DAS) Type. This situation applies to Multispecies Common Pool vessels only. When multispecies trip limits are exceeded while fishing on a declared Regular or Reserve ‘B’ DAS trip, you must change or ‘flip’ your VMS trip declaration to ‘A’ DAS. To declare a flip from the NOAA VMS screen:
• Directly below your current declaration, the screen will display ‘NE Fishery Inside’ indicating that your vessel is currently inside the NE fishery zone. If you are allowed to do a FLIP from your initial declaration, the ‘Flip’ button will be illuminated.
• Press the ‘Flip’ button to bring up your original declaration. Select your original ‘Plan’ and ‘Program’, and then press ‘Continue’. Your original selections will be displayed, your ‘Days at Sea’ will now indicate ‘Multispecies A’ and your new declaration code will be displayed.
• Press ‘Declare’. c. Changing from a Multispecies to a Monkfish DAS Declaration. To invoke the monkfish option that you selected with your initial declaration, and change to a monkfish DAS declaration at sea, go to the ‘NOAA VMS’ screen:
• Directly below your current declaration, the screen will display ‘NE Fishery Inside’ indicating that your vessel is currently inside the NE fishery zone. If you are allowed to do a MONKFISH CHANGE from your initial declaration, the ‘Flex/Monkfish’ button will be illuminated.
• Press the ‘Flex/Monkfish’ button to bring up your original declaration. Press on the ‘Plan’ selection field, and select ‘Monkfish’. The ‘Program’ field will automatically be populated.
• Press ‘Continue’. • Your original selections will be displayed. • Press ‘Declare’.
Your new Monkfish declaration will retain the trip modifier ‘M’ (for Monkfish Option) in the 2nd to last character of the code. You may also flex (one time) either before, during or after changing to a Monkfish DAS declaration. If you do not intend to invoke the monkfish option and want to remain on a groundfish trip declaration, no action is required and you may land your trip on the original declaration. Remember, if you declare the monkfish option before leaving port but decide to fish any part of your trip in the monkfish SFMA, you forfeit your option to change to a Monkfish DAS declaration. Your VMS screen provides brief instructions for changing to a Monkfish DAS declaration. The instructions are located on the Sector and Common Pool Multispecies declaration screens. 10. Required VMS Reports. The forms shown below are required to be sent from your VMS unit, as appropriate, while your vessel is at sea and seaward of the VMS demarcation line. A list of these forms is shown in Table 3 below. See Attachment 1 to view these forms and specific reporting instructions.
VMS Form Must be sent by: Purpose Multispecies Catch Report
Vessels on groundfish-declared trips on a daily or trip-level basis, and upon switching to smaller mesh to fish under an exemption/option. Refer to the flow chart in Attachment 3 for guidance.
To report VTR and estimated weights prior to landing.
Multispecies Trip End Hail
All vessels on groundfish-declared trips at least 6 hours before arrival. To provide advance notice for the monitoring of offloads.

13
VMS Form Must be sent by: Purpose Monkfish Trip Limit Overage DAS Adjustment
Those vessels on monkfish-declared trips that exceed their DAS charge, before crossing the VMS demarcation line on return to port.
To report that the daily trip limit was exceeded by one extra limit so that the vessel’s DAS charge may be adjusted.
Scallop Daily Catch Report
All vessels on scallop-declared trips by 9 am daily. This report is not required for vessels on a single-day trip and sending a scallop pre-landing notification.
To report VTR and estimated weights prior to landing.
Scallop Pre-Landing Notification
Limited Access and LAGC vessels on the following trips at least 6 hours before arrival (or upon crossing shoreward of the demarcation line when a limited access vessel declares out of the limited access scallop day-at-sea fishery to transit to a port south of 39 degrees North with scallops onboard): (1) All vessels on a declared LAGC scallop trip; (2) A vessel with an LAGC IFQ or NGOM scallop permit is retaining scallops when not on a declared scallop trip; (3) On a declared limited access scallop access area trip; (4) Declaring out of the limited access scallop day-at-sea fishery to transit to a port south of 39 degrees North with scallops onboard.
To provide advance notice for the monitoring of offloads.
Herring Daily Catch Report
All vessels on a declared herring trip by 9 am daily.
To report VTR, and estimated pounds kept and discarded prior to landing.
Herring Pre-Landing Notification
All vessels on a declared herring trip at least 6 hours before arrival. To provide advance notice for the monitoring of offloads.
Mackerel and Squid Daily Catch Report
All vessels on a declared mackerel or squid trip by 9 am daily. To report VTR and estimated weights prior to landing.
Mackerel Pre-Landing Notification
All vessels on mackerel-declared trips when the landing will exceed 20,000 lbs at least 6 hours before arrival
To provide advance notice for the monitoring of offloads.
RSA and EFP Trip End Hail
All vessels at least 6 hours before arrival as required by their NMFS RSA or EFP Letter of Authorization.
To provide advance notice for the monitoring of offloads.
Table 3 – VMS Forms Required to be Sent While in the NE Fishery
11. VMS E-Mail Messaging. The VMS Team uses e-mail to communicate with your vessel via the VMS. Communications include notifying all VMS vessels of short-notice regulatory changes (area closures, possession limits, etc) and notifying individual vessel operators of potential closed area incursions, VMS non-reporting, declaration miscodings, requests to contact a NMFS enforcement agent or officer, etc. In addition to other notification methods, the Coast Guard may request the VMS vendors to send a severe weather warning. For these purposes, it’s important that you monitor your incoming VMS e-mail and maintain the capability to send outgoing e-mail. 12. Trip ‘Stitching’. The trip stitching function is a part of the VMS trip generation program. Its purpose is to keep a trip open if a vessel briefly enters and positions shoreward of the VMS demarcation line then exits outside the line to continue its trip. The individual trip segments are stitched or joined together as one trip. For example, vessels that transit through Vineyard and

14
Nantucket Sound may cross the demarcation line several times on their outbound or inbound trip. If trip stitching was not applied, a single trip may be recorded by NMFS as two or more trips, affecting the trip length and/or DAS charge. The rules associated with trip stitching are: a. Did the base VMS declaration code (first 6 characters, ie, XXX-XXX) remain the same before and after the vessel entered the demarcation line? and; b. Was the vessel inside the demarcation line for less than 4 hours (or, less than 55 minutes for LAGC scallop trips)? If the answer to both questions above is yes, trip stitching will keep the trip intact so that only one trip is recorded. An unintended effect of trip stitching may occur when a vessel ends one trip then departs on another trip within 4 hours under the same base VMS code. Two separate trips may be captured as a single trip. Also, entering back inside the demarcation line for longer than 4 hours, such as transiting the Vineyard/Nantucket Sound area at slow speed, may result in a single trip being recorded as two trips. If you believe that your trip has been erroneously affected by trip stitching, call the VMS Team. ADDITIONAL VMS INFORMATION 1. DAS Charging for VMS Trips. The DAS Program is managed by the Analysis and Program Support Division (APSD). Please contact APSD for assistance at (978) 281-9234. 2. VMS Messaging Costs. Vessel owners are financially responsible for all regulatory reporting requirements through VMS which typically include the messaging shown below. It is recommended that you confirm your payment plan and associated costs with your VMS vendor. NMFS pays for all messages that we send to your vessel and for any additional position reports sent from your VMS unit if NMFS temporarily increases your reporting rate. Vessel owners typically pay for:
• All required 30 or 60 minute position reports sent to NMFS. • All NMFS-required VMS declarations and reports. • All other outgoing messages. • All incoming messages, except those originated by NMFS.
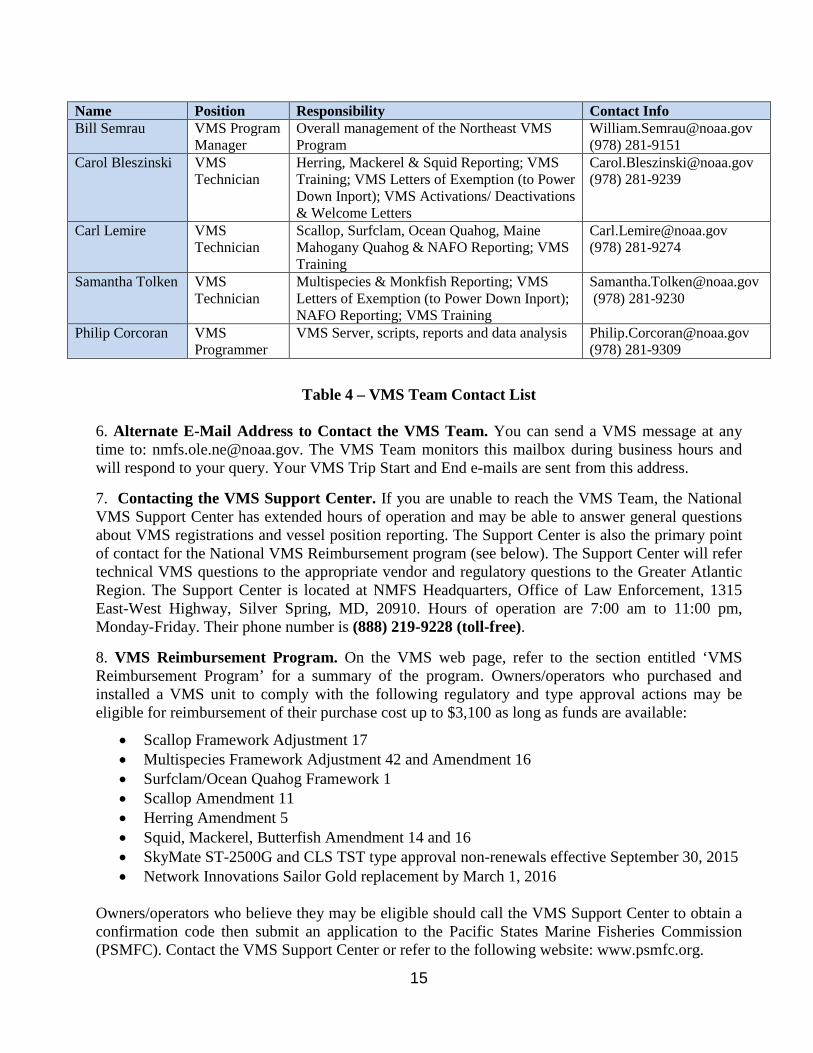
3. Replacing Your Vessel’s VMS Unit. Please notify the VMS Team within 3 days of installation of the new unit and prior to your next trip. You will need to submit documentation that you have installed an operational, approved VMS unit. Complete the VMS Certification form available under the ‘Instructions & Forms’ tab on the VMS web page. Mail or fax the form to the VMS Team. 4. Removing Your Vessel’s VMS Unit. You may not remove the VMS from the vessel if you’re required to report using VMS. If you cancel or transfer your permits, or sell the vessel and will no longer fish the vessel, contact your VMS vendor. The vendor is responsible for notifying NMFS of any VMS unit deactivations. You may also call the VMS Team to advise us of your intentions. 5. Contacting the VMS Team. The VMS Team is located in the Northeast Enforcement Division at: Greater Atlantic Regional Fisheries Office, 55 Great Republic Drive, Gloucester, MA, 01930.
• Phone Number: (978) 281-9213 (follow call prompts) • FAX Number: (978) 281-9317 • Hours: 7:00 am to 4:30 pm, Monday through Friday
15
Table 4 – VMS Team Contact List
6. Alternate E-Mail Address to Contact the VMS Team. You can send a VMS message at any time to: [email protected]. The VMS Team monitors this mailbox during business hours and will respond to your query. Your VMS Trip Start and End e-mails are sent from this address. 7. Contacting the VMS Support Center. If you are unable to reach the VMS Team, the National VMS Support Center has extended hours of operation and may be able to answer general questions about VMS registrations and vessel position reporting. The Support Center is also the primary point of contact for the National VMS Reimbursement program (see below). The Support Center will refer technical VMS questions to the appropriate vendor and regulatory questions to the Greater Atlantic Region. The Support Center is located at NMFS Headquarters, Office of Law Enforcement, 1315 East-West Highway, Silver Spring, MD, 20910. Hours of operation are 7:00 am to 11:00 pm, Monday-Friday. Their phone number is (888) 219-9228 (toll-free). 8. VMS Reimbursement Program. On the VMS web page, refer to the section entitled ‘VMS Reimbursement Program’ for a summary of the program. Owners/operators who purchased and installed a VMS unit to comply with the following regulatory and type approval actions may be eligible for reimbursement of their purchase cost up to $3,100 as long as funds are available:
• Scallop Framework Adjustment 17 • Multispecies Framework Adjustment 42 and Amendment 16 • Surfclam/Ocean Quahog Framework 1 • Scallop Amendment 11 • Herring Amendment 5 • Squid, Mackerel, Butterfish Amendment 14 and 16 • SkyMate ST-2500G and CLS TST type approval non-renewals effective September 30, 2015 • Network Innovations Sailor Gold replacement by March 1, 2016
Owners/operators who believe they may be eligible should call the VMS Support Center to obtain a confirmation code then submit an application to the Pacific States Marine Fisheries Commission (PSMFC). Contact the VMS Support Center or refer to the following website: www.psmfc.org.
Name Position Responsibility Contact Info Bill Semrau VMS Program
Manager Overall management of the Northeast VMS Program
[email protected] (978) 281-9151
Carol Bleszinski VMS Technician
Herring, Mackerel & Squid Reporting; VMS Training; VMS Letters of Exemption (to Power Down Inport); VMS Activations/ Deactivations & Welcome Letters
[email protected] (978) 281-9239
Carl Lemire VMS Technician
Scallop, Surfclam, Ocean Quahog, Maine Mahogany Quahog & NAFO Reporting; VMS Training
[email protected] (978) 281-9274
Samantha Tolken VMS Technician
Multispecies & Monkfish Reporting; VMS Letters of Exemption (to Power Down Inport); NAFO Reporting; VMS Training
[email protected] (978) 281-9230
Philip Corcoran VMS Programmer
VMS Server, scripts, reports and data analysis [email protected] (978) 281-9309

16
9. Contacting NMFS Enforcement. For law enforcement emergencies only, call the Enforcement Hot Line toll-free on a 24-hour basis at (800) 853-1964. Please do not call the Hot Line for a VMS-related equipment or technical issue; rather, contact your respective VMS vendor (below). For law enforcement-related questions or concerns that are of a non-emergency nature, contact your local NMFS enforcement office during business hours as follows: a. Northeast Enforcement Division District 1 – New England:
• Office: Boston, MA • Coverage: Maine through Connecticut • Phone Number: (617) 565-1800
b. Northeast Enforcement Division District 2 – Mid-Atlantic:
• Office: Wall, NJ • Coverage: New York through Virginia • Phone Number: (732) 280-6490
10. Contacting your VMS Vendor. Network Innovations may be reached at:
• Address: 4950 West Prospect Road, Fort Lauderdale, FL 33309 • Phone: 888-664-6727 • E-mail: [email protected] • Call Center: 24/7 for technical support (call above phone number) • Web Address: http://www.networkinv.com/
Attachments: (1) Network Innovations Declarations and Forms – NOAA NED Version 15 (2) How to ‘Confirm the Use of a Previous VMS Code’
(3) Groundfish Catch Reporting Requirements
17
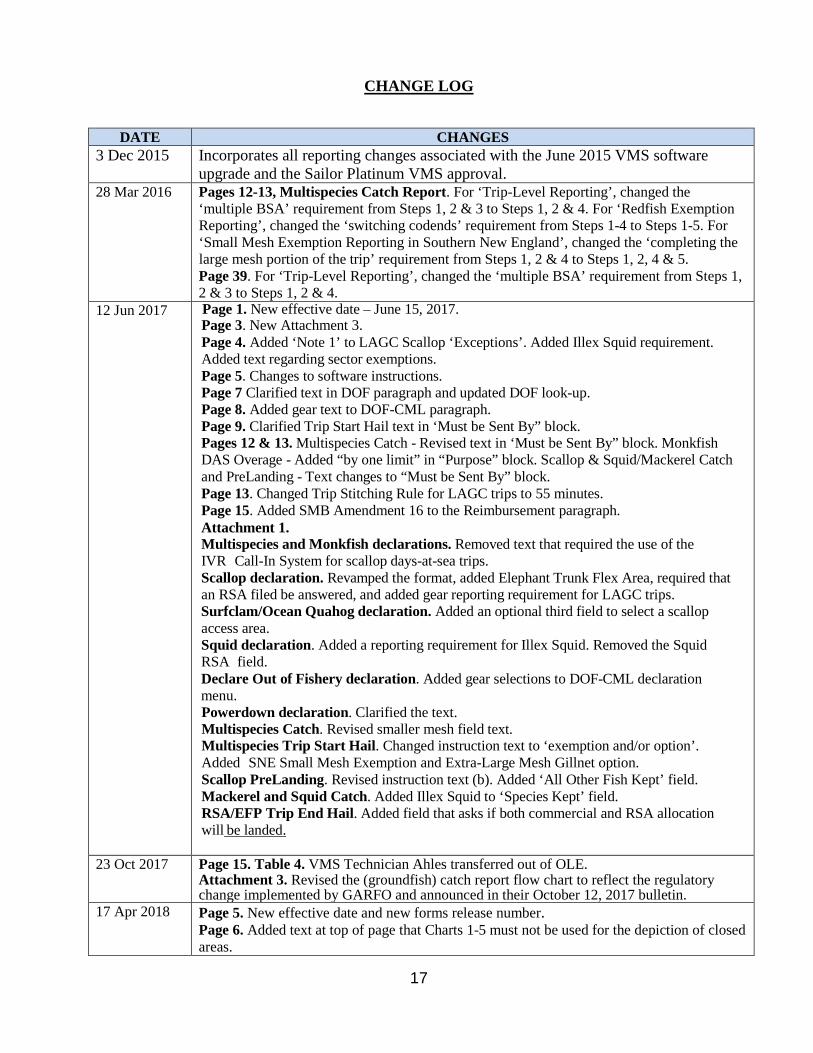
CHANGE LOG
DATE CHANGES 3 Dec 2015 Incorporates all reporting changes associated with the June 2015 VMS software
upgrade and the Sailor Platinum VMS approval. 28 Mar 2016 Pages 12-13, Multispecies Catch Report. For ‘Trip-Level Reporting’, changed the
‘multiple BSA’ requirement from Steps 1, 2 & 3 to Steps 1, 2 & 4. For ‘Redfish Exemption Reporting’, changed the ‘switching codends’ requirement from Steps 1-4 to Steps 1-5. For ‘Small Mesh Exemption Reporting in Southern New England’, changed the ‘completing the large mesh portion of the trip’ requirement from Steps 1, 2 & 4 to Steps 1, 2, 4 & 5. Page 39. For ‘Trip-Level Reporting’, changed the ‘multiple BSA’ requirement from Steps 1, 2 & 3 to Steps 1, 2 & 4.
12 Jun 2017 Page 1. New effective date – June 15, 2017. Page 3. New Attachment 3. Page 4. Added ‘Note 1’ to LAGC Scallop ‘Exceptions’. Added Illex Squid requirement. Added text regarding sector exemptions. Page 5. Changes to software instructions. Page 7 Clarified text in DOF paragraph and updated DOF look-up. Page 8. Added gear text to DOF-CML paragraph. Page 9. Clarified Trip Start Hail text in ‘Must be Sent By” block. Pages 12 & 13. Multispecies Catch - Revised text in ‘Must be Sent By” block. Monkfish DAS Overage - Added “by one limit” in “Purpose” block. Scallop & Squid/Mackerel Catch and PreLanding - Text changes to “Must be Sent By” block. Page 13. Changed Trip Stitching Rule for LAGC trips to 55 minutes. Page 15. Added SMB Amendment 16 to the Reimbursement paragraph. Attachment 1. Multispecies and Monkfish declarations. Removed text that required the use of the IVR Call-In System for scallop days-at-sea trips. Scallop declaration. Revamped the format, added Elephant Trunk Flex Area, required that an RSA filed be answered, and added gear reporting requirement for LAGC trips. Surfclam/Ocean Quahog declaration. Added an optional third field to select a scallop access area. Squid declaration. Added a reporting requirement for Illex Squid. Removed the Squid RSA field. Declare Out of Fishery declaration. Added gear selections to DOF-CML declaration menu. Powerdown declaration. Clarified the text. Multispecies Catch. Revised smaller mesh field text. Multispecies Trip Start Hail. Changed instruction text to ‘exemption and/or option’. Added SNE Small Mesh Exemption and Extra-Large Mesh Gillnet option. Scallop PreLanding. Revised instruction text (b). Added ‘All Other Fish Kept’ field. Mackerel and Squid Catch. Added Illex Squid to ‘Species Kept’ field. RSA/EFP Trip End Hail. Added field that asks if both commercial and RSA allocation will be landed.
23 Oct 2017 Page 15. Table 4. VMS Technician Ahles transferred out of OLE. Attachment 3. Revised the (groundfish) catch report flow chart to reflect the regulatory change implemented by GARFO and announced in their October 12, 2017 bulletin.
17 Apr 2018 Page 5. New effective date and new forms release number. Page 6. Added text at top of page that Charts 1-5 must not be used for the depiction of closed areas.
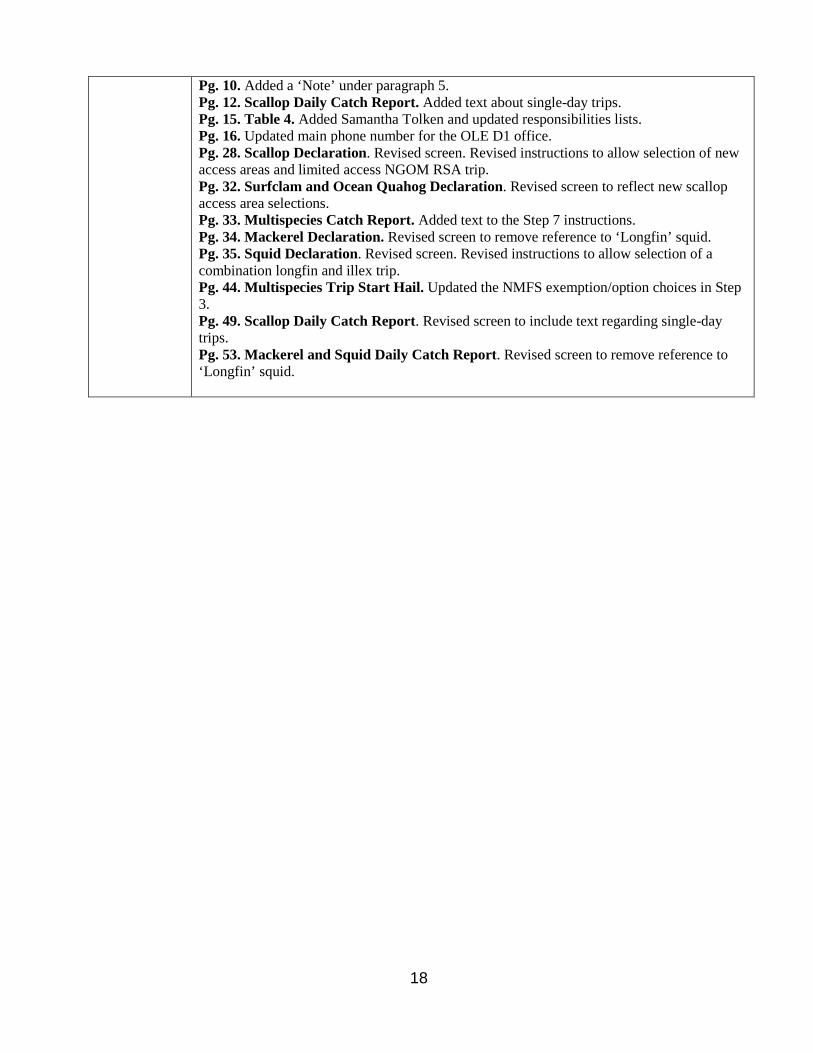
18
Pg. 10. Added a ‘Note’ under paragraph 5. Pg. 12. Scallop Daily Catch Report. Added text about single-day trips. Pg. 15. Table 4. Added Samantha Tolken and updated responsibilities lists. Pg. 16. Updated main phone number for the OLE D1 office. Pg. 28. Scallop Declaration. Revised screen. Revised instructions to allow selection of new access areas and limited access NGOM RSA trip. Pg. 32. Surfclam and Ocean Quahog Declaration. Revised screen to reflect new scallop access area selections. Pg. 33. Multispecies Catch Report. Added text to the Step 7 instructions. Pg. 34. Mackerel Declaration. Revised screen to remove reference to ‘Longfin’ squid. Pg. 35. Squid Declaration. Revised screen. Revised instructions to allow selection of a combination longfin and illex trip. Pg. 44. Multispecies Trip Start Hail. Updated the NMFS exemption/option choices in Step 3. Pg. 49. Scallop Daily Catch Report. Revised screen to include text regarding single-day trips. Pg. 53. Mackerel and Squid Daily Catch Report. Revised screen to remove reference to ‘Longfin’ squid.
19
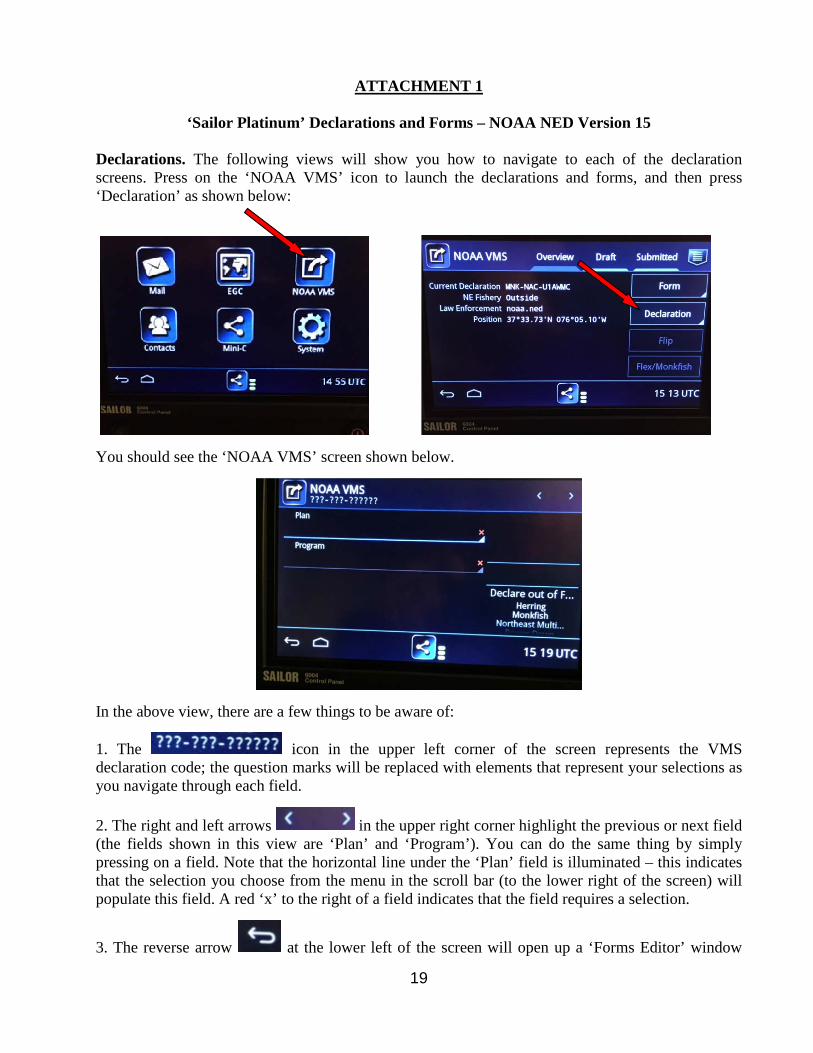
ATTACHMENT 1
‘Sailor Platinum’ Declarations and Forms – NOAA NED Version 15
Declarations. The following views will show you how to navigate to each of the declaration screens. Press on the ‘NOAA VMS’ icon to launch the declarations and forms, and then press ‘Declaration’ as shown below:
You should see the ‘NOAA VMS’ screen shown below.
In the above view, there are a few things to be aware of:
1. The icon in the upper left corner of the screen represents the VMS declaration code; the question marks will be replaced with elements that represent your selections as you navigate through each field.
2. The right and left arrows in the upper right corner highlight the previous or next field (the fields shown in this view are ‘Plan’ and ‘Program’). You can do the same thing by simply pressing on a field. Note that the horizontal line under the ‘Plan’ field is illuminated – this indicates that the selection you choose from the menu in the scroll bar (to the lower right of the screen) will populate this field. A red ‘x’ to the right of a field indicates that the field requires a selection.
3. The reverse arrow at the lower left of the screen will open up a ‘Forms Editor’ window

20
when pressed. It will ask you whether you want to delete the declaration that you started if you want to start the declaration process over. To begin the process of making a declaration, be sure the horizontal bar under the ‘Plan’ field is illuminated. Then, select the appropriate fishery plan using the scroll bar to the lower right. There are two ways to use the scroll feature – you can swipe up or down on it until your choice is displayed between the two horizontal bars, or you can tap on the selections above or below the two horizontal bars which will scroll through the choices one at a time. Your selection (within the 2 horizontal bars) will be displayed in the field. You may then press on the ‘Program’ field and make your next selection, and so on. If you need to go back to a previous screen to change a selection, just press on that field and make a new selection. You will have to reselect all subsequent field choices. As stated earlier, pressing the reverse arrow icon at the bottom left is used when you want to delete a partially-completed declaration, and start over. Once you’ve answered all required fields, the screen displays each of your declaration selections and the resultant VMS code. Review your selections to ensure they describe your intended activity, and then press ‘Declare’ in the upper right corner. For some declarations, you will have to press ‘Continue’ in the upper right corner of the screen, make additional field selections and then press ‘Declare’. Once ‘Declare’ is pressed, your declaration is being transmitted when you see displayed next to
the Mini C icon at the bottom center of your screen. You will also see a ‘wait spinner’ at the bottom right as shown below:
Once your declaration has been transmitted, the ‘Tx’ will disappear and a green check mark will replace the wait spinner.
Press the ‘Submitted’ tab near the top right of the screen to view the declaration you sent. Tapping on the declaration will bring up a screen showing each of the questions and your responses.
21
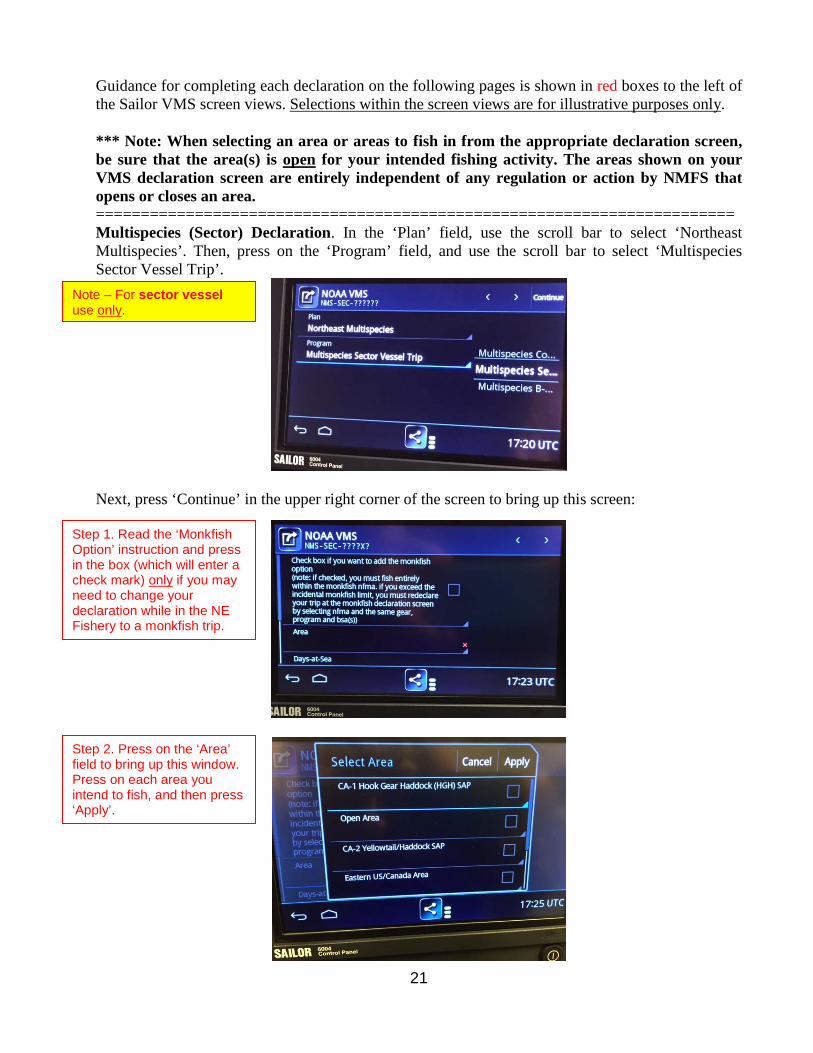
Guidance for completing each declaration on the following pages is shown in red boxes to the left of the Sailor VMS screen views. Selections within the screen views are for illustrative purposes only. *** Note: When selecting an area or areas to fish in from the appropriate declaration screen, be sure that the area(s) is open for your intended fishing activity. The areas shown on your VMS declaration screen are entirely independent of any regulation or action by NMFS that opens or closes an area. ======================================================================= Multispecies (Sector) Declaration. In the ‘Plan’ field, use the scroll bar to select ‘Northeast Multispecies’. Then, press on the ‘Program’ field, and use the scroll bar to select ‘Multispecies Sector Vessel Trip’.
Next, press ‘Continue’ in the upper right corner of the screen to bring up this screen:
Step 1. Read the ‘Monkfish Option’ instruction and press in the box (which will enter a check mark) only if you may need to change your declaration while in the NE Fishery to a monkfish trip.
Step 2. Press on the ‘Area’ field to bring up this window. Press on each area you intend to fish, and then press ‘Apply’.
Note – For sector vessel use only.
22
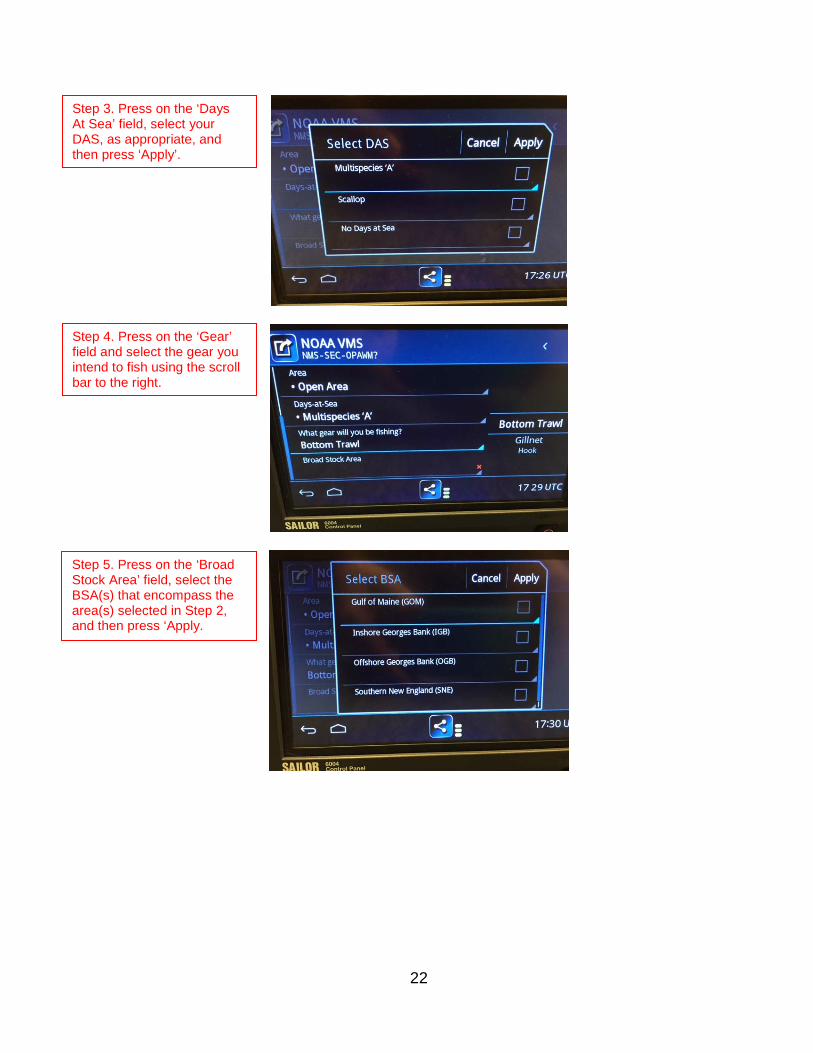
Step 5. Press on the ‘Broad Stock Area’ field, select the BSA(s) that encompass the area(s) selected in Step 2, and then press ‘Apply.
Step 4. Press on the ‘Gear’ field and select the gear you intend to fish using the scroll bar to the right.
Step 3. Press on the ‘Days At Sea’ field, select your DAS, as appropriate, and then press ‘Apply’.
23
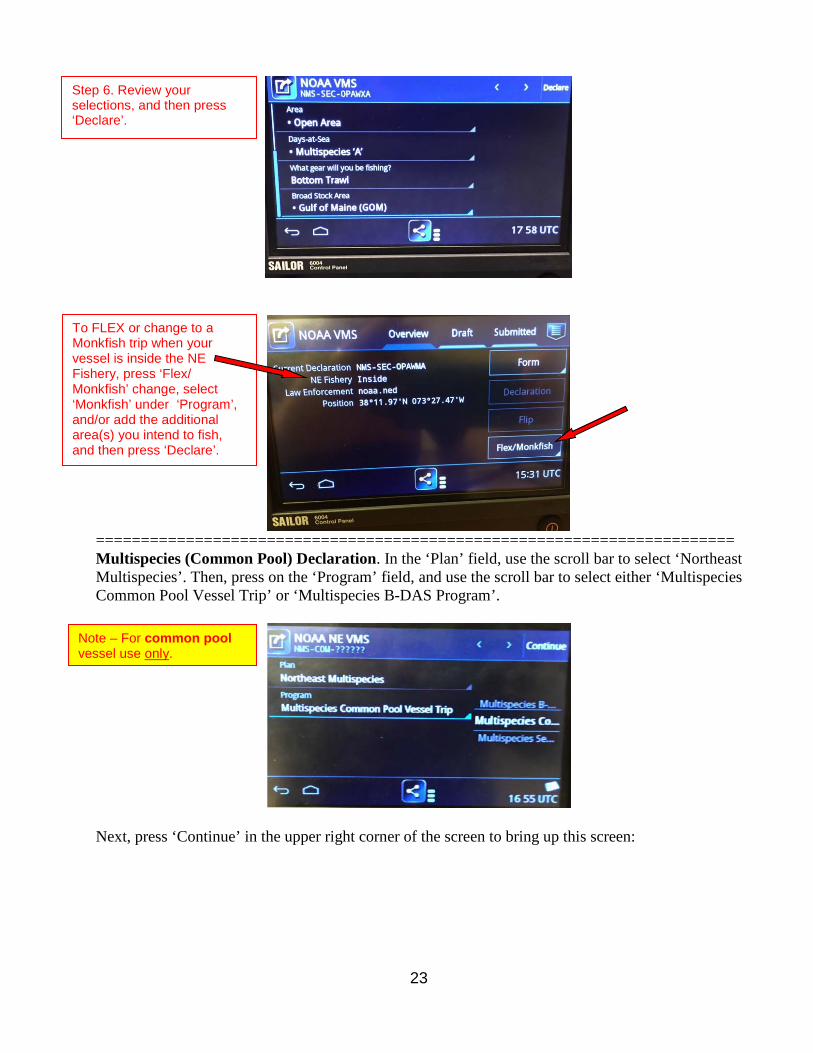
======================================================================= Multispecies (Common Pool) Declaration. In the ‘Plan’ field, use the scroll bar to select ‘Northeast Multispecies’. Then, press on the ‘Program’ field, and use the scroll bar to select either ‘Multispecies Common Pool Vessel Trip’ or ‘Multispecies B-DAS Program’.
Next, press ‘Continue’ in the upper right corner of the screen to bring up this screen:
Note – For common pool vessel use only.
Step 6. Review your selections, and then press ‘Declare’.
To FLEX or change to a Monkfish trip when your vessel is inside the NE Fishery, press ‘Flex/ Monkfish’ change, select ‘Monkfish’ under ‘Program’, and/or add the additional area(s) you intend to fish, and then press ‘Declare’.
24
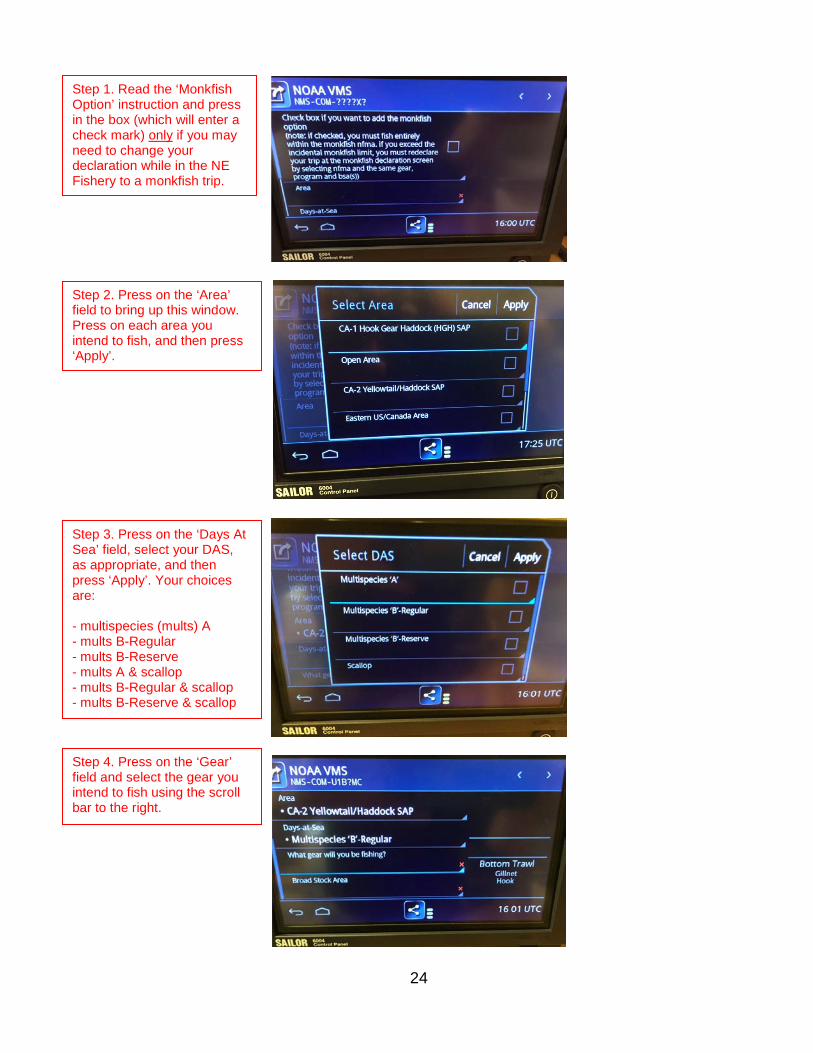
Step 2. Press on the ‘Area’ field to bring up this window. Press on each area you intend to fish, and then press ‘Apply’.
Step 1. Read the ‘Monkfish Option’ instruction and press in the box (which will enter a check mark) only if you may need to change your declaration while in the NE Fishery to a monkfish trip.
Step 3. Press on the ‘Days At Sea’ field, select your DAS, as appropriate, and then press ‘Apply’. Your choices are: - multispecies (mults) A - mults B-Regular - mults B-Reserve - mults A & scallop - mults B-Regular & scallop - mults B-Reserve & scallop Step 4. Press on the ‘Gear’ field and select the gear you intend to fish using the scroll bar to the right.

25
==================================================================== Monkfish Declaration. In the ‘Plan’ field, use the scroll bar to select ‘Monkfish’. Then, press on the ‘Program’ field, and use the scroll bar to select from several choices.
Step 5. Press on the ‘Broad Stock Area’ field, select the BSA(s) that encompass the area(s) selected in Step 2, and then press ‘Apply. In the example shown, there is only one available BSA, for the ‘Area’ selected.
Step 6. Review your selections, and then press ‘Declare’.
To FLEX or change to a Monkfish trip when your vessel is inside the NE Fishery, press ‘Flex/Monkfish’ change, select ‘Monkfish’ under ‘Program’, and/ or add the additional area(s) you intend to fish, and then press ‘Declare’.
To FLIP the DAS when your vessel is inside the NE Fishery, press ‘Flip’, select ‘Multispecies A DAS’ and press ‘Declare’.

26
Keep in mind that that if your choice includes ‘Sector Vessel Trip’ or ‘Common Pool Trip’, you will be using both Monkfish and Multispecies Days at Sea. Your choices are one of the following and presented in this order: - Monkfish Northern Management Area Common Pool Vessel Trip - Monkfish Northern Management Area Monkfish-Only Vessel Trip - Monkfish Northern Management Area Sector Vessel Trip - Monkfish Northern Management Area Common Pool Vessel Trip - Offshore Program Access - Monkfish Northern Management Area Sector Vessel Trip - Offshore Program Access - Monkfish Southern Management Area Monkfish-Only Vessel Trip - Monkfish Southern Management Area Sector Vessel Trip - Monkfish Southern Management Area Common Pool Vessel Trip - Offshore Program Access - Monkfish Southern Management Area Sector Vessel Trip - Offshore Program Access
Step 1. Press on the ‘Area’ field to bring up this window. Press on each area you intend to fish, and then press ‘Apply’.
Step 2. If Monkfish RSA days at sea (DAS) quota will be harvested, press on the box shown. A check mark will appear and ‘Monkfish RSA’ will populate the ‘Days at Sea’ field. Additionally, you must press on the ‘Days at Sea’ field and select any other appropriate DAS such as multispecies (mults) DAS and/or Scallop DAS.

27
=======================================================================
Step 3. Press on the ‘Gear’ field and select the gear you intend to fish using the scroll bar to the right.
Step 4. Press on the ‘Broad Stock Area’ field, select the BSA(s) that encompass the area(s) selected in Step 2, and then press ‘Apply’. However, select ‘Monkfish-Only’ if you are not using Multispecies DAS.
Step 5. Review your selections, and then press ‘Declare’.
To FLEX when your vessel is inside the NE Fishery, press ‘Flex’, add the additional area(s) you intend to fish, and then press ‘Declare’.
28
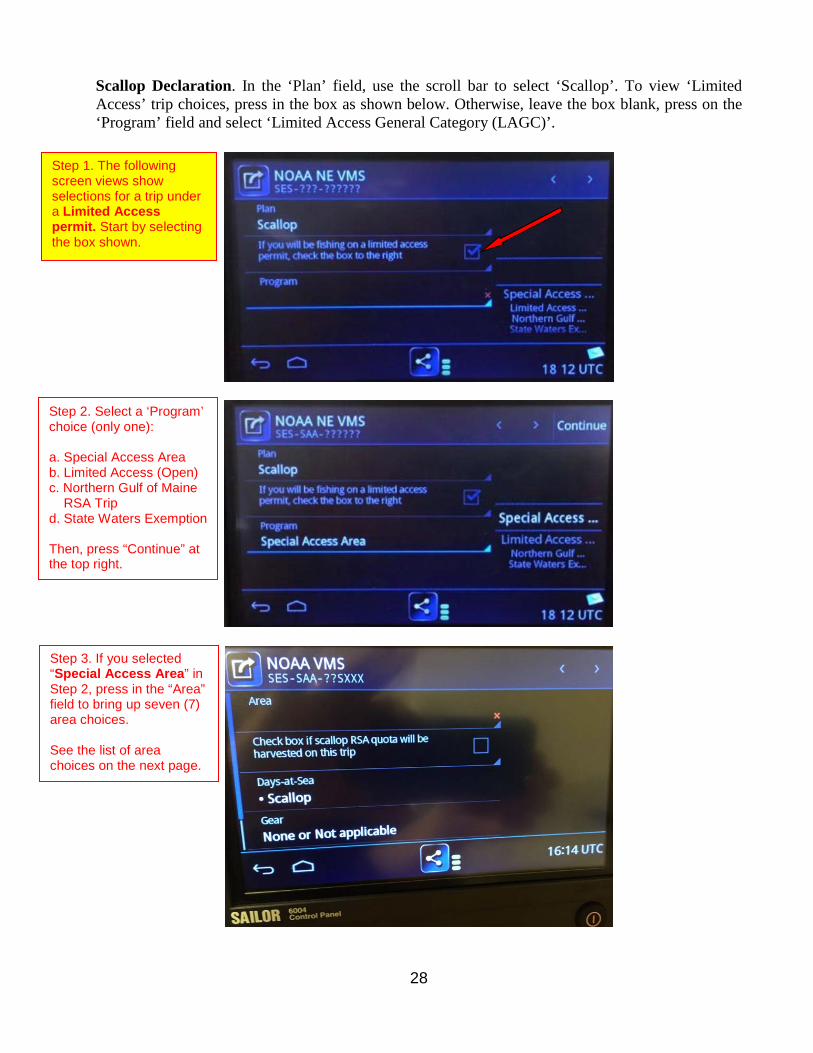
Scallop Declaration. In the ‘Plan’ field, use the scroll bar to select ‘Scallop’. To view ‘Limited Access’ trip choices, press in the box as shown below. Otherwise, leave the box blank, press on the ‘Program’ field and select ‘Limited Access General Category (LAGC)’.
Step 1. The following screen views show selections for a trip under a Limited Access permit. Start by selecting the box shown.
Step 2. Select a ‘Program’ choice (only one): a. Special Access Area b. Limited Access (Open) c. Northern Gulf of Maine RSA Trip d. State Waters Exemption Then, press “Continue” at the top right.
Step 3. If you selected “Special Access Area” in Step 2, press in the “Area” field to bring up seven (7) area choices. See the list of area choices on the next page.
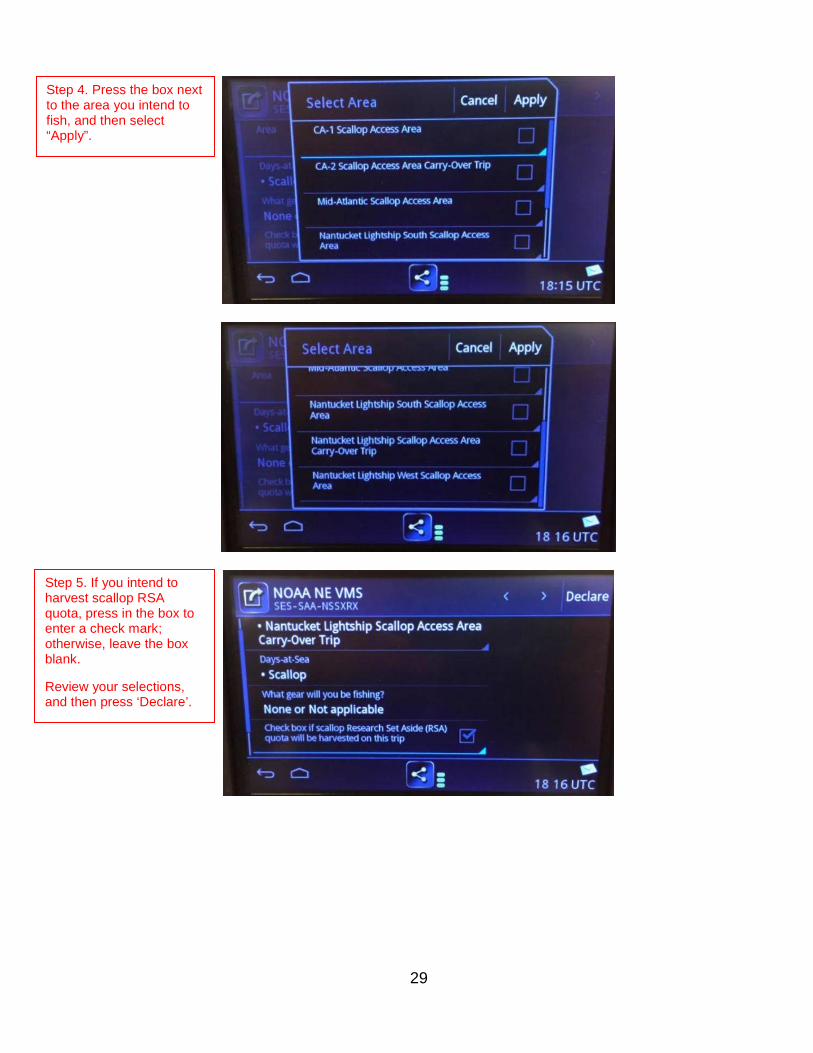
29
Step 5. If you intend to harvest scallop RSA quota, press in the box to enter a check mark; otherwise, leave the box blank. Review your selections, and then press ‘Declare’.
Step 4. Press the box next to the area you intend to fish, and then select “Apply”.
30
Step 2a. If in Step 2 on the previous page, you selected “Limited Access (Open)”, next press ‘Continue’. If you intend to harvest scallop RSA quota, press in the box to enter a check mark; otherwise, leave the box blank (not shown). Review your selections, and then press ‘Declare’.
Step 2b. If in Step 2 on the previous page, you selected “Northern Gulf of Maine RSA”, next press ‘Declare’. Important Note: Your VMS software produces the code: SES-SCX-NGSXRX”. However, the code transmitted to NMFS will be: SES-SCA-NGSXRX. Your VMS vendor will be correcting this ‘bug’ in a future software update.
Step 2c. If in Step 2 on the previous page, you selected “State Waters Exemption Program”, next press ‘Continue’. If you intend to harvest scallop RSA quota, press in the box to enter a check mark; otherwise, leave the box blank (not shown). Review your selections, and then press ‘Declare’.

31
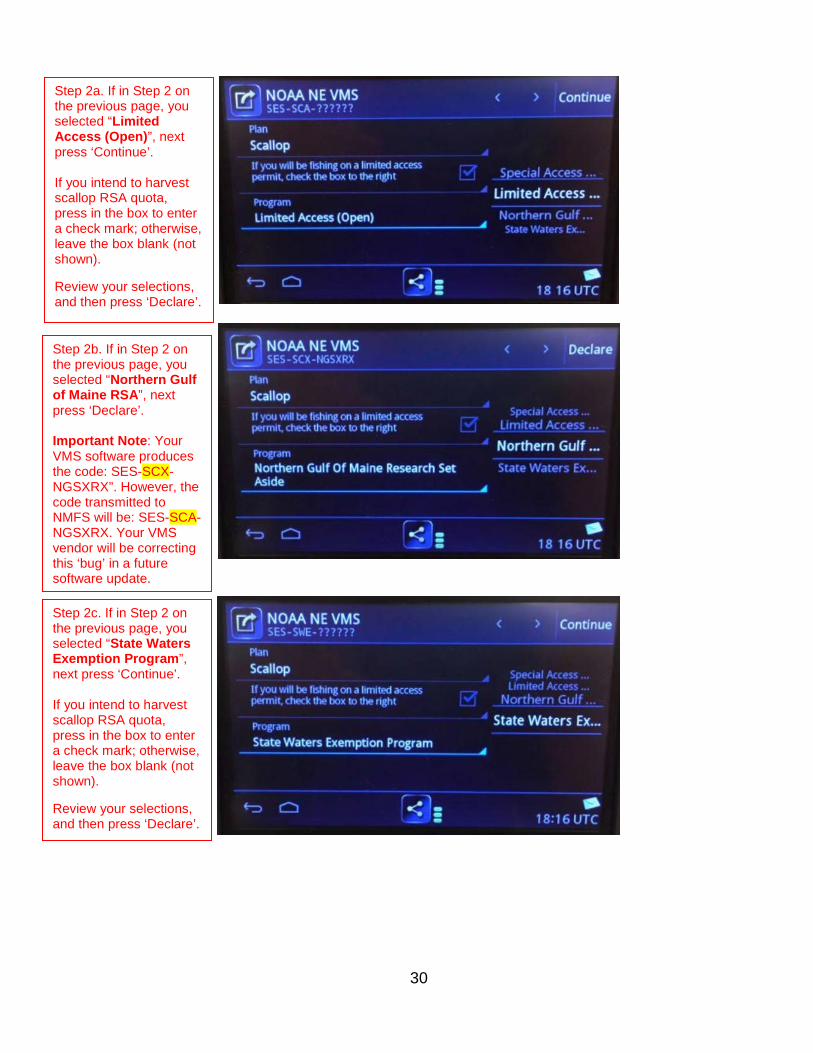
Step 1. The following screen views show selections for a trip under a General Category permit. Start by leaving the (limited access permit) box blank. Then, press on the “Program” field and select “General Category (LAGC)”. Press “Continue” in the top right.
Step 2. On the next screen, press on the “Area” field. Select from the seven (7) area choices by pressing on the box next to the area you intend to fish, and then select “Apply”.
32
===================================================================== Surfclam and Quahog Declaration. In the ‘Plan’ field, use the scroll bar to select ‘Surfclam and Ocean Quahog’. Then, press on the ‘Program’ field, and use the scroll bar to select from the three (3) choices.
Step 1. Press on the ‘Program’ field, use the scroll bar to select a surfclam, ocean quahog or Maine Mahogany quahog trip, and then press ‘Continue’.
Step 2. Press on the ‘Area’ field to bring up the selections (unless the area is already pre-populated).
Step 3. After selecting your area, select your gear from the two choices. If you intend to harvest scallop RSA quota, press in the box to enter a check mark; otherwise, leave the box blank. Review your selections, and then press ‘Declare’.
33
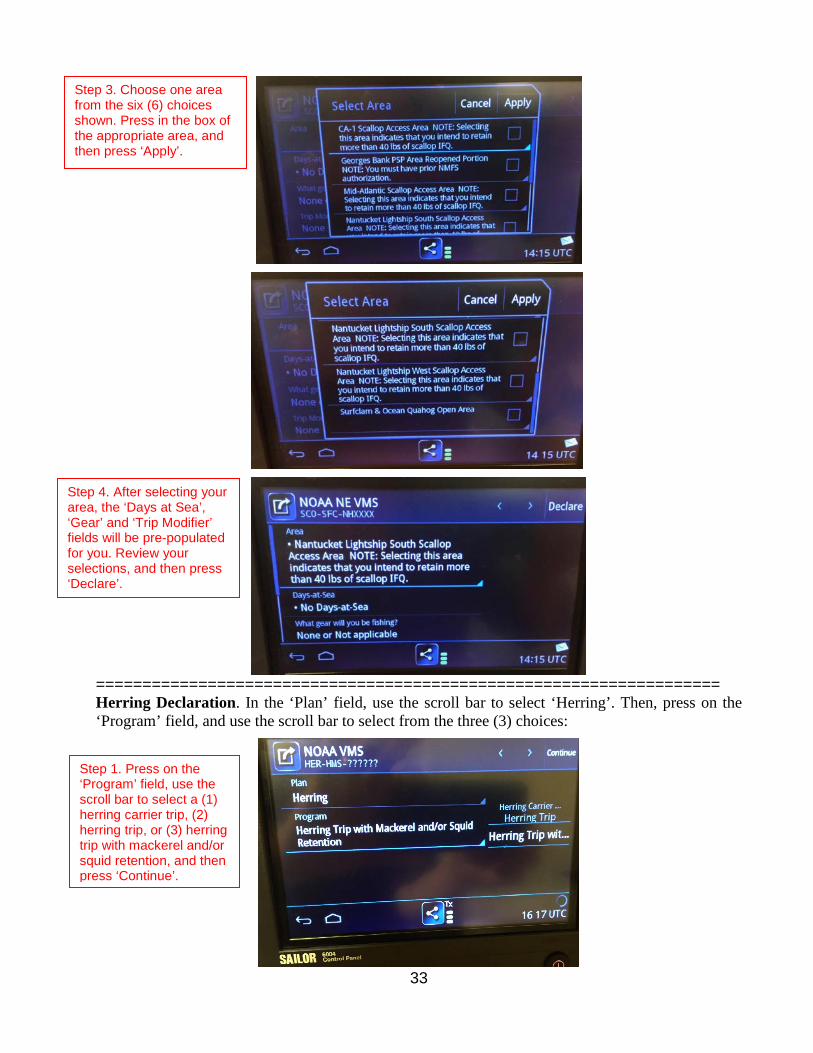
=================================================================== Herring Declaration. In the ‘Plan’ field, use the scroll bar to select ‘Herring’. Then, press on the ‘Program’ field, and use the scroll bar to select from the three (3) choices:
Step 3. Choose one area from the six (6) choices shown. Press in the box of the appropriate area, and then press ‘Apply’.
Step 1. Press on the ‘Program’ field, use the scroll bar to select a (1) herring carrier trip, (2) herring trip, or (3) herring trip with mackerel and/or squid retention, and then press ‘Continue’.
Step 4. After selecting your area, the ‘Days at Sea’, ‘Gear’ and ‘Trip Modifier’ fields will be pre-populated for you. Review your selections, and then press ‘Declare’.
34
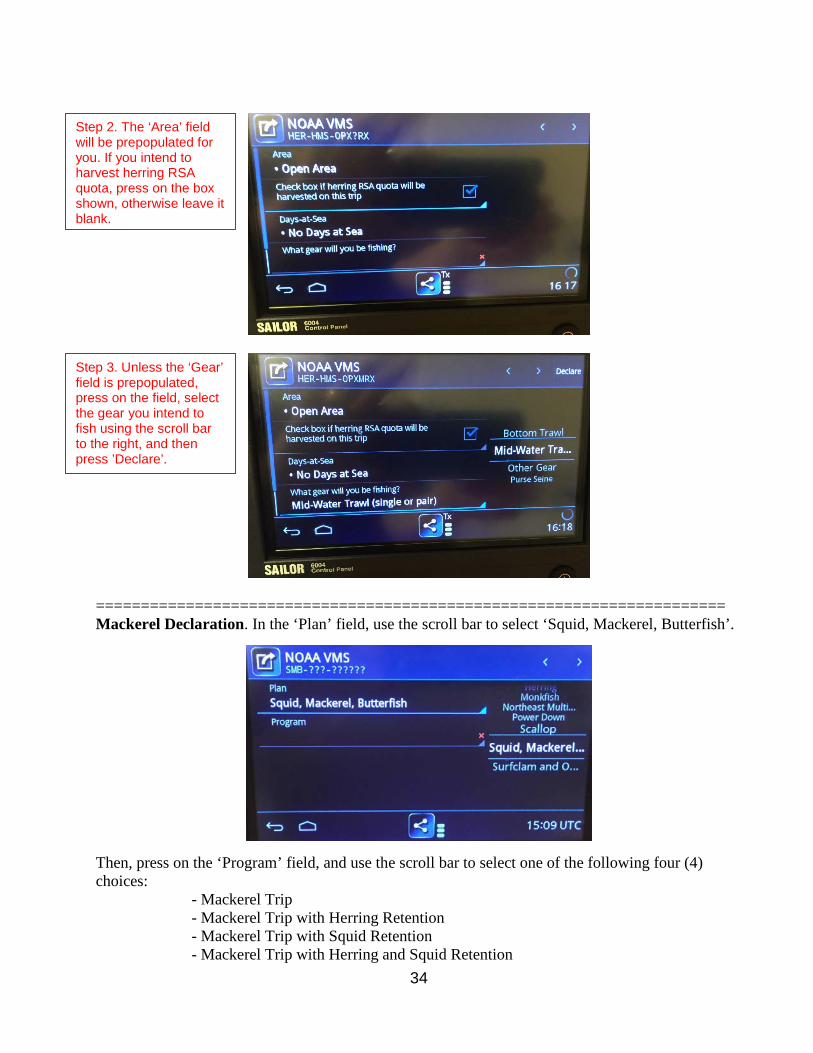
====================================================================== Mackerel Declaration. In the ‘Plan’ field, use the scroll bar to select ‘Squid, Mackerel, Butterfish’.
Then, press on the ‘Program’ field, and use the scroll bar to select one of the following four (4) choices: - Mackerel Trip - Mackerel Trip with Herring Retention - Mackerel Trip with Squid Retention - Mackerel Trip with Herring and Squid Retention
Step 2. The ‘Area’ field will be prepopulated for you. If you intend to harvest herring RSA quota, press on the box shown, otherwise leave it blank.
Step 3. Unless the ‘Gear’ field is prepopulated, press on the field, select the gear you intend to fish using the scroll bar to the right, and then press ’Declare’.
35
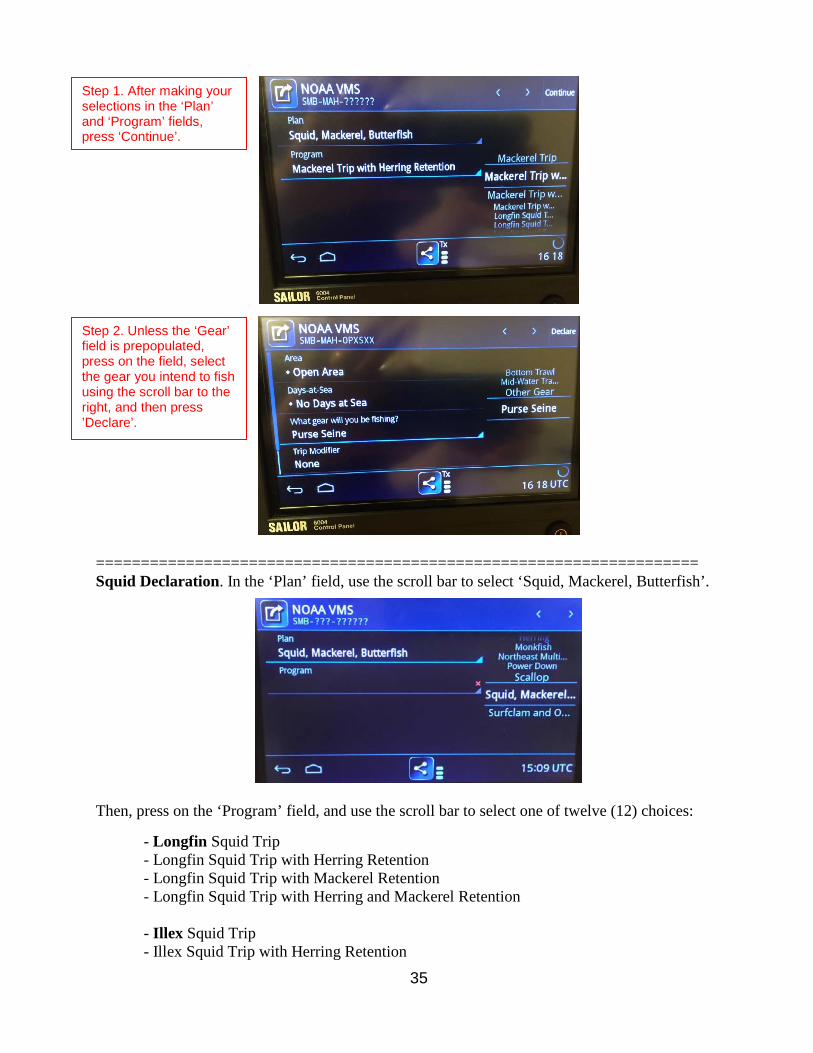
=================================================================== Squid Declaration. In the ‘Plan’ field, use the scroll bar to select ‘Squid, Mackerel, Butterfish’.
Then, press on the ‘Program’ field, and use the scroll bar to select one of twelve (12) choices: - Longfin Squid Trip - Longfin Squid Trip with Herring Retention - Longfin Squid Trip with Mackerel Retention - Longfin Squid Trip with Herring and Mackerel Retention - Illex Squid Trip - Illex Squid Trip with Herring Retention
Step 2. Unless the ‘Gear’ field is prepopulated, press on the field, select the gear you intend to fish using the scroll bar to the right, and then press ’Declare’.
Step 1. After making your selections in the ‘Plan’ and ‘Program’ fields, press ‘Continue’.
36
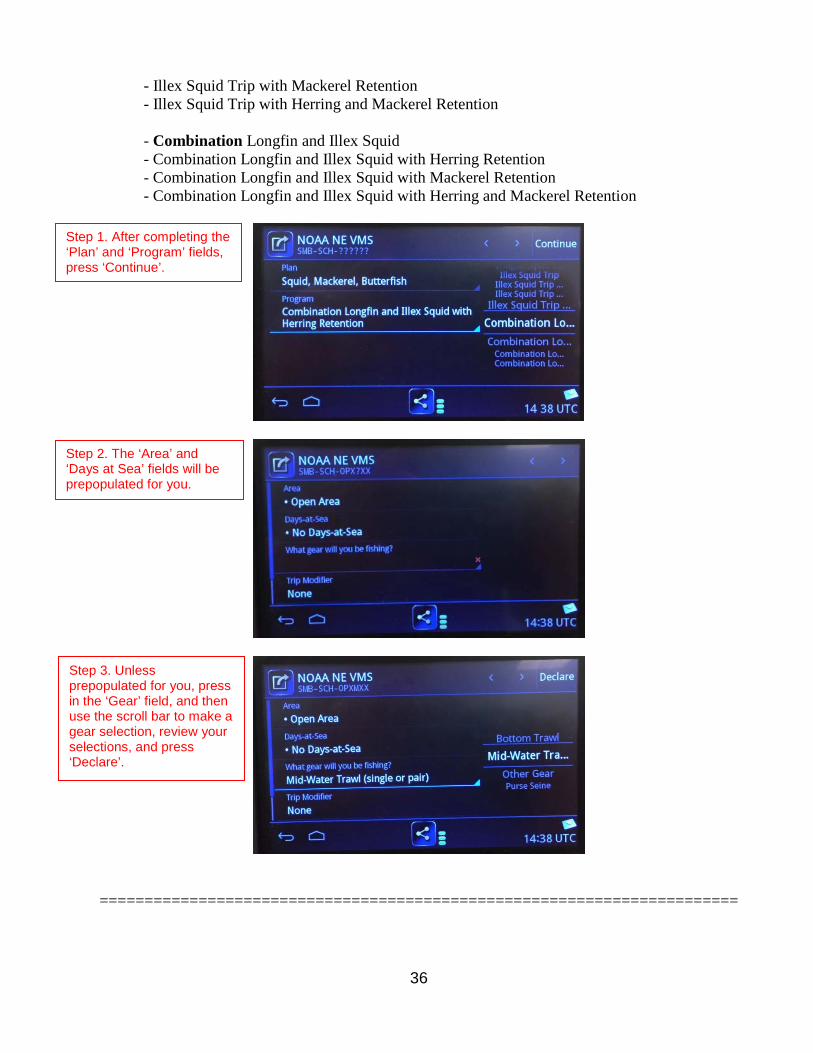
- Illex Squid Trip with Mackerel Retention - Illex Squid Trip with Herring and Mackerel Retention - Combination Longfin and Illex Squid - Combination Longfin and Illex Squid with Herring Retention - Combination Longfin and Illex Squid with Mackerel Retention - Combination Longfin and Illex Squid with Herring and Mackerel Retention
=======================================================================
Step 2. The ‘Area’ and ‘Days at Sea’ fields will be prepopulated for you.
Step 1. After completing the ‘Plan’ and ‘Program’ fields, press ‘Continue’.
Step 3. Unless prepopulated for you, press in the ‘Gear’ field, and then use the scroll bar to make a gear selection, review your selections, and press ‘Declare’.
37
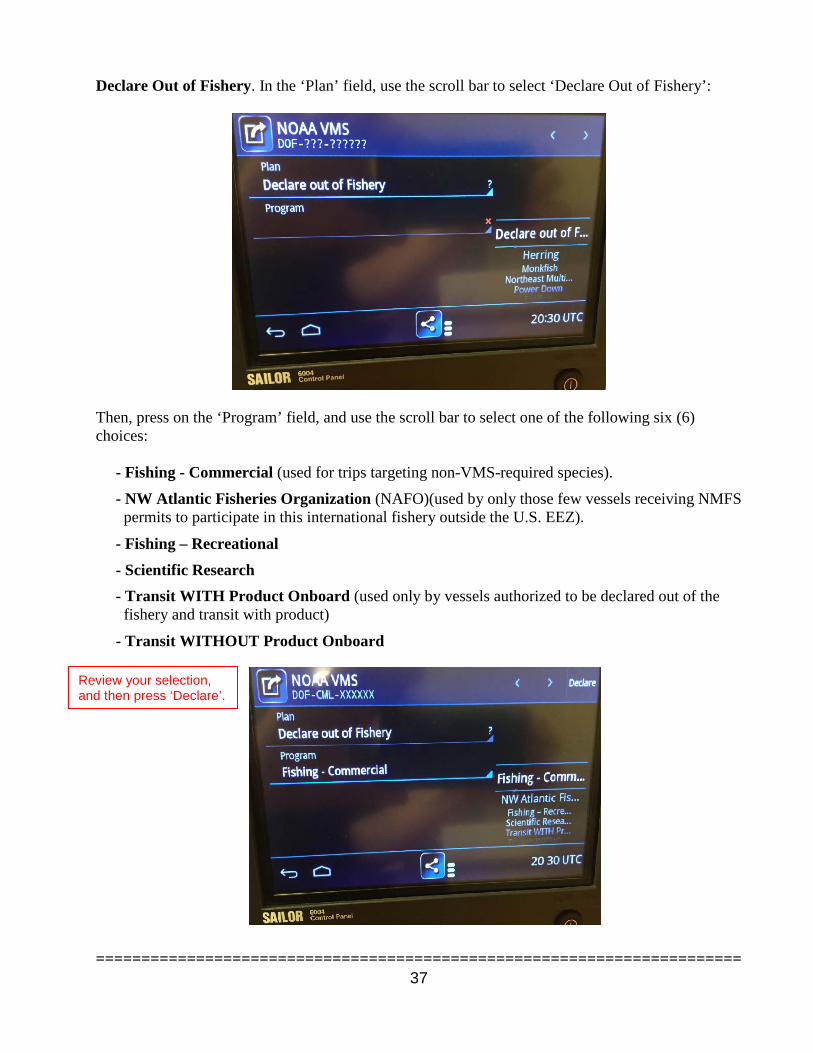
Declare Out of Fishery. In the ‘Plan’ field, use the scroll bar to select ‘Declare Out of Fishery’:
Then, press on the ‘Program’ field, and use the scroll bar to select one of the following six (6) choices: - Fishing - Commercial (used for trips targeting non-VMS-required species).
- NW Atlantic Fisheries Organization (NAFO)(used by only those few vessels receiving NMFS permits to participate in this international fishery outside the U.S. EEZ).
- Fishing – Recreational - Scientific Research - Transit WITH Product Onboard (used only by vessels authorized to be declared out of the fishery and transit with product)
- Transit WITHOUT Product Onboard
=======================================================================
Review your selection, and then press ‘Declare’.
38
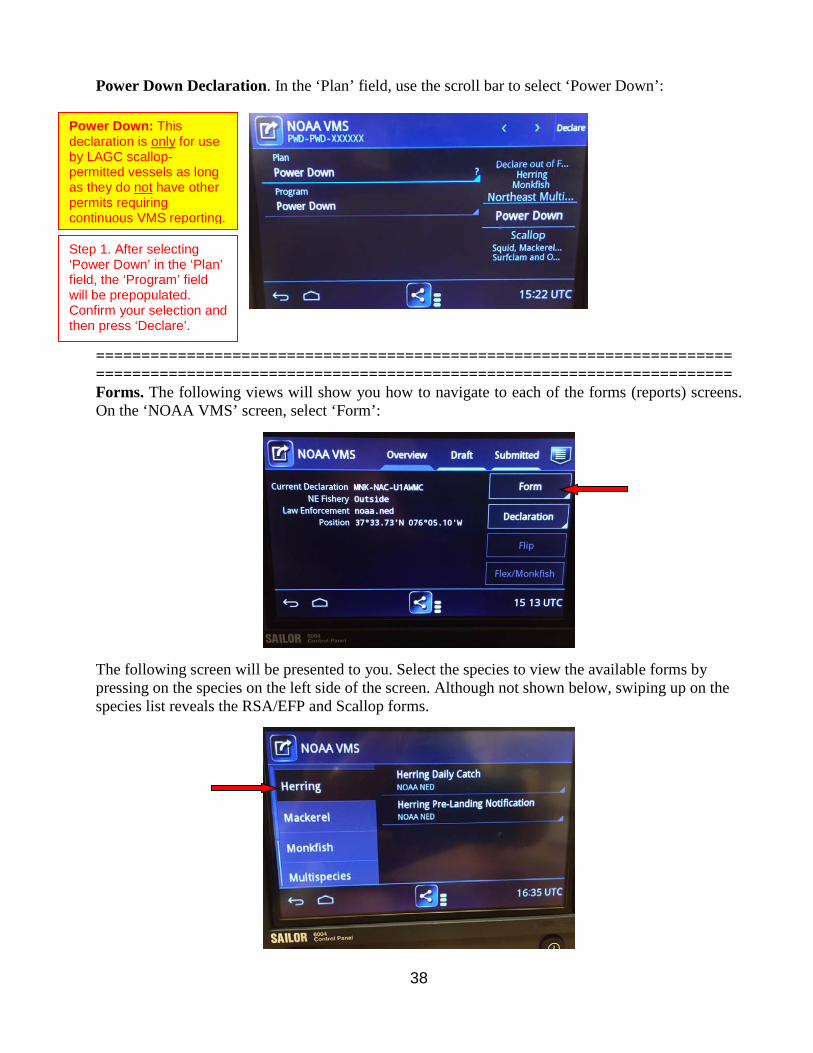
Power Down Declaration. In the ‘Plan’ field, use the scroll bar to select ‘Power Down’:
====================================================================== ====================================================================== Forms. The following views will show you how to navigate to each of the forms (reports) screens. On the ‘NOAA VMS’ screen, select ‘Form’:
The following screen will be presented to you. Select the species to view the available forms by pressing on the species on the left side of the screen. Although not shown below, swiping up on the species list reveals the RSA/EFP and Scallop forms.
Power Down: This declaration is only for use by LAGC scallop-permitted vessels as long as they do not have other permits requiring continuous VMS reporting. Step 1. After selecting ‘Power Down’ in the ‘Plan’ field, the ‘Program’ field will be prepopulated. Confirm your selection and then press ‘Declare’.
39
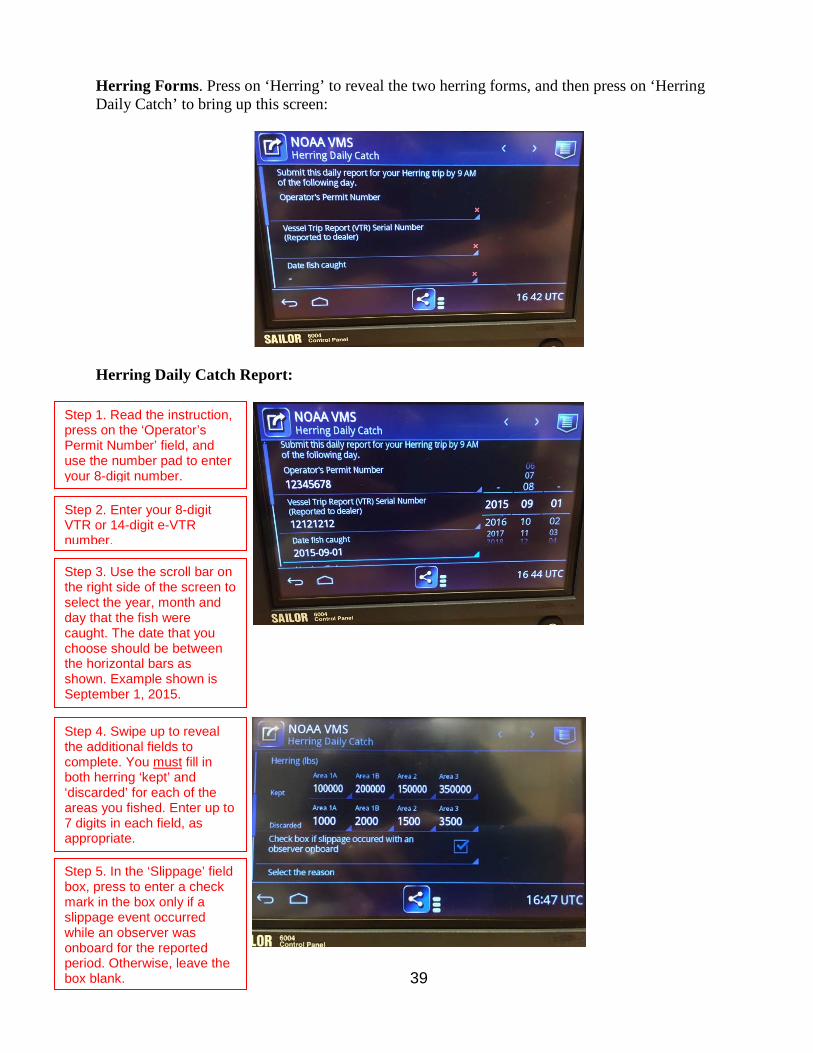
Herring Forms. Press on ‘Herring’ to reveal the two herring forms, and then press on ‘Herring Daily Catch’ to bring up this screen:
Herring Daily Catch Report:
Step 3. Use the scroll bar on the right side of the screen to select the year, month and day that the fish were caught. The date that you choose should be between the horizontal bars as shown. Example shown is September 1, 2015.
Step 2. Enter your 8-digit VTR or 14-digit e-VTR number.
Step 1. Read the instruction, press on the ‘Operator’s Permit Number’ field, and use the number pad to enter your 8-digit number.
Step 4. Swipe up to reveal the additional fields to complete. You must fill in both herring ‘kept’ and ‘discarded’ for each of the areas you fished. Enter up to 7 digits in each field, as appropriate.
Step 5. In the ‘Slippage’ field box, press to enter a check mark in the box only if a slippage event occurred while an observer was onboard for the reported period. Otherwise, leave the box blank.
40
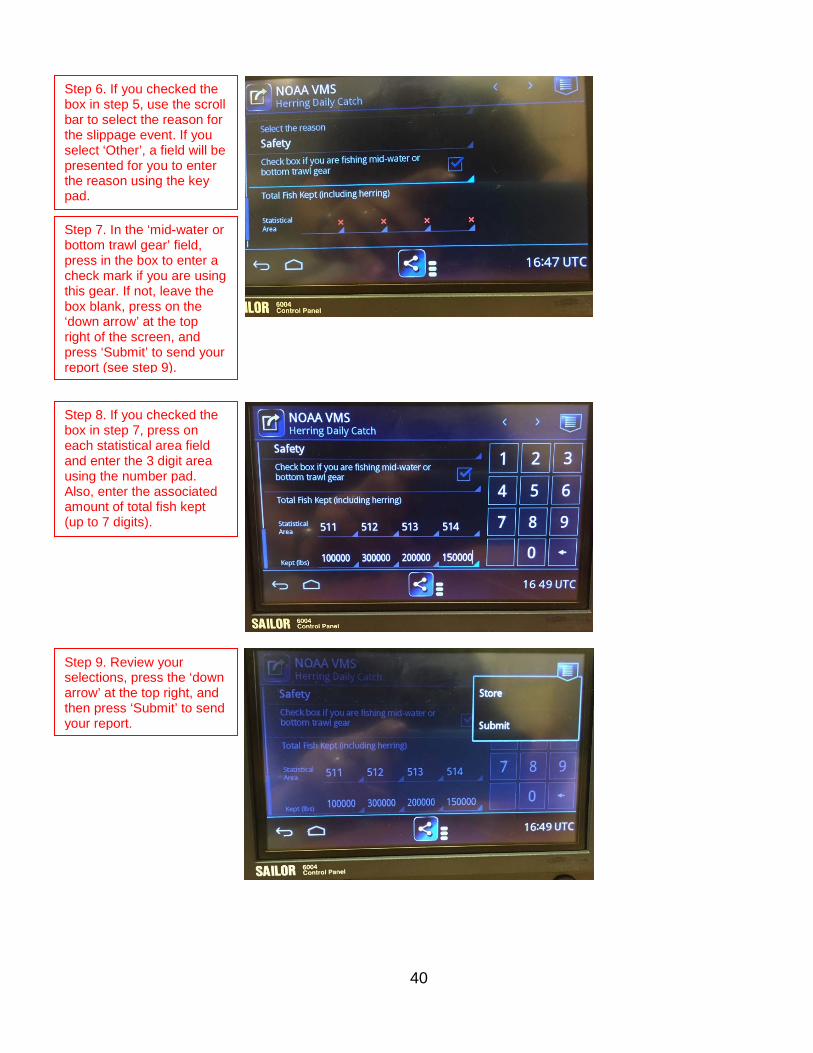
Step 7. In the ‘mid-water or bottom trawl gear’ field, press in the box to enter a check mark if you are using this gear. If not, leave the box blank, press on the ‘down arrow’ at the top right of the screen, and press ‘Submit’ to send your report (see step 9).
Step 6. If you checked the box in step 5, use the scroll bar to select the reason for the slippage event. If you select ‘Other’, a field will be presented for you to enter the reason using the key pad.
Step 8. If you checked the box in step 7, press on each statistical area field and enter the 3 digit area using the number pad. Also, enter the associated amount of total fish kept (up to 7 digits).
Step 9. Review your selections, press the ‘down arrow’ at the top right, and then press ‘Submit’ to send your report.
41
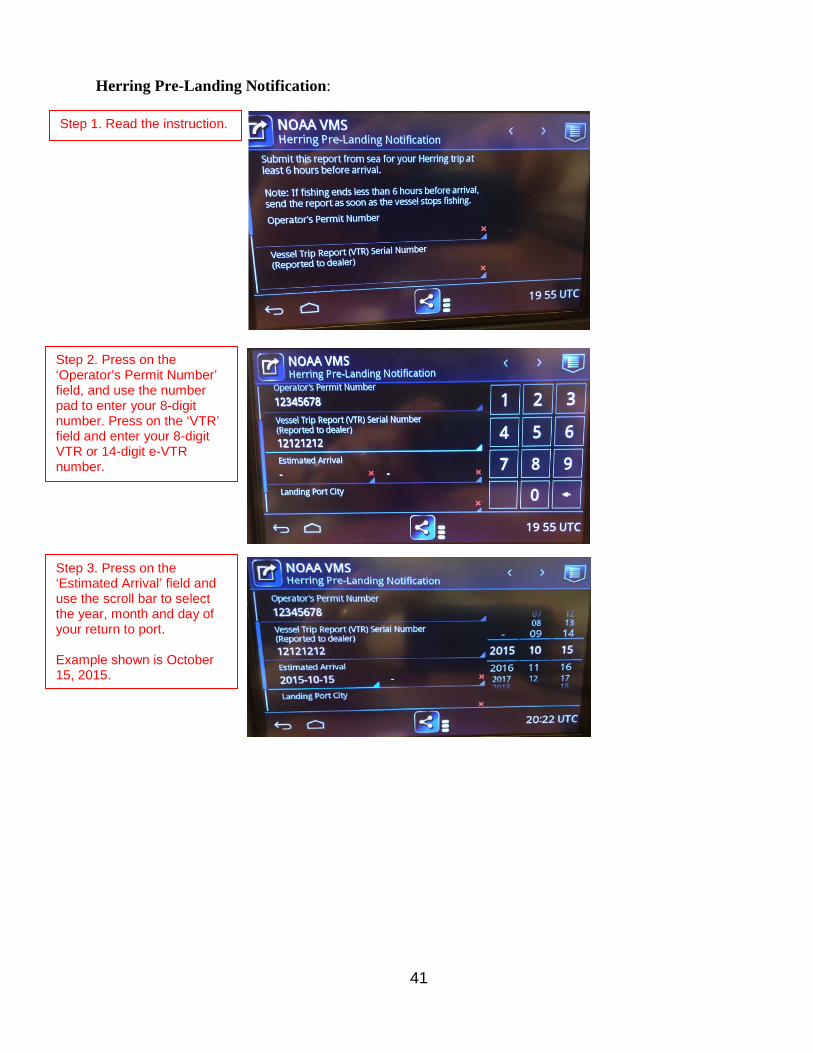
Herring Pre-Landing Notification:
Step 3. Press on the ‘Estimated Arrival’ field and use the scroll bar to select the year, month and day of your return to port. Example shown is October 15, 2015.
Step 1. Read the instruction.
Step 2. Press on the ‘Operator’s Permit Number’ field, and use the number pad to enter your 8-digit number. Press on the ‘VTR’ field and enter your 8-digit VTR or 14-digit e-VTR number.
42
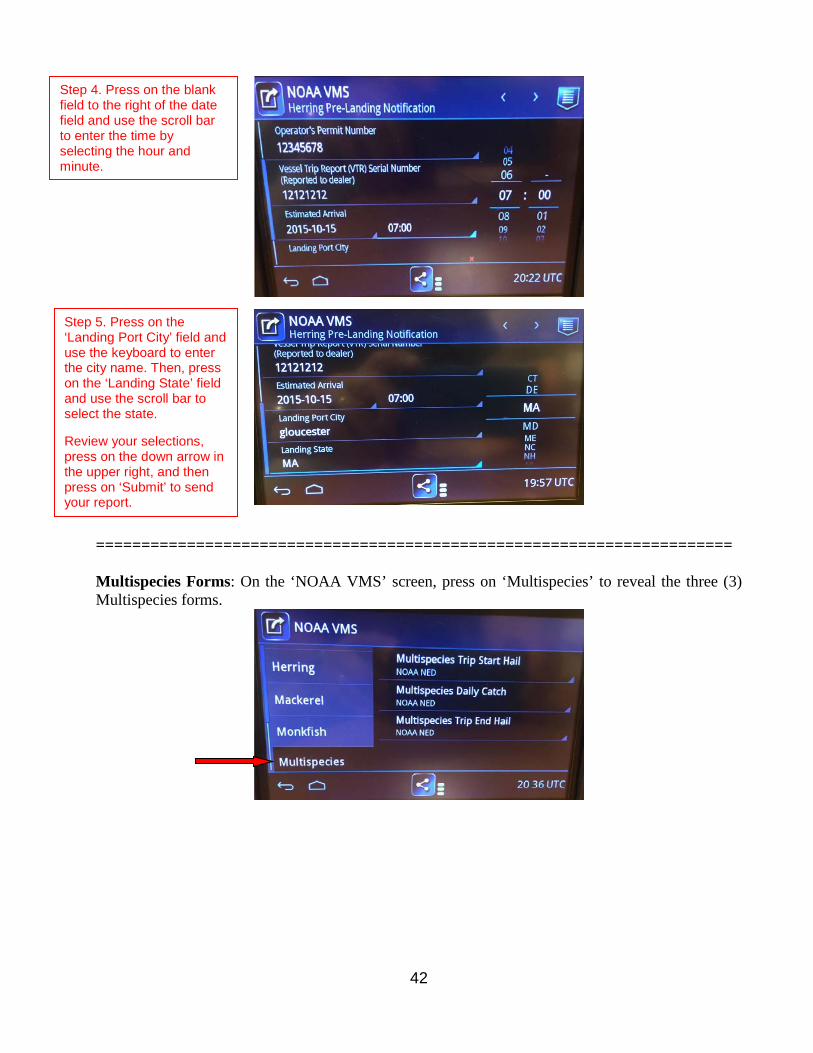
====================================================================== Multispecies Forms: On the ‘NOAA VMS’ screen, press on ‘Multispecies’ to reveal the three (3) Multispecies forms.
Step 5. Press on the ‘Landing Port City’ field and use the keyboard to enter the city name. Then, press on the ‘Landing State’ field and use the scroll bar to select the state. Review your selections, press on the down arrow in the upper right, and then press on ‘Submit’ to send your report.
Step 4. Press on the blank field to the right of the date field and use the scroll bar to enter the time by selecting the hour and minute.
43
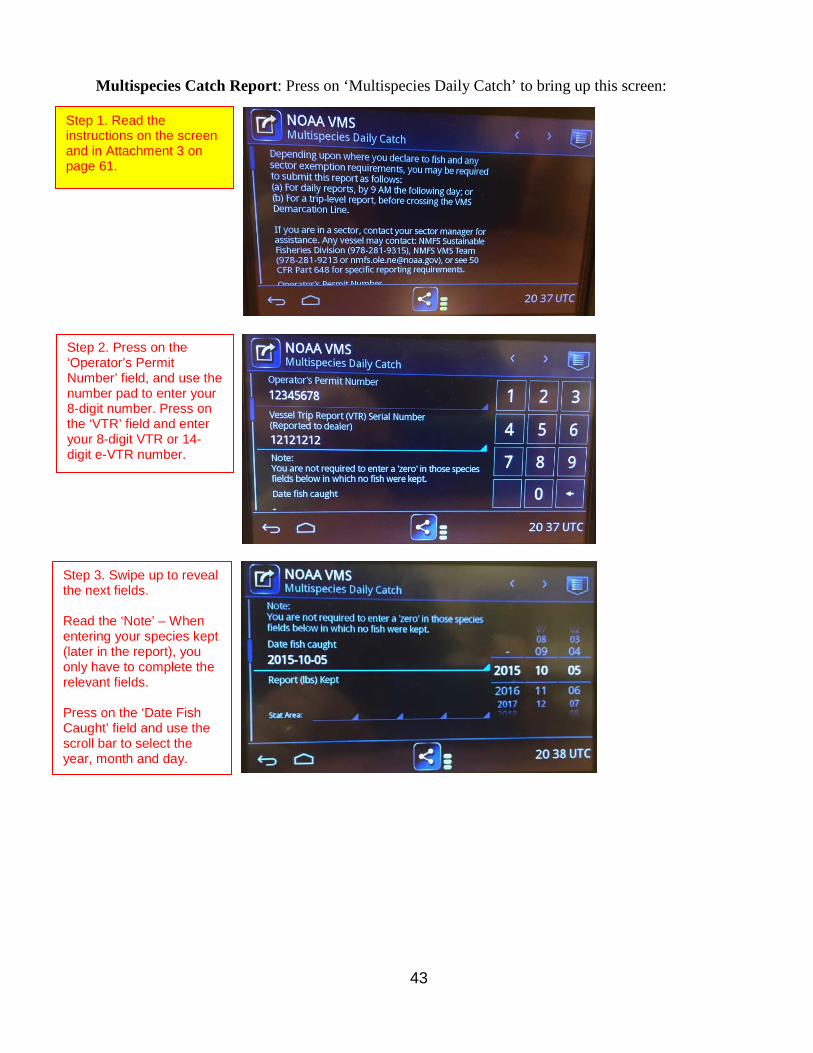
Multispecies Catch Report: Press on ‘Multispecies Daily Catch’ to bring up this screen:
Step 1. Read the instructions on the screen and in Attachment 3 on page 61.
Step 2. Press on the ‘Operator’s Permit Number’ field, and use the number pad to enter your 8-digit number. Press on the ‘VTR’ field and enter your 8-digit VTR or 14-digit e-VTR number.
Step 3. Swipe up to reveal the next fields. Read the ‘Note’ – When entering your species kept (later in the report), you only have to complete the relevant fields. Press on the ‘Date Fish Caught’ field and use the scroll bar to select the year, month and day.
44
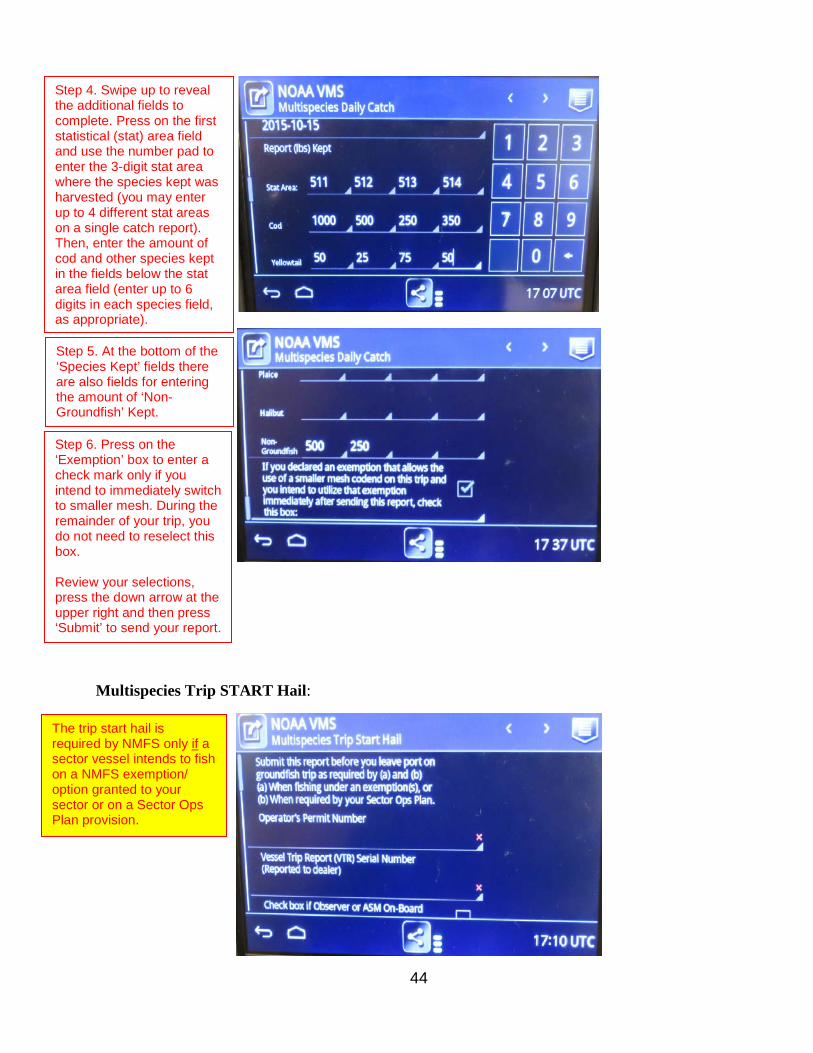
Multispecies Trip START Hail:
The trip start hail is required by NMFS only if a sector vessel intends to fish on a NMFS exemption/ option granted to your sector or on a Sector Ops Plan provision.
Step 5. At the bottom of the ‘Species Kept’ fields there are also fields for entering the amount of ‘Non-Groundfish’ Kept.
Step 4. Swipe up to reveal the additional fields to complete. Press on the first statistical (stat) area field and use the number pad to enter the 3-digit stat area where the species kept was harvested (you may enter up to 4 different stat areas on a single catch report). Then, enter the amount of cod and other species kept in the fields below the stat area field (enter up to 6 digits in each species field, as appropriate).
Step 6. Press on the ‘Exemption’ box to enter a check mark only if you intend to immediately switch to smaller mesh. During the remainder of your trip, you do not need to reselect this box. Review your selections, press the down arrow at the upper right and then press ‘Submit’ to send your report.
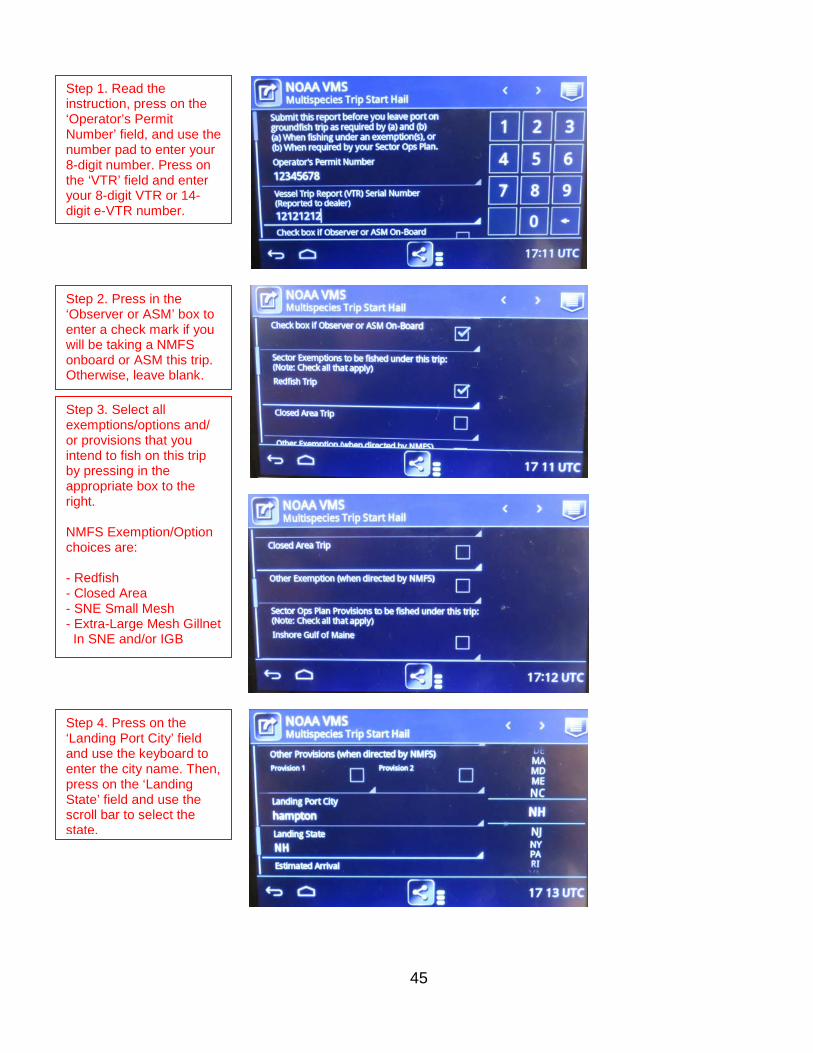
45
Step 2. Press in the ‘Observer or ASM’ box to enter a check mark if you will be taking a NMFS onboard or ASM this trip. Otherwise, leave blank.
Step 3. Select all exemptions/options and/ or provisions that you intend to fish on this trip by pressing in the appropriate box to the right. NMFS Exemption/Option choices are: - Redfish - Closed Area - SNE Small Mesh - Extra-Large Mesh Gillnet In SNE and/or IGB
Step 4. Press on the ‘Landing Port City’ field and use the keyboard to enter the city name. Then, press on the ‘Landing State’ field and use the scroll bar to select the state.
Step 1. Read the instruction, press on the ‘Operator’s Permit Number’ field, and use the number pad to enter your 8-digit number. Press on the ‘VTR’ field and enter your 8-digit VTR or 14-digit e-VTR number.
46
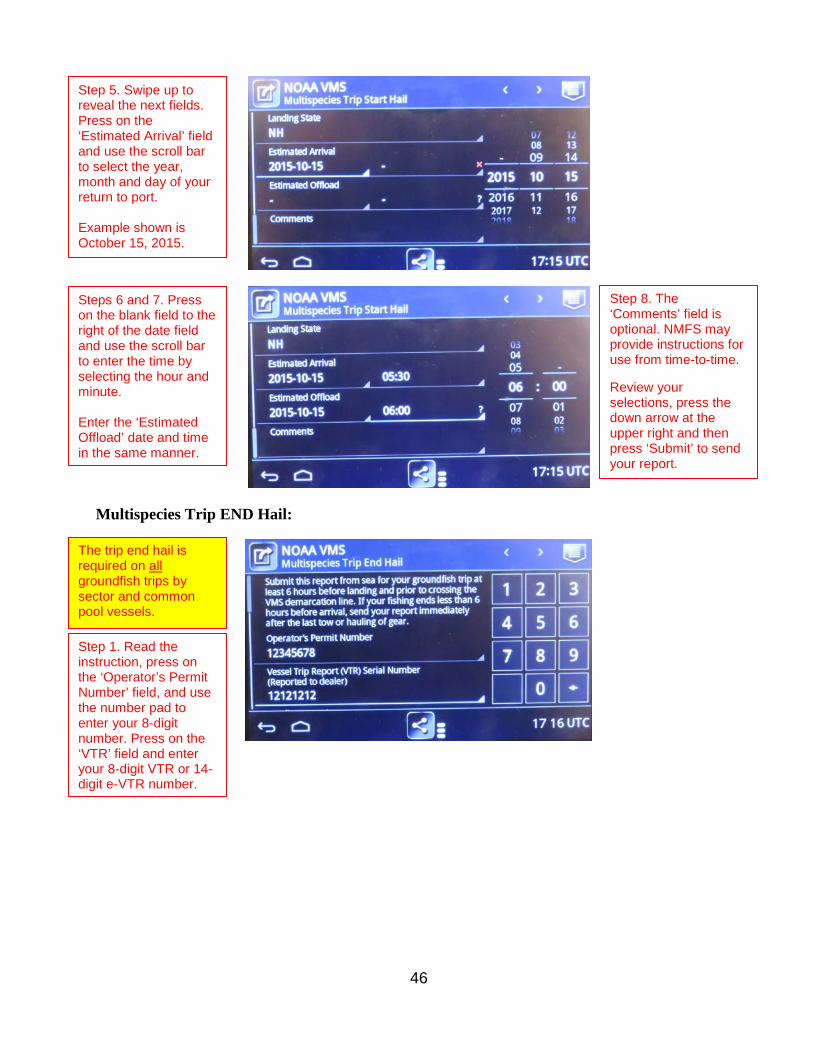
Multispecies Trip END Hail:
The trip end hail is required on all groundfish trips by sector and common pool vessels.
Step 5. Swipe up to reveal the next fields. Press on the ‘Estimated Arrival’ field and use the scroll bar to select the year, month and day of your return to port. Example shown is October 15, 2015. Steps 6 and 7. Press on the blank field to the right of the date field and use the scroll bar to enter the time by selecting the hour and minute. Enter the ‘Estimated Offload’ date and time in the same manner.
Step 8. The ‘Comments’ field is optional. NMFS may provide instructions for use from time-to-time. Review your selections, press the down arrow at the upper right and then press ‘Submit’ to send your report.
Step 1. Read the instruction, press on the ‘Operator’s Permit Number’ field, and use the number pad to enter your 8-digit number. Press on the ‘VTR’ field and enter your 8-digit VTR or 14-digit e-VTR number.
47
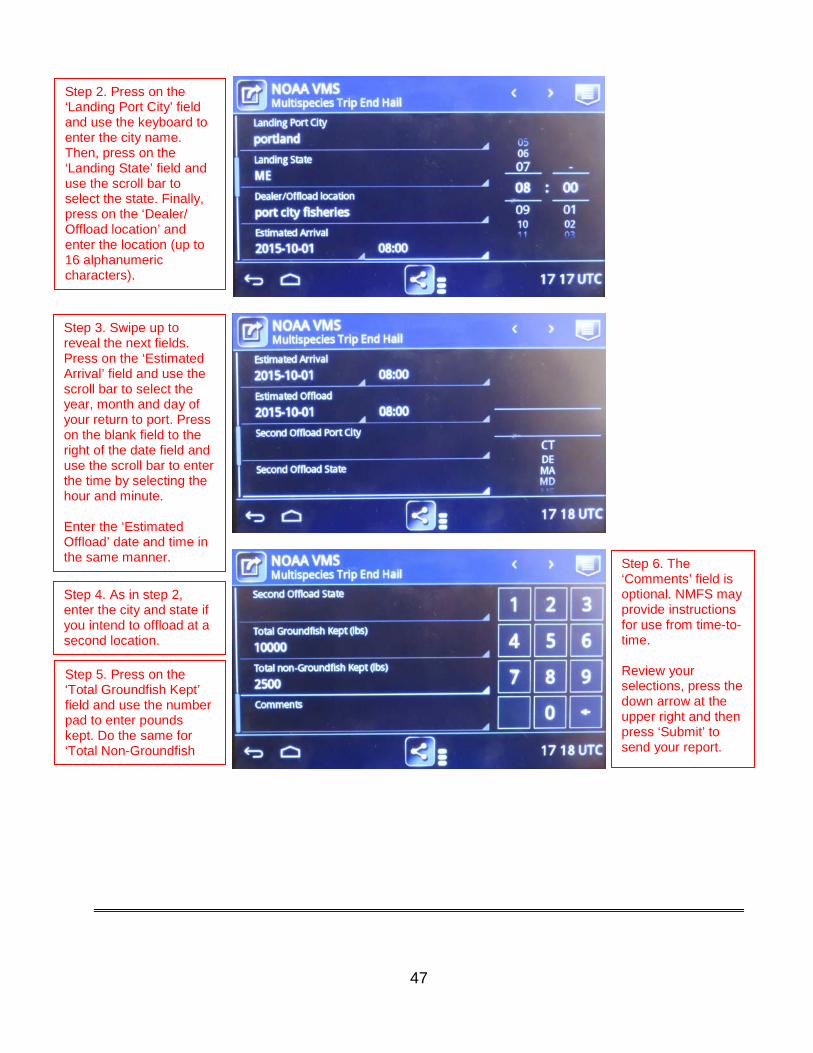
Step 5. Press on the ‘Total Groundfish Kept’ field and use the number pad to enter pounds kept. Do the same for ‘Total Non-Groundfish
Step 4. As in step 2, enter the city and state if you intend to offload at a second location.
Step 2. Press on the ‘Landing Port City’ field and use the keyboard to enter the city name. Then, press on the ‘Landing State’ field and use the scroll bar to select the state. Finally, press on the ‘Dealer/ Offload location’ and enter the location (up to 16 alphanumeric characters).
Step 3. Swipe up to reveal the next fields. Press on the ‘Estimated Arrival’ field and use the scroll bar to select the year, month and day of your return to port. Press on the blank field to the right of the date field and use the scroll bar to enter the time by selecting the hour and minute. Enter the ‘Estimated Offload’ date and time in the same manner.
Step 6. The ‘Comments’ field is optional. NMFS may provide instructions for use from time-to-time. Review your selections, press the down arrow at the upper right and then press ‘Submit’ to send your report.
48
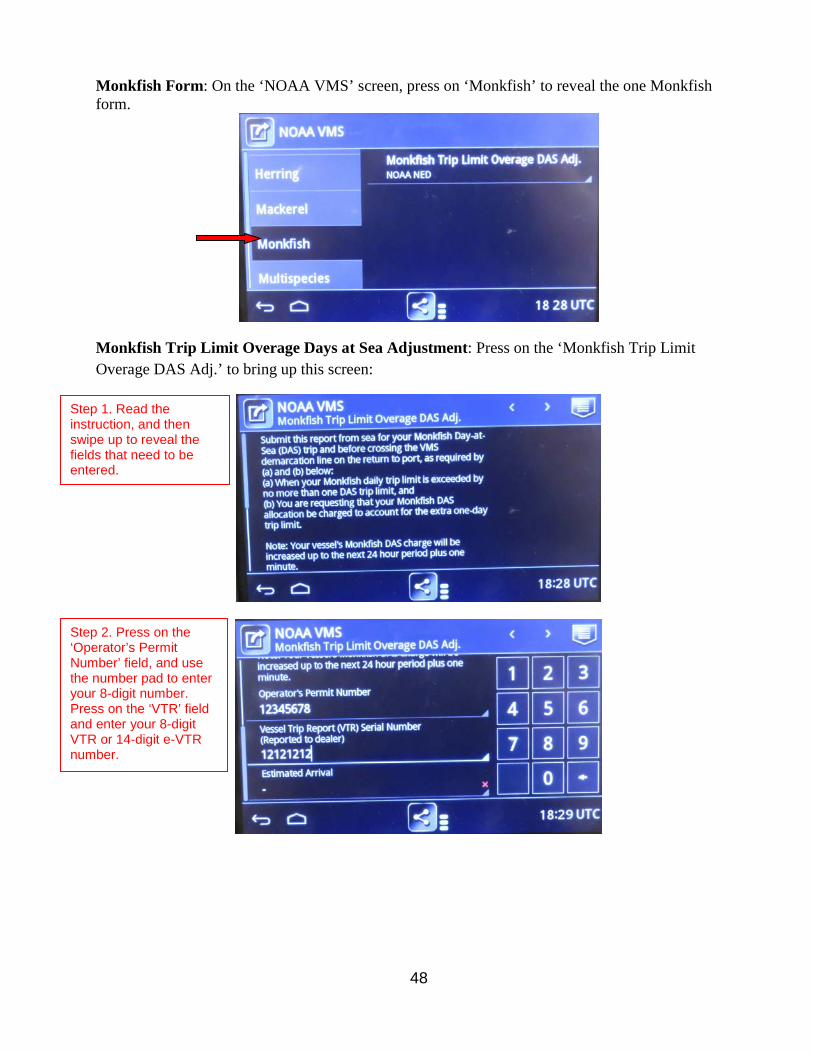
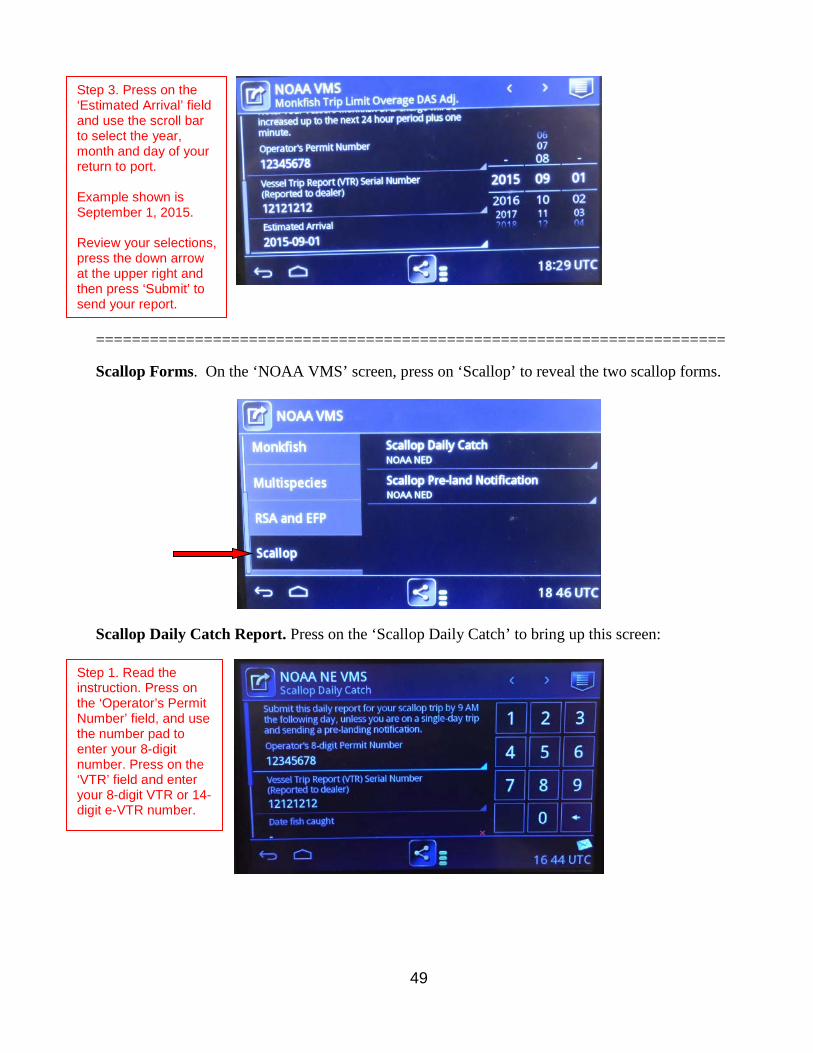
Monkfish Form: On the ‘NOAA VMS’ screen, press on ‘Monkfish’ to reveal the one Monkfish form.
Monkfish Trip Limit Overage Days at Sea Adjustment: Press on the ‘Monkfish Trip Limit Overage DAS Adj.’ to bring up this screen:
Step 1. Read the instruction, and then swipe up to reveal the fields that need to be entered.
Step 2. Press on the ‘Operator’s Permit Number’ field, and use the number pad to enter your 8-digit number. Press on the ‘VTR’ field and enter your 8-digit VTR or 14-digit e-VTR number.
49
======================================================================
Scallop Forms. On the ‘NOAA VMS’ screen, press on ‘Scallop’ to reveal the two scallop forms.
Scallop Daily Catch Report. Press on the ‘Scallop Daily Catch’ to bring up this screen:
Step 3. Press on the ‘Estimated Arrival’ field and use the scroll bar to select the year, month and day of your return to port. Example shown is September 1, 2015. Review your selections, press the down arrow at the upper right and then press ‘Submit’ to send your report.
Step 1. Read the instruction. Press on the ‘Operator’s Permit Number’ field, and use the number pad to enter your 8-digit number. Press on the ‘VTR’ field and enter your 8-digit VTR or 14-digit e-VTR number.

50
Scallop Pre-Landing Notification: Press on the ‘Scallop Pre-Land Notification’ to bring up this screen:
Step 3. Press on the ‘Scallop Meats Kept’ field and use the number pad to enter the scallops kept in pounds (up to 6 digits). Do the same for the ‘All Other Fish Kept’ field. Review your selections, press the down arrow at the upper right and then press ‘Submit’ to send your report.
Step 2. Press on the ‘Date Fish Caught’ field and use the scroll bar to select the year, month and day. Example shown is September 15, 2015.
Step 1. Read the instruction.

51
Step 3. If you are sending a correction to a report that you had previously sent, press on the box shown to enter a check mark. Then press on the ‘Date of Prior Report’ field and use the scroll bars to enter the date in year, month and day. Otherwise, leave the check box blank.
Step 5. If scallops are being retained and landed, press in the box shown to enter a check mark. Otherwise, leave the box blank, press on the down arrow in the upper right and press ‘Submit’ to send the report.
Step 2. Swipe up, and press on the ‘Operator’s Permit Number’ field. Use the number pad to enter your 8-digit number.
Step 4. Press on the ‘VTR’ field and enter your 8-digit VTR or 14-digit e-VTR number.
Step 6. If any scallops were caught in the ‘Northern Gulf of Maine’ management area, press in the box shown to enter a check mark.
52
=======================================================================
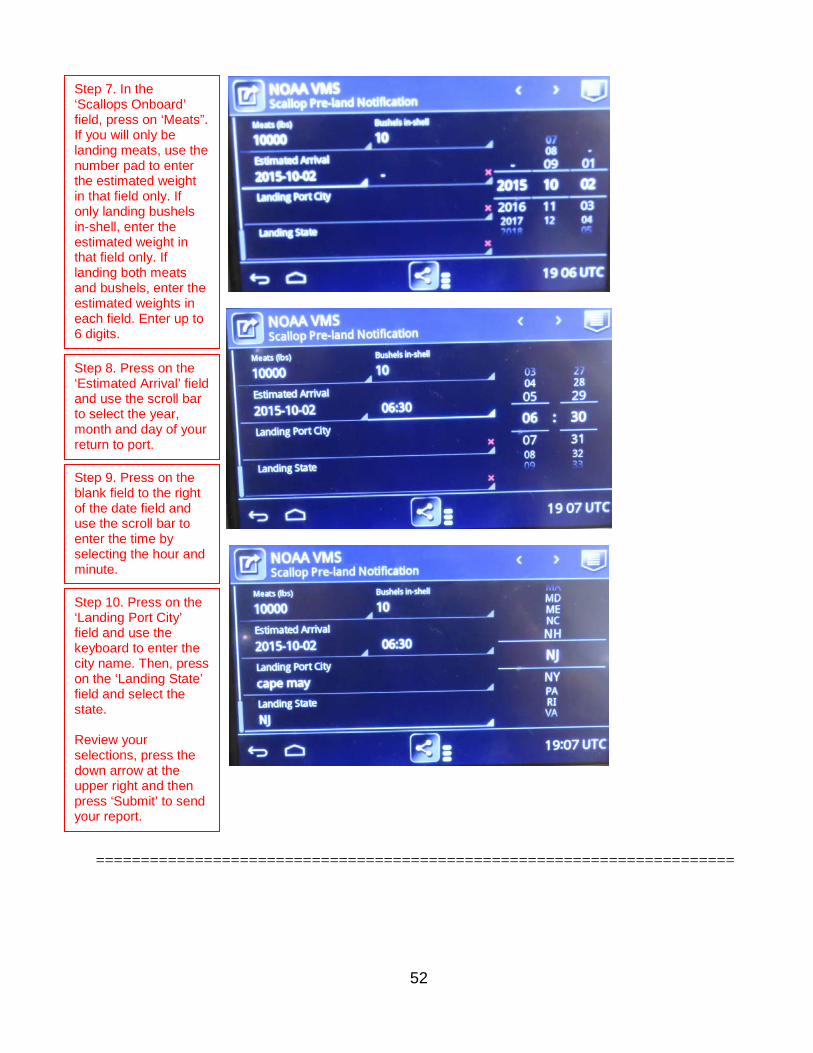
Step 8. Press on the ‘Estimated Arrival’ field and use the scroll bar to select the year, month and day of your return to port. Step 9. Press on the blank field to the right of the date field and use the scroll bar to enter the time by selecting the hour and minute.
Step 10. Press on the ‘Landing Port City’ field and use the keyboard to enter the city name. Then, press on the ‘Landing State’ field and select the state. Review your selections, press the down arrow at the upper right and then press ‘Submit’ to send your report.
Step 7. In the ‘Scallops Onboard’ field, press on ‘Meats”. If you will only be landing meats, use the number pad to enter the estimated weight in that field only. If only landing bushels in-shell, enter the estimated weight in that field only. If landing both meats and bushels, enter the estimated weights in each field. Enter up to 6 digits.
53
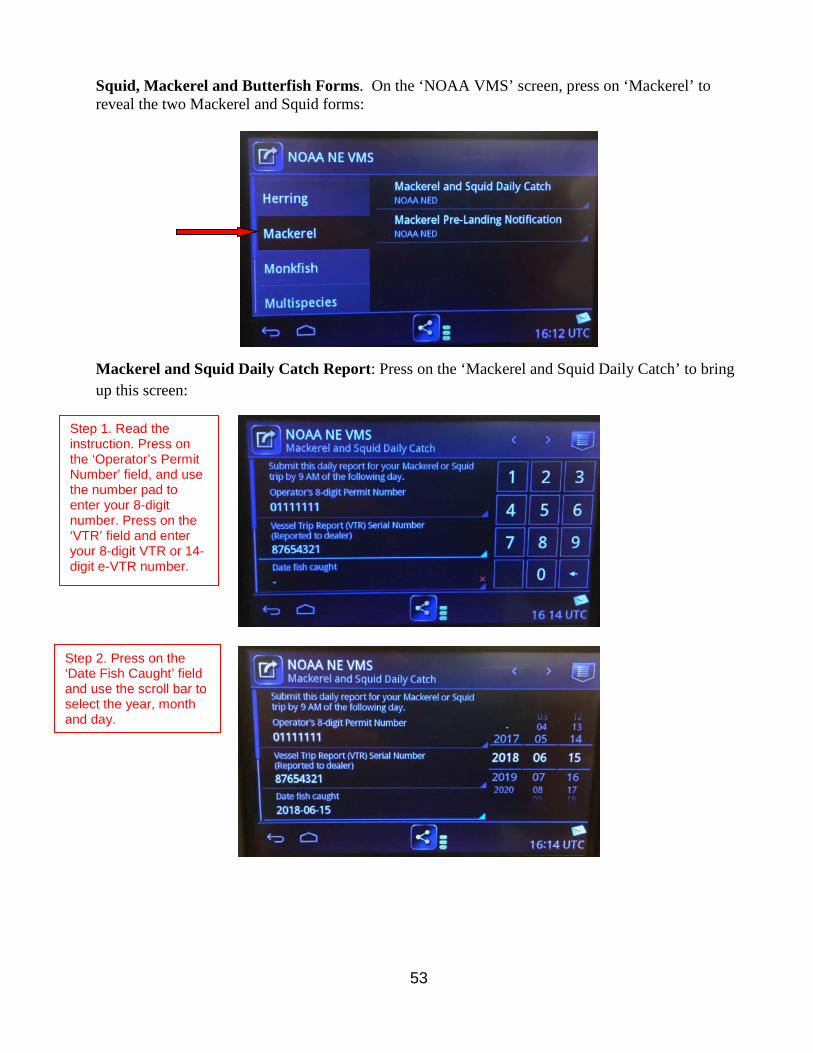
Squid, Mackerel and Butterfish Forms. On the ‘NOAA VMS’ screen, press on ‘Mackerel’ to reveal the two Mackerel and Squid forms:
Mackerel and Squid Daily Catch Report: Press on the ‘Mackerel and Squid Daily Catch’ to bring up this screen:
Step 1. Read the instruction. Press on the ‘Operator’s Permit Number’ field, and use the number pad to enter your 8-digit number. Press on the ‘VTR’ field and enter your 8-digit VTR or 14-digit e-VTR number.
Step 2. Press on the ‘Date Fish Caught’ field and use the scroll bar to select the year, month and day.

54
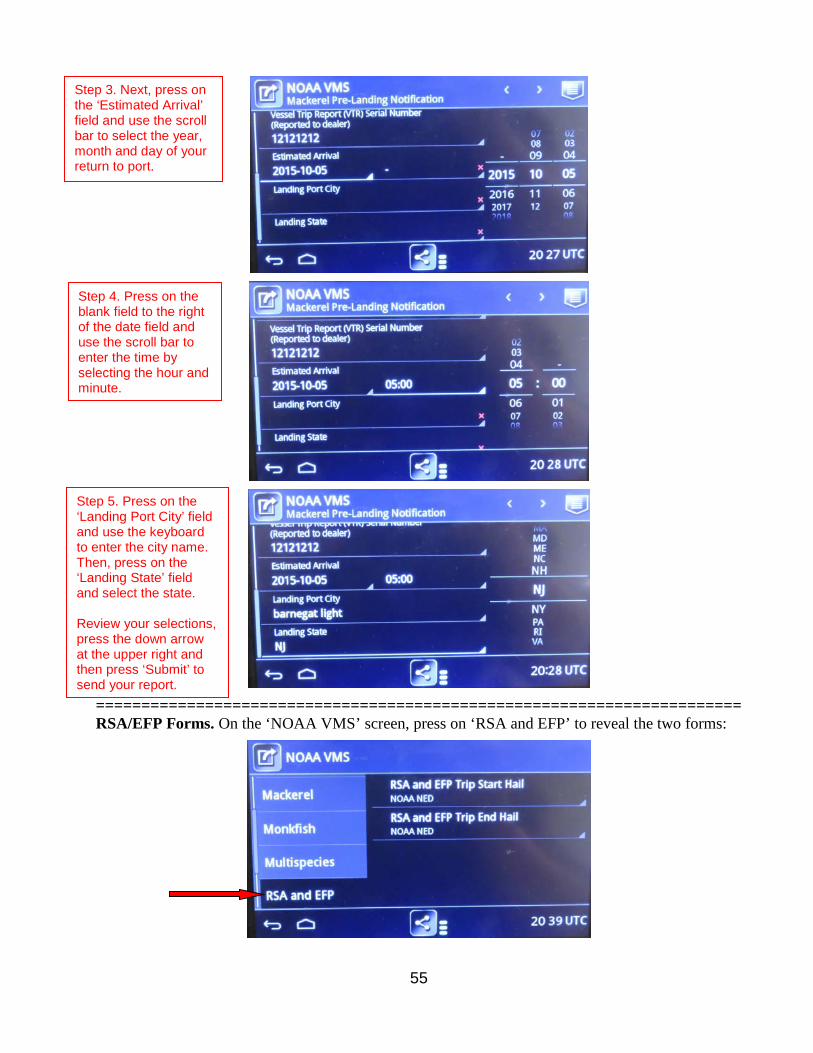
Mackerel Pre-Landing Notification: Press on ‘Mackerel Pre-Landing Notification’ to bring up this screen:
Step 4. Enter the amount in the ‘Total Fish Kept’ field. If a slippage event occurred with an observer onboard for the reported period, press in the box to enter a check mark. Next, press on the ‘Reason’ field and use the scroll bar to select the reason for the slippage event. Otherwise, leave the slippage field blank.
Step 5. If you selected ‘Other’ as the reason, press in the ‘Reason’ field and use the key pad to briefly explain the reason. Review your selections, press the down arrow at the upper right and then press ‘Submit’ to send your report.
Step 3. Swipe up to reveal the additional fields to complete. Press on the ‘Mackerel’ field and use the number pad to enter the amount of mackerel kept in pounds for that day (enter up to 7 digits in each field, as appropriate). Do the same for ‘Longfin Squid’ and ‘Illex Squid’. You must complete at least one of the 3 fields.
Step 1. Read the instruction. Press on the ‘Operator’s Permit Number’ field, and use the number pad to enter your 8-digit number.
Step 2. Swipe up and press on the ‘VTR’ field. Enter your 8-digit VTR or 14-digit e-VTR number.
55
======================================================================= RSA/EFP Forms. On the ‘NOAA VMS’ screen, press on ‘RSA and EFP’ to reveal the two forms:
Step 4. Press on the blank field to the right of the date field and use the scroll bar to enter the time by selecting the hour and minute.
Step 5. Press on the ‘Landing Port City’ field and use the keyboard to enter the city name. Then, press on the ‘Landing State’ field and select the state. Review your selections, press the down arrow at the upper right and then press ‘Submit’ to send your report.
Step 3. Next, press on the ‘Estimated Arrival’ field and use the scroll bar to select the year, month and day of your return to port.
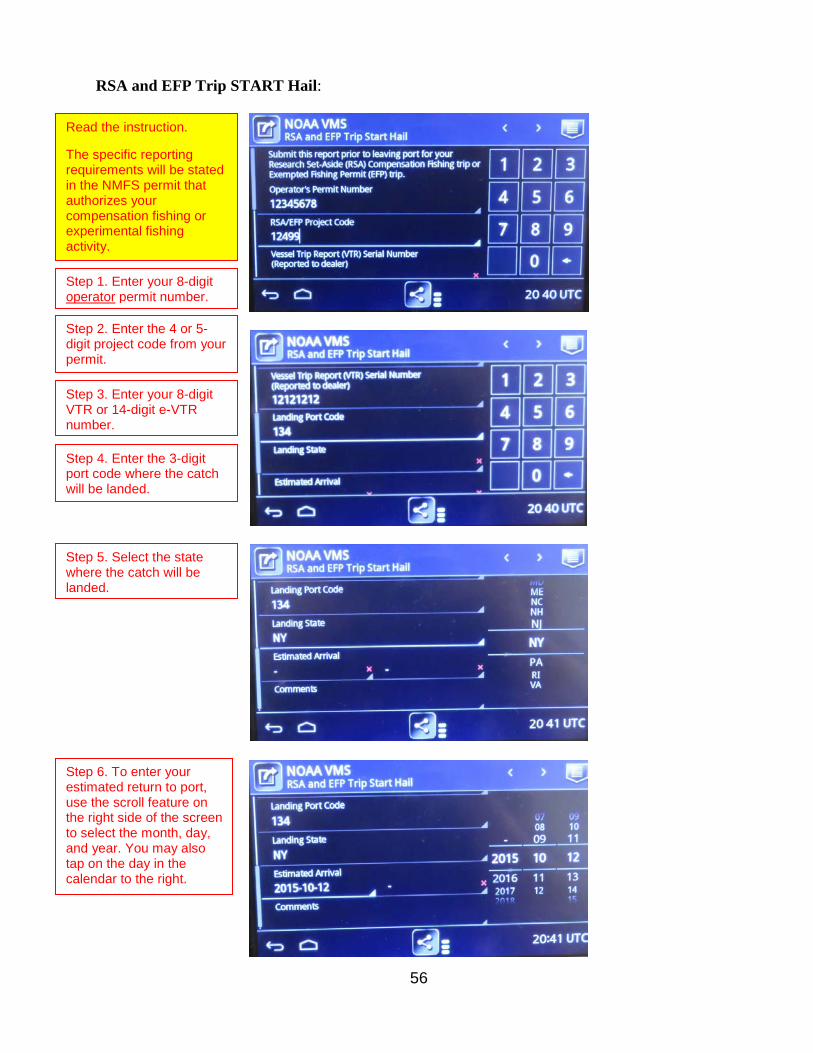
56
RSA and EFP Trip START Hail:
Read the instruction. The specific reporting requirements will be stated in the NMFS permit that authorizes your compensation fishing or experimental fishing activity. Step 1. Enter your 8-digit operator permit number.
Step 2. Enter the 4 or 5-digit project code from your permit. Step 3. Enter your 8-digit VTR or 14-digit e-VTR number.
Step 4. Enter the 3-digit port code where the catch will be landed.
Step 5. Select the state where the catch will be landed.
Step 6. To enter your estimated return to port, use the scroll feature on the right side of the screen to select the month, day, and year. You may also tap on the day in the calendar to the right.

57
RSA and EFP Trip END Hail:
Step 8. Optional field. NMFS may provide instructions for use from time-to-time.
Step 7. Press on the blank field to the right of the date field and use the scroll bar to enter the time by selecting the hour and minute. Example shown is 1:15 pm on October 12, 2015.
Read the instruction. The specific reporting requirements will be stated in the NMFS permit that authorizes your compensation fishing or experimental fishing activity. Step 1. Enter your 8-digit operator permit number.
Step 2. Enter the 4 or 5-digit project code from your permit. Step 3. Enter your 8-digit VTR or 14-digit e-VTR number.
Step 4. To enter your estimated return to port, use the scroll feature on the right side of the screen to select the month, day, and year. You may also tap on the day in the calendar to the right. Press on the blank field to the right of the date field and use the scroll bar to enter the time by selecting the hour and minute. Example shown is 5 am on October 3, 2015.
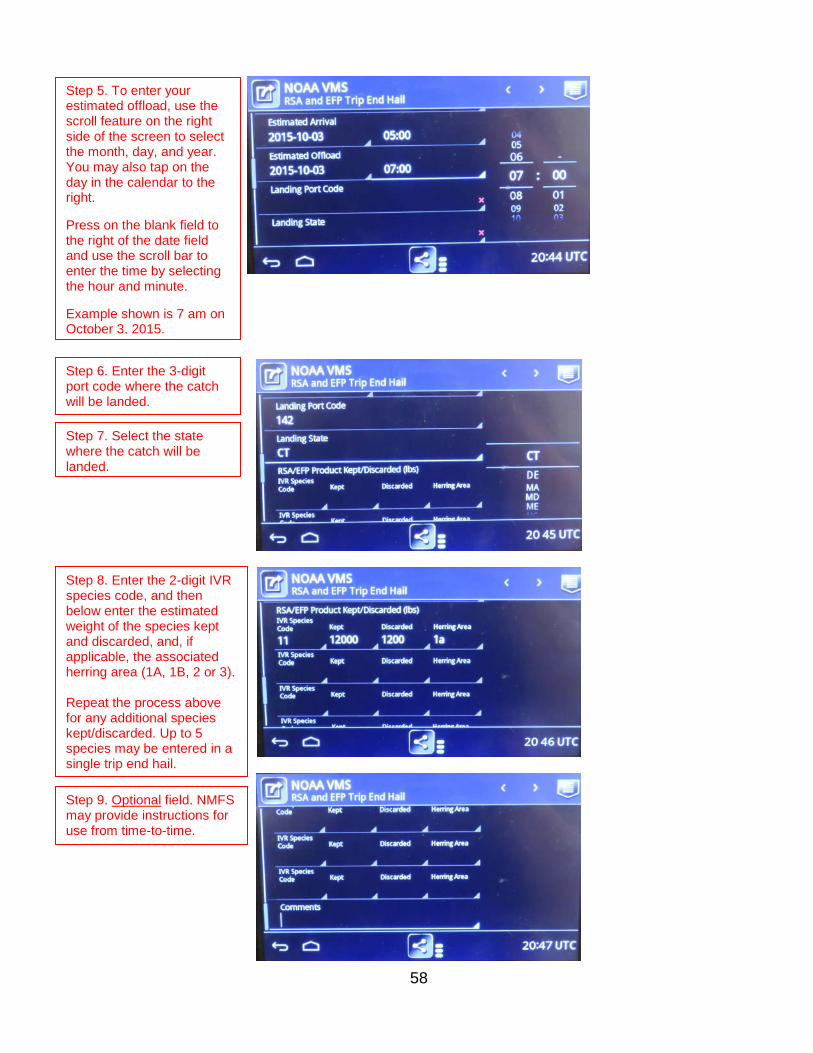
58
Step 9. Optional field. NMFS may provide instructions for use from time-to-time.
Step 5. To enter your estimated offload, use the scroll feature on the right side of the screen to select the month, day, and year. You may also tap on the day in the calendar to the right. Press on the blank field to the right of the date field and use the scroll bar to enter the time by selecting the hour and minute. Example shown is 7 am on October 3, 2015.
Step 6. Enter the 3-digit port code where the catch will be landed.
Step 7. Select the state where the catch will be landed.
Step 8. Enter the 2-digit IVR species code, and then below enter the estimated weight of the species kept and discarded, and, if applicable, the associated herring area (1A, 1B, 2 or 3). Repeat the process above for any additional species kept/discarded. Up to 5 species may be entered in a single trip end hail.
59
ATTACHMENT 2
How to ‘Confirm the Use of a Previous VMS Code’ Note: The information provided in this attachment is also available on the VMS web page. Under U.S. Fisheries Law, vessel owner/operators are required to declare their activity for every trip prior to leaving port. In response to a New England Fishery Management Council request to ease the financial strain, time and technical burdens associated with declaring an activity through the VMS unit on each trip, NMFS has developed an alternative declaration method through the IVR system. Who can use this method?
Vessel owner/operators who intend to fish a trip under the same VMS activity code that was last sent from the vessel's VMS unit and received by NMFS, have the option of notifying NMFS that they are confirming their previous VMS declaration by calling the IVR system.
Have the following information ready before calling: • Your vessel’s 6-digit federal permit number • Your IVR PIN (same as your Fish On-Line PIN)(available from the GARFO Analysis &
Program Support Division at 1-888-487-9994) • Your 8-digit operator permit number • Your most recent VMS activity code (format xxx-xxx-xxxxxx)
Instructions: • Call the IVR system at 1-888-284-4904. • At ‘Main Menu’, press 1 to “Report the start or end of a trip, declare a block, or confirm the use
of a previous VMS code.” • At ‘Fishing Activity Reporting’, enter your vessel’s 6-digit permit number and your IVR PIN. • When prompted, record your name and operator permit number, then press the # key. • When prompted, press 1 to confirm your name and operator number, or press 2 to re-record the
information. • When prompted, press 4 to “Confirm the use of a previous VMS code.” • The IVR will respond with either:
(1) “Your most recent VMS activity code is ( ).” When prompted, press 1 to confirm the use of this code. The system will then provide you with a confirmation number which you should record and keep with you on your trip. However, if this is not the code you will use, when prompted, hang up and declare your trip through your VMS unit; or
(2) “Your most recent VMS activity code cannot be confirmed.” When prompted, hang up and declare your trip through your VMS unit.

60
ATTACHMENT 2 (Cont’d)
How to ‘Confirm the Use of a Previous VMS Code’ IMPORTANT INFORMATION
• All other VMS reporting requirements for your trip still apply.
• This alternative method of declaring a trip prior to leaving port is not to be used in lieu of an inoperative VMS unit. Your VMS unit must be fully functional.
• The IVR back-up message line should not be used if you are unable to use the main IVR system.
• The code reported to you by the IVR system is the most recent code sent from your vessel’s
VMS unit and received by NMFS. Therefore, your most recent code sent may be from your last trip or when in port after your last trip.
• If the IVR system is unable to confirm your VMS activity code, it is likely for one of the
following reasons:
(1) No code for your vessel could be retrieved;
(2) Your last code was the power down code (PWD-PWD-XXXXXX);
(3) Your last code was a Southeast Region code (for dual-reporting vessels); or
(4) Your last code was a code that could only be declared when inside the NE Fishery. • You will still receive an automated trip start and trip end message from NMFS through your
VMS unit. Your trip will be recorded in NMFS’ monitoring system with the code that you confirmed through the IVR system.
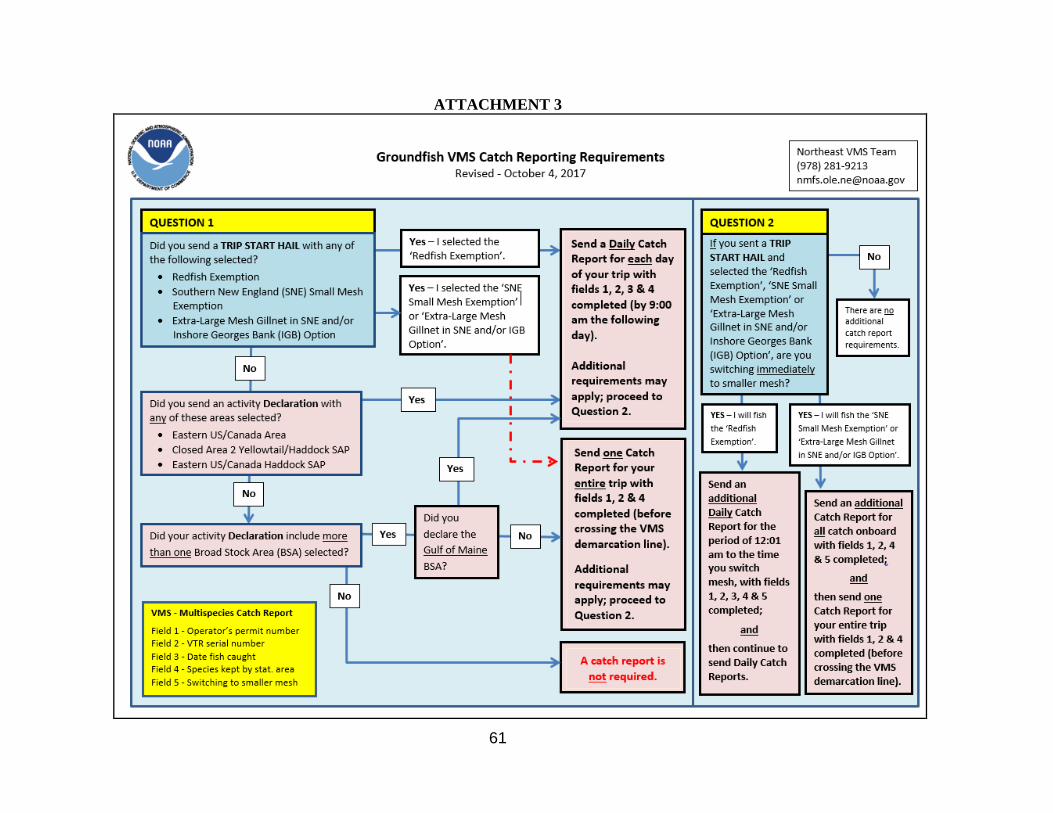
61
ATTACHMENT 3