vmd - high resolution graphics · vmd - high resolution graphics ... can be read directly within...
TRANSCRIPT

Biochem 660 – 2008 131
VMD‐page‐131
VMD - High Resolution Graphics VMD (http://www.ks.uiuc.edu/Research/vmd/) is a free program developed at the Theoretical and Computational Biophysics Group at the University of Illinois at Urbana-Champaign for the visualization and animation of biological molecules.
- e -
1 VMD - Exercise A: Starting VMD and opening a molecule The exact location of the VMD program will be provided by the instructor. On OSX it may be available on the task bar, on Windows it may be available in the Start>Programs location.
✔ TASK • Double click on the VMD icon or select it within the task-bar. • 3 windows will appear: terminal, VMD Main and a graphical VMD Display
windows:
Terminal window: VMD Main window VMD Display
✔ READ Note: NEVER close the “VMD Main” or the “Terminal” windows with the “x” ( or
) closing button or you will not be able to recover them. If you DO close it, type the following within the text window: menu main on
✔ TASK • On the “VMD Main” window menu select “File > New Molecule…” this will
open the “Molecule file browser. a)- Click the “Browse” button to select a PDB file in your folder within yet another window. – For example use “1KX5.pdb” - Click “Open” b)- Click “Load” c)- If the file name ends with “.pdb” VMD will automatically know its format. Otherwise specify the file type as “pdb”

Biochem 660 – 2008 132
VMD‐page‐132
• The selected PDB file is now loaded within VMD and appears as a line-drawing within the “VMD Display” window. Note that the name of the molecule also appears within the “VMD Main” window display.
- e -
2 VMD - Exercise B: Interacting with the molecular display
✔ READ
The mouse can be used to rotate, translate and scale (zoom) the molecule interactively. These three functions are toggled with the “Mouse” menu of the “VMD Main” display, or the keyboard shortcut as shown on the menu: “r” for rotation, “t” for translation and “s” for scaling or zooming.
✔ TASK • type the letter “s” on the keyboard, note that the mouse pointer turns
from the regular arrow to an horizontal double headed arrow <-> • zoom-in closer on the molecule, but keep it completely within the display
by moving the mouse horizontally to the right. Moving to the left makes it smaller.
• type the letter “r” to allow rotation again, the mouse pointer returns to an arrow.
Continuous rotation: typing the keyboard letters “x” “y” or “z” will launch the molecule in perpetual rotation, changing direction when a one of the three letters is typed. To stop the rotation click with the mouse and move slightly.
- e -
3 VMD - Exercise C: Changing the appearance of the molecules displayed
Note: you can view the various graphical options as shown on the web site at
Biochem 660 – 2008 133
VMD‐page‐133
http://www.ks.uiuc.edu/Research/vmd/allversions/repimages/
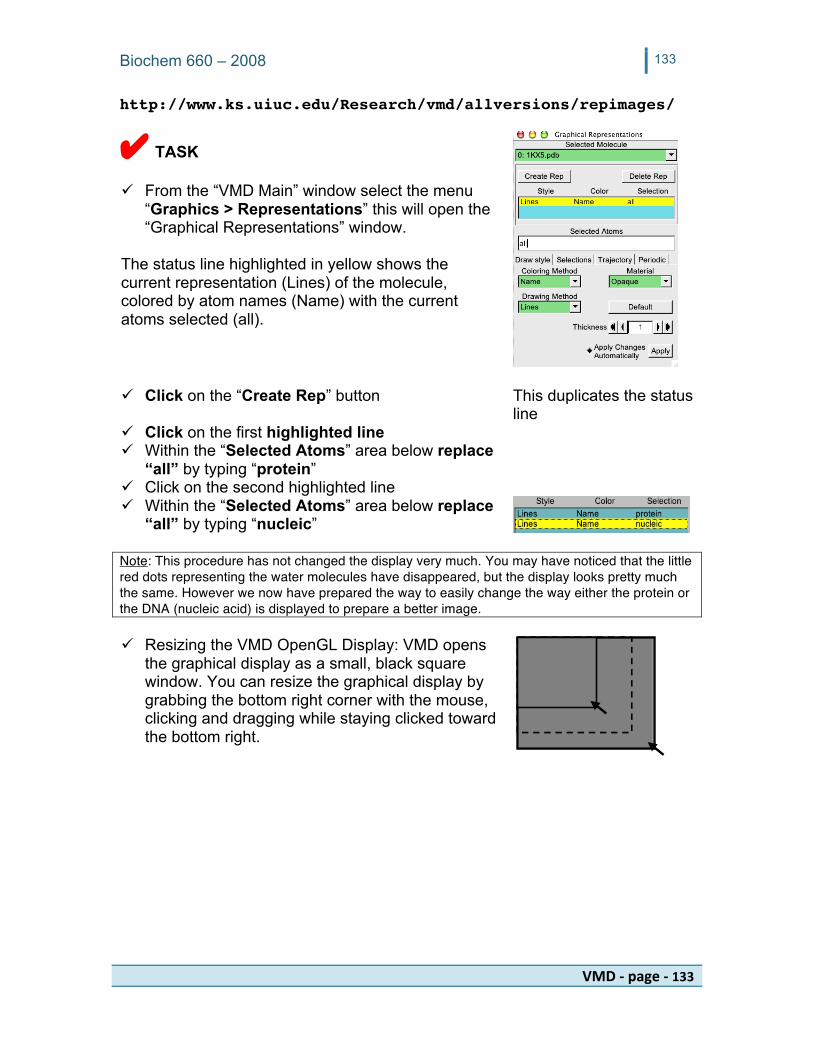
✔ TASK From the “VMD Main” window select the menu
“Graphics > Representations” this will open the “Graphical Representations” window.
The status line highlighted in yellow shows the current representation (Lines) of the molecule, colored by atom names (Name) with the current atoms selected (all).
Click on the “Create Rep” button This duplicates the status
line Click on the first highlighted line Within the “Selected Atoms” area below replace
“all” by typing “protein”
Click on the second highlighted line Within the “Selected Atoms” area below replace
“all” by typing “nucleic” Note: This procedure has not changed the display very much. You may have noticed that the little red dots representing the water molecules have disappeared, but the display looks pretty much the same. However we now have prepared the way to easily change the way either the protein or the DNA (nucleic acid) is displayed to prepare a better image. Resizing the VMD OpenGL Display: VMD opens
the graphical display as a small, black square window. You can resize the graphical display by grabbing the bottom right corner with the mouse, clicking and dragging while staying clicked toward the bottom right.

Biochem 660 – 2008 134
VMD‐page‐134
✔ READ Each one of the selections can be changed by altering either or both the coloring option and the drawing method parameters. Coloring: The “Name” and “Type” coloring option usually are identical and refer to the various atoms (e.g. carbon, nitrogen, oxygen) and color them by standard default colors (except carbon which is cyan instead of gray). “Res Type” color by complete residue type (e.g. individual amino acids for proteins and individual nucleotides for nucleic acids). “Chain” color by individual molecule, “Structure” colors by secondary structure and “Backbone” colors the backbone and side-chains differently. Drawing Method: The default is “Lines.” “Bonds” and “Licorice” are thicker, shaded lines. “VDW” is for space-filling options and “CPK” is also known elsewhere as ball-and-stick model. The “Trace” and “Tube” options create a simplified version of the molecule, tracing only the backbone. “Ribbons” and “New Ribbons” apply to proteins and nucleic acids. “Cartoon” only works with proteins. “MSMS” is not implemented by default, but “Surf” is available for displaying molecular surfaces but requires a slow calculation.
For either representation, other options appear further at the bottom of the “Graphical Representation” window, such as radius or resolution of spheres or tubes.
✔ TASK Using the mouse highlight the “Rep” selection of the
protein Explore the various option for both the “Coloring Method”
and the “Drawing Method” noting the effect on the display: it should only change the proteins.
If you are not sure which version to select choose “Chain” and “Cartoon” to display the protein.
(be aware that “Surf” will require a few minutes of calculation so you may decide to skip it this time)
Using the mouse highlight the “Rep” selection of the DNA Explore the various option for both the “Coloring Method” and
the “Drawing Method” noting the effect on the display: it should only change the DNA strands.
If you are not sure which version you prefer, choose “Chain” and “Tube” and also enhance the radius of the tube to 1.8
using the arrows at the bottom right.
Orient your image to have a relative position of the molecules that is most
informative. - e -

Biochem 660 – 2008 135
VMD‐page‐135
4 VMD - Exercise D: Saving an image
✔ TASK a. If you are continuing from the previous exercise you can save the image
currently displayed within the VMD OpenGL Display. Otherwise take the time to open a molecule and create a new visualization following the example above.
b. Make the file as big as you desire on the screen, as this will determine it’s
resolution. c. Saving an image from a
VMD menu: Use the menu cascade: File > Render to activate the saving options. This will open the “File Render Controls” window with the default option “Rendering using: Snapshot” with file-name “snap.tga” and a “Render” command” which you can ignore for now.
Note: the default format depends on the computer platform
d. Click on “Start Rendering” button.
Note: you can change the name of the file and where it is saved within this control window by using the “Browse…” button.
e. Where is my file? By default the file “snap.tga” will be saved within your
default user directory (in the DMC lab Computers this will be “DMC” user folder.
f. What is the file format? TGA (Truevision Graphics Adapter)
often referred to as TARGA File Format is a raster graphics file (pixels rather than vectors.) All the details at: http://en.wikipedia.org/wiki/Truevision_TGA
g. Other options: The “Render using” line of the “File Render
Controls” window offers the possibility to change the rendering option. Many of these (e.g. POV3 or Raster3D) require additional software for post-rendering of the saved file and will not be covered here. The only other option that might be useful is the “PostScript” option which saves the file in PostScript version 1 format (%!PS-Adobe-1.0) which can be read directly within Adobe Illustrator as a vector-based image rather than a pixel-based image. In a few occasions this can be a useful feature.
default file name: vmd.ps

Biochem 660 – 2008 136
VMD‐page‐136
✔ INFO Note on saving images from the computer screen. With most computers it is usually possible to take a snapshot of the screen, either as a full screen image or a portion of the screen. On a Macintosh, the screen dump will be saved into a file (PICT format in Mac OS classic, PDF format in Mac OS X) within the top level of the hard drive (Classic) or on the Desktop (MacOSX). You will hear a picture-taking sound and the file will then be saved starting with “Picture1” and automatically incrementing the number if you make more screen shots. On a Macintosh (Classic or OSX) a complete screen snapshot is obtained by combining3
keystrokes at the same time: Apple+Shift+3 : + + . On a Macintosh a complete screen snapshot is obtained by combining3 keystrokes at the same
time: Apple+Shift+4 : + + . The mouse arrow will become a cross-hair pointer ( ), you can then draw on the screen the portion you want to be saved into a file
On a Windows system, the keyboard key “Print Screen” should save a copy of the current screen state within the Clipboard. You can then paste the image within an image processing program such as PhotoShop or PowerPoint.
- e -
5 VMD - Exercise E: Background and colors As with most molecular graphics software VMD displays the 3D rendering over a black background. While this is useful for most purposes and creates a pleasing image, when an image is saved for inclusion into a publication or has to be printed in any way it is better to switch to a white background.
✔ TASK a. We will first make the background white (useful
for printing an image) b. Activate the “Color Controls” from the VMD
main menu Graphics > Colors

Biochem 660 – 2008 137
VMD‐page‐137
c. Click on “Display” d. Click on “Background” e. Click on “white”
Observe the background become white on the display
f. You can try other colors if you wish
Note: each of the “Categories” contain a list of “Names” in the case of “Display” the only name is “Background” but other categories can have more than one name associated with it. Note also the fact that you can edit any of the colors within the “Color Definitions” panel just below.
g. We will now change the default color for carbon atoms from cyan to silver. Other atoms have the proper CPK colors assigned by default.
h. Within the “Categories” click on “Name” i. Within “Names” click on “C” j. Within “Colors” click on “6 silver” or “2
gray” (gray is darker than silver)
Note: the “Name” option is the one we saw above within the “Graphical Representations” “Coloring Methods”
Note: The “Type” category contains mostly the same “Names” as the “Name” category and the “C” color would still be cyan as these are independent criteria. - e -
6 VMD - Exercise F: Closing, opening and manipulating multiple molecules
It is not necessary to quit VMD to open a new molecule. VMD can open more than one molecule at the same time.
✔ TASK
1) Close the current molecule with the Molecule > Delete Molecule menu cascade.
2) Open a new molecule: File > New Molecule
and choose molecule “hrv2-3C-1CQQ.pdb” (remember to use the “Browse” and “Load”
Note that now the carbon atoms appear silver as their default color based on the changes we made in the

Biochem 660 – 2008 138
VMD‐page‐138
buttons) previous exercise
3) Toggle the “Load files for:” arrow to open an additional molecule
4) Now open another molecule: “polio-3C-1L1N.pdb” (remember to use the “Browse” and “Load” buttons).
Note: The first molecule was assigned number 0, the new molecule is assigned number 1.
Your VMD Main window should look similar to this screen shot.
For brevity and clarity in the following sections the window used followed by a colon and then the menu used are displayed without comments.
5) VMD Main: Graphics > Representations
Note: at the top of the “Graphical Representations” “Selected Molecule” is molecule 1 and any changes will apply to that molecule only.
6) Graphical Representations: Click on the current representation listed
Note: the selection line becomes yellow
7) Graphical Representations: a. Coloring method: Name b. Drawing Method: Bonds
Note the change of representation of molecule 1 within the OpenGL display and the style within the list change to “Bonds:”
8) Graphical Representations:
toggle to molecule 0
9) Graphical Representations: a. Coloring method: Name b. Drawing Method: Cartoon

Biochem 660 – 2008 139
VMD‐page‐139
10) VMD Main: Display > Orthographic Note: the default “Perspective” increases the size of what is closer which can create dizziness and distort the picture. It is often useful to switch to the orthographic representation where all parts of the molecule are on the same scale. Note the difference in the presentation of the molecules as you switch from one to the other. If you did not see it well you can switch back. 11) VDM Main: Display > Axes > Off Turns off the XYZ axes
12) VMD Main: Click on line for molecule 0 13) VMD Main: Molecule > Toggle Displayed Note that molecule 0 shown as
ribbons disappears. 14) VMD Main: Molecule > Toggle Displayed Issuing the command again
makes it reappear. 15) VMD Main: Molecule > Toggle Fixed Now rotate with the mouse
Note that only molecule 1 now rotates.
16) Explore the effect of the other “Toggle”
options on your own.
17) VMD Main: Molecule > Delete Molecule Deletes molcule 0, molecule 1 remains.
18) VMD Main: Molecule > Delete Molecule Now molecule 1 is also zapped.
- e -
7 VMD - Exercise G: Molecular Surface Representations
✔ INFO The electron density surrounding any atomic center has a diffuse radial distribution, but nevertheless the solid sphere is a useful approximation for representing a single atom. The “Space filling” method for representing all the atoms of a molecule is a good method to visualize its volume but does not always gives a clear picture of the surface topography.
The outer surface of the molecule is also a valuable visualization tool as it provides a feel for the volume but also the shape of cavities and crevices on the surface. Lee and Richards (1971) calculated the outer surface of a protein by rolling a water molecule probe (approximated as a 1.4Å sphere). The surface of the macromolecule can be defined to be the part of the molecule that is accessible to solvent.
Lee B. and Richards F.M. The interpretation of protein structures: estimation of static accessibility. J. Mol. Biol. 1971, 55:379-400
For his Ph.D. thesis Michael Connolly wrote the first algorithm (known as MS) Connolly M. Solvent-

Biochem 660 – 2008 140
VMD‐page‐140
to compute a molecular surface defined as “the boundary of the volume from which a probe sphere is excluded if it is not the experience van der Waals overlap with the atoms”. The surface “consists of the part of the atoms that is accessible to the probe sphere (contact surface), connected by a network of concave and saddle-shaped surfaces (reentrant surface) that smooths over the crevices and pits between the atoms” (Connolly, 1983). (See figure below).
accessible surfaces of proteins and nucleic acids. Science 1983 221: 709-713
The figure at left is derived from Michael Connollyʼs web site with an interactive java applet that illustrates the concepts of molecular surface. The web site is at http://www.biohedron.com/ (click on the “Applet” tab) In addition to the Connolly surface known also as molecular surface (consisting of the “contact” and “reentrant” points) the “solvent accessible” surface is defined by connecting the points of centers of the probe. While the molecular surface has convex and concave structures, the solvent accessible surface is always convex with a larger volume, and is therefore less accurate and less artistically pleasing to the human eye.
✔ TASK a. VMD Main: File > New Molecule…
a. Browse “hrv2-3C-1CQQ.pdb” b. Load
Note that if you are continuing from the previous exercise the molecule number is 2 and not zero.
b. VMD Main: Graphics > Representations Open the Graphics representations
c. Graphics Representations: a. Create Rep (button) b. Edit one representation to “protein” c. Edit the other to “not protein”
d. Graphics Representations:
a. Coloring Method: Name b. Drawing Method: Licorice
Apply these menus to the “not protein” selection
e. Graphics Representations a. Switch to “protein” selection b. Coloring Method: Pos c. Drawing Method: Lines
Note: the “Pos” method colors the protein with a radial depth cue, from orange to green to blue.

Biochem 660 – 2008 141
VMD‐page‐141
f. Observe the coloring effect. Note the ligand and rotate the molecule to have the ligand face you.
g. Graphics Representations
a. Make sure “protein” line is still selected
b. Drawing Method: Surf
Note: this command will calculate a molecular surface and may take several minutes. While the calculation is performed a series of dots (……) are shown within the “Terminal” window.
h. You can rotate the structure and see
how the ligand fits in the cavity. The “Pos” coloring helps in providing visual cues for the ligand.
i. VMD Main: Display > Depth Cueing
The parts of the molecule further away will appear “fogged-in”, the fog being the color of the background. This is more useful for images used in presentations rather than images used for publication.
j. You can also practice saving the
image from the File > Render menu as we saw in a previous exercise.
✔ INFO The color palette gradient can be changed within the “Color Controls” window [Main window: Graphics > Colors] and click on the “Color Scale” tab

Biochem 660 – 2008 142
VMD‐page‐142
k. If you want to try various
representations for the surface, it is worth unchecking the “Apply Changes Automatically” at the bottom of the “Graphical Representations” window as the surface is recalculated everytime.
Note: A surface rendering saved as PostScript is vector-based and looks different within Adobe Illustrator than it does on screen or within an RGB or other type of flat file. The surface would appear more faceted, which can be used as an artistic license in some cases.
- e -
8 VMD - Exercise G: VMD extensions: membrane builder Amongst the many extensions within the extensions menu in VMD is the rather “membrane builder” that allows the construction of a lipid bilayer.

Biochem 660 – 2008 143
VMD‐page‐143
✔ TASK
• VMD Main: Extensions > Modelling > Membrane Builder
• In the new “Membrane” window enter the dimensions of the lipid bilayer. The default name is membrane.
• For example type 100 x 100 to have a
square layer. With a few modifications for a white background and changing the representation to VDW the following representation can be achieved. Coordinates can be saved with a right-click on top of the name within the Main window
- e -
End of VMD Part I In another section we will learn how VMD can create movies automatically